administering the cisco application networking manageruser guide for the cisco application...
TRANSCRIPT
User Guide for
OL-26572-03
C H A P T E R 17
Administering the Cisco Application Networking ManagerThis chapter describes how to administer, maintain, and manage the ANM management system. Previous topics described how to manage your network devices on ANM, while this topic describes how to perform procedures on the system itself.
Note When naming ACE objects (such as a real server, virtual server, parameter map, class map, health probe, and so on), enter an alphanumeric string of 1 to 64 characters, which can include the following special characters: underscore (_), hyphen (-), and dot (.). Spaces are not allowed.
If you are using ANM with an ACE module or ACE appliance and you configure a named object at the ACE CLI, keep in mind that ANM does not support all of the special characters that the ACE CLI allows you to use when configuring a named object. If you use special characters that ANM does not support, you may not be able to import or manage the ACE using ANM.
This chapter includes the following sections:
• Overview of the Admin Function, page 17-2
• Controlling Access to Cisco ANM, page 17-3
• How ANM Handles Role-Based Access Control, page 17-8
• Configuring User Authentication and Authorization, page 17-9
• Managing User Accounts, page 17-17
• Displaying or Terminating Current User Sessions, page 17-24
• Managing User Roles, page 17-25
• Managing Domains, page 17-32
• Using an AAA Server for Remote User Authentication and Authorization, page 17-38
• Disabling the ANM Login Window Change Password Feature, page 17-50
• Managing ANM, page 17-51
• Administering the ANM Mobile Feature, page 17-67
• Lifeline Management, page 17-72
17-1the Cisco Application Networking Manager 5.2.3
Chapter 17 Administering the Cisco Application Networking ManagerOverview of the Admin Function
Overview of the Admin Function
Note Some of the Admin options might not be visible to some users; the roles assigned to your login determine which options are available.
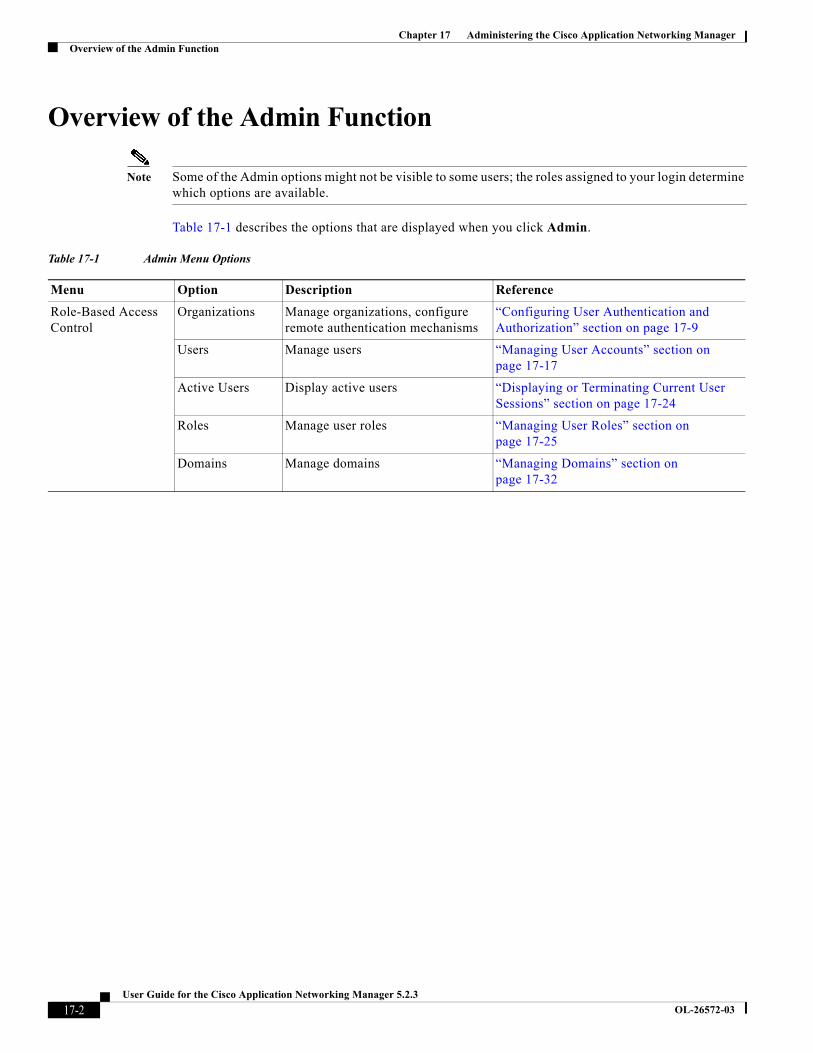
Table 17-1 describes the options that are displayed when you click Admin.
Table 17-1 Admin Menu Options
Menu Option Description Reference
Role-Based Access Control
Organizations Manage organizations, configure remote authentication mechanisms
“Configuring User Authentication and Authorization” section on page 17-9
Users Manage users “Managing User Accounts” section on page 17-17
Active Users Display active users “Displaying or Terminating Current User Sessions” section on page 17-24
Roles Manage user roles “Managing User Roles” section on page 17-25
Domains Manage domains “Managing Domains” section on page 17-32
17-2User Guide for the Cisco Application Networking Manager 5.2.3
OL-26572-03
Chapter 17 Administering the Cisco Application Networking ManagerControlling Access to Cisco ANM
Controlling Access to Cisco ANMAccess to ANM is based on usernames and passwords, which can be authenticated to a local database on the ANM system or to a remote RADIUS, Active Directory/Lightweight Directory Access Protocol (AD/LDAPS), or TACACS+ server. For detailed procedures about remote authentication, see the “Configuring Authentication and Accounting Services” chapter of either the Cisco ACE Module Security Configuration Guide or Cisco ACE 4700 Series Appliance Security Configuration Guide on www.cisco.com.
Note ANM supports LDAPS through Active Directory (AD) only.
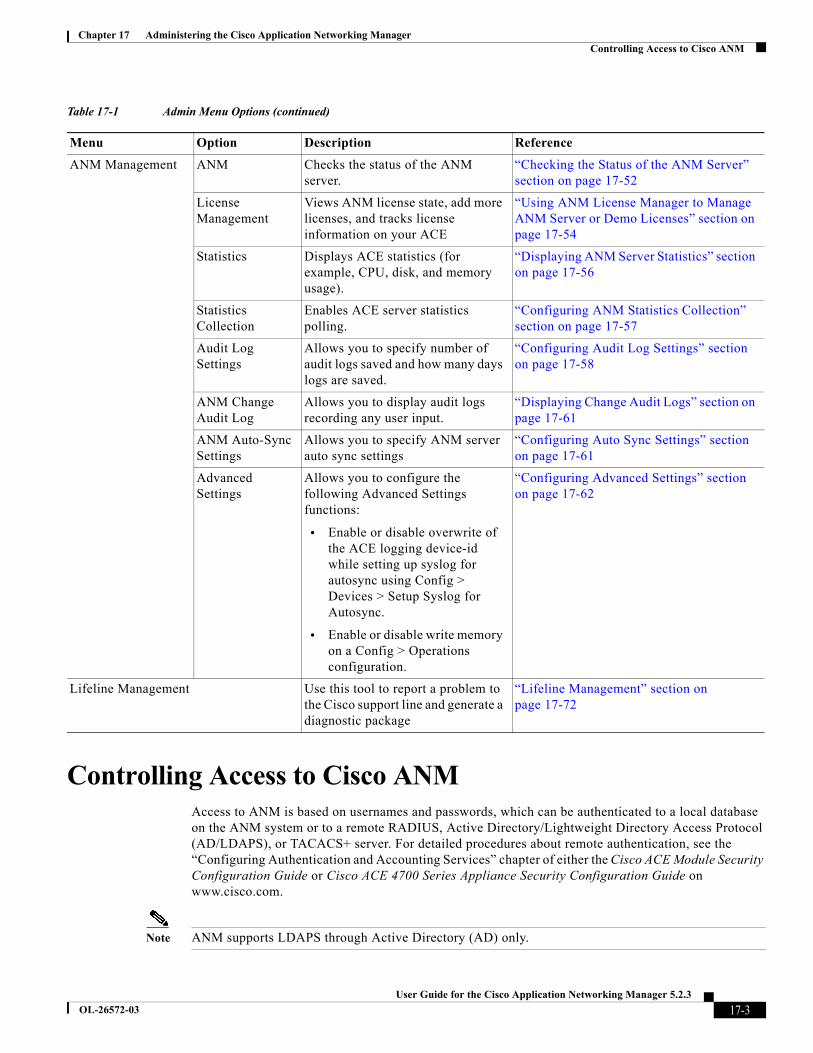
ANM Management ANM Checks the status of the ANM server.
“Checking the Status of the ANM Server” section on page 17-52
License Management
Views ANM license state, add more licenses, and tracks license information on your ACE
“Using ANM License Manager to Manage ANM Server or Demo Licenses” section on page 17-54
Statistics Displays ACE statistics (for example, CPU, disk, and memory usage).
“Displaying ANM Server Statistics” section on page 17-56
Statistics Collection
Enables ACE server statistics polling.
“Configuring ANM Statistics Collection” section on page 17-57
Audit Log Settings
Allows you to specify number of audit logs saved and how many days logs are saved.
“Configuring Audit Log Settings” section on page 17-58
ANM Change Audit Log
Allows you to display audit logs recording any user input.
“Displaying Change Audit Logs” section on page 17-61
ANM Auto-Sync Settings
Allows you to specify ANM server auto sync settings
“Configuring Auto Sync Settings” section on page 17-61
Advanced Settings
Allows you to configure the following Advanced Settings functions:
• Enable or disable overwrite of the ACE logging device-id while setting up syslog for autosync using Config > Devices > Setup Syslog for Autosync.
• Enable or disable write memory on a Config > Operations configuration.
“Configuring Advanced Settings” section on page 17-62
Lifeline Management Use this tool to report a problem to the Cisco support line and generate a diagnostic package
“Lifeline Management” section on page 17-72
Table 17-1 Admin Menu Options (continued)
Menu Option Description Reference
17-3User Guide for the Cisco Application Networking Manager 5.2.3
OL-26572-03
Chapter 17 Administering the Cisco Application Networking ManagerControlling Access to Cisco ANM
When a user logs into the system, the specific tasks they can perform and areas of the system that they can use are controlled by organizations, roles, and domains. An organization is a virtual group of users, their roles, and domains managed by a specific server that provides authentication to its users. Each organization has its own set of users. See the “Understanding Organizations” section on page 17-7 for information about organizations.
The role assigned to a user defines the tasks that a user can perform and the items in the hierarchy that they can see. Roles are either pre-defined or set up by the system administrator. See the “Understanding Roles” section on page 17-6 for more information.
A domain is a collection of managed objects. When a user is given access to a domain, it acts as a filter for a sub-set of objects on the network which are displayed as a virtual context. The types of objects in the system that are domain controlled are as follows:
• Chassis (with VLANs)
• Virtual contexts
• Resource classes
• Real servers
• Virtual servers
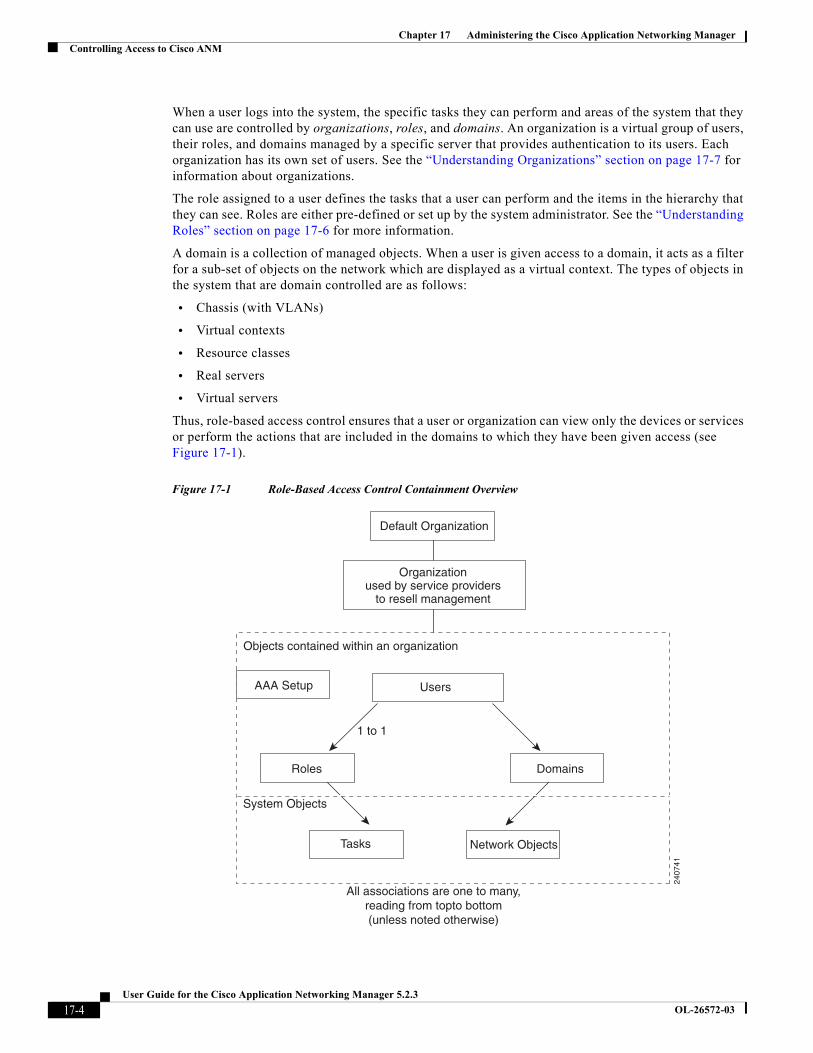
Thus, role-based access control ensures that a user or organization can view only the devices or services or perform the actions that are included in the domains to which they have been given access (see Figure 17-1).
Figure 17-1 Role-Based Access Control Containment Overview
Default Organization
System Objects
AAA Setup
Roles
1 to 1
Users
Tasks Network Objects
All associations are one to many,reading from topto bottom(unless noted otherwise)
Objects contained within an organization
Domains
2407
41
Organizationused by service providers
to resell management
17-4User Guide for the Cisco Application Networking Manager 5.2.3
OL-26572-03

Chapter 17 Administering the Cisco Application Networking ManagerControlling Access to Cisco ANM
The following is an example of RBAC containment:
All other user interfaces, such as configuration and monitoring, respect this role-based access control policy:
• Roles limit the screens (or functions on those screens) that a user can see.
• Domains limit the objects that are listed on any window that the roles allow.
• Users (other than the system administrator) can only create subdomains of the domains to which they are assigned.
• The system administrator user can see and modify all objects. All other users are subject to the role-based access controls illustrated in Figure 17-1.
Related Topics
• Types of Users, page 17-5
• Understanding Roles, page 17-6
• Understanding Operations Privileges, page 17-6
• Understanding Domains, page 17-7
• Understanding Organizations, page 17-7
• Managing User Accounts, page 17-17
Types of Users
Two types of users configure and monitor the ANM system:
• Default users—Individuals associated with the data center or IT department where ANM is installed. The default administrative account (user ID is admin) is a system user account that is preconfigured on ANM. The default administrative password (admin) is also preconfigured on ANM. You can change the password for the admin user account in the same manner as any other user password (see the “Managing User Accounts” section on page 17-17).
System roles are defined by the system administrator when ANM is first set up. System roles are specified in terms of resource types and operations privileges. For each system role, the system administrator specifies which resource types a role can work with and what operations a role can perform on each resource type.
Organization
Webmasters
Domains
East coast servers Central servers West coast servers
Role
Web server administrator
Users
User A User B User C
Note Each association is one-to-many. Because the organization itself is a collection, it is possible for a role to be used in many organizations.
17-5User Guide for the Cisco Application Networking Manager 5.2.3
OL-26572-03
Chapter 17 Administering the Cisco Application Networking ManagerControlling Access to Cisco ANM
• Organization users—Users who work for the customer of a service provider or AAA server that segments your users and to whom you want to grant access to ANM. Organization users automatically have their access limited to the organization to which they belong.
Related Topics
• Configuring User Authentication and Authorization, page 17-9
• Managing User Accounts, page 17-17
• Using an AAA Server for Remote User Authentication and Authorization, page 17-38
Understanding Roles
Roles in ANM are defined by the system administrator. Roles are specified in terms of resource types and operations privileges. For each role, the system administrator specifies which resource types a role can work with and what operations a role can perform on each resource type.
When users are created, they are assigned at least one system role and inherit the operations privileges specified for each of the resource types assigned to that role.
The options a user sees in the menu are filtered according to that user’s role (see the “Displaying User Roles and Associated Tasks and ANM Menu Privileges” section on page 17-28).
Roles can be applied to both default and organization users. All users are strictly limited by the combination of their operations privileges and user access. For example, a user cannot create another user who has greater privileges or access.
Related Topics
• Configuring User Authentication and Authorization, page 17-9
• Managing User Accounts, page 17-17
• Managing User Roles, page 17-25
Understanding Operations Privileges
Operations privileges define what users can do in the designated resource types. For example, each command and function on ANM has an assigned privilege. If a user’s privileges are not sufficient, the command or function will not be available to them. The following operations privileges can be granted:
• No Access—The user has no access to this command or function.
Note If a user is configured with no access to virtual contexts, it means absolutely no access to them. The most a user with this access can do is activate or suspend real servers.
• View—Allows the user to view statistics and specify parameter collection and threshold settings. Gives the user read-only or view access to system objects and information.
• Modify—Allows the user to change the persistent information associated with system objects, such as an organization record, or configuration.
• Debug—Gives the user read-only or view access to system objects and information.
17-6User Guide for the Cisco Application Networking Manager 5.2.3
OL-26572-03
Chapter 17 Administering the Cisco Application Networking ManagerControlling Access to Cisco ANM
• Create—Allows the user to control system objects, for example, creating them, enabling them, or powering up. Also allows the user to control system objects, for example, deleting them, disabling them, or powering down.
Note The Create privilege includes the functions associated with the Modify privilege; however, the reverse is not true (a user with Modify privileges cannot create items).
Privileges are hierarchical. If a user has Modify privileges, they have View privileges as well. If a user has Create or Debug privileges, they have View privileges as well.
Related Topics
• How ANM Handles Role-Based Access Control, page 17-8
• Managing User Roles, page 17-25
• Guidelines for Managing User Roles, page 17-25
• Understanding Predefined Roles, page 17-26
• Using an AAA Server for Remote User Authentication and Authorization, page 17-38
Understanding Domains
Domains in ANM are defined by the system administrator. A domain is a collection of managed objects to which a user is given access. By setting up a domain, you are filtering for a subset of objects on the network. The user is then given access to this virtual context.
The table rows that a user sees in any table are filtered according to the domain to which that user has access.
Understanding Organizations
An organization allows you to configure AAA server lookup for your users or set up users who work for a service provider customer. Organizations in ANM are defined by the system administrator.
When you use an ACE device as a AAA server, you may want to segment them for customer, business, or security reasons. If you use more than one authentication server, then you can use organizations to configure them to authenticate your users.
For example, if your company has four servers, one each for local, RADIUS, TACACS+, and LDAPS authentication, then organizations could reflect that. The Default organization in ANM is set up to act as the local server.
ANM supports different device types that have unique ways of configuring authentication access, which helps with future device support. ANM can configure which users are authenticated by which authentication servers, but does not act as an AAA server itself because this would be in conflict of its role as a RBAC administrator and allows for the separation of authority that is needed to perform RBAC successfully.
Related Topics
• Using an AAA Server for Remote User Authentication and Authorization, page 17-38
17-7User Guide for the Cisco Application Networking Manager 5.2.3
OL-26572-03
Chapter 17 Administering the Cisco Application Networking ManagerHow ANM Handles Role-Based Access Control
How ANM Handles Role-Based Access ControlThis section describes how and why a system administrator might want to use the ANM RBAC features.
ANM supports two distinct, but related RBAC capabilities as follows:
• ANM RBAC—ANM acts as a system and network device overseer allowing it to globally implement its use of RBAC.
• Device RBAC—ANM devices enforce RBAC.
Understanding ANM RBAC
ANM is a central place where you can globally set the RBAC for users, roles, and domains (as well as for virtual contexts or device types using device RBAC).
As a system administrator, you may need to delegate authority to allow another administrator to perform specific tasks on specific devices, such as activating, suspending, and monitoring traffic flow to specific real servers, yet restrict them from accessing all other capabilities. ANM enables you to accomplish this delegation with more control. For a description of how the roles map to the functions, see the “Displaying User Roles and Associated Tasks and ANM Menu Privileges” section on page 17-28.
Understanding Device RBAC
ANM’s device RBAC allows you to set up device permission levels of a more granular nature. You no longer have to provide “all-or-nothing” roles-based access of devices and device modules. Without ANM, some devices may be open to users who can perform every task on that device or module, regardless of their authorization due to permission level requirements on modules and or switches. ANM provides a central place to grant special access to users you specify. Device users, roles, and domain data are not part of, nor can they be used by ANM. Device RBAC is only for CLI access directly to the context.
For example, some users may need level 3 access when direct troubleshooting of ACE hardware is required. You can set up these users with or without ANM, but ANM centralizes the capability to do so. If you want to configure a network engineer with a special role, for example either ACE-Admin or Network-Admin, to provide the level 3 access. ANM accesses the ACE as a level 15 user and an admin supervisor and uses the RBAC to determine the level of access (to device types, segments, elements, subelements, and so on).
Some Cisco devices have the ability to configure RBAC directly on the device, for example the ACE. The CSS and CSM are examples of Cisco devices that do not have the capability to have its their own RBAC.
When you configure remote authentication (AAA, RADIUS, LDAPS, or TACACs+) for the ACE through ANM, users no longer have to log out to access their device using Telnet. When you manually log into a CSS, the CSS performs user authentication in a Telnet session. Telnet does not provide any domain enforcement, so it is less secure. For an overview of the steps that you perform to configure remote authentication using an AAA server, see the “Using an AAA Server for Remote User Authentication and Authorization” section on page 17-38.
If you are an admin using a CSS module outside of the ANM application, then you might have permission to do anything on this switch. If you are using ANM, you can set up better authorization for your administrators for specific devices. Better authorization controls are one of the advantages of using the ANM rather than using only the CLI on the ACE hardware. You can now configure separate access for one function for this user in this domain only. ANM allows this high level of granularity and with it, more control over who does what to your devices.
17-8User Guide for the Cisco Application Networking Manager 5.2.3
OL-26572-03
Chapter 17 Administering the Cisco Application Networking ManagerConfiguring User Authentication and Authorization
Note When configuring device RBAC though Config > Devices, a message displays reminding you that you are configuring RBAC outside of ANM for direct access. Be aware that this may contradict your ANM settings.
For more information on centralizing direct access to devices through RBAC on individual devices, see the “Configuring ACE Module and Appliance Role-Based Access Controls” section on page 4-53.
Case Example
In this example, a CSM device must have a level 15 access which by default makes the admin a supervisor on everything in the switch (and everything in the module). Another way of looking at this is providing read-only access to everything or configuration access to everything.
ACE hardware can be configured on a virtual context to perform that task on a subset domain for every individual module, on every context, but this type of configuration must be configured individually.
A system administrator might need to configure a network admin to manage two CSM modules, one out of six virtual contexts, and all East Coast web servers. With ANM, the admin could create one configuration set that includes a user account with a Network-Admin role and a domain that includes these objects. ANM then becomes the security window through which this user passes to get to their destination for that domain and for that virtual context.
If there were six users, nine domains, and three virtual contexts, there would be 54 entries required into a AAA Server and ACE module. In ANM there is one entry completed for each of the six users.
Configuring User Authentication and AuthorizationIn ANM, you can configure authentication for your users by specifying the authentication method to use for specific user; the local method using ANM or a remote method using an AAA servers. You do this through organizations. An organization allows you to configure your local or AAA server lookup for your users, then associate specific users, roles, and domains with those organizations.
The following sections describe the organization authentication tasks that you can complete in ANM:
• Adding a New Organization, page 17-10
• Configuring AAA Server lookup for your users—See the “Adding a New Organization” section on page 17-10
• Changing server passwords—See the “Changing Authentication Server Passwords” section on page 17-14
• Modifying Organizations, page 17-14
• Duplicating an Organization, page 17-15
• Displaying Authentication Server Organizations, page 17-16
• Deleting Organizations, page 17-16
The Default organization (in which all users belong) authenticates users through the ANM internal mechanism, which is based on the RBAC security model. This mechanism authenticates users through the local authentication module and a local database of user IDs and passwords. If you choose to use a remote authentication method, you must specify the authentication server and port.
17-9User Guide for the Cisco Application Networking Manager 5.2.3
OL-26572-03
Chapter 17 Administering the Cisco Application Networking ManagerConfiguring User Authentication and Authorization
Many organizations, however, already have an authentication service. To use your own authentication service instead of the local module, you can choose one of the alternate modules:
• TACACS+
• RADIUS
• AD/LDAPS
Note For detailed procedures about remote authentication, see the “Configuring Authentication and Accounting Services” chapter of either the Cisco ACE Module Security Configuration Guide or Cisco ACE 4700 Series Appliance Security Configuration Guide on www.cisco.com.
After you configure an organization, all authentication transactions are performed by the authentication service associated with that organization. Users log in with the user ID and password associated with the current authentication module.
Related Topics
• Managing User Accounts, page 17-17
• Managing User Roles, page 17-25
• Managing Domains, page 17-32
• Using an AAA Server for Remote User Authentication and Authorization, page 17-38
Adding a New Organization
You can add organizations, which define the mechanism for authenticating ANM users: local using ANM or remote using RADIUS, TACACS+, or AD/LDAPS. When you configure an organization for remote authentication, users within that organization have their passwords validated using the specified remote AAA server.
You can also configure an organization to use a TACACS+ server for remote authorization of ANM users. To use remote authorization, you must also configure the TACACS+ server with the role and domains associated with a user or user group (see the “Configuring Remote User Authorization Using a TACACS+ Server” section on page 17-45).
When you use the services of a a remote AAA server, you can configure the organization to fall back to using local authentication and authorization when the remote AAA server becomes unavailable.
Procedure
Step 1 Choose Admin > Role-Based Access Control > All Organizations.
Step 2 Click Add.
Step 3 Enter the name of the new organization and notes if required, and click Save.
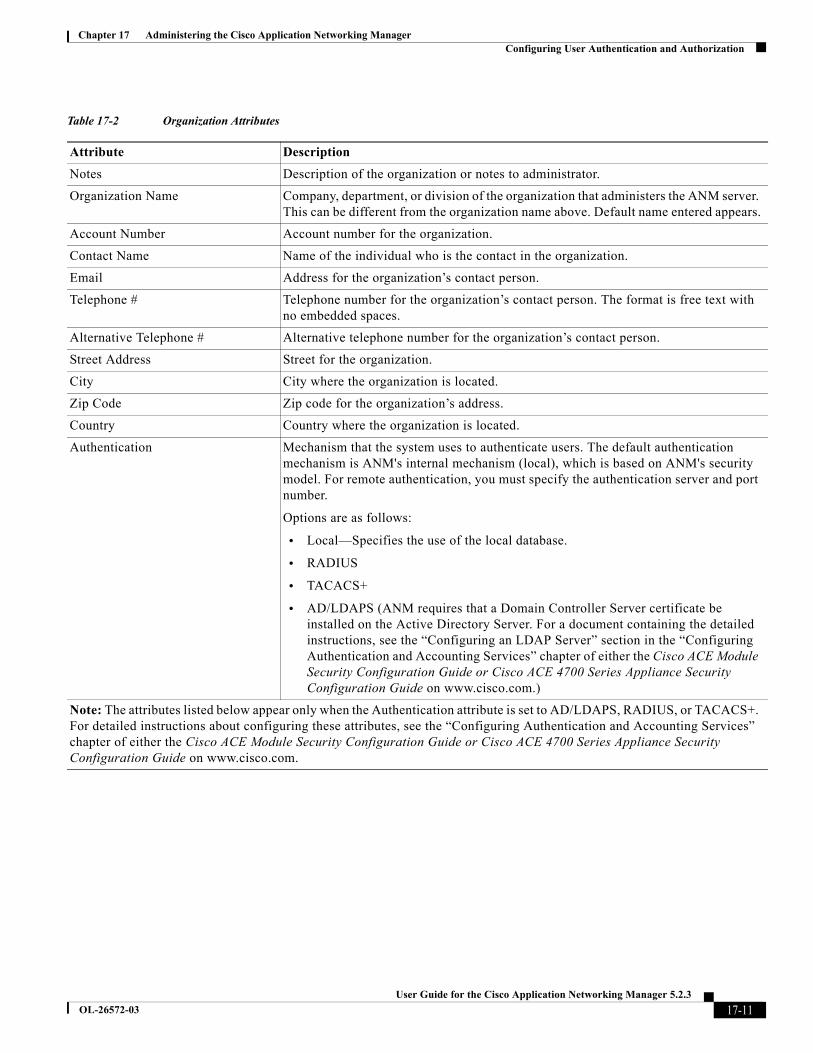
Step 4 Enter the attributes described in Table 17-2.
Certain attributes will display when specific options are selected.
17-10User Guide for the Cisco Application Networking Manager 5.2.3
OL-26572-03
Chapter 17 Administering the Cisco Application Networking ManagerConfiguring User Authentication and Authorization
Table 17-2 Organization Attributes
Attribute Description
Notes Description of the organization or notes to administrator.
Organization Name Company, department, or division of the organization that administers the ANM server. This can be different from the organization name above. Default name entered appears.
Account Number Account number for the organization.
Contact Name Name of the individual who is the contact in the organization.
Email Address for the organization’s contact person.
Telephone # Telephone number for the organization’s contact person. The format is free text with no embedded spaces.
Alternative Telephone # Alternative telephone number for the organization’s contact person.
Street Address Street for the organization.
City City where the organization is located.
Zip Code Zip code for the organization’s address.
Country Country where the organization is located.
Authentication Mechanism that the system uses to authenticate users. The default authentication mechanism is ANM's internal mechanism (local), which is based on ANM's security model. For remote authentication, you must specify the authentication server and port number.
Options are as follows:
• Local—Specifies the use of the local database.
• RADIUS
• TACACS+
• AD/LDAPS (ANM requires that a Domain Controller Server certificate be installed on the Active Directory Server. For a document containing the detailed instructions, see the “Configuring an LDAP Server” section in the “Configuring Authentication and Accounting Services” chapter of either the Cisco ACE Module Security Configuration Guide or Cisco ACE 4700 Series Appliance Security Configuration Guide on www.cisco.com.)
Note: The attributes listed below appear only when the Authentication attribute is set to AD/LDAPS, RADIUS, or TACACS+. For detailed instructions about configuring these attributes, see the “Configuring Authentication and Accounting Services” chapter of either the Cisco ACE Module Security Configuration Guide or Cisco ACE 4700 Series Appliance Security Configuration Guide on www.cisco.com.
17-11User Guide for the Cisco Application Networking Manager 5.2.3
OL-26572-03
Chapter 17 Administering the Cisco Application Networking ManagerConfiguring User Authentication and Authorization
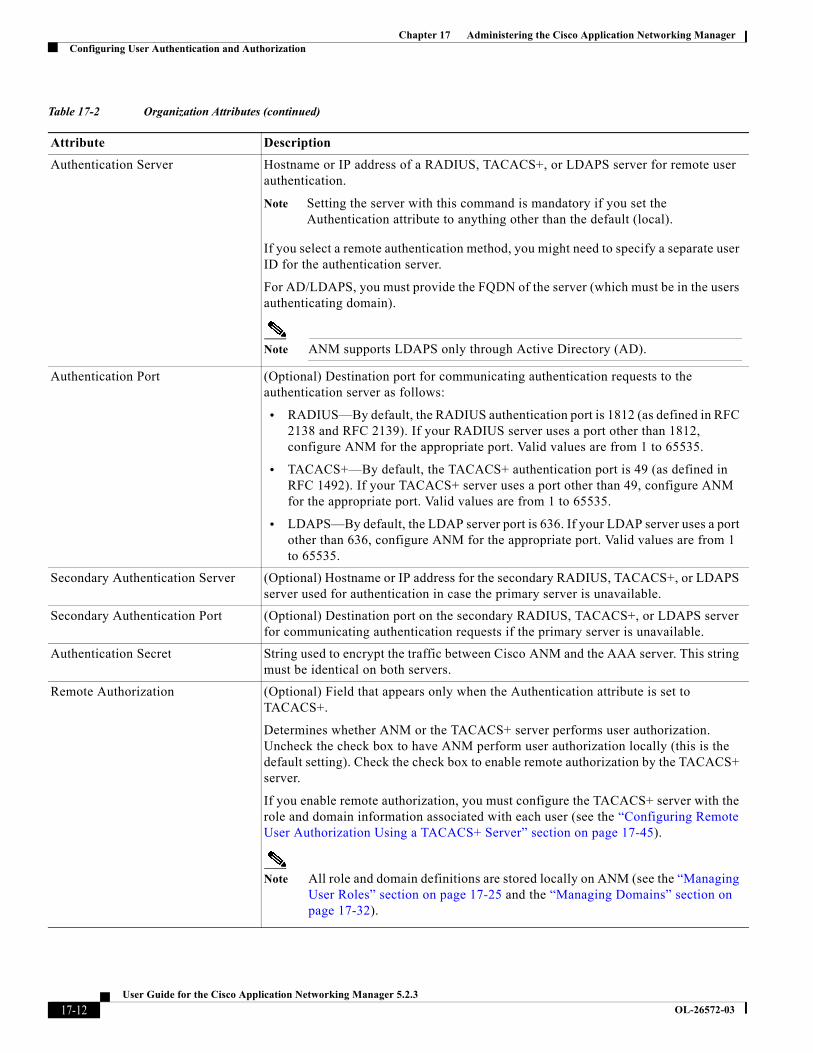
Authentication Server Hostname or IP address of a RADIUS, TACACS+, or LDAPS server for remote user authentication.
Note Setting the server with this command is mandatory if you set the Authentication attribute to anything other than the default (local).
If you select a remote authentication method, you might need to specify a separate user ID for the authentication server.
For AD/LDAPS, you must provide the FQDN of the server (which must be in the users authenticating domain).
Note ANM supports LDAPS only through Active Directory (AD).
Authentication Port (Optional) Destination port for communicating authentication requests to the authentication server as follows:
• RADIUS—By default, the RADIUS authentication port is 1812 (as defined in RFC 2138 and RFC 2139). If your RADIUS server uses a port other than 1812, configure ANM for the appropriate port. Valid values are from 1 to 65535.
• TACACS+—By default, the TACACS+ authentication port is 49 (as defined in RFC 1492). If your TACACS+ server uses a port other than 49, configure ANM for the appropriate port. Valid values are from 1 to 65535.
• LDAPS—By default, the LDAP server port is 636. If your LDAP server uses a port other than 636, configure ANM for the appropriate port. Valid values are from 1 to 65535.
Secondary Authentication Server (Optional) Hostname or IP address for the secondary RADIUS, TACACS+, or LDAPS server used for authentication in case the primary server is unavailable.
Secondary Authentication Port (Optional) Destination port on the secondary RADIUS, TACACS+, or LDAPS server for communicating authentication requests if the primary server is unavailable.
Authentication Secret String used to encrypt the traffic between Cisco ANM and the AAA server. This string must be identical on both servers.
Remote Authorization (Optional) Field that appears only when the Authentication attribute is set to TACACS+.
Determines whether ANM or the TACACS+ server performs user authorization. Uncheck the check box to have ANM perform user authorization locally (this is the default setting). Check the check box to enable remote authorization by the TACACS+ server.
If you enable remote authorization, you must configure the TACACS+ server with the role and domain information associated with each user (see the “Configuring Remote User Authorization Using a TACACS+ Server” section on page 17-45).
Note All role and domain definitions are stored locally on ANM (see the “Managing User Roles” section on page 17-25 and the “Managing Domains” section on page 17-32).
Table 17-2 Organization Attributes (continued)
Attribute Description
17-12User Guide for the Cisco Application Networking Manager 5.2.3
OL-26572-03
Chapter 17 Administering the Cisco Application Networking ManagerConfiguring User Authentication and Authorization
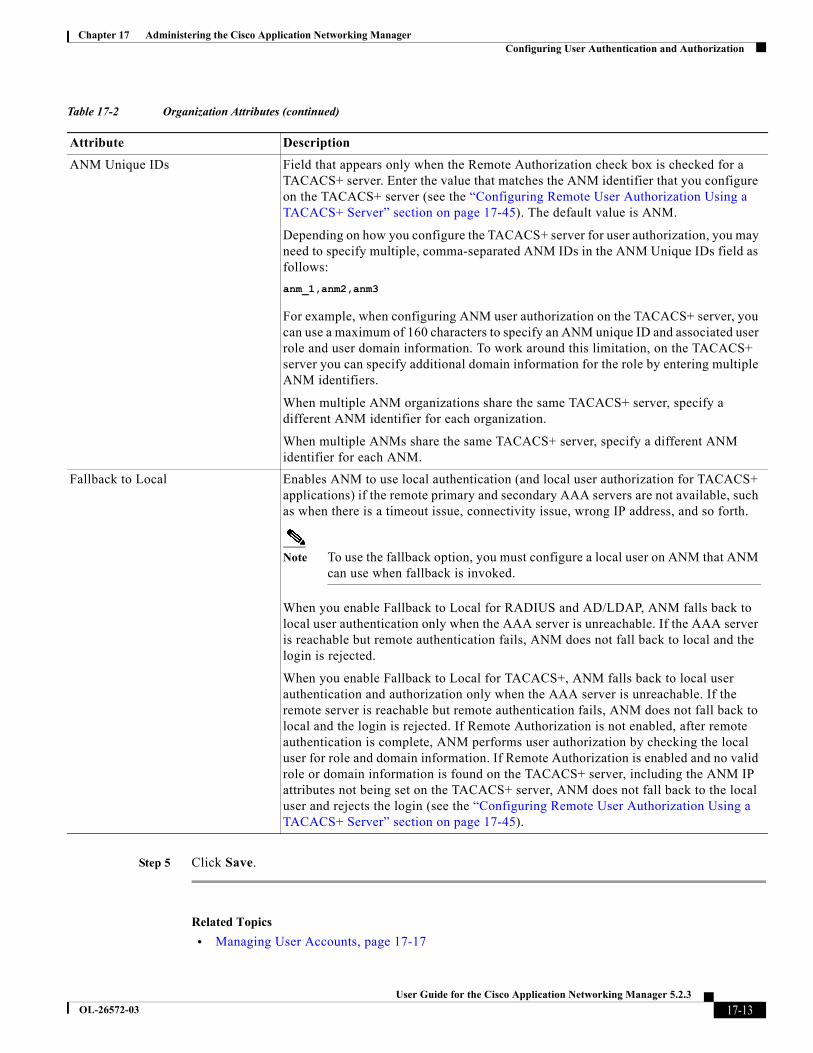
Step 5 Click Save.
Related Topics
• Managing User Accounts, page 17-17
ANM Unique IDs Field that appears only when the Remote Authorization check box is checked for a TACACS+ server. Enter the value that matches the ANM identifier that you configure on the TACACS+ server (see the “Configuring Remote User Authorization Using a TACACS+ Server” section on page 17-45). The default value is ANM.
Depending on how you configure the TACACS+ server for user authorization, you may need to specify multiple, comma-separated ANM IDs in the ANM Unique IDs field as follows:
anm_1,anm2,anm3
For example, when configuring ANM user authorization on the TACACS+ server, you can use a maximum of 160 characters to specify an ANM unique ID and associated user role and user domain information. To work around this limitation, on the TACACS+ server you can specify additional domain information for the role by entering multiple ANM identifiers.
When multiple ANM organizations share the same TACACS+ server, specify a different ANM identifier for each organization.
When multiple ANMs share the same TACACS+ server, specify a different ANM identifier for each ANM.
Fallback to Local Enables ANM to use local authentication (and local user authorization for TACACS+ applications) if the remote primary and secondary AAA servers are not available, such as when there is a timeout issue, connectivity issue, wrong IP address, and so forth.
Note To use the fallback option, you must configure a local user on ANM that ANM can use when fallback is invoked.
When you enable Fallback to Local for RADIUS and AD/LDAP, ANM falls back to local user authentication only when the AAA server is unreachable. If the AAA server is reachable but remote authentication fails, ANM does not fall back to local and the login is rejected.
When you enable Fallback to Local for TACACS+, ANM falls back to local user authentication and authorization only when the AAA server is unreachable. If the remote server is reachable but remote authentication fails, ANM does not fall back to local and the login is rejected. If Remote Authorization is not enabled, after remote authentication is complete, ANM performs user authorization by checking the local user for role and domain information. If Remote Authorization is enabled and no valid role or domain information is found on the TACACS+ server, including the ANM IP attributes not being set on the TACACS+ server, ANM does not fall back to the local user and rejects the login (see the “Configuring Remote User Authorization Using a TACACS+ Server” section on page 17-45).
Table 17-2 Organization Attributes (continued)
Attribute Description
17-13User Guide for the Cisco Application Networking Manager 5.2.3
OL-26572-03
Chapter 17 Administering the Cisco Application Networking ManagerConfiguring User Authentication and Authorization
• Changing the Admin Password, page 17-14
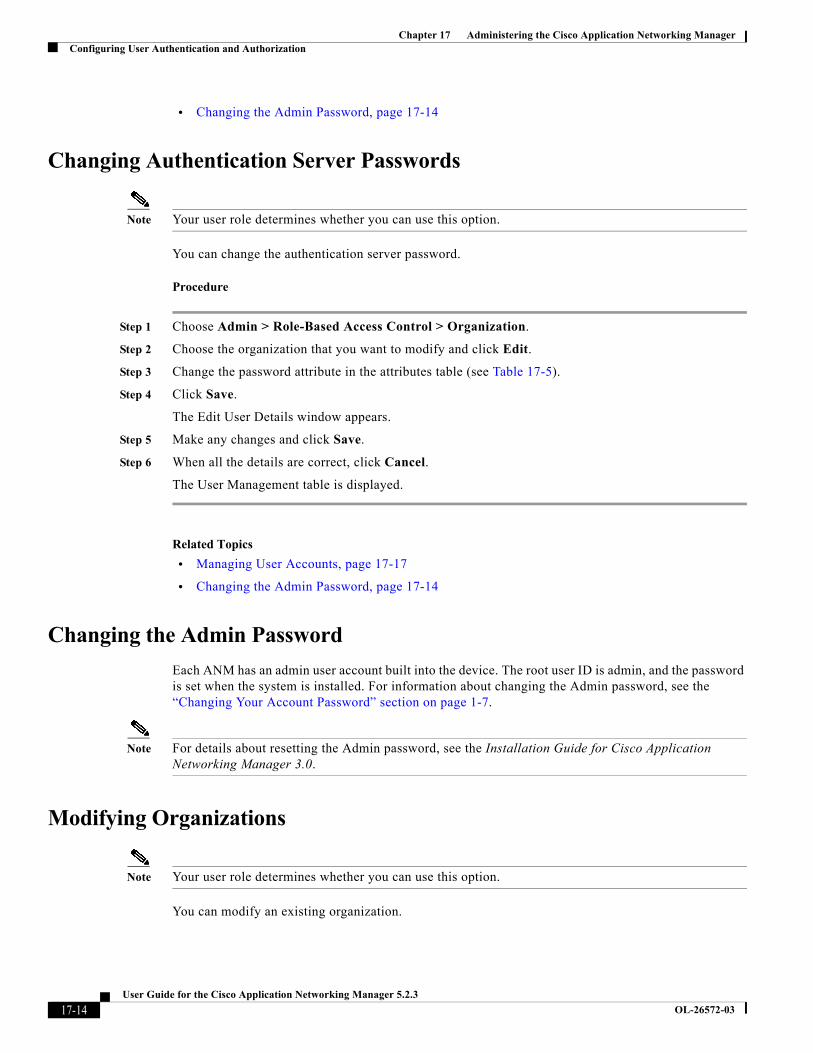
Changing Authentication Server Passwords
Note Your user role determines whether you can use this option.
You can change the authentication server password.
Procedure
Step 1 Choose Admin > Role-Based Access Control > Organization.
Step 2 Choose the organization that you want to modify and click Edit.
Step 3 Change the password attribute in the attributes table (see Table 17-5).
Step 4 Click Save.
The Edit User Details window appears.
Step 5 Make any changes and click Save.
Step 6 When all the details are correct, click Cancel.
The User Management table is displayed.
Related Topics
• Managing User Accounts, page 17-17
• Changing the Admin Password, page 17-14
Changing the Admin Password
Each ANM has an admin user account built into the device. The root user ID is admin, and the password is set when the system is installed. For information about changing the Admin password, see the “Changing Your Account Password” section on page 1-7.
Note For details about resetting the Admin password, see the Installation Guide for Cisco Application Networking Manager 3.0.
Modifying Organizations
Note Your user role determines whether you can use this option.
You can modify an existing organization.
17-14User Guide for the Cisco Application Networking Manager 5.2.3
OL-26572-03

Chapter 17 Administering the Cisco Application Networking ManagerConfiguring User Authentication and Authorization
Assumptions
This topic assumes the following:
• ANM is installed and running.
• The organization exists in the ANM database.
• You have reviewed the guidelines for managing customer organizations (see the “Adding a New Organization” section on page 17-10).
Procedure
Step 1 Choose Admin > Role-Based Access Control > Organizations.
Step 2 Choose the organization that you want to modify and click Edit.
The Edit Organization window appears.
Step 3 In the attributes table of the Edit Organization window, modify any of the attributes in the attributes table (see Table 17-2).
Step 4 Click Save.
Related Topics
• Configuring User Authentication and Authorization, page 17-9
Duplicating an Organization
Note Your user role determines whether you can use this option.
You can create a new organization from an existing one.
Assumptions
This topics assumes the following:
• ANM is installed and running.
• The organization exists in the ANM database.
• You have reviewed the guidelines for managing customer organizations (see the “Adding a New Organization” section on page 17-10).
Procedure
Step 1 Choose Admin > Role-Based Access Control > Organizations.
The Organizations window appears.
Step 2 In the Organizations window, choose the organization that you want to copy.
Step 3 Click Duplicate.
A script popup window appears.
Step 4 At the prompt in the popup window, enter a name for the new organization.
17-15User Guide for the Cisco Application Networking Manager 5.2.3
OL-26572-03
Chapter 17 Administering the Cisco Application Networking ManagerConfiguring User Authentication and Authorization
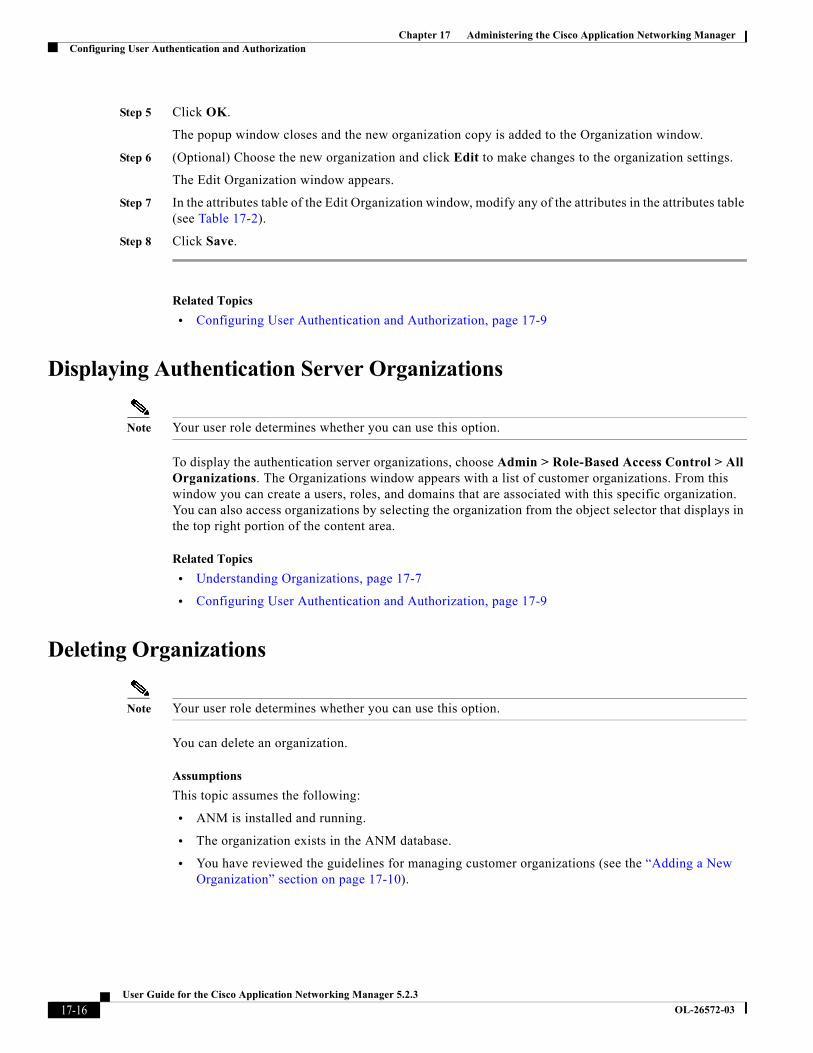
Step 5 Click OK.
The popup window closes and the new organization copy is added to the Organization window.
Step 6 (Optional) Choose the new organization and click Edit to make changes to the organization settings.
The Edit Organization window appears.
Step 7 In the attributes table of the Edit Organization window, modify any of the attributes in the attributes table (see Table 17-2).
Step 8 Click Save.
Related Topics
• Configuring User Authentication and Authorization, page 17-9
Displaying Authentication Server Organizations
Note Your user role determines whether you can use this option.
To display the authentication server organizations, choose Admin > Role-Based Access Control > All Organizations. The Organizations window appears with a list of customer organizations. From this window you can create a users, roles, and domains that are associated with this specific organization. You can also access organizations by selecting the organization from the object selector that displays in the top right portion of the content area.
Related Topics
• Understanding Organizations, page 17-7
• Configuring User Authentication and Authorization, page 17-9
Deleting Organizations
Note Your user role determines whether you can use this option.
You can delete an organization.
Assumptions
This topic assumes the following:
• ANM is installed and running.
• The organization exists in the ANM database.
• You have reviewed the guidelines for managing customer organizations (see the “Adding a New Organization” section on page 17-10).
17-16User Guide for the Cisco Application Networking Manager 5.2.3
OL-26572-03
Chapter 17 Administering the Cisco Application Networking ManagerManaging User Accounts
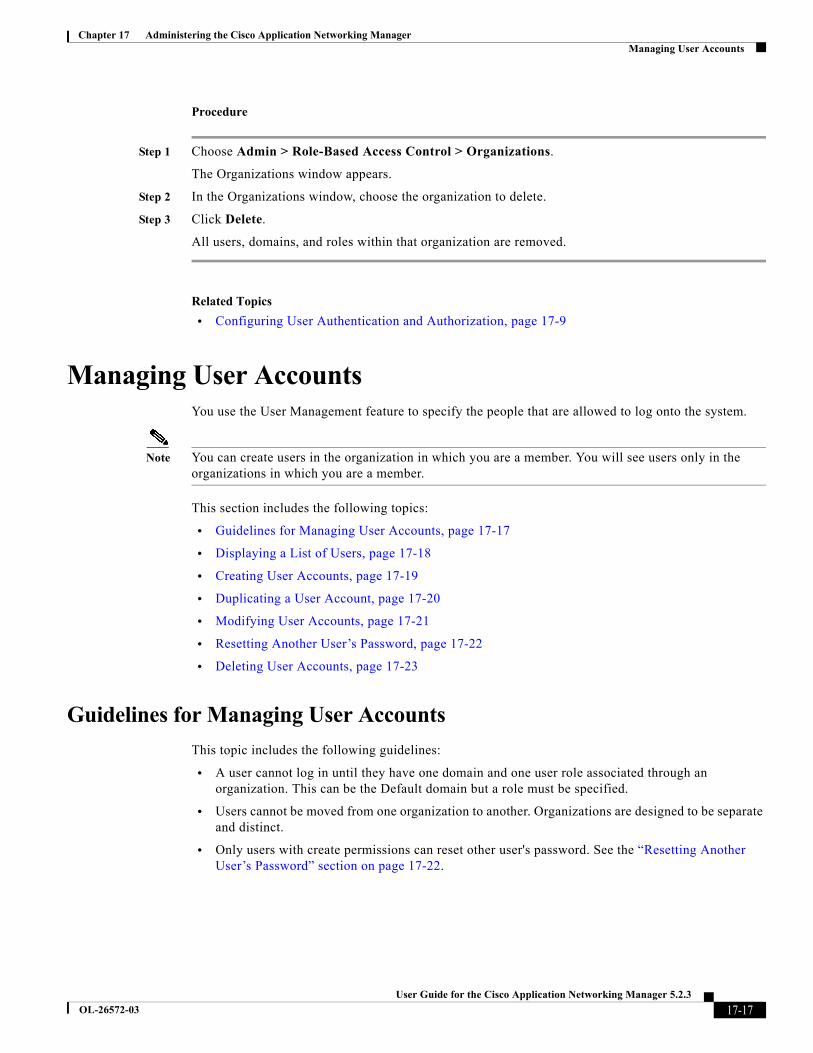
Procedure
Step 1 Choose Admin > Role-Based Access Control > Organizations.
The Organizations window appears.
Step 2 In the Organizations window, choose the organization to delete.
Step 3 Click Delete.
All users, domains, and roles within that organization are removed.
Related Topics
• Configuring User Authentication and Authorization, page 17-9
Managing User AccountsYou use the User Management feature to specify the people that are allowed to log onto the system.
Note You can create users in the organization in which you are a member. You will see users only in the organizations in which you are a member.
This section includes the following topics:
• Guidelines for Managing User Accounts, page 17-17
• Displaying a List of Users, page 17-18
• Creating User Accounts, page 17-19
• Duplicating a User Account, page 17-20
• Modifying User Accounts, page 17-21
• Resetting Another User’s Password, page 17-22
• Deleting User Accounts, page 17-23
Guidelines for Managing User Accounts
This topic includes the following guidelines:
• A user cannot log in until they have one domain and one user role associated through an organization. This can be the Default domain but a role must be specified.
• Users cannot be moved from one organization to another. Organizations are designed to be separate and distinct.
• Only users with create permissions can reset other user's password. See the “Resetting Another User’s Password” section on page 17-22.
17-17User Guide for the Cisco Application Networking Manager 5.2.3
OL-26572-03
Chapter 17 Administering the Cisco Application Networking ManagerManaging User Accounts
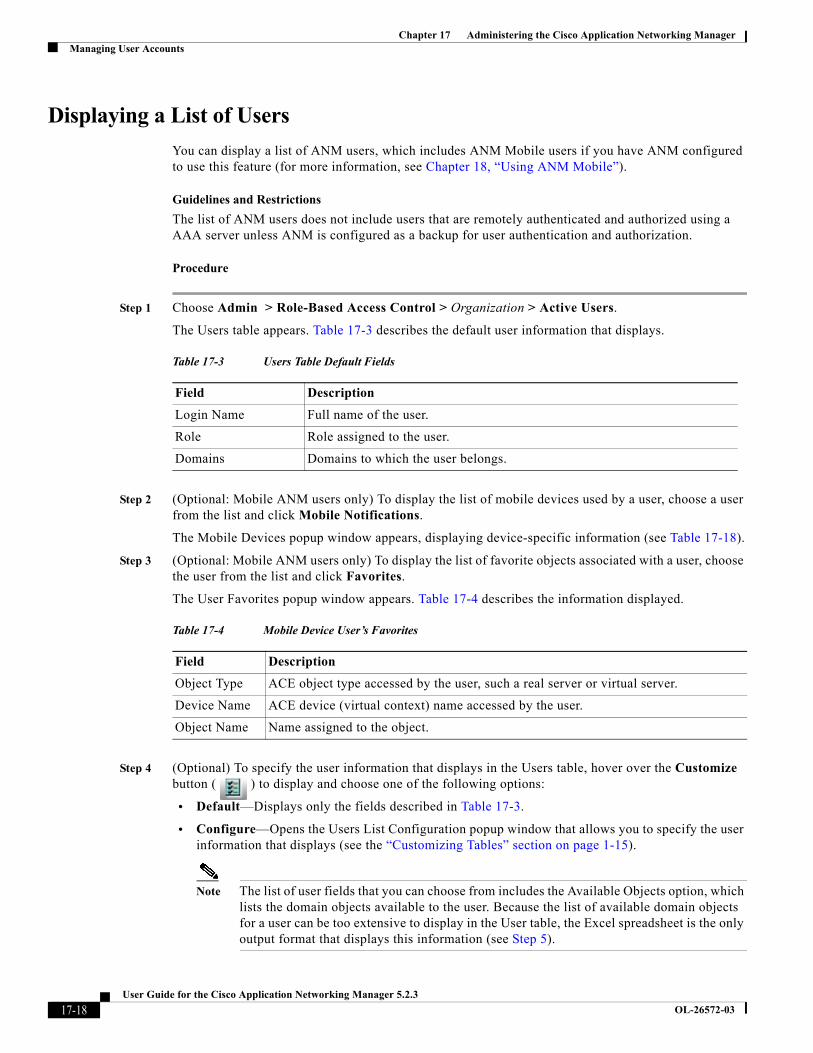
Displaying a List of Users
You can display a list of ANM users, which includes ANM Mobile users if you have ANM configured to use this feature (for more information, see Chapter 18, “Using ANM Mobile”).
Guidelines and Restrictions
The list of ANM users does not include users that are remotely authenticated and authorized using a AAA server unless ANM is configured as a backup for user authentication and authorization.
Procedure
Step 1 Choose Admin > Role-Based Access Control > Organization > Active Users.
The Users table appears. Table 17-3 describes the default user information that displays.
Step 2 (Optional: Mobile ANM users only) To display the list of mobile devices used by a user, choose a user from the list and click Mobile Notifications.
The Mobile Devices popup window appears, displaying device-specific information (see Table 17-18).
Step 3 (Optional: Mobile ANM users only) To display the list of favorite objects associated with a user, choose the user from the list and click Favorites.
The User Favorites popup window appears. Table 17-4 describes the information displayed.
Step 4 (Optional) To specify the user information that displays in the Users table, hover over the Customize button ( ) to display and choose one of the following options:
• Default—Displays only the fields described in Table 17-3.
• Configure—Opens the Users List Configuration popup window that allows you to specify the user information that displays (see the “Customizing Tables” section on page 1-15).
Note The list of user fields that you can choose from includes the Available Objects option, which lists the domain objects available to the user. Because the list of available domain objects for a user can be too extensive to display in the User table, the Excel spreadsheet is the only output format that displays this information (see Step 5).
Table 17-3 Users Table Default Fields
Field Description
Login Name Full name of the user.
Role Role assigned to the user.
Domains Domains to which the user belongs.
Table 17-4 Mobile Device User’s Favorites
Field Description
Object Type ACE object type accessed by the user, such a real server or virtual server.
Device Name ACE device (virtual context) name accessed by the user.
Object Name Name assigned to the object.
17-18User Guide for the Cisco Application Networking Manager 5.2.3
OL-26572-03
Chapter 17 Administering the Cisco Application Networking ManagerManaging User Accounts
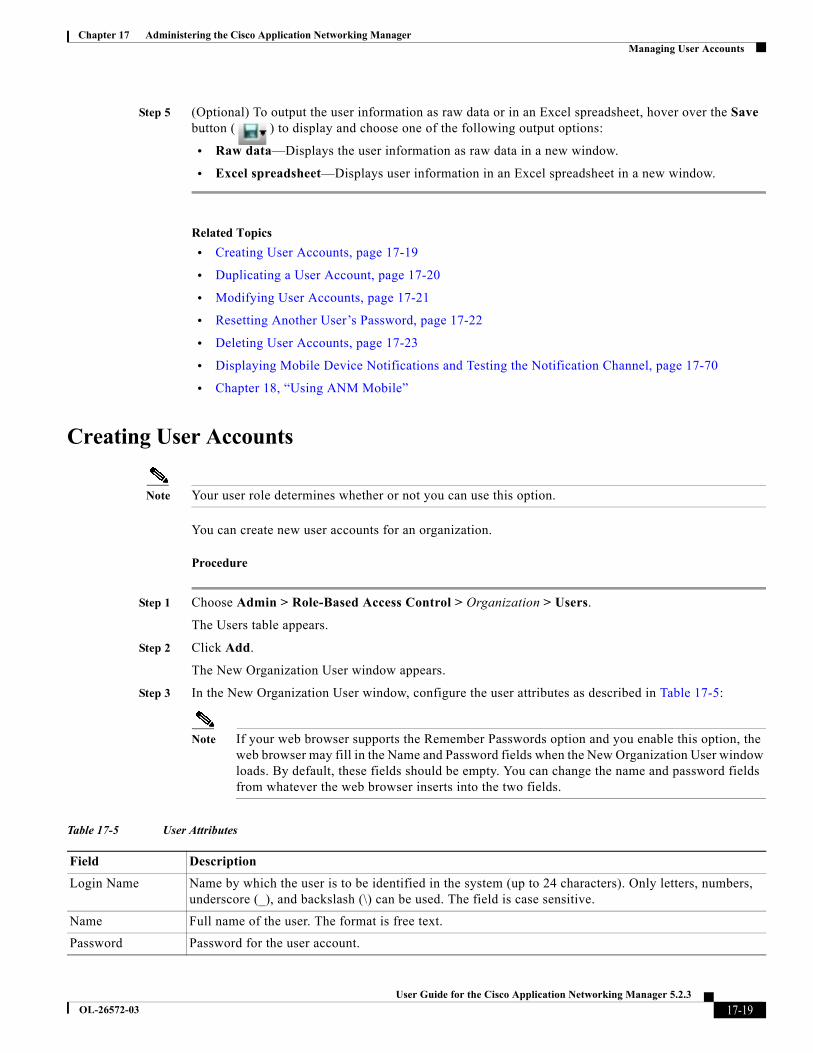
Step 5 (Optional) To output the user information as raw data or in an Excel spreadsheet, hover over the Save button ( ) to display and choose one of the following output options:
• Raw data—Displays the user information as raw data in a new window.
• Excel spreadsheet—Displays user information in an Excel spreadsheet in a new window.
Related Topics
• Creating User Accounts, page 17-19
• Duplicating a User Account, page 17-20
• Modifying User Accounts, page 17-21
• Resetting Another User’s Password, page 17-22
• Deleting User Accounts, page 17-23
• Displaying Mobile Device Notifications and Testing the Notification Channel, page 17-70
• Chapter 18, “Using ANM Mobile”
Creating User Accounts
Note Your user role determines whether or not you can use this option.
You can create new user accounts for an organization.
Procedure
Step 1 Choose Admin > Role-Based Access Control > Organization > Users.
The Users table appears.
Step 2 Click Add.
The New Organization User window appears.
Step 3 In the New Organization User window, configure the user attributes as described in Table 17-5:
Note If your web browser supports the Remember Passwords option and you enable this option, the web browser may fill in the Name and Password fields when the New Organization User window loads. By default, these fields should be empty. You can change the name and password fields from whatever the web browser inserts into the two fields.
Table 17-5 User Attributes
Field Description
Login Name Name by which the user is to be identified in the system (up to 24 characters). Only letters, numbers, underscore (_), and backslash (\) can be used. The field is case sensitive.
Name Full name of the user. The format is free text.
Password Password for the user account.
17-19User Guide for the Cisco Application Networking Manager 5.2.3
OL-26572-03
Chapter 17 Administering the Cisco Application Networking ManagerManaging User Accounts
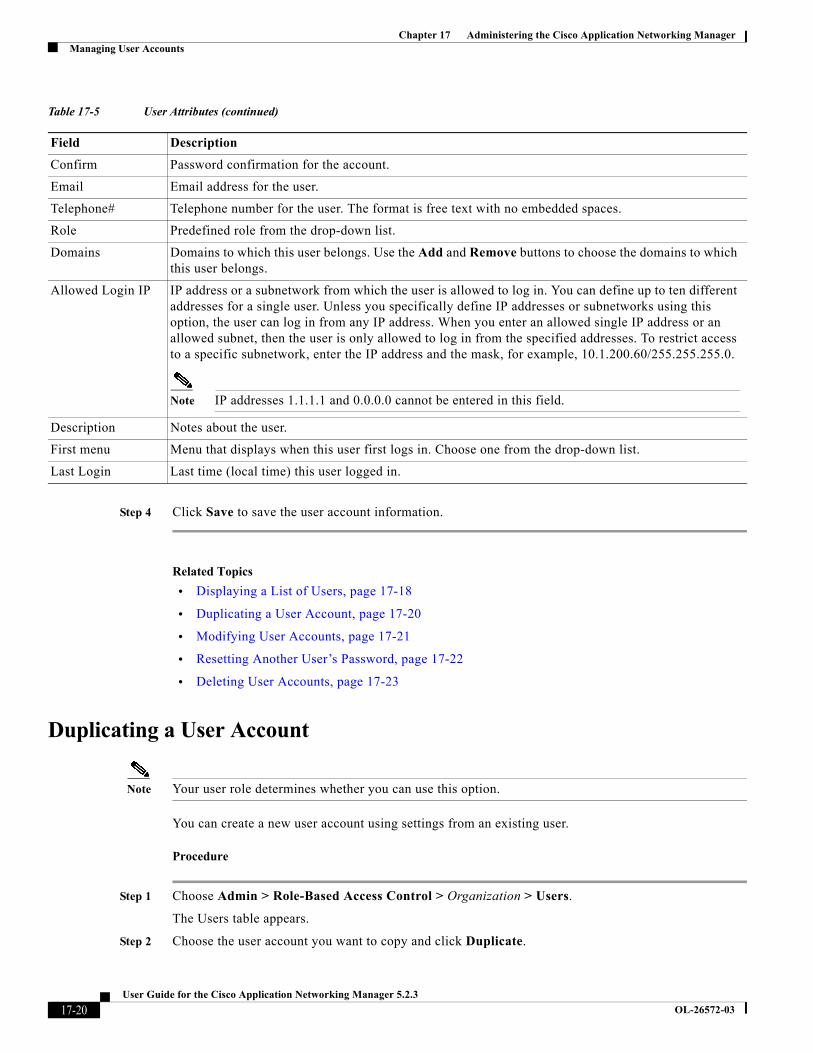
Step 4 Click Save to save the user account information.
Related Topics
• Displaying a List of Users, page 17-18
• Duplicating a User Account, page 17-20
• Modifying User Accounts, page 17-21
• Resetting Another User’s Password, page 17-22
• Deleting User Accounts, page 17-23
Duplicating a User Account
Note Your user role determines whether you can use this option.
You can create a new user account using settings from an existing user.
Procedure
Step 1 Choose Admin > Role-Based Access Control > Organization > Users.
The Users table appears.
Step 2 Choose the user account you want to copy and click Duplicate.
Confirm Password confirmation for the account.
Email Email address for the user.
Telephone# Telephone number for the user. The format is free text with no embedded spaces.
Role Predefined role from the drop-down list.
Domains Domains to which this user belongs. Use the Add and Remove buttons to choose the domains to which this user belongs.
Allowed Login IP IP address or a subnetwork from which the user is allowed to log in. You can define up to ten different addresses for a single user. Unless you specifically define IP addresses or subnetworks using this option, the user can log in from any IP address. When you enter an allowed single IP address or an allowed subnet, then the user is only allowed to log in from the specified addresses. To restrict access to a specific subnetwork, enter the IP address and the mask, for example, 10.1.200.60/255.255.255.0.
Note IP addresses 1.1.1.1 and 0.0.0.0 cannot be entered in this field.
Description Notes about the user.
First menu Menu that displays when this user first logs in. Choose one from the drop-down list.
Last Login Last time (local time) this user logged in.
Table 17-5 User Attributes (continued)
Field Description
17-20User Guide for the Cisco Application Networking Manager 5.2.3
OL-26572-03

Chapter 17 Administering the Cisco Application Networking ManagerManaging User Accounts
A script popup window appears.
Step 3 At the prompt in the popup window, enter a name for the new user account and click OK.
The popup window closes and the Users table displays the new user account.
Step 4 (Optional) To make changes to the user account, from the Users table, choose the user account and click Edit.
The Edit Organization User window appears.
Step 5 In the Edit Organization User window, modify the user account settings as described in Table 17-6.
Step 6 Click Save to save the user account information.
The Users window appears.
Related Topics
• Displaying a List of Users, page 17-18
• Creating User Accounts, page 17-19
• Modifying User Accounts, page 17-21
• Resetting Another User’s Password, page 17-22
• Deleting User Accounts, page 17-23
Modifying User Accounts
Note Your user role determines whether you can use this option.
You can modify existing user accounts.
Procedure
Step 1 Choose Admin > Role-Based Access Control > Organization > Users.
The Users table appears.
Step 2 Choose the user account you want to modify and click Edit.
The Edit Organization User window appears.
Step 3 In the Edit Organization User window, modify any of the attributes in the attributes table (see Table 17-6).
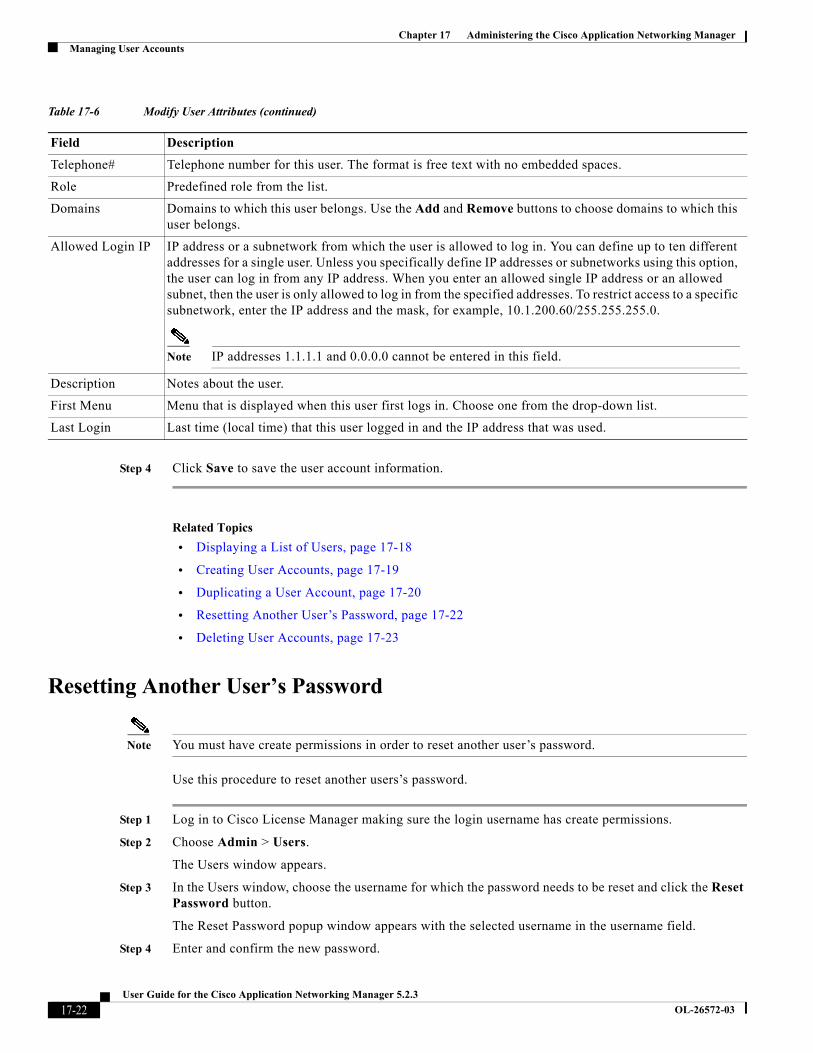
.Table 17-6 Modify User Attributes
Field Description
Login Name Name you specified when you created the user you want to duplicate. This is the name by which the user is to be identified in the system (up to 24 characters). Only letters, numbers, and underscore can be used. The field is case sensitive.
Name Full name of the user. The format is free text.
Email Email address for this user.
17-21User Guide for the Cisco Application Networking Manager 5.2.3
OL-26572-03
Chapter 17 Administering the Cisco Application Networking ManagerManaging User Accounts
Step 4 Click Save to save the user account information.
Related Topics
• Displaying a List of Users, page 17-18
• Creating User Accounts, page 17-19
• Duplicating a User Account, page 17-20
• Resetting Another User’s Password, page 17-22
• Deleting User Accounts, page 17-23
Resetting Another User’s Password
Note You must have create permissions in order to reset another user’s password.
Use this procedure to reset another users’s password.
Step 1 Log in to Cisco License Manager making sure the login username has create permissions.
Step 2 Choose Admin > Users.
The Users window appears.
Step 3 In the Users window, choose the username for which the password needs to be reset and click the Reset Password button.
The Reset Password popup window appears with the selected username in the username field.
Step 4 Enter and confirm the new password.
Telephone# Telephone number for this user. The format is free text with no embedded spaces.
Role Predefined role from the list.
Domains Domains to which this user belongs. Use the Add and Remove buttons to choose domains to which this user belongs.
Allowed Login IP IP address or a subnetwork from which the user is allowed to log in. You can define up to ten different addresses for a single user. Unless you specifically define IP addresses or subnetworks using this option, the user can log in from any IP address. When you enter an allowed single IP address or an allowed subnet, then the user is only allowed to log in from the specified addresses. To restrict access to a specific subnetwork, enter the IP address and the mask, for example, 10.1.200.60/255.255.255.0.
Note IP addresses 1.1.1.1 and 0.0.0.0 cannot be entered in this field.
Description Notes about the user.
First Menu Menu that is displayed when this user first logs in. Choose one from the drop-down list.
Last Login Last time (local time) that this user logged in and the IP address that was used.
Table 17-6 Modify User Attributes (continued)
Field Description
17-22User Guide for the Cisco Application Networking Manager 5.2.3
OL-26572-03
Chapter 17 Administering the Cisco Application Networking ManagerManaging User Accounts
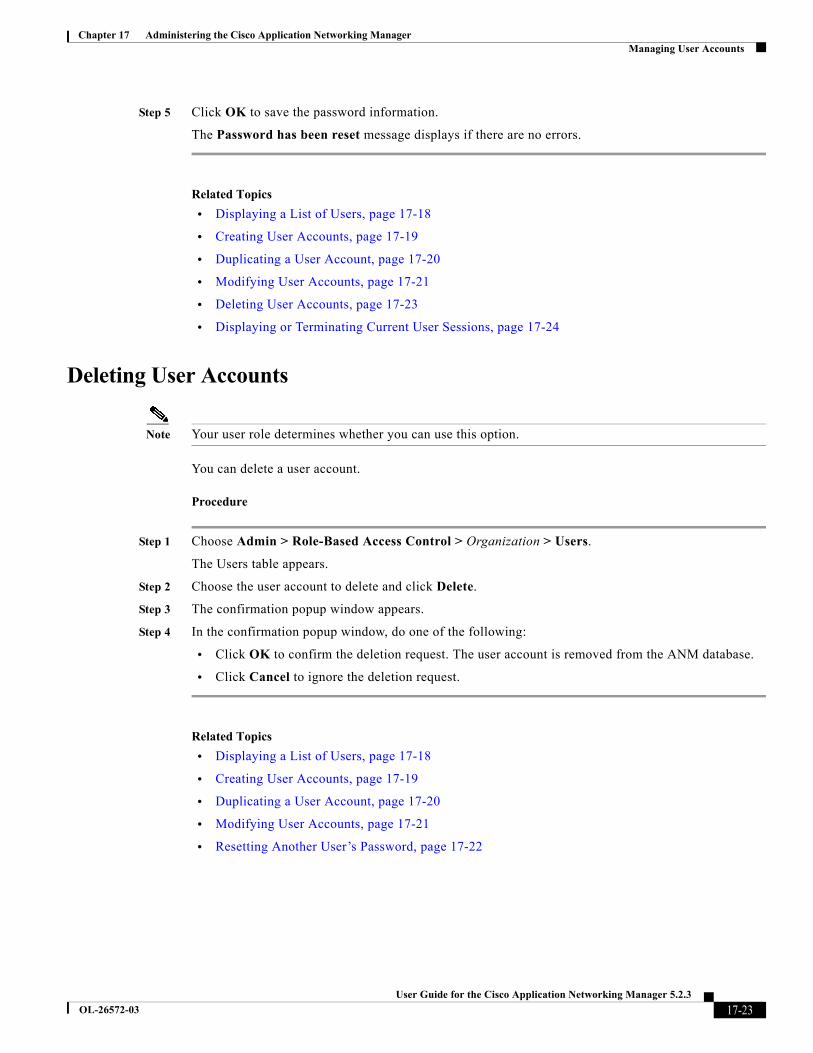
Step 5 Click OK to save the password information.
The Password has been reset message displays if there are no errors.
Related Topics
• Displaying a List of Users, page 17-18
• Creating User Accounts, page 17-19
• Duplicating a User Account, page 17-20
• Modifying User Accounts, page 17-21
• Deleting User Accounts, page 17-23
• Displaying or Terminating Current User Sessions, page 17-24
Deleting User Accounts
Note Your user role determines whether you can use this option.
You can delete a user account.
Procedure
Step 1 Choose Admin > Role-Based Access Control > Organization > Users.
The Users table appears.
Step 2 Choose the user account to delete and click Delete.
Step 3 The confirmation popup window appears.
Step 4 In the confirmation popup window, do one of the following:
• Click OK to confirm the deletion request. The user account is removed from the ANM database.
• Click Cancel to ignore the deletion request.
Related Topics
• Displaying a List of Users, page 17-18
• Creating User Accounts, page 17-19
• Duplicating a User Account, page 17-20
• Modifying User Accounts, page 17-21
• Resetting Another User’s Password, page 17-22
17-23User Guide for the Cisco Application Networking Manager 5.2.3
OL-26572-03
Chapter 17 Administering the Cisco Application Networking ManagerDisplaying or Terminating Current User Sessions
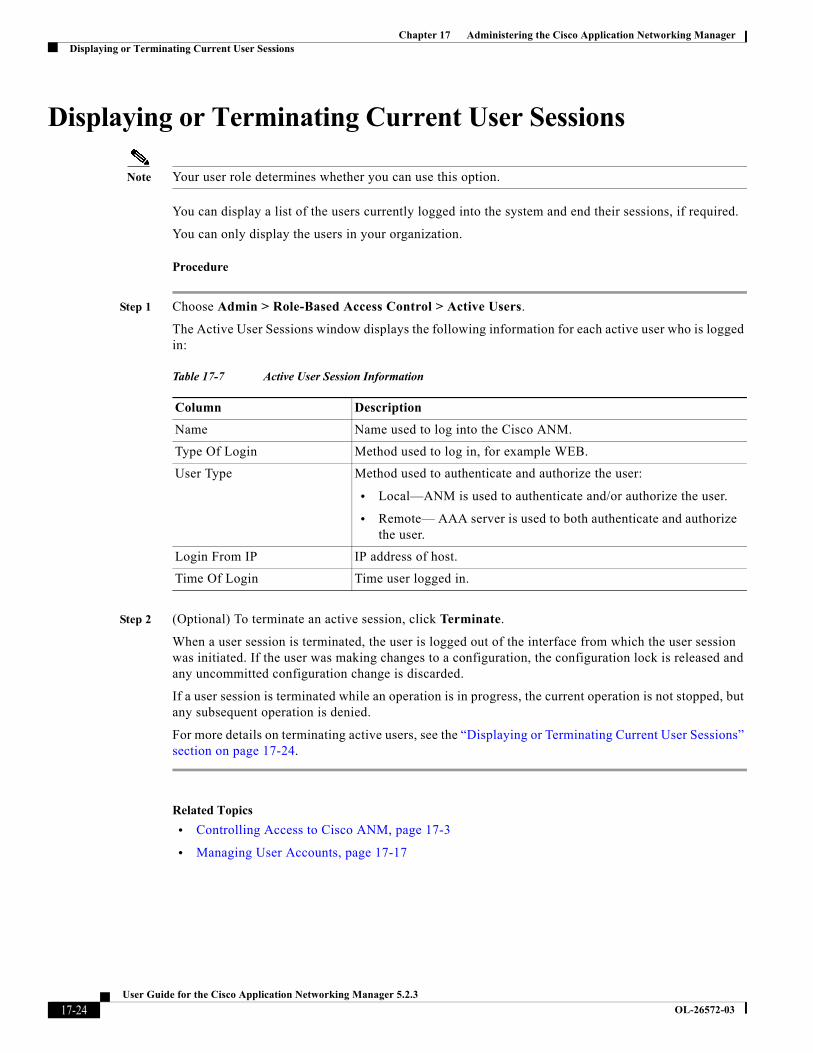
Displaying or Terminating Current User Sessions
Note Your user role determines whether you can use this option.
You can display a list of the users currently logged into the system and end their sessions, if required.
You can only display the users in your organization.
Procedure
Step 1 Choose Admin > Role-Based Access Control > Active Users.
The Active User Sessions window displays the following information for each active user who is logged in:
Step 2 (Optional) To terminate an active session, click Terminate.
When a user session is terminated, the user is logged out of the interface from which the user session was initiated. If the user was making changes to a configuration, the configuration lock is released and any uncommitted configuration change is discarded.
If a user session is terminated while an operation is in progress, the current operation is not stopped, but any subsequent operation is denied.
For more details on terminating active users, see the “Displaying or Terminating Current User Sessions” section on page 17-24.
Related Topics
• Controlling Access to Cisco ANM, page 17-3
• Managing User Accounts, page 17-17
Table 17-7 Active User Session Information
Column Description
Name Name used to log into the Cisco ANM.
Type Of Login Method used to log in, for example WEB.
User Type Method used to authenticate and authorize the user:
• Local—ANM is used to authenticate and/or authorize the user.
• Remote— AAA server is used to both authenticate and authorize the user.
Login From IP IP address of host.
Time Of Login Time user logged in.
17-24User Guide for the Cisco Application Networking Manager 5.2.3
OL-26572-03
Chapter 17 Administering the Cisco Application Networking ManagerManaging User Roles
Managing User RolesYou use the Roles Management feature to add, modify, and delete user-defined roles and to modify predefined roles.A user’s role determines the tasks the user can access. Each role is associated with permissions or rules that define what feature access this role contains. For example, if you design a role that provides access to virtual servers, the role automatically includes access to all real servers that could be included in the virtual server.
ANM provides several predefined user roles that you can modify but not delete. For more information about predefined user roles, including the list of the predefined user roles, see the “Understanding Predefined Roles” section on page 17-26.
This section includes the following topics:
• Guidelines for Managing User Roles, page 17-25
• Understanding Predefined Roles, page 17-26
• Displaying User Role Relationships, page 17-27
• Displaying User Roles and Associated Tasks and ANM Menu Privileges, page 17-28
• Creating User Roles, page 17-29
• Duplicating a User Role, page 17-31
• Modifying User Roles, page 17-31
• Deleting User Roles, page 17-32
Guidelines for Managing User Roles
This topic includes the following guidelines:
• System Administrators can view and modify all roles.
• Organization administrator users can only see and modify the users, roles, and domains in their organization.
• Other users can only view the user, roles, and domains assigned to them.
• User-defined roles can be created but follow strict rules about which tasks can be selected or deselected. See the user interface for specific dependencies or the “Displaying User Roles and Associated Tasks and ANM Menu Privileges” section on page 17-28 for role to task mapping information.
• You must have the ability to create real servers in your role and at least one virtual context in your domain before you can create real servers.
• You must have the ability to create virtual contexts in your role and an Admin context in your domain before you can create virtual contexts.
• If you upgrade to ANM 2.2 any custom roles that are migrated retain their associations but have different role definitions. We encourage you to use the ANM 2.2 predefined default roles.
17-25User Guide for the Cisco Application Networking Manager 5.2.3
OL-26572-03

Chapter 17 Administering the Cisco Application Networking ManagerManaging User Roles
Understanding Predefined Roles
You must have one of the predefined roles in the Admin context in order to use the changeto command, which allows users to visit other contexts. Non-admin/user contexts do not have access to the changeto command; they can only visit their home context. Context administrators, who have access to multiple contexts, must explicitly log in to other contexts to which they have access.
The predefined roles and their default privileges are defined in Table 17-8. For information about viewing user role details, see the “Displaying User Roles and Associated Tasks and ANM Menu Privileges” section on page 17-28. For detailed information on RBAC, see either the Cisco Application Control Engine Module Virtualization Configuration Guide or the Cisco 4700 Series Application Control Engine Appliance Virtualization Configuration Guide.
Table 17-8 ANM Predefined Role Tasks
Predefined Role DescriptionRole Tasks/Operation Privileges1
ACE-Admin Access to create virtual contexts and monitor threshold information.
• View Threshold
• Create Device Events
• Create Virtual Context+
ANM-Admin Access to create virtual contexts and monitor threshold information. Provides access to all features and functions.
• Create ANM System
• Create ANM User Access
• Create VM Mapping
• Create ANM Inventory+
Network-Admin Admin for L3 (IP and Routes) and L4 VIPs • View Threshold
• Create Device Events
• Create Switch
• Create Routing
• Create Interface
• Create NAT
• Create Connection
Network-Monitor Monitoring for all features • View ANM Inventory+
Org-Admin Access to create role-based access control and import and update device data.
• Create ANM User
• Create VM Mapping
• Create ANM Inventory+
Security-Admin Security features • Create AAA
• Modify Interface
• Create NAT
• Create Inspect
• Create Connection
17-26User Guide for the Cisco Application Networking Manager 5.2.3
OL-26572-03
Chapter 17 Administering the Cisco Application Networking ManagerManaging User Roles
Displaying User Role Relationships
Note Your user role determines whether you can use this option.
You can display which users are associated to specific roles.
Procedure
Step 1 Choose Admin > Role-Based Access Control > Organizations > Roles.
The Roles table appears.
Step 2 In the Roles table, choose a role and click Users.
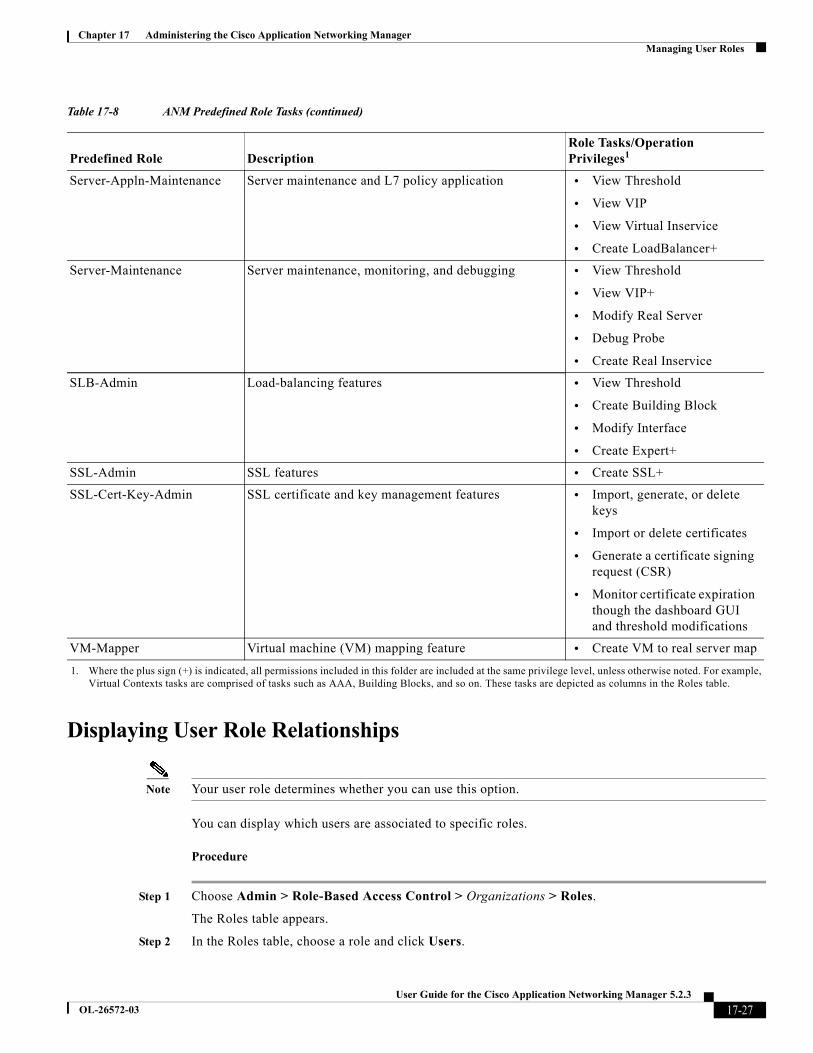
Server-Appln-Maintenance Server maintenance and L7 policy application • View Threshold
• View VIP
• View Virtual Inservice
• Create LoadBalancer+
Server-Maintenance Server maintenance, monitoring, and debugging • View Threshold
• View VIP+
• Modify Real Server
• Debug Probe
• Create Real Inservice
SLB-Admin Load-balancing features • View Threshold
• Create Building Block
• Modify Interface
• Create Expert+
SSL-Admin SSL features • Create SSL+
SSL-Cert-Key-Admin SSL certificate and key management features • Import, generate, or delete keys
• Import or delete certificates
• Generate a certificate signing request (CSR)
• Monitor certificate expiration though the dashboard GUI and threshold modifications
VM-Mapper Virtual machine (VM) mapping feature • Create VM to real server map
1. Where the plus sign (+) is indicated, all permissions included in this folder are included at the same privilege level, unless otherwise noted. For example, Virtual Contexts tasks are comprised of tasks such as AAA, Building Blocks, and so on. These tasks are depicted as columns in the Roles table.
Table 17-8 ANM Predefined Role Tasks (continued)
Predefined Role DescriptionRole Tasks/Operation Privileges1
17-27User Guide for the Cisco Application Networking Manager 5.2.3
OL-26572-03
Chapter 17 Administering the Cisco Application Networking ManagerManaging User Roles
The Users With Role window appears. From this window you can delete or duplicate a user. For information about how roles map to users, see the “Displaying User Roles and Associated Tasks and ANM Menu Privileges” section on page 17-28.
Related Topics
• Duplicating a User Account, page 17-20
• Managing User Roles, page 17-25
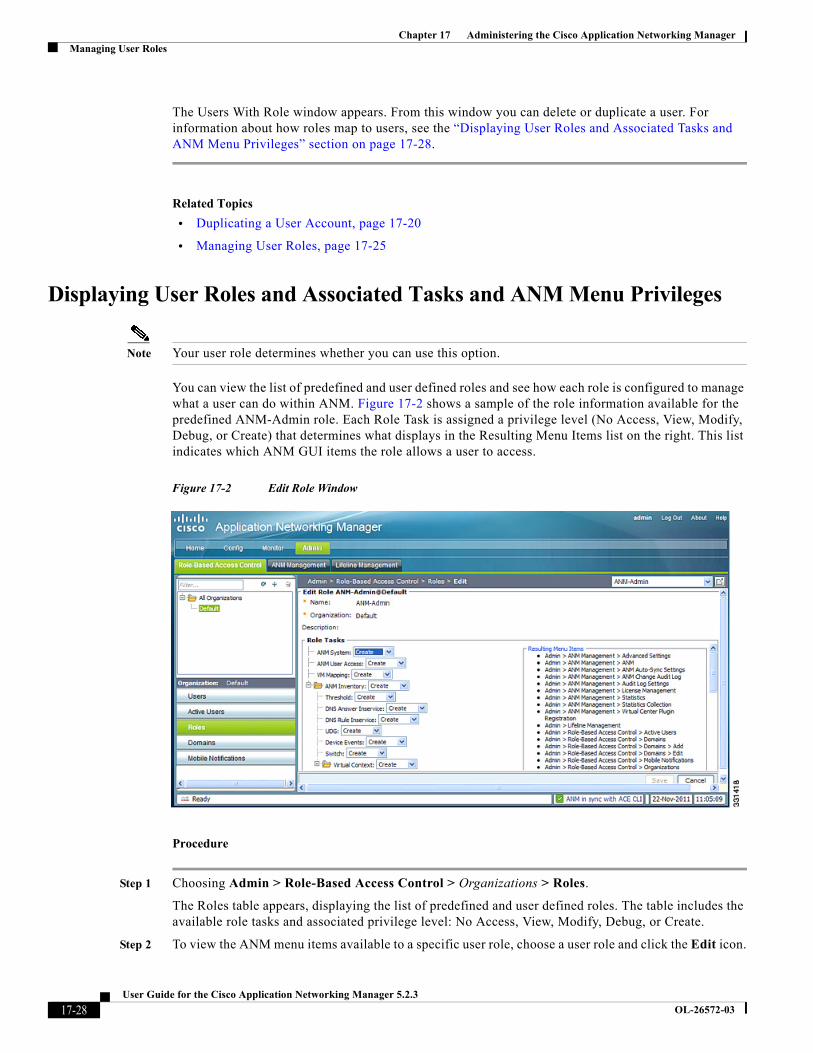
Displaying User Roles and Associated Tasks and ANM Menu Privileges
Note Your user role determines whether you can use this option.
You can view the list of predefined and user defined roles and see how each role is configured to manage what a user can do within ANM. Figure 17-2 shows a sample of the role information available for the predefined ANM-Admin role. Each Role Task is assigned a privilege level (No Access, View, Modify, Debug, or Create) that determines what displays in the Resulting Menu Items list on the right. This list indicates which ANM GUI items the role allows a user to access.
Figure 17-2 Edit Role Window
Procedure
Step 1 Choosing Admin > Role-Based Access Control > Organizations > Roles.
The Roles table appears, displaying the list of predefined and user defined roles. The table includes the available role tasks and associated privilege level: No Access, View, Modify, Debug, or Create.
Step 2 To view the ANM menu items available to a specific user role, choose a user role and click the Edit icon.
17-28User Guide for the Cisco Application Networking Manager 5.2.3
OL-26572-03
Chapter 17 Administering the Cisco Application Networking ManagerManaging User Roles
The Edit Role window appears (see Figure 17-2), displaying the Role Task tree and list of Resulting Menu Items, which is based on the privilege levels selected for each role task.
Note The information available from the Edit Role window can vary depending on the version of ANM being used.
Step 3 (Optional) Click Cancel to return to the Roles table where you can perform the following tasks:
• Create a new role (see the “Creating User Roles” section on page 17-29).
• View the users assigned to a role (see the “Displaying User Role Relationships” section on page 17-27).
• Modify an existing role to which you have access (see the “Modifying User Roles” section on page 17-31).
• Duplicate any existing role to which you have access (see the “Duplicating a User Role” section on page 17-31).
• Delete any existing role to which you have access (see the “Deleting User Roles” section on page 17-32).
Related Topics
• Understanding Operations Privileges, page 17-6
• Managing User Roles, page 17-25
Creating User Roles
Note Your user role determines whether you can use this option.
You can edit the predefined roles, or you can create new, user-defined roles. When you create a new role, you specify a name and description of the new role, then choose the privileges for each task. You can also assign this role to one or more users.
Procedure
Step 1 Choose Admin > Role-Based Access Control > Organization > Roles.
The Roles table appears.
Step 2 Click Add.
The New Role window appears.
17-29User Guide for the Cisco Application Networking Manager 5.2.3
OL-26572-03
Chapter 17 Administering the Cisco Application Networking ManagerManaging User Roles
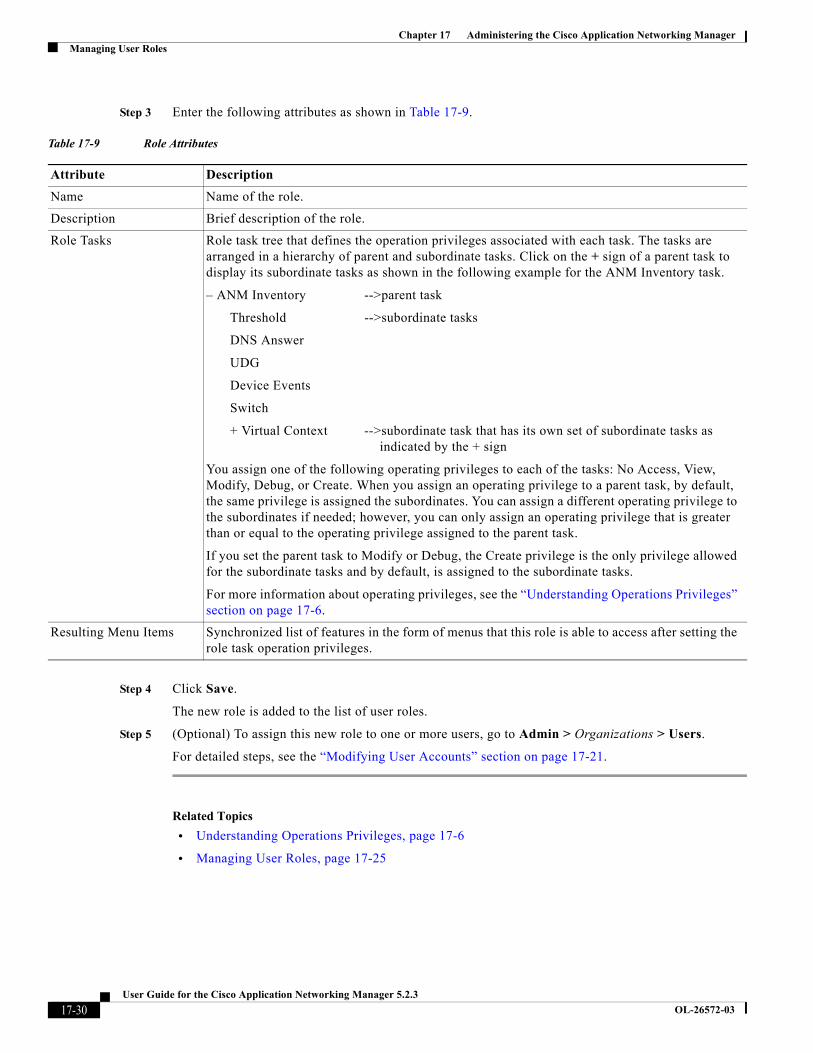
Step 3 Enter the following attributes as shown in Table 17-9.
Step 4 Click Save.
The new role is added to the list of user roles.
Step 5 (Optional) To assign this new role to one or more users, go to Admin > Organizations > Users.
For detailed steps, see the “Modifying User Accounts” section on page 17-21.
Related Topics
• Understanding Operations Privileges, page 17-6
• Managing User Roles, page 17-25
Table 17-9 Role Attributes
Attribute Description
Name Name of the role.
Description Brief description of the role.
Role Tasks Role task tree that defines the operation privileges associated with each task. The tasks are arranged in a hierarchy of parent and subordinate tasks. Click on the + sign of a parent task to display its subordinate tasks as shown in the following example for the ANM Inventory task.
– ANM Inventory -->parent task
Threshold -->subordinate tasks
DNS Answer
UDG
Device Events
Switch
+ Virtual Context -->subordinate task that has its own set of subordinate tasks as indicated by the + sign
You assign one of the following operating privileges to each of the tasks: No Access, View, Modify, Debug, or Create. When you assign an operating privilege to a parent task, by default, the same privilege is assigned the subordinates. You can assign a different operating privilege to the subordinates if needed; however, you can only assign an operating privilege that is greater than or equal to the operating privilege assigned to the parent task.
If you set the parent task to Modify or Debug, the Create privilege is the only privilege allowed for the subordinate tasks and by default, is assigned to the subordinate tasks.
For more information about operating privileges, see the “Understanding Operations Privileges” section on page 17-6.
Resulting Menu Items Synchronized list of features in the form of menus that this role is able to access after setting the role task operation privileges.
17-30User Guide for the Cisco Application Networking Manager 5.2.3
OL-26572-03
Chapter 17 Administering the Cisco Application Networking ManagerManaging User Roles
Duplicating a User Role
Note Your user role determines whether you can use this option.
You can create a new user-defined role from an existing one.
Procedure
Step 1 Choose Admin > Role-Based Access Control > Organization > Roles.
The Roles table appears.
Step 2 In the Roles table, choose the role you want to copy and click Duplicate.
A script popup window appears.
Step 3 At the prompt in the script popup window, enter a name for the new role.
Step 4 Click OK.
Step 5 The script popup window closes and Roles tables displays the new role.
Step 6 (Optional) To make changes to the new role’s attributes, in the Roles table, choose the role and click Edit.
The Edit Role window appears.
Step 7 Make the required changes and click Save to save the changes.
Related Topics
• Understanding Operations Privileges, page 17-6
• Managing User Roles, page 17-25
Modifying User Roles
Note Your user role determines whether you can use this option.
You can modify any user-defined roles.
Procedure
Step 1 Choose Admin > Role-Based Access Control > Organization > Roles.
The Roles table appears.
Step 2 Choose the role you want to modify and click Edit.
The Edit Role window appears.
Step 3 Make the required modifications.
17-31User Guide for the Cisco Application Networking Manager 5.2.3
OL-26572-03
Chapter 17 Administering the Cisco Application Networking ManagerManaging Domains
Step 4 Click Save.
Related Topics
• Understanding Operations Privileges, page 17-6
• Managing User Roles, page 17-25
Deleting User Roles
Note Your user role determines whether you can use this option.
You can delete any user-defined roles.
Procedure
Step 1 Choose Admin > Role-Based Access Control > Organization > Roles.
The Users table appears.
Step 2 Choose the role to delete and click Delete.
Step 3 The confirmation popup window appears.
Step 4 In the confirmation popup window, click OK to confirm the deletion.
Users that have the deleted role no longer have that access.
Related Topics
Managing User Roles, page 17-25
Managing DomainsNetwork domains provide a means for organizing the devices and their components (physical and logical) in your network and permitting access according to the way your site is organized. You can allow access to a domain by assigning it to an organization. Examples are specific virtual contexts or specific servers within a context.
The following sections describe how to manage domains:
• Guidelines for Managing Domains, page 17-33
• Displaying Network Domains, page 17-33
• Creating a Domain, page 17-34
• Duplicating a Domain, page 17-35
• Modifying a Domain, page 17-36
• Deleting a Domain, page 17-37
17-32User Guide for the Cisco Application Networking Manager 5.2.3
OL-26572-03
Chapter 17 Administering the Cisco Application Networking ManagerManaging Domains
Guidelines for Managing Domains
This topic includes the following guidelines:
• Domains are logical concepts. You do not delete a member of a domain when you delete the domain.
• Domains can include supported Cisco chassis, ACE modules, ACE appliances, and CSS or CSM devices, as well as their virtual contexts, building blocks, resource classes, and real and virtual servers.
• Choose the Allow All setting to include current and future device objects in a domain.
• Objects must already exist in ANM. To add objects, see the “Importing Network Devices into ANM” section on page 4-10.
• You must have the ability to create real servers in your role and at least one virtual context in your domain before you can create real servers.
• You must have the ability to create virtual contexts in your role and an Admin context in your domain before you can create virtual contexts.
• Domains continue to display device information even after you remove that device from ANM. This allows the domain information to be easily reassociated if you reimport the device. The device name must remain the same for this to work properly.
• (GSS domain objects only) ANM does not allow you to add a VIP answer to a domain if the answer contains a space in its name.
Caution Domain objects are hierarchical. If you include a parent object in a domain, the child object is also included even though they do not display in the Object selector tree when you add or edit domains.
For example:
– Inclusion of a Catalyst 6500 series switch includes all cards, virtual contexts, real servers and virtual servers.
– Inclusion of an ACE 4710 includes all virtual contexts, real servers, and virtual servers.
– Inclusion of a virtual context, CSM module or CSS device includes all associated objects.
Related Topics
• Creating a Domain, page 17-34
• Modifying a Domain, page 17-36
• Displaying Network Domains, page 17-33
• Duplicating a Domain, page 17-35
• Deleting a Domain, page 17-37
Displaying Network Domains
Note Your user role determines whether you can use this option.
You can display the network domains and a domain’s attributes.
17-33User Guide for the Cisco Application Networking Manager 5.2.3
OL-26572-03
Chapter 17 Administering the Cisco Application Networking ManagerManaging Domains
Procedure
Step 1 Choose Admin > Role-Based Access Control > Organization > Domains.
The Domains table appears.
Step 2 Expand the table until you can see all the network domains.
Step 3 Choose a domain from the Domains table to view and click Edit.
The Edit Domains window appears, displaying the domain’s attributes.
Related Topics
• Managing Domains, page 17-32
• Guidelines for Managing Domains, page 17-33
• Creating a Domain, page 17-34
• Duplicating a Domain, page 17-35
• Modifying a Domain, page 17-36
• Deleting a Domain, page 17-37
Creating a Domain
Note Your user role determines whether you can use this option.
You can create a new domain.
Procedure
Step 1 Choose Admin > Role-Based Access Control > Organization > Domains.
The Domains table appears.
Step 2 Click Add.
Step 3 Define the domain attributes as described in Table 17-10.
Table 17-10 Domain Attributes
Field Description
Name Name of the domain.
Description Description of the domain.
17-34User Guide for the Cisco Application Networking Manager 5.2.3
OL-26572-03
Chapter 17 Administering the Cisco Application Networking ManagerManaging Domains
Step 4 Click Save.
The Domains Edit window updates and displays the total object number next to the object name.
Related Topics
• Managing Domains, page 17-32
• Guidelines for Managing Domains, page 17-33
• Displaying Network Domains, page 17-33
• Creating a Domain, page 17-34
• Duplicating a Domain, page 17-35
• Modifying a Domain, page 17-36
• Deleting a Domain, page 17-37
Duplicating a Domain
Note Your user role determines whether you can use this option.
You can create a new domain from an existing one.
Procedure
Step 1 Choose Admin > Role-Based Access Control > Organization > Domains.
The Domains table appears.
Step 2 Choose the domain to copy and click Duplicate.
Step 3 A script popup window appears.
Allow All Check box that enables all objects within this domain (current and future objects). If this check box is left unchecked, the Objects tree displays.
Objects Collection of objects that comprise this domain. Choose an object name and use the arrows to move it from the available to selected column.
For example, selecting a virtual context selects all real servers within that virtual context, or selecting a chassis selects the virtual contexts on that chassis. The interface does not explicitly display this in the table, but the objects are, in fact, selected.
Note When you add objects such as real servers to a domain on an ACE that has an HA peer, ANM automatically adds the redundant objects from the HA peer to the list of selected objects.
See the “Guidelines for Managing Domains” section on page 17-33 for domain rules about creating virtual contexts and real servers.
Table 17-10 Domain Attributes (continued)
Field Description
17-35User Guide for the Cisco Application Networking Manager 5.2.3
OL-26572-03
Chapter 17 Administering the Cisco Application Networking ManagerManaging Domains
Step 4 At the prompt in the script popup window, enter a name for the new domain and click OK.
The script popup window closes and the Domains table displays the new domain.
Step 5 Click Save.
Related Topics
• Managing Domains, page 17-32
• Guidelines for Managing Domains, page 17-33
• Displaying Network Domains, page 17-33
• Creating a Domain, page 17-34
• Modifying a Domain, page 17-36
• Deleting a Domain, page 17-37
Modifying a Domain
Note Your user role determines whether you can use this option.
You can modify the settings in a domain.
Procedure
Step 1 Choose Admin > Role-Based Access Control > Organization > Domains.
The Domains table appears.
Step 2 In the Domains table, choose the domain you want to change and click Edit.
The Edit Domains window appears.
Step 3 In the Edit Domains window, modify the domain settings.
For detailed domain attribute descriptions, see Table 17-10 on page 17-34.
Step 4 Click Save.
Related Topics
• Managing Domains, page 17-32
• Guidelines for Managing Domains, page 17-33
• Displaying Network Domains, page 17-33
• Creating a Domain, page 17-34
• Duplicating a Domain, page 17-35
• Deleting a Domain, page 17-37
17-36User Guide for the Cisco Application Networking Manager 5.2.3
OL-26572-03
Chapter 17 Administering the Cisco Application Networking ManagerManaging Domains
Deleting a Domain
Note Your user role determines whether you can use this option.
You can delete a network domain from the systems. You do not delete objects associated with that domain when you delete the domain.
Procedure
Step 1 Choose Admin > Role-Based Access Control > Organization > Domains.
The Domains table appears.
Step 2 In the Domains table, choose the domain to delete and click Delete.
The confirmation popup window appears.
Step 3 In the confirmation popup window, click OK.
The domain is removed from the ANM database.
Related Topics
• Managing Domains, page 17-32
• Guidelines for Managing Domains, page 17-33
• Displaying Network Domains, page 17-33
• Creating a Domain, page 17-34
• Duplicating a Domain, page 17-35
• Modifying a Domain, page 17-36
17-37User Guide for the Cisco Application Networking Manager 5.2.3
OL-26572-03
Chapter 17 Administering the Cisco Application Networking ManagerUsing an AAA Server for Remote User Authentication and Authorization
Using an AAA Server for Remote User Authentication and Authorization
ANM allows you to centrally control user authentication and authorization. User authentication, which manages access to ANM, can be performed locally using a database that resides in ANM or remotely using a database that resides on an AAA server, such as an Active Directory (AD) server using LDAPS, RADIUS, or TACACS+. In ANM, you can configure authentication for your users by specifying which AAA servers are used for specific users. You configure authentication through organizations. An organization allows you to configure your AAA server lookup for your users and then associate specific users, roles, and domains with those organizations.
User authorization, which manages access to different ANM functionality, can also be performed locally using a database that resides in ANM or remotely using a database that resides on a TACACS+ server. ANM supports the use of a TACACS+ server only for remote authorization.
The information provided in this section is intended as a guide to help you ensure proper communication with the AAA server and ANM operating as the AAA client. For details about configuring the Cisco Secure ACS, Active Directory, or another AAA server, see the documentation that is provided with the software.
This section includes the following topics:
• Information About Using AD/LDAPS for Remote User Authentication, page 17-38
• Configuring Remote User Authentication Using a TACACS+ Server, page 17-39
• Configuring Remote User Authorization Using a TACACS+ Server, page 17-45
Information About Using AD/LDAPS for Remote User Authentication
This section describes how ANM uses AD/LDAPS for remote user authentication. ANM performs the following steps to authenticate and authorize a user when configured to use AD/LDAPS for user authentication:
1. ANM verifies that the user organization exists locally on the ANM database. ANM makes this determination based on the part of the user login name that follows the @ character.
2. ANM uses the configured AD server to authenticate the user.
3. ANM authorizes the user locally. ANM verifies that the user’s name is associated with one of the defined roles in the Roles table (Admin > Role-Based Access Control > Organization > Roles).
After ANM completes these three steps, the user is permitted access according to their account settings in the Roles table and Domains table (Admin > Role-Based Access Control > Organization > Domains).
If any of the authentication and authorization checks fail, ANM logs the error in the audit log (Admin > ANM Management > ANM Change Audit Log).
One of the following error messages display depending on when the failure occurs:
• If Step 1 fails, the message is as follows:
User authentication failed: Organization <org_name> does not exist.
• If Step 2 fails, the message is as follows:
User authentication failed: ... , reason=User password check failed - error code XXX - <error_description>.
17-38User Guide for the Cisco Application Networking Manager 5.2.3
OL-26572-03

Chapter 17 Administering the Cisco Application Networking ManagerUsing an AAA Server for Remote User Authentication and Authorization
This message means that the AD server rejected the user. The list of possible error codes and respective descriptions are as follows:
– 525—User is not found
– 52e—User credentials are invalid
– 530—User is not permitted to log on at this time
– 531—User is not permitted to log on from this workstation
– 532—Password has expired
– 533—Account is disabled
– 701—Account has expired
– 773—User must reset their password
– 775—Account is locked out
• If Step 3 fails, the message is as follows:
User authorization failed: User is not defined in the <org_name> organization.
Configuring Remote User Authentication Using a TACACS+ Server
This section describes how to configure ANM and a TACACS+ server for remote user authentication.
Note For background information about configuring an AAA server, see the “Configuring Authentication and Accounting Services” chapter of either the Cisco ACE Module Security Configuration Guide or Cisco ACE 4700 Series Appliance Security Configuration Guide on www.cisco.com.
Assumptions
This topic assumes the following:
• For purposes of this example, assume usage of a Cisco Secure ACS version 4.1 server.
• Your user role determines whether you can perform the procedures outlined in this section.
• Administrative login rights are required to access the Cisco Secure ACS HTML interface.
Table 17-11 provides a high-level overview of the steps required to authenticate ANM users with a TACACS+ server.
17-39User Guide for the Cisco Application Networking Manager 5.2.3
OL-26572-03

Chapter 17 Administering the Cisco Application Networking ManagerUsing an AAA Server for Remote User Authentication and Authorization
Table 17-11 Authenticating ANM Users with a TACACS+ Server
Task Procedure
Step 1 Create an organization and define the remote TACACS+ server used (ANM)
Note Your user role determines whether you can use this option.
Remote authentication servers are defined in ANM as organizations. A single server can be used in multiple organizations. To configure authentication for your users by creating an organization and defining TACACS+ as the method of authentication, do the following:
a. Choose Admin > Role-Based Access Control > All Organizations. The Organizations window appears.
b. Click Add.
c. Enter the name of the new organization and notes if required.
d. Click Save.
e. Choose the new organization and click Edit.
f. Enter the attributes as described in Table 17-2. Certain attributes appear when you choose specific options. Include the following organization attributes to authenticate ANM users with a TACACS+ server:
– Organization name
– TACACS+ as authentication method
– IP address of TACACS+ server
– Authentication port number
– Authentication secret
g. Click Save.
See the “Adding a New Organization” section on page 17-10 for details about this procedure.
Step 2 Creating a role for RBAC(ANM)
Note Your user role determines whether you can use this option.
You can edit the predefined roles or you can create user-defined roles. When you create a role, you specify a name and description of the new role, and then choose the privileges for each task. You can also assign this role to one or more users.
Do the following:
a. Choose Admin > Role-Based Access Control > Organization > Roles. The Roles table appears.
b. Click Add. The New Role form appears.
c. Enter the attributes as described in Table 17-9.
d. Click Save. The new role is added to the list of user roles.
See the “Creating User Roles” section on page 17-29 for details on this procedure.
17-40User Guide for the Cisco Application Networking Manager 5.2.3
OL-26572-03

Chapter 17 Administering the Cisco Application Networking ManagerUsing an AAA Server for Remote User Authentication and Authorization
Step 3 Create a domain for an RBAC user (ANM)
Note Your user role determines whether you can use this option.
A domain defines which objects that the RBAC user will have access to. The assigned role defines which actions that user will be able to perform on those objects.
To configure a domain for an RBAC user, do the following:
a. Choose Admin > Role-Based Access Control > Organization > Domains. The Domains table appears.
b. In the Domains table, click Add.
c. For the new domain, enter the attributes as described in Table 17-10.
Note If you check the Allow All checkbox, this selection enables all objects within this domain (current and future objects). If you leave this check box unchecked, the Objects tree displays. To allow a user to have access to the entire context, highlight the Virtual Contexts folder in the Objects tree, locate the specific user context, and then click the arrow to send it to the Selected box. The context name format is <chassis-name>:<slot-number>:<context-name>
d. Click Save when all the objects that you want to allow access to are listed in the Selected box.
See the “Creating a Domain” section on page 17-34 for details on this procedure.
Step 4 Create an organization user (ANM)
Note Your user role determines whether you can use this option.
Organization users are users who work for the customer of a service provider or AAA server that segments your users and to whom you want to grant access to ANM.
Do the following:
a. Choose Admin > Role-Based Access Control > Organization > Users. The Users window appears.
b. In the Users window, click Add.
c. Enter the attributes as described in Table 17-5. Include the following organization user attributes:
– Login name
– Predefined role
– Domains to which this user belongs
d. Click Save. The Users table appears.
See the “Creating User Accounts” section on page 17-19 for details on this procedure.
Table 17-11 Authenticating ANM Users with a TACACS+ Server (continued)
Task Procedure
17-41User Guide for the Cisco Application Networking Manager 5.2.3
OL-26572-03
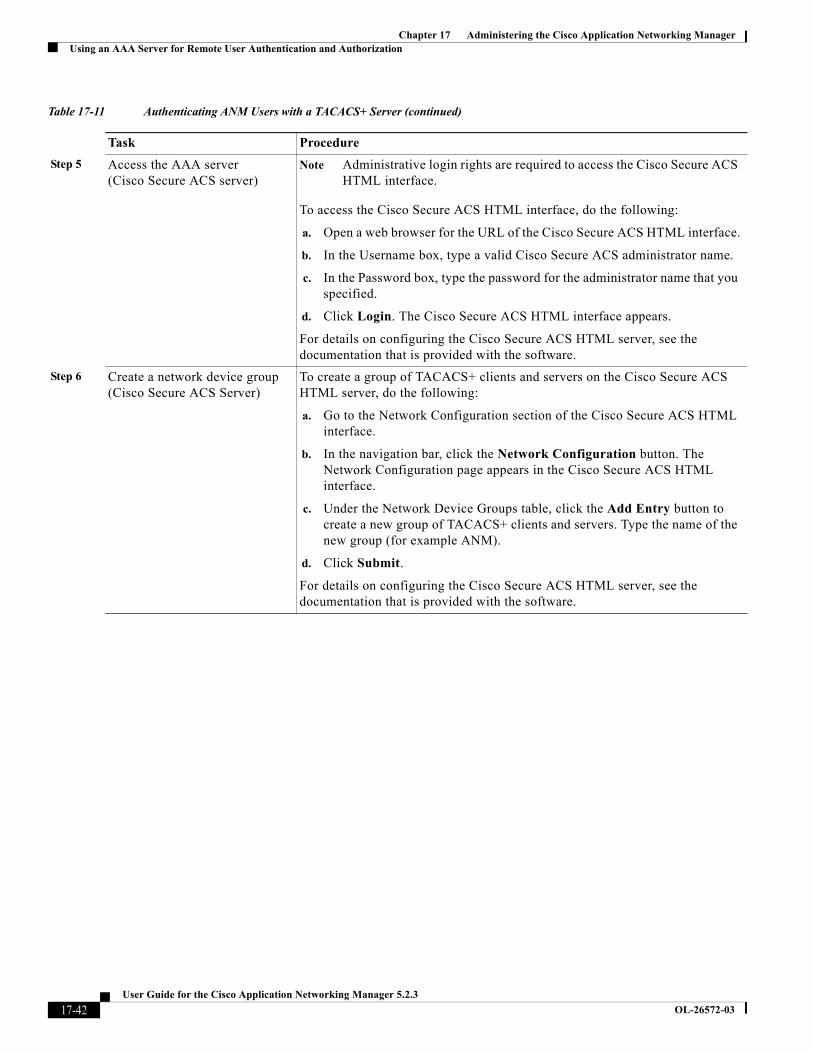
Chapter 17 Administering the Cisco Application Networking ManagerUsing an AAA Server for Remote User Authentication and Authorization
Step 5 Access the AAA server(Cisco Secure ACS server)
Note Administrative login rights are required to access the Cisco Secure ACS HTML interface.
To access the Cisco Secure ACS HTML interface, do the following:
a. Open a web browser for the URL of the Cisco Secure ACS HTML interface.
b. In the Username box, type a valid Cisco Secure ACS administrator name.
c. In the Password box, type the password for the administrator name that you specified.
d. Click Login. The Cisco Secure ACS HTML interface appears.
For details on configuring the Cisco Secure ACS HTML server, see the documentation that is provided with the software.
Step 6 Create a network device group(Cisco Secure ACS Server)
To create a group of TACACS+ clients and servers on the Cisco Secure ACS HTML server, do the following:
a. Go to the Network Configuration section of the Cisco Secure ACS HTML interface.
b. In the navigation bar, click the Network Configuration button. The Network Configuration page appears in the Cisco Secure ACS HTML interface.
c. Under the Network Device Groups table, click the Add Entry button to create a new group of TACACS+ clients and servers. Type the name of the new group (for example ANM).
d. Click Submit.
For details on configuring the Cisco Secure ACS HTML server, see the documentation that is provided with the software.
Table 17-11 Authenticating ANM Users with a TACACS+ Server (continued)
Task Procedure
17-42User Guide for the Cisco Application Networking Manager 5.2.3
OL-26572-03
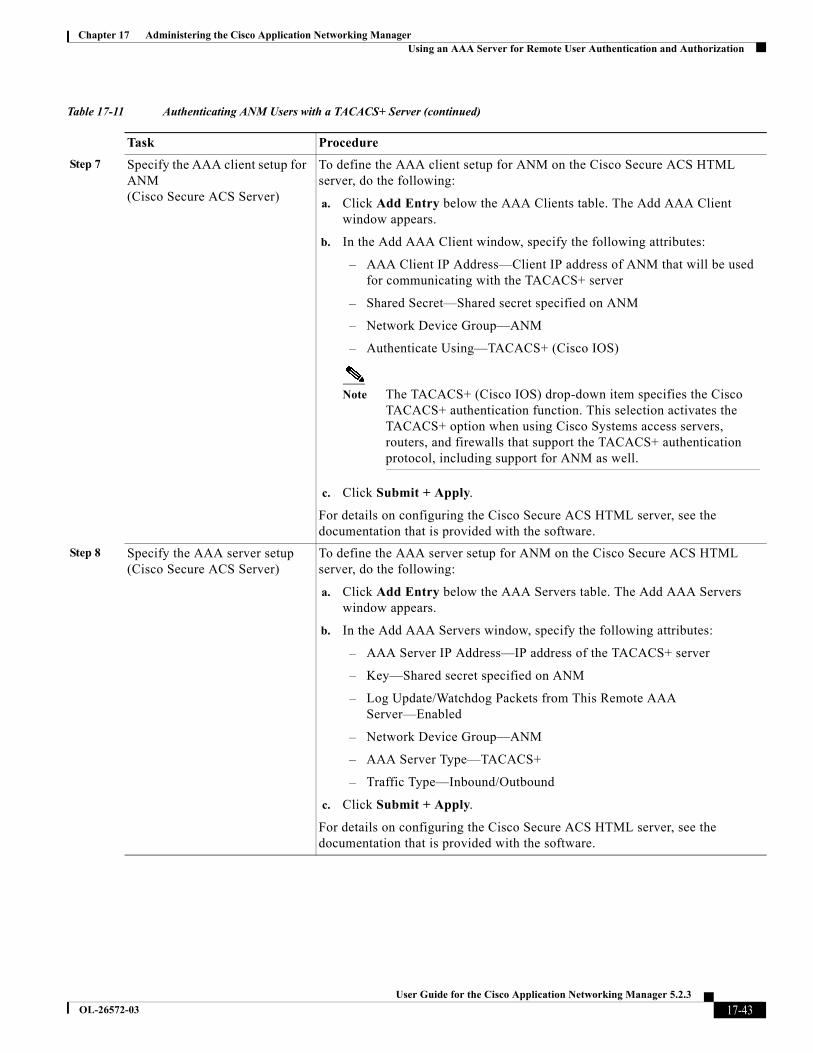
Chapter 17 Administering the Cisco Application Networking ManagerUsing an AAA Server for Remote User Authentication and Authorization
Step 7 Specify the AAA client setup for ANM(Cisco Secure ACS Server)
To define the AAA client setup for ANM on the Cisco Secure ACS HTML server, do the following:
a. Click Add Entry below the AAA Clients table. The Add AAA Client window appears.
b. In the Add AAA Client window, specify the following attributes:
– AAA Client IP Address—Client IP address of ANM that will be used for communicating with the TACACS+ server
– Shared Secret—Shared secret specified on ANM
– Network Device Group—ANM
– Authenticate Using—TACACS+ (Cisco IOS)
Note The TACACS+ (Cisco IOS) drop-down item specifies the Cisco TACACS+ authentication function. This selection activates the TACACS+ option when using Cisco Systems access servers, routers, and firewalls that support the TACACS+ authentication protocol, including support for ANM as well.
c. Click Submit + Apply.
For details on configuring the Cisco Secure ACS HTML server, see the documentation that is provided with the software.
Step 8 Specify the AAA server setup(Cisco Secure ACS Server)
To define the AAA server setup for ANM on the Cisco Secure ACS HTML server, do the following:
a. Click Add Entry below the AAA Servers table. The Add AAA Servers window appears.
b. In the Add AAA Servers window, specify the following attributes:
– AAA Server IP Address—IP address of the TACACS+ server
– Key—Shared secret specified on ANM
– Log Update/Watchdog Packets from This Remote AAA Server—Enabled
– Network Device Group—ANM
– AAA Server Type—TACACS+
– Traffic Type—Inbound/Outbound
c. Click Submit + Apply.
For details on configuring the Cisco Secure ACS HTML server, see the documentation that is provided with the software.
Table 17-11 Authenticating ANM Users with a TACACS+ Server (continued)
Task Procedure
17-43User Guide for the Cisco Application Networking Manager 5.2.3
OL-26572-03
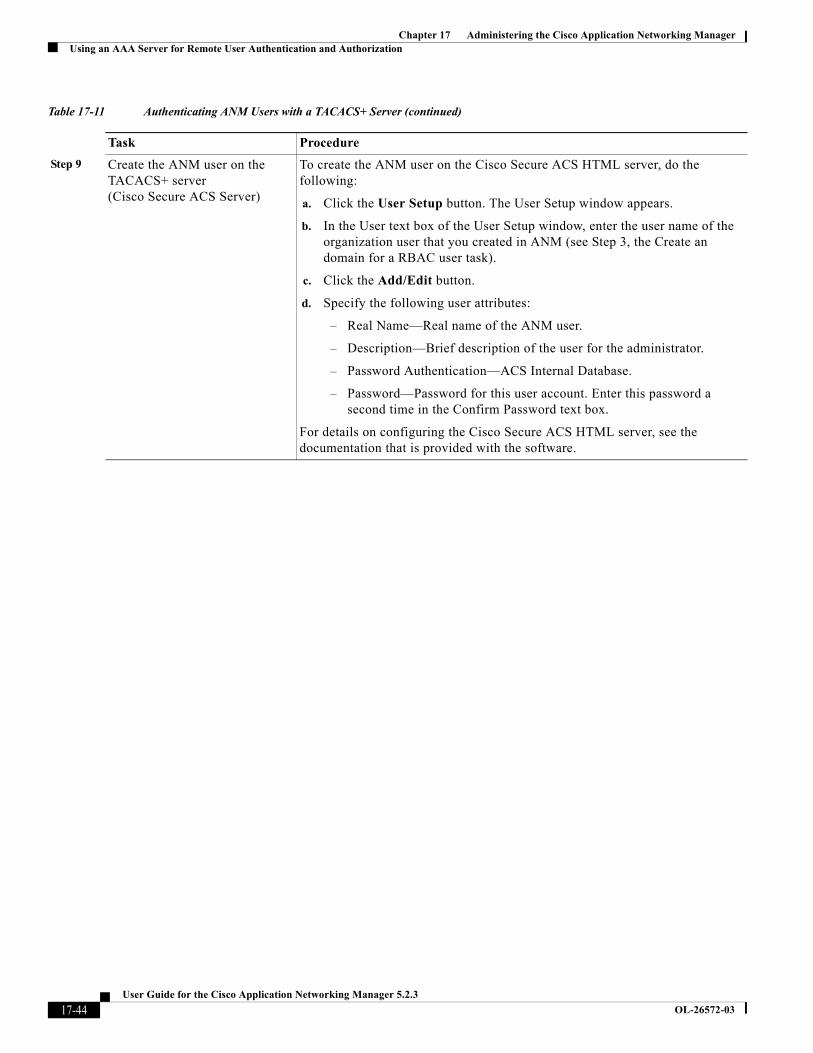
Chapter 17 Administering the Cisco Application Networking ManagerUsing an AAA Server for Remote User Authentication and Authorization
Step 9 Create the ANM user on the TACACS+ server(Cisco Secure ACS Server)
To create the ANM user on the Cisco Secure ACS HTML server, do the following:
a. Click the User Setup button. The User Setup window appears.
b. In the User text box of the User Setup window, enter the user name of the organization user that you created in ANM (see Step 3, the Create an domain for a RBAC user task).
c. Click the Add/Edit button.
d. Specify the following user attributes:
– Real Name—Real name of the ANM user.
– Description—Brief description of the user for the administrator.
– Password Authentication—ACS Internal Database.
– Password—Password for this user account. Enter this password a second time in the Confirm Password text box.
For details on configuring the Cisco Secure ACS HTML server, see the documentation that is provided with the software.
Table 17-11 Authenticating ANM Users with a TACACS+ Server (continued)
Task Procedure
17-44User Guide for the Cisco Application Networking Manager 5.2.3
OL-26572-03
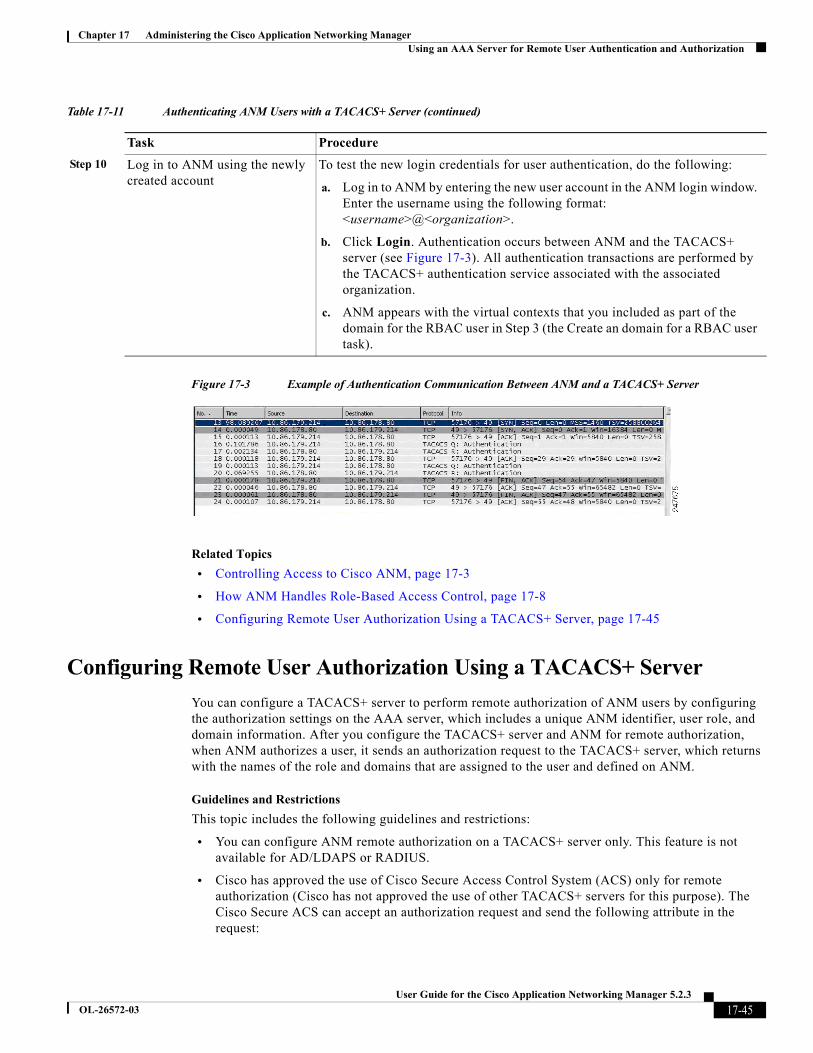
Chapter 17 Administering the Cisco Application Networking ManagerUsing an AAA Server for Remote User Authentication and Authorization
Figure 17-3 Example of Authentication Communication Between ANM and a TACACS+ Server
Related Topics
• Controlling Access to Cisco ANM, page 17-3
• How ANM Handles Role-Based Access Control, page 17-8
• Configuring Remote User Authorization Using a TACACS+ Server, page 17-45
Configuring Remote User Authorization Using a TACACS+ Server
You can configure a TACACS+ server to perform remote authorization of ANM users by configuring the authorization settings on the AAA server, which includes a unique ANM identifier, user role, and domain information. After you configure the TACACS+ server and ANM for remote authorization, when ANM authorizes a user, it sends an authorization request to the TACACS+ server, which returns with the names of the role and domains that are assigned to the user and defined on ANM.
Guidelines and Restrictions
This topic includes the following guidelines and restrictions:
• You can configure ANM remote authorization on a TACACS+ server only. This feature is not available for AD/LDAPS or RADIUS.
• Cisco has approved the use of Cisco Secure Access Control System (ACS) only for remote authorization (Cisco has not approved the use of other TACACS+ servers for this purpose). The Cisco Secure ACS can accept an authorization request and send the following attribute in the request:
Step 10 Log in to ANM using the newly created account
To test the new login credentials for user authentication, do the following:
a. Log in to ANM by entering the new user account in the ANM login window. Enter the username using the following format: <username>@<organization>.
b. Click Login. Authentication occurs between ANM and the TACACS+ server (see Figure 17-3). All authentication transactions are performed by the TACACS+ authentication service associated with the associated organization.
c. ANM appears with the virtual contexts that you included as part of the domain for the RBAC user in Step 3 (the Create an domain for a RBAC user task).
Table 17-11 Authenticating ANM Users with a TACACS+ Server (continued)
Task Procedure
17-45User Guide for the Cisco Application Networking Manager 5.2.3
OL-26572-03
Chapter 17 Administering the Cisco Application Networking ManagerUsing an AAA Server for Remote User Authentication and Authorization
ANM_UniqueID=RoleName<space>Domain1<space>Domain2 . . .
ANM/IP should be used as the TACACS_Service/TACACS_Protocol pair for an authorization request and response.
• You configure the user authorization attributes on the TACACS+ server using the following format:
ANM_UniqueID=RoleName<space>Domain1<space>Domain2 . . .
The number of characters allowed for the ANM identifier, role, and domain information is limited to 160 characters, including spaces. You can use additional characters by adding a new ANM Unique ID entry for domain attributes as follows:
ANM_UniqueID_1=RoleName<space>Domain1<space>Domain2
ANM_UniqueID_2=Domain3<space>Domain4
ANM_UniqueID_3=Domain5
You must assign a different ANM identifier to each entry. Make sure that you configure the ANM organization with each ANM unique ID (see the “Adding a New Organization” section on page 17-10).
• You can define user authorization at the user level, user group level, or both. We recommend configuring authorization at the user group level, which allows you to assign a common set of authorization attributes to multiple users. When you configure the authorization attributes at both the user level and user group level, the user attributes take precedence over user group attributes. The procedure in this section includes all three configuration options.
• You can configure ANM to revert to local user authorization if the TACACS+ server becomes unavailable (see the “Adding a New Organization” section on page 17-10).
Prerequisites
ANM has a user organization that is configured for remote authorization (see the “Adding a New Organization” section on page 17-10).
This section includes the following topics:
• Configuring Remote User Authorization Using Cisco Secure ACS Version 5.1, page 17-46
• Configuring Remote User Authorization Using Cisco Secure ACS Version 4.2, page 17-48
Configuring Remote User Authorization Using Cisco Secure ACS Version 5.1
You can use Cisco Secure ACS Version 5.1 for configuring a remote server to perform remote authorization of ANM users.
Note This procedure describes only the ANM-specific attributes for creating user groups and users on Cisco Secure ACS. For information about configuring the other attributes, see the User Guide for Cisco Secure Access Control Server located on Cisco.com.
Procedure
Step 1 From the Cisco Secure ACS HTML GUI, create a new Device Type to identify requests coming from the ANM server.
17-46User Guide for the Cisco Application Networking Manager 5.2.3
OL-26572-03
Chapter 17 Administering the Cisco Application Networking ManagerUsing an AAA Server for Remote User Authentication and Authorization
Do the following:
a. From the sidebar menu, choose Network Device Groups > Device Type. The Device Group General window appears.
b. In the Name field, enter ANM.
c. (Optional) In the Description Field, enter a description. For example, ANM Server.
d. In the Parent field, select All Device Types.
e. Click Submit.
Step 2 From the sidebar menu, choose Network Device Groups > Network Devices and AAA Clients to add a device. The Network Devices and AAA Clients window appears.
Do the following:
a. In the Name field, enter ANM.
b. From the Network Device Groups pane, do the following:
– In the Location field, select All Locations.
– In the Device Type field, select All device Types:ANM, which is the device type that you created in Step 1.
c. From the IP Address pane, do the following:
– Choose the IP Range(s) radio button.
– From the IP and Mask fields, enter the IP address and Mask to use and click Add to add the values to the IP/Mask table.
d. From the Authentication Options pane, check the TACACS+ check box.
e. Click Submit.
Step 3 From the sidebar menu, choose Users and Identity Stores > Identity Groups to create an Identity Group, which will be used later to map users to a specific role. The Identity Groups General window appears.
Do the following:
a. In the Name field, enter a name for the group. For example, ACE-Admin.
b. (Optional) In the Description field, enter a description for the group. For example, ACE devices admin.
c. In the Parent field, select ALL Groups:ANM-Groups.
d. Click Submit. The Identity Groups window appears.
e. From the Identity Groups window, drill down and check the check box of an organization division/roll to associate with the group. For example, check the ACE-Groups check box (All Groups > ANM-Groups > ACE-Admin).
f. Click Create.
g. Repeat Step 3 for every Identity Group that you need to create.
Step 4 From the sidebar menu, choose Users and Identity Stores > Internal Identity Stores > Users to create a user. The Users General window appears.
Do the following:
a. In the Name field, enter a user name.
b. From the Status drop-down list, set the status for the user account. For example, Enabled.
17-47User Guide for the Cisco Application Networking Manager 5.2.3
OL-26572-03
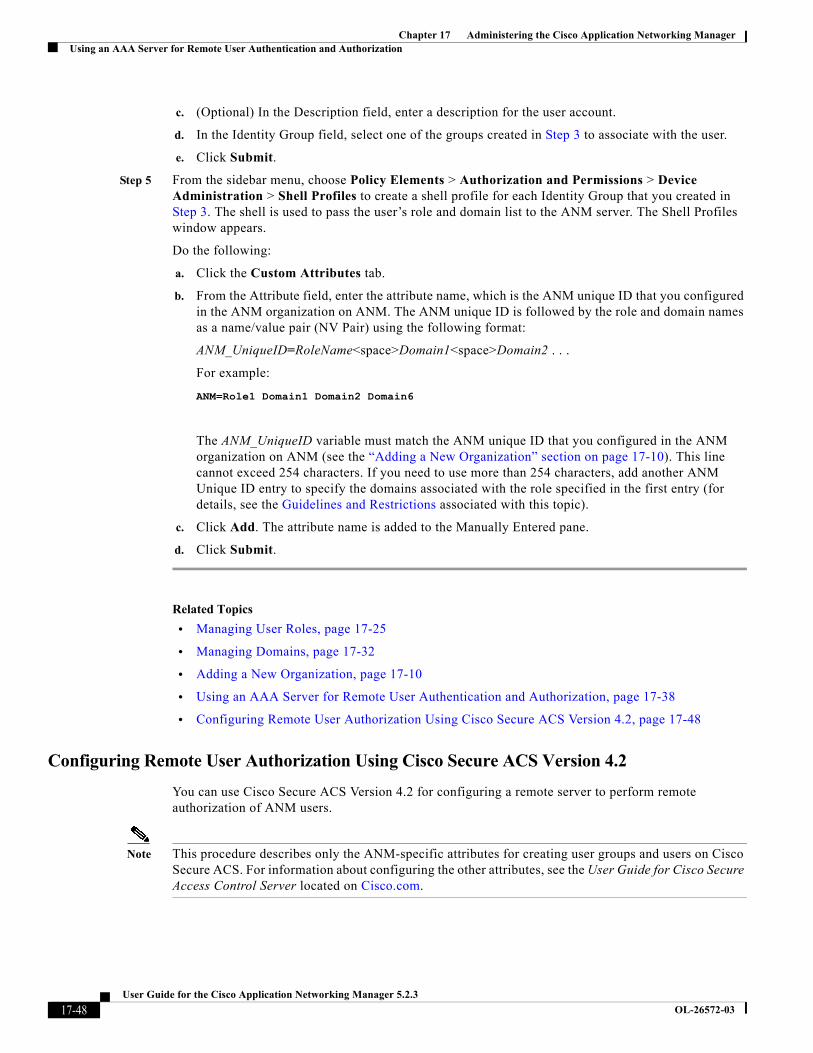
Chapter 17 Administering the Cisco Application Networking ManagerUsing an AAA Server for Remote User Authentication and Authorization
c. (Optional) In the Description field, enter a description for the user account.
d. In the Identity Group field, select one of the groups created in Step 3 to associate with the user.
e. Click Submit.
Step 5 From the sidebar menu, choose Policy Elements > Authorization and Permissions > Device Administration > Shell Profiles to create a shell profile for each Identity Group that you created in Step 3. The shell is used to pass the user’s role and domain list to the ANM server. The Shell Profiles window appears.
Do the following:
a. Click the Custom Attributes tab.
b. From the Attribute field, enter the attribute name, which is the ANM unique ID that you configured in the ANM organization on ANM. The ANM unique ID is followed by the role and domain names as a name/value pair (NV Pair) using the following format:
ANM_UniqueID=RoleName<space>Domain1<space>Domain2 . . .
For example:
ANM=Role1 Domain1 Domain2 Domain6
The ANM_UniqueID variable must match the ANM unique ID that you configured in the ANM organization on ANM (see the “Adding a New Organization” section on page 17-10). This line cannot exceed 254 characters. If you need to use more than 254 characters, add another ANM Unique ID entry to specify the domains associated with the role specified in the first entry (for details, see the Guidelines and Restrictions associated with this topic).
c. Click Add. The attribute name is added to the Manually Entered pane.
d. Click Submit.
Related Topics
• Managing User Roles, page 17-25
• Managing Domains, page 17-32
• Adding a New Organization, page 17-10
• Using an AAA Server for Remote User Authentication and Authorization, page 17-38
• Configuring Remote User Authorization Using Cisco Secure ACS Version 4.2, page 17-48
Configuring Remote User Authorization Using Cisco Secure ACS Version 4.2
You can use Cisco Secure ACS Version 4.2 for configuring a remote server to perform remote authorization of ANM users.
Note This procedure describes only the ANM-specific attributes for creating user groups and users on Cisco Secure ACS. For information about configuring the other attributes, see the User Guide for Cisco Secure Access Control Server located on Cisco.com.
17-48User Guide for the Cisco Application Networking Manager 5.2.3
OL-26572-03

Chapter 17 Administering the Cisco Application Networking ManagerUsing an AAA Server for Remote User Authentication and Authorization
Procedure
Step 1 From the Cisco Secure ACS HTML GUI, configure the interface as follows:
a. From the side menu bar, click Interface Configuration.
The Interface Configuration window appears.
b. From the Advanced Options pane of the Interface Configuration window, check the Per-user TACACS+/RADIUS Attributes check box and click Submit.
c. From the New Services pane of the Interface Configuration window, check the Service and Protocol check boxes and add a new service as follows:
– In the Service text box, enter ANM.
– In the Protocol text box, enter IP.
d. Click Submit.
Step 2 Do one of the following:
• Configure a user group for the users that you create—Go to Step 3.
• Configure a user only—Skip to Step 4.
Step 3 To configure a user group, do the following:
a. From the side menu bar, click Group Setup.
The Group Setup window appears.
b. From the Group Setup window, create a user group and set the following ANM attributes:
– Check the ANM IP service check box.
– Check the Custom attributes check box and enter the ANM unique identifier followed by the role and domain names as a name/value pair (NV Pair) in the Custom Attributes pane using the following format:
ANM_UniqueID=RoleName<space>Domain1<space>Domain2 . . .
For example:
ANM=Role1 Domain1 Domain2 Domain6
The ANM_UniqueID variable must match the ANM unique ID that you configured in the ANM organization on ANM (see the “Adding a New Organization” section on page 17-10). This line cannot exceed 160 characters. If you need to use more than 160 characters, add another ANM Unique ID entry to specify the domains associated with the role specified in the first entry (for details, see the Guidelines and Restrictions associated with this topics).
c. Click Submit.
The user group is now ready for adding users (go to Step 4).
Step 4 Create a user as follows:
a. From the side menu bar, click User Setup.
The User Setup window appears.
b. To assign the user to the user group that you created in Step 3, from the User Setup window, choose the group from the following drop-down list: Group to which the user is assigned.
Skip this step if the user is not to be included in a user group.
17-49User Guide for the Cisco Application Networking Manager 5.2.3
OL-26572-03

Chapter 17 Administering the Cisco Application Networking ManagerDisabling the ANM Login Window Change Password Feature
c. Configure the ANM-specific attributes. Perform this step for either of the following reasons; otherwise, skip this step:
– The user is not to be included in a user group.
– The user is included in a user group but requires different authorization attributes (user attributes have precedence over user group attributes).
To configure the ANM-specific attributes, from the User Setup window, do the following:
– Check the ANM IP service check box.
– Check the Custom attributes check box, enter the ANM unique ID and role and domain names as NV Pair in the Custom Attributes pane using the following format:
ANM_UniqueID=RoleName<space>Domain1<space>Domain2 . . .
For example:
ANM=Role1 Domain1 Domain2 Domain6
The ANM_UniqueID variable must match the ANM Unique ID that you configured in the ANM organization (see the “Adding a New Organization” section on page 17-10). This line cannot exceed 160 characters. If you need to use more that 160 characters, add another ANM Unique ID entry to specify the domains associated with the role (for details, see the “Guidelines and Restrictions” section on page 17-45):
d. Click Submit.
Related Topics
• Managing User Roles, page 17-25
• Managing Domains, page 17-32
• Adding a New Organization, page 17-10
• Using an AAA Server for Remote User Authentication and Authorization, page 17-38
• Configuring Remote User Authorization Using Cisco Secure ACS Version 5.1, page 17-46
Disabling the ANM Login Window Change Password Feature
When you log into ANM from the login window, you have the option to change your password at that time. This feature is enabled by default; however, you can disable it by modifying the ANM cs-config.properties file. When disabled, the login window no longer displays the Change Password hyperlink.
Procedure
Step 1 Disable the Change Password option on the ANM login window as follows:
• ANM Server—Open the /opt/CSCOanm/etc/cs-config.properties file in a text editor and change the state of the following line from true to false:
changeANMPassword.enable=false
17-50User Guide for the Cisco Application Networking Manager 5.2.3
OL-26572-03
Chapter 17 Administering the Cisco Application Networking ManagerManaging ANM
• ANM Virtual Appliance—Enter the following command:
anm-property set changeANMPassword.enable false
Step 2 Restart ANM as follows:
• ANM Server—Enter the following command:
/opt/CSCOanm/bin/anm-tool restart
• ANM Virtual Appliance—Enter the following command:
anm-tool restart
Related Topics
• Logging In To the Cisco Application Networking Manager, page 1-6
• Changing Your Account Password, page 1-7
Managing ANM When you choose Admin > ANM Management, you can display the following information:
• ANM—Allows you to check the status of your ANM server. See the “Checking the Status of the ANM Server” section on page 17-52.
• License Management—Displays the ANM license information. See the “Using ANM License Manager to Manage ANM Server or Demo Licenses” section on page 17-54.
• Statistics—Displays the ANM server statistics. See the “Displaying ANM Server Statistics” section on page 17-56.
• Statistics Collection—Allows you to enable or disable ANM server statistic collection. See the “Configuring ANM Statistics Collection” section on page 17-57.
• Audit Log Settings—Allows you to determine how long audit log records are kept. See the “Configuring Audit Log Settings” section on page 17-58.
• Change Audit Log—Displays ANM server logs. See the “Displaying Change Audit Logs” section on page 17-61.
• Auto Sync Settings—Allows you to allow ANM to automatically sync with CLI when it detects out of band changes between itself and the ACE. See the “Configuring Auto Sync Settings” section on page 17-61.
• Advanced Settings—Allows you to set the following advanced settings for ANM:
– Enable or disable overwrite of the ACE logging device-id while setting up syslog for autosync using Config > Devices > Setup Syslog for Autosync.
– Enable or disable write memory on a Config > Operations configuration.
– Enable features for displaying details about real or virtual servers.
– Enable mobile notifications from ANM.
– Hide syslog buffer details in the Dashboard pane Top 10 Current Resources.
– Display all virtual servers that have class-map and policy-map definitions in the monitoring and operations windows.
See the “Configuring Advanced Settings” section on page 17-62.
17-51User Guide for the Cisco Application Networking Manager 5.2.3
OL-26572-03
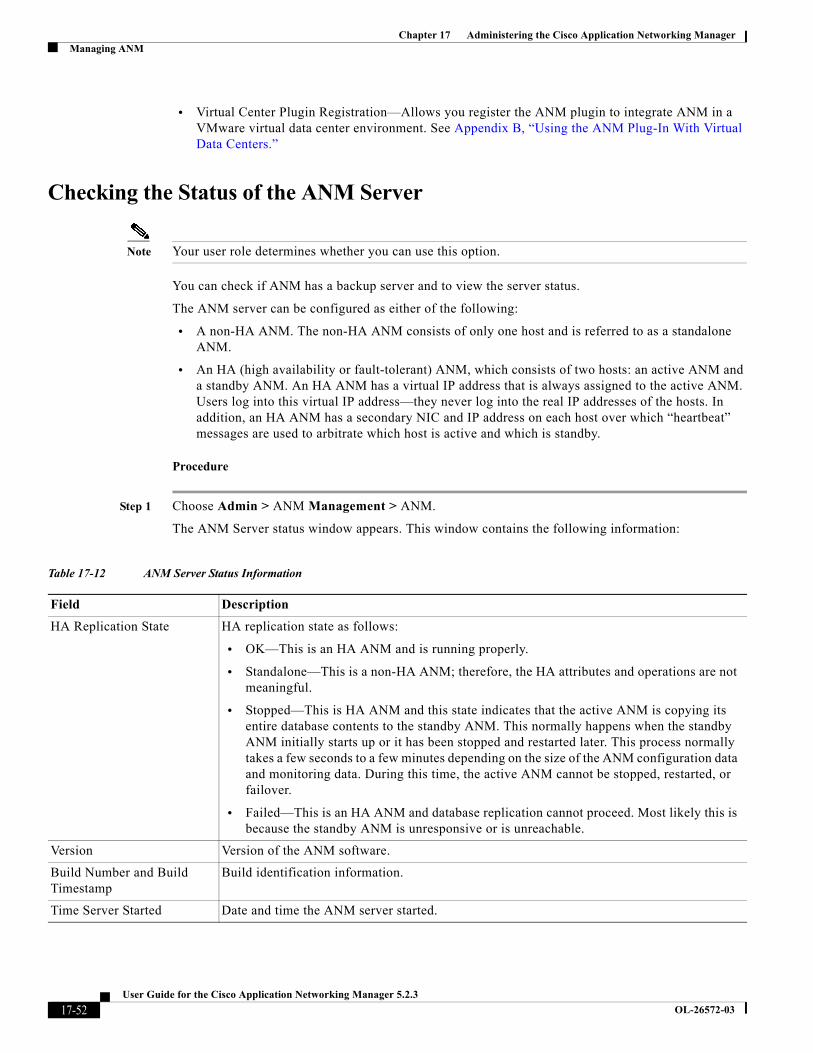
Chapter 17 Administering the Cisco Application Networking ManagerManaging ANM
• Virtual Center Plugin Registration—Allows you register the ANM plugin to integrate ANM in a VMware virtual data center environment. See Appendix B, “Using the ANM Plug-In With Virtual Data Centers.”
Checking the Status of the ANM Server
Note Your user role determines whether you can use this option.
You can check if ANM has a backup server and to view the server status.
The ANM server can be configured as either of the following:
• A non-HA ANM. The non-HA ANM consists of only one host and is referred to as a standalone ANM.
• An HA (high availability or fault-tolerant) ANM, which consists of two hosts: an active ANM and a standby ANM. An HA ANM has a virtual IP address that is always assigned to the active ANM. Users log into this virtual IP address—they never log into the real IP addresses of the hosts. In addition, an HA ANM has a secondary NIC and IP address on each host over which “heartbeat” messages are used to arbitrate which host is active and which is standby.
Procedure
Step 1 Choose Admin > ANM Management > ANM.
The ANM Server status window appears. This window contains the following information:
Table 17-12 ANM Server Status Information
Field Description
HA Replication State HA replication state as follows:
• OK—This is an HA ANM and is running properly.
• Standalone—This is a non-HA ANM; therefore, the HA attributes and operations are not meaningful.
• Stopped—This is HA ANM and this state indicates that the active ANM is copying its entire database contents to the standby ANM. This normally happens when the standby ANM initially starts up or it has been stopped and restarted later. This process normally takes a few seconds to a few minutes depending on the size of the ANM configuration data and monitoring data. During this time, the active ANM cannot be stopped, restarted, or failover.
• Failed—This is an HA ANM and database replication cannot proceed. Most likely this is because the standby ANM is unresponsive or is unreachable.
Version Version of the ANM software.
Build Number and Build Timestamp
Build identification information.
Time Server Started Date and time the ANM server started.
17-52User Guide for the Cisco Application Networking Manager 5.2.3
OL-26572-03

Chapter 17 Administering the Cisco Application Networking ManagerManaging ANM
Related Topics
• Using ANM License Manager to Manage ANM Server or Demo Licenses, page 17-54
• Displaying ANM Server Statistics, page 17-56
Virtual IP Address Virtual IP address that associates with the active host. This IP address must be on the same subnet as the primary IP addresses of both Node 1 and Node 2.
Active Name Name of Node 1, which can be displayed by issuing the uname -n command on the host.
Active IP IP address used by Node 1 for normal (non-heartbeat related) communication. This IP address must be on the same subnet as the primary address for Node 2.
Active Heartbeat IP IP address associated with the crossover network interface for Node 1. This IP address must be on the same subnet as the Heartbeat IP address for Node 2.
Standby Name Name of Node 2, which can be returned by issuing the uname -n command on the host.
Standby IP IP address used by Node 2 for normal (non-heartbeat related) communication. This IP address must be on the same subnet as the primary IP address for Node 1.
Standby Heartbeat IP IP address associated with the crossover network interface for Node 2. This IP address must be on the same subnet as the Heartbeat IP address for Node 1.
License Server State License server state as follows:
• OK—There is a valid license on the host.
• Invalid—The host either contains an invalid license or there is no license present.
• Unknown—It is not possible to communicate with the host's license manager, therefore, the license state is unknown.
Note The Unknown and Invalid states will not display for the active (local) ANM. If the standby ANM has an Invalid license state, you should install a valid license. If the standby ANM has an Unknown license state, check that the standby ANM has been installed correctly.
• DEMO—Used for the demonstration purposes. It lasts for 30, 60, or 90 days from the issue day of the license. It allows you to use all features.
Standby License Server State Standby license server state as follows:
• OK—There is a valid license on Node 2.
• Invalid—Node 2 either contains an invalid license or there is no license present.
• Unknown—It is not possible to communicate with the license manager on Node 2, therefore, the license state is unknown.
Note The Unknown and Invalid states will not display for the active (local) ANM. If the standby ANM has an Invalid license state, you should install a valid license. If the standby ANM has an Unknown license state, check that the standby ANM has been installed correctly.
• DEMO—Used for the demonstration purposes. It lasts for 30, 60, or 90 days from the issue day of the license. It allows you to use all features.
Table 17-12 ANM Server Status Information (continued)
Field Description
17-53User Guide for the Cisco Application Networking Manager 5.2.3
OL-26572-03
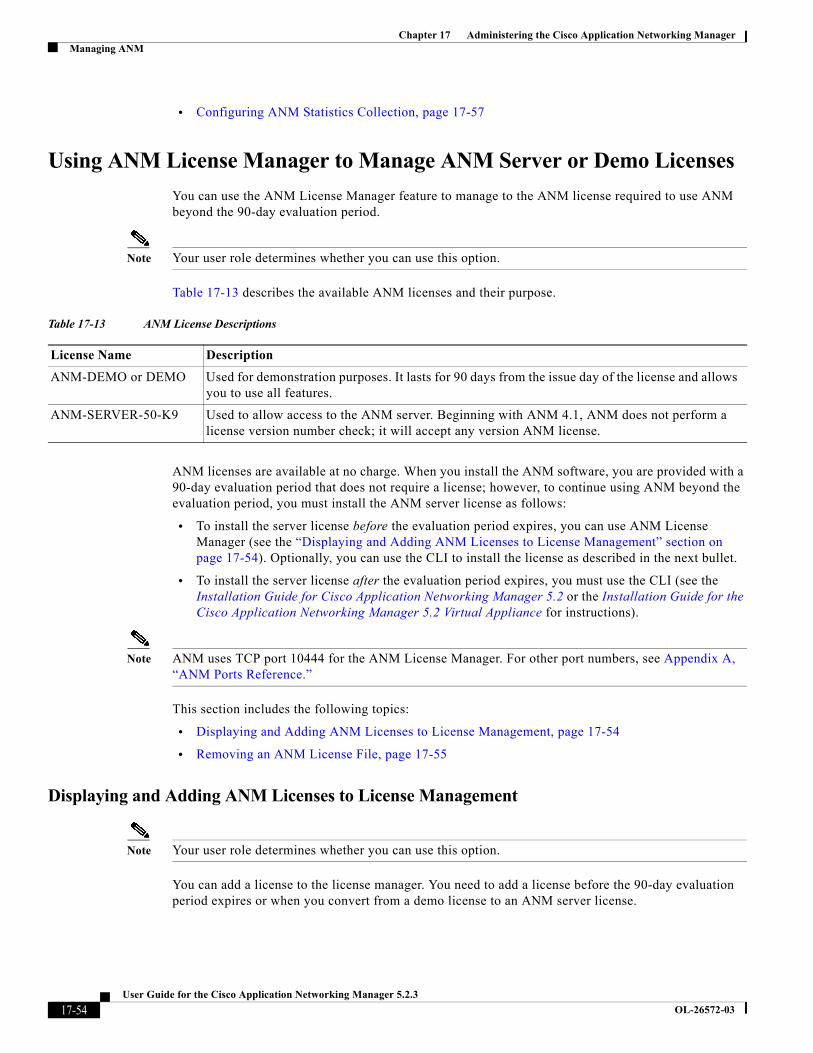
Chapter 17 Administering the Cisco Application Networking ManagerManaging ANM
• Configuring ANM Statistics Collection, page 17-57
Using ANM License Manager to Manage ANM Server or Demo Licenses
You can use the ANM License Manager feature to manage to the ANM license required to use ANM beyond the 90-day evaluation period.
Note Your user role determines whether you can use this option.
Table 17-13 describes the available ANM licenses and their purpose.
ANM licenses are available at no charge. When you install the ANM software, you are provided with a 90-day evaluation period that does not require a license; however, to continue using ANM beyond the evaluation period, you must install the ANM server license as follows:
• To install the server license before the evaluation period expires, you can use ANM License Manager (see the “Displaying and Adding ANM Licenses to License Management” section on page 17-54). Optionally, you can use the CLI to install the license as described in the next bullet.
• To install the server license after the evaluation period expires, you must use the CLI (see the Installation Guide for Cisco Application Networking Manager 5.2 or the Installation Guide for the Cisco Application Networking Manager 5.2 Virtual Appliance for instructions).
Note ANM uses TCP port 10444 for the ANM License Manager. For other port numbers, see Appendix A, “ANM Ports Reference.”
This section includes the following topics:
• Displaying and Adding ANM Licenses to License Management, page 17-54
• Removing an ANM License File, page 17-55
Displaying and Adding ANM Licenses to License Management
Note Your user role determines whether you can use this option.
You can add a license to the license manager. You need to add a license before the 90-day evaluation period expires or when you convert from a demo license to an ANM server license.
Table 17-13 ANM License Descriptions
License Name Description
ANM-DEMO or DEMO Used for demonstration purposes. It lasts for 90 days from the issue day of the license and allows you to use all features.
ANM-SERVER-50-K9 Used to allow access to the ANM server. Beginning with ANM 4.1, ANM does not perform a license version number check; it will accept any version ANM license.
17-54User Guide for the Cisco Application Networking Manager 5.2.3
OL-26572-03
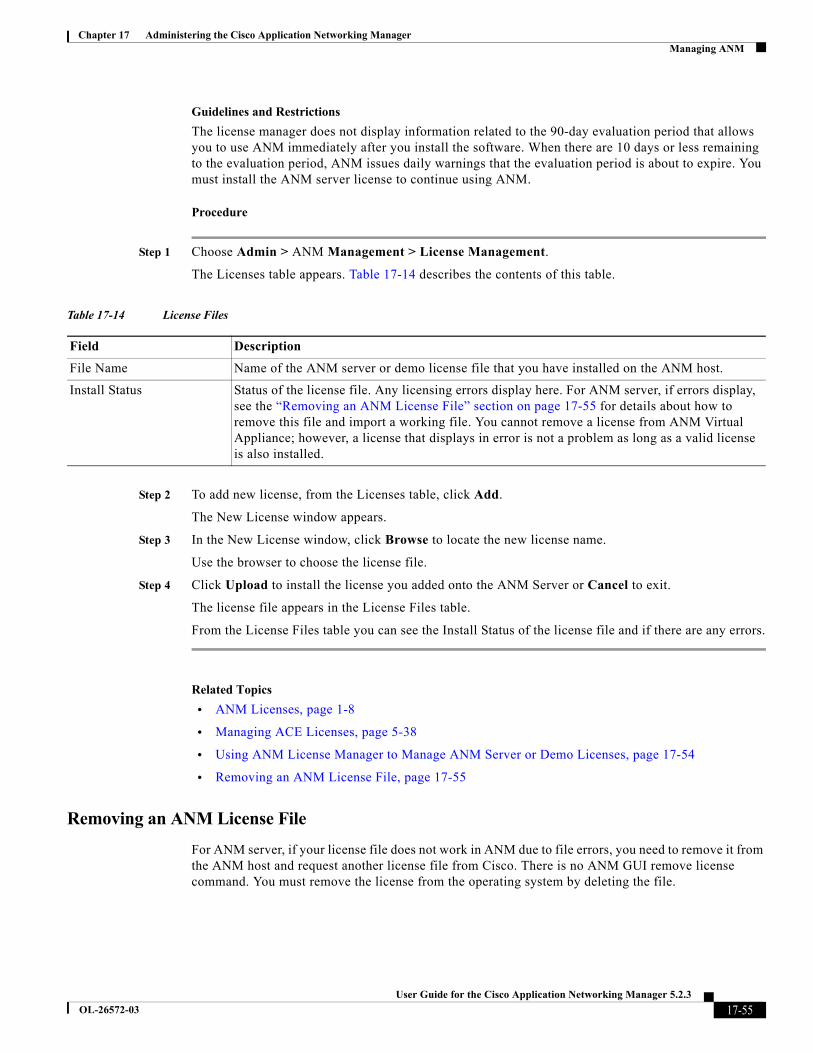
Chapter 17 Administering the Cisco Application Networking ManagerManaging ANM
Guidelines and Restrictions
The license manager does not display information related to the 90-day evaluation period that allows you to use ANM immediately after you install the software. When there are 10 days or less remaining to the evaluation period, ANM issues daily warnings that the evaluation period is about to expire. You must install the ANM server license to continue using ANM.
Procedure
Step 1 Choose Admin > ANM Management > License Management.
The Licenses table appears. Table 17-14 describes the contents of this table.
Step 2 To add new license, from the Licenses table, click Add.
The New License window appears.
Step 3 In the New License window, click Browse to locate the new license name.
Use the browser to choose the license file.
Step 4 Click Upload to install the license you added onto the ANM Server or Cancel to exit.
The license file appears in the License Files table.
From the License Files table you can see the Install Status of the license file and if there are any errors.
Related Topics
• ANM Licenses, page 1-8
• Managing ACE Licenses, page 5-38
• Using ANM License Manager to Manage ANM Server or Demo Licenses, page 17-54
• Removing an ANM License File, page 17-55
Removing an ANM License File
For ANM server, if your license file does not work in ANM due to file errors, you need to remove it from the ANM host and request another license file from Cisco. There is no ANM GUI remove license command. You must remove the license from the operating system by deleting the file.
Table 17-14 License Files
Field Description
File Name Name of the ANM server or demo license file that you have installed on the ANM host.
Install Status Status of the license file. Any licensing errors display here. For ANM server, if errors display, see the “Removing an ANM License File” section on page 17-55 for details about how to remove this file and import a working file. You cannot remove a license from ANM Virtual Appliance; however, a license that displays in error is not a problem as long as a valid license is also installed.
17-55User Guide for the Cisco Application Networking Manager 5.2.3
OL-26572-03
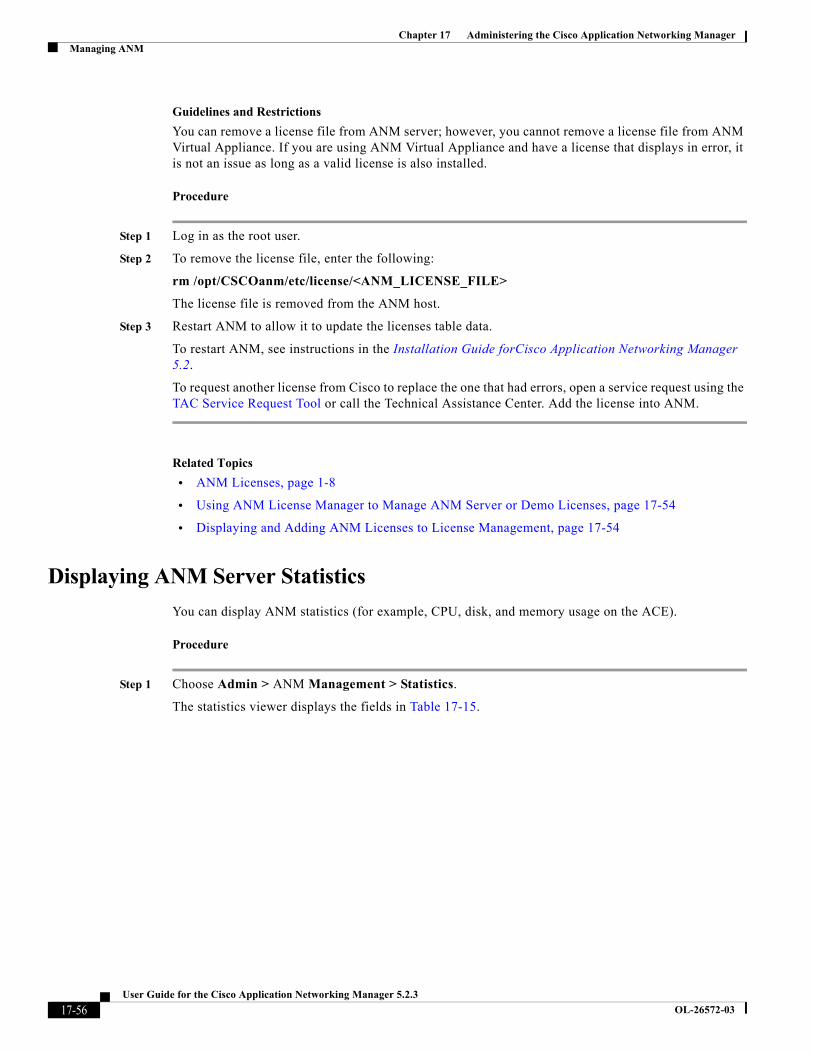
Chapter 17 Administering the Cisco Application Networking ManagerManaging ANM
Guidelines and Restrictions
You can remove a license file from ANM server; however, you cannot remove a license file from ANM Virtual Appliance. If you are using ANM Virtual Appliance and have a license that displays in error, it is not an issue as long as a valid license is also installed.
Procedure
Step 1 Log in as the root user.
Step 2 To remove the license file, enter the following:
rm /opt/CSCOanm/etc/license/<ANM_LICENSE_FILE>
The license file is removed from the ANM host.
Step 3 Restart ANM to allow it to update the licenses table data.
To restart ANM, see instructions in the Installation Guide forCisco Application Networking Manager 5.2.
To request another license from Cisco to replace the one that had errors, open a service request using the TAC Service Request Tool or call the Technical Assistance Center. Add the license into ANM.
Related Topics
• ANM Licenses, page 1-8
• Using ANM License Manager to Manage ANM Server or Demo Licenses, page 17-54
• Displaying and Adding ANM Licenses to License Management, page 17-54
Displaying ANM Server Statistics
You can display ANM statistics (for example, CPU, disk, and memory usage on the ACE).
Procedure
Step 1 Choose Admin > ANM Management > Statistics.
The statistics viewer displays the fields in Table 17-15.
17-56User Guide for the Cisco Application Networking Manager 5.2.3
OL-26572-03

Chapter 17 Administering the Cisco Application Networking ManagerManaging ANM
Related Topics
• Checking the Status of the ANM Server, page 17-52
• Configuring ANM Statistics Collection, page 17-57
Configuring ANM Statistics Collection
You can enable ACE server statistics polling.
Procedure
Step 1 Choose Admin > ANM Management > Statistics Collection.
The Primary Attributes configuration window appears.
Step 2 In the Polling Stats field, click Enable to start background polling or Disable to stop background polling.
Step 3 In the Background Polling Interval field, choose the polling interval appropriate for your networking environment.
Step 4 Click Deploy Now to save your entries.
Related Topics
• Checking the Status of the ANM Server, page 17-52
• Displaying ANM Server Statistics, page 17-56
Table 17-15 ACE Server Statistics
Name Description
Owner Process where statistics are collected.
Statistic Statistical information, includes the following:
• CPU Usage—Overall ACE CPU busy percentage in the last 5-minute period.
• Disk Usage—Amount of disk space being used by the ANM server or ACE device.
• Memory Usage—Amount of memory being used by the ANM server or ACE hardware.
• Process Uptime—Amount of time since this system was last initialized, or the amount of time since the network management portion of the system was last reinitialized.
Value Value of the statistic.
Description Information that the statistic gathered.
17-57User Guide for the Cisco Application Networking Manager 5.2.3
OL-26572-03
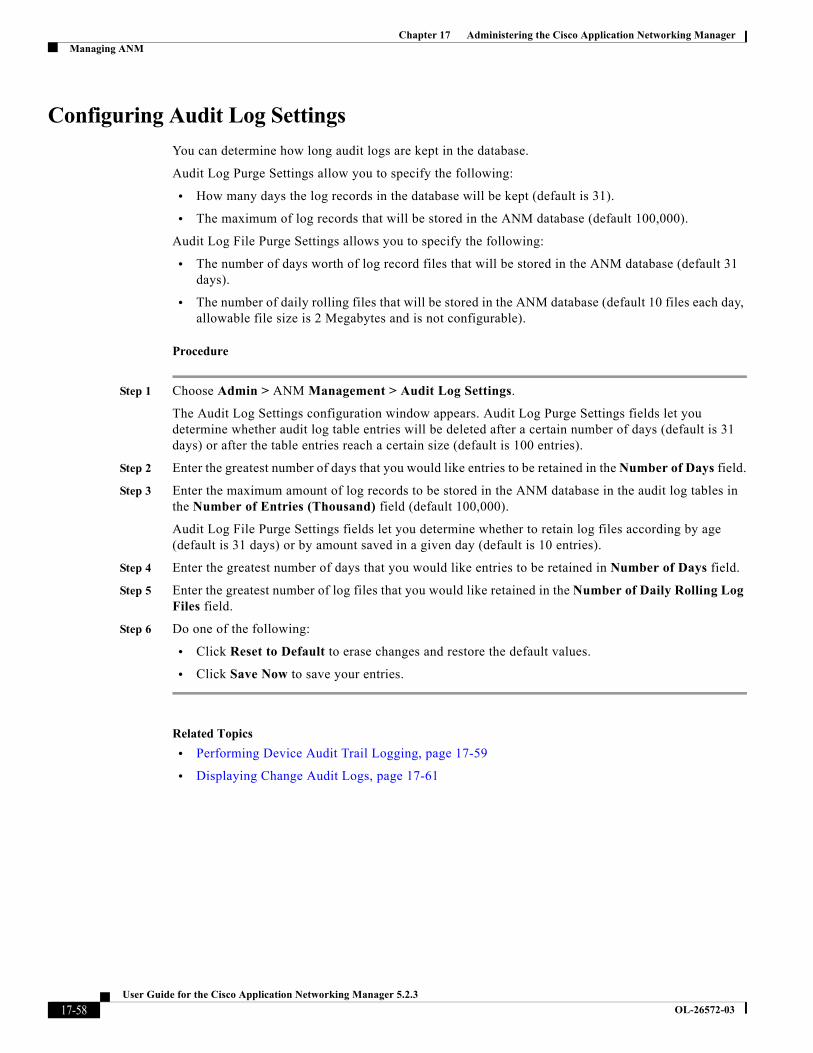
Chapter 17 Administering the Cisco Application Networking ManagerManaging ANM
Configuring Audit Log Settings
You can determine how long audit logs are kept in the database.
Audit Log Purge Settings allow you to specify the following:
• How many days the log records in the database will be kept (default is 31).
• The maximum of log records that will be stored in the ANM database (default 100,000).
Audit Log File Purge Settings allows you to specify the following:
• The number of days worth of log record files that will be stored in the ANM database (default 31 days).
• The number of daily rolling files that will be stored in the ANM database (default 10 files each day, allowable file size is 2 Megabytes and is not configurable).
Procedure
Step 1 Choose Admin > ANM Management > Audit Log Settings.
The Audit Log Settings configuration window appears. Audit Log Purge Settings fields let you determine whether audit log table entries will be deleted after a certain number of days (default is 31 days) or after the table entries reach a certain size (default is 100 entries).
Step 2 Enter the greatest number of days that you would like entries to be retained in the Number of Days field.
Step 3 Enter the maximum amount of log records to be stored in the ANM database in the audit log tables in the Number of Entries (Thousand) field (default 100,000).
Audit Log File Purge Settings fields let you determine whether to retain log files according by age (default is 31 days) or by amount saved in a given day (default is 10 entries).
Step 4 Enter the greatest number of days that you would like entries to be retained in Number of Days field.
Step 5 Enter the greatest number of log files that you would like retained in the Number of Daily Rolling Log Files field.
Step 6 Do one of the following:
• Click Reset to Default to erase changes and restore the default values.
• Click Save Now to save your entries.
Related Topics
• Performing Device Audit Trail Logging, page 17-59
• Displaying Change Audit Logs, page 17-61
17-58User Guide for the Cisco Application Networking Manager 5.2.3
OL-26572-03
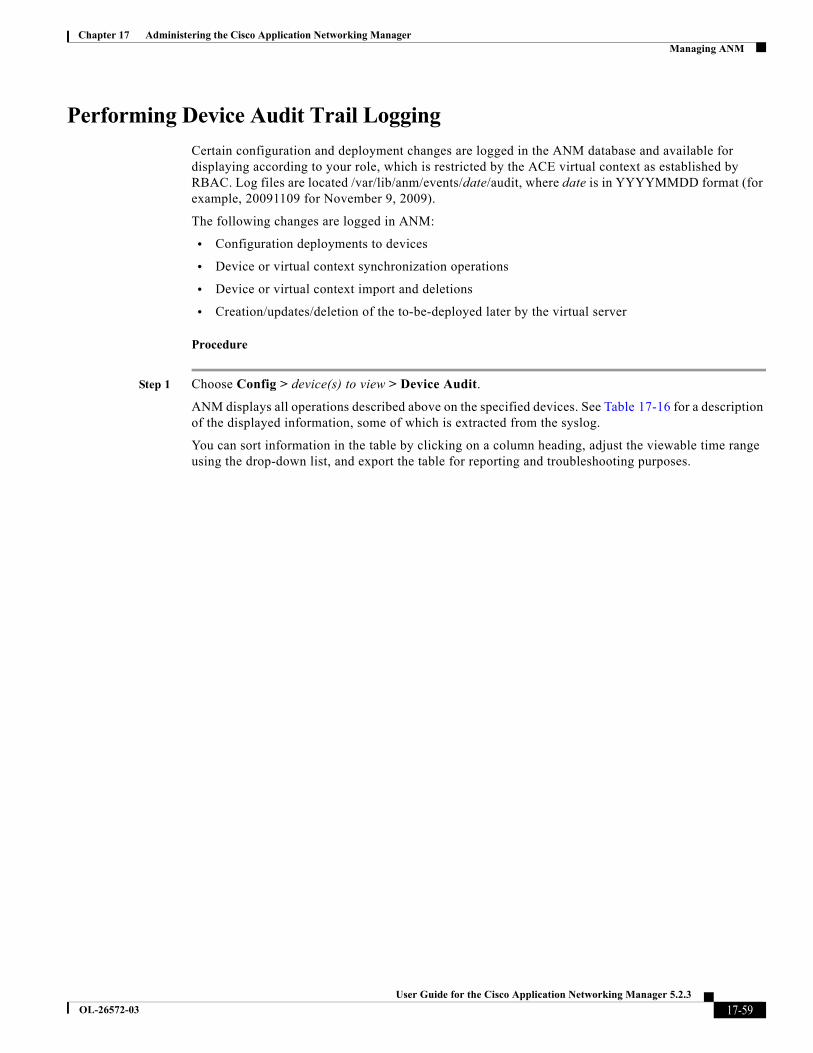
Chapter 17 Administering the Cisco Application Networking ManagerManaging ANM
Performing Device Audit Trail Logging
Certain configuration and deployment changes are logged in the ANM database and available for displaying according to your role, which is restricted by the ACE virtual context as established by RBAC. Log files are located /var/lib/anm/events/date/audit, where date is in YYYYMMDD format (for example, 20091109 for November 9, 2009).
The following changes are logged in ANM:
• Configuration deployments to devices
• Device or virtual context synchronization operations
• Device or virtual context import and deletions
• Creation/updates/deletion of the to-be-deployed later by the virtual server
Procedure
Step 1 Choose Config > device(s) to view > Device Audit.
ANM displays all operations described above on the specified devices. See Table 17-16 for a description of the displayed information, some of which is extracted from the syslog.
You can sort information in the table by clicking on a column heading, adjust the viewable time range using the drop-down list, and export the table for reporting and troubleshooting purposes.
17-59User Guide for the Cisco Application Networking Manager 5.2.3
OL-26572-03
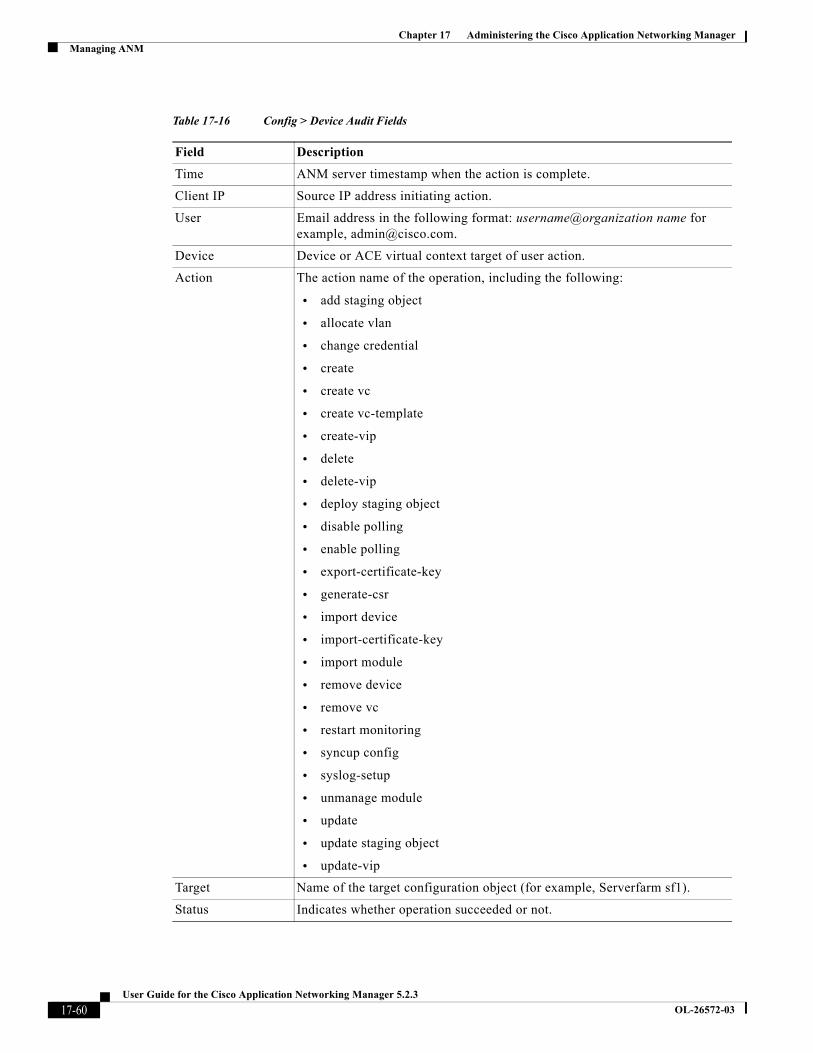
Chapter 17 Administering the Cisco Application Networking ManagerManaging ANM
Table 17-16 Config > Device Audit Fields
Field Description
Time ANM server timestamp when the action is complete.
Client IP Source IP address initiating action.
User Email address in the following format: username@organization name for example, [email protected].
Device Device or ACE virtual context target of user action.
Action The action name of the operation, including the following:
• add staging object
• allocate vlan
• change credential
• create
• create vc
• create vc-template
• create-vip
• delete
• delete-vip
• deploy staging object
• disable polling
• enable polling
• export-certificate-key
• generate-csr
• import device
• import-certificate-key
• import module
• remove device
• remove vc
• restart monitoring
• syncup config
• syslog-setup
• unmanage module
• update
• update staging object
• update-vip
Target Name of the target configuration object (for example, Serverfarm sf1).
Status Indicates whether operation succeeded or not.
17-60User Guide for the Cisco Application Networking Manager 5.2.3
OL-26572-03
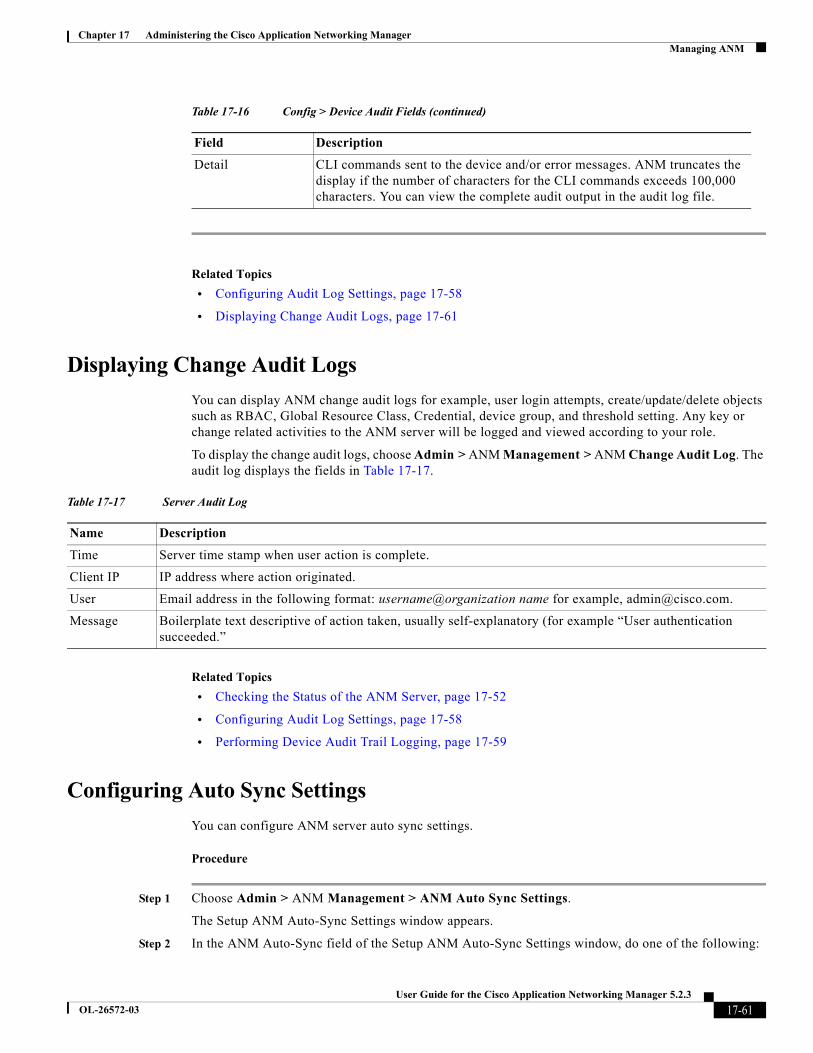
Chapter 17 Administering the Cisco Application Networking ManagerManaging ANM
Related Topics
• Configuring Audit Log Settings, page 17-58
• Displaying Change Audit Logs, page 17-61
Displaying Change Audit Logs
You can display ANM change audit logs for example, user login attempts, create/update/delete objects such as RBAC, Global Resource Class, Credential, device group, and threshold setting. Any key or change related activities to the ANM server will be logged and viewed according to your role.
To display the change audit logs, choose Admin > ANM Management > ANM Change Audit Log. The audit log displays the fields in Table 17-17.
Related Topics
• Checking the Status of the ANM Server, page 17-52
• Configuring Audit Log Settings, page 17-58
• Performing Device Audit Trail Logging, page 17-59
Configuring Auto Sync Settings
You can configure ANM server auto sync settings.
Procedure
Step 1 Choose Admin > ANM Management > ANM Auto Sync Settings.
The Setup ANM Auto-Sync Settings window appears.
Step 2 In the ANM Auto-Sync field of the Setup ANM Auto-Sync Settings window, do one of the following:
Detail CLI commands sent to the device and/or error messages. ANM truncates the display if the number of characters for the CLI commands exceeds 100,000 characters. You can view the complete audit output in the audit log file.
Table 17-16 Config > Device Audit Fields (continued)
Field Description
Table 17-17 Server Audit Log
Name Description
Time Server time stamp when user action is complete.
Client IP IP address where action originated.
User Email address in the following format: username@organization name for example, [email protected].
Message Boilerplate text descriptive of action taken, usually self-explanatory (for example “User authentication succeeded.”
17-61User Guide for the Cisco Application Networking Manager 5.2.3
OL-26572-03
Chapter 17 Administering the Cisco Application Networking ManagerManaging ANM
• Click Enable to have the ANM server automatically sync with ACE CLI when it detects out of band changes.
• Click Disable to have the ANM server warn but not take independent action when it detects out of band changes between the server and ACE CLI.
Step 3 In the Polling Interval field, choose the polling interval you want the ANM server to employ.
Step 4 Click OK to save your entries.
Related Topics
• Synchronizing Virtual Context Configurations, page 5-110
Configuring Advanced Settings
This section discusses the Advanced Settings window.
This section includes the following topics:
• Configuring the Overwrite ACE Logging device-id for the Syslog Option, page 17-62
• Configuring the Enable Write Mem on the Config > Operations Option, page 17-63
• Enabling the ACE Real Server Details Popup Window Option, page 17-64
• Enabling the ACE Server Farm Details Popup Window Option for Virtual Servers, page 17-65
• Enable Mobile Notifications from ANM, page 17-66
• Managing the Syslog Buffer Display in the All Devices Dashboard, page 17-66
• Managing the Display of Virtual Servers in the Operations and Monitoring Windows, page 17-66
Configuring the Overwrite ACE Logging device-id for the Syslog Option
Yo can overwrite the ACE logging device-id.
By default, ANM Autosync relies on the ACE logging device-id to be of type “String.” A device-id setting adds explicit information that is appended to the syslog message and is used by ANM to identify the source of a syslog message. If you configure ANM to manage syslog settings for Autosync on a virtual context (Config > Devices > Setup Syslog for Autosync) and the logging device-id is defined as something other than type “String” for the context, the operation fails and ANM displays “Syslog device is already configured for other purpose.”
You can instruct ANM to overwrite the ACE logging device-id when you enable the synchronization of syslog messages setup of syslog for Autosync from the ACE. If any of the contexts that you are trying to set up a syslog the syslog for Autosync has a device-id setup for a type other than string, ANM will override the device-id with the ANM preferred string.
Procedure
Step 1 Choose Admin > ANM Management > Advanced Settings.
The Advanced Settings configuration window appears.
Step 2 In the Overwrite ACE Logging Device ID field of the Advanced Settings configuration window, do one of the following:
17-62User Guide for the Cisco Application Networking Manager 5.2.3
OL-26572-03
Chapter 17 Administering the Cisco Application Networking ManagerManaging ANM
• Click Enable to overwrite the logging device-id during Setup Syslog for Autosync.
• Click Disable to prevent overwriting the existing logging device-id if it has been previously set up with a type other than string. If the selected context from Setup Syslog for Autosync already has a device-id that is set up with a type other than string, then the operation reports an error and ANM does not overwrite this setting. This is the default setting.
Step 3 Click OK to accept your entries on the Advanced Settings configuration window.
Related Topics
• Enabling a Setup Syslog for Autosync for Use With an ACE, page 4-27
Configuring the Enable Write Mem on the Config > Operations Option
You can configure the Enable Write Mem on the Config > Operations feature.
By default, ANM initiates a write memory command action after you activate or suspend changes on the ACE, CSM, or CSS through the different ANM Operations Pages (Config > Operations). In certain situations, such as those that involve large configurations, a write memory action can take an extended period of time to complete. In this case, the ANM GUI may time out. If a write memory action is not performed before a device reload occurs, the changes will be lost. You can instruct ANM to enable or disable write memory on a Config > Operations configuration.
Note The write memory command is the same as the copy running-config startup-config command; both commands save changes to the configuration.
Note The CSS Expert mode must be disabled if you wish to disable the Write Mem on Config > Operations feature. The Expert mode allows you to turn the CSS confirmation capability on or off; turning Expert mode on disables the CSS from prompting for confirmation when configuration changes are made. If Expert mode is enabled on the CSS, this function will cause the CSS to perform an implicit write memory action after each operational change.
Procedure
Step 1 Choose Admin > ANM Management > Advanced Settings.
The Advanced Settings configuration window appears.
Step 2 In the Enable Write Mem on Config > Operations field of the Advanced Settings configuration window, do one of the following:
• Click Enable to instruct ANM to activate the write memory action on the Config > Operations window. This is the default.
• Click Disable to deactivate the write memory action on the Config > Operations window. This option will require you to periodically access the CLI for the ACE context, the CSM, or the CSS and enter the write memory command to commit the change to the startup-configuration file.
Step 3 Click OK to accept your entries on the Advanced Settings configuration window.
17-63User Guide for the Cisco Application Networking Manager 5.2.3
OL-26572-03
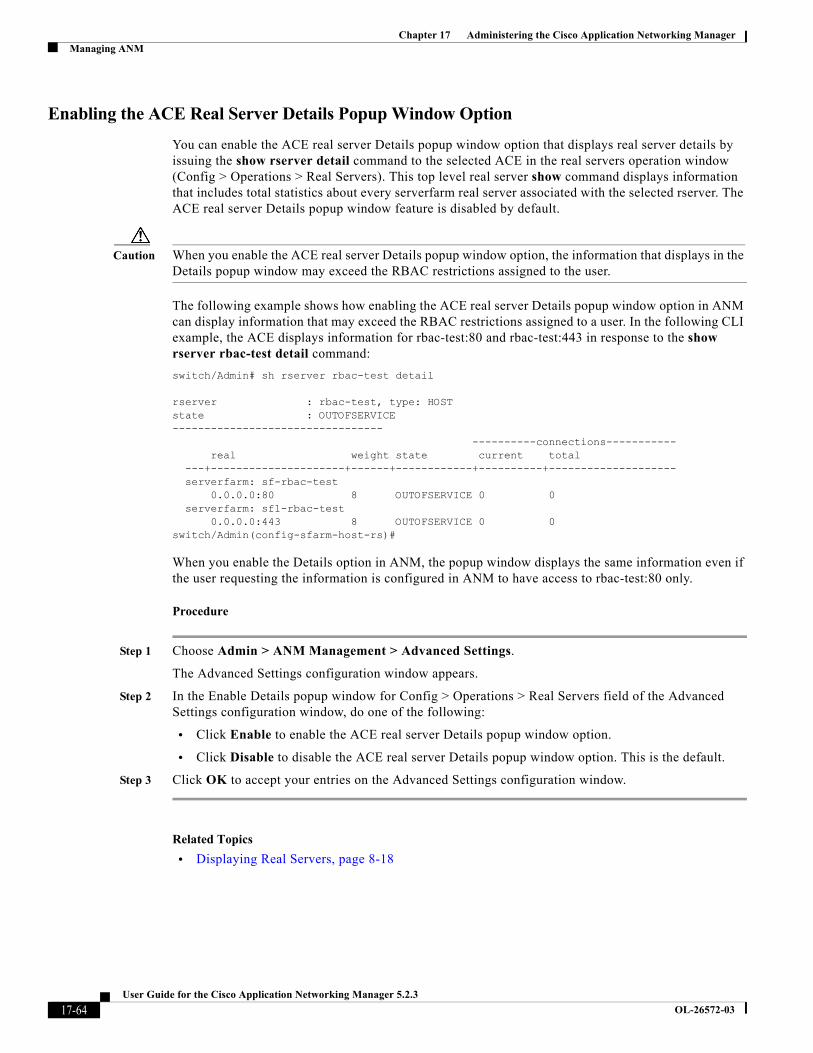
Chapter 17 Administering the Cisco Application Networking ManagerManaging ANM
Enabling the ACE Real Server Details Popup Window Option
You can enable the ACE real server Details popup window option that displays real server details by issuing the show rserver detail command to the selected ACE in the real servers operation window (Config > Operations > Real Servers). This top level real server show command displays information that includes total statistics about every serverfarm real server associated with the selected rserver. The ACE real server Details popup window feature is disabled by default.
Caution When you enable the ACE real server Details popup window option, the information that displays in the Details popup window may exceed the RBAC restrictions assigned to the user.
The following example shows how enabling the ACE real server Details popup window option in ANM can display information that may exceed the RBAC restrictions assigned to a user. In the following CLI example, the ACE displays information for rbac-test:80 and rbac-test:443 in response to the show rserver rbac-test detail command:
switch/Admin# sh rserver rbac-test detail rserver : rbac-test, type: HOSTstate : OUTOFSERVICE--------------------------------- ----------connections----------- real weight state current total ---+---------------------+------+------------+----------+-------------------- serverfarm: sf-rbac-test 0.0.0.0:80 8 OUTOFSERVICE 0 0 serverfarm: sf1-rbac-test 0.0.0.0:443 8 OUTOFSERVICE 0 0switch/Admin(config-sfarm-host-rs)#
When you enable the Details option in ANM, the popup window displays the same information even if the user requesting the information is configured in ANM to have access to rbac-test:80 only.
Procedure
Step 1 Choose Admin > ANM Management > Advanced Settings.
The Advanced Settings configuration window appears.
Step 2 In the Enable Details popup window for Config > Operations > Real Servers field of the Advanced Settings configuration window, do one of the following:
• Click Enable to enable the ACE real server Details popup window option.
• Click Disable to disable the ACE real server Details popup window option. This is the default.
Step 3 Click OK to accept your entries on the Advanced Settings configuration window.
Related Topics
• Displaying Real Servers, page 8-18
17-64User Guide for the Cisco Application Networking Manager 5.2.3
OL-26572-03

Chapter 17 Administering the Cisco Application Networking ManagerManaging ANM
Enabling the ACE Server Farm Details Popup Window Option for Virtual Servers
You can enable the ACE Server Farm Details popup window option that displays details about the server farms associated with a virtual server. When you enable this feature, the server farms listed in the virtual servers operation window (Config > Operations > Virtual Servers) become hyperlinks that open a popup details window. When you click a server farm associated with a virtual server, ANM issues the show serverfarm detail command to the ACE and displays the command output in the popup window.
This top level virtual server show command displays information that includes statistical information related to the real servers associated with the server farm. The ACE Server Farm Details popup window feature is disabled by default.
Caution When you enable the ACE Server Farm Details popup window option, the information that displays in the popup window may exceed the RBAC restrictions assigned to the user. For example, information related to real severs that a user is not permitted to access may display.
The following is an example of the show serverfarm test-sf detail command output:
serverfarm : test-sf, type: REDIRECT total rservers : 1 active rservers: 0 description : - state : INACTIVE predictor : ROUNDROBIN failaction : - back-inservice : 0 partial-threshold : 0 num times failover : 0 num times back inservice : 0 total conn-dropcount : 0 --------------------------------- ----------connections----------- real weight state current total failures ---+---------------------+------+------------+----------+----------+--------- rserver: anm-vm-119 0.0.0.0:0 8 OUTOFSERVICE 0 0 0 description : - max-conns : - , out-of-rotation count : - min-conns : - conn-rate-limit : - , out-of-rotation count : - bandwidth-rate-limit : - , out-of-rotation count : - retcode out-of-rotation count : -
Procedure
Step 1 Choose Admin > ANM Management > Advanced Settings.
The Advanced Settings configuration window appears.
Step 2 In the “Enable Details popup window for Config > Operations > Virtual Servers” field of the Advanced Settings configuration window, do one of the following:
• Click Enable to enable the ACE Server Farm Details popup window option.
• Click Disable to disable the ACE Server Farm Details popup window option. This is the default.
Step 3 Click OK to accept your entries on the Advanced Settings configuration window.
17-65User Guide for the Cisco Application Networking Manager 5.2.3
OL-26572-03
Chapter 17 Administering the Cisco Application Networking ManagerManaging ANM
Related Topics
• “Displaying Virtual Servers” section on page 7-82
Enable Mobile Notifications from ANM
You can enable ANM to send alarm notifications to supported mobile devices that are using the ANM Mobile app. By default, this feature is disabled. For details about the enabling this advanced setting, see the “Globally Enabling or Disabling Mobile Device Notifications” section on page 17-69.
Related Topics
• Globally Enabling or Disabling Mobile Device Notifications, page 17-69
• Configuring Alarm Notifications on ANM, page 16-61
• Administering the ANM Mobile Feature, page 17-67
• Chapter 18, “Using ANM Mobile”
Managing the Syslog Buffer Display in the All Devices Dashboard
You can choose to show or hide the syslog buffer information that displays in the Top 10 Current Resources pane of the All Devices Dashboard window (Monitor > Devices > Dashboard >All Devices). You may want to hide this information because it will always show 100 percent after the buffer becomes full and starts to wrap.
Procedure
Step 1 Choose Admin > ANM Management > Advanced Settings.
The Advanced Settings configuration window appears.
Step 2 Check the Hide 'Syslog Buffer' details in 'Top 10 Current Resources' in Dashboard Pane (All devices dashboard) check box to hide the syslog information. Uncheck the check box to display the syslog information.
Step 3 Click OK to accept your entries on the Advanced Settings configuration window.
Step 4 (Optional) Choose Monitor > Devices > Dashboard >All Device to view the change to the Top 10 Current Resources pane. For more information, see the “Top 10 Current Resources Table” section on page 16-21.
Managing the Display of Virtual Servers in the Operations and Monitoring Windows
You can choose to show only ANM recognized virtual servers or all virtual servers in the virtual server windows for Config Operations (Config > Operations > Virtual Servers) and Monitor Devices (Monitor > Devices > Load Balancing > Virtual Servers).
ANM recognized virtual servers are virtual servers that match ANM’s virtual server definition (see “Virtual Server Configuration and ANM” section on page 7-2). When you have the display set to display all virtual servers, it includes virtual servers that match ANM’s virtual server definition and those that do not match this definition but that ANM can recognize as virtual servers using SNMP polling
17-66User Guide for the Cisco Application Networking Manager 5.2.3
OL-26572-03
Chapter 17 Administering the Cisco Application Networking ManagerAdministering the ANM Mobile Feature
Procedure
Step 1 Choose Admin > ANM Management > Advanced Settings.
The Advanced Settings configuration window appears.
Step 2 Do one of the following to specify the virtual server types that display in the Operations and Monitor windows for virtual servers:
• Check the Display All Virtual Servers in Monitoring & Operations page (Virtual Servers that have class-map/policy-map definitions) check box to display virtual servers that match ANM’s virtual server definition and those that do not match this definition but that ANM can recognize as virtual servers using SNMP polling.
When this option is checked, the virtual server windows for Config Operations and Monitor Devices includes a display toggle button ( ) located above the table that allows you to change from viewing all virtual servers to viewing only ANM recognized virtual servers.
• Uncheck the check box to display only virtual servers that match ANM’s virtual server definition (see the “Information About Using ANM to Configure Virtual Servers” section on page 7-4. This is the default.
Step 3 Click OK to accept your entries on the Advanced Settings configuration window.
Step 4 (Optional) Choose Config > Operations > Virtual Servers to view the change.
Administering the ANM Mobile FeatureANM Mobile is a mobile device app that allows supported mobile devices to access your ANM server or ANM Virtual Appliance and manage the network objects in much the same way you do from an ANM client as described in Chapter 18, “Using ANM Mobile.” This section describes how to configure ANM to send alarm notifications to ANM Mobile, which requires configuring ANM with a push notification proxy server and globally enabling the mobile notification feature. For remotely authorized users, you must also modify the ANM configuration to allow ANM to send this user type mobile notifications.
After you have ANM configured to issue mobile notifications, you can send a test message to test the notification channel between ANM and the mobile device. You can also view a list that shows the last notification that ANM issued to each mobile device.
This section includes the following topics:
• Configuring ANM with a Proxy Server for ANM Mobile Push Notifications, page 17-67
• Enabling Mobile Device Notifications for Remotely Authorized Users, page 17-69
• Globally Enabling or Disabling Mobile Device Notifications, page 17-69
• Displaying Mobile Device Notifications and Testing the Notification Channel, page 17-70
Configuring ANM with a Proxy Server for ANM Mobile Push Notifications
You can modify the ANM properties file for ANM Mobile push (or alarm) notifications. ANM is preconfigured to send ANM Mobile notifications directly to the Cisco proxy service. If your network does not allow direct access to the proxy service, you can configure ANM to send notifications to your proxy server, which in turn forwards the notifications to the Cisco proxy service.
17-67User Guide for the Cisco Application Networking Manager 5.2.3
OL-26572-03

Chapter 17 Administering the Cisco Application Networking ManagerAdministering the ANM Mobile Feature
Prerequisites
ANM has alarm threshold groups configured for mobile device alarm notifications (see the “Configuring Alarm Notifications on ANM” section on page 16-61).
Procedure
Step 1 Specify a proxy server to use as follows:
• ANM Server—Open the /opt/CSCOanm/etc/cs-config.properties file in a text editor and modify the following lines:
– proxy-type=type
Specify a type of either ssl or socks depending on your network requirements.
– proxy-server=proxy_IPaddress
Specify the IP address of your proxy server.
– proxy-server-port=port_number
Specify the port to use to communicate with your proxy server.
• ANM Virtual Appliance—Enter the following commands:
– anm-property set proxy-type type
Specify a type of either ssl or socks depending on your network requirements.
– anm-property set proxy-server proxy_IPaddress
Specify the IP address of your proxy server.
– anm-property set proxy-server-port port_number
Specify the port to use to communicate with your proxy server.
Step 2 Restart ANM as follows:
• ANM Server—Enter the following command:
/opt/CSCOanm/bin/anm-tool restart
• ANM Virtual Appliance—Enter the following command:
anm-tool restart
Step 3 Allow ANM to send alarm notifications to supported mobile devices.
For more information, see the “Globally Enabling or Disabling Mobile Device Notifications” section on page 17-69.
Step 4 (Optional) Send a test notification to a mobile device.
For more information, see the “Displaying Mobile Device Notifications and Testing the Notification Channel” section on page 17-70.
Related Topics
• Enabling Mobile Device Notifications for Remotely Authorized Users, page 17-69
• Globally Enabling or Disabling Mobile Device Notifications, page 17-69
• Displaying Mobile Device Notifications and Testing the Notification Channel, page 17-70
• Chapter 18, “Using ANM Mobile”
17-68User Guide for the Cisco Application Networking Manager 5.2.3
OL-26572-03
Chapter 17 Administering the Cisco Application Networking ManagerAdministering the ANM Mobile Feature
Enabling Mobile Device Notifications for Remotely Authorized Users
You can modify the ANM configuration when you need to send mobile device alarm notifications to users that are authorized remotely using an AAA server.
Guidelines and Restrictions
When you enable alarm notifications to remotely authorized users, ANM does not perform any RBAC filtering of alarms to users, which means that remotely authorized users receive all alarm notifications regardless of the roles and domains assigned to them.
Procedure
Step 1 Enable mobile device notifications for remotely authorized users as follows:
• ANM Server—Open the /opt/CSCOanm/etc/cs-config.properties file in a text editor and change the state of the following line from false to true:
send.mobile.notifications.to.remote.users=true
• ANM Virtual Appliance—Enter the following command:
anm-property set send.mobile.notifications.to.remote.users true
Step 2 Restart ANM as follows:
• ANM Server—Enter the following command:
/opt/CSCOanm/bin/anm-tool restart
• ANM Virtual Appliance—Enter the following command:
anm-tool restart
Step 3 Globally enable ANM to send mobile device alarm notifications (see the “Globally Enabling or Disabling Mobile Device Notifications” section on page 17-69).
Related Topics
• Configuring ANM with a Proxy Server for ANM Mobile Push Notifications, page 17-67
• Globally Enabling or Disabling Mobile Device Notifications, page 17-69
• Displaying Mobile Device Notifications and Testing the Notification Channel, page 17-70
• Chapter 18, “Using ANM Mobile”
Globally Enabling or Disabling Mobile Device Notifications
You can globally enable or disable mobile device notifications from ANM.
Prerequisites
This topic includes the following prerequisites:
• ANM has alarm threshold groups configured for mobile device alarm notifications (see the “Configuring Alarm Notifications on ANM” section on page 16-61).
17-69User Guide for the Cisco Application Networking Manager 5.2.3
OL-26572-03
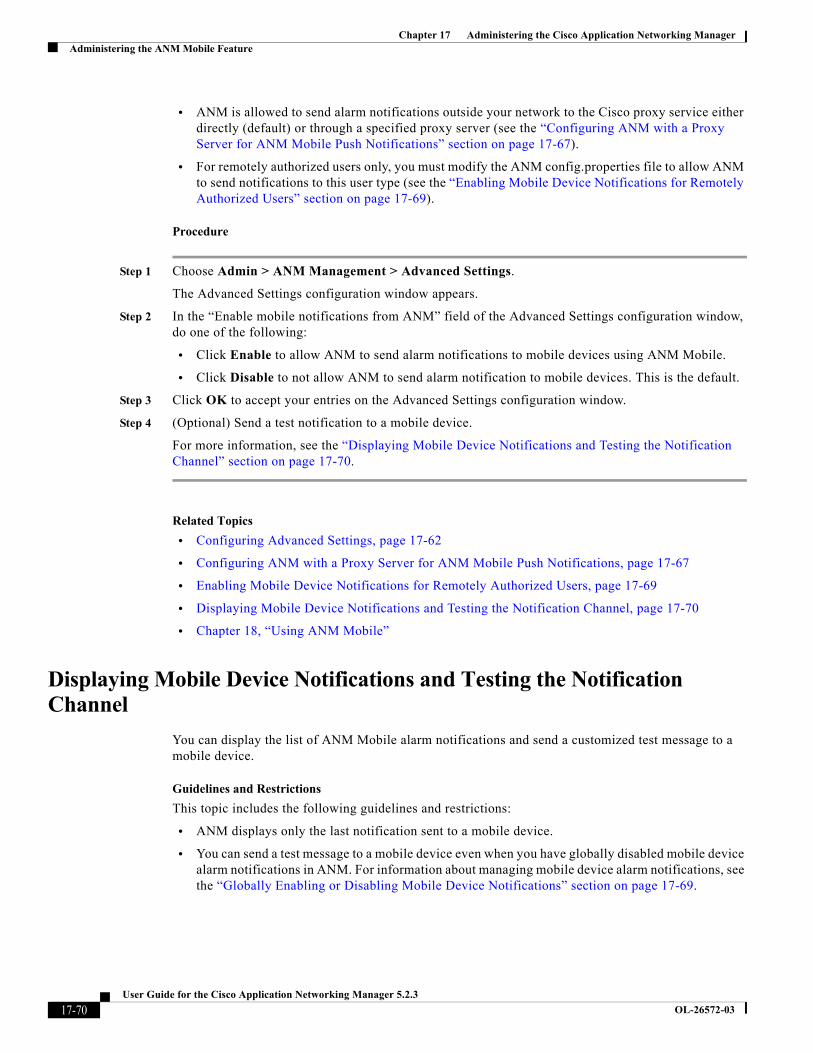
Chapter 17 Administering the Cisco Application Networking ManagerAdministering the ANM Mobile Feature
• ANM is allowed to send alarm notifications outside your network to the Cisco proxy service either directly (default) or through a specified proxy server (see the “Configuring ANM with a Proxy Server for ANM Mobile Push Notifications” section on page 17-67).
• For remotely authorized users only, you must modify the ANM config.properties file to allow ANM to send notifications to this user type (see the “Enabling Mobile Device Notifications for Remotely Authorized Users” section on page 17-69).
Procedure
Step 1 Choose Admin > ANM Management > Advanced Settings.
The Advanced Settings configuration window appears.
Step 2 In the “Enable mobile notifications from ANM” field of the Advanced Settings configuration window, do one of the following:
• Click Enable to allow ANM to send alarm notifications to mobile devices using ANM Mobile.
• Click Disable to not allow ANM to send alarm notification to mobile devices. This is the default.
Step 3 Click OK to accept your entries on the Advanced Settings configuration window.
Step 4 (Optional) Send a test notification to a mobile device.
For more information, see the “Displaying Mobile Device Notifications and Testing the Notification Channel” section on page 17-70.
Related Topics
• Configuring Advanced Settings, page 17-62
• Configuring ANM with a Proxy Server for ANM Mobile Push Notifications, page 17-67
• Enabling Mobile Device Notifications for Remotely Authorized Users, page 17-69
• Displaying Mobile Device Notifications and Testing the Notification Channel, page 17-70
• Chapter 18, “Using ANM Mobile”
Displaying Mobile Device Notifications and Testing the Notification Channel
You can display the list of ANM Mobile alarm notifications and send a customized test message to a mobile device.
Guidelines and Restrictions
This topic includes the following guidelines and restrictions:
• ANM displays only the last notification sent to a mobile device.
• You can send a test message to a mobile device even when you have globally disabled mobile device alarm notifications in ANM. For information about managing mobile device alarm notifications, see the “Globally Enabling or Disabling Mobile Device Notifications” section on page 17-69.
17-70User Guide for the Cisco Application Networking Manager 5.2.3
OL-26572-03
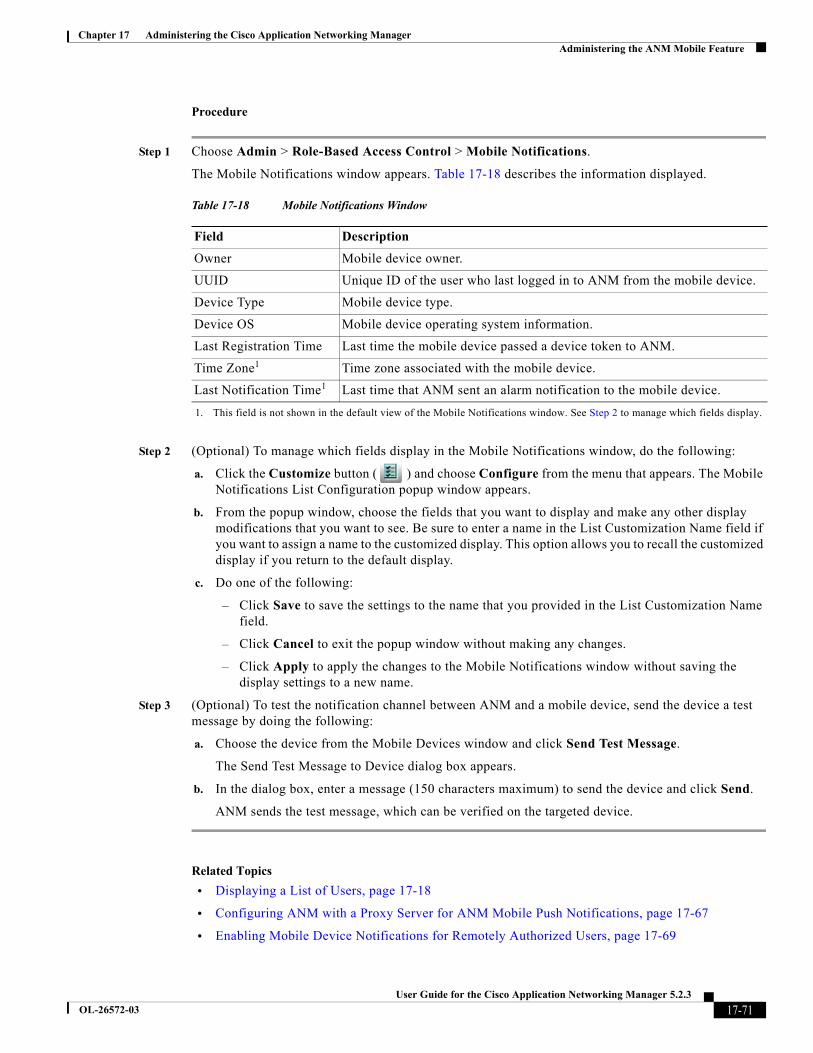
Chapter 17 Administering the Cisco Application Networking ManagerAdministering the ANM Mobile Feature
Procedure
Step 1 Choose Admin > Role-Based Access Control > Mobile Notifications.
The Mobile Notifications window appears. Table 17-18 describes the information displayed.
Step 2 (Optional) To manage which fields display in the Mobile Notifications window, do the following:
a. Click the Customize button ( ) and choose Configure from the menu that appears. The Mobile Notifications List Configuration popup window appears.
b. From the popup window, choose the fields that you want to display and make any other display modifications that you want to see. Be sure to enter a name in the List Customization Name field if you want to assign a name to the customized display. This option allows you to recall the customized display if you return to the default display.
c. Do one of the following:
– Click Save to save the settings to the name that you provided in the List Customization Name field.
– Click Cancel to exit the popup window without making any changes.
– Click Apply to apply the changes to the Mobile Notifications window without saving the display settings to a new name.
Step 3 (Optional) To test the notification channel between ANM and a mobile device, send the device a test message by doing the following:
a. Choose the device from the Mobile Devices window and click Send Test Message.
The Send Test Message to Device dialog box appears.
b. In the dialog box, enter a message (150 characters maximum) to send the device and click Send.
ANM sends the test message, which can be verified on the targeted device.
Related Topics
• Displaying a List of Users, page 17-18
• Configuring ANM with a Proxy Server for ANM Mobile Push Notifications, page 17-67
• Enabling Mobile Device Notifications for Remotely Authorized Users, page 17-69
Table 17-18 Mobile Notifications Window
Field Description
Owner Mobile device owner.
UUID Unique ID of the user who last logged in to ANM from the mobile device.
Device Type Mobile device type.
Device OS Mobile device operating system information.
Last Registration Time Last time the mobile device passed a device token to ANM.
Time Zone1
1. This field is not shown in the default view of the Mobile Notifications window. See Step 2 to manage which fields display.
Time zone associated with the mobile device.
Last Notification Time1 Last time that ANM sent an alarm notification to the mobile device.
17-71User Guide for the Cisco Application Networking Manager 5.2.3
OL-26572-03
Chapter 17 Administering the Cisco Application Networking ManagerLifeline Management
• Globally Enabling or Disabling Mobile Device Notifications, page 17-69
• Chapter 18, “Using ANM Mobile”
Lifeline ManagementYou can use the troubleshooting and diagnostics tools provided by the Lifeline feature to report a critical problem to the Cisco support line and generate a diagnostic package. For more information about this feature, see the “Using Lifeline” section on page 20-7.
17-72User Guide for the Cisco Application Networking Manager 5.2.3
OL-26572-03