administrative console user guide
TRANSCRIPT
RoomWizard
Administrative Console
Information in this document is subject to change without notice. Reproduction
in any manner without written permission of Steelcase Corporation is forbidden.
Steelcase Corporation reserves the right to make changes in product design, or
detail, and to discontinue any product or material without notice. RoomWizard
is a trademark of Steelcase, Inc. All other registered trademarks and trademarks
used herein are the property of their respective owners.
Order number 12-0000506
©2012 Steelcase Inc.
All rights reserved.
USER
MA
NU
AL
Contents
Welcome ............................................................................................................ 3
Administer your RoomWizards from one location ........................................ 3
About this Manual ......................................................................................... 4
Setup of the Administrative Console ................................................................. 4
Installation ..................................................................................................... 4
The Console Window ..................................................................................... 4
Configuration of the Administrative Console ................................................ 7
Setup of RoomWizard Lists ............................................................................ 8
Using the Administrative Console ...................................................................... 8
How To: Configure a new RoomWizard installation. ....................................... 12
How To: Upgrade Firmware ............................................................................. 13
Warranty .......................................................................................................... 14
Technical Support………………………………………..………………………………………………14
Welcome
Administer your RoomWizards from one location
The RoomWizard Administrative Console allows you to administer all of the
RoomWizards in your enterprise from one location. It’s a PC based application
that enables you to
o Find all the RoomWizards on your network (Firmware Version 4.1 is
required on the RoomWizards to enable the Console search
function to operate).
o Logically group your RoomWizards together – no limits on number
of groups or the number of RoomWizards in a group.
o Perform administrative operations on multiple RoomWizards at the
same time such as:
Select a master (already configured RoomWizard) and
replicate its configuration out to all other selected
RoomWizards with one operation
Upgrade the firmware/apply patches to all selected
RoomWizards with one operation
o Get status information on all your RoomWizards such as:
See what units are currently offline/experiencing problems.
See CPU Loading, Disk Usage and other information on any
selected RoomWizard.
o View and capture log files from RoomWizards
About this Manual
This manual describes how to use the RoomWizard Administrative Console,
which helps you better manage your RoomWizards.
Setup of the RoomWizard Administrative Console
Installation
The RoomWizard Administrative Console needs to be installed on a PC
compatible computer, running windows XP or higher. System Hardware
requirements are minimal, less than 50MB of disk space and 100MB or RAM.
The RoomWizard Administrative Console uses .NET, but installs all components
that it needs.
Simply run Setup.exe on your PC to install the software.
The RoomWizard Administrative Console Window
Each time you execute RoomWizard Administrative Console.exe, you are
prompted for a password. The default password is “roomwizard” and can be
changed in the Options dialog.
Enter the password and the console window will appear.
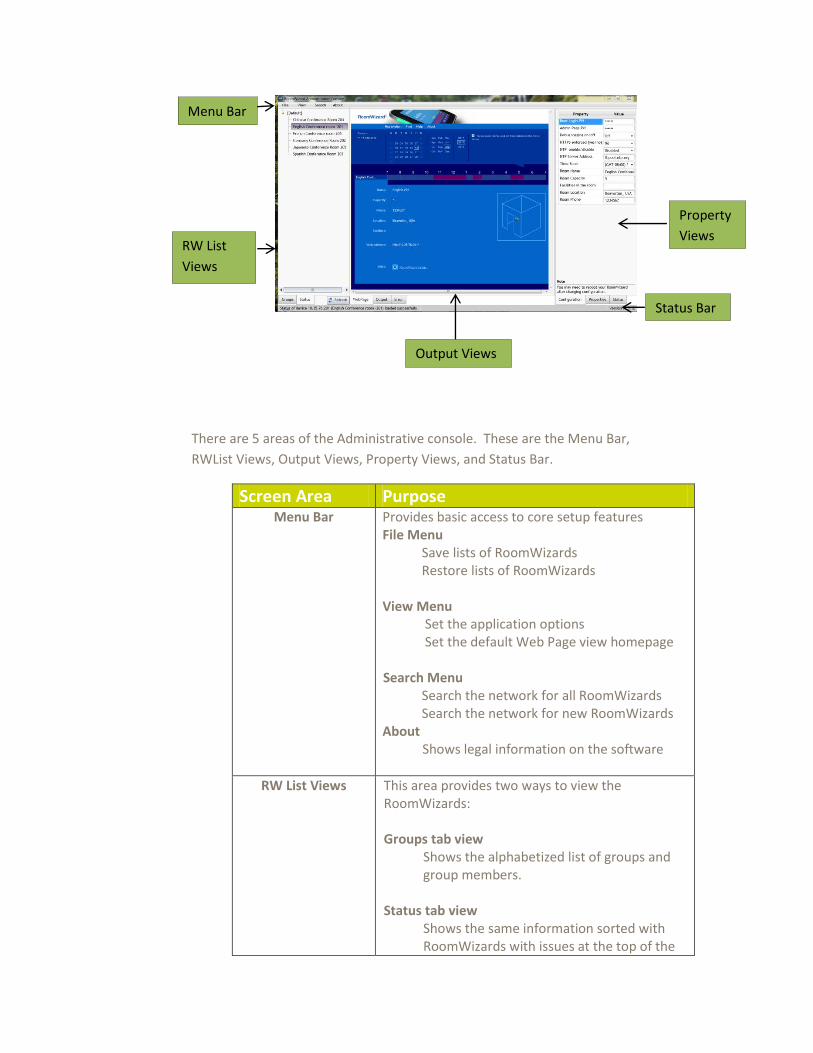
There are 5 areas of the Administrative console. These are the Menu Bar,
RWList Views, Output Views, Property Views, and Status Bar.
Screen Area Purpose Menu Bar Provides basic access to core setup features
File Menu Save lists of RoomWizards Restore lists of RoomWizards
View Menu Set the application options Set the default Web Page view homepage
Search Menu Search the network for all RoomWizards Search the network for new RoomWizards
About Shows legal information on the software
RW List Views This area provides two ways to view the RoomWizards: Groups tab view
Shows the alphabetized list of groups and group members.
Status tab view Shows the same information sorted with RoomWizards with issues at the top of the
Menu Bar
RW List
Views
Property
Views
Output Views
Status Bar

lists to make it easy to find what RoomWizards are having problems currently.
Refresh button Refreshes the status of the RoomWizards in the view.
Right clicking on a group or selected RoomWizard brings up a right click menu with all of the options available for administrating the RoomWizards.
Output Views Shows the various outputs from the RoomWizard Administrative Console. Web Page view
Displays one of three pages from the RoomWizard currently selected. This can be configured via the View->Web Page menu item. The Reservation page, the Home page or the Front Panel of the RoomWizard can be displayed in this window.
Output tab view Shows information on what the RoomWizard Administrative Console is doing and any issues that may have occurred.
Error tab view Shows only errors that have occurred during operations, to quickly locate problem units.
Property Views Shows information about a specific selected RoomWizard. Configuration tab view
Contains information about the RoomWizard that can be edited directly in the tab such as the Room Capacity, Time Zone, NTP server information, etc.
Properties tab view
Contains static information about the RoomWizards network connection, Serial Number, and installed Firmware version.

Status tab view
Contains static information pulled from the RoomWizard such as the CPU, Memory and Driver status.
Status bar Shows information on what the RoomWizard Administrative Console is currently doing, if long operation is in progress, and the Console version number.
Configuration of the RoomWizard Administrative Console
On the first time use of the RoomWizard Administrative Console, the main
options need to be set, and the RoomWizard List needs to be setup.
To configure the main options, on the menu bar, select View->Options to bring
up the Options dialog for the RoomWizard Administrative Console.
Font Settings:
The font used in the application, and the font size may be selected here.
SSH Command Settings
The RoomWizard Administrative Console will open a telnet session and log you
in automatically via the menus. Enter the path to your favorite telnet client, and
the default timeout used for the telnet client. The default command timeout is
15 minutes.
Broadcast Settings
The RoomWizard Administrative Console uses a broadcast to find RoomWizards.
You can customize the search time and refresh times here.
Email Server Settings
The RoomWizard Administrative Console will email you when there are
problems on a RoomWizard. Use the controls here to setup email access for the
Console.
Application Password
The password to access the RoomWizard Administrative console can be
changed here. The default password after installation is “roomwizard”.
Setup of RoomWizard Lists
Once the options have been set, the RW List needs to be configured.
Automatic List Setup
If you are running firmware version 4.1 with RoomWizard II, or are running the
RoomWizard 10 3.5.2 update, you can automatically search your network for all
RoomWizards via the Search->Search for All Devices menu.
The RoomWizard Administrative Console will prompt you for the subnet and
Network that you wish to search, and then broadcast on that subnet and await
responses from the RoomWizards. The RoomWizard List will be automatically
populated with all the RoomWizards under a “Default” Group.
Note: The “Default” group name cannot be changed, and all RoomWizards
found in a search are automatically added to the “Default” Group.
Manual List Setup
If you simply wish to add a new RoomWizard to the list, or your RoomWizards
are not running the correct firmware version, you can manually add the
RoomWizards to the list.
To manually add a RoomWizard, right click on any group name in the Groups
tab, and select “List Maintenance” -> “Add Unit”. Fill out the dialog box that
comes up, press OK and the RoomWizard is added to the selected group.
Using the RoomWizard Administrative Console Once the RoomWizards are in the RoomWizard Administrative Console, you can
begin administering them.
All operations are selected/initiated from the Groups tab or Status tab via
selecting the RoomWizards to operate on, and right clicking.
There are 8 menu items available via the Right Click menu:
Access…
Certificates…
Firmware…
List Maintenance…
Logfiles…
Replicate…
Set as Master Device
Set Root Password
Note: You must run Firmware 4.1 with RoomWizard II’s, and Firmware 3.5.2
with RoomWizard 10’s to unlock all the features of the RoomWizard
Administrative Console, including Searching and property retrieval. However,
you can update firmware on units with older firmware directly from the
RoomWizard Administrative Console.
Note: FTP, and Secure Telnet, are both required to operate with the
RoomWizard Administrative Console. These features are on by default on the
RoomWizards.
Access
Access menu items allow you to do the following on the selected RoomWizard:
Refresh the Properties View’s Properties tab
Refresh the Properties View’s Status tab
Start your web browser on the RoomWizards home page
Start your telnet client on the RoomWizard. Putty is an excellent
free telnet client that operates well with the RoomWizard
Administrative Console and RoomWizard.
Set the RoomWizard to sync its clock via NTP
Sync the RoomWizards clock to your PC’s clock.
Certificates
The Certificates menu items allow you to install new custom certificates into
your RoomWizard.
Add Certificate prompts you for the Alias Name and the certificate
itself to load into the RoomWizard.
Firmware
The Firmware menu allows you to upgrade the firmware on the selected
RoomWizards.
Note: That the RoomWizard Administrative Console requires the firmware to be
in cpio.tar.gz format. If the firmware file ends in cpio.tar.gz, it is the correct
format of firmware file.
Reboot Unit (s) instructs the RoomWizards to reboot.
Rebuild Unit (s) instructs the RoomWizard to restore its firmware –
this is the same as reinstalling the last full firmware update on the
unit. This should be used only when units are exhibiting issues that
aren’t related to the configuration.
Upgrade Firmware upgrades the firmware via one of two methods
o Via FTP Server
The FTP path to the firmware file, and FTP
credentials to log into the ftp server that contains
the firmware are entered. A sample ftp path is
ftp://ftp.steelcase.com/firmwarefile.cpio.tar.gz.
Note: this is not a working path, but only an
example.
The RoomWizard FTP’s to the site directly to
download and install the update.
o Via Local Host
The path to the firmware file is entered,
Enter the user for the RoomWizard II is “root” for
RoomWizard 10 is “backup”.
Enter the FTP User password for the RoomWizard
and uploads the firmware, Click “OK” and wait for
the RoomWizard to installs the upgrade.
Once the firmware upgrade is complete, details show in the
dialog for each RoomWizard that was upgraded including if it
was successful upgraded or not.
List Maintenance
These menu items allow for customization of the Lists of RoomWizards.
The options are:
Add Group
A new High Level group is added to the List.
Add SubGroup
A Subgroup is added to the selected group.

Add Unit
A new RoomWizard is added to the group
Delete
The selected Group or RoomWizard is removed from the
list.
Note: drag and drop RoomWizards and Groups to rearrange the lists as
required.
Note: the “Default” group is fixed and cannot be renamed or removed.
LogFiles
The LogFiles menu allows you to both download all the log files from the
selected units, as well as viewing individual logs directly from units.
Download All Logs will collect all the log files on the selected units
and save them locally. These log files can be provided to Steelcase
Technical Support when issues arise.
The rest of the menu items allow you to directly view in a window the
following log files:
o Admin Log
o Concurrent Log
o EndUser log
o Epiphany log
o Firmware Patches log
o Front Panel Log
o Jettystart Log
o LocalHost log
o Message log
o Upgrade log
Replicate
The Replicate menu , in conjunction with “Set as Master Device” below, allow
you to select a master RoomWizard, that the configuration is harvested from,
and then replicated out to all selected RoomWizards.
Push Configuration reads the configuration of the Master Device,
and duplicates it out to every selected RoomWizard. Note that
Network configuration, and specific room configuration such as
facilities and room names are not replicated, so RoomWizards
preserve the unique information.
Push Partial Configurations pushes the NTP server address, the root
Password, and new certificate information (if provided) to all
selected RoomWizards. If a field is left blank in the dialog, that field
is not replicated to other units. No master is required for Partial
Configurations.
Set as Master Device
Set as “Master” Device makes the currently selected RoomWizard the master
RoomWizard. Its configuration can be pushed out to other RoomWizards via
the Replicate menu.
Set Root Password
Administrator can set same “root password” on multiple RoomWizards in a
single operation via selecting them and selecting Set Root Password from the
menu.
How To: Configure a new RoomWizard installation.
To setup a new installation of RoomWizards with the RoomWizard
Administrative Console, perform the following steps.
1) Install the RoomWizards and power them up.
2) Search for RoomWizards via the Search->Search for All RoomWizard’s
menu item.
3) Select View->Administrative Page on the menu.
4) All the RoomWizards will appear in the RoomWizard List property tab.
5) Select one RoomWizard
6) Right click and select Access->Start Browser
7) In the Browser, click RoomWizard Setup, and configure the RoomWizard
as desired.
8) Close the browser
9) Right click on the configured RoomWizard and select “Set as Master
Device”
10) Select the remaining RoomWizards
11) Right click and select Replicate->Push Configuration
All the units are now configured, and unique configuration can be added
individually.
Best Practices
Upgrade Firmware
Upgrading firmware requires sending a new firmware file to every unit selected,
which can be 150MB in size, to every RoomWizard in an organization.
To optimize firmware upgrades and minimize the amount of time each upgrade
takes, it is recommended to break the RoomWizards into groups, such as a
group per building, or facility. This both reduces the load on the network and
reduces the possibility of failed downloads through network retries.
With smaller groups being updated, the time required to perform the updates
on the group is reduced, and the overall load is broken up for both the IT
administrator and the network.
Note: If FTP is disabled on the RoomWizard units, firmware upgrades will not
work. FTP is required for Firmware upgrades and patches.
Grouping RoomWizards by type
It is recommended to group similar RoomWizards together, i.e., keep
RoomWizard 10’s in one group and RoomWizard II in another group. This will
allow upgrading firmware on all RoomWizard II and all RoomWizard 10’s with
only two operations (one for each group), without having validated which units
were updated and which need different firmware loads.
Password Handling
As the firmware upgrade process requires RoomWizard credentials, it is
recommended that all RoomWizard II units share the same root password, and
all RoomWizard 10 units share the same root password. The RoomWizard
Administrative Console can deal with unique passwords on all RoomWizards,
but on firmware upgrades, each unit would need to have its password entered,
which can be very time consuming.
RoomWizard lists
The File Menu option to save or reload different groupings of your
RoomWizards can be used to maintain different “views” of your network. You
may want one list setup with a single group to watch for trouble units, and
another list with logical groupings to easily perform firmware upgrades, and yet
a third with physical location groupings.
Warranty: This software is provided as-is, with no warranty of any kind. Steelcase shall not
be liable for consequential or incidental damages arising from any product
defect including without limitation any liability for products not being available
for use or for lost data or software.
Technical Support: If you have questions or difficulties with the installation, please call Steelcase
Technical Support at: 1.800.334.4922 or send an e-mail to:
Located in Europe, Middle East or Africa?
Please call 00 800 0 1111 222 (toll-free) from Austria, Benelux, Scandinavia,
France, Germany, Ireland, Italy, Portugal, Spain, Switzerland and UK, or call 00
33 3 88 13 3636 from any other country, or send an e-mail to:
The available languages are: English.