adobe captivate 9 - onpoint digital · what are the advantages and disadvantages of ......
TRANSCRIPT

ADOBE CAPTIVATE 9 Content Planning Guide
Summer 2015

© OnPoint Digital, Inc. 2015 All Rights Reserved. Version 07.10.2015 1
Table of Contents Using Captivate 9 on Your OnPoint Learning Platform ................................................................ 3
What are the Advantages and Disadvantages of Captivate? ....................................................... 3
Use Cases for Captivate – Where does it fit? ............................................................................... 3
Where Does Captivate Fit/Work? ................................................................................................. 5
Getting Started .............................................................................................................................. 6
So, What is HTML5? ..................................................................................................................... 6
And, Responsive Content? ........................................................................................................... 6
Working from a Template ............................................................................................................. 7
Authoring Interface ....................................................................................................................... 8
Converting from Existing Content Documents .............................................................................. 8
Navigation ..................................................................................................................................... 9
Gestures ....................................................................................................................................... 9
Branching .................................................................................................................................... 12
Location-Based Learning ............................................................................................................ 12
Drag and Drop Interactions ......................................................................................................... 13
Timelines .................................................................................................................................... 13
Content ....................................................................................................................................... 14
Images ................................................................................................................................. 14
Text ...................................................................................................................................... 14
Audio ................................................................................................................................... 15
Video ................................................................................................................................... 15
Objects ................................................................................................................................ 16
Publish ........................................................................................................................................ 16
eLearning Compliant ........................................................................................................... 17
HTML Package .................................................................................................................... 20
Import into OPLS/CellCast .......................................................................................................... 21
Advanced Optional Features ............................................................................................... 27

© OnPoint Digital, Inc. 2015 All Rights Reserved. Version 07.10.2015 2
Assigning Users and Groups ...................................................................................................... 29
Assigning Users ................................................................................................................... 29
Assigning Groups ................................................................................................................ 31
Additional Resources .................................................................................................................. 33
Questions .................................................................................................................................... 33

© OnPoint Digital, Inc. 2015 All Rights Reserved. Version 07.10.2015 3
Using Captivate 9 on Your OnPoint Learning Platform This job aid provides instructions for using Captivate version 9 from Adobe Systems Inc., a provider of
world-class publishing technologies and services for multimedia eLearning, to create content for online
and mobile delivery to OnPoint Digital’s OPLS and CellCast Solution platforms. Captivate is an authoring
software tool to design responsive HTML5 content that can be exported and deployed into OnPoint’s
OPLS and CellCast Solution platforms quickly and easily.
What are the Advantages and Disadvantages of Captivate 9? The biggest standout for Captivate 9 is its feature to integrate screen-specific design choices for content.
Authoring adaptive, responsive eLearning content without any programming knowledge is possible with
Captivate 9. Another standout feature is that Captivate 9 includes Storyboard that allows you and your
team to collaborate on the go. As a disadvantage, if your workflow uses PowerPoint imports, there may
be better approaches than Captivate for mobile usage because you cannot edit the PowerPoint content
you imported.
New highlights to version 9 are:
1. Interface improvements
2. Inclusion of Captivate Storyboard
3. Multi states for objects
4. Enhancements to effects and responsive design
5. Capture content from iOS devices
6. SVG graphic support
Use Cases for Captivate 9 – Where does it fit? Adobe Captivate 9 software rapidly authors a wide range of interactive and responsive HTML5-‐based eLearning
content without programming. Easily create application simulations, product demos, drag-‐and-‐drop modules, and
soft skills and compliance training materials. Import Microsoft PowerPoint presentations into an array of features
that Instructional Designers can leverage to create rapid eLearning digital courseware, performance
support tools and interactive marketing materials for their online and mobile audiences. The following
table summarizes the common use cases, supported communications methods and target devices
OnPoint believes are best suited for Captivate-created materials.

© OnPoint Digital, Inc. 2015 All Rights Reserved. Version 07.10.2015 4

© OnPoint Digital, Inc. 2015 All Rights Reserved. Version 07.10.2015 5
Where Does Captivate Fit/Work?
Supports
Common Use Cases
Learning Features þ
Interaction and
Engagement
þ
Gaming Elements þ
Reference
Materials/EPSS
þ
Social Features ý
Communication Methods With LMS/TM Platforms
Non-SCORM þ
SCORM v1.2 þ
SCORM v2004 þ
xAPI / Tin Can/ þ
Supported Devices
Desktop Mac/Windows/Linux: Microsoft Internet Explorer, Google Chrome, Mozilla Firefox,
Apple Safari
Apple iPad Tablets iOS5
iOS6
iOS7
iOS8
Apple iPhones & iPod
touch
iOS5
iOS6
iOS7
iOS8
Android Tablets V3.x – v5.x
Android Handsets v2.3.7- v5.x

© OnPoint Digital, Inc. 2015 All Rights Reserved. Version 07.10.2015 6
Getting Started To get started, you should have either purchased or signed up for a free 30-day trial account for Adobe
Captivate authoring platform. Captivate is now available on the creative cloud subscription base, as well.
If you need to sign up for a new account:
1. Visit http://www.adobe.com/products/captivate/buying-‐guide-‐subscriptions.html
2. Confirm your system requirements.
We also recommend that you watch Adobe’s video, Introduction to Captivate before beginning your
project.
So, What is HTML5? HTML5 is a markup language used for structuring and presenting content for the World Wide Web.
HTML5 improves the language with support for the latest multimedia while keeping it easily readable by
humans and consistently understood by computers and mobile devices. It includes detailed processing
models to encourage more interoperable implementations. It introduces markup and application
programming interfaces (APIs) for complex web applications. For the same reasons, HTML5 supports
cross-platform mobile applications. Many features of HTML5 have been built with the consideration of
being able to run on low-powered devices such as smartphones and tablets.
And, Responsive Content? Responsive content enables you to design, build and publish content once then publish it for delivery to
desktop, tablets and smartphones. Responsive content automatically repositions itself based on the
screen’s space available and adapts to show using available screen size. Screens are optimized for the
size of the screen, with the most appropriate alternative being selected to ensure content remains user-
friendly and high quality. As you develop your content, think about how the content responds across the
multiple delivery methods common among your target audience. Adobe made enhancements in version 9
for responsive layouts and breakpoints. You can now center horizontally and vertically.

© OnPoint Digital, Inc. 2015 All Rights Reserved. Version 07.10.2015 7
You can design each devices content, specific and uniquely to that device’s experience. This ensures the
content is easily consumed by each device in its unique way.
Note: Selecting relative for grouped objects is useful for responding between multiple screen
sizes.
Note: If you do not want to design varying layouts to support the best experience per device size, you can use a non-responsive layout and export project to scale. When you do this, make sure
your design is readable in the smallest screen sizes, however.
Working from a Template
When you want to create similar projects or similar modules in a project, use project templates to ensure
consistency, efficiency, and company brand. Project templates are especially useful when multiple
authors are working on different projects. Project templates help achieve the following:
• Consistency across Adobe Captivate projects.
• Reduced development time for multiple projects due to reuse of design.
• Reuse of project preferences across multiple projects.
In a collaborative environment where the designers work separately from the people creating the content,
designers use templates to ensure consistency across projects. Content developers do not have to worry
about the workflow of the project, the various standards involved, or the creation of the layout. All they
have to do is follow the instructions in the template and provide the required content in the relevant
placeholders. Creating a repository of templates requires a disciplined effort involving all stakeholders.
However, the effort pays for itself over time in terms of reduced development time for projects. Use
object styles along with the project templates to ensure a uniform appearance for your projects. To make
a project template more effective, add slide notes providing information or instructions.

© OnPoint Digital, Inc. 2015 All Rights Reserved. Version 07.10.2015 8
Authoring Interface
Captivate’s interface consists of:
• Film Strip: This area allows you to see all your pages within your project.
• Timeline: This allows you to apply transitions to objects and audio.
• Properties: This panel has the available property options to assign the objects you have on your
work area.
• Work Area: This area allows you to drag and drop, resize and move objects.
• Toolbar: All objects and media types you can drop in your work area are located in this area.
Converting from Existing Content Documents If you have existing Microsoft PowerPoints, Adobe Captivate allows you to import the slides into your
project. However, the information is not imported as individual editable objects, rather a flattened image
per slide. You can add additional objects over the PowerPoint imported content to add interaction. If you
have older Captivate projects you want to convert for mobile, you may have to update some behaviors for
mobile consumption. The desktop experience may not always translate to mobile devices. Objects in the
project that are not supported in the HTML5 output get dynamically listed in the HTML5 Tracker. The
primary behavior that is used a lot and does not transfer to the mobile experience is hover. You must add
a fallback behavior of tap (click) for mobile.
4 3
1
2
5

© OnPoint Digital, Inc. 2015 All Rights Reserved. Version 07.10.2015 9
Note: Imported Flash content will need to be re-engineered to work on mobile devices. Consider
using Adobe Edge Animate to create mobile-friendly animations and exercises that are supported
in a multi-screen delivery environment.
Navigation Captivate offers two ways to navigate through your course. You can use their existing skin editor options
that will provide a bottom bar with the options you select or create your own navigation. In order to create
your own navigation, you must create a back and next link on every page and any supporting branching
navigation. OnPoint’s interface has a course exit button, but you can create your own and turn it off.
Note: When creating custom navigations, make sure the objects and links are visible for the entire
timeline span.
iOS Device Capture New to version 9, record your device’s screen. Once you have recorded, add interactivity through
gestures, audio or instructional tool-tips.
Asset Store New to version 9 is its asset store that has a library of over 25,000 assets you can use in your courses.
The assets include games, interactions, layouts, scenarios, people cutouts, and more, to add
engagement easily and efficiently to your courses.
Responsive Motion Effects New to version 9, you can now create fluid object transitions, without programming, that include motion
paths and rotations, even for responsive projects. Define Linear, Custom or Scribble motion paths to
completely control the way objects move. Preview animations on hover, and see how effects play out
relative to other objects on the integrated Effects and Project timeline. Create a custom effect for each
device to ensure the best mobile expereince.

© OnPoint Digital, Inc. 2015 All Rights Reserved. Version 07.10.2015 10
Multistate Objects One of the best new features to version 9 is the ability add multistates to object. Before, you would create
several slides to account for the various states. With 9, assign states to the object within a single slide.
Create an unlimited number of states to virtually any object. Each state can contain images, text, videos,
animations or any combination of these objects. Add buttons that learners can use to navigate the course.
Create engaging mobile experiences by leveraging multistate object support for drag and drop
interactions. Simulate real-life scenarios by customizing the states for the drag sources and drop targets,
based on learner interaction. Provide feedback and aid retention, by altering the state of the drop target to
reflect whether an answer is correct or not.
Scalable Vector Graphics (SVG) Support Create high-quality projects with vector images that scale across devices and sizes with no loss of quality
and minimal file size. Build complex shapes in Adobe Illustrator CC and bring them into Adobe Captivate
as SVG graphics. Convert them to auto shapes and use them as buttons or feedback captions. Edit these
shapes using Roundtrip. The images are automatically added to the library, and can be re-used across
projects.
Knowledge Check Questions Before version 9, knowledge check opportunities could not be scored with the final testing. Now with
version 9, keep learners engaged with informal knowledge checks embedded in your courses. Include
knowledge check questions to ensure learners pause, think, and apply the learning before they move on
to more content or assessments. Provide feedback to learners for greater understanding and retention as
they progress through the course.
SCORM.com Testing You can now automatically preview courses in Scorm.com, to gauge your LMS compatibility and get error
logs to identify those portions of the course that need attention before you publish courses.

© OnPoint Digital, Inc. 2015 All Rights Reserved. Version 07.10.2015 11
Gestures
Device-centered user behavior and gestures have been added to Captivate export packages. Enable
gestures when you publish your project.
© OnPoint Digital, Inc. 2015 All Rights Reserved. Version 07.10.2015 12
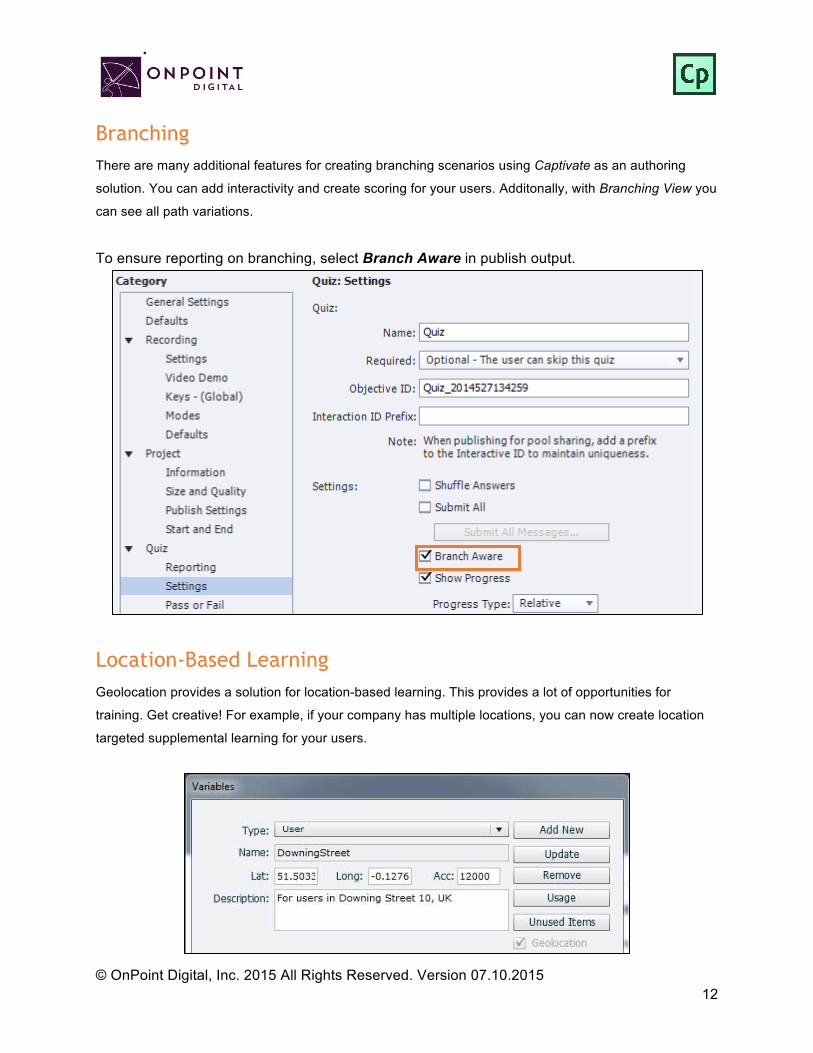
Branching There are many additional features for creating branching scenarios using Captivate as an authoring
solution. You can add interactivity and create scoring for your users. Additonally, with Branching View you
can see all path variations.
To ensure reporting on branching, select Branch Aware in publish output.
Location-Based Learning Geolocation provides a solution for location-based learning. This provides a lot of opportunities for
training. Get creative! For example, if your company has multiple locations, you can now create location
targeted supplemental learning for your users.

© OnPoint Digital, Inc. 2015 All Rights Reserved. Version 07.10.2015 13
Drag and Drop Interactions Drag and drop interactions provide an engaging way of assessing your users’ knowledge. This interaction
lets users answer questions by dragging and dropping objects in the designated areas or objects. Create
all your objects before adding the interaction of drag and drop. As you create the drag options, ensure
your timing is not conflicting with display time of objects and do not have as appear after setting.
Additionally, if you are designing this exercise for a specific device, use absolute sizing instead of scaling.
Gaming and Widgets Although, widgets offer an easy solution to adding interactive objects, they are not always reliable and it is better
to create interactive objects from scratch. If you want to leverage widgets, test before you add all your content to
ensure it will work before spending a lot of time on production. With Captivate 9, Adobe added widgets for
gaming. You may include instructions for viewing in landscape or portrait mode to have better reliability.
For example, the Catch the AlphaNums game works well in portrait, but not landscape mode.
Note: Test on all devices to ensure layout is supported along with the interactions.
Timelines With the Timeline, you can organize objects and precisely control the timing of objects. For example, on a
slide that contains a caption, an image, and a highlight box, you can display the caption, then the image 4
seconds later, and then the highlight box 2 seconds after that. The Timeline also shows any audio
associated with the slide or with objects on the slide. You can easily coordinate the timing of audio with
the slide using the Timeline. It is a best practice to get your audio placed first, and then apply timings
using your audio file.
Note: While testing, a common issue is objects not showing or going away too fast. This is
because your object is not placed on the timeline for the full amount of time or incorrect start/end
times.

© OnPoint Digital, Inc. 2015 All Rights Reserved. Version 07.10.2015 14
Content
Images
Saving photos at the smallest size possible while still maintaining visual quality is the best way to ensure
that images are responsive. Web images are saved as 72 DPI. Images should be in PNG format to
ensure proper rendering in a mobile APP’s UI Web View Browser.
Text
In order for your text to be responsive as devices change varies in size, you should set objects to scale.
Choose % if you want object dimension or position to be a % of stage width and height and %relative if
you want overlay position to be maintained.
Set device height to support text moving around when needed. 800 pixels are recommended.

© OnPoint Digital, Inc. 2015 All Rights Reserved. Version 07.10.2015 15
Audio Any Audio should be in MP3 format and compressed for fast load times. Additionally, when your project
has audio, make sure to select Publish Audio as Mono in your publish output.
Video Videos are most successful when they are 1-3 minutes in length. If your topic is longer, break into bite-
size subtopic videos. This will allow smaller files sizes and ensure efficient load times for downloading the
video. In addition to keeping videos short, ensure to compress the video to the smallest size while still
maintaining quality to ensure proper load times.
As a recommendation, the video should be sized at 480x320 as it still looks good when scaled up, but
keeps the file size down.
NOTE: Video and animations must be MP4 files encoded using an H264 codec for widest device support and we would recommend that no video be more than 1-2 MB per minute running time; this means you may need to use another utility or tool to compress your original videos down to a smaller size. Easy ways to do this besides making the content small on a pixel basis to 480x320 is to drop the frame rate (15 FPS), change the key frames to 100 or 200, and bring down the audio quality to 24 K or 16 K mono because there are no stereo speakers on most mobile devices.

© OnPoint Digital, Inc. 2015 All Rights Reserved. Version 07.10.2015 16
Objects Create specific, meaningful naming of all objects and make sure no naming is duplicated. Depending on
your design, you may need to set % relative and % so that objects can scale with each device’s width and
height ratio
Publish From the Ribbon, publish your course with Publish for Devices option.
Select Zip Files and enter Project Title information. Name your project a unique, meaningful name with
no spaces or characters. You will select your advanced options for LMS output before clicking Publish.
Depending on your communication type—SCORM, xAPI / Tin Can—and interactions being used you will
have advanced settings to select from to ensure your project’s output is successfully supported.

© OnPoint Digital, Inc. 2015 All Rights Reserved. Version 07.10.2015 17
eLearning Compliant
From eLearning Output, you can choose your SCORM or xAPI / Tin Can options. Name your project a
unique, meaningful name with no spaces or characters.

© OnPoint Digital, Inc. 2015 All Rights Reserved. Version 07.10.2015 18
Once you have selected your eLearning output type, from Quiz tab you must enable reporting for this
project. You will then be presented with all reporting setting options. Select your Standard
Communication and configure its settings.

© OnPoint Digital, Inc. 2015 All Rights Reserved. Version 07.10.2015 19
You will be presented with the manifest information. Give your course a unique Identification, enter
Course Title and Description. Click OK when you have completed manifest information
Captivate has compression options to ensure fast download times. These settings will depend on your
original source quality. The higher quality of the source, the more compression can be done without loss
of quality showing. This is something you should test to ensure you maintain quality media.
Course Identifier file naming should have no spaces.

© OnPoint Digital, Inc. 2015 All Rights Reserved. Version 07.10.2015 20
Once you have selected from available options, click OK to Publish.
HTML Package To create a HTML package, name your project a unique, meaningful name with no spaces or characters.
Disable eLearning output and click Publish.

© OnPoint Digital, Inc. 2015 All Rights Reserved. Version 07.10.2015 21
Import into OPLS/CellCast From Content Tab, click Wizards.
The Wizards options screen will appear. Select Content Wizard.

© OnPoint Digital, Inc. 2015 All Rights Reserved. Version 07.10.2015 22
Click SCORM, xAPI or HTML, depending on file type, to begin upload options.

© OnPoint Digital, Inc. 2015 All Rights Reserved. Version 07.10.2015 23
The Information screen will appear. Enter all the course information and click Continue when complete.
Browse for your ZIP package to upload course and click Continue.
1
2

© OnPoint Digital, Inc. 2015 All Rights Reserved. Version 07.10.2015 24
Browse for and upload your course thumbnail image and click continue, or click Proceed… and use
default thumbnail.
Review course information and click Generate Course.
1
2

© OnPoint Digital, Inc. 2015 All Rights Reserved. Version 07.10.2015 25
Once the generation is complete, a pop-up will display—click View and Publish Course.

© OnPoint Digital, Inc. 2015 All Rights Reserved. Version 07.10.2015 26
Hide the Welcome message so the user goes straight to your content. Additionally, if you do not want
your content to be eligible for self-service enroll you must disable the OnPoint Content Viewer (“OPCV”)
Catalog option by selecting No.
If your course is for mobile delivery, always keep hidden.

© OnPoint Digital, Inc. 2015 All Rights Reserved. Version 07.10.2015 27
Select your publish options for browser and mobile and click Publish.
Your course is now published, click Continue.
Advanced Optional Features There are advanced options to choose from to improve the user experience. One thing to think about is
screen real estate. To maximize your content’s real estate, you can choose settings in the Advanced Tab.
A: Select for Online Portal Delivery
B: Select to
Deliver for CellCast App
C: Select to
Deliver for Mobile Web
A
B
C

© OnPoint Digital, Inc. 2015 All Rights Reserved. Version 07.10.2015 28
At the bottom of the page, click Edit to open setting options.

© OnPoint Digital, Inc. 2015 All Rights Reserved. Version 07.10.2015 29
If you do not have an assessment or welcome page, a good setting to improve experience is set SCORM
to Minimum. This will remove the top bar and menu from the viewable screen.
The most important setting to ensure is IE8 compatibility is disabled. This is set to true by default and
must be unchecked.
Assigning Users and Groups Once you have published your course, you can assign users or groups to be assigned to the course.
Assigning Users
From the Content Tab, select Courses.
A list of all courses will show. Select your Course Name from list.

© OnPoint Digital, Inc. 2015 All Rights Reserved. Version 07.10.2015 30
From Assignments Tab, click Assign in the Assigned Users section.
Select desired User from Available Users and click Assign.

© OnPoint Digital, Inc. 2015 All Rights Reserved. Version 07.10.2015 31
You will now see the user in the Assigned Users section. Click Finished..
Assigning Groups
From the Content Tab, select Courses.
Select Course from list.

© OnPoint Digital, Inc. 2015 All Rights Reserved. Version 07.10.2015 32
From Assignments Tab, click Assign in the Assigned Users section.
Click Groups to view the list of groups to choose from.

© OnPoint Digital, Inc. 2015 All Rights Reserved. Version 07.10.2015 33
From the list of available groups, select your Group.
You will now click Assigned and Finish, as you did before to assign a user.
Additional Resources For additional resources, visit Captivate’s Blog site http://blogs.adobe.com/captivate/. For in-depth
information of each of Captivate’s components, you can search their reference guide. Additionally, the
Welcome screen has tutorials and trainings you can choose from.
Questions If you have a question about this guide or would like OnPoint Digital’s support team contact us at 912-
898-9202 or email [email protected].