adobe connect instructor’s manual
TRANSCRIPT
1
ADOBE CONNECT INSTRUCTOR’S MANUAL
GENERAL INFORMATION
Adobe Connect is a platform that enables virtual meetings and distance learning independent
of any specific location. Adobe Connect is also the most widely used virtual classroom
application for mobile devices.
Adobe Connect software is a web service that allows you to teach online with voice, video and
text or create an environment for conversation and discussion. This guide provides
information to assist instructors who will use this system.
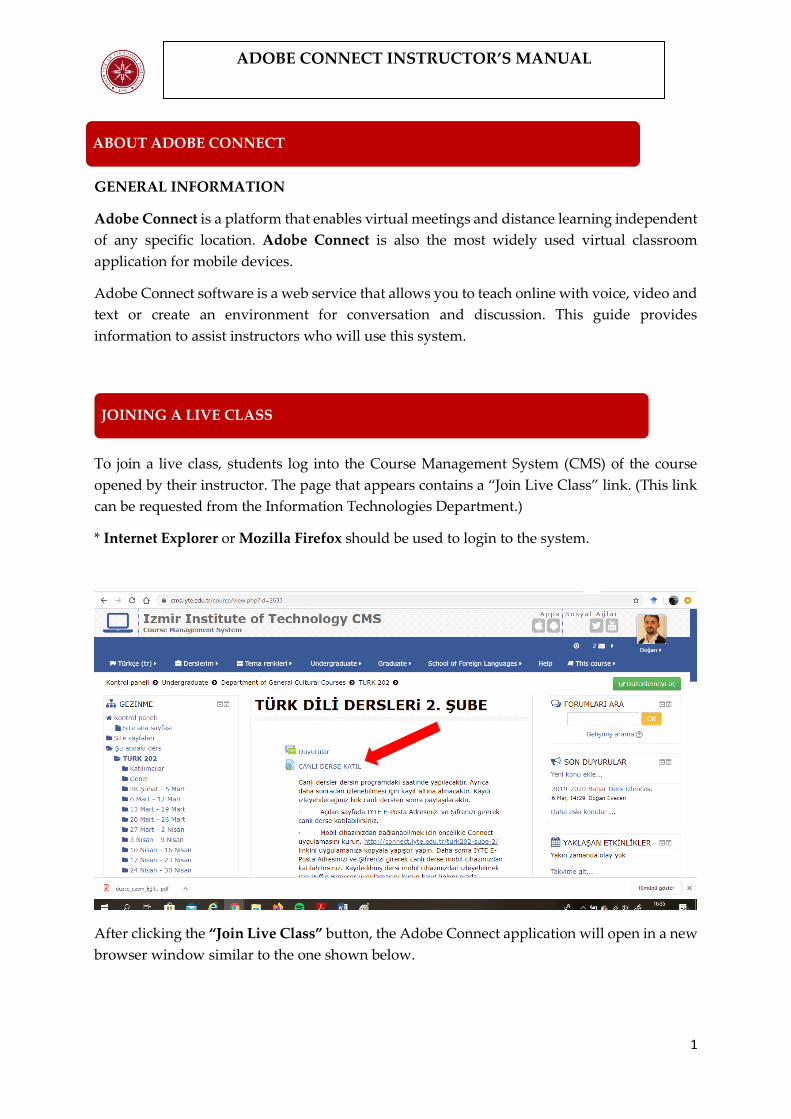
To join a live class, students log into the Course Management System (CMS) of the course
opened by their instructor. The page that appears contains a “Join Live Class” link. (This link
can be requested from the Information Technologies Department.)
* Internet Explorer or Mozilla Firefox should be used to login to the system.
After clicking the “Join Live Class” button, the Adobe Connect application will open in a new
browser window similar to the one shown below.
JOINING A LIVE CLASS
ABOUT ADOBE CONNECT
2
ADOBE CONNECT INSTRUCTOR’S MANUAL
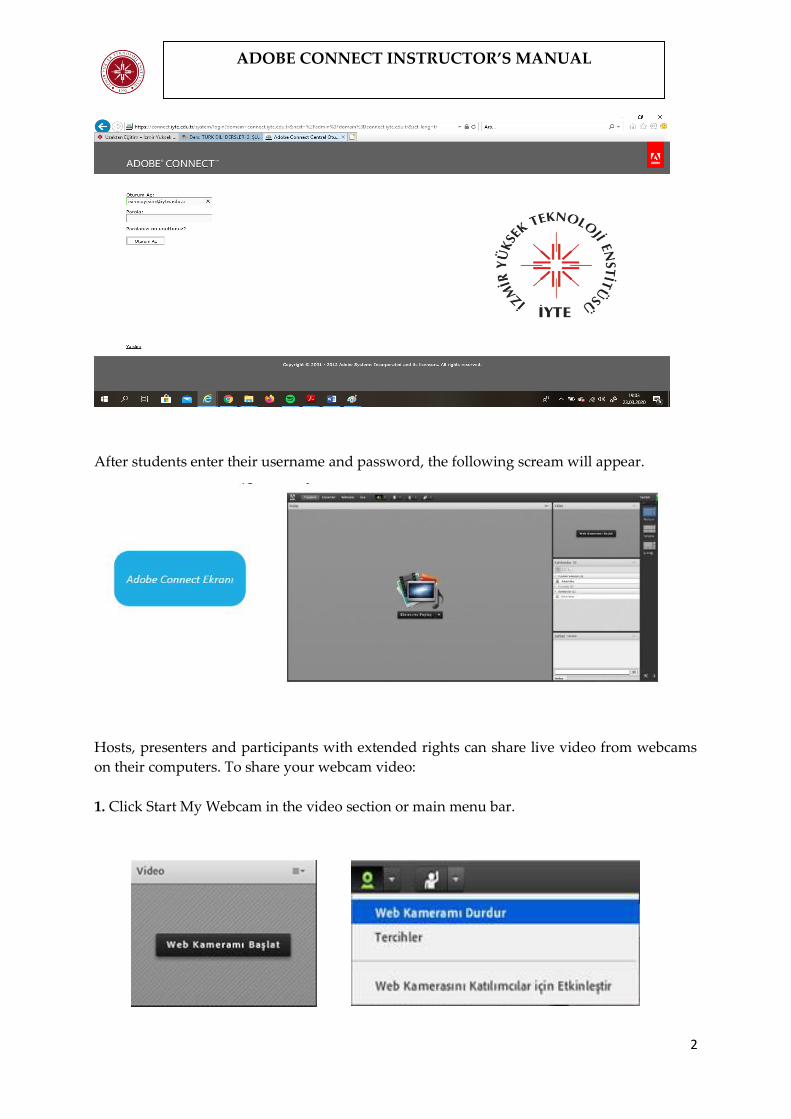
After students enter their username and password, the following scream will appear.
Hosts, presenters and participants with extended rights can share live video from webcams
on their computers. To share your webcam video:
1. Click Start My Webcam in the video section or main menu bar.
3
ADOBE CONNECT INSTRUCTOR’S MANUAL
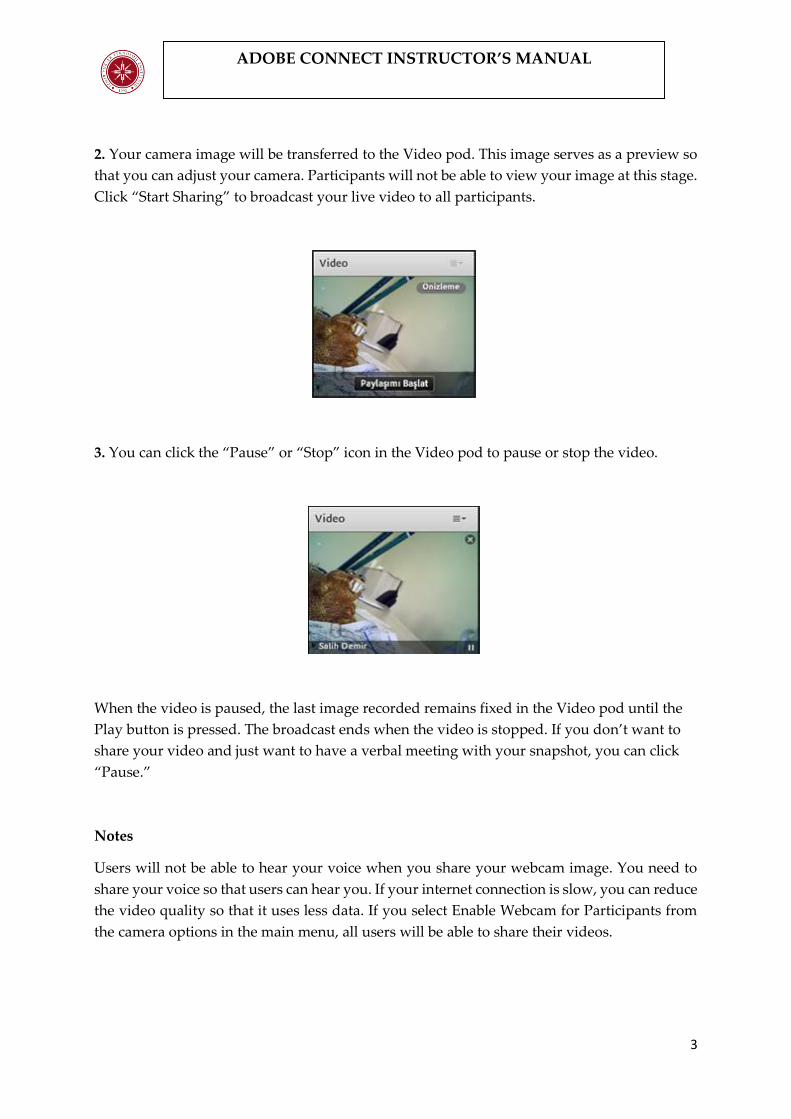
2. Your camera image will be transferred to the Video pod. This image serves as a preview so
that you can adjust your camera. Participants will not be able to view your image at this stage.
Click “Start Sharing” to broadcast your live video to all participants.
3. You can click the “Pause” or “Stop” icon in the Video pod to pause or stop the video.
When the video is paused, the last image recorded remains fixed in the Video pod until the
Play button is pressed. The broadcast ends when the video is stopped. If you don’t want to
share your video and just want to have a verbal meeting with your snapshot, you can click
“Pause.”
Notes
Users will not be able to hear your voice when you share your webcam image. You need to
share your voice so that users can hear you. If your internet connection is slow, you can reduce
the video quality so that it uses less data. If you select Enable Webcam for Participants from
the camera options in the main menu, all users will be able to share their videos.
4
ADOBE CONNECT INSTRUCTOR’S MANUAL
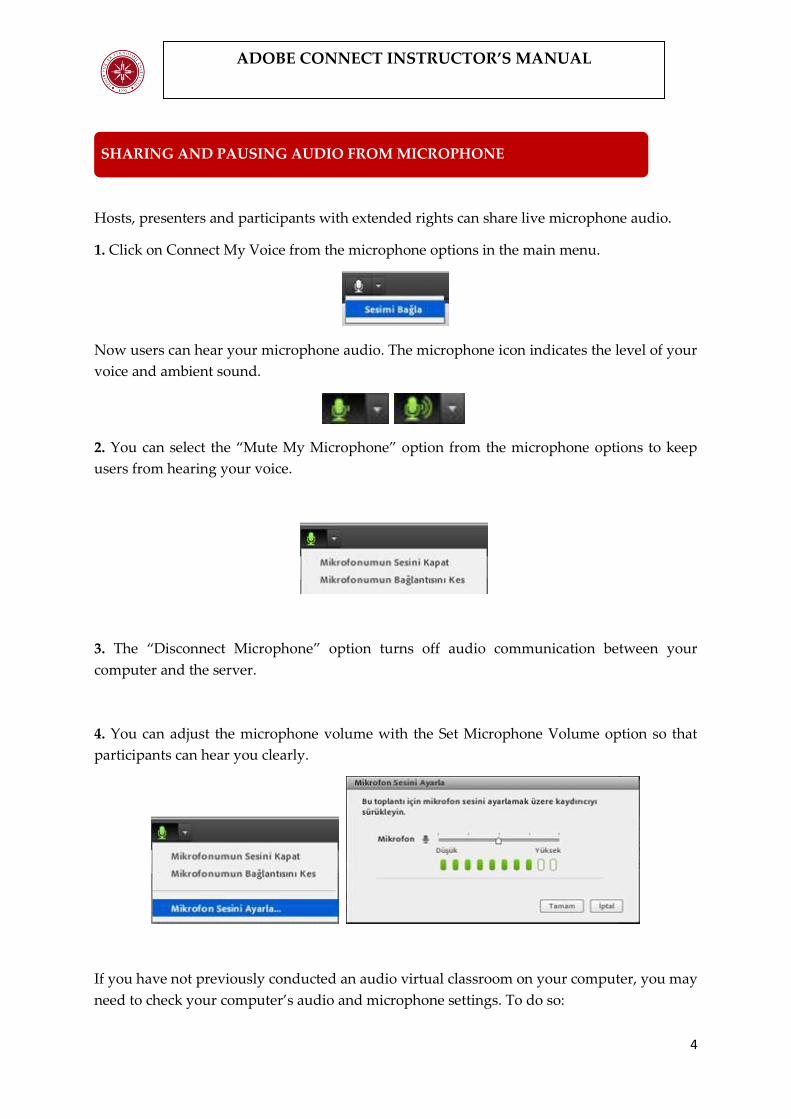
Hosts, presenters and participants with extended rights can share live microphone audio.
1. Click on Connect My Voice from the microphone options in the main menu.
Now users can hear your microphone audio. The microphone icon indicates the level of your
voice and ambient sound.
2. You can select the “Mute My Microphone” option from the microphone options to keep
users from hearing your voice.
3. The “Disconnect Microphone” option turns off audio communication between your
computer and the server.
4. You can adjust the microphone volume with the Set Microphone Volume option so that
participants can hear you clearly.
If you have not previously conducted an audio virtual classroom on your computer, you may
need to check your computer’s audio and microphone settings. To do so:
SHARING AND PAUSING AUDIO FROM MICROPHONE
5
ADOBE CONNECT INSTRUCTOR’S MANUAL
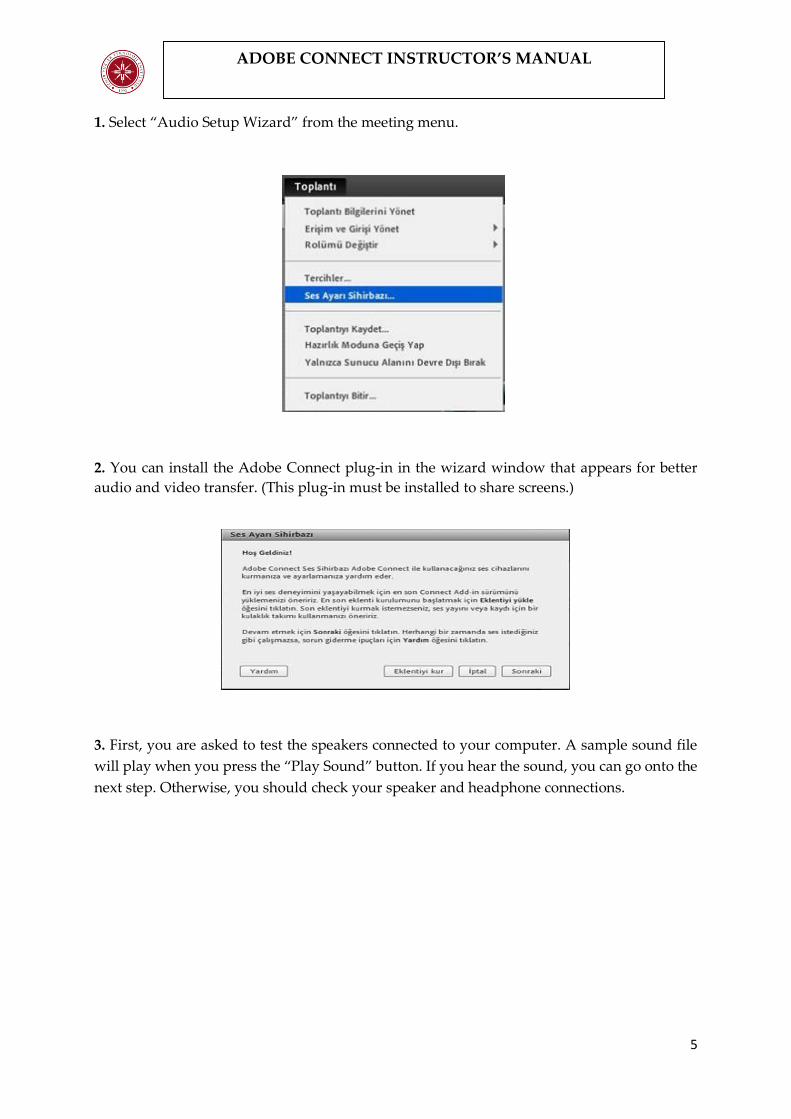
1. Select “Audio Setup Wizard” from the meeting menu.
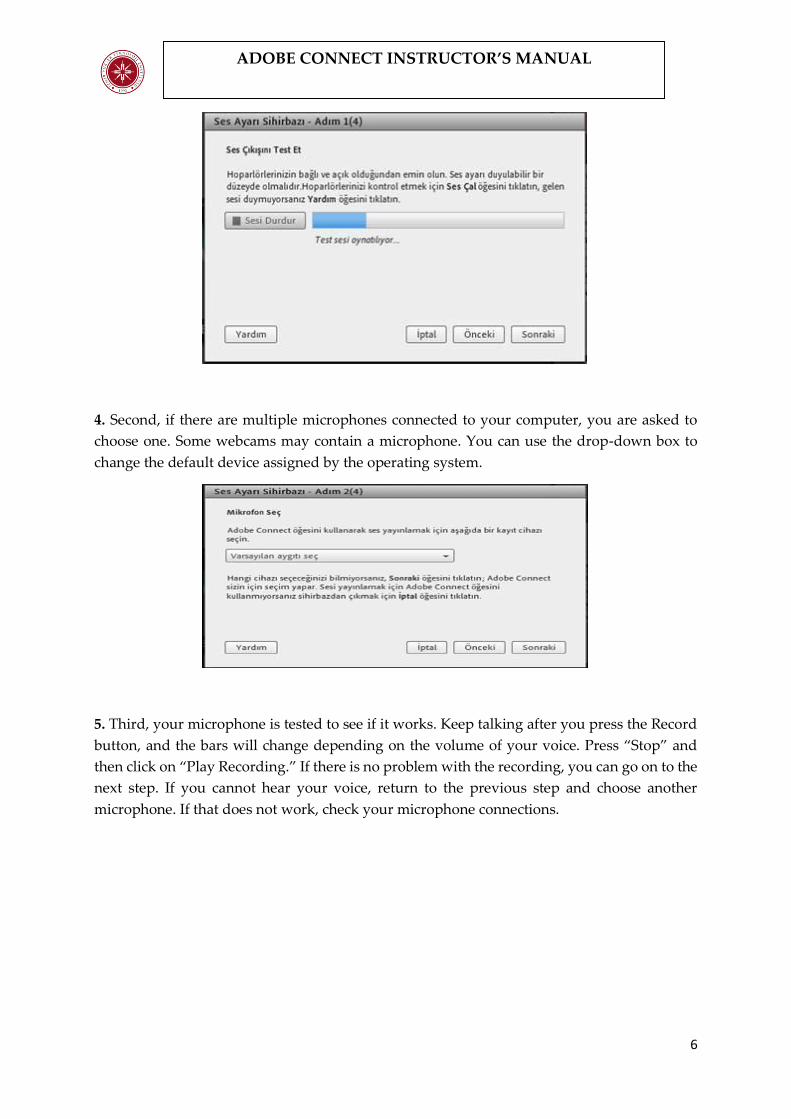
2. You can install the Adobe Connect plug-in in the wizard window that appears for better
audio and video transfer. (This plug-in must be installed to share screens.)
3. First, you are asked to test the speakers connected to your computer. A sample sound file
will play when you press the “Play Sound” button. If you hear the sound, you can go onto the
next step. Otherwise, you should check your speaker and headphone connections.
6
ADOBE CONNECT INSTRUCTOR’S MANUAL
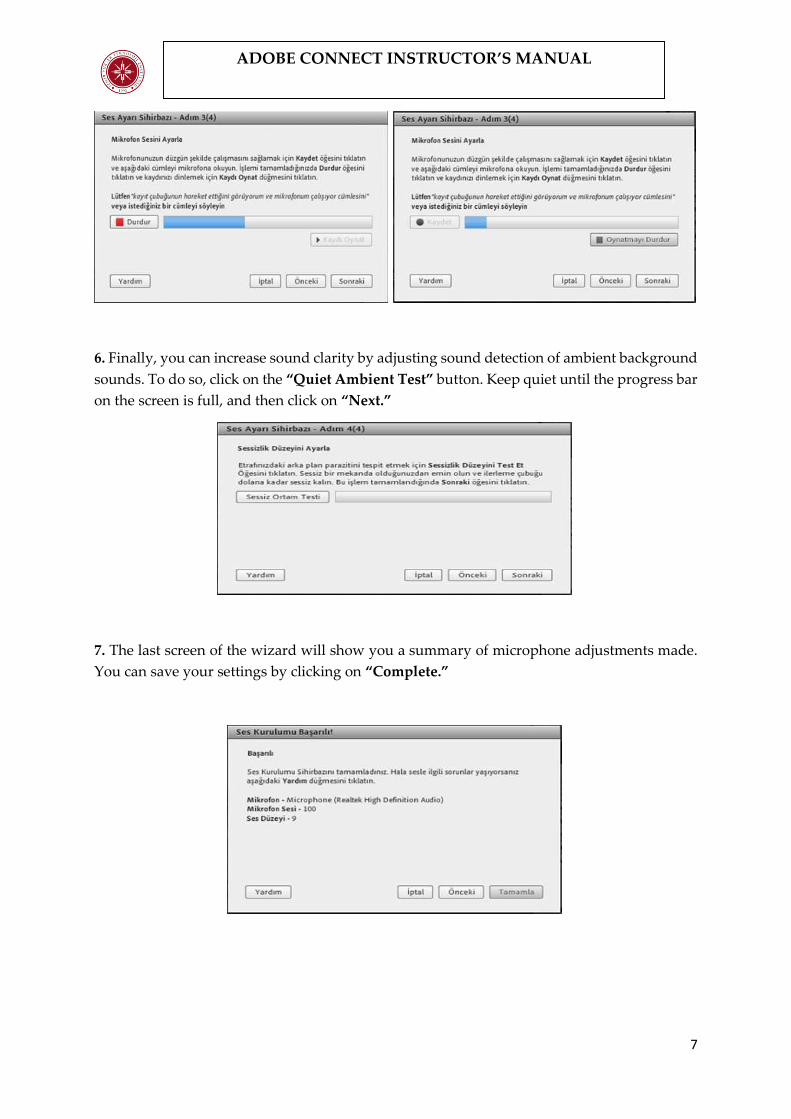
4. Second, if there are multiple microphones connected to your computer, you are asked to
choose one. Some webcams may contain a microphone. You can use the drop-down box to
change the default device assigned by the operating system.
5. Third, your microphone is tested to see if it works. Keep talking after you press the Record
button, and the bars will change depending on the volume of your voice. Press “Stop” and
then click on “Play Recording.” If there is no problem with the recording, you can go on to the
next step. If you cannot hear your voice, return to the previous step and choose another
microphone. If that does not work, check your microphone connections.
7
ADOBE CONNECT INSTRUCTOR’S MANUAL
6. Finally, you can increase sound clarity by adjusting sound detection of ambient background
sounds. To do so, click on the “Quiet Ambient Test” button. Keep quiet until the progress bar
on the screen is full, and then click on “Next.”
7. The last screen of the wizard will show you a summary of microphone adjustments made.
You can save your settings by clicking on “Complete.”
8
ADOBE CONNECT INSTRUCTOR’S MANUAL
The host or presenter (or a participant with certain rights) can use the whiteboard to share
text, drawings, and other annotations.
You can use the whiteboard in the Share pod in two ways:
• A stand-alone whiteboard allows presenters to create content on a white background.
• An overlay whiteboard allows presenters to create content over an existing document in a
Share pod, adding annotations to and drawing on the document. You can lay a whiteboard
over presentations, JPG, SWF, FLV, and PDF documents.
If you turn off sharing, change the content in a Share pod, or close the Share pod, the
whiteboard is still part of the meeting room and can be displayed again.
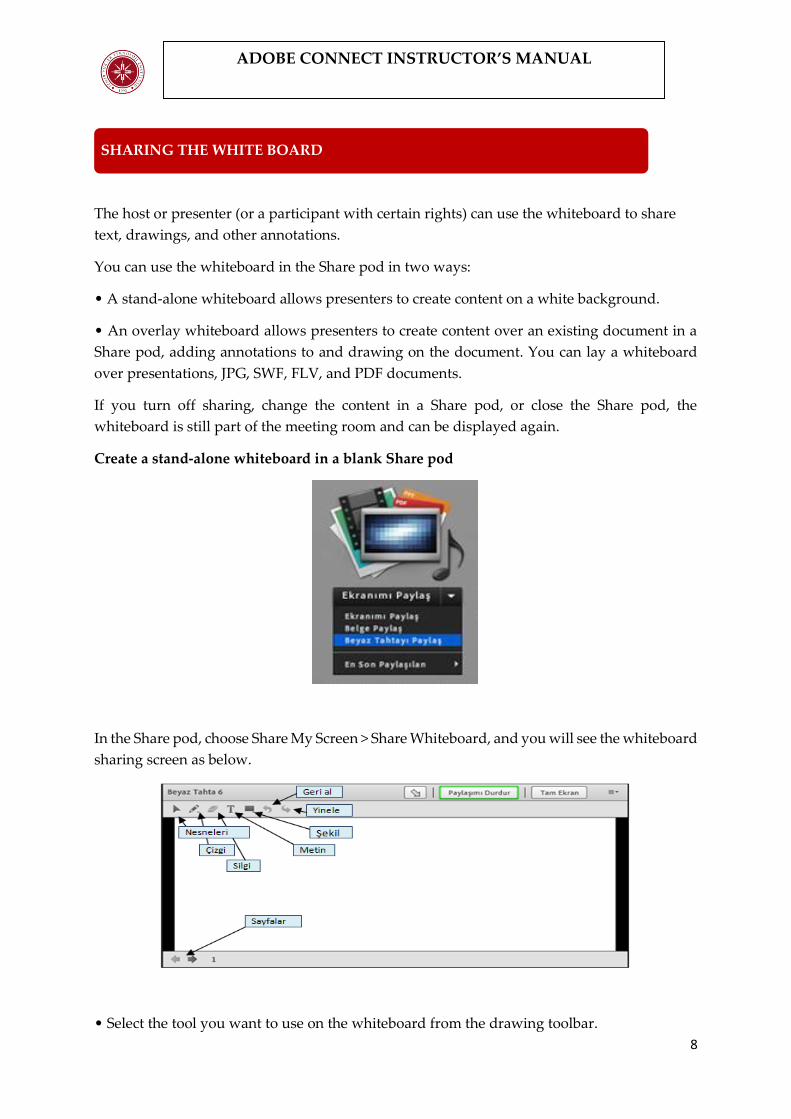
Create a stand-alone whiteboard in a blank Share pod
In the Share pod, choose Share My Screen > Share Whiteboard, and you will see the whiteboard
sharing screen as below.
• Select the tool you want to use on the whiteboard from the drawing toolbar.
SHARING THE WHITE BOARD

9
ADOBE CONNECT INSTRUCTOR’S MANUAL
• The property settings of the tool you selected are displayed in the drawing toolbar and can
be adjusted.
In the image below, the text box (T) is selected and toolbars for font, font size, and font color
are displayed.
• Click the “Stop Sharing” button if you want to stop sharing your whiteboard. The
whiteboard application will be removed from the screen but not deleted.
10
ADOBE CONNECT INSTRUCTOR’S MANUAL
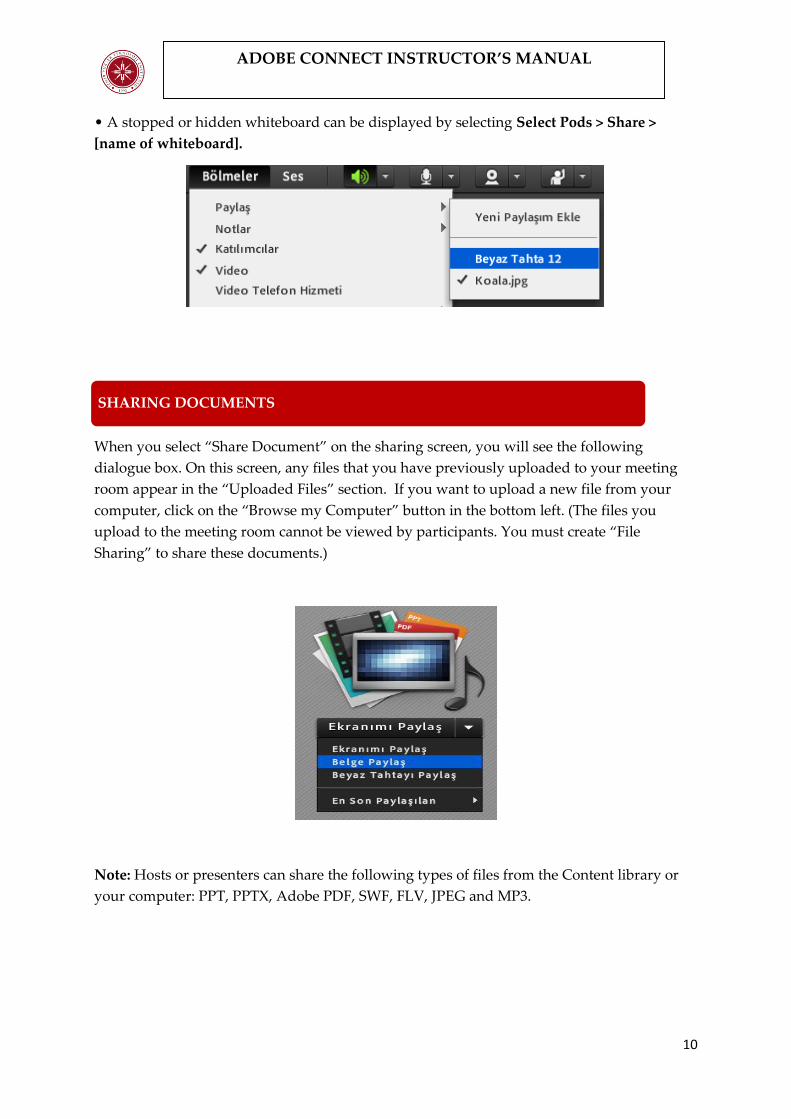
• A stopped or hidden whiteboard can be displayed by selecting Select Pods > Share >
[name of whiteboard].
When you select “Share Document” on the sharing screen, you will see the following
dialogue box. On this screen, any files that you have previously uploaded to your meeting
room appear in the “Uploaded Files” section. If you want to upload a new file from your
computer, click on the “Browse my Computer” button in the bottom left. (The files you
upload to the meeting room cannot be viewed by participants. You must create “File
Sharing” to share these documents.)
Note: Hosts or presenters can share the following types of files from the Content library or
your computer: PPT, PPTX, Adobe PDF, SWF, FLV, JPEG and MP3.
SHARING DOCUMENTS
11
ADOBE CONNECT INSTRUCTOR’S MANUAL
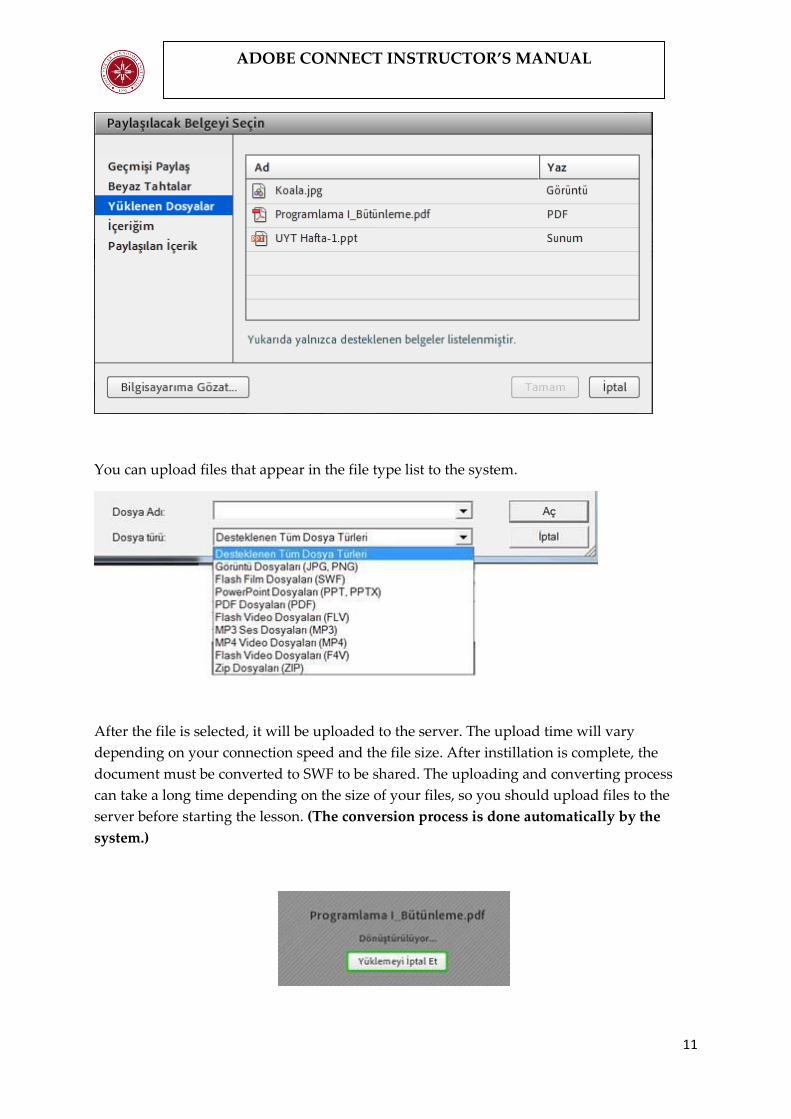
You can upload files that appear in the file type list to the system.
After the file is selected, it will be uploaded to the server. The upload time will vary
depending on your connection speed and the file size. After instillation is complete, the
document must be converted to SWF to be shared. The uploading and converting process
can take a long time depending on the size of your files, so you should upload files to the
server before starting the lesson. (The conversion process is done automatically by the
system.)
12
ADOBE CONNECT INSTRUCTOR’S MANUAL
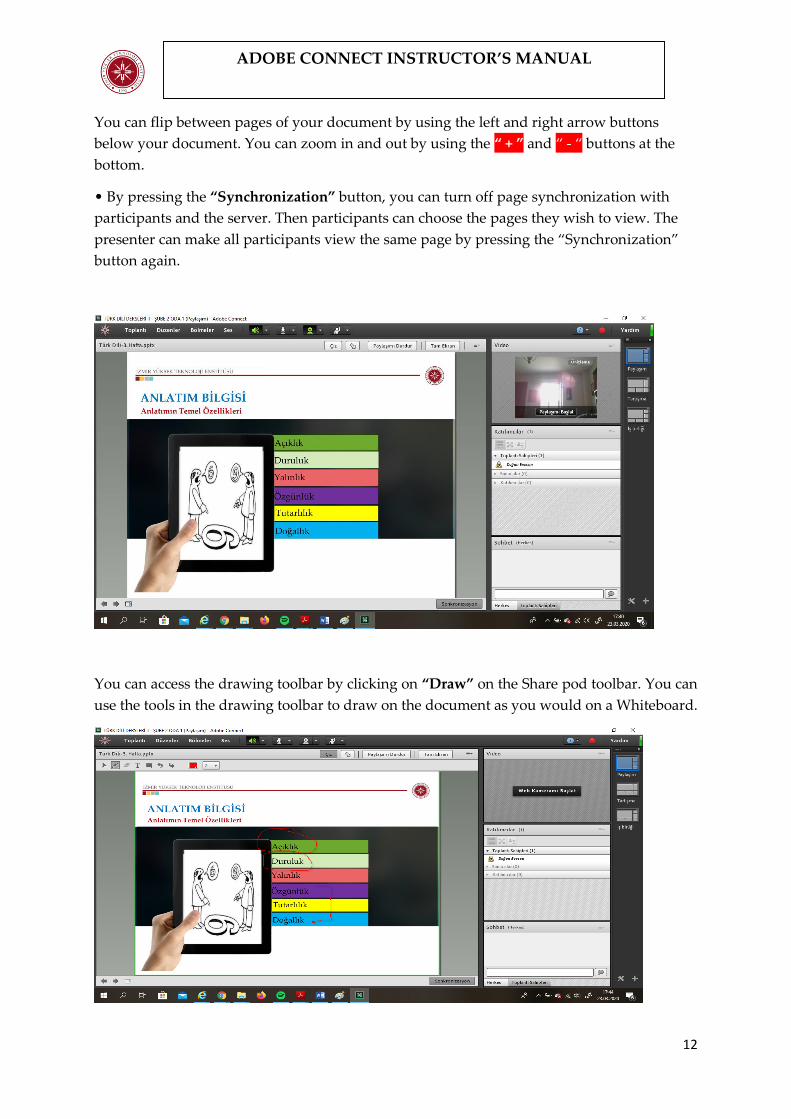
You can flip between pages of your document by using the left and right arrow buttons
below your document. You can zoom in and out by using the “ + ” and “ - “ buttons at the
bottom.
• By pressing the “Synchronization” button, you can turn off page synchronization with
participants and the server. Then participants can choose the pages they wish to view. The
presenter can make all participants view the same page by pressing the “Synchronization”
button again.
You can access the drawing toolbar by clicking on “Draw” on the Share pod toolbar. You can
use the tools in the drawing toolbar to draw on the document as you would on a Whiteboard.
13
ADOBE CONNECT INSTRUCTOR’S MANUAL
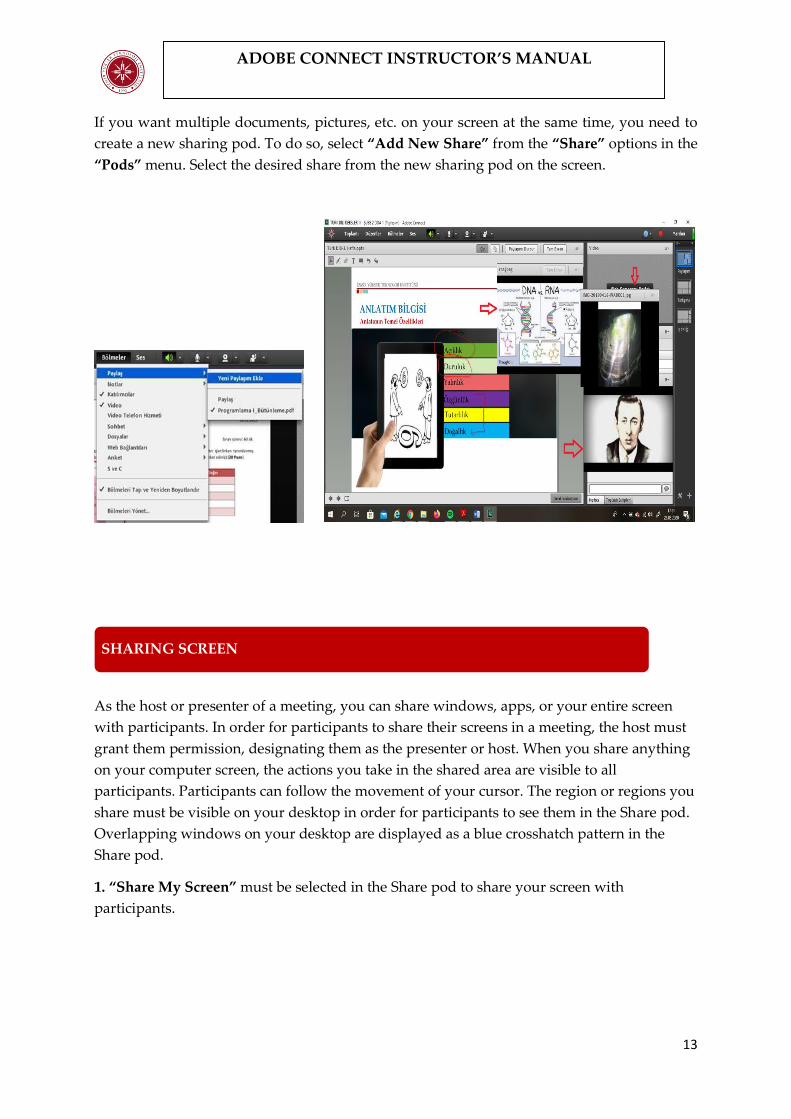
If you want multiple documents, pictures, etc. on your screen at the same time, you need to
create a new sharing pod. To do so, select “Add New Share” from the “Share” options in the
“Pods” menu. Select the desired share from the new sharing pod on the screen.
As the host or presenter of a meeting, you can share windows, apps, or your entire screen
with participants. In order for participants to share their screens in a meeting, the host must
grant them permission, designating them as the presenter or host. When you share anything
on your computer screen, the actions you take in the shared area are visible to all
participants. Participants can follow the movement of your cursor. The region or regions you
share must be visible on your desktop in order for participants to see them in the Share pod.
Overlapping windows on your desktop are displayed as a blue crosshatch pattern in the
Share pod.
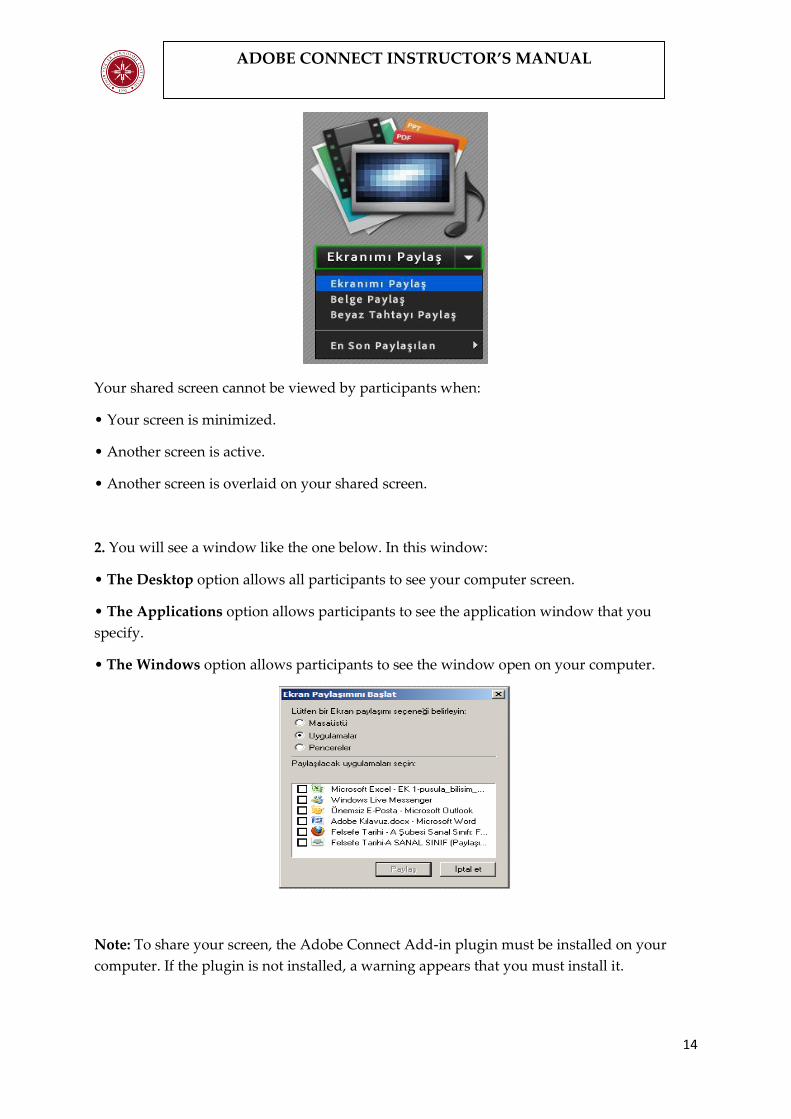
1. “Share My Screen” must be selected in the Share pod to share your screen with
participants.
SHARING SCREEN
14
ADOBE CONNECT INSTRUCTOR’S MANUAL
Your shared screen cannot be viewed by participants when:
• Your screen is minimized.
• Another screen is active.
• Another screen is overlaid on your shared screen.
2. You will see a window like the one below. In this window:
• The Desktop option allows all participants to see your computer screen.
• The Applications option allows participants to see the application window that you
specify.
• The Windows option allows participants to see the window open on your computer.
Note: To share your screen, the Adobe Connect Add-in plugin must be installed on your
computer. If the plugin is not installed, a warning appears that you must install it.

15
ADOBE CONNECT INSTRUCTOR’S MANUAL
* This plugin does not work in Chrome. Use other browsers.
Hosts and presenters can use the Poll pod to create questions or surveys for participants and
view results. Only hosts and presenters can control how polls are managed and displayed to
participants. Hosts can also cast votes. Questionnaires are useful if you want instant
feedback on what is discussed during the meeting. Surveys can also be used at the end of the
meeting to find out if participants consider the meeting, content and presenters to be of high
quality.
Creating a Survey
1. If the Poll pod is not visible, click on the “Pods” menu and select “Poll.” Select “New Poll”
from the options.
2. In the upper left corner of the pod, select, “Multiple Choice” or “Multiple Answers.”
SURVEYING PARTICIPANTS
16
ADOBE CONNECT INSTRUCTOR’S MANUAL
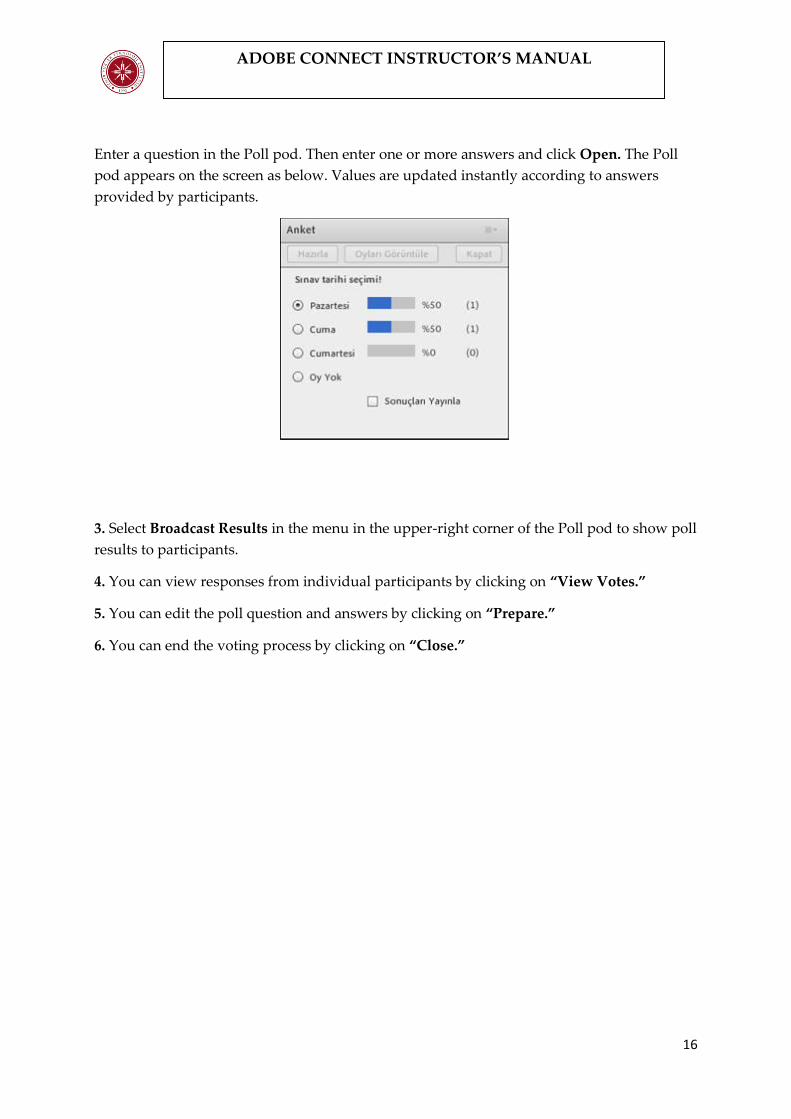
Enter a question in the Poll pod. Then enter one or more answers and click Open. The Poll
pod appears on the screen as below. Values are updated instantly according to answers
provided by participants.
3. Select Broadcast Results in the menu in the upper-right corner of the Poll pod to show poll
results to participants.
4. You can view responses from individual participants by clicking on “View Votes.”
5. You can edit the poll question and answers by clicking on “Prepare.”
6. You can end the voting process by clicking on “Close.”