adobe connect layouts and pods support sheet - …€¦ · cead technology support sheet connect...
TRANSCRIPT

CEAD technology support sheet Connect layouts and pods: 1
Supp
ort S
heet
Centre for Educational andAcademic Development
Adobe Connect Layouts and PodsThis guide has been written for University staff holding online meetings in Adobe Connect.
The Connect meeting room is organised into a number of areas or pods. Each pod has a specific function – the Share pod, to share files and one’s screen with the attendees, the video pod to share and receive webcam feeds, the Attendees pod that features a list of all the meeting attendees, the Chat pod for attendees to communicate in private or public by text chat, the Notes pod for taking notes and sharing with the rest of the attendees, to name a few of the popular pods.
The arrangement of pods in the meeting room is referred to as a layout in Connect. Connect has three pre-built layouts – Sharing (the default), Discussion, and Collaboration. Hosts can customise these layouts or create completely new ones by adding new pods, hiding or removing existing ones, or changing the positions of the pods.
To switch between layouts simply click onto a layout in the Layout Bar (by default on the right side of the screen):
LayoutsTIPThe Sharing layout is optimized for sharing content (Microsoft PowerPoint presentations, video, Adobe PDF, and so on). The Discussion layout is optimized for discussing issues interactively and taking notes. The Collaboration layout is optimized for annotating content and drawing freehand on content.

CEAD technology support sheet Connect layouts and pods: 2
Support S
heet
Even though the Layout Bar is only visible to hosts, when a layout is changed during a meeting, the new layout is displayed on all the attendees’ screens. It is advisable to minimise the number of times you change the layout as this can be disruptive for the other attendees.
A more sophisticated approach is to use the preparing mode. In preparing mode a host can navigate between meeting layouts without affecting the participants’ view. This makes it possible for a host to edit or prepare meeting layouts while another attendee is presenting or during a break in the meeting.
To adjust the layout during a meeting;
In the Layout Bar, click on the Prepare Layouts icon
A notification about the Preparing Mode opens – click OK to close it
Click on the Add Layouts icon
Select Duplicate an existing layout, select the existing layout closest to what you want to achieve, give it a name and click OK
TIPCreating different layouts for different parts of your lecture in advance is a way around this. For example, you could start with a lecture-based layout, then move to a discussion-based layout for group work, re-convening in the original lecture-based layout.
CEAD technology support sheet Connect layouts and pods: 3
Suppor
t Shee
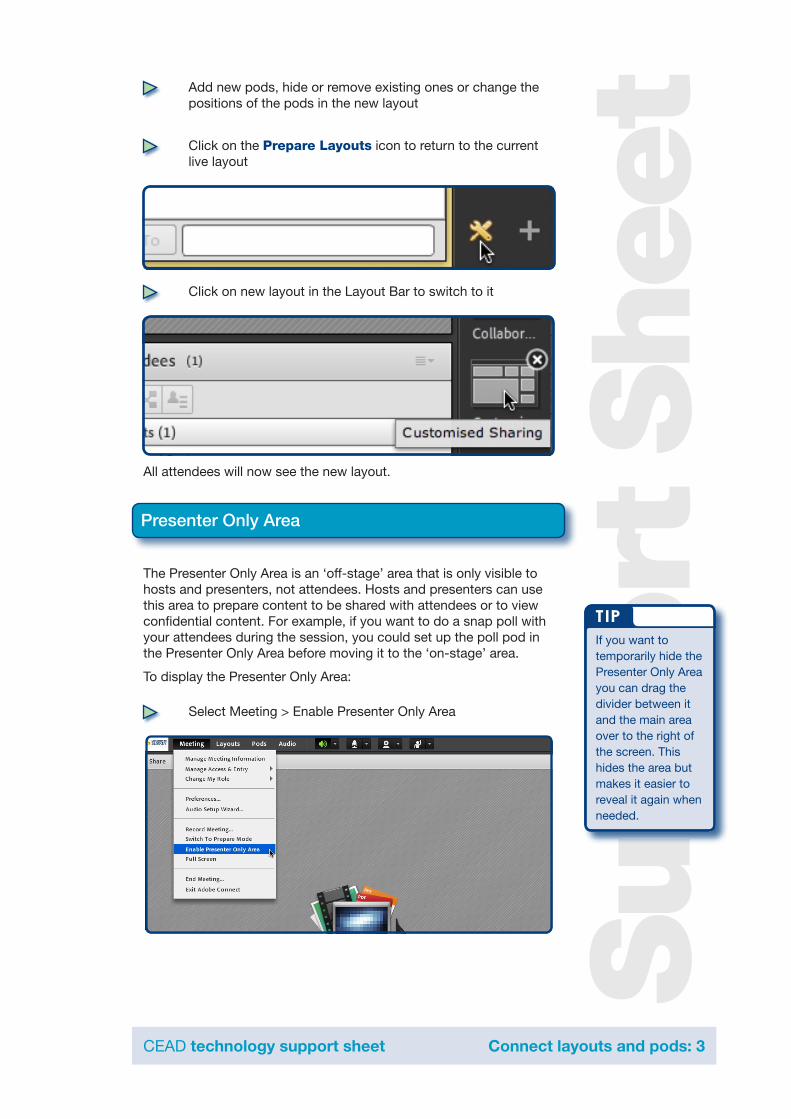
tAdd new pods, hide or remove existing ones or change the positions of the pods in the new layout
Click on the Prepare Layouts icon to return to the current live layout
Click on new layout in the Layout Bar to switch to it
All attendees will now see the new layout.
The Presenter Only Area is an ‘off-stage’ area that is only visible to hosts and presenters, not attendees. Hosts and presenters can use this area to prepare content to be shared with attendees or to view confidential content. For example, if you want to do a snap poll with your attendees during the session, you could set up the poll pod in the Presenter Only Area before moving it to the ‘on-stage’ area.
To display the Presenter Only Area:
Select Meeting > Enable Presenter Only Area
Presenter Only Area
TIPIf you want to temporarily hide the Presenter Only Area you can drag the divider between it and the main area over to the right of the screen. This hides the area but makes it easier to reveal it again when needed.

CEAD technology support sheet Connect layouts and pods: 4
Support S
heet
There are nine pod types in Connect:
Share
Notes
Attendees
Video
Chat
Files
Web Links
Poll
Q&A (Question and Answer)
Hosts can show and hide, add, delete, rearrange, and organize pods. More than one instance of a pod (except the Attendees and Video pods) can be displayed in a meeting at the same time.
Show a pod
Click Pods in the main menu, and select a pod type. For pods that can have multiple instances, select the instance name from the sub-menu.
Hide a pod
To hide a pod, un-check it in the Pods menu by clicking on the pod’s name.
Retitle a pod
To retitle a pod double-click on the title bar of the pod.
Add a pod
In the main menu click Pods and click the name of a pod
In the pod sub-menu that appears, select New [pod name] Pod
Move and resize pods
To move a pod, drag it by its title bar. To resize a pod, drag the lower-right corner.
Pods
TIPAlternatively to hide a pod click the menu icon in the top right corner of the pod, and click Hide.
TIPBy default pods can be moved and resized by hosts. If you find you cannot move any pods click Pods > Move And Resize Pods. A check mark appears next to the option when it is selected.

CEAD technology support sheet Connect layouts and pods: 5
Suppor
t Shee
tDisplay a pod at maximum sizeWhen you maximize a pod, it expands to fill the current meeting window.
In the top right corner of the pod, click the Pod Options button and select Maximize
To restore the pod to its original size, click the Pod Options again, and select Restore
As a host or presenter in a meeting, you can display certain document types, application windows, complete applications, or your entire desktop to all attendees. Participants in a meeting can share their screens too, but only after being granted access to do so by a presenter or a host.
When you share anything on your computer screen, actions you take in the shared region are visible to all participants in the meeting. Participants follow the progress of your cursor as you move it across your screen.
Sharing your screen
In the Share pod, click Share My Screen You may be asked to launch the Adobe Connect add-in. To share your screen you will need click Yes
TIPTo expand the Share pod beyond the current meeting window to the edge of the display, click Full Screen. You have the option to control whether entering Full Screen occurs for all attendess or not.
Share Pod
TIPHosts can show their cursors without sharing their screens. Click Meeting > Preferences > General and select a Host Cursors option.
TIPPresenters and hosts must install the Connect Add-in the first time they attempt to upload content or share a screen. The Add-in is a special version of Flash Player with additional features for hosts and presenters. The Add-in provides support for uploading files to the server and sharing screens during a meeting. It also provides additional audio support.

CEAD technology support sheet Connect layouts and pods: 6
Support S
heet
In the Start Screen Sharing dialog, choose how you would like to share your screen:
Desktop: Share all applications on your desktop
Windows: Choose specific, already open windows to share
Applications: Share one or more applications along with related windows
Click Share
Stopping or Pausing Screen SharingAn Adobe Connect icon appears in your system tray (Windows) or your toolbar (Mac & Linux) while you are sharing your screen.
Click the Adobe Connect icon to stop sharing or access other available options
Sharing a DocumentAs a host or presenter you can share the following file types from your computer: *.ppt, *.pptx, *.flv, *.swf, *.pdf, *.gif, *.jpg, *.png, *.mp3, *.html, *.mp4, *.f4v or *.zip.
Sharing documents has the following advantages over sharing your screen:
Better and higher fidelity viewing experience for participants.
Lower bandwidth requirement for presenters and participants.
More navigation options with the Adobe Presenter sidebar.
Preloading and organizing documents in the meeting room.
Easier presentation when multiple presenters are involved. To share a document from your computer:
TIPWhen sharing your entire desktop, it is recommended that your screen resolution is set to 1024x768. Reducing the number of applications running and closing the number of open windows will provide a better experience for the participants.
TIPWhen sharing a PowerPoint slideshow via the Share Pod only basic slide transitions and animations are retained. Therefore it is a good idea to upload and review the slideshow in the meeting before the attendees arrive. Sometimes tables and fonts may display different and therefore also need checking.

CEAD technology support sheet Connect layouts and pods: 7
Suppor
t Shee
tIn an empty Share pod, click the downward arrow beside Share My Screen and select Share Document
Click Browse My Computer to select a file from your system
In the Browse dialog, locate the file you would like to share and click Open
The file is automatically uploaded and converted to a special Flash format called Adobe Presenter. Once the file has been converted, it will appear in the Share pod.
Hosts and Presenters can use a Notes pod to take meeting notes that all attendees can see. Notes remain visible throughout the meeting or until a presenter edits the note or displays a different note. A host can remove the Notes pod from view, or switch to a different room layout that does not contain that Notes pod.
When you type a message in the Notes pod of one layout, the same text appears in other layouts that contain the same pod. With the Add New Notes option, you can create a unique instance of a Notes pod that appears in only one layout.
Create a Notes podA host can create and display multiple Notes pods, each with its own text. You can use different Notes pods for different layouts and meetings.
Select Pods > Note > Add New Notes. Or, choose New Note from the Notes pod options menu
You can rename, move, and resize the Notes pod after it is created.
Add a note to a Notes pod
As a host or presenter, click anywhere inside the Notes pod.
Type the text that you want to appear in the Notes pod.
Delete a Notes pod
TIPIf you turn off sharing, change the content in a Share pod, or close the Share pod, the document is still part of the meeting room and can be displayed again.
Notes Pod

CEAD technology support sheet Connect layouts and pods: 8
Support S
heet
Choose Pods > Manage Pods
Select the Notes pod, and click Delete
Export notes to a text file or e-mailHosts can export the contents of a Notes pod. (The Connect Add-in must be installed to use this option.)
Click the pod menu icon in the upper-right corner of the pod
Select Export Note, and then select either Save As RTF (to create a text file) or E-mail Note.
Use the Chat pod to communicate with other attendees while a meeting is in progress. If you have a question and do not want to disturb the meeting flow, you can send a chat message to another meeting participant. For example, when you first enter a meeting room, you can introduce yourself by sending a chat message to everyone in the room.
As a presenter, you can use more than one Chat pod simultaneously. Chat pods can display content to either everyone or only presenters (in the Presenter Only area).
Chat pod content is persistent, and remains in a meeting room until deleted. If you want to preserve Chat pod content for future use, you can e-mail the content.
Send a chat messageUse the Chat pod to compose a chat message and address it to a specific participant, to all presenters at the meeting, or to all attendees.
Click the text box in the Chat pod
Enter your message
Click Send Message or press Enter or Return
Chat Pod
TIPThe Chat pod can be to communicate with other attendees for troubleshooting, especially if they are experiencing problems with their audio.
CEAD technology support sheet Connect layouts and pods: 9
Suppor
t Shee
tBy default, everyone will see the message. To limit the recipients, click the menu icon in the upper-right corner of the Chat pod. Choose Start Chat With, and then select Hosts, Presenters, or specific attendees.
At the bottom of the Chat pod, tabs let you view different conversations.
Disable private chat between participantsBy default, two participants can chat privately. As a host or presenter, you can disable this option and prevent private chat.
Choose Meeting > Preferences
Select Chat Pod from the list on the left
Deselect Enable Private Chat For Participants
You can use a Q&A pod to answer questions posed by attendees. When a presenter answers a question, the question and answer appear as pairs in the Q&A pod.
Here are some examples in which the Q&A pod is helpful:
During a large meeting, questions are added to a queue on the Q&A pod while the speaker presents. After completing the presentation, the speaker reviews the messages, applies a filter, and begins answering the questions.
A meeting moderator answers logistical questions but forwards subject enquiries to the teacher who is presenting.
A meeting moderator returns certain replies to the sender only. Replies that are relevant to all attendees are sent to everyone in the meeting.
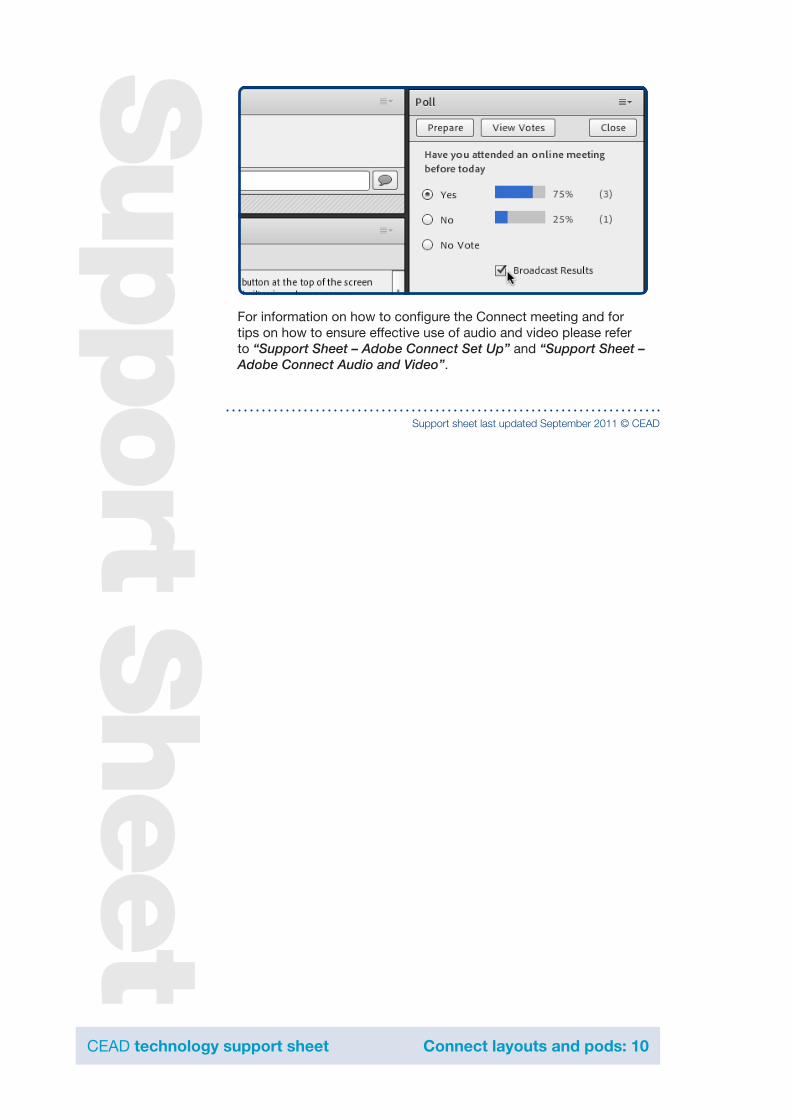
Hosts and presenters can use the Poll pod to create questions, or polls, for participants and to view the results. Only hosts and presenters control poll management and how polls appear to meeting participants. Hosts can also cast votes.
Q&A Pod
TIPThe Chat pod can be to communicate with other attendees for troubleshooting, especially if they are experiencing problems with their audio.
Poll PodTIPThe Poll pod is not anonymous as Hosts and Presenters can View Votes. However how individual attendees voted is not revealled to Participants when the Broadcast Results option is selected.
CEAD technology support sheet Connect layouts and pods: 10
Support S
heet
For information on how to configure the Connect meeting and for tips on how to ensure effective use of audio and video please refer to “Support Sheet – Adobe Connect Set Up” and “Support Sheet – Adobe Connect Audio and Video”.
Support sheet last updated September 2011 © CEAD