adobe illustrator power shortcuts ...images.ruceci.com/pdfs/wtisbbook.pdf2 wtisb022012 discover the...
TRANSCRIPT

ADOBE ILLUSTRATOR®:POWER SHORTCUTS & TECHNIQUES FOR BEGINNER TOINTERMEDIATE USERS
Copyright 2012, National Seminars Training

2WTISB022012
Discover the Time-saving Magic of ShortcutKeys, and How to Create Customized Shortcutsto Power Through Complex ProjectsShortcuts are a more efficient way to conduct business and get projects completed on time.Studies suggest that most designers spend up to one hour out of every workday doing thingswithout using shortcuts.
Adobe Illustrator is a complex application with hundreds of commands within its pull-downmenus; add to that dozens of floating panels, and you have a recipe for disaster.
Being able to quickly navigate through all of Illustrator’s complexities is a distinct advantage andfrees you up to be more creative.
The Adobe Illustrator interface is a complex area to navigate.

3WTISB022012
The Power of Controlling ShortcutsMost people know the most common shortcuts; for example, to save a file, hold downCMD/CTRL + S, give the file a name, and you’ve successfully saved the file. The menucommand would be to go to the File menu and select Save or Save As from the drop-downmenu. The difference between the two approaches would only be five or six seconds; however,those seconds add up, and the hours go by. The end result of using shortcut keys is an hour’ssavings out of every eight-hour workday.
To access the Shortcuts areas of Adobe Illustrator, perform the following:
1. Open Illustrator.
2. Click the Edit menu, then select Keyboard Shortcuts from the drop-down menu.
3. Choose between viewing the Tools or Menu Commands shortcuts (in this example, theMenu Commands shortcuts are selected).
4. Scroll through the list to identify the shortcuts associated with the commands.
Customizing Shortcuts
1. Select the action that you want to assign a shortcut.
2. Click in the shortcut area located to the right of the command or tool.
3. Choose a keyboard shortcut by pressing the appropriate keys.
Note: If the shortcut you selected is already in use, Illustrator will ask if you want to remove itfrom its original command and assign it to your new command.
4. Repeat the process for any additional commands or menu items.
5. Click the Save button, and identify your new shortcuts with a unique name. That namewill now appear under the Set button.
6. To return all shortcuts to their default values, click the Set button, then select Illustrator Defaults.
7. Click OK to save your changes.
The Keyboard Shortcuts dialog box gives you the ability to create your own customized shortcut set.

WTISB022012
4
Power Through Complex Projects by Creating Specific Workspaces to Help Focus Your Creative EnergiesThe Adobe Illustrator workspace can be a very complex place to work, or it can be a verycontrolled space. Just like any other application, Illustrator allows you to generate your ownworkspaces. Think this way: What is this specific Illustrator project going to involve, and whatspecific panels and layout would you need to help you get to your goal?
Of course, the goal should be to have the best project possible and to get it accomplished in theleast amount of time. That’s a great goal for any project.
Adobe Illustrator Workspace Presets
There are two ways to change an Illustrator workspace.
1. Click the Window menu, move down to Workspace, and select an available workspacefrom the drop-down menu.
2. Click the Workspace button, located in the upper-right corner of the Illustrator window,and choose from the available options.
The look and feel of the Illustrator interface is controlled by you.

WTISB022012
5
Creating Custom WorkspacesArrange the Illustrator interface into an organizational scheme to your liking. In addition, closeany panels you don’t think you will be using. When you’re happy, perform the following steps:
1. Click the Window menu, move down to Workspace, then select Save Workspace fromthe fly-out menu.
2. Give the new workspace a descriptive name and click the OK button to save it.
The Save Workspace dialog box allows you to customize the name of your new workspace.
Managing Workspaces
If, at any time, you wish to delete or rename your custom workspaces, simply go to the Windowmenu, move down to Workspace, and select Manage Workspaces from the fly-out menu.
Once a workspace is created, it can be deleted or the name can be changed.

6WTISB022012
Learn How to Properly Configure Preferences,and Make Illustrator Work Faster and BetterThe Preferences area of Illustrator allows the designer to control 12 areas of the application.Once preferences have been set, they remain valid for the application, no matter whatdocument is opened. Accessing preferences is different on a Mac and a Windows system. Forthe Macintosh, click the Illustrator menu option and then select Preferences from the drop-downmenu. For Windows, select the Edit menu, and select Preferences from the drop-down menu.The following preference options are available:
1. General
2. Selection & Anchor Display
3. Type
4. Units
5. Grids & Guides
6. Smart Guides
7. Slices
8. Hyphenation
9. Plug-ins & Scratch Disks
10. User Interface
11. File Handling & Clipboard
12. Appearance of Black

7WTISB022012
General Preferences• Scale Strokes & Effects: This option allows you to scale strokes and effects when you
change the size of an Illustrator object.
• Show Tool Tips:Wonder what a tool is, or tired of seeing all those little tips in your way?This option will toggle tool tips on and off.
• Keyboard Increment: This allows you to control the amount of nudge applied when usingthe arrow keys to move an object.
The General Preferences area of Preferences gives you control over the basic functions of Illustrator.
Units
Go here to change how Illustrator measures a document.
The Units area controls all of Illustrator’s complex measuring systems.

8WTISB022012
Discover How to Use Simple Arrow Keys to Manipulate Illustrator Objects, and Learn the Secret of Changing How the Arrow Keys FunctionYou want to move an Illustrator object around the keyboard, but you don’t want to use the click-and-drag method. Use the Up, Down, Left, and Right arrow keys.
When you select one or more objects and press the arrow keys, you will move the object(s) onepixel at a time; however, if you hold down the Shift key and use the arrow keys, you will movethe object(s) five times faster.
Controlling the Keyboard Increment
Say you’re moving an object one pixel at a time, but even a single pixel is moving the object toomuch. What do you do? Change the keyboard increment:
1. Click the Illustrator menu on Macintosh (Edit menu on Windows).
2. Select General Preferences.
3. Select the Option to change the Keyboard Increment.
Note: You can make the increment for the arrow keys smaller or larger.
4. Click OK to save the changes.
Now when you use the arrow keys to move an object, Illustrator will move it in incrementsdefined by you in General Preferences.
Changing the Keyboard Increment in General Preferences gives you complete control of how Illustrator moves objects.
9WTISB022012
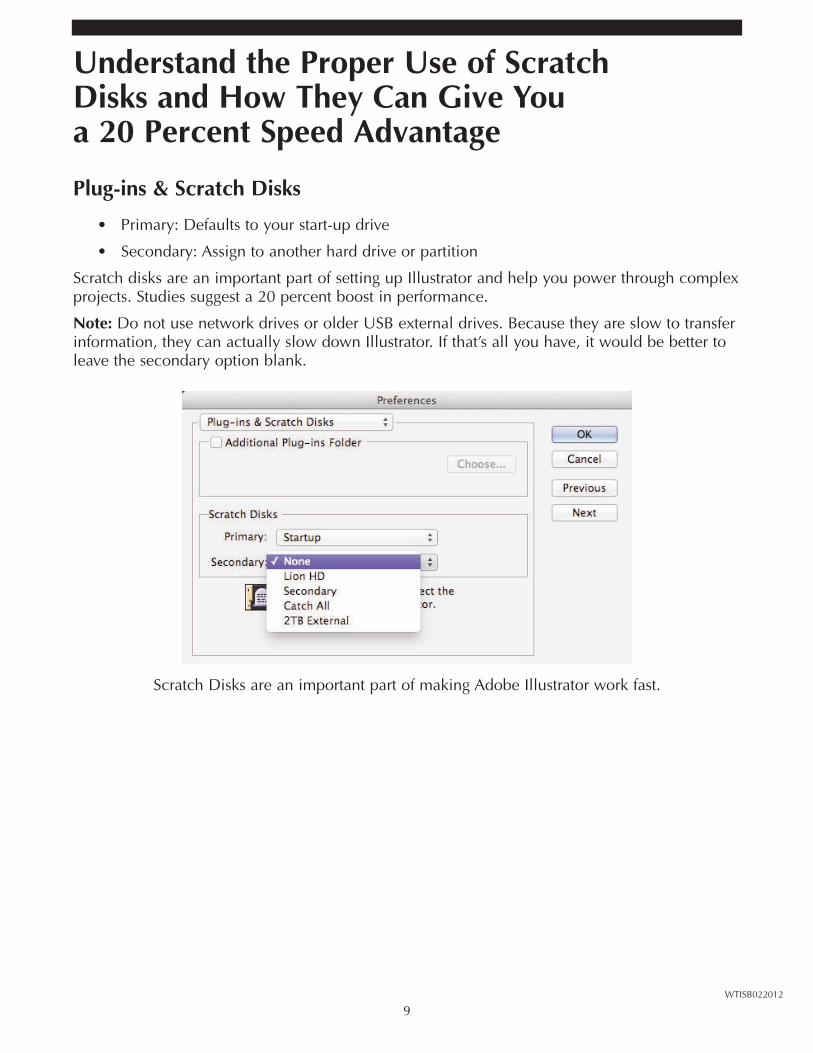
Understand the Proper Use of Scratch Disks and How They Can Give You a 20 Percent Speed Advantage
Plug-ins & Scratch Disks
• Primary: Defaults to your start-up drive
• Secondary: Assign to another hard drive or partition
Scratch disks are an important part of setting up Illustrator and help you power through complexprojects. Studies suggest a 20 percent boost in performance.
Note: Do not use network drives or older USB external drives. Because they are slow to transferinformation, they can actually slow down Illustrator. If that’s all you have, it would be better toleave the secondary option blank.
Scratch Disks are an important part of making Adobe Illustrator work fast.
10WTISB022012
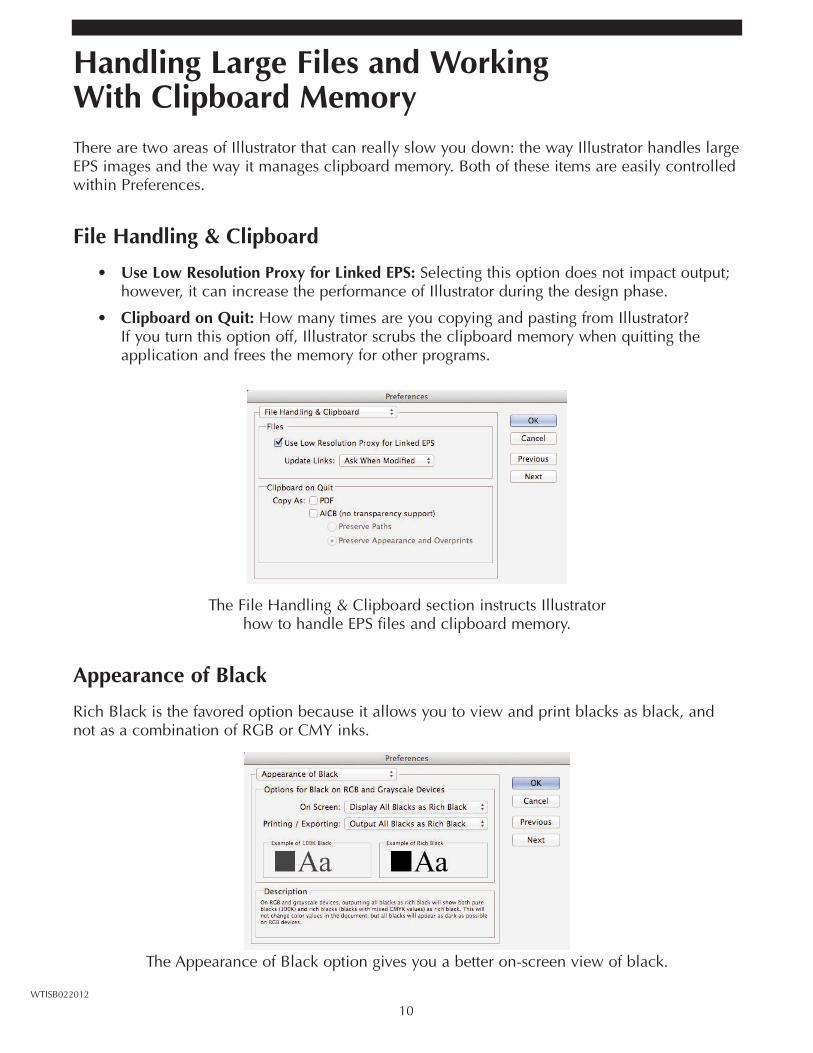
Handling Large Files and Working With Clipboard MemoryThere are two areas of Illustrator that can really slow you down: the way Illustrator handles largeEPS images and the way it manages clipboard memory. Both of these items are easily controlledwithin Preferences.
File Handling & Clipboard
• Use Low Resolution Proxy for Linked EPS: Selecting this option does not impact output;however, it can increase the performance of Illustrator during the design phase.
• Clipboard on Quit: How many times are you copying and pasting from Illustrator? If you turn this option off, Illustrator scrubs the clipboard memory when quitting theapplication and frees the memory for other programs.
The File Handling & Clipboard section instructs Illustrator how to handle EPS files and clipboard memory.
Appearance of Black
Rich Black is the favored option because it allows you to view and print blacks as black, andnot as a combination of RGB or CMY inks.
The Appearance of Black option gives you a better on-screen view of black.

11WTISB022012
Understand the Five Simple Steps That Can CutYour Development Time by 20 PercentStudy after study suggests ways for designers to get more out of their development time. Thesefive steps, when implemented, can increase your production rate by 20 percent. That’s oneworkday out of five.
1. Who: It’s about the viewer. Who is your audience?
2. What: Be goal oriented. What are your goals?
3. When: Time is money. When is it due?
4. Where: Location, location, location. Where will it be displayed?
5. Why: Motivation is a wonderful thing. Why are you doing this project?
These are the questions you ask yourself, your boss, or your client before beginning a project.With this type of information at hand, you can go on to create a mind map of the project and aworking flowchart to chart your progress. And save 20 percent to boot.
12WTISB022012
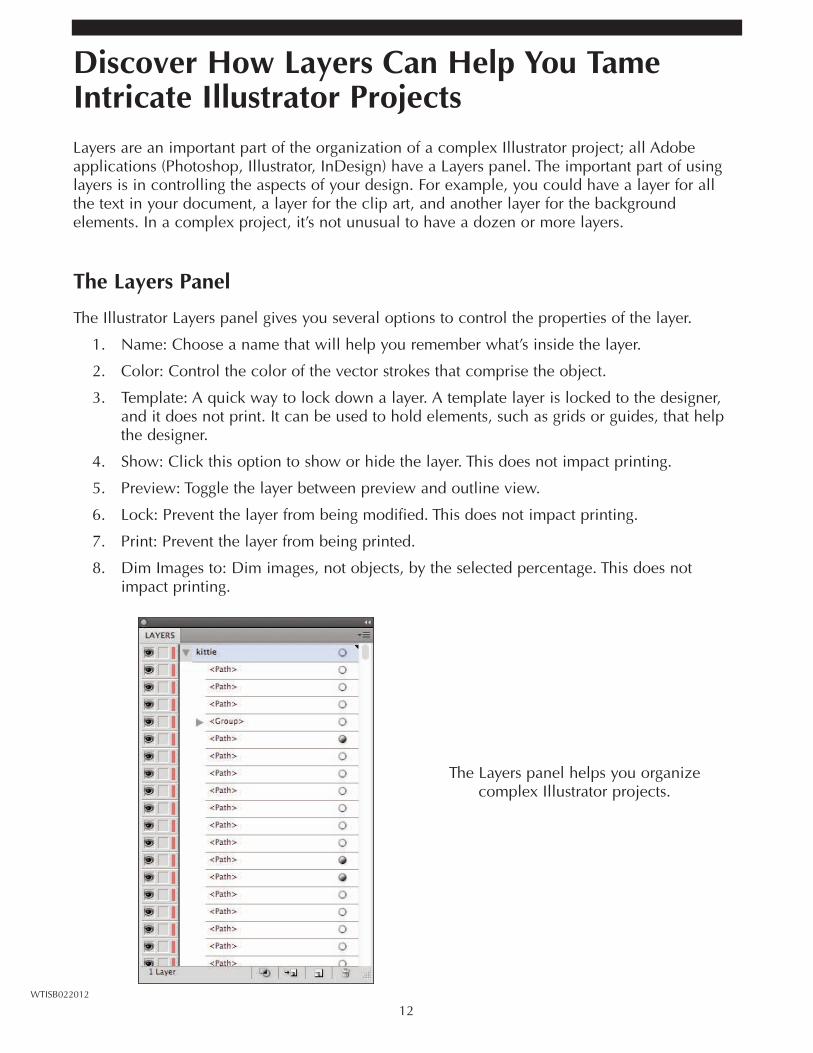
Discover How Layers Can Help You TameIntricate Illustrator ProjectsLayers are an important part of the organization of a complex Illustrator project; all Adobeapplications (Photoshop, Illustrator, InDesign) have a Layers panel. The important part of usinglayers is in controlling the aspects of your design. For example, you could have a layer for allthe text in your document, a layer for the clip art, and another layer for the backgroundelements. In a complex project, it’s not unusual to have a dozen or more layers.
The Layers Panel
The Illustrator Layers panel gives you several options to control the properties of the layer.
1. Name: Choose a name that will help you remember what’s inside the layer.
2. Color: Control the color of the vector strokes that comprise the object.
3. Template: A quick way to lock down a layer. A template layer is locked to the designer,and it does not print. It can be used to hold elements, such as grids or guides, that helpthe designer.
4. Show: Click this option to show or hide the layer. This does not impact printing.
5. Preview: Toggle the layer between preview and outline view.
6. Lock: Prevent the layer from being modified. This does not impact printing.
7. Print: Prevent the layer from being printed.
8. Dim Images to: Dim images, not objects, by the selected percentage. This does notimpact printing.
The Layers panel helps you organize complex Illustrator projects.
13WTISB022012
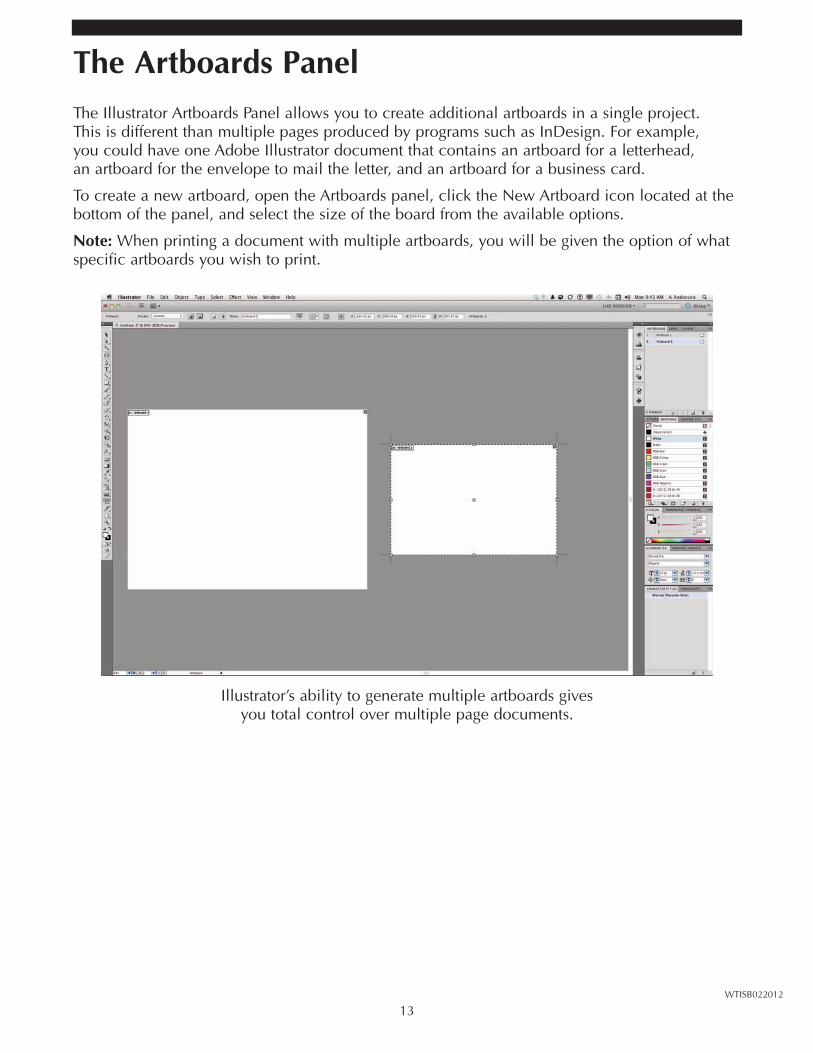
The Artboards PanelThe Illustrator Artboards Panel allows you to create additional artboards in a single project. This is different than multiple pages produced by programs such as InDesign. For example, you could have one Adobe Illustrator document that contains an artboard for a letterhead, an artboard for the envelope to mail the letter, and an artboard for a business card.
To create a new artboard, open the Artboards panel, click the New Artboard icon located at thebottom of the panel, and select the size of the board from the available options.
Note: When printing a document with multiple artboards, you will be given the option of whatspecific artboards you wish to print.
Illustrator’s ability to generate multiple artboards gives you total control over multiple page documents.
14WTISB022012
Learn How the Simple “Save As” Command Can Help You Correct Mistakes Throughout the Life of a Project, No Matter How Long That Project Might Take We all make mistakes; it’s a part of the design process. Designers who never make mistakes are mechanical designers. The good news is that we don’t call them mistakes. We call themdesign experiments. Adobe Illustrator understands that designers want control to go backwardand forward, so they give users the unlimited ability to undo (CMD/CTRL + Z) mistakes. Theimportant thing to remember about using Undo is that undos are held with the active documentand purged when you save and close the document. If you open an existing document, you startfrom scratch. What if you work on a document, save that document, and the next day see amistake (design experiment) that you wish you could undo?
Using “Save As”
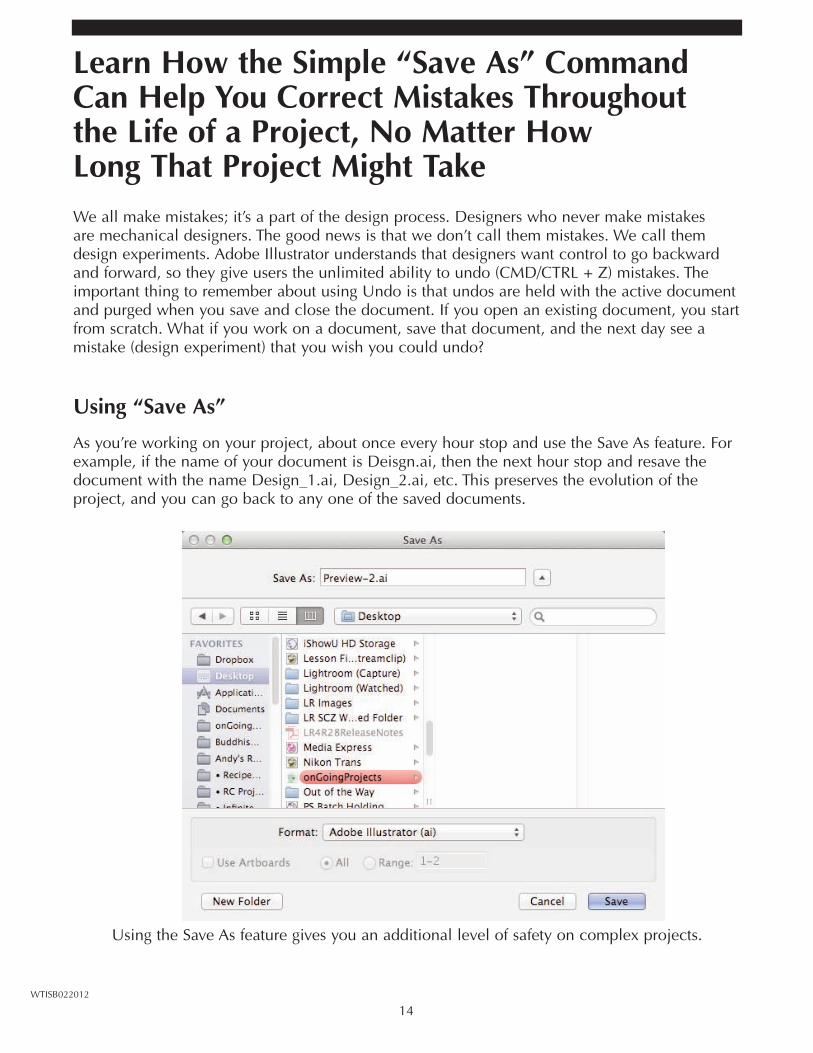
As you’re working on your project, about once every hour stop and use the Save As feature. Forexample, if the name of your document is Deisgn.ai, then the next hour stop and resave thedocument with the name Design_1.ai, Design_2.ai, etc. This preserves the evolution of theproject, and you can go back to any one of the saved documents.
Using the Save As feature gives you an additional level of safety on complex projects.
15WTISB022012
Learn Shortcuts to Help You Swiftly CreateIllustrator Objects … It’s All in the MathYou’re designing a project that requires a circle with a radius of exactly 1 inch. That’s pretty easyto do; however, now you need another circle exactly 1.6 times larger. Adobe Illustrator has abuilt-in calculator.
Working With the Math
1. Select a drawing tool. In this example, the Ellipse tool is chosen.
2. Move onto the artboard and click once. This opens the Ellipse tool options.
3. Change the Width and Height to 3 inches, then click OK.
4. This creates a 3-inch round circle.
5. Return to the artboard, and click a second time.
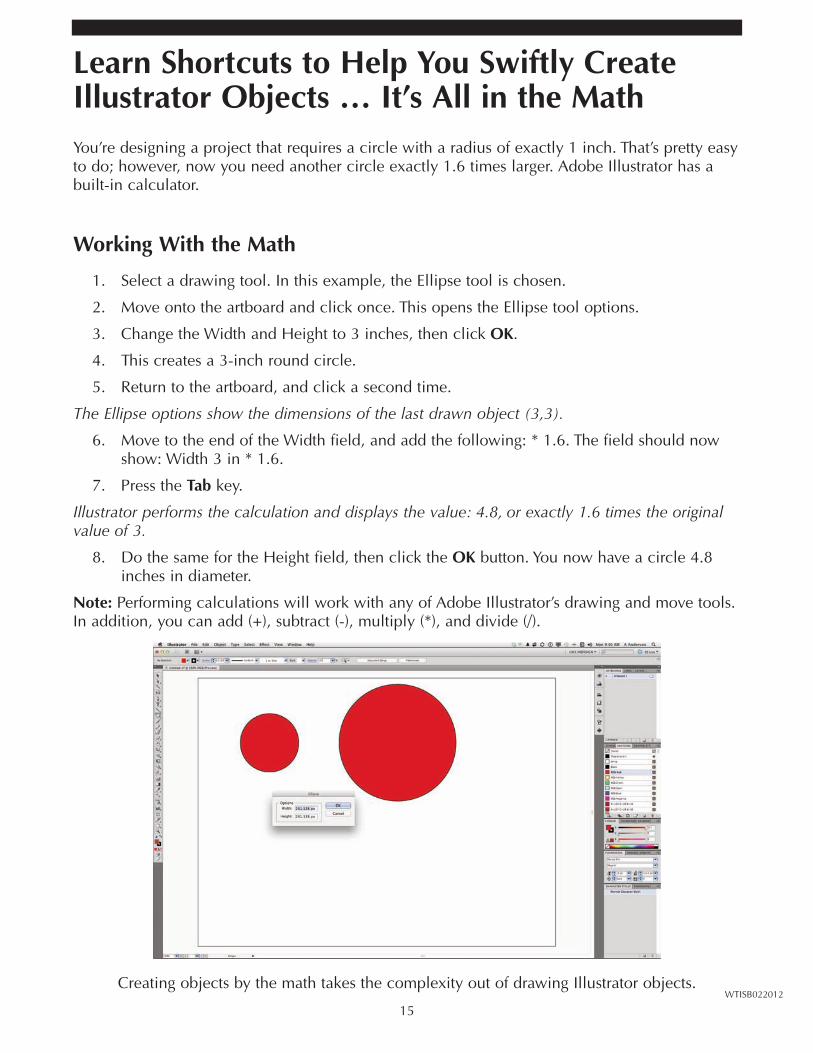
The Ellipse options show the dimensions of the last drawn object (3,3).
6. Move to the end of the Width field, and add the following: * 1.6. The field should nowshow: Width 3 in * 1.6.
7. Press the Tab key.
Illustrator performs the calculation and displays the value: 4.8, or exactly 1.6 times the originalvalue of 3.
8. Do the same for the Height field, then click the OK button. You now have a circle 4.8inches in diameter.
Note: Performing calculations will work with any of Adobe Illustrator’s drawing and move tools.In addition, you can add (+), subtract (-), multiply (*), and divide (/).
Creating objects by the math takes the complexity out of drawing Illustrator objects.

16WTISB022012
Learn How Smart Guides Help QuicklyPosition Illustrator ObjectsSmart Guides are not new; Adobe Illustrator came out with them several versions ago. Whatthey do is allow you to quickly view what’s going on with selections and with the precisemovement of objects. You can precisely control the use of the Smart Guides to give you all oronly those tips that you want.
To activate Smart Guides click the View menu, then select Smart Guides from the drop-downmenu. The shortcut for activating guides is CMD/CTRL + U.
To control the Smart Guides options: On a Macintosh, click the Illustrator menu, move down toPreferences, then select Smart Guides from the fly-out menu. On Windows, click the Editbutton, move down to Preferences, then select Smart Guides from the fly-out menu.
• Color: Select a color for the guides.
• Smart Guides options: Choose from the various display options exactly what you wantthe Smart Guides to show you.
• Construction Guides: When dragging objects, you can use Construction Guides to helpyou move the object at a precise angle. In addition, you can create your own unique setof Construction Guides.
• Snapping Tolerance: This indicates how close to an object you need to be beforeactivating the Smart Guides.
Smart Guides help you quickly organize your Illustrator objects.