adobe photoshop cc classroom in a book® (2018...
TRANSCRIPT

From the Library of Alvaro Alvarez
9 ADVANCED COMPOSITING
Lesson overview In this lesson, you’ll learn how to do the following:
• Apply and edit Smart Filters.
• Use the Liquify filter to distort an image.
• Apply color effects to selected areas of an image.
• Apply filters to create various effects.
• Use the History panel to return to a previous state.
• Upscale a low-resolution image for high-resolution printing.
This lesson will take about an hour to complete. Please log in to your account on peachpit.com to download the lesson files for this chapter, or go to the Getting Started section at the beginning of this book and follow the instructions under “Accessing the Lesson Files and Web Edition.” As you work on this lesson, you’ll preserve the start files. If you need to restore the start files, download them from your Account page.
206

From the Library of Alvaro Alvarez
Mon
ster
mak
eup
imag
ery
cour
tesy
of R
usse
ll Br
own,
with
illu
stra
tion
by Jo
hn C
onne
ll
Filters can transform ordinary images into extraordinary digital artwork. Smart Filters let you edit those transfor- mations at any time. The wide variety of features in Photoshop lets you be as creative as you want to be.
207
PROJECT: MONSTER MOVIE POSTER DESIGN

From the Library of Alvaro Alvarez
● Note: If Bridge isn’t installed, you’ll be prompted to install it when you choose Browse In Bridge. For more information, see page 3.
Getting started In this lesson, you’ll assemble a montage of images for a movie poster as you explore filters in Photoshop. First, look at the final project to see what you’ll be creating.
1 Start Photoshop, and then immediately hold down Ctrl+Alt+Shift (Windows) or Command+Option+Shift (Mac) to restore the default preferences. (See “Restoring Default Preferences” on page 5.)
2 When prompted, click Yes to delete the Adobe Photoshop Settings file.
3 Choose File > Browse In Bridge.
4 In Bridge, choose Favorites from the menu on the left, and then click the Lessons folder. Double-click the Lesson09 folder.
5 View the 09_End.psd thumbnail. Move the slider at the bottom of the Bridge window if you need to zoom in to see the thumbnail more clearly.
This file is a movie poster that comprises a back- ground, a monster image, and several smaller images. Each image has had one or more filters or effects applied to it.
The monster is composed of an image of a perfectly normal (though slightly threat- ening) guy with several ghoulish images applied. These monstrous additions are courtesy of Russell Brown, with illustration by John Connell.
6 In Bridge, navigate to the Lesson09/Monster_Makeup folder, and open it.
208 LESSON 9 Advanced Compositing
From the Library of Alvaro Alvarez
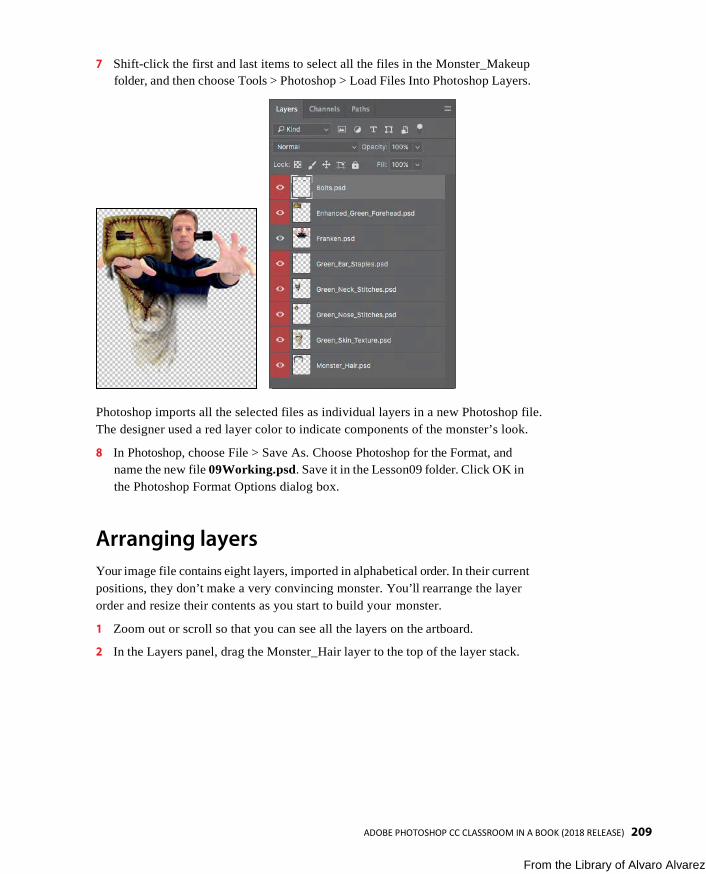
7 Shift-click the first and last items to select all the files in the Monster_Makeup folder, and then choose Tools > Photoshop > Load Files Into Photoshop Layers.
Photoshop imports all the selected files as individual layers in a new Photoshop file. The designer used a red layer color to indicate components of the monster’s look.
8 In Photoshop, choose File > Save As. Choose Photoshop for the Format, and name the new file 09Working.psd. Save it in the Lesson09 folder. Click OK in the Photoshop Format Options dialog box.
Arranging layers Your image file contains eight layers, imported in alphabetical order. In their current positions, they don’t make a very convincing monster. You’ll rearrange the layer order and resize their contents as you start to build your monster.
1 Zoom out or scroll so that you can see all the layers on the artboard.
2 In the Layers panel, drag the Monster_Hair layer to the top of the layer stack.
ADOBE PHOTOSHOP CC CLASSROOM IN A BOOK (2018 RELEASE) 209

From the Library of Alvaro Alvarez
3 Drag the Franken layer to the bottom of the layer stack.
4 Select the Move tool ( ), and then move the Franken layer (the image of the person) to the bottom of the page.
5 In the Layers panel, Shift-select every layer except the Franken layer, and choose Edit > Free Transform.
210 LESSON 9 Advanced Compositing

From the Library of Alvaro Alvarez
6 Press the Shift key as you drag down from a corner of the selection to resize all the selected layers to about 50% of their original size. (Watch the width and height percentages in the options bar.)
7 With the Free Transform bounding box still active, position the layers over the head of the Franken layer. Then press Enter or Return to commit the transformation.
8 Zoom in to see the head area clearly.
9 Hide all layers except the Green_Skin_Texture and Franken layers.
10 Select only the Green_Skin_Texture layer, and use the Move tool to center it over the face.
E Tip: If magenta Smart Guides appear, making it difficult to position the Green_Skin_Texture layer, hold down the Control key to temporarily disable Smart Guides as you drag. Or permanently disable them by deselecting the View > Show > Smart Guides command.
ADOBE PHOTOSHOP CC CLASSROOM IN A BOOK (2018 RELEASE) 211

From the Library of Alvaro Alvarez
11 Choose Edit > Free Transform again to adjust the fit of the texture to the face. Use the side handles to adjust the width, the bottom and top handles to adjust the height, and arrow keys to nudge the entire layer into position. Use the eyes and mouth as a guide. When you’ve positioned the skin texture, press Enter or Return to commit the transformation.
12 Save your file.
Using Smart Filters Unlike regular filters, which permanently change an image, Smart Filters are nondestructive: They can be adjusted, turned off and on, and deleted. However, you can apply Smart Filters only to a Smart Object.
Applying the Liquify filter You’ll use the Liquify filter to tighten the eye openings and change the shape of the monster’s face. Because you want to be able to adjust the filter settings later, you’ll use the Liquify filter as a Smart Filter. So you’ll first need to convert the Green_Skin_Texture layer to a Smart Object.
1 Make sure the Green_Skin_Texture layer is selected in the Layers panel, and then choose Convert To Smart Object from the Layers panel menu.
2 Choose Filter > Liquify.
Photoshop displays the layer in the Liquify dialog box.
3 In the Liquify dialog box, click the disclosure triangle next to Face-Aware Liquify to close that group of options.
You already explored Face-Aware Liquify in Lesson 5. While Face-Aware Liquify is a quick and powerful way to modify facial features, the amount of face editing
212 LESSON 9 Advanced Compositing

From the Library of Alvaro Alvarez
you can do with those options is limited. In this lesson, you’ll try some of the more manual Liquify techniques, which you may prefer when you want to create a more expressive face. Hiding the Face-Aware Liquify options makes it easier to concen- trate on the other options in the Liquify dialog box.
4 Select Show Backdrop, and then choose Behind from the Mode menu. Set the Opacity to 75.
5 Select the Zoom tool ( ) from the Tools panel on the left side of the dialog box, and zoom in to the eye area.
6 Select the Forward Warp tool ( ) (the first tool).
The Forward Warp tool pushes pixels forward as you drag.
7 In the Brush Tool Options area, set the Size to 150 and Pressure to 75.
ADOBE PHOTOSHOP CC CLASSROOM IN A BOOK (2018 RELEASE) 213

From the Library of Alvaro Alvarez
8 With the Forward Warp tool, pull the right eyebrow down to close the eye opening. Then pull up from under the eye.
9 Repeat step 8 on the left eyebrow and under-eye area. You might prefer to use the Forward Warp tool differently for each eye, to create an even scarier face.
10 When you’ve closed the gap around the eyes, click OK.
Because you’ve applied the Liquify filter as a Smart Filter, you’ll be able to return later to make additional changes to the face.
Positioning other layers Now that you’ve got the skin texture in place, you’ll move the other layers into position, working up from the lowest layers in the Layers panel.
1 Make the Green_Nose_Stitches layer visible, and select it in the Layers panel.
214 LESSON 9 Advanced Compositing

From the Library of Alvaro Alvarez
2 Choose Edit > Free Transform, and then position the layer over the nose, resizing it as necessary. Press Enter or Return to commit the transformation.
You’ll repeat the process to position the rest of the layers.
3 Make the Green_Neck_Stitches layer visible, and select it. Then move it over the neck. If you need to adjust it, choose Edit > Free Transform, resize it, and press Enter or Return.
4 Make the Green_Ear_Staples layer visible, and select it. Move the staples over his right ear. Choose Edit > Free Transform, resize and reposition the staples, and then press Enter or Return.
E Tip: As you drag the layer, it may snap to magenta Smart Guides that appear. They’re intended to help you align the layer to other layers, but if they make it difficult to position the layer where you want, choose View > Show > Smart Guides and deselect that command.
ADOBE PHOTOSHOP CC CLASSROOM IN A BOOK (2018 RELEASE) 215

From the Library of Alvaro Alvarez
5 Make the Enhanced_Green_Forehead layer visible, and select it. Move it over the forehead; it’s probably a bit large. Choose Edit > Free Transform, resize the forehead to fit the space, and press Enter or Return.
6 Make the Bolts layer visible, and select it. Drag the bolts so they’re positioned on either side of the neck. Choose Edit > Free Transform, and resize them so that they fit snugly against the neck. When you have them in position, press Enter or Return to commit the transformation.
7 Lastly, make the Monster_Hair layer visible, and select it. Move it over the forehead. Choose Edit > Transform, and then resize the hair so it fits properly against the forehead. Press Enter or Return to commit the change.
8 Save your work so far.
216 LESSON 9 Advanced Compositing

From the Library of Alvaro Alvarez
Editing a Smart Filter With all the layers in position, you can further refine the eye openings and experi- ment with the bulges in the eyebrows. You’ll return to the Liquify filter to make those adjustments.
1 In the Layers panel, double-click Liquify, listed under Smart Filters in the Green_Skin_Texture layer.
Photoshop opens the Liquify dialog box again. This time, all the layers are visible in Photoshop, so when Show Backdrop is selected, you see them all. Sometimes it’s easier to make changes without a backdrop to distract you. Other times, it’s useful to see your edits in context.
2 Zoom in to see the eyes more closely.
3 Select the Pucker tool ( ) in the Tools panel, and click on the outer corner of each eye.
The Pucker tool moves pixels towards the center of the brush as you click or drag, for a puckering effect.
4 Select the Bloat tool ( ), and click the outer edge of an eyebrow to expand it; do the same for the other eyebrow.
The Bloat tool moves pixels away from the center of the brush as you click or drag.
5 Experiment with the Pucker, Bloat, and other tools in the Liquify filter to customize the monster’s face. Remember that you can change the brush size and other settings. You can undo individual steps, but if you want to start over, it’s easiest to click Cancel, and then return to the Liquify dialog box.
6 When you’re happy with the monster’s face, click OK.
E Tip: The Pucker, Bloat, and other tools on the left side of the Liquify panel provide more control over Liquify distortions than the Face-Aware Liquify options, and they work on any part of an image. But Face-Aware Liquify is easier for quick and subtle adjustments to facial features.
ADOBE PHOTOSHOP CC CLASSROOM IN A BOOK (2018 RELEASE) 217

From the Library of Alvaro Alvarez
E Tip: To learn more about blending modes, including a description of each one, see “Blending modes” in Photoshop Help.
Painting a layer There are many ways to paint objects and layers in Photoshop. One of the simplest is to use the Color blending mode and the Brush tool. You’ll use this method to paint the exposed skin green on your monster.
1 Select the Franken layer in the Layers panel.
2 Click the Create A New Layer button ( ) at the bottom of the Layers panel.
Photoshop creates a new layer, named Layer 1.
3 With Layer 1 selected, choose Color from the Blending Mode menu at the top of the Layers panel.
The Color blending mode combines the luminance of the base color (the color already on the layer) with the hue and saturation of the color you’re applying. It’s a good blend- ing mode to use when you’re coloring mono- chrome images or tinting color images.
4 In the Tools panel, select the Brush tool ( ). In the options bar, select a 60-pixel brush with a Hardness of 0.
5 Press Alt or Option to temporarily switch to the Eyedropper tool. Sample a green color from the forehead. Then release the Alt or Option key to return to the Brush tool.
218 LESSON 9 Advanced Compositing

From the Library of Alvaro Alvarez
6 Ctrl-click or Command-click the thumbnail in the Franken layer to select its contents.
Usually, you select an entire layer in the Layers panel. When you do that, the layer is active, but there isn’t actually an active selection. When you Ctrl-click or Command- click the thumbnail of the layer, Photoshop selects the contents of the layer, so you have an active selection. It’s a quick way to select all of the contents of a layer—but only the contents of that specific layer.
7 Make sure Layer 1 is still selected in the Layers panel, and then use the Brush tool to paint over the hands and arms. You can paint quickly where the hands are against transparent areas, because painting outside the selection has no effect. However, remember that the shirt is part of the selection, so you need to be more careful as you paint the skin where it abuts the shirt colors.
E Tip: To change the brush size as you paint, press the bracket keys on your keyboard. The Left Bracket key ([) decreases the brush size; the Right Bracket (]) increases it.
8 Paint any areas of the face or neck where the original flesh color shows through the Green_Skin_Texture layer.
9 When you’re happy with the green skin, choose Select > Deselect. Save your work.
ADOBE PHOTOSHOP CC CLASSROOM IN A BOOK (2018 RELEASE) 219

From the Library of Alvaro Alvarez
Adding a background You’ve got a good-looking monster. Now it’s time to put him in his spooky environ- ment. To easily move the monster onto a background, you’ll first merge the layers.
1 Make sure all the layers are visible. Then choose Merge Visible from the Layers panel menu.
Photoshop merges all the layers into one, named Layer 1.
2 Rename Layer 1 Monster.
3 Choose File > Open. Navigate to and open the Backdrop.psd file in the Lesson09 folder.
4 Choose Window > Arrange > 2-Up Vertical to display both the monster and backdrop files.
220 LESSON 9 Advanced Compositing

From the Library of Alvaro Alvarez
5 Click the 09Working.psd file to make it active.
6 Select the Move tool ( ), drag the Monster layer, and then drop it onto the Backdrop.psd file. Position the monster so his hands are just above the movie title.
7 Close the 09Working.psd file, saving the changes when prompted.
From now on, you’ll work on the movie poster file itself.
8 Choose File > Save As, and save the file with the name Movie-Poster.psd. Click OK in the Photoshop Format Options dialog box.
Using the History panel to undo edits You’ve used the Edit > Undo command to move backward one step. That’s because by default, you can toggle between undoing and redoing the last step each time you press the keyboard shortcut for the Undo command (Ctrl+Z or Command+Z). This is a handy way to see a before/after comparison of your last edit.
You can also undo and redo multiple steps using the Step Backward and Step Forward commands, which are just below the Undo command on the Edit menu, where you can also see the keyboard shortcuts for those commands.
Another way to step backward and forward through your changes is to use the History panel; choose Window > History to see it. The History panel shows you a list of your changes. To go back to a certain edit (for example, four steps ago), just select it in the History panel, and continue working from that point.
ADOBE PHOTOSHOP CC CLASSROOM IN A BOOK (2018 RELEASE) 221

From the Library of Alvaro Alvarez
Applying filters and effects You’ll add a tombstone to the poster, and you’ll experiment with filters and effects to see what works, using the History panel to reverse course if necessary.
1 In Photoshop, choose File > Open.
2 Navigate to the Lesson09 folder, and double-click the T1.psd file to open it.
The tombstone image is plain, but you’ll add texture and color to it.
3 In the Tools panel, click the Default Foreground And Background Colors icon ( ) to return the foreground color to black.
You’ll start by adding a little atmosphere to the tombstone.
4 Choose Filter > Render > Difference Clouds.
The original is dull. Clouds add drama.
You’ll leave the top of the tombstone in focus, but blur the rest using an iris blur. The default blur settings will work fine.
5 Choose Filter > Blur Gallery > Iris Blur.
6 In the image window, drag the Iris Blur ellipse up so that the top of the tombstone is in focus. Then click OK.
By default, the ellipse is centered. Shift the focus higher.
222 LESSON 9 Advanced Compositing

From the Library of Alvaro Alvarez
You’ll use adjustment layers to make the image darker and change its color.
7 Click the Brightness/Contrast icon in the Adjustments panel. Then, in the Properties panel, move the Brightness slider to 70.
8 Click the Channel Mixer icon in the Adjustments panel.
9 In the Properties panel, choose Green from the Output Channel menu, and then change the Green value to +37 and the Blue value to +108.
The tombstone takes on a green cast. You can use the Channel Mixer adjustment to make these types of creative color adjustments to an image. The Channel Mixer is also popular as an alternative to the Black & White adjustment for converting color images to black and white, and for tinting effects. It’s also useful for some advanced color correction techniques.
ADOBE PHOTOSHOP CC CLASSROOM IN A BOOK (2018 RELEASE) 223

From the Library of Alvaro Alvarez
E Tip: The Exposure adjustment is primarily intended for correcting HDR images, but in this lesson it’s used as a creative effect.
10 Click the Exposure icon in the Adjustments panel. In the Properties panel, move the Exposure slider to +.90 to brighten the lighter areas of the image.
Undoing multiple steps The tombstone certainly looks different than it did when you started, but it doesn’t quite match the tombstones that are already in the poster. You’ll use the History panel to revisit the steps you’ve taken.
1 Choose Window > History to open the History panel. Drag the bottom of the panel down so that you can see everything in it.
The History panel records the recent actions you’ve performed on the image. The current state is selected.
2 Click the Blur Gallery state in the History panel.
The states below the selected state are dimmed, and the image has changed. The color is gone, as are the Brightness/Contrast settings. At this point, the Difference Clouds filter has been run and the iris blur has been applied. Everything else has been removed. There are no adjustment layers listed in the Layers panel.
224 LESSON 9 Advanced Compositing

From the Library of Alvaro Alvarez
3 Click the Modify Channel Mixer Layer state in the History panel.
Many of the states are restored. The color has returned, along with the brightness and contrast settings. There are two adjustment layers in the Layers panel. However, the states below the one you selected remain dimmed, and the Exposure adjustment layer is not listed in the Layers panel.
You’ll return almost to the beginning to apply different effects to the tombstone.
4 Click Difference Clouds in the History panel.
Everything following that state is dimmed.
5 Choose Filter > Noise > Add Noise.
Adding noise will give the tombstone a grainier look.
6 In the Add Noise dialog box, set the Amount to 3%, select Gaussian, and select Monochromatic. Then click OK.
The states that were dimmed are no longer in the History panel. Instead, the History panel has added a state for the task you just performed (Add Noise),
ADOBE PHOTOSHOP CC CLASSROOM IN A BOOK (2018 RELEASE) 225

From the Library of Alvaro Alvarez
● Note: The Lighting Effects filter is unavailable if Use Graphics Processor is not selected in the Performance Preferences dialog box. If the graphics hardware in your computer does not support the Use Graphics Processor option, skip steps 7–12.
following the state you had selected (Difference Clouds). You can click any state to return to that point in the process, but as soon as you perform a new task, Photoshop deletes all dimmed states.
7 Choose Filter > Render > Lighting Effects.
8 In the options bar, choose Flashlight from the Presets menu.
9 In the Properties panel, click the Color swatch, select a light blue color, and then click OK.
10 In the image window, drag the light source to the upper third of the tombstone, centered over the letters “RIP.”
11 In the Properties panel, change the Ambience to 46.
12 Click OK in the options bar to accept the Lighting Effects settings.
The tombstone is ready to join the others in your movie poster.
13 Save the file, then choose Window > Arrange > Tile All Vertically.
14 With the Move tool, drag the tombstone you just created to the Movie-Poster.psd file. Click OK if you see a color management warning.
15 Drag the tombstone to the bottom left corner, with the top third of it showing.
16 Choose File > Save to save the Movie-Poster.psd file. Then close the T1.psd file without saving it.
226 LESSON 9 Advanced Compositing

From the Library of Alvaro Alvarez
You’ve had a chance to try out some new filters and effects, and to use the History panel to backtrack. By default, the History panel retains only the last 50 states. You can change the number of levels in the History panel by choosing Edit > Preferences > Performance (Windows) or Photoshop CC > Preferences > Performance (Mac), and entering a different value for History States.
Upscaling a low-resolution image Low-resolution images are fine—even desirable—for web pages and social media. If you need to enlarge them, though, they may not contain enough information for high-quality printing. To scale an image up in size, Photoshop needs to resample it. That is, it needs to create new pixels where none existed, approximating their values. The Preserve Details (Enlargement) algorithm in Photoshop gives the best results when you upscale low-resolution images.
In your movie poster, you want to use a low-resolution image that was posted on a social media site. You’ll need to resize it without compromising quality for your printed poster.
1 Choose File > Open, navigate to the Lesson09 folder, and open the Faces.jpg file.
2 Zoom in to 300%, so you can see the pixels.
3 Choose Image > Image Size.
4 Make sure the Resample option is selected.
5 Change the width and height measurements to Percent, and then change their values to 400%.
The width and height are linked by default, so that images resize proportionally. If you need to change the width and height separately for a project, click the link icon to unlink the values.
6 Drag in the preview window to pan so that you can see the glasses.
7 In the Resample menu, choose Bicubic Smoother (Enlargement). The image looks less rough than it did before.
The Resample menu includes options that control how to adjust the image for enlargement or reduction. Automatic is the default and it picks a method based on whether you’re enlarging or reducing, but you may find that another option might look better depending on the image.
8 With the Resample option still selected, choose Preserve Details (Enlargement) from the Resample menu.
The Preserve Details option results in a sharper enlargement than Bicubic Smoother, but it has emphasized the existing noise in the image.
● Note: Your version of Photoshop CC 2018 may display a“Preserve Details 2.0” option in the Resample menu. This is an upgraded version of Preserve Details provided as a Technology Preview for comparison with the older Preserve Details option. Use the option that produces better results for the image you’re scaling up.
ADOBE PHOTOSHOP CC CLASSROOM IN A BOOK (2018 RELEASE) 227

From the Library of Alvaro Alvarez
9 Move the Reduce Noise slider to 50% to smooth the image.
10 Click and hold in the preview window to see the original image, so you can compare it to the current settings. You can also compare the current settings to the Bicubic Smoother option by switching between them in the Resample menu. When upscaling or downscaling, choose the Resample method that produces the best balance between preserving details and smoothing pixel jagginess, and then use Reduce Noise to remove noise that remains. If the Reduce Noise value removes too much detail, lower it.
11 Click OK.
Now you’ll paste the image into a feathered selection on the poster.
12 Choose Select > All, and then choose Edit > Copy.
13 Select the Movie-Poster.psd tab to bring it to the front, and then select the Elliptical Marquee tool ( ), hidden under the Rectangular Marquee tool ( ).
14 In the options bar, enter 50 px for Feather to soften the edge of the pasted image.
15 Draw an oval in the upper right corner of the poster, above the monster’s head. The oval should overlap the window and fire escape.
16 Make sure Layer 1 is selected, and then choose Edit > Paste Special > Paste Into. Click OK if you see the Paste Profile Mismatch dialog box.
17 Select the Move tool ( ), and center the pasted image in the feathered area.
18 In the Layers panel, choose Luminosity from the Blending Mode menu, and move the Opacity slider to 50%.
19 Choose File > Save. Then close the Faces.jpg file without saving it.
228 LESSON 9 Advanced Compositing