adobe photoshop guide 2017 tools right click on tools with an arrow in the corner to reveal...
TRANSCRIPT

NESTED TOOLS
Right click on tools with an arrow in the corner to reveal additional tools.
Move Tool
Rectangular Marquee
Elliptical Marquee
Single Row Marquee
Single Column Marquee
Lasso
Polygonal Lasso
Magnetic Lasso
Magic Wand
Quick Selection
Crop
Perspective Crop
Slice
Slice Select
Eyedropper
3D Material Eyedropper
Color Sampler
Ruler
Note
Count
Spot Healing Brush
Healing Brush
Patch
Content Aware Move
Red Eye
Clone Stamp
Pattern Stamp
Dodge
Burn
Sponge
Blur
Sharpen
Smudge
Brush
Pencil
Color Replacement
Mixer Brush
History Brush
Art History Brush
Eraser
Background Eraser
Magic Eraser
Gradient
Paint Bucket
3D Material Drop
Pen
Freeform Pen
Add Anchor Point
Delete Anchor Point
Convert Point
Rectangle
Rounded Rectangle
Ellipse
Polygon
Line
Custom Shape
Horizontal Type
Vertical Type
Horizontal Type Mask
Vertical Type Mask
Path Selection
Direct Selection
Hand
Rotate View
Standard Screen
Full Screen + Menu
Full Screen
Toolbar Index
Resizing & Rotating
Resizing
Rotating
Width
Keep the aspect ratio by clicking the chain
HeightResolution
Image>Image Size or Image>Image Rotation
Alter image size by going to Image>Image Size in the menu bar.
Rotate an image by going to Image>Image Rotation in the menu bar. Choose a direction and amount of degree change.
The fi rst thing to decide in Photoshop is what type of document you want to work with. There are two options. Selecting File>New will give you a blank canvas to work with. Selecting File>Open will allow you to choose an image fi le from the computer to start editing.
File>New or File>Open
Choose canvas height, width, resolution, color mode, and name.
New Document
Photoshop will give you the option to select a preexisting size or you can type in the size of your document manually
Adobe Photoshop CC 2017 Photoshop is used to alter, retouch, and edit images. It can also be used for drawing, web & print design, and video.

Essentials
This workspace is recommended for people who are new to Photoshop due to its Basic tool set up. Here you can learn the functions of Photoshop or do quick edits to your project.
Workspaces are a great way to personalize the tools and panels that surround the opened program window. This could be a simple way to work on projects in a fast and productive way.
Graphic and Web
This workspace is perfect for creating and designing mockups that would be used on websites. Any internet browser (e.g. Chrome or Fire Fox) will alter the appearance of your website. Using this feature will allow you to quickly change color or size to best fi t with most if not all web browsers.
Photography
This workspace is great for manipulating photos such as fi lters, highlights, or cosmetics. use this workspace when dealing with photographs such as Family, landscape, portraits, etc.
Paint
This creative workspace is used for more Fine Art work. This workspace includes tools that are suited for Digital painting and Graphic Design. Using this workspace will enhance your tools for a more creative atmosphere.
When you feel comfortable with Photoshop and know the tools that you need. Creating your own workspace that best fi ts you can be a quick and productive way of getting projects done. You can change the tool bar, add/remove work panels (e.g. History, color panel, Layers panel), and even change the hotkeys (shortcuts) on your keyboard.
Workspaces
Customize a Workspaces
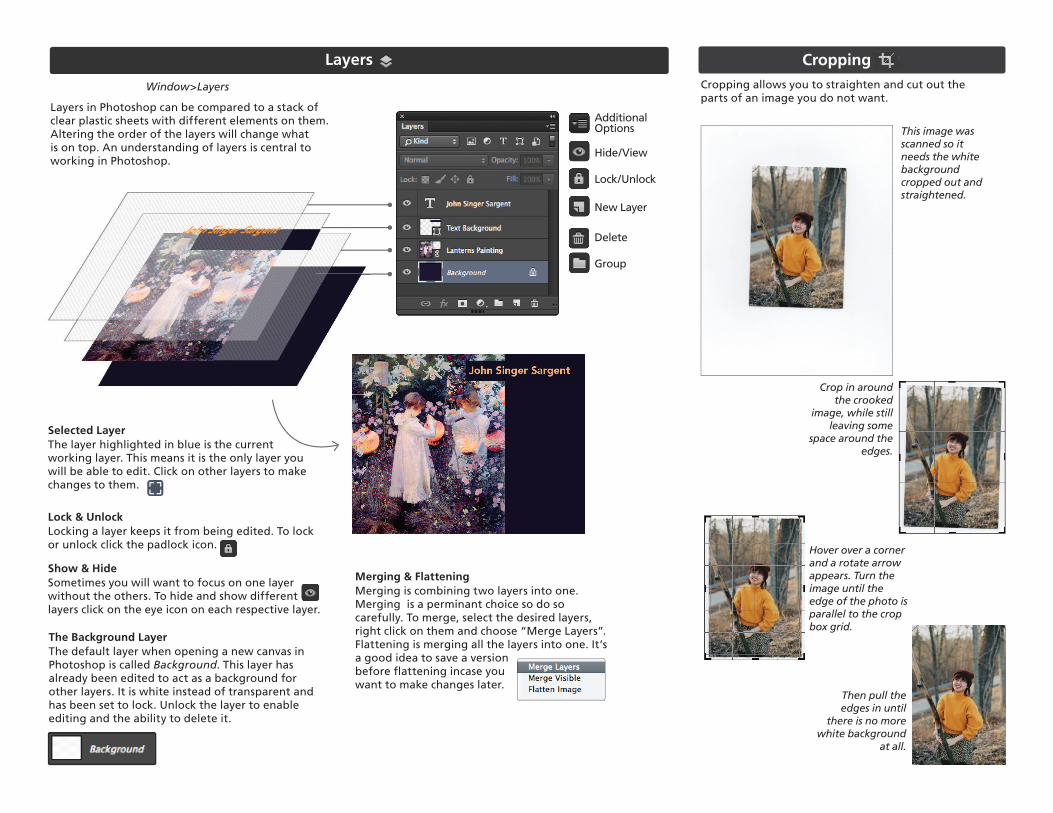
This image was scanned so it needs the white background cropped out and straightened.
Hover over a corner and a rotate arrow appears. Turn the image until the edge of the photo is parallel to the crop box grid.
Crop in around the crooked
image, while still leaving some
space around the edges.
Then pull the edges in until
there is no more white background
at all.
Cropping allows you to straighten and cut out the parts of an image you do not want.
Cropping
Locking a layer keeps it from being edited. To lock or unlock click the padlock icon.
Layers in Photoshop can be compared to a stack of clear plastic sheets with different elements on them. Altering the order of the layers will change what is on top. An understanding of layers is central to working in Photoshop.
The layer highlighted in blue is the current working layer. This means it is the only layer you will be able to edit. Click on other layers to make changes to them.
Sometimes you will want to focus on one layer without the others. To hide and show different layers click on the eye icon on each respective layer.
Merging is combining two layers into one. Merging is a perminant choice so do so carefully. To merge, select the desired layers, right click on them and choose “Merge Layers”. Flattening is merging all the layers into one. It’s a good idea to save a version before fl attening incase you want to make changes later.
The default layer when opening a new canvas in Photoshop is called Background. This layer has already been edited to act as a background for other layers. It is white instead of transparent and has been set to lock. Unlock the layer to enable editing and the ability to delete it.
Selected Layer
Lock & Unlock
Show & HideMerging & Flattening
The Background Layer
Window>Layers
New Layer
AdditionalOptions
Hide/View
Lock/Unlock
Delete
Group
Layers

Some of the most common ways to edit an image can be found under this menu.
Image>Adjustments or Window>Adjustments
Image Adjustments
This graph in Levels is called a histogram. Use it to alter the darks, highlights, and midtones of an image.
Use the sliders found in the black and white options to affect the contrast between colors.
Brightness ContrastOriginal
Brightness/Contrast
Correctly Toned
Black & White
Drastically Increased Red Drastically Increased Cyan
Original
Levels
Original
Black & White
Original
Color Balance
Marquee Options
Lasso Options
Magic Wand & Quick Selection
Making Selections
Selections allow you to chose a very specifi c area of your project to edit, move, or cut out. There are many different ways to make selections in Photoshop. The following are the most commonly used tools. All can be found in the toolbar.
These selection tools allow you to make a selection that is a certain type of shape. Either rectangular, elliptical, or simply a single row of horizontal or vertical pixels.
The Magic Wand will select parts of an image that are similar to the area you click such as a single color. Quick selection selects a brush-stroke-like area.
The Lasso option is comparable to drawing the outline of a selection. The Polygonal Lasso lets you click points one after another. The Magnetic Lasso will search for the edges of an object as you trace around it.
Full Image
Here we are using the lasso tool to only select the yellow bird.
Elliptical Marquee
Polygonal Lasso Magnetic Lasso
Magic Wand Quick Selection
Rectangular Marquee

Making Transparent Backgrounds
When you have an image with a background you wish was not there it is helpful to make the background transparent.
1
3
2
4
This is my original image. For this logo I want to take out the black background so I can use it against different colors.
Select all areas of the background using one of the many selection tools. I used the magic wand tool in this example.
Once all of the background is selected use the delete button on the keyboard to get rid of it. You will be left with a transparent background.
Saving as a JPEG will not keep you background transparent. Saving your fi le as a PNG will.
Unlock the background layer by clicking on the lock icon or by double clicking on the name “Background” and renaming it.
Unlock or rename layer
Saving Files with Transparency
The Clone Tool allows you to edit out parts of an image by blending in an area with part of its surroundings.
Selcet the Clone Stamp from the toolbar. Option + Click on an area that will blend well with what you are trying to remove. This creates a source location.
Then “paint” over what you want to hide little by little. Choose a new source every so often.
In this example I found the yellow in the camera strap distracting to the rest of the photo. I removed it using the clone stamp.
Original Edited
1
Clone Tool
2

Customizing a preexisting Brush
Photoshop has more than enough brush options for you to choose from. Picking one will give you options to alter the preset brush for a more unique outcome. Go to Window > Brush Preset. This will give you a window full of brush thumbnails. Clicking on one will give you the settings below to alter the Brush.
You have the option to change the size of your brush by mov-ing the size cursor or typing in your exact brush size
Hardness of the brush will make it seem crisp. If you bring the Hardness all the way down, your brush will seem softer or out of focus.
Adjusting the round-ness of your brush will give it a calligraphic style. This will give the brush strokes a thick to thin movement
Rotate your brush to prevent repetition
Your brush can be smooth, or have spacing.
You can fl ip your brush on an X-axis, Y-axis, or X and Y axis. This will help make your brushes look less repetitive.
Creating a Brush from an Image or Text
First, choose a picture that you want to convert to a brush. A PNG fi le is highly recommended. Open your image fi le as normal through Photoshop. If you’re using the Text instead, open a Transpar-ent project and begin typing your word. Make sure to be on a separate window when creating a Brush.
Your brush will work the best if it’s in a gray scale. Change the contrast and Exposure for a more vivid brush pattern. If using Text, a black silhouette is recommended.
You can also turn your image into a silhouette which will give you a solid color brush pattern.
Photoshop gives you the option to turn any image into a brush. You can also use the Type tool to make a brush out of letters/words. This could be very helpful if you can’t seem to get the brush you want out of the Brush Preset Panel.
Once your image is ready to be converted to a brush, go to Edit > Defi ne Brush Preset... Give your Brush a name and as soon you click Save, the brush will be the fi rst one in the Brush Panel

Saving
File> Save As...
Once you want to save your document go to File>Save As. A dialogue box will appear with the following options:
Choose your fi le format carefully depending on what you want to do with your document. The Following are some of the most commonly used fi le types:
File Name
File Type
AdditionalOptions
Save
Save Location
There are a many different options when it comes to using text in Photoshop.
Text
Horizontal Type is the most commonly used text tool. Use the Vertical Text tool when vertical type is preferred.
Use these two tools when you wish to have something inside the text such as an image
Use this option to alter the shape of your text
These two windows open additional type options such as tracking, kerning, leading, indents, & hyphenation.
Orientation Font Style SizeAlignment
Color
Warp
Open Windows
Horizontal & Vertical Type
Horizontal & Vertical Type Masks
Warped Text
Character & Paragraph Windows
Photoshop.psd
JPEG.jpg
PNG .png
TIFF.tif
The native fi le type. This is the type of fi le you will have when you open a new document. Saving a fi le as a Photoshop document will allow you to go back and make changes.
Most common fi le type for images, but won’t preserve transparency.
Keeps quality of image and preserves transparency.
Used for high quality prints, won’t preserve transparency.
Horizontal Text
Warped Text
Warp Options
Character
Paragraph
Window> Character / Paragraph
Horizontal Text Mask

Adobe Photoshop CC 2017 Shortcuts