adobe prelude tm help and tutorials · adobe® prelude® cc ships with several exciting features...
TRANSCRIPT

Help and tutorialsADOBE® PRELUDETM
October 2013
Contents
What’s new 1...................................................................................................................................................What’s new in Prelude CC 2......................................................................................................................................................
What’s New in Adobe Media Encoder CC 10............................................................................................................................
What’s New in Adobe Premiere Pro CC June 2013 release (version 7.0) 16...........................................................................
Getting Started tutorials 28..............................................................................................................................About Prelude 29.......................................................................................................................................................................
Working with Adobe Prelude 31................................................................................................................................................
Workspace and workflow 32............................................................................................................................Linking Adobe Story scripts with movie clips in Prelude 33.......................................................................................................
The Prelude Workspace 35.......................................................................................................................................................
Importing media 40..........................................................................................................................................Ingesting media clips 41............................................................................................................................................................
Logging movie clips 46....................................................................................................................................Logging movie clips 47..............................................................................................................................................................
Rough cuts 52..................................................................................................................................................Working with Adobe Prelude 53................................................................................................................................................
Rough cuts 54............................................................................................................................................................................
Setting preferences 56.....................................................................................................................................Setting Prelude preferences 57.................................................................................................................................................
Keyboard shortcuts 62.....................................................................................................................................Keyboard shortcuts 63...............................................................................................................................................................

What's new
1

What's new in Prelude CC
To the top
Adobe® Prelude® CC ships with several exciting features and enhancements. Read on for a quick introduction to these features and links toresources offering more information.
Prelude CC | October 2013Ingest still imagesImprovements to the Unassociated Metadata workflowsExport markersClips conform automatically after ingestOther enhancementsUseful video resources
Prelude CC | June 2013Video | Adobe Prelude CC OverviewPerform speech to text analysis using Adobe Story scripts as a guideRename files during ingestSupport for growing filesSpecify a preroll time for markersPlayback for the duration of a markerVideo | Organize clips, subclips, and sequences in PreludeChanges to the Ingest panelRelink a rough cut with its assetsExport rough cuts directly to Adobe Media EncoderChanges in the Preferences dialogUser interface changesNew file format supportUpload and download XMP metadata filesAudio workflowsFrom the community | 10 exciting features in Prelude CC
Prelude CC | October 2013
Ingest still images
Enhanced in Prelude CC
You can now ingest still images into Prelude. The following formats are supported:
Adobe Illustrator (.ai)
Adobe Photoshop (.psd)
Bitmap (.bmp)
CompuServe GIF (.gif)
JPEGPNG
2

Note:
TIFFIcon files
Only static metadata is associated with still images in Prelude. For the purpose of inclusion into rough cuts, still images are assigned a defaultduration of 150 frames. You can adjust this default duration in your preferences (Preferences > General). No markers are associated with stillimages in Prelude.
Still images ingested into Prelude
Improvements to the Unassociated Metadata workflows
Enhanced in Prelude CC
Using the Unassociated Metadata panel, you can apply log files (XMP) created by Adobe Prelude Live Logger to media created while logging.
You can now apply metadata from multiple XMP files—stored on your computer or downloaded from Creative Cloud—to one or more clips. Whenyou select an XMP file in the left pane of the Unassociated Metadata dialog, the markers in it are listed in the right pane. You can select thedesired markers and apply them on one or more selected clips.
Before applying markers to clips currently selected in the Project panel, ensure that the Apply Markers At option is set to Marker StartTime. The Current Player Position option is applicable only to a clip open in the Timeline/Monitor panel.
Export markers
New in Prelude CC
You can now export markers from selected assets as a CSV text file or a well-formatted HTML page (File > Export > Markers).
3

Export markers
Clips conform automatically after ingest
Enhanced in Prelude CC
Prelude now lets you set a preference that automatically conforms audio while ingesting clips (Preferences > Audio > Automatically Conform AudioOn Ingest).
In Prelude CS6, conforming/PEK file generation did not happen until a clip was opened in the Timeline/Monitor panel. In Prelude CC, all assetsare conformed during ingest. With this enhancement, all audio is available when required. Audio during playback is now available from the Projectpanel's thumbnail view.
Other enhancements
Prelude now lets you log and apply metadata to GoPro media.
You can now use MD5 verification to ensure that the ingested files match the original.
MD5 verification for ingested files
You can now export one or more subclips in supported formats (File > Export > Media).
Prelude now autosaves your project whenever markers are added or modified.
Useful video resources
4

To the top
Note:
Prelude CC | June 2013
Perform speech to text analysis using Adobe Story scripts as a guide
New in Prelude CC
Similar to the workflow available in Adobe Premiere Pro, you can analyze clips using Adobe Prelude to turn speech into searchable metadata.Scripts from Adobe Story can be used to guide the speech analysis engine and improve accuracy.
Prelude now has a new Adobe Story panel directly within the application that displays a list of available scripts in your Adobe Story account. Youcan simply drag and drop scenes onto clips in Prelude's Project panel to associate scripts with the video clips. Then, you can select the clips andanalyze them.
Rename files during ingest
New in Prelude CC
The Ingest dialog allows you to create your own naming conventions and save them as presets. You can also share presets using the ImportPreset feature.
The way in which files are renamed depends on the type of media being ingested. For simple video assets (QuickTime, AVI, and so on), the entireasset is represented as a single file. Prelude renames the asset file on disk to match the naming convention.
If you are ingesting media from a complex folder structure (XDCAM, P2, AVCHD), Prelude renames the alias used in the Project Panel. Inaddition, the new name is written to the XMP metadata (Title field of the Dublin Core XMP schema). Because this field is used by Premiere Prowhen displaying project alias names, the appearance and behavior of your media through cross product workflows remains consistent.
Support for growing files
New in Prelude CC
You can now ingest and log growing files while they are still being recorded. In the Media section of the Preferences dialog, you can customize therefresh rate for growing files.
This feature has additional hardware and software requirements.
Specify a preroll time for markers
New in Prelude CC
When you add markers during playback, you sometimes miss adding the marker at the exact time. For example, if you want to add the marker at00:20:41:02 during playback, the delay in pressing the key can result in the marker getting added after the required time.
The Preroll setting lets you factor the delay in adding markers when the movie is in playback mode. In the Marker section ofthe Preferences dialog, you can specify the Preroll time for markers.
Markers added while the open clip is not playing do not use the preroll time, they start at the location of the Current Time Indicator.
Playback for the duration of a marker
5

Enhanced in Prelude CC
You can now play back the movie for the duration of a marker. Click the Play In-Out button on the Monitor panel to play back the movie for aselected marker. Alternatively, use Ctrl+Shift+Space (Windows) or Option+K (Mac OS).
Changes to the Ingest panel
Enhanced in Prelude CC
Selected clips appear brighter and with a border.In the Files of Type menu, only the supported file formats are listed. The list reflects the support for audio files in this release.The label Concatenate changed to Stitch Clips Together.In the Verify menu, labels of options changed to File Size Comparison and Bit by Bit Comparison.The Power button in the panel header allows you to disable all features in the panel without opening the panel.To ingest clips to a specified bin in the Project panel, select the bin before you click Ingest. The movie clips are ingested to the specified bin.Two new panels, File Metadata and File Rename have been introduced. These panels allow you to add file metadata and change the currentname of files during and after ingest.
Relink a rough cut with its assets
New in Prelude CC
When you move an asset to a different location, its link with the rough cut is broken. You can now relink relocated assets associated with the roughcut.
To relink a rough cut with its assets, right-click the clips inside the open rough cut and select Relink. Select the asset from its current location.Prelude relinks the selected asset, and other assets associated with the rough cut present at that location.
6

Export rough cuts directly to Adobe Media Encoder
New in Prelude CC
Select a rough cut in the Project panel and then select File > Export > Rough Cut to export the rough cut directly to Adobe Media Encoder. Selectthe presets, output, and destination for encoding in Adobe Media Encoder.
This feature requires that Premiere Pro be installed on your computer.
Changes in the Preferences dialog
If the Welcome Screen is disabled, the previously opened project is launched when you open Prelude. You can reenable the WelcomeScreen in the General section of the Preferences dialog. From the startup menu, select Show Welcome Screen.In the Creative Cloud section, you can specify a location for XMP files that are downloaded from the creative cloud.In the Marker section, you can change the default color settings and duration for markers. For example, if you want the comment markers tohave a default time of 5 seconds, you specify the time in Duration.To change the skip back duration when you press the H key, specify a Skip Back Amount in the Playback section of the Preferences dialog.
User interface changes
Welcome screen
To disable the Welcome Screen at launch, disable the option Show Welcome Screen at Startup.
If you disable the Welcome screen, the last opened project launches when you start Prelude. To re-enable the Welcome screen, open thePreferences dialog, and select Show Welcome Screen in the At Startup menu.
Thumbnail view for movie clips in the Project panel
Thumbnail view has been added for movie clips in addition to the List view.To scrub the contents of a movie clip, hover your cursor across the thumbnail or select the clip and control playback using JKL keys.Different badges for master clips and sub clips.One level up button allows you to move up by one level when navigating bins.
7

A. Up one level B. Badge for movie clip C. Badge for sub clips D. List view E. Thumbnail view F. Zoom option G. Attached Adobe Story scene H.Scroll bar
Switching between a rough cut and open clip
The user interface for switching between a rough cut and an open clip is now standardized with other video applications from Adobe.
CC: Use the options in the menu of the Monitor or Timeline panels to switch between a rough cut and an open clip.
CS6: Click the name of the rough cut or the open clip in the Timeline or Monitor panel.
New file format support
New in Prelude CC
Logging support for Red R3D files.Sony XMPilot planning metadata on XDCAM HD cameras.
During ingest, Prelude converts XMPilot Planning metadata to Static metadata. It also converts essence markers to comment markers.
AIFF, MP3, and WAV filesImport and logging of DNxHD assets
Upload and download XMP metadata files
New in Prelude CC
You can upload asset metadata to the Creative Cloud as an XMP file. You can later download the XMP file to Prelude running on anothercomputer or device and apply that metadata to assets. The metadata is downloaded to the Unassociated Metadata panel.
For more information, see Use the Creative Cloud to upload and download asset metadata
8

Twitter™ and Facebook posts are not covered under the terms of Creative Commons.
Legal Notices | Online Privacy Policy
Audio workflows
Enhanced in Prelude CC
You can mute an audio channel by doing one of the following:Right-click the movie clip, and select Mute Audio Channel.Click the mute buttons on the header of the track
The new look of the audio waveforms matches the current look of the waveform in Premiere Pro. Just like in Premiere Pro, you can switch tothe old style of audio waveform appearance by toggling "Rectified Audio Waveforms" in the Timeline panel flyout menu.
From the community | 10 exciting features in Prelude CC
Check out these exciting features in PreludeCC... Read More
http://www.premiumbeat.com/blog/next-version-...
byhttp://www.premiumbeat.com
Contribute your expertise toAdobe Community Help
9
What's New in Adobe Media Encoder CC
To the top
Adobe® Media Encoder CC offers new features and enhancements for an enhanced video encoding experience. Read on for a quick introductionto new features with links to resources offering more information.
Match Source presetsExporting Closed Caption dataSupport for Avid DNxHD assetsUpdated MPEG-2 exportersEnhancements to SurCode for Dolby Digital audio codecCloser integration with Adobe After EffectsOther changes
Also, read this blog post by Adobe's Kevin Monahan for a look at some of the top new features in this release.
Match Source presets
When exporting video files in H.264 or MPEG format, Adobe Media Encoder lets you automatically match the video settings of the source fileusing Match Source presets. Selecting a Match Source preset automatically activates the appropriate options in the Video settings tab in theExport Settings dialog.
Adobe Media Encoder provides the following two Match Source presets for both H.264 and MPEG-2 exporters:
Match Source - High bit rate: for High-Definition (HD) video sources. This preset is the default Match Source preset for both H.264 andMPEG-2 exporters.Match Source - Medium bit rate: for Standard-Definition (SD) video sources.
Match Source presets are useful when you want to pass a few video attributes from the source, and select specific values for the other attributes.You can save the Match Source setting as a new preset and apply them to any source in the Queue or Watch Folder panels.
For example, say, you have a Watch Folder containing assets with varying frame sizes and frame rates. You want to convert all the assets in theWatch Folder to a single format at 24 fps. To do so, create a preset with source-matching enabled for all properties except Frame Rate, which isset to 24 fps.
Match source while exporting H.264 and MPEG-2 videos
1. In Adobe Media Encoder, select Edit > Export Settings.
2. In the Export Settings dialog, select the Video tab.
3. Click Match Source to turn on source-matching. Source-matching is turned on for the following basic video settings:
Frame SizeFrame RateField OrderAspect ratio
10

To the top
TV StandardProfileLevel
You can choose to turn source matching on and off for individual properties by clicking the checkbox next to each property. Deselecting aMatch Source shows you the matching source value for each setting, and lets you edit the value as required.
Match Source settings
Exporting Closed Caption data
Closed captions are typically used to display the audio portion of a video as text on televisions and other devices that support the display of closedcaptions.
Adobe Media Encoder can export closed caption tracks from Premiere sequences as a separate "sidecar" file that contains the caption data. ForQuickTime exports, you can choose to export the data either as a separate sidecar file, or embed the data within the output file.
For more information on exporting closed caption data from Adobe Premiere Pro through Adobe Media Encoder, see Closed Captioning, andwatch this video:
Export Closed Caption data using the Export Settings dialog
The new Captions tab in the Export Settings dialog box lets you specify the format and the frame rate while exporting closed caption data. Theframe rate options depend on the file format that you choose while exporting.
Adobe Media Encoder provides you the following sidecar formats:
Scenarist Closed Caption File (.scc) - CC Standards: CEA-608MacCaption VANC File (.mcc) - CC Standards: CEA-608 or CEA-708SMPTE Timed Text (.xml) - CC Standards: CEA-608 or CEA-708EBU Timed Text (.xml) - CC Standards: TeletextEBU N19 Subtitle (.stl) - CC Standards: Teletext
11

To the top
Closed captions export options
1. Queue a Premiere Pro sequence with closed caption data by doing one of the following:
In Premiere Pro, select File > Export > Media.Load a closed caption asset in the Source Monitor or select it in the Project panel. Then, select File > Export > Media.
In the Export Settings dialog box, click Queue to send the sequence into the Adobe Media Encoder queue.
Alternatively, you can also drag-and-drop the sequence from Premiere Pro into the Queue panel in Adobe Media Encoder.
2. In Adobe Media Encoder, select Export Settings from the file's context menu.
3. In the Export Settings dialog box, select the Captions tab.
4. Select the Export Option as:
Create Sidecar File, orEmbed in Output File (QuickTime movies only).
If you choose not to export the closed caption data, select None.
5. You can specify the file format for the sidecar file. The frame rate options that are provided depend on the sidecar file format that youchoose.
Support for Avid DNxHD assets
Adobe Media Encoder provides enhanced support for Avid DNxHD assets. Avid DNxHD is an intermediate codec that is used in several non-linear video editing systems. To learn more about the Avid DNxHD codec, see this article from Avid.
Easy import and export of DNxHD assets
Adobe Media Encoder supports the import and export of Avid DNxHD assets without having to install additional codecs.
You can import DNxHD assets in the following formats:
MXF (MXF OP1a and MXF Op Atom variants)QuickTime (with uncompressed alpha channel)
You can also encode any source to the DNxHD MXF format (MXF OP1a variant).
New DNxHD MXF presets
Several DNxHD MXF presets have been added to Adobe Media Encoder. They are available in the Presets Browser under the Broadcastcategory.
DNxHD presets are available as 8-bit or 10-bit depth. The 8-bit depth variants are in YUV color space. The 10-bit depth variants can either be inYUV or RGB color space. Presets with "X" in their name denote a 10-bit depth.
See also:
12

To the top
To the top
Note:
To the top
Import and export assets using Adobe Media Encoder
Updated MPEG-2 exporters
Adobe Media Encoder has updated MPEG-2, MPEG-2 Blu-ray, and MPEG-2-DVD export formats.
The updates include performance enhancements and the following user interface changes:Note: There are no changes to the functionality of these exporters.
To give a unified appearance across exporters, the order of fields is adjusted to match the layout of H.264 and other newer exporters.The Quality slider now has a range of 0-100 (earlier range was 1-5). Approximate values in the new range can be calculated as 1=0, 2=25,3=50, 4=75, 5=100.
To import MPEG-2 presets from a CS6 version, you need to re-create the presets manually. You cannot import the presets directly.
Enhancements to SurCode for Dolby Digital audio codec
The SurCode for Dolby Digital audio codec is now available for MPEG-2, MPEG Blu-ray, MPEG-2-DVD, H.264, and H.264 Blu-ray exporters.
You can select the SurCode for Dolby Digital audio codec from the Export Settings dialog box.
SurCode for Dolby Digital Audio Codec settings
1. In Adobe Media Encoder, select Edit > Export Settings.
2. In the Export Settings dialog box, select the Audio tab.
3. Under Audio Format Settings, select the audio format as Dolby Digital.
4. Under Basic Audio Settings, select the audio codec as SurCode for Dolby Digital.
5. For information about installing SurCode for Dolby Digital encoder and other additional information, click Codec Settings.
Adobe Media Encoder installs a trial version of SurCode for Dolby Digital encoder by default. To continue using the SurCode forDolby Digital encoder after the trial period ends, you need to purchase the third-party license from Minnetonka Audio Software.
Closer integration with Adobe After Effects
You can now send compositions from Adobe After Effects directly to Adobe Media Encoder. There are two new menu commands and a keyboard
13

To the top
shortcut to send active compositions selected in the Project panel to the Adobe Media Encoder encoding queue:
In Adobe After Effects, select Composition > Add To Adobe Media Encoder Queue, or select File > Export > Add To Adobe Media EncoderQueue.Use the keyboard shortcut Ctrl+Alt+M (Windows) and Cmd+Option+M (Mac OS)
Several export formats that were available in previous versions of Adobe After Effects are now available in Adobe Media Encoder.
Note: These export formats are now disabled by default in Adobe After Effects. If you want, you can re-enable the older versions of these formatsin After Effects using the Output preferences in the Preferences dialog box. Adobe, however, recommends that you use newer versions of theseformats that are available from Adobe Media Encoder.
H.264H.264 Blu-rayMPEG-2MPEG-2 Blu-rayMPEG2-DVDMPEG4Windows Media (available only on Windows)
To use these formats, export your compositions from Adobe After Effects to Adobe Media Encoder.
For more information, see What's New in After Effects CC and this blog post by Adobe's Todd Kopriva.
Community resources:
Other changes
Additional system presets
Adobe Media Encoder CC includes new system presets for the following mobile devices:
Amazon Kindle Fire,Barnes & Noble Nook,and Android tablets.
Adobe Media Encoder also provides 1080p presets for the following new Apple devices:
iPad retina display (third and fourth generation),iPad Mini,iPhone 5, andApple TV (third generation).
You now also have new presets for XDCAM EX and AVC-Intra in MXF wrappers. For information about using and installing these presets, see thisblog post by Adobe's Todd Kopriva.
Smart Rendering by default for MXF OP1a and MXF formats
Smart Rendering is turned on by default for MXF OP1a and DNxHD MXF formats. For more information about Smart Rendering, see this article.
Support for new formats
Adobe Media Encoder now supports the following new import formats:
Sony 4K AVC-Intra (XAVC)Panasonic AVCI-200RED Epic Monochrome
14

Twitter™ and Facebook posts are not covered under the terms of Creative Commons.
Legal Notices | Online Privacy Policy
DNxHD.MXFDNxHD.MOVProRes.MOVXDCAMHD.MOVXDCAMEX.MOV
Ability to change the output folder for multiple selections
You can change the output directory for multiple outputs at once by following these steps:
1. Select two or more outputs in the Queue panel. You can select outputs from the same source or from different sources.2. In the Output File column, click the output path of one of the selected outputs.3. Select a folder from the dialog, and click Choose. The Output path of every output in your selection changes to the new folder.
Ability to import ARRIRAW (.ari) camera files
You can now import ARRIRAW (.ari) camera files directly into Adobe Media Encoder.
15

What's New in Adobe Premiere Pro CC June 2013 release (version7.0)
To the top
To the top
Premiere Pro CC October 2013 release (version 7.1) now available. For information about the new and changed features in this release, seethis What's New article.
Adobe® Premiere® Pro CC offers several new features and enhancements that enrich your digital video editing experience. Read on for a quickintroduction to the new features and links to resources offering more information.
IMPORTANT: Apart from the features listed in this article, Premiere Pro CC includes several useful features that help you be more productivewhen using Premiere Pro. For more information, see New features in Premiere Pro CC June 2013 (version 7.0).
Premiere Pro CC new features overviewSync Settings using Adobe Creative CloudAdobe Anywhere integrationUser Interface improvementsRelinking offline mediaDuplicate frame detectionClosed CaptioningEditing finesse enhancementsAudio enhancementsColor-related enhancementsExtending the power of Adobe Premiere ProNew and changed keyboard shortcutsOther changes
Sync Settings using Adobe Creative Cloud
The new Sync Settings feature enables users to sync their preferences, presets, and settings to the Creative Cloud.
If you use Premiere Pro on multiple machines, the Sync Settings feature makes it easy for you to keep those settings synchronized across themachines. The syncing happens via your Adobe Creative Cloud account. All the settings are uploaded to your Creative Cloud account, which canbe downloaded and applied on the other machine.
For more information, see Sync settings in Premiere Pro CC.
Adobe Anywhere integration
16

To the top
Adobe Anywhere lets video teams effectively collaborate and access shared media across standard networks. You can you use local or remotenetworks to simultaneously access, stream, and work with remotely stored media. Heavy file transfers, duplicate media, and proxy files are notrequired.
To use Adobe Anywhere in Premiere Pro, select File > Adobe Anywhere > Sign In. Enter the required information in the Adobe Anywhere Sign Indialog box.
For more information, read about Adobe Anywhere for Video, or watch this video:
User Interface improvements
High-resolution viewing and improved overall user experience
Premiere Pro now provides HiDPI support for an enhanced viewing experience with a high-resolution user interface. HiDPI displays are availableon the newest monitors like Apple’s Retina Mac computers, including the new MacBook Pro models.
Other improvements to the user interface include:
Improved title and action-safe guidesSwitching between video and audio waveforms with one clickToggling tool tips on and off
Enhanced viewing experience with HiDPI support A. View video or audio in one-click B. Enhanced titling and action-safe guides
Redesigned Timeline with customizable track headers
Premiere Pro now has a redesigned Timeline panel that is customizable, letting you choose what to display, and lets you have immediate accessto controls.
17

To the top
To the top
You can now work more quickly and efficiently with track controls for volume and pan, recording, and audio metering.
Redesigned Timeline
The track headers in the Timeline panel are now customizable, allowing you to determine which controls are displayed. Since the controls aredifferent for the video and audio tracks, there are separate Button Editors for each track type.
Right-click a video or audio track and select Customize. Then drag-and-drop buttons as required. For example, you can select the Track Metercontrol and drag it into your audio track.
You can easily edit source sequences into other sequences without nesting. You can also copy effects from one clip to another with enhancedpaste attributes.
Community resources:
Video tutorial by Josh Weiss: The redesigned Timeline panel
Relinking offline media
You can often move, rename, or transcode files to different formats. Premiere Pro helps you locate and relink such files with the new Link Mediadialog box.
A. Locate missing media
When you open a project containing offline media, the Link Media dialog provides information like filename, last known path, and metadataproperties. Using all this information, Premiere Pro lets you quickly locate and relink the media, bringing them back online for use in your project.
For more information, see Relinking offline media.
Duplicate frame detection
Premiere Pro identifies clips that are used in a timeline more than once in the same sequence by displaying duplicate frame markers. A duplicateframe marker is a colored stripe indicator that runs across the bottom of a clip for each duplicated frame.
18

Note:
To the top
To turn on duplicate frame markers, Click Timeline Display Settings, and select Show Duplicate Frame Markers.
Show duplicate frame markers
Premiere Pro assigns a color automatically to each master clip that has a duplicate clip. Up to ten different colors are assigned. After ten colors areused, the tenth color is reused.
For example, say, you've used multiple cameras to shoot a sporting event. You may use different shots of the crowd all through the show. If youuse the same crowd shot more than once, then duplicate frame detection alerts you to the duplicate clip by displaying a colored stripe across it.
Duplicate frame markers are not available for still images and time remapping.
Community resources:
Video tutorial by Josh Weiss: Duplicate frame indicators
Closed Captioning
You can now work with closed caption text within Premiere Pro without the need for separate Closed Captioning authoring software.
19

To the top
Closed Captioning tools in Premiere Pro A. Display closed captions with content B. See captions on the Timeline
You can import Closed Caption text, link it to the appropriate clips, edit the text, and adjust durations in the timeline from within Premiere Pro.When you're done, export your sequence to tape, or to Adobe Media Encoder, with embedded closed captions or as a separate Sidecar file.
For more information about working with closed captions in Premiere Pro, see Closed Captioning.
Editing finesse enhancements
Auto-sync multiple camera angles
The new Multicamera mode displays the multicamera editing interface inside the Program Monitor. You can create ready-to-edit sequence fromclips shot from different angles with multiple cameras or from different takes of a particular scene.
You can use the Create Multi-Camera Source Sequence option to combine clips that have common In or Out points or overlapping timecode into amulticamera sequence. You can create a multicamera source sequence from a bin of clips. When creating a multicamera sequence, there is nowan Offset Audio By control, with a range of -100 to +100 frames.
For more information, see Create multi-camera source sequence.
20

Use the Create Multi-Camera Source Sequence option to automatically match multiple camera angles
Auto-sync clips using audio waveforms
Premiere Pro also lets you can merge clips by using audio waveforms. You can use audio recorded from a second source to automatically syncand create multicamera and merged clips using audio waveforms.
Source Patching and Track Targeting
Source patching and track targeting has been redesigned for faster and more efficient editing. You can now patch sources for insert and overwriteediting, or targeting tracks for Copy/Paste, Match Frame, and other edit operations in just a single click.
You can create presets for common patching scenarios, letting you reconfigure the Timeline with a single command.
For more information, see Source patching and track targeting.
Edit unnested sequences into destination sequences
You can now edit source sequences into other sequences, keeping the original source clips and track layout intact. This feature lets you usesegments of other sequences containing individual source clips, edit points, transitions, and effects, much like copy/paste.
A "Nest Source Sequence" toggle command lets you toggle between nested and unnested behavior. The "Nest Source Sequence" togglecommand is available from the Timeline header's source indicators context menu.
For more information, see Edit from sequences loaded into the Source monitor.
Join Through Edits
You can now join through edits in your clips using the new Join Through Edits feature.
In the Timeline panel, select the edit points in your clip that you want to join. Then, right-click (Win) or Ctrl-click (Mac) the selected edit points andselect Join Through Edits from the context menu.
Through edit indicators are displayed on extraneous edits that do not cause a break in the original frame sequence of the clip. When you use JoinThrough Edits for a through edit, Premiere Pro heals the cut and recreates a longer clip from the contiguous parts.
Snapping Razor tool
21

You can now snap the playhead to items when you drag it over the Timeline. When snapping is enabled, the Razor tool is selected, and the cursorsnaps to any snapping target including the playhead.
To use the multi-razor tool over all tracks, press the Shift key. To ignore track items, press the Alt key (Windows) or Option (Mac OS).
New Snap Playhead preference
Snap Playhead In Timeline When Snap Is Enabled is a new preference option that controls the behavior of the playhead when scrubbing. Whenyou select this preference, the playhead snaps to every edit point.
This preference option is available under the General preferences category in the Preferences dialog box.
Naming nested sequences
When you create a nested sequence with the Timeline's Nest command, the Nested Sequence Name dialog box appears. You can enter a nameof your choice for the nested sequence.
To use the Nested Sequence command, right-click (Win) or Ctrl-click (Mac) a clip in the Timeline panel and choose Nest from the context menu.
Trim-to-zero duration
Trim a clip to zero duration using the keyboard or mouse. For more information, see this video tutorial by Josh Weiss.
Enhanced Paste attributes
The Paste Attributes dialog box lets you easily add and move audio and visual effects across multiple clips.
After copying a clip containing effects, the dialog box lets you select which effect you want to paste into the destination clip selected in theTimeline.
If the video or audio clips have any additional user-applied effects, these effects are also available for selection. You can select a group of effectsor specific effects.
For more information, see this video tutorial.
Playhead moves to edit point after a ripple-delete
When you ripple-delete clips in the Timeline panel, the playhead automatically moves to the beginning of the edit point, instead of remaining inplace. You can immediately replace the edit without having to first reposition the playhead.
22

To the top
Audio enhancements
Renamed Audio Mixer panel
The Audio Mixer panel is now renamed the Audio Track Mixer. This name change helps you distinguish the Audio Track Mixer from the new AudioClip Mixer panel.
Audio Track Mixer
The pop-up menu in the Audio Track mixer is redesigned to display the audio plug-ins in categorized subfolders for a faster selection.
Enhanced Timeline track header
A horizontal Audio meter is now available in the audio track headers.
Audio Meter
Two new controls are available in the Timeline's customizable track header area to adjust the pan and track volume for audio tracks.
Multiple stereo assignments for tracks to multichannel masters
You can now assign a mono or standard track to multiple pairs of channels in a multichannel master. In the panner assignment dialog, set thestereo channel pairs you want to assign to a track.
For more information, see Multiple stereo assignments for tracks to multichannel masters.
New Clip Mixer panel
23

To the top
The Audio Clip Mixer lets you monitor and adjust the volume and pan of clips in sequence when the Timeline panel is in focus. Similarly, when theSource Monitor panel is in focus, the Audio Clip Mixer lets you monitor clips in the Source Monitor.
Audio Clip Mixer
To access the Audio Clip Mixer, choose Window > Audio Clip Mixer from the main menu.
For more information, see Monitor clip volume and pan using Clip Mixer.
Audio waveform changes
Audio waveforms now appear similar to the waveforms in Adobe Audition. In addition, Audio waveforms now appear in nested sequences. You canreturn to standard audio waveforms in the panel menu.
You can also use a label color for your audio waveforms. In the Timeline panel, select Audio Waveforms Use Label Color.
New Audio Plug-ins manager and audio plug-ins
The Audio Plug-ins manager is available to work with your audio effects. You can access the Audio Plug-In Manager menu from the Audio TrackMixer and Effects panels. You can also access the Audio Plug-In Manager from the Audio Preferences dialog.
Premiere Pro now supports third-party VST3 plug-ins. On the Mac, you can also use Audio Units (AU) plug-ins.
Multi-channel QuickTime export
When exporting multi-channel master sequences, the Export Media dialog's Audio Channel setting changes to a pop-up menu. This menu lets youselect the channels to be included in the export.
Control surface support
Premiere Pro now lets you interactively mix audio with control surfaces that use the EUCON and Mackie protocols. You can also use third-partytablet-based controllers that support these protocols.
To connect your controller to Premiere Pro, select Control Surface in the Preferences dialog box. Choose the controller protocol from the DeviceClass menu.
Use the faders, knobs, and buttons on these devices to control Track Mixer faders and parameters, such as track pan and balance. You canconnect supported devices, such as Avid MC Artist and Mackie XT and assume control of the Track Mixer.
For more information, see Control surface support.
24

To the top
To the top
Color-related enhancements
Integration of Lumetri Deep Color Engine
Premiere Pro now includes the Lumetri Deep Color Engine. You can instantly apply SpeedGrade .look files and pre-made Lookup Tables (LUTs)to your sequences from within Premiere Pro.
Use the new integrated Looks browser in the Effects panel to apply preset color grading effects, or to locate exported .looks from SpeedGrade orLUTs from other systems.
For more information, see Apply SpeedGrade color-correction within Premiere Pro.
The Looks Browser integrated in Premiere Pro
Extending the power of Adobe Premiere Pro
Adobe Story panel
The new Adobe Story panel in Premiere Pro lets you import scripts created in Adobe Story, along with associated metadata to guide your editing.
You can quickly navigate to specific scenes, locations, dialogue, and characters as you work. You can use Speech To Text search to find the clipsyou need and edit to the script within the Premiere Pro editing environment.
Adobe Exchange panel
The Adobe Exchange panel integrated with Premiere Pro lets you easily browse, install, and find support for the latest plug-ins and extensions.
Select Window > Extensions > Adobe Exchange to open the Adobe Exchange panel. You can find both free and paid extensions.
New and changed keyboard shortcuts
Premiere Pro provides you many new keyboard shortcuts including the following:
25

To the top
Note:
Select next and previous clips in a sequence
The Select Next Clip and Select Previous Clip keyboard shortcuts let you quickly navigate relative to the current clip selection and select anadjacent clip in the sequence.
Select clips under playhead or within In-Out range
To provide two slightly different keyboard-driven workflows, there are two new keyboard shortcuts for selecting clips in the sequence: Select Clip atPlayhead and Select In to Out.
Move selected clips to different tracks
Use the Nudge Clip Selection Up and Nudge Clip Selection Down keyboard shortcuts to move selected clips up or down to different tracks.
For the complete list of available keyboard shortcuts, see Keyboard shortcuts in Premiere Pro CC.
Other changes
GPU processing changes
You can now enable OpenCL or CUDA processing on any card that meets minimum requirements (1-GB RAM, basic shader tests).
CUDA support for NVIDIA Kepler 2000 and 4000 Dual GPU support for NVIDIA cards for export performance enhancement are now available.
OpenCL processing is now available on Windows for cards that meet the basic requirements.
Support for mezzanine codecs, native formats
Industry-standard mezzanine codecs and native video formats, such as the following, are now available within Premiere Pro:
Native MXF-wrapped DNxHDApple ProRes (decode only on Windows)Sony XAVCPanasonic AVCi200
Enhanced import/export workflows for Avid and Final Cut Pro projects
You now have an enhanced and improved workflow when importing or exporting Avid or Final Cut Pro projects. You can import AAF projects withmuch higher fidelity, and with supportfor more video formats, including DNxHD.
Export to Tape (Serial Device)
When a serial device is connected, you can export your edited sequence onto videotape directly from your computer, for example, to create amaster tape. To do so, select File > Export > Tape (Serial Device).
The Export to Tape (Serial Device) feature requires a third-party SDI tape export solution. Premiere cannot natively export to tape usingSerial Device control.
For information about the many other new features, see New features in Premiere Pro CC.
26

Twitter™ and Facebook posts are not covered under the terms of Creative Commons.
Legal Notices | Online Privacy Policy
27

Getting Started tutorials
Video | Adobe Premiere Pro CC and Prelude CCvideo-tutorial (Jun. 17, 2013)
Video | Adobe Prelude CC Overviewvideo-tutorial (Jun. 17, 2013)
Video | What is Prelude CCvideo-tutorial (Jun. 17, 2013)
Video | Organizing clips in Preludevideo-tutorial (Jun. 17, 2013)
28

About Prelude
To the top
Introduction to Adobe PreludeWorkflowExtending Prelude
Adobe Prelude software is a video ingest and logging tool that helps you quickly tag and transcode raw footage from file-based cameras. It is anopen platform that supports customized integration with third-party technologies and management systems.
You could also check out this video from Video2Brain. http://www.video2brain.com/en/videos-13357.htm
Workflow
1. Create a project / Open an existing project
Adobe Prelude creates a project (.plproj) file for every project that you create in Prelude. The project file contains references to the media you addto your project.
A project file stores only references to the source files that you ingest. For this reason, project files remain fairly small. Because only references tothe source files are stored, you don't need to worry about moving, renaming, or deleting your source files. If media files are moved or renamed,you can reconnect such media to your project using the Relink command available in the File menu.
2. Ingest raw footage
Ingest entire movie clips, or only portions of a clip (partial ingest). Choose a codec that best suits your editing requirements.
File-size and byte-level checks help you immediately identify whether the footage was ingested successfully.
3. Organize ingested footage
You can reorder the sequence of clips by moving them in the project view. Use bins to organize project contents much as you use folders toorganize files. Bins can contain clips, subclips, and rough cuts.
4. Log video clips
Use interface options or keyboard shortcuts to add temporal metadata to clips, and create subclips. Markers and other temporal metadata help youquickly organize and search clips. You can leverage the metadata information when you export to other software such as Adobe Premiere Pro.
5. Create rough cuts
Create rough cuts from clips and subclips before sending them to other software such as Adobe Premiere Pro for final editing.
29

Twitter™ and Facebook posts are not covered under the terms of Creative Commons.
Legal Notices | Online Privacy Policy
To the top
6. Export to Adobe Premiere Pro/Final Cut Pro
You can export rough cuts, clips, subclips, and bins to an Adobe Premiere Pro project or FCP XML file. Alternatively, you can send the rough cut toAdobe Premiere Pro directly for editing.
The organization and metadata information from Prelude is carried over to Adobe Premiere Pro. This seamless workflow reduces post-productiontime and effort when you create the final cut of a movie.
Extending Prelude
Adobe technical partners can use the Prelude SDK to customize Prelude.
Leverage XMP-based open platform capabilities of Adobe Prelude to integrate with third-party technologies and asset management systems.Create searchable, custom, temporal-based markers through ActionScript panels that capture information for your project or organization.Import event metadata from other workflow-specific sources. Then add it to your footage in Prelude by importing it as an XMP stream or file.
®
30

Working with Adobe Prelude
Twitter™ and Facebook posts are not covered under the terms of Creative Commons.
Legal Notices | Online Privacy Policy
To the top
You can use Adobe® Prelude™ to ingest clips, transcode footage, create subclips markers and rough cuts, and then import that data into Adobe®Premiere® Pro.
You can use Prelude’s clip naming and metadata features to quickly create subclips, build a rough-cut assembly, and send it to Premiere Pro as asequence for immediate editing. You can then export rough cuts, clips, subclips, and bins from Prelude to an Adobe Premiere Pro project forediting.
For more information on using Adobe Prelude, see Adobe Prelude Help.
Exporting files from Adobe Prelude
You can export rough cuts, clips, subclips, and bins from Prelude to an Adobe Premiere Pro project or FCP XML file. Alternatively, you can sendthe rough cut to Adobe Premiere Pro directly for editing.
The organization and metadata information from Prelude is carried over to Adobe Premiere Pro. This seamless workflow reduces post-productiontime and effort when you create the final cut of a movie.
Exporting a Premiere Pro project or Final Cut Pro XML file
To export a Premiere Pro project file that contains clips, subclips, markers, and rough cuts from Adobe Prelude, do the following:
1. Choose File > Export.2. The Export dialog box launches.3. Choose the destination for the project file.4. Name the project file and click the enable checkbox.5. From the Type menu, choose either a Premiere Pro or Final Cut Pro 7 XML file type.6. Optional: export associated media by clicking the enable checkbox, and creating a folder name.7. Click OK
The file is exported. You can now import or open the project file in Adobe Premiere Pro.
Resources
Adobe Prelude HelpVideo tutorial: What is Adobe Prelude?Video tutorial: An overview of the interfaceVideo tutorial: Improved markers and importing from PreludeVideo tutorial: Sharing clips and rough cuts directly with Adobe Premiere ProVideo tutorial: Adding comments
31

Workspace and workflow
32
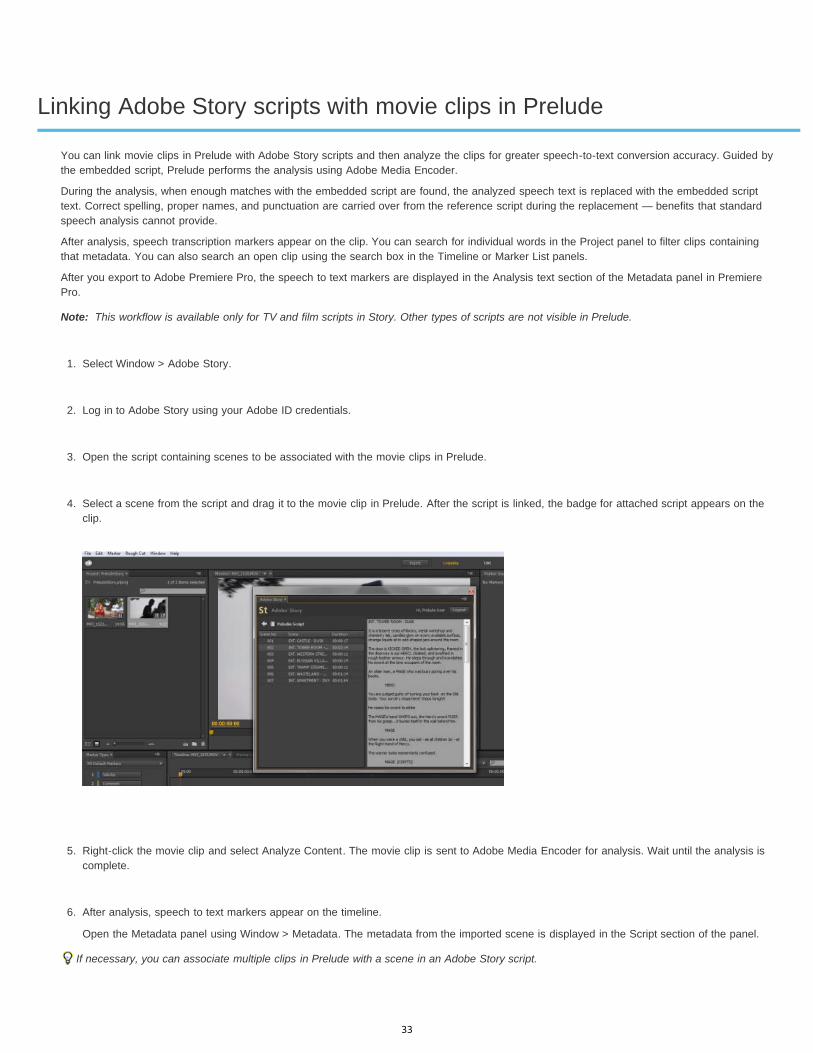
Linking Adobe Story scripts with movie clips in Prelude
Note:
You can link movie clips in Prelude with Adobe Story scripts and then analyze the clips for greater speech-to-text conversion accuracy. Guided bythe embedded script, Prelude performs the analysis using Adobe Media Encoder.
During the analysis, when enough matches with the embedded script are found, the analyzed speech text is replaced with the embedded scripttext. Correct spelling, proper names, and punctuation are carried over from the reference script during the replacement — benefits that standardspeech analysis cannot provide.
After analysis, speech transcription markers appear on the clip. You can search for individual words in the Project panel to filter clips containingthat metadata. You can also search an open clip using the search box in the Timeline or Marker List panels.
After you export to Adobe Premiere Pro, the speech to text markers are displayed in the Analysis text section of the Metadata panel in PremierePro.
This workflow is available only for TV and film scripts in Story. Other types of scripts are not visible in Prelude.
1. Select Window > Adobe Story.
2. Log in to Adobe Story using your Adobe ID credentials.
3. Open the script containing scenes to be associated with the movie clips in Prelude.
4. Select a scene from the script and drag it to the movie clip in Prelude. After the script is linked, the badge for attached script appears on theclip.
5. Right-click the movie clip and select Analyze Content. The movie clip is sent to Adobe Media Encoder for analysis. Wait until the analysis iscomplete.
6. After analysis, speech to text markers appear on the timeline.
Open the Metadata panel using Window > Metadata. The metadata from the imported scene is displayed in the Script section of the panel.
If necessary, you can associate multiple clips in Prelude with a scene in an Adobe Story script.
33

Twitter™ and Facebook posts are not covered under the terms of Creative Commons.
Legal Notices | Online Privacy Policy
Clear script metadata from clips
Right click the movie clip and select Clear Script Data.
34

The Prelude workspace
To the top
To the top
To the top
Video tutorialWelcome screenIngest, Logging, List, and Rough Cut workspacesCreating custom workspacesPanels in Prelude
Video tutorial
To view the video in full screen mode, click .
Welcome screen
The Welcome Screen appears when you open Prelude. Use the Welcome Screen to create a project, open an existing project, or access Help forPrelude.
To disable the Welcome Screen at launch, disable the option Show Welcome Screen at Startup on the Welcome Screen.
If you disable the Welcome Screen, the last opened project launches when you relaunch Prelude. To re-enable the Welcome Screen, open thePreferences dialog, and select Show Welcome Screen in the At Startup menu.
Ingest, Logging, List, and Rough Cut workspaces
The default workspaces available in Prelude are designed to show panel arrangements optimized for tasks like logging or working with rough cuts.
The Ingest dialog
Use the Ingest dialog box to select and ingest movie clips. You can also select folders and rough cuts. When you choose a folder, all theassociated movie clips in it are ingested.
You can ingest clips from your computer, other software, or attached devices such as an external hard disk, video camera, or camera card. Youcan ingest a portion of a clip (partial ingest) by setting In and Out points on the clip thumbnail and enabling transcoding in the Transfer Clips ToDestination section.. You can also choose a transcode option that best suits your editing requirements.
Prelude allows you to add metadata and rename files before ingesting them.
To view the location of the clips on your computer, right-click the clip in the list or thumbnail view. Select Reveal in Explorer (Windows), or Revealin Finder (Mac OS).
The Logging workspace
35
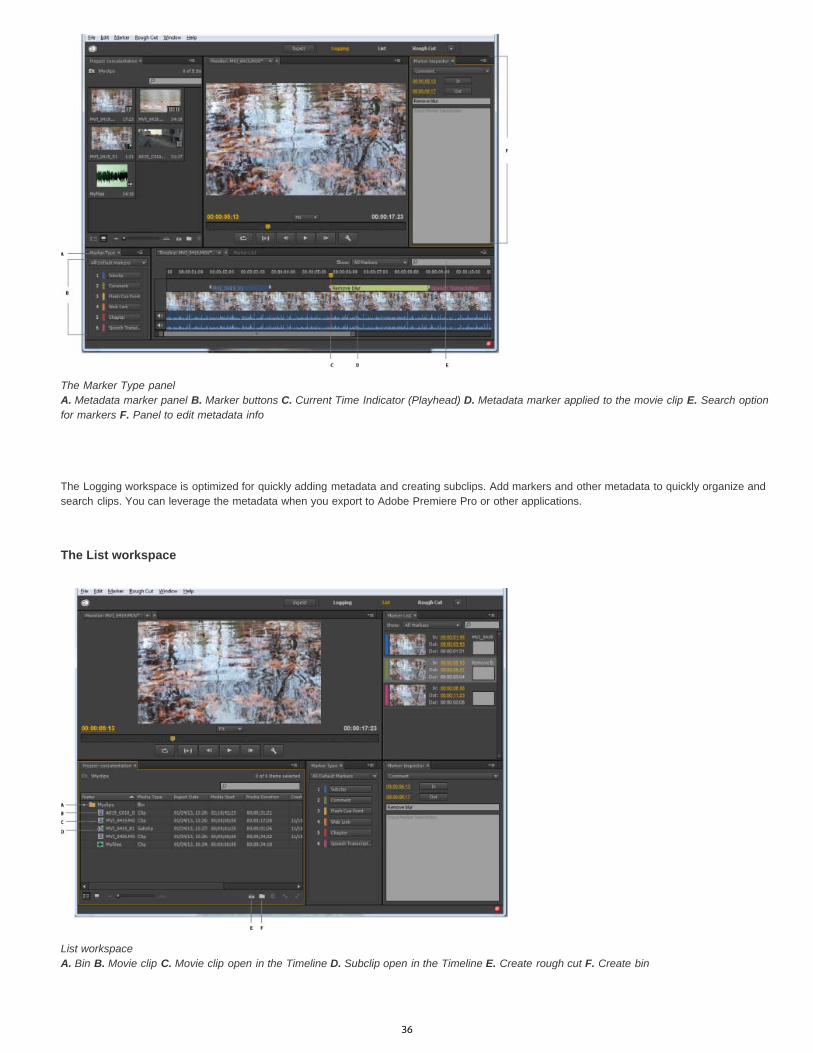
The Marker Type panel A. Metadata marker panel B. Marker buttons C. Current Time Indicator (Playhead) D. Metadata marker applied to the movie clip E. Search optionfor markers F. Panel to edit metadata info
The Logging workspace is optimized for quickly adding metadata and creating subclips. Add markers and other metadata to quickly organize andsearch clips. You can leverage the metadata when you export to Adobe Premiere Pro or other applications.
The List workspace
List workspace A. Bin B. Movie clip C. Movie clip open in the Timeline D. Subclip open in the Timeline E. Create rough cut F. Create bin
36

To the top
Note:
To the top
In the Project panel, you organize project contents much as you use folders to organize files. Bins can contain clips, subclips, and rough cuts. Usethe Project panel to create a rough cut, and then add subclips to the rough cut.
Reorder content in the Project panel by dragging it to a new location.
The Rough Cut workspace
Rough cut workspace A. Project panel containing clips and rough cuts B. Timeline containing the subclips for the rough cut C. Monitor panel D. Search option formarkers E. Track containing metadata and subclip info F. Video track G. Audio track
Open the rough cut that you created and add clips and subclips to the timeline. When you export the rough cuts to Adobe Premiere Pro or otherapplications, all the organizational and metadata information of the clips is retained.
Use the options in the Show menu to selectively display markers in the timeline.
Creating custom workspaces
Use the Window menu to access panels in Prelude. As in other Adobe applications, you can float and dock panels and frames. You can alsocreate custom workspaces. To access custom Workspaces, select Window > Workspace, and choose from the options.
If you have a customized workspace that you use frequently, you can create a custom workspace using Window > Workspace > New Workspace.The custom workspace is added to the Window > Workspace menu. To go back to the default workspace, select Window > Workspace > ResetCurrent Workspace.
A frame is a set of grouped panels.
Reorder contents in a panel and across panels by dragging them to their new location.
Panels in Prelude
Here is a partial list of panels in Prelude:
37

The Monitor panel
Monitor workspace A. Current-Time-Indicator (Playhead) B. Timecode C. Loop video D. Play In-Out E. Step back F. Magnification options G. Play/Pause H. Stepforward I. Output settings J. Clip duration
Double-click a movie clip in the Project panel to open it for playback in the Monitor panel. The monitor gives you access to the standard play andnavigation options. You can use the timecode, playback buttons, or the playhead to navigate the movie.
The Play In-Out option allows play back of a movie for the duration of a selected marker.
Use the keyboard shortcuts J, K, and L to preview the movie clip. For greater control, use a combination of J and K keys to move backwardslowly, and K and L keys to move forward slowly.
Panel Description
ExtensionsContains extensions or plug-ins for extending the functionalityof Prelude. If no Extensions or plug-ins are available, thisoption is disabled.
Displays the audio level for the movie being played in thetimeline.
Events Lists warnings, error messages, and other information foridentifying and troubleshooting problems.
History
Use the History panel to jump to any state of the projectcreated during the current working session. Every time youapply a change to some part of the project, the new state ofthat project is added to the panel. You can modify the projectfrom the state you select.
Right-click a state in the History panel to view the availableoptions.
The History panel is cleared when you switch between anopen clip and a rough cut. It is also cleared when you savethe open clip or rough cut.
Marker ListDisplays all the markers in the movie that is currently open.This panel also allows you to change the timecode of the Inand Out points, or edit the marker description.
38

Twitter™ and Facebook posts are not covered under the terms of Creative Commons.
Legal Notices | Online Privacy Policy
Set display quality
Some formats are difficult to display in full-motion playback because of their high compression or high data rate. A lower resolution permits fastermotion playback but at the expense of image quality. This tradeoff is most noticeable when you view AVCHD and other H.264 -codec basedmedia. Below full resolution these formats have error correction turned off, and artifacts are common during playback. These artifacts, however, donot show up in exported media.
Use separate playback and pause resolutions to gain more control over the monitoring experience. With high-resolution footage, set playbackresolution to a lower value (for example, 1/4) for smooth playback, and set the Pause resolution to Full. These settings allow you to check thequality of focus or edge details when you pause playback. Scrubbing puts the monitor in playback resolution, not pause resolution.
1. Click the Output button.2. Select an option for Playback Resolution and Paused Resolution.
39

Importing media
40

Ingesting media clips
To the top
Note:
The Panasonic P2 format
Note:
XDCAM and AVCHD formats
To the top
Video | Organize clips, subclips, and sequences in PreludeSupported file formats for ingestCreate a project / Open an existing projectIngest movie clipsRenaming files during ingestAdd metadata to the files being ingestedRelinking files moved to another location
The video and audio from a file-based camcorder are contained in digital files. Ingest is the process of transferring data from the recording mediaand optionally transcoding to other formats.
You create a project before you ingest movie clips into Adobe Prelude. Prelude creates a project (.plproj) file for every project that you create.
A project file stores only references to the source files that you ingest. For this reason, project files remain fairly small.
Supported file formats for ingest
You can ingest video, audio-only (AIFF, MP3, and WAV), and still files (Adobe Illustrator, Adobe Photoshop, Bitmap, GIF, JPEG, PNG, TIFF, andicon files) into Prelude.
Only static metadata is associated with still images in Prelude. For the purpose of inclusion into rough cuts, still images are assigned adefault duration of 150 frames. You can adjust this default duration in your preferences (Preferences > General). No markers are associated withstill images in Prelude.
Prelude supports the Panasonic Op-Atom variant of MXF, with video in DV, DVCPRO, DVCPRO 50, DVCPRO HD, orAVC-I formats.The root of the P2 file structure is a CONTENTS folder. Each essence item (an item of video or audio) is contained in a separate MXF wrapperfile. The video MXF files are in the VIDEO subfolder, and the audio MXF files are in the AUDIO subfolder. XML files in the CLIP subfolder containthe associations between essence files and the metadata associated with them.For your computer to read P2 cards, it needs the appropriate driver, which you can download from the Panasonic website. Panasonic alsoprovides the P2 Viewer application, with which you can browse and play media stored on a P2 card.
To use certain features with P2 files, you first change the file properties from read only to read and write. For example, to change thetimecode metadata of a clip using the Timecode dialog box, you first set the file properties to read and write. Use the operating system file explorerto change file properties.
You can find the video files from XDCAM HD camcorders in the CLIP folder, written in the MXF format. XDCAM EXcamcorders write MP4 files into a folder named BPAV.XMPilot is an optional add-on from Sony for some of their XDCAM HD cameras. Prelude translates Planning metadata in XMPilot to staticmetadata. Essence markers are converted to comment markers. Metadata collected and added to the XMPilot system during production is nowmaintained through post-production.When using AVCHD files, ensure that you maintain the folder structure. Raw MTS files cannot be logged in Prelude.
Create a project / Open an existing project
Use the options on the Welcome screen to create a project, or open an existing project.
If your project is already open in Prelude, choose from the following options:
To create a project, select File > New Project. Alternatively, press Ctrl+Alt+N (Windows), or Cmd+Opt+N (Mac OS). Specify a name and
41

To the top
location for the project file.To open an existing project, select File > Open Project. Alternatively, press Ctrl+Shift+O (Windows) or Cmd+Shift+O (Mac OS).Navigate to the location of the project file, and open it.
Ingest movie clips
You can ingest entire movie clips or a selected portion of the movie clips (partial ingest). You can also transcode the selected movie clips usingmore than one encoding option.
1. Select File > Ingest. Alternatively, press Ctrl+I (Win) or Cmd+I (Mac OS).
To ingest the files to a specified bin, select the bin in the Project panel before you click Ingest.
2. Navigate to the folder containing media, and click the folder. The contents of the folder are displayed in the center panel.
Tip: To access folders from which you previously ingested content, use the menu above the panel.
3. Do the following based on your requirements:
To view content as Thumbnails, click the Icon View button.To view content as a list, click the List View button.To quickly preview the contents of a movie clip, drag the cursor across the thumbnail. You can also click the thumbnail and use theplayhead to scrub the movie. Alternatively, use the JKL keys to control playback of the selected thumbnail.To change the thumbnail size of movie clips in the panel, use the Zoom slide bar.To view files of a specific file type, select an option from the Files Of Type menu. Repeat the procedure to choose more than one option.By default, all file types that Prelude supports are displayed.To view files from a specific source, select an option from the View As menu. If ingesting from a device, ensure that it is connected toyour computer.To select clips for ingest, click the corresponding check box. Click Check All to select all clips for ingest.
4. To ingest a specific portion of a clip (partial ingest), click its thumbnail. Use the JKL keyboard shortcuts, or drag the playhead to navigatethrough the clip. Press I and O at the desired positions to set the In and Out points.
When using this feature, ensure that you enable the Transcode option. Transcoding is required for partial ingest.
5. To specify a location for the ingested files, select Transfer Clips to Destination, and do the following:
a. To change the folder for the transferred files, select Browse For Location in the Primary Destination menu, and select a destinationfolder.
b. (Optional) To create a subfolder for the transferred files in the selected folder, click Add Subfolder. Specify a name for the subfolder.Creating a subfolder helps accidental overwriting of files with the same name.
6. To transfer media files without transcoding, leave the Transcode option deselected.
To ensure that the copied files match the original, select Verify. This option is available only for the Primary Destination, and when theTranscode option is disabled.
MD5 Comparison: Performs an MD5 check and ensures that the source file is the same as the ingested file.File Size Comparison: Checks whether the file size of the ingested file is the same as the size of the original movie clip.Bit by Bit Comparison: Does a CRC check and verifies whether the checksum of the source file is the same as the ingested file. If the filesare different, the checksums don't match, and the test fails.
42

Note:
To the top
MD5 verification for ingested files
7. To specify transcoding settings for the ingested files, select Transcode. Use the submenus to specify presets for transcoding the files. Tospecify additional presets, add presets in Adobe Media Encoder. The presets are reflected in Prelude.
If you have Adobe Premiere Pro installed on your computer, select Stitch Clips Together to combine several selected clips into a singlemovie clip. Specify a name for the movie clip. After ingest, the newly stitched clip is displayed in the Project panel.
8. To transcode the selected files in more than one format or to transfer files to multiple locations, click Add Destination. Repeat the procedure.
Only files transferred to the primary destination appear in the Prelude project panel when ingesting is complete.
9. Click Ingest.
Files are transcoded using Adobe Media Encoder. The transcoded files are displayed in the destination folder after the transcoding process iscomplete.
To pause or cancel transcoding, use the corresponding buttons in the progress bar.
Renaming files during ingest
Before you rename files, you create a preset based on various parameters provided by Prelude. You then use the preset to rename selected filesduring ingest.
Renaming of files on disk works as intended with simple files like QuickTime, and when Transfer Clips to Destination is enabled.
Files that are a part of a complex folder struture (like P2) are not renamed. In such cases, the new name appears in the Prelude project becausethe new name is saved in metadata (Dublin Core > Title) and displayed as the clip name.
1. In the File Rename panel of the Ingest dialog, select Rename Files.
2. Do one of the following:
To apply the new renaming preset to the movie clips copied to the primary destination and copies in additional destinations, select Applyto All Destinations.To apply the new renaming preset to only the clips ingested to the primary destination, select Apply to Primary Destination Only.
3. To create a preset for naming files, do the following:
a. Click the downward arrow icon next to the list of renaming presets, and choose New Preset.b. Click "+" to add an element to your custom naming preset. Select one of the following:
Autoincrement increments the number associated with the name as files are named. You can choose to increment names byincrements of 1, 01, 001, or 0001.In Custom Text, enter text based on your requirement. For example, the text can correspond to a project name or a separatorbetween two elements.Date uses the timestamp associated with the files to name the files.File Name uses the original file name (without the extension), as an elements in the new name.
c. Click Save to save the preset. Enter a name for the preset. Ensure that the name doesn't contain spaces.
43

To the top
Note:
d. To add additional elements, click the "+" button again.
4. To go back to the File Rename panel without saving changes, click "x". To delete a preset, click the Trash icon.
Edit file naming presets
1. Select the preset in the menu.2. Click the downward icon next to the menu, and select Edit.3. Edit the values as required, and click Save.4. To save the preset with a different name, select Save As. Enter a new name for the preset.
You can store your File Metadata preset in a system-wide location that prevents other users from modifying the preset. The shared location is/Users/Shared/Adobe/Prelude/2.0/Presets/Metadata (Mac) andC:\Users\Public\Documents\Adobe\Prelude\2.0\Presets\Metadata (Windows).
Share file naming presets
Consistent naming conventions can be very useful in collaborative workflows. After creating a preset at a specified location, you can share it withmultiple users. The people you shared the preset with can import the preset file into Prelude. After import, Prelude copies the preset to anappropriate location on the computer.
To import a preset, click the downward arrow next to the Preset menu, and select Import Preset. Select the presets that you want to import andclick Open.
All the presets are stored at a specific location on your computer. To locate the presets on your computer, click the downward icon next to thePreset menu, and select Show in Explorer or Show in Finder.
Add metadata to the files being ingested
You can add metadata to movie clips before ingesting them in Prelude. The metadata is reflected in the Metadata panel.
Similar to renaming files during ingest, you create a custom form (or schema) to be applied to each ingested clip as XMP metadata. The metadatapresets can be shared and imported. Sharing metadata helps establish consistent sets of metadata your teams can leverage when organizingassets and content.
1. In the File Metadata panel of the Ingest dialog, select Add File Metadata.
2. Do one of the following:
To apply the new preset to movie clips copied to the primary destination and copies saved to additional destinations, select Apply to AllDestinations.To apply the new preset to only the clips ingested to the primary destination, select Apply to Primary Destination Only.
3. To create a preset, do the following:
a. Click the downward arrow icon next to the list of metadata presets, and choose "New Preset".b. Click "+" to add a metadata field.c. Enter a name for the metadata field. Ensure that the name doesn't contain spaces.d. For mandatory fields, click the check box next to the asterisk (*).e. Optionally, in Input Metadata Value, enter the value for the preset.f. Click Save to save the preset.
g. To add additional fields, click the "+" button again.
The metadata name and the metadata value together are called the metadata pair or key-value pair. You can choose to provide a
44

Twitter™ and Facebook posts are not covered under the terms of Creative Commons.
Legal Notices | Online Privacy Policy
To the top
default value to the name or add the value dynamically during ingest.
4. To edit a preset, do the following:
a. Select a preset in the menu.b. Click the downward icon next to the menu, and select Edit.c. Edit the values as required, and click Save.d. To save the preset with a different name, select Save As. Enter a new name for the preset.
5. To import a preset, click the downward arrow next to the Preset menu, and select Import Preset. Select the presets that you want to importand click Open.
All the presets are stored at a specific location on your computer. To locate the presets on your computer, click the downward icon next tothe Preset menu, and select Show in Explorer or Show in Finder.
When collaborating, you can share presets with other editors.
6. To go back to the Metadata panel without saving changes, click "x". To delete a preset, click the Trash icon.
You can store your File Metadata preset in a system-wide location that prevents other users from modifying the preset. The shared location is/Users/Shared/Adobe/Prelude/2.0/Presets/Metadata (Mac) andC:\Users\Public\Documents\Adobe\Prelude\2.0\Presets\Metadata (Windows).
Relinking files moved to another location
The project file contains references to the location of ingested files. If you move these files to a different location on your computer, they are nolonger available to your project. To continue using the moved files in your project, relink them using the options in Prelude.
When you open a project containing files that have moved since you last opened the project, a list of such files is displayed. Click Yes to relink thefiles by specifying their current location. If you choose to not relink the files, you can manually relink the files later.
1. In the Project panel, right-click the file with the offline icon , and select Relink. To select multiple files that exist at the same location, useCtrl-click/Cmd-click or Shift-click.
2. Navigate to the folder containing the files and select a file. Prelude uses this location to relink all the other files in your selection.3. Click Open.
45

Logging movie clips
46

Logging movie clips
To the top
To the top
Video tutorialMarker typesUsing the timelineLog movie clips (keyboard driven workflow)Log movie clips (menu driven workflow)Create a marker templateAdd metadata to a movie clipImport/Export metadata infoUse the Creative Cloud to upload and download asset metadata
Use the logging features in Adobe Prelude to create subclips, and add temporal markers. Temporal markers contain data about a specific portionof the movie clip. For example, you can use a temporal marker such as Speech Transcription to edit text generated from speech-to-text conversionin software such as Adobe Media Encoder.
To add static metadata to the clip, use the Metadata panel.
The logging information and the added metadata are captured in an XMP file. For some formats such as QuickTime (.mov) the XMP information iswritten into the media file. For formats that don't support writing to the media file, like MXF, the XMP is written into a sidecar file. The sidecar file isstored at the same location as the media file.
Video tutorial
To view the video in fulls screen mode, click on the video.
Marker types
Export markers
You can export markers from selected assets as a CSV text file or a well-formatted HTML page (File > Export > Markers).
Marker Type Description
Subclip For creating In and Out points for subclips. When you savethe project, the subclips appear in the Project view.
Comment A comment or note about the selected part of the movie clip.
Flash Cue Point Trigger external events such as synchronizing graphics,providing navigation options. and loading other video files.
Web Link To add a URL that provides more info about the selected partof the movie clip.
Chapter These markers, when imported to software such as Encoreand Adobe Premiere Pro, are used to create chapter points.
Speech Transcription To edit speech-to-text content created in software such asAdobe Media Encoder, or to manually add such content.
47

To the top
To the top
Export markers
Using the timeline
The Timeline panel A. Option to mute audio B. Audio track C. Video track D. Marker E. Current Time Indicator (CTI) F. Option to find markers
The markers in a movie clip appear in tracks above the timeline. Move the cursor above a movie clip to display information about the clip.
Use the Current Time Indicator / Playhead to scrub the movie clip, or to move quickly to a specific point in the movie clip.Use the options in the Show menu to view specific markers added to the movie clip.Enter marker information in the Search field to search for a marker.Use the Zoom option to zoom in or zoom out of tracks in the timeline view.Use the keyboard shortcuts I and O to set In and Out points for markers.
Log movie clips (keyboard driven workflow)
1. To quickly open the default Logging workspace, Press Alt+Shift+2 (Windows) or Opt+Shift+2 (Mac OS).
2. Drag a movie clip from the Project panel to the timeline, or double-click a clip in the Project panel. A check mark appears on the movie clipindicating that it is open.
3. Play the movie. Use the JKL keyboard shortcuts to move among frames.
48

Note:
Note:
To the top
4. Using the main keyboard, press the following keys to add the corresponding markers:
To add a subclip marker, press 1.
To add a comment marker, press 2.
To add a Flash Cue Point marker, press 3.
To add a Web Link Marker, press 4.
To add a Chapter Marker, press 5.
To add a Speech Transcription Marker, press 6.
If you have customized the list of markers or marker templates, the Marker Type panel displays the appropriate keyboard numberbeside each marker button.
5. Enter information in the Marker Inspector panel.
For example, you can change the default names assigned to subclips. Names and Descriptions of markers can also be edited in the textfield, also called the Heads Up Display (HUD), that appears above the timeline.
To set marker In and Out points when the Heads Up Display is enabled use Alt+I / Alt+O (Windows) or Opt+I / Opt+O (Mac OS).
Use the Alt/Opt key in conjunction with the JKL keys to control playback, or with H to move back the number of seconds set inPreferences. Release Alt/Opt to continue typing into the HUD. Press Enter/Return key to close the HUD.
If you have added markers for subclips, the subclips appear in the Project panel after you save the clip.
To mute an audio channel during playback, right-click/ctrl-click the audio chanel in the timeline and select Mute Audio Channel.Alternatively, click the mute button to the left of the audio channel.
Change default settings for markers
Log movie clips (menu driven workflow)
1. Select Window > Workspace > Logging.
2. Drag a movie clip from the Project panel to the timeline, or double-click a clip in the Project panel. A check mark appears on the movie clipto indicate that it is open.
In the Marker Type panel, click the marker that you want to add. The marker appears on the track above the movie clip. Its position is setbased on the preferences set for marker duration.
3. Do one of the following:
Use the Set In Point and Set Out Point buttons to set the time frame for the added marker.Use the Timecode in the Marker Inspector panel to set the In and Out points for the marker. Drag your cursor over the Timecode tochange the value, or click to enter a value.Move the Current Time Indicator / Playhead to a position where you want to set the In or Out marker. Press I to set the In point, and O toset the Out point.
4. Enter information in the Marker Inspector panel. For example, you can change the default names assigned to subclips. Names andDescriptions of markers can also be edited in the Heads Up Display (HUD) that appears above the timeline.
Drag to move markers added to the timeline. To select and navigate among markers, use the options in the Marker menu.
If you have added markers for subclips, the subclips appear in the Project panel after you save the clip.
Change general settings for markers
49

To the top
To the top
Note:
To the top
To the top
Create a marker template
A marker template is like a preset for a type of marker, it is not a new custom marker type.
For example, to identify usable portions of a movie clip, you use the comment marker with the label Good Take frequently. When you save such acomment marker as a template, Prelude creates a button in the Marker Type panel. When you click this button, a comment marker labeled GoodTake is added to the movie clip.
The keyboard shortcuts for new markers depend on their sequence in the Marker Type panel. For a button that is placed sixth in the sequence,use 6 as the keyboard shortcut.
1. Select a marker in the Timeline panel that you want to save as a template.
2. Select Marker > Save Marker as Template.
3. Enter a name for the marker template. This name is used for the label of the button.
Add metadata to a movie clip
1. Select a clip to which you want to add metadata.2. Select Window > Metadata.3. In the Metadata panel, enter the required information for the selected movie clip.
Metadata panel has no Save button. All information that you add is automatically saved.
Import/Export metadata info
The exported XMP file contains all the metadata in the open movie clip, including logging information. You can import and apply the metadata andtimecode in the XMP file to a movie clip open in Prelude.
Import metadata
1. Select Window > Unassociated Metadata.2. Click Import, and open the XMP file. You can also open more than one XMP file. The markers in the file are displayed.3. Do one of the following:
Select Current Player Position to insert markers imported from the XMP file at the location of the Current Time Indicator.
Select Marker Start Time to specify the location of markers based on the start time assigned to them.
Export metadata
To save the metadata information in the file, select File > Save XMP As. Save the XMP file to a location on your computer.
Use the Creative Cloud to upload and download asset metadata
50

Twitter™ and Facebook posts are not covered under the terms of Creative Commons.
Legal Notices | Online Privacy Policy
You can upload asset metadata to the Creative Cloud as an XMP file. You can later download the XMP file to Prelude running on anothercomputer or device and apply that metadata to assets. The metadata is downloaded to the Unassociated Metadata panel.
Right-click the file whose metadata you want to upload to the Creative Cloud, and select Upload Metadata to Creative Cloud.
To download XMP metadata from the cloud, open the Unassociated Metadata panel in Prelude. Click Download from Creative Cloud from the menu button on the
right side of the Unassociated Metadata panel.
51

Rough cuts
52

Working with Adobe Prelude
Twitter™ and Facebook posts are not covered under the terms of Creative Commons.
Legal Notices | Online Privacy Policy
To the top
You can use Adobe® Prelude™ to ingest clips, transcode footage, create subclips markers and rough cuts, and then import that data into Adobe®Premiere® Pro.
You can use Prelude’s clip naming and metadata features to quickly create subclips, build a rough-cut assembly, and send it to Premiere Pro as asequence for immediate editing. You can then export rough cuts, clips, subclips, and bins from Prelude to an Adobe Premiere Pro project forediting.
For more information on using Adobe Prelude, see Adobe Prelude Help.
Exporting files from Adobe Prelude
You can export rough cuts, clips, subclips, and bins from Prelude to an Adobe Premiere Pro project or FCP XML file. Alternatively, you can sendthe rough cut to Adobe Premiere Pro directly for editing.
The organization and metadata information from Prelude is carried over to Adobe Premiere Pro. This seamless workflow reduces post-productiontime and effort when you create the final cut of a movie.
Exporting a Premiere Pro project or Final Cut Pro XML file
To export a Premiere Pro project file that contains clips, subclips, markers, and rough cuts from Adobe Prelude, do the following:
1. Choose File > Export.2. The Export dialog box launches.3. Choose the destination for the project file.4. Name the project file and click the enable checkbox.5. From the Type menu, choose either a Premiere Pro or Final Cut Pro 7 XML file type.6. Optional: export associated media by clicking the enable checkbox, and creating a folder name.7. Click OK
The file is exported. You can now import or open the project file in Adobe Premiere Pro.
Resources
Adobe Prelude HelpVideo tutorial: What is Adobe Prelude?Video tutorial: An overview of the interfaceVideo tutorial: Improved markers and importing from PreludeVideo tutorial: Sharing clips and rough cuts directly with Adobe Premiere ProVideo tutorial: Adding comments
53

Rough cuts
To the top
To the top
To the top
To the top
Create a rough cutAdd markers to a rough cutVideo tutorialOpen rough cut in other applications
After you assemble your clips and subclips, you create a rough cut of the movie by appending them to the rough cut.
Create a rough cut
1. Select File > Create Rough Cut.2. Enter a name for the rough cut (.arcut) file, and click Save.3. Double-click the rough cut in the Project panel to open it in the Timeline and Monitor panels.4. Select the movie clips or subclips to add to the rough cut.5. Select File > Append To Rough Cut. The movie clips are added to the Timeline in the order in of their selection. Alternatively, drag the
movie clips to the Timeline.6. Use the options in the Rough Cut menu to select or reorder movie clips in the rough cut.7. Save the project to save changes to the rough cut file.
To create a copy of your rough cut, select File > Save Rough Cut As, and save the rough cut file using a different name.
Add markers to a rough cut
1. Open a clip containing markers in the timeline. Open the rough cut in the background.
2. Select the markers that you want to add to the rough cut.
3. Select Rough Cut > Add Selected Markers.
The markers are added to the rough cut currently open in the timeline.
When a rough cut, and a clip containing subclip markers are open in the Timeline panel, you can select subclip markers in the clip andadd them to the rough cut.
Video tutorial
To view the video in full screen mode, click on the video.
Open rough cut in other applications
If you have Adobe Premiere Pro installed on the same computer as Prelude, you can send the rough cut directly to Premiere Pro.
54

Twitter™ and Facebook posts are not covered under the terms of Creative Commons.
Legal Notices | Online Privacy Policy
To create a file for use in applications such as Premiere Pro or Final Cut Pro running on a different computer, use the Export option.
1. In the Project panel, select the rough cut and other clips or bins you want to send to Adobe Premiere Pro.
2. Select File > Send To Premiere Pro.
Adobe Premiere Pro launches and prompts you to save the new project. If Adobe Premiere Pro is already open on your computer, the itemsfrom Prelude appear in the open project.
3. The rough cut is displayed in the Project panel. Double-click the rough cut in the Project panel.
All the markers added in Prelude are available in Premiere Pro. You can edit markers added in Prelude in Premiere Pro.
Export to other applications
1. In the Project panel, select the rough cut and other clips or bins you want to export.
2. Select File > Export > Project.
3. In the Destination menu, do one of the following:
Select Local Disk to save the exported project on your computer.Select FTP Server to upload the exported files to an FTP server.
4. Enter a name for the exported project.
5. From the Type menu, select either Premiere Pro or Final Cut Pro XML for final editing.
6. Select Media to export the project file along with its associated media. Prelude exports media files to a subfolder at the specified location.You can edit the default name Prelude assigns to the subfolder.
7. Click OK. Do one of the following based on whether you previously chose to save to a local disk or to the FTP server.
Select a location on your computer to save the exported file.Enter details for the FTP server for hosting the exported file.
Navigate to the folder or directory to which you exported the project. Open the Adobe Premiere Pro project or the Final Cut Pro XML file.
55

Setting preferences
56

Setting Prelude preferences
To the top
To the top
Change general settingsChange appearance settingsChange audio settingsChange audio hardware settingsChange audio output mapping settingsSet media cache preferencesSet memory preferencesSet playback preferencesSet Marker preferences
Use the options in the Preferences dialog (Edit > Preferences) to change the default settings in Prelude.
Change general settings
Change appearance settings
Option Description
Start Mode
The default option is Start Native Mode.
The Library Panel gives you the ability to view clips on yourmedia management system. If you have a created a Librarypanel using Prelude APIs that is displayed on startup, chooseStart Library Mode.
At Startup
Show Welcome Screen: Displays the Welcome screen atstartup.Load Most Recent: Loads the project that you worked onbefore you closed Prelude.
Timeline Playback Auto-Scrolling
No Scroll: The focus of the timeline does not changewhen the Current Time Indicator moves offscreen.Page Scroll: Displays a new view of the timeline after theCurrent Time Indicator moves offscreen.Smooth Scroll: The Current Time Indicator remains in themiddle of the screen, while the clips and time ruler moveby.
Double-clicking a clip or rough cut opens Timeline (or MarkerList) and Monitor panels
Enables or disables the opening of the Timeline/Monitorpanels if those panels are closed in the workspace. If you usecustom panels, and do not want the Timeline and Monitorpanels displayed when you open a clip or rough cut, disablethis setting.
Project Loading Cache
Cache files help improve the opening time of Prelude. Afteryou enable project cache, you can set preferences for cachefiles using the options.You can specify a limit for the cache files and the folder inwhich the Project cache files are stored using the options.
57

To the top
To the top
To the top
The appearance settings allow you to change the overall appearance of the Prelude application.
Change audio settings
Change audio hardware settings
Use this option to specify the default audio output device. When you click ASIO Settings, the Audio Hardware Settings dialog box is displayed.
Change audio output mapping settings
Option Description
Brightness Set the brightness by dragging the slider.
Option Description
Play Audio While Scrubbing Deselect this option to disable audio when scrubbing a movieon the timeline.
Automatically Conform Audio On Ingest
Set this preference to automatically conform audio duringingest. With this enhancement, all audio is available whenrequired. Audio during playback is now available from theProject panel's thumbnail view.
Option Description
Enable Devices (Windows)
Determines the connected audio device that is routed intoand out of Prelude. If the device is an ASIO device, select theASIO drivers for the device.
If the sound card does not have manufacturer-supplied ASIOdrivers, choose SoundMAX Integrated Digital High DefinitionAudio. To enable a device, be sure to install an up-to-datedriver for the device (Windows.)
To input more than two stereo channels or monitor 5.1surround audio, the device driver must comply with the ASIO(Audio Stream Input Output) specification. If it does notcomply, only stereo inputs and outputs are availableregardless of the number of hardware inputs and outputs thatare connected.
Default Device (Mac OS) Select an input and output device from the Default Devicemenu.
Buffersize Specifies the size of the buffer, in kilobytes, that Prelude usesfor playing audio.
Device 32-bit Playback (Windows Only) On the Output tab, check Device 32-bit Playback to enable32-bit playback.
58

To the top
To the top
The audio output devices available in your computer appear in the Map Output For menu. To map to a different device on your computer, selectthe corresponding option from the menu.
Set media cache preferences
When Prelude ingests video and audio in some formats, it processes and caches versions of these items that it can readily access whengenerating previews.
Option Description
Save Media Cache Files Next To Originals When Possible
To store cache files with source files rather than in the mediacache folder, select Save Media Cache Files Next ToOriginals When Possible. Click Browse to specify a locationfor the files.
Media cache database
A database retains links to each of the cached media files.This media cache database is shared with other applications.Each of these applications can read from and write to thesame set of cached media files.
If you change the location of the database in any of theseapplications, the location is updated for the other applicationstoo. Each application can use its own cache folder, but thesame database tracks them.
TimecodeSelect Start at 00:00:00:00 if you want to reset the timecodein the original clip. Select Media Source if you want to retainthe original timecode of the clip.
Frame Count
Start At 0: Numbers every frame sequentially, with the firstframe numbered 0.Start At 1: Numbers every frame sequentially, with the firstframe numbered 1.Timecode Conversion: Generates frame numberequivalents of the source timecode numbers.
Write XMP ID To Files On Import
The ID number is a unique value associated with an asset. Itenables the application to recognize a file even if the filenamehas changed. Each application can use this information tomanage cached previews and conformed audio files,preventing additional rendering and conforming.
When this option is selected, XMP ID values are written tosource files when they are imported into Prelude. If a filealready has an XMP ID, then Prelude doesn’t write a newone, and no change is made. Files from recent versions ofAdobe applications will, in general, already have an XMP ID.
Important: The Write XMP IDs To Files On Import preferenceonly controls whether unique ID values are automaticallywritten to files during import. This preference does not controlwhether XMP metadata is written to a file under othercircumstances, such as when you edit metadata in theMetadata panel.
Growing FilesGrowing files, in this context, are files that are edited as theyare still being recorded. You can specify the refresh rate forsuch files using the Refresh Growing Files option.
59

To the top
To the top
Set memory preferences
In the Memory pane of the Preferences dialog box, you can specify the amount of RAM reserved for other applications and for Prelude. Forexample, as you reduce the amount of RAM reserved for other applications, the amount of RAM available for Prelude increases.
To maximize available memory, change the Optimize Playback For preference from Performance to Memory. Change this preference back toPerformance when processes in Prelude no longer require memory optimization.
Set playback preferences
Set Marker preferences
Option Description
Default player Prelude uses the player to play media from clips andsequences in the monitor.
Audio device The default audio device that is used for playback.
Video device A video monitor other than your computer monitor, such as abroadcast monitor.
Disable video output when in the background Disables video when Prelude is not the active application onyour computer.
Skip back amountTo change the skip back duration when you press the H key,specify a Skip Back Amount in the Playback section of thePreferences dialog.
Option Description
Preroll
When you add markers during playback, you sometimes missadding the marker at the exact time. For example, if you wantto add the marker at 00:20:41:02 during playback, the delay inpressing the key can result in the marker getting added afterthe required time.
Adding a New Marker Closes a Selected Marker
By default Prelude sets the Out point of a new marker to bethe end of the clip. Enable this option to set the Out point ofthe previously added marker to the frame before the In pointof the new marker. When this option is disabled, the newmarker is added to a layer above the current layer in thetimeline.
Stop Playback When a New Marker Is Added Stops the playback of the movie in the Monitor panel whenyou add a marker.
Double-clicking a Marker Switches to the Marker Panel Shifts the focus to the Marker panel when you double-click amarker.
Marker Type
In the Marker section, you can change the default colors forthe various kinds of markers and specify a time interval forthe markers. For example, if you want the comment markersto have a default time of 5 seconds, you specify the time inDuration.
60

Twitter™ and Facebook posts are not covered under the terms of Creative Commons.
Legal Notices | Online Privacy Policy
61

Keyboard shortcuts
62

Keyboard shortcuts
To the top
Application shortcutsPanel shortcutsCustomize keyboard shortcuts
Application shortcuts
New Project Ctrl+Alt+N (Win), Opt+Cmd+N (Mac OS)
Open Project Ctrl+Shift+O (Win), Shift+Cmd+O (Mac OS)
Close Project Ctrl+Shift+W (Win), Shift+Cmd+W (Mac OS)
Close Ctrl+W (Win), Cmd+W (Mac OS)
Save Ctrl+S (Win), Cmd+S (Mac OS)
Ingest Ctrl+I (Win), Cmd+I (Mac OS)
Export Project Ctrl+M (Win), Cmd+M (Mac OS)
Create Rough Cut Ctrl+N (Win), Cmd+N (Mac OS)
Exit Ctrl+Q (Win), Cmd+Q (Mac OS)
Undo Ctrl+Z (Win), Cmd+Z (Mac OS)
Redo Ctrl+Shift+Z (Win), Shift+Cmd+Z (Mac OS)
Cut Ctrl+X (Win), Cmd+X (Mac OS)
Copy Ctrl+C (Win), Cmd+C (Mac OS)
Paste Ctrl+V (Win), Cmd+V (Mac OS)
Clear Delete (Win), Forward Delete (Mac OS)
Select All Ctrl+A (Win), Cmd+A (Mac OS)
Deselect All Ctrl+Shift+A (Win), Shift+Cmd+A (Mac OS)
Set Marker In PointI (Use Alt+I or Opt+I when Heads Up Display is enabledduring playback.)
Set Marker Out PointO (Use Alt+O or Opt+O when Heads Up Display is enabledduring playback.)
Select Previous Marker Ctrl+Left Arrow (Win), Cmd+Left Arrow (Mac OS)
Select Next MarkerCtrl+Right Arrow (Win), Cmd+Right Arrow (MacOS)
Select Previous Clip Alt+Left Arrow (Win), Opt+Left Arrow (Mac OS)
Select Next ClipAlt+Right Arrow (Win), Opt+Right Arrow (MacOS)
Move Clip Left , (comma)
Move Clip Right . (period)
Add Selected Markers Shift+=
Add Subclip Marker 1 (Main keyboard)
Add Comment Marker 2 (Main keyboard)
63

Add Flash Cue Point 3 (Main keyboard)
Add Web Link 4 (Main keyboard)
Add Chapter 5 (Main keyboard)
Add Speech Transcription Marker 6 (Main keyboard)
Marker Inspector Shift+5
Marker List Shift+6
Marker Type Shift+4
Metadata Shift+7
Monitor Shift+2
Project Shift+1
Timeline Shift+3
Adobe Prelude Help F1
Go To Selected Clip End Shift+End
Go To Selected Clip Start Shift+Home
Go To Time View End End
Go To Time View Start Home
Maximize or Restore Frame ' (accent under tilde)
Play In-out Ctrl+Shift+Space
Play Stop Toggle Space
Select Find Box Shift+F
Select Next Panel Ctrl+Shift+. (period)
Select Previous Panel Ctrl+Shift+, (comma)
Shuttle Left J
Shuttle Right L
Shuttle Slow Left Shift+J
Shuttle Slow Right Shift+L
Shuttle Stop K
Skip Back While Playing H
Step Back Left Arrow
Step Back Five Frames - Units Shift+Left Arrow
Step Forward Right Arrow
Step Forward Five Frames - Units Shift+Right Arrow
Workspace 1 Alt+Shift+1 (Win), Opt+Shift+1 (Mac OS)
Workspace 2 Alt+Shift+2 (Win), Opt+Shift+2 (Mac OS)
Workspace 3 Alt+Shift+3 (Win), Opt+Shift+3 (Mac OS)
Workspace 4 Alt+Shift+4 (Win), Opt+Shift+4 (Mac OS)
Workspace 5 Alt+Shift+5 (Win), Opt+Shift+5 (Mac OS)
Workspace 6 Alt+Shift+6 (Win), Opt+Shift+6 (Mac OS)
Workspace 7 Alt+Shift+7 (Win), Opt+Shift+7 (Mac OS)
Workspace 8 Alt+Shift+8 (Win), Opt+Shift+8 (Mac OS)
Workspace 9 Alt+Shift+9 (Win), Opt+Shift+9 (Mac OS)
Zoom In =
Zoom Out - (hyphen)
64

Twitter™ and Facebook posts are not covered under the terms of Creative Commons.
Legal Notices | Online Privacy Policy
To the top
To the top
Panel shortcuts
Customize keyboard shortcuts
When you open the Keyboard Shortcuts panel for the first time, the only option in the Set menu is Adobe Prelude Factory Defaults.
You can edit keyboard shortcuts and save the new set. After you save the new set, it appears in the Set menu.
1. Select Edit > Keyboard Shortcuts (Windows), or Prelude > Keyboard Shortcuts (Mac OS) to open the Keyboard Shortcuts panel.2. In the Keyboard Shortcuts panel, select the option for which you want to create or update the keyboard shortcut.3. Press the keys that you prefer for the keyboard shortcut.4. Click Save As to save the updated Keyboard Shortcut set.5. Enter a name for the new set, and click Save.
Zoom To Clip \
Project
New Bin (Prelude CC)
Ctrl+B (Windows), Cmd+B (Mac)
History Panel Menu
Step Backward Left Arrow
Step Forward Right Arrow
Ingest Dialog
Check All Shift+V
Uncheck All Ctrl+Shift+V
Check Selected Item(s) V
Clear In Out Points C
Select Directory List Ctrl+Left Arrow (Win), Cmd+Left Arrow (Mac OS)
Select Media ListCtrl+Right Arrow (Win), Cmd+Right Arrow (MacOS)
Set In Point I
Set Out Point O
Timeline Panel Menu
Ripple Delete Alt+Backspace (Win), Opt+Delete (Mac OS)
Show Next Screen Down Arrow
Show Previous Screen Up
65