adult jacob’s ladder hat - bobwilson123.org · 1 | p a g e ©2012 clare sullivan – bobwilson123...
TRANSCRIPT

1 | P a g e ©2012 Clare Sullivan – BobWilson123
Adult Jacob’s Ladder Hat
(Notes at end of pattern to make a smaller size)
Designed by Clare Sullivan from bobwilson123
Video tutorial – http://www.youtube.com/watch?v=yDr6bugmBXI
Materials
100 gms / 3 ounce Red Heart Super Saver Worsted weight
5.5mm / I hook -I have loose tension and I used a 5.00mm H hook
Yarn needle and scissors
Approx circumference 58-60 cm / 23 – 23.5 inch
Approx height 21 cms / 8 ¼ inch

2 | P a g e ©2012 Clare Sullivan – BobWilson123
Note: Whilst making the main part of the hat we do not work into the chain 6, we only work into the double crochet stitch from the previous row
The chain 3 at the beginning of the row will count as the first double crochet
Leaving a 6inch tail make a magic ring – After row 1 DO NOT TIGHTEN magic ring
1- Working into magic ring - Chain 3, 1dc, chain 6, *2 dc, chain 6* repeat from *to* 5 more times, join with a slip stitch to the top of the beginning chain 3 (change colour for striped version) DO NOT TIGHTEN magic ring !!
2 -Chain 3 and dc into same stitch, 2 dc into next stitch, chain 6, *2 dc into the next 2 stitches, chain 6* repeat from * to * 5 more times, join with a slip stitch to the top of the beginning chain 3 (change colour for striped version)
3 - Chain 3, 2dc into next stitch, 1 dc into next stitch,2dc into next , chain 6, *1dc into next stitch, 2dc into next stitch, 1 dc into next stitch, 2dc into the next stitch, chain 6 repeat from * to * 5 more times, join with a slip stitch to the top of the beginning chain 3 (change colour for striped version)
4 -Ch3, 1dc into the next stitch, 2 dc into next stitch, 1 dc in to the next 2 stitches, 2 dc into next stitch, chain 6 * 1 dc in to the next 2 stitches, 2 dc into next stitch, 1 dc in to the next 2 stiches, 2 dc into next stitch, chain 6* repeat from * to * 5 more times, join with a slip stitch to the top of the beginning chain 3 (change colour for striped version)
5 - Ch 3, 1dc into next 2 stitches, 2 dc into next stitch, 1 dc into the next 3 stitches, 2 dc into the next stitch, chain 6 * 1 dc into the next 3 stitches, 2 dc into the next stitch, 1 dc into the next 3 stitches, 2 dc into the next stitch, chain 6* repeat from * to * 5 more times, join with a slip stitch to the top of the beginning chain 3 (change colour for striped version)
6 -Ch 3, 1 dc into next 3 stitches, 2 dc into next stitch, 1 dc into the next 4 stitches, 2 dc into the next stitch, chain 6 * 1 dc into the next 4 stitches, 2 dc into the next stitch, 1 dc into the next 4 stitches, 2 dc into the next stitch, chain 6* repeat from * to * 5 more times, join with a slip stitch to the top of the beginning chain 3 (change colour for striped version)
7 -Chain 3, *dc into each stitch, chain 6 * repeat from * to * 5 more times, join with a slip stitch to the top of the beginning chain 3 (change colour for striped version)
8–12. Repeat row 7
3 | P a g e ©2012 Clare Sullivan – BobWilson123
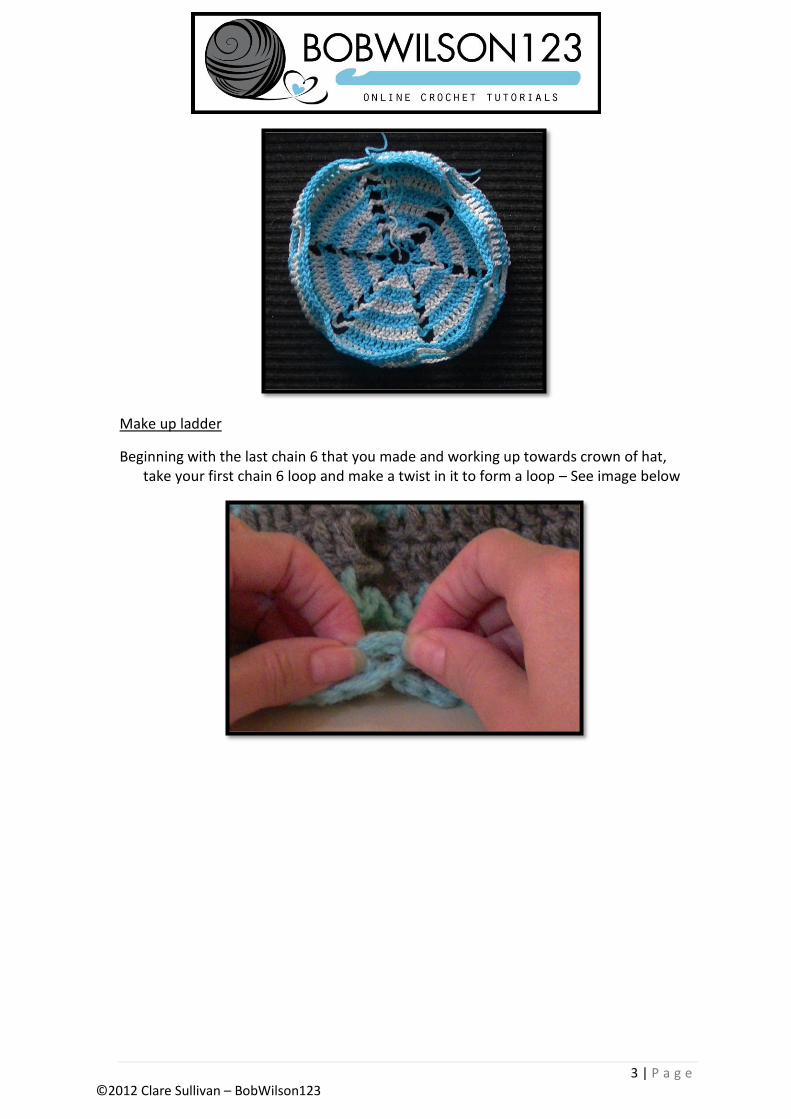
Make up ladder
Beginning with the last chain 6 that you made and working up towards crown of hat, take your first chain 6 loop and make a twist in it to form a loop – See image below

4 | P a g e ©2012 Clare Sullivan – BobWilson123
Draw the next chain 6 loop through it. Draw the next chain 6 through loop. See image below

5 | P a g e ©2012 Clare Sullivan – BobWilson123
Continue to make the ladder up to the crown of the hat
DO NOT INCLUDE the Magic ring in the ladder
Dont panic if your hat puckers
Pull the ladder to straighten/loosen ladder
6 | P a g e ©2012 Clare Sullivan – BobWilson123
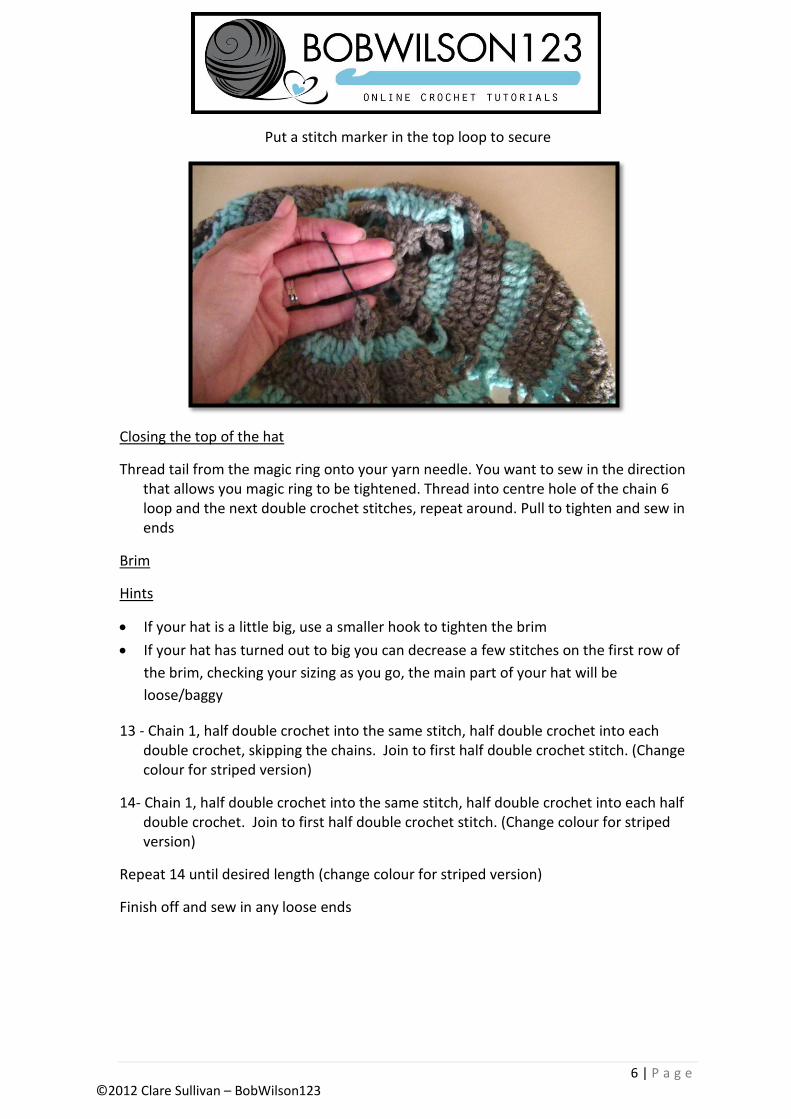
Put a stitch marker in the top loop to secure
Closing the top of the hat
Thread tail from the magic ring onto your yarn needle. You want to sew in the direction that allows you magic ring to be tightened. Thread into centre hole of the chain 6 loop and the next double crochet stitches, repeat around. Pull to tighten and sew in ends
Brim
Hints
If your hat is a little big, use a smaller hook to tighten the brim
If your hat has turned out to big you can decrease a few stitches on the first row of
the brim, checking your sizing as you go, the main part of your hat will be
loose/baggy
13 - Chain 1, half double crochet into the same stitch, half double crochet into each double crochet, skipping the chains. Join to first half double crochet stitch. (Change colour for striped version)
14- Chain 1, half double crochet into the same stitch, half double crochet into each half double crochet. Join to first half double crochet stitch. (Change colour for striped version)
Repeat 14 until desired length (change colour for striped version)
Finish off and sew in any loose ends

7 | P a g e ©2012 Clare Sullivan – BobWilson123
Different Sizes
When making the hat, you can make a different size hat by the amount of increase rows that you make
Depending on the yarn and hook size you are using you will have a different size hat. Measuring is very important if you want to make different sizes.
For example
If you are making a newborn size when you have 3 or so rows measure your hat (you
will be measuring from the middle (see image below) to the last row you completed
In this pattern we have a big hole in the top until you sew it closed at the end of the pattern. We will need to measure between the red lines
Measure between red lines x 2 = diameter
Diameter x 3.14 = head circumference
Your calculations may be different. You can also use the formula for inches

8 | P a g e ©2012 Clare Sullivan – BobWilson123
Remembering that your hat will stretch slightly, you want your finished hat a tiny bit smaller than the actual head measurement.
9cm x 2 = 18cm
18cm x 3.14 = 56.52 cm
56.52cm will be the approx finished circumference of your hat – Your hat will stretch a little
Brim
Yarn – same as used for hat – you will need 2 strands
Hook- same as used for hat
Lay your hat flat, as you can see with the image below if your yarn is still attached it needs to be on the top left 1 ½ inches in from the edge. If you yarn is not attached you will need to attached it
Place a stitch marker on the top right 1 ½ inches in from the edge (see image below) you will be working in between the attached yarn and the stitch marker
The brim is worked with 2 strands of yarn and the same size hook that you use for 1 of the strands of yarn. The stitch marker is used as a GUIDE ONLY
1. Half double crochet into the first stitch, 1 half double crochet in the next stitch, *2
half double crochet into the next stitch, 1 half double crochet into the next 2 stiches
* repeat across to stitch marker ending with 1 half double crochet into the next 2
stiches, slip stitch into the next 2 stitches, turn
2. Chain 1, skip next stitch and half double crochet in every stitch across, when you
reach the end of the row you will half double crochet into the next available stitch 2
rows below (see image below)

9 | P a g e ©2012 Clare Sullivan – BobWilson123
Slip stitch in the next 2 stitches, turn
3. Skip first stitch and half double crochet into the next stitch, 1 half double crochet in
the next stitch, *2 half double crochet into the next stitch, 1 half double crochet into
the next 2 stiches * repeat across, when you reach the end of the row you will half
double crochet into the next available stitch 2 rows below, slip stitch in the next 2
stitches, turn
4. Chain 1, skip next stitch and half double crochet in every stitch across, hdc into the
next stitch 2 rows below, slip stitch into the next 2 stitches
Optional
5. Slip stitch in each stitch around hat including brim
6. Fasten off and sew in tails
Thank you for choosing my pattern
Haooy Crochet
Clare