advanced management console user's guide - oracle · the advanced management console user’s...
TRANSCRIPT
Java Platform, Standard EditionAdvanced Management Console User'sGuide
2.16E62444-20January 2020
Java Platform, Standard Edition Advanced Management Console User's Guide, 2.16
E62444-20
Copyright © 2014, 2020, Oracle and/or its affiliates. All rights reserved.
This software and related documentation are provided under a license agreement containing restrictions onuse and disclosure and are protected by intellectual property laws. Except as expressly permitted in yourlicense agreement or allowed by law, you may not use, copy, reproduce, translate, broadcast, modify,license, transmit, distribute, exhibit, perform, publish, or display any part, in any form, or by any means.Reverse engineering, disassembly, or decompilation of this software, unless required by law forinteroperability, is prohibited.
The information contained herein is subject to change without notice and is not warranted to be error-free. Ifyou find any errors, please report them to us in writing.
If this is software or related documentation that is delivered to the U.S. Government or anyone licensing it onbehalf of the U.S. Government, then the following notice is applicable:
U.S. GOVERNMENT END USERS: Oracle programs, including any operating system, integrated software,any programs installed on the hardware, and/or documentation, delivered to U.S. Government end users are"commercial computer software" pursuant to the applicable Federal Acquisition Regulation and agency-specific supplemental regulations. As such, use, duplication, disclosure, modification, and adaptation of theprograms, including any operating system, integrated software, any programs installed on the hardware,and/or documentation, shall be subject to license terms and license restrictions applicable to the programs.No other rights are granted to the U.S. Government.
This software or hardware is developed for general use in a variety of information management applications.It is not developed or intended for use in any inherently dangerous applications, including applications thatmay create a risk of personal injury. If you use this software or hardware in dangerous applications, then youshall be responsible to take all appropriate fail-safe, backup, redundancy, and other measures to ensure itssafe use. Oracle Corporation and its affiliates disclaim any liability for any damages caused by use of thissoftware or hardware in dangerous applications.
Oracle and Java are registered trademarks of Oracle and/or its affiliates. Other names may be trademarks oftheir respective owners.
Intel and Intel Xeon are trademarks or registered trademarks of Intel Corporation. All SPARC trademarks areused under license and are trademarks or registered trademarks of SPARC International, Inc. AMD, Opteron,the AMD logo, and the AMD Opteron logo are trademarks or registered trademarks of Advanced MicroDevices. UNIX is a registered trademark of The Open Group.
This software or hardware and documentation may provide access to or information about content, products,and services from third parties. Oracle Corporation and its affiliates are not responsible for and expresslydisclaim all warranties of any kind with respect to third-party content, products, and services unless otherwiseset forth in an applicable agreement between you and Oracle. Oracle Corporation and its affiliates will not beresponsible for any loss, costs, or damages incurred due to your access to or use of third-party content,products, or services, except as set forth in an applicable agreement between you and Oracle.

Contents
Preface
Audience vii
Documentation Accessibility vii
Related Documents vii
Conventions viii
1 What's New in the Advanced Management Console
2 Introduction to Advanced Management Console
About Advanced Management Console 2-1
Starting the Advanced Management Console User Interface 2-2
3 Desktop Management
About Desktops 3-1
Desktops Tab 3-1
Views for Desktops 3-2
Filters for Desktop Properties 3-2
Deployment Rule Set Distribution 3-3
Generating Reports for Desktops 3-3
Setting the Display Option for Desktop Reports 3-3
Setting Filters for Desktop Reports 3-4
Exporting Desktop Reports 3-4
Pushing a Deployment Rule Set 3-5
Enabling or Disabling Agent Auto Update 3-6
Enabling or Disabling Java Auto Update 3-7
Desktop Properties 3-7
Web-Enabled JREs 3-8
Desktop Properties Shared With Advanced Management Console Server 3-9
Filter Criteria for Desktops 3-9
iii
JRE Security Baseline 3-12
4 Java Usage
About Tracking Java Usage 4-1
Java Usage Tab 4-1
Views for Java Usage 4-2
Filters for Usage Information 4-2
Generating Reports for Java Usage 4-3
Updating Application Names 4-3
Exporting Java Usage Reports 4-4
Java Usage Information 4-5
Filter Criteria for Java Usage Information 4-6
Java Usage Record Counters 4-7
Java Usage Tracker Configuration on Managed Desktops 4-7
Modifying Advanced Management Console Server Host Name 4-8
Tracking Managed JREs in Agents 4-8
5 Java Runtime Environment Management
About the JRE Management Architecture 5-1
Installing JRE 5-2
Installing a Non-Enterprise JRE 5-3
Uninstalling JREs 5-5
Status 5-6
6 Installer Configuration
About Installer Configurations 6-1
Adding a Java Version 6-2
Adding an Installer Configuration 6-3
Editing an Installer Configuration 6-3
Deleting an Installer Configuration 6-4
Applying a Configuration to an Installer File 6-4
Exporting an Installer Configuration to a File 6-5
Installer Configuration Attributes 6-6
Installer Configuration Properties 6-6
7 User Management
About User Accounts 7-1
Views for Users 7-1
iv

User Table Details 7-2
User Properties 7-2
Creating User Accounts 7-2
Editing User Accounts 7-3
Changing the Account Password 7-3
Password Rules 7-4
Deleting User Accounts 7-5
User Permissions 7-5
8 Agent Configuration
Configuring Advanced Management Console Agent Proxy Settings 8-1
Configuring Agent Intervals 8-1
Agent Update Initiation 8-2
9 Other Settings
Customizing Java Usage Tracker Properties 9-1
Server Settings 9-2
10
Rule Sets and Rules Management
About Deployment Rule Sets 10-1
Rule Sets Tab 10-2
Managing Rules and Rule Sets 10-2
Managing Rule Sets 10-3
Adding a Rule Set 10-3
Editing a Rule Set 10-4
Deleting a Rule Set 10-7
Exporting a Rule Set 10-7
Signing a Rule Set 10-8
Setting Default Deployment Rule Set 10-9
Viewing Relationships between Rule Sets and Applications 10-9
Managing Rules 10-10
Creating a Rule 10-10
Editing a Rule 10-10
Deleting a Rule 10-11
Rule Properties 10-11
Deploying Rule Sets 10-12
Generating a Self-Signed Certificate 10-13
v

11
Desktop Groups Configuration
About Desktop Groups 11-1
About Mapping Files 11-2
Views for Desktop Groups 11-2
Desktop Group Table Details 11-3
Desktop Group Property Details 11-3
Creating a Desktop Group 11-3
Updating an Existing Desktop Group 11-5
Viewing Desktops in a Desktop Group 11-5
Deleting a Desktop Group 11-6
Desktop Group Properties 11-6
A Advanced Management Console Samples
vi

Preface
The Advanced Management Console User’s Guide provides information about usingthe Advanced Management Console to create deployment rules and rule sets, and tomonitor the Java applications that are run in your enterprise.
The Advanced Management Console is available to enterprise customers within MyOracle Support.
Note:
The Advanced Management Console requires a commercial license for usein production. To learn more about commercial features and how to enablethem, see Oracle Java SE Advanced & Suite Products.
AudienceThis document is intended for system administrators who are responsible formanaging the Java desktop environment in their enterprise. Readers are expected toknow the process for distributing software to computers in their enterprise and havesome knowledge of the Deployment Rule Set feature.
Documentation AccessibilityFor information about Oracle's commitment to accessibility, visit the OracleAccessibility Program website at http://www.oracle.com/pls/topic/lookup?ctx=acc&id=docacc.
Access to Oracle Support
Oracle customers that have purchased support have access to electronic supportthrough My Oracle Support. For information, visit http://www.oracle.com/pls/topic/lookup?ctx=acc&id=info or visit http://www.oracle.com/pls/topic/lookup?ctx=acc&id=trsif you are hearing impaired.
Related Documents• Advanced Management Console Installation and Configuration Guide
• Information about Java Platform, Standard Edition (Java SE) 8
• Information about the Deployment Rule Set feature is available at DeploymentRule Set in the Java Platform, Standard Edition Deployment Guide.
vii

• Information about the Java Usage Tracker is available at Java Platform, StandardEdition Usage Tracker Overview.
ConventionsThe following text conventions are used in this document:
Convention Meaning
boldface Boldface type indicates graphical user interface elements associatedwith an action, or terms defined in text or the glossary.
italic Italic type indicates book titles, emphasis, or placeholder variables forwhich you supply particular values.
monospace Monospace type indicates commands within a paragraph, URLs, codein examples, text that appears on the screen, or text that you enter.
Preface
viii

1What's New in the Advanced ManagementConsole
This release of the Advanced Management Console is primarily a bug fix release. See What's New In Advanced Management Console for descriptions of changes and newfeatures in this and other releases of the Advanced Management Console.
1-1

2Introduction to Advanced ManagementConsole
The Advanced Management Console is a feature of Oracle Java SE Advanced. TheAdvanced Management Console enables system administrators to monitor andmanage the use of Java technology in their enterprise.The Introduction to Advanced Management Console topic includes the followingsections:
• About Advanced Management Console
• Starting the Advanced Management Console User Interface
About Advanced Management ConsoleThe Advanced Management Console provides system administrators with an insightinto the Java applications that their users run and the versions of the Java RuntimeEnvironment (JRE) that are used. Administrators can use the Advanced ManagementConsole to provide some control over the use of Java technology on desktops in theirenterprise.
The Advanced Management Console provides the following capabilities:
• Collection of information about Java applications that are run in the enterprise
• Automated discovery of all installed versions of Java on desktops that theAdvanced Management Console manages
• Web-based analytics for data collected and for remote management
• Management and distribution of deployment rule sets
• Configuration of the MSI file for installing JREs
This guide contains the following topics that describe the capabilities of the AdvancedManagement Console:
• Desktop Management
• Java Usage
• Java Runtime Environment Management
• Installer Configuration
• Rule Sets and Rules Management
• User Management
• Desktop Groups Configuration
• Advanced Management Console Samples
2-1

Starting the Advanced Management Console User InterfaceThe Advanced Management Console provides a browser-based user interface (UI).You must have a valid user account to log in.
If the Advanced Management Console is not yet installed, then see Installing andConfiguring Advanced Management Console in the Advanced Management ConsoleInstallation and Configuration Guide. At least one administrator account must exist.
To start the Advanced Management Console UI:
1. Enter https://host-name:port-number/amcwebui/login.html in the browser,where host-name is the DNS name of the WebLogic server that hosts AdvancedManagement Console and port-number is the listen port of the WebLogic Server.
The browser must be set to allow cookies.
If you are using the Internet Explorer, then make sure that Display Intranet Sitesin Compatibility View is not selected in Compatibility View Settings.
2. Enter your login ID and password.
You must have an existing account to log in. The login ID is typically your emailaddress.
3. Click Login to display the Home tab of the Advanced Management Console.
Note:
Users are automatically logged out after a preset interval of inactivity.
Chapter 2Starting the Advanced Management Console User Interface
2-2

3Desktop Management
The Advanced Management Console provides administrators with information abouthow Java technology is used in their enterprise. Through the Advanced ManagementConsole, administrators can determine such things as how many computers arerunning an insecure version of Java, what versions of the JRE are installed onenterprise computers, and what deployment rule sets are active in the enterprise. TheAdvanced Management Console also enables administrators to push deployment rulesets to managed computers.
This topic includes the following sections:
• About Desktops
• Desktops Tab
• Exporting Desktop Reports
• Pushing a Deployment Rule Set
• Enabling or Disabling of Agent Auto Update
• Enabling or Disabling Java Auto Update
• Desktop Properties
• Filter Criteria for Desktops
• JRE Security Baseline
About DesktopsDesktops in the Advanced Management Console represent the client computers in anenterprise. Information about the desktops that are managed by the AdvancedManagement Console is shown in the Desktops tab and the Status tab.
For a desktop to be managed by the Advanced Management Console, the AdvancedManagement Console agent must be installed on the desktop. The agent gathers theinformation about the desktop and sends it to the central server. The agent alsoprocesses the requests to install a deployment rule set on the desktop. See AdvancedManagement Console Agent Installation and Configuration in the AdvancedManagement Console Installation and Configuration Guide.
A report of retired desktops and rule set failures is available from the Status tab.
Desktops TabThe Desktops tab of the Advanced Management Console shows information about thedesktops that are managed by the Advanced Management Console. Filters areavailable to get reports about selected desktop properties. The ability to pushDeployment Rule Sets to desktops and export desktop information to an HTML file orcomma-separated values (CSV) file is also provided.
3-1

Views for DesktopsThe table in the Desktops tab shows the properties for desktops that are managed bythe Advanced Management Console. The properties view provides more detailedinformation for each desktop. Depending on the display option selected, informationcan also be shown as a pie chart or a bar chart.
The table view is the default view. The table view is available for all display options.However the properties that are shown are dependent on the display option selected.Click the arrow that appears in the column heading to sort the data by the values inthat column. Use the navigation bar below the table to view additional pages when thenumber of desktops exceeds the page size.
The properties view is available only when Desktop is selected as the display option.Click the column heading in the Installed JREs table or Command Queue table to sortthe data by the values in that column. Use the navigation bar to scroll through theproperties for other desktops that match the filter criteria.
The pie chart and bar chart are available when something other than Desktop isselected as the display option. Click a segment from the pie chart or a bar from the barchart to see the desktops that match the selected value.
Filters for Desktop PropertiesThe display option and the filter criteria in the Desktops tab determine what informationis shown for the desktops managed by Advanced Management Console.
The default display option is Desktop, which shows the properties for each manageddesktop in a table. The other choices for the display option show the values for theselected option and the number of desktops that match each value. For example,selecting Java Runtime Environment (JRE) Major Version shows every major versionof the JRE that is installed on at least one desktop and the number of desktops onwhich it is installed.
The filter criteria further refine the information shown. The choices available for thecriteria are based on the properties of the desktops. For example, if the only majorJRE versions found across all managed desktops are 1.7.0 and 1.8.0, then 1.6.0 is notshown as a choice for the JRE Major Version criterion.
You can use the display option and filter criteria together to get answers to questionssimilar to the ones in the following list:
• Which desktops are running insecure versions of the JRE?
Set Display to Desktop. Add the criterion JRE Security, and set it to some JREsare insecure. The table shows the list of desktops that have at least one insecureJRE installed.
• How many desktops are running versions of JRE 7?
Set Display to JRE Major Version. See the number in the Hosts column for therow showing JRE Major Version 1.6.0.
To show only the data for version 1.7.0, add the criterion JRE Major Version andset it to 1.7.0. If 1.7.0 is not shown in the table or in the list of major versionsavailable, then no desktops are running a version of JRE 7.
• Which deployment rule sets are desktops using?
Chapter 3Desktops Tab
3-2

Set Display to Active Rule Set. The table shows the list of rules sets that areactive and the number of desktops for each rule set.
• Which desktops are using the rule set rule-set-name?
Set Display to Desktop. Add the criterion Active Rule Set and set it to the nameof the rule set that you are interested in. The table shows the list of desktops thatare using the selected rule set.
Deployment Rule Set DistributionA deployment rule set helps you manage the applications that are allowed to run inyour enterprise. The Desktops tab in Advanced Management Console contains anoption for pushing a deployment rule set to selected desktops.
The Advanced Management Console agent is used to install the rule set on a desktop.Pushing a rule set sends a command to the agent. The next time the agent contactsthe Advanced Management Console server, the agent processes the command. Viewthe status of the rule set by selecting the Rule Set Status display option or setting theRule Set Status filter criteria.
Generating Reports for DesktopsReports are used to answer questions about desktops that are managed by AdvancedManagement Console and about the JRE versions and deployment rule sets installedon those desktops. Set the display option and filter criteria in the Desktops tab togenerate the type of report that you want. Report data can be exported to an externalfile.
Depending on the filters that are used, reports are available as a table, pie chart, orbar chart. See Views for Desktops.
Reports about retired desktops or desktops with rule set failures are available from theStatus tab.
Setting the Display Option for Desktop ReportsSet the display option in the Desktops tab to show how many desktops managed byAdvanced Management Console match each value for a specific property.
To set the display option:
1. In the Advanced Management Console, click the Desktops tab.
2. Select a property to see the report for that property.
The following examples show how the display option is used:
• To show the JRE versions installed on desktops and the number of desktopsthat have each version installed, set Display to JRE Full Version. The firstcolumn in the table shows the JRE versions that are found. The secondcolumn shows how many desktops have that version installed.
• To show the rule sets that are active on desktops and the number of desktopsthat have each rule set installed, set Display to Active Rule Set. The firstcolumn in the table shows the names of the active rule sets that are found.The second column shows how many desktops have that rule set installed.
Chapter 3Generating Reports for Desktops
3-3

• If a desktop group exists, then show the number of desktops associated witheach value for a desktop group by setting Display to the name of a desktopgroup.
Setting Filters for Desktop ReportsUse filters in the Desktops tab to show only desktops managed by AdvancedManagement Console that match specific values for selected desktop properties.
To filter the information by a desktop property:
1. In Advanced Management Console, click the Desktops tab.
2. Click Add Criteria and select one or more filters from the list.
3. For each filter selected, select or enter the value to match.
Filters that provide a list of values show only values that are present in at least onedesktop. For example, the JRE Major Version filter shows only major versions thatare installed on at least one desktop. For filters that do not provide a list of values,such as First Name and Last Name, enter the string to match and press Enter.Wildcards are not currently supported.
Some filters require a secondary filter. The secondary filter is automatically shownwhen the primary filter is selected. For example, if the filter criterion OS Version isselected, then the OS Family filter is also displayed.
To see which desktops match the filter criteria, set Display to Desktop.
Exporting Desktop ReportsData from the desktop reports that are generated by Advanced Management Consolecan be exported to an external file. Filter criteria is used to choose the desktops thatare included in the exported data.
To export data for desktops:
1. In the Advanced Management Console, click the Desktops tab.
2. Make sure that Display is set to Desktop.
The Other Actions button is available only with the Desktop display option.
3. (Optional) Set the filter criteria to show only the desktops that you want included inthe exported data.
Click Add Criteria and set the values for each filter that you select. Onlyinformation that matches the criteria is exported.
If no filters are set, then all desktops are included in the exported data.
4. Click Other Actions and then select Export Data.
The Export Data window is shown.
5. Choose the output format.
• HTML: The generated file contains the data in a table with HTML formatting.
• CSV: The generated file contains the data in text fields that are separated bythe value separator that you select.
6. Click Confirm.
Chapter 3Exporting Desktop Reports
3-4
The browser prompts you to either save or view the data. Depending on the formatselected, the default file name is amc2-desktops_YYYY-MM-DD_HH-MM.csv or amc2-desktops_YYYY-MM-DD_HH-MM.html, where YYYY-MM-DD_HH-MM is the server-sidetime stamp of when the file was created.
The following data is exported for each application that meets the filter criteria.
• Operating system name
• Operating system version
• Operating system architecture
• Owner name
• Owner email address
• Time stamp of last contact
• Host name
• IP address
• Name of active rule set
• Agent version
• Number of secure JRE versions installed on the desktop
• Number of insecure JRE versions installed on the desktop
• Desktop groups and the value of the group property for any group that includes thedesktop
• Latest Usage column that indicates timestamp of most recent usage for therespective Java version
Pushing a Deployment Rule SetA deployment rule set provides rules for allowing or blocking Java applications basedon the criteria set in the rule. The Advanced Management Console enables you todistribute signed deployment rule sets to the desktops in your enterprise. When theAdvanced Management Console pushes a signed DeploymentRuleSet.jar file to adesktop, the Advanced Management Console agent edits the Javadeployment.properties on that desktop to point to a specific truststore that holds thecertificates from this DeploymentRuleSet.jar file. By default, thedeployment.properties file is located at: C:\Windows\Sun\Java\Deployment\.
If your desktop already contains a deployment.properties file with thedeployment.user.security.trusted.cacerts property set to a specific location, thenAdvanced Management Console overwrites that property value.
Note:
A signed deployment rule set must be available in Advanced ManagementConsole. Otherwise, the option to push a deployment rule set is not enabled.
To push a deployment rule set:
Chapter 3Pushing a Deployment Rule Set
3-5

1. In Advanced Management Console, click the Desktops tab.
2. Make sure that Display is set to Desktop.
The Push Deployment Rule Set button is available only with the Desktop displayoption.
3. (Optional) Set the filter criteria to show the subset of desktops to which you wantto push the rule set.
4. (Optional) Select the target desktops by selecting the check box for the desktop.
If no desktops are selected, then the target is all desktops that match the filtercriteria that is set.
5. Click Push Deployment Rule Set to display the Push Deployment Rule Set dialog
6. Choose one rule set from the list provided.
Only signed rule sets can be distributed. If the rule set that you want to push is notin the list, then the rule set is currently unsigned.
7. Choose the target.
• To push only to selected desktops, select Selected Desktops.
• To push to all desktops matched by the filter criteria that is set, select AllFiltered Desktops.
8. Click Push.
The next time the agent on the target desktops contacts the Advanced ManagementConsole server, the agent downloads and installs the rule set. View the status of therule set by selecting the Rule Set Status display option or setting the Rule Set Statusfilter criteria.
Note:
A rule set that is altered on a desktop after being deployed from theAdvanced Management Console is no longer recognized by the AdvancedManagement Console. Properties for any desktop with an altered rule set areupdated to indicate that the desktop does not have an active rule set.
Enabling or Disabling Agent Auto UpdateThe Advanced Management Console provides an option in the Configuration tab toenable or disable the agent auto update.
To enable or disable the agent auto update:
1. In the Advanced Management Console, click the Configuration tab.
2. Click the Agent Settings sub tab.
3. Click Edit.
4. Select or deselect the Agent Auto Update check box under Agent Action Intervalsand Units to enable or disable agent auto update.
5. Click Save.
Chapter 3Enabling or Disabling Agent Auto Update
3-6
Enabling or Disabling Java Auto UpdateJava has a mechanism which checks for and installs new versions of Java in thebackground. As the Advanced Management Console provides finer-grained control ofJava Runtime Environment (JRE) management on dekstops, an option is provided inthe Desktop tab to enable or disable Java Auto Update on each desktop.
To enable or disable Java auto update:
1. In the Advanced Management Console, click the Desktop tab.
2. Ensure that the Desktop is selected in the Display drop-down list.
The Other Actions button is available only with the Desktop display option.
3. Ensure that the Table icon is selected.
4. (Optional) Set the filter criteria to show only the desktops for which you want toenable or disable the auto update.
a. Click Add Criteria .
b. Select the filters and set the values for each filter that you select.
The agent auto update is enabled or disabled only for the desktops that match thecriteria. If no filters are set, then the agent auto update is enabled or disabled forall desktops.
5. Click Other Actions and then select Set Java Auto Update for Desktop(s) todisplay the Set Java Auto Update for Desktop(s) dialog.
6. Select the target desktops by selecting either of the following options:
• Selected Desktops: Shows the number of desktops selected.
• All Filtered Desktops: Shows the number of filtered desktops included.
7. Select Enabled to enable Java auto update or Disabled to disable it.
8. Click Confirm.
The Java Auto Update mechanism is now enabled (or disabled) on the selecteddesktops.
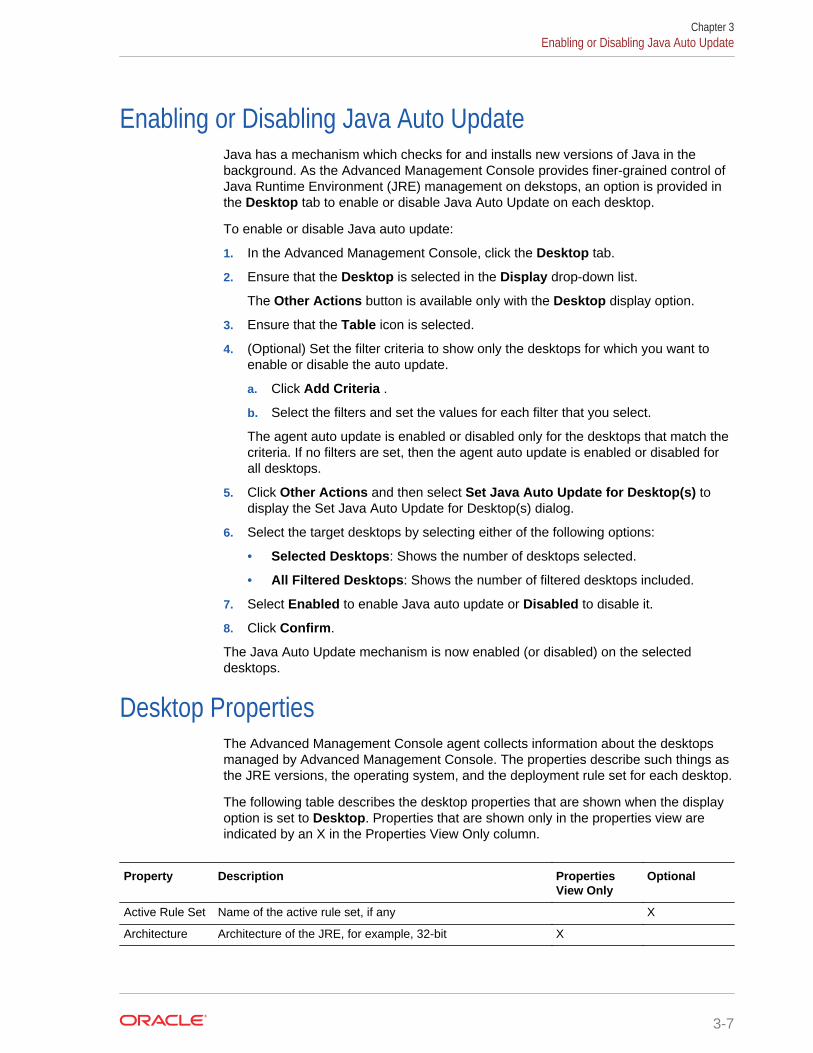
Desktop PropertiesThe Advanced Management Console agent collects information about the desktopsmanaged by Advanced Management Console. The properties describe such things asthe JRE versions, the operating system, and the deployment rule set for each desktop.
The following table describes the desktop properties that are shown when the displayoption is set to Desktop. Properties that are shown only in the properties view areindicated by an X in the Properties View Only column.
Property Description PropertiesView Only
Optional
Active Rule Set Name of the active rule set, if any X
Architecture Architecture of the JRE, for example, 32-bit X
Chapter 3Enabling or Disabling Java Auto Update
3-7

Property Description PropertiesView Only
Optional
CommandQueue
List of commands executed for the desktop, the status of eachcommand, and any additional details, such as the name of thedeployment rule set that was pushed
X
First Name First name of the registered user of the desktop X X
Host Name Host name of the desktop X
IP Address IP address of the desktop X
Java Vendor Name of the vendor that distributed the JRE X
Java Versions List all web-enabled JREs found on the desktop. X
Last Contact Time stamp of the last contact with the agent
Last Name Last name of the registered user of the desktop X X
OS Operating system that the desktop is running
OS Architecture Architecture of the operating system that the desktop isrunning, for example, 64-bit
X
OS Family Operating system for the desktop X
Other JREs Lists all other JREs (not web-enabled) found on the desktop.
Owner Email Email for the registered user of the desktop X
Secure Flag that indicates if the JRE is a secure version. A checkmark means that it is secure.
X
Path Path to the location of the JRE. If the JRE is in more than onelocation, then all paths are shown, separated by semicolons(;).
X
Version Version of the Advanced Management Console agent installedon the desktop
When the display option is set to something other than Desktop, the table shows thevalues for the selected filter criteria for desktops and the number of desktops thatmatch each value.
Web-Enabled JREsThe Advanced Management Console agents can detect whether or not the JavaRuntime Environments (JREs) are web enabled. If the JREs are web enabled, thenthey can be used to run applets and Java Web Start applications.
The Advanced Management Console can detect what JREs are actually used by JavaPlugin or the Java Web Start to run Rich Internet Applications (RIAs). These web-enabled JREs are displayed in the Java Versions column of the Desktop Propertiesand in the Web Enabled JREs table in the Properties view. To view the Web EnabledJREs table, in the Desktops tab, select a Desktop, and click the Properties icon.Details of the selected desktop are displayed in the following tables: Web EnabledJREs, Installed JREs, and Command Queue. All the other JREs are listed in theOther JREs column of the Desktop tab.
You can also view the web-enabled JREs when you select either the JRE Full Versionor the JRE Major Version from the Display drop-down list in the Desktop tab.
Chapter 3Desktop Properties
3-8

Desktop Properties Shared With Advanced Management ConsoleServer
When the Advanced Management Console agent registers, it sends some information(Desktop Properties) to the Advanced Management Console server. This isinformation pertaining to both the Java Usage as well as the Java RuntimeEnvironment (JRE).
The agent sends the following information about itself to the server:
• First Name (Optional)
• Last Name (Optional)
• Email (Optional)
• Heartbeat: Current time stamp of the agent trying to register.
• IP Address
• Host Name
• OS Architecture, for example 64–bit
• OS Version, for example, 10.9.5
• OS Name, for example, macOS
The values for First Name, Last Name, and the Email are the values entered in theAMCUser.properties file, which is the properties file of the Advanced ManagementConsole agent. If the properties file is absent or the agent chooses to leave some ofthese values empty, then the values of the three properties are reported as null. Oncethe agent starts running, with the usage tracking record configured, details, such asthe usage tracking records for webstart applications, applets — both jnlp and html, andthe standalone applications are collected and shared periodically with the AdvancedManagement Console server.
The agent also periodically scans for JREs on the Desktop and shares the followinginformation with the server:
• Java Version (both major and minor)
• Architecture
• Vendor
• Path where the JRE is installed
• Type of installation
• Whether the JRE is web enabled
Filter Criteria for DesktopsThe filter criteria available in the Desktops tab is used to generate reports about thedesktops managed by Advanced Management Console. The filters and the valueschosen provide administrators with specific information about the desktops and JREversions in use in the enterprise.
Chapter 3Filter Criteria for Desktops
3-9

The following table describes the filters that are available for desktops, and indicates ifthe criteria is set as the display option or as a filter. For filters, the valid values areprovided in the drop-down list, except where noted in the description.
Criteria Description DisplayOption
Filter Criteria
Desktop List of desktops managed by AdvancedManagement Console
X
JRE Major Version Major version of the JRE, such as 1.7.0 or1.8.0.
X X
JRE Minor Version Version number of the update release for amajor release. The JRE major version filter isalso shown when this filter is selected.
X
JRE Full Version Major and minor version of the JRE, such as1.7.0_67 or 1.8.0_40
X
JRE Architecture Architecture of the JRE, such as 32 for the 32-bit JRE
X X
JRE Security Security status based on the JRE securitybaseline. Set the filter to show desktops whereall installed JREs are secure, all installed JREsare insecure, or some installed JREs areinsecure.
X
OS Family Operating system for the desktop X X
OS Version Version of the operating system. The OS familyfilter is also shown when this filter is selected.
X
OS (Family +Version)
Family and version of the operating system X
OS Architecture Architecture of the operating system X X
Chapter 3Filter Criteria for Desktops
3-10
Criteria Description DisplayOption
Filter Criteria
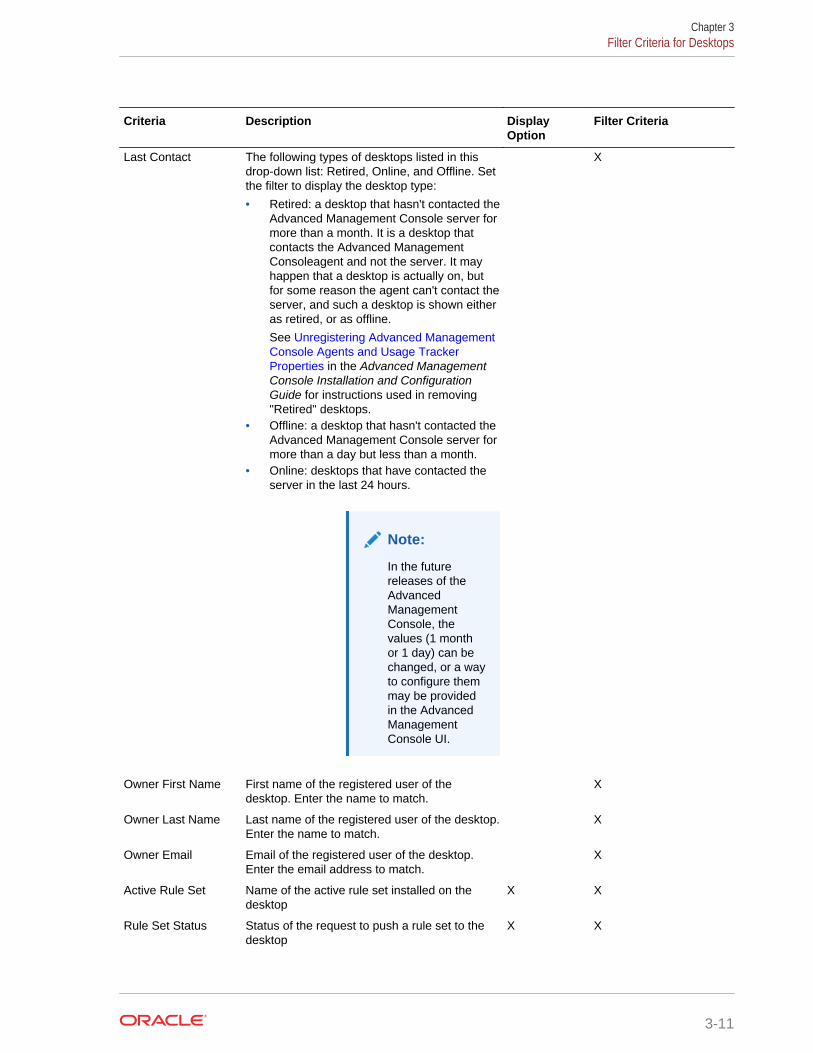
Last Contact The following types of desktops listed in thisdrop-down list: Retired, Online, and Offline. Setthe filter to display the desktop type:
• Retired: a desktop that hasn't contacted theAdvanced Management Console server formore than a month. It is a desktop thatcontacts the Advanced ManagementConsoleagent and not the server. It mayhappen that a desktop is actually on, butfor some reason the agent can't contact theserver, and such a desktop is shown eitheras retired, or as offline.
See Unregistering Advanced ManagementConsole Agents and Usage TrackerProperties in the Advanced ManagementConsole Installation and ConfigurationGuide for instructions used in removing"Retired" desktops.
• Offline: a desktop that hasn't contacted theAdvanced Management Console server formore than a day but less than a month.
• Online: desktops that have contacted theserver in the last 24 hours.
Note:
In the futurereleases of theAdvancedManagementConsole, thevalues (1 monthor 1 day) can bechanged, or a wayto configure themmay be providedin the AdvancedManagementConsole UI.
X
Owner First Name First name of the registered user of thedesktop. Enter the name to match.
X
Owner Last Name Last name of the registered user of the desktop.Enter the name to match.
X
Owner Email Email of the registered user of the desktop.Enter the email address to match.
X
Active Rule Set Name of the active rule set installed on thedesktop
X X
Rule Set Status Status of the request to push a rule set to thedesktop
X X
Chapter 3Filter Criteria for Desktops
3-11
Criteria Description DisplayOption
Filter Criteria
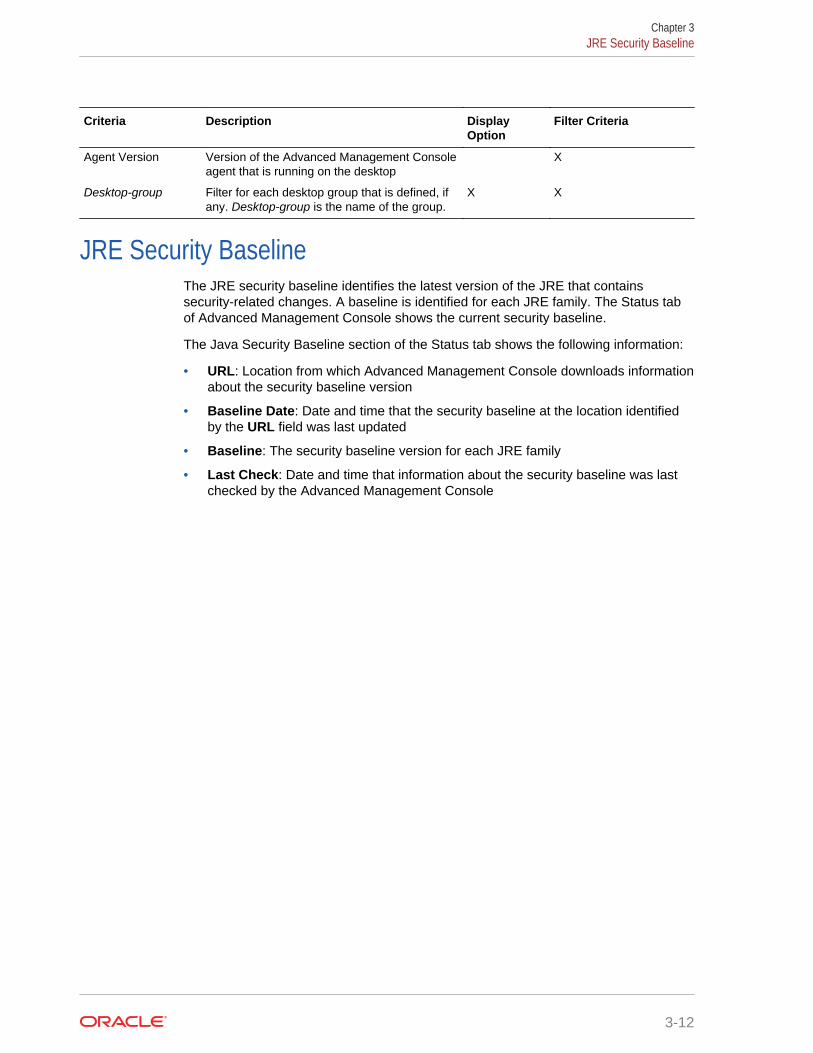
Agent Version Version of the Advanced Management Consoleagent that is running on the desktop
X
Desktop-group Filter for each desktop group that is defined, ifany. Desktop-group is the name of the group.
X X
JRE Security BaselineThe JRE security baseline identifies the latest version of the JRE that containssecurity-related changes. A baseline is identified for each JRE family. The Status tabof Advanced Management Console shows the current security baseline.
The Java Security Baseline section of the Status tab shows the following information:
• URL: Location from which Advanced Management Console downloads informationabout the security baseline version
• Baseline Date: Date and time that the security baseline at the location identifiedby the URL field was last updated
• Baseline: The security baseline version for each JRE family
• Last Check: Date and time that information about the security baseline was lastchecked by the Advanced Management Console
Chapter 3JRE Security Baseline
3-12
4Java Usage
The Advanced Management Console provides administrators with information aboutthe Java applications that are run in their enterprise and the versions of the JavaRuntime Environment (JRE) that are used to run them. Through the AdvancedManagement Console, administrators can determine such things as which version ofthe JRE is used to run corporate applications and how many browser-based appletsare being run in the enterprise.
This topic contains the following sections:
• About Tracking Java Usage
• Java Usage Tab
• Generating Reports for Java Usage
• Updating Application Names
• Exporting Java Usage Reports
• Java Usage Information
• Filter Criteria for Java Usage Information
• Java Usage Record Counters
• Java Usage Tracker Configuration on Managed Desktops
About Tracking Java UsageJava Usage Tracker is a feature of the JRE. When enabled on a computer, JavaUsage Tracker (JUT) tracks the use of applications and JREs on that computer.Advanced Management Console collects the information from the Usage Tracker andpresents it in reports.
For the Advanced Management Console to collect information, the Java UsageTracker must be enabled on desktops in the enterprise. When you install theAdvanced Management Console Agent on a desktop, the Java Usage Tracker isenabled. You can also manually enable the Java Usage Tracker on desktops that donot support the Advanced Management Console Agent.
See Java Usage Tracker Setup for Advanced Management Console in the AdvancedManagement Console Installation and Configuration Guide.
The Status tab of the Advanced Management Console shows the number of recordsthat were processed successfully or unsuccessfully. See Java Usage RecordCounters.
Java Usage TabThe Java Usage tab of Advanced Management Console shows the applications thatare running on desktops in your enterprise and the versions of the Java Runtime
4-1

Environment (JRE) that are being used. Filters are available to get reports about theapplications and JREs.
The information is shown in the format of a table, pie chart, or bar chart. See Views forJava Usage.
The filters determine what information is shown.
From this tab, Java Usage Tracker data can be exported to an HTML file or a comma-separated values (CSV) file.
Views for Java UsageInformation in the Java Usage tab of the Advanced Management Console is availablein table format, as a pie chart, and as a bar chart, as depicted by table, pie chart, andbar chart icons respectively. The display option and filter criterion are used to choosethe type of information shown.
The table view is the default view. Click the arrow that appears in the column headingto sort the data by the values in that column. Use the navigation bar below the table toview additional pages when the number of entries exceeds the page size. The Detailsand Properties icons are enabled when you select an application in the Display table.These two icons are grayed out if no application is selected no application is selected.The Properties icon gets enabled when you select a non-web application and the boththe icons are enabled only when you select a web-based application.
The categories shown for the pie chart and the horizontal axis of the bar chart arebased on the option selected for Display. For example, if Application Security isselected, then the categories are Sandbox and All permissions. The count shown inthe pie chart segments and the vertical axis of the bar chart is based on the optionselected for Counter. If Counter is set to Hosts, then the charts show the number ofhosts in each category.
Filters for Usage InformationThe display option and filter criteria in the Java Usage tab of the AdvancedManagement Console determine what type of information is shown.
The default display option is JRE Full Version. This option shows statistics for theapplications that were run with the JRE versions that are shown. The display optionsets the type of information that is shown in the first column of the table view and thecategories for the pie chart and bar chart.
The filter criteria further refine the information shown. The choices available for eachcriterion are based on the values reported by Java Usage Tracker. For example, if theonly major JRE versions used for all applications that are tracked are 1.7.0 and 1.8.0,then 1.6.0 is not shown as a choice for the JRE Major Version criteria.
You can use the display option and filter criteria together to get answers to questionssimilar to the ones in the following list:
• Which applications are running with an insecure version of the JRE?
Set Display to Application. Add the criterion JRE Security Baseline and set it tosome JREs are insecure.
• How many Java Web Start applications require access to the user's system?
Chapter 4Java Usage Tab
4-2
Set Display to Application Type. Add the criterion Application Security and setit to All Permissions. Add the criteria Application Type and set it to WebStartApplication.
The next example shows how to see which applications require access.
• Which Java Web Start applications require access to the user's system?
Set Display to Application. Add the criterion Application Security and set it toAll Permissions. Add the criterion Application Type and set it to WebStartApplication.
• What operating systems are being used to run applications?
Set Display to OS Family. No additional filters are needed.
• What are the applications, types of applications, and the JRE versions discoveredafter a specified date?
Add the criterion First Use After and set the required date and time to view all theapplications or JREs that were discovered after the date and time selected.
Generating Reports for Java UsageReports are used to answer questions about how Java is used in your enterprise.These reports use the information generated by Java Usage Tracker and collected bythe Advanced Management Console Agent. Report data can be exported to anexternal file.
To generate a report:
1. In the Advanced Management Console, click the Java Usage tab.
2. Set Display to the type of information that you want.
The values for the type of information selected are shown as the first column of thetable view, the categories for the pie chart, or the horizontal axis of the bar chart.
3. To further filter the information, click Add Criteria and select one or more filtersfrom the list.
4. For each filter selected, select or enter the value to match.
Filters that provide a list of values show only values that are present for at leastone application. For filters that do not provide a list of values, such as Application,type the string to match and press Enter.
Some filters require a secondary filter. The secondary filter is automatically shownwhen the primary filter is selected. For example, if the filter criterion JRE MinorVersion is selected, then the JRE Major Version filter is also shown.
5. Choose the format in which you want to view the information.
Updating Application NamesIn the Java Usage tab of the Advanced Management Console, you can select anapplication and set a name (an alias) for it. Applications are uniquely identified bylocations, which are different for various application types. They can be, for example,class names, web page URLs, JNLP URLs, or jar file names. However, locationnames are often long and/or less understandable. In addition, it is also possible for asingle application to have multiple locations that look similar or share a common
Chapter 4Generating Reports for Java Usage
4-3
pattern. For this reason, setting an alias makes an application appear more readableand also enables the merging of multiple locations into a single application. Morespecifically, for every application in the Java Usage tab, you can set an alias tosimplify the application name. For example,com.sun.deploy.panel.ControlPanel can be named Java Control Panel.
To update (or simplify) application names:
1. In the Advanced Management Console, click the Java Usage tab.
2. Set Display to the type of information that you want. To update application names,ensure to set the Display type to Applications.
The Update Name button is displayed only when the Display type is set toApplications.
3. Select an Application that you want to update in the Application table.
The Update Name button becomes enabled.
4. Click Update Name to display the Update Application Name dialog box.
5. Enter the new application name in the Application Name field.
6. Enter a pattern in the Location Pattern field. You can use wild cards for thepattern: an asterisk (*) substitutes zero or any characters; an underscore (_)substitutes a single character.
Note that the merging is enabled for standalone applications only.
7. Click Next to review the details under Review and Submit.
At this step, you can review the new name of the application, and in case ofstandalone applications, a list of locations that are going to be merged into a singleapplication.
8. Click Submit.
The application name gets updated and message is displayed indicating that theapplication was successfully updated.
Exporting Java Usage ReportsData from the Java usage reports that are generated by Advanced ManagementConsole can be exported to an external file. Filter criteria is used to choose theapplications that are included in the exported data.
To export Java usage data:
1. In Advanced Management Console, click the Java Usage tab.
2. (Optional) Set the filter criteria to show only the applications that you want includedin the exported data.
Click Add Criteria and set the values for each filter that you select. Onlyinformation that matches the criteria is exported. The Display option does notaffect what information is exported.
If no filters are set, all applications are included in the exported data.
3. Click Export Data.
The Export Data window is shown.
4. Choose the output format.
Chapter 4Exporting Java Usage Reports
4-4
• HTML: The generated file contains the data in a table with HTML formatting.
• CSV: The generated file contains the data in text fields that are separated bythe value separator that you select.
5. Click Confirm.
The browser prompts you to either save or view the data. Depending on the formatselected, the default file name is amc2-java-usage_YYYY-MM-DD_HH-MM.csv oramc2-java-usage_YYYY-MM-DD_HH-MM.html, where YYYY-MM-DD_HH-MM is theserver-side timestamp of when the file was created.
The following data is exported for each application that meets the filter criteria. See Filter Criteria for Java Usage Information for a description of the properties:
• Location
• Type of application
• Application security
• Java version
• Java architecture
• Host name/IP address
• Operating system name
• Operating system version
• Run count
• Timestamp of last run
Java Usage InformationThe Java Usage Information is about applications and their Java Runtime Environment(JRE) versions that are used to run them is collected from desktops that have theAdvanced Management Console agent installed. This information is shown in the JavaUsage tab of Advanced Management Console.
The following table describes the statistics that are shown. All of the statistics, exceptPath are available in the table view. Select one row (depends on the selected Display,one row can be an application, or an application type, or an OS family) in table viewand click the Properties icon, the Path information for the table row is shown. Thepath details for the JRE are displayed immediately below the Hosts details, andappear in the same place for all display types. Latest usage is not available for the piechart or bar chart.
Statistic Description
# Apps Number of applications that meet the filter criteria
# Runs Cumulative number of times that the applications that meet the filtercriteria have been run
# Hosts Number of hosts on which the applications that meet the filtercriteria are installed
Chapter 4Java Usage Information
4-5
Statistic Description
# JREs Number of JREs associated with this row for the chosen displaytype. For example, if the display type is Applications, then it's thenumber of JREs used to run the application; similarly, if the displaytype is OS family, then it's the number of JREs run on that OSfamily.
First Usage The first time an application or a JRE version was discovered.
Latest Usage The most recent time that an application that meets the filter criteriawas run.
Path Full path of the JRE in Java Usage reports. For example: /Library/Application Support/Oracle/Java_AMC/versions/AMC-2.7-b04/java.
Filter Criteria for Java Usage InformationThe filter criteria available in the Java Usage tab of Advanced Management Consoleare used to generate reports about how Java is used. The filters and the valueschosen provide administrators with specific information about the applications in use inthe enterprise.
The following table describes the filters that are available, and indicates if eachcriterion is available as the display option or as a filter. For filters, valid values areprovided in the drop-down list, except where noted in the description.
Criteria Description DisplayOption
FilterCriteria
Application Type Type of application, such as HTML applet orJava Web Start application
X X
Application Name or location of the main class, JAR file, orJNLP file, depending on the type of application.Enter the string to match.
X X
Application Security Type of access required by the application, suchas sandbox or all-permissions
X X
JRE Major Version Major version of the JRE, such as 1.7.0 or 1.8.0 X X
JRE Minor Version Version number of the update release for amajor release
X
JRE Full Version Major and minor version of the JRE, such as1.7.0_67 or 1.8.0_40
X
JRE SecurityBaseline
Security status based on the JRE securitybaseline. See JRE Security Baseline. Set thefilter to show statistics for applications that wererun with only secure JREs, only insecure JREs,or a mixture of secure and insecure JREs.
X
JRE Architecture Architecture of the JRE, such as 32 for the 32-bitJRE
X X
OS Family Operating system on which the application andJRE run
X X
OS Version Version of the operating system X
OS Family + Version Family and version of the operating system X
Chapter 4Filter Criteria for Java Usage Information
4-6

Java Usage Record CountersThe Advanced Management Console collects Java usage records and processesthem to extract the information needed. The Status tab shows the number of recordsthat are processed.
The Java Usage section of the Status tab shows the following information:
• Accepted Records: Number of usage records that were processed successfully.
• Rejected Records: Number of usage records that couldn’t be processed. Possiblereasons for rejecting a record can either include a discrepancy between the JavaUsage Tracker configuration in the Advanced Management Console and the JavaUsage Tracker configuration for a desktop, or a new Java application is using anargument value that conflicts with the existing Java Usage Tracker configuration.
To display details of records:
1. Click Rejected Records to display rejected record details, such as IPaddress, Rejection Reason, and Truncated Java Usage Tracker Record in theJUT Record Rejection Details dialog.
2. Click the Rejected Records Table icon to display all the records in a tabularformat.
3. Select a record and click the Rejected Record details icon to display thedetails of the selected record. The display of records in the Rejected RecordsTable can be further refined with filters. You can toggle the checkboxesagainst each of the filters to select or deselect the filters.
4. If you want to remove all filters, then click Remove All.
5. Click Download Rejected Records File to open or save the list of rejectedrecords as a CSV file.
Note:
The maximum number of records that gets downloaded in a file is100,000.
Clear Counters resets the record counters to zero. If records are being rejected,then clearing the counters after attempting to resolve the issue shows if recordsare no longer being rejected.
Java Usage Tracker Configuration on Managed DesktopsManaged desktops are those desktops, where the Advanced Management Consoleagents are running and installed. The Advanced Management Console agentsconfigure Java Usage Tracker on managed desktops. This helps you in handling theJava Usage Tracker configuration issues, if in case you have Java Usage Trackerconfigured with one server and want to switch to Advanced Management Console forJava tracking.
To achieve this configuration, the Advanced Management Console agent places theusagetracker.properties file (Java Usage Tracker configuration file) in theappropriate JRE sub directory. For JREs prior to JDK 9, the file is placed in the lib/
Chapter 4Java Usage Record Counters
4-7

management folder, and for JDK 9, it's the conf/management folder. In theAdvanced Management Console UI, you can download the usagetracker.propertiesfile in the Settings sub tab of the Configurations tab.
When you modify any of the Java Usage Tracker properties, for example Java UsageTracker separator, Java Usage Tracker listener port, or Quote Character, and then theAdvanced Management Console automatically updates such configuration on all themanaged desktops.
Modifying Advanced Management Console Server Host NameYou can modify the hostname that you had specified during the initialization ofAdvanced Management Console, in case you had entered the host name incorrectly.
To change the server host name:
1. In the Advanced Management Console UI, click the Configuration tab.
2. Click Settings sub tab, and then click Edit.
You can now edit the Hostname. The Edit button is replaced by the Save andCancel buttons.
3. Enter a new Hostname, and then click Save.
The new host name applies to new agents and not to the agents that already exist.
Tracking Managed JREs in AgentsIn the Configurations tab of the Advanced Management Console UI, you can selectthe type of managed Java Runtime Environments (JREs), such as standard, private,installed, enterprise, or web-enabled JREs that you want to track on the agent side,and to exclude specific folders from JRE scanning and tracking.
Based on what you select in the Configurations tab, only those JREs are tracked onthe agents, which effectively means that the Java Usage Tracker configuration isenabled only on those tracked JREs.
To track managed JREs:
1. In the Advanced Management Console UI, click the Configuration tab.
2. Click the Agent Settings tab, and then click Edit.
The check boxes in the Other Agent Settings section are now enabled, theExclude Paths list becomes editable. The Edit button is replaced by the Save andCancel buttons.
3. Select all or any of the following JREs to track:
Note:
By default, all of the check boxes are selected.
• Installed: JRE that is currently installed on the agent.
• Web Enabled: Helps in running applets and Java Web Start applications.
Chapter 4Java Usage Tracker Configuration on Managed Desktops
4-8

• Enterprise: Allows system administrators to quickly and consistently roll outpre-configured Oracle JRE updates to Windows systems by using theautomation tools.
• Standalone: JRE that doesn’t contains tools, such as tools.jar or javac thatare specific to a JDK. The Standalone JRE is sometimes also referred to as apublic JRE. It is available to all Java programs, browsers, and libs in this JRE.
• Private: JRE that is installed in the system but is not referred to by default.This could be a copy of either the JRE or the JDK folder from another installeddirectory.
4. Add or Remove paths from the list.
a. To exclude specific folders from the JRE scan and consequently from trackingwith the AMC Agent, enter the path for the folder and click Add.
The path is added to the list. The maximum number of paths that can beadded is 10. The maximum length of a path is 2000 characters. You can entereither Windows or Linux/macOS paths.
When the AMC agent scans a system for a JRE, it will skip the excluded pathsand all subdirectories. In particular, the usagetracker.properties file will notbe put into the JRE directory. If an application is launched using a JRE froman excluded path, the application that is launched will not be recorded.
b. To re-enable scanning for JREs in specific folders, click the Remove linkbeside the path in the list.
5. Click Save to save the changes.
The Save and Cancel buttons disappear and the Edit button comes back on theAgent Settings tab.
Chapter 4Java Usage Tracker Configuration on Managed Desktops
4-9

5Java Runtime Environment Management
The Advanced Management Console agents enables you to install or uninstall theJava Runtime Environment (JRE) — both Enterprise and Non Enterprise frommanaged desktops. You can also customize a JRE version on Installers tab and selectit for installing on targeted desktops. The installed JREs from managed desktops canalso be uninstalled for targeted desktops.
The JRE Management topic consists of the following sections:
• About the JRE Management Architecture
• Installing JRE
• Uninstalling JREs
• Status
About the JRE Management ArchitectureThe Java Runtime Environment (JRE) management workflow consists of the followingcomponents: User Interface (UI), Server, and agents.
This topic describes the JRE architecture:
• UI: The user interface for JRE Management is facilitated through the Desktop andthe Status tabs in the Advanced Management Console
– Desktops: In the Desktops tab, select required desktops, where a JRE shouldbe installed or uninstalled, and click Install JRE or Uninstall JRErespectively.
– Status: In the Status Tab, you can see view the details of all the scheduledactions (commands) with information about the number of desktops, whereeach action is completed, failed, or in progress.
– Installer: In the Installers tab, you can add Java versions and configure themfor both enterprise and non-enterprise JREs. Enterprise JREs are similarto .msi packages, which contain both JRE packages and configuration files,while non-enterprise JREs don’t contain any configuration files. Non-Enterprise JREs cannot be configured. They are used without configuration.
• Server/Database: The information about each install JRE or uninstall JRE actionis stored. Each action contains information about all desktops, where it is targetedto, as well as status on each desktop
• Agents: The agent actions perform the JRE installation and uninstallationprocesses.
5-1

Installing JREIn the Desktop tab of /amcwebui, click Install JRE to install a configured JavaRuntime Environment (JRE).
As a prerequisite, in the Installer tab of the Advanced Management Console, clickAdd Java Version to add and configure a Java version before you start with the JREinstallation process:
To install JRE:
1. In the Advanced Management Console, click the Desktops tab. Ensure that youhave selected the targeted Desktop from the Display drop-down list.
2. Click Install JRE to display the Install JRE dialog.
The Enterprise button is highlighted, by default.
3. Select a JRE from the from the Select JRE to install drop-down list.
You can select an available JRE version added to Installers tab. Once you select aJRE, the corresponding Configuration is displayed in the Select a Configurationfor JRE drop-down list. For example, if you select Java 8 Update 141 JRE, then inthe Select a Configuration for Java 8 Update 141 drop-down list, 8u141config isdisplayed.
4. Select target desktops on which to install the selected JRE. You can either selectthe Selected Desktop or All Filtered Desktops. Ensure that you have selected atleast one desktop.
Once you select either of these options, Next is enabled. If you haven’t selected atleast one desktop, the Next button is not enabled.
Chapter 5Installing JRE
5-2
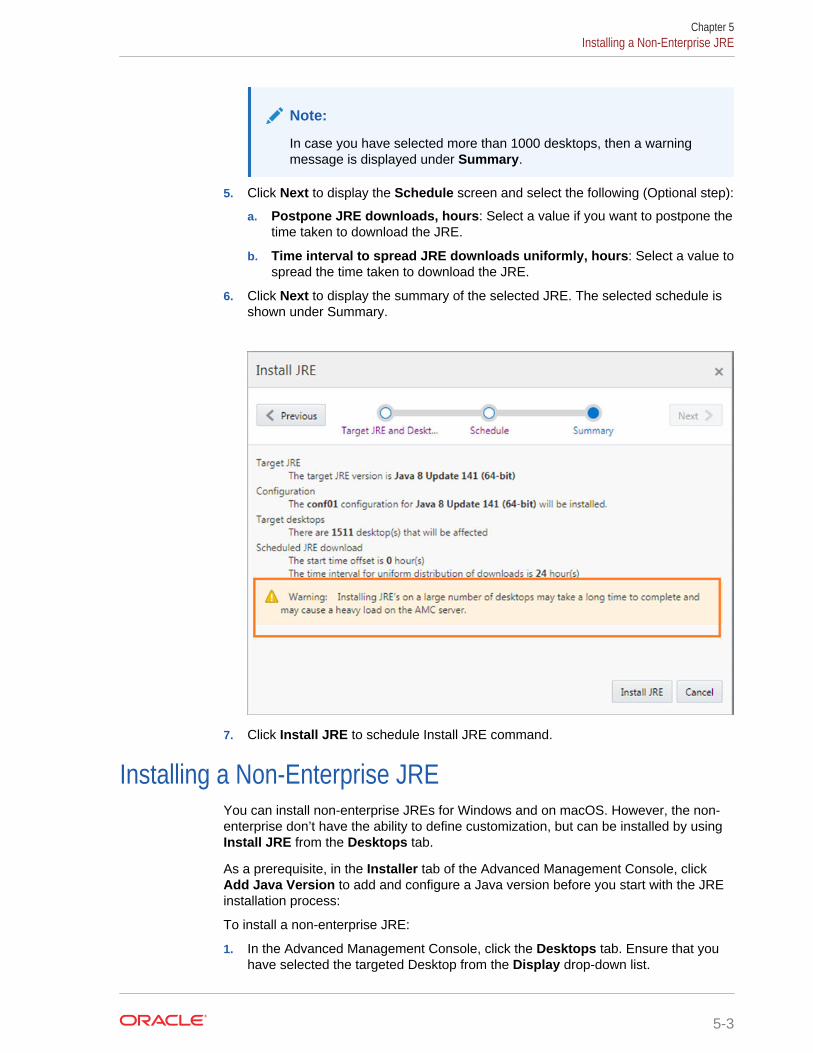
Note:
In case you have selected more than 1000 desktops, then a warningmessage is displayed under Summary.
5. Click Next to display the Schedule screen and select the following (Optional step):
a. Postpone JRE downloads, hours: Select a value if you want to postpone thetime taken to download the JRE.
b. Time interval to spread JRE downloads uniformly, hours: Select a value tospread the time taken to download the JRE.
6. Click Next to display the summary of the selected JRE. The selected schedule isshown under Summary.
7. Click Install JRE to schedule Install JRE command.
Installing a Non-Enterprise JREYou can install non-enterprise JREs for Windows and on macOS. However, the non-enterprise don’t have the ability to define customization, but can be installed by usingInstall JRE from the Desktops tab.
As a prerequisite, in the Installer tab of the Advanced Management Console, clickAdd Java Version to add and configure a Java version before you start with the JREinstallation process:
To install a non-enterprise JRE:
1. In the Advanced Management Console, click the Desktops tab. Ensure that youhave selected the targeted Desktop from the Display drop-down list.
Chapter 5Installing a Non-Enterprise JRE
5-3

2. Click Install JRE to display the Install JRE dialog.
The Enterprise tab is highlighted, by default.
3. Select target desktops on which to install the selected JRE. You can either selectthe Selected Desktop or All Filtered Desktops.
Once you select either of these options, Next is enabled.
4. Click Non-Enterprise tab.
5. Select a JRE from the Select JRE to install drop-down list.
6. Click Next to display the Schedule screen and select the following (Optional step):
a. Postpone JRE downloads, hours: Select a value if you want to postpone thetime taken to download the JRE.
b. Time interval to spread JRE downloads uniformly, hours: Select a value tospread the time taken to download the JRE.
7. Click Next to display the summary of the selected JRE:
Chapter 5Installing a Non-Enterprise JRE
5-4
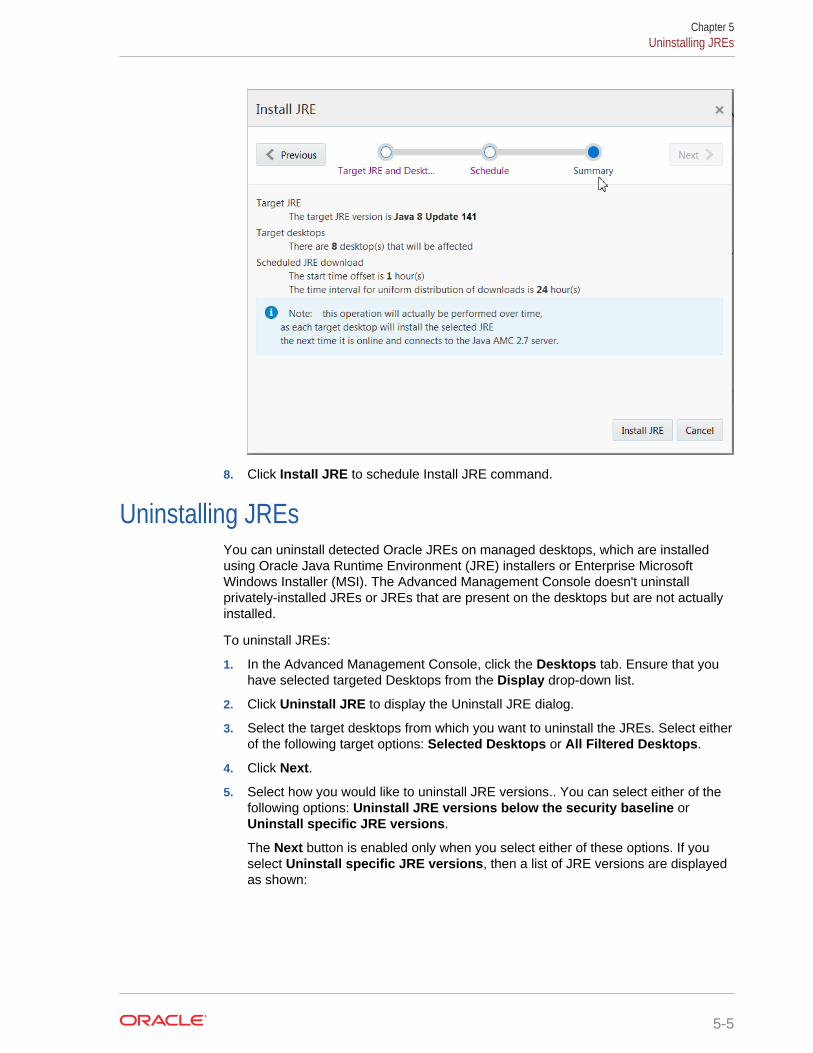
8. Click Install JRE to schedule Install JRE command.
Uninstalling JREsYou can uninstall detected Oracle JREs on managed desktops, which are installedusing Oracle Java Runtime Environment (JRE) installers or Enterprise MicrosoftWindows Installer (MSI). The Advanced Management Console doesn't uninstallprivately-installed JREs or JREs that are present on the desktops but are not actuallyinstalled.
To uninstall JREs:
1. In the Advanced Management Console, click the Desktops tab. Ensure that youhave selected targeted Desktops from the Display drop-down list.
2. Click Uninstall JRE to display the Uninstall JRE dialog.
3. Select the target desktops from which you want to uninstall the JREs. Select eitherof the following target options: Selected Desktops or All Filtered Desktops.
4. Click Next.
5. Select how you would like to uninstall JRE versions.. You can select either of thefollowing options: Uninstall JRE versions below the security baseline orUninstall specific JRE versions.
The Next button is enabled only when you select either of these options. If youselect Uninstall specific JRE versions, then a list of JRE versions are displayedas shown:
Chapter 5Uninstalling JREs
5-5

6. Click Next to display the Summary of the JREs selected to be uninstalled.
7. Click Uninstall JRE to uninstall the selected JREs.
StatusThe Status tab forms a major User Interface (UI) component of the Java RuntimeEngine (JRE) management architecture. This tab further comprises the following tabs:Commands, Desktop, Java, and Java Releases tabs.
Chapter 5Status
5-6
• Commands: In the Commands tab, you can view the details of the agent actions,such as Install JRE and Uninstall JRE, along with their status: whether Scheduled,In Progress, Completed, Failed, or Cancelled. For each of these command status,you can click on the counter to see all the desktops, where the command is in thespecified state. To cancel any of the actions, click the Cancel icon.
• Desktops: In the Desktops tab, you can view the details of the rule sets that havefailed and retired desktops. Click Display data in Desktops tab to go to theDesktop tab.
• Java: In the Java tab, you can view the details of the number of processed andfailed Java Usage Tracker records, as well as information about Java SecurityBaseline.
• Java Releases: In the Java Releases tab, information about the upcoming andreleased CPUs are displayed. The Java Versions, Type (CPU/LU/PSU), and Dateare displayed in a tabular format in this tab. Also, a warning appears as a numbernext to the Java Releases tab that indicates the number of new releases that youmay not be aware of. For example, (4), where (4) indicates that 4 new releaseshave happened since you last visited the Java Releases tab.
Chapter 5Status
5-7

6Installer Configuration
The Advanced Management Console enables administrators to add Java installerpackages for Windows and macOS. This supports Java Runtime (JRE) installers forEnterprise (MSI/PKG) as well as Non-Enterprise (EXE/DMG). The customized installerpackage contains the installation options that are set according to the needs of theenterprise.
This topic includes the following sections:
• About Installer Configurations
• Adding a Java Version
• Adding an Installer Configuration
• Editing an Installer Configuration
• Deleting an Installer Configuration
• Applying a Configuration to an Installer File
• Exporting an Installer Configuration to a File
• Installer Configuration Attributes
• Installer Configuration Properties
About Installer ConfigurationsThe Installers tab of the Advanced Management Console is divided into Enterprise andNon Enterprise sub tabs. Each of these sub tabs comprises the Windows tab and themacOS tabs that show the installer configurations that have been created on Windowsand macOS respectively. Information about each installer is also shown, such as thedate it was last modified and the number of properties that have been customized.Commercial customers have access to MSI (Windows installer) and PKG (macOSinstaller) for the JRE. These files contain installer properties that you can set tocustomize the installation of the JRE. The Advanced Management Console enablesyou to create configuration files and custom installer files to use when deploying a JREto desktops that run on these operating systems.
Additional configurations can be created as needed. For example, if the organizationsin your enterprise have different requirements for installing the JRE, then you cancreate a custom configuration for each organization. A custom installer file can begenerated for each configuration, or the configuration can be exported to a file, whichis then passed to the installer when the installer is invoked.
Note:
Any kind of installer configuration is applicable to Enterprise installers only.
6-1

The initial configuration is created when the Java version is added to the AdvancedManagement Console. This configuration shows the default settings for the installerproperties.
Adding a Java VersionIf you have an installer file for a Java Runtime Environment (JRE) version that is usedin your enterprise, then add this Java version to the Advanced Management Console.As new versions of Java are released, add the installer files for each version. A defaultconfiguration is created for each version based on the settings in the installer file. Youcan also add non-enterprise JREs (EXE/DMG) to Advanced Management Console,but customization is not supported.
To add a Java version:
1. In the Advanced Management Console, click the Installers tab.
The Enterprises sub tab is highlighted by default.
The Windows tab is displayed by default. Start the Advanced ManagementConsole UI as described in Starting the Advanced Management Console UserInterface, in case the user interface is not running. If you want to add a Javaversion in a macOS environment, then click the macOS tab.
2. Click Add Java Version.
A Java Web Start application is downloaded to your system and started. If you areprompted to allow the application to run, then click Run.
3. In the Select installer for Configuration window, select installer file for the JRE thatyou want to add, and click Open.
After the installer file is uploaded to the Advanced Management Console, refreshthe browser page to see added Java version and installer file.
The installer file shown next to the Java version contains the default settings for theinstaller properties. This is the base version, which is never changed in the AdvancedManagement Console.
Note:
Click the Non Enterprise sub tab, and repeat the steps to add a Javaversion to non-enterprise JREs.
Chapter 6Adding a Java Version
6-2
Adding an Installer ConfigurationAfter you add a Java version to Advanced Management Console, you can add moreconfigurations for that version as needed. Different configurations enable you tocustomize the installation for the different groups that you support.
Note:
The configuration-related topics are applicable only to Enterprise JREs only.Non-Enterprise JREs cannot be configured. They are used withoutconfiguration.
To add an installer configuration:
1. In the Advanced Management Console, click the Installers tab. The Enterprisesub tab is highlighted by default.
In the Windows tab, the list of Java versions and existing configurations is shown.See Adding a Java Version. If you want to add a configuration in a macOSenvironment, then click the macOS tab.
2. Add a configuration.
• To add a configuration using the default settings, click Add NewConfiguration in the table for the Java version of interest.
Enter the name for the configuration when prompted. The page of properties isthen shown.
• To add a configuration using the settings from an existing configuration, clickDuplicate in the Actions column for that configuration.
The page of properties is shown. The name of the configuration defaults to thename of the configuration that was duplicated followed by -copy. Edit theConfiguration field to change the name.
3. Set the properties as needed.
If you change a property from its default setting, then the Reset option is shown inthe Set Default column. To restore the default value for a property, click Reset. Ifyou duplicate an existing configuration and change a property, then reset sets theproperty to the default value, not to the value in the configuration that wasduplicated.
4. Click Save to save the configuration.
Editing an Installer ConfigurationYou can modify existing installer configurations in Advanced Management Console asneeded.
To edit an installer configuration:
1. In the Advanced Management Console, click the Installers tab. The Enterprisesub tab is highlighted by default.
In the Windows tab, the list of Java versions and existing configurations is shown.
Chapter 6Adding an Installer Configuration
6-3

If you want to edit a configuration in a macOS environment, then click the macOStab.
2. Click Edit in the Actions column for the configuration that you want to edit.
The page of properties is shown.
3. Change the settings as needed.
If you change a property from its default setting, then the Reset option is shown inthe Set Default column. To restore the default value for a property, click Reset.
4. Click Save to save the configuration.
Any customized MSI files and exported configuration files that were created before theconfiguration was edited are not changed.
Deleting an Installer ConfigurationWhen a configuration is no longer needed, you can delete this installer configurationfrom Advanced Management Console.
To delete an installer configuration:
1. In the Advanced Management Console, click the Installers tab. The Enterprisesub tab is highlighted by default.
In the Windows tab, the list of Java versions and existing configurations is shown.If you want to delete a configuration from a macOS environment, then click themacOS tab.
2. Click Delete in the Actions column for the configuration that you want to remove.
3. Confirm the deletion when prompted.
The page automatically refreshes and shows that the installer configuration hasbeen deleted.
4. (Optional) Manually delete any customized MSI files and exported configurationfiles that you created from the deleted configuration.
Applying a Configuration to an Installer FileTo create a custom installer file, apply an installer configuration in AdvancedManagement Console to the base installer file for a Java version. The custom installerfile then contains the settings needed to install the Java Runtime Environment (JRE) inyour enterprise.
To apply a configuration to an installer file:
1. In the Advanced Management Console, click the Installers tab. The Enterprisesub tab is highlighted by default.
In the Windows tab, the list of Java versions and existing configurations is shown.
Note:
You cannot apply a configuration to an installer file in the macOSenvironment.
Chapter 6Deleting an Installer Configuration
6-4
2. Click Apply to MSI in the Actions column for the configuration that you want touse to create the custom MSI file.
A Java Web Start application is downloaded to your system and started. If you areprompted to allow the application to run, then click Run.
3. In the Save Configured MSI File As window, go to the location where you want tosave the custom MSI file and provide a name for the file.
4. Click Save to start downloading the base MSI and applying the configuration.
The message "File file-name patched successfully" is shown when the customizedMSI file is successfully saved.
Use this installer (MSI) file with system management software to distribute the JREand ensure that it is installed with the settings required by your enterprise. If needed,settings in the MSI file can be overridden by settings passed from the command line ora configuration file.
Exporting an Installer Configuration to a FileA configuration file for installer can be exported using the Export to File option. Thisconfiguration contains customized setting applicable to related Java version installerand can be used to run a customized installations.
To export an installer configuration to a file:
1. In the Advanced Management Console, click the Installers tab. The Enterprisesub tab is highlighted by default.
In the Windows tab, the list of Java versions and existing configurations is shown.If you want to export an installer configuration in a macOS environment, then clickthe macOS tab.
2. Click Export to File in the Actions column for the configuration that you want toexport.
You are prompted to either open the file with a text editor or save the file.
• To save the file, select Save File.
Navigate to the location where you want to save the file and enter a name ofyour choice. Click Save.
• To view the file in an editor, select Open With and choose the editor to use.
Make any changes that you want and then save the file to the location of yourchoice.
When you install a JRE, pass the file that you created while installing an MSI file. Thisstep is required to provide custom settings to the file that is created during MSIinstallation. Ensure that the version of the JRE you are installing matches the versionof the JRE for which the configuration file was created. Make sure that the Settings inthe configuration file override the settings in the MSI file. Settings from the commandline override both the configuration file and the MSI file.
You can use this configuration file to test configurations without needing to createmultiple MSI files. Also, if most settings are the same for all organizations, then youcan create a custom MSI file for most settings and then pass in a configuration file forthe few settings that are different.
Chapter 6Exporting an Installer Configuration to a File
6-5

Installer Configuration AttributesThe Installers tab of Advanced Management Console provides information about theavailable installer configurations and the attributes. Configurations for each Javaversion that was added to Advanced Management Console are grouped by Javaversion.
The following table describes the information shown for each configuration:
Attribute Description
Configuration Name of the configuration
Created On Date and time that the configuration was created
Last Modified On Date and time of the most recent modification
# Customized Properties Number of properties that have a value different than the defaultvalue
Actions Actions that are available for the configuration
Installer Configuration PropertiesProperty settings are used to manage the installation of the Java RuntimeEnvironment (JRE). These settings control such things as the location of thedeployment rule set, where the JRE is installed, and if Java applications are allowed torun in the browser.
The properties that are available differ by the version of the JRE. See InstallerConfiguration File Options in MSI Enterprise JRE Installer Guide for Windows.
Chapter 6Installer Configuration Attributes
6-6

7User Management
Access to the Advanced Management Console is managed with user accounts. Whena user is added, the permissions that are given to the user determine the functions thatthe user can access. Users are managed in the Configuration tab of the AdvancedManagement Console.
The User Management topic includes the following sections:
• About User Accounts
• Views for Users
• Creating User Accounts
• Editing User Accounts
• Changing the Account Password
• Password Rules
• Deleting User Accounts
• User Permissions
About User AccountsUsers of the Advanced Management Console are the enterprise administrators whoare responsible for managing desktops in an enterprise. A user must have an accountto log in to the Advanced Management Console. Access to the different functions iscontrolled by the permissions given to the account.
The first time the Advanced Management Console is started, the user is prompted tocreate a user account. That account is then used to create additional users from theConfiguration tab of the Advanced Management Console. See Creating User andConfiguring MySQL on Windows in the Advanced Management Console Installationand Configuration Guide.
Users can change the password and edit the properties for their own account. If theydo not have Administrator permission, then they cannot change their permissions. See User Permissions.
Only users with Administrator permission can create and delete users. These userscan also edit the accounts of other users, including changing the permissions for theaccount.
Views for UsersThe table view for Users in the Configuration tab of Advanced Management Consoleshows the user accounts that are defined. The properties view shows the propertiesfor the selected account.
7-1

In the table view, click the arrow that appears in the Users column heading to sort thedata by the values in that column. Use the navigation bar below the table to viewadditional pages when the number of user accounts exceeds the page size. Use thenavigation bar below the properties to view the properties for other user accounts.
User Table DetailsThe table view for Users in the Configuration tab of Advanced Management Consoleprovides information about the user accounts and the permissions associated witheach account.
The following table describes the information that is shown in the table view for useraccounts:
Column Name Description
Users Name of the user account
Admin Permission If a check mark is shown, then the account has administratorpermission
Installers Permission If a check mark is shown, then the account has installers permission
Rule Sets Permission If a check mark is shown, then the account has rule sets permission
Java Usage Permission If a check mark is shown, then the account has Java usagepermission
User PropertiesThe properties view for Users in the Configuration tab of the Advanced ManagementConsole provides information about user account.
The following table describes the information that is shown in the properties view for auser account.
Property Description
Email Name of the account. The string entered is used to log in to theaccount.
First Name First name of the owner of the account
Last Name Last name of the owner of the account
Phone Phone number for the owner of the account
Role Permissions given to the account
Creating User AccountsUser accounts enable administrators to access the Advanced Management Console.Create the accounts for your organization and use the permissions to limit access toonly the functions needed by each user.
To create a user account:
1. In the Advanced Management Console UI, click the Configuration tab.
2. Click Users.
Chapter 7Creating User Accounts
7-2
The table of existing user accounts is shown.
3. Click Create.
The form for providing information needed for the account is shown.
4. Enter the information for the account that you are creating.
The email address is used as the name of the account and the string that the userenters to log in. The email address must be unique.
Required fields are marked with an asterisk (*). See Password Rules for theguidelines on setting passwords.
5. Click Save to create the account.
The account is shown in the table of accounts.
Editing User AccountsEdit a user account when a user's information changes or you need to change thepermissions for the account. Users with Admin permission can edit any user account.Users without Admin permission can edit only their own account.
To edit a user account:
1. In the Advanced Management Console UI, click the Configuration tab.
2. Click Users.
The table of existing user accounts is shown.
3. Double-click the account that you want to edit.
The properties view for the account is shown.
4. Click Edit.
5. Change the information for the account that you are editing.
You must have Admin permission to change the permissions for an account. Youcannot remove Admin permission from your own account.
6. Click Save to save the changes.
Changing the Account PasswordYou can change the account password for your Advanced Management Console asneeded, regardless of the permissions given to the account.
To change the password for a user account:
1. In the Advanced Management Console UI, click the Configuration tab.
2. Click Users.
The table of existing user accounts is shown.
3. Double-click the account for the password that you want to change.
The properties view for the account is shown.
4. Click Update Password.
The Update Password dialog is shown.
Chapter 7Editing User Accounts
7-3

5. Enter the new password in both fields. Refer to Password Rules for the guidelineson setting passwords.
6. Click Save to change the password.
Password Rules
Requirements for Passwords
The default length for passwords is initially set by the administrator when initializingthe AMC console. The length of all passwords must be between 8 and 128 characters.After the AMC console is initialized, the password length can be edited under Users inthe Configuration tab. When the length is edited by changing the value in thePassword Policy section of Users settings, all user accounts must use the newpassword length.
In addition to meeting the minimum character length requirement, all passwords mustcontain at least one character from each of the following groups:
• Numbers
• Special characters: See the following table for a list and description of the specialcharacters that can be used in passwords
• Lowercase letters
• Uppercase letters
Table 7-1 Special Characters Allowed in Passwords
Name of the Character Characters
question mark ?
at sign @
exclamation point !
number sign #
dollar sign $
percent sign %
plus sign +
hyphen -
slash /
period .
backslash \
single quotation mark '
comma ,
colon :
caret ^
underscore _
grave accent
This character is also known as the backquotecharacter.
`
Chapter 7Password Rules
7-4
Table 7-1 (Cont.) Special Characters Allowed in Passwords
Name of the Character Characters
tilde ~
left parenthesis (
right parenthesis )
left brace {
right brace }
left bracket [
right bracket ]
Deleting User AccountsWhen a user account is no longer needed for the Advanced Management Console,you can delete it. Administrator permissions are required to delete a user account.
To delete a user account:
1. In the Advanced Management Console UI, click the Configuration tab.
2. Click Users.
The table of existing user accounts is shown.
3. Select the user that you want to delete.
You cannot delete the account that you used to log in.
4. Click Delete.
5. Confirm the deletion in the Confirm Delete dialog box.
The account is removed from the table of accounts.
User PermissionsAccess to the functions of Advanced Management Console is controlled by useraccounts and the permissions given to the accounts.
The following table describes the permissions that are available:
Permission Description
Admin Permission for managing users and desktop groups, view permissionfor other tabs
Installers Permission for installer configuration
Rule Sets Permission for desktop management, rule set management, and status
Java Usage Permission for Java usage reports
Chapter 7Deleting User Accounts
7-5

8Agent Configuration
This topic includes the following sections
• Configuring Agent Proxy Settings
• Customizing Agent Intervals
• Initiating Agent Update
Configuring Advanced Management Console Agent ProxySettings
You can set the Advanced Management Console agent proxy host name and port inthe Agents Download sub tab of the Configuration tab. The Agents Download subtab consists of downloadable agent bundle files (zip files).
To configure the agent proxy setting:
1. In the Advanced Management Console UI, click the Configuration tab.
2. Click Agents Download.
3. Click Edit to display the Configure AMC Agent Proxy Settings dialog.
4. Enter the following details for the agent to connect to the Advanced ManagementConsole server:
• Agent Proxy Host Name: Specify a proxy server host name.
• Agent Proxy Port: Specify a proxy server port number.
Note:
Clearing both the Agent Proxy host name and port deletes anexisting proxy setting. If there is no proxy, then the proxy host nameand port details are not needed.
Configuring Agent IntervalsIn the Advanced Management Console web user interface, you can set the timebetween regular agent actions to different values. The Advanced ManagementConsole checks for updates to these values. When you modify the agent intervals inthe Advanced Management Console UI and save the changes, a command is createdwith the information of the new intervals. Agents then fetch this command the nexttime they check for new commands and update themselves with new interval valuesand the new values replace the old interval values.
To configure the agent intervals:
8-1
1. In the Advanced Management Console UI, click the Configuration tab.
2. Click Agent Settings.
3. Click Edit to display the Agent Actions Interval dialog.
4. Edit any of the following values. You can either edit all of them or just the ones thatyou want to:
JUT Processing IntervalInterval for the agents to report Java Usage Tracker records to the server
Check Command IntervalInterval to check if the server has any commands for the agent
Standard JRE Scan IntervalInterval to scan Java Runtime Environment (JRE) in the standard location (Forexample, on Windows it is C:\Program Files\Java) and report to server
Application JRE Scan IntervalInterval to scan JRE under the application location (For example, on Windows it isC:\Program Files) and report to server
LocalStorage JRE Scan IntervalInterval to scan JREs in the entire local storage system (not targeting anyparticular directory) and report to server
Agent Auto UpdateEnable or disable the agent auto update
Agent Log File Max Size (Kb)Maximum agent log file size in Kb
Number of Agent Log FilesMaximum agent log file number during agent log rotation
Randomize IntervalEnable or disable randomize interval
5. Click Save.
Agent Update InitiationThe agent update initiation setting provides you with a way to influence the frequencyat which agent updates are initiated or retried. This frequency can affect the load onservers and the network.
To manage the agent update initiation window:
1. In the Advanced Management Console UI, click the Configuration tab.
2. Click Agent Settings.
3. Click Edit to be able to update values under the Agent Actions Interval or AgentUpdate Initiation sections of the Agent Settings sub tab.
4. In the Agent Update Initiation section, enter a time period in the Agent UpdateInitiation Period in Hours field. The Advanced Management Console uses thistime period to calculate the frequency at which the agent updates are initiated. TheExample gives an estimation of how frequently the initiations occurs. The values
Chapter 8Agent Update Initiation
8-2

in the Example get updated dynamically, as you update Agent Update InitiationPeriod in Hours. The interval between update attempts is never greater than 1second, regardless of the period selected.
The calculation doesn't include agents that have been offline for approximately 60days or more.
Chapter 8Agent Update Initiation
8-3
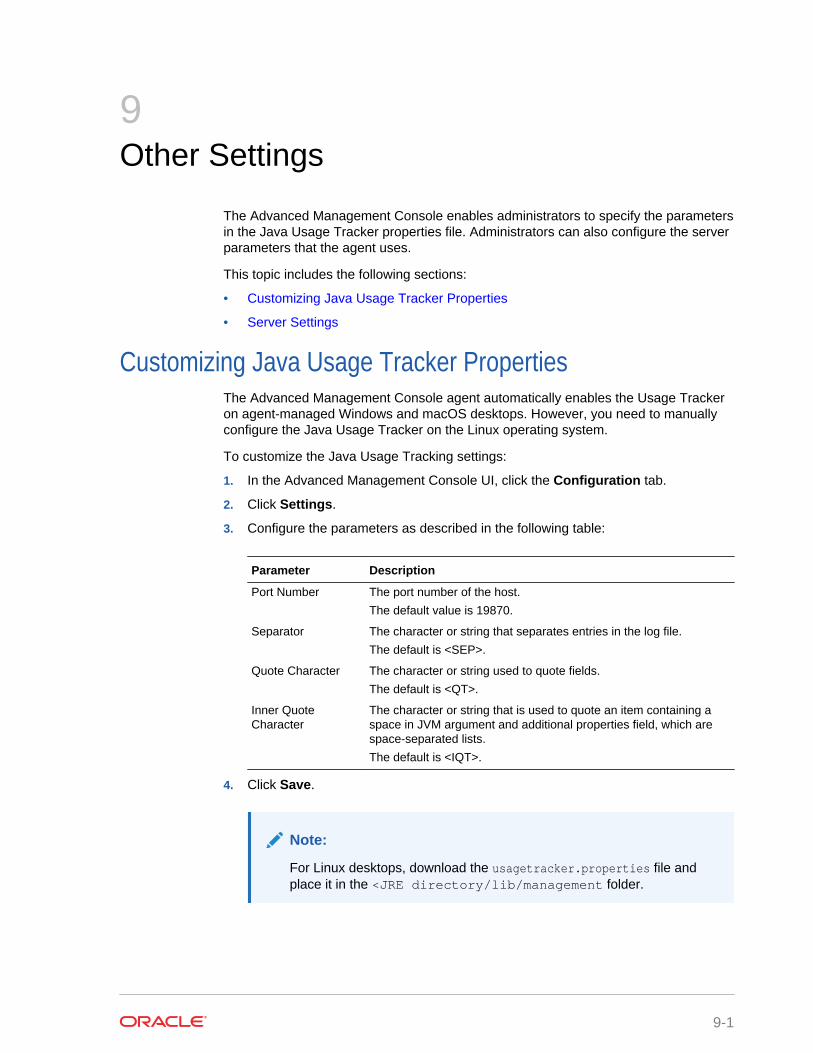
9Other Settings
The Advanced Management Console enables administrators to specify the parametersin the Java Usage Tracker properties file. Administrators can also configure the serverparameters that the agent uses.
This topic includes the following sections:
• Customizing Java Usage Tracker Properties
• Server Settings
Customizing Java Usage Tracker PropertiesThe Advanced Management Console agent automatically enables the Usage Trackeron agent-managed Windows and macOS desktops. However, you need to manuallyconfigure the Java Usage Tracker on the Linux operating system.
To customize the Java Usage Tracking settings:
1. In the Advanced Management Console UI, click the Configuration tab.
2. Click Settings.
3. Configure the parameters as described in the following table:
Parameter Description
Port Number The port number of the host.
The default value is 19870.
Separator The character or string that separates entries in the log file.
The default is <SEP>.
Quote Character The character or string used to quote fields.
The default is <QT>.
Inner QuoteCharacter
The character or string that is used to quote an item containing aspace in JVM argument and additional properties field, which arespace-separated lists.
The default is <IQT>.
4. Click Save.
Note:
For Linux desktops, download the usagetracker.properties file andplace it in the <JRE directory/lib/management folder.
9-1

Server SettingsYou can edit the default values for server settings as follows:
1. In the Advanced Management Console UI, click the Configuration tab.
2. Click Settings.
3. Enter the Hostname of the server.
4. Enter the Port Number of the server.
5. Customize the browser Session Timeout for the AMC UI. A notification isdisplayed informing the user about the timeout and an option to extend thesession. The value should be set in the range of 5 minutes to 480 minutes(8hours).The default value is 60 minutes.
6. Click Save.
Chapter 9Server Settings
9-2

10Rule Sets and Rules Management
The Advanced Management Console enables administrators to create and distributedeployment rule sets, which provide control over the browser-based Java applicationsthat are run on desktops in their enterprise. Usage information collected from JavaUsage Tracker reports can be used to create rules and rule sets. Existing rule sets canbe imported and managed by Advanced Management Console.
This topic includes the following sections:
• About Deployment Rule Sets
• Rule Sets Tab
• Managing Rule Sets and Rules
• Deploying Rule Sets
• Generating a Self-Signing Certificate
About Deployment Rule SetsA deployment rule set enables enterprises to continue using legacy businessapplications in an environment of ever-tightening application security policies. You canuse a deployment rule set to manage which web-based Java applications, such asJava applets or Java Web Start applications, are allowed to run in an enterprise. Youcan also use a deployment rule set to control the version of the Java RuntimeEnvironment (JRE) that is used for an application. The Advanced ManagementConsole provides administrators with a tool for creating and managing deploymentrules sets, which can then be distributed throughout the enterprise.
Deployment rule sets contain deployment rules. These rules are used in thedeployment process to determine if a browser-based Java application is allowed torun, if the application is automatically blocked, or if default processing is used.Applications are compared to the rules based on criteria such as location, title, JAR filechecksum, and certificate used to sign the application. Rules are compared in theorder in which they appear in the rule set. The first rule that an application matchesdetermines the action taken for that application.
Although multiple rule sets can be defined, only one rule set can be active on a user'ssystem. That rule set must be a signed JAR file. The export feature of the in the RuleSets tab generates the necessary JAR file. If JAR signing is enabled, then signing isdone as part of the export process; otherwise, the JAR file must be signed manually.After the JAR file is signed, it must be imported into the Advanced ManagementConsole to be available for distribution. See Exporting a Rule Set. In the Rule Sets tab,you can also set a rule set as the default deployment rule set. See Setting DefaultDeployment Rule Set,
See Deployment Rule Set in the Java Platform, Standard Edition Deployment Guide.
10-1
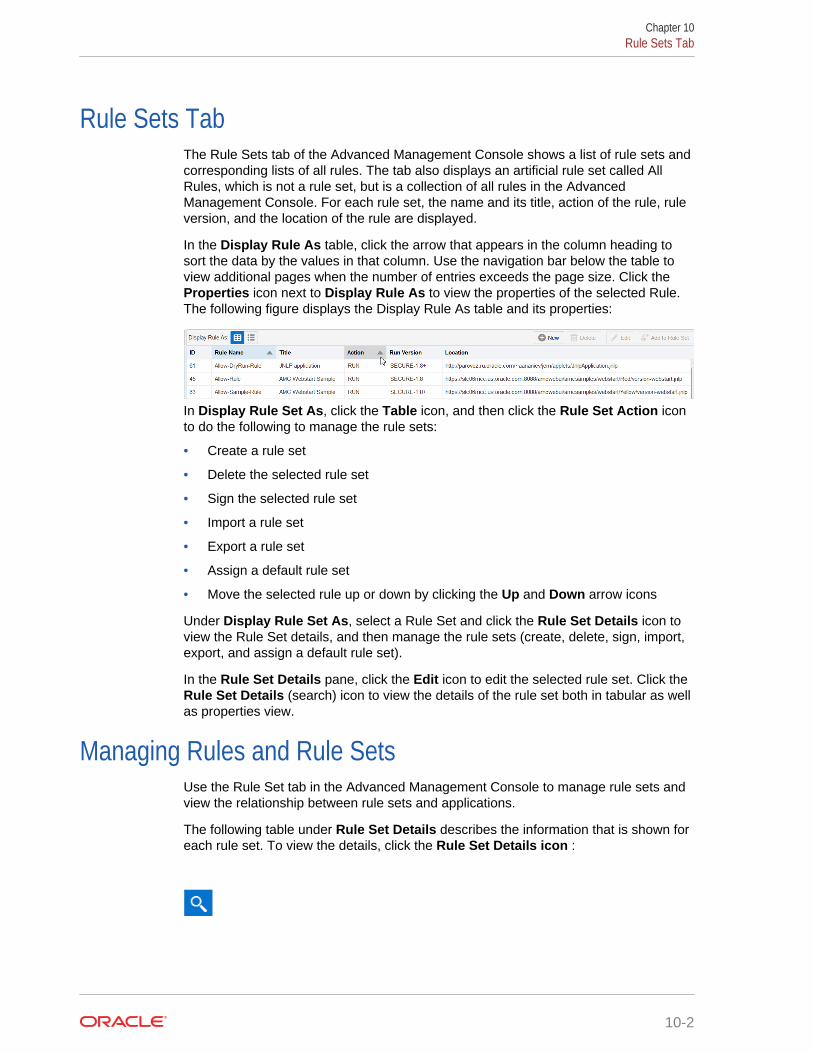
Rule Sets TabThe Rule Sets tab of the Advanced Management Console shows a list of rule sets andcorresponding lists of all rules. The tab also displays an artificial rule set called AllRules, which is not a rule set, but is a collection of all rules in the AdvancedManagement Console. For each rule set, the name and its title, action of the rule, ruleversion, and the location of the rule are displayed.
In the Display Rule As table, click the arrow that appears in the column heading tosort the data by the values in that column. Use the navigation bar below the table toview additional pages when the number of entries exceeds the page size. Click theProperties icon next to Display Rule As to view the properties of the selected Rule.The following figure displays the Display Rule As table and its properties:
In Display Rule Set As, click the Table icon, and then click the Rule Set Action iconto do the following to manage the rule sets:
• Create a rule set
• Delete the selected rule set
• Sign the selected rule set
• Import a rule set
• Export a rule set
• Assign a default rule set
• Move the selected rule up or down by clicking the Up and Down arrow icons
Under Display Rule Set As, select a Rule Set and click the Rule Set Details icon toview the Rule Set details, and then manage the rule sets (create, delete, sign, import,export, and assign a default rule set).
In the Rule Set Details pane, click the Edit icon to edit the selected rule set. Click theRule Set Details (search) icon to view the details of the rule set both in tabular as wellas properties view.
Managing Rules and Rule SetsUse the Rule Set tab in the Advanced Management Console to manage rule sets andview the relationship between rule sets and applications.
The following table under Rule Set Details describes the information that is shown foreach rule set. To view the details, click the Rule Set Details icon :
Chapter 10Rule Sets Tab
10-2

Property Description
Rule Set Name Name of the rule set. This name is not part of the exported rule set.Double-click the rule set name to show and hide the names of the rulesthat are in the rule set.
# of Rules Number of rules in the rule set
Signed Indicator that the rule set is signed. Rule sets that show a check markin this column are signed. Only signed rule sets can be distributed todesktops in your enterprise.
This topic contains the following sections:
• Managing Rule Sets
• Managing Rules
Managing Rule SetsYou can manage rule sets in the Rule Sets tab of the Advanced ManagementConsole.
This topic contains the following sections:
• Adding Rules to a Rule Set
• Editing a Rule Set
• Deleting a Rule Set
• Exporting a Rule Set
• Signing a Rule Set
• Setting Default Deployment Rule Set
Adding a Rule SetOnly one deployment rule set can be active on a desktop. However, you can havemore than one rule set in Advanced Management Console. You can also create rulesets for different purposes, such as providing a customized rule set for eachdepartment in your enterprise. Working with multiple rule sets also enables you to tryout different combinations of rules.
Adding a Rule Set includes the following:
• Importing an Existing Rule Set
• Creating a Rule Set
Importing an Existing Rule SetIf you have an existing rule set, then you can import it into Advanced ManagementConsole from the Rule Set tab.
To import a rule set:
1. In the Advanced Management Console, click Rule Set.
Chapter 10Managing Rules and Rule Sets
10-3
2. In the Display Rule Set As, click the Rule Set Actions drop-down arrow icon andselect Import to display the Import New Rule Set dialog.
3. Enter or browse to the location of the file that you want to import.
You can import a signed or unsigned rule set JAR file namedDeploymentRuleSet.jar, or a rule set definition file named ruleset.xml.
4. Enter a name in Rule Set Name.
Advanced Management Console uses this name is used to manage the rule set.The name is not included when a rule set is exported.
5. Click Import to import the rule set.
The rule set is added to the Rule Sets table, and the rules included in the rule setare added to the Rules table. Expand the rule set to see the rules that wereimported. The names for the rules in the imported rule set default to the name ofthe rule set followed by a rule number. See Editing a Rule.
Creating a Rule SetTo create new Rule Sets for managing web-based Java applications in yourenterprise, go to the Rule Set tab in theAdvanced Management Console.
To create a rule set:
1. In the Advanced Management Console, click Rule Set.
2. In Display Rule Set As, click the Rule Set Actions icon to display the New RuleSet dialog.
3. Enter a Name for the rule set.
4. (Optional) Enter the Customer Data for the rule set.
The Custom Data information is added to the Java Usage Tracker record when norules in the rule set match the application.
Add valid XML in the Customer Data field. A block of data must begin with the<customer> element and end with the </customer> element. Multiple <customer>blocks are valid and all XML elements must be within a <customer> block. If thedata is invalid, then the rule cannot be saved.
5. Click Create to create the rule set.
The rule set is added to the Rule Sets table. If you added rules when you createdthe rule set, then you can expand the rule set to see the rules. See Adding a Ruleto a Rule Set.
Editing a Rule SetAfter a deployment rule set is created, you can add more deployment rules and deleterules that are not needed in the Rule Sets tab in the Advanced Management Console.You can also reorder the rules. The order of the rules in the rule set is important,because the action taken for a web-based Java application is determined by the firstrule that the application matches.
The Editing a Rule Set topic includes the following sections:
• Adding a Rule to a Rule Set
• Reordering Rules in a Rule Set
Chapter 10Managing Rules and Rule Sets
10-4

• Removing Rules from a Rule Set
• Editing Customer Data in a Rule Set
• Editing a Signed Rule Set
Adding a Rule to a Rule SetYou can add deployment rules to the rule set to define the action that you to beapplied for a web-based Java application in the Rule Sets tab. The order of the rulesmatters.
To add rules to a rule set:
1. Click the Rule Sets tab in the Advanced Management Console.
2. Under Display Rule As, select a rule in the Rules table.
3. Use one of the following methods to add the selected rule to a rule set:
• Use the mouse to drag the selected rule from the Rules table to the target ruleset in the Rule Sets table.
• Click Add to Rule Set. In the Add a Rule to a Rule Set dialog, select a targetrule sets, and click Add.
• In the Rule Sets table, select a rule in a rule set. Use the mouse to drag therule to a different rule set. The rule is added to the target rule set and alsoremains in the source rule set.
See Editing a Signed Rule Set for actions that are needed if you edit a signed rule set.
Reordering Rules in a Rule SetThe order of the deployment rules in a deployment rule set matters. The first rule tomatch an application is used to determine the action for that application. You canreorder rules using the Up and Down arrows in the Rule Sets tab. For best results,place rules with the most restrictive matching criteria ahead of rules with lessrestrictive matching criteria.
To reorder rules in a rule set:
1. Click the Rule Sets tab in the Advanced Management Console.
2. Under Display Rule Set As, select a Rule Set from the Rule Set table.
The associated rules are displayed in the Rules table under Display Rule As.
3. Select a rule that you want to reorder and use Up or Down buttons accordingly tomove the selected rule.
If the rule set is a signed rule set, then when you reorder the rules, a warningmessage is displayed indicating that you are about to modify a signed rule set.Typically, if rules are reordered in a signed rule set, then the rule set becomesunsigned and you need to sign the rule set to make your changes effective. See Editing a Signed Rule Set.
Removing Rules from a Rule SetWhen you no longer need a deployment rule, remove it from the Rule Sets tab in theAdvanced Management Console.
To remove rules from a rule set:
Chapter 10Managing Rules and Rule Sets
10-5

1. Click the Rule Sets tab in the Advanced Management Console.
2. Under Display Rule As, select a rule in the Rules table.
3. Select the rule that you want to remove.
4. Click Remove from Rule Set.
The rule gets deleted from the rule set. If the rule set is a signed rule set, thenwhen you try to remove a rule, a warning message is displayed in the RemoveRule From Rule Set dialog indicating that you are about to modify a signed ruleset. Typically, if rules are removed from a signed rule set, then the rule setbecomes unsigned and you need to sign the rule set to make your changeseffective. See Editing a Signed Rule Set.
The selected rules are removed from the rule set, but remain in the Rules table forfuture use. See Deleting a Rule.
Editing Customer Data in a Rule SetAdd custom data to a rule set or modify that data in the Rule Sets tab of the AdvancedManagement Console. This data is added to the Java Usage Tracker record when norules in the rule set match the application.
To edit customer data:
1. Click the Rule Sets tab in the Advanced Management Console.
2. Under Display Rule As, select a rule in the Rules table and click Edit to displaythe Edit Rule dialog.
3. In the Customer Data section, make the changes that you want.
Add valid XML in the Customer Data field. A block of data must begin with the<customer> element and end with the </customer> element. Multiple <customer>blocks are valid and all XML elements must be within a <customer> block. If thedata is invalid, then the rule cannot be saved.
4. Click Apply to save the changes.
Editing a Signed Rule SetA signed deployment rule set is locked and is ready to be distributed in AdvancedManagement Console. When you edit a signed rule set, a warning message isdisplayed indicating that the rule set is locked. If you proceed to edit the rule set, thenthe rule set gets unlocked and is no longer considered signed.
The following tasks provides information about editing a signed deployment rule set:
• Adding Rules to a Rule Set
• Reordering Rules in a Rule Set
• Removing Rules from a Rule Set
• Editing Customer Data in a Rule Set
To use the rule set after it is edited, you must export and sign the rule set. To sign therule set, you can do either of the following:
• Select the option to sign the rule set internally in the Advanced ManagementConsole when you export: In this case, you need not import the signed rule set
Chapter 10Managing Rules and Rule Sets
10-6

back into Advanced Management Console, because the import is automaticallydone. See Exporting a Rule Set.
• Sign the rule set externally after you have exported it. Typically, you can do thiswhen you have your own corporate code signing group or service that signsartifacts for you: In this scenario, when you export the rule set and sign externally,you must import the signed rule set back to Advanced Management Console. See Importing an Existing Rule Set.
Note:
After an existing rule set is signed, it is redeployed to all the manageddesktops, to which the rule set was originally deployed. For example, if therule set was the most recent rule set deployed to desktop A, then desktop Agets an automatic update with a new version of the rule set after it is signedagain.
Deleting a Rule SetWhen you no longer need one of the deployment rule sets that you created, you candelete the rule set in the Rule Sets tab of the Advanced Management Console.
To delete a rule set:
1. In the Advanced Management Console, click Rule Set.
2. Under Display Rule Set As, select a Rule Set that you want to delete.
3. Click the Rule Set Actions icon and select Delete.
4. In the Delete Rule Set confirmation dialog, click Delete to delete the selected ruleset.
Exporting a Rule SetWhen you have a deployment rule set ready for production, you can export that ruleset and create the file that can be distributed to desktops. The file is signed if the toolis configured to supporting signing the rule set as part of the export process.
To export a rule set:
1. In the Advanced Management Console, click the Rule Sets tab.
2. Under Display Rule Set As select a Rule Set that you want to export.
3. Click the Rule Set Actions icon and select Export to display the Export Rule Setdialog
4. Provide the following information:
• DRS Version: Select the deployment rule set version for the rule set. Rulesmight contain information that is not supported in earlier versions. Select Autoto have the version set automatically based on the rules in the rule set.
• Sign Rule Set: Select this option to sign the rule set as part of the exportprocess.
5. Click Export to export the rule set.
Chapter 10Managing Rules and Rule Sets
10-7
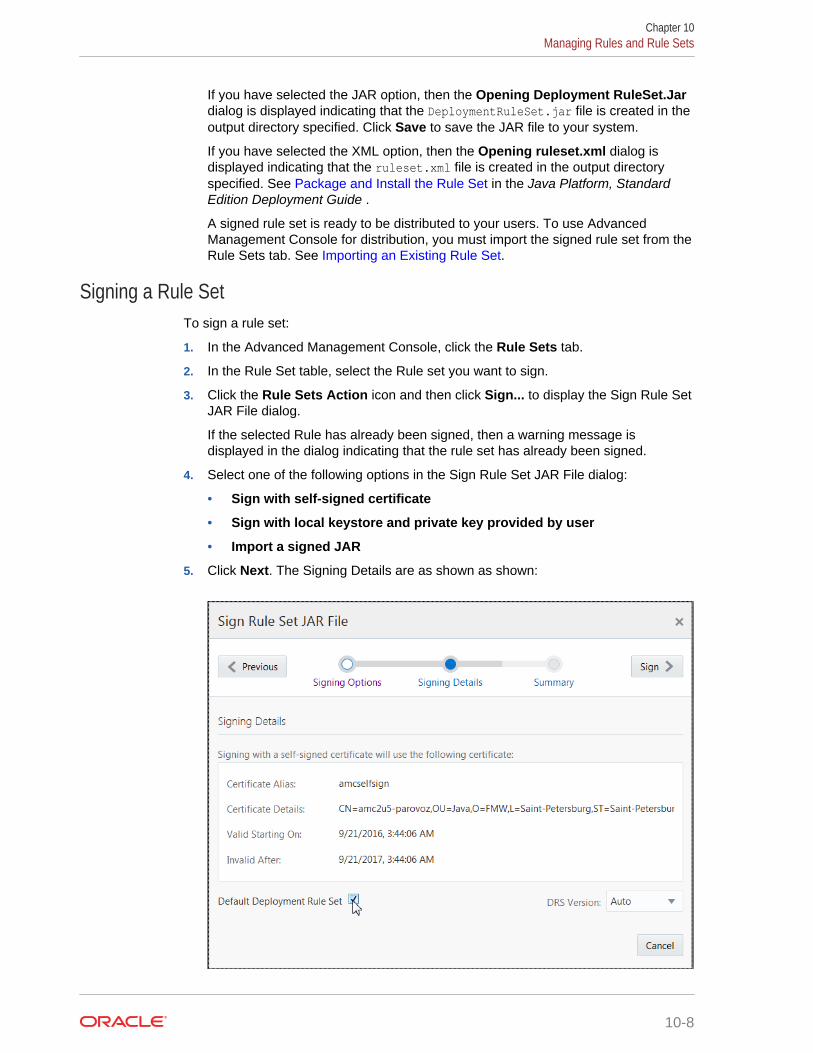
If you have selected the JAR option, then the Opening Deployment RuleSet.Jardialog is displayed indicating that the DeploymentRuleSet.jar file is created in theoutput directory specified. Click Save to save the JAR file to your system.
If you have selected the XML option, then the Opening ruleset.xml dialog isdisplayed indicating that the ruleset.xml file is created in the output directoryspecified. See Package and Install the Rule Set in the Java Platform, StandardEdition Deployment Guide .
A signed rule set is ready to be distributed to your users. To use AdvancedManagement Console for distribution, you must import the signed rule set from theRule Sets tab. See Importing an Existing Rule Set.
Signing a Rule SetTo sign a rule set:
1. In the Advanced Management Console, click the Rule Sets tab.
2. In the Rule Set table, select the Rule set you want to sign.
3. Click the Rule Sets Action icon and then click Sign... to display the Sign Rule SetJAR File dialog.
If the selected Rule has already been signed, then a warning message isdisplayed in the dialog indicating that the rule set has already been signed.
4. Select one of the following options in the Sign Rule Set JAR File dialog:
• Sign with self-signed certificate
• Sign with local keystore and private key provided by user
• Import a signed JAR
5. Click Next. The Signing Details are as shown as shown:
Chapter 10Managing Rules and Rule Sets
10-8

6. Select Default Deployment Rule Set to set the Deployment Rule Set as thedefault.
There can be only one default Default Deployment Rule Set. If you select a signedruleset as the default one, then this selection overrides any previous defaultDefault Deployment Rule setting.
7. Click Sign.
If the Rule Set has been signed, then it is indicated with a success message in theSummary page of the Sign Rule Set Jar File dialog box.
Setting Default Deployment Rule SetIn the Rule Sets tab of the Advanced Management Console, you can set a rule set asthe default deployment rule set. If a default deployment rule set exists, then AdvancedManagement Console automatically deploys that default rule set to target systemsduring the Advanced Management Console agent registration.
To set a default deployment rule set:
1. In the Advanced Management Console, click the Rule Sets tab.
2. In the Rule Set table, select the rule set that you want to set as the default rule set.
3. Click the Rule Sets Action icon and then click Set as Default to display theDefault Deployment Rule Set dialog.
4. Click Apply to set the selected Rule set as the default deployment rule set.
The default deployment rule set is indicated by D.
If you want to mark any other rule set as a default one, then you can just select adifferent, signed rule set as the default option. This new selection overrides the oldselection. The Set as Default option is available only for signed rule sets.
Note:
If you select a rule set that is already marked as the default, then use the Setas Default option to remove the default status from the deleted rule set.
Viewing Relationships between Rule Sets and ApplicationsIdentify the deployment rule sets that match a specific application from the Rule Setstab. Viewing rule set relationships enables you to verify that you have defined adeployment rule to provide the desired action for a web-based Java application.
To view the relationships for a specific application:
1. In the Advanced Management Console, click the Rule Sets tab.
2. Under Display Rule Set As select a rule set from the rule set table.
3. Click the Rule Set — App Relationship icon to display a tree view of all rule setsand their related applications.
4. Expand the All Rule Sets tree and select a rule set to display the relationship inthe Related Applications panel.
Chapter 10Managing Rules and Rule Sets
10-9

The Related Applications panel shows the web-based Java applications that youselected and the JAR file and extensions for that application.
5. Click the Table icon to go back to the rule sets table view.
Managing RulesIn the Advanced Management Console, click the Rule Sets tab to create, edit, anddelete deployment rules. The rules that you create can then be added to deploymentrule sets to manage the web-based Java applications that are being run in yourenterprise.
The following actions are available for managing rules:
• Creating a Rule
• Editing a Rule
• Deleting a Rule
• Rule Properties
Creating a RuleCreate deployment rules from both the Java Usage tab and the Rule Set tab of theAdvanced Management Console. A rule is used to define the action taken when aweb-based Java application that matches the rule is started.
To create a rule from the Rule Sets tab:
1. In the Advanced Management Console click the Rule Sets tab.
2. Click New on the Display Rule As panel to display the Create a New Rule dialog.
3. Enter a name for the rule, and provide information for the remaining fields.
4. Click Create to save the rule.
Editing a RuleYou can modify existing deployment rules by using the Edit button in the Rule Setstab of the Advanced Management Console.
To edit a rule:
1. In the Advanced Management Console click the Rule Sets tab.
2. Under Display Rules As, select a Rule from the Rules table.
3. Click Edit to display the Edit Rule dialog.
4. Edit the rule details.
If you edit a rule that is associated with a signed rule set, then the respective ruleset becomes unsigned and out of date. You need to sign the rule sets again tomake them effective.
5. Click Apply to apply your changes to the rule.
Chapter 10Managing Rules and Rule Sets
10-10
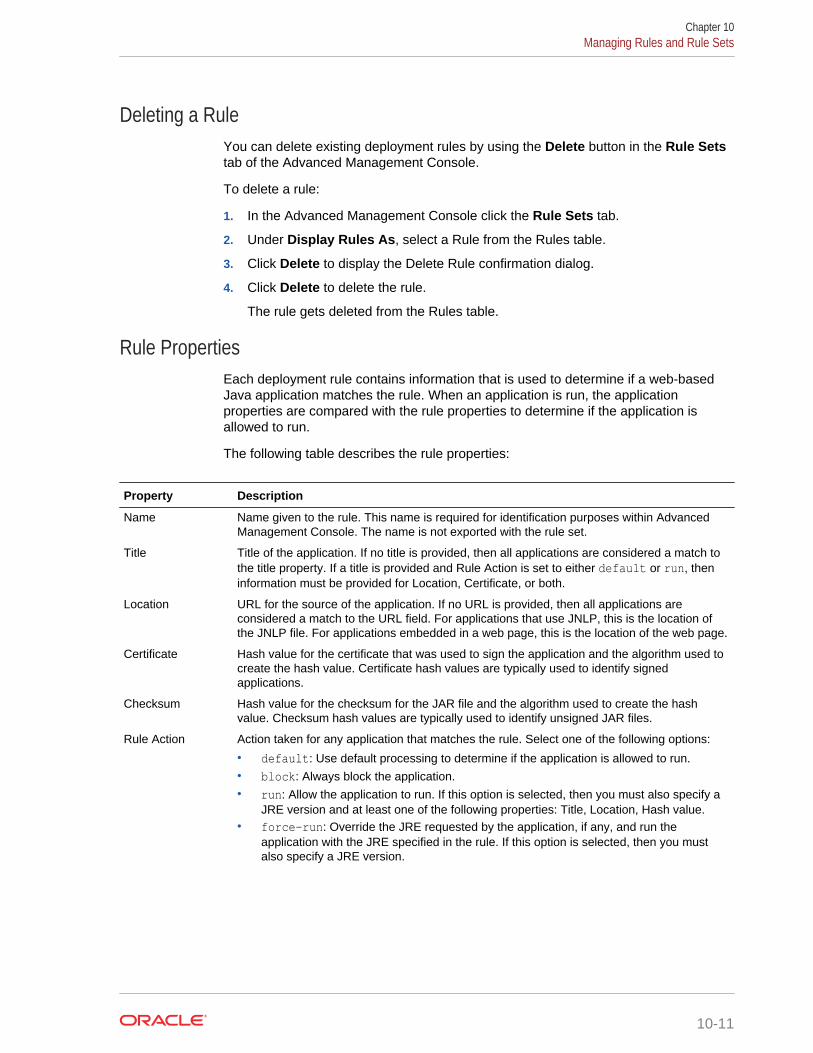
Deleting a RuleYou can delete existing deployment rules by using the Delete button in the Rule Setstab of the Advanced Management Console.
To delete a rule:
1. In the Advanced Management Console click the Rule Sets tab.
2. Under Display Rules As, select a Rule from the Rules table.
3. Click Delete to display the Delete Rule confirmation dialog.
4. Click Delete to delete the rule.
The rule gets deleted from the Rules table.
Rule PropertiesEach deployment rule contains information that is used to determine if a web-basedJava application matches the rule. When an application is run, the applicationproperties are compared with the rule properties to determine if the application isallowed to run.
The following table describes the rule properties:
Property Description
Name Name given to the rule. This name is required for identification purposes within AdvancedManagement Console. The name is not exported with the rule set.
Title Title of the application. If no title is provided, then all applications are considered a match tothe title property. If a title is provided and Rule Action is set to either default or run, theninformation must be provided for Location, Certificate, or both.
Location URL for the source of the application. If no URL is provided, then all applications areconsidered a match to the URL field. For applications that use JNLP, this is the location ofthe JNLP file. For applications embedded in a web page, this is the location of the web page.
Certificate Hash value for the certificate that was used to sign the application and the algorithm used tocreate the hash value. Certificate hash values are typically used to identify signedapplications.
Checksum Hash value for the checksum for the JAR file and the algorithm used to create the hashvalue. Checksum hash values are typically used to identify unsigned JAR files.
Rule Action Action taken for any application that matches the rule. Select one of the following options:
• default: Use default processing to determine if the application is allowed to run.• block: Always block the application.• run: Allow the application to run. If this option is selected, then you must also specify a
JRE version and at least one of the following properties: Title, Location, Hash value.• force-run: Override the JRE requested by the application, if any, and run the
application with the JRE specified in the rule. If this option is selected, then you mustalso specify a JRE version.
Chapter 10Managing Rules and Rule Sets
10-11
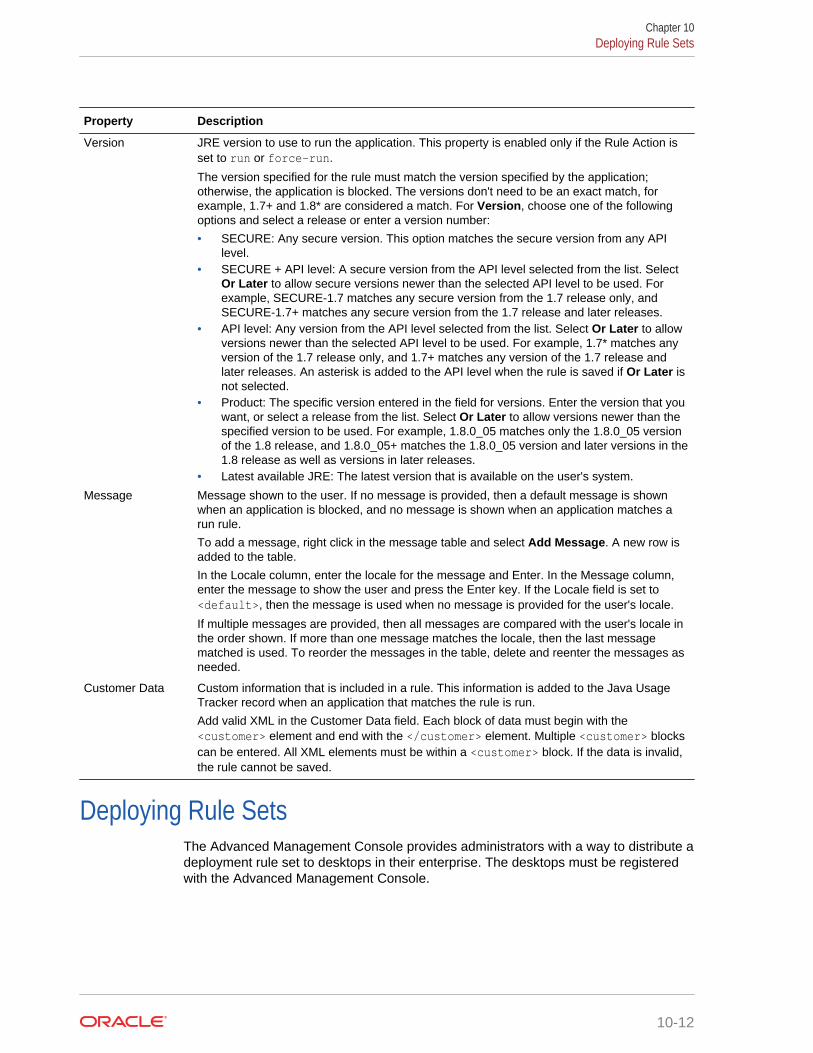
Property Description
Version JRE version to use to run the application. This property is enabled only if the Rule Action isset to run or force-run.
The version specified for the rule must match the version specified by the application;otherwise, the application is blocked. The versions don't need to be an exact match, forexample, 1.7+ and 1.8* are considered a match. For Version, choose one of the followingoptions and select a release or enter a version number:
• SECURE: Any secure version. This option matches the secure version from any APIlevel.
• SECURE + API level: A secure version from the API level selected from the list. SelectOr Later to allow secure versions newer than the selected API level to be used. Forexample, SECURE-1.7 matches any secure version from the 1.7 release only, andSECURE-1.7+ matches any secure version from the 1.7 release and later releases.
• API level: Any version from the API level selected from the list. Select Or Later to allowversions newer than the selected API level to be used. For example, 1.7* matches anyversion of the 1.7 release only, and 1.7+ matches any version of the 1.7 release andlater releases. An asterisk is added to the API level when the rule is saved if Or Later isnot selected.
• Product: The specific version entered in the field for versions. Enter the version that youwant, or select a release from the list. Select Or Later to allow versions newer than thespecified version to be used. For example, 1.8.0_05 matches only the 1.8.0_05 versionof the 1.8 release, and 1.8.0_05+ matches the 1.8.0_05 version and later versions in the1.8 release as well as versions in later releases.
• Latest available JRE: The latest version that is available on the user's system.
Message Message shown to the user. If no message is provided, then a default message is shownwhen an application is blocked, and no message is shown when an application matches arun rule.
To add a message, right click in the message table and select Add Message. A new row isadded to the table.
In the Locale column, enter the locale for the message and Enter. In the Message column,enter the message to show the user and press the Enter key. If the Locale field is set to<default>, then the message is used when no message is provided for the user's locale.
If multiple messages are provided, then all messages are compared with the user's locale inthe order shown. If more than one message matches the locale, then the last messagematched is used. To reorder the messages in the table, delete and reenter the messages asneeded.
Customer Data Custom information that is included in a rule. This information is added to the Java UsageTracker record when an application that matches the rule is run.
Add valid XML in the Customer Data field. Each block of data must begin with the<customer> element and end with the </customer> element. Multiple <customer> blockscan be entered. All XML elements must be within a <customer> block. If the data is invalid,the rule cannot be saved.
Deploying Rule SetsThe Advanced Management Console provides administrators with a way to distribute adeployment rule set to desktops in their enterprise. The desktops must be registeredwith the Advanced Management Console.
Chapter 10Deploying Rule Sets
10-12

Generating a Self-Signed CertificateIn the Configuration tab of the Advanced Management Console, you can generate aself-signed certificate on the server to sign rule set jars.
To generate a self-signed certificate:
1. In the Advanced Management Console click the Configuration tab.
2. Click Jar Signing.
If a generated certificate already exists, the corresponding data is displayed, andthe Generate button is disabled.
3. Enter the following details in the Create Certificate dialog:
• Common Name
• Organizational Unit
• Organization
• City
• State/Region
• Country
• Days Valid: Optional field. By default, the value in the Days Valid field is set to365 days.
4. Click Generate.
The details of the self-signed certificate are displayed under Generatedcertificate for signing deployment rule set JARs. Click Export Certificate todownload the generated certificate in PEM (Privacy-Enhanced Mail) format .
Chapter 10Generating a Self-Signed Certificate
10-13

11Desktop Groups Configuration
The Advanced Management Console enables enterprise administrators to definedesktop groups and associate desktops with one or more groups based on desktopproperties. Desktop groups are added in the Configuration tab of the AdvancedManagement Console. Existing desktop groups are available as filters in the Desktopstab.
This topic includes the following sections:
• About Desktop Groups
• About Mapping Files
• Views for Desktop Groups
• Creating a Desktop Group
• Updating an Existing Desktop Group
• Viewing Desktops in a Desktop Group
• Deleting a Desktop Group
• Desktop Group Properties
About Desktop GroupsDesktop groups in the Advanced Management Console provide a way to filterdesktops based on the values for a group. The group name is treated as an additionalproperty for desktops and a mapping file defines the values for that property.
As an example, consider a group named Country, which has the values China,France, Russia, and United States. When the group is created, existing desktops aremapped to the appropriate group value. To view desktops that are associated with thegroup value France, the filter criterion Country is added in the Desktops tab and set toFrance.
Desktops are associated with a group based on one of the following desktopproperties:
• IP address
• Host name
When the group is created, the desktop property to use is selected. A mapping file isprovided, which contains a list of values for the selected desktop property and thegroup value to associate with the desktop.
If the desktop properties for a desktop are changed, then the new values arecompared with the group mapping files. Group associations are automatically adjustedbased on the new values for the desktop properties. For desktops that are added aftera group is created, the desktop properties are compared with the mapping file for thegroup. If a match is found, then the new desktop is associated with the group.
11-1

About Mapping FilesA desktop group in the Advanced Management Console is generated from a mappingfile, which is used to map desktops to the group. The mapping file can be any comma-separated values (CSV) file that contains information about the desktops in theenterprise.
Each entry in the mapping file must contain a column for the desktop property onwhich the mapping is based and a column for the group value that is associated withthe desktop. For example, if the mapping is based on host names and the group isbased on countries, then each entry must contain a host name and country name. If amapping file contains additional columns, then that information is ignored.
The character that is used to separate columns is specified when the group is created.The default is a semicolon (;). The column indexes for the desktop property and thegroup value are also specified when the group is created. The index is zero-based, sothe first index for the first column is 0.
The following example shows a sample mapping file named country-mapping.txt,which can be used to create a group named Country that contains the group valuesChina, France, Russia, and United States. The mapping between group values anddesktops is based on the host name. The file contains the host names of desktops incolumn 0 and the country for each desktop in column 2. The file also containsbusiness unit information in column 1, which is ignored.
hostname1;Marketing;Francehostname2;Marketing;Francehostname3;Marketing;United Stateshostname4;Engineering;Russiahostname5;Finance;Francehostname6;Finance;United Stateshostname7;Sales;Chinahostname8;Sales;Russia
When a group is created, the mapping file is processed. Desktops that are matched toan entry in the file are associated with the group value that is specified for the desktop.Using the sample mapping file above, the desktop with host name hostname4 isassociated with the group Country and the group value Russia. Desktops that do notmatch any entry in the file are not associated with the group. Entries in the file that donot match any desktop are ignored. The number of desktops that are matched and thenumber that are ignored are reported in the Configuration tab of AdvancedManagement Console.
To change a mapping file, you must delete the group and create it again using theedited mapping file.
Views for Desktop GroupsThe table view for Desktop Groups in the Configuration tab of the AdvancedManagement Console shows the groups that are defined. The properties view showsthe property values for the selected group.
In both views, click the arrow that appears in the column heading to sort the data bythe values in that column. Use the navigation bar below the table to view additional
Chapter 11About Mapping Files
11-2

pages when the number of desktop groups exceeds the page size. Use the navigationbar below the properties to view the properties for other desktop groups.
Desktop Group Table DetailsThe table view for Desktop Groups in the Configuration tab of Advanced ManagementConsole provides information about the number of entries in the mapping file and thenumber of entries that do not match a desktop.
The following table describes the information that is shown in the table view fordesktop groups:
Column Name Description
Group Name Name of the group
Desktop Property Desktop property that is used to match desktops to thegroup
Desktop Property Value Count Number of entries in the mapping file that contain thedesktop property to be matched. One entry in the mappingfile could match more than one desktop. For example, anemail address could be associated with multiple desktops.
Unassigned Desktop PropertyValue Count
Number of entries in the mapping file that do not match anydesktops
Desktop Group Property DetailsThe properties view for Desktop Groups in the Configuration tab of AdvancedManagement Console provides information about the values associated with the groupand the number of desktops that match each value.
The following table describes the information that is shown in the properties view for adesktop group:
Column Name Description
desktop-group-name Name of the desktop group. The entries in this column arethe group values found in the mapping file for this group.
number-of-desktop-property-values
Number of entries in the mapping file that contain a value forthe desktop property on which the mapping is based. Thecolumn name shows the total number of entries in themapping file. For each row, the column shows the number ofentries in the mapping file that match the group value shownin the first column.
number-of-values-not-assigned Number of entries in the mapping file that do not match anydesktop. The column name shows the total number of entriesthat are not matched. For each row, the column shows thenumber of entries in the mapping file that match the groupvalue shown in the first column, but don't match any desktop.
Creating a Desktop GroupDesktop groups in Advanced Management Console add properties for searching andorganizing the desktops in an enterprise.
Chapter 11Creating a Desktop Group
11-3
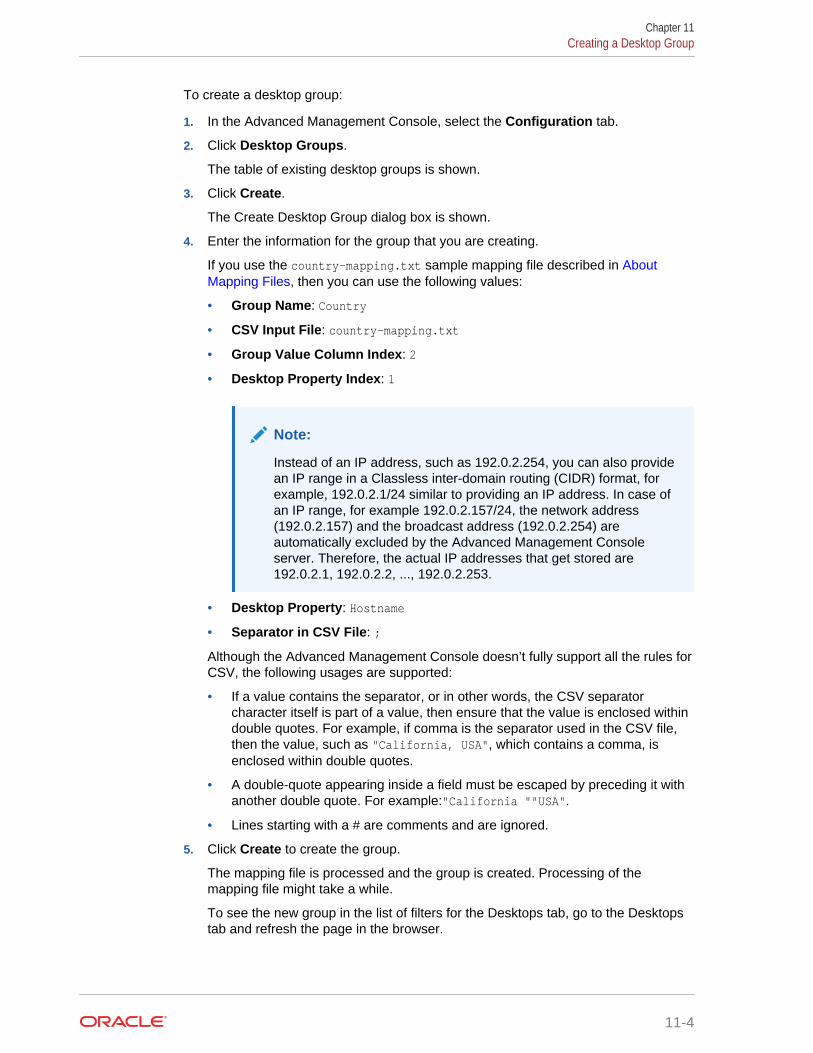
To create a desktop group:
1. In the Advanced Management Console, select the Configuration tab.
2. Click Desktop Groups.
The table of existing desktop groups is shown.
3. Click Create.
The Create Desktop Group dialog box is shown.
4. Enter the information for the group that you are creating.
If you use the country-mapping.txt sample mapping file described in AboutMapping Files, then you can use the following values:
• Group Name: Country
• CSV Input File: country-mapping.txt
• Group Value Column Index: 2
• Desktop Property Index: 1
Note:
Instead of an IP address, such as 192.0.2.254, you can also providean IP range in a Classless inter-domain routing (CIDR) format, forexample, 192.0.2.1/24 similar to providing an IP address. In case ofan IP range, for example 192.0.2.157/24, the network address(192.0.2.157) and the broadcast address (192.0.2.254) areautomatically excluded by the Advanced Management Consoleserver. Therefore, the actual IP addresses that get stored are192.0.2.1, 192.0.2.2, ..., 192.0.2.253.
• Desktop Property: Hostname
• Separator in CSV File: ;
Although the Advanced Management Console doesn’t fully support all the rules forCSV, the following usages are supported:
• If a value contains the separator, or in other words, the CSV separatorcharacter itself is part of a value, then ensure that the value is enclosed withindouble quotes. For example, if comma is the separator used in the CSV file,then the value, such as "California, USA", which contains a comma, isenclosed within double quotes.
• A double-quote appearing inside a field must be escaped by preceding it withanother double quote. For example:"California ""USA".
• Lines starting with a # are comments and are ignored.
5. Click Create to create the group.
The mapping file is processed and the group is created. Processing of themapping file might take a while.
To see the new group in the list of filters for the Desktops tab, go to the Desktopstab and refresh the page in the browser.
Chapter 11Creating a Desktop Group
11-4

Updating an Existing Desktop GroupA desktop group in the Advanced Management Console organizes or groups anumber of desktops together based on their properties, such as IP Address. Forexample, a desktop group called Country has values, such as Canada, US, and thereare 100 entries that have desktop group value called Canada. You can update anexisting group, by removing desktops from it, adding new desktops to it, or reassigningsome desktops to a different group.
To update an existing desktop group:
1. In the Advanced Management Console, select the Configuration tab.
2. Click Desktop Groups to display the existing desktop group.
3. Select a desktop group in the table. The Update button becomes enabled.
4. Click Update to display the Update Desktop Group dialog box.
You can choose to do one of the following:
• a batch update (which is updating multiple entries at once)
• a point update (which is updating a single entry)
• schedule automatic update by providing the data required in the UpdateDesktop Group dialog box
A batch update requires an input file in the CSV format. During an automaticupdate, the Advanced Management Console fetches the Desktop group mappingfile (the CSV file) from the host (the URL parameter in the Update Desktop Groupdialog box), and updates the selected group automatically. The CSV format issame as detailed in Creating a Desktop Group. Depending on the selection of theupdate type, an appropriate section for that update is toggled to show up for you toenter data and submit an update.
Viewing Desktops in a Desktop GroupThe properties view for desktop groups in the Advanced Management Consoleprovides links to the list of desktops that are associated with each group value. Also,desktops in the Desktops tab can be filtered by group name to see which desktops areassociated with the group.
To view the desktops that are in a desktop group:
1. In the Advanced Management Console, select the Configuration tab.
2. Click Desktop Groups.
The table of existing desktop groups is shown.
3. Double-click the desktop group that you want to view.
The properties view for that desktop group is shown. The first column shows thevalues for the group. Each value is a link to the list of desktops that are associatedwith that value.
4. Click the link for one of the group values.
Chapter 11Updating an Existing Desktop Group
11-5
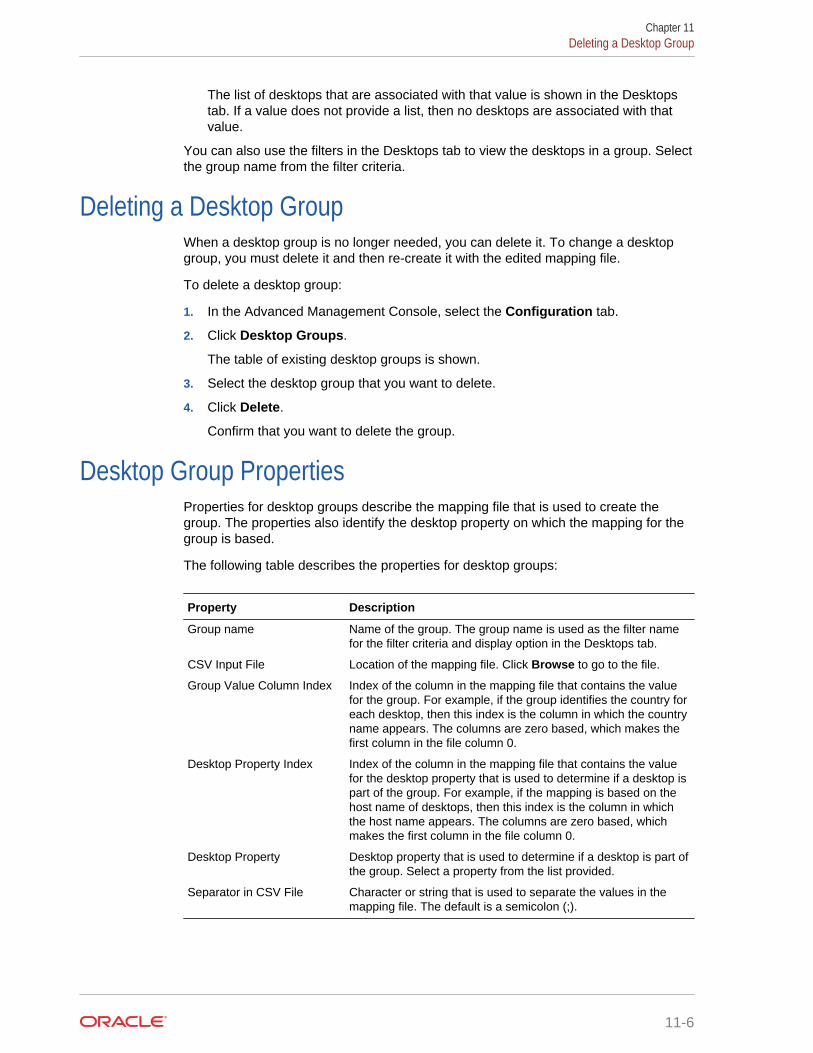
The list of desktops that are associated with that value is shown in the Desktopstab. If a value does not provide a list, then no desktops are associated with thatvalue.
You can also use the filters in the Desktops tab to view the desktops in a group. Selectthe group name from the filter criteria.
Deleting a Desktop GroupWhen a desktop group is no longer needed, you can delete it. To change a desktopgroup, you must delete it and then re-create it with the edited mapping file.
To delete a desktop group:
1. In the Advanced Management Console, select the Configuration tab.
2. Click Desktop Groups.
The table of existing desktop groups is shown.
3. Select the desktop group that you want to delete.
4. Click Delete.
Confirm that you want to delete the group.
Desktop Group PropertiesProperties for desktop groups describe the mapping file that is used to create thegroup. The properties also identify the desktop property on which the mapping for thegroup is based.
The following table describes the properties for desktop groups:
Property Description
Group name Name of the group. The group name is used as the filter namefor the filter criteria and display option in the Desktops tab.
CSV Input File Location of the mapping file. Click Browse to go to the file.
Group Value Column Index Index of the column in the mapping file that contains the valuefor the group. For example, if the group identifies the country foreach desktop, then this index is the column in which the countryname appears. The columns are zero based, which makes thefirst column in the file column 0.
Desktop Property Index Index of the column in the mapping file that contains the valuefor the desktop property that is used to determine if a desktop ispart of the group. For example, if the mapping is based on thehost name of desktops, then this index is the column in whichthe host name appears. The columns are zero based, whichmakes the first column in the file column 0.
Desktop Property Desktop property that is used to determine if a desktop is part ofthe group. Select a property from the list provided.
Separator in CSV File Character or string that is used to separate the values in themapping file. The default is a semicolon (;).
Chapter 11Deleting a Desktop Group
11-6
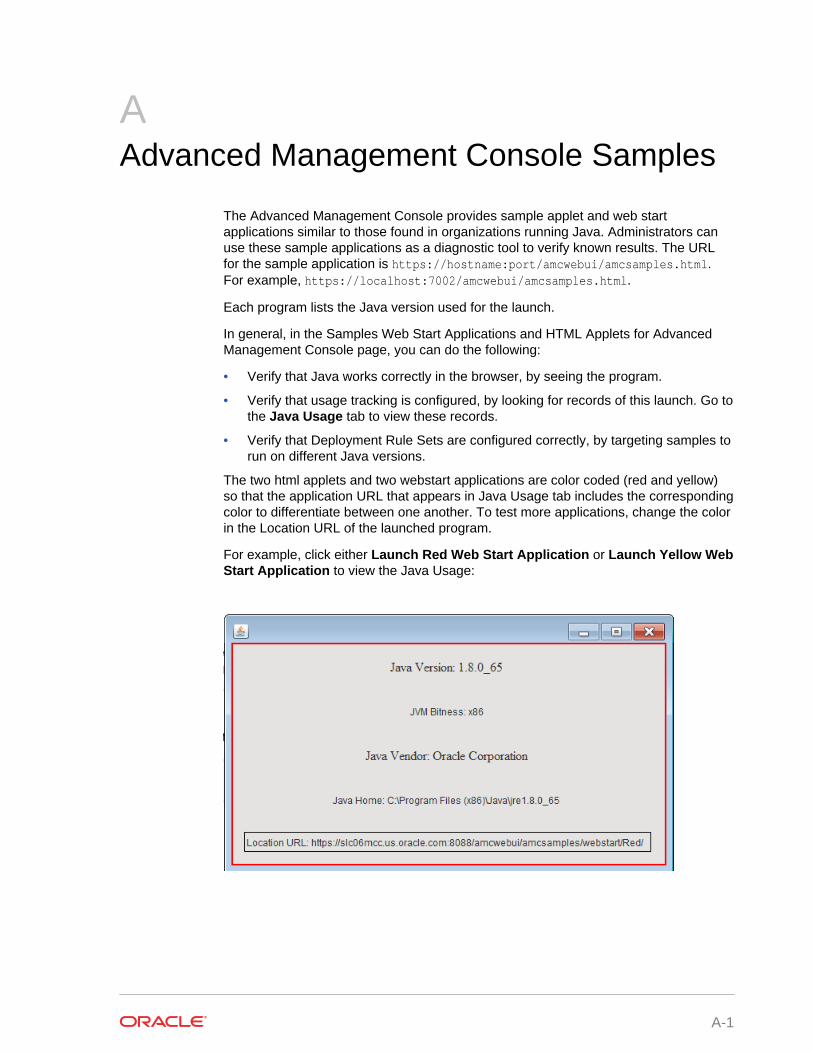
AAdvanced Management Console Samples
The Advanced Management Console provides sample applet and web startapplications similar to those found in organizations running Java. Administrators canuse these sample applications as a diagnostic tool to verify known results. The URLfor the sample application is https://hostname:port/amcwebui/amcsamples.html.For example, https://localhost:7002/amcwebui/amcsamples.html.
Each program lists the Java version used for the launch.
In general, in the Samples Web Start Applications and HTML Applets for AdvancedManagement Console page, you can do the following:
• Verify that Java works correctly in the browser, by seeing the program.
• Verify that usage tracking is configured, by looking for records of this launch. Go tothe Java Usage tab to view these records.
• Verify that Deployment Rule Sets are configured correctly, by targeting samples torun on different Java versions.
The two html applets and two webstart applications are color coded (red and yellow)so that the application URL that appears in Java Usage tab includes the correspondingcolor to differentiate between one another. To test more applications, change the colorin the Location URL of the launched program.
For example, click either Launch Red Web Start Application or Launch Yellow WebStart Application to view the Java Usage:
A-1

To verify the sample applets or webstart applications with different Java versions, youcan create rules that can be launched with specific Java versions. A sample rule (for ared application) is as follows:
<rule><location=“https://hostname:port/amcwebui/amcsamples/webstart/Red” action=“run” version=“1.8.0_65”/></rule>
Appendix A
A-2