advanced rgb led 1 - eastern voltage research · the advanced rgb led 1.0 utilizes a pic12f683...
TRANSCRIPT

Advanced RGB LED 1.0 Kit
December 2013, Rev 1 − 1 − http://www.EasternVoltageResearch.com Advanced RGB LED 1.0 Kit
AAddvvaanncceedd RRGGBB LLEEDD 11..00
IInnssttrruuccttiioonn MMaannuuaall
EEaasstteerrnn VVoollttaaggee RReesseeaarrcchh,, LLLLCC

Advanced RGB LED 1.0 Kit
December 2013, Rev 1 − 2 − http://www.EasternVoltageResearch.com Advanced RGB LED 1.0 Kit
Introduction to the Advanced RGB LED 1.0 Kit
Thank you for purchasing the Advanced RGB LED 1.0 Kit. This kit is a favorite of my
children. Using a high power RGB LED controlled via a PIC12F683 microcontroller, a
wide array of colors and effects can be created with this kit. Multiple brightness levels,
colors, flashing modes, strobe effects, pulsing effects, and fade effects are pre-
programmed into the PIC12F683 microcontroller and user selectable by the onboard
pushbutton.
As I previously stated, this kit is definitely one of my children’s favorites and I hope you
enjoy it too!
Notice to Beginners: If you are a first time kit builder, you may find this instruction
manual easier to understand than expected. Each component in this kit has an individual
check box, while a detailed description of each component is provided as well. If you
follow each step in the instruction manual in order, and practice good soldering and kit
building skills, the kit is next to fail-safe.
Please read this manual in its entirety before building, testing, or operating your kit!

Advanced RGB LED 1.0 Kit
December 2013, Rev 1 − 3 − http://www.EasternVoltageResearch.com Advanced RGB LED 1.0 Kit
Circuit Description
The Advanced RGB LED 1.0 utilizes a PIC12F683 microcontroller, U2, which outputs a
3-channel pulse width modulated (PWM) signal which controls a single high power RGB
LED module, D1. The output PWM signals are modulated to produce a wide array of
colors, brightness levels, and effects that are used to control the current flowing through
each of the red, green, and blue dies of the LED, D2, via the MOSFET transistors, Q1,
Q2, and Q3. Voltage regulator, U1, provides the regulated 5VDC required by the
PIC12F683 microcontroller, U2, while diode, CR1, provides reverse voltage protection
against a battery or power supply that is hooked up backwards.
A pushbutton, PB1, allows the user to cycle through the various modes of operation
which include, but is not limited to, the following effects:
• Steady-state colors (red, blue, green, purple, white, yellow, cyan)
• Pulsing colors (red, blue, green, white)
• Different brightness levels for steady-state colors
• Strobe effects (red, white)
• Police strobes (red and blue alternating) – Different flashrates
• Mood light modes (cycles through all colors of the spectrum slowly)

Advanced RGB LED 1.0 Kit
December 2013, Rev 1 − 4 − http://www.EasternVoltageResearch.com Advanced RGB LED 1.0 Kit
Kit Building Tips
A good soldering technique is key! Let your soldering iron tip gently heat both the wires
and pads simultaneously. Apply solder to the wire and the pad when the pad is hot
enough to melt the solder. The finished joint should appear like a small shiny drop of
water on paper, somewhat soaked in. If the pads have not heated up sufficiently, melted
solder (heated only by the soldering iron itself) will form a cold solder joint and will not
conduct properly. These cold joints appear as dull beads of solder, and can be easily
fixed by applying additional heat to the pad and wire. All components, unless otherwise
noted, should be mounted on the top side of the board. This is the side with the
silkscreen printing.
When installing components, the component is placed flat to the board and the leads are
bent on the backside of the board to prevent the part from falling out before soldering.
The part is then soldered securely to the board, and the remaining lead length is clipped
off. It is also extremely important to place the components as close to the board as
possible. This is necessary for proper operation over the wide frequency range of the
various kits we provide. Also be sure that component lead lengths are always as short as
possible. This will avoid adding any stray capacitances or inductances that can be
detrimental to circuit operation.
An alternative approach (which is actually the one I use) is to install the component into
the board and then apply a piece of masking tape on the topside to the hold the
component in place temporarily. The leads on the backside of the board are then trimmed
leaving about 0.10” lead protruding through the backside of the board, and then soldered
from the backside. You can then remove the masking tape, and finally apply a small
amount of solder on the top to complete the joint on both sides. This is shown in the
figure below.

Advanced RGB LED 1.0 Kit
December 2013, Rev 1 − 5 − http://www.EasternVoltageResearch.com Advanced RGB LED 1.0 Kit
Surface Mount (SMT) Component Soldering Instructions
One of the first things you’ll notice with your electronics kit is that many of the included
components are surface mount components. These components do not have conventional
leads, as is the case with thru-hole components, and instead solder directly to pads
located either on the top or bottom of the PCB board.
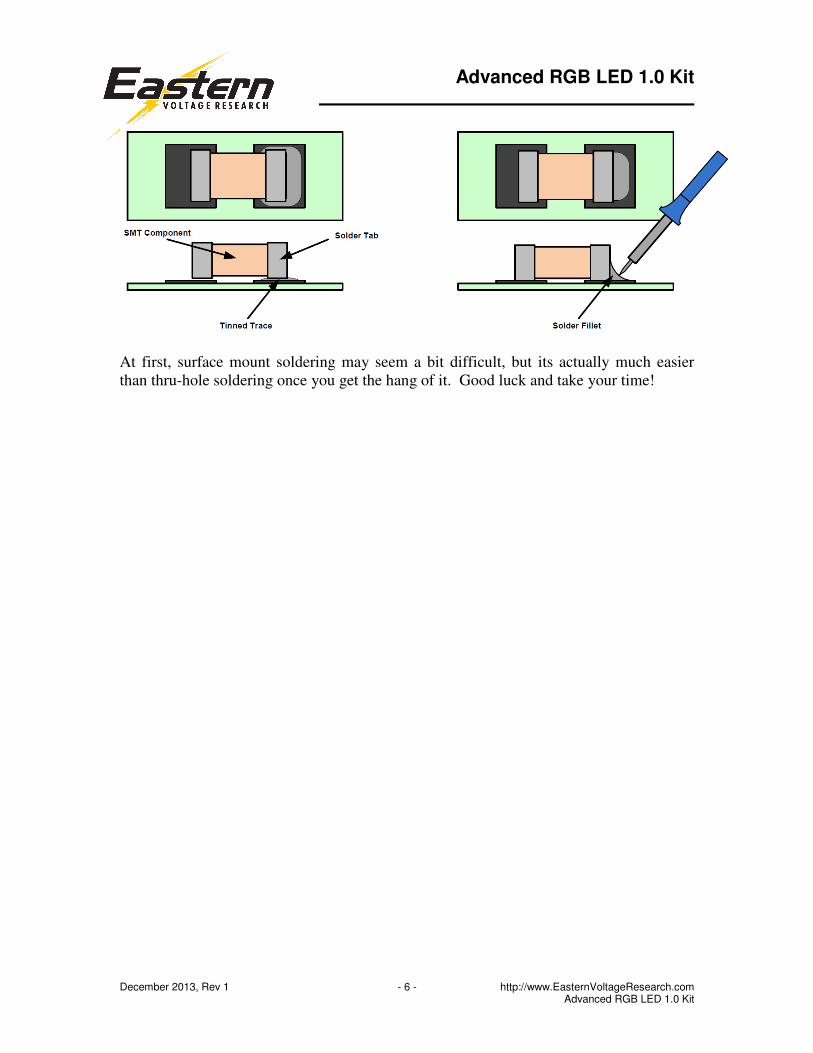
One of the first things to remember when soldering surface mount (SMT) components to
the board is that patience is a must! The first step when soldering a SMT component to
the board, after properly identifying both the component and the location where it will be
installed on the PCB board, is to slightly “tin” one of the pads on the PCB board that will
connect to the component. This is accomplished by simply applying a very small amount
of solder directly to the pad with the soldering iron as shown below.
The next step is to pick up and hold the component in place on its tinned pad using
tweezers. While holding the component in place with tweezers, briefly re-heat the solder
with the soldering iron so that it flows onto the component solder tab and forms a nicely
shaped solder fillet. For the remaining solder tabs on the same component, briefly heat
up the component tab using the soldering iron and apply a small amount of solder directly
to the pad, again creating a nicely shaped solder fillet. It is important to note that when
reheating the solder, the soldering iron tip should contact the solder tab of the body of the
component and not the solder directly. This will allow the solder to flow as efficiently as
possible and form a proper solder fillet.
Advanced RGB LED 1.0 Kit
December 2013, Rev 1 − 6 − http://www.EasternVoltageResearch.com Advanced RGB LED 1.0 Kit
At first, surface mount soldering may seem a bit difficult, but its actually much easier
than thru-hole soldering once you get the hang of it. Good luck and take your time!

Advanced RGB LED 1.0 Kit
December 2013, Rev 1 − 7 − http://www.EasternVoltageResearch.com Advanced RGB LED 1.0 Kit
Advanced RGB LED 1.0 Kit Parts List
RESISTORS
� 1 220 ohm Resistor (red-red-brown), R1
� 2 160 ohm Resistor (brown-blue-brown), R2, R3
� 3 10 ohm Resistor (brown-black-black), R4,R5,R6
CAPACITORS
� 1 0.33uF Capacitor, C1
� 1 0.1uF Capacitor, C2
DIODES
� 1 1N4148 Diode, CR1
� 1 High Power RGB LED Module, D1
SEMICONDUCTORS
� 1 MC78L05AB Voltage Regulator, U1
� 1 PIC12F683 Microcontroller, U2
� 3 BS170 MOSFET, Q1,Q2,Q3
MISCELLANEOUS
� 1 Pushbutton, PB1
� 1 9V Battery Connector
� 1 DIP Socket, 8-Pin
REQUIRED, NOT SUPPLIED
� 1 9V Battery or 9-12V DC Power Supply

Advanced RGB LED 1.0 Kit
December 2013, Rev 1 − 8 − http://www.EasternVoltageResearch.com Advanced RGB LED 1.0 Kit
Advanced RGB LED 1.0 - Component Layout Diagram

Advanced RGB LED 1.0 Kit
December 2013, Rev 1 − 9 − http://www.EasternVoltageResearch.com Advanced RGB LED 1.0 Kit
KIT Building Instructions
Now we will begin building the kit. There are just a few more important things to know
before we install the first components.
For each component, the word “install” always means the following:
1. Pick the correct value to start with.
2. Insert the component into the correct printed circuit board (PCB) location.
3. Orient the component correctly – especially when there is a right and a wrong
way to solder it in. (i.e. Electrolytic capacitors, diodes, ICs, transistors, etc…)
4. Solder all connections unless directed otherwise. Ensure enough heat is used to
allow solder to flow for clean, shiny, and completed connections.
Also, please be sure to take us seriously when we say that good soldering is the key to the
proper operation of your circuit!
• Use a 25W soldering pencil with a clean, sharp tip. DO NOT USE a high power
soldering gun such as those trigger activated units.
• Use only rosin core solder intended for electronics use
• Ensure your work area is clean, and has plenty of bright lighting
• Build your kit in stages, taking breaks to check your work. Be sure to clean the
board periodically with a brush or compressed air to remove any excess wire
cuttings, etc…
Advanced RGB LED 1.0 Kit
December 2013, Rev 1 − 10 − http://www.EasternVoltageResearch.com Advanced RGB LED 1.0 Kit
Okay, so lets begin!
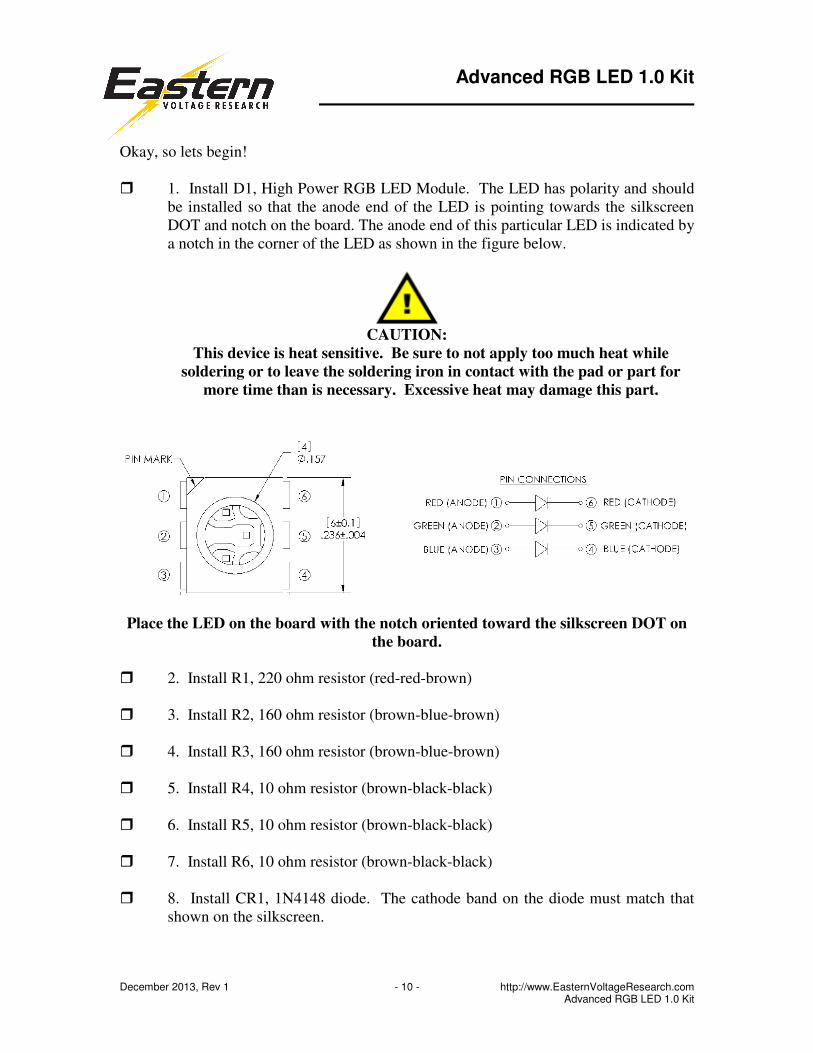
� 1. Install D1, High Power RGB LED Module. The LED has polarity and should
be installed so that the anode end of the LED is pointing towards the silkscreen
DOT and notch on the board. The anode end of this particular LED is indicated by
a notch in the corner of the LED as shown in the figure below.
CAUTION:
This device is heat sensitive. Be sure to not apply too much heat while
soldering or to leave the soldering iron in contact with the pad or part for
more time than is necessary. Excessive heat may damage this part.
Place the LED on the board with the notch oriented toward the silkscreen DOT on
the board.
� 2. Install R1, 220 ohm resistor (red-red-brown)
� 3. Install R2, 160 ohm resistor (brown-blue-brown)
� 4. Install R3, 160 ohm resistor (brown-blue-brown)
� 5. Install R4, 10 ohm resistor (brown-black-black)
� 6. Install R5, 10 ohm resistor (brown-black-black)
� 7. Install R6, 10 ohm resistor (brown-black-black)
� 8. Install CR1, 1N4148 diode. The cathode band on the diode must match that
shown on the silkscreen.

Advanced RGB LED 1.0 Kit
December 2013, Rev 1 − 11 − http://www.EasternVoltageResearch.com Advanced RGB LED 1.0 Kit
� 9. Install C1, 0.33uF capacitor(marking BC334 or 334 or similar)
� 10. Install C2, 0.1uF capacitor (marking BC104 or 104 or similar)
� 11. Install U1, MC78L05AB voltage regulator (marked MC78L05AB) This IC
needs to be orientated properly. Please insert U1 into the board with the flat edge
of the IC orientated according to the silkscreen layout drawing.
� 12. Install an 8-pin DIP socket into the U2 location. Note that one end of the DIP
socket is marked by a notch; this end MUST be oriented as shown on the PCB
layout. DO NOT INSTALL PIC12F683 at this time!
� 13. Install Q1, BS170 MOSFET transistor (marked BS170) This transistor needs
to be orientated properly. Please insert U1 into the board with the flat edge of the
transistor orientated according to the silkscreen layout drawing.
� 14. Install Q2, BS170 MOSFET transistor (marked BS170) This transistor needs
to be orientated properly. Please insert U2 into the board with the flat edge of the
transistor orientated according to the silkscreen layout drawing.
� 15. Install Q3, BS170 MOSFET transistor (marked BS170) This transistor needs
to be orientated properly. Please insert U3 into the board with the flat edge of the
transistor orientated according to the silkscreen layout drawing.
� 16. Install pushbutton, PB1.
� 17. Install the 9V battery connector to the PCB board. The red wire connects to
the terminal pad labeled VIN on the PCB while the black wire connects to the
terminal pad labeled GND.
Congratulations! You have just completed your Advanced RGB LED 1.0 kit. Please
take a few moments to look over the board and ensure that all the components are
installed properly with the correct orientation. Since some of the parts may be unfamiliar
to you, you may want to be extra sure that they have been inserted correctly. After you
are sure that everything seems to be properly installed, move on to the set-up and testing
section.

Advanced RGB LED 1.0 Kit
December 2013, Rev 1 − 12 − http://www.EasternVoltageResearch.com Advanced RGB LED 1.0 Kit
Set-up and Testing
Okay, so lets begin!
� 1. Install a 9V battery into the battery connector, or connect a 7-12VDC power
supply to the proper terminals ensuring proper polarity is observed.
� 2. Using a multimeter, verify that there is 5VDC at pin 1, of U2. This will ensure
that the onboard 5V regulator, U1, is connected and working properly. If the
voltage is not 5V, you will need to determine why U1 is not working before
continuing on.
� 3. Disconnect the 9V battery or 7-12VDC power supply.
� 4. Install the programmed PIC12F683 microcontroller into the U2 location. Note
that one end of the PIC12F683 is marked by a notch; this end MUST be oriented
as shown on the PCB layout.
� 5. Reconnect the 9V battery or 7-12VDC power source.
� 6. The unit will start-up in the mode it was last operating on. Generally, it will
default to the first operating mode (pulsating red) the first time the unit is powered
up.
Congratulations! Your Advanced RGB 1.0 is now completed and operational.
Selecting Modes
There are several pushbutton modes of operation. Pressing the pushbutton twice in
succession will cycle the unit into the next operational display mode. Pressing the
pushbutton once will pause the current mode of operation, and likewise, pressing once
again will restart the display operation. Holding the pushbutton down for 2 seconds will
turn the unit OFF while holding the pushbutton down for 2 seconds while in the OFF
mode will turn the unit back ON.
Troubleshooting
PROBLEM: The LEDs do not illuminate when I turn the switch ON.
SOLUTION: Verify that the LEDs and U1 are installed correctly, the battery is installed
correctly, and the battery is not completely drained.

Advanced RGB LED 1.0 Kit
December 2013, Rev 1 − 13 − http://www.EasternVoltageResearch.com Advanced RGB LED 1.0 Kit
Conclusion
We sincerely hope that you have enjoyed the construction of this Eastern Voltage
Research Kit. As always, we have tried to write this instruction manual in the easiest,
most “user friendly” format that is possible. As our customers, we value your opinions,
comments, and additions that you would like to see in future publications. Please submit
comments or ideas to:
Eastern Voltage Research, LLC
Technical Support
Thanks again from the people here at Eastern Voltage Research.
Terms and Conditions of Sale
Before opening or assemblying your kit, please read and review the latest Terms and
Conditions of Sale on our website at the following link:
http://www.easternvoltageresearch.com/terms.html