advanced security
DESCRIPTION
Advanced SecurityTRANSCRIPT
Microsoft Dynamics™ GP
Advanced Security

Copyright Copyright © 2005 Microsoft Corporation. All rights reserved.
Complying with all applicable copyright laws is the responsibility of the user. Without limiting the rights under copyright, no part of this document may be reproduced, stored in or introduced into a retrieval system, or transmitted in any form or by any means (electronic, mechanical, photocopying, recording, or otherwise), or for any purpose, without the express written permission of Microsoft Corporation. Notwithstanding the foregoing, the licensee of the software with which this document was provided may make a reasonable number of copies of this document solely for internal use.
Trademarks Microsoft and Microsoft Dynamics are either registered trademarks or trademarks of Microsoft Corporation or its affiliates in the United States and/or other countries. FairCom and c-tree Plus are trademarks of FairCom Corporation and are registered in the United States and other countries.
The names of actual companies and products mentioned herein may be trademarks or registered marks - in the United States and/or other countries - of their respective owners.
Unless otherwise noted, the example companies, organizations, products, domain names, e-mail addresses, logos, people, places, and events depicted herein are fictitious. No association with any real company, organization, product, domain name, e-mail address, logo, person, place, or event is intended or should be inferred.
Intellectual property Microsoft may have patents, patent applications, trademarks, copyrights, or other intellectual property rights covering subject matter in this document. Except as expressly provided in any written license agreement from Microsoft, the furnishing of this document does not give you any license to these patents, trademarks, copyrights, or other intellectual property.
Warranty disclaimer Microsoft Corporation disclaims any warranty regarding the sample code contained in this documentation, including the warranties of merchantability and fitness for a particular purpose.
Limitation of liability The content of this document is furnished for informational use only, is subject to change without notice, and should not be construed as a commitment by Microsoft Corporation. Microsoft Corporation assumes no responsibility or liability for any errors or inaccuracies that may appear in this manual. Neither Microsoft Corporation nor anyone else who has been involved in the creation, production or delivery of this documentation shall be liable for any indirect, incidental, special, exemplary or consequential damages, including but not limited to any loss of anticipated profit or benefits, resulting from the use of this documentation or sample code.
License agreement Use of this product is covered by a license agreement provided with the software product. If you have any questions, please call the Microsoft Dynamics GP Customer Assistance Department at 800-456-0025 (in the U.S. or Canada) or +1-701-281-6500.
Publication date October 2005

A D V A N C E D S E C U R I T Y i
ContentsIntroduction ............................................................................................................................................... 1
Overview........................................................................................................................................................1
Advanced Security terms.............................................................................................................................1
Field Level Security terms ...........................................................................................................................2
What’s in this manual...................................................................................................................................2
Symbols and conventions ............................................................................................................................3
Resources available from the Help menu..................................................................................................3
Send us your documentation comments ...................................................................................................5
Chapter 1: Setting up Advanced Security ..................................................................... 7Setting accelerator options...........................................................................................................................7
Setting Advanced Security options ...........................................................................................................8
Setting up or modifying user information ................................................................................................9
Modifying user class information ............................................................................................................10
Chapter 2: Using Advanced Security ...............................................................................11The Security Object Tree ............................................................................................................................ 11
Viewing user and user class security settings.........................................................................................12
Rolling down security settings .................................................................................................................12
Rolling up security settings .......................................................................................................................13
Reverting security settings ........................................................................................................................13
Verifying security settings .........................................................................................................................13
Importing or exporting security settings.................................................................................................14
Copying security settings ..........................................................................................................................14
Printing security settings ...........................................................................................................................15
Chapter 3: Field Level Security ............................................................................................. 17Adding or modifying a field security ID.................................................................................................17
Copying a field security ID .......................................................................................................................18
Security modes ............................................................................................................................................18
Resource Explorer .......................................................................................................................................19
Creating a password...................................................................................................................................20
Index .............................................................................................................................................................. 21

ii A D V A N C E D S E C U R I T Y

A D V A N C E D S E C U R I T Y 1
IntroductionAdvanced Security provides users with access security for the forms, windows, fields, and programs in Microsoft Dynamics GP.
This introduction is divided into the following sections:
• Overview• Advanced Security terms• Field Level Security terms• What’s in this manual• Symbols and conventions• Resources available from the Help menu• Send us your documentation comments
Overview
The following information provides an overview of Advanced Security and Field Level Security.
Advanced Security You can use Advanced Security to maintain security at a window level within Microsoft Dynamics GP. It provides users with access security to the forms, windows, fields, and programs in Microsoft Dynamics GP.
You can set up a multiuser system to provide additional levels of access that users have to other companies, users, and classes. You can roll down security settings of classes without affecting other changes made to resources at the user level.
Field Level Security Field Level Security works with Advanced Security to provide additional security to programs, fields, forms, and windows in Microsoft Dynamics GP. Users, user classes, and companies that you create or modify in Advanced Security also appear in the Field Level Security window. Likewise, any changes to users and classes that you make in Field Level Security also apply to Advanced Security.
In Field Level Security you can apply passwords, and hide and inactivate fields, forms, and windows.
Advanced Security terms
Rolling down The process of applying changes you’ve made in one record to all records within a class.
Rolling up The process of applying changes you’ve made to a user’s security settings to a class of users.
Company list Located in the upper right pane of the Advanced Security window, this list contains all companies in the system. You can select companies from this list by double-clicking them.
User/Class list Located in the lower right pane of the Advanced Security window, this list contains all users and classes in the system that you can select. Users and classes are distinguished by the icons next to their IDs.

I N T R O D U C T I O N
2 A D V A N C E D S E C U R I T Y
Security Object Tree Located in the left pane of the Advanced Security window, the security object tree allows users to view the security settings of selected users for the company you are working with.
Field Level Security terms
Refer here for more information about some of the terms related to Field Level Security.
Company list Located in the upper right pane of the Field Security window, this list contains a list of the companies in the system. The check box next to each company name shows how the selected field security ID is applied to the users of that company.
User/class list Located in the upper left pane of the Field Security window, it contains all users and classes in the system that you can select. A class record is identified by an icon of two people.
Field security object list Located in the bottom pane of the Field Level Security window, it contains the field security IDs that can be assigned and their status for the selected users, companies, and classes.
What’s in this manual
This manual is designed to give you an in-depth understanding of Advanced Security.
Some features described in this documentation are optional and can be purchased through your Microsoft Dynamics GP partner.
To view information about the release of Microsoft Dynamics GP that you’re using and which modules or features you are registered to use, choose Help >> About Microsoft Dynamics GP.
This manual is divided into the following chapters:
• Chapter 1, “Setting up Advanced Security,” provides a description of how you can use Advanced Security and Field Level Security in your organization.
• Chapter 2, “Using Advanced Security,” provides important information on how to maintain Advanced Security.
• Chapter 3, “Field Level Security,” explains how to use Field Level Security and how to maintain it.

A D V A N C E D S E C U R I T Y 3
I N T R O D U C T I O N
Symbols and conventions
For definitions of unfamiliar terms, see the glossary in the manual or refer to the glossary in Help.
This manual uses the following conventions to refer to sections, navigation and other information.
Resources available from the Help menu
The Microsoft Dynamics GP Help menu gives you access to user assistance resources on your computer, as well as on the Web.
ContentsOpens the Help file for the active Microsoft Dynamics GP component, and displays the main “contents” topic. To browse a more detailed table of contents, click the Contents tab above the Help navigation pane. Items in the contents topic and tab are arranged by module. If the contents for the active component includes an “Additional Help files” topic, click the links to view separate Help files that describe additional components.
To find information in Help by using the index or full-text search, click the appropriate tab above the navigation pane, and type the keyword to find.
To save the link to a topic in the Help, select a topic and then select the Favorites tab. Click Add.
IndexOpens the Help file for the active Microsoft Dynamics GP component, with the Index tab active. To find information about a window that’s not currently displayed, type the name of the window, and click Display.
About this windowDisplays overview information about the current window. To view related topics and descriptions of the fields, buttons, and menus for the window, choose the appropriate link in the topic. You also can press F1 to display Help about the current window.
Symbol Description
The light bulb symbol indicates helpful tips, shortcuts and suggestions.
The warning symbol indicates situations you should be especially aware of when completing tasks.
Convention Description
Creating a batch Italicized type indicates the name of a section or procedure.
File >> Print or File > Print
The (>>) or (>) symbol indicates a sequence of actions, such as selecting items from a menu or toolbar, or pressing buttons in a window. This example directs you to go to the File menu and choose Print.
TAB or ENTER All capital letters indicate a key or a key sequence.
I N T R O D U C T I O N
4 A D V A N C E D S E C U R I T Y
LookupOpens a lookup window, if a window that you are viewing has a lookup window. For example, if the Checkbook Maintenance window is open, you can choose this item to open the Checkbooks lookup window.
Show Required FieldsHighlights fields that are required to have entries. Required fields must contain information before you can save the record and close the window. To change the way required fields are highlighted, choose Tools >> Setup >> User Preferences >> Display, and specify a different color and type style.
Printable ManualsDisplays a list of manuals in Adobe Acrobat .pdf format, which you can print or view.
Orientation TrainingAccesses online tutorials that show you how to complete basic procedures within Microsoft Dynamics GP. Additional tutorials are available through the CustomerSource Web site.
What’s NewProvides information about enhancements that were added to Microsoft Dynamics GP since the last major release.
Microsoft Dynamics GP OnlineOpens a Web page that provides links to a variety of Web-based user assistance resources. Access to some items requires registration for a paid support plan.
Current implementation and upgrade information The most recent revisions of upgrade and implementation documentation, plus documentation for service packs and payroll tax updates.
User documentation and resources The most recent user guides, how-to articles, and white papers for users.
Developer documentation and resources The most recent documentation and updated information for developers.
Product support information Information about the Microsoft Dynamics GP product support plans and options that are available, along with information about peer support and self-support resources.
Services information Information about Microsoft Dynamics GP support, training, and consulting services.
Microsoft Dynamics GP Community Access to newsgroups, where you can ask questions or share your expertise with other Microsoft Dynamics GP users.
CustomerSource home page A wide range of resources available to customers who are registered for a paid support plan. Includes access to Knowledge Base articles, software downloads, self-support, and much more.
A D V A N C E D S E C U R I T Y 5
I N T R O D U C T I O N
U.S. Payroll UpdatesProvides access to tax updates for state and federal tax withholding. When you select an option, the process to install the updates will begin immediately.
Check with your system administrator before installing tax updates. To be sure that tax updates are installed correctly, refer to documentation for specific tax updates on the CustomerSource Web site.
Customer Feedback OptionsProvides information about how you can join the Customer Experience Improvement Program to improve the quality, reliability, and performance of Microsoft® software and services.
Send us your documentation comments
We welcome comments regarding the usefulness of the Microsoft Dynamics GP documentation. If you have specific suggestions or find any errors in this manual, send your comments by e-mail to the following address: [email protected].
To send comments about specific topics from within Help, click the Documentation Feedback link, which is located at the bottom of each Help topic.
Note: By offering any suggestions to Microsoft, you give Microsoft full permission to use them freely.

6 A D V A N C E D S E C U R I T Y

A D V A N C E D S E C U R I T Y 7
Chapter 1: Setting up Advanced SecurityUse the following information to set up Advanced Security. You can use Advanced Security to maintain security at a window level within Microsoft Dynamics GP.
• Setting accelerator options• Setting Advanced Security options• Setting up or modifying user information• Modifying user class information
Setting accelerator options
Advanced Security uses accelerator tables to store the security information of the objects in the security object tree. A setup wizard will guide you through the accelerator settings.
The Advanced Security setup wizard will automatically be displayed the first time you attempt to use Advanced Security.
To set accelerator options:1. Open the Advanced Security window.
(Tools >> Setup >> System >> Advanced Security)
2. Choose Options to open the Advanced Security Options window.
3. Choose Wizard to open the Advanced Security setup wizard.
4. Follow the wizard instructions to select the optimal settings for your system.
C H A P T E R 1 S E T T I N G U P A D V A N C E D S E C U R I T Y
8 A D V A N C E D S E C U R I T Y
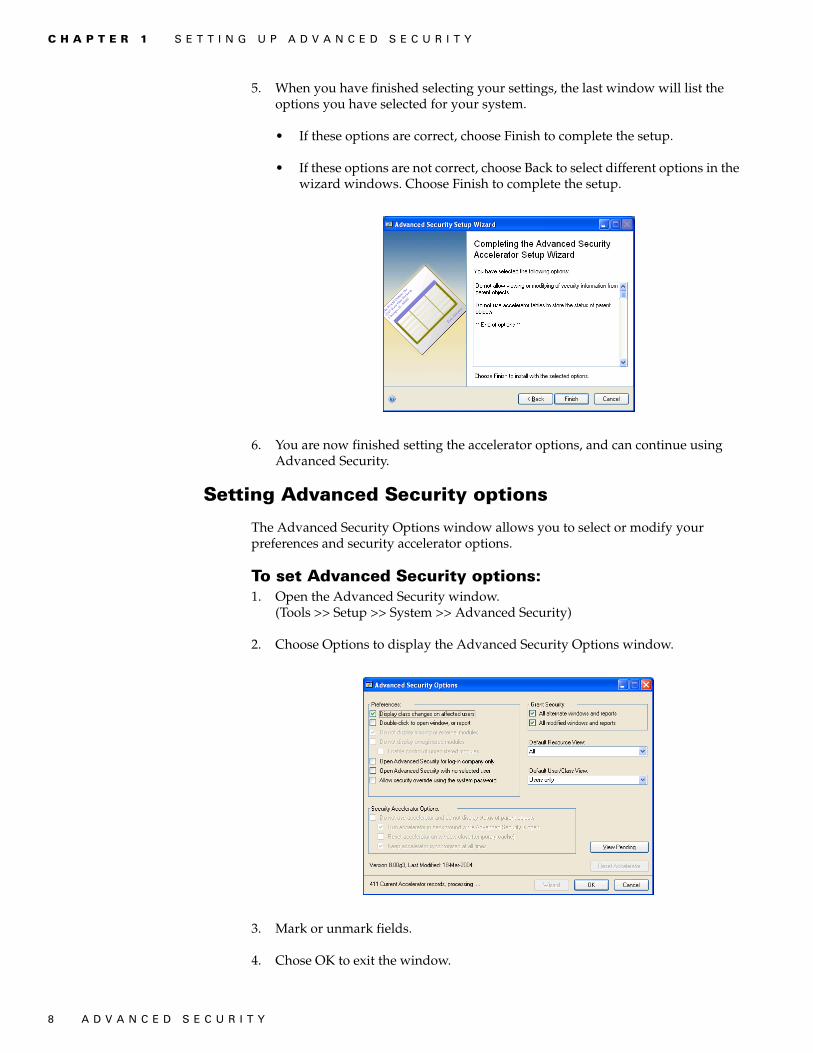
5. When you have finished selecting your settings, the last window will list the options you have selected for your system.
• If these options are correct, choose Finish to complete the setup.
• If these options are not correct, choose Back to select different options in the wizard windows. Choose Finish to complete the setup.
6. You are now finished setting the accelerator options, and can continue using Advanced Security.
Setting Advanced Security options
The Advanced Security Options window allows you to select or modify your preferences and security accelerator options.
To set Advanced Security options:1. Open the Advanced Security window.
(Tools >> Setup >> System >> Advanced Security)
2. Choose Options to display the Advanced Security Options window.
3. Mark or unmark fields.
4. Chose OK to exit the window.

A D V A N C E D S E C U R I T Y 9
C H A P T E R 1 S E T T I N G U P A D V A N C E D S E C U R I T Y
Setting up or modifying user information
You can use the User Setup window to modify setup information for a user. A list of users in the User/Class list appears in the lower right pane of the Advanced Security window.
You also can add a user record using Microsoft Dynamics GP. Refer to your Microsoft Dynamics GP system setup documentation for more information about adding users or classes using Microsoft Dynamics GP.
You also can use this procedure to modify a user in the Field Level Security window.
To set up or modify user information:1. Open the Advanced Security window.
(Tools >> Setup >> System >> Advanced Security)
2. Double-click a user name in the User/Class list to open the User Setup window.
3. Enter user information.
• If you are setting up a new user, choose Clear to remove current user’s information from the window, enter a user ID, name, password, and class ID.
• If you are modifying user information, make changes, as necessary.
4. Choose Save.
C H A P T E R 1 S E T T I N G U P A D V A N C E D S E C U R I T Y
10 A D V A N C E D S E C U R I T Y
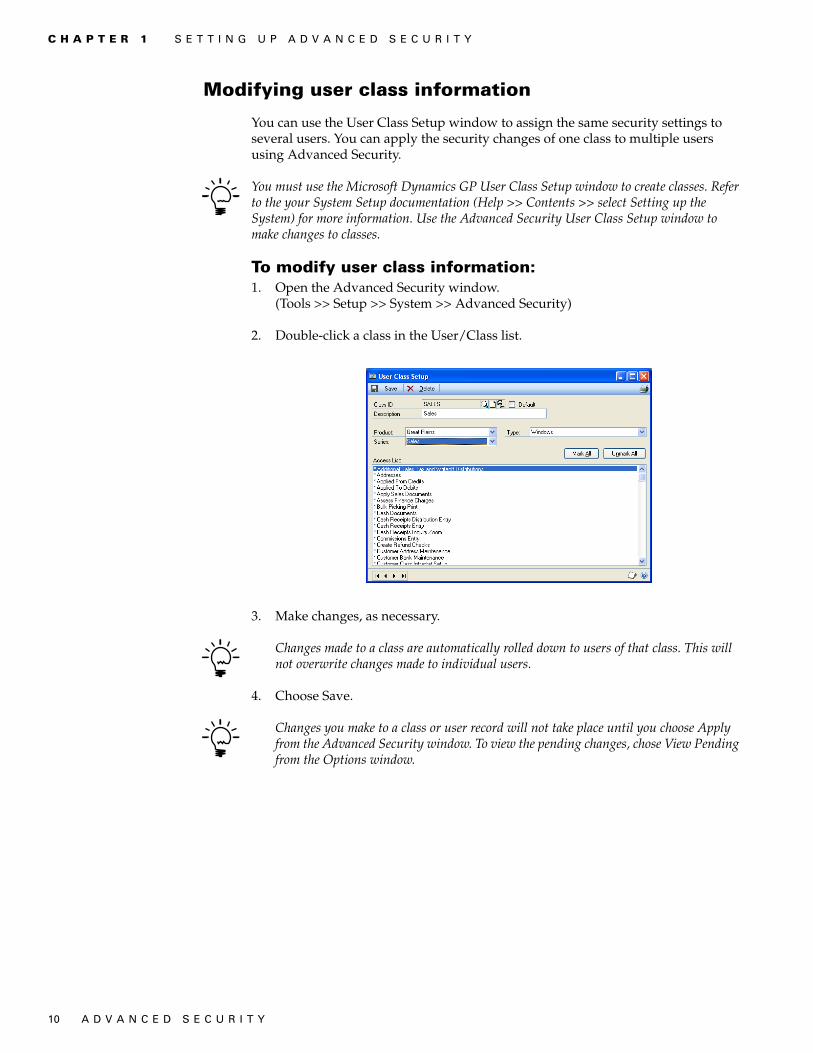
Modifying user class information
You can use the User Class Setup window to assign the same security settings to several users. You can apply the security changes of one class to multiple users using Advanced Security.
You must use the Microsoft Dynamics GP User Class Setup window to create classes. Refer to the your System Setup documentation (Help >> Contents >> select Setting up the System) for more information. Use the Advanced Security User Class Setup window to make changes to classes.
To modify user class information:1. Open the Advanced Security window.
(Tools >> Setup >> System >> Advanced Security)
2. Double-click a class in the User/Class list.
3. Make changes, as necessary.
Changes made to a class are automatically rolled down to users of that class. This will not overwrite changes made to individual users.
4. Choose Save.
Changes you make to a class or user record will not take place until you choose Apply from the Advanced Security window. To view the pending changes, chose View Pending from the Options window.

A D V A N C E D S E C U R I T Y 11
Chapter 2: Using Advanced SecurityUse the following information to view information in the Security Object Tree and to set up and modify security settings.
The information is divided into the following sections:
• The Security Object Tree• Viewing user and user class security settings• Rolling down security settings• Rolling up security settings• Reverting security settings• Verifying security settings• Importing or exporting security settings• Copying security settings• Printing security settings
The Security Object Tree
The Security Object Tree is located in the left pane of the Advanced Security window. It is divided into the following areas:
• By menu• By dictionary• Tools• Document Access• Posting Permissions• SmartList
You can change the way information in the pane is displayed by choosing the view menu and selecting a view. The default view will display all six areas. If you select Alternate, Modified, and Custom resources, only customized forms and reports will be displayed in the pane.
If you click on a check box that is not available, a message will be displayed explaining why the check box is not available.
By menu Select this view if you are modifying form security. It deals with the primary windows only, and grants access to lookup windows and hidden system windows.
By dictionary Select this view to control security access to forms, reports, and tables.
We recommend that you leave access to tables unrestricted; restricting access to tables could prevent the user from working with Microsoft Dynamics GP.
Tools Select this view to control the security of tools within Microsoft Dynamics GP.
Document Access Select this view to control which users have access to which documents.
Posting Permissions Select this view to control which users can post new transactions in the system.

C H A P T E R 2 U S I N G A D V A N C E D S E C U R I T Y
12 A D V A N C E D S E C U R I T Y
SmartList Select this view to control which SmartList Favorites users have access to. SmartList is used to create and modify customized inquiries.
Advanced Financial Analysis Select this view to control which users have access to Advanced Financial Analysis. Advanced Financial Analysis only can be used for a single company at a time.
Alternate, Modified, and Custom resources Select this view to display only customized forms and reports in the pane.
Using the Alternate, Modified, and Custom resources view might be slower because it does not use the accelerator table.
Viewing user and user class security settings
Users and user classes have security settings that you can view, modify, and print. You can access these settings using the Advanced Security window.
To view user and user class security settings:1. Open the Advanced Security window.
(Tools >> Setup >> System >> Advanced Security)
2. Select a user and company, or a class.
3. In the Security Objects List, choose the view menu and select a view.
If the check boxes for objects in the Security Objects List are selected, the objects are accessible to the selected user record or class. If the check boxes for the objects aren’t selected, the objects are not accessible to the selected user or class.
To give a selected user or class access to an object, mark the check box and choose Apply.
Rolling down security settings
If you have multiple users that are in the same class, you can use the Advanced Security window to roll down security settings for a class to all users in the class. You can change the security settings in that user class and then roll down those settings to all the users.
Advanced Security automatically will roll down changes you have made to a class.
To roll down security settings:1. Open the Advanced Security window.
(Tools >> Setup >> System >> Advanced Security)
2. Select a class.
3. To open the Advanced Security Rolldown window, choose Roll Down.
We recommend that you revert security before you manually roll down security settings. See Reverting security settings on page 13.
4. Select users from the list. Choose OK.
A D V A N C E D S E C U R I T Y 13
C H A P T E R 2 U S I N G A D V A N C E D S E C U R I T Y
All of the users you selected will have the same security settings as the user class you selected.
Rolling up security settings
You can use the Advanced Security window to apply security settings for a user to a class.
To roll up security settings:1. Open the Advanced Security window.
(Tools >> Setup >> System >> Advanced Security)
2. Select a user record and company.
3. To open the Advanced Security Rollup window, choose Roll Up.
We recommend that you revert security before you manually roll up security settings.
4. Select one class or multiple classes from the list. Choose OK.
The selected classes will have the same security settings as the selected user.
Reverting security settings
Use the Advanced Security window to change the security settings of a user back to their original state at any time by reverting those settings.
To revert security settings:1. Open the Advanced Security window.
(Tools >> Setup >> System >> Advanced Security)
2. Select a user record and company or class.
3. Choose Revert. A confirmation window will be displayed.
4. Choose Yes in the confirmation window.
The user you selected will now have its original security settings for the selected company.
Verifying security settings
You can check security settings periodically to be sure there are no errors. Use the Advanced Security window to verify security settings.
All of the additional products being used in your system with Microsoft Dynamics GP must be installed on the machine you use to verify security settings.
To verify security settings:1. Open the Advanced Security window.
(Tools >> Setup >> System >> Advanced Security)
2. Select the user record, and company or class to verify security settings for that user or class.
C H A P T E R 2 U S I N G A D V A N C E D S E C U R I T Y
14 A D V A N C E D S E C U R I T Y
3. Choose Verify. A confirmation window will be displayed.
4. Choose Yes in the confirmation window.
5. If there are errors, a window will appear and you will have the option to do one of the following:
• Fix the error• Fix all errors that might be found • Do not fix the error found
6. Select an option. A window will appear that displays how many changes have been made.
If you choose Fix the error or Fix all errors that might be found, the errors will not be corrected until you choose Apply from the Advanced Security window.
7. Choose OK.
Importing or exporting security settings
Use the Advanced Security window to import or export security settings for users or classes.
All of the additional products being used in your system with Microsoft Dynamics GP must be installed on the machine you are using to import security settings.
To import or export security settings:1. Open the Advanced Security window.
(Tools >> Setup >> System >> Advanced Security)
2. Select a user record, and company or a class.
3. Choose the Import/Export button to open the Advanced Security Import/Export window.
4. If you are importing security settings, enter a location to import from. If you are exporting security settings, enter a location to export to.
5. Choose Import to import security settings from the selected location to your selected user or class, or choose Export to export security settings from the selected user or class to the selected location.
Copying security settings
Use the Advanced Security window to copy the security settings from a user to other users in the same company, from a user to the same user in a different company, or from one class to other classes.
To copy security settings:1. Open the Advanced Security window
(Tools >> Setup >> System >> Advanced Security)
2. Select a user and a company, or select a class.
A D V A N C E D S E C U R I T Y 15
C H A P T E R 2 U S I N G A D V A N C E D S E C U R I T Y
3. Choose Copy.
4. Select what you are copying.
• If you are copying from a user, choose Users or Companies to open the Advanced Security Copy User window. If you choose Users, a list of users is displayed. If you choose Companies, a list of companies will be displayed.
• If you are copying from a class, the Advanced Security Copy Class window will open, and a list of classes to copy to will be displayed.
5. Select an item to copy to from the list that is displayed.
6. For an exact copy of the security settings for the selected user or class, mark the Revert security first check box. Reverting first will change security settings for a user or class back to their original settings.
7. Choose OK.
If you copy to a class, the changes in that class automatically will be rolled down to the users in that class.
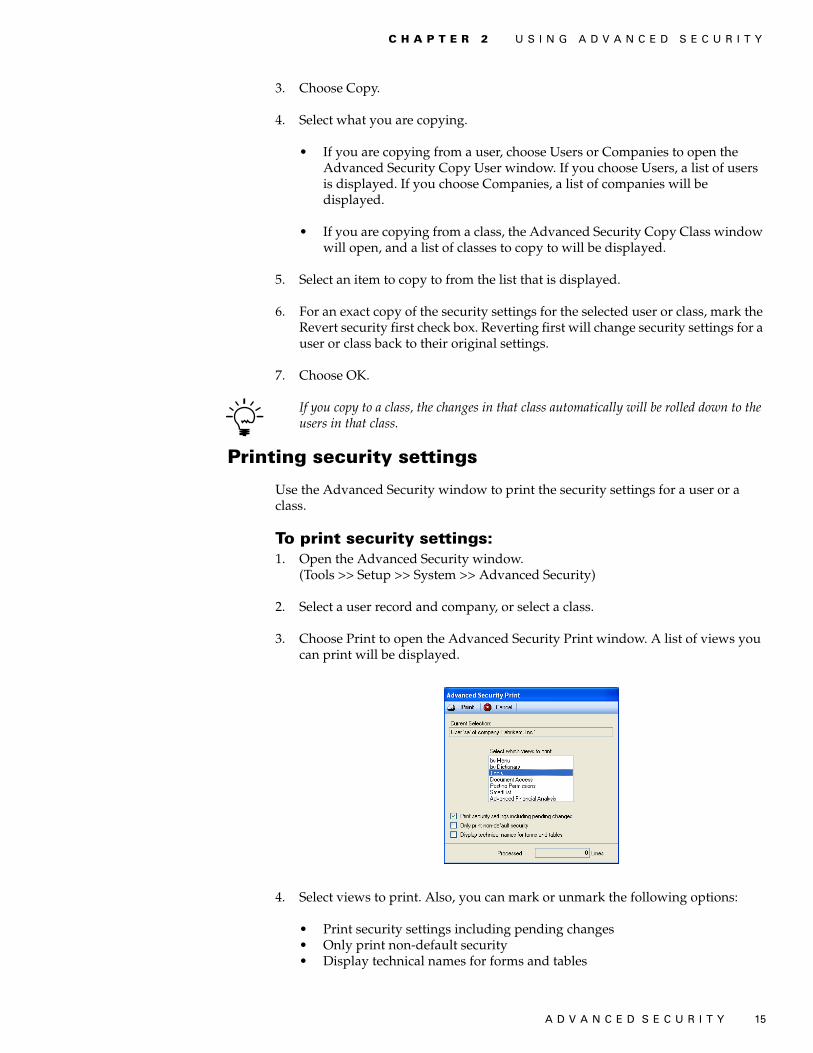
Printing security settings
Use the Advanced Security window to print the security settings for a user or a class.
To print security settings:1. Open the Advanced Security window.
(Tools >> Setup >> System >> Advanced Security)
2. Select a user record and company, or select a class.
3. Choose Print to open the Advanced Security Print window. A list of views you can print will be displayed.
4. Select views to print. Also, you can mark or unmark the following options:
• Print security settings including pending changes• Only print non-default security• Display technical names for forms and tables
C H A P T E R 2 U S I N G A D V A N C E D S E C U R I T Y
16 A D V A N C E D S E C U R I T Y
5. Choose Print. A Report Destination window will appear.
6. Choose to print to your screen, to a file, or to a printer. Choose OK.

A D V A N C E D S E C U R I T Y 17
Chapter 3: Field Level SecurityField Level Security restricts access to any field, window, or form in Microsoft Dynamics GP. It allows you to apply a password, or to make a window or form unavailable. It also allows you to hide, lock, or apply passwords to fields.
This information is divided into the following sections:
• Adding or modifying a field security ID• Copying a field security ID• Security modes• Resource Explorer• Creating a password
Adding or modifying a field security ID
Use the Field Security Maintenance window to assign field level security IDs, which are necessary to define user passwords, and to lock, hide, or make windows, forms, and fields unavailable. The Field Security Maintenance window also allows you to modify, add, or delete field security IDs.
To add or modify a field security ID:1. Open the Field Level Security window.
(Tools >> Setup >> System >> Field Level Security)
2. Choose Add to open the Field Security Maintenance window.
You also can double-click an existing field security ID in the Field Security window to open the Field Level Security Maintenance and continue through this procedure.

C H A P T E R 3 F I E L D L E V E L S E C U R I T Y
18 A D V A N C E D S E C U R I T Y
3. Enter or modify the Field Security ID field and a description.
4. Choose the product name lookup button to open the Resource Explorer window.
5. Select an object from the Resource Explorer window to apply security to. For more information refer to Resource Explorer on page 19.
6. Apply or modify the security mode for the field, form, or window you have selected. For more information refer to Security modes on page 18.
7. If you selected a security mode that requires a password, enter or select a password ID in the Password ID field.
8. Choose Save.
You can now use the Field Level Security window to apply this field security ID to users and user classes.
Copying a field security ID
Use the Field Security Maintenance window to copy an existing field security ID to create a new one. To create a new field security ID that will be similar to an existing field security ID, you can copy the existing field security ID as your new field security ID and then modify it.
To copy a field security ID:1. Open the Field Level Security window
(Tools >> Setup >> System >> Field Level Security)
2. Double-click on a field security ID in the field security object tree to open the Field Security Maintenance window.
3. Choose Copy.
4. Enter a new ID in the Field Security ID field.
5. Modify fields, as necessary.
6. Choose Save.
Security modes
You can select the following security modes from the Field Level Security Maintenance window to give security to fields, forms, or windows.
Password Before You must enter a password before getting access to a field.
Password After You must enter a password after modifying a field for the changes to be saved.
Warning Before A warning will be displayed and access to that field will be denied.
Lock Field You can’t use or modify the field.

A D V A N C E D S E C U R I T Y 19
C H A P T E R 3 F I E L D L E V E L S E C U R I T Y
Disable Field The field will be displayed but it will not be available.
Hide Field The field won’t be displayed.
Password Window You must to enter a password before access to the window is permitted.
Disable Window Enter the system administrator’s password to have access to the window.
Password Form Users or classes must enter the correct password before access to the form is permitted.
Disable Form You must enter the system administrator’s password to modify the form.
Resource Explorer
The Resource Explorer window opens when you choose the lookup button for the Product Name field. Use the Resource Explorer to look up forms, fields, and tables.
The objects tree is located in the left pane of the Resource Explorer window. Choose the plus sign next to an object to open it in the objects tree.
• Double-click on an object to open it in the right pane of the Resource Explorer window.
• Select an object in the right pane and choose OK to enter it into the Field Security Maintenance window.

C H A P T E R 3 F I E L D L E V E L S E C U R I T Y
20 A D V A N C E D S E C U R I T Y
Creating a password
Use the Password Maintenance window to create and modify passwords that you assign to a field, form, or window.
To create a password:1. Open the Password Maintenance window by clicking the underlined password
ID in the Field Security Maintenance window.
You also can open the Password Maintenance window by opening the lookup window for the password field. You can either select a current password, or you can choose New to clear the fields.
2. Enter a password ID and a description.
3. Enter the password.
4. Choose Save.
5. You can continue to create new passwords, modify existing passwords, or return to the Field Security Maintenance window.
• To create more passwords, choose Clear and repeat steps 2-5.
• To modify other passwords, select an existing password and make changes, as necessary.
• To exit, close the window.

A D V A N C E D S E C U R I T Y 21
IndexAaccelerator, setting 7Advanced Security options, setting 8Advanced Security Print window 15
Cchanges since last release, information
about 4company list, described 1current upgrade information, accessing on
the Web 4
Ddocumentation, symbols and conventions
3
FField Level Security
company list 2field security object list 2user/class list 2
Field Level Security window 17field security ID
adding 17copying 18modifying 17
Field Security Maintenance window, displaying 17
Hhelp, displaying 3Help menu, described 3
Iicons, used in manual 3
Llessons, accessing 4lookup window, displaying 4
Nnavigation, symbols used for 3new features, information about 4
OOrientation training, accessing 4
PPassword Maintenance window,
displaying 20passwords
adding 20modifying 20
Rrequired fields, described 4Resource Explorer window 19resources, documentation 3
Ssecurity modes
disable field 18disable form 19disable window 19hide field 19lock field 18password after 18password before 18password form 19password window 19warning before 18
security object treeAdvanced Financial Analysis 12alternate, modified, and custom
resources 12by dictionary 11by menu 11described 1document access 11posting permissions 11SmartList 11tools 11viewing 11
security settingscopying 14exporting 14importing 14printing 15reverting 13rolling down 1, 12rolling up 1, 13verifying 13viewing 12
symbols, used in manual 3
Ttutorial, accessing 4
Uupgrade information, accessing on the
Web 4User Class Setup window 10user setup, modifying 9User Setup window 9user/class list, described 1
Wwhat’s new, accessing 4

22 A D V A N C E D S E C U R I T Y