advanced technology guide -...
TRANSCRIPT
o w n e r s . a c u r a . c o m
3 1 T Y 2 Q 1 0 2 0 1 5 A c u r a R L X A d v a n c e d T e c h n o l o g y G u i d e 0 0 X 3 1 - T Y 2 - Q 1 0 0 © 2 0 1 4 H o n d a M o t o r C o . , L t d . — A l l R i g h t s R e s e r v e d P r i n t e d i n J a p a n
2015 RLXADVANCED TECHNOLOGY GUIDE
15 RLX_KA_English_ATG_BQS51272_ATG_NEW STYLE 5/13/2014 12:43 PM Page 1

A D V A N C E D T E C H N O L O G Y G U I D EThe Advanced Technology Guide is designed to help you get
acquainted with your 2015 Acura RLX and provide basic
instructions on some of its technology and convenience
features.
This guide is not intended to be a substitute for the Owner’s
Manual. For more detailed information on vehicle controls and
operation, please refer to the respective sections in the
Owner’s Manual or Navigation Manual.
As with the Owner’s Manual, this guide covers all trim levels of
the Acura RLX. Therefore, you may find descriptions of
equipment and features that are not on your particular vehicle.
M U L T I - I N F O R M A T I O ND I S P L A Y p. 6
V O I C ER E C O G N I T I O N p. 30
N A V I G A T I O N p. 33
O N - D E M A N D M U L T I -U S E D I S P L A Y T M p. 27
BLUETOOTH ®H A N D S F R E E L I N K ® p. 36
Advance Package shown
Electric Parking Brake . . . . . . . . . . . . . . . . . . . . . . . . . . . . . . . . . . . .25Automatic Brake Hold . . . . . . . . . . . . . . . . . . . . . . . . . . . . . . . . . . . .26On-Demand Multi-Use DisplayTM (ODMDTM) . . . . . . . . . . . . . . . . . .27Color Information Display . . . . . . . . . . . . . . . . . . . . . . . . . . . . . . . . .29Voice Recognition . . . . . . . . . . . . . . . . . . . . . . . . . . . . . . . . . . . . . . .30Navigation* . . . . . . . . . . . . . . . . . . . . . . . . . . . . . . . . . . . . . . . . . . . .33Bluetooth® HandsFreeLink® . . . . . . . . . . . . . . . . . . . . . . . . . . . . . . . .36SMS Text Messaging and E-Mail . . . . . . . . . . . . . . . . . . . . . . . . . . . .41Basic Audio Operation . . . . . . . . . . . . . . . . . . . . . . . . . . . . . . . . . . .42Bluetooth® Audio . . . . . . . . . . . . . . . . . . . . . . . . . . . . . . . . . . . . . . . .43iPod® or USB Flash Drive . . . . . . . . . . . . . . . . . . . . . . . . . . . . . . . . . . .44Hard Disc Drive (HDD) Audio* . . . . . . . . . . . . . . . . . . . . . . . . . . . . .45Song By Voice* . . . . . . . . . . . . . . . . . . . . . . . . . . . . . . . . . . . . . . . . . .46Pandora® . . . . . . . . . . . . . . . . . . . . . . . . . . . . . . . . . . . . . . . . . . . . . .47AcuraLink featuring Aha™ . . . . . . . . . . . . . . . . . . . . . . . . . . . . . . . .48Settings for Your Vehicle . . . . . . . . . . . . . . . . . . . . . . . . . . . . . . . . . .49AcuraLink®: Next Generation* . . . . . . . . . . . . . . . . . . . . . . . . . . . . .50My Acura . . . . . . . . . . . . . . . . . . . . . . . . . . . . . . . . . . . . . . . . . . . . . .51Safety Reminder . . . . . . . . . . . . . . . . . . . . . . . . . . . . . . . . . . . . . . . . .51Fuel Recommendation . . . . . . . . . . . . . . . . . . . . . . . . . . . . . . . . . . .51
*if equipped
Keyless Access System . . . . . . . . . . . . . . . . . . . . . . . . . . . . . . . . . . . .2Instrument Panel Indicators . . . . . . . . . . . . . . . . . . . . . . . . . . . . . . . .4Multi-Information Display (MID) . . . . . . . . . . . . . . . . . . . . . . . . . . . . .6Auto Door Locks . . . . . . . . . . . . . . . . . . . . . . . . . . . . . . . . . . . . . . . . . .9Tire Pressure Monitoring System (TPMS) . . . . . . . . . . . . . . . . . . . . . .10Driving Position Memory System (DPMS) . . . . . . . . . . . . . . . . . . . . .11HomeLink® . . . . . . . . . . . . . . . . . . . . . . . . . . . . . . . . . . . . . . . . . . . . . .12Reverse Tilt Door Mirrors . . . . . . . . . . . . . . . . . . . . . . . . . . . . . . . . . . .13Power Folding Mirrors* . . . . . . . . . . . . . . . . . . . . . . . . . . . . . . . . . . . .13One-Touch Turn Signal . . . . . . . . . . . . . . . . . . . . . . . . . . . . . . . . . . .14Auto Headlights with Wiper Integration . . . . . . . . . . . . . . . . . . . . .14Automatic Rain-Sensing Wipers* . . . . . . . . . . . . . . . . . . . . . . . . . . .15Heated Steering Wheel . . . . . . . . . . . . . . . . . . . . . . . . . . . . . . . . . . .15Multi-View Rear Camera . . . . . . . . . . . . . . . . . . . . . . . . . . . . . . . . .16Lane Departure Warning (LDW)* . . . . . . . . . . . . . . . . . . . . . . . . . . .17Lane Keeping Assist System (LKAS)* . . . . . . . . . . . . . . . . . . . . . . . .18Blind Spot Information (BSI) System* . . . . . . . . . . . . . . . . . . . . . . . .19Parking Sensor System* . . . . . . . . . . . . . . . . . . . . . . . . . . . . . . . . . . .20Forward Collision Warning (FCW)* . . . . . . . . . . . . . . . . . . . . . . . . . .21Collision Mitigation Braking SystemTM (CMBSTM)* . . . . . . . . . . . . . . .22Adaptive Cruise Control with Low Speed Follow* . . . . . . . . . . . . .23
15 RLX_KA_English_ATG_BQS51272_ATG_NEW STYLE 5/13/2014 12:43 PM Page 2

2
K e y l e s s A c c e s s S y s t e mOperate certain functions of your vehicle by simply having the remote withinoperating range.
Grab either one of the frontdoor handles.*
Press the door lock buttonon either front door handle.*
*For Technology and Advance Packages, all doors can be operated for this function.
L o c k i n g t h e D o o r s
O p e n i n g t h e T r u n k
U n l o c k i n g t h e D o o r s
3
Press the trunk release buttonunder the trunk handle whenall doors are unlocked.
E n g i n e S t a r t / S t o p B u t t o n
A c c e s s o r y o r O n M o d ePress ENGINE START/STOP once without pressing the brake pedal. Press it againfor On mode.
S t a r t i n g t h e E n g i n ePress and hold the brake pedal, then press ENGINE START/STOP.
T u r n i n g t h e V e h i c l e O f fShift to Park, then press ENGINE START/STOP.
Note: If you press the button and the shift lever is not in Park, the vehicle goesinto Accessory mode.
15 RLX_KA_English_ATG_BQS51272_ATG_NEW STYLE 5/13/2014 12:43 PM Page 3

I n s t r u m e n t P a n e l I n d i c a t o r s
54
Briefly appear with each engine start. Red and amber indicators are most critical.Blue and green indicators are used for general information. See your Owner’s Manualfor more information.
O n / O f f I n d i c a t o r s
M a l f u n c t i o n I n d i c a t o r s If an indicator remains on, there may be a problem; see your dealer.
Charging system
Low brake fluid, Brake system
Low oil pressure
Precision All Wheel Steer System
Vehicle Stability Assist (VSA®)
Malfunction indicator lamp(check engine light)
Tire Pressure Monitoring System(TPMS) (blinks)
Collision Mitigation BrakingSystem™ (CMBS™)*
SRS(Supplemental Restraint System)
ABS (Anti-lock Brake System) Blind Spot Information (BSI)*
Brake system (hydraulic)
Electric Power Steering
Keyless Access System
PASSENGER AIRBAG OFF(next to display)
SPORT mode on
VSA OFF
BSI* off
Immobilizer (blinks):Use other vehicle key
Exterior lights on
Turn signals/hazards on
CRUISE CONTROL* on
CRUISE MAIN* on
High beams on
*if equipped
C o n d i t i o n I n d i c a t o r sAction is needed by driver.
Parking brake on:Release
Message indicator:See MID
Low tire pressure (stays on):Add air
Seat belt reminder:Fasten seat belt(s)
Low fuel:Refill
Electric Parking Brake
CMBS* off
FCW off
Electric parking brake on
Brake Hold System on
Automatic Brake Hold on
Lane Departure Warning(LDW)*
Forward Collision Warning(FCW)*
Electric Parking Brake(blinks)
15 RLX_KA_English_ATG_BQS51272_ATG_NEW STYLE 5/13/2014 12:43 PM Page 4

M u l t i - I n f o r m a t i o n D i s p l a y ( M I D )
A c c e s s i n g t h e M I D M a i n D i s p l a y s ( m o d e l s w i t h o u t n a v i g a t i o n )
Consists of several displays that provide you with useful information.
To scroll through the differentdisplays:• Roll the selector wheel for the
main displays.• Press TRIP for the lower
displays.
Selectorwheel
TRIPbutton
76
Maindisplay
Vehiclesettings*
L o w e r D i s p l a y sOutside
temperature,Odometer
Outside temperature,Trip A
Outside temperature,Trip B
*You can also change Vehicle Settings using the SETTINGS button on the center panel (see page 49).
Average/instant fueleconomy
Tire pressuremonitoring
system
Range Oil life
Elapsedtime
Averagespeed
MainDisplays
LowerDisplays
15 RLX_KA_English_ATG_BQS51272_ATG_NEW STYLE 5/13/2014 12:43 PM Page 5

8
A u t o D o o r L o c k sProgram how and when the vehicle doors automatically lock and unlock.
H o w I t W o r k s
C h a n g i n g S e t t i n g s
1. Press SETTINGS. Use theinterface dial to make andenter selections.
2. Select Vehicle Settings.3. Select Auto Door Unlock.4. Select All Doors When Shifted
to Park.5. Press BACK to exit the menu.
Follow the steps below to set all doors to unlock when you shift to Park. Makesure you are using the key you want to change settings for (Driver 1 or Driver 2).*
Note: The driver’s and front passenger’s door can be opened by pulling theinner front door handle, regardless of the setting. Changing the setting to “AllDoors” is useful for rear passengers.
M a i n D i s p l a y s ( m o d e l s w i t h n a v i g a t i o n )
Average/instant fueleconomy
Vehiclesettings*
L o w e r D i s p l a y sOutside
temperature,Odometer
Outside temperature,Trip A
Outside temperature,Trip B
Maindisplay(blank)
RangeTire pressuremonitoring
system
Elapsedtime Oil life
Averagespeed
Turn-by-turndirections
(duringguidance)
9
D e f a u l t L o c k S e t t i n gThe doors are preset to lockwhen your vehicle reachesabout 10 mph.
D e f a u l t U n l o c k S e t t i n gAll doors are set to unlock whenthe driver’s door is opened.
*You can also change these settings using themulti-information display (see page 6).
*You can also change Vehicle Settings using the SETTINGS button on the center panel (see page 49).
15 RLX_KA_English_ATG_BQS51272_ATG_NEW STYLE 5/13/2014 12:43 PM Page 6

10
H o w I t W o r k sWhen the tire pressure drops significantly below recommended levels:
T i r e P r e s s u r e M o n i t o r i n g S y s t e m ( T P M S )Monitors the vehicle’s tire pressures.
W h a t t o D o
1. Visually inspect the tires for damage.
2. Inflate the tire(s) to therecommended pressures listed onthe label on the driver’s doorjamb.
P r o g r a m m i n g t h e D P M S1. Turn on the vehicle. Make sure
the shift lever is in Park (P).3. Press SET. You will hear a beep.
2. Adjust your preferred seat,outside mirror, and steeringwheel settings.
4. Press the memory buttoncorresponding to the remote(1 or 2) you are using. You willhear two beeps.
Notes:• Stored positions can also be recalled by pressing one of the memory
buttons (1 or 2) on the door. • Lumbar position cannot be stored.
D r i v i n g P o s i t i o n M e m o r y S y s t e m ( D P M S )Store driver’s seat, outside mirror, and steering wheel positions into memory for eachcorresponding keyless remote (1 or 2), which are recalled when you unlock thedriver’s door with the remote and enter the vehicle.
11
The low tire pressureindicator comes on.
A message appears inthe MID.
Roll the selector wheel tothe tire pressure monitor tosee which tires have lowpressure.
15 RLX_KA_English_ATG_BQS51272_ATG_NEW STYLE 5/13/2014 12:44 PM Page 7
913
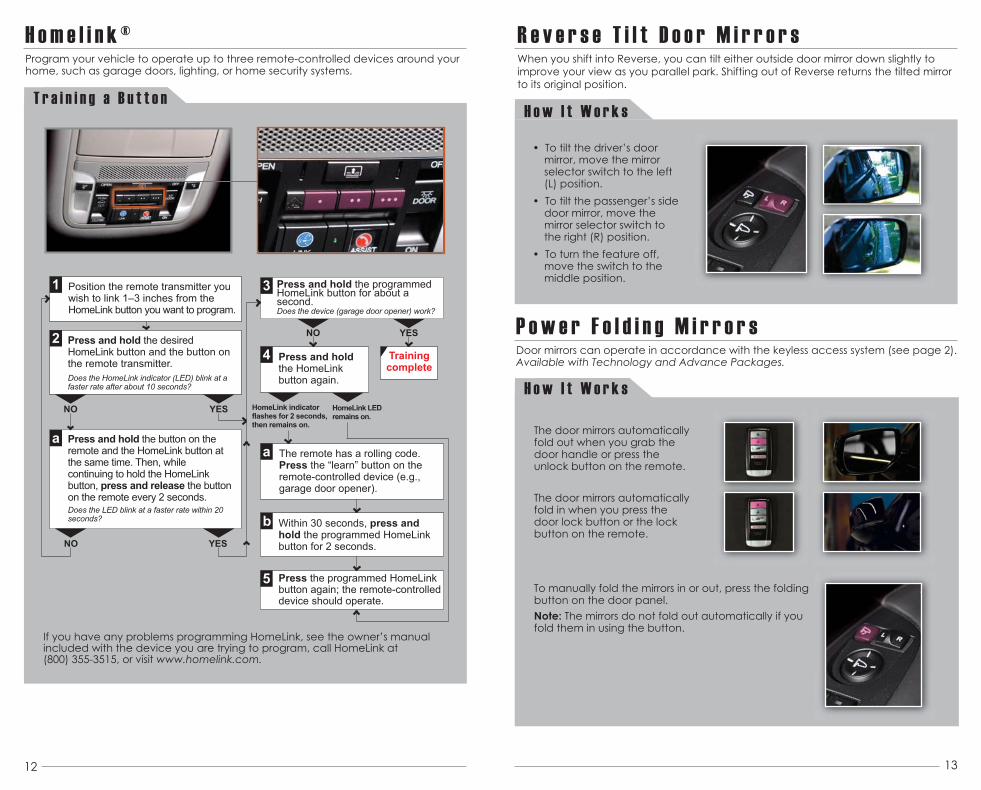
R e v e r s e T i l t D o o r M i r r o r s
H o w I t W o r k s
When you shift into Reverse, you can tilt either outside door mirror down slightly toimprove your view as you parallel park. Shifting out of Reverse returns the tilted mirrorto its original position.
• To tilt the driver’s doormirror, move the mirrorselector switch to the left(L) position.
• To tilt the passenger’s sidedoor mirror, move themirror selector switch tothe right (R) position.
• To turn the feature off,move the switch to themiddle position.
P o w e r F o l d i n g M i r r o r sDoor mirrors can operate in accordance with the keyless access system (see page 2).Available with Technology and Advance Packages.
H o w I t W o r k s
The door mirrors automaticallyfold out when you grab thedoor handle or press theunlock button on the remote.
The door mirrors automaticallyfold in when you press thedoor lock button or the lockbutton on the remote.
H o m e l i n k ®
Press and hold the button on the remote and the HomeLink button at the same time. Then, while continuing to hold the HomeLink button, press and release the button on the remote every 2 seconds.Does the LED blink at a faster rate within 20 seconds?
Press and hold the HomeLink button again.
Training complete
YESNO
HomeLink indicator flashes for 2 seconds, then remains on.
HomeLink LED remains on.
YESNO
YESNO
Position the remote transmitter you wish to link 1–3 inches from the HomeLink button you want to program.
1
Press and hold the desired HomeLink button and the button on the remote transmitter.Does the HomeLink indicator (LED) blink at a faster rate after about 10 seconds?
2
aThe remote has a rolling code. Press the “learn” button on the remote-controlled device (e.g., garage door opener).
Press the programmed HomeLink button again; the remote-controlled device should operate.
Within 30 seconds, press and hold the programmed HomeLink button for 2 seconds.
a
Press and hold the programmed HomeLink button for about a second.Does the device (garage door opener) work?
3
b
4
5
T r a i n i n g a B u t t o n
Program your vehicle to operate up to three remote-controlled devices around yourhome, such as garage doors, lighting, or home security systems.
If you have any problems programming HomeLink, see the owner’s manualincluded with the device you are trying to program, call HomeLink at(800) 355-3515, or visit www.homelink.com.
1210
To manually fold the mirrors in or out, press the foldingbutton on the door panel.Note: The mirrors do not fold out automatically if youfold them in using the button.
15 RLX_KA_English_ATG_BQS51272_ATG_NEW STYLE 5/13/2014 12:44 PM Page 8

1511
O n e - T o u c h T u r n S i g n a lUse this quick and convenient method to signal a lane change.
A u t o H e a d l i g h t s w i t h W i p e r I n t e g r a t i o nFor your convenience, your vehicle’s headlights automatically turn on when thewindshield wipers operate.
H o w I t W o r k s
H o w I t W o r k s
• Lightly push the turn signal lever upor down for a three-blink sequence.
• For a continuous signal, push thelever up or down until it locks intoplace.
Make sure your headlights arein the AUTO position.
Turn on your windshieldwipers. The headlights alsoturn on. When you turn off thewindshield wipers, theheadlights turn off shortlyafter.
1410
When driving in rainy weather,move the wiper lever down tothe AUTO position. Adjust therainfall sensor sensitivity withthe intermittent timeadjustment ring.
Press the heated steeringwheel button to turn onheating. Press the buttonagain to turn it off.
A u t o m a t i c R a i n - S e n s i n g W i p e r sAdjust how the windshield wipers operate based on the amount of rainfall detected.Available with Technology and Advance Packages.
H e a t e d S t e e r i n g W h e e lHeat the steering wheel to a comfortable temperature when the vehicle is on.Available with Advance Package.
H o w I t W o r k s
Always ensure the wiper lever is in theOFF position before entering a carwash to prevent severe damage tothe windshield wiper system.
NOTICE
Intermittent TimeAdjustment Ring
15 RLX_KA_English_ATG_BQS51272_ATG_NEW STYLE 5/13/2014 12:44 PM Page 9

M u l t i - V i e w R e a r C a m e r aFor added convenience, the area behind your vehicle is displayed to help younavigate while backing up.
H o w I t W o r k s• When you shift into Reverse (R), a real-time image of the area behind your
vehicle is shown in the display, along with helpful parking guidelines.• The display turns off when you shift out of Reverse.• Press the interface dial to toggle between views.
C h a n g i n g S e t t i n g sTurn the guidelines on or off.
Wide (default) Normal Top down
1. Press SETTINGS. Use the interfacedial to make and enterselections.
2. Select Camera Settings.3. Select one of the options.
Fixed Guidelines: Guidelinesappear when you shift intoReverse. Select On or Off.Dynamic Guidelines: Guidelinesmove as you turn the steeringwheel. Select On or Off.
4. Press BACK to exit the menu.
1711
1610
L a n e D e p a r t u r e W a r n i n g ( L D W )Alerts you if your vehicle begins to move out of a detected lane without the turnsignal activated. Available with Standard and Technology Packages.
H o w I t W o r k s
A camera mounted between the windshield and the rearview mirror determinesif your vehicle begins to move away from the center of a detected lane whiledriving between 40 –90 mph.
T u r n i n g L D W O n o r O f fPress LDW to turn the system on or off. A green indicator light appears on thebutton when the system is on.
LDW may not activate under certain conditions. See your Owner’s Manualfor more information.
If you cross a detectedlane line without using yourturn signal, a messageappears on the MID and abeep sounds.
15 RLX_KA_English_ATG_BQS51272_ATG_NEW STYLE 5/13/2014 12:44 PM Page 10

1810
L a n e K e e p i n g A s s i s t S y s t e m ( L K A S )Alerts you if your vehicle begins to move out of a detected lane and helps withsteering operation. Available with Advance Package.
H o w I t W o r k s
A camera mounted between the windshield and the rearview mirror determinesif your vehicle begins to move away from the center of a detected lane whiledriving between 45–90 mph.
T u r n i n g L K A S O n o r O f f
If you cross a detected lane line without using your turn signal,a message appears on the MID and a beep sounds. Steeringtorque is applied to keep your vehicle in the middle of the lane.
LKAS may not activate under certain conditions. See your Owner’s Manualfor more information.
1911
1. Press MAIN. LKAS appears in the MID.
2. Press the LKAS button. Laneoutlines appear in the MID.Dotted lane lines turn solidwhen the system operates.
Press MAIN or the LKAS buttonto turn the system off.
Minimum operating speed: 20 mph
B l i n d S p o t I n f o r m a t i o n ( B S I ) S y s t e mAssists you in determining if there are detected vehicles in your blind spots. Availablewith Technology and Advance Packages.
H o w I t W o r k sA radar sensor under each corner of the rear bumper alerts you to a detectedvehicle in your left or right blind spots.
When a vehicle is detectedin your blind spot, the blindspot indicator turns on andstays lit until the area is clear.
When your turn signal is onand a vehicle is detected,the blind spot indicator blinksand a beep sounds until thearea is clear or the turnsignal is off.
C h a n g i n g S e t t i n g s
1. Press SETTINGS. Use theinterface dial to make andenter selections.
2. Select Vehicle Settings.3. Select Blind Spot Info.4. Select an alert type or Off.5. Press BACK to exit the menu.
Choose alert types, or turn the system off.*
*You can also change these settings using themulti-information display (see page 6).
15 RLX_KA_English_ATG_BQS51272_ATG_NEW STYLE 5/13/2014 12:44 PM Page 11

2010
H o w I t W o r k sWhen the system senses an object, an indicator appears on the upperdisplay and a series of beeps sound. As you get closer to the object, thebeep rate increases.
Corner sensors
Within 24 in. (60 cm)
Rear center sensors
Within 59 in. (150 cm)
P a r k i n g S e n s o r S y s t e mWarns you of the proximity between your vehicle and nearby objects when parkingor backing up. Available with Advance Package.
2111
T u r n i n g t h e S y s t e m O n o r O f fPress the parking sensor button. A green indicator light appears on the buttonwhen the system is on.
F o r w a r d C o l l i s i o n W a r n i n g ( F C W )Alerts you to the possibility of a front-end collision. Available with Standard andTechnology Packages.
If the camera mounted between the windshield and the rearview mirror detectsa vehicle in front of you when your vehicle speed is 10 mph or higher—and itdetermines there is a likelihood of a frontal collision—the system provides youwith visual and audible warnings.
H o w I t W o r k s
C h a n g i n g S e t t i n g s
1. Press SETTINGS. Use theinterface dial to make andenter selections.
2. Select Vehicle Settings.3. Select Forward Collision
Warning Distance.4. Select Long, Normal, Short,
or Off.5. Press BACK to exit the menu.
Determine the warning timing, or turn the system off.*
If you do not brake in timeor take preventive action:• BRAKE flashes in the MID• a beep sounds
continuously
FCW may not activate under certain conditions. See your Owner’s Manualfor more information.
ShortNormal
Long
*You can also change these settings using themulti-information display (see page 6).
15 RLX_KA_English_ATG_BQS51272_ATG_NEW STYLE 5/13/2014 12:44 PM Page 12

C o l l i s i o n M i t i g a t i o n B r a k i n g S y s t e m T M ( C M B S T M)Can alert you to the possibility of a front-end collision and help reduce the severity ofthe collision if you are unable to avoid it. Alerts depend on the distance setting. SeeForward Collision Warning on page 21 for instructions on changing the distancesetting. Available with Advance Package.
T u r n i n g C M B S O f f o r O n
CMBS Off
A beep sounds and a messageappears in the MID.
CMBS On
A beep sounds, a messageappears in the MID, and the CMBSindicator turns on.
* Depending on the circumstances, CMBS may not go through all of the alert stages before initiating the last stage.
4 S t a g e s o f C M B S *
Press and hold CMBS OFF.
22 2311
Visualwarning
Audiblewarning
Seat belt retraction
Brakeapplication
Stage 1
Stage 2
Stage 3
Stage 4
Heads-upwarning timingdepends on theCMBS distancesetting.
Lightly applied Lightly applied
Strongly applied Strongly applied
O p e r a t i n g A C C
Adapt ive Cru ise Control (ACC) with Low Speed Fo l low Set a time or space interval between your vehicle and the vehicle ahead of you.When the vehicle ahead changes speed, ACC senses the change and accelerates ordecelerates your vehicle's speed to maintain a set range. Available with AdvancePackage.
Check the MID forACC information.
H o w t o U s e A C CU s i n g A C C1. Accelerate to the desired speed.
Above 25 mph: Go to step 2.Below 25 mph (Low Speed Follow): Press SET/- to set the speed at 25 mphwhen there is a vehicle ahead of you. If there is no vehicle ahead, ACC iscanceled.
2. Press SET/-, then release the accelerator pedal. The set speed is fixed, andACC begins.
3. To increase speed, press RES/+. To decrease speed, press SET/-.
4. If the vehicle ahead of you stops, your vehicle also stops. When the vehicleahead starts to accelerate, press RES/+ or SET/- or depress the acceleratorpedal to resume following at the set speed.
S t a n d a r d C r u i s e C o n t r o l1. Press and hold the Distance button.2. A beep sounds, and the selected mode appears in the MID.
MAIN
SET/-Distance
RES/+
CANCEL
Turning ACC OnPress MAIN. ACC appears in the MID.Canceling ACCPress MAIN or CANCEL, or tap the brakepedal.
15 RLX_KA_English_ATG_BQS51272_ATG_NEW STYLE 5/13/2014 12:45 PM Page 13

2524
Press the Distance button to scrollthrough four ranges.
The selected range and set speed are shown in the MID.
Note: The ACC radar sensor in the front grille can detect and monitor the distance of avehicle up to approximately 100 yards ahead.
C h a n g i n g V e h i c l e D i s t a n c eControl the distance between your vehicle and the vehicle in front of you.
Range MID Screen
Extra Long
Long
Middle
Short
If there is no vehicle ahead ofyou, a dotted-line vehicle iconappears on the MID.
If a vehicle enters the ACCrange, a beep sounds and avehicle icon appears on the MID.
Shortrange
Normalrange
Longrange
Extra LongRange
ACC automatically adjusts the following distance based on therange selected and your vehicle speed.
E l e c t r i c P a r k i n g B r a k eKeep your vehicle stationary while parked using a simple switch.
A p p l y i n g t h e P a r k i n g B r a k e
R e l e a s i n g t h e P a r k i n g B r a k e
Pull up theparking brakeswitch.
The PARKindicator turnson.
Press theparking brakeswitch withyour foot onthe brakepedal andyour seat beltfastened.
You can alsolightly depress theacceleratorpedal if your seatbelt is fastenedand the vehicle ison and not inPark.
15 RLX_KA_English_ATG_BQS51272_ATG_NEW STYLE 5/13/2014 12:45 PM Page 14

A u t o m a t i c B r a k e H o l dMaintains rear brake hold even after the brake pedal is released.
2610
H o w I t W o r k s
1. Make sure the vehicle is on andyour seat belt is fastened.
2. Press BRAKE HOLD. The BRAKEHOLD indicator turns on.
Note: Brake hold is canceled if the system is on for more than 10 minutes,your seat belt is unfastened, or you turn the vehicle off.
27
3. With the shift lever in Drive(D), depress the brake pedaland come to a completestop. The HOLD indicatorappears and brake hold isapplied. Release the brakepedal.
4. Depress the brake pedaland press BRAKE HOLDagain to turn off the system.
Depress the acceleratorpedal to cancel brake holdand start moving.
O n - D e m a n d M u l t i - U s e D i s p l a y T M ( O D M D T M )Interactive and tactile touchscreen display includes navigation (if equipped), audio,climate control, Bluetooth® HandsFreeLink® functionality, and more. See your Owner’sManual for information on how to store shortcuts.
H o w I t W o r k s
N a v i g a t i o n O p t i o n sSelect Shortcuts from the main screen, thenselect Places.You can store up to six destination addressesfrom the navigation address book and selectthem for easy access.
Bluetooth ® H a n d s F r e e L i n k ® O p t i o n sSelect Shortcuts from the main screen, thenselect Phone.You can select from five speed dial entriesstored to the Shortcuts menu or the five mostrecent call history numbers.You can also dial a number.*
*Dial is inoperable while the vehicle is moving.
The main screen includes audio andclimate control operation, as well asa convenient shortcuts menu.
Simply touch the item you want toselect.
15 RLX_KA_English_ATG_BQS51272_ATG_NEW STYLE 5/13/2014 12:45 PM Page 15

112928
A u d i o O p t i o n s
C l i m a t e C o n t r o l O p t i o n sFrom the main screen, you can select climate control options.
Driver’s sidetemperature
Driver’s sidevent mode
Recirculation/fresh air mode
Fancontrol
AC/SYNCmode
Passenger’s sidevent mode
Passenger’s sidetemperature
Select Shortcuts from the main screen, thenselect Climate.You can store two customized climatecontrol settings and select them for easyaccess.
From the main screen, you can operate certainaudio items (see page 42).Select Shortcuts from the main screen, thenselect Audio.You can store up to six audio presets from AM,FM, XM, or HDD and select them for easy access.
C o l o r I n f o r m a t i o n D i s p l a yChoose what to display in the center screen.
C h a n g i n g t h e D i s p l a y
N a v i g a t i o n * Press NAV to display the mapscreen.
P h o n ePress PHONE to display thePhone screen.
I n f o r m a t i o nPress INFO to display vehicleinformation and options.
A u d i oPress AUDIO to display theaudio screen.
* if equipped
15 RLX_KA_English_ATG_BQS51272_ATG_NEW STYLE 5/13/2014 12:45 PM Page 16

11
V o i c e C o m m a n d T i p s• To hear a list of available commands at any time, press and release the Talk
button, then say “Voice help.”• To bypass the system prompts, simply press the Talk button again to say your
command.• When the Talk button is pressed, all available voice commands are
highlighted in yellow.• Speak in a clear, natural voice.• Reduce all background noise.• Adjust the dashboard and side vents away from the microphone in the
ceiling.• Close the windows and moonroof.
30 31
V o i c e R e c o g n i t i o nTo keep your eyes on the road and hands on the wheel, use voice commands tooperate certain vehicle features*, such as hands-free calling.
H o w I t W o r k s
To reduce the potential for driver distraction, certain manual functions may beinoperable or grayed out while the vehicle is moving. Voice commands arealways available.
Pick-Up button: Answer an incoming callor display HFL speed dial or call history inthe MID.
Hang-Up/Back button: End or decline acall, clear HFL information in the MIDscreen, or cancel an operation.
Talk button: Give voice commands.
*Voice commands are available for navigation, audio, and climate control onvehicles equipped with navigation (see page 31).
C o m m o n l y U s e d V o i c e C o m m a n d s
Press and release the Talk button before you say a command.
G e n e r a l C o m m a n d s• Display map• Display menu• Display phone• Information• Display audio screen•What time is it?
F i n d P l a c e C o m m a n d s• Find nearest: - ATM - Acura dealer - gas station - airport - Mexican - hospital restaurant - bank
- post office
N a v i g a t i o n C o m m a n d s• How long/far to the destination?
• Display destination map• Display entire route
D i s p l a y C o m m a n d s• Display (or hide): - ATM - gas station - restaurant - post office• Display north up/heading up• Zoom in/out• Go home• Display current location
Here are some examples of commonly used voice commands for vehiclesequipped with navigation. Try some of these to familiarize yourself with the voicecommand system.
15 RLX_KA_English_ATG_BQS51272_ATG_NEW STYLE 5/13/2014 12:45 PM Page 17

Press and release the Talk button before you say a command.
32 33
A u d i o C o m m a n d s• Radio on• Radio # FM/AM• Radio preset 1/2/3/4/5/6• XM channel #• XM preset 1/2/3/4/5/6• DISC play• DISC play track #• DISC skip forward/back• iPod/USB/HDD play
P h o n e C o m m a n d s *• Call by name• Call by number
C l i m a t e C o n t r o l C o m m a n d s• Air conditioner on/off• Rear defrost on/off• Climate control recirculate/
fresh air• Fan speed up/down• Temperature # degrees(# = 57–87)
• Temperature max hot/cold
H e l p C o m m a n d s• Voice help (list of all
available commands by category)
*Available on all vehicles
E n t e r i n g a D e s t i n a t i o n U s i n g V o i c e C o m m a n d s
N a v i g a t i o nReal-time navigation system uses GPS and a map database to show your currentlocation and help guide you to a desired destination. Available on RLX withNavigation, Technology, and Advance Packages.
Press and release the Talk button before you say a command.
Press and release the Talk button before you say a command.
For information on setting other destination options, see your Navigation Manual.
1. Say “Address.”
2. Say “Street,” then say the streetname on the next screen. Do notinclude the direction (N, S, E, W) ortype (St., Ave., Blvd., etc.).
3. A list of street names appears. Saythe number next to the street youwant to select.
4. Say the entire street addressnumber. For example, “1-2-3-4.” Ifnecessary, say “OK” to proceed.
5. If the street address is in more thanone city, a list of city namesappears. Say the number next tothe city you want to select.
6. Say “Set as destination” to set theroute.
1. Say “Find nearest ATM.”
2. A list of the nearest ATMs in yourarea is displayed by shortestdistance to destination.
3. Say the number next to thedestination you want to select.
4. Say “Set as destination” to set theroute.
U s i n g t h e “ F i n d N e a r e s t ” C o m m a n d
E n t e r i n g a S t r e e t A d d r e s s
Note: It is recommended that you enter your destination before driving orwhen the vehicle is stopped.
15 RLX_KA_English_ATG_BQS51272_ATG_NEW STYLE 5/13/2014 12:45 PM Page 18

18 1934 35
A c u r a L i n k R e a l - T i m e T r a f f i c T M *Provides continuously updated info, including traffic speed, incidents, andconstruction in major metro areas.
Press and release the Talk button before you say a command.
D i s p l a y i n g T r a f f i c I n f o r m a t i o nSay “Display traffic” to view traffic flow and incident icons.
Note: Traffic flow and incidenticons are displayed on mapscales of 5 miles or less.
Heavy traffic
Moderate traffic
Free-flow traffic
*AcuraLink subscription service (complimentary for the first three years of vehicle ownership)
Incident
I n c i d e n t I c o n s
Congestion
Construction
Roadclosed
Weather
1. Say “Display traffic on my route” to view a listof incidents on your route.
2. Say the number of the incident you want toavoid.
3. Say “Avoid” and the incident list returns.
4. Say “Recalculate route” to set the new route.
T r a f f i c R e r o u t i n g T M
The system can automatically provide detours around traffic or incidentswhen a destination is set and Traffic Rerouting is turned on in Navi Settings(see page 49).
IncidenticonIncidenticon
TrafficFlowdata
TrafficFlowdata
M a p S c r e e n L e g e n d
T u r n - b y - T u r n D i r e c t i o n sShows a more detailed view of the next maneuver during route guidance on themulti-information display. See your Owner’s Manual for instructions on how to turnthis feature on or off.
Calculatedroute
Distance to go
Next guidancepoint
Time to go Current vehiclelocation
Distance tonext maneuver
Current route
Upcoming maneuver
15 RLX_KA_English_ATG_BQS51272_ATG_NEW STYLE 5/13/2014 12:45 PM Page 19

3621
37
Blue too th ® H a n d s F r e e L i n k ® ( H F L )Make and receive phone calls through your vehicle’s audio system. Visitwww.acura.com/handsfreelink to check if your phone is compatible.
U s i n g H F L
To reduce the potential for driver distraction, certain manual functions may beinoperable or grayed out while the vehicle is moving. Voice commands arealways available.
Pick-Up button: Answer an incoming callor display speed dial and call history inthe MID.Hang-Up/Back button: End or decline acall, clear HFL information in the MID, orcancel an operation.Selector wheel: Scroll through speed dialand call history in the MID. Press to makea selection.Talk button: Make a call using a storedvoice tag, phonebook name, or phonenumber.
PHONE button: Go to thephone screen.BACK button: Cancel anoperation or return to theprevious screen.Interface Dial: Rotate to scrollthrough selections and press toenter a selection.MENU button: From the Phonescreen, access Speed Dial,Call History, Phonebook, andmore. SETTINGS button: Go to PhoneSettings to pair a phone andset up text/E-mail options.
P a i r i n g Y o u r P h o n e
Use the interface dial to make and enter selections.
Pair your phone when the vehicle is stopped to begin using hands-free phoneand related audio functions.
1. Press SETTINGS.
2. Select Phone Settings.
3. Select Bluetooth Device List (if nophone has been paired) orConnect Phone (if pairing anadditional phone).
4. Select Add Bluetooth Device.
5. Make sure your phone is indiscovery mode.
6. HFL searches for your phone.Select your phone when itappears on the list.
If your phone does not appear:Select Phone Not Found andsearch for HandsFreeLink fromyour phone.
7. HFL gives you a six-digit code.Compare it to the code thatappears on your phone. Connectto HFL from your phone.
8. The system asks if you want toenable Phone Synchronization.Select On.
R e c e i v i n g a C a l lA notification is heard and the incoming call information appears on the display.
Press thePick-Upbutton toaccept thecall.
Press theHang-Upbutton to endor decline thecall.
15 RLX_KA_English_ATG_BQS51272_ATG_NEW STYLE 5/13/2014 12:45 PM Page 20

22 2338 39
D i a l i n g a N u m b e r
Use the interface dial to make and enter selections.
Enter a 10-digit phone number to call.
U s i n g t h e M e n u *
1. Press PHONE.
2. Press MENU.
3. Select Dial.
4. From the navigation screen or theODMD, enter the phone number.Select the green phone icon to call.
*This feature is inoperable while the vehicle is moving.
Press and release the Talk button to say a command.
U s i n g V o i c e C o m m a n d s
1. Say “Dial by number.”
2. Say the phone number. Forexample, “3-1-0-5-5-5-1-2-3-4.”
3. The system begins to dial.
Select items by touch.
U s i n g t h e O D M D *
1. Select Shortcuts.
2. Select Phone.
3. Select Dial.
4. Enter the phone number and selectthe green phone icon to call.
*This feature is inoperable while the vehicle is moving.
U s i n g t h e P h o n e b o o k
Use the interface dial to make and enter selections.
When your phone is paired, its entire phonebook is automatically imported to thesystem.
U s i n g t h e M e n u *
1. Press PHONE.
2. Press MENU.
3. Select Phonebook.
4. Scroll through the list to find thename and number you want tocall, and select it to call.
*This feature is inoperable while the vehicle is moving.
Press and release the Talk button to say a command.
U s i n g V o i c e C o m m a n d s
1. Say “Call by name.”
2. Say the phonebook name andphone type. For example, “JohnSmith mobile.”
Note: Phone synchronization must beon for this feature to work.
15 RLX_KA_English_ATG_BQS51272_ATG_NEW STYLE 5/13/2014 12:45 PM Page 21

2440 41
U s i n g S p e e d D i a l a n d C a l l H i s t o r y
Use the interface dial to make and enter selections.
Store 20 speed dial entries for quick calling, or view the last 20 calls.
U s i n g t h e P h o n e S c r e e n
1. Press PHONE.
2. For Speed Dial, scroll through thelist to find the entry you want tocall, and select it to call.
For Call History, move theinterface dial to the right andscroll through the list.
Use the left selector wheel on the steering wheel to enter selections.
U s i n g t h e M I D
1. Press the Pick-Up button.• The speed dial list appears in
the MID.• For Call History, move the
selector wheel to the right.
2. Scroll through the list to find theentry you want to call, and selectit to call.
Select items by touch.
U s i n g t h e O D M D
1. Select Shortcuts.
2. Select Phone.
3. Select Speed Dial or Call History.
4. Select the desired entry to call.
S M S T e x t M e s s a g i n g a n d E - M a i lReceive and send text messages and e-mails from your paired and linked phoneusing Bluetooth® HandsFreeLink®. Visit www.acura.com/handsfreelink to see if thisfeature is compatible with your phone. Standard message rates apply. This feature islimited while the vehicle is moving.
R e c e i v i n g M e s s a g e s
Use the interface dial to make and enter selections.
1. A notification appears on thedisplay. Select Read to open themessage.
2. The message is displayed, and thesystem reads it aloud.
R e p l y i n g t o M e s s a g e s
Use the interface dial to make and enter selections.
1. With the message open, selectReply.
2. Select one of the six availablereply messages,
3. Select Send to send the message.
C a l l i n g t h e S e n d e r
Use the interface dial to make and enter selections.
1. With the message open, selectCall.
2. The system begins dialing thenumber.
Note: Notifications and operation for SMS Text and E-mail are separate. Chooseyour desired account in the Phone Settings menu (see page 49).
15 RLX_KA_English_ATG_BQS51272_ATG_NEW STYLE 5/13/2014 12:46 PM Page 22
2442
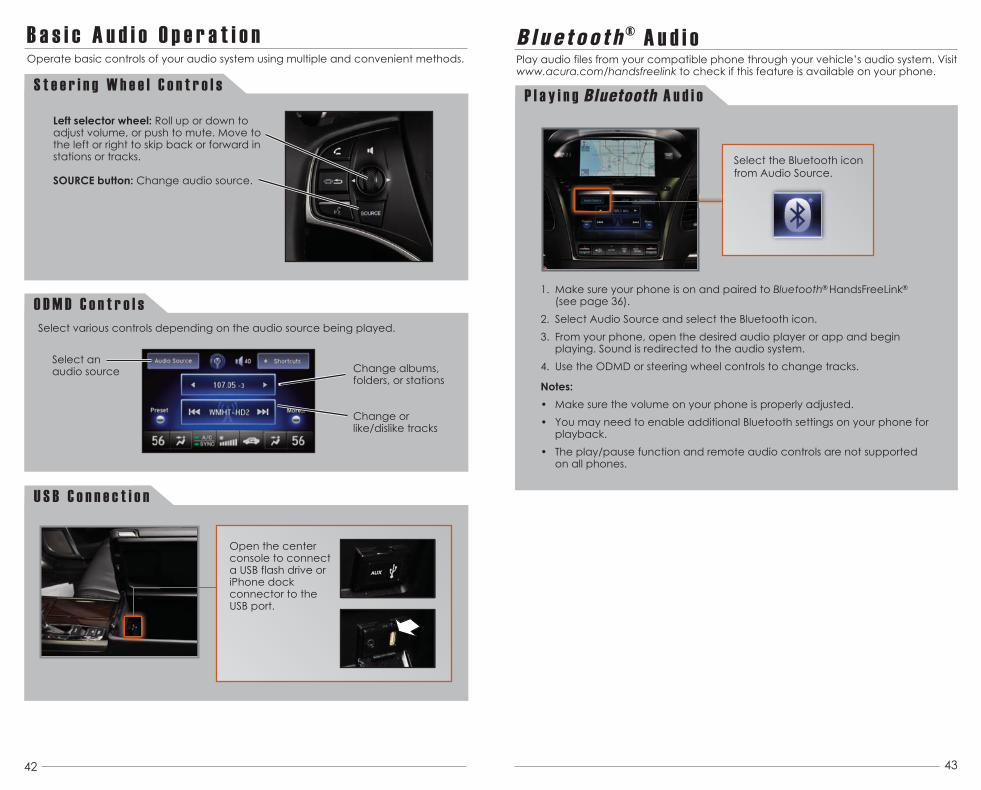
B a s i c A u d i o O p e r a t i o nOperate basic controls of your audio system using multiple and convenient methods.
S t e e r i n g W h e e l C o n t r o l s
Left selector wheel: Roll up or down toadjust volume, or push to mute. Move tothe left or right to skip back or forward instations or tracks.
SOURCE button: Change audio source.
U S B C o n n e c t i o n
Open the centerconsole to connecta USB flash drive oriPhone dockconnector to theUSB port.
43
O D M D C o n t r o l s
Change albums,folders, or stations
Change orlike/dislike tracks
Select various controls depending on the audio source being played.
Select anaudio source
Blue too th ® A u d i oPlay audio files from your compatible phone through your vehicle’s audio system. Visitwww.acura.com/handsfreelink to check if this feature is available on your phone.
1. Make sure your phone is on and paired to Bluetooth® HandsFreeLink®
(see page 36).2. Select Audio Source and select the Bluetooth icon.3. From your phone, open the desired audio player or app and begin
playing. Sound is redirected to the audio system.4. Use the ODMD or steering wheel controls to change tracks.
Notes:• Make sure the volume on your phone is properly adjusted.• You may need to enable additional Bluetooth settings on your phone for
playback.• The play/pause function and remote audio controls are not supported
on all phones.
P l a y i n g Bluetooth A u d i o
Select the Bluetooth iconfrom Audio Source.
15 RLX_KA_English_ATG_BQS51272_ATG_NEW STYLE 5/13/2014 12:46 PM Page 23

28
i P o d ® o r U S B F l a s h D r i v ePlay audio files from your compatible iPod or USB flash drive through your vehicle’saudio system.
2944 45
P l a y i n g A u d i o F i l e s
S e a r c h i n g f o r M u s i c
Use the interface dial to make and enter selections.
1. Connect the iPod dock connector or USB flash drive to the USB port in thecenter console (see page 42).
2. Select Audio Source and select the iPod or USB icon.3. Use the ODMD or steering wheel controls to change tracks.
iPod is a registered trademark of Apple Computer, Inc., registered in the U.S. and other countries. iPod not included.
Select the iPod or USB iconfrom Audio Source.
1. Press AUDIO.
2. Press MENU.
3. Select Music Search.
4. Select a category orfolder.
5. Select a track and pressENTER to begin playing.
H a r d D i s c D r i v e ( H D D ) A u d i oRecord CDs onto your vehicle’s hard disc drive for future playback. Songs areautomatically recorded once a CD is inserted into the disc slot. Available on RLX withNavigation, Technology, and Advance Packages.
1. Select Audio Source and select the HDD icon. The last recorded albumbegins playing.
2. Use the ODMD or steering wheel controls to change tracks.
P l a y i n g HDD A u d i o
Select the HDD iconfrom Audio Source.
S e a r c h i n g f o r M u s i c
Use the interface dial to make and enter selections.
1. Press AUDIO.
2. Press MENU.
3. Select Music Search.
4. Select one of thecategories.
5. Select a track and pressENTER to begin playing.
15 RLX_KA_English_ATG_BQS51272_ATG_NEW STYLE 5/13/2014 12:46 PM Page 24

U s i n g t h e “ L i s t ” C o m m a n d
28
S o n g B y V o i c e ™ ( S B V )Play songs from your iPod and HDD from most screens by using simple voice commands.Available on RLX with Navigation, Technology, and Advance Packages.
2946 47
Press and release the Talk button to say a command.
1. Say “Music search.”
2. Say “List” and a search option. Forexample, “List artist XYZ” or “Listalbum XYZ.”
3. A list of tracks by the artist oralbum is displayed. Say thenumber of your selection. Forexample, “One.”
4. The system plays the selected songand returns to your original screen.
U s i n g t h e “ P l a y ” C o m m a n d
Press and release the Talk button to say a command.
1. Say “Music search.”
2. Say “Play” and a search option.For example, “Play artist XYZ” or“Play song XYZ.”
3. The system plays the first song bythe artist or the specified song andreturns to your original screen.
P a n d o r a ®Play and operate Pandora streaming radio from your compatible phone throughyour vehicle’s audio system. Visit www.acura.com/handsfreelink to check if thisfeature is available on your phone. Standard data rates apply.
1. For Bluetooth connection: Make sure your phone is paired to Bluetooth®
HandsFreeLink® (see page 36) and the screen is on and unlocked.For USB connection: Connect the dock connector to the USB port in thecenter console (see page 42).
2. Select Audio Source and select the Pandora icon. Streaming begins.3. Use the ODMD to like/dislike songs, and the ODMD or steering wheel
controls to change tracks.Notes:• iPhone can connect via Bluetooth or USB; Android and BlackBerry can
connect via Bluetooth only.• If you cannot operate Pandora through the audio system, it may be
streaming through Bluetooth® Audio. Make sure the Pandora source onyour audio system is selected.
P l a y i n g P a n d o r a
Select the Pandora iconfrom Audio Source.
15 RLX_KA_English_ATG_BQS51272_ATG_NEW STYLE 5/13/2014 12:46 PM Page 25

28
A c u r a L i n k f e a t u r i n g A h a ™Access music and information programming, location-based services, and social mediathrough your vehicle’s audio system. Download the AcuraLink app to your phone priorto using this feature at owners.acura.com/apps. Visit www.acura.com/handsfreelink tocheck if this feature is compatible on your phone. Standard data rates apply.
2948 49
1. For Bluetooth connection: Make sure your phone is paired to Bluetooth®
HandsFreeLink® (see page 36) and the screen is on and unlocked.For USB connection: Connect the dock connector to the USB port in thecenter console (see page 42).
2. Select Audio Source and select the Aha icon. Streaming begins.3. Use the ODMD to like/dislike songs, and the ODMD or steering wheel
controls to change tracks.Notes:• iPhone can connect via Bluetooth or USB; Android can connect via
Bluetooth only.• If you cannot operate Pandora through the audio system, it may be
streaming through Bluetooth® Audio. Make sure the Aha source on youraudio system is selected.
P l a y i n g A h a
Select the Aha iconfrom Audio Source.
Select Stations to selectfrom 16 favorite stations.
Press MENU to view thecomplete station list.
S e t t i n g s f o r Y o u r V e h i c l eChange different settings for many features in your vehicle. See your Owner’s Manualfor detailed information on settings and options.
A d j u s t i n g S e t t i n g s
Navi SettingsChange various settings fornavigation system routing.
Camera SettingsChange camera modes.
Vehicle SettingsTPMS calibration, meter setup,door setup, and more.
System SettingsAdjust the display, systemlanguage, and more.
Choose from the available options:
Phone SettingsPair a phone, change call andtext/e-mail options, and more.
Info SettingsImport wallpaper and selectclock type.
Audio SettingsChange sound options andvarious settings for audiosources.
Press SETTINGS to enter the settingsmenu.
Use the interface dial to make andenter selections.
15 RLX_KA_English_ATG_BQS51272_ATG_NEW STYLE 5/13/2014 12:46 PM Page 26

2551
A c u r a L i n k ® : N e x t G e n e r a t i o nExperience assistive, convenience, and connectivity features through AcuraLinkConnected Services. Visit owners.acura.com for more information and pricingoptions. All packages require enrollment and a privacy agreement. Available on RLXwith Navigation, Technology, and Advance Packages.
2850
P a c k a g e O p t i o n sS t a n d a r d P a c k a g e
• Automatic collision notification• Security alarm notification • Car finder• Remote door locking and unlocking• Stolen vehicle locator• Additional navigation map and routing features• Vehicle condition and diagnostics• Enhanced roadside assistance
C o n n e c t P a c k a g e
Subscription-based service. Features include Connect Package, plus:• Business and personal concierge services (via LINK)
Note: Available features can change at any time. Visit owners.acura.com forthe most current information.
P r e m i u m P a c k a g e
Complimentary for the first three years of vehicle ownership. Features include:
Subscription-based service. Notifications for certain features can be sent toyou via SMS text, e-mail, or call recordings. Standard data rates apply.Features include Standard Package, plus:
• Continuously updated surface street and highway traffic (see page 34)• Feature Guide, Quick Tips, and general messages about your vehicle • Maintenance Minder• Dealer appointment scheduling (with participating dealers)
Press LINK to search and sendpoints of interest (POI) to thenavigation system, or torequest roadside assistance.
Press ASSIST to connect toemergency services.
R e g i s t e r a t M y A c u r aMy Acura enhances your ownership experience by allowing you to explore featuresand technologies specific to your vehicle, schedule service appointments, obtainand update maintenance and service records, manage your financial servicesaccount, and access other useful information. Visit owners.acura.com to register.
S a f e t y R e m i n d e rYour vehicle is equipped with airbags. Airbags do not replace your seat belts; theyadd to the protection offered by seat belts. Airbags can help protect you in sometypes of collisions, but they do not provide protection in all collisions.Always make sure you and your passengers wear seat belts, and that young childrenare properly secured in a child seat or booster in the rear seat. Never place an infantseat in the front passenger’s seat as the force of a deploying airbag can seriouslyinjure an infant.
F u e l R e c o m m e n d a t i o nUse of unleaded gasoline of 91 octane or higher is recommended. • Acura recommends TOP TIER Detergent Gasoline where available.• Do NOT use gasoline containing more than 15% ethanol.• Do NOT use gasoline containing methanol.• Do NOT use gasoline containing MMT.• See your Owner’s Manual for more information.Some gasoline in North America contains MMT, a manganese-based fueladditive. Prolonged and consistent use of gasoline containing MMT candeteriorate your vehicle’s performance, fuel economy, and the emission controlsystem. Always use MMT-free gasoline if available. Failures caused by use ofgasoline containing MMT may not be covered under your new vehicle warranty.TOP TIER Detergent Gasoline (recommended) never contains MMT and hasdetergent additives to keep your engine clean. For further information on fuel andlubricants for your car and information on gasoline that does not contain MMT,contact your dealer or visit owners.acura.com.
15 RLX_KA_English_ATG_BQS51272_ATG_NEW STYLE 5/13/2014 12:46 PM Page 27