advanced topics in ods lauren haworth, genentech, inc., south
TRANSCRIPT

1
Paper RV-010
Advanced Topics in ODS Lauren Haworth, Genentech, Inc., South San Francisco, CA
ABSTRACT This presentation will be a whirlwind tour of some of the most useful advanced techniques in ODS. Topics covered include:
• Tip sheets on new features • inline formatting, • RTF features: enhanced page numbers, hyperlinks, text, tables of contents, and RTF control words • PDF features: bookmarks, enhanced page numbers, hyperlinks, text.
INTRODUCTION This paper is aimed at the casual user of ODS who would like to take their skills to the next level. The examples are all taken from the book “ODS: Beyond the Basics” (SAS® Press, Fall 2009). All of the examples are written using SAS 9.2. You can find SAS 9.1.3 versions of the examples on the companion web site for the book.
TIP SHEETS There is no better set of reference guides to ODS than the new tip sheets that were developed by the Base SAS Team, as shown on the Base SAS R&D web site (http://support.sas.com/rnd/base/ods/index.html). The tip sheets should not be considered a substitute for the ODS documentation, however, they are concise, accurate and extremely handy. And since they are maintained by the ODS developers, they represent the most up-to-date quick reference sheets available.

2
In addition to these handy tip sheets, on the R&D web site you will find links to papers by the developers and the most current information on R&D efforts in the Base SAS arena.

3
USING INLINE FORMATTING TO CUSTOMIZE HTML OUTPUT Inline formatting allows you to make simple formatting changes in specific parts of your output, and for specific output destinations. Inline formatting allows you to specify the style and layout characteristics of almost any cell or line in your output.
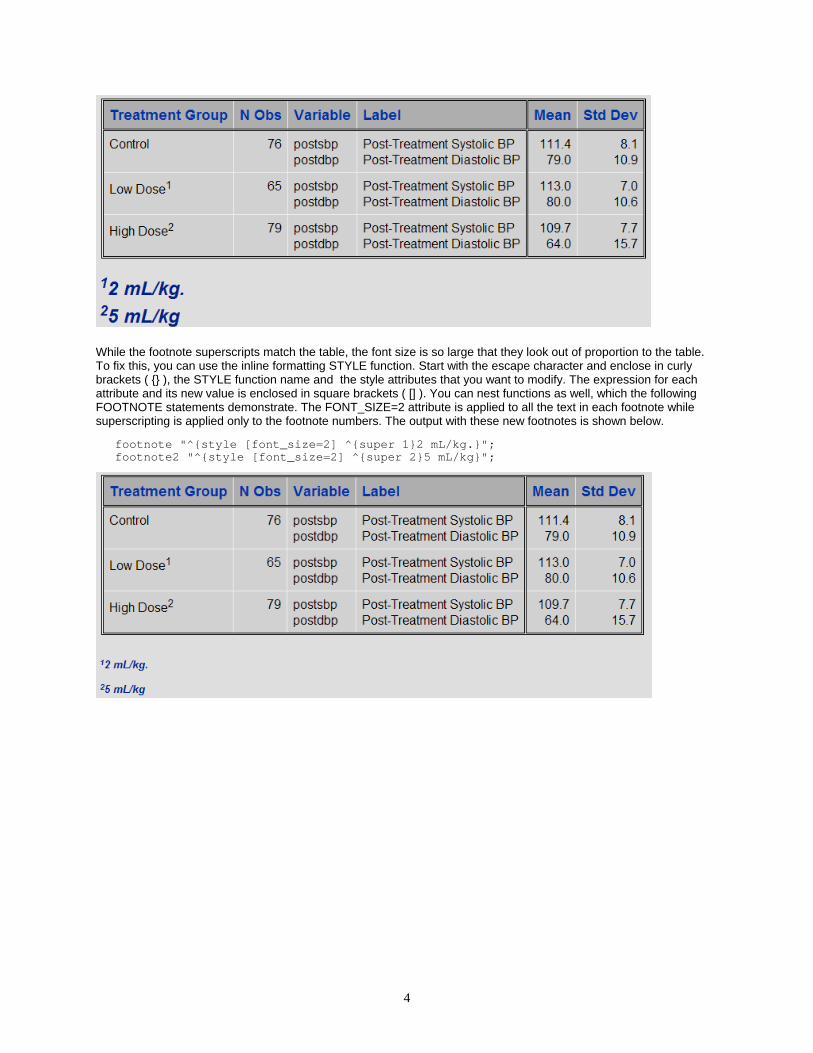
For example, if you’d like to add footnote references to some of the labels in your output, you can use inline formatting to add the footnote numbers as superscripts. The following program demonstrates this technique by adding footnotes to the row labels of PROC MEANS output.
The first thing you need to do to use inline formatting is to designate a character to be used to identify inline formatting. This character is called an escape character. It needs to be a character that is not used anywhere else in your output or program. Suggested characters include: ~, ^, #, and @.
ODS ESCAPECHAR="^";
Now you can use this character to add superscripts to your format labels. The syntax for applying inline formatting always starts with the escape character. Then, for a superscript, you enclose the SUPER function name and the text to superscript in curly brackets ({ } ), as shown below.
proc format; value superfmt 1='Control' 2='Low Dose^{super 1}' 3='High Dose^{super 2}'; run;
If you apply the SUPERFMT format to CLASS variable TX in a PROC MEANS step that analyzes data set CLINICAL, you get the output shown below. The PROC MEANS step follows.
options nocenter; proc means data=clinical mean std maxdec=1; class tx; var postsbp postdbp; format tx superfmt.; run;
With footnote references in the table, the next step is to add the footnotes themselves. Inline formatting in the following FOOTNOTE statements generates superscripts for the two footnote numbers.
footnote "^{super 1}2 mL/kg."; footnote2 "^{super 2}5 mL/kg";
The output below shows the new results with footnotes added to the report and with OPTIONS NOCENTER in effect.
4
While the footnote superscripts match the table, the font size is so large that they look out of proportion to the table. To fix this, you can use the inline formatting STYLE function. Start with the escape character and enclose in curly brackets ( {} ), the STYLE function name and the style attributes that you want to modify. The expression for each attribute and its new value is enclosed in square brackets ( [] ). You can nest functions as well, which the following FOOTNOTE statements demonstrate. The FONT_SIZE=2 attribute is applied to all the text in each footnote while superscripting is applied only to the footnote numbers. The output with these new footnotes is shown below.
footnote "^{style [font_size=2] ^{super 1}2 mL/kg.}"; footnote2 "^{style [font_size=2] ^{super 2}5 mL/kg}";

5
ADDING “PAGE X OF Y” TO RTF REPORTS When producing multi-page reports, it’s useful to be able to indicate how many pages the reader should expect. This avoids problems caused by someone not receiving all of the pages. If your SAS reports have page numbers in the format of "Page 1 of 3", "Page 2 of 3", etc., and a page gets lost in a fax transmission, the receiver will know to call you back and ask for the missing page.
Standard SAS page numbering just gives you a single page number. For example, the output below shows the top an RTF file created by ODS. The file contains a PROC PRINT report of data set CLIPS. This is the first page of the output, so the page number 1 is generated in the top right heading.
This page number was generated by ensuring that page numbering was turned on with the following SAS system option setting:
OPTIONS NUMBER;
These page numbers are implemented in word processors using a field that automatically computes the page number. This is useful because if you later edit your ODS RTF output, the page numbering will adjust automatically. To see the field, in Word you can use ALT-F9 to toggle the field so that it shows the code instead of the page number. This is shown in the output below.
The same word processor fields are used to generate page numbers in the “Page X of Y” format. To ask ODS to create those fields, you need to turn off page numbering with the NONUMBER SAS system option and you need to add an escape sequence to your TITLE statement that requests the “Page X of Y” text. The code to add the “Page X of Y” text to the PROC PRINT report follows. The code centers the title text “Data Set CLIPS” and it right justifies the “Page X of Y” text. If you use the BODYTITLE option, ODS will not place the “Page X of Y” text in the page header of the RTF document.
OPTIONS NONUMBER; ODS ESCAPECHAR='^'; title justify=center 'Data Set CLIPS' justify=right 'Page ^{pageof}';

6
For the RTF destination, SAS gives you a simple escape sequence to use to request the "X of Y" page numbers. The "pageof" escape sequence requests that ODS insert the word processor fields to generate the current page number and the total number of pages. You can see the results in the output below.
The field codes can be viewed by pressing ALT-F9 in Word, which is shown below.
This is a great way to add custom page numbers without having to know anything about RTF tags. However, this method has its limitations. The only page numbering format you can get with the {pageof} escape sequence is "X of Y”. If you’d like something different, like "X/Y", you have to do that with different ODS escape character functions as shown in the following specification. The “{thispage}” function returns the current page. The “{lastpage}” function returns the total number of pages in the document.
ODS ESCAPECHAR='^'; title justify=center 'Data Set CLIPS' justify=right 'Page ^{thispage}/^{lastpage}';
These ODS ESCAPECHAR functions generate the actual RTF control strings for the page number in the desired format. This is a better alternative than using the equivalent RTF control strings because the RTF control strings are very fussy about space, slashes, curly braces and line breaks; if you mistype the RTF control strings, you may create an unopenable RTF file.

7
ADDING STATIC OR DYNAMIC DATES TO RTF REPORTS Adding a date to a header or footer provides useful information about when a file was created or modified. By default, ODS inserts an RTF control string that corresponds to the Word date field in the page header of RTF output. This means that the date value is updated to the current date each time the file is opened.
Depending on why the date is needed, this may be what you want. For some reports, you want the date in the header to be the date the report was printed or delivered. For other reports, it may be preferable to have a fixed date that represents the date the report was generated.
With ODS RTF, you can do it either way. To generate a page header with a dynamic date that will be updated every time the file is opened, you don’t need to do anything. As long as the default SAS system option of DATE is in effect, you will get dynamic dates in your output. For example, the output below shows the top of an RTF file created by ODS. The file contains a PROC PRINT report of data set CLIPS. This view shows the field code that is generated. (In Word, press ALT-F9 to toggle the field codes on and off.)
The output below shows the date generated by this field code. The SAS system option NUMBER is off so page numbers are not shown in these two displays.
To generate a page header with a static date based on the day the output was generated, all you have to do is add the SASDATE option to the ODS RTF statement. By adding this option, SAS will insert text for the current date when the program was run. Remember that the SAS date is actually the time and date that you started your SAS session. So,if a programmer keeps his/her session open for days at a time, this date might not correspond to the actual date the program was run. If you start a SAS session or batch process for your reports, then SASDATE will result in a static date that corresponds to the date the program was run.
ODS RTF FILE='StaticDate.rtf' SASDATE;
ODS writes this date as a fixed value. If you toggle to the field codes view by pressing ALT-F9, the view of the value remains the same and no field code is displayed.

8
Both static and dynamic dates can be generated automatically by using the default system option of DATE. However, each of these date options gives you no control over the format of the date. The default dynamic or static dates will always be in the format "hh:mm dddd, MMMM dd yyyy".
ADDING TEXT TO RTF REPORTS One of the reasons RTF is such a useful output destination is that we can cut and paste from the RTF document or we can add explanatory text to our RTF document to build our final report, but wouldn’t it be nice if the entire report could be generated automatically?
To insert text into an RTF document, use the TEXT= option on an ODS statement to write to all open destinations including RTF. Both of the following statements will insert text into an open RTF destination file:
ODS TEXT='Text to insert';
You also need to add the STARTPAGE=OFF option to your ODS statement to prevent SAS from inserting page breaks between your table and text.
The output from the following program contains results from one ODS table from the PROC CORR step and adds text below the table. The ODS TEXT= statement follows the PROC CORR step. The text wraps across several lines, and only one statement is needed.
An escape character is defined at the beginning of the program. It is used to signal to ODS to apply left and right margins of one inch to the text. The output is presented below.
ODS ESCAPECHAR='^'; ODS SELECT PearsonCorr; ODS RTF FILE='AddText.rtf' STARTPAGE=OFF; proc corr data=clips nosimple; var mentions; with compete; run; ODS TEXT='^S={LEFTMARGIN=1in RIGHTMARGIN=1in} This text was inserted with the TEXT= option. It can be used to add a detailed explanatory caption below a table or figure. This example uses an inline formatting escape sequence to apply different styles here. This text can also be formatted by using PROC TEMPLATE and the usertext style element'; ODS RTF CLOSE;

9
ADDING MORE COMPLEX TEXT TO RTF OUTPUT To generate a more complicated report, just add more procedures and more TEXT= options. The following code generates the output shown below. Since we showed ODS TEXT= in the previous example, we will show the other version of the TEXT= option in this example. This version of the TEXT= option would ONLY write to the RTF destination, as opposed to the previous statement, which would write to ALL open destinations.
ODS ESCAPECHAR='^'; ODS SELECT PearsonCorr; ODS RTF FILE='c:\temp\ReportWithText_4_38.rtf' STARTPAGE=OFF; ODS RTF TEXT='^{style[font_style=italic just=c fontweight=bold fontsize=14pt]This bold, italicized text in 14pt introduces the table. This introductory text will automatically wrap.}'; proc corr data=clips nosimple; var mentions; with compete; run; ODS RTF TEXT='^{newline 4}'; ODS RTF TEXT='^{style[font=(Arial)]Four lines appear before this sentence (in Arial) and a bar chart follows:}'; proc gchart data=clips; vbar mentions / midpoints=1 to 12 by 1 inside=freq; run; quit; ODS RTF TEXT='^{style[fontweight=bold textdecoration=underline]This bold, underlined sentence concludes the report.}'; ODS RTF CLOSE;
If you wanted to customize the text, you could, for example, use macro variables to add the current date or insert custom text based on the results in the data. One thing to keep in mind is that as the text gets lengthy, you will start to get warning messages in the log about the string being longer than 512 characters. These messages can be ignored or turned off with the NOQUOTELENMAX option.

10
ADDING HYPERLINKS TO RTF OUTPUT Web pages aren’t the only place you can use hyperlinks. You can put a link in a word processing document so that the reader can link to related information. With word processing documents frequently being shared electronically, rather than on paper, this can be a useful feature.
Adding a hyperlink is simple. You can add this link anywhere you have text in your output, such as labels, formatted values, titles, and footnotes. All you need to do is add the following escape sequence where the escape character has been defined as the carat (^):
^S={URL="http://www.myweb.com"}
This code applies the style attribute URL= to the subsequent text, which specifies a destination for the hyperlink. The following example adds a hyperlink at the bottom of the output using the ODS RTF TEXT= statement. Rather than putting the hyperlink in a footnote, which would be at the bottom of the page, the TEXT= feature places the hyperlink in a text box right below the procedure output. Remember that if we used the ODS TEXT= form of the option, the text would be written to all open destinations.
ODS ESCAPECHAR='^'; ODS RTF FILE='Hyperlink.rtf'; proc freq data=clips; table compete; run; ODS RTF TEXT='^S={URL="http://www.myweb.com"}Source: www.myweb.com'; ODS RTF CLOSE;
The resulting RTF file is shown the output below. You can see the text for the hyperlink below the table.
If you move the mouse over the text, as in the example below, you can see that it is a hyperlink. However, it’s not obvious to the reader that a hyperlink is there, unless they happen to move the mouse over the correct part of the page.

11
To solve this problem, you can provide a visual clue for the reader by changing the text color of the hyperlink to blue, the typical color used for hyperlinks. To do that, add a second escape sequence that sets the color of the text for the web site address to blue, as in the code below.
ODS RTF TEXT='^S={URL="http://www.myweb.com"}Source: ^S={FOREGROUND=blue}www.myweb.com';
The revised output is shown in the figure below. Now the web site address looks like a standard hyperlink because it appears in blue (like a web page hyperlink), which should prompt the user to click on the link.

12
ADDING A TABLE OF CONTENTS TO RTF OUTPUT
Starting with SAS 9, you can direct ODS to specify a table of contents in the RTF document that it creates. It does this by inserting control words in your RTF document that your word processing software can use to build a table of contents. In SAS 8, you had to insert the RTF control words yourself or build the table of contents manually from inside the word processing software.
In SAS 9.2, you add the CONTENTS= and TOC_DATA options to the ODS RTF statement to request a table of contents in the output.
ODS RTF FILE='PayrollTOC.rtf' CONTENTS=yes TOC_DATA;
This causes SAS to insert a table of contents as the first page of the report, as shown in the first output below, and to insert control words that support the table of contents in the pages of the report. The second output below shows these control words in a typical report page.
The program that created this output follows. The ODS PROCLABEL statement replaces the procedure title with the text specified on the statement. Note that the labels for the page dimension in the PROC TABULATE step become references in the table of contents.
ODS RTF FILE='PayrollTOC.rtf' CONTENTS=yes TOC_DATA; ODS PROCLABEL 'Human Resources Report on Salary and Hours';

13
proc tabulate data=hr; class department category; var annualsalary hoursweek; table department='Annual Salary Statistics for ' all='Annual Salary Statistics in All Departments and Categories', (category all='All Categories in Department'), annualsalary*( (n mean min median max)*f=dollar8.); table department='Hours per Week Statistics for ' all= 'Hours per Week Statistics for All Departments and Categories', (category all='All Categories in Department'), hoursweek*( (n mean min median max)*f=3.); run; ODS RTF CLOSE;
Warning: when you run this code, and open the resulting file, the table of contents will not automatically appear. When you first open the RTF output file in Microsoft Word, it looks as though ODS has failed you because it displays a front page with the header, "Table of Contents" but no actual table of contents. The reason for this is that ODS does not determine pagination, but instead hands this task off to the word processor. ODS does not build a table of contents because it does not know the page numbers to insert into the table.
You must direct your word processing software to complete the table of contents. To do this after opening the RTF file, click the Show/Hide paragraph marker (¶) to turn on formatting markers if they are not already displayed. Next position your cursor at the edge of the section break following the table of contents header, right mouse click, and select “Update Field”, which is shown in the figure below. This causes Microsoft Word, to build and insert the table of contents.
If you add text or page breaks after the table of contents is initially built, you can follow these same steps to update the page numbers or to rebuild the table.

14
ENHANCING RTF OUTPUT BY USING RTF CONTROL WORDS AND FIELD CODES
Another method, which is described below, is to place RTF control words and field codes directly in the TITLE or FOOTNOTE statements in the program that creates your RTF document. There are so many control words, that we show only a selection here. The table below lists selected RTF control words that you might find useful.
Style
RTF Control Word(s)
Quoted String in TITLE or FOOTNOTE Statement
Bold Italicize
\b \i
"\b\i0 Bold \b0 \i Italicize"
Bullet \bullet "\Bullet Bullet" Double strike \striked1 "\striked1 Double Strike \striked0 Regular Words" Double underline
\dul "\uldb Double Underline \uldb0"
Engrave \impr "\impr Engrave" Subscript \sub "Subscript \sub 1" Superscript \super "Superscript \super 2" Outline \outl "\outl Outline" Shadow \shad "\shad Shadow" Foreground color
\cfn "\cf1 Foreground1 \cf2 Foreground2 \cf3 Foreground3"
Wave underline \ulw "\ulwave Wave underline";
Thick underline \ulth "\ulth Thick Underline" Font size in half points
\fs24 "\fs48 Font Size in half points size 48 will be 24pt in the document"
The syntax starts with the escape character. Next curly braces enclose the keyword “raw” followed by the control words and text to be formatted. This entire specification is enclosed in double quotation marks. In the sample TITLE statement, all you have to do is substitute your control words and text where we show <string>. The RTF control words won’t change unless Microsoft changes them.
title "^{raw <string>}";
There is an alternate ESCAPECHAR method, which involves using the RTF control word directly without using ^{raw}. This alternate syntax assumes that you are only going to send the RTF control words to an open RTF destination and in this case, all you need to do is set PROTECTSPECIALCHARS= to OFF. This is the method most often used in SAS 9.1.3.:
title "^S={protectspecialchars=off}<string>";
The two outputs below show the result of using these control words in a series of ten TITLE and three FOOTNOTE statements. Because the code is so lengthy, refer to the book’s companion web site for complete program code.

15
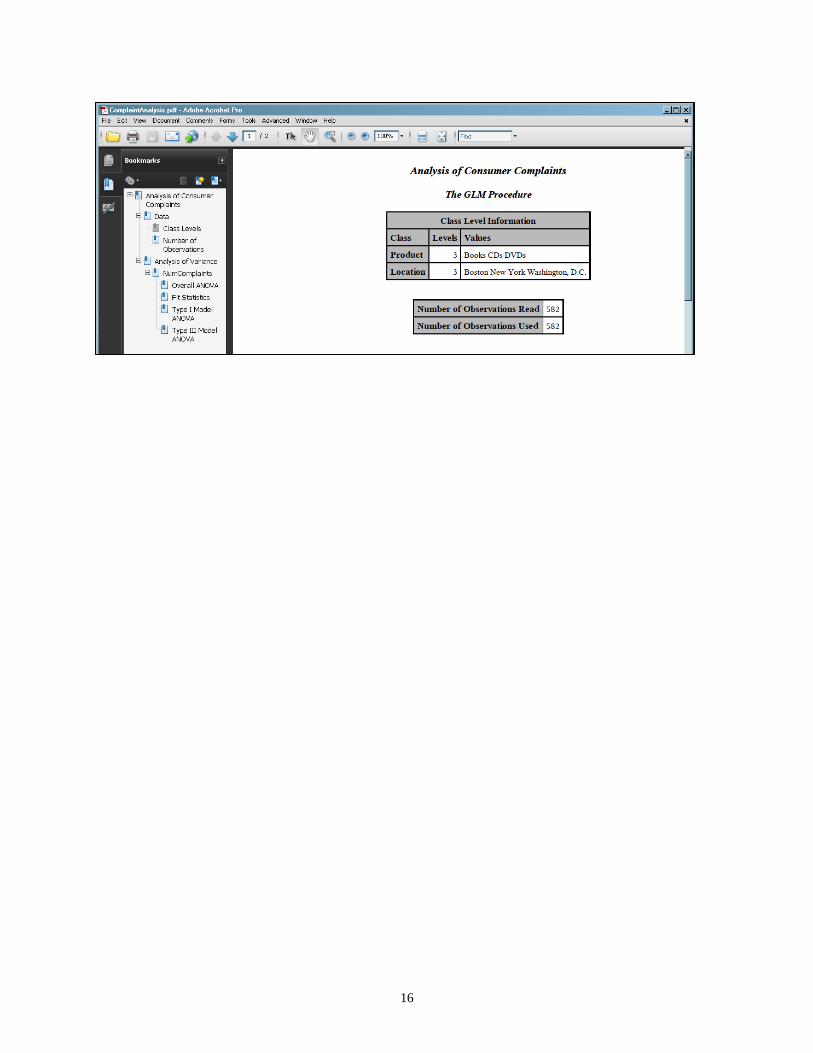
CREATING BOOKMARKS IN YOUR PDF FILE With ODS HTML output, you can generate a table of contents to help you find the results you want in a lengthy report. You also get a table of contents with ODS PDF output.
The PDF format supports the creation of bookmarks, which are displayed by Acrobat Reader in a window to the left of the main PDF file. By clicking on a bookmark, you can jump directly to the correct output page. The PDF bookmarks created by ODS are basically the same as the headings and subheadings created in an ODS HTML table of contents.
The following code illustrates this feature. It produces a two-page output file with several tables, which are bookmarked in the PDF output.
title 'Analysis of Consumer Complaints'; ODS PDF FILE='ComplaintAnalysis.pdf'; proc glm data=Complaints; class product location; model NumComplaints=Product Location; run; ODS PDF CLOSE;
The resulting PDF file is shown in the output below. Notice the window on the left with the bookmark tab. It displays a tree view of the structure of the output file. It has two top-level bookmarks: one for the "Data" component of the output and one for the “Analysis of Variance” component of the output. Below each of these bookmarks are links to the tables within each component. If you click on one of the links, the page with that section or table will be displayed in the window on the right.
If the bookmarks do not appear when you open the PDF file, you may need to click on the bookmarks icon or bookmarks arrow to display them. This example is shown in Adobe Acrobat version 9. Your version of Adobe may have different options to display bookmarks.
As with HTML output, if you use the ODS PROCLABEL statement to assign a new label to the procedure, that label will be displayed in the bookmarks. For example, the same text used in the TITLE statement of our example could also be used to generate a procedure label by adding the following ODS PROCLABEL statement to the program above.
ODS PROCLABEL ’Analysis of Consumer Complaints’;
The output below shows the new results. Notice how the top label has changed from “The GLM Procedure” to “Analysis of Consumer Complaints”.
16

17
CREATING PDF FILES THAT INCLUDE HYPERLINKS AND ANNOTATIONS The PDF file format is a lot more than just a convenient way to share electronic documents. ODS can also add interactive features to your PDF files. You can add a hyperlink to a PDF document, allowing the viewer to link to a related web site. We have already seen the use of LINK= in the SAS TITLE statement. That feature of ODS works with PDF in the same manner as it works for HTML and RTF. So, we want to illustrate another method of performing linking and adding annotations to PDF files.
You can add annotations that create pop-up notes with added details. To access these features, you use the STYLE= option and the URL= and FLYOVER= attributes. The STYLE= option is currently supported for the PRINT, REPORT, and TABULATE procedures. In this example, hyperlinks will be added to two column headings, and an annotation will be added to a third column heading. The hyperlinks allow the report to be linked to web sites with information about the artists and media described in the table. The annotation explains that the prices are in US dollars. The code is shown below.
ODS PDF FILE='AnnotatedReport.pdf'; proc report data=gallery nowd; column artist medium price; define artist / group STYLE(Header)= {URL="http://www.artistlookupwebsite.com/"}; define medium / group STYLE(Header)= {URL="http://www.artistmediumlookup.com"}; define price / analysis mean STYLE(Header)= {FLYOVER="Prices listed in US$"}; run; ODS PDF CLOSE;
The STYLE= option is applied to each column separately since each column has a different link or flyover note. In the first two columns, the URL= attribute specifies a link to a related web site. In the third column, the FLYOVER= attribute specifies the text for the annotation.
The resulting PDF is shown in the output below. The first two column headings are surrounded by blue boxes, indicating that they are hyperlinks. Clicking on or in a blue-outlined box links the viewer to the appropriate web site. The icon in the third column indicates that it has an annotation.
Double-clicking on the icon brings up the note, as shown the output below.

18
ANOTHER MEANS OF ADDING HYPERLINKS AND ANNOTATIONS TO PDF OUTPUT
The previous technique works great if you want to add hyperlinks or annotations to PDF output from the PRINT, REPORT, or TABULATE procedures. However, if you want to use a different procedure, you don’t have access to the STYLE= option (except in a modified Table template), so you can’t apply the URL= or FLYOVER= attributes. Also, you might want to put a hyperlink or annotation somewhere else in your output, not just in the table.
There is another way control style attributes, using the escape character ^{STYLE} method (new for SAS 9.2). You can use an escape sequence almost anywhere in your output where you can add text: titles, footnotes, labels, etc. The following example uses an escape sequence to create a hyperlink on one of the words in the table footnote, as shown in the example below.
ODS ESCAPECHAR='^'; ODS PDF FILE='HyperlinkedReport.pdf'; footnote '^{style[URL="http://threeartgalleries.info"]Click for more gallery info}'; proc tabulate data=gallery; class gallery; var price; tables gallery,price*(n*f=5. (mean min max)*f=dollar8.); run; ODS PDF CLOSE;
This could also be done using the TEXT= option on an ODS PDF statement. This statement would be inserted into the code following the PROC UNIVARIATE step, and the FOOTNOTE statement would be omitted from the program. This approach has the added advantage of creating a "footnote" much closer to the table itself, as shown in the output below.
ODS PDF TEXT= '^{style[just=c URL="http://threeartgalleries.info"]Click for more gallery info}';
Annotations can be added to titles, footnotes, or text in the same way by using the FLYOVER= option. Hyperlinks and annotations can also be embedded in format values. The following PROC FORMAT code creates annotations for each value of variable GALLERY.

19
proc format; value $galft 'East Side'='^{style[FLYOVER="130 East 23rd"]East side}' 'Downtown'='^{style[FLYOVER="10 Elm Street"]Downtown}' 'Mall'='^{style[FLYOVER="Southside Mall Blvd"]Mall}'; run;
Applying format $GALFT to variable GALLERY generates annotations in the PDF output with the address for each gallery location, as shown in the output below. The same technique can add annotations to variable labels and values of character variables.

20
ADDING “PAGE X OF Y” NUMBERS TO PDF OUTPUT
In an ODS RTF example, we defined an ODS escape character (ODS ESCAPECHAR=) so that we could code a special sequence to insert page numbers into the document in the form “Page X of Y”. This capability is also available when creating PDF output with ODS. The ESCAPECHAR functions to use with ODS PDF output are “thispage” for the “X” position and “lastpage” for the “Y” position. Each ESCAPECHAR function is enclosed in curly braces and preceded by the escape character. In the code below, the ODS escape character is set to the caret '^'. Consider the following set of FOOTNOTE statements:
ODS ESCAPECHAR='^'; ODS PDF FILE="Footnotes.pdf"; footnote justify=left 'Page ^{thispage} of ^{lastpage}'; footnote2 'Page -^{thispage}-' ; footnote3 'Total Pages: ^{lastpage}'; footnote5 justify=left 'Seite ^{thispage} von ^{lastpage}'; footnote7 justify=left 'Página ^{thispage} de ^{lastpage}'; footnote8 '^{pageof}'; proc print data=gallery(obs=20); run; ODS PDF CLOSE;
They produce the output shown in the output below. Note that the {pageof} function when used with PDF does NOT produce the same results as when used with the ODS RTF destination. The {pageof} escape character function is available only when sending output to the RTF destination.
CONCLUSION These are just a sampling of some of the more advanced things that can be done with ODS. Other topics worth exploring: tagsets, style templates, ODS LAYOUT, and ODS DOCUMENT.
ACKNOWLEDGMENTS The examples in this paper were co-written with Cynthia Zender, Curriculum Manager for the Report Writing and Output Delivery System curriculum at SAS, and Michele Burlew, owner of Episystems, Inc..
CONTACT INFORMATION Your comments and questions are valued and encouraged. Contact the author at: [email protected]. SAS and all other SAS Institute Inc. product or service names are registered trademarks or trademarks of SAS Institute Inc. in the USA and other countries. ® indicates USA registration. Other brand and product names are trademarks of their respective companies.