aeromaster rear roll-up door t-series - utilimaster
TRANSCRIPT
103103436-A10023 Rev. A 574-848-2200
Service Guide
NOTICETo prevent damage to the cargo or vehicle, be sure that the rear door is closed and latched before driving the vehicle.
The information in this document applies to our most common roll-up door option. If your vehicle is equipped with a different roll-up door, refer to the door manufacturer's service guide for operation, adjustment, and maintenance instructions.
Rear Roll-up Door T-Series
! WARNINGThe counterbalance spring is wound under high tension. This high-tension spring can cause severe injury or death. Only qualified technicians should adjust this spring.
Use two winding bars that are 1/2” in diameter and 18” long. DO NOT USE bent winding bars, screwdrivers, or punches for spring winding.
! CAUTIONRead all instructions before starting repair. Always maintain firm footing and control of tools.
Installation, repairs, and adjustments must be made by trained service personnel using proper tools and instructions.
Read the safety and warning decals provided by the manufacturer. Never paint over the decals, and replace them if they are faded.
Do NOT use the rear door pull strap to support yourself when entering or exiting the rear. The strap can break or pull the door down on you. Use the grab handles for aid getting in and out of the back.
Stand clear of the opening while the door is moving.

203103436-A10023 Rev. A 574-848-2200
BALANCER BRACKET
SPACER
SPRING
BALANCER SHAFT
CABLE DRUM
HEADERSEAL
SPRING WIND PLUG
ROLLER
CABLE ASSY
GUARD END
TOP HINGE
TOP PANEL
SUPPORT BRACKET
HORIZONTAL DOOR TRACK
VERT TRACK
STRIKER PLATE
ROLLER
LOCK CATCH
SIDE SEAL
HANDLE
STRAP MOUNT
PULL STRAP
BOTTOM SEAL
L-HANDLELATCH CABLE
CABLE COVER
CABLE PIN BRACKET
BOTTOM PANEL
SPACER
HINGE CENTER
LATCH ASSY
BOTTOM FIXTURE
MIDDLE PANEL
Overview of T-series roll-up door

303103436-A10023 Rev. A 574-848-2200
InspectionCheck the condition of the door and strap:
❑ Checkthatthedooropenseasilyandclosestightly.
❑ Checktheoperationandconditionoflatch.
❑ Checkforloosefastenersorothercomponents.
❑ Checktheconditionofthepull-downstrapforfrayingorwear.
❑ Checkthatthereardooriscenteredintheopening.
Lubrication points on roll-up door
1 2 3
54
6
7
Lubrication
NOTICEDo NOT use grease on doors. Do NOT get oil on rubber seals. Wipe up any drips immediately
Lubricatethefollowingrearroll-updoorpartswitha(P/N04202540orequivalent)lightoil:
❑ Rollerdrumsandshafts—wipeoffexcessoil(#1,#3).
❑ Springs—lubricatespring(s)alongtheirentirelengthtopreventrusting(#2).
❑ Cleanandlubricatetrack(#4).
❑ Hinges(centerandend)—wipeoffexcessoil(#5).
❑ Rollers(#6,#7).
❑ Latches(NS).

403103436-A10023 Rev. A 574-848-2200
NOTICEWhen ordering parts for a rear door, specify the serial number of the door. The serial number can be found on the metal tag attached to the inside upper driver's side corner of the door.
After replacement of any part, check relevant adjustments and proper operation of the door.
Two-Point Slam Lock To unlock the door from the outside,insertthekeyinthelockandturnclockwise1/4turnuntilthumblockpopsout.Rotatekeycounter-clockwise1/4turn,andremovethekeyfromthelock.To open the door from the outside,pushdownonthelowerdoorlifthandletorelievetensiononthelatchesandrotatethereleasehandleclockwiseuntilthelatchesrelease.To open the door from the inside,pushdownonthedoortorelievetensiononlatches,andpushthelevertowardthepassenger’ssideofvehicleuntilthesidelatchesrelease.To lock the door from the outside,insertthekeyandturnclockwiseandpushinonthumblock.
Master Security (Banana) Lock Tounlatchthedoor,rotatethecatchandthenrotatethe“banana”locklevercounterclockwiseuntilitcatchesintheopenposition.Tolatchthedoor,rotatethecatchandthenrotatethe“banana”lockleverclockwiseuntilitcatchesintheclosedposition.Ifequippedwithinteriorreleaselever,rotatethecatchreleaseknob90°androtatethelockleverabout180°clockwisetounlatchthedoor.
Roll-up door inside latch and serial number
Roll-up door latch and grab handle
Opening a banana lock
Optional interior banana lock release
503103436-A10023 Rev. A 574-848-2200
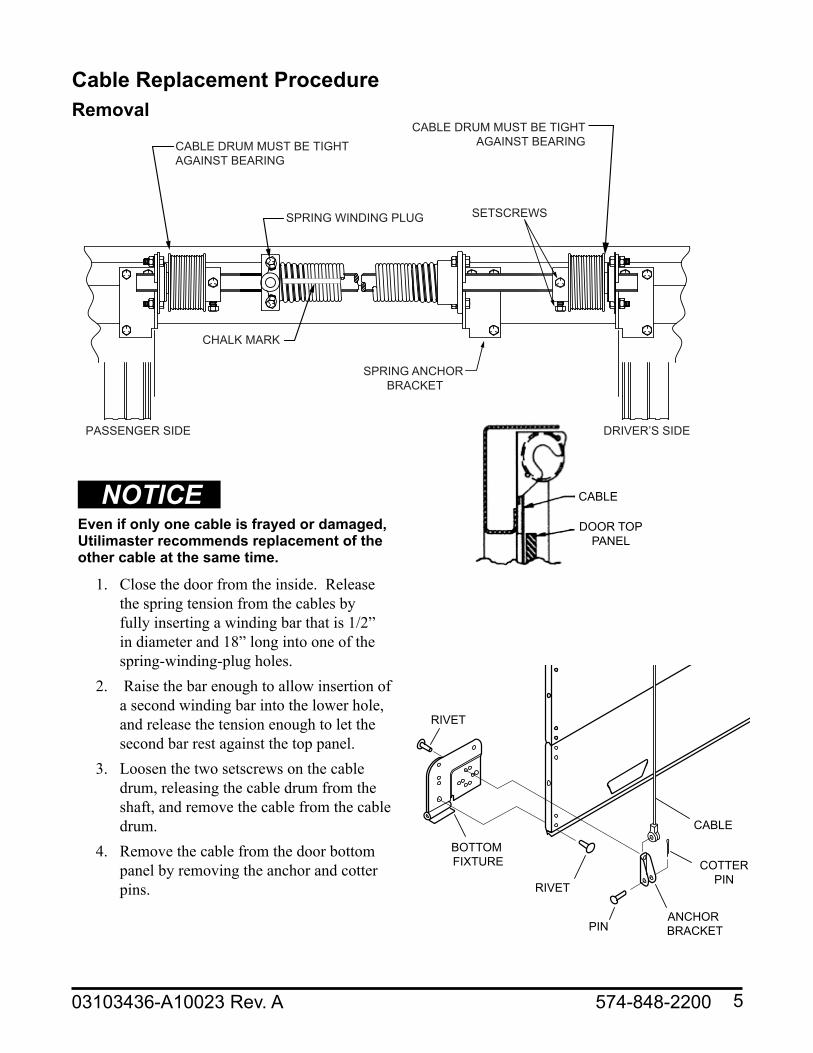
Cable Replacement Procedure Removal
NOTICEEven if only one cable is frayed or damaged, Utilimaster recommends replacement of the other cable at the same time.
1. Closethedoorfromtheinside.Releasethespringtensionfromthecablesbyfullyinsertingawindingbarthatis1/2”indiameterand18”longintooneofthespring-winding-plugholes.
2. Raisethebarenoughtoallowinsertionofasecondwindingbarintothelowerhole,andreleasethetensionenoughtoletthesecondbarrestagainstthetoppanel.
3. Loosenthetwosetscrewsonthecabledrum,releasingthecabledrumfromtheshaft,andremovethecablefromthecabledrum.
4. Removethecablefromthedoorbottompanelbyremovingtheanchorandcotterpins.
HeadPlateLoc_Utilimaster
PASSENGER SIDE DRIVER’S SIDE
CHALK MARK
SPRING ANCHOR BRACKET
SPRING WINDING PLUG
CABLE DRUM MUST BE TIGHTAGAINST BEARING
CABLE DRUM MUST BE TIGHT AGAINST BEARING
SETSCREWS
COTTERPIN
ANCHOR BRACKETPIN
CABLE
RIVET
RIVET
BOTTOM FIXTURE
CABLE
DOOR TOP PANEL

603103436-A10023 Rev. A 574-848-2200
Installation1. Mountthenewcableatthebaseof
thebottompanelbyslippingthecableanchorpinthroughthecableanchorbracketandtheeyeattheendofthecable.
2. Insertthecotterpininthecableanchorpintosecurethecable.
3. Bringtheothercableendtothetopofthe door and thread it over the top of the doortotheinside.
4. Temporarilytapethecabletotheoutsidetoppanelofthedoor.
5. Frominsidethecargoarea,insertthecableendintothecabledrumslot.Threadthecableintothegroovenearesttheslot,andturnthecabledrumtowardyouuntilallslackistakenout,makingsurethecableisfollowinginitspropergroove.
NOTICEThe cable must be wound from the outermost groove toward the inside of the drum.
6. Maintainingtensiononthecable,slidethecabledrumonthecounterbalanceshaftagainstthebearing,andtightenthetwosetscrewsonthedrum.
NOTICEMake sure the drums are against the counterbalance shaft bearings, the set screws are properly tightened, and the cables have equal tension.
7. Clampthecounterbalanceshaftwithalockingpliers,handleagainsttheceilingtokeepthecablestight.
8. Releasethespringtensionbyrotatingthespringwindingplugjustfarenoughtoallowremovalofthewindingbaragainstthetopofthedoor.
NOTICERotating the counterbalance assembly too far may cause cables to jump off the cable drum.
9. Removetheclamp,tape,andchecktheoperationofthedoor.
NOTICEA properly adjusted door should open easily and when stopped, it should remain at any given location.
Cable drum
SETSCREW CABLE
Cotter and anchor pins

703103436-A10023 Rev. A 574-848-2200
Winding counterbalance spring
DRIVER'S SIDE
PASSENGER'S SIDE
Chalk Mark
Support Bracket
Chalk Mark(Compressed Spring)
Winding Bars (See Dimensions)
Locking PliersAgainst Ceiling
Rotate Toward theCeiling to Compress Spring
Spring Winding Plug
Cable
Door Top Panel
Cable Drum
ProtectiveFlat Stock
Setscrew
NOTICEThis vehicle was designed using English (S.A.E.) measurements. Utilimaster provides metric conversion equivalents as a courtesy, but Utilimaster does not warrant metric values given in this manual.
Winding Bar DimensionsDoor Type
Diameter (Inches)
Diameter (Millimeters)
Approximate Length
T-Series 1/2" 127 mm 18" or 46 cm
Counterbalance Shaft
Spring Winding Adjustment

803103436-A10023 Rev. A 574-848-2200
NOTICETo determine the amount of turns on a newly installed spring, measure from the bottom of the door to the header. Divide that measurement by ten and then add three. This number is the approximate number of turns needed to wind the spring. Turns are counted by using the chalk marks, which show up as stripes as the spring is wound.
A properly counterbalanced door should, when stopped, remain at any given location. If the door leaves the floor by itself, the spring is wound too tightly, and a few quarter turns should be released. If the door has a tendency to drop when stopped, a few more quarter turns should be added.
1. Closedoorandclampcounterbalanceshaftfromtheinsidewithhandleoflockingpliersagainsttheceilingtokeepcablestight.Protecttherooffromtheplierswithapieceofplywoodorsheetmetal.
2. Insertawindingbarthatis1/2"indiameterand18"longintooneofthespring-windingplugholes.
3. Loosensetscrewsonspring-windingplug.4. Insertasecondwindingbarintooneofthespring-windingplugholes.5. Raisethebartoallowinsertionofsecondwindingbarintonextspring-windingplug.6. Continuetoraisebartowindspring.7. Tightensetscrews.8. Removelockingpliersandwindingbars.9. Cycledoortocheckoperation.10.Adjustagainifnecessary.11.Lubricatewithalightoil(UtilimasterP/N04022540).
Spring winding plug
SET SCREW
WINDING PLUG HOLES

903103436-A10023 Rev. A 574-848-2200
Top roller brackets and adjustments
Move roller UPto move panel IN
Move roller DOWNto move panel OUT
a. For a solid-coredoor,drillthroughtheentirepanelwithanF(or1/4")bit.Tipthepaneltowardyoutoinsertcarriageboltsthroughtheoutsideofthepanel.Installthehingesovertheboltsandtightenthenuts.
b. For a hollow-coredoor,drill through the interior panel onlywithanF(or1/4")bitandinstallMagna-Lokfastenersthroughthehinges.
3. Checkthedooroperationbyopeningandclosingthedoor.
4. Checkthesealgapontheoutsidetopoftheroll-updoorandadjustasnecessary.
5. Tightenthenutswithawrench.6. Checktheoperationofthedoorandadjust
asnecessary.
Top Panel ReplacementRemoval
1. Withthedoorclosed,clampthetrackbelowthetoppaneltopreventthedoorfromraising.
2. Drillouttherivetheadsinthecenterhingesonthetoppanelandtherivetheadsonthejointrollerbracketinthelowerhalfofthetoppanel.
3. Punchouttherivetsand,inatleastoneofthehinges,insertapunchinoneoftherivetholestostabilizethedoorpanelwhiledetachingtheremainingrivetsandbolts.
4. Usingawrenchandsocket,removetherollerbracketsandrollersatthetopofthepanel.
5. Removethepunchandliftouttheoldpanel.
Installation
NOTICEIf you are unable to secure the hinges with the original type of rivets that extend completely through the door, use carriage bolts or rib-neck carriage bolts to attach them. The bolt head must be on the exterior side of the door, and the nut must be on the interior.
1. Usingawrenchandsocket,attachtherollerbracketsandrollerstothetopofthenewpanelwhileputtingtherollersinthetracks.
2. Lineupthenewtoppanelwiththepanelbelowit(makingsuretheyalignforaclosefitatthejoint)and(usingthehingeholesasaguide)drillallofthehingeholesonthebottom of the newpanel:

1003103436-A10023 Rev. A 574-848-2200
Adjustment1. Checkthatthedoorhasnomorethan1/4"
maximumplay,doesNOTbindinthetrack,andiscenteredinopening.
2. Addorsubtractwashersonrollershaftstoachieveproperdooroperation.Amaximumoffourspacerwashersshouldbeatthesecondfromtopjointrollerandthesecondfrombottomjointrolleroneachside.
3. Loosenbothboltsonslideslocatedattopofdoortoadjusttoppanelinandout.
4. Loosenbothlocknutsoncatcheslocatedatbottomofdoorsothatitsitsflushonthreshold.
Upper slide bolt adjustment
Catch locknutsDoor roller

1103103436-A10023 Rev. A 574-848-2200
Intermediate PanelRemoval
1. Withthedoorclosed,clampthetrackbelowthepaneltobereplacedtopreventthedoorfromraising.
2. UsingaF-bit,drillofftherivetsinthecenterhingesonthepaneltoberemoved.
NOTICETake care not to drill through the outside panel. Punch out the rivet and in at least one of the hinges, insert a punch into one of the rivet holes to stabilize the door panel while detaching the remaining rivets and bolts.
3. Useawrench,removebothrollerbracketsandrollersatbothjointsortopofthepanel.
4. DrillofftheendhingerivetsattachedtothebottomofthepanelwithaF-bit.
5. Liftthedoorpanelsabovethepaneltobereplacedintothehorizontaltrack,andsecurethemwithalockingpliersclampedonthehorizontaltrack.
6. Removethepunchandliftouttheoldpanel.
Installation1. Transferdrillallofthehingeholesonthe
bottomofthenewpanel.2. Withtheupperdoorsectionclampedso
thatitwillnotfall,tipthepaneltowardyoutoinsertthebolts.
3. Installthehingesoverthebolts,andtightenthenuts.
4. Swingthenewpaneluprightandclampintoposition.
5. Lowerthedoorfromthehorizontaltracks,anddrillalltheholesinthetopofthenewpanel.
6. Inserttheboltsandinstallthehingesoverthebolts.Tightenthenuts.
7. Removetheclampsandcheckthedooroperationbyopeningandclosingthedoor.
8. Alsocheckthesealontheoutsidetopoftheroll-updoor.
NOTICEThe top panel can be adjusted by loosening the top roller bracket bolt and moving the top roller up or down to adjust the top panel in or out.
Center hinge
Middle roller

1203103436-A10023 Rev. A 574-848-2200
Bottom PanelRemoval
NOTICETake care not to drill through the outside panel. Punch out the rivet and in at least one of the hinges, insert a punch in one of the rivet holes to stabilize the door panel while detaching the remaining rivets and bolts.
1. Openthedoorandpushbackuntilthebottomofthedoorisabout16”orsofromtheheaderatthetopofthedooropening.
2. Placeaclampinthehorizontaltracks,oneachside,belowthebottomrollers.
3. Placeaclampononeofthecables,neartheeyeofthecable.
4. Holdclampandreleasethecablefromthebottomofdoor.
5. Allowthespringtowindthecableontothedrumuntiltheclampstopsitbycontactingthedrum.
6. Repeatwiththeoppositecable.7. Removerivetsfromcableanchorsandpull
strap.8. Drilloutthecenterandendhingerivets
attachedtothebottompanel.9. Removethepanelfromthetracksandpush
theremainderofthedoorslightlytowardsthefrontofthetruck.
10.Placeaclampinthetracktopreventthedoorfromrollingbackdown.
Installation1. Removebottomrollerbracketandcable
anchorsfromtheoldpanel.2. Inserttherollerinthebottombracketofthe
newpanel.3. Positionthenewpanelandrollerinthe
track.4. Installtheotherbottomrollerinthetrack,
andalignwiththebottomrollerbracket.
5. Usethehingesasatemplatetotransferdrillrivetholesinthenewpanel.
NOTICEMake sure the panels align for a close fit at the joint.
6. Rivetthehingesintoplace.7. Replacetherollersatthejoints,aswellas
anyspacerwashersontherollershafts.
NOTICEThe roller brackets on the top of the bottom panel and on the bottom of the top panel play an important part in maintaining proper door alignment within the track. The rollers on these brackets must have 3 to 4 spacer washers (depending on the alignment) to maintain the correct distance in the track.
8. Reattachthepullstrap.9. Rivetcableanchors.10.Reconnecteachcablebydrawingittothe
outsideofthebottomdoorpanel.11.Insertpinthroughthecableeyeandanchor
bracket.Securewiththecotterpin.12.Checktheoperationofthedoorandadjust
asnecessary.
Bottom roller bracket and fasteners
RIVETS
CABLE ANCHOR RIVETS

1303103436-A10023 Rev. A 574-848-2200
Pull Strap Replacement1. Raisetheroll-updoorpartwayandplacea
clampinthetrackbelowthebottompanel.2. Removerivets.3. Slipthenewstrapthroughthepullstrap
loop.4. Attachtoroll-updoorusingrivets.5. Removetheclampandtestthestrapwhile
openingandclosingthedoor.
Pull strap and fasteners
1403103436-A10023 Rev. A 574-848-2200
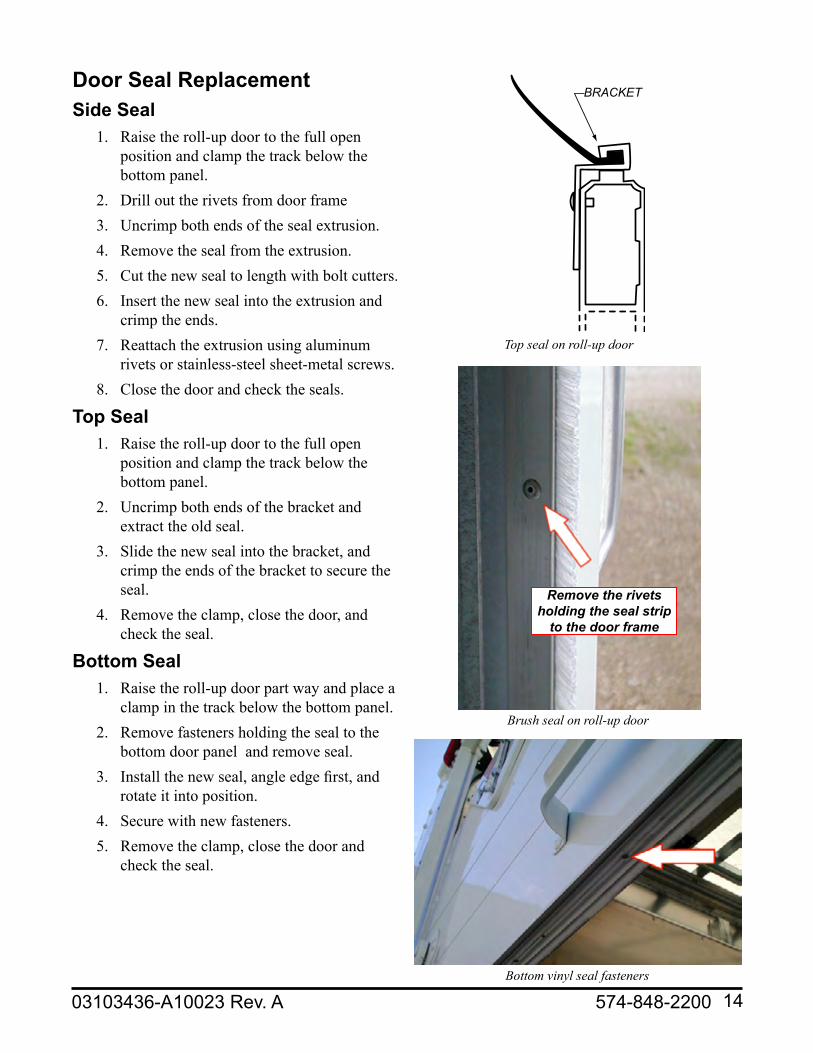
Door Seal ReplacementSide Seal
1. Raisetheroll-updoortothefullopenpositionandclampthetrackbelowthebottompanel.
2. Drillouttherivetsfromdoorframe3. Uncrimpbothendsofthesealextrusion.4. Removethesealfromtheextrusion.5. Cutthenewsealtolengthwithboltcutters.6. Insertthenewsealintotheextrusionand
crimptheends.7. Reattachtheextrusionusingaluminum
rivetsorstainless-steelsheet-metalscrews.8. Closethedoorandchecktheseals.
Top Seal1. Raisetheroll-updoortothefullopen
positionandclampthetrackbelowthebottompanel.
2. Uncrimpbothendsofthebracketandextracttheoldseal.
3. Slidethenewsealintothebracket,andcrimp the ends of the bracket to secure the seal.
4. Removetheclamp,closethedoor,andchecktheseal.
Bottom Seal1. Raisetheroll-updoorpartwayandplacea
clampinthetrackbelowthebottompanel.2. Removefastenersholdingthesealtothe
bottomdoorpanelandremoveseal.3. Installthenewseal,angleedgefirst,and
rotateitintoposition.4. Securewithnewfasteners.5. Removetheclamp,closethedoorand
checktheseal.
Top seal on roll-up door
BRACKET
Brush seal on roll-up door
Remove the rivets holding the seal strip
to the door frame
Bottom vinyl seal fasteners

1503103436-A10023 Rev. A 574-848-2200
BOLT IN STUD BASE
LATCH PLATE
LEVEL
DOOR TRACK
Square latch plate with latch(Side view)
Slam Lock Latch AdjustmentNOTICE
On rear roll-up doors with slam locks, adjust the latch if problems occur with the door latching or sealing. Also, roller/door side play is critical for slam locks.
1. Frominsidethetruck,closethedoortightly,soitissealedonthebottom.
2. Afan-typelatchshouldconsistentlylatchintheprimaryposition,withthelatchplaterodrestingonthetopofthefanofthelatchassembly.Ifthelatchisnotproperlyadjusted,itmightlatchinthesecondaryposition.
3. Ifnecessary,loosenthetwonutsonthestudbasebolts.
4. Repositionthelatchplatesothatthelatchplatefitssnuglyagainstthelatchprimarypositionforafantype.
5. Ensurethatthelatchplateislevelandsquarewiththelatchandtightenthenuts.
6. Afterlatchesonbothsidesofthedoorareproperlyadjusted,cyclethedoorseveraltimestocheckproperengagement(primaryposition).Checkthatthelatchingandunlatchingissmoothandthatthedoorsealsatthebottom.
Slam lock latch
LATCH PLATESTUD BASE
BOLTS

1603103436-A10023 Rev. A 574-848-2200
MSL (Banana Lock)
NOTICEThere is no adjustment on a Master Security Lock. If the handle becomes worn to the point that the door no longer closes tightly as it should, replace the handle.
If original rivets are unavailable, use carriage bolts or rib-neck carriage bolts to attach the handle. The bolt head must be on the exterior side of the door.
Master security (banana) lock
CATCH PLATE
COVERPAN
LOCK ASSY
LOCKPROTECTOR
HANDLEKEEPER
RIVET
Utilimaster Customer Service
574-848-2200Email: [email protected]
T-Series Rear Roll-Up Door Service Guide 03103436-A10023 January 2017
©Utilimaster Corp., 603 Earthway Boulevard, Bristol, Indiana 46507 USA