affinity customer portal training - welcome to flowserve€¦ · · 2015-10-19• request...
TRANSCRIPT
Affinity User Training
October 2015
Affinity Customer Portal
2
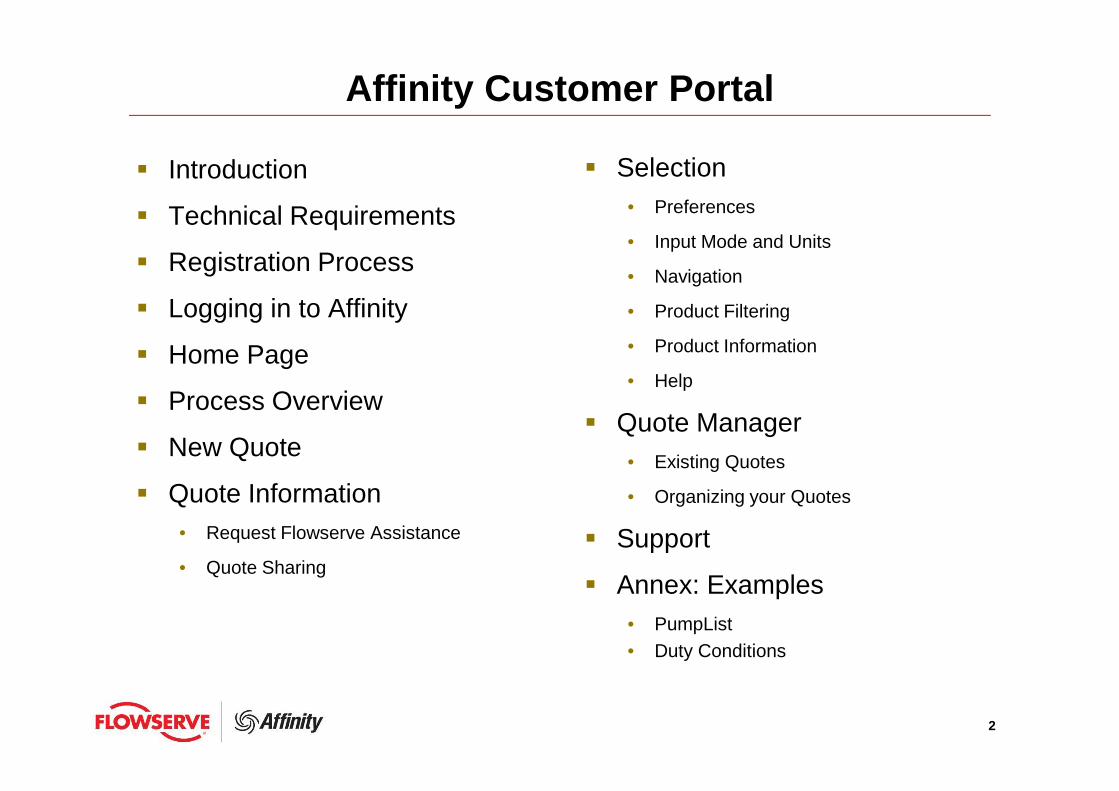
Affinity Customer Portal
� Introduction
� Technical Requirements
� Registration Process
� Logging in to Affinity
� Home Page
� Process Overview
� New Quote
� Quote Information• Request Flowserve Assistance
• Quote Sharing
� Selection• Preferences
• Input Mode and Units
• Navigation
• Product Filtering
• Product Information
• Help
� Quote Manager• Existing Quotes
• Organizing your Quotes
� Support
� Annex: Examples• PumpList• Duty Conditions

3
� Affinity Customer Portal is Flowserve’s new browser based interactive pump selection program for customers
� This tool replaces FlowSelexTM Customer Portal and introduces several enhanced features.
� Affinity is a web-based tool that delivers immediate, real-time access to the latest, most accurate data
� The new platform offers a more streamlined and efficient approach to selecting pumps
� Users can select a pump for a new application or select a specific pump size from a pump list
� Users can also save selections for future reference and generate technical documents
Introduction

4
� Supported Browsers: Mozilla Firefox, version 25 or higher and Internet Explorer, version 10 or higher.Helpful Hint : The latest version of Google Chrome no longer supports Java and therefore impacts the full capability of Affinity
� Adobe Acrobat Reader: 9.3 or higher
� Java: Version 8
� Allow Pop-ups from this site
� Screen Resolution – 1366 x 768 or higher is recommended. • Lower resolutions may cause page content wrapping
Technical Requirements

5
� Go to: flowserve.bigmachines.com and select ‘Custom er’ from the drop down ‘Account Type’
� A button will appear under the ‘Log In’ button � Click ‘Enroll’
Registration Process

6
� Fill in the Registration information� Agree to the Flowserve Terms� Click on “Submit”
Registration Process

7
Registration Process� Look for an email from [email protected]� Click on the link in the email to login
Helpful Hints: • Save the login screen as a bookmark or favorite• The password you receive is a random generated password. Please keep the registration email
for reference when signing in. Your password can be reset by Flowserve, but we’ll need to know the password desired plus a security question and answer. This will need to be set up once you received your password for the first time by emailing [email protected]
XXXX
XXXXXXXXXXXXXXXXXXXXX
http://flowserve.bigmachines.com
XXXXXXXXXXX

8
� Go to: flowserve.bigmachines.com� Select ‘Customer’ from the drop down box� User Name is your email address
• Note this is the email address that was entered during registration.• Is the full email address including everything after the @ symbol.
� Enter your Password • It is suggested that you copyand paste the password from the initial email.
� Click “Login”� You are now on the Affinity Home page
Logging in to Affinity

9
� This will include information and updates about the program.
Home Page
XXXXXXX

10
Process Overview

11
� Customer Selection: The fields shown below will be automatically populated with the information you provided on the registration form, but can be edited as necessary.
� Continue to Create Quote: Click this button, once you are ready to make a selection.
New Quote To create a new selection you will need to create a quote or select an existing quote. For a new quote select the ‘New Quote’ tab. You will see:
XXXXXXX
XXXXXXXXXXXXXX

12Page 12
Quote Information� Information listed in the quote manager is not required but when filled in it will be
stored with your quote. As you start to accumulate quotes this information can help you to better manage and access them.
� The top two Panels (Quote Manager and Line Details) are collapsible by clicking anywhere on the gray panel line.
XXXXXXXXXXXXXXXXXXXXXXX
XXXXXXXX
XXXXXXXX
XXXXXXXX

13Page 13
Quote Information� Quote Manager: This panel includes three tabs (Quote Header, Quote
Documents/Notes and Quote Access).• Quote Header: This tab includes additional information in which you can customize your
quote for easy recognition.• Quote Documents/Notes: This tab allows you to add notes to your quote.• Quote Access: This tab allows you to share your quote with other users and /or send an
email to a Flowserve representative to request help with a selection or request for pricing.
XXXXXXXX

14Page 14
Quote Information: Request Flowserve Assistance
� Request Flowserve Assistance: Go to the ‘Quote Access’ tab to request help from a Flowserve associate. Type in the email address of the person from whom you’re seeking assistance. Note the ‘@flowserve.com’ is not needed as it is already there. Add any request comments, if necessary and then click ‘Request Flowserve Assistance’. This will send an email to the Flowserve associate with your quote information and any comments.
XXXXXXX
XXXXXXXXXXXXXX
XXXXXXXXXX
Helpful Hint: The email will also be sent to your registration email address so that you have a record of the request

15Page 15
Quote Information: Quote Sharing
� Quote Sharing: Go to the ‘Quote Access’ tab to share a quote. Click the ‘Share Quote With Another User’ button. Type in the Share Key or Username of the person you want to share with and click ‘Add’. Once all users have been added make sure the you hit the ‘Assign’ button to finalize the process
� Helpful Hint : In order to share you will need to know the person’s Share Key or Username. The Share Key and Username are located in the upper right corner of the screen in the maroon box. Ask the person you want to share with to provide their Share Key or Username information so that you can add them. The Username will be the full email address used in the account for distributors and their short name (email less @flowserve.com) for FLS users.
XXXXXXXXXXXX
XXXXXXXXXXXXXXXXXXXXX

16
Quote Information� Line Details: This panel shows you all the selections you have made along with
some general information. This is where you can add, copy, delete, look at the technical information (Curve, Hydraulic Details, GA, etc.), and change alternate and primary selections. To use any of these functions simply select the item and hit the button.
• Add Item: This button is used to add a selection. Click to begin pump configuration• Copy Item: This button creates a copy of any of the items already created. Note you can only copy one item
at a time.• Delete Item(s): This button deletes any item you have created. You can delete more than one item at a
time. (Once an item is deleted it’s gone forever, so make sure to double check your selections.)• Update: This will refresh the page to allow any updates to happen.• Set Output Documents: This button allows you to view the technical documents of the pumps you have
selected. You can view more than one item at a time in this screen.• Copy From Another Quote: This button allows you to copy an item or items from a previous quote you have
created.• Toggle Alternate: This button switches the alternate and primary selections. Simply select the Alternate
item and hit this button to make it the new primary selection . The previous primary selection will become an alternate.
• Edit : :This button will be located in the ‘Edit ‘column next to the line item. This will allow you to go back into the line item to view or edit. This will only appear once an item has been saved.

17
Selection� When you click ‘Add Item’ you will be presented wit h two options:� Select by Pump List
• Choose this option if you want to see the performance for a known pump model and size. Once you have chosen the pump model and size, you can set the operating speed, impeller diameter and, if appropriate, the number of stages. The performance for the selected input parameters will be displayed.
• Search By Duty Conditions• Choose this option if you have known operating parameters and you want to search for a pump to meet
those parameters. A list of pumps that meet your criteria will be displayed with high level performance data to aid in choosing a specific pump model and size. Simply choose a pump size to see the full performance details.
XXXXXXXXXXXXXXXXXXXXXXXXXXXXXX
XXXXXXXXXXXXXXXXXXXXXX

18
Selection : Preferences
� Preferences : You can set default preferences for the selections you commonly use. It is located in the thin red bar at the top. Here you can set your defaults for:
� General• Duty Conditions : Frequency, liquid type, max temperature, hydraulic selection, test tolerances and
construction which will be found on the Duty Conditions page when you make a selection.• Product Line Filters : Industry, product classification and orientation which will be found on the Products
page.• Driver : Driver sizing spec, the site voltage, service factor, driver design and drive sourcing. These items
can be found on the Hydr./Driver Constraints page through out the selection process.• Choice/Reject List Option : Specify whether or not to suppress search results that are not even close to
meeting your input parameters.• Pump List Pre-Selection Option : Specify if the list of products available for selection should be limited by
the duty conditions you entered. If you uncheck this box, some products may not yield any acceptable selections.
• Screen Layout : Specify the Products page screen layout. You can choose between horizontal (side by side tables) or vertical (product table above the selected product table).
• Other Preferences : Misc. preferences such as document language and search results page size.
� Product Lines• Select product lines that you wish to be shown as a favorite product on the Products page.

19
Input Mode and Units
� Click on “Basic” to enter minimum duty conditions to make a pump selection:
� Click on “Advanced” to set pump parameters and hydraulic impacting features:
� Users can toggle between Basic Mode and Advanced Mode at any time � Units can be set to US standard, Metric standard, or Custom settings� Helpful Hint: The Input Mode and Unit you are currently using will be in yellow text.
Selection : Input Mode and Units

20
Navigation:
� Navigate by clicking the “Back” or “Next” Button� Users can also navigate by clicking the page name or tab on the
navigation bar at the top of each page� Helpful Hint : You can tell where you are in the process by the Black
Tab. Dark Gray tabs are the available tabs that you can navigate and Light Gray tabs are not applicable at the moment.
Selection : Navigation
XXXXXXXXXXXXXXXXXXXXXXXXXXXXXXXXX

21
Product Filtering
� Products are automatically filtered by the entered duty conditions
� Products can be also be filter by• Industry• Classification• Orientation
Selection : Product Filtering

22
Product Information
Click on the product name to view:
� Enlarged Image� Operating Conditions
(on second tab)� Links to the Product
Bulletin in 8 ½ x 11 & A4 formats
� Link to the IOM Manual (where available)
Please note that product information is not current ly fully available for some products.
Selection : Product Information

23
Search Results
This tab shows your results based on the parameters that were entered and will automatically sort the results by descending Efficiency.
Selection
Helpful Hint: You can sort results by any of the columns by clicking the Column Header.
Helpful Hint: The columns can also be customized to the order of preference by clicking the ‘Customize Columns’ button.

24
Result DetailsOnce you have selected a pump
the result details page will provide further information about the pump you have selected
Selection
Once you have selected a pump the output tab will allow you to view the curve, datasheets, general arrangement document as well as other documents associated with that selection.
Output
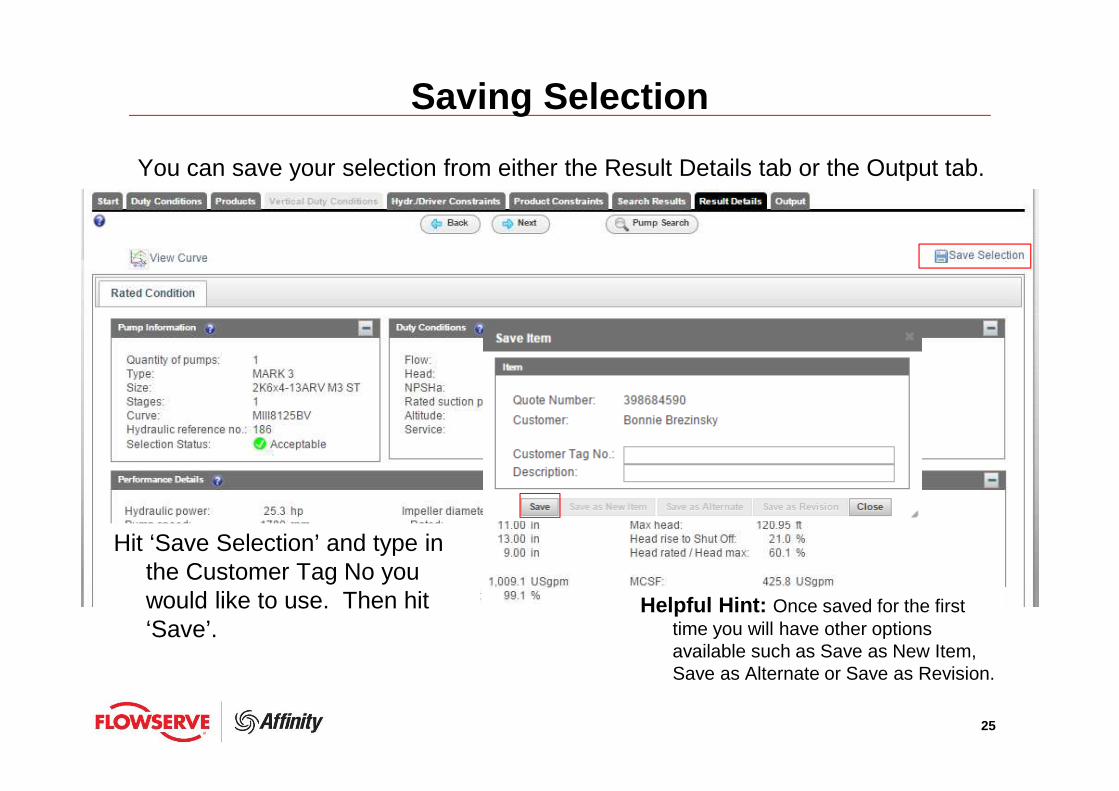
Helpful Hint: The save buttons are located on these two screens. Hit ‘Save Selection’, then type in a Customer Tag No and hit ‘Save as New Item’.
25
Saving Selection
You can save your selection from either the Result Details tab or the Output tab.
Hit ‘Save Selection’ and type in the Customer Tag No you would like to use. Then hit ‘Save’.
Helpful Hint: Once saved for the first time you will have other options available such as Save as New Item, Save as Alternate or Save as Revision.

26
Help
Click to display:
� Page level help – explains the available functionality on the particular page. This will be located in the upper left of the page.
� Section level help – explains the purpose of fields and terminology within the section. This will be located in the gray bar of a particular section.
Additional help can be accessed throughout Affinity , where ever a question mark symbol is displayed.
Selection : Help

27
Quote ManagerWhen accessing a previous quote, click on the ‘Quote Manager’ tab. This screen will show all quotes created by you or shared with you by other users. You can either navigate through this view or organize your quotes to make them easier to find.
XXXXXXXX
XXXXXXXX
XXXXXXXX

28
� Find the previous quote you have created and click on the Quote Number hyperlink to open that quote. You will then be able to Add or Edit Items from that quote.
Quote Manager : Existing Quotes
You can add new selections to existing quotes, by accessing the previous quote in the Quote Manager.
XXXXXXX
XXXXXXXX
XXXXXXXX
XXXXXXXX

29
Organizing Your Quotes
Folders• Can be used to group quotes• Quotes can be dragged and dropped into a folder• To add folders click ‘Edit’
Quote Manager
XXXXXXXX
XXXXXXXX
XXXXXXXX

30
Organizing your Quotes� Folders
• Type in the folder name and hit ‘Create’.• You can then rename or remove folders by selecting the folder and hitting
the appropriate action.• Click ‘Back’ to go back to the Quote Manager screen
Quote Manager
31
Support
� Users should direct questions and issues to
• Please provide a detailed description of the issue including the Operating
System used, Browser (name & version) and Quote Number.
• Where possible, please include a screen shot of issue in the request

32
Annex: Examples
� Selection Example: Pumplist Path
� Selection Example: Duty Condition Path
XXXXXXXX

33
� Click ‘Add Item’ � Select by Pumplist for this Example
Example: PumpList
XXXXXXXXXXXXXXXXXX
XXXXXXXXXXXXXXXXXXXXXX
XXXXXXXXXXXX

34
� In this example, an Overhung horizontal pump will be selected� You can use the
Classification ‘Overhung, close coupled, horizontal & vertical’ as well as the Orientation ‘Horizontal’ to narrow down the choices.
� Select a Mark 3 & LoFlo ANSI.
Example: PumpList

35
� Product List Options Page� Set the Frequency and Driver Design
� For this example leave as 60 Hz and NEMA Motor.
Example: PumpList
Helpful Hint: Navigation can be done with the Back/Next buttons or the tabs at the top.

36
� Pump List� The list of hydraulics (pump size & speed combination) is filtered by
frequency.� Select the 1K1.5x1-62RV with a Min RPM of 3001 and Max RPM of
3600.
Example: PumpList
Helpful Hint: If a pump has been selected the size/model will be shown at the top of the table.

37
� Overrides� You can override the default values to suite your needs� Not all options can be overridden, depending on the product line
selected.
Example: PumpList
*Change the selected diameter to 5.69 in.

38
� Result Details Page� This page shows the detailed performance for your selection
Example: PumpList
Helpful Hint: The duty conditions provided will be at the BEP point for the pump. If you need to adjust the conditions you can hit the ‘Edit Duty Conditions’ button on the left side.
*At this point Save the selection as Test123 and go Back to Quote.

39
Example: PumpList
� Line Details� Now the item is shown below.
XXXXXXXX

40
XXXXXXXXXXXXXXXXXX
XXXXXXXXXXXXXXXXXXXXXX
XXXXXXXXXXXX
Example: Duty Conditions
� Click ‘Add Item’� Search by Duty Conditions for this Example

41
� Duty Conditions� This page allows you to enter the hydraulic selection criteria for your
pump.� For this example use: 1,000 gpm and 100 ft. TDH
Example: Duty Conditions
Helpful Hint: If you have multiple duty conditions that need to be met with a pump, you can expand the panel ‘Additional Duty Conditions’ by clicking the plus sign in the right corner of the panel.
42
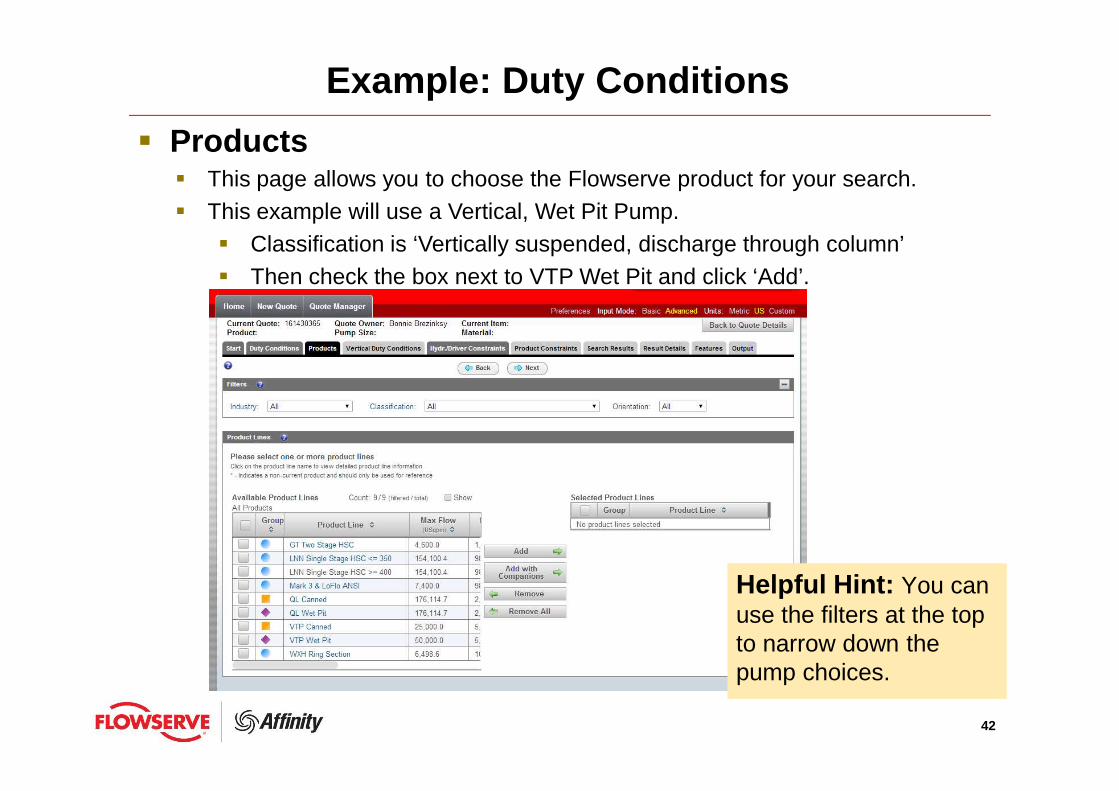
� Products� This page allows you to choose the Flowserve product for your search.� This example will use a Vertical, Wet Pit Pump.
� Classification is ‘Vertically suspended, discharge through column’� Then check the box next to VTP Wet Pit and click ‘Add’.
Example: Duty Conditions
Helpful Hint: You can use the filters at the top to narrow down the pump choices.

43
� Vertical Duty Conditions� This page allows you to enter additional information specific to vertical pump
configurations.� Input the sump depth of 20 ft. and size the pump for the bottom of the pit.
Example: Duty Conditions
� This screen will only be available when selecting a vertical pump. If a horizontal pump has been selected the program will automatically by-pass this screen.
44
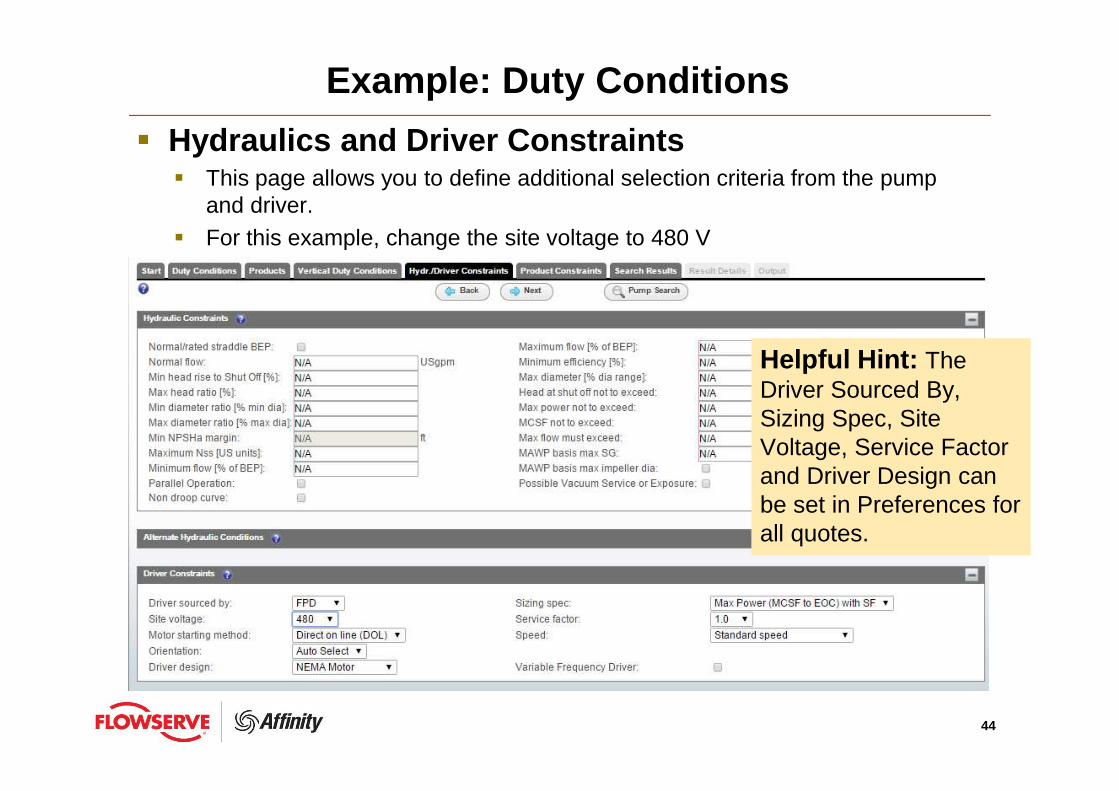
� Hydraulics and Driver Constraints� This page allows you to define additional selection criteria from the pump
and driver.� For this example, change the site voltage to 480 V
Example: Duty Conditions
Helpful Hint: The Driver Sourced By, Sizing Spec, Site Voltage, Service Factor and Driver Design can be set in Preferences for all quotes.

45
� Product Constraints� This page allows you to specify constraints for the product you selected.� In this example, change the drive shaft constraint to Solid shaft
Example: Duty Conditions
Helpful Hint: When a constraint is changed that affects other constraints on this page you will get a notification that other items have been automatically updated.

46
� Search Results� This page shows a table of the available pump sizes for the search criteria.� For this example, First sort by RPM by clicking the header ‘RPM’� Then select the 10EKY pump by clicking the blue hyperlink.
Example: Duty Conditions

47
� Results Details� This page allows you to review the hydraulic performance of the selected
pump size.
Example: Duty Conditions

48
� Output� This page allows you to select and view Output Documents for the item. � Curve preferences are also located here.
Example: Duty Conditions
Helpful Hint: This page is also available through the PumpListselection Path. * From here save the selection
as Test 321

49
Example: Duty Conditions
� Line Details� Now the second item is shown below.
XXXXXXXX