agent installation guide
TRANSCRIPT

Agent Installation GuideZENworks Patch Management 6.4 SP2
02_017N 6.4SP2 Agent Installation Guide

- 2 -

- 3 -
NoticesVersion Information
ZENworks Patch Management Agent Installation Guide - ZENworks Patch Management Version 6.4SP2 -Released: September 2009Document Number: 02_017N_6.4SP2_092651116
Legal Notices
Novell, Inc. makes no representations or warranties with respect to the contents or use of thisdocumentation, and specifically disclaims any express or implied warranties of merchantability or fitnessfor any particular purpose. Further, Novell, Inc. reserves the right to revise this publication and to makechanges to its content, at any time, without obligation to notify any person or entity of such revisions orchanges.
Further, Novell, Inc. makes no representations or warranties with respect to any software, and specificallydisclaims any express or implied warranties of merchantability or fitness for any particular purpose.Further, Novell, Inc. reserves the right to make changes to any and all parts of Novell software, at any time,without any obligation to notify any person or entity of such changes.
Any products or technical information provided under this Agreement may be subject to U.S. exportcontrols and the trade laws of other countries. You agree to comply with all export control regulations andto obtain any required licenses or classification to export, re-export or import deliverables. You agree notto export or re-export to entities on the current U.S. export exclusion lists or to any embargoed or terroristcountries as specified in the U.S. export laws. You agree to not use deliverables for prohibited nuclear,missile, or chemical biological weaponry end uses. See the Novell International Trade Services Web page(http://www.novell.com/info/exports/) for more information on exporting Novell software. Novell assumes noresponsibility for your failure to obtain any necessary export approvals.
Copyright © 2008 Novell, Inc. All rights reserved. No part of this publication may be reproduced,photocopied, stored on a retrieval system, or transmitted without the express written consent of thepublisher.
Novell, Inc. has intellectual property rights relating to technology embodied in the product that is describedin this document. In particular, and without limitation, these intellectual property rights may include one ormore of the U.S. patents listed on the Novell Legal Patents Web page (http://www.novell.com/company/legal/patents/) and one or more additional patents or pending patent applications in the U.S. and in othercountries.
Novell, Inc.404 Wyman Street, Suite 500Waltham, MA 02451U.S.A.
www.novell.com
Online Documentation: To access the latest online documentation for this and other Novell products, seethe Novell Documentation Web page (http://www.novell.com/documentation).

ZENworks Patch Management
- 4 -
Novell Trademarks
For Novell trademarks, see the Novell Trademark and Service Mark list (http://www.novell.com/company/legal/ trademarks/tmlist.html).
Third-Party Materials
All third-party trademarks are the property of their respective owners.

- 5 -
Table of Contents
Preface: About This Document............................................................................................... 7Typographical Conventions..................................................................................................................7
Contacting Novell................................................................................................................................. 7
Chapter 1: Preparing for Agent Installation........................................................................... 9Installation Methods............................................................................................................................. 9
Agent Supported Operating Systems................................................................................................ 10
Agent Supported Languages............................................................................................................. 12
Agent System Requirements............................................................................................................. 12
Agent for Windows.....................................................................................................................13
Agent for Linux, Unix, and Mac.................................................................................................13
Chapter 2: Installing Agents.................................................................................................. 15Downloading the Installer...................................................................................................................15
Installing the Agent for Windows....................................................................................................... 16
Installing the Agent for Windows Vista and Windows 2008.............................................................. 19
Installing the Agent for Linux, Unix, and Mac................................................................................... 21
Installing the Agent for Mac...............................................................................................................22
Chapter 3: Automating the Agent Installation..................................................................... 31Automating the Windows MSI Installer..............................................................................................31
Creating a Network Share......................................................................................................... 32
Modifying the MSI File............................................................................................................... 32
Creating an Organizational Unit.................................................................................................36
Performing a Silent Install From a Command Prompt.......................................................................40
Installing the Windows Agent.....................................................................................................40
Installing the Linux, Unix, and Mac Agent.................................................................................40

Table of Contents
- 6 -

- 7 -
Preface
About This Document
This User Guide is a resource written for all users of Novell ZENworks Patch Management6.4 SP2. This document defines the concepts and procedures for installing, configuring,implementing, and using Novell ZENworks Patch Management 6.4 SP2.
Tip: Novell documentation is updated on a regular basis. To acquire the latest version of thisor any other published document, please refer to the Novell Documentation Web page (http://www.novell.com/documentation/).
Typographical Conventions
The following conventions are used throughout this documentation to help you identify variousinformation types.
Convention Usage
bold Buttons, menu items, window and screen objects.
bold italics Wizard names, window names, and page names.
italics New terms, options, and variables.
UPPERCASE SQL Commands and keyboard keys.
monospace File names, path names, programs, executables, commandsyntax, and property names.
Contacting Novell
The following table lists the available technical support options.
Call Novell Support
Phone: +1 800.858.4000
Web Support
http://www.novell.com/support

Preface
- 8 -

- 9 -
Chapter
1Preparing for Agent Installation
In this chapter:
• Installation Methods• Agent Supported
Operating Systems• Agent Supported
Languages• Agent System
Requirements
Having successfully installed your Patch ManagementServer, you can now proceed to the installation of yourPatch Management Agents. Following installation, the agentis monitored and maintained by the Patch ManagementServer, requiring no additional ‘on-site’ maintenance.
Installation Methods
Patch Management Agents can be deployed using any one, or combination, of the followingmethods.
Table 1: Installation Options
Installation Type Description
Singe Agent Installer forpre-Windows Vista
Allows you to run the installer, entering the information asprompted. You can also modify the Microsoft Software Installer(.msi) file, using an MSI editor, to include your organization’sconfiguration. The file can then be delivered by using a loginscript, Active Directory Group Policy Object (GPO), or otherremote software installation method.
Single Agent Installer forpre-Windows Vista (x64)
Allows you to run the installer, entering the information asprompted. You can also modify the Microsoft Software Installer(.msi) file, using an MSI editor, to include your organization’sconfiguration. The file can then be delivered by using a loginscript, Active Directory Group Policy Object (GPO), or otherremote software installation method.
ZENworks Patch Management
- 10 -
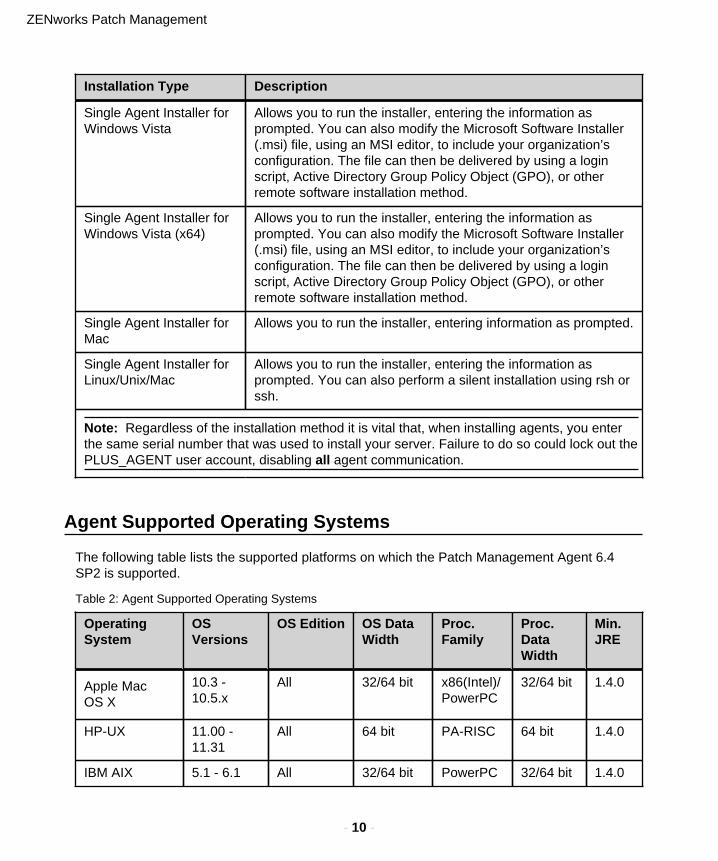
Installation Type Description
Single Agent Installer forWindows Vista
Allows you to run the installer, entering the information asprompted. You can also modify the Microsoft Software Installer(.msi) file, using an MSI editor, to include your organization’sconfiguration. The file can then be delivered by using a loginscript, Active Directory Group Policy Object (GPO), or otherremote software installation method.
Single Agent Installer forWindows Vista (x64)
Allows you to run the installer, entering the information asprompted. You can also modify the Microsoft Software Installer(.msi) file, using an MSI editor, to include your organization’sconfiguration. The file can then be delivered by using a loginscript, Active Directory Group Policy Object (GPO), or otherremote software installation method.
Single Agent Installer forMac
Allows you to run the installer, entering information as prompted.
Single Agent Installer forLinux/Unix/Mac
Allows you to run the installer, entering the information asprompted. You can also perform a silent installation using rsh orssh.
Note: Regardless of the installation method it is vital that, when installing agents, you enterthe same serial number that was used to install your server. Failure to do so could lock out thePLUS_AGENT user account, disabling all agent communication.
Agent Supported Operating Systems
The following table lists the supported platforms on which the Patch Management Agent 6.4SP2 is supported.
Table 2: Agent Supported Operating Systems
OperatingSystem
OSVersions
OS Edition OS DataWidth
Proc.Family
Proc.DataWidth
Min.JRE
Apple MacOS X
10.3 -10.5.x
All 32/64 bit x86(Intel)/PowerPC
32/64 bit 1.4.0
HP-UX 11.00 -11.31
All 64 bit PA-RISC 64 bit 1.4.0
IBM AIX 5.1 - 6.1 All 32/64 bit PowerPC 32/64 bit 1.4.0
Preparing for Agent Installation
- 11 -
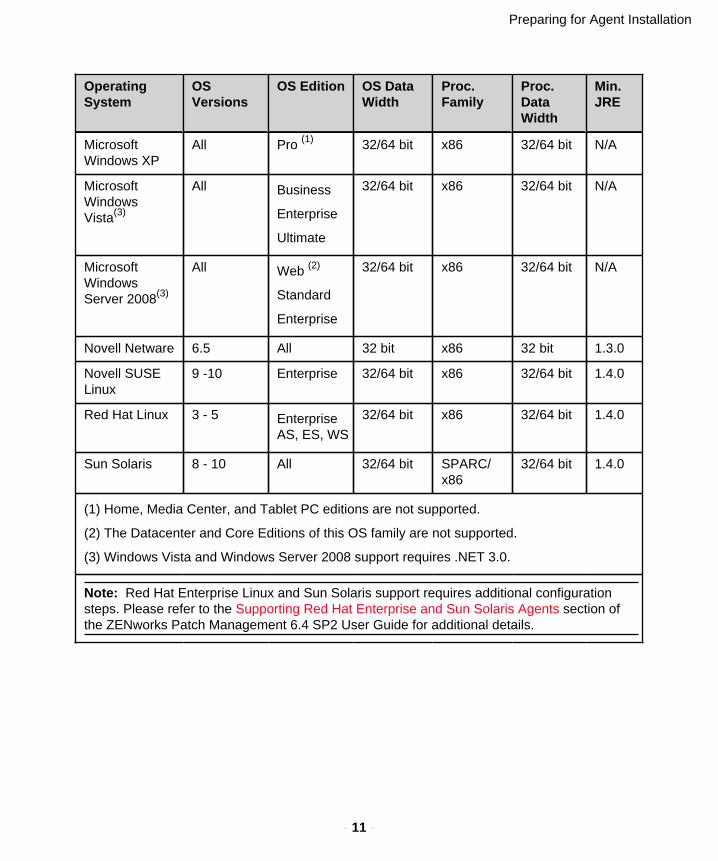
OperatingSystem
OSVersions
OS Edition OS DataWidth
Proc.Family
Proc.DataWidth
Min.JRE
MicrosoftWindows XP
All Pro (1) 32/64 bit x86 32/64 bit N/A
MicrosoftWindowsVista(3)
All Business
Enterprise
Ultimate
32/64 bit x86 32/64 bit N/A
MicrosoftWindowsServer 2008(3)
All Web (2)
Standard
Enterprise
32/64 bit x86 32/64 bit N/A
Novell Netware 6.5 All 32 bit x86 32 bit 1.3.0
Novell SUSELinux
9 -10 Enterprise 32/64 bit x86 32/64 bit 1.4.0
Red Hat Linux 3 - 5 EnterpriseAS, ES, WS
32/64 bit x86 32/64 bit 1.4.0
Sun Solaris 8 - 10 All 32/64 bit SPARC/x86
32/64 bit 1.4.0
(1) Home, Media Center, and Tablet PC editions are not supported.
(2) The Datacenter and Core Editions of this OS family are not supported.
(3) Windows Vista and Windows Server 2008 support requires .NET 3.0.
Note: Red Hat Enterprise Linux and Sun Solaris support requires additional configurationsteps. Please refer to the Supporting Red Hat Enterprise and Sun Solaris Agents section ofthe ZENworks Patch Management 6.4 SP2 User Guide for additional details.
ZENworks Patch Management
- 12 -
Agent Supported Languages
ZENworks Patch Management Agent 6.4 SP2 is supported on the following languages:
• en-AU: English (Australia)• en-BZ: English (Belize)• en-CA: English (Canada)• en-JM: English (Jamaica)• en-NZ: English (New Zealand)• en-ZA: English (South Africa)• en-GB: English (United Kingdom)• en-US: English (United States)• es-ES: Spanish (Spain)• fi-FI: Finnish (Finland)• fr-FR: French (France)• de-DE: German (Germany)• it-IT: Italian (Italy)• ja-JP: Japanese (Japan)• ko-KR: Korean (Korea)• nl-NL: Dutch (Netherlands)• pt-BE: Portuguese (Brazil)• sv-SE: Swedish (Sweden)• zh-CN: Chinese (Simplified)• zh-CHS: Chinese (Simplified)• zh-TW: Chinese (Traditional)• zh-CHT: Chinese (Traditional)
Agent System Requirements
The following section lists the hardware and software requirements for the Patch Management6.4 SP2 Agent.
Note: You must disable any virus-scanning software prior to the installation of the PatchManagement Agent. Failure to do so may result in an unsuccessful agent installation.
Preparing for Agent Installation
- 13 -
Agent for Windows
The Agent for Windows system requirements are as follow.
• Local or Domain Administrator or administrator equivalent user rights.
Note: The install (and uninstall) must be done by an Administrator or administratorequivalent user.
• A 500 MHz Processor or higher.• Minimum of 256 MB of RAM.• Minimum of 20 MB of free disk space for installation.• Sufficient free space to download and install patches (varies dependent upon the size of the
patch).• Windows Installer 2.0 or higher.• Microsoft Internet Explorer 5.01 or higher (Internet Explorer 5.5 or higher if using SSL).• 10 Mbps network connection to your Patch Management Server (6.4 SP2 or higher).
Agent for Linux, Unix, and Mac
The Agent for Linux, UNIX, and Mac system requirements are as follow.
• Superuser privileges on the target computer.
Note: The install (and uninstall) must be done by the root user (superuser).
• Minimum of 2 MB free disk space for the text-based installation.• Minimum of 20 MB free disk space for the graphical installation.• A 500 MHz Processor or higher.• Minimum of 256 MB of RAM.• 10 Mbps network connection to your Patch Management Server (6.4 SP2 or higher)• Sufficient free space to download and install patches (varies dependent upon the size of the
patch).• Presence of /tmp directory (/var/tmp directory on Solaris) for temporary file storage and
processing.
Note: There must be no whitespaces (such as a space, tab, or newline character) in theabsolute path of the installation directory.

ZENworks Patch Management
- 14 -
- 15 -
Chapter
2Installing Agents
In this chapter:
• Downloading the Installer• Installing the Agent for
Windows• Installing the Agent
for Windows Vista andWindows 2008
• Installing the Agent forLinux, Unix, and Mac
• Installing the Agent forMac
This section includes the following instructions for installingthe Patch Management Agent.
• Downloading the Installer on page 15.• Installing the Agent for Windows on page 16.• Installing the Agent for Windows Vista and Windows
2008 on page 19.• Installing the Agent for Linux, Unix, and Mac on page
21.• Installing the Agent for Mac on page 22.
Downloading the Installer
The standard agent install requires logging into the Patch Management Server administrationconsole from the target computer then downloading the installer to that computer.
1. Log on to the target computer as the local administrator or a member of the LOCAL_ADMINSgroup (root or superuser on Linux, UNIX, Mac systems).
2. Launch your web browser.
3. Type your server URL in your web browser’s Address field.
4. Press ENTER.
5. Type your user name in the User Name field.
6. Type your password in the Password field.
7. Click OK.
Step Result: The ZENworks Patch Management Server Home page opens.
8. Select Devices.

ZENworks Patch Management
- 16 -
9. Click Install.
Step Result: The Agent Installers window opens.
Figure 1: Agent Installers
10.Select the download link corresponding with the installer you need.
11.Click Save.
Step Result: The installer downloads to the location you specify.
Installing the Agent for Windows
The following steps apply to both the Single Agent Windows MSI Installer and the Single AgentWindows x64 MSI Installer. To install the agent for Windows Vista, refer to Installing the Agentfor Windows Vista and Windows 2008 on page 19.
1. From the download location, select the updateagent.msi to extract the ZENworks PatchManagement Agent for Windows Install Shield Wizard.
Installing Agents
- 17 -
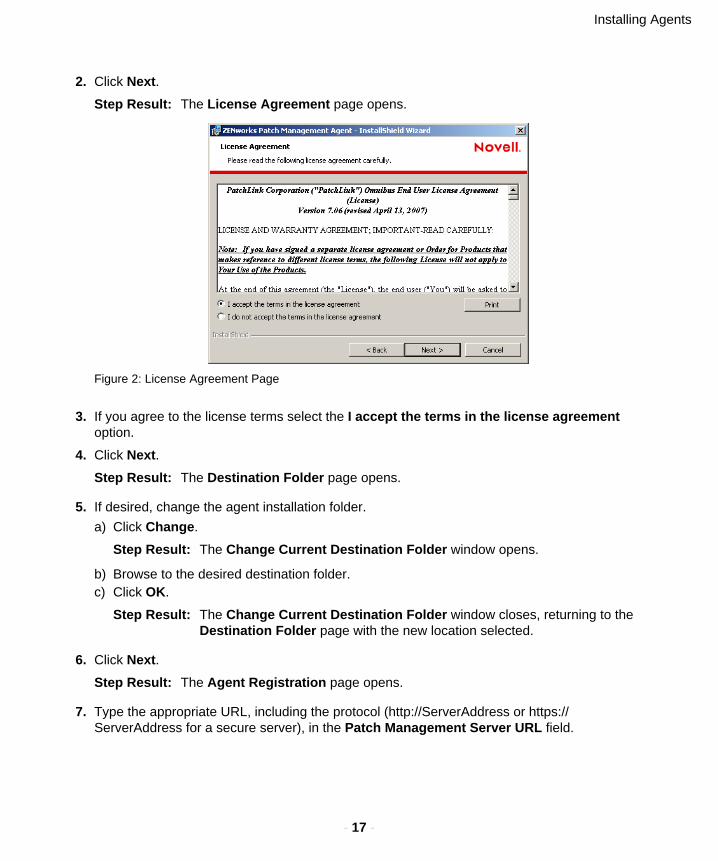
2. Click Next.
Step Result: The License Agreement page opens.
Figure 2: License Agreement Page
3. If you agree to the license terms select the I accept the terms in the license agreementoption.
4. Click Next.
Step Result: The Destination Folder page opens.
5. If desired, change the agent installation folder.
a) Click Change.
Step Result: The Change Current Destination Folder window opens.
b) Browse to the desired destination folder.c) Click OK.
Step Result: The Change Current Destination Folder window closes, returning to theDestination Folder page with the new location selected.
6. Click Next.
Step Result: The Agent Registration page opens.
7. Type the appropriate URL, including the protocol (http://ServerAddress or https://ServerAddress for a secure server), in the Patch Management Server URL field.
ZENworks Patch Management
- 18 -
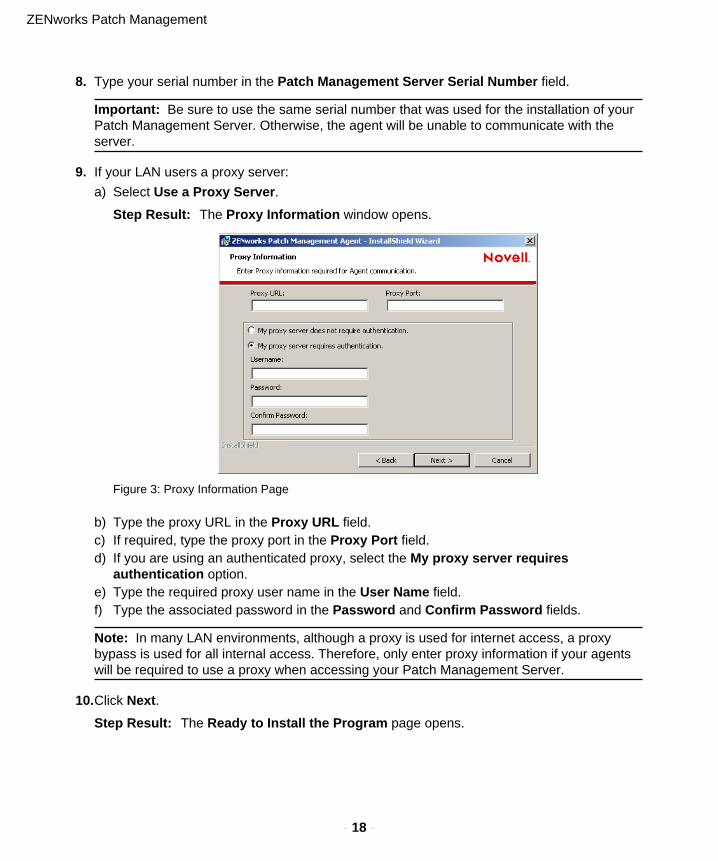
8. Type your serial number in the Patch Management Server Serial Number field.
Important: Be sure to use the same serial number that was used for the installation of yourPatch Management Server. Otherwise, the agent will be unable to communicate with theserver.
9. If your LAN users a proxy server:
a) Select Use a Proxy Server.
Step Result: The Proxy Information window opens.
Figure 3: Proxy Information Page
b) Type the proxy URL in the Proxy URL field.c) If required, type the proxy port in the Proxy Port field.d) If you are using an authenticated proxy, select the My proxy server requires
authentication option.e) Type the required proxy user name in the User Name field.f) Type the associated password in the Password and Confirm Password fields.
Note: In many LAN environments, although a proxy is used for internet access, a proxybypass is used for all internal access. Therefore, only enter proxy information if your agentswill be required to use a proxy when accessing your Patch Management Server.
10.Click Next.
Step Result: The Ready to Install the Program page opens.

Installing Agents
- 19 -
11.Click Install.
Step Result: The agent is installed and when complete the Installation Complete pageopens.
12.Click Finish to exit the wizard.
Installing the Agent for Windows Vista and Windows 2008
The following steps apply to both the Single Agent for Windows Vista and Windows 2008 MSIInstaller and the Single Agent for Windows Vista and Windows 2008 x64 MSI Installer. To installthe agent for pre-Windows Vista, refer to Installing the Agent for Windows on page 16.
1. From the download location, select the updateagentforvista.msi to extract the ZENworksPatch Management Agent for Windows Vista Install Shield Wizard.
2. Click Next.
Step Result: The License Agreement page opens.
Figure 4: License Agreement Page
3. If you agree to the license terms select the I accept the terms in the license agreementoption.
4. Click Next.
Step Result: The Destination Folder page opens.
5. If desired, change the agent installation folder.

ZENworks Patch Management
- 20 -
a) Click Change.
Step Result: The Change Current Destination Folder window opens.
b) Browse to the desired destination folder.c) Click OK.
Step Result: The Change Current Destination Folder window closes, returning to theDestination Folder page with the new location selected.
6. Click Next.
Step Result: The Agent Registration page opens.
7. Type the appropriate URL, including the protocol (http://ServerAddress or https://ServerAddress for a secure server), in the Patch Management Server URL field.
8. Type your serial number in the Patch Management Server Serial Number field.
Important: Be sure to use the same serial number that was used for the installation of yourPatch Management Server. Otherwise, the agent will be unable to communicate with theserver.
9. If your LAN users a proxy server:
a) Select Use a Proxy Server.
Step Result: The Proxy Information window opens.
Figure 5: Proxy Information Page
b) Type the proxy URL in the Proxy URL field.c) If required, type the proxy port in the Proxy Port field.

Installing Agents
- 21 -
d) If you are using an authenticated proxy, select the My proxy server requiresauthentication option.
e) Type the required proxy user name in the User Name field.f) Type the associated password in the Password and Confirm Password fields.
Note: In many LAN environments, although a proxy is used for internet access, a proxybypass is used for all internal access. Therefore, only enter proxy information if your agentswill be required to use a proxy when accessing your Patch Management Server.
10.Click Next.
Step Result: The Ready to Install the Program page opens.
11.Click Install.
Step Result: The agent is installed and when complete the Installation Complete pageopens.
12.Click Finish to exit the wizard.
Installing the Agent for Linux, Unix, and Mac
Prior to installing the Agent, you must ensure that the currently installed Java version meets therequirements defined under Agent Supported Operating Systems on page 10.
After ensuring the computer contains an appropriate version of Java, complete the followingsteps to install the Agent.
1. In the /root directory, create an UnixUpdateAgent directory.
2. From the downloaded location, select the UnixUpdateAgent.tar and extract the file’s contentsto the /root/UnixUpdateAgent directory.
3. Open a Terminal Window.
4. Navigate to the /root/UnixUpdateAgent directory.
5. Type ./install to start the installation process.
6. At the Enter the Directory where Patch Management Agent should be installed [/usr/local]: prompt, type the desired installation path or press ENTER to accept the default pathof /usr/local.
7. At the Please enter a name for this machine: prompt, type a name for the machine onwhich you are installing the agent.
8. At the Enter your Patch Management Server Address: prompt, type the URL or IP of yourPatch Management Server, to which the agent will be communicating.
Enter the server address in the format http://ServerAddress or https://ServerAddress
ZENworks Patch Management
- 22 -
9. At the Enter the product serial number that appears as xxxxxxxx-xxxxxxxx: prompt,type your serial number.
Note: You must enter your serial number in the xxxxxxxx-xxxxxxxx format.
10.At the Do you have a Proxy [Y/N]: prompt, type y to configure a proxy, or press ENTER tocontinue without a proxy.
11.At the Do you wish to add this agent to existing groups on “ZENworks PatchManagement Server”? [Y/N]: prompt, type y to add the agent to a group or n to continue.
Result: The installation completes and the terminal link can be disconnected.
Caution: Some issues when installing the Agent for Linux, Unix, Mac may include:An incorrect server address (if using SSL, the URL starts with https://), An incorrectserial number, Networking problems, or An incorrect proxy address or port.
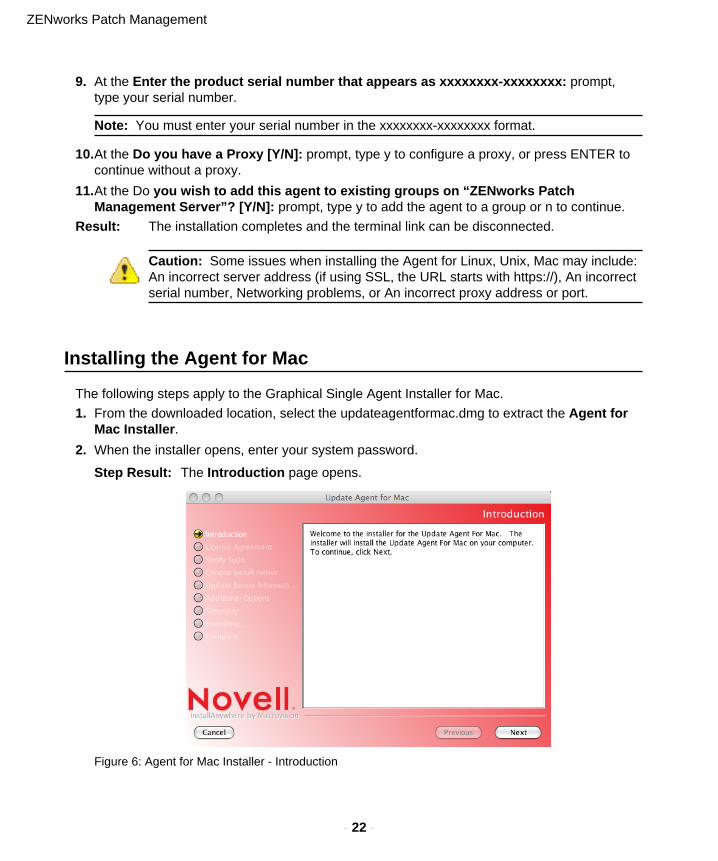
Installing the Agent for Mac
The following steps apply to the Graphical Single Agent Installer for Mac.
1. From the downloaded location, select the updateagentformac.dmg to extract the Agent forMac Installer.
2. When the installer opens, enter your system password.
Step Result: The Introduction page opens.
Figure 6: Agent for Mac Installer - Introduction
Installing Agents
- 23 -
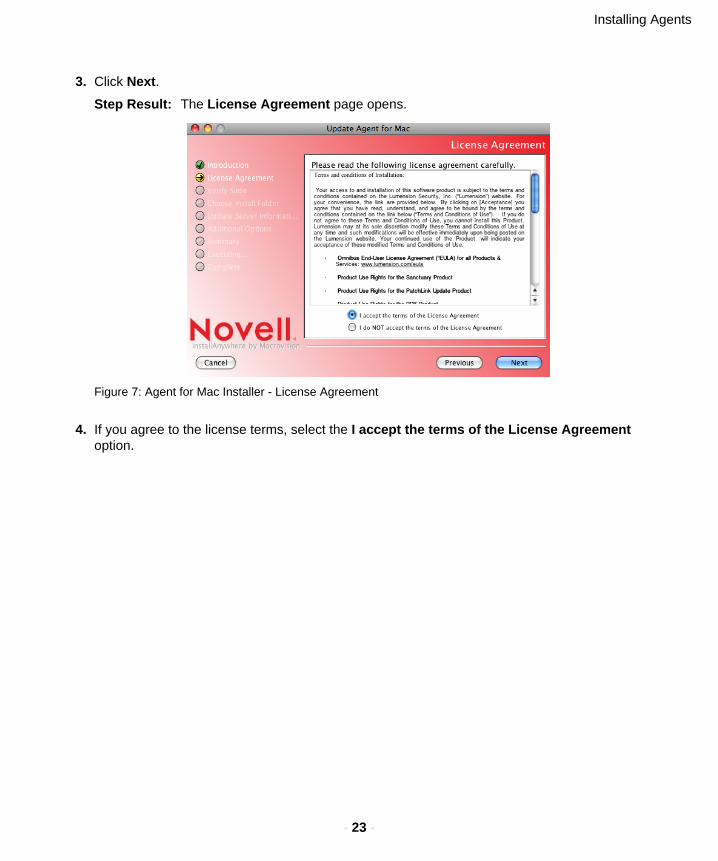
3. Click Next.
Step Result: The License Agreement page opens.
Figure 7: Agent for Mac Installer - License Agreement
4. If you agree to the license terms, select the I accept the terms of the License Agreementoption.

ZENworks Patch Management
- 24 -
5. Click Next.
Step Result: The Enter Root Password page opens.
Figure 8: Agent for Mac Installer - Enter Root Password
6. Enter your system password in the Please Enter the Password field.
Note: This is the same password that you entered in step 2.
Installing Agents
- 25 -
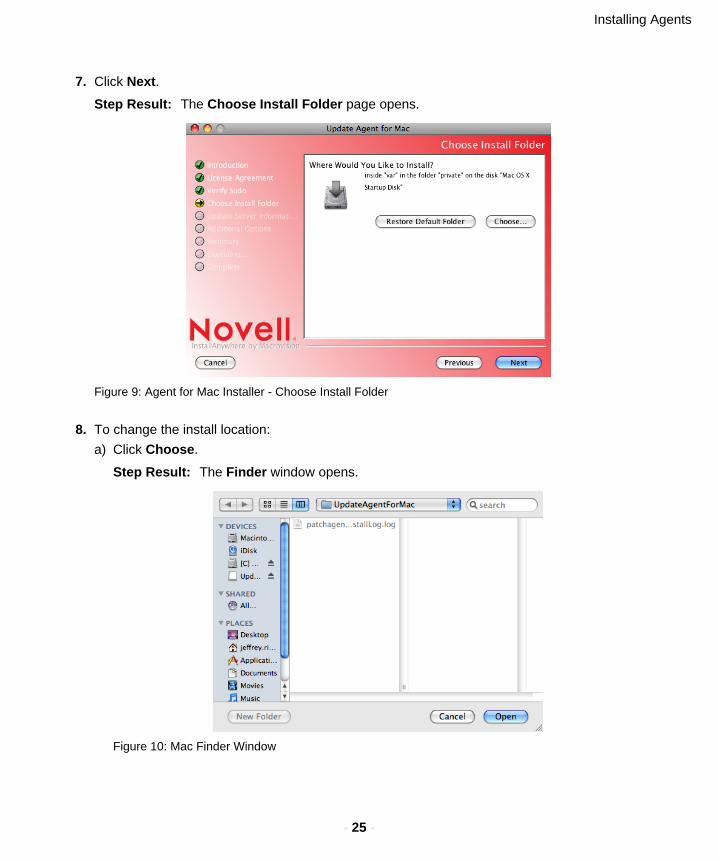
7. Click Next.
Step Result: The Choose Install Folder page opens.
Figure 9: Agent for Mac Installer - Choose Install Folder
8. To change the install location:
a) Click Choose.
Step Result: The Finder window opens.
Figure 10: Mac Finder Window

ZENworks Patch Management
- 26 -
b) Browse to and select the desired location.c) Click Open.
9. Click Next.
Step Result: The ZENworks Patch Management Server Information page displays.
Figure 11: Agent for Mac Installer - Patch Management Server Information
10.Type the appropriate URL in the Patch Management Server URL field.
Note: You must also include the protocol (http:// or https://) when entering the server URL.
11.Type your serial number in the Patch Management Server Serial Number field.
Note: Use the same serial number that was used for the installation of your Update Serverotherwise the agent will be unable to communicate with the server.
12.If your LAN uses a proxy server:
a) Select the Use a Proxy Server option.

Installing Agents
- 27 -
b) Click Next.
Step Result: The Proxy Configuration page opens.
Figure 12: Agent for Mac Installer - Proxy Configuration
c) In the Proxy URL field, type the proxy URL.d) In the Proxy Port field, type the proxy port (if one is required).e) If you are using an authenticated proxy, type the proxy server user name in the Proxy
User (if authenticated) field.f) Type the proxy user’s password in the Proxy Password (if authenticated) and Confirm
Password fields.

ZENworks Patch Management
- 28 -
13.Click Next.
Step Result: The Additional Options page opens.
Figure 13: Agent for Mac Installer - Additional Options
14.To optionally add the agent to specific device groups, enter the names of the groups in theGroups field. Separating multiple groups using a pipe (|) symbol.
15.To optionally set the operating system’s prioritization value for the ZENworks PatchManagement Agent, enter a value in the Agent Nice Value field.
16.To optionally configure the agent so that although it is detectable, it cannot receivedeployments, select the Detect Only option.

Installing Agents
- 29 -
17.Click Next.
Step Result: The Pre-Installation Summary page opens.
Figure 14: Agent for Mac Installer - Pre-Installation Summary
18.Verify the accuracy of the summary information and click Next to begin the installation.
Step Result: When the installation completes, the Install Complete Success pagedisplays.
Figure 15: Agent for Mac Installer - Install Complete Success

ZENworks Patch Management
- 30 -
19.Click Done to exit the installation wizard.

- 31 -
Chapter
3Automating the Agent Installation
In this chapter:
• Automating the WindowsMSI Installer
• Performing a Silent InstallFrom a Command Prompt
The following section includes instructions for automatingthe installation of the ZENworks Patch Management Agent.
Automating the Windows MSI Installer
The Single Agent Windows MSI Installer can be used to perform a single installation on thecurrent computer or through the use of the MSI Installer, Group Policy Objects (GPOs), and theOrca package editor on multiple computers. Using these tools you can install the Update Agenton all windows computers within your domain.
To use the MSI installer with Group Policy Objects you must:
1. Create a network share.
(See Creating a Network Share on page 32 for additional information.)2. Modify the Single Agent Windows MSI Installer (.msi) file.
(See Modifying the MSI File on page 32 for additional information.)3. Create an Organizational Unit.
(See Creating an Organizational Unit on page 36 for additional information.)
Note: Microsoft Group Policy Object (GPO) allows for mandatory software distribution tocomputers under control of a particular Organizational Unit (OU) and can be used to distributethe Patch Management Agent. However, the GPO installation does not check for an existinginstallation of the agent on the target computer and will reinstall the agent on any computersin the OU. In order to avoid potential problems caused by reinstalling the agent, ensure thatcomputers with existing Patch Management Agents are NOT members of the OU whichcontains the ZENworks Patch Management software GPO.
ZENworks Patch Management
- 32 -
Creating a Network Share
Create a network share (with Read-Only access) from which all users will be able to access andinstall the Patch Management Agent using the MSI installer.
1. Create the NovellMSI folder on a network computer.
2. Share the NovellMSI folder, granting Everyone Read access, and Domain Admins FullControl.
3. Copy the updateagent.msi, from downloaded location, into the NovellMSI folder.
Modifying the MSI File
To fully automate the Agent installation you must modify the MSI file to include your Host Nameand Serial Number. Microsoft Orca allows you to make changes to the application so your userswill not have to manually enter their name and serial number for their installs. This also allowsthe application to be installed remotely.
Note: Modifying the digitally signed MSI file will invalidate the digital signature assigned byNovell. Depending upon your security settings, this may introduce security warnings andrestrictions during the agent installation.
The user modifiable installer properties are defined in the following table:
1. Install Microsoft Orca (or a similar MSI editor) to your management workstation.
Note: Orca is installed from the Microsoft Windows Installer SDK which can be downloadedfrom http://msdn.microsoft.com/en-us/library/aa370557.aspx.
2. Select Start > Programs > Orca to open Microsoft Orca.
Automating the Agent Installation
- 33 -
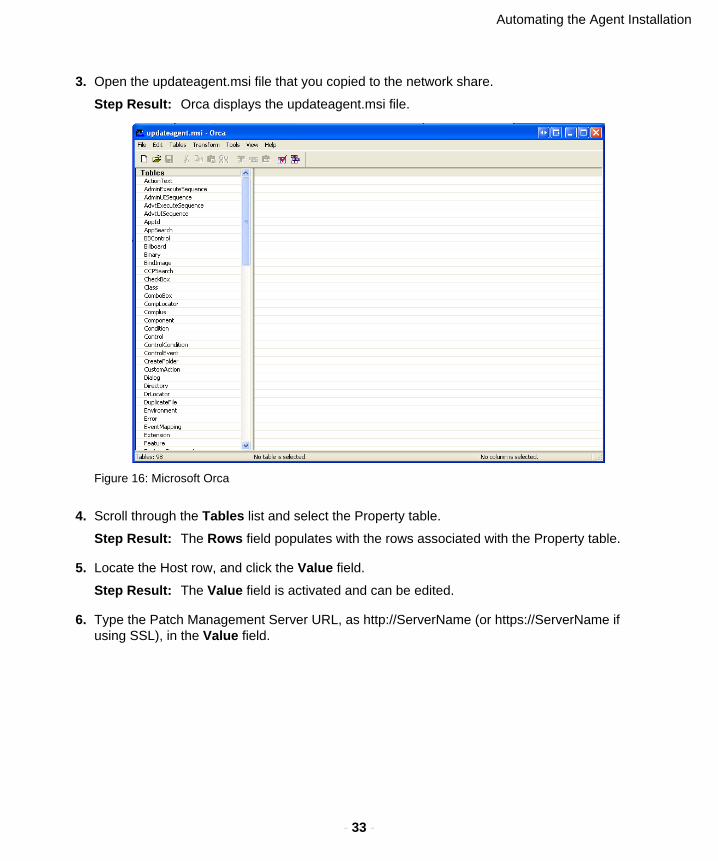
3. Open the updateagent.msi file that you copied to the network share.
Step Result: Orca displays the updateagent.msi file.
Figure 16: Microsoft Orca
4. Scroll through the Tables list and select the Property table.
Step Result: The Rows field populates with the rows associated with the Property table.
5. Locate the Host row, and click the Value field.
Step Result: The Value field is activated and can be edited.
6. Type the Patch Management Server URL, as http://ServerName (or https://ServerName ifusing SSL), in the Value field.

ZENworks Patch Management
- 34 -
7. Locate the Serial row, and click the Value field.
Step Result: The Value field is activated and can be edited.
Figure 17: Orca - Enter Serial Number
8. Type your Patch Management Server Serial Number in the Value field.
9. If you are using a proxy server, add the necessary proxy entries as follows:

Automating the Agent Installation
- 35 -
a) Right-click in the right window pane and select Add Row.
Step Result: The Add Row dialog box opens.
Figure 18: Orca - Add Row
b) Enter useproxy as the Property column field.c) Select Value, and type 1 to indicate that a proxy is in use.d) Click OK.
Step Result: The Proxy row is added to the Property table.
10.Repeat step 9, adding additional rows as needed for the following proxy entries.
Property Value
useproxy 1
proxyurl http://YourProxyServer:ProxyPort
proxyuser Login user, for authenticated proxy.
proxypass Login user’s password, for authenticated proxy.
11.To automatically add the agent to an existing group, add the following entry:
a) Right-click in the right window pane and select Add Row.
Step Result: The Add Row dialog box opens.
b) Enter grouplist as the Property column field.c) Select Value, and enter the group names.
Type the group names as: “GroupName1;GroupName2;GroupNameN”.
ZENworks Patch Management
- 36 -
d) Click OK.
Step Result: The grouplist row is added to the Property table.
12.Click Save.
Step Result: The changes are saved to the updateagent.msi file.
13.Exit Microsoft Orca.
After Completing This Task:
You can now use the updateagent.msi file to manually install the Patch Management Agent bybrowsing, from the target computer, to the network share you created and manually opening thefile.
Creating an Organizational Unit
1. Click Start > Administrative Tools > Active Directory Users and Computers.
Step Result: The Active Directory Users and Computers management console opens.
2. Right-click the domain tree (mydomain.com) and select New > Organizational Unit.
Step Result: The New Object - Organizational Unit window opens.
3. In the Name field, type a name for your Organizational Unit (OU).
4. Click OK.
Step Result: The New Object - Organizational Unit window closes, returning to theActive Directory Users and Computers management console.
Automating the Agent Installation
- 37 -
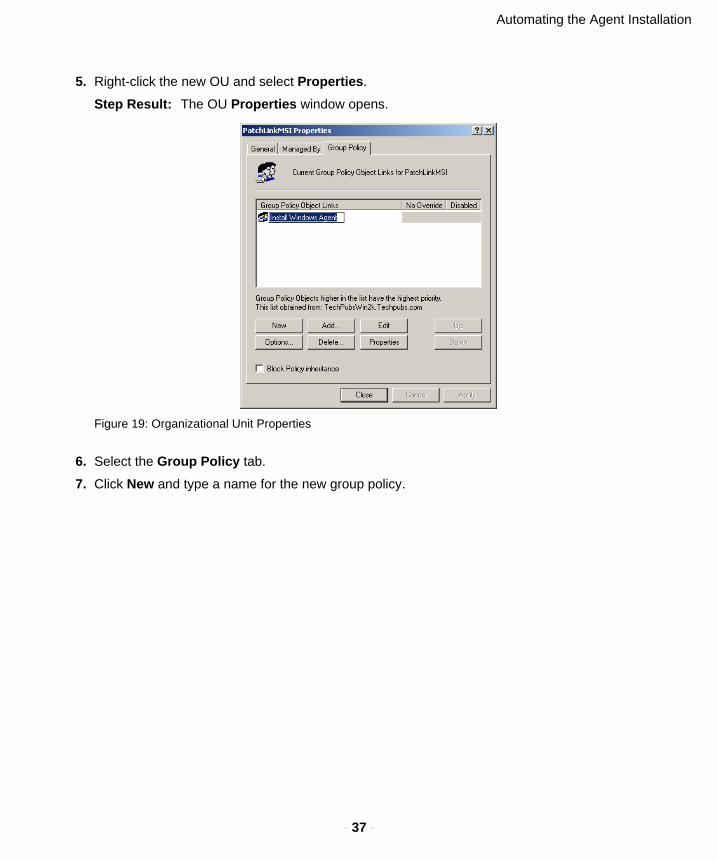
5. Right-click the new OU and select Properties.
Step Result: The OU Properties window opens.
Figure 19: Organizational Unit Properties
6. Select the Group Policy tab.
7. Click New and type a name for the new group policy.
ZENworks Patch Management
- 38 -
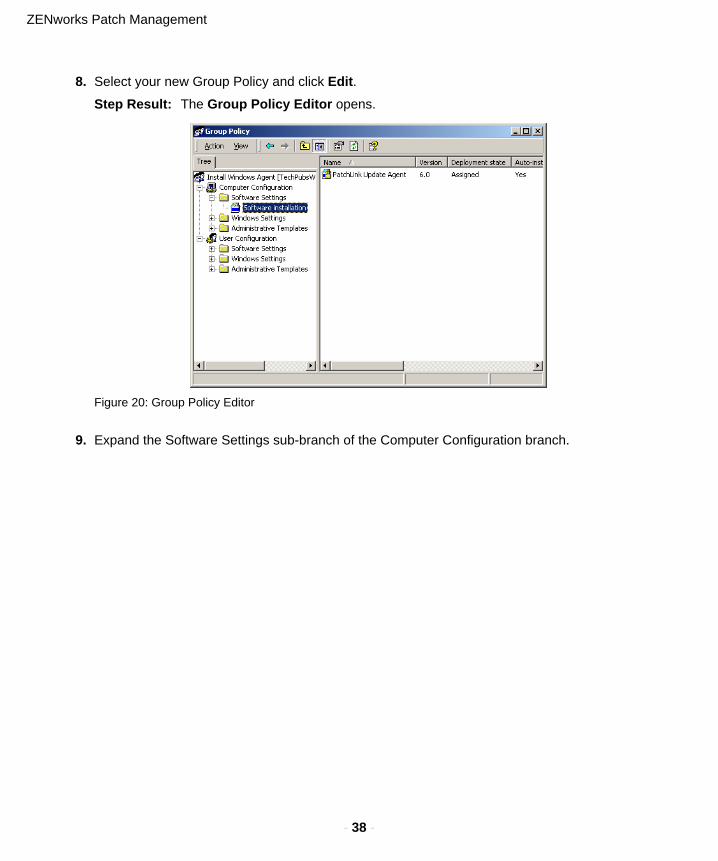
8. Select your new Group Policy and click Edit.
Step Result: The Group Policy Editor opens.
Figure 20: Group Policy Editor
9. Expand the Software Settings sub-branch of the Computer Configuration branch.

Automating the Agent Installation
- 39 -
10.Right-click Software Installation and select Properties.
Step Result: The Software Installation Properties window opens.
Figure 21: Software Installation Properties - General Tab
11.Select the General tab.
12.Select Assign.
13.Select Uninstall the applications when they fall out of the scope of management.
Note: If using Windows 2003, the Uninstall the applications when they fall out of thescope of management option is on the Advanced tab.
14.Click OK.
Step Result: The Software Installation Properties window closes.
15.Right-click Software Installation and select New > Package.
16.Browse to the shared folder you created earlier, and select the modified updateagent.msi file.
17.Close the Group Policy Editor and click Close.
18.In the Active Directory Users and Computers management console, select the Computersbranch of your domain tree.
19.Select the computers to be added to the new OU.
20.Right-click the computers and select Move...
Step Result: The Move window opens.

ZENworks Patch Management
- 40 -
21.Select your new OU.
22.Close the Active Directory Users and Computers management console.
Performing a Silent Install From a Command Prompt
In addition to the Patch Management Server URL (or IP) and Serial Number, you canalso define a Proxy and Auto-Assign groups when performing a silent install of the PatchManagement Agent.
Installing the Windows Agent
From a command line, the following user modifiable properties can be used when performing asilent installation of the Windows Agent.
The following steps will demonstrate how to perform a silent installation of the Windows Agentfrom a command line.
1. Open a command prompt.
2. Define the host location, serial number, and other optional settings using the followingsyntax:
• Perform a silent install with a proxy:
msiexec /i “C:\updateagent.msi” /qn HOST=”http://myServer” SERIAL=”88888888-88888888” USEPROXY=1 PROXYURL=”http://myProxy” PROXYPORT=”8080” PROXYUSER=”ProxyUser” PROXYPASS=”ProxyPassword” GROUPLIST=”Group1 Distinguished Name|GroupN Distinguished Name”
• Perform a silent install without a proxy:
msiexec /i “C:\updateagent.msi” /qn HOST=”http://myServer” SERIAL=”88888888-88888888” USEPROXY=0GROUPLIST=”Group1 Distinguished Name|GroupN Distinguished Name”
Installing the Linux, Unix, and Mac Agent
From a command line, the following user modifiable properties can be used when performing asilent installation of the Linux, UNIX, Mac Agent.
Table 3: Description of LUM Agent Modifiable Installation Properties
Property Description
-silent Performs installation silently.
Automating the Agent Installation
- 41 -
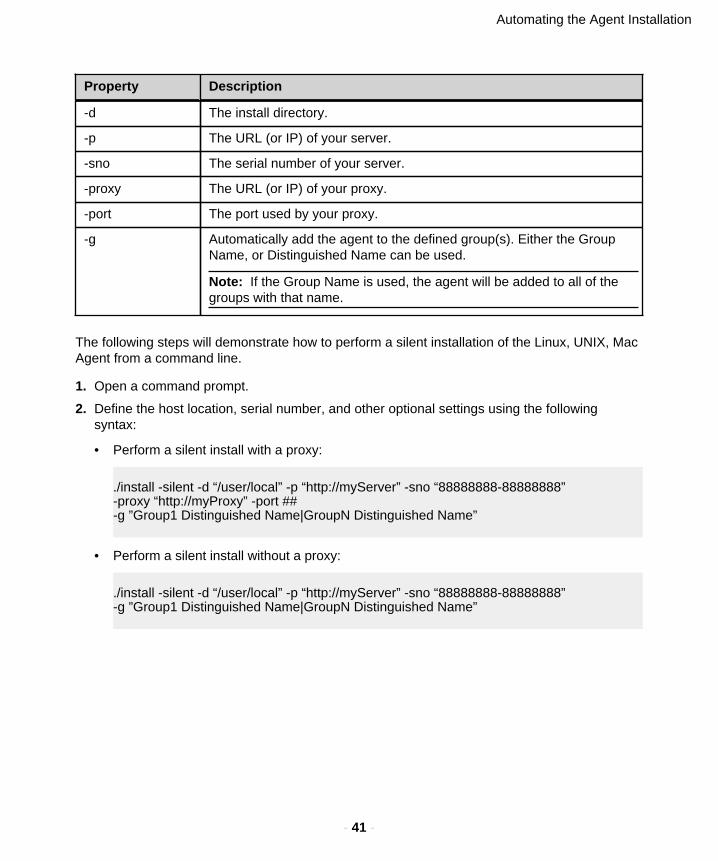
Property Description
-d The install directory.
-p The URL (or IP) of your server.
-sno The serial number of your server.
-proxy The URL (or IP) of your proxy.
-port The port used by your proxy.
-g Automatically add the agent to the defined group(s). Either the GroupName, or Distinguished Name can be used.
Note: If the Group Name is used, the agent will be added to all of thegroups with that name.
The following steps will demonstrate how to perform a silent installation of the Linux, UNIX, MacAgent from a command line.
1. Open a command prompt.
2. Define the host location, serial number, and other optional settings using the followingsyntax:
• Perform a silent install with a proxy:
./install -silent -d “/user/local” -p “http://myServer” -sno “88888888-88888888”-proxy “http://myProxy” -port ## -g ”Group1 Distinguished Name|GroupN Distinguished Name”
• Perform a silent install without a proxy:
./install -silent -d “/user/local” -p “http://myServer” -sno “88888888-88888888” -g ”Group1 Distinguished Name|GroupN Distinguished Name”

ZENworks Patch Management
- 42 -