aginity team documentation - read the docs
TRANSCRIPT
Aginity Team DocumentationRelease 1
Jeffrey Schlitt
Jan 21 2020
Contents
1 Administering Aginity Team 311 Deploying Aginity Team through AWS Marketplace 312 Installing Aginity Team on Linux 613 Upgrading Aginity Team 1614 Backing Up or Restoring Team Catalog 18
2 Creating Users in Aginity Team 2121 Administering Users 22
3 Enabling Snowflake OAuth in Aginity Team 25
4 Configuring Connections in Aginity Team 2741 Downloading Drivers 2842 Setting up Netezza Connections 2943 Setting up Redshift Connections 3244 Setting up Snowflake Connections 3345 Setting up Hive Connections 3546 Setting up SQL Server Connections 3747 Setting up DB2 Warehouse Server Connections 3848 Setting up Greenplum and Postgres Connections 3949 Import and Exporting Connections 41
5 Using the Database Explorer in Aginity Team 4551 Viewing the Database Data Dictionary 4552 Database Object Support by Platform 4653 Quick Actions from Explorer 47
6 Using the Query Panel in Aginity Team 5161 Writing your First Query 5162 Executing to a File 5263 Using Parameters in your Query 5364 Auto-Complete Capabilities 5465 Snippet support 5566 Common Actions in Query Panel 5567 Interacting with Query Results 56
7 Using the Catalog in Aginity Team 61
i
71 Catalog Overview 6172 Calling Catalog Items from SQL 6673 Adding Items to Catalog 6974 Import and Export Items from Catalog 70
8 Using Discovery Panel in Aginity Team 7581 Searching Query Execution History 7582 Searching the Amp Pro Catalog 7683 Expanding the results 7684 Doing More with the Discovery Panel 76
9 Reference 7791 Video Reference 7792 Shortcut Key Reference 7793 Frequently Asked Questions 7794 SQL Reference Guides for Supported connections 7895 Driver Support Reference 78
10 Troubleshooting 79
11 End User License for Aginity Team 81
ii
Aginity Team Documentation Release 1
Aginity Team is our new SQL analysis tool With cool new features and functions such as an active personal catalogsmart SQL discovery assistant and moremdashbeware you may get spoiled For more awesome features you can expectto see in Aginity Team check out the feature roadmap
This documentation provides you with conceptual procedural and reference information to help you install and useAginity Team and find answers to questions you may have about it
The documentation consists of the following sections
Contents 1
Aginity Team Documentation Release 1
2 Contents
CHAPTER 1
Administering Aginity Team
11 Deploying Aginity Team through AWS Marketplace
This section will detail the steps to deploy the CloudFormation template for Aginity Team within AWS
The deployment will take about 30 minutes but configuration and testing could take up to an hour
111 Pre-Requisites
An AWS Marketplace subscription is required for production use of Aginity Team The one option for obtaining asubscription andor license
bull Bring your own license (BYOL) - Subscribe through the marketplace and apply an existing license To get a 30day evaluation license please fill out this form and it will email you a license Aginity will be in contact withyou during the evaluation period You can also contact us directly at salesaginitycom
You must have an AWS account set-up If you donrsquot visit httpsawsamazoncomgetting-started
Create an IAM user or role Your IAM user should have a policy that allows AWS CloudFormation actions Do notuse your root account to deploy the CloudFormation template In addition to AWS CloudFormation actions IAMusers who create or delete stacks will also require additional permissions that depend on the stack template Thisdeployment requires permissions to all services listed in the following section
bull Reference httpsdocsawsamazoncomAWSCloudFormationlatestUserGuideusing-iam-templatehtml
Knowledge of the following AWS services
bull Amazon Elastic Compute Cloud (Amazon EC2)
bull Amazon Relational Database Service (Amazon RDS)
bull Amazon Route 53
bull Amazon Virtual Private Cloud (Amazon VPC)
bull AWS CloudFormation
3
Aginity Team Documentation Release 1
Note
1 Account limit increases will not be required for this deployment (More information on proper policy and per-missions here httpsdocsawsamazoncomAWSCloudFormationlatestUserGuideusing-iam-templatehtml)
2 Individuals possessing the AWS Associate certifications should have a sufficient depth of knowledge
112 Architecture Overview
Aginity Team can be deployed in a single availability zone The data flow and architecture components are the sameas the ones highlighted below This solution does not provide high availability or fault tolerance
113 Deployment Step by Step
1 Log into AWS account with the IAM entity created in the prerequisites section with the required permissions todeploy the solution
2 Click the following link to deploy CloudFormation template(CFT) (deploys in us-east-1)
3 In lsquoStep 1 - Create Stackrsquo press the lsquoNextrsquo button
4 In lsquoStep 2 - Specify stack detailsrsquo fill out and adjust CloudFormation parameters depending on requirements
5 Press the lsquoNextrsquo button
6 In lsquoStep 3 - Configure stack optionsrsquo enter and adjust optional tags permissions and advanced options
7 Press the lsquoNextrsquo button
8 Review your CloudFormation configurations
9 Press the lsquoCreate Stackrsquo button
10 Wait approximately 30 minutes for your CloudFormation template to deploy
11 You can verify your deployment has succeeded by looking for a lsquoCREATE_COMPLETErsquo status
12 If the status is lsquoCREATE_FAILEDrsquo see the troubleshooting section in this guide If it succeeds please usehealth checks
4 Chapter 1 Administering Aginity Team
Aginity Team Documentation Release 1
Note You will be prompted during the deployment of the CFT to enter a username and password for the AginityTeam administrator
114 Security Considerations
Amazon Certificate Manager SSLTLS Certificates
AWS Certificate Manager (ACM) is a service that lets you easily provision manage and deploy Secure SocketsLayerTransport Layer Security (SSLTLS) certificates for use with AWS services SSLTLS certificates provisionedthrough AWS Certificate Manager are free
If you donrsquot already have an SSLTLS certificate for your domain name it is recommended that you request one usingACM For more information about requesting an SSLTLS certificate using ACM please read the AWS CertificateManager User Guide
Certificate Expiration
Certificates must be monitored for expiration Aginity does not provide an integrated process for monitoring certificateexpiration but AWS provides a CloudFormation template that can help setup an alarm Please visit the following linkfor details
115 Costs
You are responsible for the cost of AWS services used while running this deployment The AWS costs will dependon Aginity Team EC2 instance sizing and are outlined in the table below Use the guidelines in the sizing section todetermine what instances are appropriate for your deployment With that information you can use the AWS SimpleMonthly Calculator to obtain the current prices and a cost estimate To calculate your resource cost please visithttpscalculators3amazonawscomindexhtml
Note Storage and data transfer are not included as these vary depending on configuration Please consult AWSPricing for the latest information
116 Sizing
The following table outlines recommendations for EC2 instance size If your team has more than 40 SQL analystsplease contact Aginity for additional sizing guidance Please refer to the Costs section for pricing
117 Troubleshooting
I cannot ldquoCreate stackrdquo in CloudFormation
Please check that you have the appropriate permissions to ldquoCreate Stackrdquo Contact your AWS accountadmin for permissions or AWS Support if you continue to have issues
My Aginity Team AMI is throwing errors
11 Deploying Aginity Team through AWS Marketplace 5
Aginity Team Documentation Release 1
Please check that you have provided a valid license
Everything is on fire
Please contact AWS Support for AWS specific problems or contact Aginity if you are having problemswith the AMI
See also
Backup
We highly recommend you do daily back-ups and snapshots to ensure minimal loss and downtime for your applicationPlease review the section in the documentation on backup and recovery
Emergency Maintenance
Our knowledge base has the most comprehensive details about general product troubleshooting It is accessible fromour support site and should be the first stop for any technical questions
118 Clean Up
1 Follow the AWS CloudFormation Delete documentation to delete the resources deployed by this document
2 By default EBS snapshots are retained for recovery purposes If you wish to delete these follow the EBSprocess to delete unwanted backups
3 Delete any other resources that you manually created to integrate or assist with the deployment
12 Installing Aginity Team on Linux
Installing team consists of accessing and setting up an environment based on an Ubuntu OS or Red Hat EnterpriseLinux (RHEL) You can either do this on an existing Ubuntu Server or set up a Virtual Machine that will host theshared catalog database and Team application server
If you have not yet done so download the software from here
Once you register and download the software you can begin the installation process Upon registration you the softwarewill automatically download The software should be titled aginity-team-ltversiongt-amd64deb
121 Pre-Requisites and Getting to a Server
Team is installed on an Ubuntu or RHEL Server or Virtual Machine environment The machine Ubuntu or RHEL isinstalled on must meet the following requirements
1 Cloud data center or on-premises
2 Minimum 200 GB of disk workspace
3 4 CPU x 16GB RAM
4 Running Ubuntu 18042 LTS (Bionic Beaver) or RHEL version 8
5 Must have network access to databases being connected to
6 HTTPS certificate (company provided or self-signed)
Desktop requirements
1 Chrome browser
6 Chapter 1 Administering Aginity Team
Aginity Team Documentation Release 1
2 HTTPS access to the Team Server
Note If you are trying to install an evaluation of Aginity Team or just getting started there are severaloptions for accessing a server environment in which to install Aginity Team server
1 You can ask your IT representative who is responsible for server infrastructure if there is a UbuntuLinux server or VM available to use
2 You can install it locally for trial purposes using personal VMWare such as Parallels or an opensource equivalent like Oracle VirtualBox
If you would prefer we are happy to schedule a free install for you Please click on the link below to schedule thatinstall
Click here to schedule an install with an Aginity Consultant
122 The Installation Process
The following steps should be executed in order
Step 1 SSH into the Linux server as root or you can also sudo to root once in with another that has administrativerights
Note In our case for documentation we are working with a Parallels Ubuntu 1804 VM and have anaccount called Parallels
ssh ltusernamegtltip_addressgt
Step 2 SFTP the aginity-team-ltversiongt-amd64deb file to the logged in users home directory Below is a samplecommand to do that
sftp ltusernamegtltip_addressgtput aginity-team-ltversiongt-amd64debexit
Step 3 Running the install
Issue the following command to initiate the install
on Ubuntusudo apt-get install aginity-team-ltversiongt-amd64deb on RHELsudo yum install aginity-team-ltversiongt-amd64rpm
This image below is what you should see after the install is complete
12 Installing Aginity Team on Linux 7
Aginity Team Documentation Release 1
Note We will generate an encryption key to ensure all information for connections and your catalog are encryptedThe installation will automatically generate and store that key on the etcaginity-teamserviceconf file
Step 4 Installing SSL certificate
The SSL certificate generation can be called using
this will generate certificatesudo optaginity-teambinssl-certificate-gensh
You will be asked for the following information
1 First and last name
2 Name of organization unit
3 Name of organization
4 Name of City or Locality
5 Name of State or Province
6 Name of Country code
7 Finally when asked to ldquoEnter key password for ltaginity_certgt (RETURN if same as keystore password) rdquo pressRETURN
123 Configuring Aginity Team Server
You can adapt Aginity Team Server to your needs by changing settings in etcaginity-teamserviceconf andetcaginity-teamapplicationyml configuration files
The serviceconf file contains settings of a linux service running Aginity Team It is in a plain text file format Hereare the parameters in the etcaginity-teamserviceconf file
General Configuration Parameters
SERVICE_KEYSTORE_PATH
8 Chapter 1 Administering Aginity Team
Aginity Team Documentation Release 1
The path to a java keystore file Aginity Team generates this file when you run optaginity-teambinssl-certificate-gensh
Default etcaginity-teamcacerts
JVM_MEMORY_LIMIT
The value of JVM maximum heap size The number has to be an integer You should specify its value using one ofthe letters ldquomrdquo or ldquoMrdquo for MB or ldquogrdquo or ldquoGrdquo for GB Examples 1024m 1024MB 12g 12GB
Default 1024m
AGINITY_ENCRYPTION_KEY
The value of encryption key which is used to encrypt H2 database used by the application This value is generated byAginity Team
Note We recommend that you copy the encryption key to a safe place as you may need it to recover Aginity TeamServer using a database backup
AGINITY_CONFIG_PATH
The path to the application configuration yml-file Do not change its value
Default etcaginity-teamapplicationyml
DB_PATH
The path to a directory to deploy Aginity Teamrsquos H2 database in
Default varlibaginity-team
Default varlibaginity-team
Configuring the YML Application File
Aginity Team Server can be customized through a number of settings of the etcaginity-teamapplicationyml file Ituses YAML format Depending on your needs Aginity Team can be configured to use either embedded H2 database orPostgreSQL database server You may want to change TCP port the server is accepting HTTP request on or integrateAginity Team with external identity providers
Note YAML does not support tab characters for indentation You should use spaces for that
For the reason of backward compatibility some settings in applicationyml use parameter expansions The basic formof parameter expansion is $parameter- The parameter is a key from etcaginity-teamserviceconf You can replaceany $parameter- with your custom value There are default values for some parameters in the configuration file
$parameter-defaultValue
If parameter is unset in etcaginity-teamserviceconf the expansion of defaultValue is substituted Otherwise thevalue of parameter is substituted
Webserver Options
server Options
12 Installing Aginity Team on Linux 9
Aginity Team Documentation Release 1
serverport $SERVICE_PORT-8080publicUrl $PUBLIC_URL-httplocalhost8080
serverport
TCP port Aginity Team uses to accept HTTP requests You may want to setup Aginity Team to listen on 443 tosimplify URL users should use to access Aginity Team In this case the server section looks like as follows
Default 8080
serverport 443publicUrl httpsmyexamplecom
serverpublicUrl
publicUrl is a URL of a server running Aginity Team It is a public URL available outside your corporate network
publicUrl has the following format schemehostport where scheme can be either http or https host ishostname of the server running Aginity Team port is TCP port Aginity Team is using
Default httplocalhost8080
Catalog Database Options
database Options
database BEGIN H2 database configurationh2
dbFilePath $DB_PATH- END H2 database configuration BEGIN PostgreSQL configuration This section is commented out by default since only one type of databaserarr˓could be enabled to enable PostgreSQL comment out the H2 database configuration sectionrarr˓and uncomment the section below postgres user user password password jdbcUrl jdbcpostgresqlhostportdatabase_name properties any properties specific to your JDBC driver ssl true connect using SSL SSL support must be enabled on therarr˓database server side sslmode require END PostgreSQL configuration
By default Aginity Team installs embedded H2 database to store application data Another option is to use a Post-greSQL database In this case you have to deploy PostgreSQL server and create a database by yourself Here is anexample of the database section with enabled PostgreSQL database
database BEGIN H2 database configuration h2
(continues on next page)
10 Chapter 1 Administering Aginity Team
Aginity Team Documentation Release 1
(continued from previous page)
dbFilePath $DB_PATH- END H2 database configuration BEGIN PostgreSQL configuration
postgresuser db_userpassword db_passowdjdbcUrl jdbcpostgresqlmyexamplecom5432aginity_team_databaseproperties
ssl truesslmode require
END PostgreSQL configuration
Note Only one type of database could be enabled To enable PostgreSQL comment out the H2 database configura-tion section and uncomment the PostgreSQL configuration section
databaseh2dbFilePath
The path to a directory to deploy Aginity Teamrsquos H2 database in
databasepostgresuser
The database user
databasepostgrespassword
The database userrsquos password
databasepostgresjdbcUrl
The connection URL
jdbcUrl has the following format jdbcpostgresqlhostportdatabase_name where host is the IP address orthe hostname of the database server port is TCP port the database server is listening database_name is the nameof Aginity Team database created by you
databasepostgresproperies
This section may contain any number of additional connection parameters which PostgreSQL JDBC driver supportsYou can read about the jdbc driver parameters at jdbcpostgresqlorg
Logging Options
logging Options
loggingpathToLogFile $PATH_TO_LOG_FILE-varlogaginity-teammaxFilesCount $MAX_FILES_COUNT-100MBmaxFileSize $MAX_FILE_SIZE-1
loggingpathToLogFile
The path to a directory to store application log files in
Default varlogaginity-team
loggingmaxFilesCount
12 Installing Aginity Team on Linux 11
Aginity Team Documentation Release 1
The maximum number of the log files Aginity Team creates
Default 1
loggingmaxFileSize
The maximum size of a log file The number has to be an integer You should specify its value using one of the letterslsquoKBrsquo lsquoMBrsquo or lsquoGBrsquo after the number Examples 200KB 35MB 1GB
Default 100MB
Platform Options
This section is used to set up OAuth for the Snowflake databases Please refer to specific Snowflake section in thedocumentation Enabling Snowflake SSO
Security Configuration Options
userDirectory Options
This section allows you to integrate Aginity Team with your LDAP system to import users sync user information anddelegate user authentication to LDAP server
userDirectoryname LDAP Serverenabled trueserverSettings
host ldapserverexamplecomport 389bindDN cn=admindc=exampledc=combindPassword admin_passwordencryption PLAINverifyCertificates falsetlsOptions
trustStorePath pathtotrustStorefiletrustStorePassword my_passwordtrustStoreType PKCS12
connectionRuleconnectTimeout 0responseTimeout 0
userSchemabaseDN ou=usersdc=exampledc=comuserFilterusernameAttribute uidfirstNameAttribute givenNamelastNameAttribute snemailAttribute mailsearchScope SUB_TREE
userDirectoryname
A descriptive name of the LDAP connection
userDirectoryenabled
Flag to indicate whether LDAP authentication is on or off
userDirectoryserverSettingshost
The IP address or hostname of the LDAP server
12 Chapter 1 Administering Aginity Team
Aginity Team Documentation Release 1
userDirectoryserverSettingsport
TCP port of the LDAP server
userDirectoryserverSettingsbindDN
The distinguished name of the user that the application will use when connecting to the directory server Examplecn=admindc=exampledc=com
userDirectoryserverSettingsbindPassword
The user password
userDirectoryserverSettingsencryption
Type of connection encyption Can be set to PLAIN START_TLS or SIMPLE_TLS START_TLS is preferred optionSTART_TLS begins as a plaintext connection over the standard LDAP port (389) and that connection is then upgradedto SSLTLS
userDirectoryserverSettingsverifyCertificates
If set to true Aginity Team verifies the certificate used for SSLTLS connection to the LDAP server A java trust-store configured in userDirectoryserverSettingstlsOptions is used to verify the certificate If you use a self-signedcertificate you must import the certificate to the truststore before starting Aginity Team
userDirectoryserverSettingstlsOptions
Use this section to configure your java truststore that is used to verify the LDAP server certificate
userDirectoryserverSettingstlsOptionstrustStorePath
The path to the Java trust store where certificates are stored
userDirectoryserverSettingstlsOptionstrustStorePassword
The password to the java trust store
userDirectoryserverSettingstlsOptionstrustStoreType
The type of the trust store The most common are JKS and PKCS12
userDirectoryconnectionRuleconnectTimeout
Timeout in milliseconds for connection to LDAP server 0 means no timeout
userDirectoryconnectionRuleresponseTimeout
Timeout in milliseconds for response time from LDAP server 0 means no timeout
userDirectoryuserSchemabaseDN
The root distinguished name (DN) to use when running queries against the directory server
userDirectoryuserSchemauserFilter
An LDAP search filter to be used when searching user objects from the LDAP server within the base DN Exampleldquo(amp(objectCategory=Person)(sAMAccountName=))rdquo
userDirectoryuserSchemausernameAttribute
Defines which attributes on an LDAP user entry will be used as its username
userDirectoryuserSchemafirstNameAttribute
Defines which attributes on an LDAP user entry will be used as its first name
userDirectoryuserSchemalastNameAttribute
Defines which attributes on an LDAP user entry will be used as its last name
12 Installing Aginity Team on Linux 13
Aginity Team Documentation Release 1
userDirectoryuserSchemaemailAttribute
Defines which attributes on an LDAP user entry will be used as its email address
userDirectoryuserSchemasearchScope
Specify strategy to use when doing a search Possible options SUB_TREE (search request should be performedagainst the search base and all entries below) ONE (search request should be performed against entries that areimmediate subordinates of the entry specified as the search base DN) BASE (search request should only be performedagainst the entry specified as the search base DN)
124 Starting Aginity Team Server
Prior to starting the Agnity Team server you must create the administrator username and password
You can do this by running the team-create-superuser script in the optaginitybin directory on the server
this will create a user with the administrator rolesudo optaginity-teambinteam-create-super-usersh
Step 5 You are now ready to start Aginity Team
We use the following commands to start Aginity Team in the background and with logging turned on
sudo systemctl start aginity-team
You can check if Aginity Team is running by issuing this command
sudo systemctl status aginity-team
125 Accessing Aginity Team for the First Time
Step 6 Step 6 Open browser and navigate to httpsltip or team server namegtltserver portgtlogin You will see thefollowing image
bull Enter credentials you used to create the administrator to enter the application
Step 7 Register and Apply License Key
14 Chapter 1 Administering Aginity Team
Aginity Team Documentation Release 1
When you open the application it will ask you to register the software and then you will be asked to applythe license key
If it does not ask for the license key you can click on Help -gt Register again and the license key boxshould pop open as shown below
12 Installing Aginity Team on Linux 15
Aginity Team Documentation Release 1
Note It is imperative that all users be created with valid business email addresses
Send the link to team to any new user along with their usernamepassword combination
126 Stopping Aginity Team Services
Log in as the team user and issue the following command
sudo systemctl stop aginity-team check to see if it is stopped Usingsudo systemctl status aginity-team
See also
Add Connections
13 Upgrading Aginity Team
Upgrading team consists of logging into the Team server downloading the latest update and applying it from thecommand line
For clarities sake when we refer to aginity-team-ltversiongt-amd64deb we purposely leave version generic Eachupgrade will have a different number associated with it
Warning It is important to take a backup of both your encryption key for the Team catalog and to do a BackingUp or Restoring Team Catalog before upgrading This way if anything goes wrong you will not use your catalogIt is also recommended to do a manual export of your catalog from time to time
You can get the encryption key using the command below
sudo cat etcaginity-teamserviceconf
16 Chapter 1 Administering Aginity Team
Aginity Team Documentation Release 1
131 Step 1 Logging into Team Server
SSH into the Team server as an administrator
Note Typically you will log in as an account other than root and then you will be using the sudo command
132 Step 2 Check to see if Team is Currently Running and then Shut it Down
Issue the command below to check the status of the Team service
sudo systemctl status aginity-team
If Team is running shut it down by issuing this command
sudo systemctl stop aginity-team
Note It is always a good idea to run the status check again to make sure Team has been shut down
133 Step 3 Download the Latest Version of Aginity Team
Using the wget command you can download the latest version as shown below
wget httprepositoryaginitycoms3amazonawscomAginityTeamaginity-team-ltversionrarr˓gt-amd64deb
134 Step 4 Upgrading the Software
Run the upgrade process by issuing this command
on Ubuntusudo apt-get install aginity-team-ltversiongt-amd64deb on RHELsudo yum install aginity-team-ltversiongt-amd64deb
The package manager will determine if your configuration files are different from ones bringing with the new versionof the application being installed and will offer you a few option to proceed with installation
13 Upgrading Aginity Team 17
Aginity Team Documentation Release 1
You should always keep your currently-installed version and resolve any conflicts by comparing and merging thedifference manually
135 Step 5 Restart Aginity Team
Restart the server by issuing this command
sudo systemctl start aginity-team
14 Backing Up or Restoring Team Catalog
We have provided two files listed and described below which will allow you to automate or manually backup andrestore your Aginity Team catalog
141 Backup Script
The backup script backupsh will perform and compress a backup of the Aginity Team Catalog to the tmp di-rectory on your OS It will append the date to the end of the file created and should be named in this pattern agin-ity_backup_m_d_Yzip
Note Before running the backupsh script you will need to edit it and provide the following variables
bull DESTINATION ~ if you do not want to use the default tmp
bull TOKEN ~ this value is the encryption key for the database To find out the value of it run this command
sudo cat etcaginity-teamserviceconf
bull H2PATH ~ Unless you modified the installation directory from the default you should not need to change this
bull DBPATH ~ Unless you modified the installation directory from the default you should not need to change this
18 Chapter 1 Administering Aginity Team
Aginity Team Documentation Release 1
When running a backup the Aginity Team server process will be stopped then restarted when complete
See also
If you want to schedule the backup and automate it we recommend scheduling using Crontab Crontab ReferenceGuide
142 Restore Script
To restore to an instance of the backup follow these instructions
Yoursquoll need to set the variables within the restoresh to match what is in the backupsh
First download the restore script restoresh Next you will provide the file name of the backup you want to restorein the
bull SOURCE variable
Now run the script and it will automatically re-start Aginity Team when complete
14 Backing Up or Restoring Team Catalog 19
Aginity Team Documentation Release 1
20 Chapter 1 Administering Aginity Team
CHAPTER 2
Creating Users in Aginity Team
Once you have installed your Aginity Team server you need to set up users To do this navigate to the Administrationmenu item as show below
Click the button Register New User and fill out the form as show below
21
Aginity Team Documentation Release 1
When choosing the role of Admin vs User reference this table below for differences in functionality
21 Administering Users
Once you have created users and you need to common tasks as described below you will go back into the Administra-tion Menu and click on the three dots ldquo rdquo to the right of each user row This will pop opne an edit menu as shown
22 Chapter 2 Creating Users in Aginity Team
Aginity Team Documentation Release 1
below
211 Disabling Users
You can choose to disable user which will not allow them to login but will not remove any of their catalog informationor query history
212 Resetting Passwords
To reset a password you can choose the Change password which will prompt you to enter and confirm a new password
213 Edit User
If you need to Edit any registration details such as name or role you can do that here
21 Administering Users 23
Aginity Team Documentation Release 1
24 Chapter 2 Creating Users in Aginity Team
CHAPTER 3
Enabling Snowflake OAuth in Aginity Team
We now support OAuth for the snowflake platform This feature only works on Aginity Team The details below willguide your through setting up the configuration on the server
1 Connect to your Snowflake server and create a Security Integration object for a custom client (more details canbe found at this link)
For example
CREATE SECURITY INTEGRATIONCREATE OR REPLACE SECURITY INTEGRATIONaginity_team_oAuthTYPE = OAUTHENABLED = TRUEOAUTH_CLIENT = CUSTOMOAUTH_CLIENT_TYPE = CONFIDENTIALOAUTH_REDIRECT_URI = Aginity Team Public URLapioauthsnowflakeOAUTH_ALLOW_NON_TLS_REDIRECT_URI = FALSEOAUTH_ENFORCE_PKCE = TRUEOAUTH_ISSUE_REFRESH_TOKENS = TRUEOAUTH_REFRESH_TOKEN_VALIDITY = 86400
Note Aginity Team Public URL is a URL of a server running Aginity Team It is a public URL available outsideyour corporate network
Aginity Team Public URL has the following format schemehostport where scheme can be either http orhttps host is hostname of the server running Aginity Team port is TCP port Aginity Team is using
2 Ssh to the Aginity Team server
3 Edit etcaginity-teamapplicationyml and uncomment and update the following properties
platformssnowflakeoauthhost
Snowflake account in format account_namesnowflakecomputingcom where account_name is your Snowflakeaccount name
25
Aginity Team Documentation Release 1
platformssnowflakeoauthclientId
Snowflake client ID of the Security Integration object The Snowflake administrator can find the client ID by describingthe integration that is by using the DESC SECURITY INTEGRATION command
platformssnowflakeoauthclientSecret
Snowflake client secret of the Security Integration object The Snowflake administrator can find the client secrets byusing the system function SHOW_OAUTH_CLIENT_SECRETS
serverpublicUrl Aginity Team Public URL
Database platform specific configurationsplatformssnowflake
oauthclientSecrets
- host account_namesnowflakecomputingcomclientId client idclientSecret client secret
For example a customer has 2 Snowflake accounts The first one is eb39151us-east-1snowflakecomputingcom and itis being used for Dev environment The second one is xr58911us-east-1snowflakecomputingcom and it is being usedfor Production environment Then to enable OAuth connections to these environments via Aginity Team administratorshould add the following parameters to serviceconf
serverpublicUrl httpsaginityexamplecom
platformssnowflake
oauthclientSecrets
Dev environment- host eb39151us-east-1snowflakecomputingcom
clientId fnm4OgHhswihrEfsahTyZo=clientSecret sHljg51o7jdsjds8723786f35Q0K+TthasjuczjQwY=
Production environment- host xr58911us-east-1snowflakecomputingcom
clientId kwajw56h(usaELkkwu=clientSecret gfhfrejds3232372822378YUUYthasjuczjQwY=
4 Restart the Aginity Team server
26 Chapter 3 Enabling Snowflake OAuth in Aginity Team
CHAPTER 4
Configuring Connections in Aginity Team
Aginity Team allows you to set up connections to a variety of different database platforms In order to do this clickthe + symbol next to the ldquoConnectionsrdquo header in the left navigation pane of Aginity Team You will be presentedwith a list of existing connections as well as options for adding another connection Clicking the ldquoNew Connectionrdquobutton will allow you to enter the necessary information for the connection you wish to create
Below is a quick start video of creating connections in Aginity Team
Note Aginity Team uses JDBC to connect to database platforms It is recommended you refer to the JDBC guidesfor our supported platforms to learn about specific variables to use within the Advance Parameters section of AginityTeam We will provide links to that documentation where available
The video below provides a more detailed explanation of how to use advanced parameters to illicit the desired behaviorand successful connection to the database platform
27
Aginity Team Documentation Release 1
41 Downloading Drivers
The first step in configuring a connection is to download the JDBC driver for the platform you will be using In mostcases we will provide access to the drivers which have been certified to work with Aginity Team In some cases suchas when the vendor does not allow us to distribute or you want to use a different version you will have to manuallyadd the JDBC driver
The video below provides a quick illustration of how to manage drivers
See also
Database Driver Reference Guide
To get started in the Edit or Add Connection box you will click on Edit Drivers as shown below
411 Automatic Download
As shown in the image below if we are allowed to to download drivers you will be provided a link to do so and thenbe presented with one or more drivers to use and your done
28 Chapter 4 Configuring Connections in Aginity Team
Aginity Team Documentation Release 1
In some cases you may get an error message if your organization does not allow you to download drivers (jar files)typically supplied through a Maven repository
In this case please review the section below Manually Add Drivers
412 Manually Add Drivers
If you have to manually add a driver it starts with first acquiring the JDBC jar for that platform and saving it somewhereon your machine Once you acquire the JDBC jar you can upload it to Aginity Pro
To do this you will hit the Edit Driver or Edit Drivers Panel section as shown above and you will be presented withthe following screen
You can name the Driver anything you want and provide a description
The class name if not provided must be looked up typically in the JDBC reference manual from the platform vendor
Finally if you click on the Add File button you will navigate to where you saved the Jar file and then click SaveChanges You are now ready to configure your connection
42 Setting up Netezza Connections
You can set up a connection to a Netezza (IBM PureData for Analytics) appliance here Simply populate the requesteddata into the form
42 Setting up Netezza Connections 29
Aginity Team Documentation Release 1
Note Netezza does not allow us to distribute their drivers so you must obtain it from your DBA or directly from IBMFix Central
30 Chapter 4 Configuring Connections in Aginity Team
Aginity Team Documentation Release 1
421 Using SSL with Netezza Connections
Aginity Team supports SSL when setting up a Netezza connection While setting up your Netezza connection simplyselect the level of security to enable from the dropdown selector Your choices include
bull Only Unsecured - Specify this option when you want an unsecured connection to the Netezza system If theNetezza system requires a secured connection the connection is rejected
bull Preferred Unsecured - This argument is the default value Specify this option when you would prefer anunsecured connection but you accept a secured connection if the Netezza system requires one
bull Preferred Secured - Specify this option when you want a secured connection to the Netezza system but youaccept an unsecured connection if the Netezza system is configured to use only unsecured connections
bull Only Secured- Specify this option when you want a secured connection to the Netezza system If the Netezzasystem accepts only unsecured connections or if you are attempting to connect to a Netezza system that isrunning a release before release 45 the connection is rejected
See also
For more information on SSL refer to the link Netezza SSL
422 Connection Timeout
The connection timeout will tell the session when to disconnect Typically set this to 10 minutes or 3600 seconds
423 Advanced Parameters
For Netezza you can supply additional JDBC parameters using the Advanced Properties section
See also
Here is the link to other configurable parameters supported within Netezza JDBCrsquos driver
42 Setting up Netezza Connections 31
Aginity Team Documentation Release 1
43 Setting up Redshift Connections
431 Using SSL Mode with Redshift Connections
Aginity Team supports SSL when setting up a Redshift connection While setting up your Redshift connection simplyselect the level of security to enable from the dropdown selector Your choices include
bull Disable - SSL is disabled and the connection is not encrypted
bull Prefer - SSL is used if the server supports it Amazon Redshift supports SSL so SSL is used when you set
32 Chapter 4 Configuring Connections in Aginity Team
Aginity Team Documentation Release 1
sslmode to prefer
bull Allow - SSL is used if the server requires it
bull Require - SSL is required
See also
For more information on Redshift SSL refer to this link
432 Advanced Parameters
For Redshift you can supply additional JDBC parameters using the Advanced Properties section
See also
Here is the link to other configurable parameters supported within Redshift JDBCrsquos driver
44 Setting up Snowflake Connections
You can set up a connection to a Snowflake here Simply populate the requested data into the form
44 Setting up Snowflake Connections 33
Aginity Team Documentation Release 1
441 Warehouse
A virtual warehouse often referred to simply as a ldquowarehouserdquo is a cluster of compute resources in Snowflake Awarehouse provides the required resources such as CPU memory and temporary storage to perform the followingoperations in a Snowflake session If you do not know which specific Warehouse to use speak to your Snowflake DBA
442 Role
This is a security role that may have been setup for you to use You can leave this field blank if you do not know whatRole to connect as
34 Chapter 4 Configuring Connections in Aginity Team
Aginity Team Documentation Release 1
443 Advanced Parameters
For Snowflake most connection detail is handled through the command line additions to the JDBC URI You cansupply additional JDBC parameters using the Advanced Properties section
See also
Here is the link to other configurable parameters supported within Snowflake JDBCrsquos driver
45 Setting up Hive Connections
You can set up a connection to a Hive databases here Simply populate the requested data into the form
45 Setting up Hive Connections 35
Aginity Team Documentation Release 1
36 Chapter 4 Configuring Connections in Aginity Team
Aginity Team Documentation Release 1
451 Picking Subprotocol
You can choose either Hive 2 or Spark SQL syntax when executing against Hive databases You can choose eithervalue in this drop down
452 Setting up Kerberos connections
In a lot of cases organizations require the use of Kerberos with Hive so by clicking on the radio button for UseKerberos for authentication you will be prompted to enter the following
bull Realm
bull FQDN
bull Service name
Note The value of these parameters are typically set by your Hadoop administrator and it is best to work with themto obtain the appropriate values
453 Advanced Parameters
You can supply additional Hive JDBC parameters using the Advanced Properties section
See also
Here is the link to other configurable parameters supported within Hive JDBCrsquos driver
46 Setting up SQL Server Connections
You can set up a connection to Microsoft SQL Server databases here Simply populate the requested data into theform
46 Setting up SQL Server Connections 37
Aginity Team Documentation Release 1
Note We only support SQL Server compatibility levels 150 and 140 which is SQL Server 2017 and greater
47 Setting up DB2 Warehouse Server Connections
You can set up a connection to IBM DB2 warehouse databases here Simply populate the requested data into the form
38 Chapter 4 Configuring Connections in Aginity Team
Aginity Team Documentation Release 1
471 Advanced Parameters
You can supply additional Hive JDBC parameters using the Advanced Properties section
See also
Here is the link to other configurable parameters supported within SQL Server JDBCrsquos driver
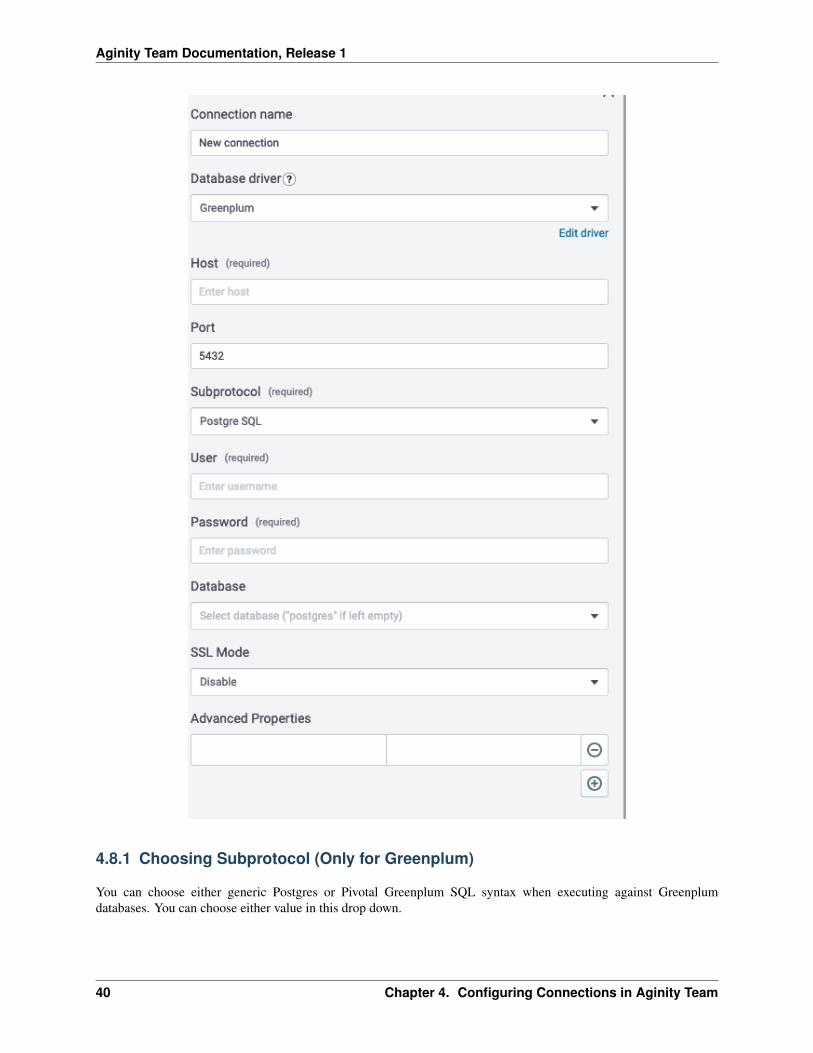
48 Setting up Greenplum and Postgres Connections
You can set up a connection to Greenplum and Postgres databases here Simply populate the requested data into theform Greenplum and Postgres share the same drivers so we will speak of them together
48 Setting up Greenplum and Postgres Connections 39
Aginity Team Documentation Release 1
481 Choosing Subprotocol (Only for Greenplum)
You can choose either generic Postgres or Pivotal Greenplum SQL syntax when executing against Greenplumdatabases You can choose either value in this drop down
40 Chapter 4 Configuring Connections in Aginity Team
Aginity Team Documentation Release 1
482 Advanced Parameters
You can supply additional Postgres JDBC parameters using the Advanced Properties section
See also
Here is the link to other configurable parameters supported within Postgres JDBCrsquos driver
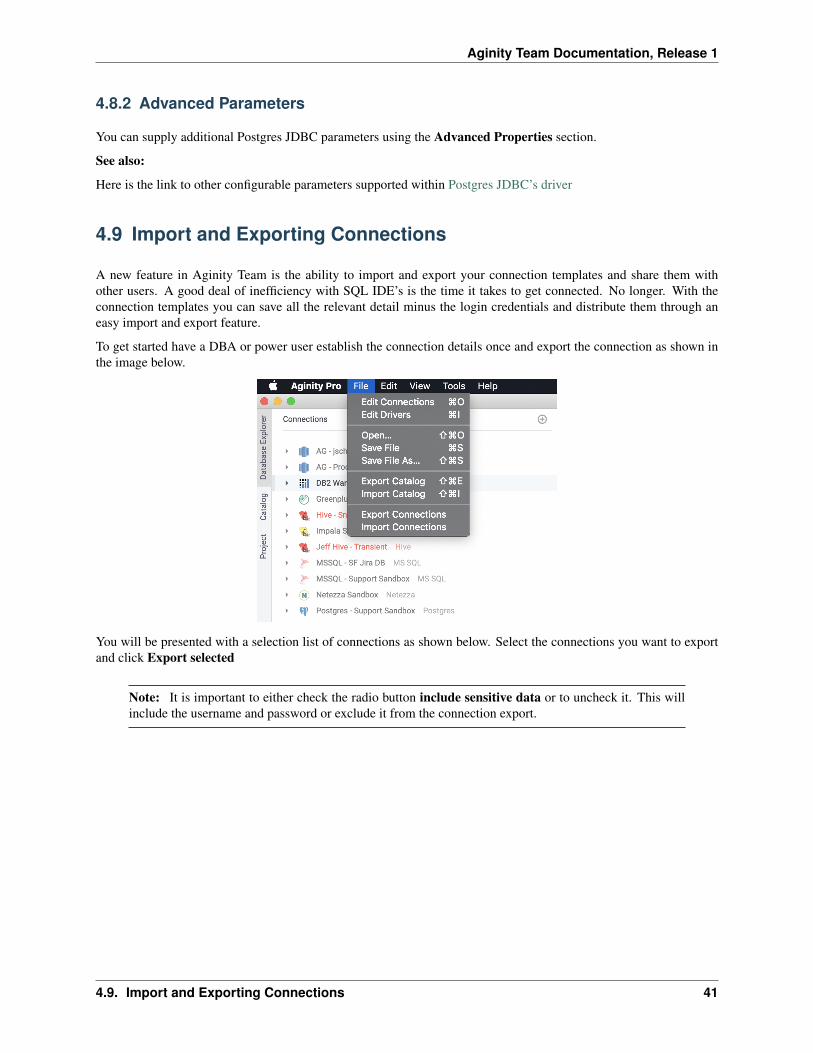
49 Import and Exporting Connections
A new feature in Aginity Team is the ability to import and export your connection templates and share them withother users A good deal of inefficiency with SQL IDErsquos is the time it takes to get connected No longer With theconnection templates you can save all the relevant detail minus the login credentials and distribute them through aneasy import and export feature
To get started have a DBA or power user establish the connection details once and export the connection as shown inthe image below
You will be presented with a selection list of connections as shown below Select the connections you want to exportand click Export selected
Note It is important to either check the radio button include sensitive data or to uncheck it This willinclude the username and password or exclude it from the connection export
49 Import and Exporting Connections 41
Aginity Team Documentation Release 1
You will be presented with a file menu window to name and pick the folder location for the export file as shown below
42 Chapter 4 Configuring Connections in Aginity Team
Aginity Team Documentation Release 1
Once you have exported the connections you can send them to Aginity Team users and have them import them To dothat choose the Import Connections menu item as shown below
You will be presented with a file selection Choose the appropriate Aginity connection package
Note By default Aginity packages for both Catalog and Connections are prefaced with aginitypkg file types
Once you choose a file select the connections you want to import and choose Import Selected
49 Import and Exporting Connections 43
Aginity Team Documentation Release 1
See also
Navigating Database Explorer
44 Chapter 4 Configuring Connections in Aginity Team
CHAPTER 5
Using the Database Explorer in Aginity Team
The Database Explorer panel in Aginity Team can be toggled by using the Database Explorer and Catalog tabs onthe left hand pane of the application as show below The Database Explorer is used to navigate database objectsbased on the Connections defined in Aginity Team The Catalog browser is used to navigate SQL Analytics that youhave personally stored
Below is a quick start video of using the Database Explorer in Aginity Team
51 Viewing the Database Data Dictionary
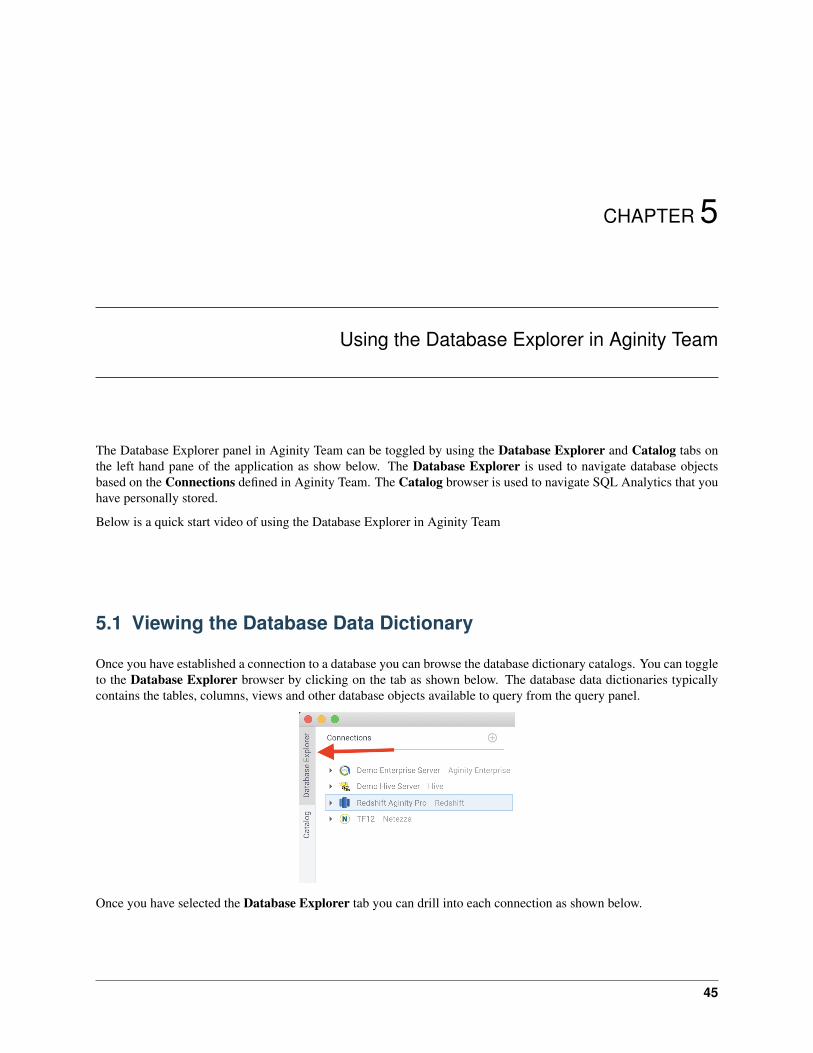
Once you have established a connection to a database you can browse the database dictionary catalogs You can toggleto the Database Explorer browser by clicking on the tab as shown below The database data dictionaries typicallycontains the tables columns views and other database objects available to query from the query panel
Once you have selected the Database Explorer tab you can drill into each connection as shown below
45
Aginity Team Documentation Release 1
52 Database Object Support by Platform
The following image details what objects are visible from the browser for all of our currently supported platformsWe do releases every two weeks with Aginity Team so if there is a feature you need please contact us at sup-portaginitycom
46 Chapter 5 Using the Database Explorer in Aginity Team
Aginity Team Documentation Release 1
53 Quick Actions from Explorer
Currently you can do the following quick actions from the Database Explorer
531 SQL Statement Generation
To generate typical SQL statements from tables or views you can right click on the object navigate to scripts andchoose the appropriate script as shown below
53 Quick Actions from Explorer 47
Aginity Team Documentation Release 1
532 Selective SQL Generation on a Set of Columns
To generate SQL statements based on a selection of columns within a Table or View multi-select the columns byholding Ctrl (Windows) or Command (Mac) and selecting the columns as shown below Then generate the SQLstatement
Hint Make sure you donrsquot have the table name selected and column names at the same time If you do it will generatethe SQL for the whole table
48 Chapter 5 Using the Database Explorer in Aginity Team
Aginity Team Documentation Release 1
533 Drag and Drop Capabilities
You can drag and drop any object from the DB Explorer into the Query Panel
Note Double-clicking expands the DB Explorer tree
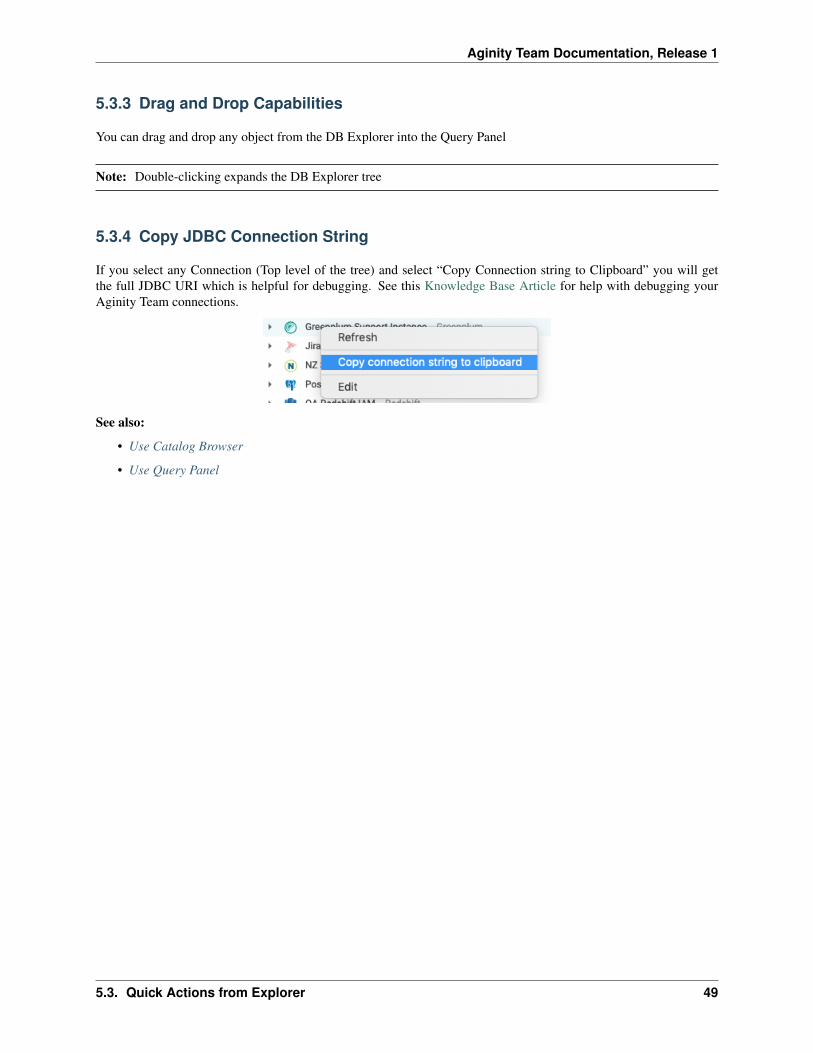
534 Copy JDBC Connection String
If you select any Connection (Top level of the tree) and select ldquoCopy Connection string to Clipboardrdquo you will getthe full JDBC URI which is helpful for debugging See this Knowledge Base Article for help with debugging yourAginity Team connections
See also
bull Use Catalog Browser
bull Use Query Panel
53 Quick Actions from Explorer 49
Aginity Team Documentation Release 1
50 Chapter 5 Using the Database Explorer in Aginity Team
CHAPTER 6
Using the Query Panel in Aginity Team
You will spend most of your time in the Query Panel writing SQL and saving it to your catalog in Aginity Team Thevideo below will give you an overview of creating your first query
61 Writing your First Query
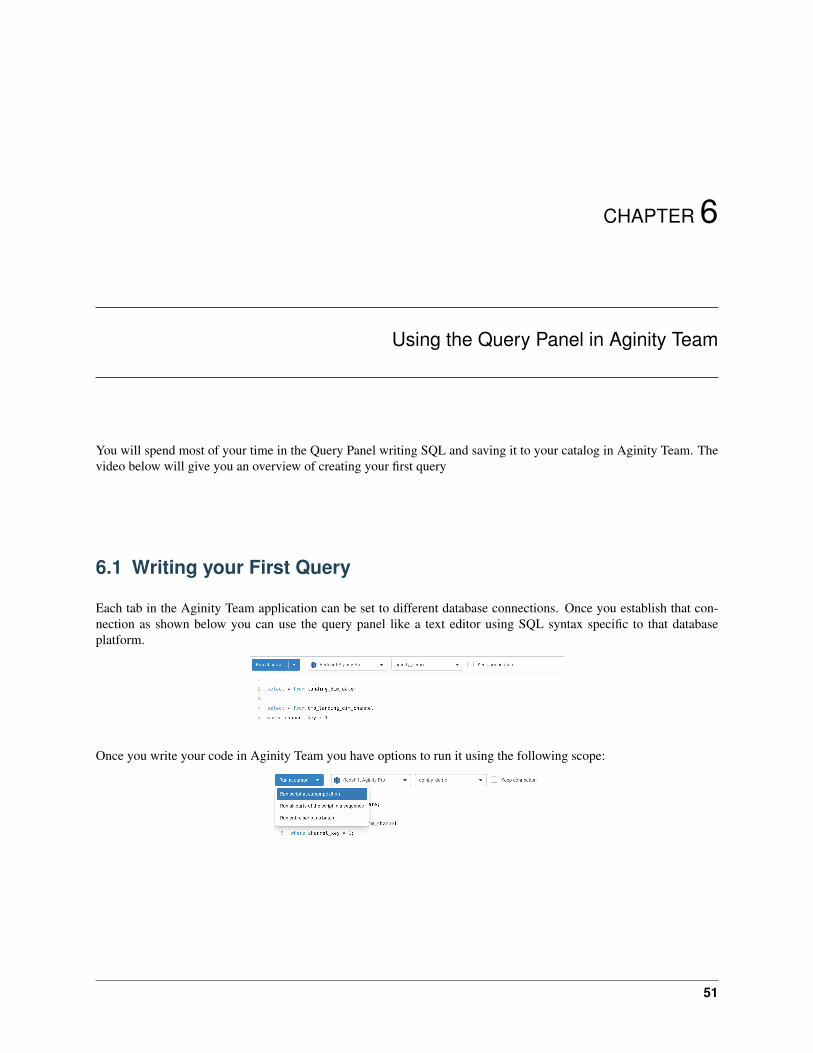
Each tab in the Aginity Team application can be set to different database connections Once you establish that con-nection as shown below you can use the query panel like a text editor using SQL syntax specific to that databaseplatform
Once you write your code in Aginity Team you have options to run it using the following scope
51
Aginity Team Documentation Release 1
Execution Type DescriptionRun at cursor When executing the query it will run the statement where the cursor is place
up until the semicolonRun all parts of the script in a se-quence
Each statement in the window will be run sequentially and the output ofeach statement will be shown in the output and if the statement was a SE-LECT then a results panel will be displayed
Run entire script as a batchAbort Query After executing a query you can direct Aginity Team to send a request to
the database to cancel the query
See also
Note one of the greatest challenges in SQL is learning the different functional syntax from different database vendorsWe are trying to make that easy by giving you links to the SQL reference manuals we support
62 Executing to a File
In version 17 of Aginity Pro we released the ability to use our editor commands to spool the results of a SQLstatement(s) to a file(s)
To do this you must issue the following commands
1 Use the +sql command to tell the editor you will be writing SQL in this section
2 You will then use the output file command to tell the editor you will spool the results to an outputfile
3 In the table below is a series of parameters and descriptions to be used when spooling
4 Use the +begin statement to tell the editor you from here until the +end command you will haveSQL to execute
5 Write your SQL
6 End with +end
7 Use the Run commands as you would any normal SQL statement as described in the Run Scopesection above
The code below is an example you can use to build off of
1 -- This will write the SQL statement between +begin and +end to therarr˓file specified
2
3 +sql4 output file5 path usersjschlittDownloadsjeff16 delimiter 7 null_value NULL8 quote_char 9 overwrite true
10 +begin11 select from wb_pro_marketing_list12 where emaildomain = aginitycom13 +end
52 Chapter 6 Using the Query Panel in Aginity Team
Aginity Team Documentation Release 1
Note We only support today the file type of csv You can still change the delimiter but all files with have a csvextension
The table below illustrates the current values accepted in execute to file commands
Parame-ter
Options
path On Mac this should be in the format ldquodirdirfilenamerdquo On Windows it should be in the formatldquodrivedirectoryfilenamerdquo
delimiter You can use any value but we recommend or | or ^ or t for (tab)null_value enter a character field for null typically lsquorsquo (empty string) or lsquoNULLrsquoquote_char enter how to enclose character string typically the quotation (ldquo)overwrite whether or not to allow overwrite if file exists true or falseheader true or false on whether you want to display headers in fileencoding the encoding of the file UTF_8 is the only value supported currentlycompres-sion
we can compress the file after it is written Values are NONE ZIP and GZIP
See also
We have a great knowledge base article on how to use the catalog to facilitate using the export as file editor feature
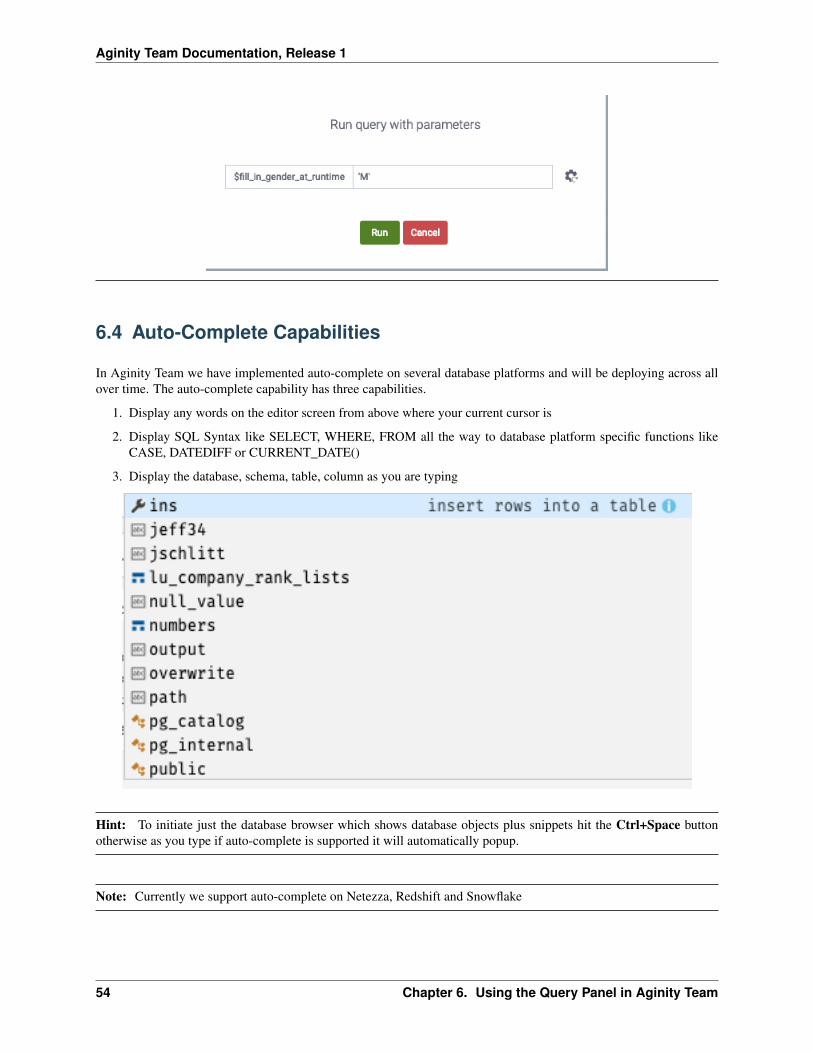
63 Using Parameters in your Query
Parameters can be used in Aginity Team by using the $ in any part of a SQL statement When you execute a query theAginity Team application will ask you to fill in the value of the parameter before it sends the query to the database
1 --sample parameter query2
3 select 4 from landing_dim_customer5 where gender = $fill_in_gender_at_runtime6 limit 100
You will have datatype choices at runtime as shown in the table below
Parameter Data Type Action TakenAs Is Aginity Team will send the value exactly as written with no casting This
is often used when using the parameter to fill in database table or columnnames See example 2 below
Hint You can specify default values with parameters by using this syntax with your parameter
$fill_in_gender_at_runtimelsquoMrsquo
When you run the query you will see the little gear icon as shown below Clicking that will populate thedefault value
63 Using Parameters in your Query 53
Aginity Team Documentation Release 1
64 Auto-Complete Capabilities
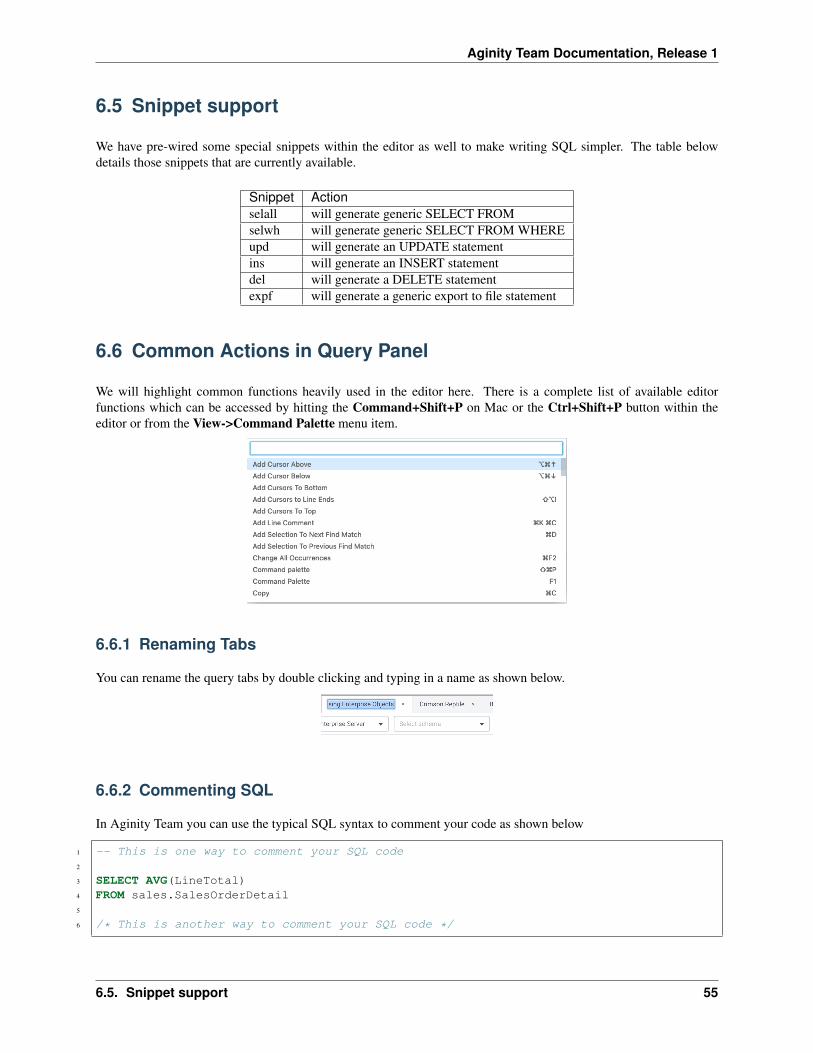
In Aginity Team we have implemented auto-complete on several database platforms and will be deploying across allover time The auto-complete capability has three capabilities
1 Display any words on the editor screen from above where your current cursor is
2 Display SQL Syntax like SELECT WHERE FROM all the way to database platform specific functions likeCASE DATEDIFF or CURRENT_DATE()
3 Display the database schema table column as you are typing
Hint To initiate just the database browser which shows database objects plus snippets hit the Ctrl+Space buttonotherwise as you type if auto-complete is supported it will automatically popup
Note Currently we support auto-complete on Netezza Redshift and Snowflake
54 Chapter 6 Using the Query Panel in Aginity Team
Aginity Team Documentation Release 1
65 Snippet support
We have pre-wired some special snippets within the editor as well to make writing SQL simpler The table belowdetails those snippets that are currently available
Snippet Actionselall will generate generic SELECT FROMselwh will generate generic SELECT FROM WHEREupd will generate an UPDATE statementins will generate an INSERT statementdel will generate a DELETE statementexpf will generate a generic export to file statement
66 Common Actions in Query Panel
We will highlight common functions heavily used in the editor here There is a complete list of available editorfunctions which can be accessed by hitting the Command+Shift+P on Mac or the Ctrl+Shift+P button within theeditor or from the View-gtCommand Palette menu item
661 Renaming Tabs
You can rename the query tabs by double clicking and typing in a name as shown below
662 Commenting SQL
In Aginity Team you can use the typical SQL syntax to comment your code as shown below
1 -- This is one way to comment your SQL code2
3 SELECT AVG(LineTotal)4 FROM salesSalesOrderDetail5
6 This is another way to comment your SQL code
65 Snippet support 55
Aginity Team Documentation Release 1
Hint If highlight multiple lines of code you can also use the Shortcut Keys Ctrl+K+C on Windows or Com-mand+K+C on Mac to comment them out To uncomment use Ctrl+K+U or Command+K+U
663 Keeping Connection
The Keep Connection checkbox as show below will instruct Aginity Team to maintain the connection to the databaseif the default behavior of the database is to disconnect after the execution of a query You are still subject to an overalldatabase connection timeout if you session connection exceeds the permitted database setting
664 Find and Replace
Ctrl+F (Windows) or Command+F (Mac) will bring up the find and replace box as shown below
67 Interacting with Query Results
Once your query has been executed you can use the features of the result grid to interact with the result set The typicalactions you will do are listed below
bull Reordering the Result Grid
bull Sorting the Result Grid
bull Filtering the Result Grid
bull Exporting results to CSV
671 Reordering the Result Grid
Once a query has executed successfully you may rearrange the columns in the Result Grid in order to more effectivelyperform subsequent analyses Rearranging the Result Grid is simple simply click hold and drag the column headerfor the column you wish to move As you move it left or right the grid will automatically adjust to reposition thecolumn
56 Chapter 6 Using the Query Panel in Aginity Team
Aginity Team Documentation Release 1
Once you are satisfied with the new position of the column you may release the drag and the column will lock intoplace
672 Sorting the Result Grid
After successfully executing a query if the query has returned any rows you may sort the results in order to permitvarious types of analysis of your results
In order to sort your results simply click on the header row in the results grid If the results are already being sortedby that column then the sort order will toggle between ascending and descending
67 Interacting with Query Results 57
Aginity Team Documentation Release 1
673 Filtering the Result Grid
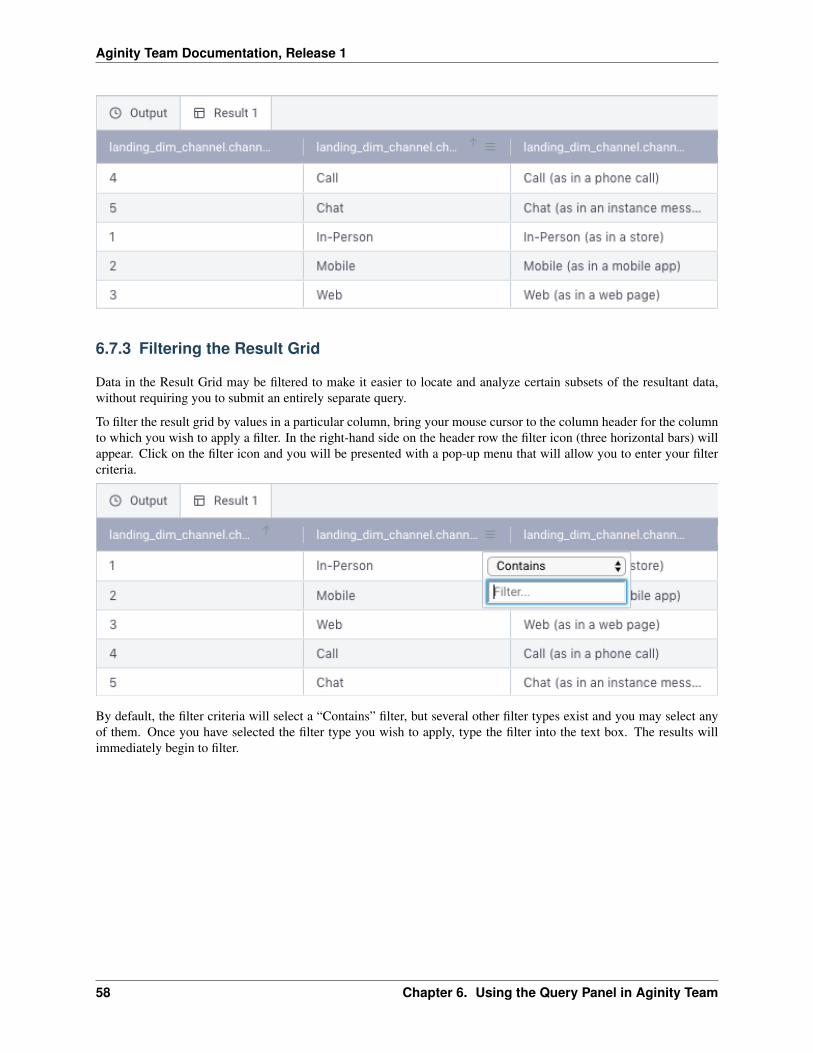
Data in the Result Grid may be filtered to make it easier to locate and analyze certain subsets of the resultant datawithout requiring you to submit an entirely separate query
To filter the result grid by values in a particular column bring your mouse cursor to the column header for the columnto which you wish to apply a filter In the right-hand side on the header row the filter icon (three horizontal bars) willappear Click on the filter icon and you will be presented with a pop-up menu that will allow you to enter your filtercriteria
By default the filter criteria will select a ldquoContainsrdquo filter but several other filter types exist and you may select anyof them Once you have selected the filter type you wish to apply type the filter into the text box The results willimmediately begin to filter
58 Chapter 6 Using the Query Panel in Aginity Team
Aginity Team Documentation Release 1
When a column is being filtered a funnel icon will appear in its header To remove the filter you may re-enter thefilter mode by clicking on the filter icon (three bars) in the header row and simply delete the filter text
Multiple columns may have active filters at the same time To accomplish this simply perform these steps on eachcolumn
674 Exporting results to CSV
Once you have successfully executed a query you can elect to export those results in Comma Separated Value (CSV)format to a file outside of Aginity Team To do this right-click anywhere in the results panel Doing this will displaya context menu from which you will select the option ldquoExport to CSVrdquo
After selecting this option you will be presented with a screen that permits you to select the location to which to saveyour results Once you have identified the proper location press the Save button to complete the export
CSV files may subsequently be imported into a large number of different programs for further review and analysis
See also
bull Adding Query to Catalog
bull Using Discovery Panel
67 Interacting with Query Results 59
Aginity Team Documentation Release 1
60 Chapter 6 Using the Query Panel in Aginity Team
CHAPTER 7
Using the Catalog in Aginity Team
71 Catalog Overview
The query catalog is a unique capability of Aginity Team allowing you to easily save manage and use items stored init Letrsquos start with browsing the catalog
The catalog is organized by any number of directories and sub-directories of queries as shown below
See also
61
Aginity Team Documentation Release 1
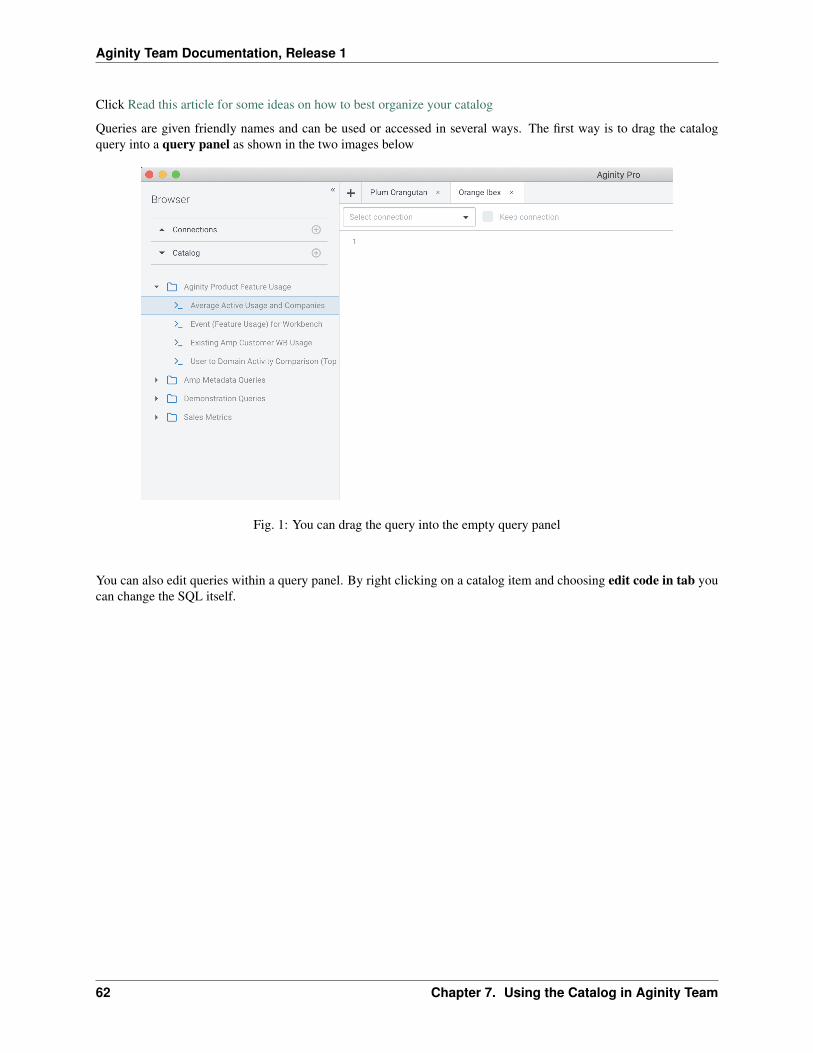
Click Read this article for some ideas on how to best organize your catalog
Queries are given friendly names and can be used or accessed in several ways The first way is to drag the catalogquery into a query panel as shown in the two images below
Fig 1 You can drag the query into the empty query panel
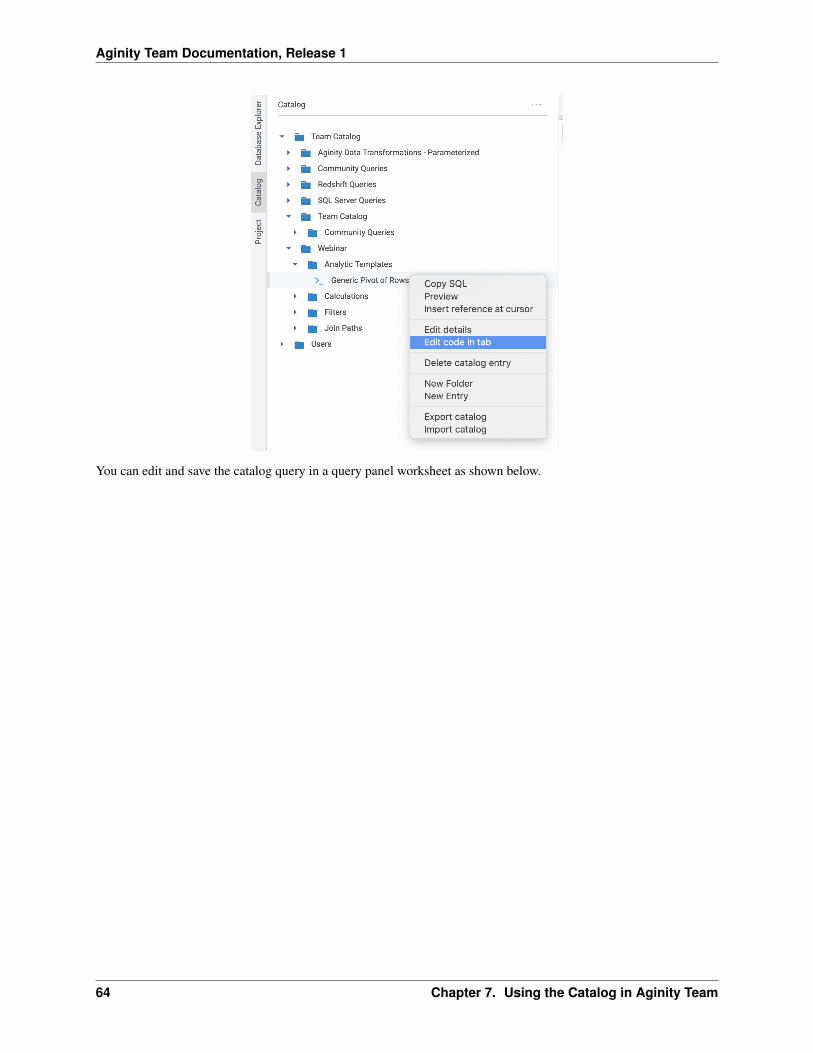
You can also edit queries within a query panel By right clicking on a catalog item and choosing edit code in tab youcan change the SQL itself
62 Chapter 7 Using the Catalog in Aginity Team
Aginity Team Documentation Release 1
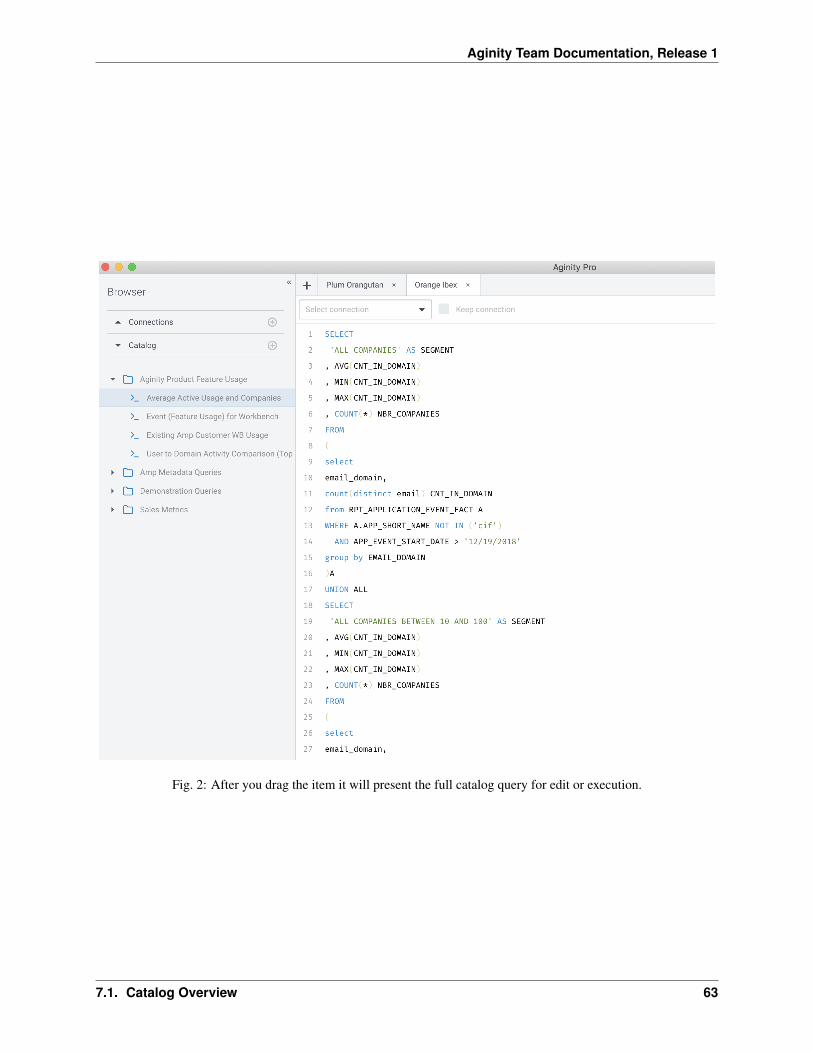
Fig 2 After you drag the item it will present the full catalog query for edit or execution
71 Catalog Overview 63
Aginity Team Documentation Release 1
You can edit and save the catalog query in a query panel worksheet as shown below
64 Chapter 7 Using the Catalog in Aginity Team
Aginity Team Documentation Release 1
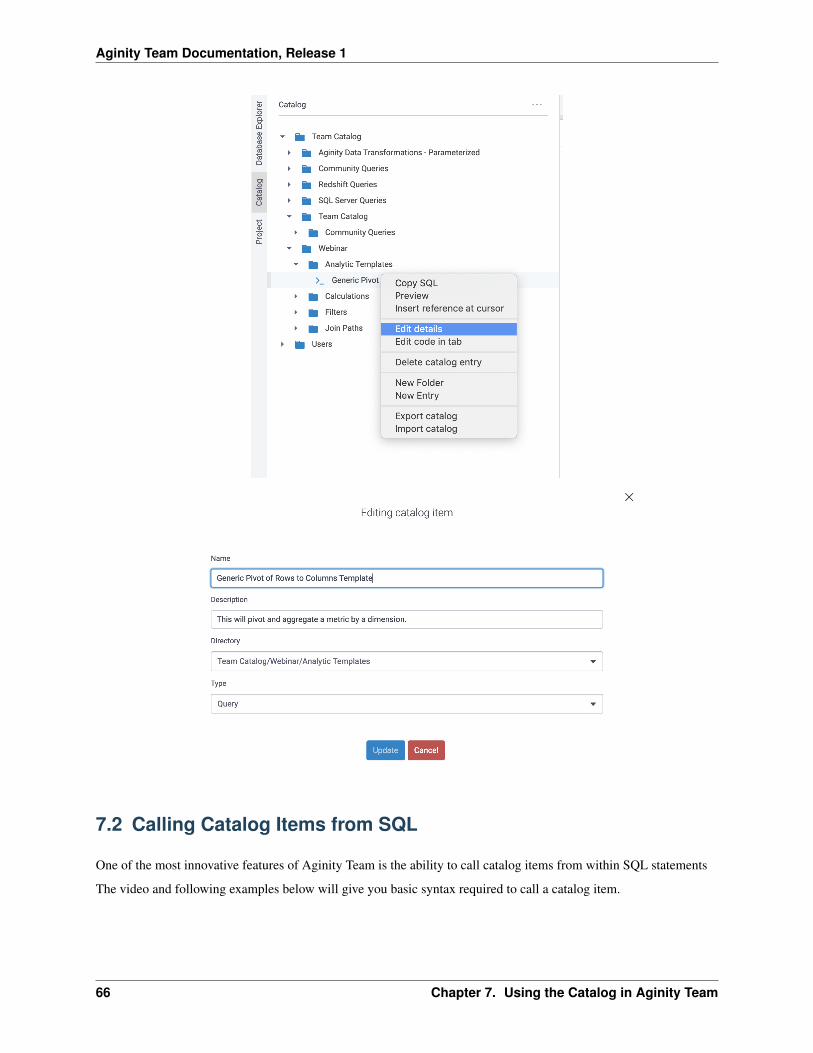
Hint If you see a next to the tab name in the query panel it means a change has not been saved
By editing the details of a catlaog query you can see key metadata items and statistics about the catalog
71 Catalog Overview 65
Aginity Team Documentation Release 1
72 Calling Catalog Items from SQL
One of the most innovative features of Aginity Team is the ability to call catalog items from within SQL statements
The video and following examples below will give you basic syntax required to call a catalog item
66 Chapter 7 Using the Catalog in Aginity Team
Aginity Team Documentation Release 1
721 Single SQL SELECT Statement
In this example we have a single SQL SELECT statement in the catalog called OrderAverage
This is the code in the Catalog
1 SELECT AVG(LineTotal)2 FROM salesSalesOrderDetail
To call this from the query panel you would issue the following command Note the highlighted reference to the objectin the catalog
1 SELECT 2 FROM (OrderAverage) a
This is the code passed to the database
1 SELECT 2 FROM (3 SELECT AVG(lineTotal)4 FROM SalesSalesOrderDetail5 ) a
722 Using Catalog Item to Facilitate Relationships
In this example we will predefine a join in the catalog called ClientAddress and then use it in the context of anotherSQL statement
This is the code in the Catalog
1 clients c2 JOIN addresses a3 ON cclientsid = aclientsid
To call this from the query panel you would issue the following command Note the highlighted reference to the objectin the catalog
1 SELECT 2 FROM ClientAddress
This is the code passed to the database
1 SELECT 2 FROM clients c3 JOIN addresses a4 ON cclientsid = aclientsid
723 Creating and Reusing Calculations
In this example we will predefine a Calculations in the catalog called Residual and then use it in the context of anotherSQL statement
This is the code in the Catalog
72 Calling Catalog Items from SQL 67
Aginity Team Documentation Release 1
1 1-total
To call this from the query panel you would issue the following command Note the highlighted reference to the objectin the catalog
1 SELECT item2 Residual3 FROM table
This is the code passed to the database
1 SELECT item2 1-total3 FROM table
724 Executing a Multi-Step script
In this example we will predefine a series of SQL statements in the catalog called DailyRun and then execute it by asingle call Any DML (SELECT CREATE UPDATE INSERT DELETE) can be used
This is the code in the Catalog
1 CREATE TABLE xyz AS2 CREATE TABLE abc AS3 SELET FROM xyz JOIN abc
To call this from the query panel you would issue the following command Note the highlighted reference to the objectin the catalog
1 DailyRun
This is the code passed to the database
1 CREATE TABLE xyz AS2 CREATE TABLE abc AS3 SELECT FROM xyz JOIN abc
725 Using Parameters in Catalog
In this example we will use a parameter within a catalog item called CitySelect
This is the code in the Catalog Note the highlighted line has the parameter in it
1 SELECT 2 FROM addresses3 WHERE city = $city
To call this from the query panel you would issue the following command Note the highlighted reference to the objectin the catalog
1 CitySelect
This is the code passed to the database
68 Chapter 7 Using the Catalog in Aginity Team
Aginity Team Documentation Release 1
1 SELECT 2 FROM addresses3 WHERE city = Chicago
Note Upon execution of the command Aginity Team will ask you to supply a parameterized value For moreinformation on parameters see Using Parameters
73 Adding Items to Catalog
To add a new query to the catalog highlight any part of a SQL statement(s) right click and select Save selection tocatalog as shown below
Once you save you will be asked to provide metadata about the query you are adding
73 Adding Items to Catalog 69
Aginity Team Documentation Release 1
Note It is important to fill out the description metadata as it will be used in searching The more information youprovide about the context of usage key business terms and intended usage the better search results you will get
You can also easily create new folders in the catalog or add SQL entries directly from the Catalog Browser by clickingthe (+) to the right of the Catalog header
When adding a new folder you will be presented with a basic text box to create your folder as shown below
74 Import and Export Items from Catalog
You have the ability to Import and Export both your full catalog as well as any folder selected within the catalog
Note We highly recommend taking regular exports of your catalog to disk to prevent accidental loss of queries
741 Export Steps
To Export your catalog start by either Right Clicking on a Catalog Folder or Using the Aginity Pro -gt Export Catalogmenu as shown below
70 Chapter 7 Using the Catalog in Aginity Team
Aginity Team Documentation Release 1
Your first step is to save either an entire folder or a selection of items within a folder
The final step in exporting is to name the file and location you will save to as shown below
742 Import Steps
Importing is valuable for several reasons One is to restore SQL catalog items you may have lost or more importantlythe ability to collaborate with other SQL developers and share your SQL making your a more efficient and consistentSQL developer
74 Import and Export Items from Catalog 71
Aginity Team Documentation Release 1
The first step is to Right Click on a folder you want to import to and Chooose Import Catalog as shown below
Note You can also use the Aginity Pro Menu -gt Import Catalog The main difference between using these twocapabilities is the context of where you are importing items If you choose to import from the Aginity Pro menu youmust set the context where to import If you Right Click on a folder the context is set to that folder
After choosing to import you will choose the file to import By default Aginity catalog files have the extensionaginitypkg
After choosing your file you can specify the folder to import to and what to import as shown below
72 Chapter 7 Using the Catalog in Aginity Team
Aginity Team Documentation Release 1
Hit the Import button and your queries should be imported
See also
Aginity also maintains a Github repository of Catalog queries to be used These queries are either administrativequeries for specific platforms data engineering queries that do powerful transformations against generic data or ana-lytic queries showing how to do cool things in SQL
Access the repositories here
See also
Using Query Panel
74 Import and Export Items from Catalog 73
Aginity Team Documentation Release 1
74 Chapter 7 Using the Catalog in Aginity Team
CHAPTER 8
Using Discovery Panel in Aginity Team
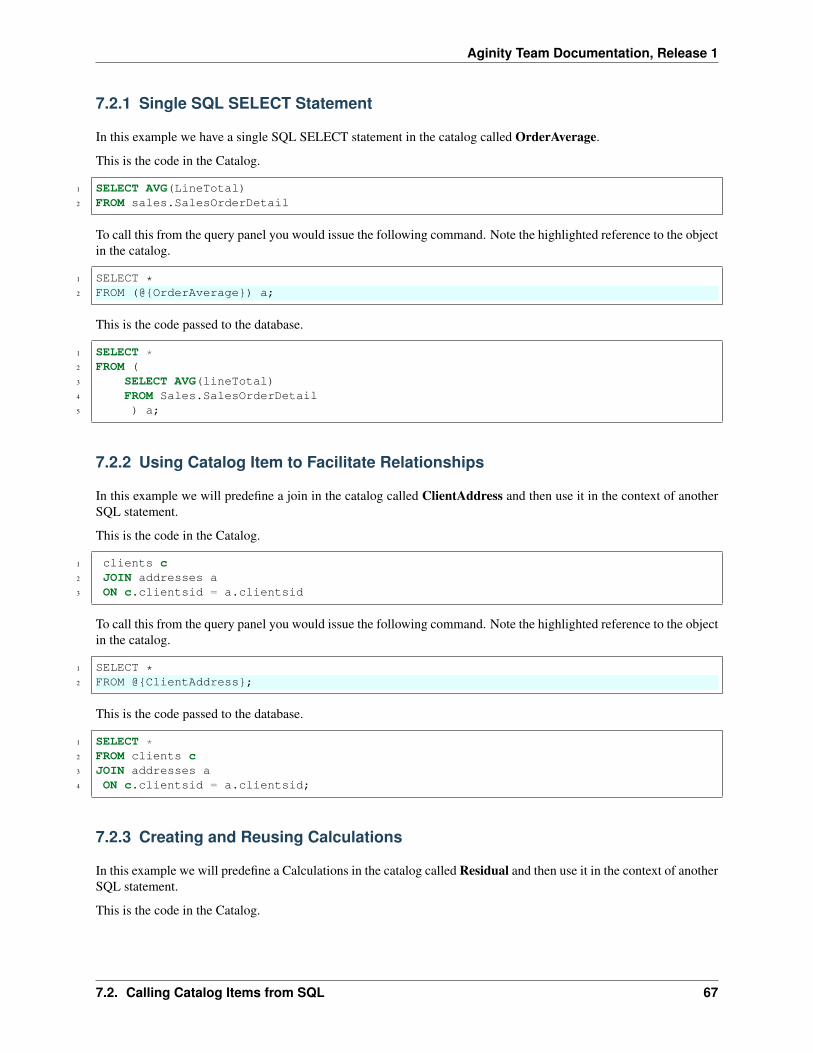
The Discovery Panel is a feature that is unique to Aginity Team and which allows you to quickly identify and reusecode that yoursquove previously executed or saved Using the Discovery Panel begins with a search Watch the videobelow to get a sense for how this feature works
By default the Discovery Panel allows you to search both your query execution history and your Pro Catalog at thesame time However by selecting one of the radio buttons in the Discovery Panel you can choose to focus on just oneor the other if you prefer
81 Searching Query Execution History
Start by typing in any free-text you want such as Sales as shown Below
75
Aginity Team Documentation Release 1
The search engine will do a full text search and display all results
82 Searching the Amp Pro Catalog
Buy clicking on the Catalog radio button you will restrict your search as shown below
83 Expanding the results
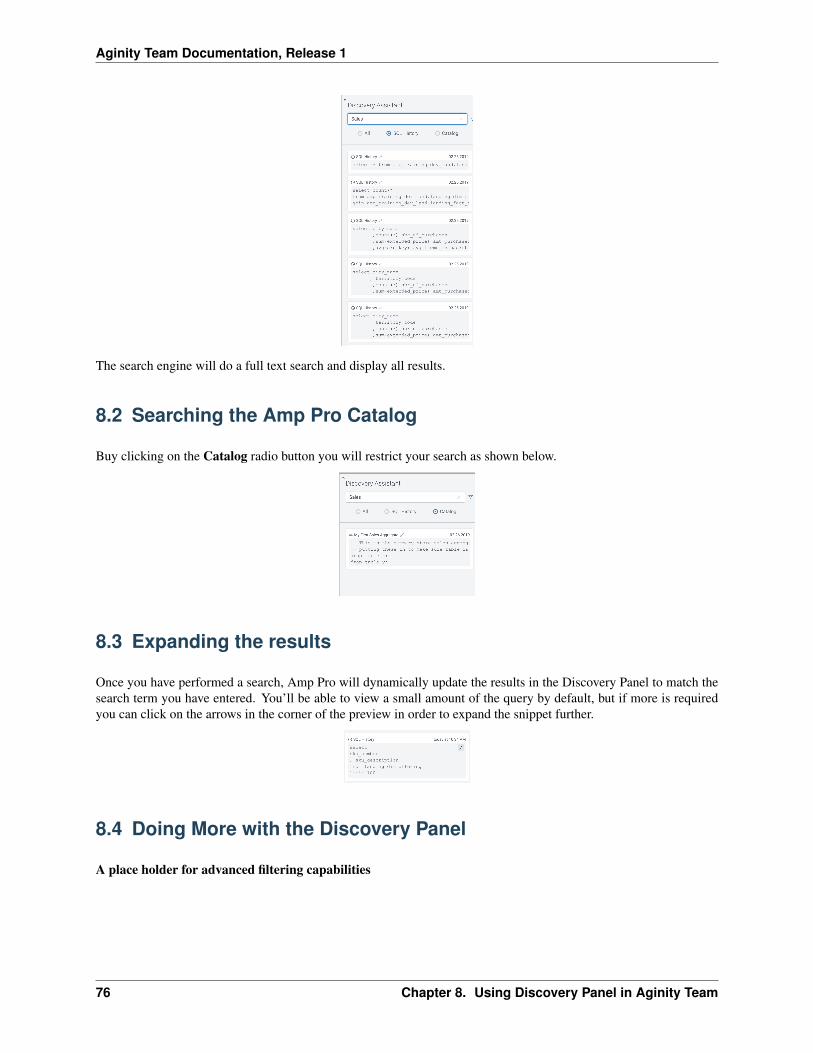
Once you have performed a search Amp Pro will dynamically update the results in the Discovery Panel to match thesearch term you have entered Yoursquoll be able to view a small amount of the query by default but if more is requiredyou can click on the arrows in the corner of the preview in order to expand the snippet further
84 Doing More with the Discovery Panel
A place holder for advanced filtering capabilities
76 Chapter 8 Using Discovery Panel in Aginity Team
CHAPTER 9
Reference
91 Video Reference
The following is a reference list of videos about Aginity Team and how to use its features
bull
bull
bull
bull
bull
bull
92 Shortcut Key Reference
Command ActionCommand K + C (Mac) or Ctrl K + C (Windows) Comment lines of codeCommand K + U (Mac) or Ctrl K + U (Windows) Uncomment lines of codeCommand F (Mac) or Ctrl F (Windows) Find and Replace Menu
93 Frequently Asked Questions
The section below is dedicated to commonly asked questions that we compile and provide answers to Over time asthings change we will keep this table up to date
77
Aginity Team Documentation Release 1
931 What Control do I have with Row Limit Preference
By default we cap the row limit preference to 100K rows to discourage users from spooling too much data across yournetwork Trust us your network infrastructure folks do appreciate it Fear not though you have options First if youset the preference to 0 it will spool as much as you want until either you run out of memory or your query completesAlternatively we recommend spooling the output to a file if you are doing returns greater than 100K rows Refer tothe documentation on execute query to file
94 SQL Reference Guides for Supported connections
As SQL developers ourselves we thought putting links to the databases we support in our documentation was a goodidea so here they are
bull
bull
bull
bull
95 Driver Support Reference
The table below is a cross reference of driver versions by platform
Platform Driver Version Class NameNetezza Not distributed with software
(nzjdbcjar)orgnetezzaDriver
SQL Server 720 jre8 commicrosoftsqlserverjdbcSQLServerDriverRedshift 12161027 comamazonredshiftjdbcDriverGreenplum and Post-gres
4225 orgpostgresqlDriver
Hive 121 orgapachehivejdbcHiveDriverSnowflake 3623 3628 355 netsnowflakeclientjdbcSnowflakeDriverIBM DB2 Warehouse db2jcc4 comibmdb2jccDB2Driver
78 Chapter 9 Reference
CHAPTER 10
Troubleshooting
This page is dedicated to common issues or errors you may encounter when using Aginity Team We recommend youalso post any new issues or questions to our Aginity Team Forum
The is a great resource for posting questions searching for common solutions to features of Pro or just learning howto be efficient as a SQL analytic developer through samples best practices and collaboration with other Pro users
Is-sueNum-ber
Isthis aDe-fect
Source of Error Description of Error Resolution
1 No Cannot DownloadDrivers via Con-nection Screen
In most cases your organization isblocking Aginityrsquos ability to downloaddrivers from a Maven repository
Follow directions in the Config-ure Connections documentationto Manually Add Drivers
79
Aginity Team Documentation Release 1
80 Chapter 10 Troubleshooting
CHAPTER 11
End User License for Aginity Team
Click here for end users license
81
- Administering Aginity Team
-
- Deploying Aginity Team through AWS Marketplace
- Installing Aginity Team on Linux
- Upgrading Aginity Team
- Backing Up or Restoring Team Catalog
-
- Creating Users in Aginity Team
-
- Administering Users
-
- Enabling Snowflake OAuth in Aginity Team
- Configuring Connections in Aginity Team
-
- Downloading Drivers
- Setting up Netezza Connections
- Setting up Redshift Connections
- Setting up Snowflake Connections
- Setting up Hive Connections
- Setting up SQL Server Connections
- Setting up DB2 Warehouse Server Connections
- Setting up Greenplum and Postgres Connections
- Import and Exporting Connections
-
- Using the Database Explorer in Aginity Team
-
- Viewing the Database Data Dictionary
- Database Object Support by Platform
- Quick Actions from Explorer
-
- Using the Query Panel in Aginity Team
-
- Writing your First Query
- Executing to a File
- Using Parameters in your Query
- Auto-Complete Capabilities
- Snippet support
- Common Actions in Query Panel
- Interacting with Query Results
-
- Using the Catalog in Aginity Team
-
- Catalog Overview
- Calling Catalog Items from SQL
- Adding Items to Catalog
- Import and Export Items from Catalog
-
- Using Discovery Panel in Aginity Team
-
- Searching Query Execution History
- Searching the Amp Pro Catalog
- Expanding the results
- Doing More with the Discovery Panel
-
- Reference
-
- Video Reference
- Shortcut Key Reference
- Frequently Asked Questions
- SQL Reference Guides for Supported connections
- Driver Support Reference
-
- Troubleshooting
- End User License for Aginity Team
-

Contents
1 Administering Aginity Team 311 Deploying Aginity Team through AWS Marketplace 312 Installing Aginity Team on Linux 613 Upgrading Aginity Team 1614 Backing Up or Restoring Team Catalog 18
2 Creating Users in Aginity Team 2121 Administering Users 22
3 Enabling Snowflake OAuth in Aginity Team 25
4 Configuring Connections in Aginity Team 2741 Downloading Drivers 2842 Setting up Netezza Connections 2943 Setting up Redshift Connections 3244 Setting up Snowflake Connections 3345 Setting up Hive Connections 3546 Setting up SQL Server Connections 3747 Setting up DB2 Warehouse Server Connections 3848 Setting up Greenplum and Postgres Connections 3949 Import and Exporting Connections 41
5 Using the Database Explorer in Aginity Team 4551 Viewing the Database Data Dictionary 4552 Database Object Support by Platform 4653 Quick Actions from Explorer 47
6 Using the Query Panel in Aginity Team 5161 Writing your First Query 5162 Executing to a File 5263 Using Parameters in your Query 5364 Auto-Complete Capabilities 5465 Snippet support 5566 Common Actions in Query Panel 5567 Interacting with Query Results 56
7 Using the Catalog in Aginity Team 61
i
71 Catalog Overview 6172 Calling Catalog Items from SQL 6673 Adding Items to Catalog 6974 Import and Export Items from Catalog 70
8 Using Discovery Panel in Aginity Team 7581 Searching Query Execution History 7582 Searching the Amp Pro Catalog 7683 Expanding the results 7684 Doing More with the Discovery Panel 76
9 Reference 7791 Video Reference 7792 Shortcut Key Reference 7793 Frequently Asked Questions 7794 SQL Reference Guides for Supported connections 7895 Driver Support Reference 78
10 Troubleshooting 79
11 End User License for Aginity Team 81
ii
Aginity Team Documentation Release 1
Aginity Team is our new SQL analysis tool With cool new features and functions such as an active personal catalogsmart SQL discovery assistant and moremdashbeware you may get spoiled For more awesome features you can expectto see in Aginity Team check out the feature roadmap
This documentation provides you with conceptual procedural and reference information to help you install and useAginity Team and find answers to questions you may have about it
The documentation consists of the following sections
Contents 1
Aginity Team Documentation Release 1
2 Contents
CHAPTER 1
Administering Aginity Team
11 Deploying Aginity Team through AWS Marketplace
This section will detail the steps to deploy the CloudFormation template for Aginity Team within AWS
The deployment will take about 30 minutes but configuration and testing could take up to an hour
111 Pre-Requisites
An AWS Marketplace subscription is required for production use of Aginity Team The one option for obtaining asubscription andor license
bull Bring your own license (BYOL) - Subscribe through the marketplace and apply an existing license To get a 30day evaluation license please fill out this form and it will email you a license Aginity will be in contact withyou during the evaluation period You can also contact us directly at salesaginitycom
You must have an AWS account set-up If you donrsquot visit httpsawsamazoncomgetting-started
Create an IAM user or role Your IAM user should have a policy that allows AWS CloudFormation actions Do notuse your root account to deploy the CloudFormation template In addition to AWS CloudFormation actions IAMusers who create or delete stacks will also require additional permissions that depend on the stack template Thisdeployment requires permissions to all services listed in the following section
bull Reference httpsdocsawsamazoncomAWSCloudFormationlatestUserGuideusing-iam-templatehtml
Knowledge of the following AWS services
bull Amazon Elastic Compute Cloud (Amazon EC2)
bull Amazon Relational Database Service (Amazon RDS)
bull Amazon Route 53
bull Amazon Virtual Private Cloud (Amazon VPC)
bull AWS CloudFormation
3
Aginity Team Documentation Release 1
Note
1 Account limit increases will not be required for this deployment (More information on proper policy and per-missions here httpsdocsawsamazoncomAWSCloudFormationlatestUserGuideusing-iam-templatehtml)
2 Individuals possessing the AWS Associate certifications should have a sufficient depth of knowledge
112 Architecture Overview
Aginity Team can be deployed in a single availability zone The data flow and architecture components are the sameas the ones highlighted below This solution does not provide high availability or fault tolerance
113 Deployment Step by Step
1 Log into AWS account with the IAM entity created in the prerequisites section with the required permissions todeploy the solution
2 Click the following link to deploy CloudFormation template(CFT) (deploys in us-east-1)
3 In lsquoStep 1 - Create Stackrsquo press the lsquoNextrsquo button
4 In lsquoStep 2 - Specify stack detailsrsquo fill out and adjust CloudFormation parameters depending on requirements
5 Press the lsquoNextrsquo button
6 In lsquoStep 3 - Configure stack optionsrsquo enter and adjust optional tags permissions and advanced options
7 Press the lsquoNextrsquo button
8 Review your CloudFormation configurations
9 Press the lsquoCreate Stackrsquo button
10 Wait approximately 30 minutes for your CloudFormation template to deploy
11 You can verify your deployment has succeeded by looking for a lsquoCREATE_COMPLETErsquo status
12 If the status is lsquoCREATE_FAILEDrsquo see the troubleshooting section in this guide If it succeeds please usehealth checks
4 Chapter 1 Administering Aginity Team
Aginity Team Documentation Release 1
Note You will be prompted during the deployment of the CFT to enter a username and password for the AginityTeam administrator
114 Security Considerations
Amazon Certificate Manager SSLTLS Certificates
AWS Certificate Manager (ACM) is a service that lets you easily provision manage and deploy Secure SocketsLayerTransport Layer Security (SSLTLS) certificates for use with AWS services SSLTLS certificates provisionedthrough AWS Certificate Manager are free
If you donrsquot already have an SSLTLS certificate for your domain name it is recommended that you request one usingACM For more information about requesting an SSLTLS certificate using ACM please read the AWS CertificateManager User Guide
Certificate Expiration
Certificates must be monitored for expiration Aginity does not provide an integrated process for monitoring certificateexpiration but AWS provides a CloudFormation template that can help setup an alarm Please visit the following linkfor details
115 Costs
You are responsible for the cost of AWS services used while running this deployment The AWS costs will dependon Aginity Team EC2 instance sizing and are outlined in the table below Use the guidelines in the sizing section todetermine what instances are appropriate for your deployment With that information you can use the AWS SimpleMonthly Calculator to obtain the current prices and a cost estimate To calculate your resource cost please visithttpscalculators3amazonawscomindexhtml
Note Storage and data transfer are not included as these vary depending on configuration Please consult AWSPricing for the latest information
116 Sizing
The following table outlines recommendations for EC2 instance size If your team has more than 40 SQL analystsplease contact Aginity for additional sizing guidance Please refer to the Costs section for pricing
117 Troubleshooting
I cannot ldquoCreate stackrdquo in CloudFormation
Please check that you have the appropriate permissions to ldquoCreate Stackrdquo Contact your AWS accountadmin for permissions or AWS Support if you continue to have issues
My Aginity Team AMI is throwing errors
11 Deploying Aginity Team through AWS Marketplace 5
Aginity Team Documentation Release 1
Please check that you have provided a valid license
Everything is on fire
Please contact AWS Support for AWS specific problems or contact Aginity if you are having problemswith the AMI
See also
Backup
We highly recommend you do daily back-ups and snapshots to ensure minimal loss and downtime for your applicationPlease review the section in the documentation on backup and recovery
Emergency Maintenance
Our knowledge base has the most comprehensive details about general product troubleshooting It is accessible fromour support site and should be the first stop for any technical questions
118 Clean Up
1 Follow the AWS CloudFormation Delete documentation to delete the resources deployed by this document
2 By default EBS snapshots are retained for recovery purposes If you wish to delete these follow the EBSprocess to delete unwanted backups
3 Delete any other resources that you manually created to integrate or assist with the deployment
12 Installing Aginity Team on Linux
Installing team consists of accessing and setting up an environment based on an Ubuntu OS or Red Hat EnterpriseLinux (RHEL) You can either do this on an existing Ubuntu Server or set up a Virtual Machine that will host theshared catalog database and Team application server
If you have not yet done so download the software from here
Once you register and download the software you can begin the installation process Upon registration you the softwarewill automatically download The software should be titled aginity-team-ltversiongt-amd64deb
121 Pre-Requisites and Getting to a Server
Team is installed on an Ubuntu or RHEL Server or Virtual Machine environment The machine Ubuntu or RHEL isinstalled on must meet the following requirements
1 Cloud data center or on-premises
2 Minimum 200 GB of disk workspace
3 4 CPU x 16GB RAM
4 Running Ubuntu 18042 LTS (Bionic Beaver) or RHEL version 8
5 Must have network access to databases being connected to
6 HTTPS certificate (company provided or self-signed)
Desktop requirements
1 Chrome browser
6 Chapter 1 Administering Aginity Team
Aginity Team Documentation Release 1
2 HTTPS access to the Team Server
Note If you are trying to install an evaluation of Aginity Team or just getting started there are severaloptions for accessing a server environment in which to install Aginity Team server
1 You can ask your IT representative who is responsible for server infrastructure if there is a UbuntuLinux server or VM available to use
2 You can install it locally for trial purposes using personal VMWare such as Parallels or an opensource equivalent like Oracle VirtualBox
If you would prefer we are happy to schedule a free install for you Please click on the link below to schedule thatinstall
Click here to schedule an install with an Aginity Consultant
122 The Installation Process
The following steps should be executed in order
Step 1 SSH into the Linux server as root or you can also sudo to root once in with another that has administrativerights
Note In our case for documentation we are working with a Parallels Ubuntu 1804 VM and have anaccount called Parallels
ssh ltusernamegtltip_addressgt
Step 2 SFTP the aginity-team-ltversiongt-amd64deb file to the logged in users home directory Below is a samplecommand to do that
sftp ltusernamegtltip_addressgtput aginity-team-ltversiongt-amd64debexit
Step 3 Running the install
Issue the following command to initiate the install
on Ubuntusudo apt-get install aginity-team-ltversiongt-amd64deb on RHELsudo yum install aginity-team-ltversiongt-amd64rpm
This image below is what you should see after the install is complete
12 Installing Aginity Team on Linux 7
Aginity Team Documentation Release 1
Note We will generate an encryption key to ensure all information for connections and your catalog are encryptedThe installation will automatically generate and store that key on the etcaginity-teamserviceconf file
Step 4 Installing SSL certificate
The SSL certificate generation can be called using
this will generate certificatesudo optaginity-teambinssl-certificate-gensh
You will be asked for the following information
1 First and last name
2 Name of organization unit
3 Name of organization
4 Name of City or Locality
5 Name of State or Province
6 Name of Country code
7 Finally when asked to ldquoEnter key password for ltaginity_certgt (RETURN if same as keystore password) rdquo pressRETURN
123 Configuring Aginity Team Server
You can adapt Aginity Team Server to your needs by changing settings in etcaginity-teamserviceconf andetcaginity-teamapplicationyml configuration files
The serviceconf file contains settings of a linux service running Aginity Team It is in a plain text file format Hereare the parameters in the etcaginity-teamserviceconf file
General Configuration Parameters
SERVICE_KEYSTORE_PATH
8 Chapter 1 Administering Aginity Team
Aginity Team Documentation Release 1
The path to a java keystore file Aginity Team generates this file when you run optaginity-teambinssl-certificate-gensh
Default etcaginity-teamcacerts
JVM_MEMORY_LIMIT
The value of JVM maximum heap size The number has to be an integer You should specify its value using one ofthe letters ldquomrdquo or ldquoMrdquo for MB or ldquogrdquo or ldquoGrdquo for GB Examples 1024m 1024MB 12g 12GB
Default 1024m
AGINITY_ENCRYPTION_KEY
The value of encryption key which is used to encrypt H2 database used by the application This value is generated byAginity Team
Note We recommend that you copy the encryption key to a safe place as you may need it to recover Aginity TeamServer using a database backup
AGINITY_CONFIG_PATH
The path to the application configuration yml-file Do not change its value
Default etcaginity-teamapplicationyml
DB_PATH
The path to a directory to deploy Aginity Teamrsquos H2 database in
Default varlibaginity-team
Default varlibaginity-team
Configuring the YML Application File
Aginity Team Server can be customized through a number of settings of the etcaginity-teamapplicationyml file Ituses YAML format Depending on your needs Aginity Team can be configured to use either embedded H2 database orPostgreSQL database server You may want to change TCP port the server is accepting HTTP request on or integrateAginity Team with external identity providers
Note YAML does not support tab characters for indentation You should use spaces for that
For the reason of backward compatibility some settings in applicationyml use parameter expansions The basic formof parameter expansion is $parameter- The parameter is a key from etcaginity-teamserviceconf You can replaceany $parameter- with your custom value There are default values for some parameters in the configuration file
$parameter-defaultValue
If parameter is unset in etcaginity-teamserviceconf the expansion of defaultValue is substituted Otherwise thevalue of parameter is substituted
Webserver Options
server Options
12 Installing Aginity Team on Linux 9
Aginity Team Documentation Release 1
serverport $SERVICE_PORT-8080publicUrl $PUBLIC_URL-httplocalhost8080
serverport
TCP port Aginity Team uses to accept HTTP requests You may want to setup Aginity Team to listen on 443 tosimplify URL users should use to access Aginity Team In this case the server section looks like as follows
Default 8080
serverport 443publicUrl httpsmyexamplecom
serverpublicUrl
publicUrl is a URL of a server running Aginity Team It is a public URL available outside your corporate network
publicUrl has the following format schemehostport where scheme can be either http or https host ishostname of the server running Aginity Team port is TCP port Aginity Team is using
Default httplocalhost8080
Catalog Database Options
database Options
database BEGIN H2 database configurationh2
dbFilePath $DB_PATH- END H2 database configuration BEGIN PostgreSQL configuration This section is commented out by default since only one type of databaserarr˓could be enabled to enable PostgreSQL comment out the H2 database configuration sectionrarr˓and uncomment the section below postgres user user password password jdbcUrl jdbcpostgresqlhostportdatabase_name properties any properties specific to your JDBC driver ssl true connect using SSL SSL support must be enabled on therarr˓database server side sslmode require END PostgreSQL configuration
By default Aginity Team installs embedded H2 database to store application data Another option is to use a Post-greSQL database In this case you have to deploy PostgreSQL server and create a database by yourself Here is anexample of the database section with enabled PostgreSQL database
database BEGIN H2 database configuration h2
(continues on next page)
10 Chapter 1 Administering Aginity Team
Aginity Team Documentation Release 1
(continued from previous page)
dbFilePath $DB_PATH- END H2 database configuration BEGIN PostgreSQL configuration
postgresuser db_userpassword db_passowdjdbcUrl jdbcpostgresqlmyexamplecom5432aginity_team_databaseproperties
ssl truesslmode require
END PostgreSQL configuration
Note Only one type of database could be enabled To enable PostgreSQL comment out the H2 database configura-tion section and uncomment the PostgreSQL configuration section
databaseh2dbFilePath
The path to a directory to deploy Aginity Teamrsquos H2 database in
databasepostgresuser
The database user
databasepostgrespassword
The database userrsquos password
databasepostgresjdbcUrl
The connection URL
jdbcUrl has the following format jdbcpostgresqlhostportdatabase_name where host is the IP address orthe hostname of the database server port is TCP port the database server is listening database_name is the nameof Aginity Team database created by you
databasepostgresproperies
This section may contain any number of additional connection parameters which PostgreSQL JDBC driver supportsYou can read about the jdbc driver parameters at jdbcpostgresqlorg
Logging Options
logging Options
loggingpathToLogFile $PATH_TO_LOG_FILE-varlogaginity-teammaxFilesCount $MAX_FILES_COUNT-100MBmaxFileSize $MAX_FILE_SIZE-1
loggingpathToLogFile
The path to a directory to store application log files in
Default varlogaginity-team
loggingmaxFilesCount
12 Installing Aginity Team on Linux 11
Aginity Team Documentation Release 1
The maximum number of the log files Aginity Team creates
Default 1
loggingmaxFileSize
The maximum size of a log file The number has to be an integer You should specify its value using one of the letterslsquoKBrsquo lsquoMBrsquo or lsquoGBrsquo after the number Examples 200KB 35MB 1GB
Default 100MB
Platform Options
This section is used to set up OAuth for the Snowflake databases Please refer to specific Snowflake section in thedocumentation Enabling Snowflake SSO
Security Configuration Options
userDirectory Options
This section allows you to integrate Aginity Team with your LDAP system to import users sync user information anddelegate user authentication to LDAP server
userDirectoryname LDAP Serverenabled trueserverSettings
host ldapserverexamplecomport 389bindDN cn=admindc=exampledc=combindPassword admin_passwordencryption PLAINverifyCertificates falsetlsOptions
trustStorePath pathtotrustStorefiletrustStorePassword my_passwordtrustStoreType PKCS12
connectionRuleconnectTimeout 0responseTimeout 0
userSchemabaseDN ou=usersdc=exampledc=comuserFilterusernameAttribute uidfirstNameAttribute givenNamelastNameAttribute snemailAttribute mailsearchScope SUB_TREE
userDirectoryname
A descriptive name of the LDAP connection
userDirectoryenabled
Flag to indicate whether LDAP authentication is on or off
userDirectoryserverSettingshost
The IP address or hostname of the LDAP server
12 Chapter 1 Administering Aginity Team
Aginity Team Documentation Release 1
userDirectoryserverSettingsport
TCP port of the LDAP server
userDirectoryserverSettingsbindDN
The distinguished name of the user that the application will use when connecting to the directory server Examplecn=admindc=exampledc=com
userDirectoryserverSettingsbindPassword
The user password
userDirectoryserverSettingsencryption
Type of connection encyption Can be set to PLAIN START_TLS or SIMPLE_TLS START_TLS is preferred optionSTART_TLS begins as a plaintext connection over the standard LDAP port (389) and that connection is then upgradedto SSLTLS
userDirectoryserverSettingsverifyCertificates
If set to true Aginity Team verifies the certificate used for SSLTLS connection to the LDAP server A java trust-store configured in userDirectoryserverSettingstlsOptions is used to verify the certificate If you use a self-signedcertificate you must import the certificate to the truststore before starting Aginity Team
userDirectoryserverSettingstlsOptions
Use this section to configure your java truststore that is used to verify the LDAP server certificate
userDirectoryserverSettingstlsOptionstrustStorePath
The path to the Java trust store where certificates are stored
userDirectoryserverSettingstlsOptionstrustStorePassword
The password to the java trust store
userDirectoryserverSettingstlsOptionstrustStoreType
The type of the trust store The most common are JKS and PKCS12
userDirectoryconnectionRuleconnectTimeout
Timeout in milliseconds for connection to LDAP server 0 means no timeout
userDirectoryconnectionRuleresponseTimeout
Timeout in milliseconds for response time from LDAP server 0 means no timeout
userDirectoryuserSchemabaseDN
The root distinguished name (DN) to use when running queries against the directory server
userDirectoryuserSchemauserFilter
An LDAP search filter to be used when searching user objects from the LDAP server within the base DN Exampleldquo(amp(objectCategory=Person)(sAMAccountName=))rdquo
userDirectoryuserSchemausernameAttribute
Defines which attributes on an LDAP user entry will be used as its username
userDirectoryuserSchemafirstNameAttribute
Defines which attributes on an LDAP user entry will be used as its first name
userDirectoryuserSchemalastNameAttribute
Defines which attributes on an LDAP user entry will be used as its last name
12 Installing Aginity Team on Linux 13
Aginity Team Documentation Release 1
userDirectoryuserSchemaemailAttribute
Defines which attributes on an LDAP user entry will be used as its email address
userDirectoryuserSchemasearchScope
Specify strategy to use when doing a search Possible options SUB_TREE (search request should be performedagainst the search base and all entries below) ONE (search request should be performed against entries that areimmediate subordinates of the entry specified as the search base DN) BASE (search request should only be performedagainst the entry specified as the search base DN)
124 Starting Aginity Team Server
Prior to starting the Agnity Team server you must create the administrator username and password
You can do this by running the team-create-superuser script in the optaginitybin directory on the server
this will create a user with the administrator rolesudo optaginity-teambinteam-create-super-usersh
Step 5 You are now ready to start Aginity Team
We use the following commands to start Aginity Team in the background and with logging turned on
sudo systemctl start aginity-team
You can check if Aginity Team is running by issuing this command
sudo systemctl status aginity-team
125 Accessing Aginity Team for the First Time
Step 6 Step 6 Open browser and navigate to httpsltip or team server namegtltserver portgtlogin You will see thefollowing image
bull Enter credentials you used to create the administrator to enter the application
Step 7 Register and Apply License Key
14 Chapter 1 Administering Aginity Team
Aginity Team Documentation Release 1
When you open the application it will ask you to register the software and then you will be asked to applythe license key
If it does not ask for the license key you can click on Help -gt Register again and the license key boxshould pop open as shown below
12 Installing Aginity Team on Linux 15
Aginity Team Documentation Release 1
Note It is imperative that all users be created with valid business email addresses
Send the link to team to any new user along with their usernamepassword combination
126 Stopping Aginity Team Services
Log in as the team user and issue the following command
sudo systemctl stop aginity-team check to see if it is stopped Usingsudo systemctl status aginity-team
See also
Add Connections
13 Upgrading Aginity Team
Upgrading team consists of logging into the Team server downloading the latest update and applying it from thecommand line
For clarities sake when we refer to aginity-team-ltversiongt-amd64deb we purposely leave version generic Eachupgrade will have a different number associated with it
Warning It is important to take a backup of both your encryption key for the Team catalog and to do a BackingUp or Restoring Team Catalog before upgrading This way if anything goes wrong you will not use your catalogIt is also recommended to do a manual export of your catalog from time to time
You can get the encryption key using the command below
sudo cat etcaginity-teamserviceconf
16 Chapter 1 Administering Aginity Team
Aginity Team Documentation Release 1
131 Step 1 Logging into Team Server
SSH into the Team server as an administrator
Note Typically you will log in as an account other than root and then you will be using the sudo command
132 Step 2 Check to see if Team is Currently Running and then Shut it Down
Issue the command below to check the status of the Team service
sudo systemctl status aginity-team
If Team is running shut it down by issuing this command
sudo systemctl stop aginity-team
Note It is always a good idea to run the status check again to make sure Team has been shut down
133 Step 3 Download the Latest Version of Aginity Team
Using the wget command you can download the latest version as shown below
wget httprepositoryaginitycoms3amazonawscomAginityTeamaginity-team-ltversionrarr˓gt-amd64deb
134 Step 4 Upgrading the Software
Run the upgrade process by issuing this command
on Ubuntusudo apt-get install aginity-team-ltversiongt-amd64deb on RHELsudo yum install aginity-team-ltversiongt-amd64deb
The package manager will determine if your configuration files are different from ones bringing with the new versionof the application being installed and will offer you a few option to proceed with installation
13 Upgrading Aginity Team 17
Aginity Team Documentation Release 1
You should always keep your currently-installed version and resolve any conflicts by comparing and merging thedifference manually
135 Step 5 Restart Aginity Team
Restart the server by issuing this command
sudo systemctl start aginity-team
14 Backing Up or Restoring Team Catalog
We have provided two files listed and described below which will allow you to automate or manually backup andrestore your Aginity Team catalog
141 Backup Script
The backup script backupsh will perform and compress a backup of the Aginity Team Catalog to the tmp di-rectory on your OS It will append the date to the end of the file created and should be named in this pattern agin-ity_backup_m_d_Yzip
Note Before running the backupsh script you will need to edit it and provide the following variables
bull DESTINATION ~ if you do not want to use the default tmp
bull TOKEN ~ this value is the encryption key for the database To find out the value of it run this command
sudo cat etcaginity-teamserviceconf
bull H2PATH ~ Unless you modified the installation directory from the default you should not need to change this
bull DBPATH ~ Unless you modified the installation directory from the default you should not need to change this
18 Chapter 1 Administering Aginity Team
Aginity Team Documentation Release 1
When running a backup the Aginity Team server process will be stopped then restarted when complete
See also
If you want to schedule the backup and automate it we recommend scheduling using Crontab Crontab ReferenceGuide
142 Restore Script
To restore to an instance of the backup follow these instructions
Yoursquoll need to set the variables within the restoresh to match what is in the backupsh
First download the restore script restoresh Next you will provide the file name of the backup you want to restorein the
bull SOURCE variable
Now run the script and it will automatically re-start Aginity Team when complete
14 Backing Up or Restoring Team Catalog 19
Aginity Team Documentation Release 1
20 Chapter 1 Administering Aginity Team
CHAPTER 2
Creating Users in Aginity Team
Once you have installed your Aginity Team server you need to set up users To do this navigate to the Administrationmenu item as show below
Click the button Register New User and fill out the form as show below
21
Aginity Team Documentation Release 1
When choosing the role of Admin vs User reference this table below for differences in functionality
21 Administering Users
Once you have created users and you need to common tasks as described below you will go back into the Administra-tion Menu and click on the three dots ldquo rdquo to the right of each user row This will pop opne an edit menu as shown
22 Chapter 2 Creating Users in Aginity Team
Aginity Team Documentation Release 1
below
211 Disabling Users
You can choose to disable user which will not allow them to login but will not remove any of their catalog informationor query history
212 Resetting Passwords
To reset a password you can choose the Change password which will prompt you to enter and confirm a new password
213 Edit User
If you need to Edit any registration details such as name or role you can do that here
21 Administering Users 23
Aginity Team Documentation Release 1
24 Chapter 2 Creating Users in Aginity Team
CHAPTER 3
Enabling Snowflake OAuth in Aginity Team
We now support OAuth for the snowflake platform This feature only works on Aginity Team The details below willguide your through setting up the configuration on the server
1 Connect to your Snowflake server and create a Security Integration object for a custom client (more details canbe found at this link)
For example
CREATE SECURITY INTEGRATIONCREATE OR REPLACE SECURITY INTEGRATIONaginity_team_oAuthTYPE = OAUTHENABLED = TRUEOAUTH_CLIENT = CUSTOMOAUTH_CLIENT_TYPE = CONFIDENTIALOAUTH_REDIRECT_URI = Aginity Team Public URLapioauthsnowflakeOAUTH_ALLOW_NON_TLS_REDIRECT_URI = FALSEOAUTH_ENFORCE_PKCE = TRUEOAUTH_ISSUE_REFRESH_TOKENS = TRUEOAUTH_REFRESH_TOKEN_VALIDITY = 86400
Note Aginity Team Public URL is a URL of a server running Aginity Team It is a public URL available outsideyour corporate network
Aginity Team Public URL has the following format schemehostport where scheme can be either http orhttps host is hostname of the server running Aginity Team port is TCP port Aginity Team is using
2 Ssh to the Aginity Team server
3 Edit etcaginity-teamapplicationyml and uncomment and update the following properties
platformssnowflakeoauthhost
Snowflake account in format account_namesnowflakecomputingcom where account_name is your Snowflakeaccount name
25
Aginity Team Documentation Release 1
platformssnowflakeoauthclientId
Snowflake client ID of the Security Integration object The Snowflake administrator can find the client ID by describingthe integration that is by using the DESC SECURITY INTEGRATION command
platformssnowflakeoauthclientSecret
Snowflake client secret of the Security Integration object The Snowflake administrator can find the client secrets byusing the system function SHOW_OAUTH_CLIENT_SECRETS
serverpublicUrl Aginity Team Public URL
Database platform specific configurationsplatformssnowflake
oauthclientSecrets
- host account_namesnowflakecomputingcomclientId client idclientSecret client secret
For example a customer has 2 Snowflake accounts The first one is eb39151us-east-1snowflakecomputingcom and itis being used for Dev environment The second one is xr58911us-east-1snowflakecomputingcom and it is being usedfor Production environment Then to enable OAuth connections to these environments via Aginity Team administratorshould add the following parameters to serviceconf
serverpublicUrl httpsaginityexamplecom
platformssnowflake
oauthclientSecrets
Dev environment- host eb39151us-east-1snowflakecomputingcom
clientId fnm4OgHhswihrEfsahTyZo=clientSecret sHljg51o7jdsjds8723786f35Q0K+TthasjuczjQwY=
Production environment- host xr58911us-east-1snowflakecomputingcom
clientId kwajw56h(usaELkkwu=clientSecret gfhfrejds3232372822378YUUYthasjuczjQwY=
4 Restart the Aginity Team server
26 Chapter 3 Enabling Snowflake OAuth in Aginity Team
CHAPTER 4
Configuring Connections in Aginity Team
Aginity Team allows you to set up connections to a variety of different database platforms In order to do this clickthe + symbol next to the ldquoConnectionsrdquo header in the left navigation pane of Aginity Team You will be presentedwith a list of existing connections as well as options for adding another connection Clicking the ldquoNew Connectionrdquobutton will allow you to enter the necessary information for the connection you wish to create
Below is a quick start video of creating connections in Aginity Team
Note Aginity Team uses JDBC to connect to database platforms It is recommended you refer to the JDBC guidesfor our supported platforms to learn about specific variables to use within the Advance Parameters section of AginityTeam We will provide links to that documentation where available
The video below provides a more detailed explanation of how to use advanced parameters to illicit the desired behaviorand successful connection to the database platform
27
Aginity Team Documentation Release 1
41 Downloading Drivers
The first step in configuring a connection is to download the JDBC driver for the platform you will be using In mostcases we will provide access to the drivers which have been certified to work with Aginity Team In some cases suchas when the vendor does not allow us to distribute or you want to use a different version you will have to manuallyadd the JDBC driver
The video below provides a quick illustration of how to manage drivers
See also
Database Driver Reference Guide
To get started in the Edit or Add Connection box you will click on Edit Drivers as shown below
411 Automatic Download
As shown in the image below if we are allowed to to download drivers you will be provided a link to do so and thenbe presented with one or more drivers to use and your done
28 Chapter 4 Configuring Connections in Aginity Team
Aginity Team Documentation Release 1
In some cases you may get an error message if your organization does not allow you to download drivers (jar files)typically supplied through a Maven repository
In this case please review the section below Manually Add Drivers
412 Manually Add Drivers
If you have to manually add a driver it starts with first acquiring the JDBC jar for that platform and saving it somewhereon your machine Once you acquire the JDBC jar you can upload it to Aginity Pro
To do this you will hit the Edit Driver or Edit Drivers Panel section as shown above and you will be presented withthe following screen
You can name the Driver anything you want and provide a description
The class name if not provided must be looked up typically in the JDBC reference manual from the platform vendor
Finally if you click on the Add File button you will navigate to where you saved the Jar file and then click SaveChanges You are now ready to configure your connection
42 Setting up Netezza Connections
You can set up a connection to a Netezza (IBM PureData for Analytics) appliance here Simply populate the requesteddata into the form
42 Setting up Netezza Connections 29
Aginity Team Documentation Release 1
Note Netezza does not allow us to distribute their drivers so you must obtain it from your DBA or directly from IBMFix Central
30 Chapter 4 Configuring Connections in Aginity Team
Aginity Team Documentation Release 1
421 Using SSL with Netezza Connections
Aginity Team supports SSL when setting up a Netezza connection While setting up your Netezza connection simplyselect the level of security to enable from the dropdown selector Your choices include
bull Only Unsecured - Specify this option when you want an unsecured connection to the Netezza system If theNetezza system requires a secured connection the connection is rejected
bull Preferred Unsecured - This argument is the default value Specify this option when you would prefer anunsecured connection but you accept a secured connection if the Netezza system requires one
bull Preferred Secured - Specify this option when you want a secured connection to the Netezza system but youaccept an unsecured connection if the Netezza system is configured to use only unsecured connections
bull Only Secured- Specify this option when you want a secured connection to the Netezza system If the Netezzasystem accepts only unsecured connections or if you are attempting to connect to a Netezza system that isrunning a release before release 45 the connection is rejected
See also
For more information on SSL refer to the link Netezza SSL
422 Connection Timeout
The connection timeout will tell the session when to disconnect Typically set this to 10 minutes or 3600 seconds
423 Advanced Parameters
For Netezza you can supply additional JDBC parameters using the Advanced Properties section
See also
Here is the link to other configurable parameters supported within Netezza JDBCrsquos driver
42 Setting up Netezza Connections 31
Aginity Team Documentation Release 1
43 Setting up Redshift Connections
431 Using SSL Mode with Redshift Connections
Aginity Team supports SSL when setting up a Redshift connection While setting up your Redshift connection simplyselect the level of security to enable from the dropdown selector Your choices include
bull Disable - SSL is disabled and the connection is not encrypted
bull Prefer - SSL is used if the server supports it Amazon Redshift supports SSL so SSL is used when you set
32 Chapter 4 Configuring Connections in Aginity Team
Aginity Team Documentation Release 1
sslmode to prefer
bull Allow - SSL is used if the server requires it
bull Require - SSL is required
See also
For more information on Redshift SSL refer to this link
432 Advanced Parameters
For Redshift you can supply additional JDBC parameters using the Advanced Properties section
See also
Here is the link to other configurable parameters supported within Redshift JDBCrsquos driver
44 Setting up Snowflake Connections
You can set up a connection to a Snowflake here Simply populate the requested data into the form
44 Setting up Snowflake Connections 33
Aginity Team Documentation Release 1
441 Warehouse
A virtual warehouse often referred to simply as a ldquowarehouserdquo is a cluster of compute resources in Snowflake Awarehouse provides the required resources such as CPU memory and temporary storage to perform the followingoperations in a Snowflake session If you do not know which specific Warehouse to use speak to your Snowflake DBA
442 Role
This is a security role that may have been setup for you to use You can leave this field blank if you do not know whatRole to connect as
34 Chapter 4 Configuring Connections in Aginity Team
Aginity Team Documentation Release 1
443 Advanced Parameters
For Snowflake most connection detail is handled through the command line additions to the JDBC URI You cansupply additional JDBC parameters using the Advanced Properties section
See also
Here is the link to other configurable parameters supported within Snowflake JDBCrsquos driver
45 Setting up Hive Connections
You can set up a connection to a Hive databases here Simply populate the requested data into the form
45 Setting up Hive Connections 35
Aginity Team Documentation Release 1
36 Chapter 4 Configuring Connections in Aginity Team
Aginity Team Documentation Release 1
451 Picking Subprotocol
You can choose either Hive 2 or Spark SQL syntax when executing against Hive databases You can choose eithervalue in this drop down
452 Setting up Kerberos connections
In a lot of cases organizations require the use of Kerberos with Hive so by clicking on the radio button for UseKerberos for authentication you will be prompted to enter the following
bull Realm
bull FQDN
bull Service name
Note The value of these parameters are typically set by your Hadoop administrator and it is best to work with themto obtain the appropriate values
453 Advanced Parameters
You can supply additional Hive JDBC parameters using the Advanced Properties section
See also
Here is the link to other configurable parameters supported within Hive JDBCrsquos driver
46 Setting up SQL Server Connections
You can set up a connection to Microsoft SQL Server databases here Simply populate the requested data into theform
46 Setting up SQL Server Connections 37
Aginity Team Documentation Release 1
Note We only support SQL Server compatibility levels 150 and 140 which is SQL Server 2017 and greater
47 Setting up DB2 Warehouse Server Connections
You can set up a connection to IBM DB2 warehouse databases here Simply populate the requested data into the form
38 Chapter 4 Configuring Connections in Aginity Team
Aginity Team Documentation Release 1
471 Advanced Parameters
You can supply additional Hive JDBC parameters using the Advanced Properties section
See also
Here is the link to other configurable parameters supported within SQL Server JDBCrsquos driver
48 Setting up Greenplum and Postgres Connections
You can set up a connection to Greenplum and Postgres databases here Simply populate the requested data into theform Greenplum and Postgres share the same drivers so we will speak of them together
48 Setting up Greenplum and Postgres Connections 39
Aginity Team Documentation Release 1
481 Choosing Subprotocol (Only for Greenplum)
You can choose either generic Postgres or Pivotal Greenplum SQL syntax when executing against Greenplumdatabases You can choose either value in this drop down
40 Chapter 4 Configuring Connections in Aginity Team
Aginity Team Documentation Release 1
482 Advanced Parameters
You can supply additional Postgres JDBC parameters using the Advanced Properties section
See also
Here is the link to other configurable parameters supported within Postgres JDBCrsquos driver
49 Import and Exporting Connections
A new feature in Aginity Team is the ability to import and export your connection templates and share them withother users A good deal of inefficiency with SQL IDErsquos is the time it takes to get connected No longer With theconnection templates you can save all the relevant detail minus the login credentials and distribute them through aneasy import and export feature
To get started have a DBA or power user establish the connection details once and export the connection as shown inthe image below
You will be presented with a selection list of connections as shown below Select the connections you want to exportand click Export selected
Note It is important to either check the radio button include sensitive data or to uncheck it This willinclude the username and password or exclude it from the connection export
49 Import and Exporting Connections 41
Aginity Team Documentation Release 1
You will be presented with a file menu window to name and pick the folder location for the export file as shown below
42 Chapter 4 Configuring Connections in Aginity Team
Aginity Team Documentation Release 1
Once you have exported the connections you can send them to Aginity Team users and have them import them To dothat choose the Import Connections menu item as shown below
You will be presented with a file selection Choose the appropriate Aginity connection package
Note By default Aginity packages for both Catalog and Connections are prefaced with aginitypkg file types
Once you choose a file select the connections you want to import and choose Import Selected
49 Import and Exporting Connections 43
Aginity Team Documentation Release 1
See also
Navigating Database Explorer
44 Chapter 4 Configuring Connections in Aginity Team
CHAPTER 5
Using the Database Explorer in Aginity Team
The Database Explorer panel in Aginity Team can be toggled by using the Database Explorer and Catalog tabs onthe left hand pane of the application as show below The Database Explorer is used to navigate database objectsbased on the Connections defined in Aginity Team The Catalog browser is used to navigate SQL Analytics that youhave personally stored
Below is a quick start video of using the Database Explorer in Aginity Team
51 Viewing the Database Data Dictionary
Once you have established a connection to a database you can browse the database dictionary catalogs You can toggleto the Database Explorer browser by clicking on the tab as shown below The database data dictionaries typicallycontains the tables columns views and other database objects available to query from the query panel
Once you have selected the Database Explorer tab you can drill into each connection as shown below
45
Aginity Team Documentation Release 1
52 Database Object Support by Platform
The following image details what objects are visible from the browser for all of our currently supported platformsWe do releases every two weeks with Aginity Team so if there is a feature you need please contact us at sup-portaginitycom
46 Chapter 5 Using the Database Explorer in Aginity Team
Aginity Team Documentation Release 1
53 Quick Actions from Explorer
Currently you can do the following quick actions from the Database Explorer
531 SQL Statement Generation
To generate typical SQL statements from tables or views you can right click on the object navigate to scripts andchoose the appropriate script as shown below
53 Quick Actions from Explorer 47
Aginity Team Documentation Release 1
532 Selective SQL Generation on a Set of Columns
To generate SQL statements based on a selection of columns within a Table or View multi-select the columns byholding Ctrl (Windows) or Command (Mac) and selecting the columns as shown below Then generate the SQLstatement
Hint Make sure you donrsquot have the table name selected and column names at the same time If you do it will generatethe SQL for the whole table
48 Chapter 5 Using the Database Explorer in Aginity Team
Aginity Team Documentation Release 1
533 Drag and Drop Capabilities
You can drag and drop any object from the DB Explorer into the Query Panel
Note Double-clicking expands the DB Explorer tree
534 Copy JDBC Connection String
If you select any Connection (Top level of the tree) and select ldquoCopy Connection string to Clipboardrdquo you will getthe full JDBC URI which is helpful for debugging See this Knowledge Base Article for help with debugging yourAginity Team connections
See also
bull Use Catalog Browser
bull Use Query Panel
53 Quick Actions from Explorer 49
Aginity Team Documentation Release 1
50 Chapter 5 Using the Database Explorer in Aginity Team
CHAPTER 6
Using the Query Panel in Aginity Team
You will spend most of your time in the Query Panel writing SQL and saving it to your catalog in Aginity Team Thevideo below will give you an overview of creating your first query
61 Writing your First Query
Each tab in the Aginity Team application can be set to different database connections Once you establish that con-nection as shown below you can use the query panel like a text editor using SQL syntax specific to that databaseplatform
Once you write your code in Aginity Team you have options to run it using the following scope
51
Aginity Team Documentation Release 1
Execution Type DescriptionRun at cursor When executing the query it will run the statement where the cursor is place
up until the semicolonRun all parts of the script in a se-quence
Each statement in the window will be run sequentially and the output ofeach statement will be shown in the output and if the statement was a SE-LECT then a results panel will be displayed
Run entire script as a batchAbort Query After executing a query you can direct Aginity Team to send a request to
the database to cancel the query
See also
Note one of the greatest challenges in SQL is learning the different functional syntax from different database vendorsWe are trying to make that easy by giving you links to the SQL reference manuals we support
62 Executing to a File
In version 17 of Aginity Pro we released the ability to use our editor commands to spool the results of a SQLstatement(s) to a file(s)
To do this you must issue the following commands
1 Use the +sql command to tell the editor you will be writing SQL in this section
2 You will then use the output file command to tell the editor you will spool the results to an outputfile
3 In the table below is a series of parameters and descriptions to be used when spooling
4 Use the +begin statement to tell the editor you from here until the +end command you will haveSQL to execute
5 Write your SQL
6 End with +end
7 Use the Run commands as you would any normal SQL statement as described in the Run Scopesection above
The code below is an example you can use to build off of
1 -- This will write the SQL statement between +begin and +end to therarr˓file specified
2
3 +sql4 output file5 path usersjschlittDownloadsjeff16 delimiter 7 null_value NULL8 quote_char 9 overwrite true
10 +begin11 select from wb_pro_marketing_list12 where emaildomain = aginitycom13 +end
52 Chapter 6 Using the Query Panel in Aginity Team
Aginity Team Documentation Release 1
Note We only support today the file type of csv You can still change the delimiter but all files with have a csvextension
The table below illustrates the current values accepted in execute to file commands
Parame-ter
Options
path On Mac this should be in the format ldquodirdirfilenamerdquo On Windows it should be in the formatldquodrivedirectoryfilenamerdquo
delimiter You can use any value but we recommend or | or ^ or t for (tab)null_value enter a character field for null typically lsquorsquo (empty string) or lsquoNULLrsquoquote_char enter how to enclose character string typically the quotation (ldquo)overwrite whether or not to allow overwrite if file exists true or falseheader true or false on whether you want to display headers in fileencoding the encoding of the file UTF_8 is the only value supported currentlycompres-sion
we can compress the file after it is written Values are NONE ZIP and GZIP
See also
We have a great knowledge base article on how to use the catalog to facilitate using the export as file editor feature
63 Using Parameters in your Query
Parameters can be used in Aginity Team by using the $ in any part of a SQL statement When you execute a query theAginity Team application will ask you to fill in the value of the parameter before it sends the query to the database
1 --sample parameter query2
3 select 4 from landing_dim_customer5 where gender = $fill_in_gender_at_runtime6 limit 100
You will have datatype choices at runtime as shown in the table below
Parameter Data Type Action TakenAs Is Aginity Team will send the value exactly as written with no casting This
is often used when using the parameter to fill in database table or columnnames See example 2 below
Hint You can specify default values with parameters by using this syntax with your parameter
$fill_in_gender_at_runtimelsquoMrsquo
When you run the query you will see the little gear icon as shown below Clicking that will populate thedefault value
63 Using Parameters in your Query 53
Aginity Team Documentation Release 1
64 Auto-Complete Capabilities
In Aginity Team we have implemented auto-complete on several database platforms and will be deploying across allover time The auto-complete capability has three capabilities
1 Display any words on the editor screen from above where your current cursor is
2 Display SQL Syntax like SELECT WHERE FROM all the way to database platform specific functions likeCASE DATEDIFF or CURRENT_DATE()
3 Display the database schema table column as you are typing
Hint To initiate just the database browser which shows database objects plus snippets hit the Ctrl+Space buttonotherwise as you type if auto-complete is supported it will automatically popup
Note Currently we support auto-complete on Netezza Redshift and Snowflake
54 Chapter 6 Using the Query Panel in Aginity Team
Aginity Team Documentation Release 1
65 Snippet support
We have pre-wired some special snippets within the editor as well to make writing SQL simpler The table belowdetails those snippets that are currently available
Snippet Actionselall will generate generic SELECT FROMselwh will generate generic SELECT FROM WHEREupd will generate an UPDATE statementins will generate an INSERT statementdel will generate a DELETE statementexpf will generate a generic export to file statement
66 Common Actions in Query Panel
We will highlight common functions heavily used in the editor here There is a complete list of available editorfunctions which can be accessed by hitting the Command+Shift+P on Mac or the Ctrl+Shift+P button within theeditor or from the View-gtCommand Palette menu item
661 Renaming Tabs
You can rename the query tabs by double clicking and typing in a name as shown below
662 Commenting SQL
In Aginity Team you can use the typical SQL syntax to comment your code as shown below
1 -- This is one way to comment your SQL code2
3 SELECT AVG(LineTotal)4 FROM salesSalesOrderDetail5
6 This is another way to comment your SQL code
65 Snippet support 55
Aginity Team Documentation Release 1
Hint If highlight multiple lines of code you can also use the Shortcut Keys Ctrl+K+C on Windows or Com-mand+K+C on Mac to comment them out To uncomment use Ctrl+K+U or Command+K+U
663 Keeping Connection
The Keep Connection checkbox as show below will instruct Aginity Team to maintain the connection to the databaseif the default behavior of the database is to disconnect after the execution of a query You are still subject to an overalldatabase connection timeout if you session connection exceeds the permitted database setting
664 Find and Replace
Ctrl+F (Windows) or Command+F (Mac) will bring up the find and replace box as shown below
67 Interacting with Query Results
Once your query has been executed you can use the features of the result grid to interact with the result set The typicalactions you will do are listed below
bull Reordering the Result Grid
bull Sorting the Result Grid
bull Filtering the Result Grid
bull Exporting results to CSV
671 Reordering the Result Grid
Once a query has executed successfully you may rearrange the columns in the Result Grid in order to more effectivelyperform subsequent analyses Rearranging the Result Grid is simple simply click hold and drag the column headerfor the column you wish to move As you move it left or right the grid will automatically adjust to reposition thecolumn
56 Chapter 6 Using the Query Panel in Aginity Team
Aginity Team Documentation Release 1
Once you are satisfied with the new position of the column you may release the drag and the column will lock intoplace
672 Sorting the Result Grid
After successfully executing a query if the query has returned any rows you may sort the results in order to permitvarious types of analysis of your results
In order to sort your results simply click on the header row in the results grid If the results are already being sortedby that column then the sort order will toggle between ascending and descending
67 Interacting with Query Results 57
Aginity Team Documentation Release 1
673 Filtering the Result Grid
Data in the Result Grid may be filtered to make it easier to locate and analyze certain subsets of the resultant datawithout requiring you to submit an entirely separate query
To filter the result grid by values in a particular column bring your mouse cursor to the column header for the columnto which you wish to apply a filter In the right-hand side on the header row the filter icon (three horizontal bars) willappear Click on the filter icon and you will be presented with a pop-up menu that will allow you to enter your filtercriteria
By default the filter criteria will select a ldquoContainsrdquo filter but several other filter types exist and you may select anyof them Once you have selected the filter type you wish to apply type the filter into the text box The results willimmediately begin to filter
58 Chapter 6 Using the Query Panel in Aginity Team
Aginity Team Documentation Release 1
When a column is being filtered a funnel icon will appear in its header To remove the filter you may re-enter thefilter mode by clicking on the filter icon (three bars) in the header row and simply delete the filter text
Multiple columns may have active filters at the same time To accomplish this simply perform these steps on eachcolumn
674 Exporting results to CSV
Once you have successfully executed a query you can elect to export those results in Comma Separated Value (CSV)format to a file outside of Aginity Team To do this right-click anywhere in the results panel Doing this will displaya context menu from which you will select the option ldquoExport to CSVrdquo
After selecting this option you will be presented with a screen that permits you to select the location to which to saveyour results Once you have identified the proper location press the Save button to complete the export
CSV files may subsequently be imported into a large number of different programs for further review and analysis
See also
bull Adding Query to Catalog
bull Using Discovery Panel
67 Interacting with Query Results 59
Aginity Team Documentation Release 1
60 Chapter 6 Using the Query Panel in Aginity Team
CHAPTER 7
Using the Catalog in Aginity Team
71 Catalog Overview
The query catalog is a unique capability of Aginity Team allowing you to easily save manage and use items stored init Letrsquos start with browsing the catalog
The catalog is organized by any number of directories and sub-directories of queries as shown below
See also
61
Aginity Team Documentation Release 1
Click Read this article for some ideas on how to best organize your catalog
Queries are given friendly names and can be used or accessed in several ways The first way is to drag the catalogquery into a query panel as shown in the two images below
Fig 1 You can drag the query into the empty query panel
You can also edit queries within a query panel By right clicking on a catalog item and choosing edit code in tab youcan change the SQL itself
62 Chapter 7 Using the Catalog in Aginity Team
Aginity Team Documentation Release 1
Fig 2 After you drag the item it will present the full catalog query for edit or execution
71 Catalog Overview 63
Aginity Team Documentation Release 1
You can edit and save the catalog query in a query panel worksheet as shown below
64 Chapter 7 Using the Catalog in Aginity Team
Aginity Team Documentation Release 1
Hint If you see a next to the tab name in the query panel it means a change has not been saved
By editing the details of a catlaog query you can see key metadata items and statistics about the catalog
71 Catalog Overview 65
Aginity Team Documentation Release 1
72 Calling Catalog Items from SQL
One of the most innovative features of Aginity Team is the ability to call catalog items from within SQL statements
The video and following examples below will give you basic syntax required to call a catalog item
66 Chapter 7 Using the Catalog in Aginity Team
Aginity Team Documentation Release 1
721 Single SQL SELECT Statement
In this example we have a single SQL SELECT statement in the catalog called OrderAverage
This is the code in the Catalog
1 SELECT AVG(LineTotal)2 FROM salesSalesOrderDetail
To call this from the query panel you would issue the following command Note the highlighted reference to the objectin the catalog
1 SELECT 2 FROM (OrderAverage) a
This is the code passed to the database
1 SELECT 2 FROM (3 SELECT AVG(lineTotal)4 FROM SalesSalesOrderDetail5 ) a
722 Using Catalog Item to Facilitate Relationships
In this example we will predefine a join in the catalog called ClientAddress and then use it in the context of anotherSQL statement
This is the code in the Catalog
1 clients c2 JOIN addresses a3 ON cclientsid = aclientsid
To call this from the query panel you would issue the following command Note the highlighted reference to the objectin the catalog
1 SELECT 2 FROM ClientAddress
This is the code passed to the database
1 SELECT 2 FROM clients c3 JOIN addresses a4 ON cclientsid = aclientsid
723 Creating and Reusing Calculations
In this example we will predefine a Calculations in the catalog called Residual and then use it in the context of anotherSQL statement
This is the code in the Catalog
72 Calling Catalog Items from SQL 67
Aginity Team Documentation Release 1
1 1-total
To call this from the query panel you would issue the following command Note the highlighted reference to the objectin the catalog
1 SELECT item2 Residual3 FROM table
This is the code passed to the database
1 SELECT item2 1-total3 FROM table
724 Executing a Multi-Step script
In this example we will predefine a series of SQL statements in the catalog called DailyRun and then execute it by asingle call Any DML (SELECT CREATE UPDATE INSERT DELETE) can be used
This is the code in the Catalog
1 CREATE TABLE xyz AS2 CREATE TABLE abc AS3 SELET FROM xyz JOIN abc
To call this from the query panel you would issue the following command Note the highlighted reference to the objectin the catalog
1 DailyRun
This is the code passed to the database
1 CREATE TABLE xyz AS2 CREATE TABLE abc AS3 SELECT FROM xyz JOIN abc
725 Using Parameters in Catalog
In this example we will use a parameter within a catalog item called CitySelect
This is the code in the Catalog Note the highlighted line has the parameter in it
1 SELECT 2 FROM addresses3 WHERE city = $city
To call this from the query panel you would issue the following command Note the highlighted reference to the objectin the catalog
1 CitySelect
This is the code passed to the database
68 Chapter 7 Using the Catalog in Aginity Team
Aginity Team Documentation Release 1
1 SELECT 2 FROM addresses3 WHERE city = Chicago
Note Upon execution of the command Aginity Team will ask you to supply a parameterized value For moreinformation on parameters see Using Parameters
73 Adding Items to Catalog
To add a new query to the catalog highlight any part of a SQL statement(s) right click and select Save selection tocatalog as shown below
Once you save you will be asked to provide metadata about the query you are adding
73 Adding Items to Catalog 69
Aginity Team Documentation Release 1
Note It is important to fill out the description metadata as it will be used in searching The more information youprovide about the context of usage key business terms and intended usage the better search results you will get
You can also easily create new folders in the catalog or add SQL entries directly from the Catalog Browser by clickingthe (+) to the right of the Catalog header
When adding a new folder you will be presented with a basic text box to create your folder as shown below
74 Import and Export Items from Catalog
You have the ability to Import and Export both your full catalog as well as any folder selected within the catalog
Note We highly recommend taking regular exports of your catalog to disk to prevent accidental loss of queries
741 Export Steps
To Export your catalog start by either Right Clicking on a Catalog Folder or Using the Aginity Pro -gt Export Catalogmenu as shown below
70 Chapter 7 Using the Catalog in Aginity Team
Aginity Team Documentation Release 1
Your first step is to save either an entire folder or a selection of items within a folder
The final step in exporting is to name the file and location you will save to as shown below
742 Import Steps
Importing is valuable for several reasons One is to restore SQL catalog items you may have lost or more importantlythe ability to collaborate with other SQL developers and share your SQL making your a more efficient and consistentSQL developer
74 Import and Export Items from Catalog 71
Aginity Team Documentation Release 1
The first step is to Right Click on a folder you want to import to and Chooose Import Catalog as shown below
Note You can also use the Aginity Pro Menu -gt Import Catalog The main difference between using these twocapabilities is the context of where you are importing items If you choose to import from the Aginity Pro menu youmust set the context where to import If you Right Click on a folder the context is set to that folder
After choosing to import you will choose the file to import By default Aginity catalog files have the extensionaginitypkg
After choosing your file you can specify the folder to import to and what to import as shown below
72 Chapter 7 Using the Catalog in Aginity Team
Aginity Team Documentation Release 1
Hit the Import button and your queries should be imported
See also
Aginity also maintains a Github repository of Catalog queries to be used These queries are either administrativequeries for specific platforms data engineering queries that do powerful transformations against generic data or ana-lytic queries showing how to do cool things in SQL
Access the repositories here
See also
Using Query Panel
74 Import and Export Items from Catalog 73
Aginity Team Documentation Release 1
74 Chapter 7 Using the Catalog in Aginity Team
CHAPTER 8
Using Discovery Panel in Aginity Team
The Discovery Panel is a feature that is unique to Aginity Team and which allows you to quickly identify and reusecode that yoursquove previously executed or saved Using the Discovery Panel begins with a search Watch the videobelow to get a sense for how this feature works
By default the Discovery Panel allows you to search both your query execution history and your Pro Catalog at thesame time However by selecting one of the radio buttons in the Discovery Panel you can choose to focus on just oneor the other if you prefer
81 Searching Query Execution History
Start by typing in any free-text you want such as Sales as shown Below
75
Aginity Team Documentation Release 1
The search engine will do a full text search and display all results
82 Searching the Amp Pro Catalog
Buy clicking on the Catalog radio button you will restrict your search as shown below
83 Expanding the results
Once you have performed a search Amp Pro will dynamically update the results in the Discovery Panel to match thesearch term you have entered Yoursquoll be able to view a small amount of the query by default but if more is requiredyou can click on the arrows in the corner of the preview in order to expand the snippet further
84 Doing More with the Discovery Panel
A place holder for advanced filtering capabilities
76 Chapter 8 Using Discovery Panel in Aginity Team
CHAPTER 9
Reference
91 Video Reference
The following is a reference list of videos about Aginity Team and how to use its features
bull
bull
bull
bull
bull
bull
92 Shortcut Key Reference
Command ActionCommand K + C (Mac) or Ctrl K + C (Windows) Comment lines of codeCommand K + U (Mac) or Ctrl K + U (Windows) Uncomment lines of codeCommand F (Mac) or Ctrl F (Windows) Find and Replace Menu
93 Frequently Asked Questions
The section below is dedicated to commonly asked questions that we compile and provide answers to Over time asthings change we will keep this table up to date
77
Aginity Team Documentation Release 1
931 What Control do I have with Row Limit Preference
By default we cap the row limit preference to 100K rows to discourage users from spooling too much data across yournetwork Trust us your network infrastructure folks do appreciate it Fear not though you have options First if youset the preference to 0 it will spool as much as you want until either you run out of memory or your query completesAlternatively we recommend spooling the output to a file if you are doing returns greater than 100K rows Refer tothe documentation on execute query to file
94 SQL Reference Guides for Supported connections
As SQL developers ourselves we thought putting links to the databases we support in our documentation was a goodidea so here they are
bull
bull
bull
bull
95 Driver Support Reference
The table below is a cross reference of driver versions by platform
Platform Driver Version Class NameNetezza Not distributed with software
(nzjdbcjar)orgnetezzaDriver
SQL Server 720 jre8 commicrosoftsqlserverjdbcSQLServerDriverRedshift 12161027 comamazonredshiftjdbcDriverGreenplum and Post-gres
4225 orgpostgresqlDriver
Hive 121 orgapachehivejdbcHiveDriverSnowflake 3623 3628 355 netsnowflakeclientjdbcSnowflakeDriverIBM DB2 Warehouse db2jcc4 comibmdb2jccDB2Driver
78 Chapter 9 Reference
CHAPTER 10
Troubleshooting
This page is dedicated to common issues or errors you may encounter when using Aginity Team We recommend youalso post any new issues or questions to our Aginity Team Forum
The is a great resource for posting questions searching for common solutions to features of Pro or just learning howto be efficient as a SQL analytic developer through samples best practices and collaboration with other Pro users
Is-sueNum-ber
Isthis aDe-fect
Source of Error Description of Error Resolution
1 No Cannot DownloadDrivers via Con-nection Screen
In most cases your organization isblocking Aginityrsquos ability to downloaddrivers from a Maven repository
Follow directions in the Config-ure Connections documentationto Manually Add Drivers
79
Aginity Team Documentation Release 1
80 Chapter 10 Troubleshooting
CHAPTER 11
End User License for Aginity Team
Click here for end users license
81
- Administering Aginity Team
-
- Deploying Aginity Team through AWS Marketplace
- Installing Aginity Team on Linux
- Upgrading Aginity Team
- Backing Up or Restoring Team Catalog
-
- Creating Users in Aginity Team
-
- Administering Users
-
- Enabling Snowflake OAuth in Aginity Team
- Configuring Connections in Aginity Team
-
- Downloading Drivers
- Setting up Netezza Connections
- Setting up Redshift Connections
- Setting up Snowflake Connections
- Setting up Hive Connections
- Setting up SQL Server Connections
- Setting up DB2 Warehouse Server Connections
- Setting up Greenplum and Postgres Connections
- Import and Exporting Connections
-
- Using the Database Explorer in Aginity Team
-
- Viewing the Database Data Dictionary
- Database Object Support by Platform
- Quick Actions from Explorer
-
- Using the Query Panel in Aginity Team
-
- Writing your First Query
- Executing to a File
- Using Parameters in your Query
- Auto-Complete Capabilities
- Snippet support
- Common Actions in Query Panel
- Interacting with Query Results
-
- Using the Catalog in Aginity Team
-
- Catalog Overview
- Calling Catalog Items from SQL
- Adding Items to Catalog
- Import and Export Items from Catalog
-
- Using Discovery Panel in Aginity Team
-
- Searching Query Execution History
- Searching the Amp Pro Catalog
- Expanding the results
- Doing More with the Discovery Panel
-
- Reference
-
- Video Reference
- Shortcut Key Reference
- Frequently Asked Questions
- SQL Reference Guides for Supported connections
- Driver Support Reference
-
- Troubleshooting
- End User License for Aginity Team
-

Aginity Team Documentation Release 1
2 Contents
CHAPTER 1
Administering Aginity Team
11 Deploying Aginity Team through AWS Marketplace
This section will detail the steps to deploy the CloudFormation template for Aginity Team within AWS
The deployment will take about 30 minutes but configuration and testing could take up to an hour
111 Pre-Requisites
An AWS Marketplace subscription is required for production use of Aginity Team The one option for obtaining asubscription andor license
bull Bring your own license (BYOL) - Subscribe through the marketplace and apply an existing license To get a 30day evaluation license please fill out this form and it will email you a license Aginity will be in contact withyou during the evaluation period You can also contact us directly at salesaginitycom
You must have an AWS account set-up If you donrsquot visit httpsawsamazoncomgetting-started
Create an IAM user or role Your IAM user should have a policy that allows AWS CloudFormation actions Do notuse your root account to deploy the CloudFormation template In addition to AWS CloudFormation actions IAMusers who create or delete stacks will also require additional permissions that depend on the stack template Thisdeployment requires permissions to all services listed in the following section
bull Reference httpsdocsawsamazoncomAWSCloudFormationlatestUserGuideusing-iam-templatehtml
Knowledge of the following AWS services
bull Amazon Elastic Compute Cloud (Amazon EC2)
bull Amazon Relational Database Service (Amazon RDS)
bull Amazon Route 53
bull Amazon Virtual Private Cloud (Amazon VPC)
bull AWS CloudFormation
3
Aginity Team Documentation Release 1
Note
1 Account limit increases will not be required for this deployment (More information on proper policy and per-missions here httpsdocsawsamazoncomAWSCloudFormationlatestUserGuideusing-iam-templatehtml)
2 Individuals possessing the AWS Associate certifications should have a sufficient depth of knowledge
112 Architecture Overview
Aginity Team can be deployed in a single availability zone The data flow and architecture components are the sameas the ones highlighted below This solution does not provide high availability or fault tolerance
113 Deployment Step by Step
1 Log into AWS account with the IAM entity created in the prerequisites section with the required permissions todeploy the solution
2 Click the following link to deploy CloudFormation template(CFT) (deploys in us-east-1)
3 In lsquoStep 1 - Create Stackrsquo press the lsquoNextrsquo button
4 In lsquoStep 2 - Specify stack detailsrsquo fill out and adjust CloudFormation parameters depending on requirements
5 Press the lsquoNextrsquo button
6 In lsquoStep 3 - Configure stack optionsrsquo enter and adjust optional tags permissions and advanced options
7 Press the lsquoNextrsquo button
8 Review your CloudFormation configurations
9 Press the lsquoCreate Stackrsquo button
10 Wait approximately 30 minutes for your CloudFormation template to deploy
11 You can verify your deployment has succeeded by looking for a lsquoCREATE_COMPLETErsquo status
12 If the status is lsquoCREATE_FAILEDrsquo see the troubleshooting section in this guide If it succeeds please usehealth checks
4 Chapter 1 Administering Aginity Team
Aginity Team Documentation Release 1
Note You will be prompted during the deployment of the CFT to enter a username and password for the AginityTeam administrator
114 Security Considerations
Amazon Certificate Manager SSLTLS Certificates
AWS Certificate Manager (ACM) is a service that lets you easily provision manage and deploy Secure SocketsLayerTransport Layer Security (SSLTLS) certificates for use with AWS services SSLTLS certificates provisionedthrough AWS Certificate Manager are free
If you donrsquot already have an SSLTLS certificate for your domain name it is recommended that you request one usingACM For more information about requesting an SSLTLS certificate using ACM please read the AWS CertificateManager User Guide
Certificate Expiration
Certificates must be monitored for expiration Aginity does not provide an integrated process for monitoring certificateexpiration but AWS provides a CloudFormation template that can help setup an alarm Please visit the following linkfor details
115 Costs
You are responsible for the cost of AWS services used while running this deployment The AWS costs will dependon Aginity Team EC2 instance sizing and are outlined in the table below Use the guidelines in the sizing section todetermine what instances are appropriate for your deployment With that information you can use the AWS SimpleMonthly Calculator to obtain the current prices and a cost estimate To calculate your resource cost please visithttpscalculators3amazonawscomindexhtml
Note Storage and data transfer are not included as these vary depending on configuration Please consult AWSPricing for the latest information
116 Sizing
The following table outlines recommendations for EC2 instance size If your team has more than 40 SQL analystsplease contact Aginity for additional sizing guidance Please refer to the Costs section for pricing
117 Troubleshooting
I cannot ldquoCreate stackrdquo in CloudFormation
Please check that you have the appropriate permissions to ldquoCreate Stackrdquo Contact your AWS accountadmin for permissions or AWS Support if you continue to have issues
My Aginity Team AMI is throwing errors
11 Deploying Aginity Team through AWS Marketplace 5
Aginity Team Documentation Release 1
Please check that you have provided a valid license
Everything is on fire
Please contact AWS Support for AWS specific problems or contact Aginity if you are having problemswith the AMI
See also
Backup
We highly recommend you do daily back-ups and snapshots to ensure minimal loss and downtime for your applicationPlease review the section in the documentation on backup and recovery
Emergency Maintenance
Our knowledge base has the most comprehensive details about general product troubleshooting It is accessible fromour support site and should be the first stop for any technical questions
118 Clean Up
1 Follow the AWS CloudFormation Delete documentation to delete the resources deployed by this document
2 By default EBS snapshots are retained for recovery purposes If you wish to delete these follow the EBSprocess to delete unwanted backups
3 Delete any other resources that you manually created to integrate or assist with the deployment
12 Installing Aginity Team on Linux
Installing team consists of accessing and setting up an environment based on an Ubuntu OS or Red Hat EnterpriseLinux (RHEL) You can either do this on an existing Ubuntu Server or set up a Virtual Machine that will host theshared catalog database and Team application server
If you have not yet done so download the software from here
Once you register and download the software you can begin the installation process Upon registration you the softwarewill automatically download The software should be titled aginity-team-ltversiongt-amd64deb
121 Pre-Requisites and Getting to a Server
Team is installed on an Ubuntu or RHEL Server or Virtual Machine environment The machine Ubuntu or RHEL isinstalled on must meet the following requirements
1 Cloud data center or on-premises
2 Minimum 200 GB of disk workspace
3 4 CPU x 16GB RAM
4 Running Ubuntu 18042 LTS (Bionic Beaver) or RHEL version 8
5 Must have network access to databases being connected to
6 HTTPS certificate (company provided or self-signed)
Desktop requirements
1 Chrome browser
6 Chapter 1 Administering Aginity Team
Aginity Team Documentation Release 1
2 HTTPS access to the Team Server
Note If you are trying to install an evaluation of Aginity Team or just getting started there are severaloptions for accessing a server environment in which to install Aginity Team server
1 You can ask your IT representative who is responsible for server infrastructure if there is a UbuntuLinux server or VM available to use
2 You can install it locally for trial purposes using personal VMWare such as Parallels or an opensource equivalent like Oracle VirtualBox
If you would prefer we are happy to schedule a free install for you Please click on the link below to schedule thatinstall
Click here to schedule an install with an Aginity Consultant
122 The Installation Process
The following steps should be executed in order
Step 1 SSH into the Linux server as root or you can also sudo to root once in with another that has administrativerights
Note In our case for documentation we are working with a Parallels Ubuntu 1804 VM and have anaccount called Parallels
ssh ltusernamegtltip_addressgt
Step 2 SFTP the aginity-team-ltversiongt-amd64deb file to the logged in users home directory Below is a samplecommand to do that
sftp ltusernamegtltip_addressgtput aginity-team-ltversiongt-amd64debexit
Step 3 Running the install
Issue the following command to initiate the install
on Ubuntusudo apt-get install aginity-team-ltversiongt-amd64deb on RHELsudo yum install aginity-team-ltversiongt-amd64rpm
This image below is what you should see after the install is complete
12 Installing Aginity Team on Linux 7
Aginity Team Documentation Release 1
Note We will generate an encryption key to ensure all information for connections and your catalog are encryptedThe installation will automatically generate and store that key on the etcaginity-teamserviceconf file
Step 4 Installing SSL certificate
The SSL certificate generation can be called using
this will generate certificatesudo optaginity-teambinssl-certificate-gensh
You will be asked for the following information
1 First and last name
2 Name of organization unit
3 Name of organization
4 Name of City or Locality
5 Name of State or Province
6 Name of Country code
7 Finally when asked to ldquoEnter key password for ltaginity_certgt (RETURN if same as keystore password) rdquo pressRETURN
123 Configuring Aginity Team Server
You can adapt Aginity Team Server to your needs by changing settings in etcaginity-teamserviceconf andetcaginity-teamapplicationyml configuration files
The serviceconf file contains settings of a linux service running Aginity Team It is in a plain text file format Hereare the parameters in the etcaginity-teamserviceconf file
General Configuration Parameters
SERVICE_KEYSTORE_PATH
8 Chapter 1 Administering Aginity Team
Aginity Team Documentation Release 1
The path to a java keystore file Aginity Team generates this file when you run optaginity-teambinssl-certificate-gensh
Default etcaginity-teamcacerts
JVM_MEMORY_LIMIT
The value of JVM maximum heap size The number has to be an integer You should specify its value using one ofthe letters ldquomrdquo or ldquoMrdquo for MB or ldquogrdquo or ldquoGrdquo for GB Examples 1024m 1024MB 12g 12GB
Default 1024m
AGINITY_ENCRYPTION_KEY
The value of encryption key which is used to encrypt H2 database used by the application This value is generated byAginity Team
Note We recommend that you copy the encryption key to a safe place as you may need it to recover Aginity TeamServer using a database backup
AGINITY_CONFIG_PATH
The path to the application configuration yml-file Do not change its value
Default etcaginity-teamapplicationyml
DB_PATH
The path to a directory to deploy Aginity Teamrsquos H2 database in
Default varlibaginity-team
Default varlibaginity-team
Configuring the YML Application File
Aginity Team Server can be customized through a number of settings of the etcaginity-teamapplicationyml file Ituses YAML format Depending on your needs Aginity Team can be configured to use either embedded H2 database orPostgreSQL database server You may want to change TCP port the server is accepting HTTP request on or integrateAginity Team with external identity providers
Note YAML does not support tab characters for indentation You should use spaces for that
For the reason of backward compatibility some settings in applicationyml use parameter expansions The basic formof parameter expansion is $parameter- The parameter is a key from etcaginity-teamserviceconf You can replaceany $parameter- with your custom value There are default values for some parameters in the configuration file
$parameter-defaultValue
If parameter is unset in etcaginity-teamserviceconf the expansion of defaultValue is substituted Otherwise thevalue of parameter is substituted
Webserver Options
server Options
12 Installing Aginity Team on Linux 9
Aginity Team Documentation Release 1
serverport $SERVICE_PORT-8080publicUrl $PUBLIC_URL-httplocalhost8080
serverport
TCP port Aginity Team uses to accept HTTP requests You may want to setup Aginity Team to listen on 443 tosimplify URL users should use to access Aginity Team In this case the server section looks like as follows
Default 8080
serverport 443publicUrl httpsmyexamplecom
serverpublicUrl
publicUrl is a URL of a server running Aginity Team It is a public URL available outside your corporate network
publicUrl has the following format schemehostport where scheme can be either http or https host ishostname of the server running Aginity Team port is TCP port Aginity Team is using
Default httplocalhost8080
Catalog Database Options
database Options
database BEGIN H2 database configurationh2
dbFilePath $DB_PATH- END H2 database configuration BEGIN PostgreSQL configuration This section is commented out by default since only one type of databaserarr˓could be enabled to enable PostgreSQL comment out the H2 database configuration sectionrarr˓and uncomment the section below postgres user user password password jdbcUrl jdbcpostgresqlhostportdatabase_name properties any properties specific to your JDBC driver ssl true connect using SSL SSL support must be enabled on therarr˓database server side sslmode require END PostgreSQL configuration
By default Aginity Team installs embedded H2 database to store application data Another option is to use a Post-greSQL database In this case you have to deploy PostgreSQL server and create a database by yourself Here is anexample of the database section with enabled PostgreSQL database
database BEGIN H2 database configuration h2
(continues on next page)
10 Chapter 1 Administering Aginity Team
Aginity Team Documentation Release 1
(continued from previous page)
dbFilePath $DB_PATH- END H2 database configuration BEGIN PostgreSQL configuration
postgresuser db_userpassword db_passowdjdbcUrl jdbcpostgresqlmyexamplecom5432aginity_team_databaseproperties
ssl truesslmode require
END PostgreSQL configuration
Note Only one type of database could be enabled To enable PostgreSQL comment out the H2 database configura-tion section and uncomment the PostgreSQL configuration section
databaseh2dbFilePath
The path to a directory to deploy Aginity Teamrsquos H2 database in
databasepostgresuser
The database user
databasepostgrespassword
The database userrsquos password
databasepostgresjdbcUrl
The connection URL
jdbcUrl has the following format jdbcpostgresqlhostportdatabase_name where host is the IP address orthe hostname of the database server port is TCP port the database server is listening database_name is the nameof Aginity Team database created by you
databasepostgresproperies
This section may contain any number of additional connection parameters which PostgreSQL JDBC driver supportsYou can read about the jdbc driver parameters at jdbcpostgresqlorg
Logging Options
logging Options
loggingpathToLogFile $PATH_TO_LOG_FILE-varlogaginity-teammaxFilesCount $MAX_FILES_COUNT-100MBmaxFileSize $MAX_FILE_SIZE-1
loggingpathToLogFile
The path to a directory to store application log files in
Default varlogaginity-team
loggingmaxFilesCount
12 Installing Aginity Team on Linux 11
Aginity Team Documentation Release 1
The maximum number of the log files Aginity Team creates
Default 1
loggingmaxFileSize
The maximum size of a log file The number has to be an integer You should specify its value using one of the letterslsquoKBrsquo lsquoMBrsquo or lsquoGBrsquo after the number Examples 200KB 35MB 1GB
Default 100MB
Platform Options
This section is used to set up OAuth for the Snowflake databases Please refer to specific Snowflake section in thedocumentation Enabling Snowflake SSO
Security Configuration Options
userDirectory Options
This section allows you to integrate Aginity Team with your LDAP system to import users sync user information anddelegate user authentication to LDAP server
userDirectoryname LDAP Serverenabled trueserverSettings
host ldapserverexamplecomport 389bindDN cn=admindc=exampledc=combindPassword admin_passwordencryption PLAINverifyCertificates falsetlsOptions
trustStorePath pathtotrustStorefiletrustStorePassword my_passwordtrustStoreType PKCS12
connectionRuleconnectTimeout 0responseTimeout 0
userSchemabaseDN ou=usersdc=exampledc=comuserFilterusernameAttribute uidfirstNameAttribute givenNamelastNameAttribute snemailAttribute mailsearchScope SUB_TREE
userDirectoryname
A descriptive name of the LDAP connection
userDirectoryenabled
Flag to indicate whether LDAP authentication is on or off
userDirectoryserverSettingshost
The IP address or hostname of the LDAP server
12 Chapter 1 Administering Aginity Team
Aginity Team Documentation Release 1
userDirectoryserverSettingsport
TCP port of the LDAP server
userDirectoryserverSettingsbindDN
The distinguished name of the user that the application will use when connecting to the directory server Examplecn=admindc=exampledc=com
userDirectoryserverSettingsbindPassword
The user password
userDirectoryserverSettingsencryption
Type of connection encyption Can be set to PLAIN START_TLS or SIMPLE_TLS START_TLS is preferred optionSTART_TLS begins as a plaintext connection over the standard LDAP port (389) and that connection is then upgradedto SSLTLS
userDirectoryserverSettingsverifyCertificates
If set to true Aginity Team verifies the certificate used for SSLTLS connection to the LDAP server A java trust-store configured in userDirectoryserverSettingstlsOptions is used to verify the certificate If you use a self-signedcertificate you must import the certificate to the truststore before starting Aginity Team
userDirectoryserverSettingstlsOptions
Use this section to configure your java truststore that is used to verify the LDAP server certificate
userDirectoryserverSettingstlsOptionstrustStorePath
The path to the Java trust store where certificates are stored
userDirectoryserverSettingstlsOptionstrustStorePassword
The password to the java trust store
userDirectoryserverSettingstlsOptionstrustStoreType
The type of the trust store The most common are JKS and PKCS12
userDirectoryconnectionRuleconnectTimeout
Timeout in milliseconds for connection to LDAP server 0 means no timeout
userDirectoryconnectionRuleresponseTimeout
Timeout in milliseconds for response time from LDAP server 0 means no timeout
userDirectoryuserSchemabaseDN
The root distinguished name (DN) to use when running queries against the directory server
userDirectoryuserSchemauserFilter
An LDAP search filter to be used when searching user objects from the LDAP server within the base DN Exampleldquo(amp(objectCategory=Person)(sAMAccountName=))rdquo
userDirectoryuserSchemausernameAttribute
Defines which attributes on an LDAP user entry will be used as its username
userDirectoryuserSchemafirstNameAttribute
Defines which attributes on an LDAP user entry will be used as its first name
userDirectoryuserSchemalastNameAttribute
Defines which attributes on an LDAP user entry will be used as its last name
12 Installing Aginity Team on Linux 13
Aginity Team Documentation Release 1
userDirectoryuserSchemaemailAttribute
Defines which attributes on an LDAP user entry will be used as its email address
userDirectoryuserSchemasearchScope
Specify strategy to use when doing a search Possible options SUB_TREE (search request should be performedagainst the search base and all entries below) ONE (search request should be performed against entries that areimmediate subordinates of the entry specified as the search base DN) BASE (search request should only be performedagainst the entry specified as the search base DN)
124 Starting Aginity Team Server
Prior to starting the Agnity Team server you must create the administrator username and password
You can do this by running the team-create-superuser script in the optaginitybin directory on the server
this will create a user with the administrator rolesudo optaginity-teambinteam-create-super-usersh
Step 5 You are now ready to start Aginity Team
We use the following commands to start Aginity Team in the background and with logging turned on
sudo systemctl start aginity-team
You can check if Aginity Team is running by issuing this command
sudo systemctl status aginity-team
125 Accessing Aginity Team for the First Time
Step 6 Step 6 Open browser and navigate to httpsltip or team server namegtltserver portgtlogin You will see thefollowing image
bull Enter credentials you used to create the administrator to enter the application
Step 7 Register and Apply License Key
14 Chapter 1 Administering Aginity Team
Aginity Team Documentation Release 1
When you open the application it will ask you to register the software and then you will be asked to applythe license key
If it does not ask for the license key you can click on Help -gt Register again and the license key boxshould pop open as shown below
12 Installing Aginity Team on Linux 15
Aginity Team Documentation Release 1
Note It is imperative that all users be created with valid business email addresses
Send the link to team to any new user along with their usernamepassword combination
126 Stopping Aginity Team Services
Log in as the team user and issue the following command
sudo systemctl stop aginity-team check to see if it is stopped Usingsudo systemctl status aginity-team
See also
Add Connections
13 Upgrading Aginity Team
Upgrading team consists of logging into the Team server downloading the latest update and applying it from thecommand line
For clarities sake when we refer to aginity-team-ltversiongt-amd64deb we purposely leave version generic Eachupgrade will have a different number associated with it
Warning It is important to take a backup of both your encryption key for the Team catalog and to do a BackingUp or Restoring Team Catalog before upgrading This way if anything goes wrong you will not use your catalogIt is also recommended to do a manual export of your catalog from time to time
You can get the encryption key using the command below
sudo cat etcaginity-teamserviceconf
16 Chapter 1 Administering Aginity Team
Aginity Team Documentation Release 1
131 Step 1 Logging into Team Server
SSH into the Team server as an administrator
Note Typically you will log in as an account other than root and then you will be using the sudo command
132 Step 2 Check to see if Team is Currently Running and then Shut it Down
Issue the command below to check the status of the Team service
sudo systemctl status aginity-team
If Team is running shut it down by issuing this command
sudo systemctl stop aginity-team
Note It is always a good idea to run the status check again to make sure Team has been shut down
133 Step 3 Download the Latest Version of Aginity Team
Using the wget command you can download the latest version as shown below
wget httprepositoryaginitycoms3amazonawscomAginityTeamaginity-team-ltversionrarr˓gt-amd64deb
134 Step 4 Upgrading the Software
Run the upgrade process by issuing this command
on Ubuntusudo apt-get install aginity-team-ltversiongt-amd64deb on RHELsudo yum install aginity-team-ltversiongt-amd64deb
The package manager will determine if your configuration files are different from ones bringing with the new versionof the application being installed and will offer you a few option to proceed with installation
13 Upgrading Aginity Team 17
Aginity Team Documentation Release 1
You should always keep your currently-installed version and resolve any conflicts by comparing and merging thedifference manually
135 Step 5 Restart Aginity Team
Restart the server by issuing this command
sudo systemctl start aginity-team
14 Backing Up or Restoring Team Catalog
We have provided two files listed and described below which will allow you to automate or manually backup andrestore your Aginity Team catalog
141 Backup Script
The backup script backupsh will perform and compress a backup of the Aginity Team Catalog to the tmp di-rectory on your OS It will append the date to the end of the file created and should be named in this pattern agin-ity_backup_m_d_Yzip
Note Before running the backupsh script you will need to edit it and provide the following variables
bull DESTINATION ~ if you do not want to use the default tmp
bull TOKEN ~ this value is the encryption key for the database To find out the value of it run this command
sudo cat etcaginity-teamserviceconf
bull H2PATH ~ Unless you modified the installation directory from the default you should not need to change this
bull DBPATH ~ Unless you modified the installation directory from the default you should not need to change this
18 Chapter 1 Administering Aginity Team
Aginity Team Documentation Release 1
When running a backup the Aginity Team server process will be stopped then restarted when complete
See also
If you want to schedule the backup and automate it we recommend scheduling using Crontab Crontab ReferenceGuide
142 Restore Script
To restore to an instance of the backup follow these instructions
Yoursquoll need to set the variables within the restoresh to match what is in the backupsh
First download the restore script restoresh Next you will provide the file name of the backup you want to restorein the
bull SOURCE variable
Now run the script and it will automatically re-start Aginity Team when complete
14 Backing Up or Restoring Team Catalog 19
Aginity Team Documentation Release 1
20 Chapter 1 Administering Aginity Team
CHAPTER 2
Creating Users in Aginity Team
Once you have installed your Aginity Team server you need to set up users To do this navigate to the Administrationmenu item as show below
Click the button Register New User and fill out the form as show below
21
Aginity Team Documentation Release 1
When choosing the role of Admin vs User reference this table below for differences in functionality
21 Administering Users
Once you have created users and you need to common tasks as described below you will go back into the Administra-tion Menu and click on the three dots ldquo rdquo to the right of each user row This will pop opne an edit menu as shown
22 Chapter 2 Creating Users in Aginity Team
Aginity Team Documentation Release 1
below
211 Disabling Users
You can choose to disable user which will not allow them to login but will not remove any of their catalog informationor query history
212 Resetting Passwords
To reset a password you can choose the Change password which will prompt you to enter and confirm a new password
213 Edit User
If you need to Edit any registration details such as name or role you can do that here
21 Administering Users 23
Aginity Team Documentation Release 1
24 Chapter 2 Creating Users in Aginity Team
CHAPTER 3
Enabling Snowflake OAuth in Aginity Team
We now support OAuth for the snowflake platform This feature only works on Aginity Team The details below willguide your through setting up the configuration on the server
1 Connect to your Snowflake server and create a Security Integration object for a custom client (more details canbe found at this link)
For example
CREATE SECURITY INTEGRATIONCREATE OR REPLACE SECURITY INTEGRATIONaginity_team_oAuthTYPE = OAUTHENABLED = TRUEOAUTH_CLIENT = CUSTOMOAUTH_CLIENT_TYPE = CONFIDENTIALOAUTH_REDIRECT_URI = Aginity Team Public URLapioauthsnowflakeOAUTH_ALLOW_NON_TLS_REDIRECT_URI = FALSEOAUTH_ENFORCE_PKCE = TRUEOAUTH_ISSUE_REFRESH_TOKENS = TRUEOAUTH_REFRESH_TOKEN_VALIDITY = 86400
Note Aginity Team Public URL is a URL of a server running Aginity Team It is a public URL available outsideyour corporate network
Aginity Team Public URL has the following format schemehostport where scheme can be either http orhttps host is hostname of the server running Aginity Team port is TCP port Aginity Team is using
2 Ssh to the Aginity Team server
3 Edit etcaginity-teamapplicationyml and uncomment and update the following properties
platformssnowflakeoauthhost
Snowflake account in format account_namesnowflakecomputingcom where account_name is your Snowflakeaccount name
25
Aginity Team Documentation Release 1
platformssnowflakeoauthclientId
Snowflake client ID of the Security Integration object The Snowflake administrator can find the client ID by describingthe integration that is by using the DESC SECURITY INTEGRATION command
platformssnowflakeoauthclientSecret
Snowflake client secret of the Security Integration object The Snowflake administrator can find the client secrets byusing the system function SHOW_OAUTH_CLIENT_SECRETS
serverpublicUrl Aginity Team Public URL
Database platform specific configurationsplatformssnowflake
oauthclientSecrets
- host account_namesnowflakecomputingcomclientId client idclientSecret client secret
For example a customer has 2 Snowflake accounts The first one is eb39151us-east-1snowflakecomputingcom and itis being used for Dev environment The second one is xr58911us-east-1snowflakecomputingcom and it is being usedfor Production environment Then to enable OAuth connections to these environments via Aginity Team administratorshould add the following parameters to serviceconf
serverpublicUrl httpsaginityexamplecom
platformssnowflake
oauthclientSecrets
Dev environment- host eb39151us-east-1snowflakecomputingcom
clientId fnm4OgHhswihrEfsahTyZo=clientSecret sHljg51o7jdsjds8723786f35Q0K+TthasjuczjQwY=
Production environment- host xr58911us-east-1snowflakecomputingcom
clientId kwajw56h(usaELkkwu=clientSecret gfhfrejds3232372822378YUUYthasjuczjQwY=
4 Restart the Aginity Team server
26 Chapter 3 Enabling Snowflake OAuth in Aginity Team
CHAPTER 4
Configuring Connections in Aginity Team
Aginity Team allows you to set up connections to a variety of different database platforms In order to do this clickthe + symbol next to the ldquoConnectionsrdquo header in the left navigation pane of Aginity Team You will be presentedwith a list of existing connections as well as options for adding another connection Clicking the ldquoNew Connectionrdquobutton will allow you to enter the necessary information for the connection you wish to create
Below is a quick start video of creating connections in Aginity Team
Note Aginity Team uses JDBC to connect to database platforms It is recommended you refer to the JDBC guidesfor our supported platforms to learn about specific variables to use within the Advance Parameters section of AginityTeam We will provide links to that documentation where available
The video below provides a more detailed explanation of how to use advanced parameters to illicit the desired behaviorand successful connection to the database platform
27
Aginity Team Documentation Release 1
41 Downloading Drivers
The first step in configuring a connection is to download the JDBC driver for the platform you will be using In mostcases we will provide access to the drivers which have been certified to work with Aginity Team In some cases suchas when the vendor does not allow us to distribute or you want to use a different version you will have to manuallyadd the JDBC driver
The video below provides a quick illustration of how to manage drivers
See also
Database Driver Reference Guide
To get started in the Edit or Add Connection box you will click on Edit Drivers as shown below
411 Automatic Download
As shown in the image below if we are allowed to to download drivers you will be provided a link to do so and thenbe presented with one or more drivers to use and your done
28 Chapter 4 Configuring Connections in Aginity Team
Aginity Team Documentation Release 1
In some cases you may get an error message if your organization does not allow you to download drivers (jar files)typically supplied through a Maven repository
In this case please review the section below Manually Add Drivers
412 Manually Add Drivers
If you have to manually add a driver it starts with first acquiring the JDBC jar for that platform and saving it somewhereon your machine Once you acquire the JDBC jar you can upload it to Aginity Pro
To do this you will hit the Edit Driver or Edit Drivers Panel section as shown above and you will be presented withthe following screen
You can name the Driver anything you want and provide a description
The class name if not provided must be looked up typically in the JDBC reference manual from the platform vendor
Finally if you click on the Add File button you will navigate to where you saved the Jar file and then click SaveChanges You are now ready to configure your connection
42 Setting up Netezza Connections
You can set up a connection to a Netezza (IBM PureData for Analytics) appliance here Simply populate the requesteddata into the form
42 Setting up Netezza Connections 29
Aginity Team Documentation Release 1
Note Netezza does not allow us to distribute their drivers so you must obtain it from your DBA or directly from IBMFix Central
30 Chapter 4 Configuring Connections in Aginity Team
Aginity Team Documentation Release 1
421 Using SSL with Netezza Connections
Aginity Team supports SSL when setting up a Netezza connection While setting up your Netezza connection simplyselect the level of security to enable from the dropdown selector Your choices include
bull Only Unsecured - Specify this option when you want an unsecured connection to the Netezza system If theNetezza system requires a secured connection the connection is rejected
bull Preferred Unsecured - This argument is the default value Specify this option when you would prefer anunsecured connection but you accept a secured connection if the Netezza system requires one
bull Preferred Secured - Specify this option when you want a secured connection to the Netezza system but youaccept an unsecured connection if the Netezza system is configured to use only unsecured connections
bull Only Secured- Specify this option when you want a secured connection to the Netezza system If the Netezzasystem accepts only unsecured connections or if you are attempting to connect to a Netezza system that isrunning a release before release 45 the connection is rejected
See also
For more information on SSL refer to the link Netezza SSL
422 Connection Timeout
The connection timeout will tell the session when to disconnect Typically set this to 10 minutes or 3600 seconds
423 Advanced Parameters
For Netezza you can supply additional JDBC parameters using the Advanced Properties section
See also
Here is the link to other configurable parameters supported within Netezza JDBCrsquos driver
42 Setting up Netezza Connections 31
Aginity Team Documentation Release 1
43 Setting up Redshift Connections
431 Using SSL Mode with Redshift Connections
Aginity Team supports SSL when setting up a Redshift connection While setting up your Redshift connection simplyselect the level of security to enable from the dropdown selector Your choices include
bull Disable - SSL is disabled and the connection is not encrypted
bull Prefer - SSL is used if the server supports it Amazon Redshift supports SSL so SSL is used when you set
32 Chapter 4 Configuring Connections in Aginity Team
Aginity Team Documentation Release 1
sslmode to prefer
bull Allow - SSL is used if the server requires it
bull Require - SSL is required
See also
For more information on Redshift SSL refer to this link
432 Advanced Parameters
For Redshift you can supply additional JDBC parameters using the Advanced Properties section
See also
Here is the link to other configurable parameters supported within Redshift JDBCrsquos driver
44 Setting up Snowflake Connections
You can set up a connection to a Snowflake here Simply populate the requested data into the form
44 Setting up Snowflake Connections 33
Aginity Team Documentation Release 1
441 Warehouse
A virtual warehouse often referred to simply as a ldquowarehouserdquo is a cluster of compute resources in Snowflake Awarehouse provides the required resources such as CPU memory and temporary storage to perform the followingoperations in a Snowflake session If you do not know which specific Warehouse to use speak to your Snowflake DBA
442 Role
This is a security role that may have been setup for you to use You can leave this field blank if you do not know whatRole to connect as
34 Chapter 4 Configuring Connections in Aginity Team
Aginity Team Documentation Release 1
443 Advanced Parameters
For Snowflake most connection detail is handled through the command line additions to the JDBC URI You cansupply additional JDBC parameters using the Advanced Properties section
See also
Here is the link to other configurable parameters supported within Snowflake JDBCrsquos driver
45 Setting up Hive Connections
You can set up a connection to a Hive databases here Simply populate the requested data into the form
45 Setting up Hive Connections 35
Aginity Team Documentation Release 1
36 Chapter 4 Configuring Connections in Aginity Team
Aginity Team Documentation Release 1
451 Picking Subprotocol
You can choose either Hive 2 or Spark SQL syntax when executing against Hive databases You can choose eithervalue in this drop down
452 Setting up Kerberos connections
In a lot of cases organizations require the use of Kerberos with Hive so by clicking on the radio button for UseKerberos for authentication you will be prompted to enter the following
bull Realm
bull FQDN
bull Service name
Note The value of these parameters are typically set by your Hadoop administrator and it is best to work with themto obtain the appropriate values
453 Advanced Parameters
You can supply additional Hive JDBC parameters using the Advanced Properties section
See also
Here is the link to other configurable parameters supported within Hive JDBCrsquos driver
46 Setting up SQL Server Connections
You can set up a connection to Microsoft SQL Server databases here Simply populate the requested data into theform
46 Setting up SQL Server Connections 37
Aginity Team Documentation Release 1
Note We only support SQL Server compatibility levels 150 and 140 which is SQL Server 2017 and greater
47 Setting up DB2 Warehouse Server Connections
You can set up a connection to IBM DB2 warehouse databases here Simply populate the requested data into the form
38 Chapter 4 Configuring Connections in Aginity Team
Aginity Team Documentation Release 1
471 Advanced Parameters
You can supply additional Hive JDBC parameters using the Advanced Properties section
See also
Here is the link to other configurable parameters supported within SQL Server JDBCrsquos driver
48 Setting up Greenplum and Postgres Connections
You can set up a connection to Greenplum and Postgres databases here Simply populate the requested data into theform Greenplum and Postgres share the same drivers so we will speak of them together
48 Setting up Greenplum and Postgres Connections 39
Aginity Team Documentation Release 1
481 Choosing Subprotocol (Only for Greenplum)
You can choose either generic Postgres or Pivotal Greenplum SQL syntax when executing against Greenplumdatabases You can choose either value in this drop down
40 Chapter 4 Configuring Connections in Aginity Team
Aginity Team Documentation Release 1
482 Advanced Parameters
You can supply additional Postgres JDBC parameters using the Advanced Properties section
See also
Here is the link to other configurable parameters supported within Postgres JDBCrsquos driver
49 Import and Exporting Connections
A new feature in Aginity Team is the ability to import and export your connection templates and share them withother users A good deal of inefficiency with SQL IDErsquos is the time it takes to get connected No longer With theconnection templates you can save all the relevant detail minus the login credentials and distribute them through aneasy import and export feature
To get started have a DBA or power user establish the connection details once and export the connection as shown inthe image below
You will be presented with a selection list of connections as shown below Select the connections you want to exportand click Export selected
Note It is important to either check the radio button include sensitive data or to uncheck it This willinclude the username and password or exclude it from the connection export
49 Import and Exporting Connections 41
Aginity Team Documentation Release 1
You will be presented with a file menu window to name and pick the folder location for the export file as shown below
42 Chapter 4 Configuring Connections in Aginity Team
Aginity Team Documentation Release 1
Once you have exported the connections you can send them to Aginity Team users and have them import them To dothat choose the Import Connections menu item as shown below
You will be presented with a file selection Choose the appropriate Aginity connection package
Note By default Aginity packages for both Catalog and Connections are prefaced with aginitypkg file types
Once you choose a file select the connections you want to import and choose Import Selected
49 Import and Exporting Connections 43
Aginity Team Documentation Release 1
See also
Navigating Database Explorer
44 Chapter 4 Configuring Connections in Aginity Team
CHAPTER 5
Using the Database Explorer in Aginity Team
The Database Explorer panel in Aginity Team can be toggled by using the Database Explorer and Catalog tabs onthe left hand pane of the application as show below The Database Explorer is used to navigate database objectsbased on the Connections defined in Aginity Team The Catalog browser is used to navigate SQL Analytics that youhave personally stored
Below is a quick start video of using the Database Explorer in Aginity Team
51 Viewing the Database Data Dictionary
Once you have established a connection to a database you can browse the database dictionary catalogs You can toggleto the Database Explorer browser by clicking on the tab as shown below The database data dictionaries typicallycontains the tables columns views and other database objects available to query from the query panel
Once you have selected the Database Explorer tab you can drill into each connection as shown below
45
Aginity Team Documentation Release 1
52 Database Object Support by Platform
The following image details what objects are visible from the browser for all of our currently supported platformsWe do releases every two weeks with Aginity Team so if there is a feature you need please contact us at sup-portaginitycom
46 Chapter 5 Using the Database Explorer in Aginity Team
Aginity Team Documentation Release 1
53 Quick Actions from Explorer
Currently you can do the following quick actions from the Database Explorer
531 SQL Statement Generation
To generate typical SQL statements from tables or views you can right click on the object navigate to scripts andchoose the appropriate script as shown below
53 Quick Actions from Explorer 47
Aginity Team Documentation Release 1
532 Selective SQL Generation on a Set of Columns
To generate SQL statements based on a selection of columns within a Table or View multi-select the columns byholding Ctrl (Windows) or Command (Mac) and selecting the columns as shown below Then generate the SQLstatement
Hint Make sure you donrsquot have the table name selected and column names at the same time If you do it will generatethe SQL for the whole table
48 Chapter 5 Using the Database Explorer in Aginity Team
Aginity Team Documentation Release 1
533 Drag and Drop Capabilities
You can drag and drop any object from the DB Explorer into the Query Panel
Note Double-clicking expands the DB Explorer tree
534 Copy JDBC Connection String
If you select any Connection (Top level of the tree) and select ldquoCopy Connection string to Clipboardrdquo you will getthe full JDBC URI which is helpful for debugging See this Knowledge Base Article for help with debugging yourAginity Team connections
See also
bull Use Catalog Browser
bull Use Query Panel
53 Quick Actions from Explorer 49
Aginity Team Documentation Release 1
50 Chapter 5 Using the Database Explorer in Aginity Team
CHAPTER 6
Using the Query Panel in Aginity Team
You will spend most of your time in the Query Panel writing SQL and saving it to your catalog in Aginity Team Thevideo below will give you an overview of creating your first query
61 Writing your First Query
Each tab in the Aginity Team application can be set to different database connections Once you establish that con-nection as shown below you can use the query panel like a text editor using SQL syntax specific to that databaseplatform
Once you write your code in Aginity Team you have options to run it using the following scope
51
Aginity Team Documentation Release 1
Execution Type DescriptionRun at cursor When executing the query it will run the statement where the cursor is place
up until the semicolonRun all parts of the script in a se-quence
Each statement in the window will be run sequentially and the output ofeach statement will be shown in the output and if the statement was a SE-LECT then a results panel will be displayed
Run entire script as a batchAbort Query After executing a query you can direct Aginity Team to send a request to
the database to cancel the query
See also
Note one of the greatest challenges in SQL is learning the different functional syntax from different database vendorsWe are trying to make that easy by giving you links to the SQL reference manuals we support
62 Executing to a File
In version 17 of Aginity Pro we released the ability to use our editor commands to spool the results of a SQLstatement(s) to a file(s)
To do this you must issue the following commands
1 Use the +sql command to tell the editor you will be writing SQL in this section
2 You will then use the output file command to tell the editor you will spool the results to an outputfile
3 In the table below is a series of parameters and descriptions to be used when spooling
4 Use the +begin statement to tell the editor you from here until the +end command you will haveSQL to execute
5 Write your SQL
6 End with +end
7 Use the Run commands as you would any normal SQL statement as described in the Run Scopesection above
The code below is an example you can use to build off of
1 -- This will write the SQL statement between +begin and +end to therarr˓file specified
2
3 +sql4 output file5 path usersjschlittDownloadsjeff16 delimiter 7 null_value NULL8 quote_char 9 overwrite true
10 +begin11 select from wb_pro_marketing_list12 where emaildomain = aginitycom13 +end
52 Chapter 6 Using the Query Panel in Aginity Team
Aginity Team Documentation Release 1
Note We only support today the file type of csv You can still change the delimiter but all files with have a csvextension
The table below illustrates the current values accepted in execute to file commands
Parame-ter
Options
path On Mac this should be in the format ldquodirdirfilenamerdquo On Windows it should be in the formatldquodrivedirectoryfilenamerdquo
delimiter You can use any value but we recommend or | or ^ or t for (tab)null_value enter a character field for null typically lsquorsquo (empty string) or lsquoNULLrsquoquote_char enter how to enclose character string typically the quotation (ldquo)overwrite whether or not to allow overwrite if file exists true or falseheader true or false on whether you want to display headers in fileencoding the encoding of the file UTF_8 is the only value supported currentlycompres-sion
we can compress the file after it is written Values are NONE ZIP and GZIP
See also
We have a great knowledge base article on how to use the catalog to facilitate using the export as file editor feature
63 Using Parameters in your Query
Parameters can be used in Aginity Team by using the $ in any part of a SQL statement When you execute a query theAginity Team application will ask you to fill in the value of the parameter before it sends the query to the database
1 --sample parameter query2
3 select 4 from landing_dim_customer5 where gender = $fill_in_gender_at_runtime6 limit 100
You will have datatype choices at runtime as shown in the table below
Parameter Data Type Action TakenAs Is Aginity Team will send the value exactly as written with no casting This
is often used when using the parameter to fill in database table or columnnames See example 2 below
Hint You can specify default values with parameters by using this syntax with your parameter
$fill_in_gender_at_runtimelsquoMrsquo
When you run the query you will see the little gear icon as shown below Clicking that will populate thedefault value
63 Using Parameters in your Query 53
Aginity Team Documentation Release 1
64 Auto-Complete Capabilities
In Aginity Team we have implemented auto-complete on several database platforms and will be deploying across allover time The auto-complete capability has three capabilities
1 Display any words on the editor screen from above where your current cursor is
2 Display SQL Syntax like SELECT WHERE FROM all the way to database platform specific functions likeCASE DATEDIFF or CURRENT_DATE()
3 Display the database schema table column as you are typing
Hint To initiate just the database browser which shows database objects plus snippets hit the Ctrl+Space buttonotherwise as you type if auto-complete is supported it will automatically popup
Note Currently we support auto-complete on Netezza Redshift and Snowflake
54 Chapter 6 Using the Query Panel in Aginity Team
Aginity Team Documentation Release 1
65 Snippet support
We have pre-wired some special snippets within the editor as well to make writing SQL simpler The table belowdetails those snippets that are currently available
Snippet Actionselall will generate generic SELECT FROMselwh will generate generic SELECT FROM WHEREupd will generate an UPDATE statementins will generate an INSERT statementdel will generate a DELETE statementexpf will generate a generic export to file statement
66 Common Actions in Query Panel
We will highlight common functions heavily used in the editor here There is a complete list of available editorfunctions which can be accessed by hitting the Command+Shift+P on Mac or the Ctrl+Shift+P button within theeditor or from the View-gtCommand Palette menu item
661 Renaming Tabs
You can rename the query tabs by double clicking and typing in a name as shown below
662 Commenting SQL
In Aginity Team you can use the typical SQL syntax to comment your code as shown below
1 -- This is one way to comment your SQL code2
3 SELECT AVG(LineTotal)4 FROM salesSalesOrderDetail5
6 This is another way to comment your SQL code
65 Snippet support 55
Aginity Team Documentation Release 1
Hint If highlight multiple lines of code you can also use the Shortcut Keys Ctrl+K+C on Windows or Com-mand+K+C on Mac to comment them out To uncomment use Ctrl+K+U or Command+K+U
663 Keeping Connection
The Keep Connection checkbox as show below will instruct Aginity Team to maintain the connection to the databaseif the default behavior of the database is to disconnect after the execution of a query You are still subject to an overalldatabase connection timeout if you session connection exceeds the permitted database setting
664 Find and Replace
Ctrl+F (Windows) or Command+F (Mac) will bring up the find and replace box as shown below
67 Interacting with Query Results
Once your query has been executed you can use the features of the result grid to interact with the result set The typicalactions you will do are listed below
bull Reordering the Result Grid
bull Sorting the Result Grid
bull Filtering the Result Grid
bull Exporting results to CSV
671 Reordering the Result Grid
Once a query has executed successfully you may rearrange the columns in the Result Grid in order to more effectivelyperform subsequent analyses Rearranging the Result Grid is simple simply click hold and drag the column headerfor the column you wish to move As you move it left or right the grid will automatically adjust to reposition thecolumn
56 Chapter 6 Using the Query Panel in Aginity Team
Aginity Team Documentation Release 1
Once you are satisfied with the new position of the column you may release the drag and the column will lock intoplace
672 Sorting the Result Grid
After successfully executing a query if the query has returned any rows you may sort the results in order to permitvarious types of analysis of your results
In order to sort your results simply click on the header row in the results grid If the results are already being sortedby that column then the sort order will toggle between ascending and descending
67 Interacting with Query Results 57
Aginity Team Documentation Release 1
673 Filtering the Result Grid
Data in the Result Grid may be filtered to make it easier to locate and analyze certain subsets of the resultant datawithout requiring you to submit an entirely separate query
To filter the result grid by values in a particular column bring your mouse cursor to the column header for the columnto which you wish to apply a filter In the right-hand side on the header row the filter icon (three horizontal bars) willappear Click on the filter icon and you will be presented with a pop-up menu that will allow you to enter your filtercriteria
By default the filter criteria will select a ldquoContainsrdquo filter but several other filter types exist and you may select anyof them Once you have selected the filter type you wish to apply type the filter into the text box The results willimmediately begin to filter
58 Chapter 6 Using the Query Panel in Aginity Team
Aginity Team Documentation Release 1
When a column is being filtered a funnel icon will appear in its header To remove the filter you may re-enter thefilter mode by clicking on the filter icon (three bars) in the header row and simply delete the filter text
Multiple columns may have active filters at the same time To accomplish this simply perform these steps on eachcolumn
674 Exporting results to CSV
Once you have successfully executed a query you can elect to export those results in Comma Separated Value (CSV)format to a file outside of Aginity Team To do this right-click anywhere in the results panel Doing this will displaya context menu from which you will select the option ldquoExport to CSVrdquo
After selecting this option you will be presented with a screen that permits you to select the location to which to saveyour results Once you have identified the proper location press the Save button to complete the export
CSV files may subsequently be imported into a large number of different programs for further review and analysis
See also
bull Adding Query to Catalog
bull Using Discovery Panel
67 Interacting with Query Results 59
Aginity Team Documentation Release 1
60 Chapter 6 Using the Query Panel in Aginity Team
CHAPTER 7
Using the Catalog in Aginity Team
71 Catalog Overview
The query catalog is a unique capability of Aginity Team allowing you to easily save manage and use items stored init Letrsquos start with browsing the catalog
The catalog is organized by any number of directories and sub-directories of queries as shown below
See also
61
Aginity Team Documentation Release 1
Click Read this article for some ideas on how to best organize your catalog
Queries are given friendly names and can be used or accessed in several ways The first way is to drag the catalogquery into a query panel as shown in the two images below
Fig 1 You can drag the query into the empty query panel
You can also edit queries within a query panel By right clicking on a catalog item and choosing edit code in tab youcan change the SQL itself
62 Chapter 7 Using the Catalog in Aginity Team
Aginity Team Documentation Release 1
Fig 2 After you drag the item it will present the full catalog query for edit or execution
71 Catalog Overview 63
Aginity Team Documentation Release 1
You can edit and save the catalog query in a query panel worksheet as shown below
64 Chapter 7 Using the Catalog in Aginity Team
Aginity Team Documentation Release 1
Hint If you see a next to the tab name in the query panel it means a change has not been saved
By editing the details of a catlaog query you can see key metadata items and statistics about the catalog
71 Catalog Overview 65
Aginity Team Documentation Release 1
72 Calling Catalog Items from SQL
One of the most innovative features of Aginity Team is the ability to call catalog items from within SQL statements
The video and following examples below will give you basic syntax required to call a catalog item
66 Chapter 7 Using the Catalog in Aginity Team
Aginity Team Documentation Release 1
721 Single SQL SELECT Statement
In this example we have a single SQL SELECT statement in the catalog called OrderAverage
This is the code in the Catalog
1 SELECT AVG(LineTotal)2 FROM salesSalesOrderDetail
To call this from the query panel you would issue the following command Note the highlighted reference to the objectin the catalog
1 SELECT 2 FROM (OrderAverage) a
This is the code passed to the database
1 SELECT 2 FROM (3 SELECT AVG(lineTotal)4 FROM SalesSalesOrderDetail5 ) a
722 Using Catalog Item to Facilitate Relationships
In this example we will predefine a join in the catalog called ClientAddress and then use it in the context of anotherSQL statement
This is the code in the Catalog
1 clients c2 JOIN addresses a3 ON cclientsid = aclientsid
To call this from the query panel you would issue the following command Note the highlighted reference to the objectin the catalog
1 SELECT 2 FROM ClientAddress
This is the code passed to the database
1 SELECT 2 FROM clients c3 JOIN addresses a4 ON cclientsid = aclientsid
723 Creating and Reusing Calculations
In this example we will predefine a Calculations in the catalog called Residual and then use it in the context of anotherSQL statement
This is the code in the Catalog
72 Calling Catalog Items from SQL 67
Aginity Team Documentation Release 1
1 1-total
To call this from the query panel you would issue the following command Note the highlighted reference to the objectin the catalog
1 SELECT item2 Residual3 FROM table
This is the code passed to the database
1 SELECT item2 1-total3 FROM table
724 Executing a Multi-Step script
In this example we will predefine a series of SQL statements in the catalog called DailyRun and then execute it by asingle call Any DML (SELECT CREATE UPDATE INSERT DELETE) can be used
This is the code in the Catalog
1 CREATE TABLE xyz AS2 CREATE TABLE abc AS3 SELET FROM xyz JOIN abc
To call this from the query panel you would issue the following command Note the highlighted reference to the objectin the catalog
1 DailyRun
This is the code passed to the database
1 CREATE TABLE xyz AS2 CREATE TABLE abc AS3 SELECT FROM xyz JOIN abc
725 Using Parameters in Catalog
In this example we will use a parameter within a catalog item called CitySelect
This is the code in the Catalog Note the highlighted line has the parameter in it
1 SELECT 2 FROM addresses3 WHERE city = $city
To call this from the query panel you would issue the following command Note the highlighted reference to the objectin the catalog
1 CitySelect
This is the code passed to the database
68 Chapter 7 Using the Catalog in Aginity Team
Aginity Team Documentation Release 1
1 SELECT 2 FROM addresses3 WHERE city = Chicago
Note Upon execution of the command Aginity Team will ask you to supply a parameterized value For moreinformation on parameters see Using Parameters
73 Adding Items to Catalog
To add a new query to the catalog highlight any part of a SQL statement(s) right click and select Save selection tocatalog as shown below
Once you save you will be asked to provide metadata about the query you are adding
73 Adding Items to Catalog 69
Aginity Team Documentation Release 1
Note It is important to fill out the description metadata as it will be used in searching The more information youprovide about the context of usage key business terms and intended usage the better search results you will get
You can also easily create new folders in the catalog or add SQL entries directly from the Catalog Browser by clickingthe (+) to the right of the Catalog header
When adding a new folder you will be presented with a basic text box to create your folder as shown below
74 Import and Export Items from Catalog
You have the ability to Import and Export both your full catalog as well as any folder selected within the catalog
Note We highly recommend taking regular exports of your catalog to disk to prevent accidental loss of queries
741 Export Steps
To Export your catalog start by either Right Clicking on a Catalog Folder or Using the Aginity Pro -gt Export Catalogmenu as shown below
70 Chapter 7 Using the Catalog in Aginity Team
Aginity Team Documentation Release 1
Your first step is to save either an entire folder or a selection of items within a folder
The final step in exporting is to name the file and location you will save to as shown below
742 Import Steps
Importing is valuable for several reasons One is to restore SQL catalog items you may have lost or more importantlythe ability to collaborate with other SQL developers and share your SQL making your a more efficient and consistentSQL developer
74 Import and Export Items from Catalog 71
Aginity Team Documentation Release 1
The first step is to Right Click on a folder you want to import to and Chooose Import Catalog as shown below
Note You can also use the Aginity Pro Menu -gt Import Catalog The main difference between using these twocapabilities is the context of where you are importing items If you choose to import from the Aginity Pro menu youmust set the context where to import If you Right Click on a folder the context is set to that folder
After choosing to import you will choose the file to import By default Aginity catalog files have the extensionaginitypkg
After choosing your file you can specify the folder to import to and what to import as shown below
72 Chapter 7 Using the Catalog in Aginity Team
Aginity Team Documentation Release 1
Hit the Import button and your queries should be imported
See also
Aginity also maintains a Github repository of Catalog queries to be used These queries are either administrativequeries for specific platforms data engineering queries that do powerful transformations against generic data or ana-lytic queries showing how to do cool things in SQL
Access the repositories here
See also
Using Query Panel
74 Import and Export Items from Catalog 73
Aginity Team Documentation Release 1
74 Chapter 7 Using the Catalog in Aginity Team
CHAPTER 8
Using Discovery Panel in Aginity Team
The Discovery Panel is a feature that is unique to Aginity Team and which allows you to quickly identify and reusecode that yoursquove previously executed or saved Using the Discovery Panel begins with a search Watch the videobelow to get a sense for how this feature works
By default the Discovery Panel allows you to search both your query execution history and your Pro Catalog at thesame time However by selecting one of the radio buttons in the Discovery Panel you can choose to focus on just oneor the other if you prefer
81 Searching Query Execution History
Start by typing in any free-text you want such as Sales as shown Below
75
Aginity Team Documentation Release 1
The search engine will do a full text search and display all results
82 Searching the Amp Pro Catalog
Buy clicking on the Catalog radio button you will restrict your search as shown below
83 Expanding the results
Once you have performed a search Amp Pro will dynamically update the results in the Discovery Panel to match thesearch term you have entered Yoursquoll be able to view a small amount of the query by default but if more is requiredyou can click on the arrows in the corner of the preview in order to expand the snippet further
84 Doing More with the Discovery Panel
A place holder for advanced filtering capabilities
76 Chapter 8 Using Discovery Panel in Aginity Team
CHAPTER 9
Reference
91 Video Reference
The following is a reference list of videos about Aginity Team and how to use its features
bull
bull
bull
bull
bull
bull
92 Shortcut Key Reference
Command ActionCommand K + C (Mac) or Ctrl K + C (Windows) Comment lines of codeCommand K + U (Mac) or Ctrl K + U (Windows) Uncomment lines of codeCommand F (Mac) or Ctrl F (Windows) Find and Replace Menu
93 Frequently Asked Questions
The section below is dedicated to commonly asked questions that we compile and provide answers to Over time asthings change we will keep this table up to date
77
Aginity Team Documentation Release 1
931 What Control do I have with Row Limit Preference
By default we cap the row limit preference to 100K rows to discourage users from spooling too much data across yournetwork Trust us your network infrastructure folks do appreciate it Fear not though you have options First if youset the preference to 0 it will spool as much as you want until either you run out of memory or your query completesAlternatively we recommend spooling the output to a file if you are doing returns greater than 100K rows Refer tothe documentation on execute query to file
94 SQL Reference Guides for Supported connections
As SQL developers ourselves we thought putting links to the databases we support in our documentation was a goodidea so here they are
bull
bull
bull
bull
95 Driver Support Reference
The table below is a cross reference of driver versions by platform
Platform Driver Version Class NameNetezza Not distributed with software
(nzjdbcjar)orgnetezzaDriver
SQL Server 720 jre8 commicrosoftsqlserverjdbcSQLServerDriverRedshift 12161027 comamazonredshiftjdbcDriverGreenplum and Post-gres
4225 orgpostgresqlDriver
Hive 121 orgapachehivejdbcHiveDriverSnowflake 3623 3628 355 netsnowflakeclientjdbcSnowflakeDriverIBM DB2 Warehouse db2jcc4 comibmdb2jccDB2Driver
78 Chapter 9 Reference
CHAPTER 10
Troubleshooting
This page is dedicated to common issues or errors you may encounter when using Aginity Team We recommend youalso post any new issues or questions to our Aginity Team Forum
The is a great resource for posting questions searching for common solutions to features of Pro or just learning howto be efficient as a SQL analytic developer through samples best practices and collaboration with other Pro users
Is-sueNum-ber
Isthis aDe-fect
Source of Error Description of Error Resolution
1 No Cannot DownloadDrivers via Con-nection Screen
In most cases your organization isblocking Aginityrsquos ability to downloaddrivers from a Maven repository
Follow directions in the Config-ure Connections documentationto Manually Add Drivers
79
Aginity Team Documentation Release 1
80 Chapter 10 Troubleshooting
CHAPTER 11
End User License for Aginity Team
Click here for end users license
81
- Administering Aginity Team
-
- Deploying Aginity Team through AWS Marketplace
- Installing Aginity Team on Linux
- Upgrading Aginity Team
- Backing Up or Restoring Team Catalog
-
- Creating Users in Aginity Team
-
- Administering Users
-
- Enabling Snowflake OAuth in Aginity Team
- Configuring Connections in Aginity Team
-
- Downloading Drivers
- Setting up Netezza Connections
- Setting up Redshift Connections
- Setting up Snowflake Connections
- Setting up Hive Connections
- Setting up SQL Server Connections
- Setting up DB2 Warehouse Server Connections
- Setting up Greenplum and Postgres Connections
- Import and Exporting Connections
-
- Using the Database Explorer in Aginity Team
-
- Viewing the Database Data Dictionary
- Database Object Support by Platform
- Quick Actions from Explorer
-
- Using the Query Panel in Aginity Team
-
- Writing your First Query
- Executing to a File
- Using Parameters in your Query
- Auto-Complete Capabilities
- Snippet support
- Common Actions in Query Panel
- Interacting with Query Results
-
- Using the Catalog in Aginity Team
-
- Catalog Overview
- Calling Catalog Items from SQL
- Adding Items to Catalog
- Import and Export Items from Catalog
-
- Using Discovery Panel in Aginity Team
-
- Searching Query Execution History
- Searching the Amp Pro Catalog
- Expanding the results
- Doing More with the Discovery Panel
-
- Reference
-
- Video Reference
- Shortcut Key Reference
- Frequently Asked Questions
- SQL Reference Guides for Supported connections
- Driver Support Reference
-
- Troubleshooting
- End User License for Aginity Team
-

Aginity Team Documentation Release 1
Please check that you have provided a valid license
Everything is on fire
Please contact AWS Support for AWS specific problems or contact Aginity if you are having problemswith the AMI
See also
Backup
We highly recommend you do daily back-ups and snapshots to ensure minimal loss and downtime for your applicationPlease review the section in the documentation on backup and recovery
Emergency Maintenance
Our knowledge base has the most comprehensive details about general product troubleshooting It is accessible fromour support site and should be the first stop for any technical questions
118 Clean Up
1 Follow the AWS CloudFormation Delete documentation to delete the resources deployed by this document
2 By default EBS snapshots are retained for recovery purposes If you wish to delete these follow the EBSprocess to delete unwanted backups
3 Delete any other resources that you manually created to integrate or assist with the deployment
12 Installing Aginity Team on Linux
Installing team consists of accessing and setting up an environment based on an Ubuntu OS or Red Hat EnterpriseLinux (RHEL) You can either do this on an existing Ubuntu Server or set up a Virtual Machine that will host theshared catalog database and Team application server
If you have not yet done so download the software from here
Once you register and download the software you can begin the installation process Upon registration you the softwarewill automatically download The software should be titled aginity-team-ltversiongt-amd64deb
121 Pre-Requisites and Getting to a Server
Team is installed on an Ubuntu or RHEL Server or Virtual Machine environment The machine Ubuntu or RHEL isinstalled on must meet the following requirements
1 Cloud data center or on-premises
2 Minimum 200 GB of disk workspace
3 4 CPU x 16GB RAM
4 Running Ubuntu 18042 LTS (Bionic Beaver) or RHEL version 8
5 Must have network access to databases being connected to
6 HTTPS certificate (company provided or self-signed)
Desktop requirements
1 Chrome browser
6 Chapter 1 Administering Aginity Team
Aginity Team Documentation Release 1
2 HTTPS access to the Team Server
Note If you are trying to install an evaluation of Aginity Team or just getting started there are severaloptions for accessing a server environment in which to install Aginity Team server
1 You can ask your IT representative who is responsible for server infrastructure if there is a UbuntuLinux server or VM available to use
2 You can install it locally for trial purposes using personal VMWare such as Parallels or an opensource equivalent like Oracle VirtualBox
If you would prefer we are happy to schedule a free install for you Please click on the link below to schedule thatinstall
Click here to schedule an install with an Aginity Consultant
122 The Installation Process
The following steps should be executed in order
Step 1 SSH into the Linux server as root or you can also sudo to root once in with another that has administrativerights
Note In our case for documentation we are working with a Parallels Ubuntu 1804 VM and have anaccount called Parallels
ssh ltusernamegtltip_addressgt
Step 2 SFTP the aginity-team-ltversiongt-amd64deb file to the logged in users home directory Below is a samplecommand to do that
sftp ltusernamegtltip_addressgtput aginity-team-ltversiongt-amd64debexit
Step 3 Running the install
Issue the following command to initiate the install
on Ubuntusudo apt-get install aginity-team-ltversiongt-amd64deb on RHELsudo yum install aginity-team-ltversiongt-amd64rpm
This image below is what you should see after the install is complete
12 Installing Aginity Team on Linux 7
Aginity Team Documentation Release 1
Note We will generate an encryption key to ensure all information for connections and your catalog are encryptedThe installation will automatically generate and store that key on the etcaginity-teamserviceconf file
Step 4 Installing SSL certificate
The SSL certificate generation can be called using
this will generate certificatesudo optaginity-teambinssl-certificate-gensh
You will be asked for the following information
1 First and last name
2 Name of organization unit
3 Name of organization
4 Name of City or Locality
5 Name of State or Province
6 Name of Country code
7 Finally when asked to ldquoEnter key password for ltaginity_certgt (RETURN if same as keystore password) rdquo pressRETURN
123 Configuring Aginity Team Server
You can adapt Aginity Team Server to your needs by changing settings in etcaginity-teamserviceconf andetcaginity-teamapplicationyml configuration files
The serviceconf file contains settings of a linux service running Aginity Team It is in a plain text file format Hereare the parameters in the etcaginity-teamserviceconf file
General Configuration Parameters
SERVICE_KEYSTORE_PATH
8 Chapter 1 Administering Aginity Team
Aginity Team Documentation Release 1
The path to a java keystore file Aginity Team generates this file when you run optaginity-teambinssl-certificate-gensh
Default etcaginity-teamcacerts
JVM_MEMORY_LIMIT
The value of JVM maximum heap size The number has to be an integer You should specify its value using one ofthe letters ldquomrdquo or ldquoMrdquo for MB or ldquogrdquo or ldquoGrdquo for GB Examples 1024m 1024MB 12g 12GB
Default 1024m
AGINITY_ENCRYPTION_KEY
The value of encryption key which is used to encrypt H2 database used by the application This value is generated byAginity Team
Note We recommend that you copy the encryption key to a safe place as you may need it to recover Aginity TeamServer using a database backup
AGINITY_CONFIG_PATH
The path to the application configuration yml-file Do not change its value
Default etcaginity-teamapplicationyml
DB_PATH
The path to a directory to deploy Aginity Teamrsquos H2 database in
Default varlibaginity-team
Default varlibaginity-team
Configuring the YML Application File
Aginity Team Server can be customized through a number of settings of the etcaginity-teamapplicationyml file Ituses YAML format Depending on your needs Aginity Team can be configured to use either embedded H2 database orPostgreSQL database server You may want to change TCP port the server is accepting HTTP request on or integrateAginity Team with external identity providers
Note YAML does not support tab characters for indentation You should use spaces for that
For the reason of backward compatibility some settings in applicationyml use parameter expansions The basic formof parameter expansion is $parameter- The parameter is a key from etcaginity-teamserviceconf You can replaceany $parameter- with your custom value There are default values for some parameters in the configuration file
$parameter-defaultValue
If parameter is unset in etcaginity-teamserviceconf the expansion of defaultValue is substituted Otherwise thevalue of parameter is substituted
Webserver Options
server Options
12 Installing Aginity Team on Linux 9
Aginity Team Documentation Release 1
serverport $SERVICE_PORT-8080publicUrl $PUBLIC_URL-httplocalhost8080
serverport
TCP port Aginity Team uses to accept HTTP requests You may want to setup Aginity Team to listen on 443 tosimplify URL users should use to access Aginity Team In this case the server section looks like as follows
Default 8080
serverport 443publicUrl httpsmyexamplecom
serverpublicUrl
publicUrl is a URL of a server running Aginity Team It is a public URL available outside your corporate network
publicUrl has the following format schemehostport where scheme can be either http or https host ishostname of the server running Aginity Team port is TCP port Aginity Team is using
Default httplocalhost8080
Catalog Database Options
database Options
database BEGIN H2 database configurationh2
dbFilePath $DB_PATH- END H2 database configuration BEGIN PostgreSQL configuration This section is commented out by default since only one type of databaserarr˓could be enabled to enable PostgreSQL comment out the H2 database configuration sectionrarr˓and uncomment the section below postgres user user password password jdbcUrl jdbcpostgresqlhostportdatabase_name properties any properties specific to your JDBC driver ssl true connect using SSL SSL support must be enabled on therarr˓database server side sslmode require END PostgreSQL configuration
By default Aginity Team installs embedded H2 database to store application data Another option is to use a Post-greSQL database In this case you have to deploy PostgreSQL server and create a database by yourself Here is anexample of the database section with enabled PostgreSQL database
database BEGIN H2 database configuration h2
(continues on next page)
10 Chapter 1 Administering Aginity Team
Aginity Team Documentation Release 1
(continued from previous page)
dbFilePath $DB_PATH- END H2 database configuration BEGIN PostgreSQL configuration
postgresuser db_userpassword db_passowdjdbcUrl jdbcpostgresqlmyexamplecom5432aginity_team_databaseproperties
ssl truesslmode require
END PostgreSQL configuration
Note Only one type of database could be enabled To enable PostgreSQL comment out the H2 database configura-tion section and uncomment the PostgreSQL configuration section
databaseh2dbFilePath
The path to a directory to deploy Aginity Teamrsquos H2 database in
databasepostgresuser
The database user
databasepostgrespassword
The database userrsquos password
databasepostgresjdbcUrl
The connection URL
jdbcUrl has the following format jdbcpostgresqlhostportdatabase_name where host is the IP address orthe hostname of the database server port is TCP port the database server is listening database_name is the nameof Aginity Team database created by you
databasepostgresproperies
This section may contain any number of additional connection parameters which PostgreSQL JDBC driver supportsYou can read about the jdbc driver parameters at jdbcpostgresqlorg
Logging Options
logging Options
loggingpathToLogFile $PATH_TO_LOG_FILE-varlogaginity-teammaxFilesCount $MAX_FILES_COUNT-100MBmaxFileSize $MAX_FILE_SIZE-1
loggingpathToLogFile
The path to a directory to store application log files in
Default varlogaginity-team
loggingmaxFilesCount
12 Installing Aginity Team on Linux 11
Aginity Team Documentation Release 1
The maximum number of the log files Aginity Team creates
Default 1
loggingmaxFileSize
The maximum size of a log file The number has to be an integer You should specify its value using one of the letterslsquoKBrsquo lsquoMBrsquo or lsquoGBrsquo after the number Examples 200KB 35MB 1GB
Default 100MB
Platform Options
This section is used to set up OAuth for the Snowflake databases Please refer to specific Snowflake section in thedocumentation Enabling Snowflake SSO
Security Configuration Options
userDirectory Options
This section allows you to integrate Aginity Team with your LDAP system to import users sync user information anddelegate user authentication to LDAP server
userDirectoryname LDAP Serverenabled trueserverSettings
host ldapserverexamplecomport 389bindDN cn=admindc=exampledc=combindPassword admin_passwordencryption PLAINverifyCertificates falsetlsOptions
trustStorePath pathtotrustStorefiletrustStorePassword my_passwordtrustStoreType PKCS12
connectionRuleconnectTimeout 0responseTimeout 0
userSchemabaseDN ou=usersdc=exampledc=comuserFilterusernameAttribute uidfirstNameAttribute givenNamelastNameAttribute snemailAttribute mailsearchScope SUB_TREE
userDirectoryname
A descriptive name of the LDAP connection
userDirectoryenabled
Flag to indicate whether LDAP authentication is on or off
userDirectoryserverSettingshost
The IP address or hostname of the LDAP server
12 Chapter 1 Administering Aginity Team
Aginity Team Documentation Release 1
userDirectoryserverSettingsport
TCP port of the LDAP server
userDirectoryserverSettingsbindDN
The distinguished name of the user that the application will use when connecting to the directory server Examplecn=admindc=exampledc=com
userDirectoryserverSettingsbindPassword
The user password
userDirectoryserverSettingsencryption
Type of connection encyption Can be set to PLAIN START_TLS or SIMPLE_TLS START_TLS is preferred optionSTART_TLS begins as a plaintext connection over the standard LDAP port (389) and that connection is then upgradedto SSLTLS
userDirectoryserverSettingsverifyCertificates
If set to true Aginity Team verifies the certificate used for SSLTLS connection to the LDAP server A java trust-store configured in userDirectoryserverSettingstlsOptions is used to verify the certificate If you use a self-signedcertificate you must import the certificate to the truststore before starting Aginity Team
userDirectoryserverSettingstlsOptions
Use this section to configure your java truststore that is used to verify the LDAP server certificate
userDirectoryserverSettingstlsOptionstrustStorePath
The path to the Java trust store where certificates are stored
userDirectoryserverSettingstlsOptionstrustStorePassword
The password to the java trust store
userDirectoryserverSettingstlsOptionstrustStoreType
The type of the trust store The most common are JKS and PKCS12
userDirectoryconnectionRuleconnectTimeout
Timeout in milliseconds for connection to LDAP server 0 means no timeout
userDirectoryconnectionRuleresponseTimeout
Timeout in milliseconds for response time from LDAP server 0 means no timeout
userDirectoryuserSchemabaseDN
The root distinguished name (DN) to use when running queries against the directory server
userDirectoryuserSchemauserFilter
An LDAP search filter to be used when searching user objects from the LDAP server within the base DN Exampleldquo(amp(objectCategory=Person)(sAMAccountName=))rdquo
userDirectoryuserSchemausernameAttribute
Defines which attributes on an LDAP user entry will be used as its username
userDirectoryuserSchemafirstNameAttribute
Defines which attributes on an LDAP user entry will be used as its first name
userDirectoryuserSchemalastNameAttribute
Defines which attributes on an LDAP user entry will be used as its last name
12 Installing Aginity Team on Linux 13
Aginity Team Documentation Release 1
userDirectoryuserSchemaemailAttribute
Defines which attributes on an LDAP user entry will be used as its email address
userDirectoryuserSchemasearchScope
Specify strategy to use when doing a search Possible options SUB_TREE (search request should be performedagainst the search base and all entries below) ONE (search request should be performed against entries that areimmediate subordinates of the entry specified as the search base DN) BASE (search request should only be performedagainst the entry specified as the search base DN)
124 Starting Aginity Team Server
Prior to starting the Agnity Team server you must create the administrator username and password
You can do this by running the team-create-superuser script in the optaginitybin directory on the server
this will create a user with the administrator rolesudo optaginity-teambinteam-create-super-usersh
Step 5 You are now ready to start Aginity Team
We use the following commands to start Aginity Team in the background and with logging turned on
sudo systemctl start aginity-team
You can check if Aginity Team is running by issuing this command
sudo systemctl status aginity-team
125 Accessing Aginity Team for the First Time
Step 6 Step 6 Open browser and navigate to httpsltip or team server namegtltserver portgtlogin You will see thefollowing image
bull Enter credentials you used to create the administrator to enter the application
Step 7 Register and Apply License Key
14 Chapter 1 Administering Aginity Team
Aginity Team Documentation Release 1
When you open the application it will ask you to register the software and then you will be asked to applythe license key
If it does not ask for the license key you can click on Help -gt Register again and the license key boxshould pop open as shown below
12 Installing Aginity Team on Linux 15
Aginity Team Documentation Release 1
Note It is imperative that all users be created with valid business email addresses
Send the link to team to any new user along with their usernamepassword combination
126 Stopping Aginity Team Services
Log in as the team user and issue the following command
sudo systemctl stop aginity-team check to see if it is stopped Usingsudo systemctl status aginity-team
See also
Add Connections
13 Upgrading Aginity Team
Upgrading team consists of logging into the Team server downloading the latest update and applying it from thecommand line
For clarities sake when we refer to aginity-team-ltversiongt-amd64deb we purposely leave version generic Eachupgrade will have a different number associated with it
Warning It is important to take a backup of both your encryption key for the Team catalog and to do a BackingUp or Restoring Team Catalog before upgrading This way if anything goes wrong you will not use your catalogIt is also recommended to do a manual export of your catalog from time to time
You can get the encryption key using the command below
sudo cat etcaginity-teamserviceconf
16 Chapter 1 Administering Aginity Team
Aginity Team Documentation Release 1
131 Step 1 Logging into Team Server
SSH into the Team server as an administrator
Note Typically you will log in as an account other than root and then you will be using the sudo command
132 Step 2 Check to see if Team is Currently Running and then Shut it Down
Issue the command below to check the status of the Team service
sudo systemctl status aginity-team
If Team is running shut it down by issuing this command
sudo systemctl stop aginity-team
Note It is always a good idea to run the status check again to make sure Team has been shut down
133 Step 3 Download the Latest Version of Aginity Team
Using the wget command you can download the latest version as shown below
wget httprepositoryaginitycoms3amazonawscomAginityTeamaginity-team-ltversionrarr˓gt-amd64deb
134 Step 4 Upgrading the Software
Run the upgrade process by issuing this command
on Ubuntusudo apt-get install aginity-team-ltversiongt-amd64deb on RHELsudo yum install aginity-team-ltversiongt-amd64deb
The package manager will determine if your configuration files are different from ones bringing with the new versionof the application being installed and will offer you a few option to proceed with installation
13 Upgrading Aginity Team 17
Aginity Team Documentation Release 1
You should always keep your currently-installed version and resolve any conflicts by comparing and merging thedifference manually
135 Step 5 Restart Aginity Team
Restart the server by issuing this command
sudo systemctl start aginity-team
14 Backing Up or Restoring Team Catalog
We have provided two files listed and described below which will allow you to automate or manually backup andrestore your Aginity Team catalog
141 Backup Script
The backup script backupsh will perform and compress a backup of the Aginity Team Catalog to the tmp di-rectory on your OS It will append the date to the end of the file created and should be named in this pattern agin-ity_backup_m_d_Yzip
Note Before running the backupsh script you will need to edit it and provide the following variables
bull DESTINATION ~ if you do not want to use the default tmp
bull TOKEN ~ this value is the encryption key for the database To find out the value of it run this command
sudo cat etcaginity-teamserviceconf
bull H2PATH ~ Unless you modified the installation directory from the default you should not need to change this
bull DBPATH ~ Unless you modified the installation directory from the default you should not need to change this
18 Chapter 1 Administering Aginity Team
Aginity Team Documentation Release 1
When running a backup the Aginity Team server process will be stopped then restarted when complete
See also
If you want to schedule the backup and automate it we recommend scheduling using Crontab Crontab ReferenceGuide
142 Restore Script
To restore to an instance of the backup follow these instructions
Yoursquoll need to set the variables within the restoresh to match what is in the backupsh
First download the restore script restoresh Next you will provide the file name of the backup you want to restorein the
bull SOURCE variable
Now run the script and it will automatically re-start Aginity Team when complete
14 Backing Up or Restoring Team Catalog 19
Aginity Team Documentation Release 1
20 Chapter 1 Administering Aginity Team
CHAPTER 2
Creating Users in Aginity Team
Once you have installed your Aginity Team server you need to set up users To do this navigate to the Administrationmenu item as show below
Click the button Register New User and fill out the form as show below
21
Aginity Team Documentation Release 1
When choosing the role of Admin vs User reference this table below for differences in functionality
21 Administering Users
Once you have created users and you need to common tasks as described below you will go back into the Administra-tion Menu and click on the three dots ldquo rdquo to the right of each user row This will pop opne an edit menu as shown
22 Chapter 2 Creating Users in Aginity Team
Aginity Team Documentation Release 1
below
211 Disabling Users
You can choose to disable user which will not allow them to login but will not remove any of their catalog informationor query history
212 Resetting Passwords
To reset a password you can choose the Change password which will prompt you to enter and confirm a new password
213 Edit User
If you need to Edit any registration details such as name or role you can do that here
21 Administering Users 23
Aginity Team Documentation Release 1
24 Chapter 2 Creating Users in Aginity Team
CHAPTER 3
Enabling Snowflake OAuth in Aginity Team
We now support OAuth for the snowflake platform This feature only works on Aginity Team The details below willguide your through setting up the configuration on the server
1 Connect to your Snowflake server and create a Security Integration object for a custom client (more details canbe found at this link)
For example
CREATE SECURITY INTEGRATIONCREATE OR REPLACE SECURITY INTEGRATIONaginity_team_oAuthTYPE = OAUTHENABLED = TRUEOAUTH_CLIENT = CUSTOMOAUTH_CLIENT_TYPE = CONFIDENTIALOAUTH_REDIRECT_URI = Aginity Team Public URLapioauthsnowflakeOAUTH_ALLOW_NON_TLS_REDIRECT_URI = FALSEOAUTH_ENFORCE_PKCE = TRUEOAUTH_ISSUE_REFRESH_TOKENS = TRUEOAUTH_REFRESH_TOKEN_VALIDITY = 86400
Note Aginity Team Public URL is a URL of a server running Aginity Team It is a public URL available outsideyour corporate network
Aginity Team Public URL has the following format schemehostport where scheme can be either http orhttps host is hostname of the server running Aginity Team port is TCP port Aginity Team is using
2 Ssh to the Aginity Team server
3 Edit etcaginity-teamapplicationyml and uncomment and update the following properties
platformssnowflakeoauthhost
Snowflake account in format account_namesnowflakecomputingcom where account_name is your Snowflakeaccount name
25
Aginity Team Documentation Release 1
platformssnowflakeoauthclientId
Snowflake client ID of the Security Integration object The Snowflake administrator can find the client ID by describingthe integration that is by using the DESC SECURITY INTEGRATION command
platformssnowflakeoauthclientSecret
Snowflake client secret of the Security Integration object The Snowflake administrator can find the client secrets byusing the system function SHOW_OAUTH_CLIENT_SECRETS
serverpublicUrl Aginity Team Public URL
Database platform specific configurationsplatformssnowflake
oauthclientSecrets
- host account_namesnowflakecomputingcomclientId client idclientSecret client secret
For example a customer has 2 Snowflake accounts The first one is eb39151us-east-1snowflakecomputingcom and itis being used for Dev environment The second one is xr58911us-east-1snowflakecomputingcom and it is being usedfor Production environment Then to enable OAuth connections to these environments via Aginity Team administratorshould add the following parameters to serviceconf
serverpublicUrl httpsaginityexamplecom
platformssnowflake
oauthclientSecrets
Dev environment- host eb39151us-east-1snowflakecomputingcom
clientId fnm4OgHhswihrEfsahTyZo=clientSecret sHljg51o7jdsjds8723786f35Q0K+TthasjuczjQwY=
Production environment- host xr58911us-east-1snowflakecomputingcom
clientId kwajw56h(usaELkkwu=clientSecret gfhfrejds3232372822378YUUYthasjuczjQwY=
4 Restart the Aginity Team server
26 Chapter 3 Enabling Snowflake OAuth in Aginity Team
CHAPTER 4
Configuring Connections in Aginity Team
Aginity Team allows you to set up connections to a variety of different database platforms In order to do this clickthe + symbol next to the ldquoConnectionsrdquo header in the left navigation pane of Aginity Team You will be presentedwith a list of existing connections as well as options for adding another connection Clicking the ldquoNew Connectionrdquobutton will allow you to enter the necessary information for the connection you wish to create
Below is a quick start video of creating connections in Aginity Team
Note Aginity Team uses JDBC to connect to database platforms It is recommended you refer to the JDBC guidesfor our supported platforms to learn about specific variables to use within the Advance Parameters section of AginityTeam We will provide links to that documentation where available
The video below provides a more detailed explanation of how to use advanced parameters to illicit the desired behaviorand successful connection to the database platform
27
Aginity Team Documentation Release 1
41 Downloading Drivers
The first step in configuring a connection is to download the JDBC driver for the platform you will be using In mostcases we will provide access to the drivers which have been certified to work with Aginity Team In some cases suchas when the vendor does not allow us to distribute or you want to use a different version you will have to manuallyadd the JDBC driver
The video below provides a quick illustration of how to manage drivers
See also
Database Driver Reference Guide
To get started in the Edit or Add Connection box you will click on Edit Drivers as shown below
411 Automatic Download
As shown in the image below if we are allowed to to download drivers you will be provided a link to do so and thenbe presented with one or more drivers to use and your done
28 Chapter 4 Configuring Connections in Aginity Team
Aginity Team Documentation Release 1
In some cases you may get an error message if your organization does not allow you to download drivers (jar files)typically supplied through a Maven repository
In this case please review the section below Manually Add Drivers
412 Manually Add Drivers
If you have to manually add a driver it starts with first acquiring the JDBC jar for that platform and saving it somewhereon your machine Once you acquire the JDBC jar you can upload it to Aginity Pro
To do this you will hit the Edit Driver or Edit Drivers Panel section as shown above and you will be presented withthe following screen
You can name the Driver anything you want and provide a description
The class name if not provided must be looked up typically in the JDBC reference manual from the platform vendor
Finally if you click on the Add File button you will navigate to where you saved the Jar file and then click SaveChanges You are now ready to configure your connection
42 Setting up Netezza Connections
You can set up a connection to a Netezza (IBM PureData for Analytics) appliance here Simply populate the requesteddata into the form
42 Setting up Netezza Connections 29
Aginity Team Documentation Release 1
Note Netezza does not allow us to distribute their drivers so you must obtain it from your DBA or directly from IBMFix Central
30 Chapter 4 Configuring Connections in Aginity Team
Aginity Team Documentation Release 1
421 Using SSL with Netezza Connections
Aginity Team supports SSL when setting up a Netezza connection While setting up your Netezza connection simplyselect the level of security to enable from the dropdown selector Your choices include
bull Only Unsecured - Specify this option when you want an unsecured connection to the Netezza system If theNetezza system requires a secured connection the connection is rejected
bull Preferred Unsecured - This argument is the default value Specify this option when you would prefer anunsecured connection but you accept a secured connection if the Netezza system requires one
bull Preferred Secured - Specify this option when you want a secured connection to the Netezza system but youaccept an unsecured connection if the Netezza system is configured to use only unsecured connections
bull Only Secured- Specify this option when you want a secured connection to the Netezza system If the Netezzasystem accepts only unsecured connections or if you are attempting to connect to a Netezza system that isrunning a release before release 45 the connection is rejected
See also
For more information on SSL refer to the link Netezza SSL
422 Connection Timeout
The connection timeout will tell the session when to disconnect Typically set this to 10 minutes or 3600 seconds
423 Advanced Parameters
For Netezza you can supply additional JDBC parameters using the Advanced Properties section
See also
Here is the link to other configurable parameters supported within Netezza JDBCrsquos driver
42 Setting up Netezza Connections 31
Aginity Team Documentation Release 1
43 Setting up Redshift Connections
431 Using SSL Mode with Redshift Connections
Aginity Team supports SSL when setting up a Redshift connection While setting up your Redshift connection simplyselect the level of security to enable from the dropdown selector Your choices include
bull Disable - SSL is disabled and the connection is not encrypted
bull Prefer - SSL is used if the server supports it Amazon Redshift supports SSL so SSL is used when you set
32 Chapter 4 Configuring Connections in Aginity Team
Aginity Team Documentation Release 1
sslmode to prefer
bull Allow - SSL is used if the server requires it
bull Require - SSL is required
See also
For more information on Redshift SSL refer to this link
432 Advanced Parameters
For Redshift you can supply additional JDBC parameters using the Advanced Properties section
See also
Here is the link to other configurable parameters supported within Redshift JDBCrsquos driver
44 Setting up Snowflake Connections
You can set up a connection to a Snowflake here Simply populate the requested data into the form
44 Setting up Snowflake Connections 33
Aginity Team Documentation Release 1
441 Warehouse
A virtual warehouse often referred to simply as a ldquowarehouserdquo is a cluster of compute resources in Snowflake Awarehouse provides the required resources such as CPU memory and temporary storage to perform the followingoperations in a Snowflake session If you do not know which specific Warehouse to use speak to your Snowflake DBA
442 Role
This is a security role that may have been setup for you to use You can leave this field blank if you do not know whatRole to connect as
34 Chapter 4 Configuring Connections in Aginity Team
Aginity Team Documentation Release 1
443 Advanced Parameters
For Snowflake most connection detail is handled through the command line additions to the JDBC URI You cansupply additional JDBC parameters using the Advanced Properties section
See also
Here is the link to other configurable parameters supported within Snowflake JDBCrsquos driver
45 Setting up Hive Connections
You can set up a connection to a Hive databases here Simply populate the requested data into the form
45 Setting up Hive Connections 35
Aginity Team Documentation Release 1
36 Chapter 4 Configuring Connections in Aginity Team
Aginity Team Documentation Release 1
451 Picking Subprotocol
You can choose either Hive 2 or Spark SQL syntax when executing against Hive databases You can choose eithervalue in this drop down
452 Setting up Kerberos connections
In a lot of cases organizations require the use of Kerberos with Hive so by clicking on the radio button for UseKerberos for authentication you will be prompted to enter the following
bull Realm
bull FQDN
bull Service name
Note The value of these parameters are typically set by your Hadoop administrator and it is best to work with themto obtain the appropriate values
453 Advanced Parameters
You can supply additional Hive JDBC parameters using the Advanced Properties section
See also
Here is the link to other configurable parameters supported within Hive JDBCrsquos driver
46 Setting up SQL Server Connections
You can set up a connection to Microsoft SQL Server databases here Simply populate the requested data into theform
46 Setting up SQL Server Connections 37
Aginity Team Documentation Release 1
Note We only support SQL Server compatibility levels 150 and 140 which is SQL Server 2017 and greater
47 Setting up DB2 Warehouse Server Connections
You can set up a connection to IBM DB2 warehouse databases here Simply populate the requested data into the form
38 Chapter 4 Configuring Connections in Aginity Team
Aginity Team Documentation Release 1
471 Advanced Parameters
You can supply additional Hive JDBC parameters using the Advanced Properties section
See also
Here is the link to other configurable parameters supported within SQL Server JDBCrsquos driver
48 Setting up Greenplum and Postgres Connections
You can set up a connection to Greenplum and Postgres databases here Simply populate the requested data into theform Greenplum and Postgres share the same drivers so we will speak of them together
48 Setting up Greenplum and Postgres Connections 39
Aginity Team Documentation Release 1
481 Choosing Subprotocol (Only for Greenplum)
You can choose either generic Postgres or Pivotal Greenplum SQL syntax when executing against Greenplumdatabases You can choose either value in this drop down
40 Chapter 4 Configuring Connections in Aginity Team
Aginity Team Documentation Release 1
482 Advanced Parameters
You can supply additional Postgres JDBC parameters using the Advanced Properties section
See also
Here is the link to other configurable parameters supported within Postgres JDBCrsquos driver
49 Import and Exporting Connections
A new feature in Aginity Team is the ability to import and export your connection templates and share them withother users A good deal of inefficiency with SQL IDErsquos is the time it takes to get connected No longer With theconnection templates you can save all the relevant detail minus the login credentials and distribute them through aneasy import and export feature
To get started have a DBA or power user establish the connection details once and export the connection as shown inthe image below
You will be presented with a selection list of connections as shown below Select the connections you want to exportand click Export selected
Note It is important to either check the radio button include sensitive data or to uncheck it This willinclude the username and password or exclude it from the connection export
49 Import and Exporting Connections 41
Aginity Team Documentation Release 1
You will be presented with a file menu window to name and pick the folder location for the export file as shown below
42 Chapter 4 Configuring Connections in Aginity Team
Aginity Team Documentation Release 1
Once you have exported the connections you can send them to Aginity Team users and have them import them To dothat choose the Import Connections menu item as shown below
You will be presented with a file selection Choose the appropriate Aginity connection package
Note By default Aginity packages for both Catalog and Connections are prefaced with aginitypkg file types
Once you choose a file select the connections you want to import and choose Import Selected
49 Import and Exporting Connections 43
Aginity Team Documentation Release 1
See also
Navigating Database Explorer
44 Chapter 4 Configuring Connections in Aginity Team
CHAPTER 5
Using the Database Explorer in Aginity Team
The Database Explorer panel in Aginity Team can be toggled by using the Database Explorer and Catalog tabs onthe left hand pane of the application as show below The Database Explorer is used to navigate database objectsbased on the Connections defined in Aginity Team The Catalog browser is used to navigate SQL Analytics that youhave personally stored
Below is a quick start video of using the Database Explorer in Aginity Team
51 Viewing the Database Data Dictionary
Once you have established a connection to a database you can browse the database dictionary catalogs You can toggleto the Database Explorer browser by clicking on the tab as shown below The database data dictionaries typicallycontains the tables columns views and other database objects available to query from the query panel
Once you have selected the Database Explorer tab you can drill into each connection as shown below
45
Aginity Team Documentation Release 1
52 Database Object Support by Platform
The following image details what objects are visible from the browser for all of our currently supported platformsWe do releases every two weeks with Aginity Team so if there is a feature you need please contact us at sup-portaginitycom
46 Chapter 5 Using the Database Explorer in Aginity Team
Aginity Team Documentation Release 1
53 Quick Actions from Explorer
Currently you can do the following quick actions from the Database Explorer
531 SQL Statement Generation
To generate typical SQL statements from tables or views you can right click on the object navigate to scripts andchoose the appropriate script as shown below
53 Quick Actions from Explorer 47
Aginity Team Documentation Release 1
532 Selective SQL Generation on a Set of Columns
To generate SQL statements based on a selection of columns within a Table or View multi-select the columns byholding Ctrl (Windows) or Command (Mac) and selecting the columns as shown below Then generate the SQLstatement
Hint Make sure you donrsquot have the table name selected and column names at the same time If you do it will generatethe SQL for the whole table
48 Chapter 5 Using the Database Explorer in Aginity Team
Aginity Team Documentation Release 1
533 Drag and Drop Capabilities
You can drag and drop any object from the DB Explorer into the Query Panel
Note Double-clicking expands the DB Explorer tree
534 Copy JDBC Connection String
If you select any Connection (Top level of the tree) and select ldquoCopy Connection string to Clipboardrdquo you will getthe full JDBC URI which is helpful for debugging See this Knowledge Base Article for help with debugging yourAginity Team connections
See also
bull Use Catalog Browser
bull Use Query Panel
53 Quick Actions from Explorer 49
Aginity Team Documentation Release 1
50 Chapter 5 Using the Database Explorer in Aginity Team
CHAPTER 6
Using the Query Panel in Aginity Team
You will spend most of your time in the Query Panel writing SQL and saving it to your catalog in Aginity Team Thevideo below will give you an overview of creating your first query
61 Writing your First Query
Each tab in the Aginity Team application can be set to different database connections Once you establish that con-nection as shown below you can use the query panel like a text editor using SQL syntax specific to that databaseplatform
Once you write your code in Aginity Team you have options to run it using the following scope
51
Aginity Team Documentation Release 1
Execution Type DescriptionRun at cursor When executing the query it will run the statement where the cursor is place
up until the semicolonRun all parts of the script in a se-quence
Each statement in the window will be run sequentially and the output ofeach statement will be shown in the output and if the statement was a SE-LECT then a results panel will be displayed
Run entire script as a batchAbort Query After executing a query you can direct Aginity Team to send a request to
the database to cancel the query
See also
Note one of the greatest challenges in SQL is learning the different functional syntax from different database vendorsWe are trying to make that easy by giving you links to the SQL reference manuals we support
62 Executing to a File
In version 17 of Aginity Pro we released the ability to use our editor commands to spool the results of a SQLstatement(s) to a file(s)
To do this you must issue the following commands
1 Use the +sql command to tell the editor you will be writing SQL in this section
2 You will then use the output file command to tell the editor you will spool the results to an outputfile
3 In the table below is a series of parameters and descriptions to be used when spooling
4 Use the +begin statement to tell the editor you from here until the +end command you will haveSQL to execute
5 Write your SQL
6 End with +end
7 Use the Run commands as you would any normal SQL statement as described in the Run Scopesection above
The code below is an example you can use to build off of
1 -- This will write the SQL statement between +begin and +end to therarr˓file specified
2
3 +sql4 output file5 path usersjschlittDownloadsjeff16 delimiter 7 null_value NULL8 quote_char 9 overwrite true
10 +begin11 select from wb_pro_marketing_list12 where emaildomain = aginitycom13 +end
52 Chapter 6 Using the Query Panel in Aginity Team
Aginity Team Documentation Release 1
Note We only support today the file type of csv You can still change the delimiter but all files with have a csvextension
The table below illustrates the current values accepted in execute to file commands
Parame-ter
Options
path On Mac this should be in the format ldquodirdirfilenamerdquo On Windows it should be in the formatldquodrivedirectoryfilenamerdquo
delimiter You can use any value but we recommend or | or ^ or t for (tab)null_value enter a character field for null typically lsquorsquo (empty string) or lsquoNULLrsquoquote_char enter how to enclose character string typically the quotation (ldquo)overwrite whether or not to allow overwrite if file exists true or falseheader true or false on whether you want to display headers in fileencoding the encoding of the file UTF_8 is the only value supported currentlycompres-sion
we can compress the file after it is written Values are NONE ZIP and GZIP
See also
We have a great knowledge base article on how to use the catalog to facilitate using the export as file editor feature
63 Using Parameters in your Query
Parameters can be used in Aginity Team by using the $ in any part of a SQL statement When you execute a query theAginity Team application will ask you to fill in the value of the parameter before it sends the query to the database
1 --sample parameter query2
3 select 4 from landing_dim_customer5 where gender = $fill_in_gender_at_runtime6 limit 100
You will have datatype choices at runtime as shown in the table below
Parameter Data Type Action TakenAs Is Aginity Team will send the value exactly as written with no casting This
is often used when using the parameter to fill in database table or columnnames See example 2 below
Hint You can specify default values with parameters by using this syntax with your parameter
$fill_in_gender_at_runtimelsquoMrsquo
When you run the query you will see the little gear icon as shown below Clicking that will populate thedefault value
63 Using Parameters in your Query 53
Aginity Team Documentation Release 1
64 Auto-Complete Capabilities
In Aginity Team we have implemented auto-complete on several database platforms and will be deploying across allover time The auto-complete capability has three capabilities
1 Display any words on the editor screen from above where your current cursor is
2 Display SQL Syntax like SELECT WHERE FROM all the way to database platform specific functions likeCASE DATEDIFF or CURRENT_DATE()
3 Display the database schema table column as you are typing
Hint To initiate just the database browser which shows database objects plus snippets hit the Ctrl+Space buttonotherwise as you type if auto-complete is supported it will automatically popup
Note Currently we support auto-complete on Netezza Redshift and Snowflake
54 Chapter 6 Using the Query Panel in Aginity Team
Aginity Team Documentation Release 1
65 Snippet support
We have pre-wired some special snippets within the editor as well to make writing SQL simpler The table belowdetails those snippets that are currently available
Snippet Actionselall will generate generic SELECT FROMselwh will generate generic SELECT FROM WHEREupd will generate an UPDATE statementins will generate an INSERT statementdel will generate a DELETE statementexpf will generate a generic export to file statement
66 Common Actions in Query Panel
We will highlight common functions heavily used in the editor here There is a complete list of available editorfunctions which can be accessed by hitting the Command+Shift+P on Mac or the Ctrl+Shift+P button within theeditor or from the View-gtCommand Palette menu item
661 Renaming Tabs
You can rename the query tabs by double clicking and typing in a name as shown below
662 Commenting SQL
In Aginity Team you can use the typical SQL syntax to comment your code as shown below
1 -- This is one way to comment your SQL code2
3 SELECT AVG(LineTotal)4 FROM salesSalesOrderDetail5
6 This is another way to comment your SQL code
65 Snippet support 55
Aginity Team Documentation Release 1
Hint If highlight multiple lines of code you can also use the Shortcut Keys Ctrl+K+C on Windows or Com-mand+K+C on Mac to comment them out To uncomment use Ctrl+K+U or Command+K+U
663 Keeping Connection
The Keep Connection checkbox as show below will instruct Aginity Team to maintain the connection to the databaseif the default behavior of the database is to disconnect after the execution of a query You are still subject to an overalldatabase connection timeout if you session connection exceeds the permitted database setting
664 Find and Replace
Ctrl+F (Windows) or Command+F (Mac) will bring up the find and replace box as shown below
67 Interacting with Query Results
Once your query has been executed you can use the features of the result grid to interact with the result set The typicalactions you will do are listed below
bull Reordering the Result Grid
bull Sorting the Result Grid
bull Filtering the Result Grid
bull Exporting results to CSV
671 Reordering the Result Grid
Once a query has executed successfully you may rearrange the columns in the Result Grid in order to more effectivelyperform subsequent analyses Rearranging the Result Grid is simple simply click hold and drag the column headerfor the column you wish to move As you move it left or right the grid will automatically adjust to reposition thecolumn
56 Chapter 6 Using the Query Panel in Aginity Team
Aginity Team Documentation Release 1
Once you are satisfied with the new position of the column you may release the drag and the column will lock intoplace
672 Sorting the Result Grid
After successfully executing a query if the query has returned any rows you may sort the results in order to permitvarious types of analysis of your results
In order to sort your results simply click on the header row in the results grid If the results are already being sortedby that column then the sort order will toggle between ascending and descending
67 Interacting with Query Results 57
Aginity Team Documentation Release 1
673 Filtering the Result Grid
Data in the Result Grid may be filtered to make it easier to locate and analyze certain subsets of the resultant datawithout requiring you to submit an entirely separate query
To filter the result grid by values in a particular column bring your mouse cursor to the column header for the columnto which you wish to apply a filter In the right-hand side on the header row the filter icon (three horizontal bars) willappear Click on the filter icon and you will be presented with a pop-up menu that will allow you to enter your filtercriteria
By default the filter criteria will select a ldquoContainsrdquo filter but several other filter types exist and you may select anyof them Once you have selected the filter type you wish to apply type the filter into the text box The results willimmediately begin to filter
58 Chapter 6 Using the Query Panel in Aginity Team
Aginity Team Documentation Release 1
When a column is being filtered a funnel icon will appear in its header To remove the filter you may re-enter thefilter mode by clicking on the filter icon (three bars) in the header row and simply delete the filter text
Multiple columns may have active filters at the same time To accomplish this simply perform these steps on eachcolumn
674 Exporting results to CSV
Once you have successfully executed a query you can elect to export those results in Comma Separated Value (CSV)format to a file outside of Aginity Team To do this right-click anywhere in the results panel Doing this will displaya context menu from which you will select the option ldquoExport to CSVrdquo
After selecting this option you will be presented with a screen that permits you to select the location to which to saveyour results Once you have identified the proper location press the Save button to complete the export
CSV files may subsequently be imported into a large number of different programs for further review and analysis
See also
bull Adding Query to Catalog
bull Using Discovery Panel
67 Interacting with Query Results 59
Aginity Team Documentation Release 1
60 Chapter 6 Using the Query Panel in Aginity Team
CHAPTER 7
Using the Catalog in Aginity Team
71 Catalog Overview
The query catalog is a unique capability of Aginity Team allowing you to easily save manage and use items stored init Letrsquos start with browsing the catalog
The catalog is organized by any number of directories and sub-directories of queries as shown below
See also
61
Aginity Team Documentation Release 1
Click Read this article for some ideas on how to best organize your catalog
Queries are given friendly names and can be used or accessed in several ways The first way is to drag the catalogquery into a query panel as shown in the two images below
Fig 1 You can drag the query into the empty query panel
You can also edit queries within a query panel By right clicking on a catalog item and choosing edit code in tab youcan change the SQL itself
62 Chapter 7 Using the Catalog in Aginity Team
Aginity Team Documentation Release 1
Fig 2 After you drag the item it will present the full catalog query for edit or execution
71 Catalog Overview 63
Aginity Team Documentation Release 1
You can edit and save the catalog query in a query panel worksheet as shown below
64 Chapter 7 Using the Catalog in Aginity Team
Aginity Team Documentation Release 1
Hint If you see a next to the tab name in the query panel it means a change has not been saved
By editing the details of a catlaog query you can see key metadata items and statistics about the catalog
71 Catalog Overview 65
Aginity Team Documentation Release 1
72 Calling Catalog Items from SQL
One of the most innovative features of Aginity Team is the ability to call catalog items from within SQL statements
The video and following examples below will give you basic syntax required to call a catalog item
66 Chapter 7 Using the Catalog in Aginity Team
Aginity Team Documentation Release 1
721 Single SQL SELECT Statement
In this example we have a single SQL SELECT statement in the catalog called OrderAverage
This is the code in the Catalog
1 SELECT AVG(LineTotal)2 FROM salesSalesOrderDetail
To call this from the query panel you would issue the following command Note the highlighted reference to the objectin the catalog
1 SELECT 2 FROM (OrderAverage) a
This is the code passed to the database
1 SELECT 2 FROM (3 SELECT AVG(lineTotal)4 FROM SalesSalesOrderDetail5 ) a
722 Using Catalog Item to Facilitate Relationships
In this example we will predefine a join in the catalog called ClientAddress and then use it in the context of anotherSQL statement
This is the code in the Catalog
1 clients c2 JOIN addresses a3 ON cclientsid = aclientsid
To call this from the query panel you would issue the following command Note the highlighted reference to the objectin the catalog
1 SELECT 2 FROM ClientAddress
This is the code passed to the database
1 SELECT 2 FROM clients c3 JOIN addresses a4 ON cclientsid = aclientsid
723 Creating and Reusing Calculations
In this example we will predefine a Calculations in the catalog called Residual and then use it in the context of anotherSQL statement
This is the code in the Catalog
72 Calling Catalog Items from SQL 67
Aginity Team Documentation Release 1
1 1-total
To call this from the query panel you would issue the following command Note the highlighted reference to the objectin the catalog
1 SELECT item2 Residual3 FROM table
This is the code passed to the database
1 SELECT item2 1-total3 FROM table
724 Executing a Multi-Step script
In this example we will predefine a series of SQL statements in the catalog called DailyRun and then execute it by asingle call Any DML (SELECT CREATE UPDATE INSERT DELETE) can be used
This is the code in the Catalog
1 CREATE TABLE xyz AS2 CREATE TABLE abc AS3 SELET FROM xyz JOIN abc
To call this from the query panel you would issue the following command Note the highlighted reference to the objectin the catalog
1 DailyRun
This is the code passed to the database
1 CREATE TABLE xyz AS2 CREATE TABLE abc AS3 SELECT FROM xyz JOIN abc
725 Using Parameters in Catalog
In this example we will use a parameter within a catalog item called CitySelect
This is the code in the Catalog Note the highlighted line has the parameter in it
1 SELECT 2 FROM addresses3 WHERE city = $city
To call this from the query panel you would issue the following command Note the highlighted reference to the objectin the catalog
1 CitySelect
This is the code passed to the database
68 Chapter 7 Using the Catalog in Aginity Team
Aginity Team Documentation Release 1
1 SELECT 2 FROM addresses3 WHERE city = Chicago
Note Upon execution of the command Aginity Team will ask you to supply a parameterized value For moreinformation on parameters see Using Parameters
73 Adding Items to Catalog
To add a new query to the catalog highlight any part of a SQL statement(s) right click and select Save selection tocatalog as shown below
Once you save you will be asked to provide metadata about the query you are adding
73 Adding Items to Catalog 69
Aginity Team Documentation Release 1
Note It is important to fill out the description metadata as it will be used in searching The more information youprovide about the context of usage key business terms and intended usage the better search results you will get
You can also easily create new folders in the catalog or add SQL entries directly from the Catalog Browser by clickingthe (+) to the right of the Catalog header
When adding a new folder you will be presented with a basic text box to create your folder as shown below
74 Import and Export Items from Catalog
You have the ability to Import and Export both your full catalog as well as any folder selected within the catalog
Note We highly recommend taking regular exports of your catalog to disk to prevent accidental loss of queries
741 Export Steps
To Export your catalog start by either Right Clicking on a Catalog Folder or Using the Aginity Pro -gt Export Catalogmenu as shown below
70 Chapter 7 Using the Catalog in Aginity Team
Aginity Team Documentation Release 1
Your first step is to save either an entire folder or a selection of items within a folder
The final step in exporting is to name the file and location you will save to as shown below
742 Import Steps
Importing is valuable for several reasons One is to restore SQL catalog items you may have lost or more importantlythe ability to collaborate with other SQL developers and share your SQL making your a more efficient and consistentSQL developer
74 Import and Export Items from Catalog 71
Aginity Team Documentation Release 1
The first step is to Right Click on a folder you want to import to and Chooose Import Catalog as shown below
Note You can also use the Aginity Pro Menu -gt Import Catalog The main difference between using these twocapabilities is the context of where you are importing items If you choose to import from the Aginity Pro menu youmust set the context where to import If you Right Click on a folder the context is set to that folder
After choosing to import you will choose the file to import By default Aginity catalog files have the extensionaginitypkg
After choosing your file you can specify the folder to import to and what to import as shown below
72 Chapter 7 Using the Catalog in Aginity Team
Aginity Team Documentation Release 1
Hit the Import button and your queries should be imported
See also
Aginity also maintains a Github repository of Catalog queries to be used These queries are either administrativequeries for specific platforms data engineering queries that do powerful transformations against generic data or ana-lytic queries showing how to do cool things in SQL
Access the repositories here
See also
Using Query Panel
74 Import and Export Items from Catalog 73
Aginity Team Documentation Release 1
74 Chapter 7 Using the Catalog in Aginity Team
CHAPTER 8
Using Discovery Panel in Aginity Team
The Discovery Panel is a feature that is unique to Aginity Team and which allows you to quickly identify and reusecode that yoursquove previously executed or saved Using the Discovery Panel begins with a search Watch the videobelow to get a sense for how this feature works
By default the Discovery Panel allows you to search both your query execution history and your Pro Catalog at thesame time However by selecting one of the radio buttons in the Discovery Panel you can choose to focus on just oneor the other if you prefer
81 Searching Query Execution History
Start by typing in any free-text you want such as Sales as shown Below
75
Aginity Team Documentation Release 1
The search engine will do a full text search and display all results
82 Searching the Amp Pro Catalog
Buy clicking on the Catalog radio button you will restrict your search as shown below
83 Expanding the results
Once you have performed a search Amp Pro will dynamically update the results in the Discovery Panel to match thesearch term you have entered Yoursquoll be able to view a small amount of the query by default but if more is requiredyou can click on the arrows in the corner of the preview in order to expand the snippet further
84 Doing More with the Discovery Panel
A place holder for advanced filtering capabilities
76 Chapter 8 Using Discovery Panel in Aginity Team
CHAPTER 9
Reference
91 Video Reference
The following is a reference list of videos about Aginity Team and how to use its features
bull
bull
bull
bull
bull
bull
92 Shortcut Key Reference
Command ActionCommand K + C (Mac) or Ctrl K + C (Windows) Comment lines of codeCommand K + U (Mac) or Ctrl K + U (Windows) Uncomment lines of codeCommand F (Mac) or Ctrl F (Windows) Find and Replace Menu
93 Frequently Asked Questions
The section below is dedicated to commonly asked questions that we compile and provide answers to Over time asthings change we will keep this table up to date
77
Aginity Team Documentation Release 1
931 What Control do I have with Row Limit Preference
By default we cap the row limit preference to 100K rows to discourage users from spooling too much data across yournetwork Trust us your network infrastructure folks do appreciate it Fear not though you have options First if youset the preference to 0 it will spool as much as you want until either you run out of memory or your query completesAlternatively we recommend spooling the output to a file if you are doing returns greater than 100K rows Refer tothe documentation on execute query to file
94 SQL Reference Guides for Supported connections
As SQL developers ourselves we thought putting links to the databases we support in our documentation was a goodidea so here they are
bull
bull
bull
bull
95 Driver Support Reference
The table below is a cross reference of driver versions by platform
Platform Driver Version Class NameNetezza Not distributed with software
(nzjdbcjar)orgnetezzaDriver
SQL Server 720 jre8 commicrosoftsqlserverjdbcSQLServerDriverRedshift 12161027 comamazonredshiftjdbcDriverGreenplum and Post-gres
4225 orgpostgresqlDriver
Hive 121 orgapachehivejdbcHiveDriverSnowflake 3623 3628 355 netsnowflakeclientjdbcSnowflakeDriverIBM DB2 Warehouse db2jcc4 comibmdb2jccDB2Driver
78 Chapter 9 Reference
CHAPTER 10
Troubleshooting
This page is dedicated to common issues or errors you may encounter when using Aginity Team We recommend youalso post any new issues or questions to our Aginity Team Forum
The is a great resource for posting questions searching for common solutions to features of Pro or just learning howto be efficient as a SQL analytic developer through samples best practices and collaboration with other Pro users
Is-sueNum-ber
Isthis aDe-fect
Source of Error Description of Error Resolution
1 No Cannot DownloadDrivers via Con-nection Screen
In most cases your organization isblocking Aginityrsquos ability to downloaddrivers from a Maven repository
Follow directions in the Config-ure Connections documentationto Manually Add Drivers
79
Aginity Team Documentation Release 1
80 Chapter 10 Troubleshooting
CHAPTER 11
End User License for Aginity Team
Click here for end users license
81
- Administering Aginity Team
-
- Deploying Aginity Team through AWS Marketplace
- Installing Aginity Team on Linux
- Upgrading Aginity Team
- Backing Up or Restoring Team Catalog
-
- Creating Users in Aginity Team
-
- Administering Users
-
- Enabling Snowflake OAuth in Aginity Team
- Configuring Connections in Aginity Team
-
- Downloading Drivers
- Setting up Netezza Connections
- Setting up Redshift Connections
- Setting up Snowflake Connections
- Setting up Hive Connections
- Setting up SQL Server Connections
- Setting up DB2 Warehouse Server Connections
- Setting up Greenplum and Postgres Connections
- Import and Exporting Connections
-
- Using the Database Explorer in Aginity Team
-
- Viewing the Database Data Dictionary
- Database Object Support by Platform
- Quick Actions from Explorer
-
- Using the Query Panel in Aginity Team
-
- Writing your First Query
- Executing to a File
- Using Parameters in your Query
- Auto-Complete Capabilities
- Snippet support
- Common Actions in Query Panel
- Interacting with Query Results
-
- Using the Catalog in Aginity Team
-
- Catalog Overview
- Calling Catalog Items from SQL
- Adding Items to Catalog
- Import and Export Items from Catalog
-
- Using Discovery Panel in Aginity Team
-
- Searching Query Execution History
- Searching the Amp Pro Catalog
- Expanding the results
- Doing More with the Discovery Panel
-
- Reference
-
- Video Reference
- Shortcut Key Reference
- Frequently Asked Questions
- SQL Reference Guides for Supported connections
- Driver Support Reference
-
- Troubleshooting
- End User License for Aginity Team
-
Aginity Team Documentation Release 1
Note We will generate an encryption key to ensure all information for connections and your catalog are encryptedThe installation will automatically generate and store that key on the etcaginity-teamserviceconf file
Step 4 Installing SSL certificate
The SSL certificate generation can be called using
this will generate certificatesudo optaginity-teambinssl-certificate-gensh
You will be asked for the following information
1 First and last name
2 Name of organization unit
3 Name of organization
4 Name of City or Locality
5 Name of State or Province
6 Name of Country code
7 Finally when asked to ldquoEnter key password for ltaginity_certgt (RETURN if same as keystore password) rdquo pressRETURN
123 Configuring Aginity Team Server
You can adapt Aginity Team Server to your needs by changing settings in etcaginity-teamserviceconf andetcaginity-teamapplicationyml configuration files
The serviceconf file contains settings of a linux service running Aginity Team It is in a plain text file format Hereare the parameters in the etcaginity-teamserviceconf file
General Configuration Parameters
SERVICE_KEYSTORE_PATH
8 Chapter 1 Administering Aginity Team
Aginity Team Documentation Release 1
The path to a java keystore file Aginity Team generates this file when you run optaginity-teambinssl-certificate-gensh
Default etcaginity-teamcacerts
JVM_MEMORY_LIMIT
The value of JVM maximum heap size The number has to be an integer You should specify its value using one ofthe letters ldquomrdquo or ldquoMrdquo for MB or ldquogrdquo or ldquoGrdquo for GB Examples 1024m 1024MB 12g 12GB
Default 1024m
AGINITY_ENCRYPTION_KEY
The value of encryption key which is used to encrypt H2 database used by the application This value is generated byAginity Team
Note We recommend that you copy the encryption key to a safe place as you may need it to recover Aginity TeamServer using a database backup
AGINITY_CONFIG_PATH
The path to the application configuration yml-file Do not change its value
Default etcaginity-teamapplicationyml
DB_PATH
The path to a directory to deploy Aginity Teamrsquos H2 database in
Default varlibaginity-team
Default varlibaginity-team
Configuring the YML Application File
Aginity Team Server can be customized through a number of settings of the etcaginity-teamapplicationyml file Ituses YAML format Depending on your needs Aginity Team can be configured to use either embedded H2 database orPostgreSQL database server You may want to change TCP port the server is accepting HTTP request on or integrateAginity Team with external identity providers
Note YAML does not support tab characters for indentation You should use spaces for that
For the reason of backward compatibility some settings in applicationyml use parameter expansions The basic formof parameter expansion is $parameter- The parameter is a key from etcaginity-teamserviceconf You can replaceany $parameter- with your custom value There are default values for some parameters in the configuration file
$parameter-defaultValue
If parameter is unset in etcaginity-teamserviceconf the expansion of defaultValue is substituted Otherwise thevalue of parameter is substituted
Webserver Options
server Options
12 Installing Aginity Team on Linux 9
Aginity Team Documentation Release 1
serverport $SERVICE_PORT-8080publicUrl $PUBLIC_URL-httplocalhost8080
serverport
TCP port Aginity Team uses to accept HTTP requests You may want to setup Aginity Team to listen on 443 tosimplify URL users should use to access Aginity Team In this case the server section looks like as follows
Default 8080
serverport 443publicUrl httpsmyexamplecom
serverpublicUrl
publicUrl is a URL of a server running Aginity Team It is a public URL available outside your corporate network
publicUrl has the following format schemehostport where scheme can be either http or https host ishostname of the server running Aginity Team port is TCP port Aginity Team is using
Default httplocalhost8080
Catalog Database Options
database Options
database BEGIN H2 database configurationh2
dbFilePath $DB_PATH- END H2 database configuration BEGIN PostgreSQL configuration This section is commented out by default since only one type of databaserarr˓could be enabled to enable PostgreSQL comment out the H2 database configuration sectionrarr˓and uncomment the section below postgres user user password password jdbcUrl jdbcpostgresqlhostportdatabase_name properties any properties specific to your JDBC driver ssl true connect using SSL SSL support must be enabled on therarr˓database server side sslmode require END PostgreSQL configuration
By default Aginity Team installs embedded H2 database to store application data Another option is to use a Post-greSQL database In this case you have to deploy PostgreSQL server and create a database by yourself Here is anexample of the database section with enabled PostgreSQL database
database BEGIN H2 database configuration h2
(continues on next page)
10 Chapter 1 Administering Aginity Team
Aginity Team Documentation Release 1
(continued from previous page)
dbFilePath $DB_PATH- END H2 database configuration BEGIN PostgreSQL configuration
postgresuser db_userpassword db_passowdjdbcUrl jdbcpostgresqlmyexamplecom5432aginity_team_databaseproperties
ssl truesslmode require
END PostgreSQL configuration
Note Only one type of database could be enabled To enable PostgreSQL comment out the H2 database configura-tion section and uncomment the PostgreSQL configuration section
databaseh2dbFilePath
The path to a directory to deploy Aginity Teamrsquos H2 database in
databasepostgresuser
The database user
databasepostgrespassword
The database userrsquos password
databasepostgresjdbcUrl
The connection URL
jdbcUrl has the following format jdbcpostgresqlhostportdatabase_name where host is the IP address orthe hostname of the database server port is TCP port the database server is listening database_name is the nameof Aginity Team database created by you
databasepostgresproperies
This section may contain any number of additional connection parameters which PostgreSQL JDBC driver supportsYou can read about the jdbc driver parameters at jdbcpostgresqlorg
Logging Options
logging Options
loggingpathToLogFile $PATH_TO_LOG_FILE-varlogaginity-teammaxFilesCount $MAX_FILES_COUNT-100MBmaxFileSize $MAX_FILE_SIZE-1
loggingpathToLogFile
The path to a directory to store application log files in
Default varlogaginity-team
loggingmaxFilesCount
12 Installing Aginity Team on Linux 11
Aginity Team Documentation Release 1
The maximum number of the log files Aginity Team creates
Default 1
loggingmaxFileSize
The maximum size of a log file The number has to be an integer You should specify its value using one of the letterslsquoKBrsquo lsquoMBrsquo or lsquoGBrsquo after the number Examples 200KB 35MB 1GB
Default 100MB
Platform Options
This section is used to set up OAuth for the Snowflake databases Please refer to specific Snowflake section in thedocumentation Enabling Snowflake SSO
Security Configuration Options
userDirectory Options
This section allows you to integrate Aginity Team with your LDAP system to import users sync user information anddelegate user authentication to LDAP server
userDirectoryname LDAP Serverenabled trueserverSettings
host ldapserverexamplecomport 389bindDN cn=admindc=exampledc=combindPassword admin_passwordencryption PLAINverifyCertificates falsetlsOptions
trustStorePath pathtotrustStorefiletrustStorePassword my_passwordtrustStoreType PKCS12
connectionRuleconnectTimeout 0responseTimeout 0
userSchemabaseDN ou=usersdc=exampledc=comuserFilterusernameAttribute uidfirstNameAttribute givenNamelastNameAttribute snemailAttribute mailsearchScope SUB_TREE
userDirectoryname
A descriptive name of the LDAP connection
userDirectoryenabled
Flag to indicate whether LDAP authentication is on or off
userDirectoryserverSettingshost
The IP address or hostname of the LDAP server
12 Chapter 1 Administering Aginity Team
Aginity Team Documentation Release 1
userDirectoryserverSettingsport
TCP port of the LDAP server
userDirectoryserverSettingsbindDN
The distinguished name of the user that the application will use when connecting to the directory server Examplecn=admindc=exampledc=com
userDirectoryserverSettingsbindPassword
The user password
userDirectoryserverSettingsencryption
Type of connection encyption Can be set to PLAIN START_TLS or SIMPLE_TLS START_TLS is preferred optionSTART_TLS begins as a plaintext connection over the standard LDAP port (389) and that connection is then upgradedto SSLTLS
userDirectoryserverSettingsverifyCertificates
If set to true Aginity Team verifies the certificate used for SSLTLS connection to the LDAP server A java trust-store configured in userDirectoryserverSettingstlsOptions is used to verify the certificate If you use a self-signedcertificate you must import the certificate to the truststore before starting Aginity Team
userDirectoryserverSettingstlsOptions
Use this section to configure your java truststore that is used to verify the LDAP server certificate
userDirectoryserverSettingstlsOptionstrustStorePath
The path to the Java trust store where certificates are stored
userDirectoryserverSettingstlsOptionstrustStorePassword
The password to the java trust store
userDirectoryserverSettingstlsOptionstrustStoreType
The type of the trust store The most common are JKS and PKCS12
userDirectoryconnectionRuleconnectTimeout
Timeout in milliseconds for connection to LDAP server 0 means no timeout
userDirectoryconnectionRuleresponseTimeout
Timeout in milliseconds for response time from LDAP server 0 means no timeout
userDirectoryuserSchemabaseDN
The root distinguished name (DN) to use when running queries against the directory server
userDirectoryuserSchemauserFilter
An LDAP search filter to be used when searching user objects from the LDAP server within the base DN Exampleldquo(amp(objectCategory=Person)(sAMAccountName=))rdquo
userDirectoryuserSchemausernameAttribute
Defines which attributes on an LDAP user entry will be used as its username
userDirectoryuserSchemafirstNameAttribute
Defines which attributes on an LDAP user entry will be used as its first name
userDirectoryuserSchemalastNameAttribute
Defines which attributes on an LDAP user entry will be used as its last name
12 Installing Aginity Team on Linux 13
Aginity Team Documentation Release 1
userDirectoryuserSchemaemailAttribute
Defines which attributes on an LDAP user entry will be used as its email address
userDirectoryuserSchemasearchScope
Specify strategy to use when doing a search Possible options SUB_TREE (search request should be performedagainst the search base and all entries below) ONE (search request should be performed against entries that areimmediate subordinates of the entry specified as the search base DN) BASE (search request should only be performedagainst the entry specified as the search base DN)
124 Starting Aginity Team Server
Prior to starting the Agnity Team server you must create the administrator username and password
You can do this by running the team-create-superuser script in the optaginitybin directory on the server
this will create a user with the administrator rolesudo optaginity-teambinteam-create-super-usersh
Step 5 You are now ready to start Aginity Team
We use the following commands to start Aginity Team in the background and with logging turned on
sudo systemctl start aginity-team
You can check if Aginity Team is running by issuing this command
sudo systemctl status aginity-team
125 Accessing Aginity Team for the First Time
Step 6 Step 6 Open browser and navigate to httpsltip or team server namegtltserver portgtlogin You will see thefollowing image
bull Enter credentials you used to create the administrator to enter the application
Step 7 Register and Apply License Key
14 Chapter 1 Administering Aginity Team
Aginity Team Documentation Release 1
When you open the application it will ask you to register the software and then you will be asked to applythe license key
If it does not ask for the license key you can click on Help -gt Register again and the license key boxshould pop open as shown below
12 Installing Aginity Team on Linux 15
Aginity Team Documentation Release 1
Note It is imperative that all users be created with valid business email addresses
Send the link to team to any new user along with their usernamepassword combination
126 Stopping Aginity Team Services
Log in as the team user and issue the following command
sudo systemctl stop aginity-team check to see if it is stopped Usingsudo systemctl status aginity-team
See also
Add Connections
13 Upgrading Aginity Team
Upgrading team consists of logging into the Team server downloading the latest update and applying it from thecommand line
For clarities sake when we refer to aginity-team-ltversiongt-amd64deb we purposely leave version generic Eachupgrade will have a different number associated with it
Warning It is important to take a backup of both your encryption key for the Team catalog and to do a BackingUp or Restoring Team Catalog before upgrading This way if anything goes wrong you will not use your catalogIt is also recommended to do a manual export of your catalog from time to time
You can get the encryption key using the command below
sudo cat etcaginity-teamserviceconf
16 Chapter 1 Administering Aginity Team
Aginity Team Documentation Release 1
131 Step 1 Logging into Team Server
SSH into the Team server as an administrator
Note Typically you will log in as an account other than root and then you will be using the sudo command
132 Step 2 Check to see if Team is Currently Running and then Shut it Down
Issue the command below to check the status of the Team service
sudo systemctl status aginity-team
If Team is running shut it down by issuing this command
sudo systemctl stop aginity-team
Note It is always a good idea to run the status check again to make sure Team has been shut down
133 Step 3 Download the Latest Version of Aginity Team
Using the wget command you can download the latest version as shown below
wget httprepositoryaginitycoms3amazonawscomAginityTeamaginity-team-ltversionrarr˓gt-amd64deb
134 Step 4 Upgrading the Software
Run the upgrade process by issuing this command
on Ubuntusudo apt-get install aginity-team-ltversiongt-amd64deb on RHELsudo yum install aginity-team-ltversiongt-amd64deb
The package manager will determine if your configuration files are different from ones bringing with the new versionof the application being installed and will offer you a few option to proceed with installation
13 Upgrading Aginity Team 17
Aginity Team Documentation Release 1
You should always keep your currently-installed version and resolve any conflicts by comparing and merging thedifference manually
135 Step 5 Restart Aginity Team
Restart the server by issuing this command
sudo systemctl start aginity-team
14 Backing Up or Restoring Team Catalog
We have provided two files listed and described below which will allow you to automate or manually backup andrestore your Aginity Team catalog
141 Backup Script
The backup script backupsh will perform and compress a backup of the Aginity Team Catalog to the tmp di-rectory on your OS It will append the date to the end of the file created and should be named in this pattern agin-ity_backup_m_d_Yzip
Note Before running the backupsh script you will need to edit it and provide the following variables
bull DESTINATION ~ if you do not want to use the default tmp
bull TOKEN ~ this value is the encryption key for the database To find out the value of it run this command
sudo cat etcaginity-teamserviceconf
bull H2PATH ~ Unless you modified the installation directory from the default you should not need to change this
bull DBPATH ~ Unless you modified the installation directory from the default you should not need to change this
18 Chapter 1 Administering Aginity Team
Aginity Team Documentation Release 1
When running a backup the Aginity Team server process will be stopped then restarted when complete
See also
If you want to schedule the backup and automate it we recommend scheduling using Crontab Crontab ReferenceGuide
142 Restore Script
To restore to an instance of the backup follow these instructions
Yoursquoll need to set the variables within the restoresh to match what is in the backupsh
First download the restore script restoresh Next you will provide the file name of the backup you want to restorein the
bull SOURCE variable
Now run the script and it will automatically re-start Aginity Team when complete
14 Backing Up or Restoring Team Catalog 19
Aginity Team Documentation Release 1
20 Chapter 1 Administering Aginity Team
CHAPTER 2
Creating Users in Aginity Team
Once you have installed your Aginity Team server you need to set up users To do this navigate to the Administrationmenu item as show below
Click the button Register New User and fill out the form as show below
21
Aginity Team Documentation Release 1
When choosing the role of Admin vs User reference this table below for differences in functionality
21 Administering Users
Once you have created users and you need to common tasks as described below you will go back into the Administra-tion Menu and click on the three dots ldquo rdquo to the right of each user row This will pop opne an edit menu as shown
22 Chapter 2 Creating Users in Aginity Team
Aginity Team Documentation Release 1
below
211 Disabling Users
You can choose to disable user which will not allow them to login but will not remove any of their catalog informationor query history
212 Resetting Passwords
To reset a password you can choose the Change password which will prompt you to enter and confirm a new password
213 Edit User
If you need to Edit any registration details such as name or role you can do that here
21 Administering Users 23
Aginity Team Documentation Release 1
24 Chapter 2 Creating Users in Aginity Team
CHAPTER 3
Enabling Snowflake OAuth in Aginity Team
We now support OAuth for the snowflake platform This feature only works on Aginity Team The details below willguide your through setting up the configuration on the server
1 Connect to your Snowflake server and create a Security Integration object for a custom client (more details canbe found at this link)
For example
CREATE SECURITY INTEGRATIONCREATE OR REPLACE SECURITY INTEGRATIONaginity_team_oAuthTYPE = OAUTHENABLED = TRUEOAUTH_CLIENT = CUSTOMOAUTH_CLIENT_TYPE = CONFIDENTIALOAUTH_REDIRECT_URI = Aginity Team Public URLapioauthsnowflakeOAUTH_ALLOW_NON_TLS_REDIRECT_URI = FALSEOAUTH_ENFORCE_PKCE = TRUEOAUTH_ISSUE_REFRESH_TOKENS = TRUEOAUTH_REFRESH_TOKEN_VALIDITY = 86400
Note Aginity Team Public URL is a URL of a server running Aginity Team It is a public URL available outsideyour corporate network
Aginity Team Public URL has the following format schemehostport where scheme can be either http orhttps host is hostname of the server running Aginity Team port is TCP port Aginity Team is using
2 Ssh to the Aginity Team server
3 Edit etcaginity-teamapplicationyml and uncomment and update the following properties
platformssnowflakeoauthhost
Snowflake account in format account_namesnowflakecomputingcom where account_name is your Snowflakeaccount name
25
Aginity Team Documentation Release 1
platformssnowflakeoauthclientId
Snowflake client ID of the Security Integration object The Snowflake administrator can find the client ID by describingthe integration that is by using the DESC SECURITY INTEGRATION command
platformssnowflakeoauthclientSecret
Snowflake client secret of the Security Integration object The Snowflake administrator can find the client secrets byusing the system function SHOW_OAUTH_CLIENT_SECRETS
serverpublicUrl Aginity Team Public URL
Database platform specific configurationsplatformssnowflake
oauthclientSecrets
- host account_namesnowflakecomputingcomclientId client idclientSecret client secret
For example a customer has 2 Snowflake accounts The first one is eb39151us-east-1snowflakecomputingcom and itis being used for Dev environment The second one is xr58911us-east-1snowflakecomputingcom and it is being usedfor Production environment Then to enable OAuth connections to these environments via Aginity Team administratorshould add the following parameters to serviceconf
serverpublicUrl httpsaginityexamplecom
platformssnowflake
oauthclientSecrets
Dev environment- host eb39151us-east-1snowflakecomputingcom
clientId fnm4OgHhswihrEfsahTyZo=clientSecret sHljg51o7jdsjds8723786f35Q0K+TthasjuczjQwY=
Production environment- host xr58911us-east-1snowflakecomputingcom
clientId kwajw56h(usaELkkwu=clientSecret gfhfrejds3232372822378YUUYthasjuczjQwY=
4 Restart the Aginity Team server
26 Chapter 3 Enabling Snowflake OAuth in Aginity Team
CHAPTER 4
Configuring Connections in Aginity Team
Aginity Team allows you to set up connections to a variety of different database platforms In order to do this clickthe + symbol next to the ldquoConnectionsrdquo header in the left navigation pane of Aginity Team You will be presentedwith a list of existing connections as well as options for adding another connection Clicking the ldquoNew Connectionrdquobutton will allow you to enter the necessary information for the connection you wish to create
Below is a quick start video of creating connections in Aginity Team
Note Aginity Team uses JDBC to connect to database platforms It is recommended you refer to the JDBC guidesfor our supported platforms to learn about specific variables to use within the Advance Parameters section of AginityTeam We will provide links to that documentation where available
The video below provides a more detailed explanation of how to use advanced parameters to illicit the desired behaviorand successful connection to the database platform
27
Aginity Team Documentation Release 1
41 Downloading Drivers
The first step in configuring a connection is to download the JDBC driver for the platform you will be using In mostcases we will provide access to the drivers which have been certified to work with Aginity Team In some cases suchas when the vendor does not allow us to distribute or you want to use a different version you will have to manuallyadd the JDBC driver
The video below provides a quick illustration of how to manage drivers
See also
Database Driver Reference Guide
To get started in the Edit or Add Connection box you will click on Edit Drivers as shown below
411 Automatic Download
As shown in the image below if we are allowed to to download drivers you will be provided a link to do so and thenbe presented with one or more drivers to use and your done
28 Chapter 4 Configuring Connections in Aginity Team
Aginity Team Documentation Release 1
In some cases you may get an error message if your organization does not allow you to download drivers (jar files)typically supplied through a Maven repository
In this case please review the section below Manually Add Drivers
412 Manually Add Drivers
If you have to manually add a driver it starts with first acquiring the JDBC jar for that platform and saving it somewhereon your machine Once you acquire the JDBC jar you can upload it to Aginity Pro
To do this you will hit the Edit Driver or Edit Drivers Panel section as shown above and you will be presented withthe following screen
You can name the Driver anything you want and provide a description
The class name if not provided must be looked up typically in the JDBC reference manual from the platform vendor
Finally if you click on the Add File button you will navigate to where you saved the Jar file and then click SaveChanges You are now ready to configure your connection
42 Setting up Netezza Connections
You can set up a connection to a Netezza (IBM PureData for Analytics) appliance here Simply populate the requesteddata into the form
42 Setting up Netezza Connections 29
Aginity Team Documentation Release 1
Note Netezza does not allow us to distribute their drivers so you must obtain it from your DBA or directly from IBMFix Central
30 Chapter 4 Configuring Connections in Aginity Team
Aginity Team Documentation Release 1
421 Using SSL with Netezza Connections
Aginity Team supports SSL when setting up a Netezza connection While setting up your Netezza connection simplyselect the level of security to enable from the dropdown selector Your choices include
bull Only Unsecured - Specify this option when you want an unsecured connection to the Netezza system If theNetezza system requires a secured connection the connection is rejected
bull Preferred Unsecured - This argument is the default value Specify this option when you would prefer anunsecured connection but you accept a secured connection if the Netezza system requires one
bull Preferred Secured - Specify this option when you want a secured connection to the Netezza system but youaccept an unsecured connection if the Netezza system is configured to use only unsecured connections
bull Only Secured- Specify this option when you want a secured connection to the Netezza system If the Netezzasystem accepts only unsecured connections or if you are attempting to connect to a Netezza system that isrunning a release before release 45 the connection is rejected
See also
For more information on SSL refer to the link Netezza SSL
422 Connection Timeout
The connection timeout will tell the session when to disconnect Typically set this to 10 minutes or 3600 seconds
423 Advanced Parameters
For Netezza you can supply additional JDBC parameters using the Advanced Properties section
See also
Here is the link to other configurable parameters supported within Netezza JDBCrsquos driver
42 Setting up Netezza Connections 31
Aginity Team Documentation Release 1
43 Setting up Redshift Connections
431 Using SSL Mode with Redshift Connections
Aginity Team supports SSL when setting up a Redshift connection While setting up your Redshift connection simplyselect the level of security to enable from the dropdown selector Your choices include
bull Disable - SSL is disabled and the connection is not encrypted
bull Prefer - SSL is used if the server supports it Amazon Redshift supports SSL so SSL is used when you set
32 Chapter 4 Configuring Connections in Aginity Team
Aginity Team Documentation Release 1
sslmode to prefer
bull Allow - SSL is used if the server requires it
bull Require - SSL is required
See also
For more information on Redshift SSL refer to this link
432 Advanced Parameters
For Redshift you can supply additional JDBC parameters using the Advanced Properties section
See also
Here is the link to other configurable parameters supported within Redshift JDBCrsquos driver
44 Setting up Snowflake Connections
You can set up a connection to a Snowflake here Simply populate the requested data into the form
44 Setting up Snowflake Connections 33
Aginity Team Documentation Release 1
441 Warehouse
A virtual warehouse often referred to simply as a ldquowarehouserdquo is a cluster of compute resources in Snowflake Awarehouse provides the required resources such as CPU memory and temporary storage to perform the followingoperations in a Snowflake session If you do not know which specific Warehouse to use speak to your Snowflake DBA
442 Role
This is a security role that may have been setup for you to use You can leave this field blank if you do not know whatRole to connect as
34 Chapter 4 Configuring Connections in Aginity Team
Aginity Team Documentation Release 1
443 Advanced Parameters
For Snowflake most connection detail is handled through the command line additions to the JDBC URI You cansupply additional JDBC parameters using the Advanced Properties section
See also
Here is the link to other configurable parameters supported within Snowflake JDBCrsquos driver
45 Setting up Hive Connections
You can set up a connection to a Hive databases here Simply populate the requested data into the form
45 Setting up Hive Connections 35
Aginity Team Documentation Release 1
36 Chapter 4 Configuring Connections in Aginity Team
Aginity Team Documentation Release 1
451 Picking Subprotocol
You can choose either Hive 2 or Spark SQL syntax when executing against Hive databases You can choose eithervalue in this drop down
452 Setting up Kerberos connections
In a lot of cases organizations require the use of Kerberos with Hive so by clicking on the radio button for UseKerberos for authentication you will be prompted to enter the following
bull Realm
bull FQDN
bull Service name
Note The value of these parameters are typically set by your Hadoop administrator and it is best to work with themto obtain the appropriate values
453 Advanced Parameters
You can supply additional Hive JDBC parameters using the Advanced Properties section
See also
Here is the link to other configurable parameters supported within Hive JDBCrsquos driver
46 Setting up SQL Server Connections
You can set up a connection to Microsoft SQL Server databases here Simply populate the requested data into theform
46 Setting up SQL Server Connections 37
Aginity Team Documentation Release 1
Note We only support SQL Server compatibility levels 150 and 140 which is SQL Server 2017 and greater
47 Setting up DB2 Warehouse Server Connections
You can set up a connection to IBM DB2 warehouse databases here Simply populate the requested data into the form
38 Chapter 4 Configuring Connections in Aginity Team
Aginity Team Documentation Release 1
471 Advanced Parameters
You can supply additional Hive JDBC parameters using the Advanced Properties section
See also
Here is the link to other configurable parameters supported within SQL Server JDBCrsquos driver
48 Setting up Greenplum and Postgres Connections
You can set up a connection to Greenplum and Postgres databases here Simply populate the requested data into theform Greenplum and Postgres share the same drivers so we will speak of them together
48 Setting up Greenplum and Postgres Connections 39
Aginity Team Documentation Release 1
481 Choosing Subprotocol (Only for Greenplum)
You can choose either generic Postgres or Pivotal Greenplum SQL syntax when executing against Greenplumdatabases You can choose either value in this drop down
40 Chapter 4 Configuring Connections in Aginity Team
Aginity Team Documentation Release 1
482 Advanced Parameters
You can supply additional Postgres JDBC parameters using the Advanced Properties section
See also
Here is the link to other configurable parameters supported within Postgres JDBCrsquos driver
49 Import and Exporting Connections
A new feature in Aginity Team is the ability to import and export your connection templates and share them withother users A good deal of inefficiency with SQL IDErsquos is the time it takes to get connected No longer With theconnection templates you can save all the relevant detail minus the login credentials and distribute them through aneasy import and export feature
To get started have a DBA or power user establish the connection details once and export the connection as shown inthe image below
You will be presented with a selection list of connections as shown below Select the connections you want to exportand click Export selected
Note It is important to either check the radio button include sensitive data or to uncheck it This willinclude the username and password or exclude it from the connection export
49 Import and Exporting Connections 41
Aginity Team Documentation Release 1
You will be presented with a file menu window to name and pick the folder location for the export file as shown below
42 Chapter 4 Configuring Connections in Aginity Team
Aginity Team Documentation Release 1
Once you have exported the connections you can send them to Aginity Team users and have them import them To dothat choose the Import Connections menu item as shown below
You will be presented with a file selection Choose the appropriate Aginity connection package
Note By default Aginity packages for both Catalog and Connections are prefaced with aginitypkg file types
Once you choose a file select the connections you want to import and choose Import Selected
49 Import and Exporting Connections 43
Aginity Team Documentation Release 1
See also
Navigating Database Explorer
44 Chapter 4 Configuring Connections in Aginity Team
CHAPTER 5
Using the Database Explorer in Aginity Team
The Database Explorer panel in Aginity Team can be toggled by using the Database Explorer and Catalog tabs onthe left hand pane of the application as show below The Database Explorer is used to navigate database objectsbased on the Connections defined in Aginity Team The Catalog browser is used to navigate SQL Analytics that youhave personally stored
Below is a quick start video of using the Database Explorer in Aginity Team
51 Viewing the Database Data Dictionary
Once you have established a connection to a database you can browse the database dictionary catalogs You can toggleto the Database Explorer browser by clicking on the tab as shown below The database data dictionaries typicallycontains the tables columns views and other database objects available to query from the query panel
Once you have selected the Database Explorer tab you can drill into each connection as shown below
45
Aginity Team Documentation Release 1
52 Database Object Support by Platform
The following image details what objects are visible from the browser for all of our currently supported platformsWe do releases every two weeks with Aginity Team so if there is a feature you need please contact us at sup-portaginitycom
46 Chapter 5 Using the Database Explorer in Aginity Team
Aginity Team Documentation Release 1
53 Quick Actions from Explorer
Currently you can do the following quick actions from the Database Explorer
531 SQL Statement Generation
To generate typical SQL statements from tables or views you can right click on the object navigate to scripts andchoose the appropriate script as shown below
53 Quick Actions from Explorer 47
Aginity Team Documentation Release 1
532 Selective SQL Generation on a Set of Columns
To generate SQL statements based on a selection of columns within a Table or View multi-select the columns byholding Ctrl (Windows) or Command (Mac) and selecting the columns as shown below Then generate the SQLstatement
Hint Make sure you donrsquot have the table name selected and column names at the same time If you do it will generatethe SQL for the whole table
48 Chapter 5 Using the Database Explorer in Aginity Team
Aginity Team Documentation Release 1
533 Drag and Drop Capabilities
You can drag and drop any object from the DB Explorer into the Query Panel
Note Double-clicking expands the DB Explorer tree
534 Copy JDBC Connection String
If you select any Connection (Top level of the tree) and select ldquoCopy Connection string to Clipboardrdquo you will getthe full JDBC URI which is helpful for debugging See this Knowledge Base Article for help with debugging yourAginity Team connections
See also
bull Use Catalog Browser
bull Use Query Panel
53 Quick Actions from Explorer 49
Aginity Team Documentation Release 1
50 Chapter 5 Using the Database Explorer in Aginity Team
CHAPTER 6
Using the Query Panel in Aginity Team
You will spend most of your time in the Query Panel writing SQL and saving it to your catalog in Aginity Team Thevideo below will give you an overview of creating your first query
61 Writing your First Query
Each tab in the Aginity Team application can be set to different database connections Once you establish that con-nection as shown below you can use the query panel like a text editor using SQL syntax specific to that databaseplatform
Once you write your code in Aginity Team you have options to run it using the following scope
51
Aginity Team Documentation Release 1
Execution Type DescriptionRun at cursor When executing the query it will run the statement where the cursor is place
up until the semicolonRun all parts of the script in a se-quence
Each statement in the window will be run sequentially and the output ofeach statement will be shown in the output and if the statement was a SE-LECT then a results panel will be displayed
Run entire script as a batchAbort Query After executing a query you can direct Aginity Team to send a request to
the database to cancel the query
See also
Note one of the greatest challenges in SQL is learning the different functional syntax from different database vendorsWe are trying to make that easy by giving you links to the SQL reference manuals we support
62 Executing to a File
In version 17 of Aginity Pro we released the ability to use our editor commands to spool the results of a SQLstatement(s) to a file(s)
To do this you must issue the following commands
1 Use the +sql command to tell the editor you will be writing SQL in this section
2 You will then use the output file command to tell the editor you will spool the results to an outputfile
3 In the table below is a series of parameters and descriptions to be used when spooling
4 Use the +begin statement to tell the editor you from here until the +end command you will haveSQL to execute
5 Write your SQL
6 End with +end
7 Use the Run commands as you would any normal SQL statement as described in the Run Scopesection above
The code below is an example you can use to build off of
1 -- This will write the SQL statement between +begin and +end to therarr˓file specified
2
3 +sql4 output file5 path usersjschlittDownloadsjeff16 delimiter 7 null_value NULL8 quote_char 9 overwrite true
10 +begin11 select from wb_pro_marketing_list12 where emaildomain = aginitycom13 +end
52 Chapter 6 Using the Query Panel in Aginity Team
Aginity Team Documentation Release 1
Note We only support today the file type of csv You can still change the delimiter but all files with have a csvextension
The table below illustrates the current values accepted in execute to file commands
Parame-ter
Options
path On Mac this should be in the format ldquodirdirfilenamerdquo On Windows it should be in the formatldquodrivedirectoryfilenamerdquo
delimiter You can use any value but we recommend or | or ^ or t for (tab)null_value enter a character field for null typically lsquorsquo (empty string) or lsquoNULLrsquoquote_char enter how to enclose character string typically the quotation (ldquo)overwrite whether or not to allow overwrite if file exists true or falseheader true or false on whether you want to display headers in fileencoding the encoding of the file UTF_8 is the only value supported currentlycompres-sion
we can compress the file after it is written Values are NONE ZIP and GZIP
See also
We have a great knowledge base article on how to use the catalog to facilitate using the export as file editor feature
63 Using Parameters in your Query
Parameters can be used in Aginity Team by using the $ in any part of a SQL statement When you execute a query theAginity Team application will ask you to fill in the value of the parameter before it sends the query to the database
1 --sample parameter query2
3 select 4 from landing_dim_customer5 where gender = $fill_in_gender_at_runtime6 limit 100
You will have datatype choices at runtime as shown in the table below
Parameter Data Type Action TakenAs Is Aginity Team will send the value exactly as written with no casting This
is often used when using the parameter to fill in database table or columnnames See example 2 below
Hint You can specify default values with parameters by using this syntax with your parameter
$fill_in_gender_at_runtimelsquoMrsquo
When you run the query you will see the little gear icon as shown below Clicking that will populate thedefault value
63 Using Parameters in your Query 53
Aginity Team Documentation Release 1
64 Auto-Complete Capabilities
In Aginity Team we have implemented auto-complete on several database platforms and will be deploying across allover time The auto-complete capability has three capabilities
1 Display any words on the editor screen from above where your current cursor is
2 Display SQL Syntax like SELECT WHERE FROM all the way to database platform specific functions likeCASE DATEDIFF or CURRENT_DATE()
3 Display the database schema table column as you are typing
Hint To initiate just the database browser which shows database objects plus snippets hit the Ctrl+Space buttonotherwise as you type if auto-complete is supported it will automatically popup
Note Currently we support auto-complete on Netezza Redshift and Snowflake
54 Chapter 6 Using the Query Panel in Aginity Team
Aginity Team Documentation Release 1
65 Snippet support
We have pre-wired some special snippets within the editor as well to make writing SQL simpler The table belowdetails those snippets that are currently available
Snippet Actionselall will generate generic SELECT FROMselwh will generate generic SELECT FROM WHEREupd will generate an UPDATE statementins will generate an INSERT statementdel will generate a DELETE statementexpf will generate a generic export to file statement
66 Common Actions in Query Panel
We will highlight common functions heavily used in the editor here There is a complete list of available editorfunctions which can be accessed by hitting the Command+Shift+P on Mac or the Ctrl+Shift+P button within theeditor or from the View-gtCommand Palette menu item
661 Renaming Tabs
You can rename the query tabs by double clicking and typing in a name as shown below
662 Commenting SQL
In Aginity Team you can use the typical SQL syntax to comment your code as shown below
1 -- This is one way to comment your SQL code2
3 SELECT AVG(LineTotal)4 FROM salesSalesOrderDetail5
6 This is another way to comment your SQL code
65 Snippet support 55
Aginity Team Documentation Release 1
Hint If highlight multiple lines of code you can also use the Shortcut Keys Ctrl+K+C on Windows or Com-mand+K+C on Mac to comment them out To uncomment use Ctrl+K+U or Command+K+U
663 Keeping Connection
The Keep Connection checkbox as show below will instruct Aginity Team to maintain the connection to the databaseif the default behavior of the database is to disconnect after the execution of a query You are still subject to an overalldatabase connection timeout if you session connection exceeds the permitted database setting
664 Find and Replace
Ctrl+F (Windows) or Command+F (Mac) will bring up the find and replace box as shown below
67 Interacting with Query Results
Once your query has been executed you can use the features of the result grid to interact with the result set The typicalactions you will do are listed below
bull Reordering the Result Grid
bull Sorting the Result Grid
bull Filtering the Result Grid
bull Exporting results to CSV
671 Reordering the Result Grid
Once a query has executed successfully you may rearrange the columns in the Result Grid in order to more effectivelyperform subsequent analyses Rearranging the Result Grid is simple simply click hold and drag the column headerfor the column you wish to move As you move it left or right the grid will automatically adjust to reposition thecolumn
56 Chapter 6 Using the Query Panel in Aginity Team
Aginity Team Documentation Release 1
Once you are satisfied with the new position of the column you may release the drag and the column will lock intoplace
672 Sorting the Result Grid
After successfully executing a query if the query has returned any rows you may sort the results in order to permitvarious types of analysis of your results
In order to sort your results simply click on the header row in the results grid If the results are already being sortedby that column then the sort order will toggle between ascending and descending
67 Interacting with Query Results 57
Aginity Team Documentation Release 1
673 Filtering the Result Grid
Data in the Result Grid may be filtered to make it easier to locate and analyze certain subsets of the resultant datawithout requiring you to submit an entirely separate query
To filter the result grid by values in a particular column bring your mouse cursor to the column header for the columnto which you wish to apply a filter In the right-hand side on the header row the filter icon (three horizontal bars) willappear Click on the filter icon and you will be presented with a pop-up menu that will allow you to enter your filtercriteria
By default the filter criteria will select a ldquoContainsrdquo filter but several other filter types exist and you may select anyof them Once you have selected the filter type you wish to apply type the filter into the text box The results willimmediately begin to filter
58 Chapter 6 Using the Query Panel in Aginity Team
Aginity Team Documentation Release 1
When a column is being filtered a funnel icon will appear in its header To remove the filter you may re-enter thefilter mode by clicking on the filter icon (three bars) in the header row and simply delete the filter text
Multiple columns may have active filters at the same time To accomplish this simply perform these steps on eachcolumn
674 Exporting results to CSV
Once you have successfully executed a query you can elect to export those results in Comma Separated Value (CSV)format to a file outside of Aginity Team To do this right-click anywhere in the results panel Doing this will displaya context menu from which you will select the option ldquoExport to CSVrdquo
After selecting this option you will be presented with a screen that permits you to select the location to which to saveyour results Once you have identified the proper location press the Save button to complete the export
CSV files may subsequently be imported into a large number of different programs for further review and analysis
See also
bull Adding Query to Catalog
bull Using Discovery Panel
67 Interacting with Query Results 59
Aginity Team Documentation Release 1
60 Chapter 6 Using the Query Panel in Aginity Team
CHAPTER 7
Using the Catalog in Aginity Team
71 Catalog Overview
The query catalog is a unique capability of Aginity Team allowing you to easily save manage and use items stored init Letrsquos start with browsing the catalog
The catalog is organized by any number of directories and sub-directories of queries as shown below
See also
61
Aginity Team Documentation Release 1
Click Read this article for some ideas on how to best organize your catalog
Queries are given friendly names and can be used or accessed in several ways The first way is to drag the catalogquery into a query panel as shown in the two images below
Fig 1 You can drag the query into the empty query panel
You can also edit queries within a query panel By right clicking on a catalog item and choosing edit code in tab youcan change the SQL itself
62 Chapter 7 Using the Catalog in Aginity Team
Aginity Team Documentation Release 1
Fig 2 After you drag the item it will present the full catalog query for edit or execution
71 Catalog Overview 63
Aginity Team Documentation Release 1
You can edit and save the catalog query in a query panel worksheet as shown below
64 Chapter 7 Using the Catalog in Aginity Team
Aginity Team Documentation Release 1
Hint If you see a next to the tab name in the query panel it means a change has not been saved
By editing the details of a catlaog query you can see key metadata items and statistics about the catalog
71 Catalog Overview 65
Aginity Team Documentation Release 1
72 Calling Catalog Items from SQL
One of the most innovative features of Aginity Team is the ability to call catalog items from within SQL statements
The video and following examples below will give you basic syntax required to call a catalog item
66 Chapter 7 Using the Catalog in Aginity Team
Aginity Team Documentation Release 1
721 Single SQL SELECT Statement
In this example we have a single SQL SELECT statement in the catalog called OrderAverage
This is the code in the Catalog
1 SELECT AVG(LineTotal)2 FROM salesSalesOrderDetail
To call this from the query panel you would issue the following command Note the highlighted reference to the objectin the catalog
1 SELECT 2 FROM (OrderAverage) a
This is the code passed to the database
1 SELECT 2 FROM (3 SELECT AVG(lineTotal)4 FROM SalesSalesOrderDetail5 ) a
722 Using Catalog Item to Facilitate Relationships
In this example we will predefine a join in the catalog called ClientAddress and then use it in the context of anotherSQL statement
This is the code in the Catalog
1 clients c2 JOIN addresses a3 ON cclientsid = aclientsid
To call this from the query panel you would issue the following command Note the highlighted reference to the objectin the catalog
1 SELECT 2 FROM ClientAddress
This is the code passed to the database
1 SELECT 2 FROM clients c3 JOIN addresses a4 ON cclientsid = aclientsid
723 Creating and Reusing Calculations
In this example we will predefine a Calculations in the catalog called Residual and then use it in the context of anotherSQL statement
This is the code in the Catalog
72 Calling Catalog Items from SQL 67
Aginity Team Documentation Release 1
1 1-total
To call this from the query panel you would issue the following command Note the highlighted reference to the objectin the catalog
1 SELECT item2 Residual3 FROM table
This is the code passed to the database
1 SELECT item2 1-total3 FROM table
724 Executing a Multi-Step script
In this example we will predefine a series of SQL statements in the catalog called DailyRun and then execute it by asingle call Any DML (SELECT CREATE UPDATE INSERT DELETE) can be used
This is the code in the Catalog
1 CREATE TABLE xyz AS2 CREATE TABLE abc AS3 SELET FROM xyz JOIN abc
To call this from the query panel you would issue the following command Note the highlighted reference to the objectin the catalog
1 DailyRun
This is the code passed to the database
1 CREATE TABLE xyz AS2 CREATE TABLE abc AS3 SELECT FROM xyz JOIN abc
725 Using Parameters in Catalog
In this example we will use a parameter within a catalog item called CitySelect
This is the code in the Catalog Note the highlighted line has the parameter in it
1 SELECT 2 FROM addresses3 WHERE city = $city
To call this from the query panel you would issue the following command Note the highlighted reference to the objectin the catalog
1 CitySelect
This is the code passed to the database
68 Chapter 7 Using the Catalog in Aginity Team
Aginity Team Documentation Release 1
1 SELECT 2 FROM addresses3 WHERE city = Chicago
Note Upon execution of the command Aginity Team will ask you to supply a parameterized value For moreinformation on parameters see Using Parameters
73 Adding Items to Catalog
To add a new query to the catalog highlight any part of a SQL statement(s) right click and select Save selection tocatalog as shown below
Once you save you will be asked to provide metadata about the query you are adding
73 Adding Items to Catalog 69
Aginity Team Documentation Release 1
Note It is important to fill out the description metadata as it will be used in searching The more information youprovide about the context of usage key business terms and intended usage the better search results you will get
You can also easily create new folders in the catalog or add SQL entries directly from the Catalog Browser by clickingthe (+) to the right of the Catalog header
When adding a new folder you will be presented with a basic text box to create your folder as shown below
74 Import and Export Items from Catalog
You have the ability to Import and Export both your full catalog as well as any folder selected within the catalog
Note We highly recommend taking regular exports of your catalog to disk to prevent accidental loss of queries
741 Export Steps
To Export your catalog start by either Right Clicking on a Catalog Folder or Using the Aginity Pro -gt Export Catalogmenu as shown below
70 Chapter 7 Using the Catalog in Aginity Team
Aginity Team Documentation Release 1
Your first step is to save either an entire folder or a selection of items within a folder
The final step in exporting is to name the file and location you will save to as shown below
742 Import Steps
Importing is valuable for several reasons One is to restore SQL catalog items you may have lost or more importantlythe ability to collaborate with other SQL developers and share your SQL making your a more efficient and consistentSQL developer
74 Import and Export Items from Catalog 71
Aginity Team Documentation Release 1
The first step is to Right Click on a folder you want to import to and Chooose Import Catalog as shown below
Note You can also use the Aginity Pro Menu -gt Import Catalog The main difference between using these twocapabilities is the context of where you are importing items If you choose to import from the Aginity Pro menu youmust set the context where to import If you Right Click on a folder the context is set to that folder
After choosing to import you will choose the file to import By default Aginity catalog files have the extensionaginitypkg
After choosing your file you can specify the folder to import to and what to import as shown below
72 Chapter 7 Using the Catalog in Aginity Team
Aginity Team Documentation Release 1
Hit the Import button and your queries should be imported
See also
Aginity also maintains a Github repository of Catalog queries to be used These queries are either administrativequeries for specific platforms data engineering queries that do powerful transformations against generic data or ana-lytic queries showing how to do cool things in SQL
Access the repositories here
See also
Using Query Panel
74 Import and Export Items from Catalog 73
Aginity Team Documentation Release 1
74 Chapter 7 Using the Catalog in Aginity Team
CHAPTER 8
Using Discovery Panel in Aginity Team
The Discovery Panel is a feature that is unique to Aginity Team and which allows you to quickly identify and reusecode that yoursquove previously executed or saved Using the Discovery Panel begins with a search Watch the videobelow to get a sense for how this feature works
By default the Discovery Panel allows you to search both your query execution history and your Pro Catalog at thesame time However by selecting one of the radio buttons in the Discovery Panel you can choose to focus on just oneor the other if you prefer
81 Searching Query Execution History
Start by typing in any free-text you want such as Sales as shown Below
75
Aginity Team Documentation Release 1
The search engine will do a full text search and display all results
82 Searching the Amp Pro Catalog
Buy clicking on the Catalog radio button you will restrict your search as shown below
83 Expanding the results
Once you have performed a search Amp Pro will dynamically update the results in the Discovery Panel to match thesearch term you have entered Yoursquoll be able to view a small amount of the query by default but if more is requiredyou can click on the arrows in the corner of the preview in order to expand the snippet further
84 Doing More with the Discovery Panel
A place holder for advanced filtering capabilities
76 Chapter 8 Using Discovery Panel in Aginity Team
CHAPTER 9
Reference
91 Video Reference
The following is a reference list of videos about Aginity Team and how to use its features
bull
bull
bull
bull
bull
bull
92 Shortcut Key Reference
Command ActionCommand K + C (Mac) or Ctrl K + C (Windows) Comment lines of codeCommand K + U (Mac) or Ctrl K + U (Windows) Uncomment lines of codeCommand F (Mac) or Ctrl F (Windows) Find and Replace Menu
93 Frequently Asked Questions
The section below is dedicated to commonly asked questions that we compile and provide answers to Over time asthings change we will keep this table up to date
77
Aginity Team Documentation Release 1
931 What Control do I have with Row Limit Preference
By default we cap the row limit preference to 100K rows to discourage users from spooling too much data across yournetwork Trust us your network infrastructure folks do appreciate it Fear not though you have options First if youset the preference to 0 it will spool as much as you want until either you run out of memory or your query completesAlternatively we recommend spooling the output to a file if you are doing returns greater than 100K rows Refer tothe documentation on execute query to file
94 SQL Reference Guides for Supported connections
As SQL developers ourselves we thought putting links to the databases we support in our documentation was a goodidea so here they are
bull
bull
bull
bull
95 Driver Support Reference
The table below is a cross reference of driver versions by platform
Platform Driver Version Class NameNetezza Not distributed with software
(nzjdbcjar)orgnetezzaDriver
SQL Server 720 jre8 commicrosoftsqlserverjdbcSQLServerDriverRedshift 12161027 comamazonredshiftjdbcDriverGreenplum and Post-gres
4225 orgpostgresqlDriver
Hive 121 orgapachehivejdbcHiveDriverSnowflake 3623 3628 355 netsnowflakeclientjdbcSnowflakeDriverIBM DB2 Warehouse db2jcc4 comibmdb2jccDB2Driver
78 Chapter 9 Reference
CHAPTER 10
Troubleshooting
This page is dedicated to common issues or errors you may encounter when using Aginity Team We recommend youalso post any new issues or questions to our Aginity Team Forum
The is a great resource for posting questions searching for common solutions to features of Pro or just learning howto be efficient as a SQL analytic developer through samples best practices and collaboration with other Pro users
Is-sueNum-ber
Isthis aDe-fect
Source of Error Description of Error Resolution
1 No Cannot DownloadDrivers via Con-nection Screen
In most cases your organization isblocking Aginityrsquos ability to downloaddrivers from a Maven repository
Follow directions in the Config-ure Connections documentationto Manually Add Drivers
79
Aginity Team Documentation Release 1
80 Chapter 10 Troubleshooting
CHAPTER 11
End User License for Aginity Team
Click here for end users license
81
- Administering Aginity Team
-
- Deploying Aginity Team through AWS Marketplace
- Installing Aginity Team on Linux
- Upgrading Aginity Team
- Backing Up or Restoring Team Catalog
-
- Creating Users in Aginity Team
-
- Administering Users
-
- Enabling Snowflake OAuth in Aginity Team
- Configuring Connections in Aginity Team
-
- Downloading Drivers
- Setting up Netezza Connections
- Setting up Redshift Connections
- Setting up Snowflake Connections
- Setting up Hive Connections
- Setting up SQL Server Connections
- Setting up DB2 Warehouse Server Connections
- Setting up Greenplum and Postgres Connections
- Import and Exporting Connections
-
- Using the Database Explorer in Aginity Team
-
- Viewing the Database Data Dictionary
- Database Object Support by Platform
- Quick Actions from Explorer
-
- Using the Query Panel in Aginity Team
-
- Writing your First Query
- Executing to a File
- Using Parameters in your Query
- Auto-Complete Capabilities
- Snippet support
- Common Actions in Query Panel
- Interacting with Query Results
-
- Using the Catalog in Aginity Team
-
- Catalog Overview
- Calling Catalog Items from SQL
- Adding Items to Catalog
- Import and Export Items from Catalog
-
- Using Discovery Panel in Aginity Team
-
- Searching Query Execution History
- Searching the Amp Pro Catalog
- Expanding the results
- Doing More with the Discovery Panel
-
- Reference
-
- Video Reference
- Shortcut Key Reference
- Frequently Asked Questions
- SQL Reference Guides for Supported connections
- Driver Support Reference
-
- Troubleshooting
- End User License for Aginity Team
-

Aginity Team Documentation Release 1
serverport $SERVICE_PORT-8080publicUrl $PUBLIC_URL-httplocalhost8080
serverport
TCP port Aginity Team uses to accept HTTP requests You may want to setup Aginity Team to listen on 443 tosimplify URL users should use to access Aginity Team In this case the server section looks like as follows
Default 8080
serverport 443publicUrl httpsmyexamplecom
serverpublicUrl
publicUrl is a URL of a server running Aginity Team It is a public URL available outside your corporate network
publicUrl has the following format schemehostport where scheme can be either http or https host ishostname of the server running Aginity Team port is TCP port Aginity Team is using
Default httplocalhost8080
Catalog Database Options
database Options
database BEGIN H2 database configurationh2
dbFilePath $DB_PATH- END H2 database configuration BEGIN PostgreSQL configuration This section is commented out by default since only one type of databaserarr˓could be enabled to enable PostgreSQL comment out the H2 database configuration sectionrarr˓and uncomment the section below postgres user user password password jdbcUrl jdbcpostgresqlhostportdatabase_name properties any properties specific to your JDBC driver ssl true connect using SSL SSL support must be enabled on therarr˓database server side sslmode require END PostgreSQL configuration
By default Aginity Team installs embedded H2 database to store application data Another option is to use a Post-greSQL database In this case you have to deploy PostgreSQL server and create a database by yourself Here is anexample of the database section with enabled PostgreSQL database
database BEGIN H2 database configuration h2
(continues on next page)
10 Chapter 1 Administering Aginity Team
Aginity Team Documentation Release 1
(continued from previous page)
dbFilePath $DB_PATH- END H2 database configuration BEGIN PostgreSQL configuration
postgresuser db_userpassword db_passowdjdbcUrl jdbcpostgresqlmyexamplecom5432aginity_team_databaseproperties
ssl truesslmode require
END PostgreSQL configuration
Note Only one type of database could be enabled To enable PostgreSQL comment out the H2 database configura-tion section and uncomment the PostgreSQL configuration section
databaseh2dbFilePath
The path to a directory to deploy Aginity Teamrsquos H2 database in
databasepostgresuser
The database user
databasepostgrespassword
The database userrsquos password
databasepostgresjdbcUrl
The connection URL
jdbcUrl has the following format jdbcpostgresqlhostportdatabase_name where host is the IP address orthe hostname of the database server port is TCP port the database server is listening database_name is the nameof Aginity Team database created by you
databasepostgresproperies
This section may contain any number of additional connection parameters which PostgreSQL JDBC driver supportsYou can read about the jdbc driver parameters at jdbcpostgresqlorg
Logging Options
logging Options
loggingpathToLogFile $PATH_TO_LOG_FILE-varlogaginity-teammaxFilesCount $MAX_FILES_COUNT-100MBmaxFileSize $MAX_FILE_SIZE-1
loggingpathToLogFile
The path to a directory to store application log files in
Default varlogaginity-team
loggingmaxFilesCount
12 Installing Aginity Team on Linux 11
Aginity Team Documentation Release 1
The maximum number of the log files Aginity Team creates
Default 1
loggingmaxFileSize
The maximum size of a log file The number has to be an integer You should specify its value using one of the letterslsquoKBrsquo lsquoMBrsquo or lsquoGBrsquo after the number Examples 200KB 35MB 1GB
Default 100MB
Platform Options
This section is used to set up OAuth for the Snowflake databases Please refer to specific Snowflake section in thedocumentation Enabling Snowflake SSO
Security Configuration Options
userDirectory Options
This section allows you to integrate Aginity Team with your LDAP system to import users sync user information anddelegate user authentication to LDAP server
userDirectoryname LDAP Serverenabled trueserverSettings
host ldapserverexamplecomport 389bindDN cn=admindc=exampledc=combindPassword admin_passwordencryption PLAINverifyCertificates falsetlsOptions
trustStorePath pathtotrustStorefiletrustStorePassword my_passwordtrustStoreType PKCS12
connectionRuleconnectTimeout 0responseTimeout 0
userSchemabaseDN ou=usersdc=exampledc=comuserFilterusernameAttribute uidfirstNameAttribute givenNamelastNameAttribute snemailAttribute mailsearchScope SUB_TREE
userDirectoryname
A descriptive name of the LDAP connection
userDirectoryenabled
Flag to indicate whether LDAP authentication is on or off
userDirectoryserverSettingshost
The IP address or hostname of the LDAP server
12 Chapter 1 Administering Aginity Team
Aginity Team Documentation Release 1
userDirectoryserverSettingsport
TCP port of the LDAP server
userDirectoryserverSettingsbindDN
The distinguished name of the user that the application will use when connecting to the directory server Examplecn=admindc=exampledc=com
userDirectoryserverSettingsbindPassword
The user password
userDirectoryserverSettingsencryption
Type of connection encyption Can be set to PLAIN START_TLS or SIMPLE_TLS START_TLS is preferred optionSTART_TLS begins as a plaintext connection over the standard LDAP port (389) and that connection is then upgradedto SSLTLS
userDirectoryserverSettingsverifyCertificates
If set to true Aginity Team verifies the certificate used for SSLTLS connection to the LDAP server A java trust-store configured in userDirectoryserverSettingstlsOptions is used to verify the certificate If you use a self-signedcertificate you must import the certificate to the truststore before starting Aginity Team
userDirectoryserverSettingstlsOptions
Use this section to configure your java truststore that is used to verify the LDAP server certificate
userDirectoryserverSettingstlsOptionstrustStorePath
The path to the Java trust store where certificates are stored
userDirectoryserverSettingstlsOptionstrustStorePassword
The password to the java trust store
userDirectoryserverSettingstlsOptionstrustStoreType
The type of the trust store The most common are JKS and PKCS12
userDirectoryconnectionRuleconnectTimeout
Timeout in milliseconds for connection to LDAP server 0 means no timeout
userDirectoryconnectionRuleresponseTimeout
Timeout in milliseconds for response time from LDAP server 0 means no timeout
userDirectoryuserSchemabaseDN
The root distinguished name (DN) to use when running queries against the directory server
userDirectoryuserSchemauserFilter
An LDAP search filter to be used when searching user objects from the LDAP server within the base DN Exampleldquo(amp(objectCategory=Person)(sAMAccountName=))rdquo
userDirectoryuserSchemausernameAttribute
Defines which attributes on an LDAP user entry will be used as its username
userDirectoryuserSchemafirstNameAttribute
Defines which attributes on an LDAP user entry will be used as its first name
userDirectoryuserSchemalastNameAttribute
Defines which attributes on an LDAP user entry will be used as its last name
12 Installing Aginity Team on Linux 13
Aginity Team Documentation Release 1
userDirectoryuserSchemaemailAttribute
Defines which attributes on an LDAP user entry will be used as its email address
userDirectoryuserSchemasearchScope
Specify strategy to use when doing a search Possible options SUB_TREE (search request should be performedagainst the search base and all entries below) ONE (search request should be performed against entries that areimmediate subordinates of the entry specified as the search base DN) BASE (search request should only be performedagainst the entry specified as the search base DN)
124 Starting Aginity Team Server
Prior to starting the Agnity Team server you must create the administrator username and password
You can do this by running the team-create-superuser script in the optaginitybin directory on the server
this will create a user with the administrator rolesudo optaginity-teambinteam-create-super-usersh
Step 5 You are now ready to start Aginity Team
We use the following commands to start Aginity Team in the background and with logging turned on
sudo systemctl start aginity-team
You can check if Aginity Team is running by issuing this command
sudo systemctl status aginity-team
125 Accessing Aginity Team for the First Time
Step 6 Step 6 Open browser and navigate to httpsltip or team server namegtltserver portgtlogin You will see thefollowing image
bull Enter credentials you used to create the administrator to enter the application
Step 7 Register and Apply License Key
14 Chapter 1 Administering Aginity Team
Aginity Team Documentation Release 1
When you open the application it will ask you to register the software and then you will be asked to applythe license key
If it does not ask for the license key you can click on Help -gt Register again and the license key boxshould pop open as shown below
12 Installing Aginity Team on Linux 15
Aginity Team Documentation Release 1
Note It is imperative that all users be created with valid business email addresses
Send the link to team to any new user along with their usernamepassword combination
126 Stopping Aginity Team Services
Log in as the team user and issue the following command
sudo systemctl stop aginity-team check to see if it is stopped Usingsudo systemctl status aginity-team
See also
Add Connections
13 Upgrading Aginity Team
Upgrading team consists of logging into the Team server downloading the latest update and applying it from thecommand line
For clarities sake when we refer to aginity-team-ltversiongt-amd64deb we purposely leave version generic Eachupgrade will have a different number associated with it
Warning It is important to take a backup of both your encryption key for the Team catalog and to do a BackingUp or Restoring Team Catalog before upgrading This way if anything goes wrong you will not use your catalogIt is also recommended to do a manual export of your catalog from time to time
You can get the encryption key using the command below
sudo cat etcaginity-teamserviceconf
16 Chapter 1 Administering Aginity Team
Aginity Team Documentation Release 1
131 Step 1 Logging into Team Server
SSH into the Team server as an administrator
Note Typically you will log in as an account other than root and then you will be using the sudo command
132 Step 2 Check to see if Team is Currently Running and then Shut it Down
Issue the command below to check the status of the Team service
sudo systemctl status aginity-team
If Team is running shut it down by issuing this command
sudo systemctl stop aginity-team
Note It is always a good idea to run the status check again to make sure Team has been shut down
133 Step 3 Download the Latest Version of Aginity Team
Using the wget command you can download the latest version as shown below
wget httprepositoryaginitycoms3amazonawscomAginityTeamaginity-team-ltversionrarr˓gt-amd64deb
134 Step 4 Upgrading the Software
Run the upgrade process by issuing this command
on Ubuntusudo apt-get install aginity-team-ltversiongt-amd64deb on RHELsudo yum install aginity-team-ltversiongt-amd64deb
The package manager will determine if your configuration files are different from ones bringing with the new versionof the application being installed and will offer you a few option to proceed with installation
13 Upgrading Aginity Team 17
Aginity Team Documentation Release 1
You should always keep your currently-installed version and resolve any conflicts by comparing and merging thedifference manually
135 Step 5 Restart Aginity Team
Restart the server by issuing this command
sudo systemctl start aginity-team
14 Backing Up or Restoring Team Catalog
We have provided two files listed and described below which will allow you to automate or manually backup andrestore your Aginity Team catalog
141 Backup Script
The backup script backupsh will perform and compress a backup of the Aginity Team Catalog to the tmp di-rectory on your OS It will append the date to the end of the file created and should be named in this pattern agin-ity_backup_m_d_Yzip
Note Before running the backupsh script you will need to edit it and provide the following variables
bull DESTINATION ~ if you do not want to use the default tmp
bull TOKEN ~ this value is the encryption key for the database To find out the value of it run this command
sudo cat etcaginity-teamserviceconf
bull H2PATH ~ Unless you modified the installation directory from the default you should not need to change this
bull DBPATH ~ Unless you modified the installation directory from the default you should not need to change this
18 Chapter 1 Administering Aginity Team
Aginity Team Documentation Release 1
When running a backup the Aginity Team server process will be stopped then restarted when complete
See also
If you want to schedule the backup and automate it we recommend scheduling using Crontab Crontab ReferenceGuide
142 Restore Script
To restore to an instance of the backup follow these instructions
Yoursquoll need to set the variables within the restoresh to match what is in the backupsh
First download the restore script restoresh Next you will provide the file name of the backup you want to restorein the
bull SOURCE variable
Now run the script and it will automatically re-start Aginity Team when complete
14 Backing Up or Restoring Team Catalog 19
Aginity Team Documentation Release 1
20 Chapter 1 Administering Aginity Team
CHAPTER 2
Creating Users in Aginity Team
Once you have installed your Aginity Team server you need to set up users To do this navigate to the Administrationmenu item as show below
Click the button Register New User and fill out the form as show below
21
Aginity Team Documentation Release 1
When choosing the role of Admin vs User reference this table below for differences in functionality
21 Administering Users
Once you have created users and you need to common tasks as described below you will go back into the Administra-tion Menu and click on the three dots ldquo rdquo to the right of each user row This will pop opne an edit menu as shown
22 Chapter 2 Creating Users in Aginity Team
Aginity Team Documentation Release 1
below
211 Disabling Users
You can choose to disable user which will not allow them to login but will not remove any of their catalog informationor query history
212 Resetting Passwords
To reset a password you can choose the Change password which will prompt you to enter and confirm a new password
213 Edit User
If you need to Edit any registration details such as name or role you can do that here
21 Administering Users 23
Aginity Team Documentation Release 1
24 Chapter 2 Creating Users in Aginity Team
CHAPTER 3
Enabling Snowflake OAuth in Aginity Team
We now support OAuth for the snowflake platform This feature only works on Aginity Team The details below willguide your through setting up the configuration on the server
1 Connect to your Snowflake server and create a Security Integration object for a custom client (more details canbe found at this link)
For example
CREATE SECURITY INTEGRATIONCREATE OR REPLACE SECURITY INTEGRATIONaginity_team_oAuthTYPE = OAUTHENABLED = TRUEOAUTH_CLIENT = CUSTOMOAUTH_CLIENT_TYPE = CONFIDENTIALOAUTH_REDIRECT_URI = Aginity Team Public URLapioauthsnowflakeOAUTH_ALLOW_NON_TLS_REDIRECT_URI = FALSEOAUTH_ENFORCE_PKCE = TRUEOAUTH_ISSUE_REFRESH_TOKENS = TRUEOAUTH_REFRESH_TOKEN_VALIDITY = 86400
Note Aginity Team Public URL is a URL of a server running Aginity Team It is a public URL available outsideyour corporate network
Aginity Team Public URL has the following format schemehostport where scheme can be either http orhttps host is hostname of the server running Aginity Team port is TCP port Aginity Team is using
2 Ssh to the Aginity Team server
3 Edit etcaginity-teamapplicationyml and uncomment and update the following properties
platformssnowflakeoauthhost
Snowflake account in format account_namesnowflakecomputingcom where account_name is your Snowflakeaccount name
25
Aginity Team Documentation Release 1
platformssnowflakeoauthclientId
Snowflake client ID of the Security Integration object The Snowflake administrator can find the client ID by describingthe integration that is by using the DESC SECURITY INTEGRATION command
platformssnowflakeoauthclientSecret
Snowflake client secret of the Security Integration object The Snowflake administrator can find the client secrets byusing the system function SHOW_OAUTH_CLIENT_SECRETS
serverpublicUrl Aginity Team Public URL
Database platform specific configurationsplatformssnowflake
oauthclientSecrets
- host account_namesnowflakecomputingcomclientId client idclientSecret client secret
For example a customer has 2 Snowflake accounts The first one is eb39151us-east-1snowflakecomputingcom and itis being used for Dev environment The second one is xr58911us-east-1snowflakecomputingcom and it is being usedfor Production environment Then to enable OAuth connections to these environments via Aginity Team administratorshould add the following parameters to serviceconf
serverpublicUrl httpsaginityexamplecom
platformssnowflake
oauthclientSecrets
Dev environment- host eb39151us-east-1snowflakecomputingcom
clientId fnm4OgHhswihrEfsahTyZo=clientSecret sHljg51o7jdsjds8723786f35Q0K+TthasjuczjQwY=
Production environment- host xr58911us-east-1snowflakecomputingcom
clientId kwajw56h(usaELkkwu=clientSecret gfhfrejds3232372822378YUUYthasjuczjQwY=
4 Restart the Aginity Team server
26 Chapter 3 Enabling Snowflake OAuth in Aginity Team
CHAPTER 4
Configuring Connections in Aginity Team
Aginity Team allows you to set up connections to a variety of different database platforms In order to do this clickthe + symbol next to the ldquoConnectionsrdquo header in the left navigation pane of Aginity Team You will be presentedwith a list of existing connections as well as options for adding another connection Clicking the ldquoNew Connectionrdquobutton will allow you to enter the necessary information for the connection you wish to create
Below is a quick start video of creating connections in Aginity Team
Note Aginity Team uses JDBC to connect to database platforms It is recommended you refer to the JDBC guidesfor our supported platforms to learn about specific variables to use within the Advance Parameters section of AginityTeam We will provide links to that documentation where available
The video below provides a more detailed explanation of how to use advanced parameters to illicit the desired behaviorand successful connection to the database platform
27
Aginity Team Documentation Release 1
41 Downloading Drivers
The first step in configuring a connection is to download the JDBC driver for the platform you will be using In mostcases we will provide access to the drivers which have been certified to work with Aginity Team In some cases suchas when the vendor does not allow us to distribute or you want to use a different version you will have to manuallyadd the JDBC driver
The video below provides a quick illustration of how to manage drivers
See also
Database Driver Reference Guide
To get started in the Edit or Add Connection box you will click on Edit Drivers as shown below
411 Automatic Download
As shown in the image below if we are allowed to to download drivers you will be provided a link to do so and thenbe presented with one or more drivers to use and your done
28 Chapter 4 Configuring Connections in Aginity Team
Aginity Team Documentation Release 1
In some cases you may get an error message if your organization does not allow you to download drivers (jar files)typically supplied through a Maven repository
In this case please review the section below Manually Add Drivers
412 Manually Add Drivers
If you have to manually add a driver it starts with first acquiring the JDBC jar for that platform and saving it somewhereon your machine Once you acquire the JDBC jar you can upload it to Aginity Pro
To do this you will hit the Edit Driver or Edit Drivers Panel section as shown above and you will be presented withthe following screen
You can name the Driver anything you want and provide a description
The class name if not provided must be looked up typically in the JDBC reference manual from the platform vendor
Finally if you click on the Add File button you will navigate to where you saved the Jar file and then click SaveChanges You are now ready to configure your connection
42 Setting up Netezza Connections
You can set up a connection to a Netezza (IBM PureData for Analytics) appliance here Simply populate the requesteddata into the form
42 Setting up Netezza Connections 29
Aginity Team Documentation Release 1
Note Netezza does not allow us to distribute their drivers so you must obtain it from your DBA or directly from IBMFix Central
30 Chapter 4 Configuring Connections in Aginity Team
Aginity Team Documentation Release 1
421 Using SSL with Netezza Connections
Aginity Team supports SSL when setting up a Netezza connection While setting up your Netezza connection simplyselect the level of security to enable from the dropdown selector Your choices include
bull Only Unsecured - Specify this option when you want an unsecured connection to the Netezza system If theNetezza system requires a secured connection the connection is rejected
bull Preferred Unsecured - This argument is the default value Specify this option when you would prefer anunsecured connection but you accept a secured connection if the Netezza system requires one
bull Preferred Secured - Specify this option when you want a secured connection to the Netezza system but youaccept an unsecured connection if the Netezza system is configured to use only unsecured connections
bull Only Secured- Specify this option when you want a secured connection to the Netezza system If the Netezzasystem accepts only unsecured connections or if you are attempting to connect to a Netezza system that isrunning a release before release 45 the connection is rejected
See also
For more information on SSL refer to the link Netezza SSL
422 Connection Timeout
The connection timeout will tell the session when to disconnect Typically set this to 10 minutes or 3600 seconds
423 Advanced Parameters
For Netezza you can supply additional JDBC parameters using the Advanced Properties section
See also
Here is the link to other configurable parameters supported within Netezza JDBCrsquos driver
42 Setting up Netezza Connections 31
Aginity Team Documentation Release 1
43 Setting up Redshift Connections
431 Using SSL Mode with Redshift Connections
Aginity Team supports SSL when setting up a Redshift connection While setting up your Redshift connection simplyselect the level of security to enable from the dropdown selector Your choices include
bull Disable - SSL is disabled and the connection is not encrypted
bull Prefer - SSL is used if the server supports it Amazon Redshift supports SSL so SSL is used when you set
32 Chapter 4 Configuring Connections in Aginity Team
Aginity Team Documentation Release 1
sslmode to prefer
bull Allow - SSL is used if the server requires it
bull Require - SSL is required
See also
For more information on Redshift SSL refer to this link
432 Advanced Parameters
For Redshift you can supply additional JDBC parameters using the Advanced Properties section
See also
Here is the link to other configurable parameters supported within Redshift JDBCrsquos driver
44 Setting up Snowflake Connections
You can set up a connection to a Snowflake here Simply populate the requested data into the form
44 Setting up Snowflake Connections 33
Aginity Team Documentation Release 1
441 Warehouse
A virtual warehouse often referred to simply as a ldquowarehouserdquo is a cluster of compute resources in Snowflake Awarehouse provides the required resources such as CPU memory and temporary storage to perform the followingoperations in a Snowflake session If you do not know which specific Warehouse to use speak to your Snowflake DBA
442 Role
This is a security role that may have been setup for you to use You can leave this field blank if you do not know whatRole to connect as
34 Chapter 4 Configuring Connections in Aginity Team
Aginity Team Documentation Release 1
443 Advanced Parameters
For Snowflake most connection detail is handled through the command line additions to the JDBC URI You cansupply additional JDBC parameters using the Advanced Properties section
See also
Here is the link to other configurable parameters supported within Snowflake JDBCrsquos driver
45 Setting up Hive Connections
You can set up a connection to a Hive databases here Simply populate the requested data into the form
45 Setting up Hive Connections 35
Aginity Team Documentation Release 1
36 Chapter 4 Configuring Connections in Aginity Team
Aginity Team Documentation Release 1
451 Picking Subprotocol
You can choose either Hive 2 or Spark SQL syntax when executing against Hive databases You can choose eithervalue in this drop down
452 Setting up Kerberos connections
In a lot of cases organizations require the use of Kerberos with Hive so by clicking on the radio button for UseKerberos for authentication you will be prompted to enter the following
bull Realm
bull FQDN
bull Service name
Note The value of these parameters are typically set by your Hadoop administrator and it is best to work with themto obtain the appropriate values
453 Advanced Parameters
You can supply additional Hive JDBC parameters using the Advanced Properties section
See also
Here is the link to other configurable parameters supported within Hive JDBCrsquos driver
46 Setting up SQL Server Connections
You can set up a connection to Microsoft SQL Server databases here Simply populate the requested data into theform
46 Setting up SQL Server Connections 37
Aginity Team Documentation Release 1
Note We only support SQL Server compatibility levels 150 and 140 which is SQL Server 2017 and greater
47 Setting up DB2 Warehouse Server Connections
You can set up a connection to IBM DB2 warehouse databases here Simply populate the requested data into the form
38 Chapter 4 Configuring Connections in Aginity Team
Aginity Team Documentation Release 1
471 Advanced Parameters
You can supply additional Hive JDBC parameters using the Advanced Properties section
See also
Here is the link to other configurable parameters supported within SQL Server JDBCrsquos driver
48 Setting up Greenplum and Postgres Connections
You can set up a connection to Greenplum and Postgres databases here Simply populate the requested data into theform Greenplum and Postgres share the same drivers so we will speak of them together
48 Setting up Greenplum and Postgres Connections 39
Aginity Team Documentation Release 1
481 Choosing Subprotocol (Only for Greenplum)
You can choose either generic Postgres or Pivotal Greenplum SQL syntax when executing against Greenplumdatabases You can choose either value in this drop down
40 Chapter 4 Configuring Connections in Aginity Team
Aginity Team Documentation Release 1
482 Advanced Parameters
You can supply additional Postgres JDBC parameters using the Advanced Properties section
See also
Here is the link to other configurable parameters supported within Postgres JDBCrsquos driver
49 Import and Exporting Connections
A new feature in Aginity Team is the ability to import and export your connection templates and share them withother users A good deal of inefficiency with SQL IDErsquos is the time it takes to get connected No longer With theconnection templates you can save all the relevant detail minus the login credentials and distribute them through aneasy import and export feature
To get started have a DBA or power user establish the connection details once and export the connection as shown inthe image below
You will be presented with a selection list of connections as shown below Select the connections you want to exportand click Export selected
Note It is important to either check the radio button include sensitive data or to uncheck it This willinclude the username and password or exclude it from the connection export
49 Import and Exporting Connections 41
Aginity Team Documentation Release 1
You will be presented with a file menu window to name and pick the folder location for the export file as shown below
42 Chapter 4 Configuring Connections in Aginity Team
Aginity Team Documentation Release 1
Once you have exported the connections you can send them to Aginity Team users and have them import them To dothat choose the Import Connections menu item as shown below
You will be presented with a file selection Choose the appropriate Aginity connection package
Note By default Aginity packages for both Catalog and Connections are prefaced with aginitypkg file types
Once you choose a file select the connections you want to import and choose Import Selected
49 Import and Exporting Connections 43
Aginity Team Documentation Release 1
See also
Navigating Database Explorer
44 Chapter 4 Configuring Connections in Aginity Team
CHAPTER 5
Using the Database Explorer in Aginity Team
The Database Explorer panel in Aginity Team can be toggled by using the Database Explorer and Catalog tabs onthe left hand pane of the application as show below The Database Explorer is used to navigate database objectsbased on the Connections defined in Aginity Team The Catalog browser is used to navigate SQL Analytics that youhave personally stored
Below is a quick start video of using the Database Explorer in Aginity Team
51 Viewing the Database Data Dictionary
Once you have established a connection to a database you can browse the database dictionary catalogs You can toggleto the Database Explorer browser by clicking on the tab as shown below The database data dictionaries typicallycontains the tables columns views and other database objects available to query from the query panel
Once you have selected the Database Explorer tab you can drill into each connection as shown below
45
Aginity Team Documentation Release 1
52 Database Object Support by Platform
The following image details what objects are visible from the browser for all of our currently supported platformsWe do releases every two weeks with Aginity Team so if there is a feature you need please contact us at sup-portaginitycom
46 Chapter 5 Using the Database Explorer in Aginity Team
Aginity Team Documentation Release 1
53 Quick Actions from Explorer
Currently you can do the following quick actions from the Database Explorer
531 SQL Statement Generation
To generate typical SQL statements from tables or views you can right click on the object navigate to scripts andchoose the appropriate script as shown below
53 Quick Actions from Explorer 47
Aginity Team Documentation Release 1
532 Selective SQL Generation on a Set of Columns
To generate SQL statements based on a selection of columns within a Table or View multi-select the columns byholding Ctrl (Windows) or Command (Mac) and selecting the columns as shown below Then generate the SQLstatement
Hint Make sure you donrsquot have the table name selected and column names at the same time If you do it will generatethe SQL for the whole table
48 Chapter 5 Using the Database Explorer in Aginity Team
Aginity Team Documentation Release 1
533 Drag and Drop Capabilities
You can drag and drop any object from the DB Explorer into the Query Panel
Note Double-clicking expands the DB Explorer tree
534 Copy JDBC Connection String
If you select any Connection (Top level of the tree) and select ldquoCopy Connection string to Clipboardrdquo you will getthe full JDBC URI which is helpful for debugging See this Knowledge Base Article for help with debugging yourAginity Team connections
See also
bull Use Catalog Browser
bull Use Query Panel
53 Quick Actions from Explorer 49
Aginity Team Documentation Release 1
50 Chapter 5 Using the Database Explorer in Aginity Team
CHAPTER 6
Using the Query Panel in Aginity Team
You will spend most of your time in the Query Panel writing SQL and saving it to your catalog in Aginity Team Thevideo below will give you an overview of creating your first query
61 Writing your First Query
Each tab in the Aginity Team application can be set to different database connections Once you establish that con-nection as shown below you can use the query panel like a text editor using SQL syntax specific to that databaseplatform
Once you write your code in Aginity Team you have options to run it using the following scope
51
Aginity Team Documentation Release 1
Execution Type DescriptionRun at cursor When executing the query it will run the statement where the cursor is place
up until the semicolonRun all parts of the script in a se-quence
Each statement in the window will be run sequentially and the output ofeach statement will be shown in the output and if the statement was a SE-LECT then a results panel will be displayed
Run entire script as a batchAbort Query After executing a query you can direct Aginity Team to send a request to
the database to cancel the query
See also
Note one of the greatest challenges in SQL is learning the different functional syntax from different database vendorsWe are trying to make that easy by giving you links to the SQL reference manuals we support
62 Executing to a File
In version 17 of Aginity Pro we released the ability to use our editor commands to spool the results of a SQLstatement(s) to a file(s)
To do this you must issue the following commands
1 Use the +sql command to tell the editor you will be writing SQL in this section
2 You will then use the output file command to tell the editor you will spool the results to an outputfile
3 In the table below is a series of parameters and descriptions to be used when spooling
4 Use the +begin statement to tell the editor you from here until the +end command you will haveSQL to execute
5 Write your SQL
6 End with +end
7 Use the Run commands as you would any normal SQL statement as described in the Run Scopesection above
The code below is an example you can use to build off of
1 -- This will write the SQL statement between +begin and +end to therarr˓file specified
2
3 +sql4 output file5 path usersjschlittDownloadsjeff16 delimiter 7 null_value NULL8 quote_char 9 overwrite true
10 +begin11 select from wb_pro_marketing_list12 where emaildomain = aginitycom13 +end
52 Chapter 6 Using the Query Panel in Aginity Team
Aginity Team Documentation Release 1
Note We only support today the file type of csv You can still change the delimiter but all files with have a csvextension
The table below illustrates the current values accepted in execute to file commands
Parame-ter
Options
path On Mac this should be in the format ldquodirdirfilenamerdquo On Windows it should be in the formatldquodrivedirectoryfilenamerdquo
delimiter You can use any value but we recommend or | or ^ or t for (tab)null_value enter a character field for null typically lsquorsquo (empty string) or lsquoNULLrsquoquote_char enter how to enclose character string typically the quotation (ldquo)overwrite whether or not to allow overwrite if file exists true or falseheader true or false on whether you want to display headers in fileencoding the encoding of the file UTF_8 is the only value supported currentlycompres-sion
we can compress the file after it is written Values are NONE ZIP and GZIP
See also
We have a great knowledge base article on how to use the catalog to facilitate using the export as file editor feature
63 Using Parameters in your Query
Parameters can be used in Aginity Team by using the $ in any part of a SQL statement When you execute a query theAginity Team application will ask you to fill in the value of the parameter before it sends the query to the database
1 --sample parameter query2
3 select 4 from landing_dim_customer5 where gender = $fill_in_gender_at_runtime6 limit 100
You will have datatype choices at runtime as shown in the table below
Parameter Data Type Action TakenAs Is Aginity Team will send the value exactly as written with no casting This
is often used when using the parameter to fill in database table or columnnames See example 2 below
Hint You can specify default values with parameters by using this syntax with your parameter
$fill_in_gender_at_runtimelsquoMrsquo
When you run the query you will see the little gear icon as shown below Clicking that will populate thedefault value
63 Using Parameters in your Query 53
Aginity Team Documentation Release 1
64 Auto-Complete Capabilities
In Aginity Team we have implemented auto-complete on several database platforms and will be deploying across allover time The auto-complete capability has three capabilities
1 Display any words on the editor screen from above where your current cursor is
2 Display SQL Syntax like SELECT WHERE FROM all the way to database platform specific functions likeCASE DATEDIFF or CURRENT_DATE()
3 Display the database schema table column as you are typing
Hint To initiate just the database browser which shows database objects plus snippets hit the Ctrl+Space buttonotherwise as you type if auto-complete is supported it will automatically popup
Note Currently we support auto-complete on Netezza Redshift and Snowflake
54 Chapter 6 Using the Query Panel in Aginity Team
Aginity Team Documentation Release 1
65 Snippet support
We have pre-wired some special snippets within the editor as well to make writing SQL simpler The table belowdetails those snippets that are currently available
Snippet Actionselall will generate generic SELECT FROMselwh will generate generic SELECT FROM WHEREupd will generate an UPDATE statementins will generate an INSERT statementdel will generate a DELETE statementexpf will generate a generic export to file statement
66 Common Actions in Query Panel
We will highlight common functions heavily used in the editor here There is a complete list of available editorfunctions which can be accessed by hitting the Command+Shift+P on Mac or the Ctrl+Shift+P button within theeditor or from the View-gtCommand Palette menu item
661 Renaming Tabs
You can rename the query tabs by double clicking and typing in a name as shown below
662 Commenting SQL
In Aginity Team you can use the typical SQL syntax to comment your code as shown below
1 -- This is one way to comment your SQL code2
3 SELECT AVG(LineTotal)4 FROM salesSalesOrderDetail5
6 This is another way to comment your SQL code
65 Snippet support 55
Aginity Team Documentation Release 1
Hint If highlight multiple lines of code you can also use the Shortcut Keys Ctrl+K+C on Windows or Com-mand+K+C on Mac to comment them out To uncomment use Ctrl+K+U or Command+K+U
663 Keeping Connection
The Keep Connection checkbox as show below will instruct Aginity Team to maintain the connection to the databaseif the default behavior of the database is to disconnect after the execution of a query You are still subject to an overalldatabase connection timeout if you session connection exceeds the permitted database setting
664 Find and Replace
Ctrl+F (Windows) or Command+F (Mac) will bring up the find and replace box as shown below
67 Interacting with Query Results
Once your query has been executed you can use the features of the result grid to interact with the result set The typicalactions you will do are listed below
bull Reordering the Result Grid
bull Sorting the Result Grid
bull Filtering the Result Grid
bull Exporting results to CSV
671 Reordering the Result Grid
Once a query has executed successfully you may rearrange the columns in the Result Grid in order to more effectivelyperform subsequent analyses Rearranging the Result Grid is simple simply click hold and drag the column headerfor the column you wish to move As you move it left or right the grid will automatically adjust to reposition thecolumn
56 Chapter 6 Using the Query Panel in Aginity Team
Aginity Team Documentation Release 1
Once you are satisfied with the new position of the column you may release the drag and the column will lock intoplace
672 Sorting the Result Grid
After successfully executing a query if the query has returned any rows you may sort the results in order to permitvarious types of analysis of your results
In order to sort your results simply click on the header row in the results grid If the results are already being sortedby that column then the sort order will toggle between ascending and descending
67 Interacting with Query Results 57
Aginity Team Documentation Release 1
673 Filtering the Result Grid
Data in the Result Grid may be filtered to make it easier to locate and analyze certain subsets of the resultant datawithout requiring you to submit an entirely separate query
To filter the result grid by values in a particular column bring your mouse cursor to the column header for the columnto which you wish to apply a filter In the right-hand side on the header row the filter icon (three horizontal bars) willappear Click on the filter icon and you will be presented with a pop-up menu that will allow you to enter your filtercriteria
By default the filter criteria will select a ldquoContainsrdquo filter but several other filter types exist and you may select anyof them Once you have selected the filter type you wish to apply type the filter into the text box The results willimmediately begin to filter
58 Chapter 6 Using the Query Panel in Aginity Team
Aginity Team Documentation Release 1
When a column is being filtered a funnel icon will appear in its header To remove the filter you may re-enter thefilter mode by clicking on the filter icon (three bars) in the header row and simply delete the filter text
Multiple columns may have active filters at the same time To accomplish this simply perform these steps on eachcolumn
674 Exporting results to CSV
Once you have successfully executed a query you can elect to export those results in Comma Separated Value (CSV)format to a file outside of Aginity Team To do this right-click anywhere in the results panel Doing this will displaya context menu from which you will select the option ldquoExport to CSVrdquo
After selecting this option you will be presented with a screen that permits you to select the location to which to saveyour results Once you have identified the proper location press the Save button to complete the export
CSV files may subsequently be imported into a large number of different programs for further review and analysis
See also
bull Adding Query to Catalog
bull Using Discovery Panel
67 Interacting with Query Results 59
Aginity Team Documentation Release 1
60 Chapter 6 Using the Query Panel in Aginity Team
CHAPTER 7
Using the Catalog in Aginity Team
71 Catalog Overview
The query catalog is a unique capability of Aginity Team allowing you to easily save manage and use items stored init Letrsquos start with browsing the catalog
The catalog is organized by any number of directories and sub-directories of queries as shown below
See also
61
Aginity Team Documentation Release 1
Click Read this article for some ideas on how to best organize your catalog
Queries are given friendly names and can be used or accessed in several ways The first way is to drag the catalogquery into a query panel as shown in the two images below
Fig 1 You can drag the query into the empty query panel
You can also edit queries within a query panel By right clicking on a catalog item and choosing edit code in tab youcan change the SQL itself
62 Chapter 7 Using the Catalog in Aginity Team
Aginity Team Documentation Release 1
Fig 2 After you drag the item it will present the full catalog query for edit or execution
71 Catalog Overview 63
Aginity Team Documentation Release 1
You can edit and save the catalog query in a query panel worksheet as shown below
64 Chapter 7 Using the Catalog in Aginity Team
Aginity Team Documentation Release 1
Hint If you see a next to the tab name in the query panel it means a change has not been saved
By editing the details of a catlaog query you can see key metadata items and statistics about the catalog
71 Catalog Overview 65
Aginity Team Documentation Release 1
72 Calling Catalog Items from SQL
One of the most innovative features of Aginity Team is the ability to call catalog items from within SQL statements
The video and following examples below will give you basic syntax required to call a catalog item
66 Chapter 7 Using the Catalog in Aginity Team
Aginity Team Documentation Release 1
721 Single SQL SELECT Statement
In this example we have a single SQL SELECT statement in the catalog called OrderAverage
This is the code in the Catalog
1 SELECT AVG(LineTotal)2 FROM salesSalesOrderDetail
To call this from the query panel you would issue the following command Note the highlighted reference to the objectin the catalog
1 SELECT 2 FROM (OrderAverage) a
This is the code passed to the database
1 SELECT 2 FROM (3 SELECT AVG(lineTotal)4 FROM SalesSalesOrderDetail5 ) a
722 Using Catalog Item to Facilitate Relationships
In this example we will predefine a join in the catalog called ClientAddress and then use it in the context of anotherSQL statement
This is the code in the Catalog
1 clients c2 JOIN addresses a3 ON cclientsid = aclientsid
To call this from the query panel you would issue the following command Note the highlighted reference to the objectin the catalog
1 SELECT 2 FROM ClientAddress
This is the code passed to the database
1 SELECT 2 FROM clients c3 JOIN addresses a4 ON cclientsid = aclientsid
723 Creating and Reusing Calculations
In this example we will predefine a Calculations in the catalog called Residual and then use it in the context of anotherSQL statement
This is the code in the Catalog
72 Calling Catalog Items from SQL 67
Aginity Team Documentation Release 1
1 1-total
To call this from the query panel you would issue the following command Note the highlighted reference to the objectin the catalog
1 SELECT item2 Residual3 FROM table
This is the code passed to the database
1 SELECT item2 1-total3 FROM table
724 Executing a Multi-Step script
In this example we will predefine a series of SQL statements in the catalog called DailyRun and then execute it by asingle call Any DML (SELECT CREATE UPDATE INSERT DELETE) can be used
This is the code in the Catalog
1 CREATE TABLE xyz AS2 CREATE TABLE abc AS3 SELET FROM xyz JOIN abc
To call this from the query panel you would issue the following command Note the highlighted reference to the objectin the catalog
1 DailyRun
This is the code passed to the database
1 CREATE TABLE xyz AS2 CREATE TABLE abc AS3 SELECT FROM xyz JOIN abc
725 Using Parameters in Catalog
In this example we will use a parameter within a catalog item called CitySelect
This is the code in the Catalog Note the highlighted line has the parameter in it
1 SELECT 2 FROM addresses3 WHERE city = $city
To call this from the query panel you would issue the following command Note the highlighted reference to the objectin the catalog
1 CitySelect
This is the code passed to the database
68 Chapter 7 Using the Catalog in Aginity Team
Aginity Team Documentation Release 1
1 SELECT 2 FROM addresses3 WHERE city = Chicago
Note Upon execution of the command Aginity Team will ask you to supply a parameterized value For moreinformation on parameters see Using Parameters
73 Adding Items to Catalog
To add a new query to the catalog highlight any part of a SQL statement(s) right click and select Save selection tocatalog as shown below
Once you save you will be asked to provide metadata about the query you are adding
73 Adding Items to Catalog 69
Aginity Team Documentation Release 1
Note It is important to fill out the description metadata as it will be used in searching The more information youprovide about the context of usage key business terms and intended usage the better search results you will get
You can also easily create new folders in the catalog or add SQL entries directly from the Catalog Browser by clickingthe (+) to the right of the Catalog header
When adding a new folder you will be presented with a basic text box to create your folder as shown below
74 Import and Export Items from Catalog
You have the ability to Import and Export both your full catalog as well as any folder selected within the catalog
Note We highly recommend taking regular exports of your catalog to disk to prevent accidental loss of queries
741 Export Steps
To Export your catalog start by either Right Clicking on a Catalog Folder or Using the Aginity Pro -gt Export Catalogmenu as shown below
70 Chapter 7 Using the Catalog in Aginity Team
Aginity Team Documentation Release 1
Your first step is to save either an entire folder or a selection of items within a folder
The final step in exporting is to name the file and location you will save to as shown below
742 Import Steps
Importing is valuable for several reasons One is to restore SQL catalog items you may have lost or more importantlythe ability to collaborate with other SQL developers and share your SQL making your a more efficient and consistentSQL developer
74 Import and Export Items from Catalog 71
Aginity Team Documentation Release 1
The first step is to Right Click on a folder you want to import to and Chooose Import Catalog as shown below
Note You can also use the Aginity Pro Menu -gt Import Catalog The main difference between using these twocapabilities is the context of where you are importing items If you choose to import from the Aginity Pro menu youmust set the context where to import If you Right Click on a folder the context is set to that folder
After choosing to import you will choose the file to import By default Aginity catalog files have the extensionaginitypkg
After choosing your file you can specify the folder to import to and what to import as shown below
72 Chapter 7 Using the Catalog in Aginity Team
Aginity Team Documentation Release 1
Hit the Import button and your queries should be imported
See also
Aginity also maintains a Github repository of Catalog queries to be used These queries are either administrativequeries for specific platforms data engineering queries that do powerful transformations against generic data or ana-lytic queries showing how to do cool things in SQL
Access the repositories here
See also
Using Query Panel
74 Import and Export Items from Catalog 73
Aginity Team Documentation Release 1
74 Chapter 7 Using the Catalog in Aginity Team
CHAPTER 8
Using Discovery Panel in Aginity Team
The Discovery Panel is a feature that is unique to Aginity Team and which allows you to quickly identify and reusecode that yoursquove previously executed or saved Using the Discovery Panel begins with a search Watch the videobelow to get a sense for how this feature works
By default the Discovery Panel allows you to search both your query execution history and your Pro Catalog at thesame time However by selecting one of the radio buttons in the Discovery Panel you can choose to focus on just oneor the other if you prefer
81 Searching Query Execution History
Start by typing in any free-text you want such as Sales as shown Below
75
Aginity Team Documentation Release 1
The search engine will do a full text search and display all results
82 Searching the Amp Pro Catalog
Buy clicking on the Catalog radio button you will restrict your search as shown below
83 Expanding the results
Once you have performed a search Amp Pro will dynamically update the results in the Discovery Panel to match thesearch term you have entered Yoursquoll be able to view a small amount of the query by default but if more is requiredyou can click on the arrows in the corner of the preview in order to expand the snippet further
84 Doing More with the Discovery Panel
A place holder for advanced filtering capabilities
76 Chapter 8 Using Discovery Panel in Aginity Team
CHAPTER 9
Reference
91 Video Reference
The following is a reference list of videos about Aginity Team and how to use its features
bull
bull
bull
bull
bull
bull
92 Shortcut Key Reference
Command ActionCommand K + C (Mac) or Ctrl K + C (Windows) Comment lines of codeCommand K + U (Mac) or Ctrl K + U (Windows) Uncomment lines of codeCommand F (Mac) or Ctrl F (Windows) Find and Replace Menu
93 Frequently Asked Questions
The section below is dedicated to commonly asked questions that we compile and provide answers to Over time asthings change we will keep this table up to date
77
Aginity Team Documentation Release 1
931 What Control do I have with Row Limit Preference
By default we cap the row limit preference to 100K rows to discourage users from spooling too much data across yournetwork Trust us your network infrastructure folks do appreciate it Fear not though you have options First if youset the preference to 0 it will spool as much as you want until either you run out of memory or your query completesAlternatively we recommend spooling the output to a file if you are doing returns greater than 100K rows Refer tothe documentation on execute query to file
94 SQL Reference Guides for Supported connections
As SQL developers ourselves we thought putting links to the databases we support in our documentation was a goodidea so here they are
bull
bull
bull
bull
95 Driver Support Reference
The table below is a cross reference of driver versions by platform
Platform Driver Version Class NameNetezza Not distributed with software
(nzjdbcjar)orgnetezzaDriver
SQL Server 720 jre8 commicrosoftsqlserverjdbcSQLServerDriverRedshift 12161027 comamazonredshiftjdbcDriverGreenplum and Post-gres
4225 orgpostgresqlDriver
Hive 121 orgapachehivejdbcHiveDriverSnowflake 3623 3628 355 netsnowflakeclientjdbcSnowflakeDriverIBM DB2 Warehouse db2jcc4 comibmdb2jccDB2Driver
78 Chapter 9 Reference
CHAPTER 10
Troubleshooting
This page is dedicated to common issues or errors you may encounter when using Aginity Team We recommend youalso post any new issues or questions to our Aginity Team Forum
The is a great resource for posting questions searching for common solutions to features of Pro or just learning howto be efficient as a SQL analytic developer through samples best practices and collaboration with other Pro users
Is-sueNum-ber
Isthis aDe-fect
Source of Error Description of Error Resolution
1 No Cannot DownloadDrivers via Con-nection Screen
In most cases your organization isblocking Aginityrsquos ability to downloaddrivers from a Maven repository
Follow directions in the Config-ure Connections documentationto Manually Add Drivers
79
Aginity Team Documentation Release 1
80 Chapter 10 Troubleshooting
CHAPTER 11
End User License for Aginity Team
Click here for end users license
81
- Administering Aginity Team
-
- Deploying Aginity Team through AWS Marketplace
- Installing Aginity Team on Linux
- Upgrading Aginity Team
- Backing Up or Restoring Team Catalog
-
- Creating Users in Aginity Team
-
- Administering Users
-
- Enabling Snowflake OAuth in Aginity Team
- Configuring Connections in Aginity Team
-
- Downloading Drivers
- Setting up Netezza Connections
- Setting up Redshift Connections
- Setting up Snowflake Connections
- Setting up Hive Connections
- Setting up SQL Server Connections
- Setting up DB2 Warehouse Server Connections
- Setting up Greenplum and Postgres Connections
- Import and Exporting Connections
-
- Using the Database Explorer in Aginity Team
-
- Viewing the Database Data Dictionary
- Database Object Support by Platform
- Quick Actions from Explorer
-
- Using the Query Panel in Aginity Team
-
- Writing your First Query
- Executing to a File
- Using Parameters in your Query
- Auto-Complete Capabilities
- Snippet support
- Common Actions in Query Panel
- Interacting with Query Results
-
- Using the Catalog in Aginity Team
-
- Catalog Overview
- Calling Catalog Items from SQL
- Adding Items to Catalog
- Import and Export Items from Catalog
-
- Using Discovery Panel in Aginity Team
-
- Searching Query Execution History
- Searching the Amp Pro Catalog
- Expanding the results
- Doing More with the Discovery Panel
-
- Reference
-
- Video Reference
- Shortcut Key Reference
- Frequently Asked Questions
- SQL Reference Guides for Supported connections
- Driver Support Reference
-
- Troubleshooting
- End User License for Aginity Team
-
Aginity Team Documentation Release 1
(continued from previous page)
dbFilePath $DB_PATH- END H2 database configuration BEGIN PostgreSQL configuration
postgresuser db_userpassword db_passowdjdbcUrl jdbcpostgresqlmyexamplecom5432aginity_team_databaseproperties
ssl truesslmode require
END PostgreSQL configuration
Note Only one type of database could be enabled To enable PostgreSQL comment out the H2 database configura-tion section and uncomment the PostgreSQL configuration section
databaseh2dbFilePath
The path to a directory to deploy Aginity Teamrsquos H2 database in
databasepostgresuser
The database user
databasepostgrespassword
The database userrsquos password
databasepostgresjdbcUrl
The connection URL
jdbcUrl has the following format jdbcpostgresqlhostportdatabase_name where host is the IP address orthe hostname of the database server port is TCP port the database server is listening database_name is the nameof Aginity Team database created by you
databasepostgresproperies
This section may contain any number of additional connection parameters which PostgreSQL JDBC driver supportsYou can read about the jdbc driver parameters at jdbcpostgresqlorg
Logging Options
logging Options
loggingpathToLogFile $PATH_TO_LOG_FILE-varlogaginity-teammaxFilesCount $MAX_FILES_COUNT-100MBmaxFileSize $MAX_FILE_SIZE-1
loggingpathToLogFile
The path to a directory to store application log files in
Default varlogaginity-team
loggingmaxFilesCount
12 Installing Aginity Team on Linux 11
Aginity Team Documentation Release 1
The maximum number of the log files Aginity Team creates
Default 1
loggingmaxFileSize
The maximum size of a log file The number has to be an integer You should specify its value using one of the letterslsquoKBrsquo lsquoMBrsquo or lsquoGBrsquo after the number Examples 200KB 35MB 1GB
Default 100MB
Platform Options
This section is used to set up OAuth for the Snowflake databases Please refer to specific Snowflake section in thedocumentation Enabling Snowflake SSO
Security Configuration Options
userDirectory Options
This section allows you to integrate Aginity Team with your LDAP system to import users sync user information anddelegate user authentication to LDAP server
userDirectoryname LDAP Serverenabled trueserverSettings
host ldapserverexamplecomport 389bindDN cn=admindc=exampledc=combindPassword admin_passwordencryption PLAINverifyCertificates falsetlsOptions
trustStorePath pathtotrustStorefiletrustStorePassword my_passwordtrustStoreType PKCS12
connectionRuleconnectTimeout 0responseTimeout 0
userSchemabaseDN ou=usersdc=exampledc=comuserFilterusernameAttribute uidfirstNameAttribute givenNamelastNameAttribute snemailAttribute mailsearchScope SUB_TREE
userDirectoryname
A descriptive name of the LDAP connection
userDirectoryenabled
Flag to indicate whether LDAP authentication is on or off
userDirectoryserverSettingshost
The IP address or hostname of the LDAP server
12 Chapter 1 Administering Aginity Team
Aginity Team Documentation Release 1
userDirectoryserverSettingsport
TCP port of the LDAP server
userDirectoryserverSettingsbindDN
The distinguished name of the user that the application will use when connecting to the directory server Examplecn=admindc=exampledc=com
userDirectoryserverSettingsbindPassword
The user password
userDirectoryserverSettingsencryption
Type of connection encyption Can be set to PLAIN START_TLS or SIMPLE_TLS START_TLS is preferred optionSTART_TLS begins as a plaintext connection over the standard LDAP port (389) and that connection is then upgradedto SSLTLS
userDirectoryserverSettingsverifyCertificates
If set to true Aginity Team verifies the certificate used for SSLTLS connection to the LDAP server A java trust-store configured in userDirectoryserverSettingstlsOptions is used to verify the certificate If you use a self-signedcertificate you must import the certificate to the truststore before starting Aginity Team
userDirectoryserverSettingstlsOptions
Use this section to configure your java truststore that is used to verify the LDAP server certificate
userDirectoryserverSettingstlsOptionstrustStorePath
The path to the Java trust store where certificates are stored
userDirectoryserverSettingstlsOptionstrustStorePassword
The password to the java trust store
userDirectoryserverSettingstlsOptionstrustStoreType
The type of the trust store The most common are JKS and PKCS12
userDirectoryconnectionRuleconnectTimeout
Timeout in milliseconds for connection to LDAP server 0 means no timeout
userDirectoryconnectionRuleresponseTimeout
Timeout in milliseconds for response time from LDAP server 0 means no timeout
userDirectoryuserSchemabaseDN
The root distinguished name (DN) to use when running queries against the directory server
userDirectoryuserSchemauserFilter
An LDAP search filter to be used when searching user objects from the LDAP server within the base DN Exampleldquo(amp(objectCategory=Person)(sAMAccountName=))rdquo
userDirectoryuserSchemausernameAttribute
Defines which attributes on an LDAP user entry will be used as its username
userDirectoryuserSchemafirstNameAttribute
Defines which attributes on an LDAP user entry will be used as its first name
userDirectoryuserSchemalastNameAttribute
Defines which attributes on an LDAP user entry will be used as its last name
12 Installing Aginity Team on Linux 13
Aginity Team Documentation Release 1
userDirectoryuserSchemaemailAttribute
Defines which attributes on an LDAP user entry will be used as its email address
userDirectoryuserSchemasearchScope
Specify strategy to use when doing a search Possible options SUB_TREE (search request should be performedagainst the search base and all entries below) ONE (search request should be performed against entries that areimmediate subordinates of the entry specified as the search base DN) BASE (search request should only be performedagainst the entry specified as the search base DN)
124 Starting Aginity Team Server
Prior to starting the Agnity Team server you must create the administrator username and password
You can do this by running the team-create-superuser script in the optaginitybin directory on the server
this will create a user with the administrator rolesudo optaginity-teambinteam-create-super-usersh
Step 5 You are now ready to start Aginity Team
We use the following commands to start Aginity Team in the background and with logging turned on
sudo systemctl start aginity-team
You can check if Aginity Team is running by issuing this command
sudo systemctl status aginity-team
125 Accessing Aginity Team for the First Time
Step 6 Step 6 Open browser and navigate to httpsltip or team server namegtltserver portgtlogin You will see thefollowing image
bull Enter credentials you used to create the administrator to enter the application
Step 7 Register and Apply License Key
14 Chapter 1 Administering Aginity Team
Aginity Team Documentation Release 1
When you open the application it will ask you to register the software and then you will be asked to applythe license key
If it does not ask for the license key you can click on Help -gt Register again and the license key boxshould pop open as shown below
12 Installing Aginity Team on Linux 15
Aginity Team Documentation Release 1
Note It is imperative that all users be created with valid business email addresses
Send the link to team to any new user along with their usernamepassword combination
126 Stopping Aginity Team Services
Log in as the team user and issue the following command
sudo systemctl stop aginity-team check to see if it is stopped Usingsudo systemctl status aginity-team
See also
Add Connections
13 Upgrading Aginity Team
Upgrading team consists of logging into the Team server downloading the latest update and applying it from thecommand line
For clarities sake when we refer to aginity-team-ltversiongt-amd64deb we purposely leave version generic Eachupgrade will have a different number associated with it
Warning It is important to take a backup of both your encryption key for the Team catalog and to do a BackingUp or Restoring Team Catalog before upgrading This way if anything goes wrong you will not use your catalogIt is also recommended to do a manual export of your catalog from time to time
You can get the encryption key using the command below
sudo cat etcaginity-teamserviceconf
16 Chapter 1 Administering Aginity Team
Aginity Team Documentation Release 1
131 Step 1 Logging into Team Server
SSH into the Team server as an administrator
Note Typically you will log in as an account other than root and then you will be using the sudo command
132 Step 2 Check to see if Team is Currently Running and then Shut it Down
Issue the command below to check the status of the Team service
sudo systemctl status aginity-team
If Team is running shut it down by issuing this command
sudo systemctl stop aginity-team
Note It is always a good idea to run the status check again to make sure Team has been shut down
133 Step 3 Download the Latest Version of Aginity Team
Using the wget command you can download the latest version as shown below
wget httprepositoryaginitycoms3amazonawscomAginityTeamaginity-team-ltversionrarr˓gt-amd64deb
134 Step 4 Upgrading the Software
Run the upgrade process by issuing this command
on Ubuntusudo apt-get install aginity-team-ltversiongt-amd64deb on RHELsudo yum install aginity-team-ltversiongt-amd64deb
The package manager will determine if your configuration files are different from ones bringing with the new versionof the application being installed and will offer you a few option to proceed with installation
13 Upgrading Aginity Team 17
Aginity Team Documentation Release 1
You should always keep your currently-installed version and resolve any conflicts by comparing and merging thedifference manually
135 Step 5 Restart Aginity Team
Restart the server by issuing this command
sudo systemctl start aginity-team
14 Backing Up or Restoring Team Catalog
We have provided two files listed and described below which will allow you to automate or manually backup andrestore your Aginity Team catalog
141 Backup Script
The backup script backupsh will perform and compress a backup of the Aginity Team Catalog to the tmp di-rectory on your OS It will append the date to the end of the file created and should be named in this pattern agin-ity_backup_m_d_Yzip
Note Before running the backupsh script you will need to edit it and provide the following variables
bull DESTINATION ~ if you do not want to use the default tmp
bull TOKEN ~ this value is the encryption key for the database To find out the value of it run this command
sudo cat etcaginity-teamserviceconf
bull H2PATH ~ Unless you modified the installation directory from the default you should not need to change this
bull DBPATH ~ Unless you modified the installation directory from the default you should not need to change this
18 Chapter 1 Administering Aginity Team
Aginity Team Documentation Release 1
When running a backup the Aginity Team server process will be stopped then restarted when complete
See also
If you want to schedule the backup and automate it we recommend scheduling using Crontab Crontab ReferenceGuide
142 Restore Script
To restore to an instance of the backup follow these instructions
Yoursquoll need to set the variables within the restoresh to match what is in the backupsh
First download the restore script restoresh Next you will provide the file name of the backup you want to restorein the
bull SOURCE variable
Now run the script and it will automatically re-start Aginity Team when complete
14 Backing Up or Restoring Team Catalog 19
Aginity Team Documentation Release 1
20 Chapter 1 Administering Aginity Team
CHAPTER 2
Creating Users in Aginity Team
Once you have installed your Aginity Team server you need to set up users To do this navigate to the Administrationmenu item as show below
Click the button Register New User and fill out the form as show below
21
Aginity Team Documentation Release 1
When choosing the role of Admin vs User reference this table below for differences in functionality
21 Administering Users
Once you have created users and you need to common tasks as described below you will go back into the Administra-tion Menu and click on the three dots ldquo rdquo to the right of each user row This will pop opne an edit menu as shown
22 Chapter 2 Creating Users in Aginity Team
Aginity Team Documentation Release 1
below
211 Disabling Users
You can choose to disable user which will not allow them to login but will not remove any of their catalog informationor query history
212 Resetting Passwords
To reset a password you can choose the Change password which will prompt you to enter and confirm a new password
213 Edit User
If you need to Edit any registration details such as name or role you can do that here
21 Administering Users 23
Aginity Team Documentation Release 1
24 Chapter 2 Creating Users in Aginity Team
CHAPTER 3
Enabling Snowflake OAuth in Aginity Team
We now support OAuth for the snowflake platform This feature only works on Aginity Team The details below willguide your through setting up the configuration on the server
1 Connect to your Snowflake server and create a Security Integration object for a custom client (more details canbe found at this link)
For example
CREATE SECURITY INTEGRATIONCREATE OR REPLACE SECURITY INTEGRATIONaginity_team_oAuthTYPE = OAUTHENABLED = TRUEOAUTH_CLIENT = CUSTOMOAUTH_CLIENT_TYPE = CONFIDENTIALOAUTH_REDIRECT_URI = Aginity Team Public URLapioauthsnowflakeOAUTH_ALLOW_NON_TLS_REDIRECT_URI = FALSEOAUTH_ENFORCE_PKCE = TRUEOAUTH_ISSUE_REFRESH_TOKENS = TRUEOAUTH_REFRESH_TOKEN_VALIDITY = 86400
Note Aginity Team Public URL is a URL of a server running Aginity Team It is a public URL available outsideyour corporate network
Aginity Team Public URL has the following format schemehostport where scheme can be either http orhttps host is hostname of the server running Aginity Team port is TCP port Aginity Team is using
2 Ssh to the Aginity Team server
3 Edit etcaginity-teamapplicationyml and uncomment and update the following properties
platformssnowflakeoauthhost
Snowflake account in format account_namesnowflakecomputingcom where account_name is your Snowflakeaccount name
25
Aginity Team Documentation Release 1
platformssnowflakeoauthclientId
Snowflake client ID of the Security Integration object The Snowflake administrator can find the client ID by describingthe integration that is by using the DESC SECURITY INTEGRATION command
platformssnowflakeoauthclientSecret
Snowflake client secret of the Security Integration object The Snowflake administrator can find the client secrets byusing the system function SHOW_OAUTH_CLIENT_SECRETS
serverpublicUrl Aginity Team Public URL
Database platform specific configurationsplatformssnowflake
oauthclientSecrets
- host account_namesnowflakecomputingcomclientId client idclientSecret client secret
For example a customer has 2 Snowflake accounts The first one is eb39151us-east-1snowflakecomputingcom and itis being used for Dev environment The second one is xr58911us-east-1snowflakecomputingcom and it is being usedfor Production environment Then to enable OAuth connections to these environments via Aginity Team administratorshould add the following parameters to serviceconf
serverpublicUrl httpsaginityexamplecom
platformssnowflake
oauthclientSecrets
Dev environment- host eb39151us-east-1snowflakecomputingcom
clientId fnm4OgHhswihrEfsahTyZo=clientSecret sHljg51o7jdsjds8723786f35Q0K+TthasjuczjQwY=
Production environment- host xr58911us-east-1snowflakecomputingcom
clientId kwajw56h(usaELkkwu=clientSecret gfhfrejds3232372822378YUUYthasjuczjQwY=
4 Restart the Aginity Team server
26 Chapter 3 Enabling Snowflake OAuth in Aginity Team
CHAPTER 4
Configuring Connections in Aginity Team
Aginity Team allows you to set up connections to a variety of different database platforms In order to do this clickthe + symbol next to the ldquoConnectionsrdquo header in the left navigation pane of Aginity Team You will be presentedwith a list of existing connections as well as options for adding another connection Clicking the ldquoNew Connectionrdquobutton will allow you to enter the necessary information for the connection you wish to create
Below is a quick start video of creating connections in Aginity Team
Note Aginity Team uses JDBC to connect to database platforms It is recommended you refer to the JDBC guidesfor our supported platforms to learn about specific variables to use within the Advance Parameters section of AginityTeam We will provide links to that documentation where available
The video below provides a more detailed explanation of how to use advanced parameters to illicit the desired behaviorand successful connection to the database platform
27
Aginity Team Documentation Release 1
41 Downloading Drivers
The first step in configuring a connection is to download the JDBC driver for the platform you will be using In mostcases we will provide access to the drivers which have been certified to work with Aginity Team In some cases suchas when the vendor does not allow us to distribute or you want to use a different version you will have to manuallyadd the JDBC driver
The video below provides a quick illustration of how to manage drivers
See also
Database Driver Reference Guide
To get started in the Edit or Add Connection box you will click on Edit Drivers as shown below
411 Automatic Download
As shown in the image below if we are allowed to to download drivers you will be provided a link to do so and thenbe presented with one or more drivers to use and your done
28 Chapter 4 Configuring Connections in Aginity Team
Aginity Team Documentation Release 1
In some cases you may get an error message if your organization does not allow you to download drivers (jar files)typically supplied through a Maven repository
In this case please review the section below Manually Add Drivers
412 Manually Add Drivers
If you have to manually add a driver it starts with first acquiring the JDBC jar for that platform and saving it somewhereon your machine Once you acquire the JDBC jar you can upload it to Aginity Pro
To do this you will hit the Edit Driver or Edit Drivers Panel section as shown above and you will be presented withthe following screen
You can name the Driver anything you want and provide a description
The class name if not provided must be looked up typically in the JDBC reference manual from the platform vendor
Finally if you click on the Add File button you will navigate to where you saved the Jar file and then click SaveChanges You are now ready to configure your connection
42 Setting up Netezza Connections
You can set up a connection to a Netezza (IBM PureData for Analytics) appliance here Simply populate the requesteddata into the form
42 Setting up Netezza Connections 29
Aginity Team Documentation Release 1
Note Netezza does not allow us to distribute their drivers so you must obtain it from your DBA or directly from IBMFix Central
30 Chapter 4 Configuring Connections in Aginity Team
Aginity Team Documentation Release 1
421 Using SSL with Netezza Connections
Aginity Team supports SSL when setting up a Netezza connection While setting up your Netezza connection simplyselect the level of security to enable from the dropdown selector Your choices include
bull Only Unsecured - Specify this option when you want an unsecured connection to the Netezza system If theNetezza system requires a secured connection the connection is rejected
bull Preferred Unsecured - This argument is the default value Specify this option when you would prefer anunsecured connection but you accept a secured connection if the Netezza system requires one
bull Preferred Secured - Specify this option when you want a secured connection to the Netezza system but youaccept an unsecured connection if the Netezza system is configured to use only unsecured connections
bull Only Secured- Specify this option when you want a secured connection to the Netezza system If the Netezzasystem accepts only unsecured connections or if you are attempting to connect to a Netezza system that isrunning a release before release 45 the connection is rejected
See also
For more information on SSL refer to the link Netezza SSL
422 Connection Timeout
The connection timeout will tell the session when to disconnect Typically set this to 10 minutes or 3600 seconds
423 Advanced Parameters
For Netezza you can supply additional JDBC parameters using the Advanced Properties section
See also
Here is the link to other configurable parameters supported within Netezza JDBCrsquos driver
42 Setting up Netezza Connections 31
Aginity Team Documentation Release 1
43 Setting up Redshift Connections
431 Using SSL Mode with Redshift Connections
Aginity Team supports SSL when setting up a Redshift connection While setting up your Redshift connection simplyselect the level of security to enable from the dropdown selector Your choices include
bull Disable - SSL is disabled and the connection is not encrypted
bull Prefer - SSL is used if the server supports it Amazon Redshift supports SSL so SSL is used when you set
32 Chapter 4 Configuring Connections in Aginity Team
Aginity Team Documentation Release 1
sslmode to prefer
bull Allow - SSL is used if the server requires it
bull Require - SSL is required
See also
For more information on Redshift SSL refer to this link
432 Advanced Parameters
For Redshift you can supply additional JDBC parameters using the Advanced Properties section
See also
Here is the link to other configurable parameters supported within Redshift JDBCrsquos driver
44 Setting up Snowflake Connections
You can set up a connection to a Snowflake here Simply populate the requested data into the form
44 Setting up Snowflake Connections 33
Aginity Team Documentation Release 1
441 Warehouse
A virtual warehouse often referred to simply as a ldquowarehouserdquo is a cluster of compute resources in Snowflake Awarehouse provides the required resources such as CPU memory and temporary storage to perform the followingoperations in a Snowflake session If you do not know which specific Warehouse to use speak to your Snowflake DBA
442 Role
This is a security role that may have been setup for you to use You can leave this field blank if you do not know whatRole to connect as
34 Chapter 4 Configuring Connections in Aginity Team
Aginity Team Documentation Release 1
443 Advanced Parameters
For Snowflake most connection detail is handled through the command line additions to the JDBC URI You cansupply additional JDBC parameters using the Advanced Properties section
See also
Here is the link to other configurable parameters supported within Snowflake JDBCrsquos driver
45 Setting up Hive Connections
You can set up a connection to a Hive databases here Simply populate the requested data into the form
45 Setting up Hive Connections 35
Aginity Team Documentation Release 1
36 Chapter 4 Configuring Connections in Aginity Team
Aginity Team Documentation Release 1
451 Picking Subprotocol
You can choose either Hive 2 or Spark SQL syntax when executing against Hive databases You can choose eithervalue in this drop down
452 Setting up Kerberos connections
In a lot of cases organizations require the use of Kerberos with Hive so by clicking on the radio button for UseKerberos for authentication you will be prompted to enter the following
bull Realm
bull FQDN
bull Service name
Note The value of these parameters are typically set by your Hadoop administrator and it is best to work with themto obtain the appropriate values
453 Advanced Parameters
You can supply additional Hive JDBC parameters using the Advanced Properties section
See also
Here is the link to other configurable parameters supported within Hive JDBCrsquos driver
46 Setting up SQL Server Connections
You can set up a connection to Microsoft SQL Server databases here Simply populate the requested data into theform
46 Setting up SQL Server Connections 37
Aginity Team Documentation Release 1
Note We only support SQL Server compatibility levels 150 and 140 which is SQL Server 2017 and greater
47 Setting up DB2 Warehouse Server Connections
You can set up a connection to IBM DB2 warehouse databases here Simply populate the requested data into the form
38 Chapter 4 Configuring Connections in Aginity Team
Aginity Team Documentation Release 1
471 Advanced Parameters
You can supply additional Hive JDBC parameters using the Advanced Properties section
See also
Here is the link to other configurable parameters supported within SQL Server JDBCrsquos driver
48 Setting up Greenplum and Postgres Connections
You can set up a connection to Greenplum and Postgres databases here Simply populate the requested data into theform Greenplum and Postgres share the same drivers so we will speak of them together
48 Setting up Greenplum and Postgres Connections 39
Aginity Team Documentation Release 1
481 Choosing Subprotocol (Only for Greenplum)
You can choose either generic Postgres or Pivotal Greenplum SQL syntax when executing against Greenplumdatabases You can choose either value in this drop down
40 Chapter 4 Configuring Connections in Aginity Team
Aginity Team Documentation Release 1
482 Advanced Parameters
You can supply additional Postgres JDBC parameters using the Advanced Properties section
See also
Here is the link to other configurable parameters supported within Postgres JDBCrsquos driver
49 Import and Exporting Connections
A new feature in Aginity Team is the ability to import and export your connection templates and share them withother users A good deal of inefficiency with SQL IDErsquos is the time it takes to get connected No longer With theconnection templates you can save all the relevant detail minus the login credentials and distribute them through aneasy import and export feature
To get started have a DBA or power user establish the connection details once and export the connection as shown inthe image below
You will be presented with a selection list of connections as shown below Select the connections you want to exportand click Export selected
Note It is important to either check the radio button include sensitive data or to uncheck it This willinclude the username and password or exclude it from the connection export
49 Import and Exporting Connections 41
Aginity Team Documentation Release 1
You will be presented with a file menu window to name and pick the folder location for the export file as shown below
42 Chapter 4 Configuring Connections in Aginity Team
Aginity Team Documentation Release 1
Once you have exported the connections you can send them to Aginity Team users and have them import them To dothat choose the Import Connections menu item as shown below
You will be presented with a file selection Choose the appropriate Aginity connection package
Note By default Aginity packages for both Catalog and Connections are prefaced with aginitypkg file types
Once you choose a file select the connections you want to import and choose Import Selected
49 Import and Exporting Connections 43
Aginity Team Documentation Release 1
See also
Navigating Database Explorer
44 Chapter 4 Configuring Connections in Aginity Team
CHAPTER 5
Using the Database Explorer in Aginity Team
The Database Explorer panel in Aginity Team can be toggled by using the Database Explorer and Catalog tabs onthe left hand pane of the application as show below The Database Explorer is used to navigate database objectsbased on the Connections defined in Aginity Team The Catalog browser is used to navigate SQL Analytics that youhave personally stored
Below is a quick start video of using the Database Explorer in Aginity Team
51 Viewing the Database Data Dictionary
Once you have established a connection to a database you can browse the database dictionary catalogs You can toggleto the Database Explorer browser by clicking on the tab as shown below The database data dictionaries typicallycontains the tables columns views and other database objects available to query from the query panel
Once you have selected the Database Explorer tab you can drill into each connection as shown below
45
Aginity Team Documentation Release 1
52 Database Object Support by Platform
The following image details what objects are visible from the browser for all of our currently supported platformsWe do releases every two weeks with Aginity Team so if there is a feature you need please contact us at sup-portaginitycom
46 Chapter 5 Using the Database Explorer in Aginity Team
Aginity Team Documentation Release 1
53 Quick Actions from Explorer
Currently you can do the following quick actions from the Database Explorer
531 SQL Statement Generation
To generate typical SQL statements from tables or views you can right click on the object navigate to scripts andchoose the appropriate script as shown below
53 Quick Actions from Explorer 47
Aginity Team Documentation Release 1
532 Selective SQL Generation on a Set of Columns
To generate SQL statements based on a selection of columns within a Table or View multi-select the columns byholding Ctrl (Windows) or Command (Mac) and selecting the columns as shown below Then generate the SQLstatement
Hint Make sure you donrsquot have the table name selected and column names at the same time If you do it will generatethe SQL for the whole table
48 Chapter 5 Using the Database Explorer in Aginity Team
Aginity Team Documentation Release 1
533 Drag and Drop Capabilities
You can drag and drop any object from the DB Explorer into the Query Panel
Note Double-clicking expands the DB Explorer tree
534 Copy JDBC Connection String
If you select any Connection (Top level of the tree) and select ldquoCopy Connection string to Clipboardrdquo you will getthe full JDBC URI which is helpful for debugging See this Knowledge Base Article for help with debugging yourAginity Team connections
See also
bull Use Catalog Browser
bull Use Query Panel
53 Quick Actions from Explorer 49
Aginity Team Documentation Release 1
50 Chapter 5 Using the Database Explorer in Aginity Team
CHAPTER 6
Using the Query Panel in Aginity Team
You will spend most of your time in the Query Panel writing SQL and saving it to your catalog in Aginity Team Thevideo below will give you an overview of creating your first query
61 Writing your First Query
Each tab in the Aginity Team application can be set to different database connections Once you establish that con-nection as shown below you can use the query panel like a text editor using SQL syntax specific to that databaseplatform
Once you write your code in Aginity Team you have options to run it using the following scope
51
Aginity Team Documentation Release 1
Execution Type DescriptionRun at cursor When executing the query it will run the statement where the cursor is place
up until the semicolonRun all parts of the script in a se-quence
Each statement in the window will be run sequentially and the output ofeach statement will be shown in the output and if the statement was a SE-LECT then a results panel will be displayed
Run entire script as a batchAbort Query After executing a query you can direct Aginity Team to send a request to
the database to cancel the query
See also
Note one of the greatest challenges in SQL is learning the different functional syntax from different database vendorsWe are trying to make that easy by giving you links to the SQL reference manuals we support
62 Executing to a File
In version 17 of Aginity Pro we released the ability to use our editor commands to spool the results of a SQLstatement(s) to a file(s)
To do this you must issue the following commands
1 Use the +sql command to tell the editor you will be writing SQL in this section
2 You will then use the output file command to tell the editor you will spool the results to an outputfile
3 In the table below is a series of parameters and descriptions to be used when spooling
4 Use the +begin statement to tell the editor you from here until the +end command you will haveSQL to execute
5 Write your SQL
6 End with +end
7 Use the Run commands as you would any normal SQL statement as described in the Run Scopesection above
The code below is an example you can use to build off of
1 -- This will write the SQL statement between +begin and +end to therarr˓file specified
2
3 +sql4 output file5 path usersjschlittDownloadsjeff16 delimiter 7 null_value NULL8 quote_char 9 overwrite true
10 +begin11 select from wb_pro_marketing_list12 where emaildomain = aginitycom13 +end
52 Chapter 6 Using the Query Panel in Aginity Team
Aginity Team Documentation Release 1
Note We only support today the file type of csv You can still change the delimiter but all files with have a csvextension
The table below illustrates the current values accepted in execute to file commands
Parame-ter
Options
path On Mac this should be in the format ldquodirdirfilenamerdquo On Windows it should be in the formatldquodrivedirectoryfilenamerdquo
delimiter You can use any value but we recommend or | or ^ or t for (tab)null_value enter a character field for null typically lsquorsquo (empty string) or lsquoNULLrsquoquote_char enter how to enclose character string typically the quotation (ldquo)overwrite whether or not to allow overwrite if file exists true or falseheader true or false on whether you want to display headers in fileencoding the encoding of the file UTF_8 is the only value supported currentlycompres-sion
we can compress the file after it is written Values are NONE ZIP and GZIP
See also
We have a great knowledge base article on how to use the catalog to facilitate using the export as file editor feature
63 Using Parameters in your Query
Parameters can be used in Aginity Team by using the $ in any part of a SQL statement When you execute a query theAginity Team application will ask you to fill in the value of the parameter before it sends the query to the database
1 --sample parameter query2
3 select 4 from landing_dim_customer5 where gender = $fill_in_gender_at_runtime6 limit 100
You will have datatype choices at runtime as shown in the table below
Parameter Data Type Action TakenAs Is Aginity Team will send the value exactly as written with no casting This
is often used when using the parameter to fill in database table or columnnames See example 2 below
Hint You can specify default values with parameters by using this syntax with your parameter
$fill_in_gender_at_runtimelsquoMrsquo
When you run the query you will see the little gear icon as shown below Clicking that will populate thedefault value
63 Using Parameters in your Query 53
Aginity Team Documentation Release 1
64 Auto-Complete Capabilities
In Aginity Team we have implemented auto-complete on several database platforms and will be deploying across allover time The auto-complete capability has three capabilities
1 Display any words on the editor screen from above where your current cursor is
2 Display SQL Syntax like SELECT WHERE FROM all the way to database platform specific functions likeCASE DATEDIFF or CURRENT_DATE()
3 Display the database schema table column as you are typing
Hint To initiate just the database browser which shows database objects plus snippets hit the Ctrl+Space buttonotherwise as you type if auto-complete is supported it will automatically popup
Note Currently we support auto-complete on Netezza Redshift and Snowflake
54 Chapter 6 Using the Query Panel in Aginity Team
Aginity Team Documentation Release 1
65 Snippet support
We have pre-wired some special snippets within the editor as well to make writing SQL simpler The table belowdetails those snippets that are currently available
Snippet Actionselall will generate generic SELECT FROMselwh will generate generic SELECT FROM WHEREupd will generate an UPDATE statementins will generate an INSERT statementdel will generate a DELETE statementexpf will generate a generic export to file statement
66 Common Actions in Query Panel
We will highlight common functions heavily used in the editor here There is a complete list of available editorfunctions which can be accessed by hitting the Command+Shift+P on Mac or the Ctrl+Shift+P button within theeditor or from the View-gtCommand Palette menu item
661 Renaming Tabs
You can rename the query tabs by double clicking and typing in a name as shown below
662 Commenting SQL
In Aginity Team you can use the typical SQL syntax to comment your code as shown below
1 -- This is one way to comment your SQL code2
3 SELECT AVG(LineTotal)4 FROM salesSalesOrderDetail5
6 This is another way to comment your SQL code
65 Snippet support 55
Aginity Team Documentation Release 1
Hint If highlight multiple lines of code you can also use the Shortcut Keys Ctrl+K+C on Windows or Com-mand+K+C on Mac to comment them out To uncomment use Ctrl+K+U or Command+K+U
663 Keeping Connection
The Keep Connection checkbox as show below will instruct Aginity Team to maintain the connection to the databaseif the default behavior of the database is to disconnect after the execution of a query You are still subject to an overalldatabase connection timeout if you session connection exceeds the permitted database setting
664 Find and Replace
Ctrl+F (Windows) or Command+F (Mac) will bring up the find and replace box as shown below
67 Interacting with Query Results
Once your query has been executed you can use the features of the result grid to interact with the result set The typicalactions you will do are listed below
bull Reordering the Result Grid
bull Sorting the Result Grid
bull Filtering the Result Grid
bull Exporting results to CSV
671 Reordering the Result Grid
Once a query has executed successfully you may rearrange the columns in the Result Grid in order to more effectivelyperform subsequent analyses Rearranging the Result Grid is simple simply click hold and drag the column headerfor the column you wish to move As you move it left or right the grid will automatically adjust to reposition thecolumn
56 Chapter 6 Using the Query Panel in Aginity Team
Aginity Team Documentation Release 1
Once you are satisfied with the new position of the column you may release the drag and the column will lock intoplace
672 Sorting the Result Grid
After successfully executing a query if the query has returned any rows you may sort the results in order to permitvarious types of analysis of your results
In order to sort your results simply click on the header row in the results grid If the results are already being sortedby that column then the sort order will toggle between ascending and descending
67 Interacting with Query Results 57
Aginity Team Documentation Release 1
673 Filtering the Result Grid
Data in the Result Grid may be filtered to make it easier to locate and analyze certain subsets of the resultant datawithout requiring you to submit an entirely separate query
To filter the result grid by values in a particular column bring your mouse cursor to the column header for the columnto which you wish to apply a filter In the right-hand side on the header row the filter icon (three horizontal bars) willappear Click on the filter icon and you will be presented with a pop-up menu that will allow you to enter your filtercriteria
By default the filter criteria will select a ldquoContainsrdquo filter but several other filter types exist and you may select anyof them Once you have selected the filter type you wish to apply type the filter into the text box The results willimmediately begin to filter
58 Chapter 6 Using the Query Panel in Aginity Team
Aginity Team Documentation Release 1
When a column is being filtered a funnel icon will appear in its header To remove the filter you may re-enter thefilter mode by clicking on the filter icon (three bars) in the header row and simply delete the filter text
Multiple columns may have active filters at the same time To accomplish this simply perform these steps on eachcolumn
674 Exporting results to CSV
Once you have successfully executed a query you can elect to export those results in Comma Separated Value (CSV)format to a file outside of Aginity Team To do this right-click anywhere in the results panel Doing this will displaya context menu from which you will select the option ldquoExport to CSVrdquo
After selecting this option you will be presented with a screen that permits you to select the location to which to saveyour results Once you have identified the proper location press the Save button to complete the export
CSV files may subsequently be imported into a large number of different programs for further review and analysis
See also
bull Adding Query to Catalog
bull Using Discovery Panel
67 Interacting with Query Results 59
Aginity Team Documentation Release 1
60 Chapter 6 Using the Query Panel in Aginity Team
CHAPTER 7
Using the Catalog in Aginity Team
71 Catalog Overview
The query catalog is a unique capability of Aginity Team allowing you to easily save manage and use items stored init Letrsquos start with browsing the catalog
The catalog is organized by any number of directories and sub-directories of queries as shown below
See also
61
Aginity Team Documentation Release 1
Click Read this article for some ideas on how to best organize your catalog
Queries are given friendly names and can be used or accessed in several ways The first way is to drag the catalogquery into a query panel as shown in the two images below
Fig 1 You can drag the query into the empty query panel
You can also edit queries within a query panel By right clicking on a catalog item and choosing edit code in tab youcan change the SQL itself
62 Chapter 7 Using the Catalog in Aginity Team
Aginity Team Documentation Release 1
Fig 2 After you drag the item it will present the full catalog query for edit or execution
71 Catalog Overview 63
Aginity Team Documentation Release 1
You can edit and save the catalog query in a query panel worksheet as shown below
64 Chapter 7 Using the Catalog in Aginity Team
Aginity Team Documentation Release 1
Hint If you see a next to the tab name in the query panel it means a change has not been saved
By editing the details of a catlaog query you can see key metadata items and statistics about the catalog
71 Catalog Overview 65
Aginity Team Documentation Release 1
72 Calling Catalog Items from SQL
One of the most innovative features of Aginity Team is the ability to call catalog items from within SQL statements
The video and following examples below will give you basic syntax required to call a catalog item
66 Chapter 7 Using the Catalog in Aginity Team
Aginity Team Documentation Release 1
721 Single SQL SELECT Statement
In this example we have a single SQL SELECT statement in the catalog called OrderAverage
This is the code in the Catalog
1 SELECT AVG(LineTotal)2 FROM salesSalesOrderDetail
To call this from the query panel you would issue the following command Note the highlighted reference to the objectin the catalog
1 SELECT 2 FROM (OrderAverage) a
This is the code passed to the database
1 SELECT 2 FROM (3 SELECT AVG(lineTotal)4 FROM SalesSalesOrderDetail5 ) a
722 Using Catalog Item to Facilitate Relationships
In this example we will predefine a join in the catalog called ClientAddress and then use it in the context of anotherSQL statement
This is the code in the Catalog
1 clients c2 JOIN addresses a3 ON cclientsid = aclientsid
To call this from the query panel you would issue the following command Note the highlighted reference to the objectin the catalog
1 SELECT 2 FROM ClientAddress
This is the code passed to the database
1 SELECT 2 FROM clients c3 JOIN addresses a4 ON cclientsid = aclientsid
723 Creating and Reusing Calculations
In this example we will predefine a Calculations in the catalog called Residual and then use it in the context of anotherSQL statement
This is the code in the Catalog
72 Calling Catalog Items from SQL 67
Aginity Team Documentation Release 1
1 1-total
To call this from the query panel you would issue the following command Note the highlighted reference to the objectin the catalog
1 SELECT item2 Residual3 FROM table
This is the code passed to the database
1 SELECT item2 1-total3 FROM table
724 Executing a Multi-Step script
In this example we will predefine a series of SQL statements in the catalog called DailyRun and then execute it by asingle call Any DML (SELECT CREATE UPDATE INSERT DELETE) can be used
This is the code in the Catalog
1 CREATE TABLE xyz AS2 CREATE TABLE abc AS3 SELET FROM xyz JOIN abc
To call this from the query panel you would issue the following command Note the highlighted reference to the objectin the catalog
1 DailyRun
This is the code passed to the database
1 CREATE TABLE xyz AS2 CREATE TABLE abc AS3 SELECT FROM xyz JOIN abc
725 Using Parameters in Catalog
In this example we will use a parameter within a catalog item called CitySelect
This is the code in the Catalog Note the highlighted line has the parameter in it
1 SELECT 2 FROM addresses3 WHERE city = $city
To call this from the query panel you would issue the following command Note the highlighted reference to the objectin the catalog
1 CitySelect
This is the code passed to the database
68 Chapter 7 Using the Catalog in Aginity Team
Aginity Team Documentation Release 1
1 SELECT 2 FROM addresses3 WHERE city = Chicago
Note Upon execution of the command Aginity Team will ask you to supply a parameterized value For moreinformation on parameters see Using Parameters
73 Adding Items to Catalog
To add a new query to the catalog highlight any part of a SQL statement(s) right click and select Save selection tocatalog as shown below
Once you save you will be asked to provide metadata about the query you are adding
73 Adding Items to Catalog 69
Aginity Team Documentation Release 1
Note It is important to fill out the description metadata as it will be used in searching The more information youprovide about the context of usage key business terms and intended usage the better search results you will get
You can also easily create new folders in the catalog or add SQL entries directly from the Catalog Browser by clickingthe (+) to the right of the Catalog header
When adding a new folder you will be presented with a basic text box to create your folder as shown below
74 Import and Export Items from Catalog
You have the ability to Import and Export both your full catalog as well as any folder selected within the catalog
Note We highly recommend taking regular exports of your catalog to disk to prevent accidental loss of queries
741 Export Steps
To Export your catalog start by either Right Clicking on a Catalog Folder or Using the Aginity Pro -gt Export Catalogmenu as shown below
70 Chapter 7 Using the Catalog in Aginity Team
Aginity Team Documentation Release 1
Your first step is to save either an entire folder or a selection of items within a folder
The final step in exporting is to name the file and location you will save to as shown below
742 Import Steps
Importing is valuable for several reasons One is to restore SQL catalog items you may have lost or more importantlythe ability to collaborate with other SQL developers and share your SQL making your a more efficient and consistentSQL developer
74 Import and Export Items from Catalog 71
Aginity Team Documentation Release 1
The first step is to Right Click on a folder you want to import to and Chooose Import Catalog as shown below
Note You can also use the Aginity Pro Menu -gt Import Catalog The main difference between using these twocapabilities is the context of where you are importing items If you choose to import from the Aginity Pro menu youmust set the context where to import If you Right Click on a folder the context is set to that folder
After choosing to import you will choose the file to import By default Aginity catalog files have the extensionaginitypkg
After choosing your file you can specify the folder to import to and what to import as shown below
72 Chapter 7 Using the Catalog in Aginity Team
Aginity Team Documentation Release 1
Hit the Import button and your queries should be imported
See also
Aginity also maintains a Github repository of Catalog queries to be used These queries are either administrativequeries for specific platforms data engineering queries that do powerful transformations against generic data or ana-lytic queries showing how to do cool things in SQL
Access the repositories here
See also
Using Query Panel
74 Import and Export Items from Catalog 73
Aginity Team Documentation Release 1
74 Chapter 7 Using the Catalog in Aginity Team
CHAPTER 8
Using Discovery Panel in Aginity Team
The Discovery Panel is a feature that is unique to Aginity Team and which allows you to quickly identify and reusecode that yoursquove previously executed or saved Using the Discovery Panel begins with a search Watch the videobelow to get a sense for how this feature works
By default the Discovery Panel allows you to search both your query execution history and your Pro Catalog at thesame time However by selecting one of the radio buttons in the Discovery Panel you can choose to focus on just oneor the other if you prefer
81 Searching Query Execution History
Start by typing in any free-text you want such as Sales as shown Below
75
Aginity Team Documentation Release 1
The search engine will do a full text search and display all results
82 Searching the Amp Pro Catalog
Buy clicking on the Catalog radio button you will restrict your search as shown below
83 Expanding the results
Once you have performed a search Amp Pro will dynamically update the results in the Discovery Panel to match thesearch term you have entered Yoursquoll be able to view a small amount of the query by default but if more is requiredyou can click on the arrows in the corner of the preview in order to expand the snippet further
84 Doing More with the Discovery Panel
A place holder for advanced filtering capabilities
76 Chapter 8 Using Discovery Panel in Aginity Team
CHAPTER 9
Reference
91 Video Reference
The following is a reference list of videos about Aginity Team and how to use its features
bull
bull
bull
bull
bull
bull
92 Shortcut Key Reference
Command ActionCommand K + C (Mac) or Ctrl K + C (Windows) Comment lines of codeCommand K + U (Mac) or Ctrl K + U (Windows) Uncomment lines of codeCommand F (Mac) or Ctrl F (Windows) Find and Replace Menu
93 Frequently Asked Questions
The section below is dedicated to commonly asked questions that we compile and provide answers to Over time asthings change we will keep this table up to date
77
Aginity Team Documentation Release 1
931 What Control do I have with Row Limit Preference
By default we cap the row limit preference to 100K rows to discourage users from spooling too much data across yournetwork Trust us your network infrastructure folks do appreciate it Fear not though you have options First if youset the preference to 0 it will spool as much as you want until either you run out of memory or your query completesAlternatively we recommend spooling the output to a file if you are doing returns greater than 100K rows Refer tothe documentation on execute query to file
94 SQL Reference Guides for Supported connections
As SQL developers ourselves we thought putting links to the databases we support in our documentation was a goodidea so here they are
bull
bull
bull
bull
95 Driver Support Reference
The table below is a cross reference of driver versions by platform
Platform Driver Version Class NameNetezza Not distributed with software
(nzjdbcjar)orgnetezzaDriver
SQL Server 720 jre8 commicrosoftsqlserverjdbcSQLServerDriverRedshift 12161027 comamazonredshiftjdbcDriverGreenplum and Post-gres
4225 orgpostgresqlDriver
Hive 121 orgapachehivejdbcHiveDriverSnowflake 3623 3628 355 netsnowflakeclientjdbcSnowflakeDriverIBM DB2 Warehouse db2jcc4 comibmdb2jccDB2Driver
78 Chapter 9 Reference
CHAPTER 10
Troubleshooting
This page is dedicated to common issues or errors you may encounter when using Aginity Team We recommend youalso post any new issues or questions to our Aginity Team Forum
The is a great resource for posting questions searching for common solutions to features of Pro or just learning howto be efficient as a SQL analytic developer through samples best practices and collaboration with other Pro users
Is-sueNum-ber
Isthis aDe-fect
Source of Error Description of Error Resolution
1 No Cannot DownloadDrivers via Con-nection Screen
In most cases your organization isblocking Aginityrsquos ability to downloaddrivers from a Maven repository
Follow directions in the Config-ure Connections documentationto Manually Add Drivers
79
Aginity Team Documentation Release 1
80 Chapter 10 Troubleshooting
CHAPTER 11
End User License for Aginity Team
Click here for end users license
81
- Administering Aginity Team
-
- Deploying Aginity Team through AWS Marketplace
- Installing Aginity Team on Linux
- Upgrading Aginity Team
- Backing Up or Restoring Team Catalog
-
- Creating Users in Aginity Team
-
- Administering Users
-
- Enabling Snowflake OAuth in Aginity Team
- Configuring Connections in Aginity Team
-
- Downloading Drivers
- Setting up Netezza Connections
- Setting up Redshift Connections
- Setting up Snowflake Connections
- Setting up Hive Connections
- Setting up SQL Server Connections
- Setting up DB2 Warehouse Server Connections
- Setting up Greenplum and Postgres Connections
- Import and Exporting Connections
-
- Using the Database Explorer in Aginity Team
-
- Viewing the Database Data Dictionary
- Database Object Support by Platform
- Quick Actions from Explorer
-
- Using the Query Panel in Aginity Team
-
- Writing your First Query
- Executing to a File
- Using Parameters in your Query
- Auto-Complete Capabilities
- Snippet support
- Common Actions in Query Panel
- Interacting with Query Results
-
- Using the Catalog in Aginity Team
-
- Catalog Overview
- Calling Catalog Items from SQL
- Adding Items to Catalog
- Import and Export Items from Catalog
-
- Using Discovery Panel in Aginity Team
-
- Searching Query Execution History
- Searching the Amp Pro Catalog
- Expanding the results
- Doing More with the Discovery Panel
-
- Reference
-
- Video Reference
- Shortcut Key Reference
- Frequently Asked Questions
- SQL Reference Guides for Supported connections
- Driver Support Reference
-
- Troubleshooting
- End User License for Aginity Team
-

Aginity Team Documentation Release 1
userDirectoryuserSchemaemailAttribute
Defines which attributes on an LDAP user entry will be used as its email address
userDirectoryuserSchemasearchScope
Specify strategy to use when doing a search Possible options SUB_TREE (search request should be performedagainst the search base and all entries below) ONE (search request should be performed against entries that areimmediate subordinates of the entry specified as the search base DN) BASE (search request should only be performedagainst the entry specified as the search base DN)
124 Starting Aginity Team Server
Prior to starting the Agnity Team server you must create the administrator username and password
You can do this by running the team-create-superuser script in the optaginitybin directory on the server
this will create a user with the administrator rolesudo optaginity-teambinteam-create-super-usersh
Step 5 You are now ready to start Aginity Team
We use the following commands to start Aginity Team in the background and with logging turned on
sudo systemctl start aginity-team
You can check if Aginity Team is running by issuing this command
sudo systemctl status aginity-team
125 Accessing Aginity Team for the First Time
Step 6 Step 6 Open browser and navigate to httpsltip or team server namegtltserver portgtlogin You will see thefollowing image
bull Enter credentials you used to create the administrator to enter the application
Step 7 Register and Apply License Key
14 Chapter 1 Administering Aginity Team
Aginity Team Documentation Release 1
When you open the application it will ask you to register the software and then you will be asked to applythe license key
If it does not ask for the license key you can click on Help -gt Register again and the license key boxshould pop open as shown below
12 Installing Aginity Team on Linux 15
Aginity Team Documentation Release 1
Note It is imperative that all users be created with valid business email addresses
Send the link to team to any new user along with their usernamepassword combination
126 Stopping Aginity Team Services
Log in as the team user and issue the following command
sudo systemctl stop aginity-team check to see if it is stopped Usingsudo systemctl status aginity-team
See also
Add Connections
13 Upgrading Aginity Team
Upgrading team consists of logging into the Team server downloading the latest update and applying it from thecommand line
For clarities sake when we refer to aginity-team-ltversiongt-amd64deb we purposely leave version generic Eachupgrade will have a different number associated with it
Warning It is important to take a backup of both your encryption key for the Team catalog and to do a BackingUp or Restoring Team Catalog before upgrading This way if anything goes wrong you will not use your catalogIt is also recommended to do a manual export of your catalog from time to time
You can get the encryption key using the command below
sudo cat etcaginity-teamserviceconf
16 Chapter 1 Administering Aginity Team
Aginity Team Documentation Release 1
131 Step 1 Logging into Team Server
SSH into the Team server as an administrator
Note Typically you will log in as an account other than root and then you will be using the sudo command
132 Step 2 Check to see if Team is Currently Running and then Shut it Down
Issue the command below to check the status of the Team service
sudo systemctl status aginity-team
If Team is running shut it down by issuing this command
sudo systemctl stop aginity-team
Note It is always a good idea to run the status check again to make sure Team has been shut down
133 Step 3 Download the Latest Version of Aginity Team
Using the wget command you can download the latest version as shown below
wget httprepositoryaginitycoms3amazonawscomAginityTeamaginity-team-ltversionrarr˓gt-amd64deb
134 Step 4 Upgrading the Software
Run the upgrade process by issuing this command
on Ubuntusudo apt-get install aginity-team-ltversiongt-amd64deb on RHELsudo yum install aginity-team-ltversiongt-amd64deb
The package manager will determine if your configuration files are different from ones bringing with the new versionof the application being installed and will offer you a few option to proceed with installation
13 Upgrading Aginity Team 17
Aginity Team Documentation Release 1
You should always keep your currently-installed version and resolve any conflicts by comparing and merging thedifference manually
135 Step 5 Restart Aginity Team
Restart the server by issuing this command
sudo systemctl start aginity-team
14 Backing Up or Restoring Team Catalog
We have provided two files listed and described below which will allow you to automate or manually backup andrestore your Aginity Team catalog
141 Backup Script
The backup script backupsh will perform and compress a backup of the Aginity Team Catalog to the tmp di-rectory on your OS It will append the date to the end of the file created and should be named in this pattern agin-ity_backup_m_d_Yzip
Note Before running the backupsh script you will need to edit it and provide the following variables
bull DESTINATION ~ if you do not want to use the default tmp
bull TOKEN ~ this value is the encryption key for the database To find out the value of it run this command
sudo cat etcaginity-teamserviceconf
bull H2PATH ~ Unless you modified the installation directory from the default you should not need to change this
bull DBPATH ~ Unless you modified the installation directory from the default you should not need to change this
18 Chapter 1 Administering Aginity Team
Aginity Team Documentation Release 1
When running a backup the Aginity Team server process will be stopped then restarted when complete
See also
If you want to schedule the backup and automate it we recommend scheduling using Crontab Crontab ReferenceGuide
142 Restore Script
To restore to an instance of the backup follow these instructions
Yoursquoll need to set the variables within the restoresh to match what is in the backupsh
First download the restore script restoresh Next you will provide the file name of the backup you want to restorein the
bull SOURCE variable
Now run the script and it will automatically re-start Aginity Team when complete
14 Backing Up or Restoring Team Catalog 19
Aginity Team Documentation Release 1
20 Chapter 1 Administering Aginity Team
CHAPTER 2
Creating Users in Aginity Team
Once you have installed your Aginity Team server you need to set up users To do this navigate to the Administrationmenu item as show below
Click the button Register New User and fill out the form as show below
21
Aginity Team Documentation Release 1
When choosing the role of Admin vs User reference this table below for differences in functionality
21 Administering Users
Once you have created users and you need to common tasks as described below you will go back into the Administra-tion Menu and click on the three dots ldquo rdquo to the right of each user row This will pop opne an edit menu as shown
22 Chapter 2 Creating Users in Aginity Team
Aginity Team Documentation Release 1
below
211 Disabling Users
You can choose to disable user which will not allow them to login but will not remove any of their catalog informationor query history
212 Resetting Passwords
To reset a password you can choose the Change password which will prompt you to enter and confirm a new password
213 Edit User
If you need to Edit any registration details such as name or role you can do that here
21 Administering Users 23
Aginity Team Documentation Release 1
24 Chapter 2 Creating Users in Aginity Team
CHAPTER 3
Enabling Snowflake OAuth in Aginity Team
We now support OAuth for the snowflake platform This feature only works on Aginity Team The details below willguide your through setting up the configuration on the server
1 Connect to your Snowflake server and create a Security Integration object for a custom client (more details canbe found at this link)
For example
CREATE SECURITY INTEGRATIONCREATE OR REPLACE SECURITY INTEGRATIONaginity_team_oAuthTYPE = OAUTHENABLED = TRUEOAUTH_CLIENT = CUSTOMOAUTH_CLIENT_TYPE = CONFIDENTIALOAUTH_REDIRECT_URI = Aginity Team Public URLapioauthsnowflakeOAUTH_ALLOW_NON_TLS_REDIRECT_URI = FALSEOAUTH_ENFORCE_PKCE = TRUEOAUTH_ISSUE_REFRESH_TOKENS = TRUEOAUTH_REFRESH_TOKEN_VALIDITY = 86400
Note Aginity Team Public URL is a URL of a server running Aginity Team It is a public URL available outsideyour corporate network
Aginity Team Public URL has the following format schemehostport where scheme can be either http orhttps host is hostname of the server running Aginity Team port is TCP port Aginity Team is using
2 Ssh to the Aginity Team server
3 Edit etcaginity-teamapplicationyml and uncomment and update the following properties
platformssnowflakeoauthhost
Snowflake account in format account_namesnowflakecomputingcom where account_name is your Snowflakeaccount name
25
Aginity Team Documentation Release 1
platformssnowflakeoauthclientId
Snowflake client ID of the Security Integration object The Snowflake administrator can find the client ID by describingthe integration that is by using the DESC SECURITY INTEGRATION command
platformssnowflakeoauthclientSecret
Snowflake client secret of the Security Integration object The Snowflake administrator can find the client secrets byusing the system function SHOW_OAUTH_CLIENT_SECRETS
serverpublicUrl Aginity Team Public URL
Database platform specific configurationsplatformssnowflake
oauthclientSecrets
- host account_namesnowflakecomputingcomclientId client idclientSecret client secret
For example a customer has 2 Snowflake accounts The first one is eb39151us-east-1snowflakecomputingcom and itis being used for Dev environment The second one is xr58911us-east-1snowflakecomputingcom and it is being usedfor Production environment Then to enable OAuth connections to these environments via Aginity Team administratorshould add the following parameters to serviceconf
serverpublicUrl httpsaginityexamplecom
platformssnowflake
oauthclientSecrets
Dev environment- host eb39151us-east-1snowflakecomputingcom
clientId fnm4OgHhswihrEfsahTyZo=clientSecret sHljg51o7jdsjds8723786f35Q0K+TthasjuczjQwY=
Production environment- host xr58911us-east-1snowflakecomputingcom
clientId kwajw56h(usaELkkwu=clientSecret gfhfrejds3232372822378YUUYthasjuczjQwY=
4 Restart the Aginity Team server
26 Chapter 3 Enabling Snowflake OAuth in Aginity Team
CHAPTER 4
Configuring Connections in Aginity Team
Aginity Team allows you to set up connections to a variety of different database platforms In order to do this clickthe + symbol next to the ldquoConnectionsrdquo header in the left navigation pane of Aginity Team You will be presentedwith a list of existing connections as well as options for adding another connection Clicking the ldquoNew Connectionrdquobutton will allow you to enter the necessary information for the connection you wish to create
Below is a quick start video of creating connections in Aginity Team
Note Aginity Team uses JDBC to connect to database platforms It is recommended you refer to the JDBC guidesfor our supported platforms to learn about specific variables to use within the Advance Parameters section of AginityTeam We will provide links to that documentation where available
The video below provides a more detailed explanation of how to use advanced parameters to illicit the desired behaviorand successful connection to the database platform
27
Aginity Team Documentation Release 1
41 Downloading Drivers
The first step in configuring a connection is to download the JDBC driver for the platform you will be using In mostcases we will provide access to the drivers which have been certified to work with Aginity Team In some cases suchas when the vendor does not allow us to distribute or you want to use a different version you will have to manuallyadd the JDBC driver
The video below provides a quick illustration of how to manage drivers
See also
Database Driver Reference Guide
To get started in the Edit or Add Connection box you will click on Edit Drivers as shown below
411 Automatic Download
As shown in the image below if we are allowed to to download drivers you will be provided a link to do so and thenbe presented with one or more drivers to use and your done
28 Chapter 4 Configuring Connections in Aginity Team
Aginity Team Documentation Release 1
In some cases you may get an error message if your organization does not allow you to download drivers (jar files)typically supplied through a Maven repository
In this case please review the section below Manually Add Drivers
412 Manually Add Drivers
If you have to manually add a driver it starts with first acquiring the JDBC jar for that platform and saving it somewhereon your machine Once you acquire the JDBC jar you can upload it to Aginity Pro
To do this you will hit the Edit Driver or Edit Drivers Panel section as shown above and you will be presented withthe following screen
You can name the Driver anything you want and provide a description
The class name if not provided must be looked up typically in the JDBC reference manual from the platform vendor
Finally if you click on the Add File button you will navigate to where you saved the Jar file and then click SaveChanges You are now ready to configure your connection
42 Setting up Netezza Connections
You can set up a connection to a Netezza (IBM PureData for Analytics) appliance here Simply populate the requesteddata into the form
42 Setting up Netezza Connections 29
Aginity Team Documentation Release 1
Note Netezza does not allow us to distribute their drivers so you must obtain it from your DBA or directly from IBMFix Central
30 Chapter 4 Configuring Connections in Aginity Team
Aginity Team Documentation Release 1
421 Using SSL with Netezza Connections
Aginity Team supports SSL when setting up a Netezza connection While setting up your Netezza connection simplyselect the level of security to enable from the dropdown selector Your choices include
bull Only Unsecured - Specify this option when you want an unsecured connection to the Netezza system If theNetezza system requires a secured connection the connection is rejected
bull Preferred Unsecured - This argument is the default value Specify this option when you would prefer anunsecured connection but you accept a secured connection if the Netezza system requires one
bull Preferred Secured - Specify this option when you want a secured connection to the Netezza system but youaccept an unsecured connection if the Netezza system is configured to use only unsecured connections
bull Only Secured- Specify this option when you want a secured connection to the Netezza system If the Netezzasystem accepts only unsecured connections or if you are attempting to connect to a Netezza system that isrunning a release before release 45 the connection is rejected
See also
For more information on SSL refer to the link Netezza SSL
422 Connection Timeout
The connection timeout will tell the session when to disconnect Typically set this to 10 minutes or 3600 seconds
423 Advanced Parameters
For Netezza you can supply additional JDBC parameters using the Advanced Properties section
See also
Here is the link to other configurable parameters supported within Netezza JDBCrsquos driver
42 Setting up Netezza Connections 31
Aginity Team Documentation Release 1
43 Setting up Redshift Connections
431 Using SSL Mode with Redshift Connections
Aginity Team supports SSL when setting up a Redshift connection While setting up your Redshift connection simplyselect the level of security to enable from the dropdown selector Your choices include
bull Disable - SSL is disabled and the connection is not encrypted
bull Prefer - SSL is used if the server supports it Amazon Redshift supports SSL so SSL is used when you set
32 Chapter 4 Configuring Connections in Aginity Team
Aginity Team Documentation Release 1
sslmode to prefer
bull Allow - SSL is used if the server requires it
bull Require - SSL is required
See also
For more information on Redshift SSL refer to this link
432 Advanced Parameters
For Redshift you can supply additional JDBC parameters using the Advanced Properties section
See also
Here is the link to other configurable parameters supported within Redshift JDBCrsquos driver
44 Setting up Snowflake Connections
You can set up a connection to a Snowflake here Simply populate the requested data into the form
44 Setting up Snowflake Connections 33
Aginity Team Documentation Release 1
441 Warehouse
A virtual warehouse often referred to simply as a ldquowarehouserdquo is a cluster of compute resources in Snowflake Awarehouse provides the required resources such as CPU memory and temporary storage to perform the followingoperations in a Snowflake session If you do not know which specific Warehouse to use speak to your Snowflake DBA
442 Role
This is a security role that may have been setup for you to use You can leave this field blank if you do not know whatRole to connect as
34 Chapter 4 Configuring Connections in Aginity Team
Aginity Team Documentation Release 1
443 Advanced Parameters
For Snowflake most connection detail is handled through the command line additions to the JDBC URI You cansupply additional JDBC parameters using the Advanced Properties section
See also
Here is the link to other configurable parameters supported within Snowflake JDBCrsquos driver
45 Setting up Hive Connections
You can set up a connection to a Hive databases here Simply populate the requested data into the form
45 Setting up Hive Connections 35
Aginity Team Documentation Release 1
36 Chapter 4 Configuring Connections in Aginity Team
Aginity Team Documentation Release 1
451 Picking Subprotocol
You can choose either Hive 2 or Spark SQL syntax when executing against Hive databases You can choose eithervalue in this drop down
452 Setting up Kerberos connections
In a lot of cases organizations require the use of Kerberos with Hive so by clicking on the radio button for UseKerberos for authentication you will be prompted to enter the following
bull Realm
bull FQDN
bull Service name
Note The value of these parameters are typically set by your Hadoop administrator and it is best to work with themto obtain the appropriate values
453 Advanced Parameters
You can supply additional Hive JDBC parameters using the Advanced Properties section
See also
Here is the link to other configurable parameters supported within Hive JDBCrsquos driver
46 Setting up SQL Server Connections
You can set up a connection to Microsoft SQL Server databases here Simply populate the requested data into theform
46 Setting up SQL Server Connections 37
Aginity Team Documentation Release 1
Note We only support SQL Server compatibility levels 150 and 140 which is SQL Server 2017 and greater
47 Setting up DB2 Warehouse Server Connections
You can set up a connection to IBM DB2 warehouse databases here Simply populate the requested data into the form
38 Chapter 4 Configuring Connections in Aginity Team
Aginity Team Documentation Release 1
471 Advanced Parameters
You can supply additional Hive JDBC parameters using the Advanced Properties section
See also
Here is the link to other configurable parameters supported within SQL Server JDBCrsquos driver
48 Setting up Greenplum and Postgres Connections
You can set up a connection to Greenplum and Postgres databases here Simply populate the requested data into theform Greenplum and Postgres share the same drivers so we will speak of them together
48 Setting up Greenplum and Postgres Connections 39
Aginity Team Documentation Release 1
481 Choosing Subprotocol (Only for Greenplum)
You can choose either generic Postgres or Pivotal Greenplum SQL syntax when executing against Greenplumdatabases You can choose either value in this drop down
40 Chapter 4 Configuring Connections in Aginity Team
Aginity Team Documentation Release 1
482 Advanced Parameters
You can supply additional Postgres JDBC parameters using the Advanced Properties section
See also
Here is the link to other configurable parameters supported within Postgres JDBCrsquos driver
49 Import and Exporting Connections
A new feature in Aginity Team is the ability to import and export your connection templates and share them withother users A good deal of inefficiency with SQL IDErsquos is the time it takes to get connected No longer With theconnection templates you can save all the relevant detail minus the login credentials and distribute them through aneasy import and export feature
To get started have a DBA or power user establish the connection details once and export the connection as shown inthe image below
You will be presented with a selection list of connections as shown below Select the connections you want to exportand click Export selected
Note It is important to either check the radio button include sensitive data or to uncheck it This willinclude the username and password or exclude it from the connection export
49 Import and Exporting Connections 41
Aginity Team Documentation Release 1
You will be presented with a file menu window to name and pick the folder location for the export file as shown below
42 Chapter 4 Configuring Connections in Aginity Team
Aginity Team Documentation Release 1
Once you have exported the connections you can send them to Aginity Team users and have them import them To dothat choose the Import Connections menu item as shown below
You will be presented with a file selection Choose the appropriate Aginity connection package
Note By default Aginity packages for both Catalog and Connections are prefaced with aginitypkg file types
Once you choose a file select the connections you want to import and choose Import Selected
49 Import and Exporting Connections 43
Aginity Team Documentation Release 1
See also
Navigating Database Explorer
44 Chapter 4 Configuring Connections in Aginity Team
CHAPTER 5
Using the Database Explorer in Aginity Team
The Database Explorer panel in Aginity Team can be toggled by using the Database Explorer and Catalog tabs onthe left hand pane of the application as show below The Database Explorer is used to navigate database objectsbased on the Connections defined in Aginity Team The Catalog browser is used to navigate SQL Analytics that youhave personally stored
Below is a quick start video of using the Database Explorer in Aginity Team
51 Viewing the Database Data Dictionary
Once you have established a connection to a database you can browse the database dictionary catalogs You can toggleto the Database Explorer browser by clicking on the tab as shown below The database data dictionaries typicallycontains the tables columns views and other database objects available to query from the query panel
Once you have selected the Database Explorer tab you can drill into each connection as shown below
45
Aginity Team Documentation Release 1
52 Database Object Support by Platform
The following image details what objects are visible from the browser for all of our currently supported platformsWe do releases every two weeks with Aginity Team so if there is a feature you need please contact us at sup-portaginitycom
46 Chapter 5 Using the Database Explorer in Aginity Team
Aginity Team Documentation Release 1
53 Quick Actions from Explorer
Currently you can do the following quick actions from the Database Explorer
531 SQL Statement Generation
To generate typical SQL statements from tables or views you can right click on the object navigate to scripts andchoose the appropriate script as shown below
53 Quick Actions from Explorer 47
Aginity Team Documentation Release 1
532 Selective SQL Generation on a Set of Columns
To generate SQL statements based on a selection of columns within a Table or View multi-select the columns byholding Ctrl (Windows) or Command (Mac) and selecting the columns as shown below Then generate the SQLstatement
Hint Make sure you donrsquot have the table name selected and column names at the same time If you do it will generatethe SQL for the whole table
48 Chapter 5 Using the Database Explorer in Aginity Team
Aginity Team Documentation Release 1
533 Drag and Drop Capabilities
You can drag and drop any object from the DB Explorer into the Query Panel
Note Double-clicking expands the DB Explorer tree
534 Copy JDBC Connection String
If you select any Connection (Top level of the tree) and select ldquoCopy Connection string to Clipboardrdquo you will getthe full JDBC URI which is helpful for debugging See this Knowledge Base Article for help with debugging yourAginity Team connections
See also
bull Use Catalog Browser
bull Use Query Panel
53 Quick Actions from Explorer 49
Aginity Team Documentation Release 1
50 Chapter 5 Using the Database Explorer in Aginity Team
CHAPTER 6
Using the Query Panel in Aginity Team
You will spend most of your time in the Query Panel writing SQL and saving it to your catalog in Aginity Team Thevideo below will give you an overview of creating your first query
61 Writing your First Query
Each tab in the Aginity Team application can be set to different database connections Once you establish that con-nection as shown below you can use the query panel like a text editor using SQL syntax specific to that databaseplatform
Once you write your code in Aginity Team you have options to run it using the following scope
51
Aginity Team Documentation Release 1
Execution Type DescriptionRun at cursor When executing the query it will run the statement where the cursor is place
up until the semicolonRun all parts of the script in a se-quence
Each statement in the window will be run sequentially and the output ofeach statement will be shown in the output and if the statement was a SE-LECT then a results panel will be displayed
Run entire script as a batchAbort Query After executing a query you can direct Aginity Team to send a request to
the database to cancel the query
See also
Note one of the greatest challenges in SQL is learning the different functional syntax from different database vendorsWe are trying to make that easy by giving you links to the SQL reference manuals we support
62 Executing to a File
In version 17 of Aginity Pro we released the ability to use our editor commands to spool the results of a SQLstatement(s) to a file(s)
To do this you must issue the following commands
1 Use the +sql command to tell the editor you will be writing SQL in this section
2 You will then use the output file command to tell the editor you will spool the results to an outputfile
3 In the table below is a series of parameters and descriptions to be used when spooling
4 Use the +begin statement to tell the editor you from here until the +end command you will haveSQL to execute
5 Write your SQL
6 End with +end
7 Use the Run commands as you would any normal SQL statement as described in the Run Scopesection above
The code below is an example you can use to build off of
1 -- This will write the SQL statement between +begin and +end to therarr˓file specified
2
3 +sql4 output file5 path usersjschlittDownloadsjeff16 delimiter 7 null_value NULL8 quote_char 9 overwrite true
10 +begin11 select from wb_pro_marketing_list12 where emaildomain = aginitycom13 +end
52 Chapter 6 Using the Query Panel in Aginity Team
Aginity Team Documentation Release 1
Note We only support today the file type of csv You can still change the delimiter but all files with have a csvextension
The table below illustrates the current values accepted in execute to file commands
Parame-ter
Options
path On Mac this should be in the format ldquodirdirfilenamerdquo On Windows it should be in the formatldquodrivedirectoryfilenamerdquo
delimiter You can use any value but we recommend or | or ^ or t for (tab)null_value enter a character field for null typically lsquorsquo (empty string) or lsquoNULLrsquoquote_char enter how to enclose character string typically the quotation (ldquo)overwrite whether or not to allow overwrite if file exists true or falseheader true or false on whether you want to display headers in fileencoding the encoding of the file UTF_8 is the only value supported currentlycompres-sion
we can compress the file after it is written Values are NONE ZIP and GZIP
See also
We have a great knowledge base article on how to use the catalog to facilitate using the export as file editor feature
63 Using Parameters in your Query
Parameters can be used in Aginity Team by using the $ in any part of a SQL statement When you execute a query theAginity Team application will ask you to fill in the value of the parameter before it sends the query to the database
1 --sample parameter query2
3 select 4 from landing_dim_customer5 where gender = $fill_in_gender_at_runtime6 limit 100
You will have datatype choices at runtime as shown in the table below
Parameter Data Type Action TakenAs Is Aginity Team will send the value exactly as written with no casting This
is often used when using the parameter to fill in database table or columnnames See example 2 below
Hint You can specify default values with parameters by using this syntax with your parameter
$fill_in_gender_at_runtimelsquoMrsquo
When you run the query you will see the little gear icon as shown below Clicking that will populate thedefault value
63 Using Parameters in your Query 53
Aginity Team Documentation Release 1
64 Auto-Complete Capabilities
In Aginity Team we have implemented auto-complete on several database platforms and will be deploying across allover time The auto-complete capability has three capabilities
1 Display any words on the editor screen from above where your current cursor is
2 Display SQL Syntax like SELECT WHERE FROM all the way to database platform specific functions likeCASE DATEDIFF or CURRENT_DATE()
3 Display the database schema table column as you are typing
Hint To initiate just the database browser which shows database objects plus snippets hit the Ctrl+Space buttonotherwise as you type if auto-complete is supported it will automatically popup
Note Currently we support auto-complete on Netezza Redshift and Snowflake
54 Chapter 6 Using the Query Panel in Aginity Team
Aginity Team Documentation Release 1
65 Snippet support
We have pre-wired some special snippets within the editor as well to make writing SQL simpler The table belowdetails those snippets that are currently available
Snippet Actionselall will generate generic SELECT FROMselwh will generate generic SELECT FROM WHEREupd will generate an UPDATE statementins will generate an INSERT statementdel will generate a DELETE statementexpf will generate a generic export to file statement
66 Common Actions in Query Panel
We will highlight common functions heavily used in the editor here There is a complete list of available editorfunctions which can be accessed by hitting the Command+Shift+P on Mac or the Ctrl+Shift+P button within theeditor or from the View-gtCommand Palette menu item
661 Renaming Tabs
You can rename the query tabs by double clicking and typing in a name as shown below
662 Commenting SQL
In Aginity Team you can use the typical SQL syntax to comment your code as shown below
1 -- This is one way to comment your SQL code2
3 SELECT AVG(LineTotal)4 FROM salesSalesOrderDetail5
6 This is another way to comment your SQL code
65 Snippet support 55
Aginity Team Documentation Release 1
Hint If highlight multiple lines of code you can also use the Shortcut Keys Ctrl+K+C on Windows or Com-mand+K+C on Mac to comment them out To uncomment use Ctrl+K+U or Command+K+U
663 Keeping Connection
The Keep Connection checkbox as show below will instruct Aginity Team to maintain the connection to the databaseif the default behavior of the database is to disconnect after the execution of a query You are still subject to an overalldatabase connection timeout if you session connection exceeds the permitted database setting
664 Find and Replace
Ctrl+F (Windows) or Command+F (Mac) will bring up the find and replace box as shown below
67 Interacting with Query Results
Once your query has been executed you can use the features of the result grid to interact with the result set The typicalactions you will do are listed below
bull Reordering the Result Grid
bull Sorting the Result Grid
bull Filtering the Result Grid
bull Exporting results to CSV
671 Reordering the Result Grid
Once a query has executed successfully you may rearrange the columns in the Result Grid in order to more effectivelyperform subsequent analyses Rearranging the Result Grid is simple simply click hold and drag the column headerfor the column you wish to move As you move it left or right the grid will automatically adjust to reposition thecolumn
56 Chapter 6 Using the Query Panel in Aginity Team
Aginity Team Documentation Release 1
Once you are satisfied with the new position of the column you may release the drag and the column will lock intoplace
672 Sorting the Result Grid
After successfully executing a query if the query has returned any rows you may sort the results in order to permitvarious types of analysis of your results
In order to sort your results simply click on the header row in the results grid If the results are already being sortedby that column then the sort order will toggle between ascending and descending
67 Interacting with Query Results 57
Aginity Team Documentation Release 1
673 Filtering the Result Grid
Data in the Result Grid may be filtered to make it easier to locate and analyze certain subsets of the resultant datawithout requiring you to submit an entirely separate query
To filter the result grid by values in a particular column bring your mouse cursor to the column header for the columnto which you wish to apply a filter In the right-hand side on the header row the filter icon (three horizontal bars) willappear Click on the filter icon and you will be presented with a pop-up menu that will allow you to enter your filtercriteria
By default the filter criteria will select a ldquoContainsrdquo filter but several other filter types exist and you may select anyof them Once you have selected the filter type you wish to apply type the filter into the text box The results willimmediately begin to filter
58 Chapter 6 Using the Query Panel in Aginity Team
Aginity Team Documentation Release 1
When a column is being filtered a funnel icon will appear in its header To remove the filter you may re-enter thefilter mode by clicking on the filter icon (three bars) in the header row and simply delete the filter text
Multiple columns may have active filters at the same time To accomplish this simply perform these steps on eachcolumn
674 Exporting results to CSV
Once you have successfully executed a query you can elect to export those results in Comma Separated Value (CSV)format to a file outside of Aginity Team To do this right-click anywhere in the results panel Doing this will displaya context menu from which you will select the option ldquoExport to CSVrdquo
After selecting this option you will be presented with a screen that permits you to select the location to which to saveyour results Once you have identified the proper location press the Save button to complete the export
CSV files may subsequently be imported into a large number of different programs for further review and analysis
See also
bull Adding Query to Catalog
bull Using Discovery Panel
67 Interacting with Query Results 59
Aginity Team Documentation Release 1
60 Chapter 6 Using the Query Panel in Aginity Team
CHAPTER 7
Using the Catalog in Aginity Team
71 Catalog Overview
The query catalog is a unique capability of Aginity Team allowing you to easily save manage and use items stored init Letrsquos start with browsing the catalog
The catalog is organized by any number of directories and sub-directories of queries as shown below
See also
61
Aginity Team Documentation Release 1
Click Read this article for some ideas on how to best organize your catalog
Queries are given friendly names and can be used or accessed in several ways The first way is to drag the catalogquery into a query panel as shown in the two images below
Fig 1 You can drag the query into the empty query panel
You can also edit queries within a query panel By right clicking on a catalog item and choosing edit code in tab youcan change the SQL itself
62 Chapter 7 Using the Catalog in Aginity Team
Aginity Team Documentation Release 1
Fig 2 After you drag the item it will present the full catalog query for edit or execution
71 Catalog Overview 63
Aginity Team Documentation Release 1
You can edit and save the catalog query in a query panel worksheet as shown below
64 Chapter 7 Using the Catalog in Aginity Team
Aginity Team Documentation Release 1
Hint If you see a next to the tab name in the query panel it means a change has not been saved
By editing the details of a catlaog query you can see key metadata items and statistics about the catalog
71 Catalog Overview 65
Aginity Team Documentation Release 1
72 Calling Catalog Items from SQL
One of the most innovative features of Aginity Team is the ability to call catalog items from within SQL statements
The video and following examples below will give you basic syntax required to call a catalog item
66 Chapter 7 Using the Catalog in Aginity Team
Aginity Team Documentation Release 1
721 Single SQL SELECT Statement
In this example we have a single SQL SELECT statement in the catalog called OrderAverage
This is the code in the Catalog
1 SELECT AVG(LineTotal)2 FROM salesSalesOrderDetail
To call this from the query panel you would issue the following command Note the highlighted reference to the objectin the catalog
1 SELECT 2 FROM (OrderAverage) a
This is the code passed to the database
1 SELECT 2 FROM (3 SELECT AVG(lineTotal)4 FROM SalesSalesOrderDetail5 ) a
722 Using Catalog Item to Facilitate Relationships
In this example we will predefine a join in the catalog called ClientAddress and then use it in the context of anotherSQL statement
This is the code in the Catalog
1 clients c2 JOIN addresses a3 ON cclientsid = aclientsid
To call this from the query panel you would issue the following command Note the highlighted reference to the objectin the catalog
1 SELECT 2 FROM ClientAddress
This is the code passed to the database
1 SELECT 2 FROM clients c3 JOIN addresses a4 ON cclientsid = aclientsid
723 Creating and Reusing Calculations
In this example we will predefine a Calculations in the catalog called Residual and then use it in the context of anotherSQL statement
This is the code in the Catalog
72 Calling Catalog Items from SQL 67
Aginity Team Documentation Release 1
1 1-total
To call this from the query panel you would issue the following command Note the highlighted reference to the objectin the catalog
1 SELECT item2 Residual3 FROM table
This is the code passed to the database
1 SELECT item2 1-total3 FROM table
724 Executing a Multi-Step script
In this example we will predefine a series of SQL statements in the catalog called DailyRun and then execute it by asingle call Any DML (SELECT CREATE UPDATE INSERT DELETE) can be used
This is the code in the Catalog
1 CREATE TABLE xyz AS2 CREATE TABLE abc AS3 SELET FROM xyz JOIN abc
To call this from the query panel you would issue the following command Note the highlighted reference to the objectin the catalog
1 DailyRun
This is the code passed to the database
1 CREATE TABLE xyz AS2 CREATE TABLE abc AS3 SELECT FROM xyz JOIN abc
725 Using Parameters in Catalog
In this example we will use a parameter within a catalog item called CitySelect
This is the code in the Catalog Note the highlighted line has the parameter in it
1 SELECT 2 FROM addresses3 WHERE city = $city
To call this from the query panel you would issue the following command Note the highlighted reference to the objectin the catalog
1 CitySelect
This is the code passed to the database
68 Chapter 7 Using the Catalog in Aginity Team
Aginity Team Documentation Release 1
1 SELECT 2 FROM addresses3 WHERE city = Chicago
Note Upon execution of the command Aginity Team will ask you to supply a parameterized value For moreinformation on parameters see Using Parameters
73 Adding Items to Catalog
To add a new query to the catalog highlight any part of a SQL statement(s) right click and select Save selection tocatalog as shown below
Once you save you will be asked to provide metadata about the query you are adding
73 Adding Items to Catalog 69
Aginity Team Documentation Release 1
Note It is important to fill out the description metadata as it will be used in searching The more information youprovide about the context of usage key business terms and intended usage the better search results you will get
You can also easily create new folders in the catalog or add SQL entries directly from the Catalog Browser by clickingthe (+) to the right of the Catalog header
When adding a new folder you will be presented with a basic text box to create your folder as shown below
74 Import and Export Items from Catalog
You have the ability to Import and Export both your full catalog as well as any folder selected within the catalog
Note We highly recommend taking regular exports of your catalog to disk to prevent accidental loss of queries
741 Export Steps
To Export your catalog start by either Right Clicking on a Catalog Folder or Using the Aginity Pro -gt Export Catalogmenu as shown below
70 Chapter 7 Using the Catalog in Aginity Team
Aginity Team Documentation Release 1
Your first step is to save either an entire folder or a selection of items within a folder
The final step in exporting is to name the file and location you will save to as shown below
742 Import Steps
Importing is valuable for several reasons One is to restore SQL catalog items you may have lost or more importantlythe ability to collaborate with other SQL developers and share your SQL making your a more efficient and consistentSQL developer
74 Import and Export Items from Catalog 71
Aginity Team Documentation Release 1
The first step is to Right Click on a folder you want to import to and Chooose Import Catalog as shown below
Note You can also use the Aginity Pro Menu -gt Import Catalog The main difference between using these twocapabilities is the context of where you are importing items If you choose to import from the Aginity Pro menu youmust set the context where to import If you Right Click on a folder the context is set to that folder
After choosing to import you will choose the file to import By default Aginity catalog files have the extensionaginitypkg
After choosing your file you can specify the folder to import to and what to import as shown below
72 Chapter 7 Using the Catalog in Aginity Team
Aginity Team Documentation Release 1
Hit the Import button and your queries should be imported
See also
Aginity also maintains a Github repository of Catalog queries to be used These queries are either administrativequeries for specific platforms data engineering queries that do powerful transformations against generic data or ana-lytic queries showing how to do cool things in SQL
Access the repositories here
See also
Using Query Panel
74 Import and Export Items from Catalog 73
Aginity Team Documentation Release 1
74 Chapter 7 Using the Catalog in Aginity Team
CHAPTER 8
Using Discovery Panel in Aginity Team
The Discovery Panel is a feature that is unique to Aginity Team and which allows you to quickly identify and reusecode that yoursquove previously executed or saved Using the Discovery Panel begins with a search Watch the videobelow to get a sense for how this feature works
By default the Discovery Panel allows you to search both your query execution history and your Pro Catalog at thesame time However by selecting one of the radio buttons in the Discovery Panel you can choose to focus on just oneor the other if you prefer
81 Searching Query Execution History
Start by typing in any free-text you want such as Sales as shown Below
75
Aginity Team Documentation Release 1
The search engine will do a full text search and display all results
82 Searching the Amp Pro Catalog
Buy clicking on the Catalog radio button you will restrict your search as shown below
83 Expanding the results
Once you have performed a search Amp Pro will dynamically update the results in the Discovery Panel to match thesearch term you have entered Yoursquoll be able to view a small amount of the query by default but if more is requiredyou can click on the arrows in the corner of the preview in order to expand the snippet further
84 Doing More with the Discovery Panel
A place holder for advanced filtering capabilities
76 Chapter 8 Using Discovery Panel in Aginity Team
CHAPTER 9
Reference
91 Video Reference
The following is a reference list of videos about Aginity Team and how to use its features
bull
bull
bull
bull
bull
bull
92 Shortcut Key Reference
Command ActionCommand K + C (Mac) or Ctrl K + C (Windows) Comment lines of codeCommand K + U (Mac) or Ctrl K + U (Windows) Uncomment lines of codeCommand F (Mac) or Ctrl F (Windows) Find and Replace Menu
93 Frequently Asked Questions
The section below is dedicated to commonly asked questions that we compile and provide answers to Over time asthings change we will keep this table up to date
77
Aginity Team Documentation Release 1
931 What Control do I have with Row Limit Preference
By default we cap the row limit preference to 100K rows to discourage users from spooling too much data across yournetwork Trust us your network infrastructure folks do appreciate it Fear not though you have options First if youset the preference to 0 it will spool as much as you want until either you run out of memory or your query completesAlternatively we recommend spooling the output to a file if you are doing returns greater than 100K rows Refer tothe documentation on execute query to file
94 SQL Reference Guides for Supported connections
As SQL developers ourselves we thought putting links to the databases we support in our documentation was a goodidea so here they are
bull
bull
bull
bull
95 Driver Support Reference
The table below is a cross reference of driver versions by platform
Platform Driver Version Class NameNetezza Not distributed with software
(nzjdbcjar)orgnetezzaDriver
SQL Server 720 jre8 commicrosoftsqlserverjdbcSQLServerDriverRedshift 12161027 comamazonredshiftjdbcDriverGreenplum and Post-gres
4225 orgpostgresqlDriver
Hive 121 orgapachehivejdbcHiveDriverSnowflake 3623 3628 355 netsnowflakeclientjdbcSnowflakeDriverIBM DB2 Warehouse db2jcc4 comibmdb2jccDB2Driver
78 Chapter 9 Reference
CHAPTER 10
Troubleshooting
This page is dedicated to common issues or errors you may encounter when using Aginity Team We recommend youalso post any new issues or questions to our Aginity Team Forum
The is a great resource for posting questions searching for common solutions to features of Pro or just learning howto be efficient as a SQL analytic developer through samples best practices and collaboration with other Pro users
Is-sueNum-ber
Isthis aDe-fect
Source of Error Description of Error Resolution
1 No Cannot DownloadDrivers via Con-nection Screen
In most cases your organization isblocking Aginityrsquos ability to downloaddrivers from a Maven repository
Follow directions in the Config-ure Connections documentationto Manually Add Drivers
79
Aginity Team Documentation Release 1
80 Chapter 10 Troubleshooting
CHAPTER 11
End User License for Aginity Team
Click here for end users license
81
- Administering Aginity Team
-
- Deploying Aginity Team through AWS Marketplace
- Installing Aginity Team on Linux
- Upgrading Aginity Team
- Backing Up or Restoring Team Catalog
-
- Creating Users in Aginity Team
-
- Administering Users
-
- Enabling Snowflake OAuth in Aginity Team
- Configuring Connections in Aginity Team
-
- Downloading Drivers
- Setting up Netezza Connections
- Setting up Redshift Connections
- Setting up Snowflake Connections
- Setting up Hive Connections
- Setting up SQL Server Connections
- Setting up DB2 Warehouse Server Connections
- Setting up Greenplum and Postgres Connections
- Import and Exporting Connections
-
- Using the Database Explorer in Aginity Team
-
- Viewing the Database Data Dictionary
- Database Object Support by Platform
- Quick Actions from Explorer
-
- Using the Query Panel in Aginity Team
-
- Writing your First Query
- Executing to a File
- Using Parameters in your Query
- Auto-Complete Capabilities
- Snippet support
- Common Actions in Query Panel
- Interacting with Query Results
-
- Using the Catalog in Aginity Team
-
- Catalog Overview
- Calling Catalog Items from SQL
- Adding Items to Catalog
- Import and Export Items from Catalog
-
- Using Discovery Panel in Aginity Team
-
- Searching Query Execution History
- Searching the Amp Pro Catalog
- Expanding the results
- Doing More with the Discovery Panel
-
- Reference
-
- Video Reference
- Shortcut Key Reference
- Frequently Asked Questions
- SQL Reference Guides for Supported connections
- Driver Support Reference
-
- Troubleshooting
- End User License for Aginity Team
-
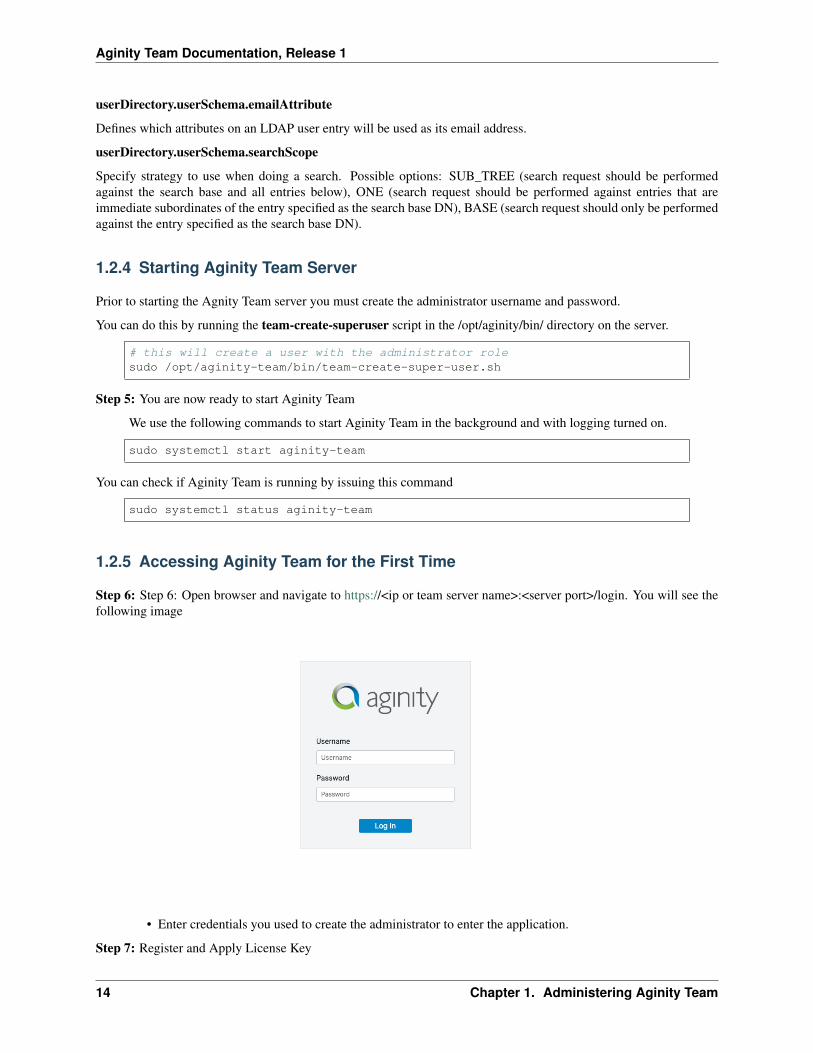
Aginity Team Documentation Release 1
20 Chapter 1 Administering Aginity Team
CHAPTER 2
Creating Users in Aginity Team
Once you have installed your Aginity Team server you need to set up users To do this navigate to the Administrationmenu item as show below
Click the button Register New User and fill out the form as show below
21
Aginity Team Documentation Release 1
When choosing the role of Admin vs User reference this table below for differences in functionality
21 Administering Users
Once you have created users and you need to common tasks as described below you will go back into the Administra-tion Menu and click on the three dots ldquo rdquo to the right of each user row This will pop opne an edit menu as shown
22 Chapter 2 Creating Users in Aginity Team
Aginity Team Documentation Release 1
below
211 Disabling Users
You can choose to disable user which will not allow them to login but will not remove any of their catalog informationor query history
212 Resetting Passwords
To reset a password you can choose the Change password which will prompt you to enter and confirm a new password
213 Edit User
If you need to Edit any registration details such as name or role you can do that here
21 Administering Users 23
Aginity Team Documentation Release 1
24 Chapter 2 Creating Users in Aginity Team
CHAPTER 3
Enabling Snowflake OAuth in Aginity Team
We now support OAuth for the snowflake platform This feature only works on Aginity Team The details below willguide your through setting up the configuration on the server
1 Connect to your Snowflake server and create a Security Integration object for a custom client (more details canbe found at this link)
For example
CREATE SECURITY INTEGRATIONCREATE OR REPLACE SECURITY INTEGRATIONaginity_team_oAuthTYPE = OAUTHENABLED = TRUEOAUTH_CLIENT = CUSTOMOAUTH_CLIENT_TYPE = CONFIDENTIALOAUTH_REDIRECT_URI = Aginity Team Public URLapioauthsnowflakeOAUTH_ALLOW_NON_TLS_REDIRECT_URI = FALSEOAUTH_ENFORCE_PKCE = TRUEOAUTH_ISSUE_REFRESH_TOKENS = TRUEOAUTH_REFRESH_TOKEN_VALIDITY = 86400
Note Aginity Team Public URL is a URL of a server running Aginity Team It is a public URL available outsideyour corporate network
Aginity Team Public URL has the following format schemehostport where scheme can be either http orhttps host is hostname of the server running Aginity Team port is TCP port Aginity Team is using
2 Ssh to the Aginity Team server
3 Edit etcaginity-teamapplicationyml and uncomment and update the following properties
platformssnowflakeoauthhost
Snowflake account in format account_namesnowflakecomputingcom where account_name is your Snowflakeaccount name
25
Aginity Team Documentation Release 1
platformssnowflakeoauthclientId
Snowflake client ID of the Security Integration object The Snowflake administrator can find the client ID by describingthe integration that is by using the DESC SECURITY INTEGRATION command
platformssnowflakeoauthclientSecret
Snowflake client secret of the Security Integration object The Snowflake administrator can find the client secrets byusing the system function SHOW_OAUTH_CLIENT_SECRETS
serverpublicUrl Aginity Team Public URL
Database platform specific configurationsplatformssnowflake
oauthclientSecrets
- host account_namesnowflakecomputingcomclientId client idclientSecret client secret
For example a customer has 2 Snowflake accounts The first one is eb39151us-east-1snowflakecomputingcom and itis being used for Dev environment The second one is xr58911us-east-1snowflakecomputingcom and it is being usedfor Production environment Then to enable OAuth connections to these environments via Aginity Team administratorshould add the following parameters to serviceconf
serverpublicUrl httpsaginityexamplecom
platformssnowflake
oauthclientSecrets
Dev environment- host eb39151us-east-1snowflakecomputingcom
clientId fnm4OgHhswihrEfsahTyZo=clientSecret sHljg51o7jdsjds8723786f35Q0K+TthasjuczjQwY=
Production environment- host xr58911us-east-1snowflakecomputingcom
clientId kwajw56h(usaELkkwu=clientSecret gfhfrejds3232372822378YUUYthasjuczjQwY=
4 Restart the Aginity Team server
26 Chapter 3 Enabling Snowflake OAuth in Aginity Team
CHAPTER 4
Configuring Connections in Aginity Team
Aginity Team allows you to set up connections to a variety of different database platforms In order to do this clickthe + symbol next to the ldquoConnectionsrdquo header in the left navigation pane of Aginity Team You will be presentedwith a list of existing connections as well as options for adding another connection Clicking the ldquoNew Connectionrdquobutton will allow you to enter the necessary information for the connection you wish to create
Below is a quick start video of creating connections in Aginity Team
Note Aginity Team uses JDBC to connect to database platforms It is recommended you refer to the JDBC guidesfor our supported platforms to learn about specific variables to use within the Advance Parameters section of AginityTeam We will provide links to that documentation where available
The video below provides a more detailed explanation of how to use advanced parameters to illicit the desired behaviorand successful connection to the database platform
27
Aginity Team Documentation Release 1
41 Downloading Drivers
The first step in configuring a connection is to download the JDBC driver for the platform you will be using In mostcases we will provide access to the drivers which have been certified to work with Aginity Team In some cases suchas when the vendor does not allow us to distribute or you want to use a different version you will have to manuallyadd the JDBC driver
The video below provides a quick illustration of how to manage drivers
See also
Database Driver Reference Guide
To get started in the Edit or Add Connection box you will click on Edit Drivers as shown below
411 Automatic Download
As shown in the image below if we are allowed to to download drivers you will be provided a link to do so and thenbe presented with one or more drivers to use and your done
28 Chapter 4 Configuring Connections in Aginity Team
Aginity Team Documentation Release 1
In some cases you may get an error message if your organization does not allow you to download drivers (jar files)typically supplied through a Maven repository
In this case please review the section below Manually Add Drivers
412 Manually Add Drivers
If you have to manually add a driver it starts with first acquiring the JDBC jar for that platform and saving it somewhereon your machine Once you acquire the JDBC jar you can upload it to Aginity Pro
To do this you will hit the Edit Driver or Edit Drivers Panel section as shown above and you will be presented withthe following screen
You can name the Driver anything you want and provide a description
The class name if not provided must be looked up typically in the JDBC reference manual from the platform vendor
Finally if you click on the Add File button you will navigate to where you saved the Jar file and then click SaveChanges You are now ready to configure your connection
42 Setting up Netezza Connections
You can set up a connection to a Netezza (IBM PureData for Analytics) appliance here Simply populate the requesteddata into the form
42 Setting up Netezza Connections 29
Aginity Team Documentation Release 1
Note Netezza does not allow us to distribute their drivers so you must obtain it from your DBA or directly from IBMFix Central
30 Chapter 4 Configuring Connections in Aginity Team
Aginity Team Documentation Release 1
421 Using SSL with Netezza Connections
Aginity Team supports SSL when setting up a Netezza connection While setting up your Netezza connection simplyselect the level of security to enable from the dropdown selector Your choices include
bull Only Unsecured - Specify this option when you want an unsecured connection to the Netezza system If theNetezza system requires a secured connection the connection is rejected
bull Preferred Unsecured - This argument is the default value Specify this option when you would prefer anunsecured connection but you accept a secured connection if the Netezza system requires one
bull Preferred Secured - Specify this option when you want a secured connection to the Netezza system but youaccept an unsecured connection if the Netezza system is configured to use only unsecured connections
bull Only Secured- Specify this option when you want a secured connection to the Netezza system If the Netezzasystem accepts only unsecured connections or if you are attempting to connect to a Netezza system that isrunning a release before release 45 the connection is rejected
See also
For more information on SSL refer to the link Netezza SSL
422 Connection Timeout
The connection timeout will tell the session when to disconnect Typically set this to 10 minutes or 3600 seconds
423 Advanced Parameters
For Netezza you can supply additional JDBC parameters using the Advanced Properties section
See also
Here is the link to other configurable parameters supported within Netezza JDBCrsquos driver
42 Setting up Netezza Connections 31
Aginity Team Documentation Release 1
43 Setting up Redshift Connections
431 Using SSL Mode with Redshift Connections
Aginity Team supports SSL when setting up a Redshift connection While setting up your Redshift connection simplyselect the level of security to enable from the dropdown selector Your choices include
bull Disable - SSL is disabled and the connection is not encrypted
bull Prefer - SSL is used if the server supports it Amazon Redshift supports SSL so SSL is used when you set
32 Chapter 4 Configuring Connections in Aginity Team
Aginity Team Documentation Release 1
sslmode to prefer
bull Allow - SSL is used if the server requires it
bull Require - SSL is required
See also
For more information on Redshift SSL refer to this link
432 Advanced Parameters
For Redshift you can supply additional JDBC parameters using the Advanced Properties section
See also
Here is the link to other configurable parameters supported within Redshift JDBCrsquos driver
44 Setting up Snowflake Connections
You can set up a connection to a Snowflake here Simply populate the requested data into the form
44 Setting up Snowflake Connections 33
Aginity Team Documentation Release 1
441 Warehouse
A virtual warehouse often referred to simply as a ldquowarehouserdquo is a cluster of compute resources in Snowflake Awarehouse provides the required resources such as CPU memory and temporary storage to perform the followingoperations in a Snowflake session If you do not know which specific Warehouse to use speak to your Snowflake DBA
442 Role
This is a security role that may have been setup for you to use You can leave this field blank if you do not know whatRole to connect as
34 Chapter 4 Configuring Connections in Aginity Team
Aginity Team Documentation Release 1
443 Advanced Parameters
For Snowflake most connection detail is handled through the command line additions to the JDBC URI You cansupply additional JDBC parameters using the Advanced Properties section
See also
Here is the link to other configurable parameters supported within Snowflake JDBCrsquos driver
45 Setting up Hive Connections
You can set up a connection to a Hive databases here Simply populate the requested data into the form
45 Setting up Hive Connections 35
Aginity Team Documentation Release 1
36 Chapter 4 Configuring Connections in Aginity Team
Aginity Team Documentation Release 1
451 Picking Subprotocol
You can choose either Hive 2 or Spark SQL syntax when executing against Hive databases You can choose eithervalue in this drop down
452 Setting up Kerberos connections
In a lot of cases organizations require the use of Kerberos with Hive so by clicking on the radio button for UseKerberos for authentication you will be prompted to enter the following
bull Realm
bull FQDN
bull Service name
Note The value of these parameters are typically set by your Hadoop administrator and it is best to work with themto obtain the appropriate values
453 Advanced Parameters
You can supply additional Hive JDBC parameters using the Advanced Properties section
See also
Here is the link to other configurable parameters supported within Hive JDBCrsquos driver
46 Setting up SQL Server Connections
You can set up a connection to Microsoft SQL Server databases here Simply populate the requested data into theform
46 Setting up SQL Server Connections 37
Aginity Team Documentation Release 1
Note We only support SQL Server compatibility levels 150 and 140 which is SQL Server 2017 and greater
47 Setting up DB2 Warehouse Server Connections
You can set up a connection to IBM DB2 warehouse databases here Simply populate the requested data into the form
38 Chapter 4 Configuring Connections in Aginity Team
Aginity Team Documentation Release 1
471 Advanced Parameters
You can supply additional Hive JDBC parameters using the Advanced Properties section
See also
Here is the link to other configurable parameters supported within SQL Server JDBCrsquos driver
48 Setting up Greenplum and Postgres Connections
You can set up a connection to Greenplum and Postgres databases here Simply populate the requested data into theform Greenplum and Postgres share the same drivers so we will speak of them together
48 Setting up Greenplum and Postgres Connections 39
Aginity Team Documentation Release 1
481 Choosing Subprotocol (Only for Greenplum)
You can choose either generic Postgres or Pivotal Greenplum SQL syntax when executing against Greenplumdatabases You can choose either value in this drop down
40 Chapter 4 Configuring Connections in Aginity Team
Aginity Team Documentation Release 1
482 Advanced Parameters
You can supply additional Postgres JDBC parameters using the Advanced Properties section
See also
Here is the link to other configurable parameters supported within Postgres JDBCrsquos driver
49 Import and Exporting Connections
A new feature in Aginity Team is the ability to import and export your connection templates and share them withother users A good deal of inefficiency with SQL IDErsquos is the time it takes to get connected No longer With theconnection templates you can save all the relevant detail minus the login credentials and distribute them through aneasy import and export feature
To get started have a DBA or power user establish the connection details once and export the connection as shown inthe image below
You will be presented with a selection list of connections as shown below Select the connections you want to exportand click Export selected
Note It is important to either check the radio button include sensitive data or to uncheck it This willinclude the username and password or exclude it from the connection export
49 Import and Exporting Connections 41
Aginity Team Documentation Release 1
You will be presented with a file menu window to name and pick the folder location for the export file as shown below
42 Chapter 4 Configuring Connections in Aginity Team
Aginity Team Documentation Release 1
Once you have exported the connections you can send them to Aginity Team users and have them import them To dothat choose the Import Connections menu item as shown below
You will be presented with a file selection Choose the appropriate Aginity connection package
Note By default Aginity packages for both Catalog and Connections are prefaced with aginitypkg file types
Once you choose a file select the connections you want to import and choose Import Selected
49 Import and Exporting Connections 43
Aginity Team Documentation Release 1
See also
Navigating Database Explorer
44 Chapter 4 Configuring Connections in Aginity Team
CHAPTER 5
Using the Database Explorer in Aginity Team
The Database Explorer panel in Aginity Team can be toggled by using the Database Explorer and Catalog tabs onthe left hand pane of the application as show below The Database Explorer is used to navigate database objectsbased on the Connections defined in Aginity Team The Catalog browser is used to navigate SQL Analytics that youhave personally stored
Below is a quick start video of using the Database Explorer in Aginity Team
51 Viewing the Database Data Dictionary
Once you have established a connection to a database you can browse the database dictionary catalogs You can toggleto the Database Explorer browser by clicking on the tab as shown below The database data dictionaries typicallycontains the tables columns views and other database objects available to query from the query panel
Once you have selected the Database Explorer tab you can drill into each connection as shown below
45
Aginity Team Documentation Release 1
52 Database Object Support by Platform
The following image details what objects are visible from the browser for all of our currently supported platformsWe do releases every two weeks with Aginity Team so if there is a feature you need please contact us at sup-portaginitycom
46 Chapter 5 Using the Database Explorer in Aginity Team
Aginity Team Documentation Release 1
53 Quick Actions from Explorer
Currently you can do the following quick actions from the Database Explorer
531 SQL Statement Generation
To generate typical SQL statements from tables or views you can right click on the object navigate to scripts andchoose the appropriate script as shown below
53 Quick Actions from Explorer 47
Aginity Team Documentation Release 1
532 Selective SQL Generation on a Set of Columns
To generate SQL statements based on a selection of columns within a Table or View multi-select the columns byholding Ctrl (Windows) or Command (Mac) and selecting the columns as shown below Then generate the SQLstatement
Hint Make sure you donrsquot have the table name selected and column names at the same time If you do it will generatethe SQL for the whole table
48 Chapter 5 Using the Database Explorer in Aginity Team
Aginity Team Documentation Release 1
533 Drag and Drop Capabilities
You can drag and drop any object from the DB Explorer into the Query Panel
Note Double-clicking expands the DB Explorer tree
534 Copy JDBC Connection String
If you select any Connection (Top level of the tree) and select ldquoCopy Connection string to Clipboardrdquo you will getthe full JDBC URI which is helpful for debugging See this Knowledge Base Article for help with debugging yourAginity Team connections
See also
bull Use Catalog Browser
bull Use Query Panel
53 Quick Actions from Explorer 49
Aginity Team Documentation Release 1
50 Chapter 5 Using the Database Explorer in Aginity Team
CHAPTER 6
Using the Query Panel in Aginity Team
You will spend most of your time in the Query Panel writing SQL and saving it to your catalog in Aginity Team Thevideo below will give you an overview of creating your first query
61 Writing your First Query
Each tab in the Aginity Team application can be set to different database connections Once you establish that con-nection as shown below you can use the query panel like a text editor using SQL syntax specific to that databaseplatform
Once you write your code in Aginity Team you have options to run it using the following scope
51
Aginity Team Documentation Release 1
Execution Type DescriptionRun at cursor When executing the query it will run the statement where the cursor is place
up until the semicolonRun all parts of the script in a se-quence
Each statement in the window will be run sequentially and the output ofeach statement will be shown in the output and if the statement was a SE-LECT then a results panel will be displayed
Run entire script as a batchAbort Query After executing a query you can direct Aginity Team to send a request to
the database to cancel the query
See also
Note one of the greatest challenges in SQL is learning the different functional syntax from different database vendorsWe are trying to make that easy by giving you links to the SQL reference manuals we support
62 Executing to a File
In version 17 of Aginity Pro we released the ability to use our editor commands to spool the results of a SQLstatement(s) to a file(s)
To do this you must issue the following commands
1 Use the +sql command to tell the editor you will be writing SQL in this section
2 You will then use the output file command to tell the editor you will spool the results to an outputfile
3 In the table below is a series of parameters and descriptions to be used when spooling
4 Use the +begin statement to tell the editor you from here until the +end command you will haveSQL to execute
5 Write your SQL
6 End with +end
7 Use the Run commands as you would any normal SQL statement as described in the Run Scopesection above
The code below is an example you can use to build off of
1 -- This will write the SQL statement between +begin and +end to therarr˓file specified
2
3 +sql4 output file5 path usersjschlittDownloadsjeff16 delimiter 7 null_value NULL8 quote_char 9 overwrite true
10 +begin11 select from wb_pro_marketing_list12 where emaildomain = aginitycom13 +end
52 Chapter 6 Using the Query Panel in Aginity Team
Aginity Team Documentation Release 1
Note We only support today the file type of csv You can still change the delimiter but all files with have a csvextension
The table below illustrates the current values accepted in execute to file commands
Parame-ter
Options
path On Mac this should be in the format ldquodirdirfilenamerdquo On Windows it should be in the formatldquodrivedirectoryfilenamerdquo
delimiter You can use any value but we recommend or | or ^ or t for (tab)null_value enter a character field for null typically lsquorsquo (empty string) or lsquoNULLrsquoquote_char enter how to enclose character string typically the quotation (ldquo)overwrite whether or not to allow overwrite if file exists true or falseheader true or false on whether you want to display headers in fileencoding the encoding of the file UTF_8 is the only value supported currentlycompres-sion
we can compress the file after it is written Values are NONE ZIP and GZIP
See also
We have a great knowledge base article on how to use the catalog to facilitate using the export as file editor feature
63 Using Parameters in your Query
Parameters can be used in Aginity Team by using the $ in any part of a SQL statement When you execute a query theAginity Team application will ask you to fill in the value of the parameter before it sends the query to the database
1 --sample parameter query2
3 select 4 from landing_dim_customer5 where gender = $fill_in_gender_at_runtime6 limit 100
You will have datatype choices at runtime as shown in the table below
Parameter Data Type Action TakenAs Is Aginity Team will send the value exactly as written with no casting This
is often used when using the parameter to fill in database table or columnnames See example 2 below
Hint You can specify default values with parameters by using this syntax with your parameter
$fill_in_gender_at_runtimelsquoMrsquo
When you run the query you will see the little gear icon as shown below Clicking that will populate thedefault value
63 Using Parameters in your Query 53
Aginity Team Documentation Release 1
64 Auto-Complete Capabilities
In Aginity Team we have implemented auto-complete on several database platforms and will be deploying across allover time The auto-complete capability has three capabilities
1 Display any words on the editor screen from above where your current cursor is
2 Display SQL Syntax like SELECT WHERE FROM all the way to database platform specific functions likeCASE DATEDIFF or CURRENT_DATE()
3 Display the database schema table column as you are typing
Hint To initiate just the database browser which shows database objects plus snippets hit the Ctrl+Space buttonotherwise as you type if auto-complete is supported it will automatically popup
Note Currently we support auto-complete on Netezza Redshift and Snowflake
54 Chapter 6 Using the Query Panel in Aginity Team
Aginity Team Documentation Release 1
65 Snippet support
We have pre-wired some special snippets within the editor as well to make writing SQL simpler The table belowdetails those snippets that are currently available
Snippet Actionselall will generate generic SELECT FROMselwh will generate generic SELECT FROM WHEREupd will generate an UPDATE statementins will generate an INSERT statementdel will generate a DELETE statementexpf will generate a generic export to file statement
66 Common Actions in Query Panel
We will highlight common functions heavily used in the editor here There is a complete list of available editorfunctions which can be accessed by hitting the Command+Shift+P on Mac or the Ctrl+Shift+P button within theeditor or from the View-gtCommand Palette menu item
661 Renaming Tabs
You can rename the query tabs by double clicking and typing in a name as shown below
662 Commenting SQL
In Aginity Team you can use the typical SQL syntax to comment your code as shown below
1 -- This is one way to comment your SQL code2
3 SELECT AVG(LineTotal)4 FROM salesSalesOrderDetail5
6 This is another way to comment your SQL code
65 Snippet support 55
Aginity Team Documentation Release 1
Hint If highlight multiple lines of code you can also use the Shortcut Keys Ctrl+K+C on Windows or Com-mand+K+C on Mac to comment them out To uncomment use Ctrl+K+U or Command+K+U
663 Keeping Connection
The Keep Connection checkbox as show below will instruct Aginity Team to maintain the connection to the databaseif the default behavior of the database is to disconnect after the execution of a query You are still subject to an overalldatabase connection timeout if you session connection exceeds the permitted database setting
664 Find and Replace
Ctrl+F (Windows) or Command+F (Mac) will bring up the find and replace box as shown below
67 Interacting with Query Results
Once your query has been executed you can use the features of the result grid to interact with the result set The typicalactions you will do are listed below
bull Reordering the Result Grid
bull Sorting the Result Grid
bull Filtering the Result Grid
bull Exporting results to CSV
671 Reordering the Result Grid
Once a query has executed successfully you may rearrange the columns in the Result Grid in order to more effectivelyperform subsequent analyses Rearranging the Result Grid is simple simply click hold and drag the column headerfor the column you wish to move As you move it left or right the grid will automatically adjust to reposition thecolumn
56 Chapter 6 Using the Query Panel in Aginity Team
Aginity Team Documentation Release 1
Once you are satisfied with the new position of the column you may release the drag and the column will lock intoplace
672 Sorting the Result Grid
After successfully executing a query if the query has returned any rows you may sort the results in order to permitvarious types of analysis of your results
In order to sort your results simply click on the header row in the results grid If the results are already being sortedby that column then the sort order will toggle between ascending and descending
67 Interacting with Query Results 57
Aginity Team Documentation Release 1
673 Filtering the Result Grid
Data in the Result Grid may be filtered to make it easier to locate and analyze certain subsets of the resultant datawithout requiring you to submit an entirely separate query
To filter the result grid by values in a particular column bring your mouse cursor to the column header for the columnto which you wish to apply a filter In the right-hand side on the header row the filter icon (three horizontal bars) willappear Click on the filter icon and you will be presented with a pop-up menu that will allow you to enter your filtercriteria
By default the filter criteria will select a ldquoContainsrdquo filter but several other filter types exist and you may select anyof them Once you have selected the filter type you wish to apply type the filter into the text box The results willimmediately begin to filter
58 Chapter 6 Using the Query Panel in Aginity Team
Aginity Team Documentation Release 1
When a column is being filtered a funnel icon will appear in its header To remove the filter you may re-enter thefilter mode by clicking on the filter icon (three bars) in the header row and simply delete the filter text
Multiple columns may have active filters at the same time To accomplish this simply perform these steps on eachcolumn
674 Exporting results to CSV
Once you have successfully executed a query you can elect to export those results in Comma Separated Value (CSV)format to a file outside of Aginity Team To do this right-click anywhere in the results panel Doing this will displaya context menu from which you will select the option ldquoExport to CSVrdquo
After selecting this option you will be presented with a screen that permits you to select the location to which to saveyour results Once you have identified the proper location press the Save button to complete the export
CSV files may subsequently be imported into a large number of different programs for further review and analysis
See also
bull Adding Query to Catalog
bull Using Discovery Panel
67 Interacting with Query Results 59
Aginity Team Documentation Release 1
60 Chapter 6 Using the Query Panel in Aginity Team
CHAPTER 7
Using the Catalog in Aginity Team
71 Catalog Overview
The query catalog is a unique capability of Aginity Team allowing you to easily save manage and use items stored init Letrsquos start with browsing the catalog
The catalog is organized by any number of directories and sub-directories of queries as shown below
See also
61
Aginity Team Documentation Release 1
Click Read this article for some ideas on how to best organize your catalog
Queries are given friendly names and can be used or accessed in several ways The first way is to drag the catalogquery into a query panel as shown in the two images below
Fig 1 You can drag the query into the empty query panel
You can also edit queries within a query panel By right clicking on a catalog item and choosing edit code in tab youcan change the SQL itself
62 Chapter 7 Using the Catalog in Aginity Team
Aginity Team Documentation Release 1
Fig 2 After you drag the item it will present the full catalog query for edit or execution
71 Catalog Overview 63
Aginity Team Documentation Release 1
You can edit and save the catalog query in a query panel worksheet as shown below
64 Chapter 7 Using the Catalog in Aginity Team
Aginity Team Documentation Release 1
Hint If you see a next to the tab name in the query panel it means a change has not been saved
By editing the details of a catlaog query you can see key metadata items and statistics about the catalog
71 Catalog Overview 65
Aginity Team Documentation Release 1
72 Calling Catalog Items from SQL
One of the most innovative features of Aginity Team is the ability to call catalog items from within SQL statements
The video and following examples below will give you basic syntax required to call a catalog item
66 Chapter 7 Using the Catalog in Aginity Team
Aginity Team Documentation Release 1
721 Single SQL SELECT Statement
In this example we have a single SQL SELECT statement in the catalog called OrderAverage
This is the code in the Catalog
1 SELECT AVG(LineTotal)2 FROM salesSalesOrderDetail
To call this from the query panel you would issue the following command Note the highlighted reference to the objectin the catalog
1 SELECT 2 FROM (OrderAverage) a
This is the code passed to the database
1 SELECT 2 FROM (3 SELECT AVG(lineTotal)4 FROM SalesSalesOrderDetail5 ) a
722 Using Catalog Item to Facilitate Relationships
In this example we will predefine a join in the catalog called ClientAddress and then use it in the context of anotherSQL statement
This is the code in the Catalog
1 clients c2 JOIN addresses a3 ON cclientsid = aclientsid
To call this from the query panel you would issue the following command Note the highlighted reference to the objectin the catalog
1 SELECT 2 FROM ClientAddress
This is the code passed to the database
1 SELECT 2 FROM clients c3 JOIN addresses a4 ON cclientsid = aclientsid
723 Creating and Reusing Calculations
In this example we will predefine a Calculations in the catalog called Residual and then use it in the context of anotherSQL statement
This is the code in the Catalog
72 Calling Catalog Items from SQL 67
Aginity Team Documentation Release 1
1 1-total
To call this from the query panel you would issue the following command Note the highlighted reference to the objectin the catalog
1 SELECT item2 Residual3 FROM table
This is the code passed to the database
1 SELECT item2 1-total3 FROM table
724 Executing a Multi-Step script
In this example we will predefine a series of SQL statements in the catalog called DailyRun and then execute it by asingle call Any DML (SELECT CREATE UPDATE INSERT DELETE) can be used
This is the code in the Catalog
1 CREATE TABLE xyz AS2 CREATE TABLE abc AS3 SELET FROM xyz JOIN abc
To call this from the query panel you would issue the following command Note the highlighted reference to the objectin the catalog
1 DailyRun
This is the code passed to the database
1 CREATE TABLE xyz AS2 CREATE TABLE abc AS3 SELECT FROM xyz JOIN abc
725 Using Parameters in Catalog
In this example we will use a parameter within a catalog item called CitySelect
This is the code in the Catalog Note the highlighted line has the parameter in it
1 SELECT 2 FROM addresses3 WHERE city = $city
To call this from the query panel you would issue the following command Note the highlighted reference to the objectin the catalog
1 CitySelect
This is the code passed to the database
68 Chapter 7 Using the Catalog in Aginity Team
Aginity Team Documentation Release 1
1 SELECT 2 FROM addresses3 WHERE city = Chicago
Note Upon execution of the command Aginity Team will ask you to supply a parameterized value For moreinformation on parameters see Using Parameters
73 Adding Items to Catalog
To add a new query to the catalog highlight any part of a SQL statement(s) right click and select Save selection tocatalog as shown below
Once you save you will be asked to provide metadata about the query you are adding
73 Adding Items to Catalog 69
Aginity Team Documentation Release 1
Note It is important to fill out the description metadata as it will be used in searching The more information youprovide about the context of usage key business terms and intended usage the better search results you will get
You can also easily create new folders in the catalog or add SQL entries directly from the Catalog Browser by clickingthe (+) to the right of the Catalog header
When adding a new folder you will be presented with a basic text box to create your folder as shown below
74 Import and Export Items from Catalog
You have the ability to Import and Export both your full catalog as well as any folder selected within the catalog
Note We highly recommend taking regular exports of your catalog to disk to prevent accidental loss of queries
741 Export Steps
To Export your catalog start by either Right Clicking on a Catalog Folder or Using the Aginity Pro -gt Export Catalogmenu as shown below
70 Chapter 7 Using the Catalog in Aginity Team
Aginity Team Documentation Release 1
Your first step is to save either an entire folder or a selection of items within a folder
The final step in exporting is to name the file and location you will save to as shown below
742 Import Steps
Importing is valuable for several reasons One is to restore SQL catalog items you may have lost or more importantlythe ability to collaborate with other SQL developers and share your SQL making your a more efficient and consistentSQL developer
74 Import and Export Items from Catalog 71
Aginity Team Documentation Release 1
The first step is to Right Click on a folder you want to import to and Chooose Import Catalog as shown below
Note You can also use the Aginity Pro Menu -gt Import Catalog The main difference between using these twocapabilities is the context of where you are importing items If you choose to import from the Aginity Pro menu youmust set the context where to import If you Right Click on a folder the context is set to that folder
After choosing to import you will choose the file to import By default Aginity catalog files have the extensionaginitypkg
After choosing your file you can specify the folder to import to and what to import as shown below
72 Chapter 7 Using the Catalog in Aginity Team
Aginity Team Documentation Release 1
Hit the Import button and your queries should be imported
See also
Aginity also maintains a Github repository of Catalog queries to be used These queries are either administrativequeries for specific platforms data engineering queries that do powerful transformations against generic data or ana-lytic queries showing how to do cool things in SQL
Access the repositories here
See also
Using Query Panel
74 Import and Export Items from Catalog 73
Aginity Team Documentation Release 1
74 Chapter 7 Using the Catalog in Aginity Team
CHAPTER 8
Using Discovery Panel in Aginity Team
The Discovery Panel is a feature that is unique to Aginity Team and which allows you to quickly identify and reusecode that yoursquove previously executed or saved Using the Discovery Panel begins with a search Watch the videobelow to get a sense for how this feature works
By default the Discovery Panel allows you to search both your query execution history and your Pro Catalog at thesame time However by selecting one of the radio buttons in the Discovery Panel you can choose to focus on just oneor the other if you prefer
81 Searching Query Execution History
Start by typing in any free-text you want such as Sales as shown Below
75
Aginity Team Documentation Release 1
The search engine will do a full text search and display all results
82 Searching the Amp Pro Catalog
Buy clicking on the Catalog radio button you will restrict your search as shown below
83 Expanding the results
Once you have performed a search Amp Pro will dynamically update the results in the Discovery Panel to match thesearch term you have entered Yoursquoll be able to view a small amount of the query by default but if more is requiredyou can click on the arrows in the corner of the preview in order to expand the snippet further
84 Doing More with the Discovery Panel
A place holder for advanced filtering capabilities
76 Chapter 8 Using Discovery Panel in Aginity Team
CHAPTER 9
Reference
91 Video Reference
The following is a reference list of videos about Aginity Team and how to use its features
bull
bull
bull
bull
bull
bull
92 Shortcut Key Reference
Command ActionCommand K + C (Mac) or Ctrl K + C (Windows) Comment lines of codeCommand K + U (Mac) or Ctrl K + U (Windows) Uncomment lines of codeCommand F (Mac) or Ctrl F (Windows) Find and Replace Menu
93 Frequently Asked Questions
The section below is dedicated to commonly asked questions that we compile and provide answers to Over time asthings change we will keep this table up to date
77
Aginity Team Documentation Release 1
931 What Control do I have with Row Limit Preference
By default we cap the row limit preference to 100K rows to discourage users from spooling too much data across yournetwork Trust us your network infrastructure folks do appreciate it Fear not though you have options First if youset the preference to 0 it will spool as much as you want until either you run out of memory or your query completesAlternatively we recommend spooling the output to a file if you are doing returns greater than 100K rows Refer tothe documentation on execute query to file
94 SQL Reference Guides for Supported connections
As SQL developers ourselves we thought putting links to the databases we support in our documentation was a goodidea so here they are
bull
bull
bull
bull
95 Driver Support Reference
The table below is a cross reference of driver versions by platform
Platform Driver Version Class NameNetezza Not distributed with software
(nzjdbcjar)orgnetezzaDriver
SQL Server 720 jre8 commicrosoftsqlserverjdbcSQLServerDriverRedshift 12161027 comamazonredshiftjdbcDriverGreenplum and Post-gres
4225 orgpostgresqlDriver
Hive 121 orgapachehivejdbcHiveDriverSnowflake 3623 3628 355 netsnowflakeclientjdbcSnowflakeDriverIBM DB2 Warehouse db2jcc4 comibmdb2jccDB2Driver
78 Chapter 9 Reference
CHAPTER 10
Troubleshooting
This page is dedicated to common issues or errors you may encounter when using Aginity Team We recommend youalso post any new issues or questions to our Aginity Team Forum
The is a great resource for posting questions searching for common solutions to features of Pro or just learning howto be efficient as a SQL analytic developer through samples best practices and collaboration with other Pro users
Is-sueNum-ber
Isthis aDe-fect
Source of Error Description of Error Resolution
1 No Cannot DownloadDrivers via Con-nection Screen
In most cases your organization isblocking Aginityrsquos ability to downloaddrivers from a Maven repository
Follow directions in the Config-ure Connections documentationto Manually Add Drivers
79
Aginity Team Documentation Release 1
80 Chapter 10 Troubleshooting
CHAPTER 11
End User License for Aginity Team
Click here for end users license
81
- Administering Aginity Team
-
- Deploying Aginity Team through AWS Marketplace
- Installing Aginity Team on Linux
- Upgrading Aginity Team
- Backing Up or Restoring Team Catalog
-
- Creating Users in Aginity Team
-
- Administering Users
-
- Enabling Snowflake OAuth in Aginity Team
- Configuring Connections in Aginity Team
-
- Downloading Drivers
- Setting up Netezza Connections
- Setting up Redshift Connections
- Setting up Snowflake Connections
- Setting up Hive Connections
- Setting up SQL Server Connections
- Setting up DB2 Warehouse Server Connections
- Setting up Greenplum and Postgres Connections
- Import and Exporting Connections
-
- Using the Database Explorer in Aginity Team
-
- Viewing the Database Data Dictionary
- Database Object Support by Platform
- Quick Actions from Explorer
-
- Using the Query Panel in Aginity Team
-
- Writing your First Query
- Executing to a File
- Using Parameters in your Query
- Auto-Complete Capabilities
- Snippet support
- Common Actions in Query Panel
- Interacting with Query Results
-
- Using the Catalog in Aginity Team
-
- Catalog Overview
- Calling Catalog Items from SQL
- Adding Items to Catalog
- Import and Export Items from Catalog
-
- Using Discovery Panel in Aginity Team
-
- Searching Query Execution History
- Searching the Amp Pro Catalog
- Expanding the results
- Doing More with the Discovery Panel
-
- Reference
-
- Video Reference
- Shortcut Key Reference
- Frequently Asked Questions
- SQL Reference Guides for Supported connections
- Driver Support Reference
-
- Troubleshooting
- End User License for Aginity Team
-

Aginity Team Documentation Release 1
24 Chapter 2 Creating Users in Aginity Team
CHAPTER 3
Enabling Snowflake OAuth in Aginity Team
We now support OAuth for the snowflake platform This feature only works on Aginity Team The details below willguide your through setting up the configuration on the server
1 Connect to your Snowflake server and create a Security Integration object for a custom client (more details canbe found at this link)
For example
CREATE SECURITY INTEGRATIONCREATE OR REPLACE SECURITY INTEGRATIONaginity_team_oAuthTYPE = OAUTHENABLED = TRUEOAUTH_CLIENT = CUSTOMOAUTH_CLIENT_TYPE = CONFIDENTIALOAUTH_REDIRECT_URI = Aginity Team Public URLapioauthsnowflakeOAUTH_ALLOW_NON_TLS_REDIRECT_URI = FALSEOAUTH_ENFORCE_PKCE = TRUEOAUTH_ISSUE_REFRESH_TOKENS = TRUEOAUTH_REFRESH_TOKEN_VALIDITY = 86400
Note Aginity Team Public URL is a URL of a server running Aginity Team It is a public URL available outsideyour corporate network
Aginity Team Public URL has the following format schemehostport where scheme can be either http orhttps host is hostname of the server running Aginity Team port is TCP port Aginity Team is using
2 Ssh to the Aginity Team server
3 Edit etcaginity-teamapplicationyml and uncomment and update the following properties
platformssnowflakeoauthhost
Snowflake account in format account_namesnowflakecomputingcom where account_name is your Snowflakeaccount name
25
Aginity Team Documentation Release 1
platformssnowflakeoauthclientId
Snowflake client ID of the Security Integration object The Snowflake administrator can find the client ID by describingthe integration that is by using the DESC SECURITY INTEGRATION command
platformssnowflakeoauthclientSecret
Snowflake client secret of the Security Integration object The Snowflake administrator can find the client secrets byusing the system function SHOW_OAUTH_CLIENT_SECRETS
serverpublicUrl Aginity Team Public URL
Database platform specific configurationsplatformssnowflake
oauthclientSecrets
- host account_namesnowflakecomputingcomclientId client idclientSecret client secret
For example a customer has 2 Snowflake accounts The first one is eb39151us-east-1snowflakecomputingcom and itis being used for Dev environment The second one is xr58911us-east-1snowflakecomputingcom and it is being usedfor Production environment Then to enable OAuth connections to these environments via Aginity Team administratorshould add the following parameters to serviceconf
serverpublicUrl httpsaginityexamplecom
platformssnowflake
oauthclientSecrets
Dev environment- host eb39151us-east-1snowflakecomputingcom
clientId fnm4OgHhswihrEfsahTyZo=clientSecret sHljg51o7jdsjds8723786f35Q0K+TthasjuczjQwY=
Production environment- host xr58911us-east-1snowflakecomputingcom
clientId kwajw56h(usaELkkwu=clientSecret gfhfrejds3232372822378YUUYthasjuczjQwY=
4 Restart the Aginity Team server
26 Chapter 3 Enabling Snowflake OAuth in Aginity Team
CHAPTER 4
Configuring Connections in Aginity Team
Aginity Team allows you to set up connections to a variety of different database platforms In order to do this clickthe + symbol next to the ldquoConnectionsrdquo header in the left navigation pane of Aginity Team You will be presentedwith a list of existing connections as well as options for adding another connection Clicking the ldquoNew Connectionrdquobutton will allow you to enter the necessary information for the connection you wish to create
Below is a quick start video of creating connections in Aginity Team
Note Aginity Team uses JDBC to connect to database platforms It is recommended you refer to the JDBC guidesfor our supported platforms to learn about specific variables to use within the Advance Parameters section of AginityTeam We will provide links to that documentation where available
The video below provides a more detailed explanation of how to use advanced parameters to illicit the desired behaviorand successful connection to the database platform
27
Aginity Team Documentation Release 1
41 Downloading Drivers
The first step in configuring a connection is to download the JDBC driver for the platform you will be using In mostcases we will provide access to the drivers which have been certified to work with Aginity Team In some cases suchas when the vendor does not allow us to distribute or you want to use a different version you will have to manuallyadd the JDBC driver
The video below provides a quick illustration of how to manage drivers
See also
Database Driver Reference Guide
To get started in the Edit or Add Connection box you will click on Edit Drivers as shown below
411 Automatic Download
As shown in the image below if we are allowed to to download drivers you will be provided a link to do so and thenbe presented with one or more drivers to use and your done
28 Chapter 4 Configuring Connections in Aginity Team
Aginity Team Documentation Release 1
In some cases you may get an error message if your organization does not allow you to download drivers (jar files)typically supplied through a Maven repository
In this case please review the section below Manually Add Drivers
412 Manually Add Drivers
If you have to manually add a driver it starts with first acquiring the JDBC jar for that platform and saving it somewhereon your machine Once you acquire the JDBC jar you can upload it to Aginity Pro
To do this you will hit the Edit Driver or Edit Drivers Panel section as shown above and you will be presented withthe following screen
You can name the Driver anything you want and provide a description
The class name if not provided must be looked up typically in the JDBC reference manual from the platform vendor
Finally if you click on the Add File button you will navigate to where you saved the Jar file and then click SaveChanges You are now ready to configure your connection
42 Setting up Netezza Connections
You can set up a connection to a Netezza (IBM PureData for Analytics) appliance here Simply populate the requesteddata into the form
42 Setting up Netezza Connections 29
Aginity Team Documentation Release 1
Note Netezza does not allow us to distribute their drivers so you must obtain it from your DBA or directly from IBMFix Central
30 Chapter 4 Configuring Connections in Aginity Team
Aginity Team Documentation Release 1
421 Using SSL with Netezza Connections
Aginity Team supports SSL when setting up a Netezza connection While setting up your Netezza connection simplyselect the level of security to enable from the dropdown selector Your choices include
bull Only Unsecured - Specify this option when you want an unsecured connection to the Netezza system If theNetezza system requires a secured connection the connection is rejected
bull Preferred Unsecured - This argument is the default value Specify this option when you would prefer anunsecured connection but you accept a secured connection if the Netezza system requires one
bull Preferred Secured - Specify this option when you want a secured connection to the Netezza system but youaccept an unsecured connection if the Netezza system is configured to use only unsecured connections
bull Only Secured- Specify this option when you want a secured connection to the Netezza system If the Netezzasystem accepts only unsecured connections or if you are attempting to connect to a Netezza system that isrunning a release before release 45 the connection is rejected
See also
For more information on SSL refer to the link Netezza SSL
422 Connection Timeout
The connection timeout will tell the session when to disconnect Typically set this to 10 minutes or 3600 seconds
423 Advanced Parameters
For Netezza you can supply additional JDBC parameters using the Advanced Properties section
See also
Here is the link to other configurable parameters supported within Netezza JDBCrsquos driver
42 Setting up Netezza Connections 31
Aginity Team Documentation Release 1
43 Setting up Redshift Connections
431 Using SSL Mode with Redshift Connections
Aginity Team supports SSL when setting up a Redshift connection While setting up your Redshift connection simplyselect the level of security to enable from the dropdown selector Your choices include
bull Disable - SSL is disabled and the connection is not encrypted
bull Prefer - SSL is used if the server supports it Amazon Redshift supports SSL so SSL is used when you set
32 Chapter 4 Configuring Connections in Aginity Team
Aginity Team Documentation Release 1
sslmode to prefer
bull Allow - SSL is used if the server requires it
bull Require - SSL is required
See also
For more information on Redshift SSL refer to this link
432 Advanced Parameters
For Redshift you can supply additional JDBC parameters using the Advanced Properties section
See also
Here is the link to other configurable parameters supported within Redshift JDBCrsquos driver
44 Setting up Snowflake Connections
You can set up a connection to a Snowflake here Simply populate the requested data into the form
44 Setting up Snowflake Connections 33
Aginity Team Documentation Release 1
441 Warehouse
A virtual warehouse often referred to simply as a ldquowarehouserdquo is a cluster of compute resources in Snowflake Awarehouse provides the required resources such as CPU memory and temporary storage to perform the followingoperations in a Snowflake session If you do not know which specific Warehouse to use speak to your Snowflake DBA
442 Role
This is a security role that may have been setup for you to use You can leave this field blank if you do not know whatRole to connect as
34 Chapter 4 Configuring Connections in Aginity Team
Aginity Team Documentation Release 1
443 Advanced Parameters
For Snowflake most connection detail is handled through the command line additions to the JDBC URI You cansupply additional JDBC parameters using the Advanced Properties section
See also
Here is the link to other configurable parameters supported within Snowflake JDBCrsquos driver
45 Setting up Hive Connections
You can set up a connection to a Hive databases here Simply populate the requested data into the form
45 Setting up Hive Connections 35
Aginity Team Documentation Release 1
36 Chapter 4 Configuring Connections in Aginity Team
Aginity Team Documentation Release 1
451 Picking Subprotocol
You can choose either Hive 2 or Spark SQL syntax when executing against Hive databases You can choose eithervalue in this drop down
452 Setting up Kerberos connections
In a lot of cases organizations require the use of Kerberos with Hive so by clicking on the radio button for UseKerberos for authentication you will be prompted to enter the following
bull Realm
bull FQDN
bull Service name
Note The value of these parameters are typically set by your Hadoop administrator and it is best to work with themto obtain the appropriate values
453 Advanced Parameters
You can supply additional Hive JDBC parameters using the Advanced Properties section
See also
Here is the link to other configurable parameters supported within Hive JDBCrsquos driver
46 Setting up SQL Server Connections
You can set up a connection to Microsoft SQL Server databases here Simply populate the requested data into theform
46 Setting up SQL Server Connections 37
Aginity Team Documentation Release 1
Note We only support SQL Server compatibility levels 150 and 140 which is SQL Server 2017 and greater
47 Setting up DB2 Warehouse Server Connections
You can set up a connection to IBM DB2 warehouse databases here Simply populate the requested data into the form
38 Chapter 4 Configuring Connections in Aginity Team
Aginity Team Documentation Release 1
471 Advanced Parameters
You can supply additional Hive JDBC parameters using the Advanced Properties section
See also
Here is the link to other configurable parameters supported within SQL Server JDBCrsquos driver
48 Setting up Greenplum and Postgres Connections
You can set up a connection to Greenplum and Postgres databases here Simply populate the requested data into theform Greenplum and Postgres share the same drivers so we will speak of them together
48 Setting up Greenplum and Postgres Connections 39
Aginity Team Documentation Release 1
481 Choosing Subprotocol (Only for Greenplum)
You can choose either generic Postgres or Pivotal Greenplum SQL syntax when executing against Greenplumdatabases You can choose either value in this drop down
40 Chapter 4 Configuring Connections in Aginity Team
Aginity Team Documentation Release 1
482 Advanced Parameters
You can supply additional Postgres JDBC parameters using the Advanced Properties section
See also
Here is the link to other configurable parameters supported within Postgres JDBCrsquos driver
49 Import and Exporting Connections
A new feature in Aginity Team is the ability to import and export your connection templates and share them withother users A good deal of inefficiency with SQL IDErsquos is the time it takes to get connected No longer With theconnection templates you can save all the relevant detail minus the login credentials and distribute them through aneasy import and export feature
To get started have a DBA or power user establish the connection details once and export the connection as shown inthe image below
You will be presented with a selection list of connections as shown below Select the connections you want to exportand click Export selected
Note It is important to either check the radio button include sensitive data or to uncheck it This willinclude the username and password or exclude it from the connection export
49 Import and Exporting Connections 41
Aginity Team Documentation Release 1
You will be presented with a file menu window to name and pick the folder location for the export file as shown below
42 Chapter 4 Configuring Connections in Aginity Team
Aginity Team Documentation Release 1
Once you have exported the connections you can send them to Aginity Team users and have them import them To dothat choose the Import Connections menu item as shown below
You will be presented with a file selection Choose the appropriate Aginity connection package
Note By default Aginity packages for both Catalog and Connections are prefaced with aginitypkg file types
Once you choose a file select the connections you want to import and choose Import Selected
49 Import and Exporting Connections 43
Aginity Team Documentation Release 1
See also
Navigating Database Explorer
44 Chapter 4 Configuring Connections in Aginity Team
CHAPTER 5
Using the Database Explorer in Aginity Team
The Database Explorer panel in Aginity Team can be toggled by using the Database Explorer and Catalog tabs onthe left hand pane of the application as show below The Database Explorer is used to navigate database objectsbased on the Connections defined in Aginity Team The Catalog browser is used to navigate SQL Analytics that youhave personally stored
Below is a quick start video of using the Database Explorer in Aginity Team
51 Viewing the Database Data Dictionary
Once you have established a connection to a database you can browse the database dictionary catalogs You can toggleto the Database Explorer browser by clicking on the tab as shown below The database data dictionaries typicallycontains the tables columns views and other database objects available to query from the query panel
Once you have selected the Database Explorer tab you can drill into each connection as shown below
45
Aginity Team Documentation Release 1
52 Database Object Support by Platform
The following image details what objects are visible from the browser for all of our currently supported platformsWe do releases every two weeks with Aginity Team so if there is a feature you need please contact us at sup-portaginitycom
46 Chapter 5 Using the Database Explorer in Aginity Team
Aginity Team Documentation Release 1
53 Quick Actions from Explorer
Currently you can do the following quick actions from the Database Explorer
531 SQL Statement Generation
To generate typical SQL statements from tables or views you can right click on the object navigate to scripts andchoose the appropriate script as shown below
53 Quick Actions from Explorer 47
Aginity Team Documentation Release 1
532 Selective SQL Generation on a Set of Columns
To generate SQL statements based on a selection of columns within a Table or View multi-select the columns byholding Ctrl (Windows) or Command (Mac) and selecting the columns as shown below Then generate the SQLstatement
Hint Make sure you donrsquot have the table name selected and column names at the same time If you do it will generatethe SQL for the whole table
48 Chapter 5 Using the Database Explorer in Aginity Team
Aginity Team Documentation Release 1
533 Drag and Drop Capabilities
You can drag and drop any object from the DB Explorer into the Query Panel
Note Double-clicking expands the DB Explorer tree
534 Copy JDBC Connection String
If you select any Connection (Top level of the tree) and select ldquoCopy Connection string to Clipboardrdquo you will getthe full JDBC URI which is helpful for debugging See this Knowledge Base Article for help with debugging yourAginity Team connections
See also
bull Use Catalog Browser
bull Use Query Panel
53 Quick Actions from Explorer 49
Aginity Team Documentation Release 1
50 Chapter 5 Using the Database Explorer in Aginity Team
CHAPTER 6
Using the Query Panel in Aginity Team
You will spend most of your time in the Query Panel writing SQL and saving it to your catalog in Aginity Team Thevideo below will give you an overview of creating your first query
61 Writing your First Query
Each tab in the Aginity Team application can be set to different database connections Once you establish that con-nection as shown below you can use the query panel like a text editor using SQL syntax specific to that databaseplatform
Once you write your code in Aginity Team you have options to run it using the following scope
51
Aginity Team Documentation Release 1
Execution Type DescriptionRun at cursor When executing the query it will run the statement where the cursor is place
up until the semicolonRun all parts of the script in a se-quence
Each statement in the window will be run sequentially and the output ofeach statement will be shown in the output and if the statement was a SE-LECT then a results panel will be displayed
Run entire script as a batchAbort Query After executing a query you can direct Aginity Team to send a request to
the database to cancel the query
See also
Note one of the greatest challenges in SQL is learning the different functional syntax from different database vendorsWe are trying to make that easy by giving you links to the SQL reference manuals we support
62 Executing to a File
In version 17 of Aginity Pro we released the ability to use our editor commands to spool the results of a SQLstatement(s) to a file(s)
To do this you must issue the following commands
1 Use the +sql command to tell the editor you will be writing SQL in this section
2 You will then use the output file command to tell the editor you will spool the results to an outputfile
3 In the table below is a series of parameters and descriptions to be used when spooling
4 Use the +begin statement to tell the editor you from here until the +end command you will haveSQL to execute
5 Write your SQL
6 End with +end
7 Use the Run commands as you would any normal SQL statement as described in the Run Scopesection above
The code below is an example you can use to build off of
1 -- This will write the SQL statement between +begin and +end to therarr˓file specified
2
3 +sql4 output file5 path usersjschlittDownloadsjeff16 delimiter 7 null_value NULL8 quote_char 9 overwrite true
10 +begin11 select from wb_pro_marketing_list12 where emaildomain = aginitycom13 +end
52 Chapter 6 Using the Query Panel in Aginity Team
Aginity Team Documentation Release 1
Note We only support today the file type of csv You can still change the delimiter but all files with have a csvextension
The table below illustrates the current values accepted in execute to file commands
Parame-ter
Options
path On Mac this should be in the format ldquodirdirfilenamerdquo On Windows it should be in the formatldquodrivedirectoryfilenamerdquo
delimiter You can use any value but we recommend or | or ^ or t for (tab)null_value enter a character field for null typically lsquorsquo (empty string) or lsquoNULLrsquoquote_char enter how to enclose character string typically the quotation (ldquo)overwrite whether or not to allow overwrite if file exists true or falseheader true or false on whether you want to display headers in fileencoding the encoding of the file UTF_8 is the only value supported currentlycompres-sion
we can compress the file after it is written Values are NONE ZIP and GZIP
See also
We have a great knowledge base article on how to use the catalog to facilitate using the export as file editor feature
63 Using Parameters in your Query
Parameters can be used in Aginity Team by using the $ in any part of a SQL statement When you execute a query theAginity Team application will ask you to fill in the value of the parameter before it sends the query to the database
1 --sample parameter query2
3 select 4 from landing_dim_customer5 where gender = $fill_in_gender_at_runtime6 limit 100
You will have datatype choices at runtime as shown in the table below
Parameter Data Type Action TakenAs Is Aginity Team will send the value exactly as written with no casting This
is often used when using the parameter to fill in database table or columnnames See example 2 below
Hint You can specify default values with parameters by using this syntax with your parameter
$fill_in_gender_at_runtimelsquoMrsquo
When you run the query you will see the little gear icon as shown below Clicking that will populate thedefault value
63 Using Parameters in your Query 53
Aginity Team Documentation Release 1
64 Auto-Complete Capabilities
In Aginity Team we have implemented auto-complete on several database platforms and will be deploying across allover time The auto-complete capability has three capabilities
1 Display any words on the editor screen from above where your current cursor is
2 Display SQL Syntax like SELECT WHERE FROM all the way to database platform specific functions likeCASE DATEDIFF or CURRENT_DATE()
3 Display the database schema table column as you are typing
Hint To initiate just the database browser which shows database objects plus snippets hit the Ctrl+Space buttonotherwise as you type if auto-complete is supported it will automatically popup
Note Currently we support auto-complete on Netezza Redshift and Snowflake
54 Chapter 6 Using the Query Panel in Aginity Team
Aginity Team Documentation Release 1
65 Snippet support
We have pre-wired some special snippets within the editor as well to make writing SQL simpler The table belowdetails those snippets that are currently available
Snippet Actionselall will generate generic SELECT FROMselwh will generate generic SELECT FROM WHEREupd will generate an UPDATE statementins will generate an INSERT statementdel will generate a DELETE statementexpf will generate a generic export to file statement
66 Common Actions in Query Panel
We will highlight common functions heavily used in the editor here There is a complete list of available editorfunctions which can be accessed by hitting the Command+Shift+P on Mac or the Ctrl+Shift+P button within theeditor or from the View-gtCommand Palette menu item
661 Renaming Tabs
You can rename the query tabs by double clicking and typing in a name as shown below
662 Commenting SQL
In Aginity Team you can use the typical SQL syntax to comment your code as shown below
1 -- This is one way to comment your SQL code2
3 SELECT AVG(LineTotal)4 FROM salesSalesOrderDetail5
6 This is another way to comment your SQL code
65 Snippet support 55
Aginity Team Documentation Release 1
Hint If highlight multiple lines of code you can also use the Shortcut Keys Ctrl+K+C on Windows or Com-mand+K+C on Mac to comment them out To uncomment use Ctrl+K+U or Command+K+U
663 Keeping Connection
The Keep Connection checkbox as show below will instruct Aginity Team to maintain the connection to the databaseif the default behavior of the database is to disconnect after the execution of a query You are still subject to an overalldatabase connection timeout if you session connection exceeds the permitted database setting
664 Find and Replace
Ctrl+F (Windows) or Command+F (Mac) will bring up the find and replace box as shown below
67 Interacting with Query Results
Once your query has been executed you can use the features of the result grid to interact with the result set The typicalactions you will do are listed below
bull Reordering the Result Grid
bull Sorting the Result Grid
bull Filtering the Result Grid
bull Exporting results to CSV
671 Reordering the Result Grid
Once a query has executed successfully you may rearrange the columns in the Result Grid in order to more effectivelyperform subsequent analyses Rearranging the Result Grid is simple simply click hold and drag the column headerfor the column you wish to move As you move it left or right the grid will automatically adjust to reposition thecolumn
56 Chapter 6 Using the Query Panel in Aginity Team
Aginity Team Documentation Release 1
Once you are satisfied with the new position of the column you may release the drag and the column will lock intoplace
672 Sorting the Result Grid
After successfully executing a query if the query has returned any rows you may sort the results in order to permitvarious types of analysis of your results
In order to sort your results simply click on the header row in the results grid If the results are already being sortedby that column then the sort order will toggle between ascending and descending
67 Interacting with Query Results 57
Aginity Team Documentation Release 1
673 Filtering the Result Grid
Data in the Result Grid may be filtered to make it easier to locate and analyze certain subsets of the resultant datawithout requiring you to submit an entirely separate query
To filter the result grid by values in a particular column bring your mouse cursor to the column header for the columnto which you wish to apply a filter In the right-hand side on the header row the filter icon (three horizontal bars) willappear Click on the filter icon and you will be presented with a pop-up menu that will allow you to enter your filtercriteria
By default the filter criteria will select a ldquoContainsrdquo filter but several other filter types exist and you may select anyof them Once you have selected the filter type you wish to apply type the filter into the text box The results willimmediately begin to filter
58 Chapter 6 Using the Query Panel in Aginity Team
Aginity Team Documentation Release 1
When a column is being filtered a funnel icon will appear in its header To remove the filter you may re-enter thefilter mode by clicking on the filter icon (three bars) in the header row and simply delete the filter text
Multiple columns may have active filters at the same time To accomplish this simply perform these steps on eachcolumn
674 Exporting results to CSV
Once you have successfully executed a query you can elect to export those results in Comma Separated Value (CSV)format to a file outside of Aginity Team To do this right-click anywhere in the results panel Doing this will displaya context menu from which you will select the option ldquoExport to CSVrdquo
After selecting this option you will be presented with a screen that permits you to select the location to which to saveyour results Once you have identified the proper location press the Save button to complete the export
CSV files may subsequently be imported into a large number of different programs for further review and analysis
See also
bull Adding Query to Catalog
bull Using Discovery Panel
67 Interacting with Query Results 59
Aginity Team Documentation Release 1
60 Chapter 6 Using the Query Panel in Aginity Team
CHAPTER 7
Using the Catalog in Aginity Team
71 Catalog Overview
The query catalog is a unique capability of Aginity Team allowing you to easily save manage and use items stored init Letrsquos start with browsing the catalog
The catalog is organized by any number of directories and sub-directories of queries as shown below
See also
61
Aginity Team Documentation Release 1
Click Read this article for some ideas on how to best organize your catalog
Queries are given friendly names and can be used or accessed in several ways The first way is to drag the catalogquery into a query panel as shown in the two images below
Fig 1 You can drag the query into the empty query panel
You can also edit queries within a query panel By right clicking on a catalog item and choosing edit code in tab youcan change the SQL itself
62 Chapter 7 Using the Catalog in Aginity Team
Aginity Team Documentation Release 1
Fig 2 After you drag the item it will present the full catalog query for edit or execution
71 Catalog Overview 63
Aginity Team Documentation Release 1
You can edit and save the catalog query in a query panel worksheet as shown below
64 Chapter 7 Using the Catalog in Aginity Team
Aginity Team Documentation Release 1
Hint If you see a next to the tab name in the query panel it means a change has not been saved
By editing the details of a catlaog query you can see key metadata items and statistics about the catalog
71 Catalog Overview 65
Aginity Team Documentation Release 1
72 Calling Catalog Items from SQL
One of the most innovative features of Aginity Team is the ability to call catalog items from within SQL statements
The video and following examples below will give you basic syntax required to call a catalog item
66 Chapter 7 Using the Catalog in Aginity Team
Aginity Team Documentation Release 1
721 Single SQL SELECT Statement
In this example we have a single SQL SELECT statement in the catalog called OrderAverage
This is the code in the Catalog
1 SELECT AVG(LineTotal)2 FROM salesSalesOrderDetail
To call this from the query panel you would issue the following command Note the highlighted reference to the objectin the catalog
1 SELECT 2 FROM (OrderAverage) a
This is the code passed to the database
1 SELECT 2 FROM (3 SELECT AVG(lineTotal)4 FROM SalesSalesOrderDetail5 ) a
722 Using Catalog Item to Facilitate Relationships
In this example we will predefine a join in the catalog called ClientAddress and then use it in the context of anotherSQL statement
This is the code in the Catalog
1 clients c2 JOIN addresses a3 ON cclientsid = aclientsid
To call this from the query panel you would issue the following command Note the highlighted reference to the objectin the catalog
1 SELECT 2 FROM ClientAddress
This is the code passed to the database
1 SELECT 2 FROM clients c3 JOIN addresses a4 ON cclientsid = aclientsid
723 Creating and Reusing Calculations
In this example we will predefine a Calculations in the catalog called Residual and then use it in the context of anotherSQL statement
This is the code in the Catalog
72 Calling Catalog Items from SQL 67
Aginity Team Documentation Release 1
1 1-total
To call this from the query panel you would issue the following command Note the highlighted reference to the objectin the catalog
1 SELECT item2 Residual3 FROM table
This is the code passed to the database
1 SELECT item2 1-total3 FROM table
724 Executing a Multi-Step script
In this example we will predefine a series of SQL statements in the catalog called DailyRun and then execute it by asingle call Any DML (SELECT CREATE UPDATE INSERT DELETE) can be used
This is the code in the Catalog
1 CREATE TABLE xyz AS2 CREATE TABLE abc AS3 SELET FROM xyz JOIN abc
To call this from the query panel you would issue the following command Note the highlighted reference to the objectin the catalog
1 DailyRun
This is the code passed to the database
1 CREATE TABLE xyz AS2 CREATE TABLE abc AS3 SELECT FROM xyz JOIN abc
725 Using Parameters in Catalog
In this example we will use a parameter within a catalog item called CitySelect
This is the code in the Catalog Note the highlighted line has the parameter in it
1 SELECT 2 FROM addresses3 WHERE city = $city
To call this from the query panel you would issue the following command Note the highlighted reference to the objectin the catalog
1 CitySelect
This is the code passed to the database
68 Chapter 7 Using the Catalog in Aginity Team
Aginity Team Documentation Release 1
1 SELECT 2 FROM addresses3 WHERE city = Chicago
Note Upon execution of the command Aginity Team will ask you to supply a parameterized value For moreinformation on parameters see Using Parameters
73 Adding Items to Catalog
To add a new query to the catalog highlight any part of a SQL statement(s) right click and select Save selection tocatalog as shown below
Once you save you will be asked to provide metadata about the query you are adding
73 Adding Items to Catalog 69
Aginity Team Documentation Release 1
Note It is important to fill out the description metadata as it will be used in searching The more information youprovide about the context of usage key business terms and intended usage the better search results you will get
You can also easily create new folders in the catalog or add SQL entries directly from the Catalog Browser by clickingthe (+) to the right of the Catalog header
When adding a new folder you will be presented with a basic text box to create your folder as shown below
74 Import and Export Items from Catalog
You have the ability to Import and Export both your full catalog as well as any folder selected within the catalog
Note We highly recommend taking regular exports of your catalog to disk to prevent accidental loss of queries
741 Export Steps
To Export your catalog start by either Right Clicking on a Catalog Folder or Using the Aginity Pro -gt Export Catalogmenu as shown below
70 Chapter 7 Using the Catalog in Aginity Team
Aginity Team Documentation Release 1
Your first step is to save either an entire folder or a selection of items within a folder
The final step in exporting is to name the file and location you will save to as shown below
742 Import Steps
Importing is valuable for several reasons One is to restore SQL catalog items you may have lost or more importantlythe ability to collaborate with other SQL developers and share your SQL making your a more efficient and consistentSQL developer
74 Import and Export Items from Catalog 71
Aginity Team Documentation Release 1
The first step is to Right Click on a folder you want to import to and Chooose Import Catalog as shown below
Note You can also use the Aginity Pro Menu -gt Import Catalog The main difference between using these twocapabilities is the context of where you are importing items If you choose to import from the Aginity Pro menu youmust set the context where to import If you Right Click on a folder the context is set to that folder
After choosing to import you will choose the file to import By default Aginity catalog files have the extensionaginitypkg
After choosing your file you can specify the folder to import to and what to import as shown below
72 Chapter 7 Using the Catalog in Aginity Team
Aginity Team Documentation Release 1
Hit the Import button and your queries should be imported
See also
Aginity also maintains a Github repository of Catalog queries to be used These queries are either administrativequeries for specific platforms data engineering queries that do powerful transformations against generic data or ana-lytic queries showing how to do cool things in SQL
Access the repositories here
See also
Using Query Panel
74 Import and Export Items from Catalog 73
Aginity Team Documentation Release 1
74 Chapter 7 Using the Catalog in Aginity Team
CHAPTER 8
Using Discovery Panel in Aginity Team
The Discovery Panel is a feature that is unique to Aginity Team and which allows you to quickly identify and reusecode that yoursquove previously executed or saved Using the Discovery Panel begins with a search Watch the videobelow to get a sense for how this feature works
By default the Discovery Panel allows you to search both your query execution history and your Pro Catalog at thesame time However by selecting one of the radio buttons in the Discovery Panel you can choose to focus on just oneor the other if you prefer
81 Searching Query Execution History
Start by typing in any free-text you want such as Sales as shown Below
75
Aginity Team Documentation Release 1
The search engine will do a full text search and display all results
82 Searching the Amp Pro Catalog
Buy clicking on the Catalog radio button you will restrict your search as shown below
83 Expanding the results
Once you have performed a search Amp Pro will dynamically update the results in the Discovery Panel to match thesearch term you have entered Yoursquoll be able to view a small amount of the query by default but if more is requiredyou can click on the arrows in the corner of the preview in order to expand the snippet further
84 Doing More with the Discovery Panel
A place holder for advanced filtering capabilities
76 Chapter 8 Using Discovery Panel in Aginity Team
CHAPTER 9
Reference
91 Video Reference
The following is a reference list of videos about Aginity Team and how to use its features
bull
bull
bull
bull
bull
bull
92 Shortcut Key Reference
Command ActionCommand K + C (Mac) or Ctrl K + C (Windows) Comment lines of codeCommand K + U (Mac) or Ctrl K + U (Windows) Uncomment lines of codeCommand F (Mac) or Ctrl F (Windows) Find and Replace Menu
93 Frequently Asked Questions
The section below is dedicated to commonly asked questions that we compile and provide answers to Over time asthings change we will keep this table up to date
77
Aginity Team Documentation Release 1
931 What Control do I have with Row Limit Preference
By default we cap the row limit preference to 100K rows to discourage users from spooling too much data across yournetwork Trust us your network infrastructure folks do appreciate it Fear not though you have options First if youset the preference to 0 it will spool as much as you want until either you run out of memory or your query completesAlternatively we recommend spooling the output to a file if you are doing returns greater than 100K rows Refer tothe documentation on execute query to file
94 SQL Reference Guides for Supported connections
As SQL developers ourselves we thought putting links to the databases we support in our documentation was a goodidea so here they are
bull
bull
bull
bull
95 Driver Support Reference
The table below is a cross reference of driver versions by platform
Platform Driver Version Class NameNetezza Not distributed with software
(nzjdbcjar)orgnetezzaDriver
SQL Server 720 jre8 commicrosoftsqlserverjdbcSQLServerDriverRedshift 12161027 comamazonredshiftjdbcDriverGreenplum and Post-gres
4225 orgpostgresqlDriver
Hive 121 orgapachehivejdbcHiveDriverSnowflake 3623 3628 355 netsnowflakeclientjdbcSnowflakeDriverIBM DB2 Warehouse db2jcc4 comibmdb2jccDB2Driver
78 Chapter 9 Reference
CHAPTER 10
Troubleshooting
This page is dedicated to common issues or errors you may encounter when using Aginity Team We recommend youalso post any new issues or questions to our Aginity Team Forum
The is a great resource for posting questions searching for common solutions to features of Pro or just learning howto be efficient as a SQL analytic developer through samples best practices and collaboration with other Pro users
Is-sueNum-ber
Isthis aDe-fect
Source of Error Description of Error Resolution
1 No Cannot DownloadDrivers via Con-nection Screen
In most cases your organization isblocking Aginityrsquos ability to downloaddrivers from a Maven repository
Follow directions in the Config-ure Connections documentationto Manually Add Drivers
79
Aginity Team Documentation Release 1
80 Chapter 10 Troubleshooting
CHAPTER 11
End User License for Aginity Team
Click here for end users license
81
- Administering Aginity Team
-
- Deploying Aginity Team through AWS Marketplace
- Installing Aginity Team on Linux
- Upgrading Aginity Team
- Backing Up or Restoring Team Catalog
-
- Creating Users in Aginity Team
-
- Administering Users
-
- Enabling Snowflake OAuth in Aginity Team
- Configuring Connections in Aginity Team
-
- Downloading Drivers
- Setting up Netezza Connections
- Setting up Redshift Connections
- Setting up Snowflake Connections
- Setting up Hive Connections
- Setting up SQL Server Connections
- Setting up DB2 Warehouse Server Connections
- Setting up Greenplum and Postgres Connections
- Import and Exporting Connections
-
- Using the Database Explorer in Aginity Team
-
- Viewing the Database Data Dictionary
- Database Object Support by Platform
- Quick Actions from Explorer
-
- Using the Query Panel in Aginity Team
-
- Writing your First Query
- Executing to a File
- Using Parameters in your Query
- Auto-Complete Capabilities
- Snippet support
- Common Actions in Query Panel
- Interacting with Query Results
-
- Using the Catalog in Aginity Team
-
- Catalog Overview
- Calling Catalog Items from SQL
- Adding Items to Catalog
- Import and Export Items from Catalog
-
- Using Discovery Panel in Aginity Team
-
- Searching Query Execution History
- Searching the Amp Pro Catalog
- Expanding the results
- Doing More with the Discovery Panel
-
- Reference
-
- Video Reference
- Shortcut Key Reference
- Frequently Asked Questions
- SQL Reference Guides for Supported connections
- Driver Support Reference
-
- Troubleshooting
- End User License for Aginity Team
-

Aginity Team Documentation Release 1
platformssnowflakeoauthclientId
Snowflake client ID of the Security Integration object The Snowflake administrator can find the client ID by describingthe integration that is by using the DESC SECURITY INTEGRATION command
platformssnowflakeoauthclientSecret
Snowflake client secret of the Security Integration object The Snowflake administrator can find the client secrets byusing the system function SHOW_OAUTH_CLIENT_SECRETS
serverpublicUrl Aginity Team Public URL
Database platform specific configurationsplatformssnowflake
oauthclientSecrets
- host account_namesnowflakecomputingcomclientId client idclientSecret client secret
For example a customer has 2 Snowflake accounts The first one is eb39151us-east-1snowflakecomputingcom and itis being used for Dev environment The second one is xr58911us-east-1snowflakecomputingcom and it is being usedfor Production environment Then to enable OAuth connections to these environments via Aginity Team administratorshould add the following parameters to serviceconf
serverpublicUrl httpsaginityexamplecom
platformssnowflake
oauthclientSecrets
Dev environment- host eb39151us-east-1snowflakecomputingcom
clientId fnm4OgHhswihrEfsahTyZo=clientSecret sHljg51o7jdsjds8723786f35Q0K+TthasjuczjQwY=
Production environment- host xr58911us-east-1snowflakecomputingcom
clientId kwajw56h(usaELkkwu=clientSecret gfhfrejds3232372822378YUUYthasjuczjQwY=
4 Restart the Aginity Team server
26 Chapter 3 Enabling Snowflake OAuth in Aginity Team
CHAPTER 4
Configuring Connections in Aginity Team
Aginity Team allows you to set up connections to a variety of different database platforms In order to do this clickthe + symbol next to the ldquoConnectionsrdquo header in the left navigation pane of Aginity Team You will be presentedwith a list of existing connections as well as options for adding another connection Clicking the ldquoNew Connectionrdquobutton will allow you to enter the necessary information for the connection you wish to create
Below is a quick start video of creating connections in Aginity Team
Note Aginity Team uses JDBC to connect to database platforms It is recommended you refer to the JDBC guidesfor our supported platforms to learn about specific variables to use within the Advance Parameters section of AginityTeam We will provide links to that documentation where available
The video below provides a more detailed explanation of how to use advanced parameters to illicit the desired behaviorand successful connection to the database platform
27
Aginity Team Documentation Release 1
41 Downloading Drivers
The first step in configuring a connection is to download the JDBC driver for the platform you will be using In mostcases we will provide access to the drivers which have been certified to work with Aginity Team In some cases suchas when the vendor does not allow us to distribute or you want to use a different version you will have to manuallyadd the JDBC driver
The video below provides a quick illustration of how to manage drivers
See also
Database Driver Reference Guide
To get started in the Edit or Add Connection box you will click on Edit Drivers as shown below
411 Automatic Download
As shown in the image below if we are allowed to to download drivers you will be provided a link to do so and thenbe presented with one or more drivers to use and your done
28 Chapter 4 Configuring Connections in Aginity Team
Aginity Team Documentation Release 1
In some cases you may get an error message if your organization does not allow you to download drivers (jar files)typically supplied through a Maven repository
In this case please review the section below Manually Add Drivers
412 Manually Add Drivers
If you have to manually add a driver it starts with first acquiring the JDBC jar for that platform and saving it somewhereon your machine Once you acquire the JDBC jar you can upload it to Aginity Pro
To do this you will hit the Edit Driver or Edit Drivers Panel section as shown above and you will be presented withthe following screen
You can name the Driver anything you want and provide a description
The class name if not provided must be looked up typically in the JDBC reference manual from the platform vendor
Finally if you click on the Add File button you will navigate to where you saved the Jar file and then click SaveChanges You are now ready to configure your connection
42 Setting up Netezza Connections
You can set up a connection to a Netezza (IBM PureData for Analytics) appliance here Simply populate the requesteddata into the form
42 Setting up Netezza Connections 29
Aginity Team Documentation Release 1
Note Netezza does not allow us to distribute their drivers so you must obtain it from your DBA or directly from IBMFix Central
30 Chapter 4 Configuring Connections in Aginity Team
Aginity Team Documentation Release 1
421 Using SSL with Netezza Connections
Aginity Team supports SSL when setting up a Netezza connection While setting up your Netezza connection simplyselect the level of security to enable from the dropdown selector Your choices include
bull Only Unsecured - Specify this option when you want an unsecured connection to the Netezza system If theNetezza system requires a secured connection the connection is rejected
bull Preferred Unsecured - This argument is the default value Specify this option when you would prefer anunsecured connection but you accept a secured connection if the Netezza system requires one
bull Preferred Secured - Specify this option when you want a secured connection to the Netezza system but youaccept an unsecured connection if the Netezza system is configured to use only unsecured connections
bull Only Secured- Specify this option when you want a secured connection to the Netezza system If the Netezzasystem accepts only unsecured connections or if you are attempting to connect to a Netezza system that isrunning a release before release 45 the connection is rejected
See also
For more information on SSL refer to the link Netezza SSL
422 Connection Timeout
The connection timeout will tell the session when to disconnect Typically set this to 10 minutes or 3600 seconds
423 Advanced Parameters
For Netezza you can supply additional JDBC parameters using the Advanced Properties section
See also
Here is the link to other configurable parameters supported within Netezza JDBCrsquos driver
42 Setting up Netezza Connections 31
Aginity Team Documentation Release 1
43 Setting up Redshift Connections
431 Using SSL Mode with Redshift Connections
Aginity Team supports SSL when setting up a Redshift connection While setting up your Redshift connection simplyselect the level of security to enable from the dropdown selector Your choices include
bull Disable - SSL is disabled and the connection is not encrypted
bull Prefer - SSL is used if the server supports it Amazon Redshift supports SSL so SSL is used when you set
32 Chapter 4 Configuring Connections in Aginity Team
Aginity Team Documentation Release 1
sslmode to prefer
bull Allow - SSL is used if the server requires it
bull Require - SSL is required
See also
For more information on Redshift SSL refer to this link
432 Advanced Parameters
For Redshift you can supply additional JDBC parameters using the Advanced Properties section
See also
Here is the link to other configurable parameters supported within Redshift JDBCrsquos driver
44 Setting up Snowflake Connections
You can set up a connection to a Snowflake here Simply populate the requested data into the form
44 Setting up Snowflake Connections 33
Aginity Team Documentation Release 1
441 Warehouse
A virtual warehouse often referred to simply as a ldquowarehouserdquo is a cluster of compute resources in Snowflake Awarehouse provides the required resources such as CPU memory and temporary storage to perform the followingoperations in a Snowflake session If you do not know which specific Warehouse to use speak to your Snowflake DBA
442 Role
This is a security role that may have been setup for you to use You can leave this field blank if you do not know whatRole to connect as
34 Chapter 4 Configuring Connections in Aginity Team
Aginity Team Documentation Release 1
443 Advanced Parameters
For Snowflake most connection detail is handled through the command line additions to the JDBC URI You cansupply additional JDBC parameters using the Advanced Properties section
See also
Here is the link to other configurable parameters supported within Snowflake JDBCrsquos driver
45 Setting up Hive Connections
You can set up a connection to a Hive databases here Simply populate the requested data into the form
45 Setting up Hive Connections 35
Aginity Team Documentation Release 1
36 Chapter 4 Configuring Connections in Aginity Team
Aginity Team Documentation Release 1
451 Picking Subprotocol
You can choose either Hive 2 or Spark SQL syntax when executing against Hive databases You can choose eithervalue in this drop down
452 Setting up Kerberos connections
In a lot of cases organizations require the use of Kerberos with Hive so by clicking on the radio button for UseKerberos for authentication you will be prompted to enter the following
bull Realm
bull FQDN
bull Service name
Note The value of these parameters are typically set by your Hadoop administrator and it is best to work with themto obtain the appropriate values
453 Advanced Parameters
You can supply additional Hive JDBC parameters using the Advanced Properties section
See also
Here is the link to other configurable parameters supported within Hive JDBCrsquos driver
46 Setting up SQL Server Connections
You can set up a connection to Microsoft SQL Server databases here Simply populate the requested data into theform
46 Setting up SQL Server Connections 37
Aginity Team Documentation Release 1
Note We only support SQL Server compatibility levels 150 and 140 which is SQL Server 2017 and greater
47 Setting up DB2 Warehouse Server Connections
You can set up a connection to IBM DB2 warehouse databases here Simply populate the requested data into the form
38 Chapter 4 Configuring Connections in Aginity Team
Aginity Team Documentation Release 1
471 Advanced Parameters
You can supply additional Hive JDBC parameters using the Advanced Properties section
See also
Here is the link to other configurable parameters supported within SQL Server JDBCrsquos driver
48 Setting up Greenplum and Postgres Connections
You can set up a connection to Greenplum and Postgres databases here Simply populate the requested data into theform Greenplum and Postgres share the same drivers so we will speak of them together
48 Setting up Greenplum and Postgres Connections 39
Aginity Team Documentation Release 1
481 Choosing Subprotocol (Only for Greenplum)
You can choose either generic Postgres or Pivotal Greenplum SQL syntax when executing against Greenplumdatabases You can choose either value in this drop down
40 Chapter 4 Configuring Connections in Aginity Team
Aginity Team Documentation Release 1
482 Advanced Parameters
You can supply additional Postgres JDBC parameters using the Advanced Properties section
See also
Here is the link to other configurable parameters supported within Postgres JDBCrsquos driver
49 Import and Exporting Connections
A new feature in Aginity Team is the ability to import and export your connection templates and share them withother users A good deal of inefficiency with SQL IDErsquos is the time it takes to get connected No longer With theconnection templates you can save all the relevant detail minus the login credentials and distribute them through aneasy import and export feature
To get started have a DBA or power user establish the connection details once and export the connection as shown inthe image below
You will be presented with a selection list of connections as shown below Select the connections you want to exportand click Export selected
Note It is important to either check the radio button include sensitive data or to uncheck it This willinclude the username and password or exclude it from the connection export
49 Import and Exporting Connections 41
Aginity Team Documentation Release 1
You will be presented with a file menu window to name and pick the folder location for the export file as shown below
42 Chapter 4 Configuring Connections in Aginity Team
Aginity Team Documentation Release 1
Once you have exported the connections you can send them to Aginity Team users and have them import them To dothat choose the Import Connections menu item as shown below
You will be presented with a file selection Choose the appropriate Aginity connection package
Note By default Aginity packages for both Catalog and Connections are prefaced with aginitypkg file types
Once you choose a file select the connections you want to import and choose Import Selected
49 Import and Exporting Connections 43
Aginity Team Documentation Release 1
See also
Navigating Database Explorer
44 Chapter 4 Configuring Connections in Aginity Team
CHAPTER 5
Using the Database Explorer in Aginity Team
The Database Explorer panel in Aginity Team can be toggled by using the Database Explorer and Catalog tabs onthe left hand pane of the application as show below The Database Explorer is used to navigate database objectsbased on the Connections defined in Aginity Team The Catalog browser is used to navigate SQL Analytics that youhave personally stored
Below is a quick start video of using the Database Explorer in Aginity Team
51 Viewing the Database Data Dictionary
Once you have established a connection to a database you can browse the database dictionary catalogs You can toggleto the Database Explorer browser by clicking on the tab as shown below The database data dictionaries typicallycontains the tables columns views and other database objects available to query from the query panel
Once you have selected the Database Explorer tab you can drill into each connection as shown below
45
Aginity Team Documentation Release 1
52 Database Object Support by Platform
The following image details what objects are visible from the browser for all of our currently supported platformsWe do releases every two weeks with Aginity Team so if there is a feature you need please contact us at sup-portaginitycom
46 Chapter 5 Using the Database Explorer in Aginity Team
Aginity Team Documentation Release 1
53 Quick Actions from Explorer
Currently you can do the following quick actions from the Database Explorer
531 SQL Statement Generation
To generate typical SQL statements from tables or views you can right click on the object navigate to scripts andchoose the appropriate script as shown below
53 Quick Actions from Explorer 47
Aginity Team Documentation Release 1
532 Selective SQL Generation on a Set of Columns
To generate SQL statements based on a selection of columns within a Table or View multi-select the columns byholding Ctrl (Windows) or Command (Mac) and selecting the columns as shown below Then generate the SQLstatement
Hint Make sure you donrsquot have the table name selected and column names at the same time If you do it will generatethe SQL for the whole table
48 Chapter 5 Using the Database Explorer in Aginity Team
Aginity Team Documentation Release 1
533 Drag and Drop Capabilities
You can drag and drop any object from the DB Explorer into the Query Panel
Note Double-clicking expands the DB Explorer tree
534 Copy JDBC Connection String
If you select any Connection (Top level of the tree) and select ldquoCopy Connection string to Clipboardrdquo you will getthe full JDBC URI which is helpful for debugging See this Knowledge Base Article for help with debugging yourAginity Team connections
See also
bull Use Catalog Browser
bull Use Query Panel
53 Quick Actions from Explorer 49
Aginity Team Documentation Release 1
50 Chapter 5 Using the Database Explorer in Aginity Team
CHAPTER 6
Using the Query Panel in Aginity Team
You will spend most of your time in the Query Panel writing SQL and saving it to your catalog in Aginity Team Thevideo below will give you an overview of creating your first query
61 Writing your First Query
Each tab in the Aginity Team application can be set to different database connections Once you establish that con-nection as shown below you can use the query panel like a text editor using SQL syntax specific to that databaseplatform
Once you write your code in Aginity Team you have options to run it using the following scope
51
Aginity Team Documentation Release 1
Execution Type DescriptionRun at cursor When executing the query it will run the statement where the cursor is place
up until the semicolonRun all parts of the script in a se-quence
Each statement in the window will be run sequentially and the output ofeach statement will be shown in the output and if the statement was a SE-LECT then a results panel will be displayed
Run entire script as a batchAbort Query After executing a query you can direct Aginity Team to send a request to
the database to cancel the query
See also
Note one of the greatest challenges in SQL is learning the different functional syntax from different database vendorsWe are trying to make that easy by giving you links to the SQL reference manuals we support
62 Executing to a File
In version 17 of Aginity Pro we released the ability to use our editor commands to spool the results of a SQLstatement(s) to a file(s)
To do this you must issue the following commands
1 Use the +sql command to tell the editor you will be writing SQL in this section
2 You will then use the output file command to tell the editor you will spool the results to an outputfile
3 In the table below is a series of parameters and descriptions to be used when spooling
4 Use the +begin statement to tell the editor you from here until the +end command you will haveSQL to execute
5 Write your SQL
6 End with +end
7 Use the Run commands as you would any normal SQL statement as described in the Run Scopesection above
The code below is an example you can use to build off of
1 -- This will write the SQL statement between +begin and +end to therarr˓file specified
2
3 +sql4 output file5 path usersjschlittDownloadsjeff16 delimiter 7 null_value NULL8 quote_char 9 overwrite true
10 +begin11 select from wb_pro_marketing_list12 where emaildomain = aginitycom13 +end
52 Chapter 6 Using the Query Panel in Aginity Team
Aginity Team Documentation Release 1
Note We only support today the file type of csv You can still change the delimiter but all files with have a csvextension
The table below illustrates the current values accepted in execute to file commands
Parame-ter
Options
path On Mac this should be in the format ldquodirdirfilenamerdquo On Windows it should be in the formatldquodrivedirectoryfilenamerdquo
delimiter You can use any value but we recommend or | or ^ or t for (tab)null_value enter a character field for null typically lsquorsquo (empty string) or lsquoNULLrsquoquote_char enter how to enclose character string typically the quotation (ldquo)overwrite whether or not to allow overwrite if file exists true or falseheader true or false on whether you want to display headers in fileencoding the encoding of the file UTF_8 is the only value supported currentlycompres-sion
we can compress the file after it is written Values are NONE ZIP and GZIP
See also
We have a great knowledge base article on how to use the catalog to facilitate using the export as file editor feature
63 Using Parameters in your Query
Parameters can be used in Aginity Team by using the $ in any part of a SQL statement When you execute a query theAginity Team application will ask you to fill in the value of the parameter before it sends the query to the database
1 --sample parameter query2
3 select 4 from landing_dim_customer5 where gender = $fill_in_gender_at_runtime6 limit 100
You will have datatype choices at runtime as shown in the table below
Parameter Data Type Action TakenAs Is Aginity Team will send the value exactly as written with no casting This
is often used when using the parameter to fill in database table or columnnames See example 2 below
Hint You can specify default values with parameters by using this syntax with your parameter
$fill_in_gender_at_runtimelsquoMrsquo
When you run the query you will see the little gear icon as shown below Clicking that will populate thedefault value
63 Using Parameters in your Query 53
Aginity Team Documentation Release 1
64 Auto-Complete Capabilities
In Aginity Team we have implemented auto-complete on several database platforms and will be deploying across allover time The auto-complete capability has three capabilities
1 Display any words on the editor screen from above where your current cursor is
2 Display SQL Syntax like SELECT WHERE FROM all the way to database platform specific functions likeCASE DATEDIFF or CURRENT_DATE()
3 Display the database schema table column as you are typing
Hint To initiate just the database browser which shows database objects plus snippets hit the Ctrl+Space buttonotherwise as you type if auto-complete is supported it will automatically popup
Note Currently we support auto-complete on Netezza Redshift and Snowflake
54 Chapter 6 Using the Query Panel in Aginity Team
Aginity Team Documentation Release 1
65 Snippet support
We have pre-wired some special snippets within the editor as well to make writing SQL simpler The table belowdetails those snippets that are currently available
Snippet Actionselall will generate generic SELECT FROMselwh will generate generic SELECT FROM WHEREupd will generate an UPDATE statementins will generate an INSERT statementdel will generate a DELETE statementexpf will generate a generic export to file statement
66 Common Actions in Query Panel
We will highlight common functions heavily used in the editor here There is a complete list of available editorfunctions which can be accessed by hitting the Command+Shift+P on Mac or the Ctrl+Shift+P button within theeditor or from the View-gtCommand Palette menu item
661 Renaming Tabs
You can rename the query tabs by double clicking and typing in a name as shown below
662 Commenting SQL
In Aginity Team you can use the typical SQL syntax to comment your code as shown below
1 -- This is one way to comment your SQL code2
3 SELECT AVG(LineTotal)4 FROM salesSalesOrderDetail5
6 This is another way to comment your SQL code
65 Snippet support 55
Aginity Team Documentation Release 1
Hint If highlight multiple lines of code you can also use the Shortcut Keys Ctrl+K+C on Windows or Com-mand+K+C on Mac to comment them out To uncomment use Ctrl+K+U or Command+K+U
663 Keeping Connection
The Keep Connection checkbox as show below will instruct Aginity Team to maintain the connection to the databaseif the default behavior of the database is to disconnect after the execution of a query You are still subject to an overalldatabase connection timeout if you session connection exceeds the permitted database setting
664 Find and Replace
Ctrl+F (Windows) or Command+F (Mac) will bring up the find and replace box as shown below
67 Interacting with Query Results
Once your query has been executed you can use the features of the result grid to interact with the result set The typicalactions you will do are listed below
bull Reordering the Result Grid
bull Sorting the Result Grid
bull Filtering the Result Grid
bull Exporting results to CSV
671 Reordering the Result Grid
Once a query has executed successfully you may rearrange the columns in the Result Grid in order to more effectivelyperform subsequent analyses Rearranging the Result Grid is simple simply click hold and drag the column headerfor the column you wish to move As you move it left or right the grid will automatically adjust to reposition thecolumn
56 Chapter 6 Using the Query Panel in Aginity Team
Aginity Team Documentation Release 1
Once you are satisfied with the new position of the column you may release the drag and the column will lock intoplace
672 Sorting the Result Grid
After successfully executing a query if the query has returned any rows you may sort the results in order to permitvarious types of analysis of your results
In order to sort your results simply click on the header row in the results grid If the results are already being sortedby that column then the sort order will toggle between ascending and descending
67 Interacting with Query Results 57
Aginity Team Documentation Release 1
673 Filtering the Result Grid
Data in the Result Grid may be filtered to make it easier to locate and analyze certain subsets of the resultant datawithout requiring you to submit an entirely separate query
To filter the result grid by values in a particular column bring your mouse cursor to the column header for the columnto which you wish to apply a filter In the right-hand side on the header row the filter icon (three horizontal bars) willappear Click on the filter icon and you will be presented with a pop-up menu that will allow you to enter your filtercriteria
By default the filter criteria will select a ldquoContainsrdquo filter but several other filter types exist and you may select anyof them Once you have selected the filter type you wish to apply type the filter into the text box The results willimmediately begin to filter
58 Chapter 6 Using the Query Panel in Aginity Team
Aginity Team Documentation Release 1
When a column is being filtered a funnel icon will appear in its header To remove the filter you may re-enter thefilter mode by clicking on the filter icon (three bars) in the header row and simply delete the filter text
Multiple columns may have active filters at the same time To accomplish this simply perform these steps on eachcolumn
674 Exporting results to CSV
Once you have successfully executed a query you can elect to export those results in Comma Separated Value (CSV)format to a file outside of Aginity Team To do this right-click anywhere in the results panel Doing this will displaya context menu from which you will select the option ldquoExport to CSVrdquo
After selecting this option you will be presented with a screen that permits you to select the location to which to saveyour results Once you have identified the proper location press the Save button to complete the export
CSV files may subsequently be imported into a large number of different programs for further review and analysis
See also
bull Adding Query to Catalog
bull Using Discovery Panel
67 Interacting with Query Results 59
Aginity Team Documentation Release 1
60 Chapter 6 Using the Query Panel in Aginity Team
CHAPTER 7
Using the Catalog in Aginity Team
71 Catalog Overview
The query catalog is a unique capability of Aginity Team allowing you to easily save manage and use items stored init Letrsquos start with browsing the catalog
The catalog is organized by any number of directories and sub-directories of queries as shown below
See also
61
Aginity Team Documentation Release 1
Click Read this article for some ideas on how to best organize your catalog
Queries are given friendly names and can be used or accessed in several ways The first way is to drag the catalogquery into a query panel as shown in the two images below
Fig 1 You can drag the query into the empty query panel
You can also edit queries within a query panel By right clicking on a catalog item and choosing edit code in tab youcan change the SQL itself
62 Chapter 7 Using the Catalog in Aginity Team
Aginity Team Documentation Release 1
Fig 2 After you drag the item it will present the full catalog query for edit or execution
71 Catalog Overview 63
Aginity Team Documentation Release 1
You can edit and save the catalog query in a query panel worksheet as shown below
64 Chapter 7 Using the Catalog in Aginity Team
Aginity Team Documentation Release 1
Hint If you see a next to the tab name in the query panel it means a change has not been saved
By editing the details of a catlaog query you can see key metadata items and statistics about the catalog
71 Catalog Overview 65
Aginity Team Documentation Release 1
72 Calling Catalog Items from SQL
One of the most innovative features of Aginity Team is the ability to call catalog items from within SQL statements
The video and following examples below will give you basic syntax required to call a catalog item
66 Chapter 7 Using the Catalog in Aginity Team
Aginity Team Documentation Release 1
721 Single SQL SELECT Statement
In this example we have a single SQL SELECT statement in the catalog called OrderAverage
This is the code in the Catalog
1 SELECT AVG(LineTotal)2 FROM salesSalesOrderDetail
To call this from the query panel you would issue the following command Note the highlighted reference to the objectin the catalog
1 SELECT 2 FROM (OrderAverage) a
This is the code passed to the database
1 SELECT 2 FROM (3 SELECT AVG(lineTotal)4 FROM SalesSalesOrderDetail5 ) a
722 Using Catalog Item to Facilitate Relationships
In this example we will predefine a join in the catalog called ClientAddress and then use it in the context of anotherSQL statement
This is the code in the Catalog
1 clients c2 JOIN addresses a3 ON cclientsid = aclientsid
To call this from the query panel you would issue the following command Note the highlighted reference to the objectin the catalog
1 SELECT 2 FROM ClientAddress
This is the code passed to the database
1 SELECT 2 FROM clients c3 JOIN addresses a4 ON cclientsid = aclientsid
723 Creating and Reusing Calculations
In this example we will predefine a Calculations in the catalog called Residual and then use it in the context of anotherSQL statement
This is the code in the Catalog
72 Calling Catalog Items from SQL 67
Aginity Team Documentation Release 1
1 1-total
To call this from the query panel you would issue the following command Note the highlighted reference to the objectin the catalog
1 SELECT item2 Residual3 FROM table
This is the code passed to the database
1 SELECT item2 1-total3 FROM table
724 Executing a Multi-Step script
In this example we will predefine a series of SQL statements in the catalog called DailyRun and then execute it by asingle call Any DML (SELECT CREATE UPDATE INSERT DELETE) can be used
This is the code in the Catalog
1 CREATE TABLE xyz AS2 CREATE TABLE abc AS3 SELET FROM xyz JOIN abc
To call this from the query panel you would issue the following command Note the highlighted reference to the objectin the catalog
1 DailyRun
This is the code passed to the database
1 CREATE TABLE xyz AS2 CREATE TABLE abc AS3 SELECT FROM xyz JOIN abc
725 Using Parameters in Catalog
In this example we will use a parameter within a catalog item called CitySelect
This is the code in the Catalog Note the highlighted line has the parameter in it
1 SELECT 2 FROM addresses3 WHERE city = $city
To call this from the query panel you would issue the following command Note the highlighted reference to the objectin the catalog
1 CitySelect
This is the code passed to the database
68 Chapter 7 Using the Catalog in Aginity Team
Aginity Team Documentation Release 1
1 SELECT 2 FROM addresses3 WHERE city = Chicago
Note Upon execution of the command Aginity Team will ask you to supply a parameterized value For moreinformation on parameters see Using Parameters
73 Adding Items to Catalog
To add a new query to the catalog highlight any part of a SQL statement(s) right click and select Save selection tocatalog as shown below
Once you save you will be asked to provide metadata about the query you are adding
73 Adding Items to Catalog 69
Aginity Team Documentation Release 1
Note It is important to fill out the description metadata as it will be used in searching The more information youprovide about the context of usage key business terms and intended usage the better search results you will get
You can also easily create new folders in the catalog or add SQL entries directly from the Catalog Browser by clickingthe (+) to the right of the Catalog header
When adding a new folder you will be presented with a basic text box to create your folder as shown below
74 Import and Export Items from Catalog
You have the ability to Import and Export both your full catalog as well as any folder selected within the catalog
Note We highly recommend taking regular exports of your catalog to disk to prevent accidental loss of queries
741 Export Steps
To Export your catalog start by either Right Clicking on a Catalog Folder or Using the Aginity Pro -gt Export Catalogmenu as shown below
70 Chapter 7 Using the Catalog in Aginity Team
Aginity Team Documentation Release 1
Your first step is to save either an entire folder or a selection of items within a folder
The final step in exporting is to name the file and location you will save to as shown below
742 Import Steps
Importing is valuable for several reasons One is to restore SQL catalog items you may have lost or more importantlythe ability to collaborate with other SQL developers and share your SQL making your a more efficient and consistentSQL developer
74 Import and Export Items from Catalog 71
Aginity Team Documentation Release 1
The first step is to Right Click on a folder you want to import to and Chooose Import Catalog as shown below
Note You can also use the Aginity Pro Menu -gt Import Catalog The main difference between using these twocapabilities is the context of where you are importing items If you choose to import from the Aginity Pro menu youmust set the context where to import If you Right Click on a folder the context is set to that folder
After choosing to import you will choose the file to import By default Aginity catalog files have the extensionaginitypkg
After choosing your file you can specify the folder to import to and what to import as shown below
72 Chapter 7 Using the Catalog in Aginity Team
Aginity Team Documentation Release 1
Hit the Import button and your queries should be imported
See also
Aginity also maintains a Github repository of Catalog queries to be used These queries are either administrativequeries for specific platforms data engineering queries that do powerful transformations against generic data or ana-lytic queries showing how to do cool things in SQL
Access the repositories here
See also
Using Query Panel
74 Import and Export Items from Catalog 73
Aginity Team Documentation Release 1
74 Chapter 7 Using the Catalog in Aginity Team
CHAPTER 8
Using Discovery Panel in Aginity Team
The Discovery Panel is a feature that is unique to Aginity Team and which allows you to quickly identify and reusecode that yoursquove previously executed or saved Using the Discovery Panel begins with a search Watch the videobelow to get a sense for how this feature works
By default the Discovery Panel allows you to search both your query execution history and your Pro Catalog at thesame time However by selecting one of the radio buttons in the Discovery Panel you can choose to focus on just oneor the other if you prefer
81 Searching Query Execution History
Start by typing in any free-text you want such as Sales as shown Below
75
Aginity Team Documentation Release 1
The search engine will do a full text search and display all results
82 Searching the Amp Pro Catalog
Buy clicking on the Catalog radio button you will restrict your search as shown below
83 Expanding the results
Once you have performed a search Amp Pro will dynamically update the results in the Discovery Panel to match thesearch term you have entered Yoursquoll be able to view a small amount of the query by default but if more is requiredyou can click on the arrows in the corner of the preview in order to expand the snippet further
84 Doing More with the Discovery Panel
A place holder for advanced filtering capabilities
76 Chapter 8 Using Discovery Panel in Aginity Team
CHAPTER 9
Reference
91 Video Reference
The following is a reference list of videos about Aginity Team and how to use its features
bull
bull
bull
bull
bull
bull
92 Shortcut Key Reference
Command ActionCommand K + C (Mac) or Ctrl K + C (Windows) Comment lines of codeCommand K + U (Mac) or Ctrl K + U (Windows) Uncomment lines of codeCommand F (Mac) or Ctrl F (Windows) Find and Replace Menu
93 Frequently Asked Questions
The section below is dedicated to commonly asked questions that we compile and provide answers to Over time asthings change we will keep this table up to date
77
Aginity Team Documentation Release 1
931 What Control do I have with Row Limit Preference
By default we cap the row limit preference to 100K rows to discourage users from spooling too much data across yournetwork Trust us your network infrastructure folks do appreciate it Fear not though you have options First if youset the preference to 0 it will spool as much as you want until either you run out of memory or your query completesAlternatively we recommend spooling the output to a file if you are doing returns greater than 100K rows Refer tothe documentation on execute query to file
94 SQL Reference Guides for Supported connections
As SQL developers ourselves we thought putting links to the databases we support in our documentation was a goodidea so here they are
bull
bull
bull
bull
95 Driver Support Reference
The table below is a cross reference of driver versions by platform
Platform Driver Version Class NameNetezza Not distributed with software
(nzjdbcjar)orgnetezzaDriver
SQL Server 720 jre8 commicrosoftsqlserverjdbcSQLServerDriverRedshift 12161027 comamazonredshiftjdbcDriverGreenplum and Post-gres
4225 orgpostgresqlDriver
Hive 121 orgapachehivejdbcHiveDriverSnowflake 3623 3628 355 netsnowflakeclientjdbcSnowflakeDriverIBM DB2 Warehouse db2jcc4 comibmdb2jccDB2Driver
78 Chapter 9 Reference
CHAPTER 10
Troubleshooting
This page is dedicated to common issues or errors you may encounter when using Aginity Team We recommend youalso post any new issues or questions to our Aginity Team Forum
The is a great resource for posting questions searching for common solutions to features of Pro or just learning howto be efficient as a SQL analytic developer through samples best practices and collaboration with other Pro users
Is-sueNum-ber
Isthis aDe-fect
Source of Error Description of Error Resolution
1 No Cannot DownloadDrivers via Con-nection Screen
In most cases your organization isblocking Aginityrsquos ability to downloaddrivers from a Maven repository
Follow directions in the Config-ure Connections documentationto Manually Add Drivers
79
Aginity Team Documentation Release 1
80 Chapter 10 Troubleshooting
CHAPTER 11
End User License for Aginity Team
Click here for end users license
81
- Administering Aginity Team
-
- Deploying Aginity Team through AWS Marketplace
- Installing Aginity Team on Linux
- Upgrading Aginity Team
- Backing Up or Restoring Team Catalog
-
- Creating Users in Aginity Team
-
- Administering Users
-
- Enabling Snowflake OAuth in Aginity Team
- Configuring Connections in Aginity Team
-
- Downloading Drivers
- Setting up Netezza Connections
- Setting up Redshift Connections
- Setting up Snowflake Connections
- Setting up Hive Connections
- Setting up SQL Server Connections
- Setting up DB2 Warehouse Server Connections
- Setting up Greenplum and Postgres Connections
- Import and Exporting Connections
-
- Using the Database Explorer in Aginity Team
-
- Viewing the Database Data Dictionary
- Database Object Support by Platform
- Quick Actions from Explorer
-
- Using the Query Panel in Aginity Team
-
- Writing your First Query
- Executing to a File
- Using Parameters in your Query
- Auto-Complete Capabilities
- Snippet support
- Common Actions in Query Panel
- Interacting with Query Results
-
- Using the Catalog in Aginity Team
-
- Catalog Overview
- Calling Catalog Items from SQL
- Adding Items to Catalog
- Import and Export Items from Catalog
-
- Using Discovery Panel in Aginity Team
-
- Searching Query Execution History
- Searching the Amp Pro Catalog
- Expanding the results
- Doing More with the Discovery Panel
-
- Reference
-
- Video Reference
- Shortcut Key Reference
- Frequently Asked Questions
- SQL Reference Guides for Supported connections
- Driver Support Reference
-
- Troubleshooting
- End User License for Aginity Team
-
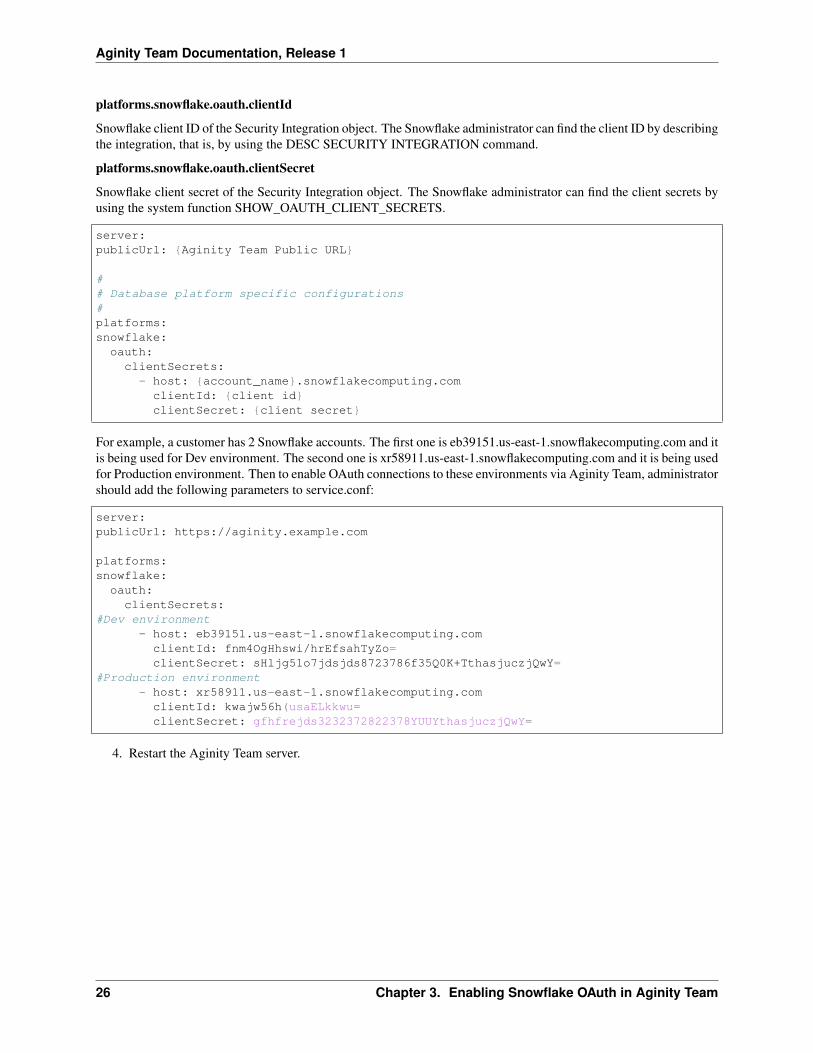

Aginity Team Documentation Release 1
In some cases you may get an error message if your organization does not allow you to download drivers (jar files)typically supplied through a Maven repository
In this case please review the section below Manually Add Drivers
412 Manually Add Drivers
If you have to manually add a driver it starts with first acquiring the JDBC jar for that platform and saving it somewhereon your machine Once you acquire the JDBC jar you can upload it to Aginity Pro
To do this you will hit the Edit Driver or Edit Drivers Panel section as shown above and you will be presented withthe following screen
You can name the Driver anything you want and provide a description
The class name if not provided must be looked up typically in the JDBC reference manual from the platform vendor
Finally if you click on the Add File button you will navigate to where you saved the Jar file and then click SaveChanges You are now ready to configure your connection
42 Setting up Netezza Connections
You can set up a connection to a Netezza (IBM PureData for Analytics) appliance here Simply populate the requesteddata into the form
42 Setting up Netezza Connections 29
Aginity Team Documentation Release 1
Note Netezza does not allow us to distribute their drivers so you must obtain it from your DBA or directly from IBMFix Central
30 Chapter 4 Configuring Connections in Aginity Team
Aginity Team Documentation Release 1
421 Using SSL with Netezza Connections
Aginity Team supports SSL when setting up a Netezza connection While setting up your Netezza connection simplyselect the level of security to enable from the dropdown selector Your choices include
bull Only Unsecured - Specify this option when you want an unsecured connection to the Netezza system If theNetezza system requires a secured connection the connection is rejected
bull Preferred Unsecured - This argument is the default value Specify this option when you would prefer anunsecured connection but you accept a secured connection if the Netezza system requires one
bull Preferred Secured - Specify this option when you want a secured connection to the Netezza system but youaccept an unsecured connection if the Netezza system is configured to use only unsecured connections
bull Only Secured- Specify this option when you want a secured connection to the Netezza system If the Netezzasystem accepts only unsecured connections or if you are attempting to connect to a Netezza system that isrunning a release before release 45 the connection is rejected
See also
For more information on SSL refer to the link Netezza SSL
422 Connection Timeout
The connection timeout will tell the session when to disconnect Typically set this to 10 minutes or 3600 seconds
423 Advanced Parameters
For Netezza you can supply additional JDBC parameters using the Advanced Properties section
See also
Here is the link to other configurable parameters supported within Netezza JDBCrsquos driver
42 Setting up Netezza Connections 31
Aginity Team Documentation Release 1
43 Setting up Redshift Connections
431 Using SSL Mode with Redshift Connections
Aginity Team supports SSL when setting up a Redshift connection While setting up your Redshift connection simplyselect the level of security to enable from the dropdown selector Your choices include
bull Disable - SSL is disabled and the connection is not encrypted
bull Prefer - SSL is used if the server supports it Amazon Redshift supports SSL so SSL is used when you set
32 Chapter 4 Configuring Connections in Aginity Team
Aginity Team Documentation Release 1
sslmode to prefer
bull Allow - SSL is used if the server requires it
bull Require - SSL is required
See also
For more information on Redshift SSL refer to this link
432 Advanced Parameters
For Redshift you can supply additional JDBC parameters using the Advanced Properties section
See also
Here is the link to other configurable parameters supported within Redshift JDBCrsquos driver
44 Setting up Snowflake Connections
You can set up a connection to a Snowflake here Simply populate the requested data into the form
44 Setting up Snowflake Connections 33
Aginity Team Documentation Release 1
441 Warehouse
A virtual warehouse often referred to simply as a ldquowarehouserdquo is a cluster of compute resources in Snowflake Awarehouse provides the required resources such as CPU memory and temporary storage to perform the followingoperations in a Snowflake session If you do not know which specific Warehouse to use speak to your Snowflake DBA
442 Role
This is a security role that may have been setup for you to use You can leave this field blank if you do not know whatRole to connect as
34 Chapter 4 Configuring Connections in Aginity Team
Aginity Team Documentation Release 1
443 Advanced Parameters
For Snowflake most connection detail is handled through the command line additions to the JDBC URI You cansupply additional JDBC parameters using the Advanced Properties section
See also
Here is the link to other configurable parameters supported within Snowflake JDBCrsquos driver
45 Setting up Hive Connections
You can set up a connection to a Hive databases here Simply populate the requested data into the form
45 Setting up Hive Connections 35
Aginity Team Documentation Release 1
36 Chapter 4 Configuring Connections in Aginity Team
Aginity Team Documentation Release 1
451 Picking Subprotocol
You can choose either Hive 2 or Spark SQL syntax when executing against Hive databases You can choose eithervalue in this drop down
452 Setting up Kerberos connections
In a lot of cases organizations require the use of Kerberos with Hive so by clicking on the radio button for UseKerberos for authentication you will be prompted to enter the following
bull Realm
bull FQDN
bull Service name
Note The value of these parameters are typically set by your Hadoop administrator and it is best to work with themto obtain the appropriate values
453 Advanced Parameters
You can supply additional Hive JDBC parameters using the Advanced Properties section
See also
Here is the link to other configurable parameters supported within Hive JDBCrsquos driver
46 Setting up SQL Server Connections
You can set up a connection to Microsoft SQL Server databases here Simply populate the requested data into theform
46 Setting up SQL Server Connections 37
Aginity Team Documentation Release 1
Note We only support SQL Server compatibility levels 150 and 140 which is SQL Server 2017 and greater
47 Setting up DB2 Warehouse Server Connections
You can set up a connection to IBM DB2 warehouse databases here Simply populate the requested data into the form
38 Chapter 4 Configuring Connections in Aginity Team
Aginity Team Documentation Release 1
471 Advanced Parameters
You can supply additional Hive JDBC parameters using the Advanced Properties section
See also
Here is the link to other configurable parameters supported within SQL Server JDBCrsquos driver
48 Setting up Greenplum and Postgres Connections
You can set up a connection to Greenplum and Postgres databases here Simply populate the requested data into theform Greenplum and Postgres share the same drivers so we will speak of them together
48 Setting up Greenplum and Postgres Connections 39
Aginity Team Documentation Release 1
481 Choosing Subprotocol (Only for Greenplum)
You can choose either generic Postgres or Pivotal Greenplum SQL syntax when executing against Greenplumdatabases You can choose either value in this drop down
40 Chapter 4 Configuring Connections in Aginity Team
Aginity Team Documentation Release 1
482 Advanced Parameters
You can supply additional Postgres JDBC parameters using the Advanced Properties section
See also
Here is the link to other configurable parameters supported within Postgres JDBCrsquos driver
49 Import and Exporting Connections
A new feature in Aginity Team is the ability to import and export your connection templates and share them withother users A good deal of inefficiency with SQL IDErsquos is the time it takes to get connected No longer With theconnection templates you can save all the relevant detail minus the login credentials and distribute them through aneasy import and export feature
To get started have a DBA or power user establish the connection details once and export the connection as shown inthe image below
You will be presented with a selection list of connections as shown below Select the connections you want to exportand click Export selected
Note It is important to either check the radio button include sensitive data or to uncheck it This willinclude the username and password or exclude it from the connection export
49 Import and Exporting Connections 41
Aginity Team Documentation Release 1
You will be presented with a file menu window to name and pick the folder location for the export file as shown below
42 Chapter 4 Configuring Connections in Aginity Team
Aginity Team Documentation Release 1
Once you have exported the connections you can send them to Aginity Team users and have them import them To dothat choose the Import Connections menu item as shown below
You will be presented with a file selection Choose the appropriate Aginity connection package
Note By default Aginity packages for both Catalog and Connections are prefaced with aginitypkg file types
Once you choose a file select the connections you want to import and choose Import Selected
49 Import and Exporting Connections 43
Aginity Team Documentation Release 1
See also
Navigating Database Explorer
44 Chapter 4 Configuring Connections in Aginity Team
CHAPTER 5
Using the Database Explorer in Aginity Team
The Database Explorer panel in Aginity Team can be toggled by using the Database Explorer and Catalog tabs onthe left hand pane of the application as show below The Database Explorer is used to navigate database objectsbased on the Connections defined in Aginity Team The Catalog browser is used to navigate SQL Analytics that youhave personally stored
Below is a quick start video of using the Database Explorer in Aginity Team
51 Viewing the Database Data Dictionary
Once you have established a connection to a database you can browse the database dictionary catalogs You can toggleto the Database Explorer browser by clicking on the tab as shown below The database data dictionaries typicallycontains the tables columns views and other database objects available to query from the query panel
Once you have selected the Database Explorer tab you can drill into each connection as shown below
45
Aginity Team Documentation Release 1
52 Database Object Support by Platform
The following image details what objects are visible from the browser for all of our currently supported platformsWe do releases every two weeks with Aginity Team so if there is a feature you need please contact us at sup-portaginitycom
46 Chapter 5 Using the Database Explorer in Aginity Team
Aginity Team Documentation Release 1
53 Quick Actions from Explorer
Currently you can do the following quick actions from the Database Explorer
531 SQL Statement Generation
To generate typical SQL statements from tables or views you can right click on the object navigate to scripts andchoose the appropriate script as shown below
53 Quick Actions from Explorer 47
Aginity Team Documentation Release 1
532 Selective SQL Generation on a Set of Columns
To generate SQL statements based on a selection of columns within a Table or View multi-select the columns byholding Ctrl (Windows) or Command (Mac) and selecting the columns as shown below Then generate the SQLstatement
Hint Make sure you donrsquot have the table name selected and column names at the same time If you do it will generatethe SQL for the whole table
48 Chapter 5 Using the Database Explorer in Aginity Team
Aginity Team Documentation Release 1
533 Drag and Drop Capabilities
You can drag and drop any object from the DB Explorer into the Query Panel
Note Double-clicking expands the DB Explorer tree
534 Copy JDBC Connection String
If you select any Connection (Top level of the tree) and select ldquoCopy Connection string to Clipboardrdquo you will getthe full JDBC URI which is helpful for debugging See this Knowledge Base Article for help with debugging yourAginity Team connections
See also
bull Use Catalog Browser
bull Use Query Panel
53 Quick Actions from Explorer 49
Aginity Team Documentation Release 1
50 Chapter 5 Using the Database Explorer in Aginity Team
CHAPTER 6
Using the Query Panel in Aginity Team
You will spend most of your time in the Query Panel writing SQL and saving it to your catalog in Aginity Team Thevideo below will give you an overview of creating your first query
61 Writing your First Query
Each tab in the Aginity Team application can be set to different database connections Once you establish that con-nection as shown below you can use the query panel like a text editor using SQL syntax specific to that databaseplatform
Once you write your code in Aginity Team you have options to run it using the following scope
51
Aginity Team Documentation Release 1
Execution Type DescriptionRun at cursor When executing the query it will run the statement where the cursor is place
up until the semicolonRun all parts of the script in a se-quence
Each statement in the window will be run sequentially and the output ofeach statement will be shown in the output and if the statement was a SE-LECT then a results panel will be displayed
Run entire script as a batchAbort Query After executing a query you can direct Aginity Team to send a request to
the database to cancel the query
See also
Note one of the greatest challenges in SQL is learning the different functional syntax from different database vendorsWe are trying to make that easy by giving you links to the SQL reference manuals we support
62 Executing to a File
In version 17 of Aginity Pro we released the ability to use our editor commands to spool the results of a SQLstatement(s) to a file(s)
To do this you must issue the following commands
1 Use the +sql command to tell the editor you will be writing SQL in this section
2 You will then use the output file command to tell the editor you will spool the results to an outputfile
3 In the table below is a series of parameters and descriptions to be used when spooling
4 Use the +begin statement to tell the editor you from here until the +end command you will haveSQL to execute
5 Write your SQL
6 End with +end
7 Use the Run commands as you would any normal SQL statement as described in the Run Scopesection above
The code below is an example you can use to build off of
1 -- This will write the SQL statement between +begin and +end to therarr˓file specified
2
3 +sql4 output file5 path usersjschlittDownloadsjeff16 delimiter 7 null_value NULL8 quote_char 9 overwrite true
10 +begin11 select from wb_pro_marketing_list12 where emaildomain = aginitycom13 +end
52 Chapter 6 Using the Query Panel in Aginity Team
Aginity Team Documentation Release 1
Note We only support today the file type of csv You can still change the delimiter but all files with have a csvextension
The table below illustrates the current values accepted in execute to file commands
Parame-ter
Options
path On Mac this should be in the format ldquodirdirfilenamerdquo On Windows it should be in the formatldquodrivedirectoryfilenamerdquo
delimiter You can use any value but we recommend or | or ^ or t for (tab)null_value enter a character field for null typically lsquorsquo (empty string) or lsquoNULLrsquoquote_char enter how to enclose character string typically the quotation (ldquo)overwrite whether or not to allow overwrite if file exists true or falseheader true or false on whether you want to display headers in fileencoding the encoding of the file UTF_8 is the only value supported currentlycompres-sion
we can compress the file after it is written Values are NONE ZIP and GZIP
See also
We have a great knowledge base article on how to use the catalog to facilitate using the export as file editor feature
63 Using Parameters in your Query
Parameters can be used in Aginity Team by using the $ in any part of a SQL statement When you execute a query theAginity Team application will ask you to fill in the value of the parameter before it sends the query to the database
1 --sample parameter query2
3 select 4 from landing_dim_customer5 where gender = $fill_in_gender_at_runtime6 limit 100
You will have datatype choices at runtime as shown in the table below
Parameter Data Type Action TakenAs Is Aginity Team will send the value exactly as written with no casting This
is often used when using the parameter to fill in database table or columnnames See example 2 below
Hint You can specify default values with parameters by using this syntax with your parameter
$fill_in_gender_at_runtimelsquoMrsquo
When you run the query you will see the little gear icon as shown below Clicking that will populate thedefault value
63 Using Parameters in your Query 53
Aginity Team Documentation Release 1
64 Auto-Complete Capabilities
In Aginity Team we have implemented auto-complete on several database platforms and will be deploying across allover time The auto-complete capability has three capabilities
1 Display any words on the editor screen from above where your current cursor is
2 Display SQL Syntax like SELECT WHERE FROM all the way to database platform specific functions likeCASE DATEDIFF or CURRENT_DATE()
3 Display the database schema table column as you are typing
Hint To initiate just the database browser which shows database objects plus snippets hit the Ctrl+Space buttonotherwise as you type if auto-complete is supported it will automatically popup
Note Currently we support auto-complete on Netezza Redshift and Snowflake
54 Chapter 6 Using the Query Panel in Aginity Team
Aginity Team Documentation Release 1
65 Snippet support
We have pre-wired some special snippets within the editor as well to make writing SQL simpler The table belowdetails those snippets that are currently available
Snippet Actionselall will generate generic SELECT FROMselwh will generate generic SELECT FROM WHEREupd will generate an UPDATE statementins will generate an INSERT statementdel will generate a DELETE statementexpf will generate a generic export to file statement
66 Common Actions in Query Panel
We will highlight common functions heavily used in the editor here There is a complete list of available editorfunctions which can be accessed by hitting the Command+Shift+P on Mac or the Ctrl+Shift+P button within theeditor or from the View-gtCommand Palette menu item
661 Renaming Tabs
You can rename the query tabs by double clicking and typing in a name as shown below
662 Commenting SQL
In Aginity Team you can use the typical SQL syntax to comment your code as shown below
1 -- This is one way to comment your SQL code2
3 SELECT AVG(LineTotal)4 FROM salesSalesOrderDetail5
6 This is another way to comment your SQL code
65 Snippet support 55
Aginity Team Documentation Release 1
Hint If highlight multiple lines of code you can also use the Shortcut Keys Ctrl+K+C on Windows or Com-mand+K+C on Mac to comment them out To uncomment use Ctrl+K+U or Command+K+U
663 Keeping Connection
The Keep Connection checkbox as show below will instruct Aginity Team to maintain the connection to the databaseif the default behavior of the database is to disconnect after the execution of a query You are still subject to an overalldatabase connection timeout if you session connection exceeds the permitted database setting
664 Find and Replace
Ctrl+F (Windows) or Command+F (Mac) will bring up the find and replace box as shown below
67 Interacting with Query Results
Once your query has been executed you can use the features of the result grid to interact with the result set The typicalactions you will do are listed below
bull Reordering the Result Grid
bull Sorting the Result Grid
bull Filtering the Result Grid
bull Exporting results to CSV
671 Reordering the Result Grid
Once a query has executed successfully you may rearrange the columns in the Result Grid in order to more effectivelyperform subsequent analyses Rearranging the Result Grid is simple simply click hold and drag the column headerfor the column you wish to move As you move it left or right the grid will automatically adjust to reposition thecolumn
56 Chapter 6 Using the Query Panel in Aginity Team
Aginity Team Documentation Release 1
Once you are satisfied with the new position of the column you may release the drag and the column will lock intoplace
672 Sorting the Result Grid
After successfully executing a query if the query has returned any rows you may sort the results in order to permitvarious types of analysis of your results
In order to sort your results simply click on the header row in the results grid If the results are already being sortedby that column then the sort order will toggle between ascending and descending
67 Interacting with Query Results 57
Aginity Team Documentation Release 1
673 Filtering the Result Grid
Data in the Result Grid may be filtered to make it easier to locate and analyze certain subsets of the resultant datawithout requiring you to submit an entirely separate query
To filter the result grid by values in a particular column bring your mouse cursor to the column header for the columnto which you wish to apply a filter In the right-hand side on the header row the filter icon (three horizontal bars) willappear Click on the filter icon and you will be presented with a pop-up menu that will allow you to enter your filtercriteria
By default the filter criteria will select a ldquoContainsrdquo filter but several other filter types exist and you may select anyof them Once you have selected the filter type you wish to apply type the filter into the text box The results willimmediately begin to filter
58 Chapter 6 Using the Query Panel in Aginity Team
Aginity Team Documentation Release 1
When a column is being filtered a funnel icon will appear in its header To remove the filter you may re-enter thefilter mode by clicking on the filter icon (three bars) in the header row and simply delete the filter text
Multiple columns may have active filters at the same time To accomplish this simply perform these steps on eachcolumn
674 Exporting results to CSV
Once you have successfully executed a query you can elect to export those results in Comma Separated Value (CSV)format to a file outside of Aginity Team To do this right-click anywhere in the results panel Doing this will displaya context menu from which you will select the option ldquoExport to CSVrdquo
After selecting this option you will be presented with a screen that permits you to select the location to which to saveyour results Once you have identified the proper location press the Save button to complete the export
CSV files may subsequently be imported into a large number of different programs for further review and analysis
See also
bull Adding Query to Catalog
bull Using Discovery Panel
67 Interacting with Query Results 59
Aginity Team Documentation Release 1
60 Chapter 6 Using the Query Panel in Aginity Team
CHAPTER 7
Using the Catalog in Aginity Team
71 Catalog Overview
The query catalog is a unique capability of Aginity Team allowing you to easily save manage and use items stored init Letrsquos start with browsing the catalog
The catalog is organized by any number of directories and sub-directories of queries as shown below
See also
61
Aginity Team Documentation Release 1
Click Read this article for some ideas on how to best organize your catalog
Queries are given friendly names and can be used or accessed in several ways The first way is to drag the catalogquery into a query panel as shown in the two images below
Fig 1 You can drag the query into the empty query panel
You can also edit queries within a query panel By right clicking on a catalog item and choosing edit code in tab youcan change the SQL itself
62 Chapter 7 Using the Catalog in Aginity Team
Aginity Team Documentation Release 1
Fig 2 After you drag the item it will present the full catalog query for edit or execution
71 Catalog Overview 63
Aginity Team Documentation Release 1
You can edit and save the catalog query in a query panel worksheet as shown below
64 Chapter 7 Using the Catalog in Aginity Team
Aginity Team Documentation Release 1
Hint If you see a next to the tab name in the query panel it means a change has not been saved
By editing the details of a catlaog query you can see key metadata items and statistics about the catalog
71 Catalog Overview 65
Aginity Team Documentation Release 1
72 Calling Catalog Items from SQL
One of the most innovative features of Aginity Team is the ability to call catalog items from within SQL statements
The video and following examples below will give you basic syntax required to call a catalog item
66 Chapter 7 Using the Catalog in Aginity Team
Aginity Team Documentation Release 1
721 Single SQL SELECT Statement
In this example we have a single SQL SELECT statement in the catalog called OrderAverage
This is the code in the Catalog
1 SELECT AVG(LineTotal)2 FROM salesSalesOrderDetail
To call this from the query panel you would issue the following command Note the highlighted reference to the objectin the catalog
1 SELECT 2 FROM (OrderAverage) a
This is the code passed to the database
1 SELECT 2 FROM (3 SELECT AVG(lineTotal)4 FROM SalesSalesOrderDetail5 ) a
722 Using Catalog Item to Facilitate Relationships
In this example we will predefine a join in the catalog called ClientAddress and then use it in the context of anotherSQL statement
This is the code in the Catalog
1 clients c2 JOIN addresses a3 ON cclientsid = aclientsid
To call this from the query panel you would issue the following command Note the highlighted reference to the objectin the catalog
1 SELECT 2 FROM ClientAddress
This is the code passed to the database
1 SELECT 2 FROM clients c3 JOIN addresses a4 ON cclientsid = aclientsid
723 Creating and Reusing Calculations
In this example we will predefine a Calculations in the catalog called Residual and then use it in the context of anotherSQL statement
This is the code in the Catalog
72 Calling Catalog Items from SQL 67
Aginity Team Documentation Release 1
1 1-total
To call this from the query panel you would issue the following command Note the highlighted reference to the objectin the catalog
1 SELECT item2 Residual3 FROM table
This is the code passed to the database
1 SELECT item2 1-total3 FROM table
724 Executing a Multi-Step script
In this example we will predefine a series of SQL statements in the catalog called DailyRun and then execute it by asingle call Any DML (SELECT CREATE UPDATE INSERT DELETE) can be used
This is the code in the Catalog
1 CREATE TABLE xyz AS2 CREATE TABLE abc AS3 SELET FROM xyz JOIN abc
To call this from the query panel you would issue the following command Note the highlighted reference to the objectin the catalog
1 DailyRun
This is the code passed to the database
1 CREATE TABLE xyz AS2 CREATE TABLE abc AS3 SELECT FROM xyz JOIN abc
725 Using Parameters in Catalog
In this example we will use a parameter within a catalog item called CitySelect
This is the code in the Catalog Note the highlighted line has the parameter in it
1 SELECT 2 FROM addresses3 WHERE city = $city
To call this from the query panel you would issue the following command Note the highlighted reference to the objectin the catalog
1 CitySelect
This is the code passed to the database
68 Chapter 7 Using the Catalog in Aginity Team
Aginity Team Documentation Release 1
1 SELECT 2 FROM addresses3 WHERE city = Chicago
Note Upon execution of the command Aginity Team will ask you to supply a parameterized value For moreinformation on parameters see Using Parameters
73 Adding Items to Catalog
To add a new query to the catalog highlight any part of a SQL statement(s) right click and select Save selection tocatalog as shown below
Once you save you will be asked to provide metadata about the query you are adding
73 Adding Items to Catalog 69
Aginity Team Documentation Release 1
Note It is important to fill out the description metadata as it will be used in searching The more information youprovide about the context of usage key business terms and intended usage the better search results you will get
You can also easily create new folders in the catalog or add SQL entries directly from the Catalog Browser by clickingthe (+) to the right of the Catalog header
When adding a new folder you will be presented with a basic text box to create your folder as shown below
74 Import and Export Items from Catalog
You have the ability to Import and Export both your full catalog as well as any folder selected within the catalog
Note We highly recommend taking regular exports of your catalog to disk to prevent accidental loss of queries
741 Export Steps
To Export your catalog start by either Right Clicking on a Catalog Folder or Using the Aginity Pro -gt Export Catalogmenu as shown below
70 Chapter 7 Using the Catalog in Aginity Team
Aginity Team Documentation Release 1
Your first step is to save either an entire folder or a selection of items within a folder
The final step in exporting is to name the file and location you will save to as shown below
742 Import Steps
Importing is valuable for several reasons One is to restore SQL catalog items you may have lost or more importantlythe ability to collaborate with other SQL developers and share your SQL making your a more efficient and consistentSQL developer
74 Import and Export Items from Catalog 71
Aginity Team Documentation Release 1
The first step is to Right Click on a folder you want to import to and Chooose Import Catalog as shown below
Note You can also use the Aginity Pro Menu -gt Import Catalog The main difference between using these twocapabilities is the context of where you are importing items If you choose to import from the Aginity Pro menu youmust set the context where to import If you Right Click on a folder the context is set to that folder
After choosing to import you will choose the file to import By default Aginity catalog files have the extensionaginitypkg
After choosing your file you can specify the folder to import to and what to import as shown below
72 Chapter 7 Using the Catalog in Aginity Team
Aginity Team Documentation Release 1
Hit the Import button and your queries should be imported
See also
Aginity also maintains a Github repository of Catalog queries to be used These queries are either administrativequeries for specific platforms data engineering queries that do powerful transformations against generic data or ana-lytic queries showing how to do cool things in SQL
Access the repositories here
See also
Using Query Panel
74 Import and Export Items from Catalog 73
Aginity Team Documentation Release 1
74 Chapter 7 Using the Catalog in Aginity Team
CHAPTER 8
Using Discovery Panel in Aginity Team
The Discovery Panel is a feature that is unique to Aginity Team and which allows you to quickly identify and reusecode that yoursquove previously executed or saved Using the Discovery Panel begins with a search Watch the videobelow to get a sense for how this feature works
By default the Discovery Panel allows you to search both your query execution history and your Pro Catalog at thesame time However by selecting one of the radio buttons in the Discovery Panel you can choose to focus on just oneor the other if you prefer
81 Searching Query Execution History
Start by typing in any free-text you want such as Sales as shown Below
75
Aginity Team Documentation Release 1
The search engine will do a full text search and display all results
82 Searching the Amp Pro Catalog
Buy clicking on the Catalog radio button you will restrict your search as shown below
83 Expanding the results
Once you have performed a search Amp Pro will dynamically update the results in the Discovery Panel to match thesearch term you have entered Yoursquoll be able to view a small amount of the query by default but if more is requiredyou can click on the arrows in the corner of the preview in order to expand the snippet further
84 Doing More with the Discovery Panel
A place holder for advanced filtering capabilities
76 Chapter 8 Using Discovery Panel in Aginity Team
CHAPTER 9
Reference
91 Video Reference
The following is a reference list of videos about Aginity Team and how to use its features
bull
bull
bull
bull
bull
bull
92 Shortcut Key Reference
Command ActionCommand K + C (Mac) or Ctrl K + C (Windows) Comment lines of codeCommand K + U (Mac) or Ctrl K + U (Windows) Uncomment lines of codeCommand F (Mac) or Ctrl F (Windows) Find and Replace Menu
93 Frequently Asked Questions
The section below is dedicated to commonly asked questions that we compile and provide answers to Over time asthings change we will keep this table up to date
77
Aginity Team Documentation Release 1
931 What Control do I have with Row Limit Preference
By default we cap the row limit preference to 100K rows to discourage users from spooling too much data across yournetwork Trust us your network infrastructure folks do appreciate it Fear not though you have options First if youset the preference to 0 it will spool as much as you want until either you run out of memory or your query completesAlternatively we recommend spooling the output to a file if you are doing returns greater than 100K rows Refer tothe documentation on execute query to file
94 SQL Reference Guides for Supported connections
As SQL developers ourselves we thought putting links to the databases we support in our documentation was a goodidea so here they are
bull
bull
bull
bull
95 Driver Support Reference
The table below is a cross reference of driver versions by platform
Platform Driver Version Class NameNetezza Not distributed with software
(nzjdbcjar)orgnetezzaDriver
SQL Server 720 jre8 commicrosoftsqlserverjdbcSQLServerDriverRedshift 12161027 comamazonredshiftjdbcDriverGreenplum and Post-gres
4225 orgpostgresqlDriver
Hive 121 orgapachehivejdbcHiveDriverSnowflake 3623 3628 355 netsnowflakeclientjdbcSnowflakeDriverIBM DB2 Warehouse db2jcc4 comibmdb2jccDB2Driver
78 Chapter 9 Reference
CHAPTER 10
Troubleshooting
This page is dedicated to common issues or errors you may encounter when using Aginity Team We recommend youalso post any new issues or questions to our Aginity Team Forum
The is a great resource for posting questions searching for common solutions to features of Pro or just learning howto be efficient as a SQL analytic developer through samples best practices and collaboration with other Pro users
Is-sueNum-ber
Isthis aDe-fect
Source of Error Description of Error Resolution
1 No Cannot DownloadDrivers via Con-nection Screen
In most cases your organization isblocking Aginityrsquos ability to downloaddrivers from a Maven repository
Follow directions in the Config-ure Connections documentationto Manually Add Drivers
79
Aginity Team Documentation Release 1
80 Chapter 10 Troubleshooting
CHAPTER 11
End User License for Aginity Team
Click here for end users license
81
- Administering Aginity Team
-
- Deploying Aginity Team through AWS Marketplace
- Installing Aginity Team on Linux
- Upgrading Aginity Team
- Backing Up or Restoring Team Catalog
-
- Creating Users in Aginity Team
-
- Administering Users
-
- Enabling Snowflake OAuth in Aginity Team
- Configuring Connections in Aginity Team
-
- Downloading Drivers
- Setting up Netezza Connections
- Setting up Redshift Connections
- Setting up Snowflake Connections
- Setting up Hive Connections
- Setting up SQL Server Connections
- Setting up DB2 Warehouse Server Connections
- Setting up Greenplum and Postgres Connections
- Import and Exporting Connections
-
- Using the Database Explorer in Aginity Team
-
- Viewing the Database Data Dictionary
- Database Object Support by Platform
- Quick Actions from Explorer
-
- Using the Query Panel in Aginity Team
-
- Writing your First Query
- Executing to a File
- Using Parameters in your Query
- Auto-Complete Capabilities
- Snippet support
- Common Actions in Query Panel
- Interacting with Query Results
-
- Using the Catalog in Aginity Team
-
- Catalog Overview
- Calling Catalog Items from SQL
- Adding Items to Catalog
- Import and Export Items from Catalog
-
- Using Discovery Panel in Aginity Team
-
- Searching Query Execution History
- Searching the Amp Pro Catalog
- Expanding the results
- Doing More with the Discovery Panel
-
- Reference
-
- Video Reference
- Shortcut Key Reference
- Frequently Asked Questions
- SQL Reference Guides for Supported connections
- Driver Support Reference
-
- Troubleshooting
- End User License for Aginity Team
-
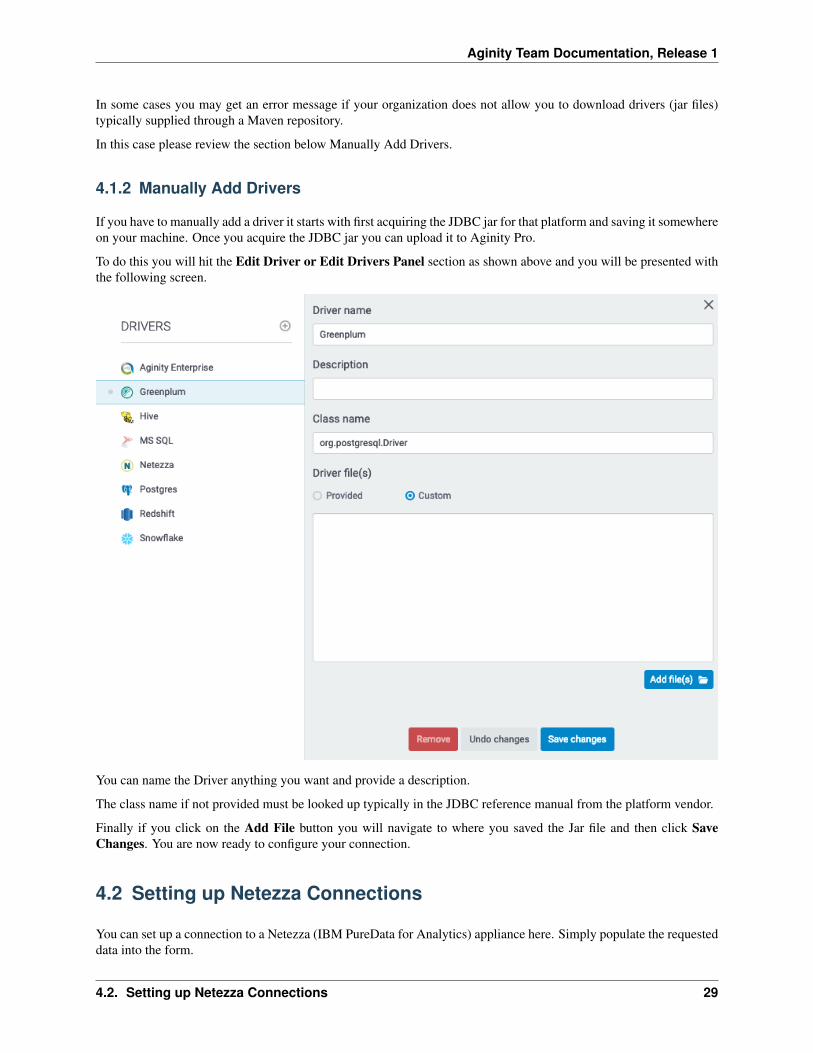
Aginity Team Documentation Release 1
43 Setting up Redshift Connections
431 Using SSL Mode with Redshift Connections
Aginity Team supports SSL when setting up a Redshift connection While setting up your Redshift connection simplyselect the level of security to enable from the dropdown selector Your choices include
bull Disable - SSL is disabled and the connection is not encrypted
bull Prefer - SSL is used if the server supports it Amazon Redshift supports SSL so SSL is used when you set
32 Chapter 4 Configuring Connections in Aginity Team
Aginity Team Documentation Release 1
sslmode to prefer
bull Allow - SSL is used if the server requires it
bull Require - SSL is required
See also
For more information on Redshift SSL refer to this link
432 Advanced Parameters
For Redshift you can supply additional JDBC parameters using the Advanced Properties section
See also
Here is the link to other configurable parameters supported within Redshift JDBCrsquos driver
44 Setting up Snowflake Connections
You can set up a connection to a Snowflake here Simply populate the requested data into the form
44 Setting up Snowflake Connections 33
Aginity Team Documentation Release 1
441 Warehouse
A virtual warehouse often referred to simply as a ldquowarehouserdquo is a cluster of compute resources in Snowflake Awarehouse provides the required resources such as CPU memory and temporary storage to perform the followingoperations in a Snowflake session If you do not know which specific Warehouse to use speak to your Snowflake DBA
442 Role
This is a security role that may have been setup for you to use You can leave this field blank if you do not know whatRole to connect as
34 Chapter 4 Configuring Connections in Aginity Team
Aginity Team Documentation Release 1
443 Advanced Parameters
For Snowflake most connection detail is handled through the command line additions to the JDBC URI You cansupply additional JDBC parameters using the Advanced Properties section
See also
Here is the link to other configurable parameters supported within Snowflake JDBCrsquos driver
45 Setting up Hive Connections
You can set up a connection to a Hive databases here Simply populate the requested data into the form
45 Setting up Hive Connections 35
Aginity Team Documentation Release 1
36 Chapter 4 Configuring Connections in Aginity Team
Aginity Team Documentation Release 1
451 Picking Subprotocol
You can choose either Hive 2 or Spark SQL syntax when executing against Hive databases You can choose eithervalue in this drop down
452 Setting up Kerberos connections
In a lot of cases organizations require the use of Kerberos with Hive so by clicking on the radio button for UseKerberos for authentication you will be prompted to enter the following
bull Realm
bull FQDN
bull Service name
Note The value of these parameters are typically set by your Hadoop administrator and it is best to work with themto obtain the appropriate values
453 Advanced Parameters
You can supply additional Hive JDBC parameters using the Advanced Properties section
See also
Here is the link to other configurable parameters supported within Hive JDBCrsquos driver
46 Setting up SQL Server Connections
You can set up a connection to Microsoft SQL Server databases here Simply populate the requested data into theform
46 Setting up SQL Server Connections 37
Aginity Team Documentation Release 1
Note We only support SQL Server compatibility levels 150 and 140 which is SQL Server 2017 and greater
47 Setting up DB2 Warehouse Server Connections
You can set up a connection to IBM DB2 warehouse databases here Simply populate the requested data into the form
38 Chapter 4 Configuring Connections in Aginity Team
Aginity Team Documentation Release 1
471 Advanced Parameters
You can supply additional Hive JDBC parameters using the Advanced Properties section
See also
Here is the link to other configurable parameters supported within SQL Server JDBCrsquos driver
48 Setting up Greenplum and Postgres Connections
You can set up a connection to Greenplum and Postgres databases here Simply populate the requested data into theform Greenplum and Postgres share the same drivers so we will speak of them together
48 Setting up Greenplum and Postgres Connections 39
Aginity Team Documentation Release 1
481 Choosing Subprotocol (Only for Greenplum)
You can choose either generic Postgres or Pivotal Greenplum SQL syntax when executing against Greenplumdatabases You can choose either value in this drop down
40 Chapter 4 Configuring Connections in Aginity Team
Aginity Team Documentation Release 1
482 Advanced Parameters
You can supply additional Postgres JDBC parameters using the Advanced Properties section
See also
Here is the link to other configurable parameters supported within Postgres JDBCrsquos driver
49 Import and Exporting Connections
A new feature in Aginity Team is the ability to import and export your connection templates and share them withother users A good deal of inefficiency with SQL IDErsquos is the time it takes to get connected No longer With theconnection templates you can save all the relevant detail minus the login credentials and distribute them through aneasy import and export feature
To get started have a DBA or power user establish the connection details once and export the connection as shown inthe image below
You will be presented with a selection list of connections as shown below Select the connections you want to exportand click Export selected
Note It is important to either check the radio button include sensitive data or to uncheck it This willinclude the username and password or exclude it from the connection export
49 Import and Exporting Connections 41
Aginity Team Documentation Release 1
You will be presented with a file menu window to name and pick the folder location for the export file as shown below
42 Chapter 4 Configuring Connections in Aginity Team
Aginity Team Documentation Release 1
Once you have exported the connections you can send them to Aginity Team users and have them import them To dothat choose the Import Connections menu item as shown below
You will be presented with a file selection Choose the appropriate Aginity connection package
Note By default Aginity packages for both Catalog and Connections are prefaced with aginitypkg file types
Once you choose a file select the connections you want to import and choose Import Selected
49 Import and Exporting Connections 43
Aginity Team Documentation Release 1
See also
Navigating Database Explorer
44 Chapter 4 Configuring Connections in Aginity Team
CHAPTER 5
Using the Database Explorer in Aginity Team
The Database Explorer panel in Aginity Team can be toggled by using the Database Explorer and Catalog tabs onthe left hand pane of the application as show below The Database Explorer is used to navigate database objectsbased on the Connections defined in Aginity Team The Catalog browser is used to navigate SQL Analytics that youhave personally stored
Below is a quick start video of using the Database Explorer in Aginity Team
51 Viewing the Database Data Dictionary
Once you have established a connection to a database you can browse the database dictionary catalogs You can toggleto the Database Explorer browser by clicking on the tab as shown below The database data dictionaries typicallycontains the tables columns views and other database objects available to query from the query panel
Once you have selected the Database Explorer tab you can drill into each connection as shown below
45
Aginity Team Documentation Release 1
52 Database Object Support by Platform
The following image details what objects are visible from the browser for all of our currently supported platformsWe do releases every two weeks with Aginity Team so if there is a feature you need please contact us at sup-portaginitycom
46 Chapter 5 Using the Database Explorer in Aginity Team
Aginity Team Documentation Release 1
53 Quick Actions from Explorer
Currently you can do the following quick actions from the Database Explorer
531 SQL Statement Generation
To generate typical SQL statements from tables or views you can right click on the object navigate to scripts andchoose the appropriate script as shown below
53 Quick Actions from Explorer 47
Aginity Team Documentation Release 1
532 Selective SQL Generation on a Set of Columns
To generate SQL statements based on a selection of columns within a Table or View multi-select the columns byholding Ctrl (Windows) or Command (Mac) and selecting the columns as shown below Then generate the SQLstatement
Hint Make sure you donrsquot have the table name selected and column names at the same time If you do it will generatethe SQL for the whole table
48 Chapter 5 Using the Database Explorer in Aginity Team
Aginity Team Documentation Release 1
533 Drag and Drop Capabilities
You can drag and drop any object from the DB Explorer into the Query Panel
Note Double-clicking expands the DB Explorer tree
534 Copy JDBC Connection String
If you select any Connection (Top level of the tree) and select ldquoCopy Connection string to Clipboardrdquo you will getthe full JDBC URI which is helpful for debugging See this Knowledge Base Article for help with debugging yourAginity Team connections
See also
bull Use Catalog Browser
bull Use Query Panel
53 Quick Actions from Explorer 49
Aginity Team Documentation Release 1
50 Chapter 5 Using the Database Explorer in Aginity Team
CHAPTER 6
Using the Query Panel in Aginity Team
You will spend most of your time in the Query Panel writing SQL and saving it to your catalog in Aginity Team Thevideo below will give you an overview of creating your first query
61 Writing your First Query
Each tab in the Aginity Team application can be set to different database connections Once you establish that con-nection as shown below you can use the query panel like a text editor using SQL syntax specific to that databaseplatform
Once you write your code in Aginity Team you have options to run it using the following scope
51
Aginity Team Documentation Release 1
Execution Type DescriptionRun at cursor When executing the query it will run the statement where the cursor is place
up until the semicolonRun all parts of the script in a se-quence
Each statement in the window will be run sequentially and the output ofeach statement will be shown in the output and if the statement was a SE-LECT then a results panel will be displayed
Run entire script as a batchAbort Query After executing a query you can direct Aginity Team to send a request to
the database to cancel the query
See also
Note one of the greatest challenges in SQL is learning the different functional syntax from different database vendorsWe are trying to make that easy by giving you links to the SQL reference manuals we support
62 Executing to a File
In version 17 of Aginity Pro we released the ability to use our editor commands to spool the results of a SQLstatement(s) to a file(s)
To do this you must issue the following commands
1 Use the +sql command to tell the editor you will be writing SQL in this section
2 You will then use the output file command to tell the editor you will spool the results to an outputfile
3 In the table below is a series of parameters and descriptions to be used when spooling
4 Use the +begin statement to tell the editor you from here until the +end command you will haveSQL to execute
5 Write your SQL
6 End with +end
7 Use the Run commands as you would any normal SQL statement as described in the Run Scopesection above
The code below is an example you can use to build off of
1 -- This will write the SQL statement between +begin and +end to therarr˓file specified
2
3 +sql4 output file5 path usersjschlittDownloadsjeff16 delimiter 7 null_value NULL8 quote_char 9 overwrite true
10 +begin11 select from wb_pro_marketing_list12 where emaildomain = aginitycom13 +end
52 Chapter 6 Using the Query Panel in Aginity Team
Aginity Team Documentation Release 1
Note We only support today the file type of csv You can still change the delimiter but all files with have a csvextension
The table below illustrates the current values accepted in execute to file commands
Parame-ter
Options
path On Mac this should be in the format ldquodirdirfilenamerdquo On Windows it should be in the formatldquodrivedirectoryfilenamerdquo
delimiter You can use any value but we recommend or | or ^ or t for (tab)null_value enter a character field for null typically lsquorsquo (empty string) or lsquoNULLrsquoquote_char enter how to enclose character string typically the quotation (ldquo)overwrite whether or not to allow overwrite if file exists true or falseheader true or false on whether you want to display headers in fileencoding the encoding of the file UTF_8 is the only value supported currentlycompres-sion
we can compress the file after it is written Values are NONE ZIP and GZIP
See also
We have a great knowledge base article on how to use the catalog to facilitate using the export as file editor feature
63 Using Parameters in your Query
Parameters can be used in Aginity Team by using the $ in any part of a SQL statement When you execute a query theAginity Team application will ask you to fill in the value of the parameter before it sends the query to the database
1 --sample parameter query2
3 select 4 from landing_dim_customer5 where gender = $fill_in_gender_at_runtime6 limit 100
You will have datatype choices at runtime as shown in the table below
Parameter Data Type Action TakenAs Is Aginity Team will send the value exactly as written with no casting This
is often used when using the parameter to fill in database table or columnnames See example 2 below
Hint You can specify default values with parameters by using this syntax with your parameter
$fill_in_gender_at_runtimelsquoMrsquo
When you run the query you will see the little gear icon as shown below Clicking that will populate thedefault value
63 Using Parameters in your Query 53
Aginity Team Documentation Release 1
64 Auto-Complete Capabilities
In Aginity Team we have implemented auto-complete on several database platforms and will be deploying across allover time The auto-complete capability has three capabilities
1 Display any words on the editor screen from above where your current cursor is
2 Display SQL Syntax like SELECT WHERE FROM all the way to database platform specific functions likeCASE DATEDIFF or CURRENT_DATE()
3 Display the database schema table column as you are typing
Hint To initiate just the database browser which shows database objects plus snippets hit the Ctrl+Space buttonotherwise as you type if auto-complete is supported it will automatically popup
Note Currently we support auto-complete on Netezza Redshift and Snowflake
54 Chapter 6 Using the Query Panel in Aginity Team
Aginity Team Documentation Release 1
65 Snippet support
We have pre-wired some special snippets within the editor as well to make writing SQL simpler The table belowdetails those snippets that are currently available
Snippet Actionselall will generate generic SELECT FROMselwh will generate generic SELECT FROM WHEREupd will generate an UPDATE statementins will generate an INSERT statementdel will generate a DELETE statementexpf will generate a generic export to file statement
66 Common Actions in Query Panel
We will highlight common functions heavily used in the editor here There is a complete list of available editorfunctions which can be accessed by hitting the Command+Shift+P on Mac or the Ctrl+Shift+P button within theeditor or from the View-gtCommand Palette menu item
661 Renaming Tabs
You can rename the query tabs by double clicking and typing in a name as shown below
662 Commenting SQL
In Aginity Team you can use the typical SQL syntax to comment your code as shown below
1 -- This is one way to comment your SQL code2
3 SELECT AVG(LineTotal)4 FROM salesSalesOrderDetail5
6 This is another way to comment your SQL code
65 Snippet support 55
Aginity Team Documentation Release 1
Hint If highlight multiple lines of code you can also use the Shortcut Keys Ctrl+K+C on Windows or Com-mand+K+C on Mac to comment them out To uncomment use Ctrl+K+U or Command+K+U
663 Keeping Connection
The Keep Connection checkbox as show below will instruct Aginity Team to maintain the connection to the databaseif the default behavior of the database is to disconnect after the execution of a query You are still subject to an overalldatabase connection timeout if you session connection exceeds the permitted database setting
664 Find and Replace
Ctrl+F (Windows) or Command+F (Mac) will bring up the find and replace box as shown below
67 Interacting with Query Results
Once your query has been executed you can use the features of the result grid to interact with the result set The typicalactions you will do are listed below
bull Reordering the Result Grid
bull Sorting the Result Grid
bull Filtering the Result Grid
bull Exporting results to CSV
671 Reordering the Result Grid
Once a query has executed successfully you may rearrange the columns in the Result Grid in order to more effectivelyperform subsequent analyses Rearranging the Result Grid is simple simply click hold and drag the column headerfor the column you wish to move As you move it left or right the grid will automatically adjust to reposition thecolumn
56 Chapter 6 Using the Query Panel in Aginity Team
Aginity Team Documentation Release 1
Once you are satisfied with the new position of the column you may release the drag and the column will lock intoplace
672 Sorting the Result Grid
After successfully executing a query if the query has returned any rows you may sort the results in order to permitvarious types of analysis of your results
In order to sort your results simply click on the header row in the results grid If the results are already being sortedby that column then the sort order will toggle between ascending and descending
67 Interacting with Query Results 57
Aginity Team Documentation Release 1
673 Filtering the Result Grid
Data in the Result Grid may be filtered to make it easier to locate and analyze certain subsets of the resultant datawithout requiring you to submit an entirely separate query
To filter the result grid by values in a particular column bring your mouse cursor to the column header for the columnto which you wish to apply a filter In the right-hand side on the header row the filter icon (three horizontal bars) willappear Click on the filter icon and you will be presented with a pop-up menu that will allow you to enter your filtercriteria
By default the filter criteria will select a ldquoContainsrdquo filter but several other filter types exist and you may select anyof them Once you have selected the filter type you wish to apply type the filter into the text box The results willimmediately begin to filter
58 Chapter 6 Using the Query Panel in Aginity Team
Aginity Team Documentation Release 1
When a column is being filtered a funnel icon will appear in its header To remove the filter you may re-enter thefilter mode by clicking on the filter icon (three bars) in the header row and simply delete the filter text
Multiple columns may have active filters at the same time To accomplish this simply perform these steps on eachcolumn
674 Exporting results to CSV
Once you have successfully executed a query you can elect to export those results in Comma Separated Value (CSV)format to a file outside of Aginity Team To do this right-click anywhere in the results panel Doing this will displaya context menu from which you will select the option ldquoExport to CSVrdquo
After selecting this option you will be presented with a screen that permits you to select the location to which to saveyour results Once you have identified the proper location press the Save button to complete the export
CSV files may subsequently be imported into a large number of different programs for further review and analysis
See also
bull Adding Query to Catalog
bull Using Discovery Panel
67 Interacting with Query Results 59
Aginity Team Documentation Release 1
60 Chapter 6 Using the Query Panel in Aginity Team
CHAPTER 7
Using the Catalog in Aginity Team
71 Catalog Overview
The query catalog is a unique capability of Aginity Team allowing you to easily save manage and use items stored init Letrsquos start with browsing the catalog
The catalog is organized by any number of directories and sub-directories of queries as shown below
See also
61
Aginity Team Documentation Release 1
Click Read this article for some ideas on how to best organize your catalog
Queries are given friendly names and can be used or accessed in several ways The first way is to drag the catalogquery into a query panel as shown in the two images below
Fig 1 You can drag the query into the empty query panel
You can also edit queries within a query panel By right clicking on a catalog item and choosing edit code in tab youcan change the SQL itself
62 Chapter 7 Using the Catalog in Aginity Team
Aginity Team Documentation Release 1
Fig 2 After you drag the item it will present the full catalog query for edit or execution
71 Catalog Overview 63
Aginity Team Documentation Release 1
You can edit and save the catalog query in a query panel worksheet as shown below
64 Chapter 7 Using the Catalog in Aginity Team
Aginity Team Documentation Release 1
Hint If you see a next to the tab name in the query panel it means a change has not been saved
By editing the details of a catlaog query you can see key metadata items and statistics about the catalog
71 Catalog Overview 65
Aginity Team Documentation Release 1
72 Calling Catalog Items from SQL
One of the most innovative features of Aginity Team is the ability to call catalog items from within SQL statements
The video and following examples below will give you basic syntax required to call a catalog item
66 Chapter 7 Using the Catalog in Aginity Team
Aginity Team Documentation Release 1
721 Single SQL SELECT Statement
In this example we have a single SQL SELECT statement in the catalog called OrderAverage
This is the code in the Catalog
1 SELECT AVG(LineTotal)2 FROM salesSalesOrderDetail
To call this from the query panel you would issue the following command Note the highlighted reference to the objectin the catalog
1 SELECT 2 FROM (OrderAverage) a
This is the code passed to the database
1 SELECT 2 FROM (3 SELECT AVG(lineTotal)4 FROM SalesSalesOrderDetail5 ) a
722 Using Catalog Item to Facilitate Relationships
In this example we will predefine a join in the catalog called ClientAddress and then use it in the context of anotherSQL statement
This is the code in the Catalog
1 clients c2 JOIN addresses a3 ON cclientsid = aclientsid
To call this from the query panel you would issue the following command Note the highlighted reference to the objectin the catalog
1 SELECT 2 FROM ClientAddress
This is the code passed to the database
1 SELECT 2 FROM clients c3 JOIN addresses a4 ON cclientsid = aclientsid
723 Creating and Reusing Calculations
In this example we will predefine a Calculations in the catalog called Residual and then use it in the context of anotherSQL statement
This is the code in the Catalog
72 Calling Catalog Items from SQL 67
Aginity Team Documentation Release 1
1 1-total
To call this from the query panel you would issue the following command Note the highlighted reference to the objectin the catalog
1 SELECT item2 Residual3 FROM table
This is the code passed to the database
1 SELECT item2 1-total3 FROM table
724 Executing a Multi-Step script
In this example we will predefine a series of SQL statements in the catalog called DailyRun and then execute it by asingle call Any DML (SELECT CREATE UPDATE INSERT DELETE) can be used
This is the code in the Catalog
1 CREATE TABLE xyz AS2 CREATE TABLE abc AS3 SELET FROM xyz JOIN abc
To call this from the query panel you would issue the following command Note the highlighted reference to the objectin the catalog
1 DailyRun
This is the code passed to the database
1 CREATE TABLE xyz AS2 CREATE TABLE abc AS3 SELECT FROM xyz JOIN abc
725 Using Parameters in Catalog
In this example we will use a parameter within a catalog item called CitySelect
This is the code in the Catalog Note the highlighted line has the parameter in it
1 SELECT 2 FROM addresses3 WHERE city = $city
To call this from the query panel you would issue the following command Note the highlighted reference to the objectin the catalog
1 CitySelect
This is the code passed to the database
68 Chapter 7 Using the Catalog in Aginity Team
Aginity Team Documentation Release 1
1 SELECT 2 FROM addresses3 WHERE city = Chicago
Note Upon execution of the command Aginity Team will ask you to supply a parameterized value For moreinformation on parameters see Using Parameters
73 Adding Items to Catalog
To add a new query to the catalog highlight any part of a SQL statement(s) right click and select Save selection tocatalog as shown below
Once you save you will be asked to provide metadata about the query you are adding
73 Adding Items to Catalog 69
Aginity Team Documentation Release 1
Note It is important to fill out the description metadata as it will be used in searching The more information youprovide about the context of usage key business terms and intended usage the better search results you will get
You can also easily create new folders in the catalog or add SQL entries directly from the Catalog Browser by clickingthe (+) to the right of the Catalog header
When adding a new folder you will be presented with a basic text box to create your folder as shown below
74 Import and Export Items from Catalog
You have the ability to Import and Export both your full catalog as well as any folder selected within the catalog
Note We highly recommend taking regular exports of your catalog to disk to prevent accidental loss of queries
741 Export Steps
To Export your catalog start by either Right Clicking on a Catalog Folder or Using the Aginity Pro -gt Export Catalogmenu as shown below
70 Chapter 7 Using the Catalog in Aginity Team
Aginity Team Documentation Release 1
Your first step is to save either an entire folder or a selection of items within a folder
The final step in exporting is to name the file and location you will save to as shown below
742 Import Steps
Importing is valuable for several reasons One is to restore SQL catalog items you may have lost or more importantlythe ability to collaborate with other SQL developers and share your SQL making your a more efficient and consistentSQL developer
74 Import and Export Items from Catalog 71
Aginity Team Documentation Release 1
The first step is to Right Click on a folder you want to import to and Chooose Import Catalog as shown below
Note You can also use the Aginity Pro Menu -gt Import Catalog The main difference between using these twocapabilities is the context of where you are importing items If you choose to import from the Aginity Pro menu youmust set the context where to import If you Right Click on a folder the context is set to that folder
After choosing to import you will choose the file to import By default Aginity catalog files have the extensionaginitypkg
After choosing your file you can specify the folder to import to and what to import as shown below
72 Chapter 7 Using the Catalog in Aginity Team
Aginity Team Documentation Release 1
Hit the Import button and your queries should be imported
See also
Aginity also maintains a Github repository of Catalog queries to be used These queries are either administrativequeries for specific platforms data engineering queries that do powerful transformations against generic data or ana-lytic queries showing how to do cool things in SQL
Access the repositories here
See also
Using Query Panel
74 Import and Export Items from Catalog 73
Aginity Team Documentation Release 1
74 Chapter 7 Using the Catalog in Aginity Team
CHAPTER 8
Using Discovery Panel in Aginity Team
The Discovery Panel is a feature that is unique to Aginity Team and which allows you to quickly identify and reusecode that yoursquove previously executed or saved Using the Discovery Panel begins with a search Watch the videobelow to get a sense for how this feature works
By default the Discovery Panel allows you to search both your query execution history and your Pro Catalog at thesame time However by selecting one of the radio buttons in the Discovery Panel you can choose to focus on just oneor the other if you prefer
81 Searching Query Execution History
Start by typing in any free-text you want such as Sales as shown Below
75
Aginity Team Documentation Release 1
The search engine will do a full text search and display all results
82 Searching the Amp Pro Catalog
Buy clicking on the Catalog radio button you will restrict your search as shown below
83 Expanding the results
Once you have performed a search Amp Pro will dynamically update the results in the Discovery Panel to match thesearch term you have entered Yoursquoll be able to view a small amount of the query by default but if more is requiredyou can click on the arrows in the corner of the preview in order to expand the snippet further
84 Doing More with the Discovery Panel
A place holder for advanced filtering capabilities
76 Chapter 8 Using Discovery Panel in Aginity Team
CHAPTER 9
Reference
91 Video Reference
The following is a reference list of videos about Aginity Team and how to use its features
bull
bull
bull
bull
bull
bull
92 Shortcut Key Reference
Command ActionCommand K + C (Mac) or Ctrl K + C (Windows) Comment lines of codeCommand K + U (Mac) or Ctrl K + U (Windows) Uncomment lines of codeCommand F (Mac) or Ctrl F (Windows) Find and Replace Menu
93 Frequently Asked Questions
The section below is dedicated to commonly asked questions that we compile and provide answers to Over time asthings change we will keep this table up to date
77
Aginity Team Documentation Release 1
931 What Control do I have with Row Limit Preference
By default we cap the row limit preference to 100K rows to discourage users from spooling too much data across yournetwork Trust us your network infrastructure folks do appreciate it Fear not though you have options First if youset the preference to 0 it will spool as much as you want until either you run out of memory or your query completesAlternatively we recommend spooling the output to a file if you are doing returns greater than 100K rows Refer tothe documentation on execute query to file
94 SQL Reference Guides for Supported connections
As SQL developers ourselves we thought putting links to the databases we support in our documentation was a goodidea so here they are
bull
bull
bull
bull
95 Driver Support Reference
The table below is a cross reference of driver versions by platform
Platform Driver Version Class NameNetezza Not distributed with software
(nzjdbcjar)orgnetezzaDriver
SQL Server 720 jre8 commicrosoftsqlserverjdbcSQLServerDriverRedshift 12161027 comamazonredshiftjdbcDriverGreenplum and Post-gres
4225 orgpostgresqlDriver
Hive 121 orgapachehivejdbcHiveDriverSnowflake 3623 3628 355 netsnowflakeclientjdbcSnowflakeDriverIBM DB2 Warehouse db2jcc4 comibmdb2jccDB2Driver
78 Chapter 9 Reference
CHAPTER 10
Troubleshooting
This page is dedicated to common issues or errors you may encounter when using Aginity Team We recommend youalso post any new issues or questions to our Aginity Team Forum
The is a great resource for posting questions searching for common solutions to features of Pro or just learning howto be efficient as a SQL analytic developer through samples best practices and collaboration with other Pro users
Is-sueNum-ber
Isthis aDe-fect
Source of Error Description of Error Resolution
1 No Cannot DownloadDrivers via Con-nection Screen
In most cases your organization isblocking Aginityrsquos ability to downloaddrivers from a Maven repository
Follow directions in the Config-ure Connections documentationto Manually Add Drivers
79
Aginity Team Documentation Release 1
80 Chapter 10 Troubleshooting
CHAPTER 11
End User License for Aginity Team
Click here for end users license
81
- Administering Aginity Team
-
- Deploying Aginity Team through AWS Marketplace
- Installing Aginity Team on Linux
- Upgrading Aginity Team
- Backing Up or Restoring Team Catalog
-
- Creating Users in Aginity Team
-
- Administering Users
-
- Enabling Snowflake OAuth in Aginity Team
- Configuring Connections in Aginity Team
-
- Downloading Drivers
- Setting up Netezza Connections
- Setting up Redshift Connections
- Setting up Snowflake Connections
- Setting up Hive Connections
- Setting up SQL Server Connections
- Setting up DB2 Warehouse Server Connections
- Setting up Greenplum and Postgres Connections
- Import and Exporting Connections
-
- Using the Database Explorer in Aginity Team
-
- Viewing the Database Data Dictionary
- Database Object Support by Platform
- Quick Actions from Explorer
-
- Using the Query Panel in Aginity Team
-
- Writing your First Query
- Executing to a File
- Using Parameters in your Query
- Auto-Complete Capabilities
- Snippet support
- Common Actions in Query Panel
- Interacting with Query Results
-
- Using the Catalog in Aginity Team
-
- Catalog Overview
- Calling Catalog Items from SQL
- Adding Items to Catalog
- Import and Export Items from Catalog
-
- Using Discovery Panel in Aginity Team
-
- Searching Query Execution History
- Searching the Amp Pro Catalog
- Expanding the results
- Doing More with the Discovery Panel
-
- Reference
-
- Video Reference
- Shortcut Key Reference
- Frequently Asked Questions
- SQL Reference Guides for Supported connections
- Driver Support Reference
-
- Troubleshooting
- End User License for Aginity Team
-