aim user manual mychron5/2t management using race studio 3 ... · pdf file1 –...
TRANSCRIPT
AiM USER Manual
MyChron5/2T management using Race Studio 3
Release 1.00

1
1 – Introduction
MyChron5 has been designed to be mainly configured using the keyboard. Some operations can be performed using Race Studio 3:
• PC connection • Firmware update • Track lists management • Custom settings and logo management • Live Measures visualization and calibration • Data download • Odometers reset and enabling/disabling
2 – PC Connection via Wi-Fi
MyChron5 connection to PC is to be carried out using Wi-Fi. This can happen in two ways:
• directly from PC (image below on the left): o clic “Network and sharing center” o select your MyChron5 (by its serial number) o clic “Connect”
• via Race Studio 3 software (image below on the right) o clic the Wi-Fi icon o select your MyChron5 (by its serial number) o clic “Connect”
2
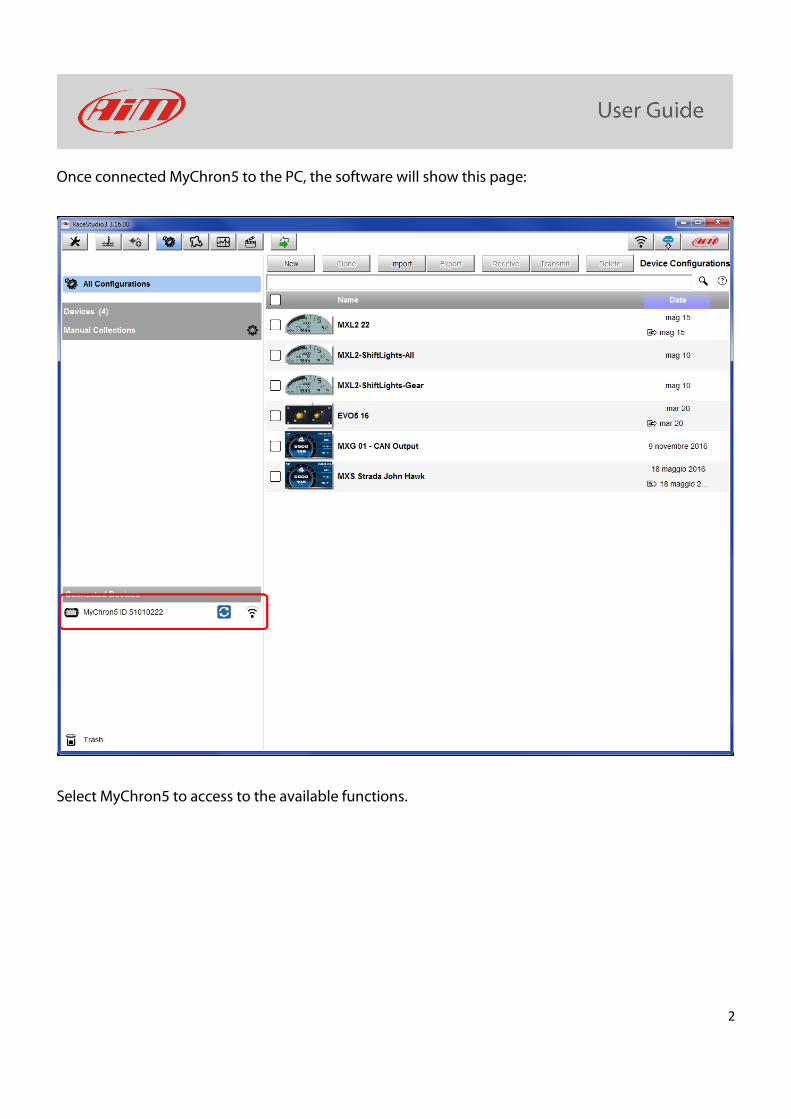
Once connected MyChron5 to the PC, the software will show this page:
Select MyChron5 to access to the available functions.
3
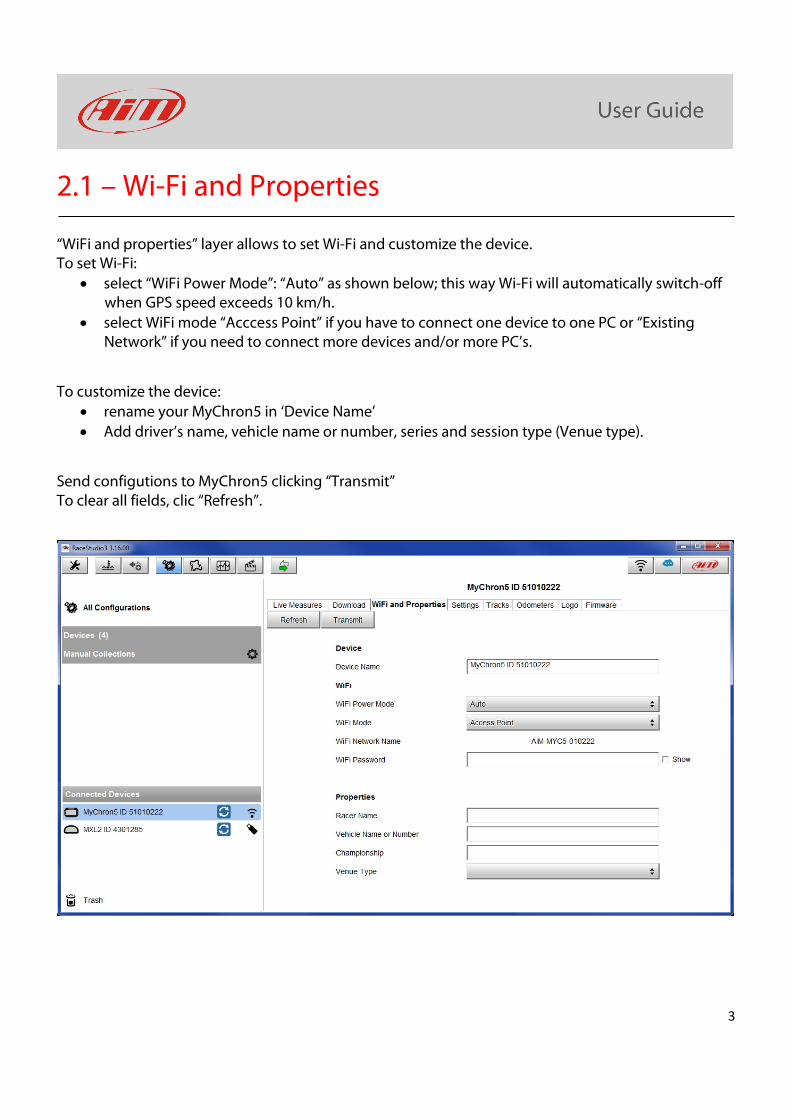
2.1 – Wi-Fi and Properties
“WiFi and properties” layer allows to set Wi-Fi and customize the device. To set Wi-Fi:
• select “WiFi Power Mode”: “Auto” as shown below; this way Wi-Fi will automatically switch-off when GPS speed exceeds 10 km/h.
• select WiFi mode “Acccess Point” if you have to connect one device to one PC or “Existing Network” if you need to connect more devices and/or more PC’s.
To customize the device: • rename your MyChron5 in ‘Device Name’ • Add driver’s name, vehicle name or number, series and session type (Venue type).
Send configutions to MyChron5 clicking “Transmit” To clear all fields, clic “Refresh”.
4
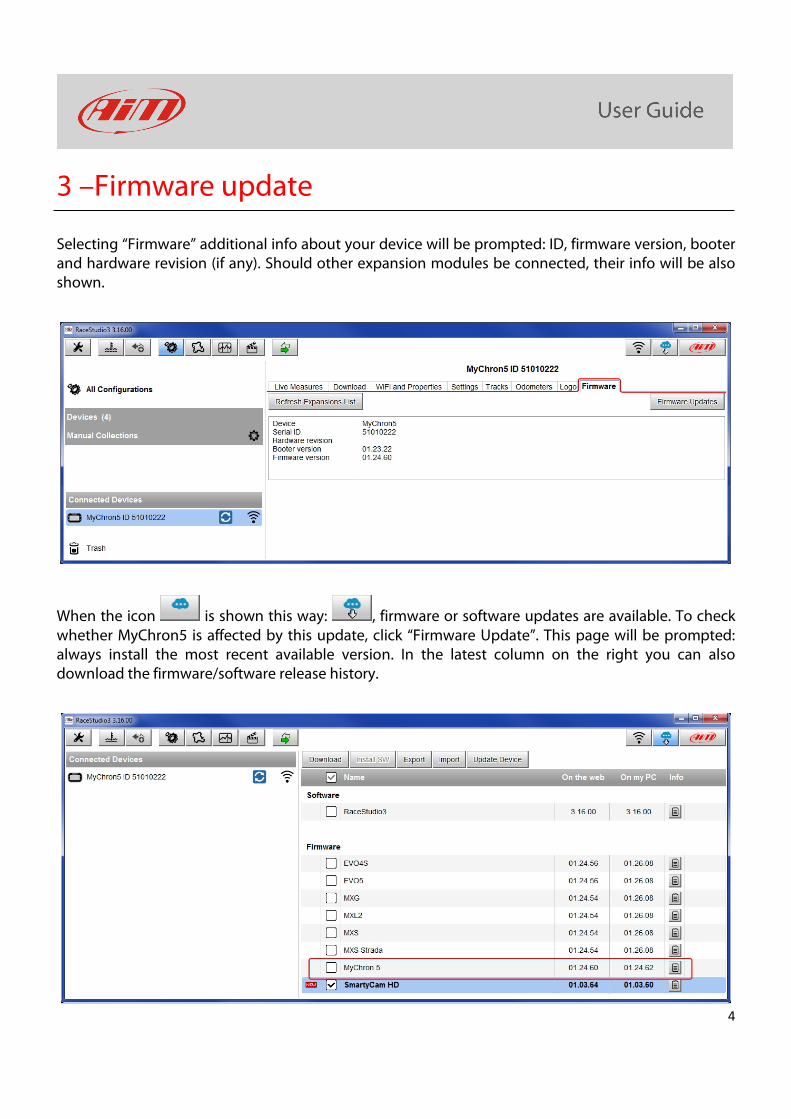
3 –Firmware update
Selecting “Firmware” additional info about your device will be prompted: ID, firmware version, booter and hardware revision (if any). Should other expansion modules be connected, their info will be also shown.
When the icon is shown this way: , firmware or software updates are available. To check whether MyChron5 is affected by this update, click “Firmware Update”. This page will be prompted: always install the most recent available version. In the latest column on the right you can also download the firmware/software release history.
5
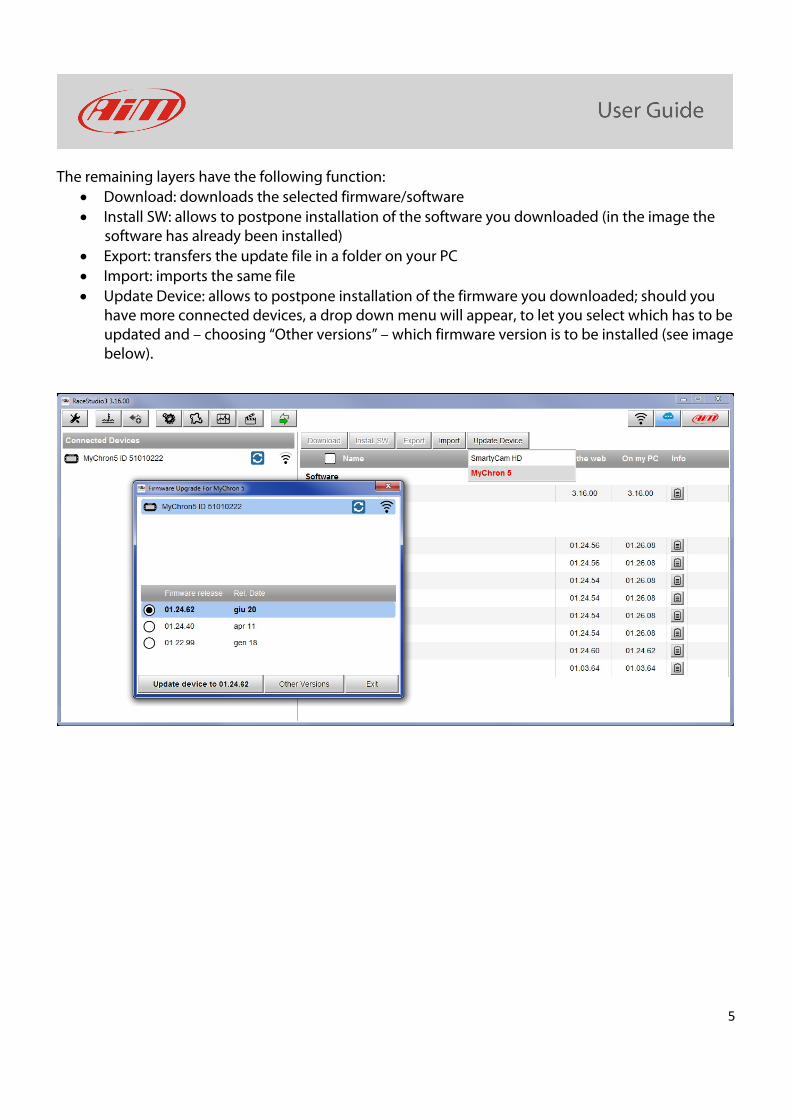
The remaining layers have the following function: • Download: downloads the selected firmware/software • Install SW: allows to postpone installation of the software you downloaded (in the image the
software has already been installed) • Export: transfers the update file in a folder on your PC • Import: imports the same file • Update Device: allows to postpone installation of the firmware you downloaded; should you
have more connected devices, a drop down menu will appear, to let you select which has to be updated and – choosing “Other versions” – which firmware version is to be installed (see image below).
6
4 – Available Tracks
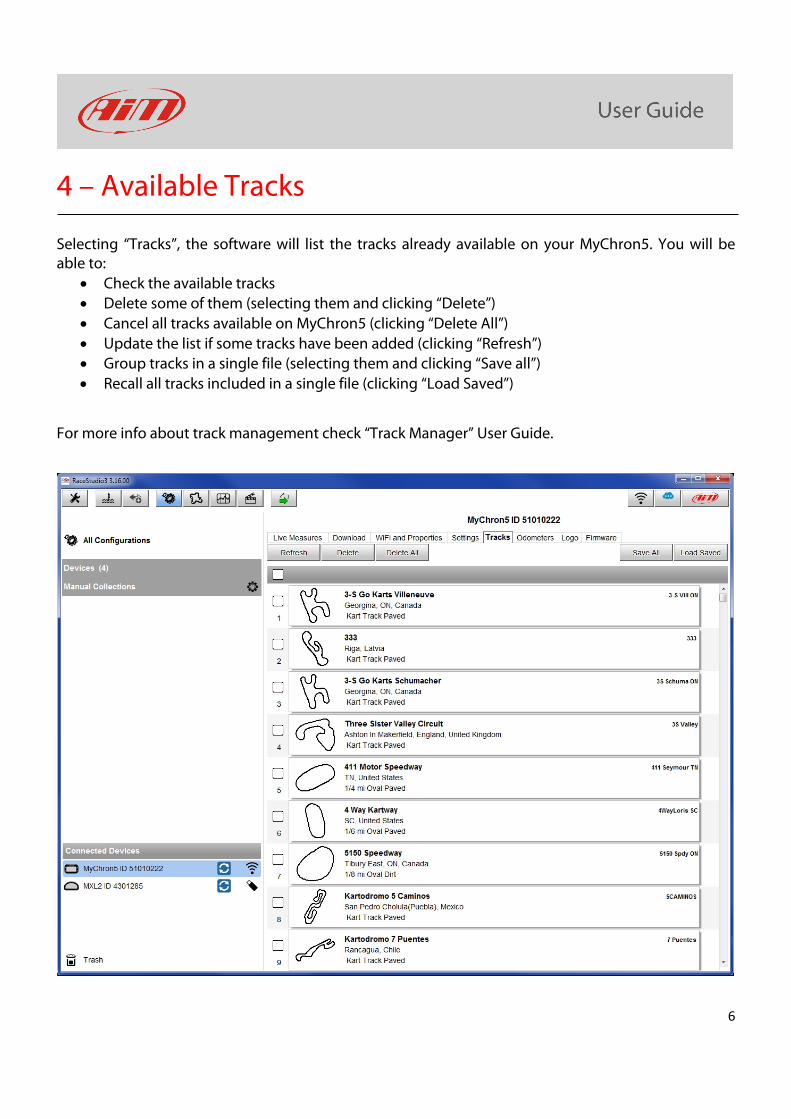
Selecting “Tracks”, the software will list the tracks already available on your MyChron5. You will be able to:
• Check the available tracks • Delete some of them (selecting them and clicking “Delete”) • Cancel all tracks available on MyChron5 (clicking “Delete All”) • Update the list if some tracks have been added (clicking “Refresh”) • Group tracks in a single file (selecting them and clicking “Save all”) • Recall all tracks included in a single file (clicking “Load Saved”)
For more info about track management check “Track Manager” User Guide.
7
5 – Logo management
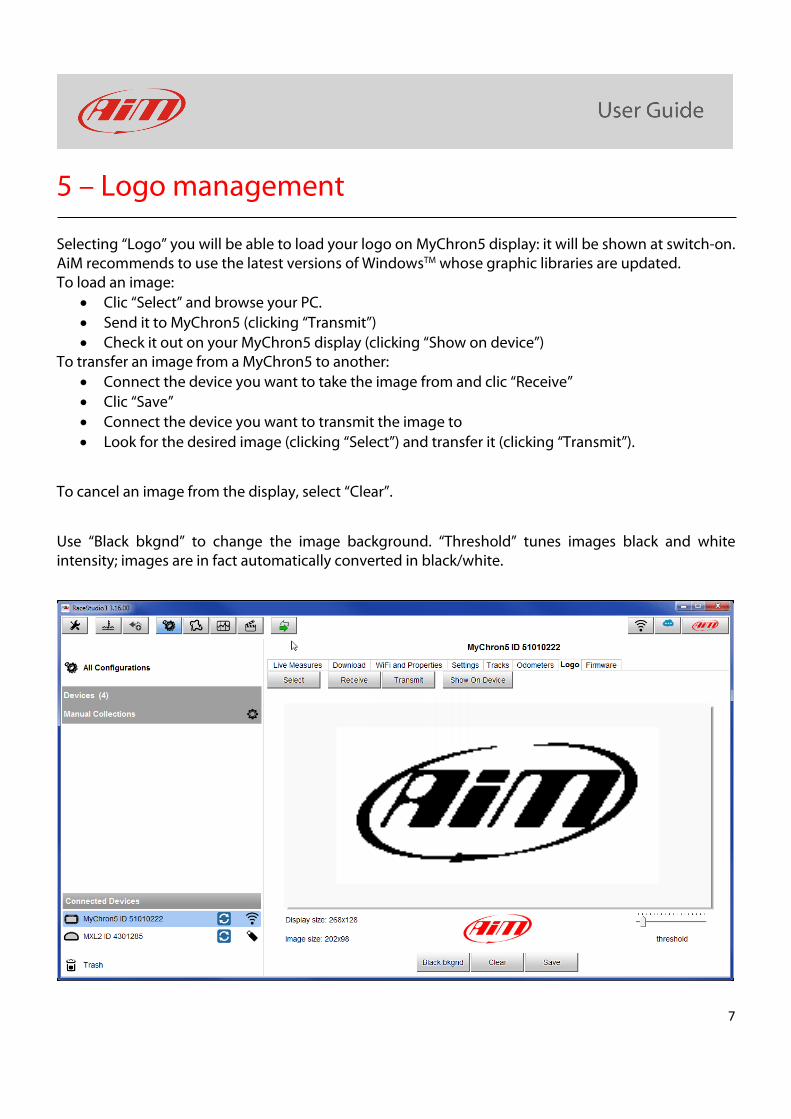
Selecting “Logo” you will be able to load your logo on MyChron5 display: it will be shown at switch-on. AiM recommends to use the latest versions of WindowsTM whose graphic libraries are updated. To load an image:
• Clic “Select” and browse your PC. • Send it to MyChron5 (clicking “Transmit”) • Check it out on your MyChron5 display (clicking “Show on device”)
To transfer an image from a MyChron5 to another: • Connect the device you want to take the image from and clic “Receive” • Clic “Save” • Connect the device you want to transmit the image to • Look for the desired image (clicking “Select”) and transfer it (clicking “Transmit”).
To cancel an image from the display, select “Clear”.
Use “Black bkgnd” to change the image background. “Threshold” tunes images black and white intensity; images are in fact automatically converted in black/white.
8
6 – Live Measures
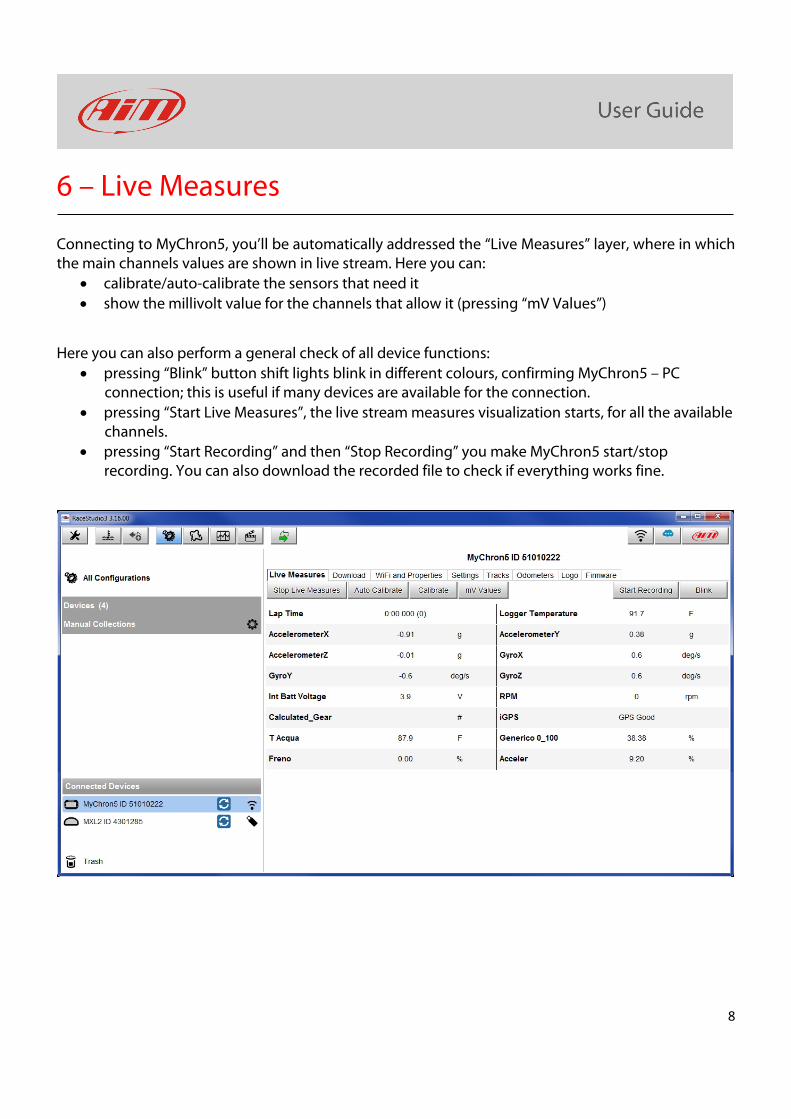
Connecting to MyChron5, you’ll be automatically addressed the “Live Measures” layer, where in which the main channels values are shown in live stream. Here you can:
• calibrate/auto-calibrate the sensors that need it • show the millivolt value for the channels that allow it (pressing “mV Values”)
Here you can also perform a general check of all device functions: • pressing “Blink” button shift lights blink in different colours, confirming MyChron5 – PC
connection; this is useful if many devices are available for the connection. • pressing “Start Live Measures”, the live stream measures visualization starts, for all the available
channels. • pressing “Start Recording” and then “Stop Recording” you make MyChron5 start/stop
recording. You can also download the recorded file to check if everything works fine.
9
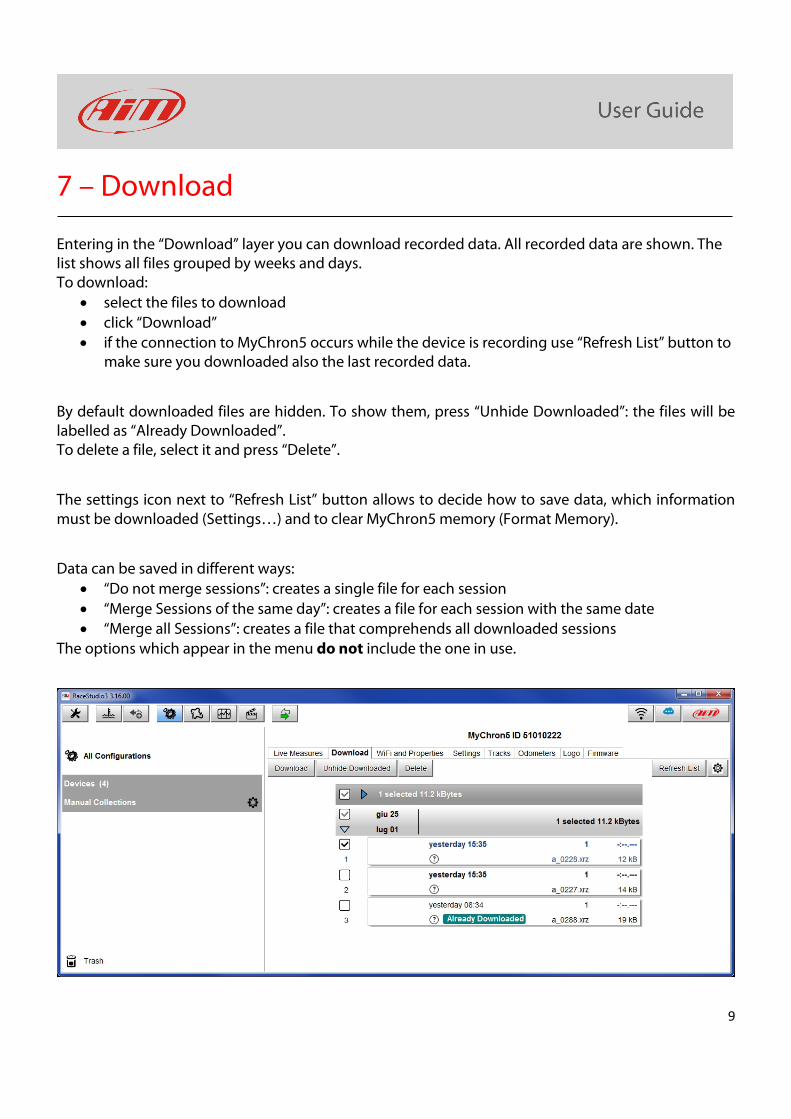
7 – Download
Entering in the “Download” layer you can download recorded data. All recorded data are shown. The list shows all files grouped by weeks and days. To download:
• select the files to download • click “Download” • if the connection to MyChron5 occurs while the device is recording use “Refresh List” button to
make sure you downloaded also the last recorded data.
By default downloaded files are hidden. To show them, press “Unhide Downloaded”: the files will be labelled as “Already Downloaded”. To delete a file, select it and press “Delete”.
The settings icon next to “Refresh List” button allows to decide how to save data, which information must be downloaded (Settings…) and to clear MyChron5 memory (Format Memory).
Data can be saved in different ways: • “Do not merge sessions”: creates a single file for each session • “Merge Sessions of the same day”: creates a file for each session with the same date • “Merge all Sessions”: creates a file that comprehends all downloaded sessions
The options which appear in the menu do not include the one in use.

10
To choose the information to download, select “Settings…” option:

11
The panel that shows up features four layers: • Download Data (image below on the left): this layer has two sub-layers:
o Folder Structure: default root folder is shown in the upper zone; to change it press “Change…”; by selecting each session data, the software automatically builds every sub-folder. Enable “Copy downloaded data to another folder” checkbox to do so
o File Name: as for the previous layer, file name is shown in the upper zone and it is possible to modify it by selecting/unselecting the available fields.
• Download Movies (image below on the right): it works as the previous one; if the user wants to use the same settings, enable “use same settings as Download Data” field.
12
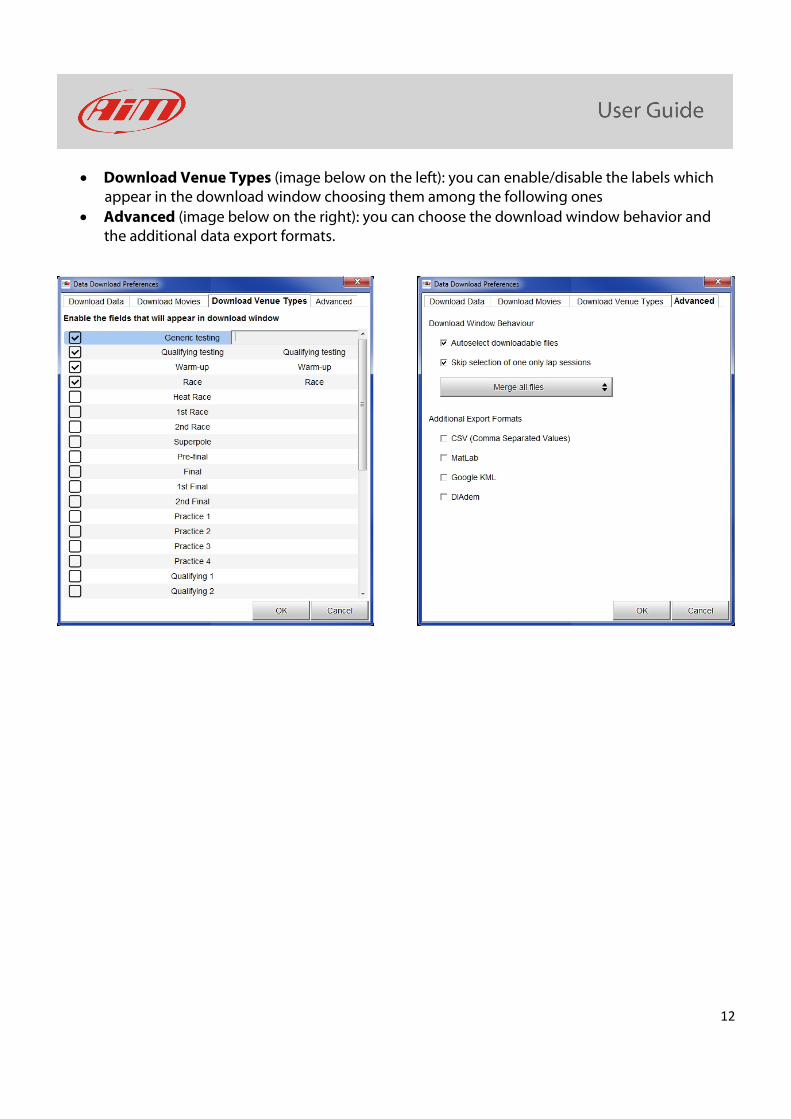
• Download Venue Types (image below on the left): you can enable/disable the labels which appear in the download window choosing them among the following ones
• Advanced (image below on the right): you can choose the download window behavior and the additional data export formats.
13
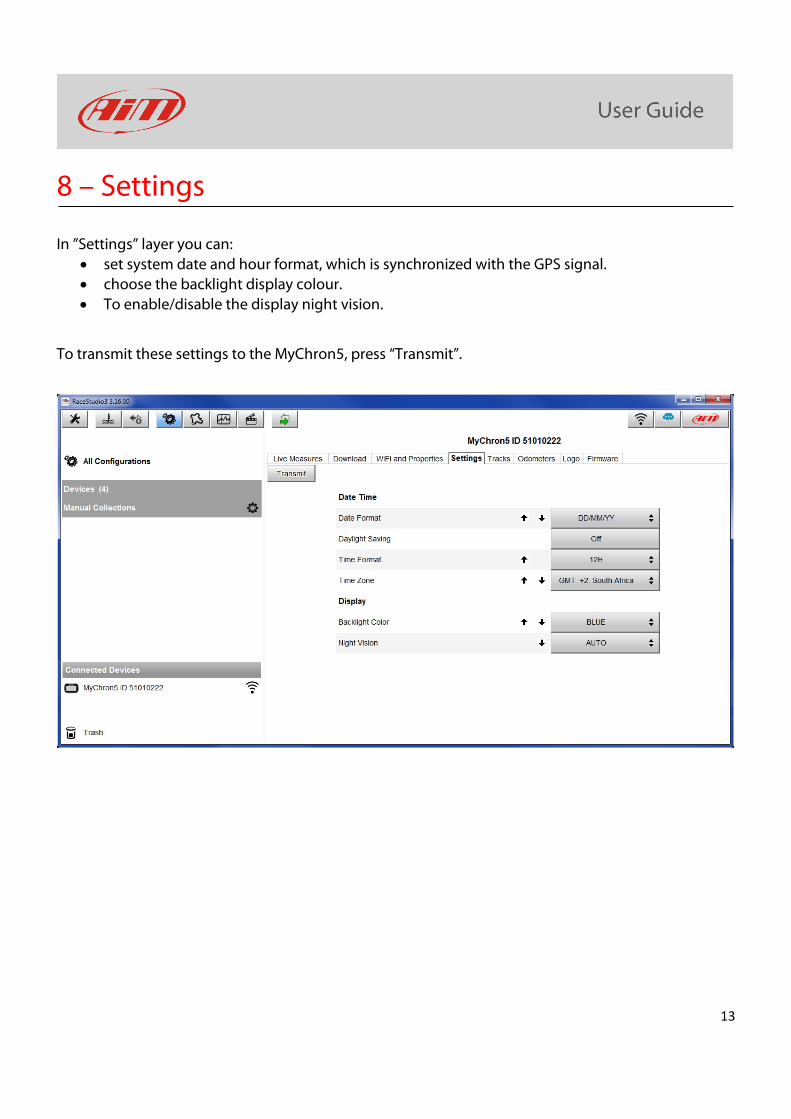
8 – Settings
In ”Settings” layer you can: • set system date and hour format, which is synchronized with the GPS signal. • choose the backlight display colour. • To enable/disable the display night vision.
To transmit these settings to the MyChron5, press “Transmit”.
14
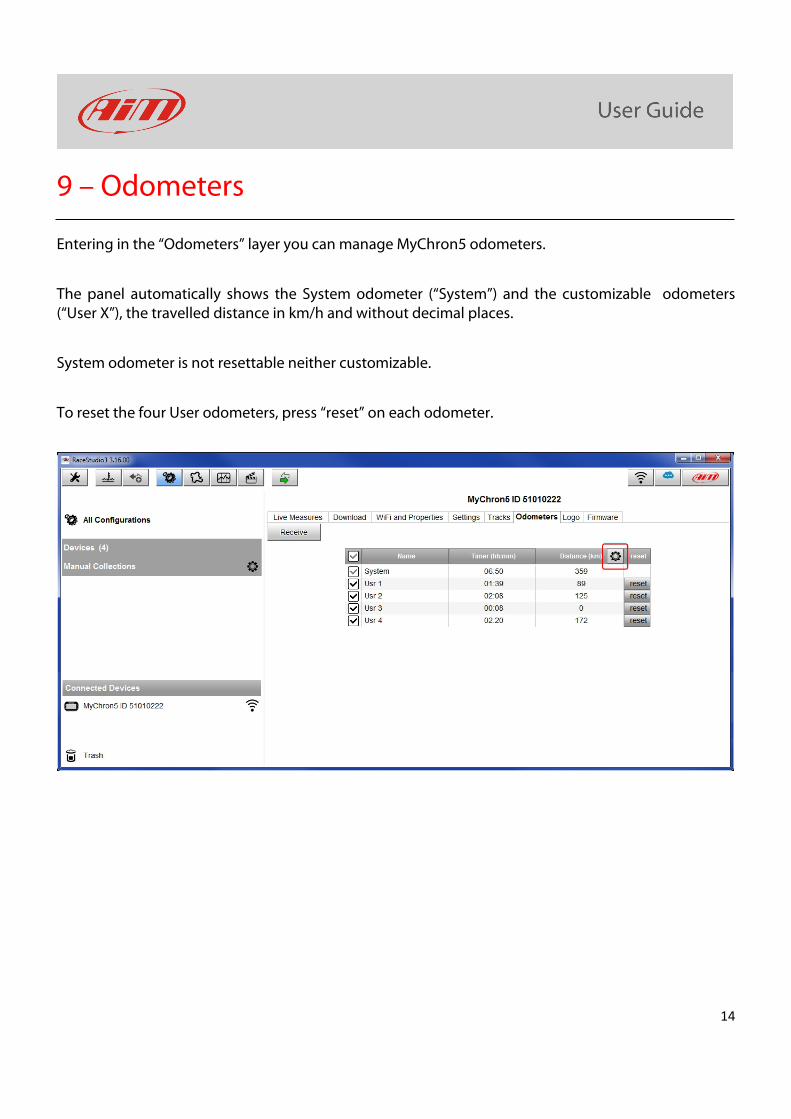
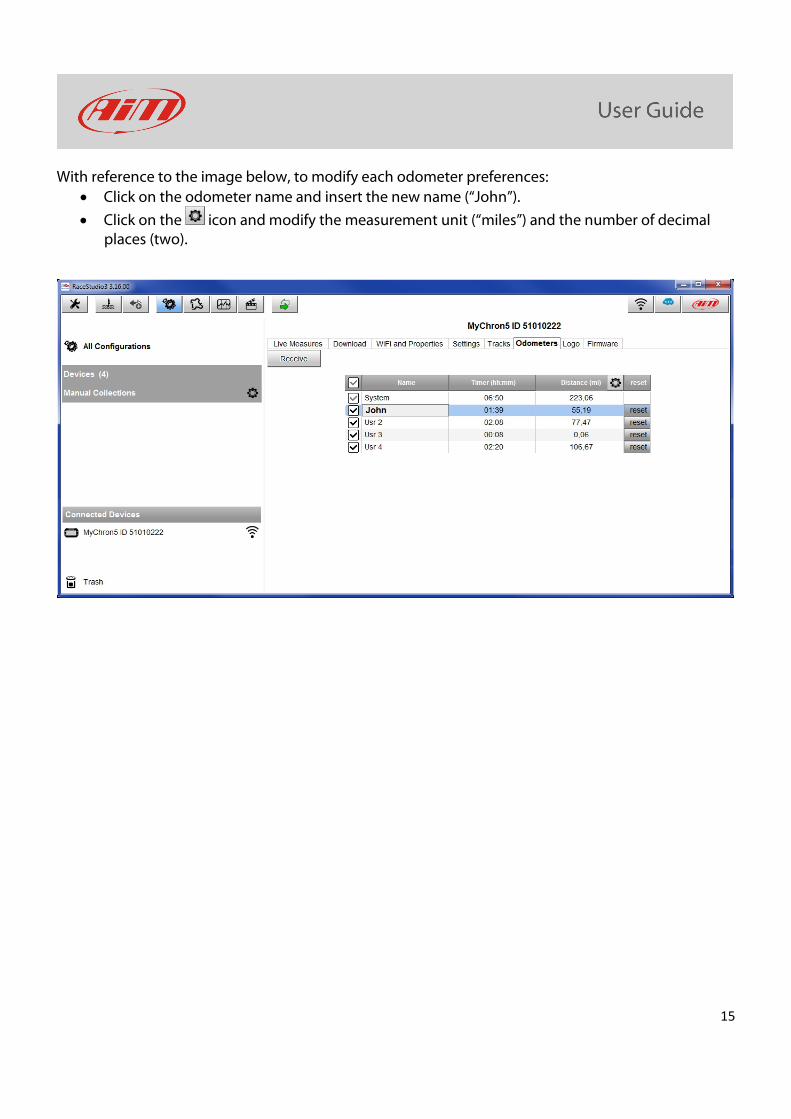
9 – Odometers
Entering in the “Odometers” layer you can manage MyChron5 odometers.
The panel automatically shows the System odometer (“System”) and the customizable odometers (“User X”), the travelled distance in km/h and without decimal places.
System odometer is not resettable neither customizable.
To reset the four User odometers, press “reset” on each odometer.
15
With reference to the image below, to modify each odometer preferences: • Click on the odometer name and insert the new name (“John”). • Click on the icon and modify the measurement unit (“miles”) and the number of decimal
places (two).

16
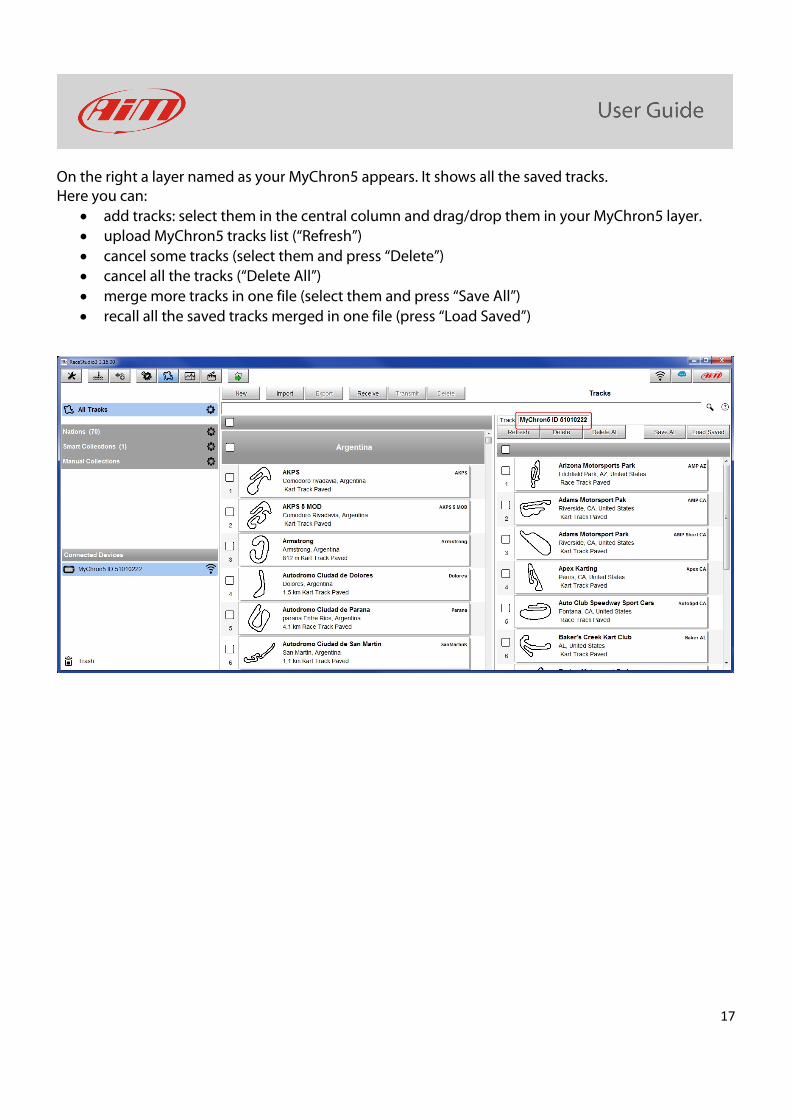
10 – Tracks management
To upload tracks on MyChron5 follow these steps: • switch MyChron5 on and connect it to the pc. • run Race Studio 3 • press “Tracks” and track manager page opens:
o on the left the connected MyChron5 is shown o in the central column all the tracks saved in Race Studio 3 database are shown o on the right you see the information about the track you are mousing over
Click on your device to show the tracks you saved there.
17
On the right a layer named as your MyChron5 appears. It shows all the saved tracks. Here you can:
• add tracks: select them in the central column and drag/drop them in your MyChron5 layer. • upload MyChron5 tracks list (“Refresh”) • cancel some tracks (select them and press “Delete”) • cancel all the tracks (“Delete All”) • merge more tracks in one file (select them and press “Save All”) • recall all the saved tracks merged in one file (press “Load Saved”)