air quality system precision and accuracy data transaction
TRANSCRIPT

1
Air Quality SystemPrecision and Accuracy Data Transaction Generator
(AQSP&A)
Training SessionTraining Session

2
Air Quality SystemPrecision and Accuracy Data Transaction Generator
(AQSP&A)
Training SessionTraining Session

3
Overview of AQSP&A
BackgroundSetting up the applicationFunctionalityQuestions
This training course will cover these topics.

4
Background
How does AQSP&A fit in with AQS?
Hardware and Operating Systems
How does AQSP&A fit in with AQS?•AQSP&A is an Excel workbook that generates the 2 transactions for Precision and Accuracy data (The RA transaction and the RP transaction). •Visual Basic for Applications (VBA) is used to automate validations, look ups, and generation of transaction files.•Use of drop down lists, and look-ups of valid monitors helps simplify transaction creation. •AQSP&A is not a stand-alone database; it is not designed to store data and generate reports.
AQSP&A contains “reference” worksheets of valid monitors, valid protocol combinations (parameter, method, unit, sampling duration) and valid code values for several different fields on the RA and RP transactions. These reference worksheets are loaded from the AQS database and updated each time a new release is posted. The reference worksheets allow the spreadsheet to look up code values and validate fields on the transactions as they are generated.
The purpose of AQSP&A is to make it easier for you to create Precision and Accuracy transactions by providing lookups of valid monitors and codes, and their descriptions. An Excel application is used because we thought it was one of the most universal and understood products available to Agencies.
Hardware and Operating SystemsAQSP&A runs on Windows 98, 2000, or XP operating systems.
Files can be opened with Excel 97, Excel 2000, Excel XP (2002), and Excel 2003.

5
Background
What do RA and RP Transactions look like?
RA|I|30|013|0001|42101|1|1|1|007|093|||20060401|AUDIT AND CERT BY RO|LAMINAR FLOW ELEMENT|ANALYTICAL|PE||||5|5|18|18|37|37|||||
RP|I|30|013|0001|42101|1|1|1|007|093|20060401|5||5|||
This transaction wraps around for display only… it is one continuous text line when submitted to AQS Load.
What do RA and RP Transactions look like?
Transactions are text files that are loaded to AQS from the EPA’s Central Data Exchange (CDX) website. The above form shows files ready to load as they would look in the AQS Batch load form.
Each text file contains transactions, shown below the form.
Fields are separated by the vertical bar delimiter “|” .

6
Setting Up AQSP&A
Load Regional file to your PCOne file for each EPA Region
Setting up AQSP&A
Load file to your PCThe USEPA OAQPS Technology Transfer Network (TTN) website contains a site for AQS. The AQS site has a page for AQSP&A downloads. The AQSP&A Excel files are posted there: one for each EPA Region.
The web address is http://www.epa.gov/ttn/airs/airsaqs/padata/padata.htm

7
Setting Up AQSP&A
Load Regional file to your PCOne file for each EPA Region
One file for each EPA Region
Here is a map showing the EPA regions.

8
Setting Up AQSP&A
Load Regional file to your PCOne file for each EPA Region
www.epa.gov/ttn/airs/airsaqs/padata/padata.htm
Setting Up AQSP&A
This is the website where you will find the 10 EPA regional files.These files are updated on occasion as needed. The version number is included in the file name so that you can tell if you have the most recent file.
An arbitrary file naming convention is used:•Incremented version numbers mean new AQSP&A program code or new code values added by AQS in addition to refreshing look up tables.•Incremented alphabetical characters following the version number mean refreshed look up tables
So if you have added new monitors to AQS, they will be included in the next posted version of AQSP&A. And you can tell when AQSP&A has beenrefreshed by the version number and date.*********************************************************************************************Choose the file for the USEPA Region that your agency resides in.
Each of the 10 files are similar, except that reference worksheets (for lookup data and validation) are loaded with monitor data specific to the screening groups located in the EPA Region.

9
Setting Up AQSP&A
Load Regional file to your PCOne file for each EPA Region
www.epa.gov/ttn/airs/airsaqs/padata/padata.htm
Setting Up AQSP&A
Choose the file for the USEPA Region that your agency resides in.
Each of the 10 files are similar, except that reference worksheets (for lookup data and validation) are loaded with monitor data specific to the screening groups located in the EPA Region.
Note that you can use any of the 10 files; there are no user id or security requirements. However if you create transactions for monitors outside of your screening group, then you will not be able to load them into AQS. They will reject during the AQS batch load.
A User Guide file is also available for downloading under the Manuals and Guides page.

10
Setting Up AQSP&A
Load Regional file to your PCOne file for each EPA Region
Setting Up AQSP&A
To download the file to your PC, click on the filename of the regional AQSP&A file you wish to download.
You will get a “File Download” confirmation window, or something similar depending on which internet browser you are using. The examples on these slides show the Microsoft Internet Explorer file download confirmation window.

11
Setting Up AQSP&A
Load Regional file to your PCOne file for each EPA Region
Setting Up AQSP&A
Specify path and filename, and then click on Save.
Note that this is a zipped file. After saving it, you must unzip it. The zipped file will unzip to one Excel file.
You can rename the Excel file, move, copy, or delete it… similar to any other files on your PC.

12
Setting Up AQSP&A
Load Regional file to your PCOne file for each EPA Region
Enable macros in ExcelSecurity setting = Medium
Setting Up AQSP&A
After downloading the regional file to your PC, the next step is to make sure that macros are enabled in your Excel application.

13
Setting Up AQSP&A
Load Regional file to your PCOne file for each EPA Region
Enable macros in ExcelSecurity setting = Medium
To make sure that macros are enabled, open Excel. (Use the Excel shortcut, rather than clicking on the Excel file).
After you have opened Excel, select Tools / Macro / Security.

14
Setting Up AQSP&A
Load Regional file to your PCOne file for each EPA Region
Enable macros in ExcelSecurity setting = Medium
Setting Up AQSP&A
Select a security level setting of “Medium”. With this setting, Excel will prompt you each time you open a file that contain Macros.
Notes regarding security settings:
Excel security setting of “Low” = no prompt, macros are run.Excel security setting of “Medium” = prompt to enable macros or not.Excel security setting of “High” = no prompt, macros are not run.And for Excel 2003:Excel security setting of “Very High” = no prompt, macros are not run.
A security setting of “High” or “Very High” prevents AQSP&A macros from running and the AQSP&A application will not work. The macros in AQSP&A include Visual Basic for Application (VBA) procedures that run “behind the scenes” to automate the application, including lookups, button functions, data validation, and report creation.

15
Setting Up AQSP&A
Load Regional file to your PCEnable macros in ExcelSet up screening group in AQSP&A
Set up Screening Group in AQSP&A
Open the AQSP&A file with Excel.Enable Macros.The Help worksheet will open, and includes a “Set Up Screening Group” button.

16
Setting Up AQSP&A
Load Regional file to your PCEnable macros in ExcelSet up screening group in AQSP&A
Set Up Screening Group
Click the set up screening group button.Choose one screening group from dialog window.All other monitors and associated reference data will be deleted, leaving only your screening group data.

17
Setting Up AQSP&A
Load Regional file to your PCEnable macros in ExcelSet up screening group in AQSP&A
Set Up Screening Group
Click “OK” on the confirmation window to continue to set up data.

18
Setting Up AQSP&A
Load Regional file to your PCEnable macros in ExcelSet up screening group in AQSP&A
Set Up Screening Group
And click “OK” again to message window.
You will return to the “Help” worksheet

19
Setting Up AQSP&A
Load Regional file to your PCEnable macros in ExcelSet up screening group in AQSP&A
Set Up Screening Group
After clicking “OK” to message window, you will return to the “Help” worksheet.
Notes about screening group set up:
Using the screening group set up button helps to ensure that you build transactions only for the monitors belonging to yourscreening group.
You only run this utility one time.
The “Set Up Screening Group” button does not have to be used. If you want all of the lookup data available for all agencies in the EPA Region, then ignore the “Set Up Screening Group” button.
If you submit precision and accuracy data to AQS for more than one screening group, then you can create copies of the AQSP&A file with different names for each screening group that you use. The AQSP&A files must have different names, of course, or else reside in different directories. Run the Set Up Screening Group utility for each file you have copied and renamed, and choose a different screening group for each copy.

20
AQSP&A Functionality
Workbook Structure7 Worksheets
1 “Help” sheetOne sheet for each transaction type (RA,RP)1 sheet stores coding manual information3 sheets hold look-up data for codes and data validation
AQSP&A Functionality
Workbook StructureThe Workbook contains 7 worksheets:HelpTransactionRATransactionRPCoding ManualValid MethodsCode ValuesAudit Protocols

21
AQSP&A Functionality
Workbook Structure7 Worksheets
1 “Help” sheetOne sheet for each transaction type (RA,RP)1 sheet stores coding manual information3 sheets hold look-up data for codes and data validation
Workbook Structure
The Help worksheet provides a starting point, some embedded help, and the Set Up Screening Group button.
To create accuracy transactions (type RA), use the TransactionRA worksheet.
To create precision transactions, (type RP), use the TransactionRP worksheet.
The Coding Manual worksheet contains entries for fields on transactions RA and RP.
The Valid Methods, Code Values, and Audit Protocols worksheets contain monitors, methods, and code values so that the transaction worksheets can provide automated lookups and validation with Visual Basic for Application (VBA) procedures.
These last 4 worksheets have been left accessible, however users do not need to navigate them to use the application.

22
AQSP&A Functionality
Workbook StructureAdditional Toolbar Commands
Look up MonitorGenerate TransactionsAdd New Monitor / MethodCreate ReportTribal Mode (On/Off)
Additional Toolbar Commands
This application adds 5 new commands to your Excel toolbar. Look up MonitorGenerate TransactionsAdd New Monitor / MethodCreate ReportTribal Mode (On/Off)
We will go over these commands shortly.

23
Using the 2 Transaction Worksheets
Column HeadingsDrop down listsLook Up Monitor buttonRight-click for code valuesData validations
Functionality on the 2 transaction worksheets
Each transaction worksheet has a fixed header area that contains the names of the fields in the order that they appear in the transaction format for the transaction type.
To create a transaction, populate a row with appropriate values in each column. If you want to create multiple transactions, populate multiple rows with the required data.

24
Column Headings
Using the 2 Transaction Worksheets
Functionality on the 2 transaction worksheets - continued
Here is a graphic of the Column Headings
Mandatory fields have black column headings; optional fields have blue headings.
Columns are in the same order as the fields on the transaction formats.
You can look up field definitions by right-clicking the column heading. (I’ll show you that later).

25
Column HeadingsDrop down lists
Using the 2 Transaction Worksheets
Functionality on the 2 transaction worksheets - continued
Drop down lists
For fields that have a set of allowable codes or values, drop down lists will appear in each cell containing the allowable choices when you select the field. Here is list of values for unit codes for the monitor id shown.
The left mouse button is used to select the appropriate value from the list. In all cases, warnings are given if values not on the list are typed in; however you can proceed with those values if so desired.
But if you generate a transaction with non-valid values, you will receive an error when attempting to load the transaction into AQS.

26
Column HeadingsDrop down listsLook Up Monitor button
Using the 2 Transaction Worksheets
Selected cell in “blank” Monitor Id
Functionality on the 2 transaction worksheets - continued
Look Up Monitor button
To use the Look Up Monitor button, you must select a monitor id field in a row with a blank monitor id. Any one of the monitor id fields can be selected.
Then click the Look Up Monitor command button.

27
Column HeadingsDrop down listsLook Up Monitor button
Using the 2 Transaction Worksheets
Functionality on the 2 transaction worksheets - continued
Look Up Monitor button
After clicking the Look Up Monitor command button, a form to select the State, County and Monitor will open.
Make the appropriate selections, and then choose OK on the Add Monitor confirmation window.
(Note that for this example, Set Up Screening Group was not run… the choices include all States in the EPA Region 1)

28
Column HeadingsDrop down listsLook Up Monitor button
Using the 2 Transaction Worksheets
Functionality on the 2 transaction worksheets - continued
Look Up Monitor button
The monitor id is returned to the worksheet.

29
Column HeadingsDrop down listsLook Up Monitor buttonRight-click for code values
Using the 2 Transaction Worksheets
Functionality on the 2 transaction worksheets - continued
Right-click for code values
The right mouse button has been reprogrammed to look up code values.A right click on one of the monitor id fields returns a Monitor Description.

30
Column HeadingsDrop down listsLook Up Monitor buttonRight-click for code values
Using the 2 Transaction Worksheets
Functionality on the 2 transaction worksheets - continued
Right-click for code values
A right click on Column Headings returns the coding manual description.
For example, a right click on Duration Code results in…

31
Column HeadingsDrop down listsLook Up Monitor buttonRight-click for code values
Using the 2 Transaction Worksheets
Functionality on the 2 transaction worksheets - continued
Right-click for code values
The coding manual entry for Duration Code. Click the Return button to go back to the transaction worksheet.

32
Column HeadingsDrop down listsLook Up Monitor buttonRight-click for code values
Using the 2 Transaction Worksheets
Functionality on the 2 transaction worksheets - continued
Right-click for code values
A right click on a code value will return the code description.
For example, a right click on a units code results in…

33
Column HeadingsDrop down listsLook Up Monitor buttonRight-click for code values
Using the 2 Transaction Worksheets
Functionality on the 2 transaction worksheets - continued
Right-click for code values
A message box with the description for unit code 001.
Fields that store code values will have the right-click look up available.

34
Column HeadingsDrop down listsLook Up Monitor buttonRight-click for code valuesData validations
Using the 2 Transaction Worksheets
Functionality on the 2 transaction worksheets - continued
Data Validations
Excel data validations have been created for cells that store date fields and code values.
Validations for Numeric fields and mandatory fields are performed by VBA procedures.

35
Column HeadingsDrop down listsLook Up Monitor buttonRight-click for code valuesData validations
Using the 2 Transaction Worksheets
Functionality on the 2 transaction worksheets - continued
Data Validations
Here is an example of a date field validation error message. A month of “13”was inadvertently entered, and the cell’s data validation formula caught the error.
Invalid dates are the only fields where data entry is stopped on error, and you must fix the date. All other validations result in warnings, so you can either fix the data or you can continue on with the invalid value.
Transactions are text files that can be edited with any word processor, and can easily be changed to include any values you choose. But AQS will validate the data as part of the load process when you submit the transactions, and invalid data will result in failed transaction(s).

36
Column HeadingsDrop down listsLook Up Monitor buttonRight-click for code valuesData validations
Using the 2 Transaction Worksheets
Functionality on the 2 transaction worksheets - continued
Data Validations
Here is an example of a field validation error message for a code value. An invalid code value of “unknown” was typed in for Audit Type. This resulted in a warning message, and you are prompted to fix the invalid value. Note that you could continue with the invalid value if you wished.
To fix the entry you could use the drop-down list of values.

37
Look up MonitorGenerate TransactionsAdd New Monitor / MethodCreate ReportTribal Mode (On/Off)
New Toolbar Commands
New Toolbar Commands
AQSAP&A adds 5 new commands to your Excel toolbar. Look up MonitorGenerate TransactionsAdd New Monitor / MethodCreate ReportTribal Mode (On/Off)

38
Look up MonitorWe discussed the use of this command a few slides ago
New Toolbar Commands
New Toolbar Commands
Look up MonitorAs we have already discussed, this command allows you to
select a monitor from a list of valid monitors in AQS, choosing State-County-Site-Parameter-and POC.
See slide 26.

39
Look up MonitorGenerate Transactions
New Toolbar Commands
New Toolbar Commands
• Generate Transactions
This is the reason for this spreadsheet… to create transactions!

40
Look up MonitorGenerate Transactions
New Toolbar Commands
New Toolbar Commands
• Generate Transactions – cont
This is the command button used to create a text file in AQS input transaction format.

41
Look up MonitorGenerate Transactions
Enter all of the data you want to update to AQS. Each row is one transaction.
New Toolbar Commands
New Toolbar Commands
• Generate Transactions – cont.
Enter all of the data you want to update to AQS. Each row is one transaction.

42
Look up MonitorGenerate Transactions
Highlight at least one cell in each row to generate transactions.
New Toolbar Commands
New Toolbar Commands
• Generate Transactions – cont.
Highlight at least one cell in each row to generate transactions.

43
Look up MonitorGenerate Transactions
Click the Generate Transactions command button.
New Toolbar Commands
New Toolbar Commands
• Generate Transactions – cont.
Click the Generate Transactions command button.

44
New Toolbar Commands
Look up MonitorGenerate Transactions
The transactions will be saved as a text file.
New Toolbar Commands
• Generate Transactions – cont.
The data will be validated. If errors are found, you will receive message prompts asking if you want to continue generating transactions.
After the validation procedure completes, a “Save As” dialog box will prompt you for a path and filename. The transactions will be saved as a text file.

45
New Toolbar Commands
Look up MonitorGenerate Transactions
The transactions will be saved as a text file.
RP|I|09|001|0010|81102|1|1|7|001|062|20060101|25||26|||RP|I|09|001|0010|81102|1|1|7|001|062|20060107|15||13|||RP|I|09|001|0010|81102|1|1|7|001|062|20060113|17||14|||RP|I|09|001|0010|81102|1|1|7|001|062|20060119|4||4|||RP|I|09|001|0010|81102|1|1|7|001|062|20060125|55||55|||RP|I|09|001|0010|81102|1|1|7|001|062|20060231|35||36|||RP|I|09|001|0010|81102|1|1|7|001|062|20060206|39||38|||RP|I|09|001|0010|81102|1|1|7|001|062|20060212|12||13|||RP|I|09|001|0010|81102|1|1|7|001|062|20060218|18||18|||RP|I|09|001|0010|81102|1|1|7|001|062|20060224|26||25|||RP|I|09|001|0010|81102|1|1|7|001|062|20060302|25||25|||RP|I|09|001|0010|81102|1|1|7|001|062|20060308|6||6|||RP|I|09|001|0010|81102|1|1|7|001|062|20060314|8||7|||RP|I|09|001|0010|81102|1|1|7|001|062|20060320|22||22|||RP|I|09|001|0010|81102|1|1|7|001|062|20060326|27||28|||
New Toolbar Commands
• Generate Transactions – cont.
Here are the transactions that were generated.

46
New Toolbar Commands
Look up MonitorGenerate Transactions
Here is an example error listing.
AQSP&A Error Listing for the following file:RP transactions from Jul 5 2006 @03-08-27 PM .txt
Error Messages --------------------------------------------------------
Row # 1, Cols 13 & 15:% difference of 190.2% outside range of ±160%.Row # 6, Col # 12: Invalid PRECISION DATERow # 9, Col # 3 - 7 : Invalid Monitor ID (State-County-Site-Parameter-POC)Row # 9, Col # 15: Invalid INDICATED VALUE
New Toolbar Commands
• Generate Transactions- cont.
If errors were encountered, you will be asked if you want to generate an error listing.
If you want an error listing, then a “Save As” dialog box will prompt you for a path and filename for the error listing.
Here is an example error report.

47
Look up MonitorGenerate TransactionsAdd New Monitor / Method
New Toolbar Commands
New Toolbar Commands
•Add New Monitor / MethodThis is the command button used to add new data to the look up tables so that new monitors, methods, protocols, etc. will be available in the look up and validation procedures.

48
Look up MonitorGenerate TransactionsAdd New Monitor / Method
New Toolbar Commands
New Toolbar Commands
•Add New Monitor / MethodThis is the command button used to add new data to the look up tables so that new monitors, methods, protocols, etc. will be available in the look up and validation procedures.

49
Look up MonitorGenerate TransactionsAdd New Monitor / Method
New Toolbar Commands
New Toolbar Commands
•Add New Monitor / MethodAfter clicking the command button, the following message appears to remind you that data you add to the spreadsheet must also be added to AQS to prevent failed transactions.

50
Look up MonitorGenerate TransactionsAdd New Monitor / Method
New Toolbar Commands
New Toolbar Commands
•Add New Monitor / MethodAll of the fields on the form must be filled in. The values will be validated to a certain extent, and then added to the look up data.
If you are adding a new method, method descriptions are required. It is best to copy the descriptions exactly from AQS.
This form does not in any way result in or represent a request to add data to AQS. The purpose of this form is to allow you to easily update your spreadsheet with new lookup data that has already been added to AQS.
When a new version of AQSP&A is posted, it will include the data in AQS up to that point in time. But after a while, you may be missing some new methods or monitors that you have added to AQS since the AQSP&A files were posted. This form allows you to add those new values to AQSP&A manually, so that you will have complete lookups for your monitors and methods.

51
Look up MonitorGenerate TransactionsAdd New Monitor / Method
New Toolbar Commands
New Toolbar Commands
•Add New Monitor / MethodHere is an example with all of the fields filled in, and a new method code specified.
Click Create this Monitor or Method to proceed.

52
Look up MonitorGenerate TransactionsAdd New Monitor / Method
New Toolbar Commands
New Toolbar Commands
•Add New Monitor / MethodClick Yes to the confirmation window.

53
Look up MonitorGenerate TransactionsAdd New Monitor / Method
New Toolbar Commands
New Toolbar Commands
•Add New Monitor / MethodClick Yes to another confirmation window.

54
Look up MonitorGenerate TransactionsAdd New Monitor / Method
New Toolbar Commands
New Toolbar Commands
•Add New Monitor / MethodIn this case, method 222 for this parameter has not been used before, so the descriptions will be required.
For this example, we will make up fictitious “test”descriptions.

55
Look up MonitorGenerate TransactionsAdd New Monitor / Method
New Toolbar Commands
New Toolbar Commands
•Add New Monitor / Method
After carefully typing in the Sample Analysis Description, click OK.

56
Look up MonitorGenerate TransactionsAdd New Monitor / Method
New Toolbar Commands
New Toolbar Commands
•Add New Monitor / Method
A Sample Collection Description is also required for a new method code.
After carefully typing in the Sample Collection Description, click OK.

57
Look up MonitorGenerate TransactionsAdd New Monitor / Method
New Toolbar Commands
New Toolbar Commands
•Add New Monitor / Method
An Equavalent Method Description is also required for a new method code.
After carefully typing in the Equivalent Method Description, click OK.
58
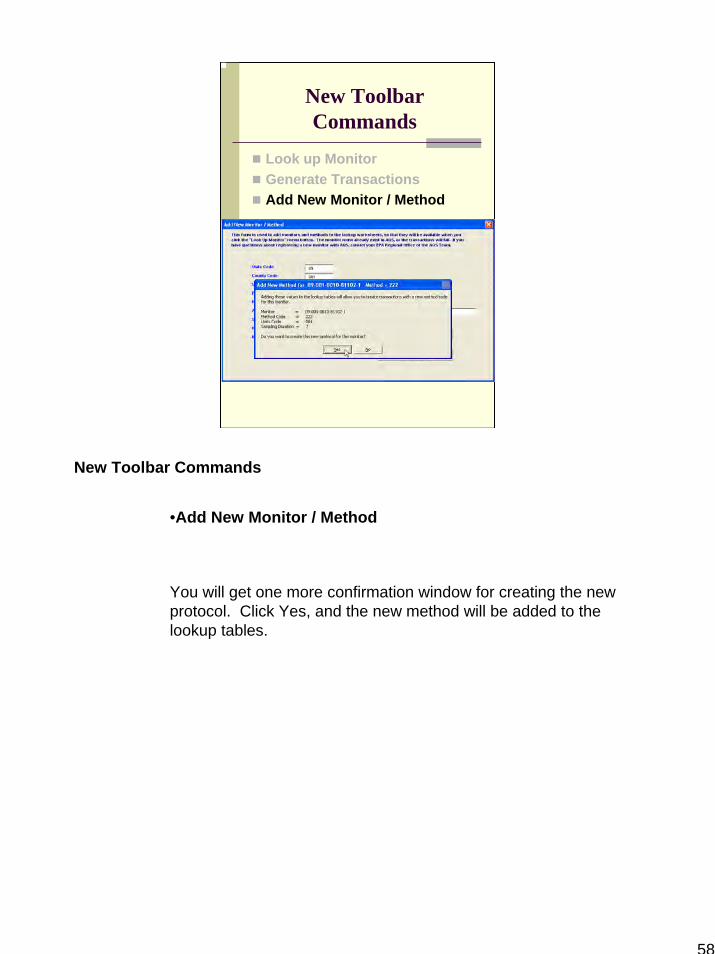
Look up MonitorGenerate TransactionsAdd New Monitor / Method
New Toolbar Commands
New Toolbar Commands
•Add New Monitor / Method
You will get one more confirmation window for creating the new protocol. Click Yes, and the new method will be added to the lookup tables.

59
Look up MonitorGenerate TransactionsAdd New Monitor / Method
New Toolbar Commands
New Toolbar Commands
•Add New Monitor / Method
An Audit Class must also be assigned. Since this method is a 24hour avg concentration in micrograms per liter, audit class is analytical. Click OK.
Note that you are not updating any data in AQS; what you are doing is adding values to the spreadsheet lookup tables, so thatthese new values will be included in the drop-down lists of values, and any data validation.

60
Look up MonitorGenerate TransactionsAdd New Monitor / Method
New Toolbar Commands
New Toolbar Commands
•Add New Monitor / Method
Now when the values for actual method are presented in the list of values, an additional choice of method 222 exists for this monitor.
Choose this method code, and right click the method code to see the description.

61
Look up MonitorGenerate TransactionsAdd New Monitor / Method
New Toolbar Commands
New Toolbar Commands
• Add New Monitor / Method
The new descriptions are also included in the lookup data.
Notes: 1. You can add sites, parameters, POCs, durations, methods, and
units with this form.2. The Equivalent method description is only populated for
equivalent and reference methods. If you know the value, you can populate it on this form. Leaving it blank is OK too, as long as the method exists in AQS, and you are using the correct method code.
3. This may be confusing… but just remember that the values you have filled in with this add monitor method function are not affecting AQS in any way. You are just adding info to the lookup tables, so now you have a method 222 (in this example) and it will appear in your list of values, along with the lookupdescriptions you gave it.

62
Look up MonitorGenerate TransactionsAdd New Monitor / MethodCreate Report
New Toolbar Commands
New Toolbar Commands
Create Report
The Create Report command button lets you printout your entries with some of the info from the transaction.
The percent difference is calculated and printed out as well.
Start by highlighting the rows you want to include in the report.

63
Look up MonitorGenerate TransactionsAdd New Monitor / MethodCreate Report
New Toolbar Commands
New Toolbar Commands
Create Report
After highlighting the rows you want printed, click on the Create Report command button.

64
Look up MonitorGenerate TransactionsAdd New Monitor / MethodCreate Report
New Toolbar Commands
New Toolbar Commands
Create Report
Here is a sample report for an RP transaction, and the Save dialog window. If percent differences are calculated to exceed the AQSedits, then the values will show in red text.You can save the Word document to a path and filename of your choice.

65
Look up MonitorGenerate TransactionsAdd New Monitor / MethodCreate ReportTribal Mode (On/Off)
New Toolbar Commands
New Toolbar Commands
Tribal Mode (On/Off)AQSP&A supports Tribal codes as implemented in AQS.

66
Look up MonitorGenerate TransactionsAdd New Monitor / MethodCreate ReportTribal Mode (On/Off)
AQSP&A supports AQS Tribal codes
A monitor can be identified in 2 ways:Non-Tribal Mode = State - County - Site Id-Parameter-POCTribal Mode = TT- Tribal Code-Site Id-Parameter-POC
New Toolbar Commands
New Toolbar Commands
Tribal Mode (On/Off)AQSP&A supports Tribal codes as implemented in AQS.
A monitor can be identified in 2 ways:Non-Tribal Mode = State Code-County Code-Site Id-Parameter
Code-POCTribal Mode = TT-Tribal Code-Site Id-Parameter Code-POC
(TT is two Capital T’s in place of the state code – this means that the next value in the transaction is a Tribal code, not a county code.)

67
Look up MonitorGenerate TransactionsAdd New Monitor / MethodCreate ReportTribal Mode (On/Off)
New Toolbar Commands
New Toolbar Commands
Tribal Mode (On/Off)You can toggle Tribal mode on and off using the toolbar command.

68
Look up MonitorGenerate TransactionsAdd New Monitor / MethodCreate ReportTribal Mode On
Transaction spreadsheets show Tribal codes, rather than state-county codes.
New Toolbar Commands
New Toolbar Commands
Tribal Mode On-> Transaction spreadsheets show Tribal codes, rather than state-county codes.
Right-click looks up Tribal information.Look Up Monitor retrieves monitors by tribe, rather than state –
county. Ability to add, change or delete Tribal codes to existing monitors
from Look Up Monitor command. Generate Transactions outputs transactions in Tribal Code format.Add New Monitor / Method includes Tribal code field.Create Report creates report with Tribal codes.

69
Look up MonitorGenerate TransactionsAdd New Monitor / MethodCreate ReportTribal Mode On
Right-click looks up Tribal information.
New Toolbar Commands
New Toolbar Commands
Tribal Mode OnTransaction spreadsheets show Tribal codes, rather than state-
county codes.-> Right-click looks up Tribal information.
Look Up Monitor retrieves monitors by tribe, rather than state –county.
Ability to add, change or delete Tribal codes to existing monitors from Look Up Monitor command.
Generate Transactions outputs transactions in Tribal Code format.Add New Monitor / Method includes Tribal code field.Create Report creates report with Tribal codes.

70
Look up MonitorGenerate TransactionsAdd New Monitor / MethodCreate ReportTribal Mode On
Look Up Monitor retrieves monitors by Tribe, rather than State – County.
New Toolbar Commands
New Toolbar Commands
Tribal Mode OnTransaction spreadsheets show Tribal codes, rather than state-
county codes.Right-click looks up Tribal information.
-> Look Up Monitor retrieves monitors by tribe, rather than state –county.
Ability to add, change or delete Tribal codes to existing monitors from Look Up Monitor command.
Generate Transactions outputs transactions in Tribal Code format.Add New Monitor / Method includes Tribal code field.Create Report creates report with Tribal codes.

71
Look up MonitorGenerate TransactionsAdd New Monitor / MethodCreate ReportTribal Mode On
Ability to add, change or delete Tribal codes to existing monitors.
New Toolbar Commands
New Toolbar Commands
Tribal Mode OnTransaction spreadsheets show Tribal codes, rather than state-
county codes.Right-click looks up Tribal information.Look Up Monitor retrieves monitors by tribe, rather than state –
county.-> Ability to add, change or delete Tribal codes to existing monitors from Look Up Monitor command.
Generate Transactions outputs transactions in Tribal Code format.Add New Monitor / Method includes Tribal code field.Create Report creates report with Tribal codes.

72
Look up MonitorGenerate TransactionsAdd New Monitor / MethodCreate ReportTribal Mode On
Ability to add, change or delete Tribal codes to existing monitors.
New Toolbar Commands
New Toolbar Commands
Tribal Mode OnTransaction spreadsheets show Tribal codes, rather than state-
county codes.Right-click looks up Tribal information.Look Up Monitor retrieves monitors by tribe, rather than state –
county.Ability to add, change or delete Tribal codes to existing monitors
from Look Up Monitor command. -> ADD Tribal Code
Click to add this Tribal code to an existing monitor. Generate Transactions outputs transactions in Tribal Code format.Add New Monitor / Method includes Tribal code field.Create Report creates report with Tribal codes.

73
Look up MonitorGenerate TransactionsAdd New Monitor / MethodCreate ReportTribal Mode On
Ability to add, change or delete Tribal codes to existing monitors.
New Toolbar Commands
New Toolbar Commands
Tribal Mode OnTransaction spreadsheets show Tribal codes, rather than state-
county codes.Right-click looks up Tribal information.Look Up Monitor retrieves monitors by tribe, rather than state –
county.Ability to add, change or delete Tribal codes to existing monitors
from Look Up Monitor command. ADD Tribal Code
-> Click to add this Tribal code to an existing monitor, and click OK.
Now select the monitor you want to associate with this tribal code.
Generate Transactions outputs transactions in Tribal Code format.Add New Monitor / Method includes Tribal code field.Create Report creates report with Tribal codes.
Notes:If data has already been submitted to AQS using the Tribal codes,
then the codes will be included when the Regional files are refreshed on the

74
Look up MonitorGenerate TransactionsAdd New Monitor / MethodCreate ReportTribal Mode On
Ability to add, change or delete Tribal codes to existing monitors.
New Toolbar Commands
New Toolbar Commands
Tribal Mode OnTransaction spreadsheets show Tribal codes, rather than state-
county codes.Right-click looks up Tribal information.Look Up Monitor retrieves monitors by tribe, rather than state –
county.Ability to add, change or delete Tribal codes to existing monitors
from Look Up Monitor command. -> DELETE Tribal Code from monitor
Select the monitor which should have the tribal code removed, and then click the button to remove the Tribal code association.
Generate Transactions outputs transactions in Tribal Code format.Add New Monitor / Method includes Tribal code field.Create Report creates report with Tribal codes.
Here, the one existing Tribal code can be deleted. The monitor will remain, but no longer have a tribal code.
Multiple Tribes and monitors would appear if there were more than one in the look up tables.

75
Look up MonitorGenerate TransactionsAdd New Monitor / MethodCreate ReportTribal Mode On
Ability to add, change or delete Tribal codes to existing monitors.
New Toolbar Commands
New Toolbar Commands
Tribal Mode OnTransaction spreadsheets show Tribal codes, rather than state-
county codes.Right-click looks up Tribal information.Look Up Monitor retrieves monitors by tribe, rather than state –
county.Ability to add, change or delete Tribal codes to existing monitors
from Look Up Monitor command. -> DELETE Tribal Code
Click OK to remove association of Tribal Code with Monitor.
Generate Transactions outputs transactions in Tribal Code format.Add New Monitor / Method includes Tribal code field.Create Report creates report with Tribal codes.
Ability to change Tribal codes for existing monitors from Look Up Monitor command. In other words, update the look up tables with Tribal codes so that they
will be available for help and validation routines.

76
Look up MonitorGenerate TransactionsAdd New Monitor / MethodCreate ReportTribal Mode On
Ability to add, change or delete Tribal codes to existing monitors.
New Toolbar Commands
New Toolbar Commands
Tribal Mode OnTransaction spreadsheets show Tribal codes, rather than state-
county codes.Right-click looks up Tribal information.Look Up Monitor retrieves monitors by tribe, rather than state –
county.Ability to add, change or delete Tribal codes to existing monitors
from Look Up Monitor command. CHANGE Tribal CodeChoose the Tribal code you want to change to. Then
select an existing monitor. -> Click OK to change the Tribal Code associated with the chosen monitor.
Generate Transactions outputs transactions in Tribal Code format.Add New Monitor / Method includes Tribal code field.Create Report creates report with Tribal codes.

77
Look up MonitorGenerate TransactionsAdd New Monitor / MethodCreate ReportTribal Mode On
You have just seen how to associate (and dissociate) Tribal codes with monitors. Please remember that this occurs in the AQSP&A spreadsheet only – to conform with the AQS use of Tribal codes, and make lookups work in tribal mode.In order to successfully submit transactions to AQS using Tribal codes, the Site record in AQS must have the proper Tribal code associated with it.
New Toolbar Commands
New Toolbar Commands
Tribal Mode OnTransaction spreadsheets show Tribal codes, rather than state-
county codes.Right-click looks up Tribal information.Look Up Monitor retrieves monitors by tribe, rather than state –
county.-> Ability to add, change or delete Tribal codes to existing monitors from Look Up Monitor command.
Generate Transactions outputs transactions in Tribal Code format.Add New Monitor / Method includes Tribal code field.Create Report creates report with Tribal codes.

78
Look up MonitorGenerate TransactionsAdd New Monitor / MethodCreate ReportTribal Mode On
Generate Transactions outputs transactions in Tribal Code format.
New Toolbar Commands
New Toolbar Commands
Tribal Mode OnTransaction spreadsheets show Tribal codes, rather than state-
county codes.Right-click looks up Tribal information.Look Up Monitor retrieves monitors by tribe, rather than state –
county. Ability to add, change or delete Tribal codes to existing monitors
from Look Up Monitor command. -> Generate Transactions outputs transactions in Tribal Code format.
Add New Monitor / Method includes Tribal code field.Create Report creates report with Tribal codes.

79
Look up MonitorGenerate TransactionsAdd New Monitor / MethodCreate ReportTribal Mode On
Transaction spreadsheets show Tribal codes, rather than state-county codes.
New Toolbar Commands
Transactions with Tribal Code
New Toolbar Commands
Tribal Mode OnTransaction spreadsheets show Tribal codes, rather than state-
county codes.Right-click looks up Tribal information.Look Up Monitor retrieves monitors by tribe, rather than state –
county. Ability to add, change or delete Tribal codes to existing monitors
from Look Up Monitor command. -> Generate Transactions outputs transactions in Tribal Code format.
Add New Monitor / Method includes Tribal code field.Create Report creates report with Tribal codes.

80
Look up MonitorGenerate TransactionsAdd New Monitor / MethodCreate ReportTribal Mode On
Add New Monitor / Method command includes Tribal code field.
New Toolbar Commands
New Toolbar Commands
Tribal Mode OnTransaction spreadsheets show Tribal codes, rather than state-
county codes.Right-click looks up Tribal information.Look Up Monitor retrieves monitors by tribe, rather than state –
county. Ability to add, change or delete Tribal codes to existing monitors
from Look Up Monitor command. Generate Transactions outputs transactions in Tribal Code format.
-> Add New Monitor / Method includes Tribal code field.Create Report creates report with Tribal codes.

81
Look up MonitorGenerate TransactionsAdd New Monitor / MethodCreate ReportTribal Mode On
Add New Monitor / Method command also includes Tribal code selector list.
New Toolbar Commands
New Toolbar Commands
Tribal Mode OnTransaction spreadsheets show Tribal codes, rather than state-
county codes.Right-click looks up Tribal information.Look Up Monitor retrieves monitors by tribe, rather than state –
county. Ability to add, change or delete Tribal codes to existing monitors
from Look Up Monitor command. Generate Transactions outputs transactions in Tribal Code format.
-> Add New Monitor / Method includes Tribal code field.Create Report creates report with Tribal codes.

82
Look up MonitorGenerate TransactionsAdd New Monitor / MethodCreate ReportTribal Mode On
Create Report creates report with Tribal codes.
New Toolbar Commands
New Toolbar Commands
Tribal Mode OnTransaction spreadsheets show Tribal codes, rather than state-
county codes.Right-click looks up Tribal information.Look Up Monitor retrieves monitors by tribe, rather than state –
county. Ability to add, change or delete Tribal codes to existing monitors
from Look Up Monitor command. Generate Transactions outputs transactions in Tribal Code format.Add New Monitor / Method includes Tribal code field.
-> Create Report creates report with Tribal codes.

83
Look up MonitorGenerate TransactionsAdd New Monitor / MethodCreate ReportTribal Mode On
Create Report creates report with Tribal codes.
New Toolbar Commands
Tribal Code
New Toolbar Commands
Tribal Mode OnTransaction spreadsheets show Tribal codes, rather than state-
county codes.Right-click looks up Tribal information.Look Up Monitor retrieves monitors by tribe, rather than state –
county. Ability to add, change or delete Tribal codes to existing monitors
from Look Up Monitor command. Generate Transactions outputs transactions in Tribal Code format.Add New Monitor / Method includes Tribal code field.
-> Create Report creates report with Tribal codes.

84
Miscellaneous Topics
Miscellaneous
Miscellaneous tips

85
Miscellaneous Topics
Worksheet structure must be kept intactUsing Cut / Copy / PasteDeleting Cell valuesExcel functions availableGetting Updates

86
Miscellaneous Topics
Worksheet structure must be kept intact
By worksheet structure, I am referring to the worksheet names, column positions, cell validation formulae, and lookup table data.

87
Miscellaneous Topics
Worksheet structure must be kept intact
Adding columns, moving columns, or adding look up table entries may disable VBA routinesIf this happens, reload a “fresh” copy from the AQS website.

88
Miscellaneous Topics
Worksheet structure must be kept intact
You can hide the 3 look up sheets.Do not hide the Coding Manual sheet.
The Coding Manual sheet must be visible for data element look ups to work.

89
Miscellaneous Topics
Worksheet structure must be kept intactUsing Cut / Copy / Paste
As mentioned earlier, the mouse right click has been reprogrammed to perform field lookups. So the right click menu will not appear. Instead, use the menu commands at the top of the application.

90
Miscellaneous Topics
Worksheet structure must be kept intactUsing Cut / Copy / Paste
The default “right-click” menu of commands is not active on the worksheets (cut, copy, paste, insert, delete, clear, format, etc.).
You can perform these functions by using the Excel command menu toolbar.
Here is an example of using the menu for the “Copy” function.

91
Miscellaneous Topics
Worksheet structure must be kept intactUsing Cut / Copy / Paste
Choose “Paste Special” when pasting.
This will give you additional Excel Paste options.

92
Miscellaneous Topics
Worksheet structure must be kept intactUsing Cut / Copy / Paste
Choose “Paste Values Only”.
This will keep the formatting and validation in place for the selected cells

93
Miscellaneous Topics
Worksheet structure must be kept intactUsing Cut / Copy / PasteDeleting Cell values

94
Miscellaneous Topics
Worksheet structure must be kept intactUsing Cut / Copy / PasteDeleting Cell values
Deleting rows on the transaction spreadsheets is OK. The data validations are still in place.
Rows roll up when a row is deleted, so the validations are still in place.

95
Miscellaneous Topics
Worksheet structure must be kept intactUsing Cut / Copy / PasteDeleting Cell valuesExcel functions available
Excel has many built in functions. You can use them if you are careful not to modify the workbook structure.

96
Miscellaneous Topics
Worksheet structure must be kept intactUsing Cut / Copy / PasteDeleting Cell valuesExcel functions available
SortingFiltersSave asExcel Functions

97
Miscellaneous Topics
Worksheet structure must be kept intactUsing Cut / Copy / PasteDeleting Cell valuesExcel functions available
SortingFiltersSave asExcel Functions
Here is an added function to calculate the percent difference for each pair of values. The formula is out past the transaction fields.

98
Miscellaneous Topics
Worksheet structure must be kept intactUsing Cut / Copy / PasteDeleting Cell valuesExcel functions available
SortingFiltersSave asExcel Functions
Here, the standard deviation of the percent differences is calculated.
Keep in mind that not all percent differences are used when AQS calculates standard deviation for collocated monitors. Both values must be above the following limits for the percent difference to be used in the precision calculations:TSP 20 μg/m3
SO2 45 μg/m3
NO2 30 μg/m3
Pb 0.15 μg/m3
PM10 20 μg/m3
PM2.5 6 μg/m3
Note: If you have data on your worksheet, and if you are going to experiment with functions, then make a backup copy to prevent retyping. You can always cut and paste data back into a fresh copy.

99
Miscellaneous Topics
Worksheet structure must be kept intactUsing Cut / Copy / PasteDeleting Cell valuesExcel functions availableGetting Updates
How do you get new files with updated look up tables and updated code?

100
Miscellaneous Topics
Worksheet structure must be kept intactUsing Cut / Copy / PasteDeleting Cell valuesExcel functions availableGetting Updates
Click on link to check for new updatesNew updates will have a different version number

101
Questions
User SupportBill Frietsche(919) 541-5451 or [email protected]
And you can always call me. Without feedback from you, I don’t know how things are going… so I always appreciate hearing if there is a problem or confusing aspect with the application.

102
Thank You
Would you please fill out the evaluation questions?
Thank you for participating. I would appreciate it if you would fill out the test questions