akrutosync 4.0 user · pdf fileakrutosync 4.0 user guide ... akrutosync can synchronize your...
TRANSCRIPT

AKRUTO
AkrutoSync 4.0 User Guide
Copyright © 2014 Akruto, Inc.
P a g e | 2 Copyright © 2014 Akruto, Inc.
Welcome Thank you for choosing AkrutoSync. AkrutoSync can synchronize your Contacts, Calendar and Tasks
between Outlook on your computer and your Windows Phone. AkrutoSync does not use the cloud; your
data is stored only on your computer and on your phone.
Table of Contents Welcome ....................................................................................................................................................... 2
Prerequisites ................................................................................................................................................. 3
Supported software versions .................................................................................................................... 3
Network requirements ............................................................................................................................. 3
Configuring AkrutoSync to sync with your phone ........................................................................................ 4
Configuring AkrutoSync to sync over the Internet ................................................................................... 4
Obtaining a DNS name from a third-party service .................................................................................... 8
DNS: Option 1. Obtaining a DNS name from No-IP.com ...................................................................... 9
DNS: Option 2. Obtaining a DNS name from DNSDynamic................................................................. 13
DNS: Option 3. Obtaining a DNS name from Two-DNS.de ................................................................. 17
DNS: Other options for obtaining a DNS name ................................................................................... 20
Completing AkrutoSync setup to sync over the Internet........................................................................ 20
Configuring AkrutoSync to sync over your home Wi-Fi network ........................................................... 26
Configuring your firewall ............................................................................................................................ 35
Starting a sync manually ............................................................................................................................. 35
Synchronizing automatically ....................................................................................................................... 36
Synchronizing Outlook Notes ...................................................................................................................... 36
Synchronizing new data from phone to computer ..................................................................................... 37
Synchronizing your phone with two or more computers ........................................................................... 37

P a g e | 3 Copyright © 2014 Akruto, Inc.
Prerequisites
Supported software versions In order to use AkrutoSync, your computer needs to have Microsoft Windows and Microsoft Outlook
installed. We support all versions of Windows, starting with Windows XP and all versions of Outlook,
starting with Outlook XP. Both 32-bit and 64-bit version of Windows and Outlook are supported.
All phones and tablets using Android OS, iOS (iPhone, iPad, iPod touch) and Windows Phone OS are
supported. Windows Mobile 6.5 and earlier is not supported.
Network requirements You can synchronize either over the Internet or over your home Wi-Fi network.
AkrutoSync uses your existing network to allow your phone and your computer to communicate.
AkrutoSync can function in most home networks. With most corporate networks, you will not be able to
sync over the Internet, but may be able to sync over Wi-Fi. With Wi-Fi networks in hotels, coffee shops,
and other public places, you may or may not be able to sync using AkrutoSync.
P a g e | 4 Copyright © 2014 Akruto, Inc.
Configuring AkrutoSync to sync with your phone AkrutoSync needs to be configured to synchronize with your phone. AkrutoSync can be configured to
sync over the Internet or over your home Wi-Fi network.
If AkrutoSync is configured to sync over the Internet, your phone can be located anywhere. Your phone
can use your wireless data plan, or connect to a Wi-Fi network (either your home Wi-Fi network, or
another network). You do not need to have a wireless router in order to use this option. If you choose
this option, you will be able to keep the data on your phone always in sync with your computer.
If AkrutoSync is configured to sync over your home Wi-Fi network, your phone can sync only when it is
located within the range of your wireless router and only when Wi-Fi on the phone is turned on. This
option does not allow you to keep the data on your phone always in sync with your computer. To
synchronize your phone with your computer, you will need to make sure that your phone is connected
to your Wi-Fi network and initiate a sync manually. Keep in mind that many phones have a battery
saving feature that turns off Wi-Fi on the phone whenever the phone screen is locked and the phone is
not plugged in to charge. This may cause the phone not to sync automatically. There is usually a setting
to turn this feature on or off.
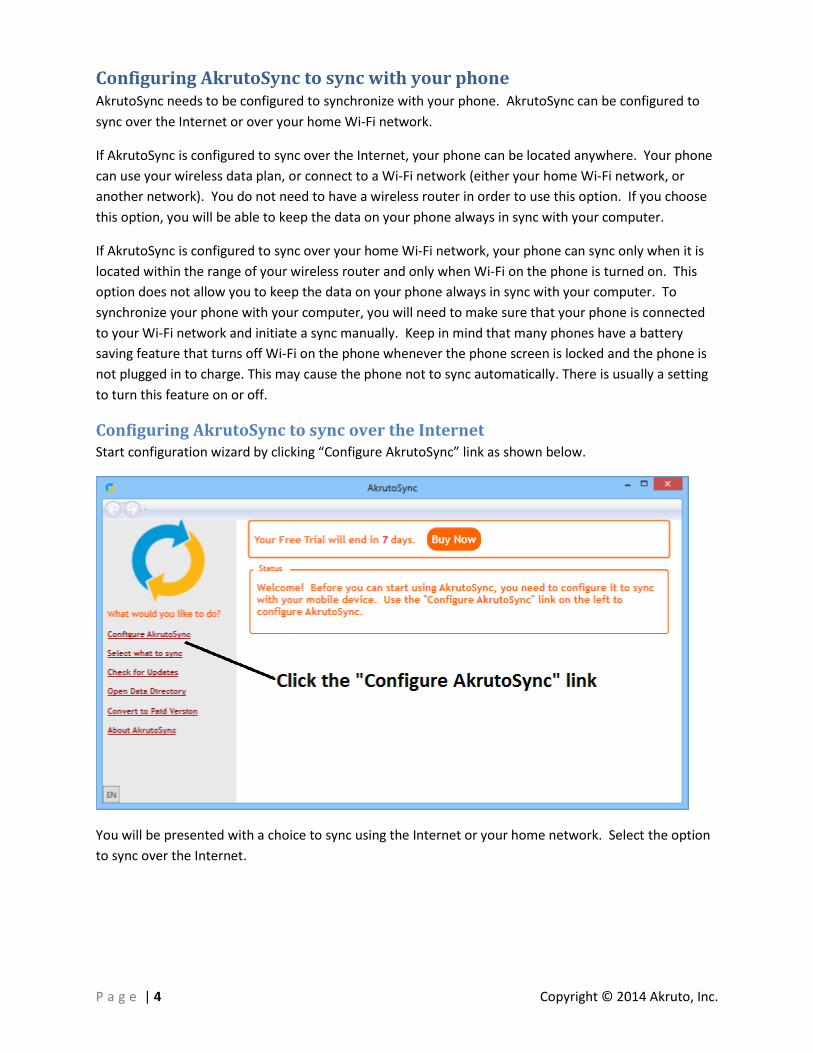
Configuring AkrutoSync to sync over the Internet Start configuration wizard by clicking “Configure AkrutoSync” link as shown below.
You will be presented with a choice to sync using the Internet or your home network. Select the option
to sync over the Internet.

P a g e | 5 Copyright © 2014 Akruto, Inc.
The next screen gives you a choice between Android, iOS and Windows Phone. This selection allows
AkrutoSync to better guide you through subsequent configuration steps. This selection does not affect
operation of AkrutoSync. In fact, it is possible to synchronize the same computer with Android, iOS and
Windows Phone devices at the same time.

P a g e | 6 Copyright © 2014 Akruto, Inc.
On the next screen, AkrutoSync will list all Outlook Contact, Calendar, Task and Note folders on your
computer. Select the folders that you want to sync.
You can come back to this screen at any time and change your selection by clicking the “Select what to
sync” link in the main screen of AkrutoSync.
Click “Save” to save your selection.
Depending on your computer’s network configuration, the following screen may or may not be
displayed.
If the screen is displayed, click “Test”.
P a g e | 7 Copyright © 2014 Akruto, Inc.
Technical
Detail
If your computer has multiple network adapters (for example, a wired connection and a wireless one, or a VPN connection) we display this screen to determine which network adapter to use. In order to do this, we establish a test connection to a web site URL (any web site will work) and check the local IP address of the connection. Then we close the connection. No information is transmitted to or from the test web site. You can use any web site for this test, as long as you provide a valid URL.
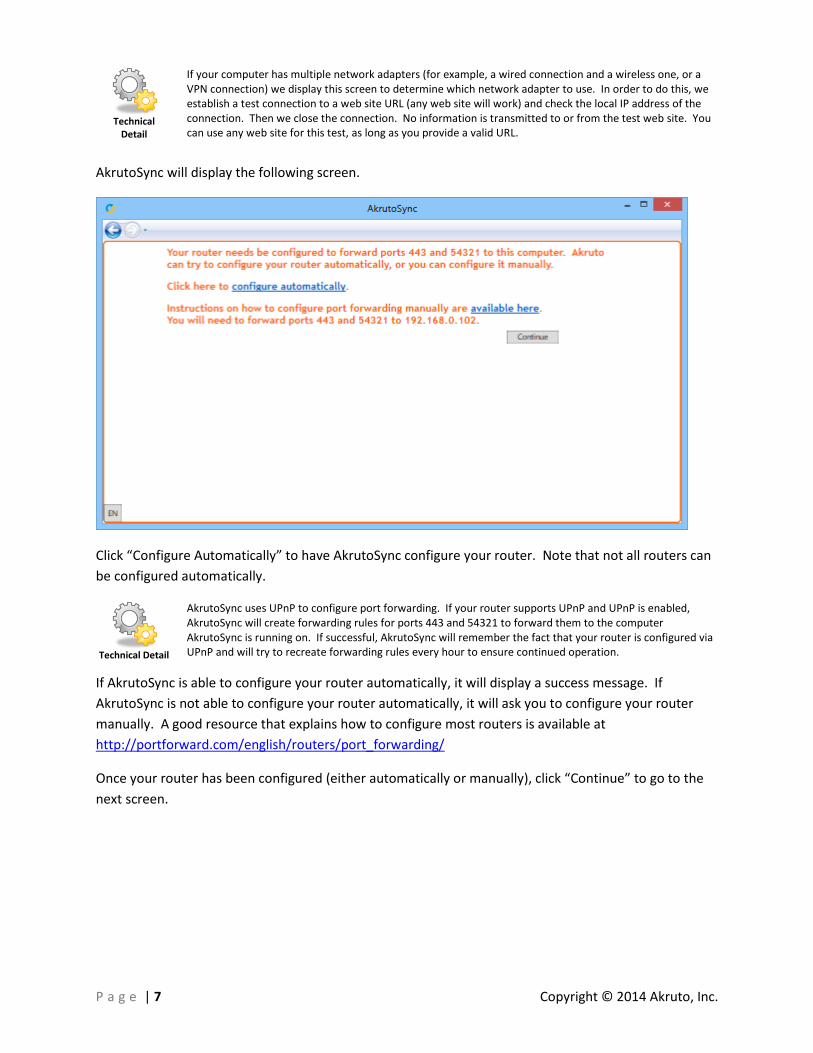
AkrutoSync will display the following screen.
Click “Configure Automatically” to have AkrutoSync configure your router. Note that not all routers can
be configured automatically.
Technical Detail
AkrutoSync uses UPnP to configure port forwarding. If your router supports UPnP and UPnP is enabled, AkrutoSync will create forwarding rules for ports 443 and 54321 to forward them to the computer AkrutoSync is running on. If successful, AkrutoSync will remember the fact that your router is configured via UPnP and will try to recreate forwarding rules every hour to ensure continued operation.
If AkrutoSync is able to configure your router automatically, it will display a success message. If
AkrutoSync is not able to configure your router automatically, it will ask you to configure your router
manually. A good resource that explains how to configure most routers is available at
http://portforward.com/english/routers/port_forwarding/
Once your router has been configured (either automatically or manually), click “Continue” to go to the
next screen.
P a g e | 8 Copyright © 2014 Akruto, Inc.
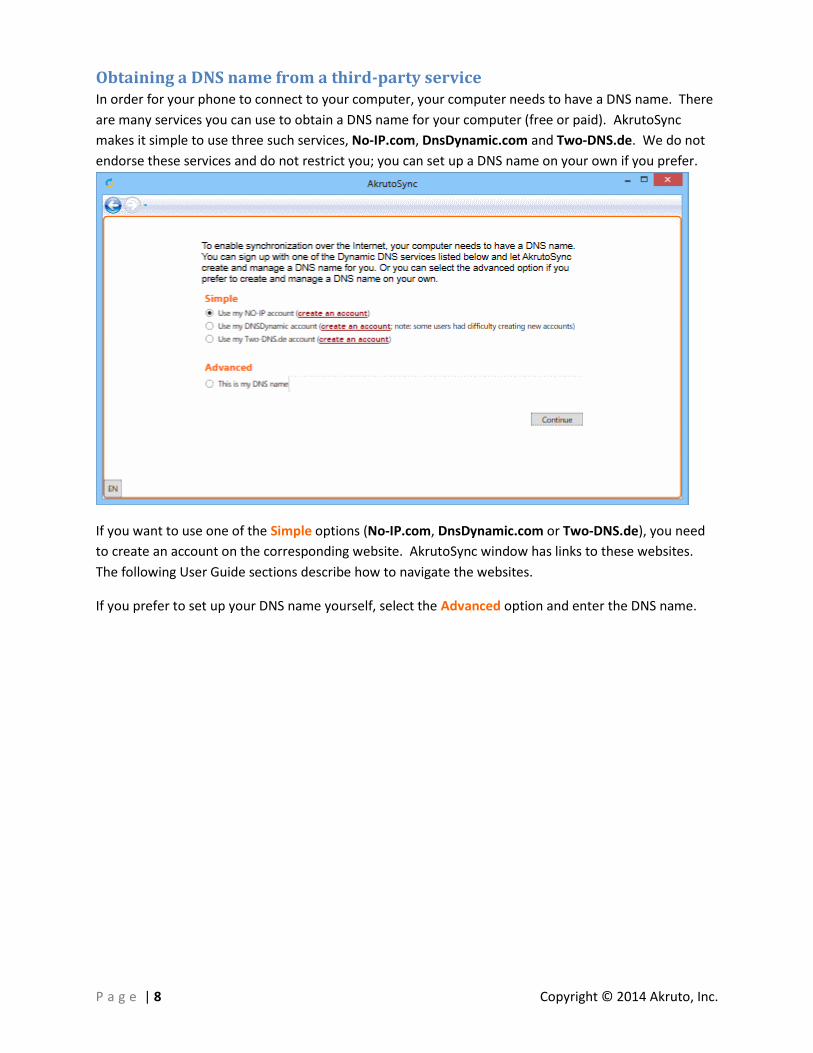
Obtaining a DNS name from a third-party service In order for your phone to connect to your computer, your computer needs to have a DNS name. There
are many services you can use to obtain a DNS name for your computer (free or paid). AkrutoSync
makes it simple to use three such services, No-IP.com, DnsDynamic.com and Two-DNS.de. We do not
endorse these services and do not restrict you; you can set up a DNS name on your own if you prefer.
If you want to use one of the Simple options (No-IP.com, DnsDynamic.com or Two-DNS.de), you need
to create an account on the corresponding website. AkrutoSync window has links to these websites.
The following User Guide sections describe how to navigate the websites.
If you prefer to set up your DNS name yourself, select the Advanced option and enter the DNS name.
P a g e | 9 Copyright © 2014 Akruto, Inc.
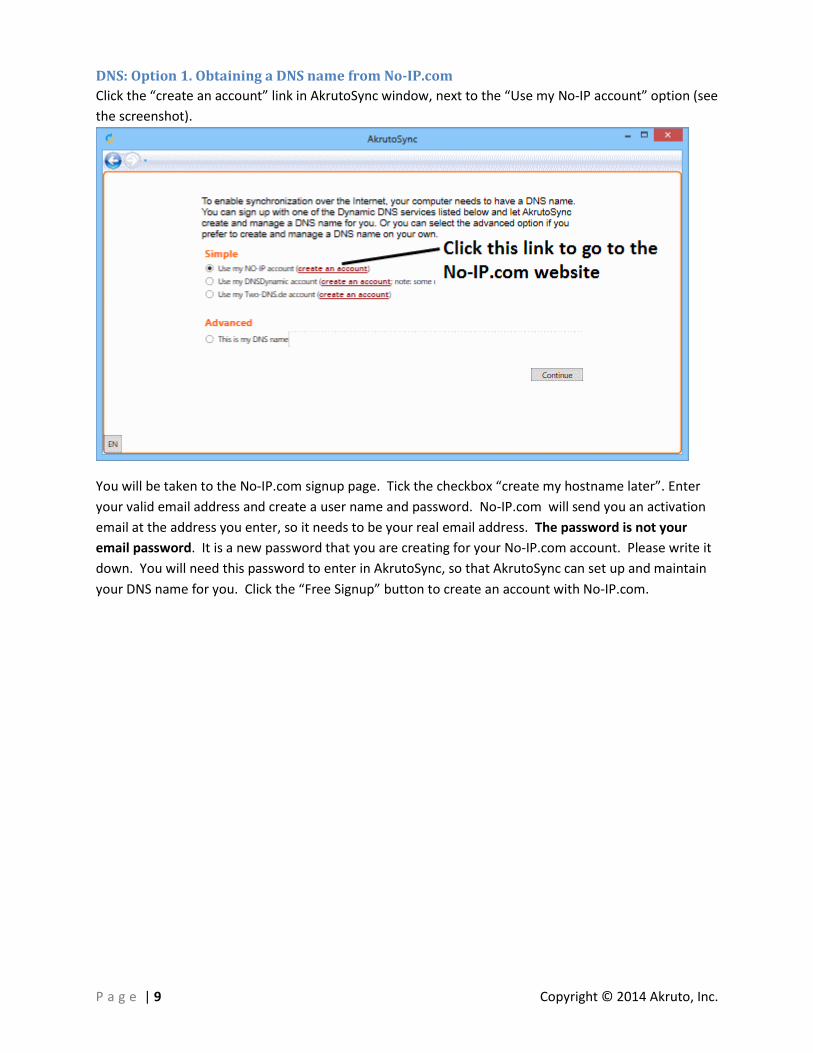
DNS: Option 1. Obtaining a DNS name from No-IP.com
Click the “create an account” link in AkrutoSync window, next to the “Use my No-IP account” option (see
the screenshot).
You will be taken to the No-IP.com signup page. Tick the checkbox “create my hostname later”. Enter
your valid email address and create a user name and password. No-IP.com will send you an activation
email at the address you enter, so it needs to be your real email address. The password is not your
email password. It is a new password that you are creating for your No-IP.com account. Please write it
down. You will need this password to enter in AkrutoSync, so that AkrutoSync can set up and maintain
your DNS name for you. Click the “Free Signup” button to create an account with No-IP.com.

P a g e | 10 Copyright © 2014 Akruto, Inc.
No-IP.com will send you an email with an activation link. Click that link to activate your No-IP.com
account.
Once you complete the above, you do not need to do anything else on the No-IP.com website. You do
not need to login to your newly created No-IP.com account. AkrutoSync will do this for you.
Go back to AkrutoSync configuration, select the “Use my No-IP account” option and click “Continue”.

P a g e | 11 Copyright © 2014 Akruto, Inc.
On the next screen, enter your No-IP account information into AkrutoSync and click Login, so that
AkrutoSync can log in to your No-IP account.
AkrutoSync will log in to your No-IP account and offer you to generate a DNS name. Click the
“Generate” button to generate a new DNS name.

P a g e | 12 Copyright © 2014 Akruto, Inc.
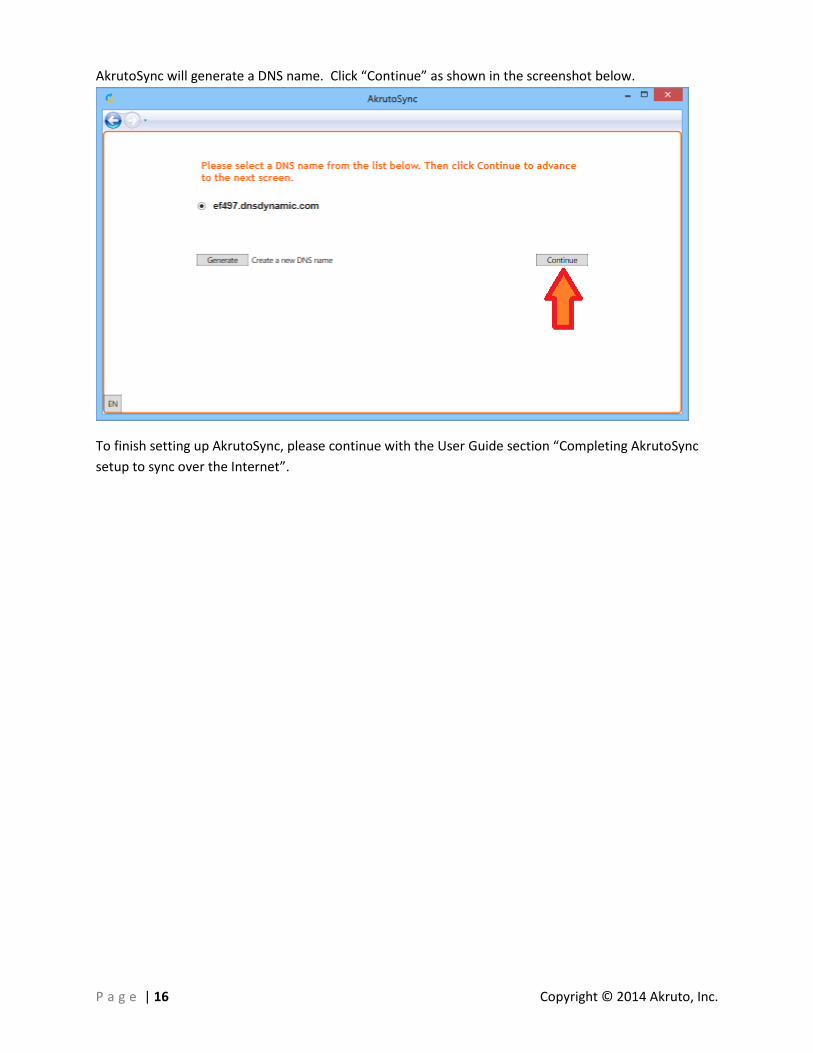
AkrutoSync will generate a DNS name. Click “Continue” as shown in the screenshot below.
To finish setting up AkrutoSync, please continue with the User Guide section “Completing AkrutoSync
setup to sync over the Internet”.
P a g e | 13 Copyright © 2014 Akruto, Inc.
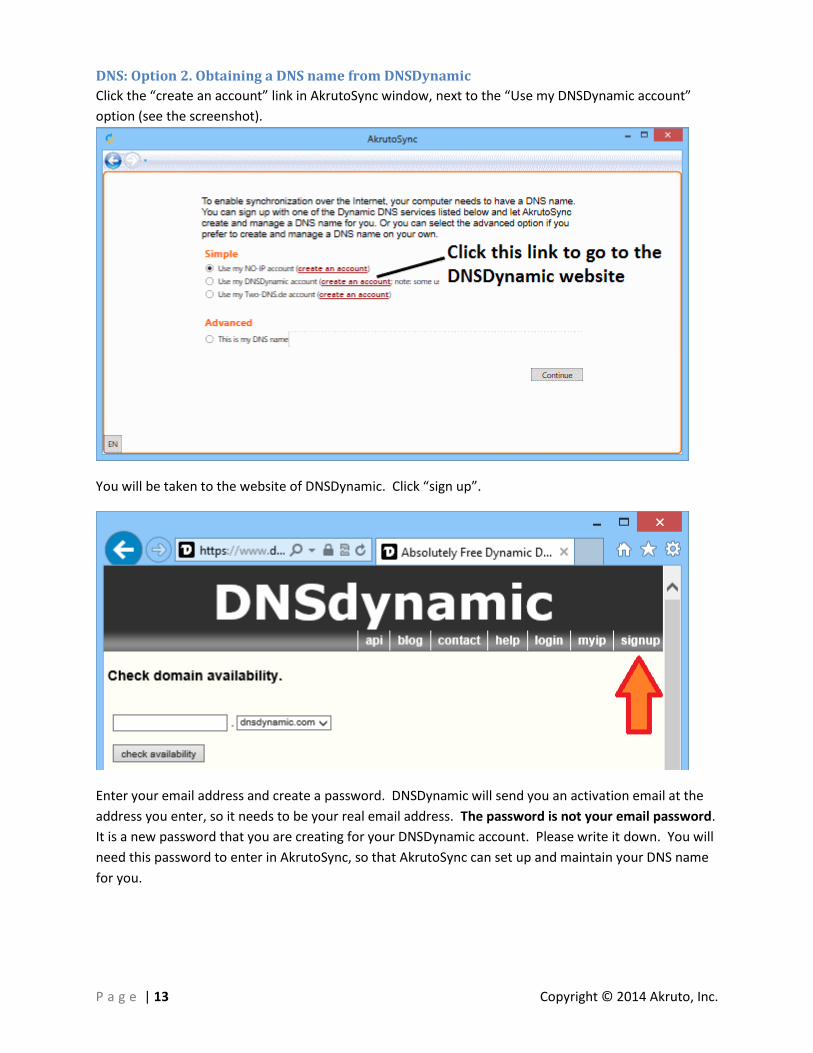
DNS: Option 2. Obtaining a DNS name from DNSDynamic
Click the “create an account” link in AkrutoSync window, next to the “Use my DNSDynamic account”
option (see the screenshot).
You will be taken to the website of DNSDynamic. Click “sign up”.
Enter your email address and create a password. DNSDynamic will send you an activation email at the
address you enter, so it needs to be your real email address. The password is not your email password.
It is a new password that you are creating for your DNSDynamic account. Please write it down. You will
need this password to enter in AkrutoSync, so that AkrutoSync can set up and maintain your DNS name
for you.

P a g e | 14 Copyright © 2014 Akruto, Inc.
Click the “Submit” button. DNSDynamic will send you an email with an activation link. Click that link to
activate your DNSDynamic account.
Once you complete the above, you do not need to do anything else on the DNSDynamic website. You
do not need to login to your newly created DNSDynamic account. AkrutoSync will do this for you.
Go back to AkrutoSync configuration, select the “Use my DNSDynamic account” option and click
“Continue”.

P a g e | 15 Copyright © 2014 Akruto, Inc.
On the next screen, enter your DNSDynamic account information into AkrutoSync and click Login, so
that AkrutoSync can log in to your DNSDynamic account.
AkrutoSync will log in to your DNSDynamic account and offer you to generate a DNS name. Click the
“Generate” button to generate a new DNS name.
P a g e | 16 Copyright © 2014 Akruto, Inc.
AkrutoSync will generate a DNS name. Click “Continue” as shown in the screenshot below.
To finish setting up AkrutoSync, please continue with the User Guide section “Completing AkrutoSync
setup to sync over the Internet”.

P a g e | 17 Copyright © 2014 Akruto, Inc.
DNS: Option 3. Obtaining a DNS name from Two-DNS.de
Click the “create an account” link in AkrutoSync window, next to the “Use my Two-DNS.de account”
option (see the screenshot).
You will be taken to the website of Two-DNS. Click the “Sign up now, it’s free” link.
Enter your email address and create a password. Two-DNS will send you an activation email at the
address you enter, so it needs to be your real email address. The password is not your email password.
It is a new password that you are creating for your Two-DNS account. Please write it down. You will
need this password to enter in AkrutoSync, so that AkrutoSync can set up and maintain your DNS name.

P a g e | 18 Copyright © 2014 Akruto, Inc.
Check the checkbox to accept terms of service and click the “Sign up” button. Two-DNS will send you an
email with an activation link. Click that link to activate your Two-DNS account.
Once you complete the above, you do not need to do anything else on the Two-DNS website. You do
not need to login to your newly created Two-DNS account. AkrutoSync will do this for you.
Go back to AkrutoSync configuration, select the “Use my Two-DNS account” option and click “Continue”.

P a g e | 19 Copyright © 2014 Akruto, Inc.
On the next screen, enter your Two-DNS account information into AkrutoSync and click Login, so that
AkrutoSync can log in to your Two-DNS account.
AkrutoSync will log in to your Two-DNS account and offer you to generate a DNS name. Click the
“Generate” button to generate a new DNS name.

P a g e | 20 Copyright © 2014 Akruto, Inc.
AkrutoSync will generate a DNS name. Click “Continue” as shown in the screenshot below.
To finish setting up AkrutoSync, please continue with the User Guide section “Completing AkrutoSync
setup to sync over the Internet”.
DNS: Other options for obtaining a DNS name
There are many more choices for obtaining a DNS name. AkrutoSync will work with any DNS name that
resolves to your computer’s IP address. However, with so many options available, we are not able to
provide instructions for all of them.
Completing AkrutoSync setup to sync over the Internet Now, let’s continue with AkrutoSync configuration. Click “Continue” to go to the next screen.
If you have a third party firewall (such as Symantec, ESET, etc…) on your computer, you need to
configure it to allow AkrutoSync to use the network. Our firewall configuration guide is available at
http://www.akruto.com/firewall-configuration/. AkrutoSync configuration wizard tells you that you
need to configure your firewall and provides a link to our firewall configuration instructions.

P a g e | 21 Copyright © 2014 Akruto, Inc.
If you use the standard Windows Firewall (part of the Windows Operating System) you do not need to
configure it manually, because it is configured as part of AkrutoSync installation.
Next, import an SSL certificate into your phone. Start the web browser on your phone and browse to
the URL shown in AkrutoSync. As you type the URL into your web browser, the browser will suggest
some web sites to you. It is important that you ignore the suggestions and type in the URL exactly as
shown in AkrutoSync screen. The following two screenshots illustrate this step.
If you are setting up sync with an Android phone, AkrutoSync screen may looks like shown below.

P a g e | 22 Copyright © 2014 Akruto, Inc.
If you are setting up Outlook sync with iPhone, iPad, or iPod Touch, AkrutoSync screen looks like shown
below.
If you are setting up sync with the Windows Phone, AkrutoSync screen looks like shown below.
The web browser on your phone should load a web page that explains that AkrutoSync uses SSL to
secure communication between your phone and your computer. At the bottom of the web page you
will see a link to import the SSL certificate to your phone. Click the link.
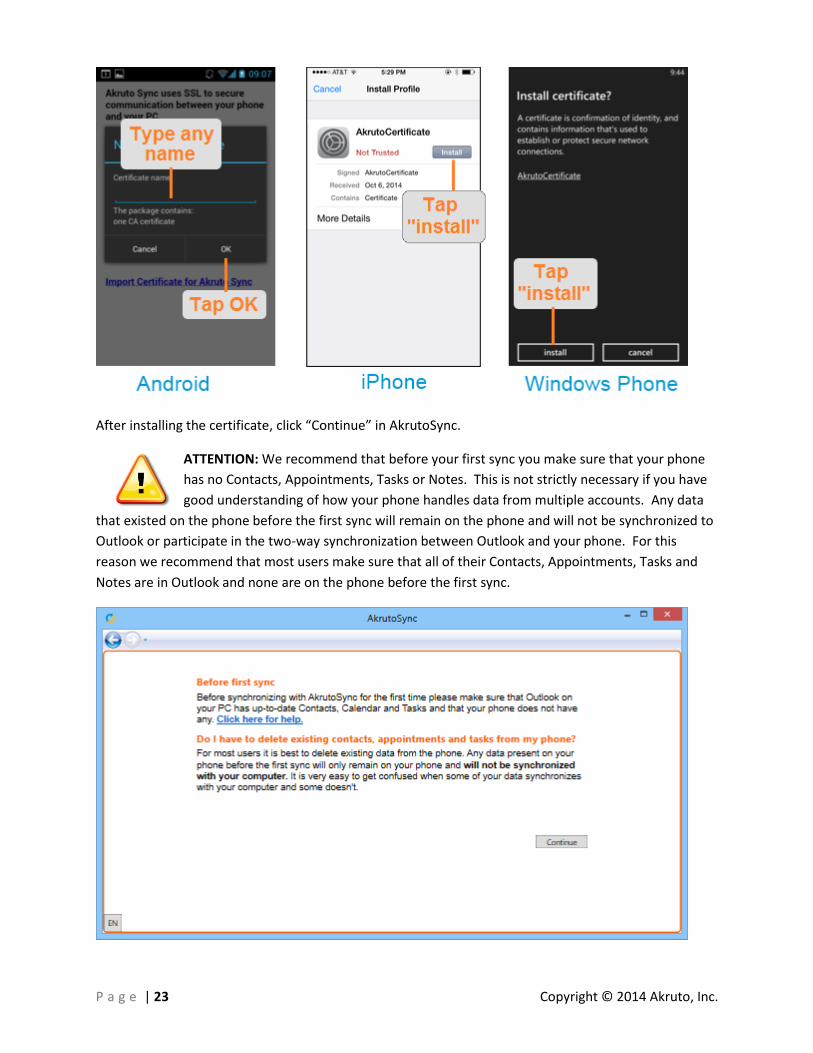
The phone will then prompt you to install the certificate. Install the certificate on the phone, as shown
below
P a g e | 23 Copyright © 2014 Akruto, Inc.
After installing the certificate, click “Continue” in AkrutoSync.
ATTENTION: We recommend that before your first sync you make sure that your phone
has no Contacts, Appointments, Tasks or Notes. This is not strictly necessary if you have
good understanding of how your phone handles data from multiple accounts. Any data
that existed on the phone before the first sync will remain on the phone and will not be synchronized to
Outlook or participate in the two-way synchronization between Outlook and your phone. For this
reason we recommend that most users make sure that all of their Contacts, Appointments, Tasks and
Notes are in Outlook and none are on the phone before the first sync.

P a g e | 24 Copyright © 2014 Akruto, Inc.
Next, AkrutoSync will ask you to choose credentials for your phone to connect to your computer. Note
that at present, AkrutoSync does not check the user name; it only checks the password.
Decide what username and password you would like you use, enter them, and click “Continue”.
The last step is to add an Outlook or Exchange account to your phone using the email address shown in
AkrutoSync screen.
Instructions for adding an account vary from phone to phone. Instructions are available at
http://www.akruto.com/phone-setup/
P a g e | 25 Copyright © 2014 Akruto, Inc.
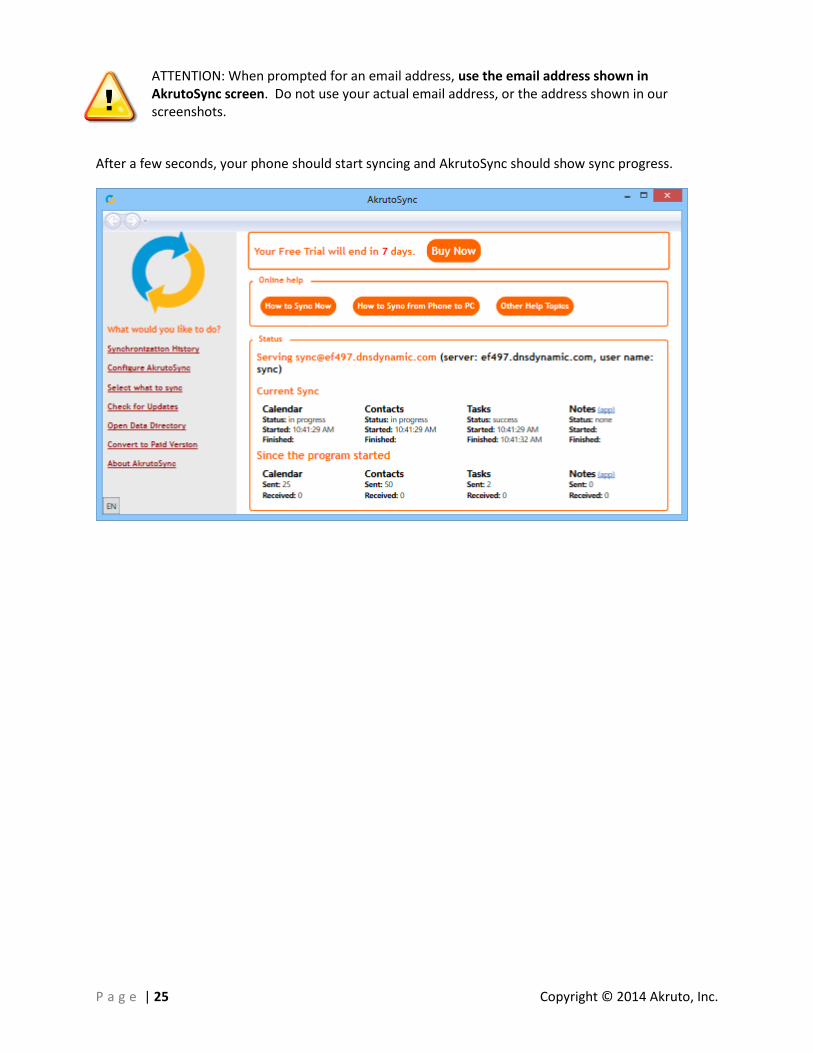
ATTENTION: When prompted for an email address, use the email address shown in AkrutoSync screen. Do not use your actual email address, or the address shown in our screenshots.
After a few seconds, your phone should start syncing and AkrutoSync should show sync progress.

P a g e | 26 Copyright © 2014 Akruto, Inc.
Configuring AkrutoSync to sync over your home Wi-Fi network Start configuration wizard by clicking “Configure AkrutoSync” link as shown below.
You will be presented with a choice to sync using the Internet or your home network. Select the option
to sync over the over your home network.
P a g e | 27 Copyright © 2014 Akruto, Inc.
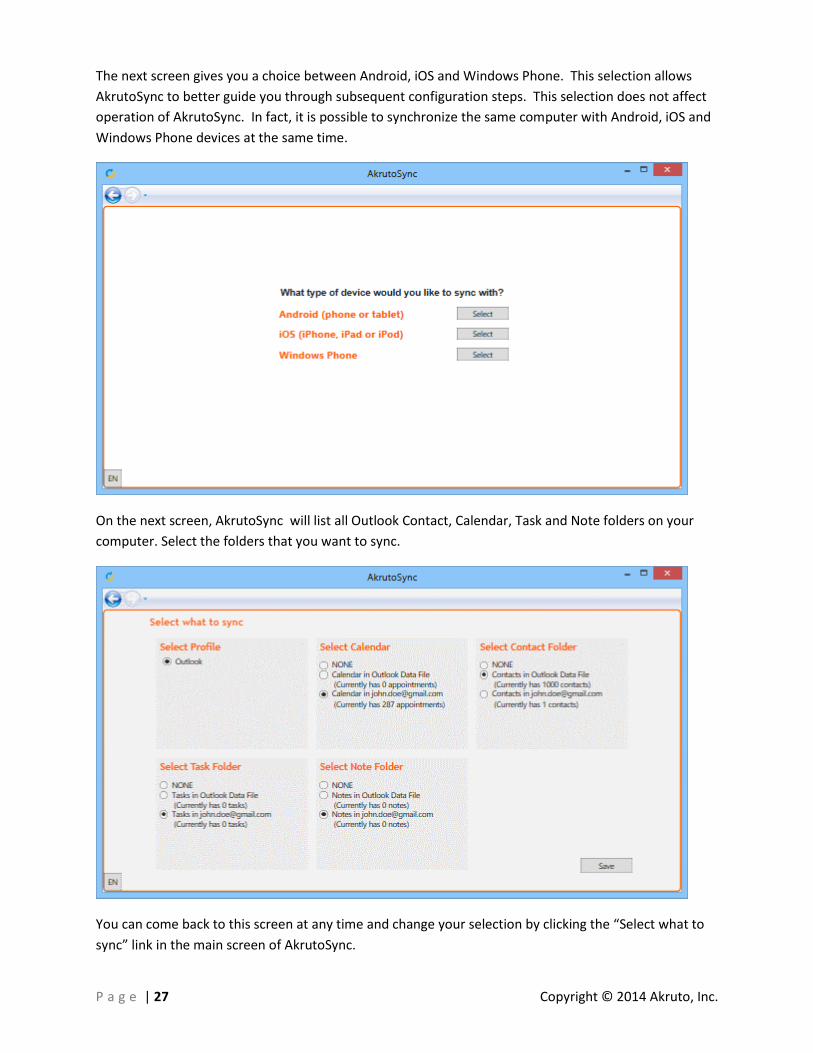
The next screen gives you a choice between Android, iOS and Windows Phone. This selection allows
AkrutoSync to better guide you through subsequent configuration steps. This selection does not affect
operation of AkrutoSync. In fact, it is possible to synchronize the same computer with Android, iOS and
Windows Phone devices at the same time.
On the next screen, AkrutoSync will list all Outlook Contact, Calendar, Task and Note folders on your
computer. Select the folders that you want to sync.
You can come back to this screen at any time and change your selection by clicking the “Select what to
sync” link in the main screen of AkrutoSync.
P a g e | 28 Copyright © 2014 Akruto, Inc.
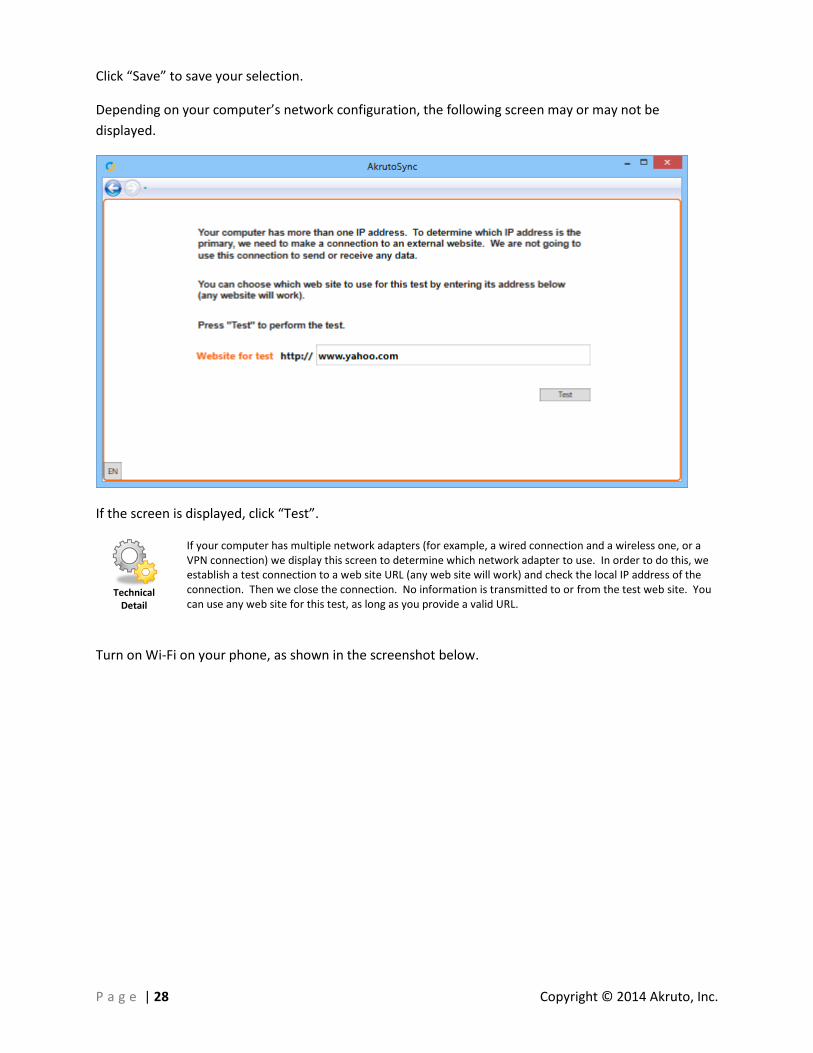
Click “Save” to save your selection.
Depending on your computer’s network configuration, the following screen may or may not be
displayed.
If the screen is displayed, click “Test”.
Technical
Detail
If your computer has multiple network adapters (for example, a wired connection and a wireless one, or a VPN connection) we display this screen to determine which network adapter to use. In order to do this, we establish a test connection to a web site URL (any web site will work) and check the local IP address of the connection. Then we close the connection. No information is transmitted to or from the test web site. You can use any web site for this test, as long as you provide a valid URL.
Turn on Wi-Fi on your phone, as shown in the screenshot below.

P a g e | 29 Copyright © 2014 Akruto, Inc.
ATTENTION: It is not enough that Wi-Fi is on. You should see the word connected. As
shown in the screenshots above. If you do not see the word connected, you will not be
able to use Wi-Fi, even if Wi-Fi is on.
Make sure that the network you are connecting to (in red in the screenshot) is the network created by
your router. There should be no wireless access point device, just the wireless router. Also make sure
your phone is not connected to some other Wi-Fi network when you want to sync. If your computer is
also connected to a Wi-Fi network, your phone and your computer must be connected to the same Wi-Fi
network.
After making sure that Wi-Fi on your phone is on and connected, click “Continue” to go to the next
screen.

P a g e | 30 Copyright © 2014 Akruto, Inc.
If you have a third party firewall (such as Symantec, ESET, etc…) on your computer, you need to
configure it to allow AkrutoSync to use the network. Our firewall configuration guide is available at
http://www.akruto.com/firewall-configuration/. AkrutoSync configuration wizard tells you that you
need to configure your firewall and provides a link to our firewall configuration instructions.
If you use the standard Windows Firewall (part of the Windows Operating System) you do not need to
configure it manually, because it is configured as part of AkrutoSync installation.
P a g e | 31 Copyright © 2014 Akruto, Inc.
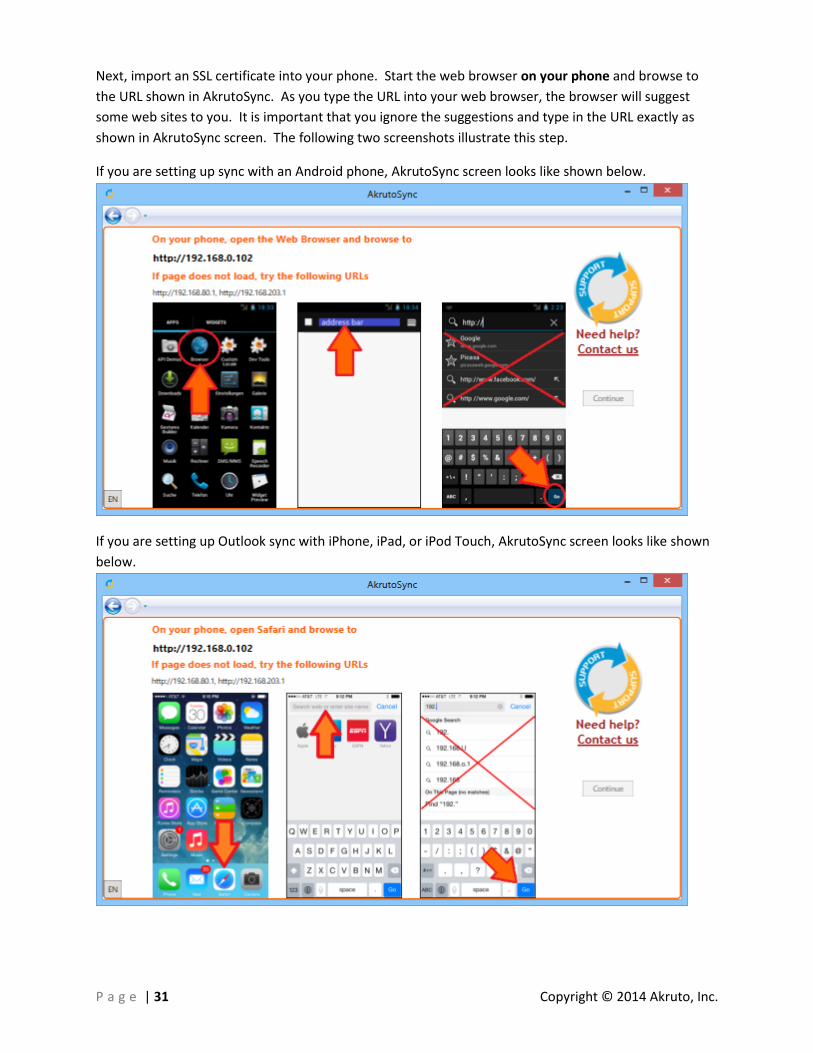
Next, import an SSL certificate into your phone. Start the web browser on your phone and browse to
the URL shown in AkrutoSync. As you type the URL into your web browser, the browser will suggest
some web sites to you. It is important that you ignore the suggestions and type in the URL exactly as
shown in AkrutoSync screen. The following two screenshots illustrate this step.
If you are setting up sync with an Android phone, AkrutoSync screen looks like shown below.
If you are setting up Outlook sync with iPhone, iPad, or iPod Touch, AkrutoSync screen looks like shown
below.

P a g e | 32 Copyright © 2014 Akruto, Inc.
If you are setting up sync with the Windows Phone, AkrutoSync screen looks like shown below.
The web browser on your phone should load a web page that explains that AkrutoSync uses SSL to
secure communication between your phone and your computer. At the bottom of the web page you
will see a link to import the SSL certificate to your phone. Click the link.
The phone will then prompt you to install the certificate. Install the certificate on the phone, as shown
below
After installing the certificate, click “Continue” in AkrutoSync.

P a g e | 33 Copyright © 2014 Akruto, Inc.
We recommend that before your first sync you make sure that your phone has no
Contacts, Appointments, Tasks or Notes. This is not strictly necessary if you have good
understanding of how your phone handles data from multiple accounts. Any data that
existed on the phone before the first sync will remain on the phone and will not be synchronized to
Outlook or participate in the two-way synchronization between Outlook and your phone. For this
reason we recommend that most users make sure that all of their Contacts, Appointments, Tasks and
Notes are in Outlook and none are on the phone before the first sync.
Next, AkrutoSync will ask you to choose credentials for your phone to connect to your computer. Note
that at present, AkrutoSync does not check the user name; it only checks the password.
P a g e | 34 Copyright © 2014 Akruto, Inc.
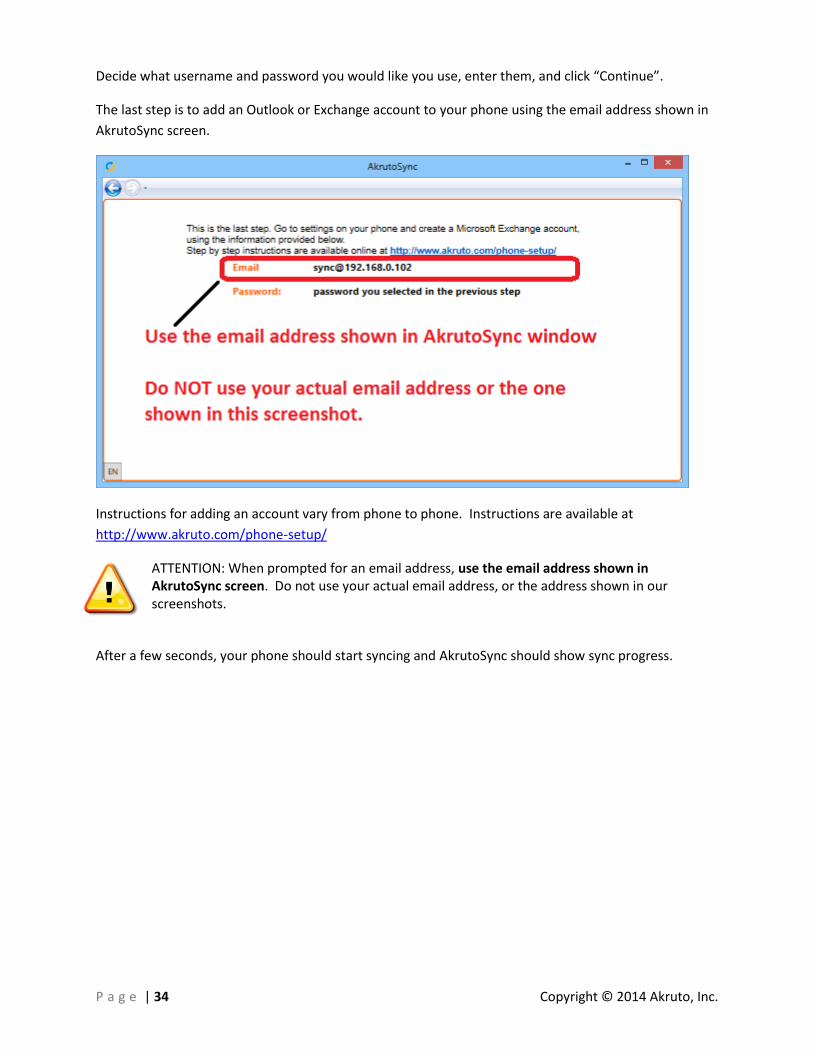
Decide what username and password you would like you use, enter them, and click “Continue”.
The last step is to add an Outlook or Exchange account to your phone using the email address shown in
AkrutoSync screen.
Instructions for adding an account vary from phone to phone. Instructions are available at
http://www.akruto.com/phone-setup/
ATTENTION: When prompted for an email address, use the email address shown in AkrutoSync screen. Do not use your actual email address, or the address shown in our screenshots.
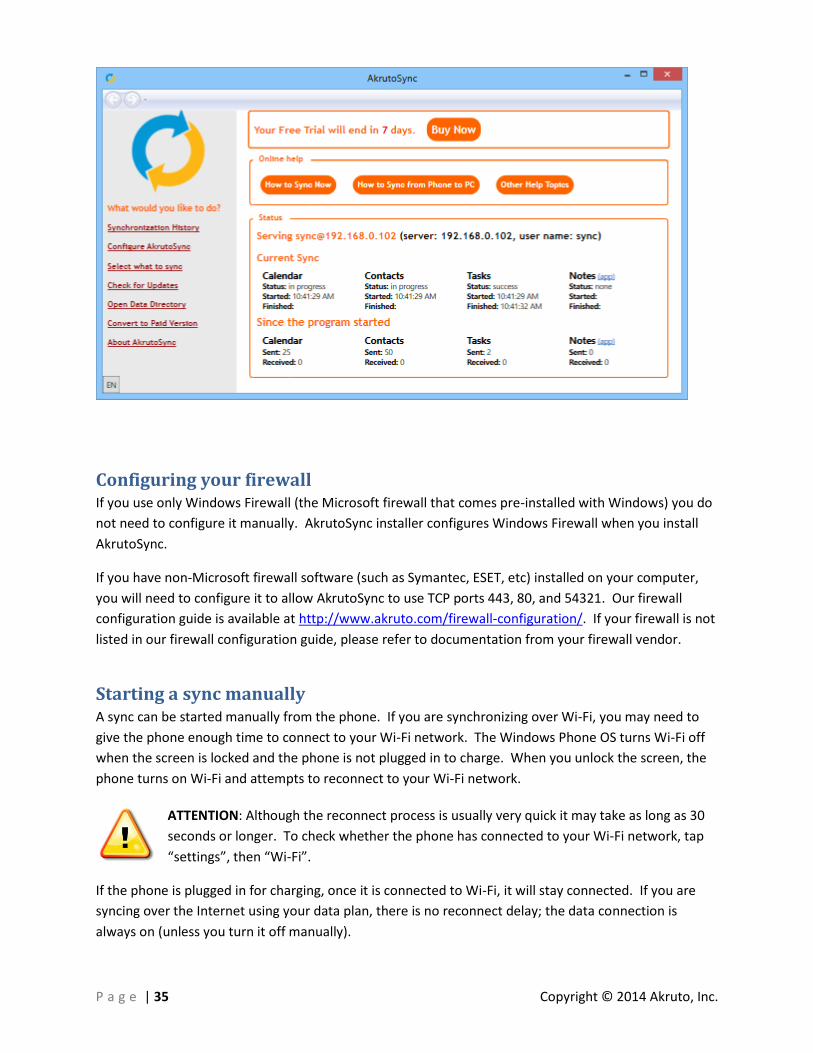
After a few seconds, your phone should start syncing and AkrutoSync should show sync progress.
P a g e | 35 Copyright © 2014 Akruto, Inc.
Configuring your firewall If you use only Windows Firewall (the Microsoft firewall that comes pre-installed with Windows) you do
not need to configure it manually. AkrutoSync installer configures Windows Firewall when you install
AkrutoSync.
If you have non-Microsoft firewall software (such as Symantec, ESET, etc) installed on your computer,
you will need to configure it to allow AkrutoSync to use TCP ports 443, 80, and 54321. Our firewall
configuration guide is available at http://www.akruto.com/firewall-configuration/. If your firewall is not
listed in our firewall configuration guide, please refer to documentation from your firewall vendor.
Starting a sync manually A sync can be started manually from the phone. If you are synchronizing over Wi-Fi, you may need to
give the phone enough time to connect to your Wi-Fi network. The Windows Phone OS turns Wi-Fi off
when the screen is locked and the phone is not plugged in to charge. When you unlock the screen, the
phone turns on Wi-Fi and attempts to reconnect to your Wi-Fi network.
ATTENTION: Although the reconnect process is usually very quick it may take as long as 30
seconds or longer. To check whether the phone has connected to your Wi-Fi network, tap
“settings”, then “Wi-Fi”.
If the phone is plugged in for charging, once it is connected to Wi-Fi, it will stay connected. If you are
syncing over the Internet using your data plan, there is no reconnect delay; the data connection is
always on (unless you turn it off manually).
P a g e | 36 Copyright © 2014 Akruto, Inc.
To manually sync your Windows Phone, tap “settings”, then “email+accounts”. Tap and hold the
account that was created for AkrutoSync. Tap “sync”. After a few seconds, in the AkrutoSync window
on your computer you should see sync status indicating when sync begins and ends.
iPhone and other iOS devices do not usually require manual sync. However, you can force a sync to start
be opening an app. Opening the Calendar app starts calendar sync. Opening the Contacts app causes
contacts to be synced immediately, etc.
Android phones do not usually require manual sync. Once the phone is connected to the network it
begins to sync on its own. If you want manual control, we recommend the Power Control widget. The
Power Control widget provides a sync button which can be used to enable and disable synchronization.
Note that the sync button affects synchronization with all your email accounts, not just with AkrutoSync.
Synchronizing automatically If you do nothing, your Windows Phone will try to initiate a sync on its own. After the initial
configuration Windows Phone will use the so called “push mode” and will sync new data as soon as it
becomes available. However, if the phone is unable to connect to AkrutoSync for some reason, the
phone will turn the “push mode” off and try to sync approximately every 30 to 60 minutes. The most
common reason the phone is unable to connect to AkrutoSync is that the phone turns off Wi-Fi when its
screen is locked and the phone is not plugged in to charge. Even after it turns Wi-Fi off, the phone will
still try to connect, but connection attempts will fail.
If you have chosen to sync over the Internet and leave AkrutoSync running, the phone will connect and
sync (either in push mode or periodically) without any intervention on your part.
If you have chosen to sync over your home network, leave AkrutoSync running, and plug the phone in to
charge overnight, the phone will connect and sync some time after you plug it in. This way it can sync
nightly without any intervention on your part.
Synchronizing Outlook Notes Android and Windows Phone devices do not have built-in apps to synchronize Outlook Notes. If you
want to synchronize Outlook Notes with an Android phone or tablet or with the Windows Phone, you
need to install an app on your device. Please refer to our list of apps and setup instructions at
http://www.akruto.com/synchronize-outlook-apps/.
For Android, there are several third-party apps that that you can use to synchronize Outlook Notes.
Please refer to the above list for instructions.
For the Windows Phone, you can use our own app – Basic Notes. The Basic Notes app has three
configuration settings that need to be set for the app to synchronize notes with Outlook. These settings
are server address, user name and password. The server address and the user name are displayed in the
main screen of AkrutoSync. The password is the same password that you created when you configured
AkrutoSync. Notes are synchronized only when the Basic Notes app is running. You can also use Viperal
Tasks, which can synchronize not just Tasks, but also Notes. Please refer to the above list for
instructions.
P a g e | 37 Copyright © 2014 Akruto, Inc.
iOS devices have a built-in Notes app that syncs with AkrutoSync. No special setup is needed to sync
Outlook Notes.
Synchronizing new data from phone to computer Any contacts, appointments, or tasks that were synchronized from your computer to your phone can be
edited on your phone. You do not need to do anything to make sure that your changes are synchronized
back to your computer.
However, if you create a new contact, appointment, or task on your phone and want it to be
synchronized with your computer, you need to make sure that this contact, appointment, or task is
associated with the right account on your phone. We will explain this using an example of adding a new
appointment.
To add a new appointment, start the calendar app on your phone. Tap the plus sign at the bottom of
your screen. The phone gives you an option to specify an account to associate with your new
appointment. Select the account that your phone uses to synchronize with your computer. Edit and
save your appointment.
Synchronizing your phone with two or more computers You can sync the same phone with multiple PCs. However, syncing your phone with two PCs will not
result in identical data on these PC's. Instead, the phone will maintain two sets of data. One set synced
with each PC. In each case, you can select whether or not to sync Contacts, Calendar and Tasks. So you
can, for example, decide to sync contacts from one PC, tasks from the other PC, and calendar from both
PCs. The two calendars will be shown on the phone in different colors.