alaskan village science
DESCRIPTION
Alaskan Village ScienceTRANSCRIPT


VillageScience
Alan Dick
Alaska Native Knowledge Network

Alaska Native Knowledge NetworkUniversity of Alaska FairbanksP.O. Box 756730Fairbanks, Alaska 99775-6730
©1997 by Alan DickAll rights reserved.Printed in the United States of America
Previous pilot edition printed April, 1997First printing August, 1999

I thoughtfully dedicate this book to my mentor of manyyears, Sinka Zaukar of Sleetmute, Alaska.
He was one of the most articulate and intelligent peopleI have ever met, yet his name can be found in no schoolrecords.
As I have written this book, I have heard his voice manytimes in my head and heart, and have recalled the sameimages that were present when we talked and did so manythings together.
Without him and his perceptions, this book would notexist in any form, nor would my life be remotely the same.


v
To the Students
I wrote this book to share with you some of the things I have learnedover the years. If I were to teach you in person, we wouldn’t follow theformat of this book, but this is the best I can do from here.
I have lived in the Alaska bush since 1966. My wife, Helen, is from LimeVillage, a small place with only forty to forty-five people.
We are both over fifty now and have five children, Anna, Elizabeth,William, Rachel, and Wayne. You might know them, or your older brothersor sisters might have played basketball with them. They played their highschool years in McGrath. We have eight grandchildren, the oldest is ten andthe youngest is almost one. We have lived mostly on the Kuskokwim Riverfrom Bethel and Aniak upriver to Sleetmute, Red Devil, Lime Village, McGrath,and Telida.
I have always loved science because it has made the world less threat-ening. While the world is certainly filled with mysteries that I will neverfathom, the basic physical principles by which it works have remained thesame for thousands of years. The same principles that keep the earth inorbit around the sun operate in the clutch of a chainsaw. I like that. It makesthe physical world more predictable. Understanding science has kept mefrom being stuck in out in the woods lots of times. I can figure things out.
I have shared my ideas in this book as simply as possible. In my nextbook, I will show you the thinking skills I used along the way. This book ismainly facts and activities. I hope you enjoy reading and doing it as much asI have enjoyed writing it.
Thanks for using my book.
Sincerely,
Alan Dick

Chapter 1: Cutting & Drying Fish1
Chapter 2: Sharpening Tools11
Chapter 3: Nails, Pegs, & Lashings21
Chapter 4: Falling Trees &Small-Scale Logging
29
Chapter 5: Guns35
Chapter 6: Chainsaw Clutch & Chain47
Chapter 7: Ice pick53
Skills, Tools &Craftsmanship

Chapter 1
Cutting &Drying Fish
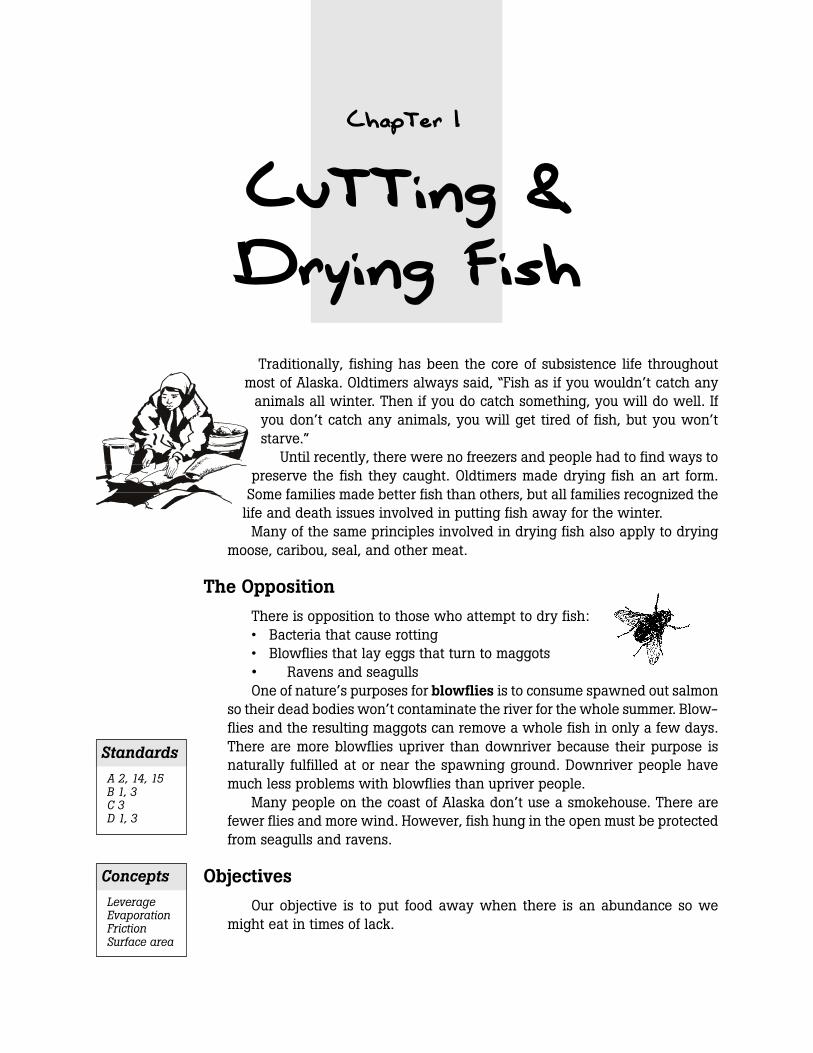
Traditionally, fishing has been the core of subsistence life throughoutmost of Alaska. Oldtimers always said, “Fish as if you wouldn’t catch any
animals all winter. Then if you do catch something, you will do well. Ifyou don’t catch any animals, you will get tired of fish, but you won’tstarve.”
Until recently, there were no freezers and people had to find ways topreserve the fish they caught. Oldtimers made drying fish an art form.
Some families made better fish than others, but all families recognized thelife and death issues involved in putting fish away for the winter.
Many of the same principles involved in drying fish also apply to dryingmoose, caribou, seal, and other meat.
The Opposition
There is opposition to those who attempt to dry fish:• Bacteria that cause rotting• Blowflies that lay eggs that turn to maggots• Ravens and seagullsOne of nature’s purposes for blowflies is to consume spawned out salmon
so their dead bodies won’t contaminate the river for the whole summer. Blow-flies and the resulting maggots can remove a whole fish in only a few days.There are more blowflies upriver than downriver because their purpose isnaturally fulfilled at or near the spawning ground. Downriver people havemuch less problems with blowflies than upriver people.
Many people on the coast of Alaska don’t use a smokehouse. There arefewer flies and more wind. However, fish hung in the open must be protectedfrom seagulls and ravens.
Objectives
Our objective is to put food away when there is an abundance so wemight eat in times of lack.
Standards
A 2, 14, 15B 1, 3C 3D 1, 3
Concepts
LeverageEvaporationFrictionSurface area
10 PART 1: SKILLS, TOOLS, & CRAFTSMANSHIP
There are three ways of preserving fish:• Freezing solidifies the water in the fish and lowers the temperature
below which bacteria are active.• Salting in a barrel removes much of the moisture and creates an inhos-
pitable environment for the bacteria.• Drying fish in the presence of cool, dry smoke removes the moisture
necessary for bacterial growth.
Conditions
There are a couple of conditions necessary for fish to rot:• There must be enough moisture for the bacteria to grow. Drying re-
moves the necessary moisture.• The temperature must be above freezing for bacteria to flourish. As the
temperature goes up, bacteria become more active. However, fish oilcan chemically decompose apart from bacteria at temperatures wellbelow freezing.
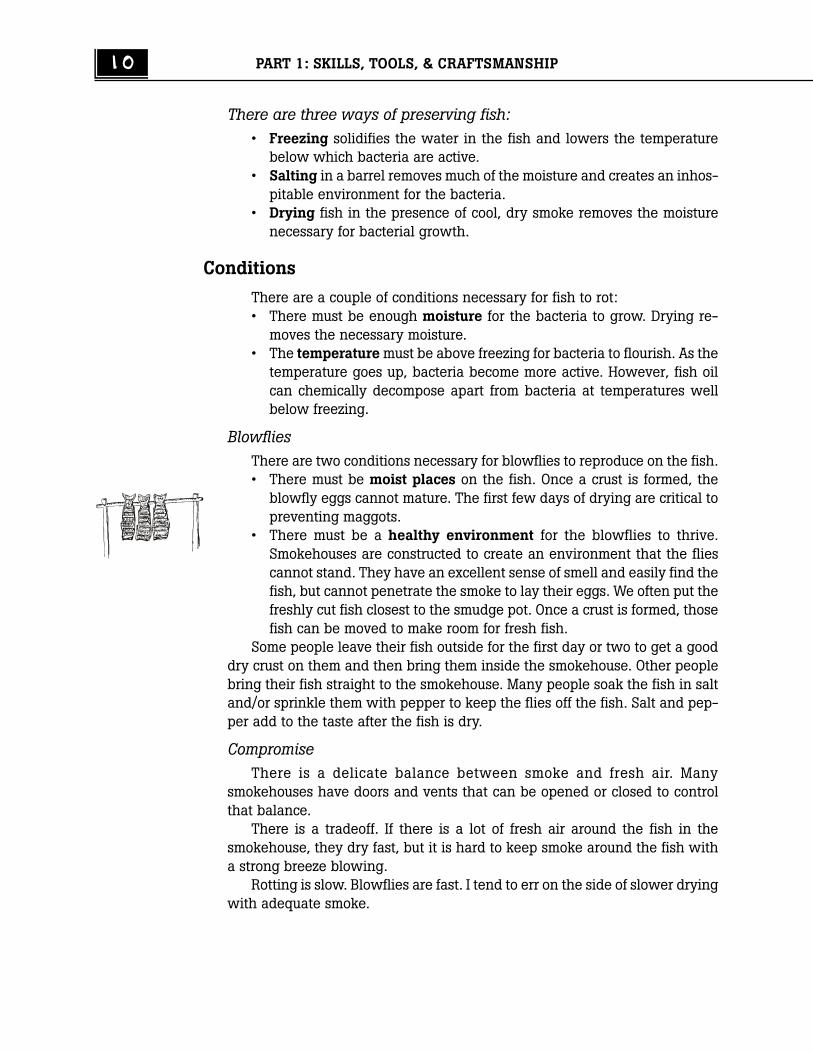
BlowfliesThere are two conditions necessary for blowflies to reproduce on the fish.• There must be moist places on the fish. Once a crust is formed, the
blowfly eggs cannot mature. The first few days of drying are critical topreventing maggots.
• There must be a healthy environment for the blowflies to thrive.Smokehouses are constructed to create an environment that the fliescannot stand. They have an excellent sense of smell and easily find thefish, but cannot penetrate the smoke to lay their eggs. We often put thefreshly cut fish closest to the smudge pot. Once a crust is formed, thosefish can be moved to make room for fresh fish.
Some people leave their fish outside for the first day or two to get a gooddry crust on them and then bring them inside the smokehouse. Other peoplebring their fish straight to the smokehouse. Many people soak the fish in saltand/or sprinkle them with pepper to keep the flies off the fish. Salt and pep-per add to the taste after the fish is dry.
CompromiseThere is a delicate balance between smoke and fresh air. Many
smokehouses have doors and vents that can be opened or closed to controlthat balance.
There is a tradeoff. If there is a lot of fresh air around the fish in thesmokehouse, they dry fast, but it is hard to keep smoke around the fish witha strong breeze blowing.
Rotting is slow. Blowflies are fast. I tend to err on the side of slower dryingwith adequate smoke.
Chapter 1: Cutting & Drying Fish 11
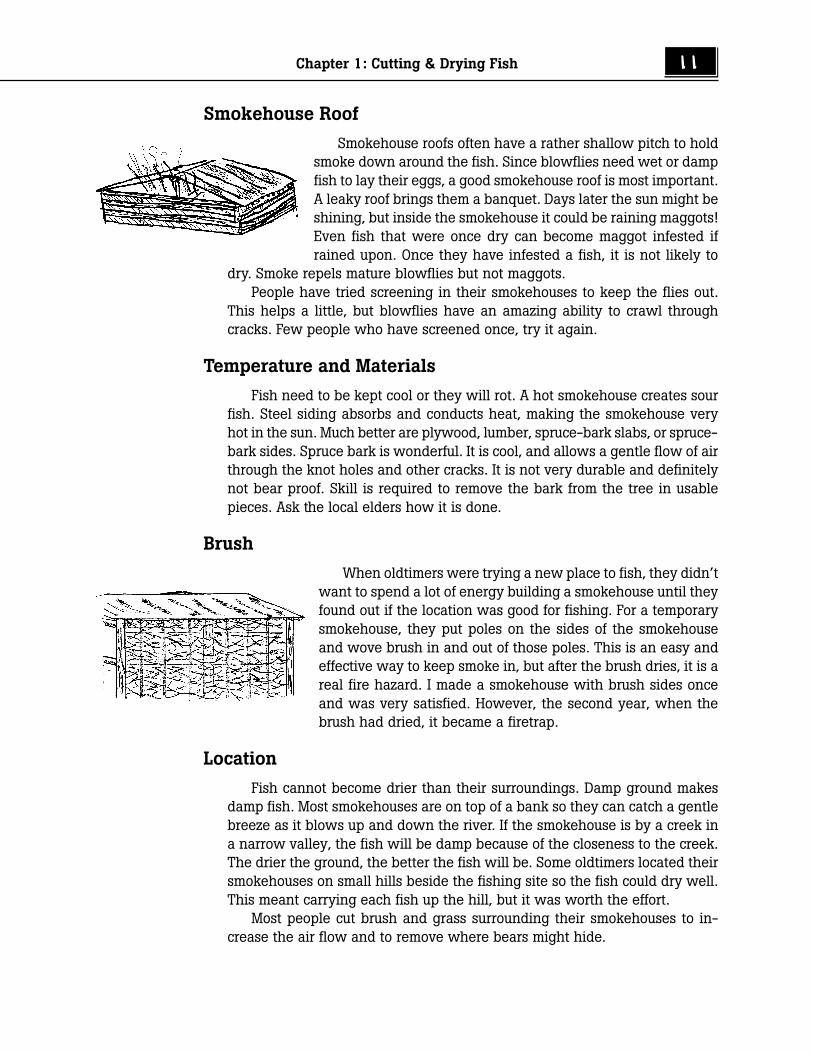
Smokehouse Roof
Smokehouse roofs often have a rather shallow pitch to holdsmoke down around the fish. Since blowflies need wet or dampfish to lay their eggs, a good smokehouse roof is most important.A leaky roof brings them a banquet. Days later the sun might beshining, but inside the smokehouse it could be raining maggots!Even fish that were once dry can become maggot infested ifrained upon. Once they have infested a fish, it is not likely to
dry. Smoke repels mature blowflies but not maggots.People have tried screening in their smokehouses to keep the flies out.
This helps a little, but blowflies have an amazing ability to crawl throughcracks. Few people who have screened once, try it again.
Temperature and Materials
Fish need to be kept cool or they will rot. A hot smokehouse creates sourfish. Steel siding absorbs and conducts heat, making the smokehouse veryhot in the sun. Much better are plywood, lumber, spruce-bark slabs, or spruce-bark sides. Spruce bark is wonderful. It is cool, and allows a gentle flow of airthrough the knot holes and other cracks. It is not very durable and definitelynot bear proof. Skill is required to remove the bark from the tree in usablepieces. Ask the local elders how it is done.
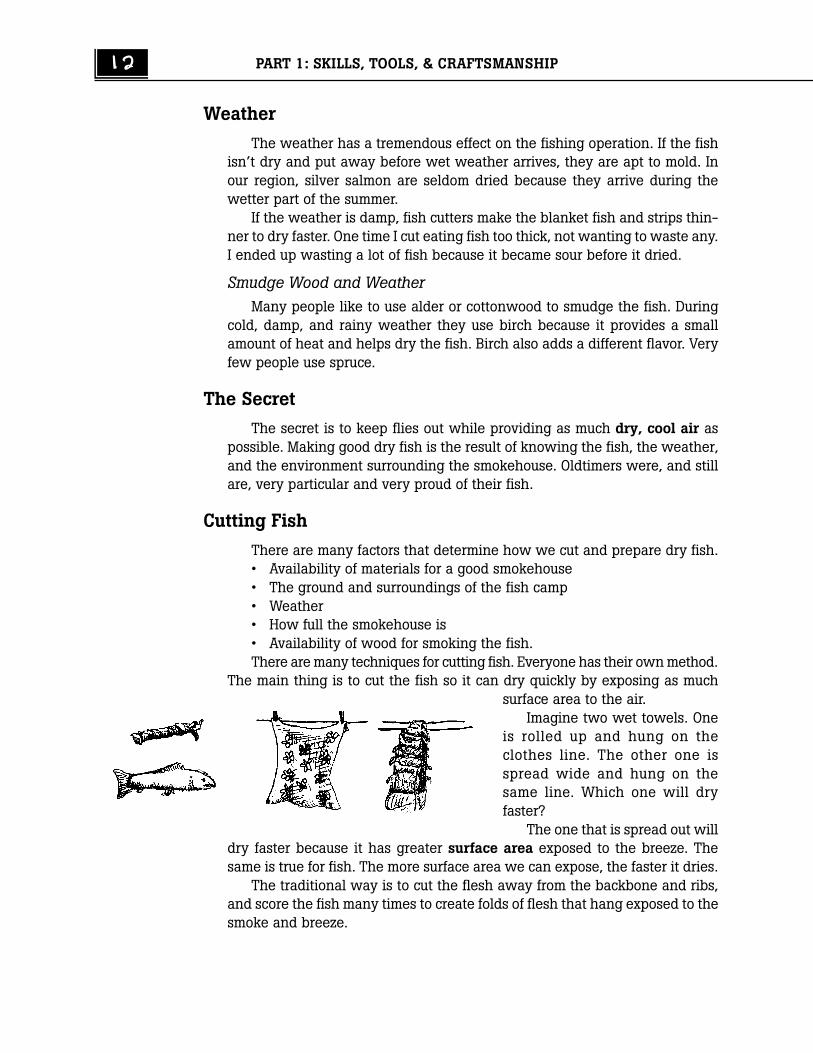
Brush
When oldtimers were trying a new place to fish, they didn’twant to spend a lot of energy building a smokehouse until theyfound out if the location was good for fishing. For a temporarysmokehouse, they put poles on the sides of the smokehouseand wove brush in and out of those poles. This is an easy andeffective way to keep smoke in, but after the brush dries, it is areal fire hazard. I made a smokehouse with brush sides onceand was very satisfied. However, the second year, when thebrush had dried, it became a firetrap.
Location
Fish cannot become drier than their surroundings. Damp ground makesdamp fish. Most smokehouses are on top of a bank so they can catch a gentlebreeze as it blows up and down the river. If the smokehouse is by a creek ina narrow valley, the fish will be damp because of the closeness to the creek.The drier the ground, the better the fish will be. Some oldtimers located theirsmokehouses on small hills beside the fishing site so the fish could dry well.This meant carrying each fish up the hill, but it was worth the effort.
Most people cut brush and grass surrounding their smokehouses to in-crease the air flow and to remove where bears might hide.
12 PART 1: SKILLS, TOOLS, & CRAFTSMANSHIP
Weather
The weather has a tremendous effect on the fishing operation. If the fishisn’t dry and put away before wet weather arrives, they are apt to mold. Inour region, silver salmon are seldom dried because they arrive during thewetter part of the summer.
If the weather is damp, fish cutters make the blanket fish and strips thin-ner to dry faster. One time I cut eating fish too thick, not wanting to waste any.I ended up wasting a lot of fish because it became sour before it dried.
Smudge Wood and WeatherMany people like to use alder or cottonwood to smudge the fish. During
cold, damp, and rainy weather they use birch because it provides a smallamount of heat and helps dry the fish. Birch also adds a different flavor. Veryfew people use spruce.
The Secret
The secret is to keep flies out while providing as much dry, cool air aspossible. Making good dry fish is the result of knowing the fish, the weather,and the environment surrounding the smokehouse. Oldtimers were, and stillare, very particular and very proud of their fish.
Cutting Fish
There are many factors that determine how we cut and prepare dry fish.• Availability of materials for a good smokehouse• The ground and surroundings of the fish camp• Weather• How full the smokehouse is• Availability of wood for smoking the fish.There are many techniques for cutting fish. Everyone has their own method.
The main thing is to cut the fish so it can dry quickly by exposing as muchsurface area to the air.
Imagine two wet towels. Oneis rolled up and hung on theclothes line. The other one isspread wide and hung on thesame line. Which one will dryfaster?
The one that is spread out willdry faster because it has greater surface area exposed to the breeze. Thesame is true for fish. The more surface area we can expose, the faster it dries.
The traditional way is to cut the flesh away from the backbone and ribs,and score the fish many times to create folds of flesh that hang exposed to thesmoke and breeze.
Chapter 1: Cutting & Drying Fish 13
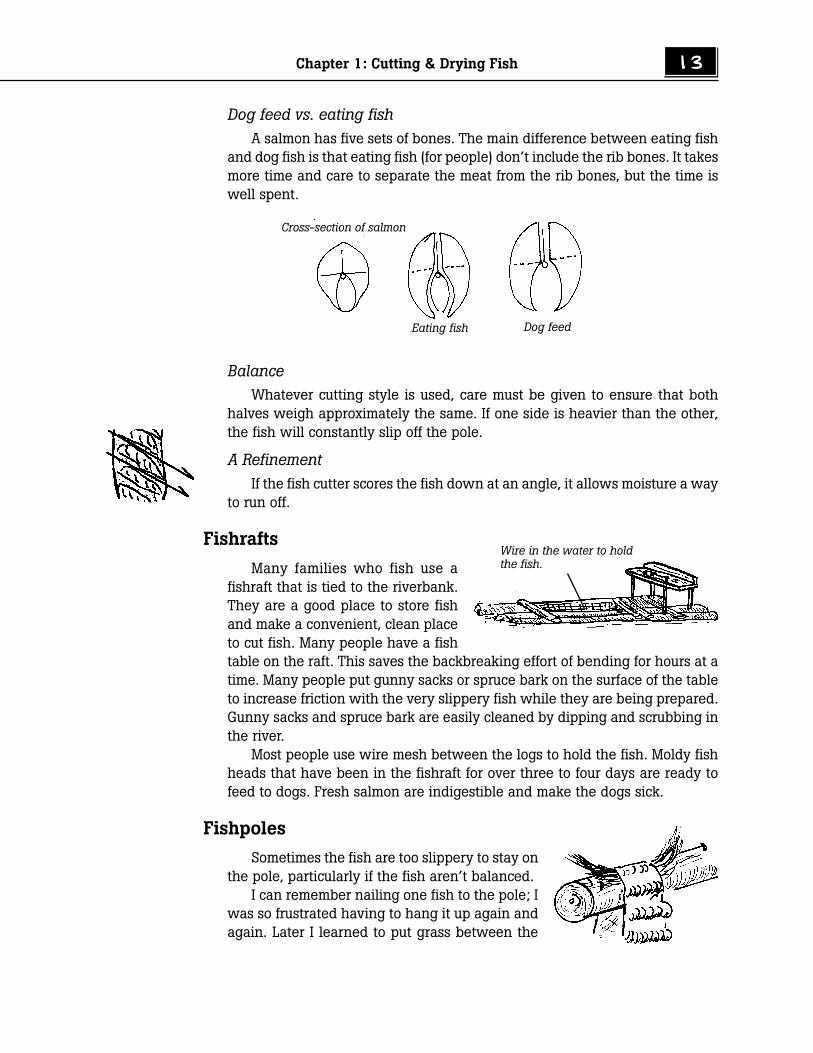
Dog feed vs. eating fishA salmon has five sets of bones. The main difference between eating fish
and dog fish is that eating fish (for people) don’t include the rib bones. It takesmore time and care to separate the meat from the rib bones, but the time iswell spent.
BalanceWhatever cutting style is used, care must be given to ensure that both
halves weigh approximately the same. If one side is heavier than the other,the fish will constantly slip off the pole.
A RefinementIf the fish cutter scores the fish down at an angle, it allows moisture a way
to run off.
Fishrafts
Many families who fish use afishraft that is tied to the riverbank.They are a good place to store fishand make a convenient, clean placeto cut fish. Many people have a fishtable on the raft. This saves the backbreaking effort of bending for hours at atime. Many people put gunny sacks or spruce bark on the surface of the tableto increase friction with the very slippery fish while they are being prepared.Gunny sacks and spruce bark are easily cleaned by dipping and scrubbing inthe river.
Most people use wire mesh between the logs to hold the fish. Moldy fishheads that have been in the fishraft for over three to four days are ready tofeed to dogs. Fresh salmon are indigestible and make the dogs sick.
Fishpoles
Sometimes the fish are too slippery to stay onthe pole, particularly if the fish aren’t balanced.
I can remember nailing one fish to the pole; Iwas so frustrated having to hang it up again andagain. Later I learned to put grass between the
Wire in the water to holdthe fish.
Cross-section of salmon
Eating fish Dog feed
14 PART 1: SKILLS, TOOLS, & CRAFTSMANSHIP
pole and the fish. This increased the friction between the two and actuallydried the fish on the point of contact.
Spruce poles are the most satisfactory. The bark is rough enough to holdmost fish from sliding.
Upriver Trick
Fish caught downriver are in good shape—fat and silvery in skin color.Fish caught upriver are very lean. They often dry out brittle and hard to eat.One trick upriver people use is to leave the fish in the fishraft overnight. Theymust be under water. The enzymes in the fish soften the meat and make thefish better eating when dry. However, this method makes them prone to sourand should only be done in good weather. Sometimes people leave the fish inthe raft overnight because they are lazy. Special care must be given to fish orthey will easily sour.
Storing Dry Fish
A well ventilated cache is the best place to store dry fish.They need to be off the damp ground and under a good roof.
Dry fish can mold if they become the slightest bit damp.Moldy fish doesn’t taste good at all.
Eating fish needs to be stored in a very dry place.Nowadays people vacuum seal eating fish and
store it in the freezer with a little vegetable oil.This is by far the best way if you have afreezer.
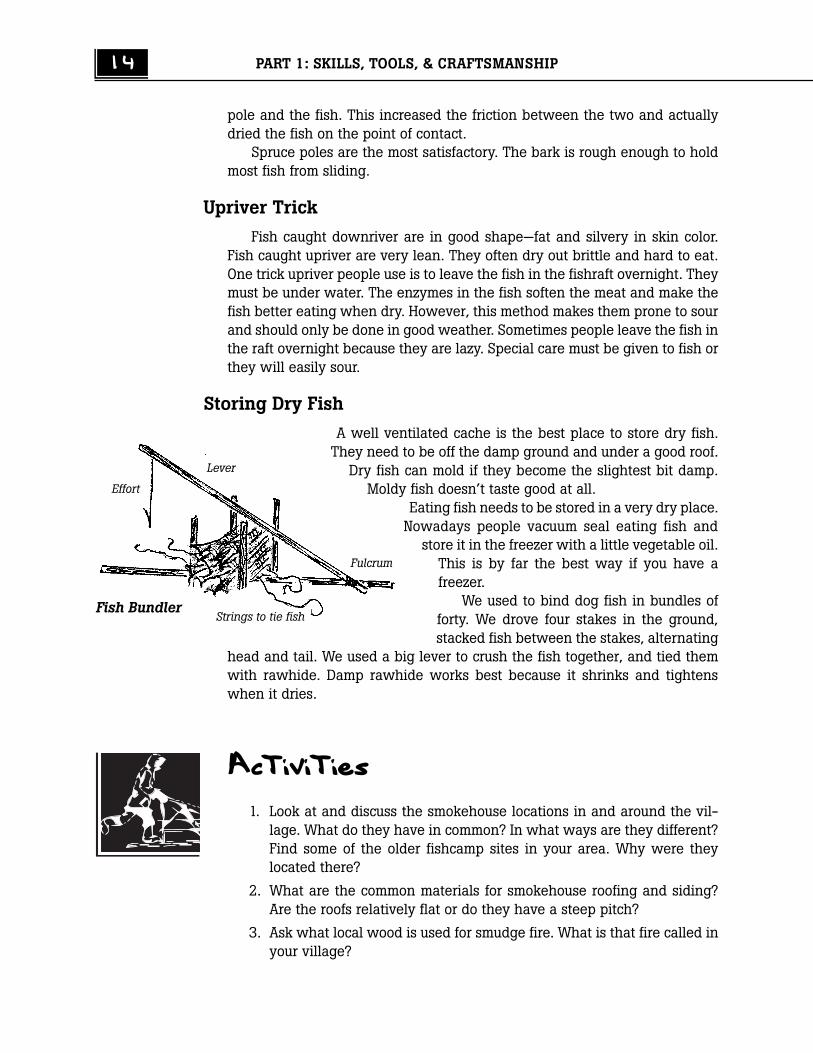
We used to bind dog fish in bundles offorty. We drove four stakes in the ground,stacked fish between the stakes, alternating
head and tail. We used a big lever to crush the fish together, and tied themwith rawhide. Damp rawhide works best because it shrinks and tightenswhen it dries.
Activities
1. Look at and discuss the smokehouse locations in and around the vil-lage. What do they have in common? In what ways are they different?Find some of the older fishcamp sites in your area. Why were theylocated there?
2. What are the common materials for smokehouse roofing and siding?Are the roofs relatively flat or do they have a steep pitch?
3. Ask what local wood is used for smudge fire. What is that fire called inyour village?
Fish Bundler
Lever
Effort
Strings to tie fish
Fulcrum
Chapter 1: Cutting & Drying Fish 15
4. Ask people in your village what changes they make in their dryingprocess when the weather turns bad.
5. Do people in your village usually bring the fish right into the smokehouseafter cutting or do they leave them on poles outside for a few days toget a dry crust?
6. Make a trap for blowflies like a fishtrap. Use a jar with a screen for thefunnel. Use a piece of sour fish for bait. Can you reduce the number ofblowflies in your area?
7. Cut a fish into three pieces. Put one in the freezer. Score the other andhang it to dry. Leave the third one, as it is, in a warm place. In a day ortwo, compare the three. What can you say about preserving fish?
8. Leave a fish outside where blowflies can lay their eggs. Once the mag-gots start to crawl around, bring the fish into the smokehouse and putthe fish directly into the smoke. Does the smoke get rid of the maggots?Does the fish ever dry properly? What can you say about preventionbeing better than a cure?
9. Get samples of different people’s fish throughout the village. Being care-ful not to insult someone’s cutting style, compare them. Compare dogfish and eating fish.
10. Why do people cut king salmon in strips rather than flat like red salmonor other eating fish?
11. Try to find some dry dog fish that has the evidence of maggots. Canyou see and smell the difference from that part and other unspoiledparts?
12. Ask someone how to cut whitefish in the fall. How is this different fromsalmon in the summer? Why do you think there are differences? Distin-guish between cutting for dogs and for people.
13. Hang fish on a spruce, birch, or willow pole. Can you tell the differencein terms of friction between the pole and fish?
14. How are salmon bundled and stored in your village? If this is a thing ofthe past, ask how it used to be done.
15. Why do people make and use fishrafts? In your village, what do theyuse on top of the cutting table to keep the fish from slipping around?
16. Find out about the fermenting methods used in your village for prepar-ing fish heads. Have you ever tried “smelly heads?”
16 PART 1: SKILLS, TOOLS, & CRAFTSMANSHIP
Student Response
1. What are the two oppositions of those trying to dry fish?
2. What keeps blowflies away?
3. What requirements are there for fish to rot? Which of these is the easi-est to remove?
4. What are the factors that determine how we cut and prepare fish?
5. Why is a good roof so important for a smokehouse?
6. What are some of the better materials for smokehouse sides? Why issheet iron not the best?
7. Describe what makes a location good for a smokehouse.
8. What is the secret of drying fish?
9. is increased when we cut fish. This speeds the dry-ing process.
10. What changes need to be made in the way fish are cut during wetweather?
11. What changes might be made in the smudge wood during rainyweather?
12. What type of tree makes the best fishpole? Why?
13. Describe one way of bundling and storing fish.
Math
1. Nick has 7 dogs. He figures that he needs 1 fish per day for each dogfrom freezeup to breakup, from October 1 through May 7. How manyfish does he need to dry for the winter? (He can feed them fresh fishfrom his net during the summer.)
2. Nick manages to get 1,400 fish. He gives away 2 dogs on January 1.Will he have enough fish to get through breakup on May 7?
3. Marjory has 5 dogs to feed from October 1 through May 7. She plans tocook for her dogs, supplementing with oatmeal. She will only need ahalf a fish per day for each dog. She has 600 fish. Will she have enoughfish to make it to breakup?
4. Nick (from problem #1) has a chance to go to work instead of fishing.He figures that he can make $1,800 (after taxes) in the time he mightbe fishing. It costs 50 cents per day to feed a dog. Financially, is hebetter off fishing or going to work?
Chapter 1: Cutting & Drying Fish 17
5. At 50 cents per day for commercial dog food, how much does it cost tofeed a dog from October 1 through May 7 for the life of the dog (12years)?
6. Henry’s smokehouse has poles that are 6 feet long. Each pole can hold9 fish on average. He counts the poles and finds that he has 127 polesfull of fish. He needs 1400 fish to get his dogs through the winter. Canhe stop fishing or should he fish more?
7. In Ed’s village an average king salmon dries out to 5 pounds of strips.He has 90 pounds of strips, but he needs a total of 150 pounds to getthrough the winter if he will have enough to give away at Christmas.How many more king salmon does he need?

Chapter 2
Sharpening Tools
A sharp tool is truly a thing of beauty. A dull tool is the cause of frustrationand discouragement. I wish someone had taught me as a young man how tosharpen things. It took many years to learn. I was often frustrated. I did poorwork, and broke many of the projects I was working on.
There is a unique feeling that comes from passing a hand plane over aboard, producing a long thin shaving, or passing a sharp knife through a fish,and with a few strokes, have it ready to hang on the rack.
The idea behind sharpening an edge is simple. Reduce the surface area ofthe blade so it will penetrate the wood, meat, fish, ice etc. with as little effortas possible. A sharp tool penetrates easily. A dull tool has greater surface areaon the edge, and resists penetrating.
The difference between sharp and dull is most noticeable when usinghand tools. When using power tools the motor does the work.
My wife’s grandma tested her knife by holding up a hair. If she could cutthe dangling hair with one pass of her knife it was sharp enough for tanningand making rawhide. I have experimented for years trying to learn how tosharpen to that level.
There are three considerations in sharpening a tool:• At what angle is the edge formed?• How thick or thin is the actual edge?• How rough or smooth is the edge and sides of the blade?
Angle
Many directions for sharpening say, “Sharpen the tool at 30° or 25°.” Thematerial we are cutting and the toughness of the steel in the blade deter-mine the best angle to sharpen the edge. I often wonder how the manufac-turer could pretend to know what I am cutting.
Picture the Extremes
How thick or thin should Imake the edge?
Imagine trying to chop atree with a splitting maul. Theblade is too thick. It will neverpenetrate the wood deeply
Standards
A 15B 1, 3C 3D 1, 3, 4
Concepts
Surface areaLeverageFriction
20 PART 1: SKILLS, TOOLS, & CRAFTSMANSHIP
enough to chop down the tree.Imagine again trying to cut down the same tree with a razor blade. The
blade can penetrate the wood fibers, but is so thin it will break on first im-pact.
Conclusion: if a blade is too thick, even if the edge is sharp, it will take toomuch energy to penetrate. If the edge is too thin, the blade will break.
Direction of Force
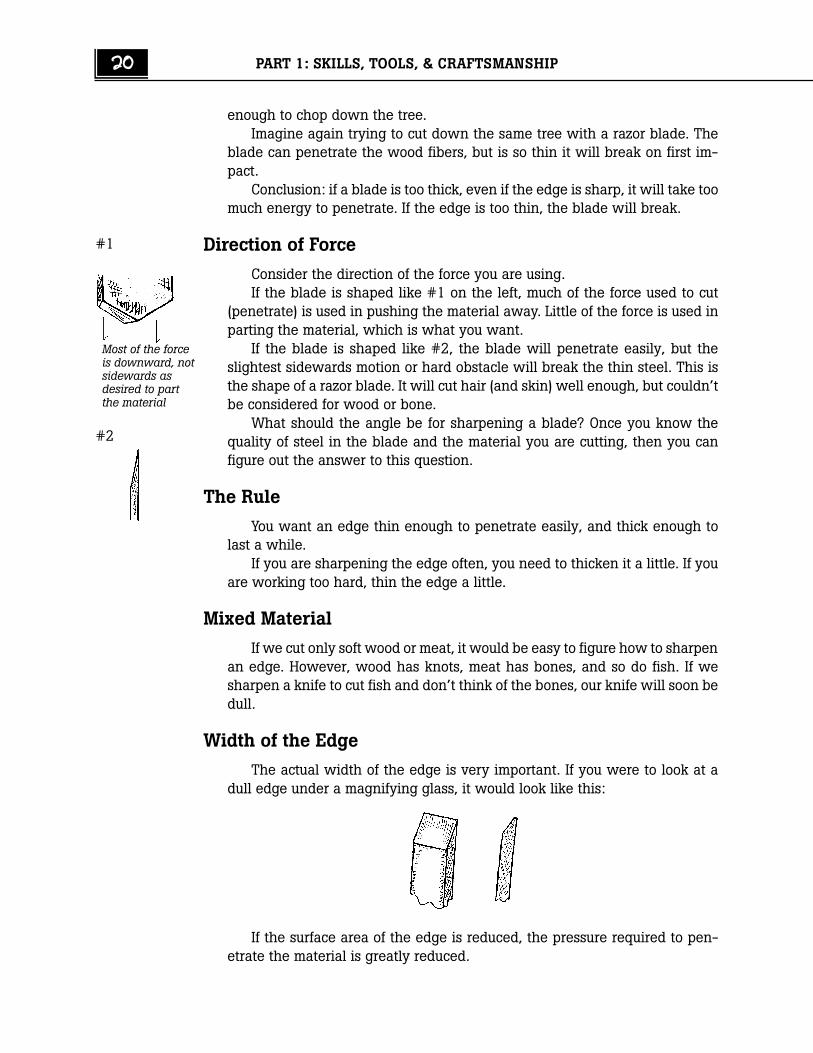
Consider the direction of the force you are using.If the blade is shaped like #1 on the left, much of the force used to cut
(penetrate) is used in pushing the material away. Little of the force is used inparting the material, which is what you want.
If the blade is shaped like #2, the blade will penetrate easily, but theslightest sidewards motion or hard obstacle will break the thin steel. This isthe shape of a razor blade. It will cut hair (and skin) well enough, but couldn’tbe considered for wood or bone.
What should the angle be for sharpening a blade? Once you know thequality of steel in the blade and the material you are cutting, then you canfigure out the answer to this question.
The Rule
You want an edge thin enough to penetrate easily, and thick enough tolast a while.
If you are sharpening the edge often, you need to thicken it a little. If youare working too hard, thin the edge a little.
Mixed Material
If we cut only soft wood or meat, it would be easy to figure how to sharpenan edge. However, wood has knots, meat has bones, and so do fish. If wesharpen a knife to cut fish and don’t think of the bones, our knife will soon bedull.
Width of the Edge
The actual width of the edge is very important. If you were to look at adull edge under a magnifying glass, it would look like this:
If the surface area of the edge is reduced, the pressure required to pen-etrate the material is greatly reduced.
Most of the forceis downward, notsidewards asdesired to partthe material
#1
#2

Chapter 2: Sharpening 21
With a sharp edge like the one on the left, the surface area is almost zero,and all the force can be used in separating the material. This makes a tre-mendous difference if you are cutting fish all day.
If the edge is chipped, it obviously has a large surface area that resistspenetrating the wood, meat or fish. One chip in a knife or axe can make atiring difference.
New axes or other tools always come with an edge that is far too thick.You must thin the edge to your needs.
As you sharpen, there will be a hair of metal that clings to the edge of theblade. In some applications, you will want to remove it, but for cutting fish ormeat, that “hair edge” helps sever the meat.
Digging Tools
A hoe, pick, or shovel should be sharpened to make digging easier. Thethickness of the edge is determined by the kind of dirt you are working. If it isloose soil with no rocks, the edge can be thin to cut roots. If there are hardrocks in the soil, the edge must be thicker.
Sharpened on One Side
Some tools are sharpened on one side only.Oldtimers used to sharpen their axes on one sidefor chopping and shaping boat and sled parts.Shovels, hand planes, drills, circular saw blades,etc., are all sharpened on only one side. Tradi-tional tanning and skinning knives, including ulus,are sharpened on one side.
The flat surface of the blade on the right will follow straight down a skinor wood surface without deflecting as the one on the left might.
Rough or SmoothIf an edge is rough, it will have considerable friction
with the surface it is penetrating. When cutting wood, avery smooth surface makes entrance of the blade mucheasier.
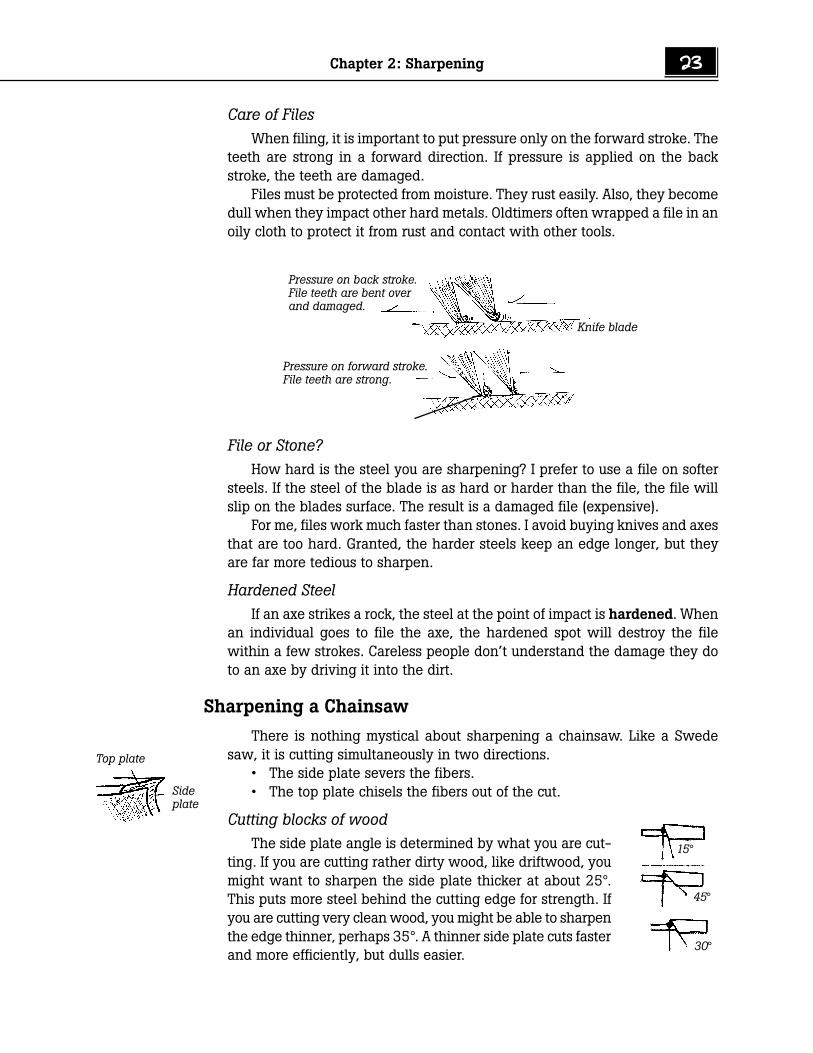
Swede SawYears ago, sharpening a Swede (or two-man saw) was an art that every-
one knew. Since the advent of chainsaws, it is but a memory, but there areprinciples involved that apply in other blades. A combination blade for a cir-cular saw has the same teeth as a Swede saw and cuts in an identical man-ner.
A Swede saw does two things in two directions:1. The teeth shaped in figure A cut the fibers. They must have this shape
as they cut in both directions, forward and backward.2. The tooth in figure B chisels out the severed fibers. It is very important
Grindto desiredthickness
Dow
nwar
d fo
rce
Lateralforce
Lateralforce
B. Chisel tooth
A. Fiber cutting tooth
22 PART 1: SKILLS, TOOLS, & CRAFTSMANSHIP
that the chisel teeth be slightly lower than the cutting teeth men-tioned above.
The chisel teeth remove the severed wood fibers to make room for thecutting teeth to go deeper.
“Setting” a saw means bending the tips of the teeth slightly outward sothe cut is wider than the thickness of the blade. If there is no set to a blade,friction with the sides of the cut will tire the loggers very quickly. If the set istoo wide, the loggers work too hard removing more wood than is necessary.
The sides of the blade must be smooth and rust free. The friction of a rustysaw blade in the cut is tiring, especially when it is a pitchy spruce tree. Somepeople lubricate the blade with a bar of soap.
Stones, Files, and Steels
There are three ways to shape a blade:• With a file. Files work well on softer steels.• With a stone. Hand stones do well on hard steels, but don’t work as
fast as files.• With a sharpening steel. Steels put a good finish cutting edge on a
knife to be used for meat or fish. They don’t remove much material.They shape and texture the edge. Some sharpening steels are embed-ded with durable diamonds. Some sharpeners are made of porcelain.
Coarse or Fine?How much of the blade must be removed?Coarse. If there is much steel that needs to come off, a coarse file or stone
is faster. However, caution must be taken with electric grinding wheels. Fric-tion overheats the blade so that it loses its temper1, turning the edge soft andblue. It will then dull quite easily. Fine knifemakers grind the blades underwater to keep the steel from overheating and to keep the grindstone fromplugging with filings.
Fine. If there isn’t much steel to remove, a fine file or stone is in order toput the finishing touches on the edge.
Care of StonesSome people oil a hand stone to
float the ground steel filings. Otherpeople use saliva. Either methodkeeps the stone from becomingglazed and plugged. It can’t cut steelwith the abrasive particles hiddenunder a layer of debris.
1. Temper means hardness of the steel. Steel can lose its temper or hardness if it is heated and cooledslowly. Temper is created by heating the steel to a given color—blue, red, white—and quickly quenching(cooling) it in cold water. This hardens the steel. Some steels are easy to temper; others because of theirlow carbon content, are difficult or impossible to temper.
Saw teeth “set” toeither side ofcenter line
Plugged stone
Chapter 2: Sharpening 23
Care of FilesWhen filing, it is important to put pressure only on the forward stroke. The
teeth are strong in a forward direction. If pressure is applied on the backstroke, the teeth are damaged.
Files must be protected from moisture. They rust easily. Also, they becomedull when they impact other hard metals. Oldtimers often wrapped a file in anoily cloth to protect it from rust and contact with other tools.
File or Stone?How hard is the steel you are sharpening? I prefer to use a file on softer
steels. If the steel of the blade is as hard or harder than the file, the file willslip on the blades surface. The result is a damaged file (expensive).
For me, files work much faster than stones. I avoid buying knives and axesthat are too hard. Granted, the harder steels keep an edge longer, but theyare far more tedious to sharpen.
Hardened SteelIf an axe strikes a rock, the steel at the point of impact is hardened. When
an individual goes to file the axe, the hardened spot will destroy the filewithin a few strokes. Careless people don’t understand the damage they doto an axe by driving it into the dirt.
Sharpening a Chainsaw
There is nothing mystical about sharpening a chainsaw. Like a Swedesaw, it is cutting simultaneously in two directions.
• The side plate severs the fibers.• The top plate chisels the fibers out of the cut.
Cutting blocks of woodThe side plate angle is determined by what you are cut-
ting. If you are cutting rather dirty wood, like driftwood, youmight want to sharpen the side plate thicker at about 25°.This puts more steel behind the cutting edge for strength. Ifyou are cutting very clean wood, you might be able to sharpenthe edge thinner, perhaps 35°. A thinner side plate cuts fasterand more efficiently, but dulls easier.
15°
45°
30°
Top plate
Sideplate
Pressure on back stroke.File teeth are bent overand damaged.
Pressure on forward stroke.File teeth are strong.
Knife blade
24 PART 1: SKILLS, TOOLS, & CRAFTSMANSHIP
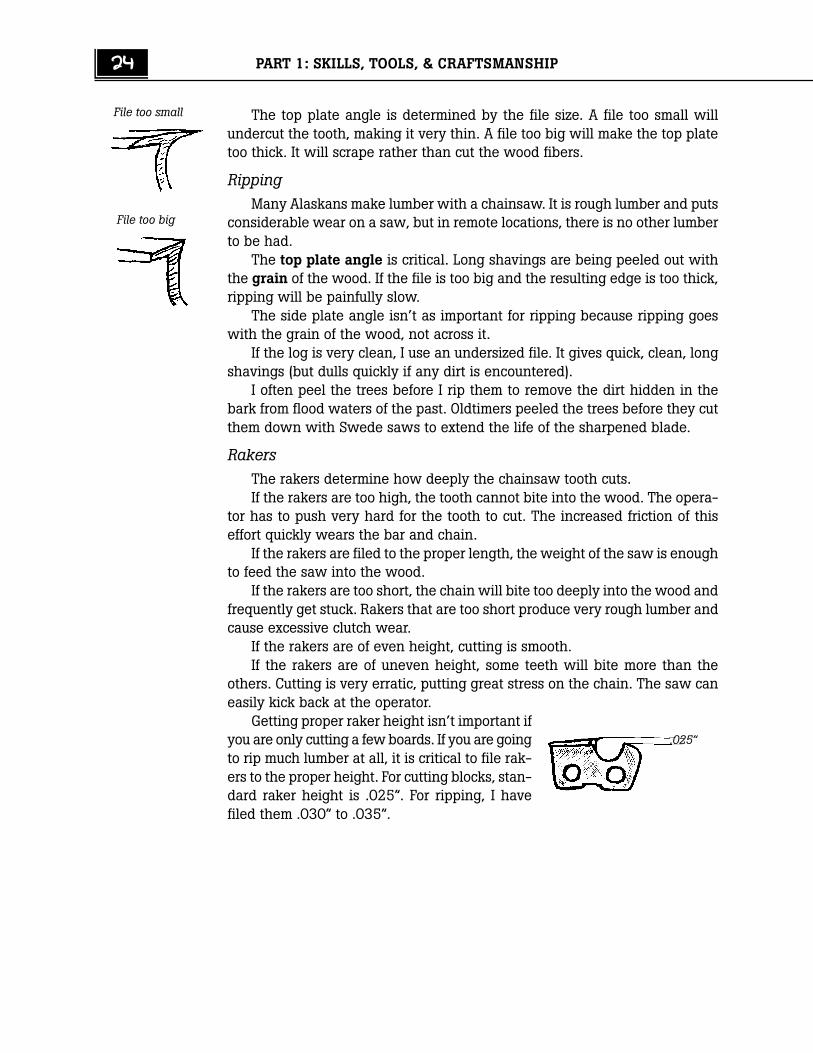
The top plate angle is determined by the file size. A file too small willundercut the tooth, making it very thin. A file too big will make the top platetoo thick. It will scrape rather than cut the wood fibers.
RippingMany Alaskans make lumber with a chainsaw. It is rough lumber and puts
considerable wear on a saw, but in remote locations, there is no other lumberto be had.
The top plate angle is critical. Long shavings are being peeled out withthe grain of the wood. If the file is too big and the resulting edge is too thick,ripping will be painfully slow.
The side plate angle isn’t as important for ripping because ripping goeswith the grain of the wood, not across it.
If the log is very clean, I use an undersized file. It gives quick, clean, longshavings (but dulls quickly if any dirt is encountered).
I often peel the trees before I rip them to remove the dirt hidden in thebark from flood waters of the past. Oldtimers peeled the trees before they cutthem down with Swede saws to extend the life of the sharpened blade.
RakersThe rakers determine how deeply the chainsaw tooth cuts.If the rakers are too high, the tooth cannot bite into the wood. The opera-
tor has to push very hard for the tooth to cut. The increased friction of thiseffort quickly wears the bar and chain.
If the rakers are filed to the proper length, the weight of the saw is enoughto feed the saw into the wood.
If the rakers are too short, the chain will bite too deeply into the wood andfrequently get stuck. Rakers that are too short produce very rough lumber andcause excessive clutch wear.
If the rakers are of even height, cutting is smooth.If the rakers are of uneven height, some teeth will bite more than the
others. Cutting is very erratic, putting great stress on the chain. The saw caneasily kick back at the operator.
Getting proper raker height isn’t important ifyou are only cutting a few boards. If you are goingto rip much lumber at all, it is critical to file rak-ers to the proper height. For cutting blocks, stan-dard raker height is .025”. For ripping, I havefiled them .030” to .035”.
File too small
File too big
.025”
Chapter 2: Sharpening 25
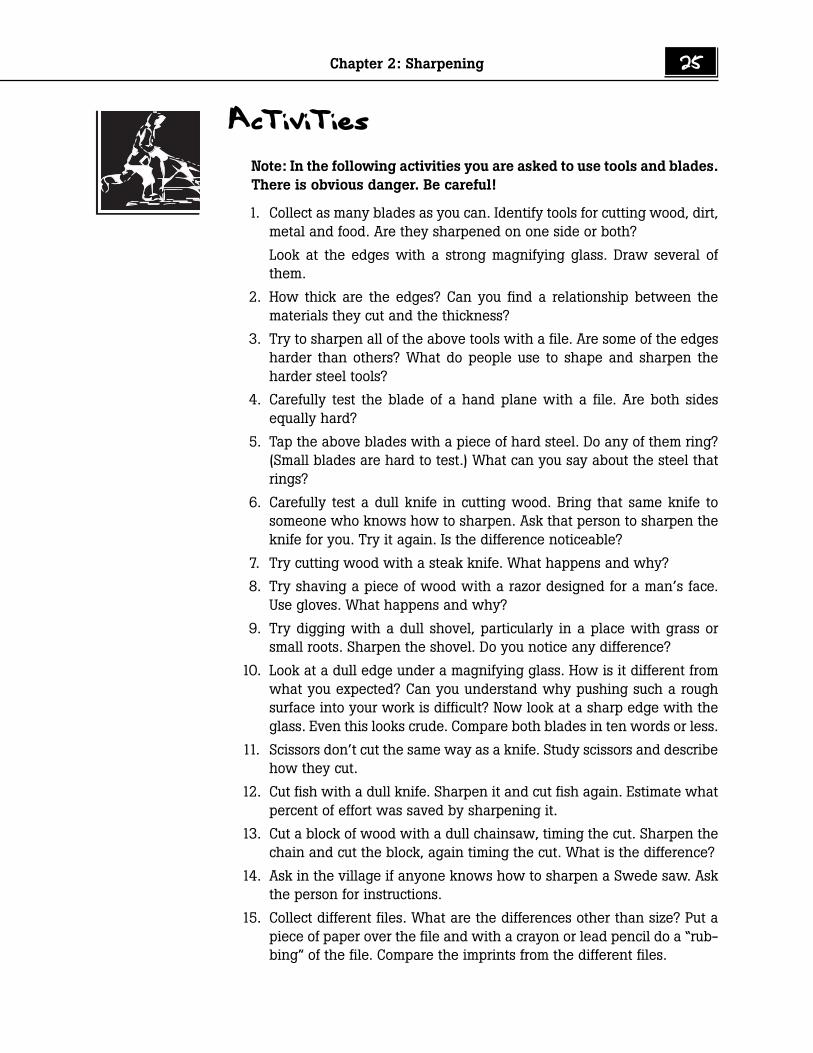
Activities
Note: In the following activities you are asked to use tools and blades.There is obvious danger. Be careful!
1. Collect as many blades as you can. Identify tools for cutting wood, dirt,metal and food. Are they sharpened on one side or both?
Look at the edges with a strong magnifying glass. Draw several ofthem.
2. How thick are the edges? Can you find a relationship between thematerials they cut and the thickness?
3. Try to sharpen all of the above tools with a file. Are some of the edgesharder than others? What do people use to shape and sharpen theharder steel tools?
4. Carefully test the blade of a hand plane with a file. Are both sidesequally hard?
5. Tap the above blades with a piece of hard steel. Do any of them ring?(Small blades are hard to test.) What can you say about the steel thatrings?
6. Carefully test a dull knife in cutting wood. Bring that same knife tosomeone who knows how to sharpen. Ask that person to sharpen theknife for you. Try it again. Is the difference noticeable?
7. Try cutting wood with a steak knife. What happens and why?
8. Try shaving a piece of wood with a razor designed for a man’s face.Use gloves. What happens and why?
9. Try digging with a dull shovel, particularly in a place with grass orsmall roots. Sharpen the shovel. Do you notice any difference?
10. Look at a dull edge under a magnifying glass. How is it different fromwhat you expected? Can you understand why pushing such a roughsurface into your work is difficult? Now look at a sharp edge with theglass. Even this looks crude. Compare both blades in ten words or less.
11. Scissors don’t cut the same way as a knife. Study scissors and describehow they cut.
12. Cut fish with a dull knife. Sharpen it and cut fish again. Estimate whatpercent of effort was saved by sharpening it.
13. Cut a block of wood with a dull chainsaw, timing the cut. Sharpen thechain and cut the block, again timing the cut. What is the difference?
14. Ask in the village if anyone knows how to sharpen a Swede saw. Askthe person for instructions.
15. Collect different files. What are the differences other than size? Put apiece of paper over the file and with a crayon or lead pencil do a “rub-bing” of the file. Compare the imprints from the different files.
26 PART 1: SKILLS, TOOLS, & CRAFTSMANSHIP
16. With an old file, file aluminum (like an old prop). What problem arises?
17. Compare the two sides of a sharpening stone. Which one is for fasterand which one for finer sharpening?
18. Sharpen a knife for meat and finish the edge with a butcher’s steel. Cuta little meat. Now try the same edge on wood. What do you notice?Strop the edge back and forth on a piece of leather for a while and thentry again on both meat and wood. What do you notice? Which edge isbetter for meat, the rough or smooth one? Which is better for wood?
19. Students should each share a story of a time they cut themselves beingcareless with a tool.
20. Draw or trace a Swede saw blade identifying the two kinds of teeth.Describe to someone else how each of these relates to a modern chain-saw tooth.
21. Picture in your mind what would happen if a Swede saw blade hadonly this kind of teeth:
22. Picture what would happen if it had only this kind of teeth:
23. If you can get some beaver or muskrat teeth, test the front and back forhardness. Explain how they are self sharpening.
24. Picture in your mind what is happening when the rakers on a chainsawchain aren’t filed evenly. Can you imagine the jerking of the chain assome teeth bite deeper into the wood than others?
25. Put pressure on a bathroom scale with a fish cutting knife. Record howmany pounds you can assert. Now put pressure with an ulu. How manytimes more pressure is possible with the ulu? Test the whole class. Firstlet students estimate, the test. How many times more pressure can theulu put than the knife? Average the results. How does the knife serveas a lever?
Student Response
1. What happens when an edge is too thick?
2. What happens when an edge is too thin?
3. What are the three considerations in sharpening a tool?
4. What two things determine how thick or thin an edge can be?
Chapter 2: Sharpening 27
5. Draw a shovel blade sharpened for rocky ground. Draw one sharpenedfor ground with no rocks, but lots of roots.
6. What is the difference between cutting meat and wood in terms of thefriction of the blade?
7. Draw a Swede saw blade. Which teeth are for cutting fibers and whichfor chiseling the severed fibers out of the cut?
8. Which is harder: a file or a sharpening stone?
9. An axe of fairly soft steel has a hard spot. What might cause this?
10. Why do people put oil or saliva on a sharpening stone?
11. Why do we put pressure only on the forward stroke of a file?
12. Draw a chainsaw tooth. Label which part severs fibers. Which partchisels the fibers from the cut?
13. What do the rakers do on a chainsaw tooth? What happens if they aretoo high? Too low?
14. Why should the height of the rakers be the same on all teeth?
Math
1. When Sal cuts fish she puts about 15 lbs of pressure on her knife. Shefinds that sharpening reduces the surface area of her cutting edge by30%. How much pressure will she apply to do the same work?
2. Hank can cut a block of wood in 30 seconds when his chainsaw issharp. It takes 1.5 minutes when it is dull. If he can cut a tree intoblocks in 25 minutes with a sharp saw, how long will it take with adull saw?
3. Hank also discovered that he could increase the speed of ripping 35%by filing the rakers on his saw from .025 to .040. If he could cut 350board feet per day before, how much lumber can he cut with the rakersfiled properly?
4. Hank estimated that it would take him 5 days to cut the lumber heneeded. Once he filed the rakers, he cut 35% faster than expected.How long will it take him to cut the lumber now?
Let “x” equal the amount he could cut before filing the rakers.
[(x v .35x) z 5]

Chapter 3
Nails, Pegs, &Lashings
In traditional and modern lifestyles, we blend materials together to makehomes and tools that best meet our needs. Often the materials are held to-gether by fasteners: nails, screws, pegs, or lashing. Lashing might sound likean old fashioned technique, but it is the method most of us use to keep ourshoes on every day.
Can you imagine trying to build a house without nails? Would you usestring, glue, wire, rope? Our world would not be the same without nails.
Before there were nails in Alaska, the oldtimers used wooden pins as wellas rawhide and root lashings.
In applications, like a dogsled, where the joined parts must be held to-gether with flexibility, lashing works best. When I first came to Alaska, theteacher in Sleetmute made a sled and nailed it together. It didn’t last a month.It couldn’t flex enough.
Rawhide lashing is difficult to prepare and hard to protect from hungryanimals of all sizes.
Spruce roots are wonderful lashing material, but they take considerabletime and effort to collect and prepare.
Pins. It takes a long time to make wooden pins, drill the material, and setthe pins.
When wood must be held firmly together, nails work well and are easy todrive.
Different Nails
Nails are very different from eachother for specific reasons. They vary inlength, thickness, size of head, surface,coating, and other features.
Usually nails hold two pieces of woodtogether, or hold another material liketar paper, to wood.
Standards
A 15B 1, 3C 3D 1, 3
Concepts
Surface areaFriction
30 PART 1: SKILLS, TOOLS, & CRAFTSMANSHIP
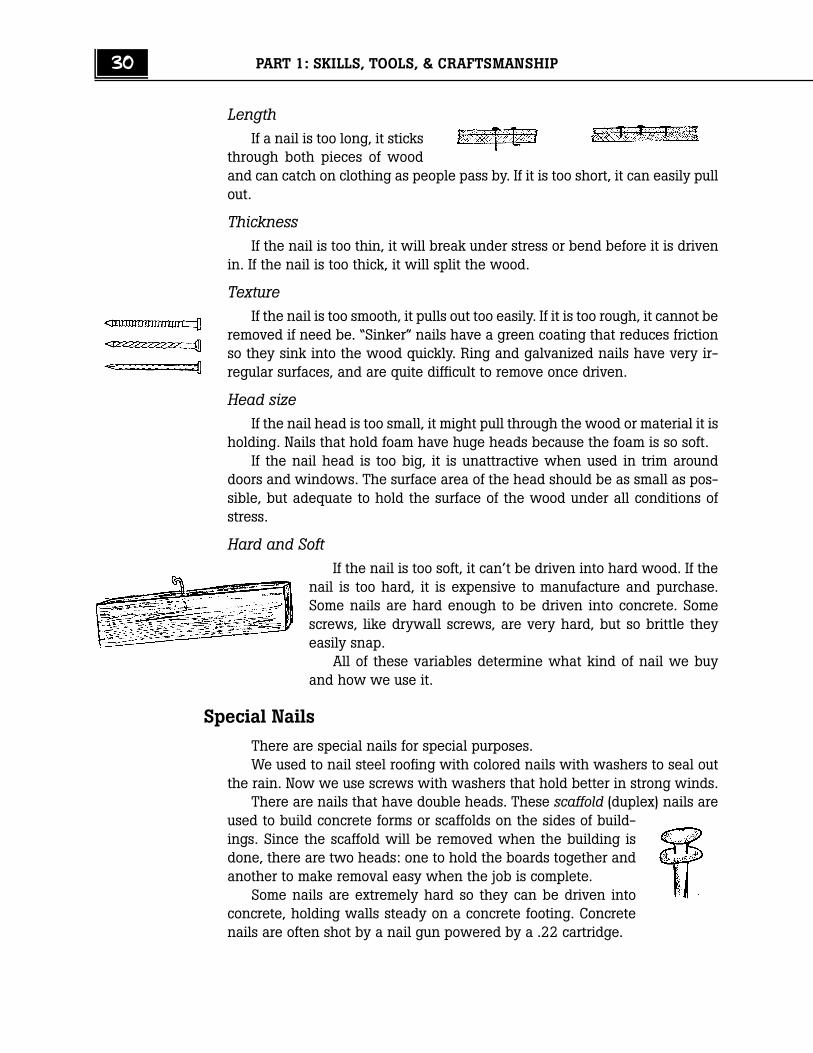
LengthIf a nail is too long, it sticks
through both pieces of woodand can catch on clothing as people pass by. If it is too short, it can easily pullout.
ThicknessIf the nail is too thin, it will break under stress or bend before it is driven
in. If the nail is too thick, it will split the wood.
TextureIf the nail is too smooth, it pulls out too easily. If it is too rough, it cannot be
removed if need be. “Sinker” nails have a green coating that reduces frictionso they sink into the wood quickly. Ring and galvanized nails have very ir-regular surfaces, and are quite difficult to remove once driven.
Head sizeIf the nail head is too small, it might pull through the wood or material it is
holding. Nails that hold foam have huge heads because the foam is so soft.If the nail head is too big, it is unattractive when used in trim around
doors and windows. The surface area of the head should be as small as pos-sible, but adequate to hold the surface of the wood under all conditions ofstress.
Hard and SoftIf the nail is too soft, it can’t be driven into hard wood. If the
nail is too hard, it is expensive to manufacture and purchase.Some nails are hard enough to be driven into concrete. Somescrews, like drywall screws, are very hard, but so brittle theyeasily snap.
All of these variables determine what kind of nail we buyand how we use it.
Special Nails
There are special nails for special purposes.We used to nail steel roofing with colored nails with washers to seal out
the rain. Now we use screws with washers that hold better in strong winds.There are nails that have double heads. These scaffold (duplex) nails are
used to build concrete forms or scaffolds on the sides of build-ings. Since the scaffold will be removed when the building isdone, there are two heads: one to hold the boards together andanother to make removal easy when the job is complete.
Some nails are extremely hard so they can be driven intoconcrete, holding walls steady on a concrete footing. Concretenails are often shot by a nail gun powered by a .22 cartridge.
Chapter 3: Nails, Pegs, & Lashings 31
Ring nails have their shanks intentionally roughed so they will hold moreeffectively. Boat builders use them, as the boat constantly works in the wavesand current.
Some nails are glued together in a row, held apart bypaper like the bullets in a machine gun. They are fornailguns. The nailguns drive these nails with 90 lbs of airpressure and nail twenty to fifty times faster than a car-penter nailing by hand. The added expense of the nails isovercome by savings in the carpenter’s time.
Materials
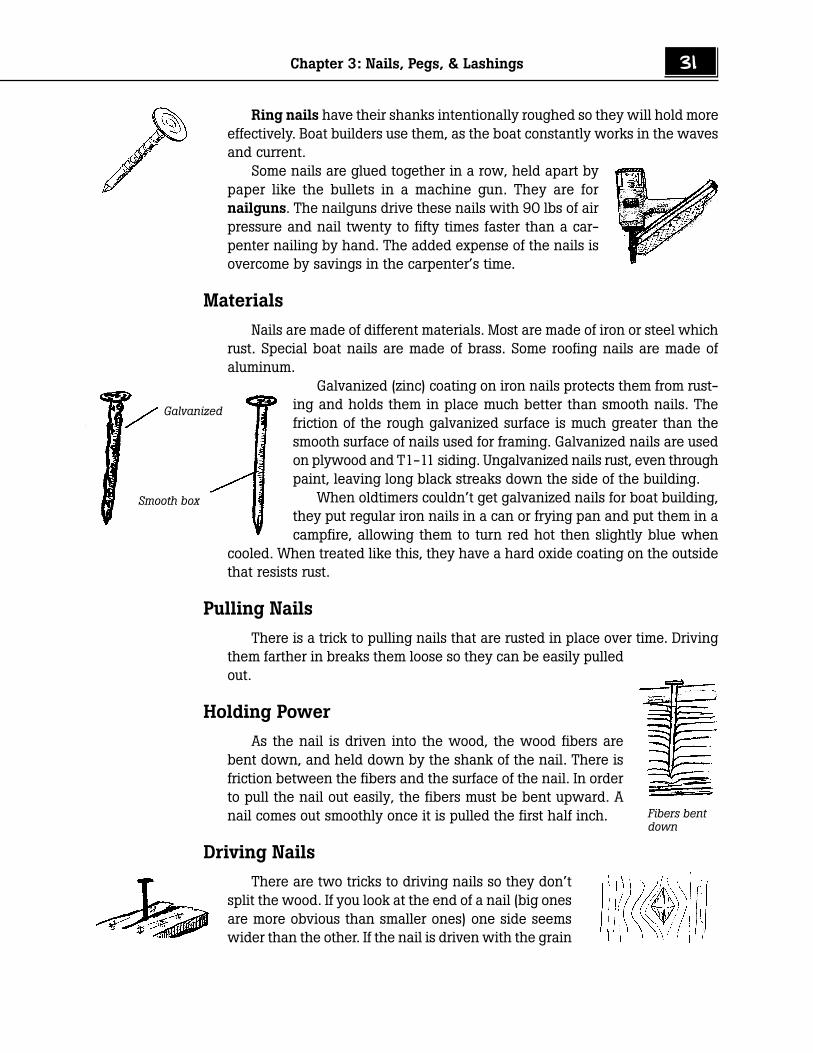
Nails are made of different materials. Most are made of iron or steel whichrust. Special boat nails are made of brass. Some roofing nails are made ofaluminum.
Galvanized (zinc) coating on iron nails protects them from rust-ing and holds them in place much better than smooth nails. Thefriction of the rough galvanized surface is much greater than thesmooth surface of nails used for framing. Galvanized nails are usedon plywood and T1-11 siding. Ungalvanized nails rust, even throughpaint, leaving long black streaks down the side of the building.
When oldtimers couldn’t get galvanized nails for boat building,they put regular iron nails in a can or frying pan and put them in acampfire, allowing them to turn red hot then slightly blue when
cooled. When treated like this, they have a hard oxide coating on the outsidethat resists rust.
Pulling Nails
There is a trick to pulling nails that are rusted in place over time. Drivingthem farther in breaks them loose so they can be easily pulledout.
Holding Power
As the nail is driven into the wood, the wood fibers arebent down, and held down by the shank of the nail. There isfriction between the fibers and the surface of the nail. In orderto pull the nail out easily, the fibers must be bent upward. Anail comes out smoothly once it is pulled the first half inch.
Driving Nails
There are two tricks to driving nails so they don’tsplit the wood. If you look at the end of a nail (big onesare more obvious than smaller ones) one side seemswider than the other. If the nail is driven with the grain
Galvanized
Smooth box
Fibers bentdown
32 PART 1: SKILLS, TOOLS, & CRAFTSMANSHIP
rather than against the grain, it won’t eas-ily split the wood. This is particularly im-portant when building in cold temperatureswhen the wood is frozen.
If a nail is first pounded on the point, and then driven into the wood, itdoesn’t easily split the wood. This is particularly important when the wood isfrozen.
Extra Holding PowerThe way we drive nails determines how well they hold the wood to-
gether. If the nails are driven straight in, they can be pulled straight out. Ifthey are driven in at different angles, they cannot be pulled straight out.
Size Description
Nails are made in different sizes. Small nails are 2 penny, 4 penny, and 6penny, written 2d, 4d, and 6d. Larger nails are 8d, 12d, 16d, 20d, etc. Nailshave been around for so many centuries, no one knows where the expression“penny” came from.
Pegs
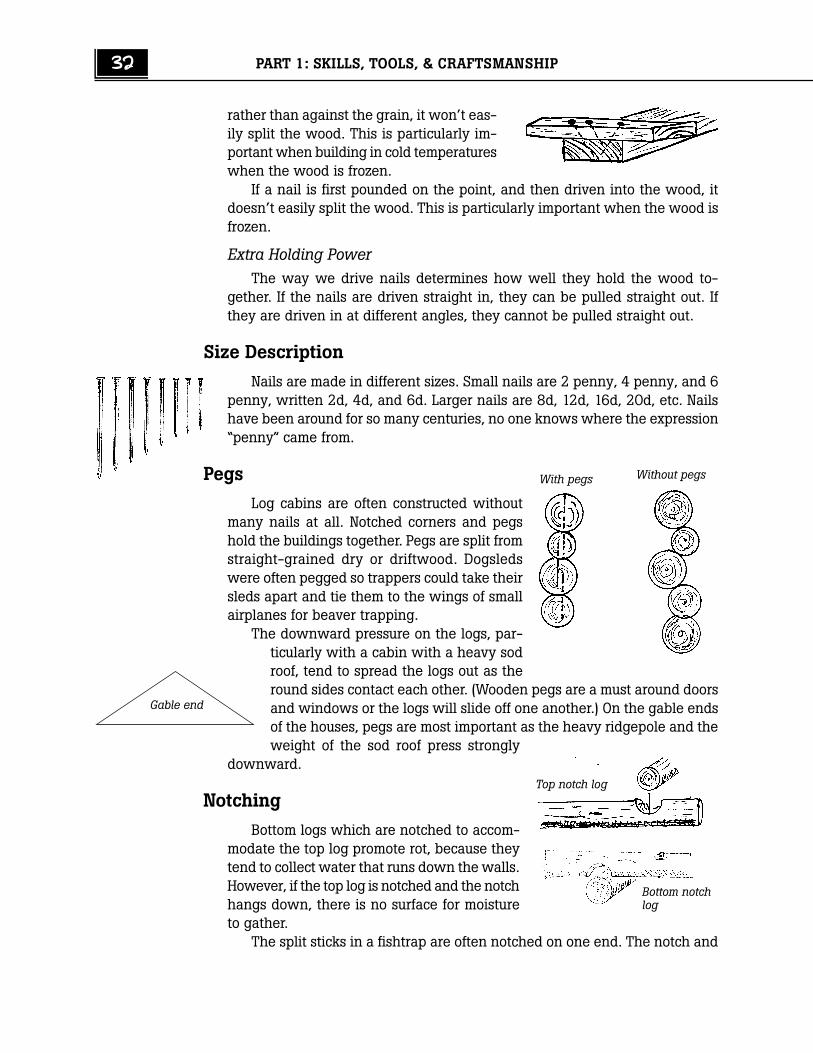
Log cabins are often constructed withoutmany nails at all. Notched corners and pegshold the buildings together. Pegs are split fromstraight-grained dry or driftwood. Dogsledswere often pegged so trappers could take theirsleds apart and tie them to the wings of smallairplanes for beaver trapping.
The downward pressure on the logs, par-ticularly with a cabin with a heavy sodroof, tend to spread the logs out as theround sides contact each other. (Wooden pegs are a must around doorsand windows or the logs will slide off one another.) On the gable endsof the houses, pegs are most important as the heavy ridgepole and theweight of the sod roof press strongly
downward.
Notching
Bottom logs which are notched to accom-modate the top log promote rot, because theytend to collect water that runs down the walls.However, if the top log is notched and the notchhangs down, there is no surface for moistureto gather.
The split sticks in a fishtrap are often notched on one end. The notch and
With pegs Without pegs
Gable end
Top notch log
Bottom notchlog
Chapter 3: Nails, Pegs, & Lashings 33
lashing work together.
Lashing
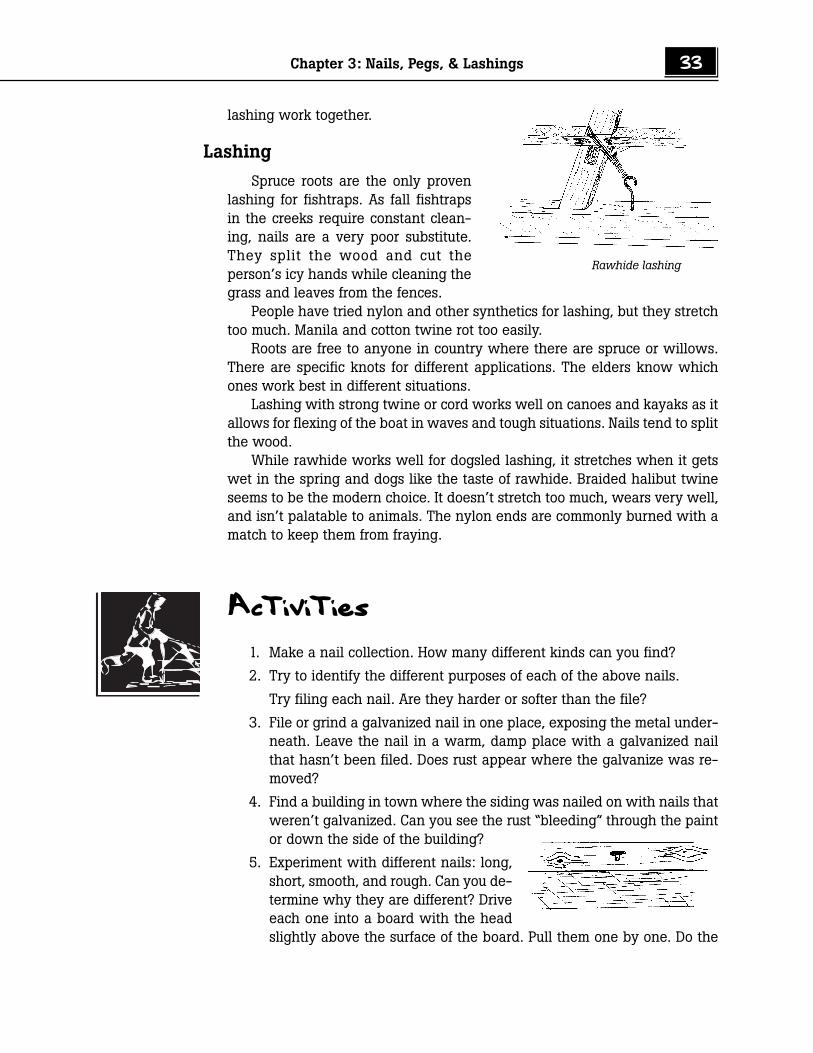
Spruce roots are the only provenlashing for fishtraps. As fall fishtrapsin the creeks require constant clean-ing, nails are a very poor substitute.They split the wood and cut theperson’s icy hands while cleaning thegrass and leaves from the fences.
People have tried nylon and other synthetics for lashing, but they stretchtoo much. Manila and cotton twine rot too easily.
Roots are free to anyone in country where there are spruce or willows.There are specific knots for different applications. The elders know whichones work best in different situations.
Lashing with strong twine or cord works well on canoes and kayaks as itallows for flexing of the boat in waves and tough situations. Nails tend to splitthe wood.
While rawhide works well for dogsled lashing, it stretches when it getswet in the spring and dogs like the taste of rawhide. Braided halibut twineseems to be the modern choice. It doesn’t stretch too much, wears very well,and isn’t palatable to animals. The nylon ends are commonly burned with amatch to keep them from fraying.
Activities
1. Make a nail collection. How many different kinds can you find?
2. Try to identify the different purposes of each of the above nails.
Try filing each nail. Are they harder or softer than the file?
3. File or grind a galvanized nail in one place, exposing the metal under-neath. Leave the nail in a warm, damp place with a galvanized nailthat hasn’t been filed. Does rust appear where the galvanize was re-moved?
4. Find a building in town where the siding was nailed on with nails thatweren’t galvanized. Can you see the rust “bleeding” through the paintor down the side of the building?
5. Experiment with different nails: long,short, smooth, and rough. Can you de-termine why they are different? Driveeach one into a board with the headslightly above the surface of the board. Pull them one by one. Do the
Rawhide lashing
34 PART 1: SKILLS, TOOLS, & CRAFTSMANSHIP
ring nails or galvanized pull out easier or harder? Can you tell the dif-ference?
6. Draw a nail that would hold two inches of foam to a wood surface?Imagine in your mind what would happen when the head of the nailpressed against the surface of the foam. How would you design a nailfor this purpose?
7. Drive nails into the end grain of a board. Do they hold as well, better, orworse than cross grain?
8. Look at the point of a spike (end view). Can you see how one side istapered more than the other? Draw what you see.
9. Try the tricks mentioned in this chapter to prevent splitting at the endof a board. Do they help to keep the wood from splitting? Use greenfrozen lumber.
10. Listen to a good carpenter drive nails on a surface like a floor or roof.How is his nailing different from that of an inexperienced person (apartfrom speed)?
11. Research how nails are now made. Find a case of nails. Where werethey made? How were nails made before modern machinery?
12. How much does a pound of nails cost in the village? How much doesthis come out to for each 6d, 8d, and 16d nail?
13. Pull some old nails from a board. Does driving them first to loosen themseem to help?
14. If there is a nailgun in the village, have an experienced person demon-strate. Can ten students drive ten nails as fast as one person with a nailgun? What are the safety features of a nailgun so someone can’t beshot with a nail? What are some of the hazards of nailguns? What canyou learn about the pressure of the compressor, specifically the differ-ence between a framing gun and a finish gun?
15. Ask a good carpenter about hammers. What weight hammers are usedfor different applications? Waffle and smooth faces? What are the dif-ferences between steel, wood, and fiberglass handles? Why do peopleprefer one over another? Which hammers are better in different situa-tions? Why do you think there is such a variety of hammers?
16. Ask an oldtimer in the village to demonstrate lashing a fishtrap. Whatlashing material was commonly used? Videotape if possible.
17. Ask a local sled builder to demonstrate how to lash a sled—crosspiecesand stanchion—to the runner. Videotape to show others.
18. If there is a log cabin in the village, inspect the corners and inspect thepins used. Are they spikes or wooden pins? What kind of wood wasused for pins? Ask a local person where the pins were placed in thewall and why. If spikes were used, ask them how the holes were drilledto allow for settling of the logs.
Chapter 3: Nails, Pegs, & Lashings 35
Student Response
1. What will happen if a nail is too short? Too thick? Too smooth? Toothin?
2. Draw the type of nail that is used on tar paper and roofing shingles.
3. What kind of nail would you use on a boat?
4. Draw the end view of a nail. Show how it should be driven if it is closeto the end of a board.
5. Draw a nail that would have high friction in wood. Draw one that wouldhave low friction.
6. Draw a scaffold nail.
7. Why are galvanized nails used?
8. What is the name given to describe the sizes of nails?
9. Why were pegs used in log cabins?
10. Why are spruce roots superior to all other materials for a fishtrap?
11. What is the best lashing for a sled and why?
Math
1. If a 50 lb. case of 8d galvanized nails cost $57, what is the cost of 27lbs at the same rate? 150 lbs?
2. Matt wants to use spikes on his cabin rather than wooden pegs. Spikesare $.50 each. He figures that each log will average 3 spikes. There are56 logs in the house. How much would wooden pegs save him?
3. If Matt’s time is worth $10 an hour and he can make 12 pegs an hour,which is cheaper?
4. Which is stronger: 4 larger nails with a shear strength of 65 lbs each,or 9 smaller nails with a shear strength of 52 lbs each?
5. Two carpenters frame a whole house. The total time of both workers is80 hours using a nail gun (40 hours each.) They both make $18 perhour. Without a nail gun, they will take 98 hours. The special nails forthe nailguns cost $100 more than regular nails. Nailgun rental is $20per day for 5 days. Are they saving money?
6. A 50 lb case of 16d galvanized nails costs $57 delivered to the jobsite.A case of 16d sinker nails cost $42 delivered, but Al figures that he hasto use 20% more nails if he uses sinkers because they don’t hold aswell. Which is cheaper: sinkers or galvanized?

36 PART 1: SKILLS, TOOLS, & CRAFTSMANSHIP
7. Sinker nails are $1 a pound delivered to the jobsite. Scaffold nails are$1.50 delivered. Building scaffolding takes 30 lbs of nails. Scaffold nailssave 3 man-hours working at $12 per hour. Are scaffold nails worthpurchasing and using?

Chapter 4
Falling Trees &Small-Scale Logging
Without trees, life in most parts of Alaska would be impossible. Areas thatdon’t have trees growing nearby rely on driftwood. Knowing how to fall or, aswe say, “knock” trees is an important skill. Almost anyone can get a tree tofall over, but it is difficult to log:
• safely,• with the trees landing and pointing in the same direction, and• without getting hung up on other trees.Instruction and experience help to develop the ability to safely log.Smaller trees can be pushed down fairly easily by hand or with a long
pole once the tree has been cut to the point of falling.Larger trees, trees leaning in the wrong direction, and trees that can get
hung on surrounding trees, pose problems of their own. Sometimes a loggermay have all three problems in the same tree.
Few trees grow straight up. Most have grown leaning toward the sun-light, leaning from the wind, or leaning away from competing trees in thevicinity.
Falling the Tree
1. The first thing to determine when falling a treeis the direction it is leaning. Is this the direc-tion the logger wants it to go? If the answer is“yes”, the process is easy.
2. Clear the brush away from the trunk of thetree. There must be room for the logger to workand to escape the falling tree.
3. Cut a notch in the tree perpendicular to thedirection the tree is to fall.The notch should be wide enough to allowthe tree to lean over. If the notch is too nar-row, the tree will start to fall and then hangon the notch.
Wide notch
Narrow notch
Standards
A 15B 1, 3C 3D 1, 3
Concepts
InertiaFrictionLeverage

38 PART 1: SKILLS, TOOLS, & CRAFTSMANSHIP
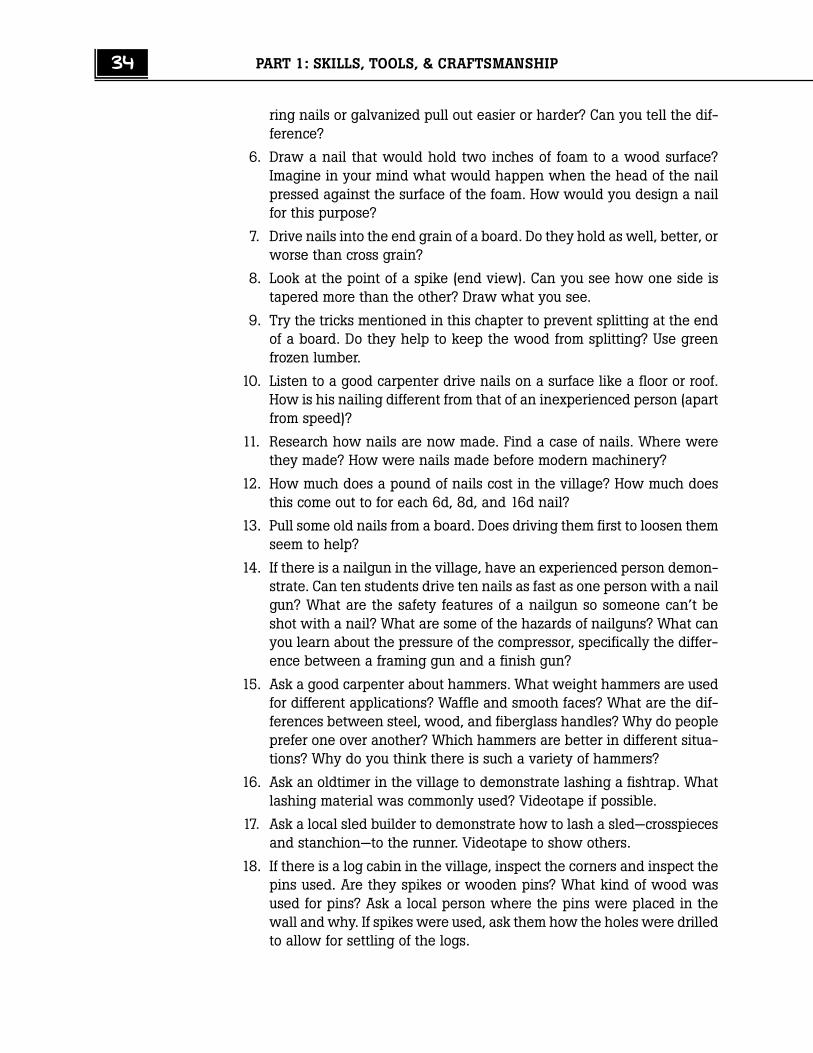
If there is no notch in the front of the tree a ter-ribly dangerous situation exists, particularly if thetree is naturally leaning. When it starts to fall,the trunk of the tree splits throwing the loggerand his saw quite a distance.
4. From the back of the tree, cut in the directionthe tree should fall. If the tree is small it shouldbe cut quickly so the inertia of the tree will carryit to the ground past the clinging branches of nearby trees and brush. Ifthe tree goes down slowly, it will often get hung up before reachingthe ground, therefore creating a troublesome or dangerous situation.
Hinge
The wood that is left betweenthe notch and the back cut is calledthe “hinge”. If the hinge is too thick,the tree will fall slowly if at all. Ifthe hinge is too thin, or cut com-pletely through, look out! The treecan fall in any direction. The bottomof the tree can jump anywhere. It isa form of “widowmaker.” (Thelogger’s wife can easily become awidow.)
If the tree is leaning in a differentdirection than desired, the logger leaves more wood on one side of the hingethan the other. As the tree starts to fall, the uneven hinge will actually pull thetree in the direction the logger desires.
Wedges
As soon as the saw is deep enough into the back cut, the logger puts awedge or two in the cut behind the blade. If the tree leans backward, thisprevents the saw from pinching . Wedges can drive even the biggest trees inthe direction desired. One logger slowly saws the tree while the helper,“swamper”, drives the wedges.
Plastic wedges driven with a small axe work best because they can takethe impact of the axe without splitting and they don’t dull the saw blade if hitby accident. Metal wedges are out of the question for this reason. Plasticwedges are cheap enough to be semi-disposable. Oldtimers used woodenwedges made out of dry spruce or dry tamarack. (Green wood is too soft.)Wooden wedges work as well as plastic, but tend to split after a few uses. Theawesome power of a wedge should never be underestimated.
A good logger drives the wedge, waiting until the tree top moves. Then hecuts a little more before driving the wedge again. The logger continues in thismanner as it takes time for the tree top to move.
Forceupward
Wedge
Directionof fall
Cutstraightin
Tree leansthis way
Wood left inhinge to pullto this side
No notch
Hinge
Chapter 4: Falling Trees 39
It might seem like a waste of time getting trees to fall in a certain direc-tion. When it is time to winch them out of the woods or to cut them up intofirewood, having an orderly wood yard or logging operation saves immenseamounts of time and frustration.
I used to make the back cut angled downward. This doesn’t work withwedges, as they split the stump rather than driving and lifting the tree in thedesired direction.
WindWhen the wind is blowing in the direction the logger wants the trees to
fall, the job becomes easy. As the surface area of the branches catch the wind,there is tremendous leverage from high up on the tree. When a strong wind isagainst the logger, it might be better to go home. Wind places enormous forceon trees, making logging unpredictable and dangerous. Live trees have fullerbranches, and are more strongly influenced by the wind than dead trees.
Winter
In winter, trees are more brittle than in warm weather. They can snapand go down faster than in the summer. There is less warning if things aren’tgoing the way the logger plans. Often the snow around the base of the treemakes escaping dangerous.
Many Alaskan logging operators prefer logging in March and April as thetrees are cleaned when they are skidded on the snow. Logs skidded summer-time are impossible to clean thoroughly. They dull the saw blade quickly.
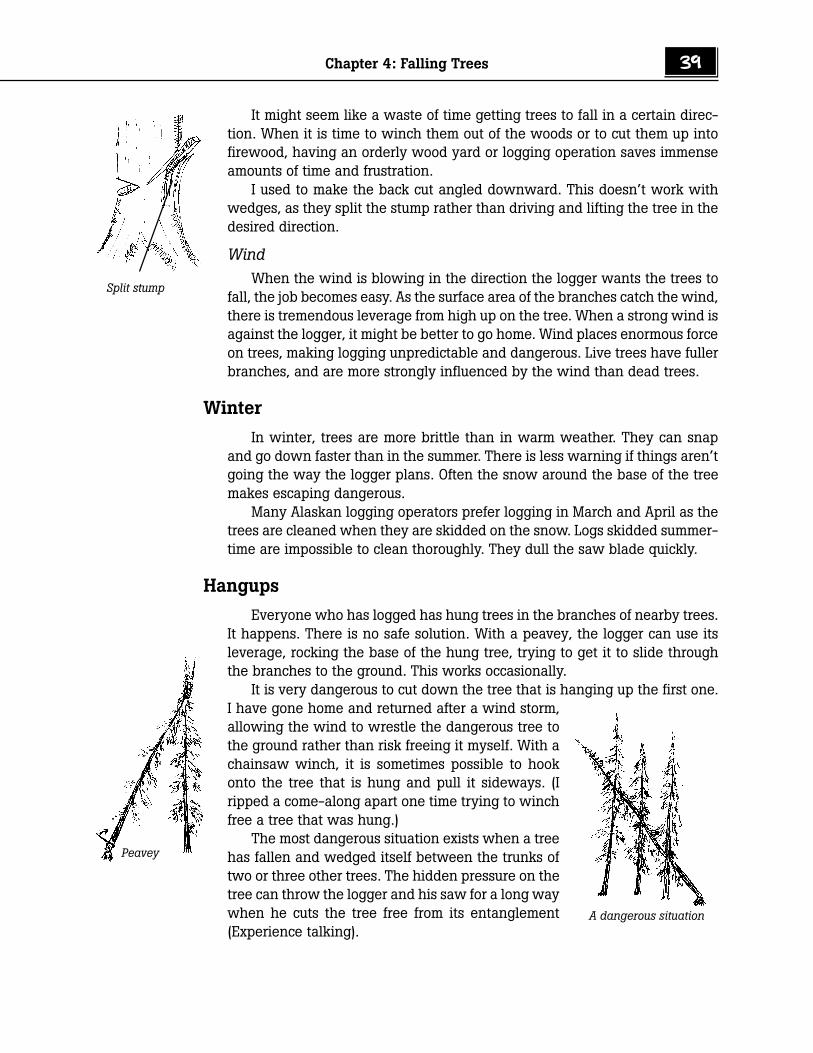
Hangups
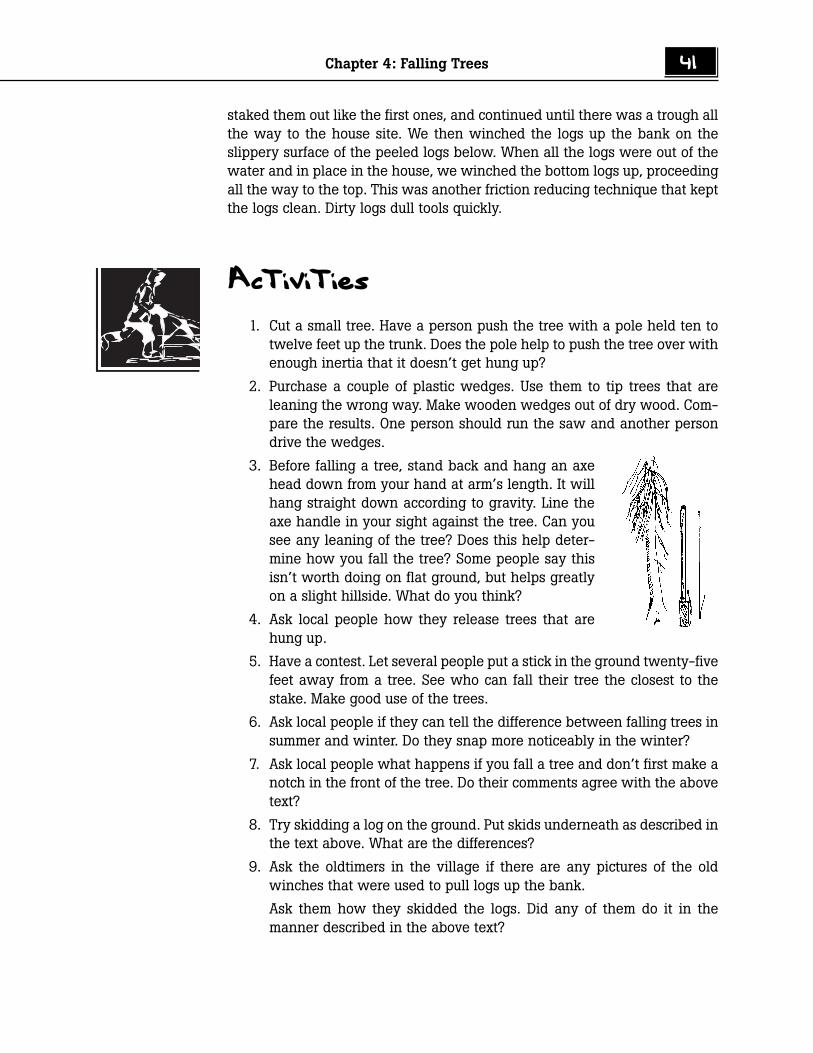
Everyone who has logged has hung trees in the branches of nearby trees.It happens. There is no safe solution. With a peavey, the logger can use itsleverage, rocking the base of the hung tree, trying to get it to slide throughthe branches to the ground. This works occasionally.
It is very dangerous to cut down the tree that is hanging up the first one.I have gone home and returned after a wind storm,allowing the wind to wrestle the dangerous tree tothe ground rather than risk freeing it myself. With achainsaw winch, it is sometimes possible to hookonto the tree that is hung and pull it sideways. (Iripped a come-along apart one time trying to winchfree a tree that was hung.)
The most dangerous situation exists when a treehas fallen and wedged itself between the trunks oftwo or three other trees. The hidden pressure on thetree can throw the logger and his saw for a long waywhen he cuts the tree free from its entanglement(Experience talking).
Split stump
Peavey
A dangerous situation
40 PART 1: SKILLS, TOOLS, & CRAFTSMANSHIP
Aftermath
While walking through a logging or wood yard, it is easy to see if theloggers are experienced. Sometimes I am tempted to look for dead bodies.Other times I can see that the logger was something of an artist.
Oldtimers always cleaned up their wood yard when they were done, of-ten burning the branches. Nowadays, the Department of Natural Resourcesasks people to cut all tree tops to two foot lengths and to scatter branches.This allows them to dry quickly and prevents spruce bark beetle infestation.
Skidding Logs
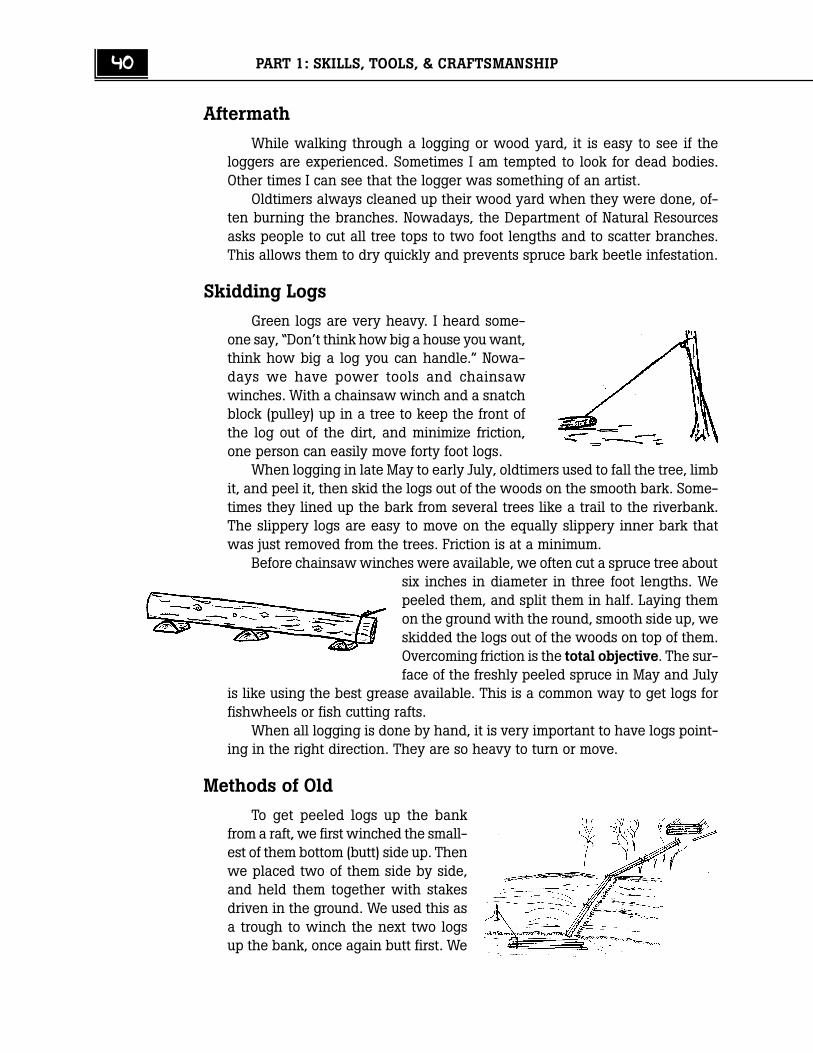
Green logs are very heavy. I heard some-one say, “Don’t think how big a house you want,think how big a log you can handle.” Nowa-days we have power tools and chainsawwinches. With a chainsaw winch and a snatchblock (pulley) up in a tree to keep the front ofthe log out of the dirt, and minimize friction,one person can easily move forty foot logs.
When logging in late May to early July, oldtimers used to fall the tree, limbit, and peel it, then skid the logs out of the woods on the smooth bark. Some-times they lined up the bark from several trees like a trail to the riverbank.The slippery logs are easy to move on the equally slippery inner bark thatwas just removed from the trees. Friction is at a minimum.
Before chainsaw winches were available, we often cut a spruce tree aboutsix inches in diameter in three foot lengths. Wepeeled them, and split them in half. Laying themon the ground with the round, smooth side up, weskidded the logs out of the woods on top of them.Overcoming friction is the total objective. The sur-face of the freshly peeled spruce in May and July
is like using the best grease available. This is a common way to get logs forfishwheels or fish cutting rafts.
When all logging is done by hand, it is very important to have logs point-ing in the right direction. They are so heavy to turn or move.
Methods of Old
To get peeled logs up the bankfrom a raft, we first winched the small-est of them bottom (butt) side up. Thenwe placed two of them side by side,and held them together with stakesdriven in the ground. We used this asa trough to winch the next two logsup the bank, once again butt first. We
Chapter 4: Falling Trees 41
staked them out like the first ones, and continued until there was a trough allthe way to the house site. We then winched the logs up the bank on theslippery surface of the peeled logs below. When all the logs were out of thewater and in place in the house, we winched the bottom logs up, proceedingall the way to the top. This was another friction reducing technique that keptthe logs clean. Dirty logs dull tools quickly.
Activities
1. Cut a small tree. Have a person push the tree with a pole held ten totwelve feet up the trunk. Does the pole help to push the tree over withenough inertia that it doesn’t get hung up?
2. Purchase a couple of plastic wedges. Use them to tip trees that areleaning the wrong way. Make wooden wedges out of dry wood. Com-pare the results. One person should run the saw and another persondrive the wedges.
3. Before falling a tree, stand back and hang an axehead down from your hand at arm’s length. It willhang straight down according to gravity. Line theaxe handle in your sight against the tree. Can yousee any leaning of the tree? Does this help deter-mine how you fall the tree? Some people say thisisn’t worth doing on flat ground, but helps greatlyon a slight hillside. What do you think?
4. Ask local people how they release trees that arehung up.
5. Have a contest. Let several people put a stick in the ground twenty-fivefeet away from a tree. See who can fall their tree the closest to thestake. Make good use of the trees.
6. Ask local people if they can tell the difference between falling trees insummer and winter. Do they snap more noticeably in the winter?
7. Ask local people what happens if you fall a tree and don’t first make anotch in the front of the tree. Do their comments agree with the abovetext?
8. Try skidding a log on the ground. Put skids underneath as described inthe text above. What are the differences?
9. Ask the oldtimers in the village if there are any pictures of the oldwinches that were used to pull logs up the bank.
Ask them how they skidded the logs. Did any of them do it in themanner described in the above text?
42 PART 1: SKILLS, TOOLS, & CRAFTSMANSHIP
Student Response
1. Draw a tree whose center of gravity is leaning to the right.
2. Why would a living tree be more effected by the wind than a deadone?
3. Draw what will happen if there is no notch in the front of the tree.
4. Draw what will happen if the notch on the front of the tree is not V cut,but only as wide as the saw blade.
5. Draw the top view of the stump of a tree that was made to pull to theleft.
6. Why is it dangerous to completely cut the hinge when falling a tree?
7. Why is falling trees more dangerous in the winter than in the summer?
8. Why does the logger want the tree to fall fast once it starts to go down?
9. When skidding logs out of the woods, what is the most important thingto avoid? Name one technique for doing this.
10. From the whole lesson, list four things that are dangerous whenlogging.
Math
1. Matt can fall and limb 25 trees a day. He can cut an average of 36’ of 6”x 6” house logs from each tree. His house is going to be 24’ x 32’ with8’ high walls (each linear foot of house log z .5 square foot). Approxi-mately how many days must he log in order to get enough logs to makehis house out of three-sided logs?
2. Matt is done with his house. He figures that he needs 5 cords of woodto get through the winter. A cord of wood is 4’ x 4’ x 8’. He can cutand split approximately 100 cubic feet of wood a day. How long will ittake him to cut and split enough wood for all winter?
3. Harold can fall and raft 100 logs in 7 days. Two men can do the samejob in 3 days. He has to take time off his job making $100 a day to dothis. He can pay his nephew $80 a day to help him. Which is cheaperfor Harold: to work alone or hire help?
Chapter 5
Guns
Guns have been a part of the lives of Alaskans for many generations.Previous to the development of rifles, shotguns, and handguns, people usedbows, snares, harpoons, and traps. The advent of guns changed the lives ofAlaskans as new techniques for hunting were developed. Harvesting gamebecame easier than before. Guns were very important trade items in the earlydays of contact with the Western world. A gun is a very personal item to mostpeople living in remote areas.
A quick look at the guns in a village shows that there are many differentmakes and models all designed for different applications. Some of the differ-ences are important and some are the result of personal preferences. If wehunt caribou with the same rifle that we hunt ptarmigan, there will be prob-lems. Either the caribou will escape wounded or the ptarmigan will be blownto a pile of feathers, depending on the direction of our error.
Three Types of Guns
There are basically three types of guns:Rifles usually have a barrel over eighteen inches and have “rifles” (grooves)
inside the barrel. They are most often used on animals other than birds. Theyshoot bullets one at a time for long distances with great accuracy.
Shotguns shoot round lead or steel balls of varying sizes. We use shot-guns mostly on birds. As birds are often flying fast or sitting low in the water,they are hard to hit with only one bullet. A shotgun throws many smaller leador steel pellets at the birds, increasing the hunter’s chances of hitting them.While they are quite effective up close, they don’t shoot far at all.
Handguns are seldom used for hunting. They don’t have as much poweras most rifles and aren’t very accurate for long distances. Handguns are mucheasier to carry which is why so many Alaskans use them for protection againstbears and wolves. They are also used to kill large animals still alive in traps,such as wolves, lynx, and wolverine.
Bullets
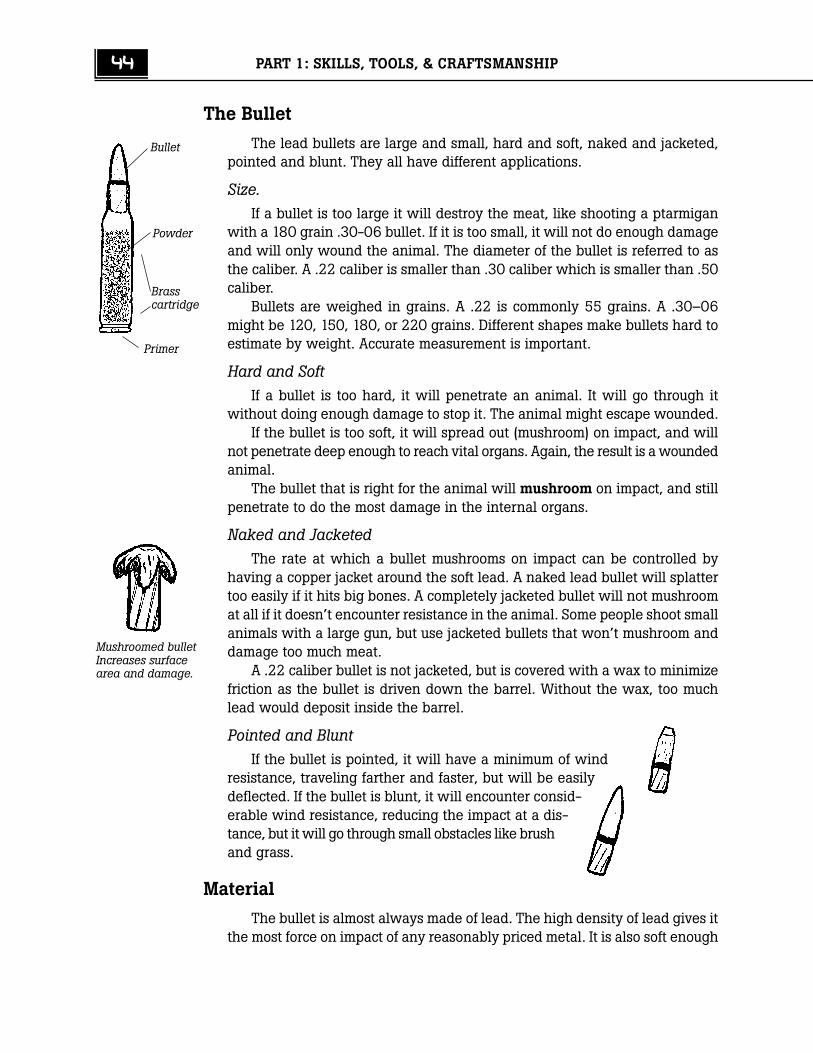
The bullet or cartridge is made of several different parts:• The bullet• The primer• The powder• The brass (or in the case of a shotgun, plastic) cartridge
Standards
A 5, 6, 8a, 16B 1, 3D 1, 3
Concepts
InertiaFrictionF z MAA z RMass/DensityLeverageForms ofenergy
44 PART 1: SKILLS, TOOLS, & CRAFTSMANSHIP
The Bullet
The lead bullets are large and small, hard and soft, naked and jacketed,pointed and blunt. They all have different applications.
Size.If a bullet is too large it will destroy the meat, like shooting a ptarmigan
with a 180 grain .30-06 bullet. If it is too small, it will not do enough damageand will only wound the animal. The diameter of the bullet is referred to asthe caliber. A .22 caliber is smaller than .30 caliber which is smaller than .50caliber.
Bullets are weighed in grains. A .22 is commonly 55 grains. A .30–06might be 120, 150, 180, or 220 grains. Different shapes make bullets hard toestimate by weight. Accurate measurement is important.
Hard and SoftIf a bullet is too hard, it will penetrate an animal. It will go through it
without doing enough damage to stop it. The animal might escape wounded.If the bullet is too soft, it will spread out (mushroom) on impact, and will
not penetrate deep enough to reach vital organs. Again, the result is a woundedanimal.
The bullet that is right for the animal will mushroom on impact, and stillpenetrate to do the most damage in the internal organs.
Naked and JacketedThe rate at which a bullet mushrooms on impact can be controlled by
having a copper jacket around the soft lead. A naked lead bullet will splattertoo easily if it hits big bones. A completely jacketed bullet will not mushroomat all if it doesn’t encounter resistance in the animal. Some people shoot smallanimals with a large gun, but use jacketed bullets that won’t mushroom anddamage too much meat.
A .22 caliber bullet is not jacketed, but is covered with a wax to minimizefriction as the bullet is driven down the barrel. Without the wax, too muchlead would deposit inside the barrel.
Pointed and BluntIf the bullet is pointed, it will have a minimum of wind
resistance, traveling farther and faster, but will be easilydeflected. If the bullet is blunt, it will encounter consid-erable wind resistance, reducing the impact at a dis-tance, but it will go through small obstacles like brushand grass.
Material
The bullet is almost always made of lead. The high density of lead gives itthe most force on impact of any reasonably priced metal. It is also soft enough
Bullet
Powder
Brasscartridge
Primer
Mushroomed bulletIncreases surfacearea and damage.

Chapter 5: Guns 45
to mushroom. Look at lead on the Periodic table. What is it’s atomic weight?The jacket around the lead is most often of copper. Copper is harder than
lead, holding it together for slower mushrooming. Copper also provides lowfriction with the barrel of the rifle, a very important consideration if rifles areto last for many years.
Shotgun pellets used for hunting waterfowl are now made of steel. It wasdetermined that waterfowl were eating the lead pellets, poisoning themselves.Steel is less dense than lead, with less ability to bring a bird down. Hunterscompensate for this by using one size bigger BB shot.
The Perfect Bullet
It is easy to see that the choice of bullets depends totally on which animalis being hunted under what conditions. There is no perfect bullet or caliber.
For hunting caribou at a distance, I use a pointed, lighter bullet that israther soft. For hunting bears in the brush I use a heavy, blunt bullet.
The goal is to effectively and safely harvest animals with no woundedanimals escaping. I would rather miss an animal entirely than have it escapewounded.
Primers
Primers are the small silver colored inserts in the center of the back of thecartridge (except .22s). They are like the caps in a child’s toy gun. When theyare struck, pressure and friction within cause them to ignite. The primershave little power by themselves. They couldn’t drive the bullet out of thebarrel. Their job is to ignite the powder which drives the bullet.
Primers can only be used once and must be changed if the cartridge isreloaded. Reloading is inherently dangerous and should only be done undersupervision by a trained adult. However, when done sensibly according tothe directions, it provides a great savings and sense of satisfaction for thehunter.
Chain Reaction
How can the little bit of energy we release, as we squeeze the trigger,cause such a noise and drive a bullet with so much force?
Our pressure on the trigger releases the stored kinetic energy of thespring behind the firing pin. When this is released, it strikes and releases thestored chemical energy of the primer. The ignition of the primer releases thestored chemical energy of the powder. This creates high pressure gasseswhich push the bullet out of the barrel of the rifle. The bullet now has tre-mendous kinetic energy. Our pressure on the trigger releases a chain reactionthat looses many forms of stored energy.
A cartridge stores energy until the split second we need it.
46 PART 1: SKILLS, TOOLS, & CRAFTSMANSHIP
Powder
There are a multitude of powders available. The greatest variables in load-ing different powders are:
Quantity. Obviously, more powder will provide more power or impulsethan less␣ powder.
The surface area of the powder helps to determine the rate of burn. Thesame amount of fine powder will burn faster than a like amount of coarsepowder.
Rates. Different powders burn at different rates. This is most important. Ifthe powder burns too slowly, the bullet will be out of the barrel before thepowder is completely consumed. Energy is wasted. If the powder burns toofast, the powder will be burned before the bullet leaves the barrel.
Rifle and Handgun PowderRifle powder will not burn fast enough in a handgun. Handgun powder
burns far too fast to be loaded in a rifle cartridge in the same quantity.
SafetyOld time Alaskans used to reload their own cartridges, but the lack of
proper measuring devices caused many accidents that led people to preferstore-bought ammunition. Proper storage of powder also presented problems.
Clean burningIt is important that powder burns clean. A dirty barrel might explode when
bullets force their way down a clogged barrel. Many chemical reactions willcreate the force necessary to drive a bullet down the barrel, however, modernpowders burn quite cleanly.
Oxygen or What?For years I wondered where the oxygen came from to burn the powder.
Later it dawned on me that there is no oxygen. A quick look at the Periodictable of elements shows that sulfur is in the same group as oxygen. In old-time black powder, sulfur, a solid, takes the place of the large amounts ofoxygen that would be required to efficiently oxidize (burn) the other elementsin the powder.1 In more modern powders, nitrates take the place of oxygenand sulfur in oxidizing the powder.
Cartridge
Rifle and HandgunMost cartridges are made of brass. Brass is soft enough to slip in and out of
the rifle’s chamber without causing a lot of wear by friction. When fired, thesoft brass cartridge expands against the strong heavy steel of the firing cham-ber which holds it in shape.
1. Sulfur has two free valence electrons like oxygen.
Chapter 5: Guns 47
The cartridges of different calibers are unique. They have long and shortnecks, and bodies which are straight or tapered.
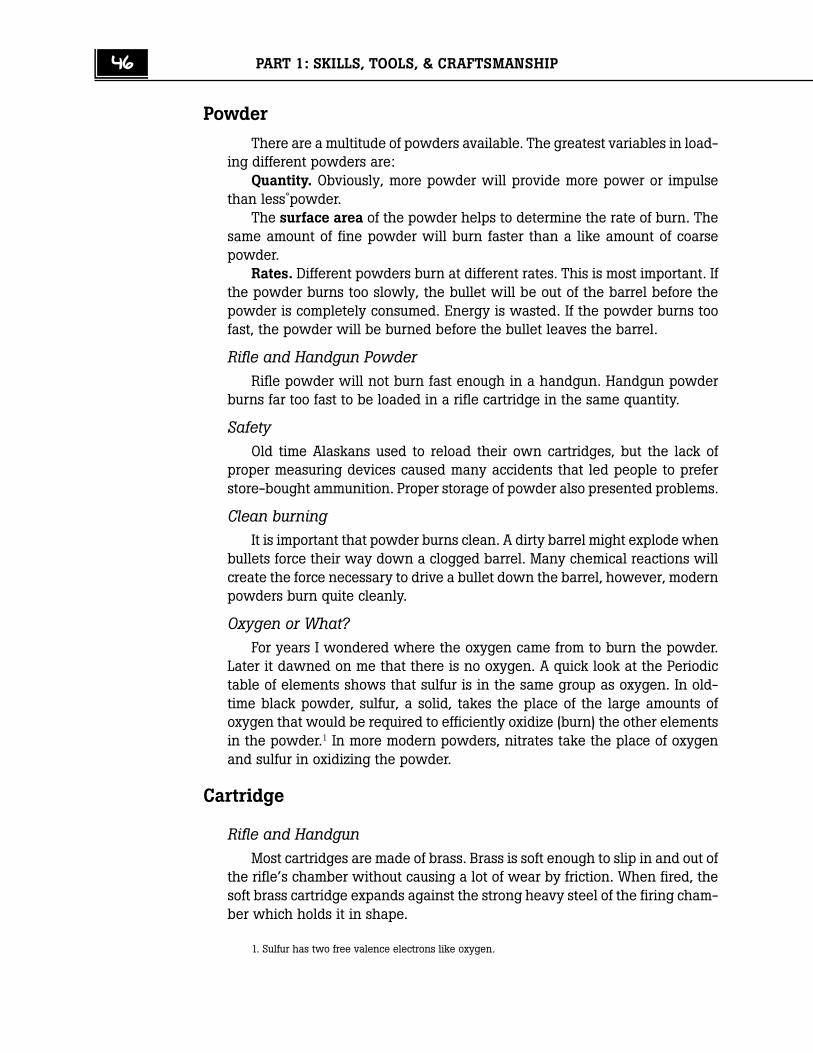
ShotgunShotgun cartridges have a bit of brass on the back end, but they are made
mostly of plastic. The plastic protects and seals, keeping the cartridge dry.Within the plastic shotgun shell is a plastic cup called “wadding” that
holds the pellets. When the primer ignites the powder, the cup and pelletsare driven out of the barrel. When it hits the open air, the light plastic wad-ding slows down and the pellets are carried along their course by inertia. Thecup provides very low friction for the pellets to get out of the barrel. Withoutit, the pellets would jam tightly in the barrel, greatly reducing velocity.
Before plastic, a cotton wad separated the pellets and expanding powder.
Rifling
A look down the barrel of most shotguns shows that the barrel is perfectlysmooth. A shotgun’s pellets are thrown straight out of the barrel.
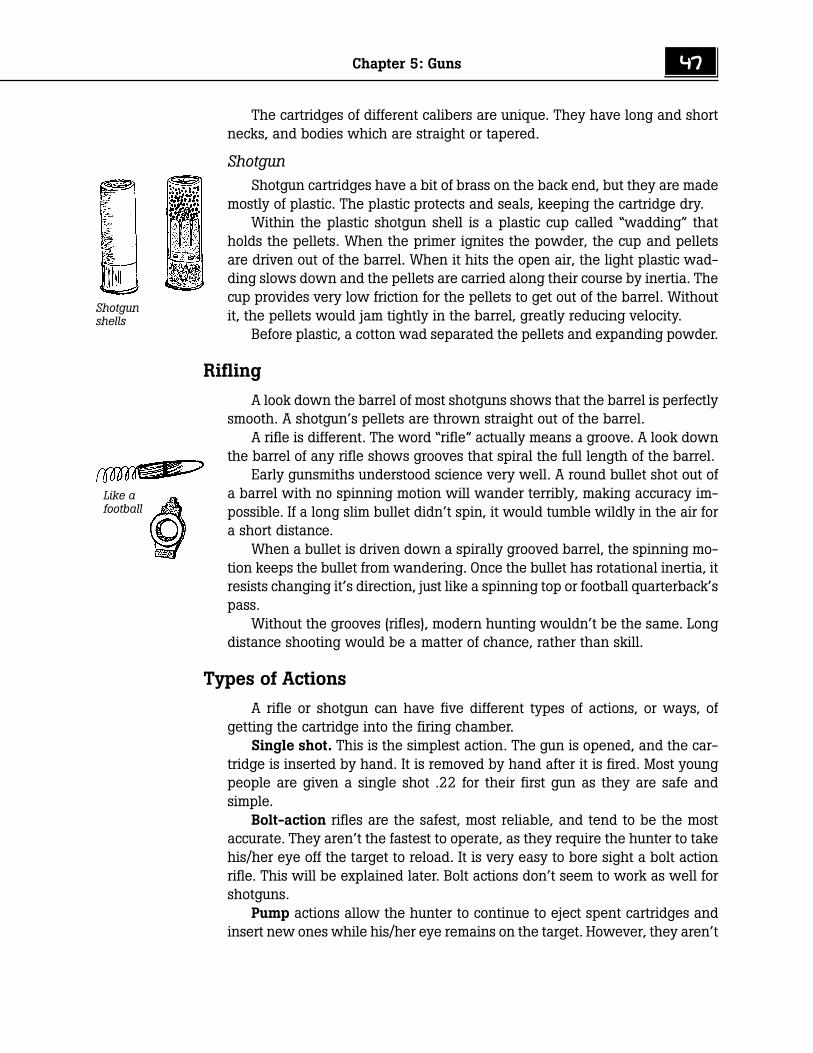
A rifle is different. The word “rifle” actually means a groove. A look downthe barrel of any rifle shows grooves that spiral the full length of the barrel.
Early gunsmiths understood science very well. A round bullet shot out ofa barrel with no spinning motion will wander terribly, making accuracy im-possible. If a long slim bullet didn’t spin, it would tumble wildly in the air fora short distance.
When a bullet is driven down a spirally grooved barrel, the spinning mo-tion keeps the bullet from wandering. Once the bullet has rotational inertia, itresists changing it’s direction, just like a spinning top or football quarterback’spass.
Without the grooves (rifles), modern hunting wouldn’t be the same. Longdistance shooting would be a matter of chance, rather than skill.
Types of Actions
A rifle or shotgun can have five different types of actions, or ways, ofgetting the cartridge into the firing chamber.
Single shot. This is the simplest action. The gun is opened, and the car-tridge is inserted by hand. It is removed by hand after it is fired. Most youngpeople are given a single shot .22 for their first gun as they are safe andsimple.
Bolt-action rifles are the safest, most reliable, and tend to be the mostaccurate. They aren’t the fastest to operate, as they require the hunter to takehis/her eye off the target to reload. It is very easy to bore sight a bolt actionrifle. This will be explained later. Bolt actions don’t seem to work as well forshotguns.
Pump actions allow the hunter to continue to eject spent cartridges andinsert new ones while his/her eye remains on the target. However, they aren’t
Shotgunshells
Like afootball
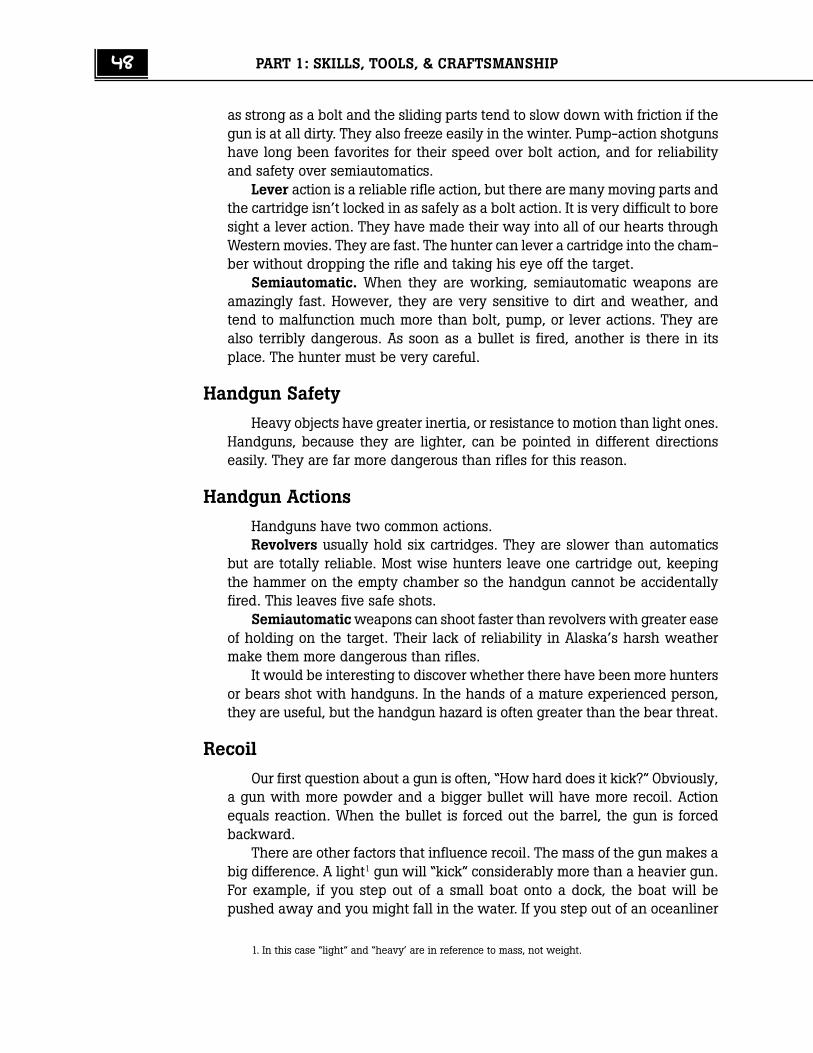
48 PART 1: SKILLS, TOOLS, & CRAFTSMANSHIP
1. In this case “light” and “heavy’ are in reference to mass, not weight.
as strong as a bolt and the sliding parts tend to slow down with friction if thegun is at all dirty. They also freeze easily in the winter. Pump-action shotgunshave long been favorites for their speed over bolt action, and for reliabilityand safety over semiautomatics.
Lever action is a reliable rifle action, but there are many moving parts andthe cartridge isn’t locked in as safely as a bolt action. It is very difficult to boresight a lever action. They have made their way into all of our hearts throughWestern movies. They are fast. The hunter can lever a cartridge into the cham-ber without dropping the rifle and taking his eye off the target.
Semiautomatic. When they are working, semiautomatic weapons areamazingly fast. However, they are very sensitive to dirt and weather, andtend to malfunction much more than bolt, pump, or lever actions. They arealso terribly dangerous. As soon as a bullet is fired, another is there in itsplace. The hunter must be very careful.
Handgun Safety
Heavy objects have greater inertia, or resistance to motion than light ones.Handguns, because they are lighter, can be pointed in different directionseasily. They are far more dangerous than rifles for this reason.
Handgun Actions
Handguns have two common actions.Revolvers usually hold six cartridges. They are slower than automatics
but are totally reliable. Most wise hunters leave one cartridge out, keepingthe hammer on the empty chamber so the handgun cannot be accidentallyfired. This leaves five safe shots.
Semiautomatic weapons can shoot faster than revolvers with greater easeof holding on the target. Their lack of reliability in Alaska’s harsh weathermake them more dangerous than rifles.
It would be interesting to discover whether there have been more huntersor bears shot with handguns. In the hands of a mature experienced person,they are useful, but the handgun hazard is often greater than the bear threat.
Recoil
Our first question about a gun is often, “How hard does it kick?” Obviously,a gun with more powder and a bigger bullet will have more recoil. Actionequals reaction. When the bullet is forced out the barrel, the gun is forcedbackward.
There are other factors that influence recoil. The mass of the gun makes abig difference. A light1 gun will “kick” considerably more than a heavier gun.For example, if you step out of a small boat onto a dock, the boat will bepushed away and you might fall in the water. If you step out of an oceanliner
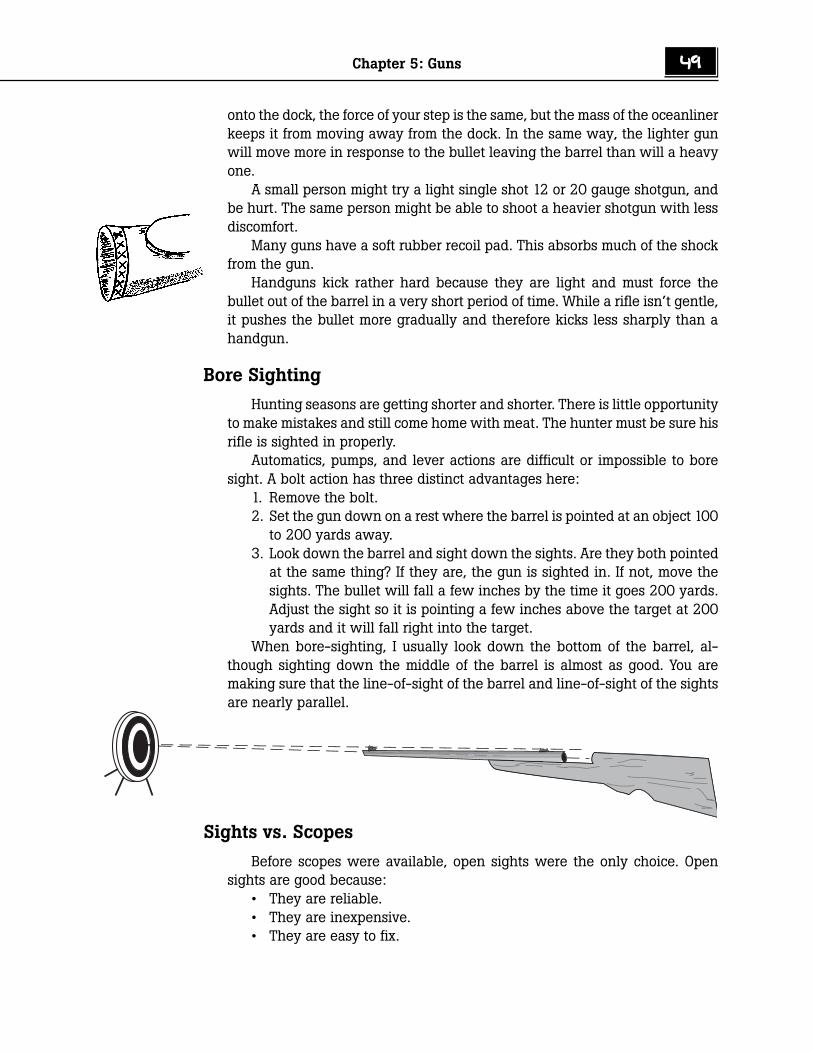
Chapter 5: Guns 49
onto the dock, the force of your step is the same, but the mass of the oceanlinerkeeps it from moving away from the dock. In the same way, the lighter gunwill move more in response to the bullet leaving the barrel than will a heavyone.
A small person might try a light single shot 12 or 20 gauge shotgun, andbe hurt. The same person might be able to shoot a heavier shotgun with lessdiscomfort.
Many guns have a soft rubber recoil pad. This absorbs much of the shockfrom the gun.
Handguns kick rather hard because they are light and must force thebullet out of the barrel in a very short period of time. While a rifle isn’t gentle,it pushes the bullet more gradually and therefore kicks less sharply than ahandgun.
Bore Sighting
Hunting seasons are getting shorter and shorter. There is little opportunityto make mistakes and still come home with meat. The hunter must be sure hisrifle is sighted in properly.
Automatics, pumps, and lever actions are difficult or impossible to boresight. A bolt action has three distinct advantages here:
1. Remove the bolt.2. Set the gun down on a rest where the barrel is pointed at an object 100
to 200 yards away.3. Look down the barrel and sight down the sights. Are they both pointed
at the same thing? If they are, the gun is sighted in. If not, move thesights. The bullet will fall a few inches by the time it goes 200 yards.Adjust the sight so it is pointing a few inches above the target at 200yards and it will fall right into the target.
When bore-sighting, I usually look down the bottom of the barrel, al-though sighting down the middle of the barrel is almost as good. You aremaking sure that the line-of-sight of the barrel and line-of-sight of the sightsare nearly parallel.
Sights vs. Scopes
Before scopes were available, open sights were the only choice. Opensights are good because:
• They are reliable.• They are inexpensive.• They are easy to fix.
50 PART 1: SKILLS, TOOLS, & CRAFTSMANSHIP
• They aren’t easily bumped out of adjustment.
DisadvantagesWith open sights, the hunter’s eye is trying to focus in three places.• Very close. The rear sight.• Near. The front sight.• Far. The target.This is difficult enough for people who have good eyes and far more diffi-
cult for those who don’t.Scopes have become popular for several reasons:• They allow the hunter to see the target much more clearly, magnified
two to seven times by the lenses.• A scope allows the hunter to focus on one place␣ .␣ .␣ . the lens close to
his eye.• They seem to “gather light” in the twilight, and allow the hunter to
shoot in conditions too dark for open sights.Scopes have some distinct disadvantages:• They easily fog and condense. Often hunting is done in bad weather
and the scope, in the moment of greatest need, is blurred with mois-ture even if there has been protection over the lenses.
• They are more easily bumped out of adjustment.• If they are too high a power, in the brush the hunter cannot see any-
thing but giant leaves and twigs that appear to be tree trunks. A highpower scope is dangerous in the brush. It is hard to find the animal asthe field of view is so narrow. I once went after a wounded bear in thebrush with a high powered scope. Never again.
• They make the gun heavier to carry long distances.• They are rather expensive.Whatever a hunter chooses will be determined by his needs and applica-
tions.Shotguns don’t have scopes for hunting birds, nor do they have open
sights. The shotgun needs to be an extension of the hunter’s body. It isn’tsighted. It is pointed. If the stock of the shotgun doesn’t fit the face and bodyof the hunter well, he will continually miss. The stock needs to be shapeduntil the place where the hunter is pointing the gun is the same place he islooking with his eye when he puts the gun to his shoulder. The importance ofthis cannot be overstated.
In the Lower 48, deer and elk hunters put scopes on shotguns using one-ounce slugs. Slugs don’t travel as far as rifle bullets, which is important inhighly populated areas.
Trajectory
The trajectory of a bullet is the path that it takes between the gun and thetarget.
One bullet is dropped from a place 3’ from the ground. Another bullet is
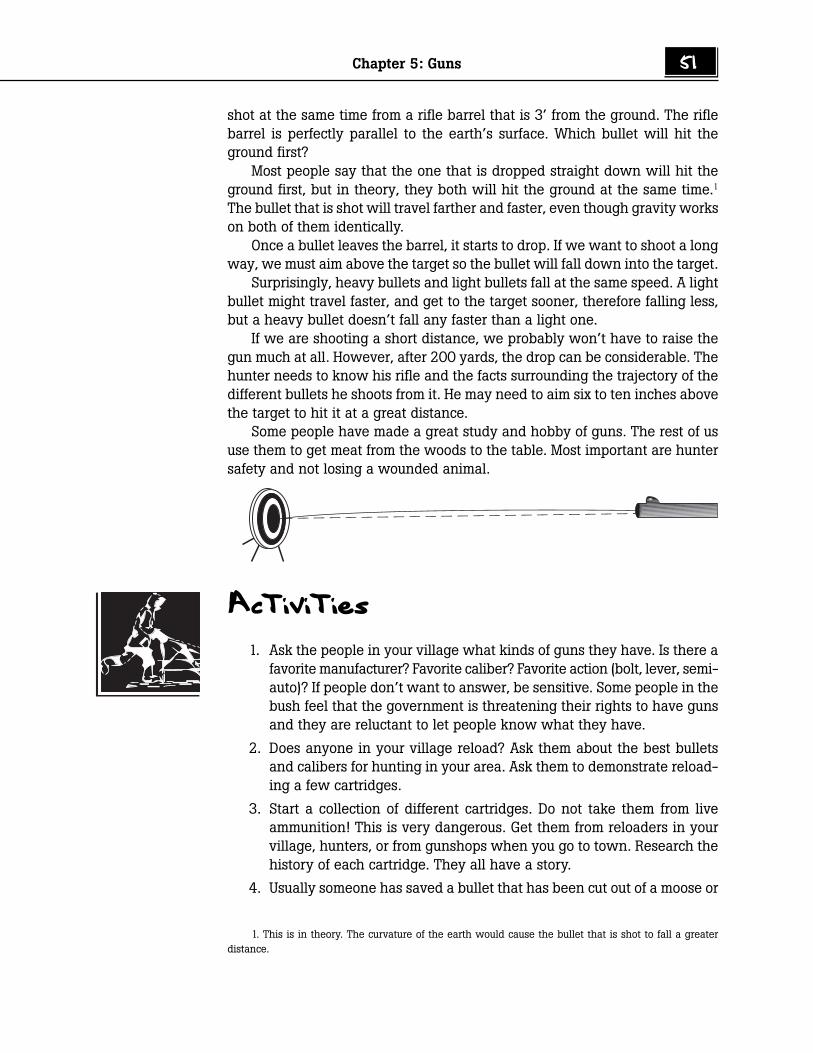
Chapter 5: Guns 51
shot at the same time from a rifle barrel that is 3’ from the ground. The riflebarrel is perfectly parallel to the earth’s surface. Which bullet will hit theground first?
Most people say that the one that is dropped straight down will hit theground first, but in theory, they both will hit the ground at the same time.1
The bullet that is shot will travel farther and faster, even though gravity workson both of them identically.
Once a bullet leaves the barrel, it starts to drop. If we want to shoot a longway, we must aim above the target so the bullet will fall down into the target.
Surprisingly, heavy bullets and light bullets fall at the same speed. A lightbullet might travel faster, and get to the target sooner, therefore falling less,but a heavy bullet doesn’t fall any faster than a light one.
If we are shooting a short distance, we probably won’t have to raise thegun much at all. However, after 200 yards, the drop can be considerable. Thehunter needs to know his rifle and the facts surrounding the trajectory of thedifferent bullets he shoots from it. He may need to aim six to ten inches abovethe target to hit it at a great distance.
Some people have made a great study and hobby of guns. The rest of ususe them to get meat from the woods to the table. Most important are huntersafety and not losing a wounded animal.
Activities
1. Ask the people in your village what kinds of guns they have. Is there afavorite manufacturer? Favorite caliber? Favorite action (bolt, lever, semi-auto)? If people don’t want to answer, be sensitive. Some people in thebush feel that the government is threatening their rights to have gunsand they are reluctant to let people know what they have.
2. Does anyone in your village reload? Ask them about the best bulletsand calibers for hunting in your area. Ask them to demonstrate reload-ing a few cartridges.
3. Start a collection of different cartridges. Do not take them from liveammunition! This is very dangerous. Get them from reloaders in yourvillage, hunters, or from gunshops when you go to town. Research thehistory of each cartridge. They all have a story.
4. Usually someone has saved a bullet that has been cut out of a moose or
1. This is in theory. The curvature of the earth would cause the bullet that is shot to fall a greaterdistance.
52 PART 1: SKILLS, TOOLS, & CRAFTSMANSHIP
caribou. Ask around the village for one. Can you see the grooves im-printed in the bullet from the rifling in the barrel? Draw the mush-roomed bullet. Do you think it hit a bone?
5. Try filing the different parts of the bullet. Is it hard or soft?
6. Ask your local reloading expert to put a primer in a cartridge and omitthe bullet and powder. Let him shoot the primer outside. Do you nowhave a sense of how little power is in the primer?
7. Ask your reloading expert to put a little powder on a flat surface andlight it with a match. Does it explode or burn quickly? Smell the burnedpowder.
8. Scrape the lead on a .22 cartridge with your fingernail. Can you detectthe wax to lubricate the bullet?
9. Handle lead and steel shot from a shotgun. Can you feel the differencein weight?
10. If a bullet came out of a rifle without spin it would wander. The bestway to observe this is to hit a volleyball underhanded in the gym. Ifyou hit it with no spin, people on the receiving end will see it wander,and will have a hard time hitting it. Research what a “knuckle ball” isin baseball and how it is thrown. What is the relationship of this phe-nomenon to shotgun pellets?
11. With the bolt removed from a bolt action rifle (to remove all danger)look down the barrel. Can you see the rifles? How do you think policeverify that a certain bullet was shot from a certain gun?
12. Feel the recoil pad on some of the rifles and shotguns in the village. Doyou think they would help reduce the kick of the gun? Do you findrecoil pads on .22s? Why?
13. Bore sight a bolt-action rifle according to the directions given in thetext. Are the sights or scope on target?
14. Ask people in your village which they prefer: open sights or a scope.What are their reasons for their preference? Does it vary with the ani-mal hunted?
15. From a ballistics chart, compare the three top favorite rifles in yourvillage for velocity of bullet, drop of bullet, and foot pounds of energy at100, 200, and 300 yards. Note the differences for different weight bul-lets. What are the favorites in your village?
16. Draw the trajectory of those three favorite rifles and three favorite bul-let weights.
17. Ask the oldtimers what the favorite rifles were long ago and why.
18. Drop two balls of the same size but different weights at the same timefrom a given height. Does the heavier one fall faster? Why or why not?
19. Ask the good hunters in your village whether they shoot with one orboth eyes open.
Chapter 5: Guns 53
20. Test the students in your class. Which eye is dominant? Do they shootright handed or left handed? Does anyone shoot right handed with aleft eye dominant or vice versa?
Student Response
1. What are the three types of guns?
2. Draw a loaded cartridge and label the parts: cartridge, powder, primer,and bullet.
3. What are the four differences that must be considered when choosinga bullet?
4. What is the material most often used in making bullets? What is thejacket material?
5. What are primers and what do they do?
6. What energy conversions take place as we squeeze the trigger? Whatkind of energy is stored in a cartridge?
7. What is the difference between handgun and rifle powder?
8. What element is used in the chemical reaction in a cartridge that re-places oxygen in the burning process?
9. Draw the rifling in the barrel of a rifle.
10. What are four kinds of actions of rifles? Name one advantage of each.
11. What are the two kinds of actions of handguns? Name one advantageof each.
12. In your own words, what is recoil?
13. Draw the side view of the process of bore sighting a rifle.
14. List three advantages of open sights.
15. List three advantages of scopes.
16. Draw the trajectory of a fast bullet.
17. Draw the trajectory of a slow bullet.
Math
1. Phil reloads his own shells for $.30 each. A box of 20 shells costs $19.95in the store. His reloading equipment cost $65. How many years doeshe have to reload (if he uses an average of 3 boxes a year) in order topay for his reloading equipment?

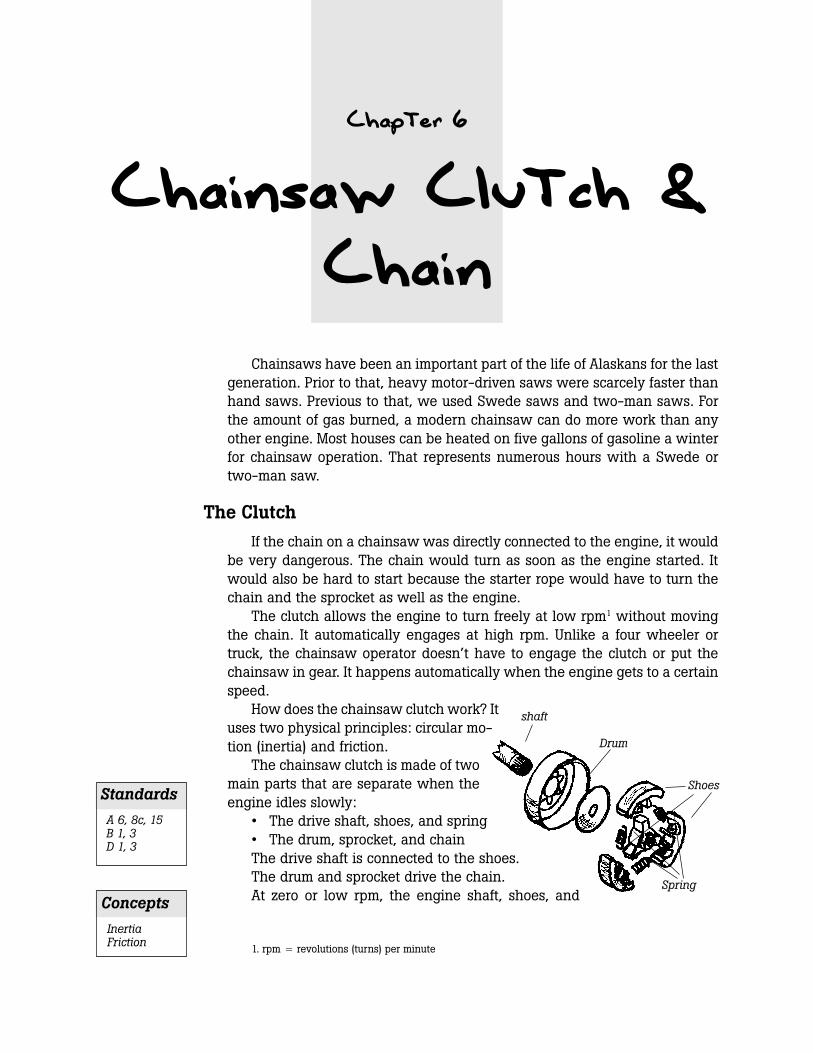
Chapter 6
Chainsaw Clutch &Chain
Chainsaws have been an important part of the life of Alaskans for the lastgeneration. Prior to that, heavy motor-driven saws were scarcely faster thanhand saws. Previous to that, we used Swede saws and two-man saws. Forthe amount of gas burned, a modern chainsaw can do more work than anyother engine. Most houses can be heated on five gallons of gasoline a winterfor chainsaw operation. That represents numerous hours with a Swede ortwo-man saw.
The Clutch
If the chain on a chainsaw was directly connected to the engine, it wouldbe very dangerous. The chain would turn as soon as the engine started. Itwould also be hard to start because the starter rope would have to turn thechain and the sprocket as well as the engine.
The clutch allows the engine to turn freely at low rpm1 without movingthe chain. It automatically engages at high rpm. Unlike a four wheeler ortruck, the chainsaw operator doesn’t have to engage the clutch or put thechainsaw in gear. It happens automatically when the engine gets to a certainspeed.
How does the chainsaw clutch work? Ituses two physical principles: circular mo-tion (inertia) and friction.
The chainsaw clutch is made of twomain parts that are separate when theengine idles slowly:
• The drive shaft, shoes, and spring• The drum, sprocket, and chainThe drive shaft is connected to the shoes.The drum and sprocket drive the chain.At zero or low rpm, the engine shaft, shoes, and
1. rpm z revolutions (turns) per minute
Drum
Shoes
Spring
shaft
Concepts
InertiaFriction
Standards
A 6, 8c, 15B 1, 3D 1, 3
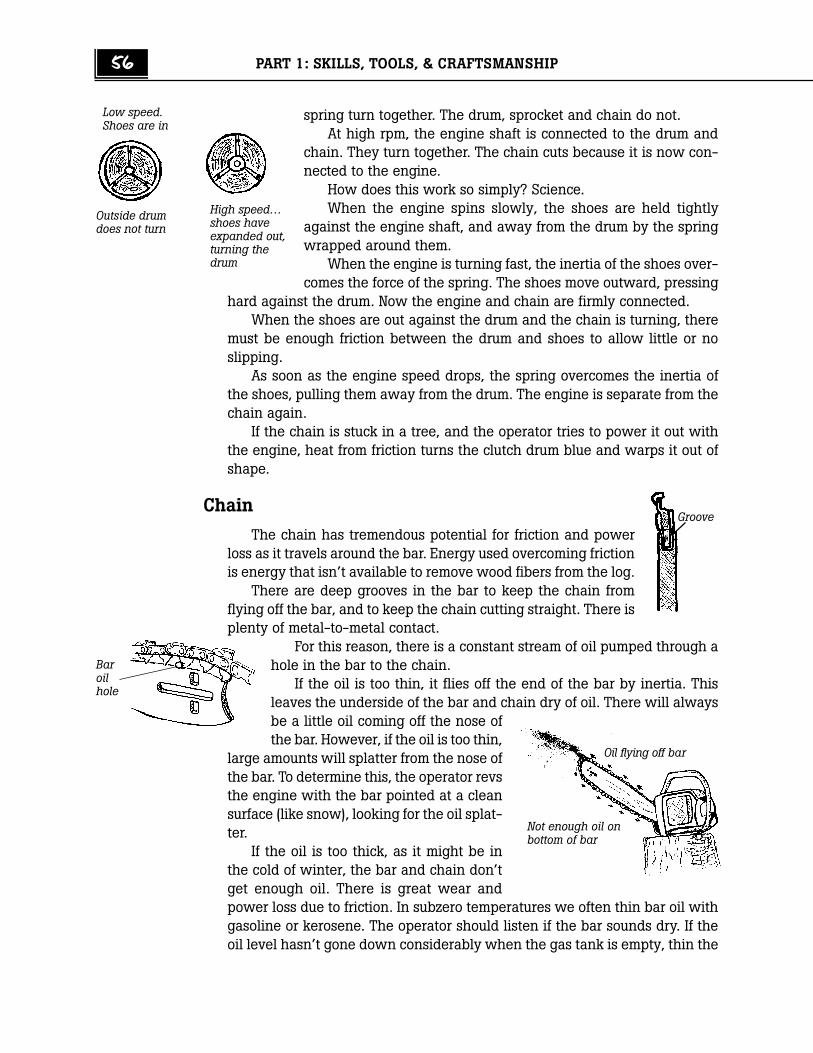
56 PART 1: SKILLS, TOOLS, & CRAFTSMANSHIP
spring turn together. The drum, sprocket and chain do not.At high rpm, the engine shaft is connected to the drum and
chain. They turn together. The chain cuts because it is now con-nected to the engine.
How does this work so simply? Science.When the engine spins slowly, the shoes are held tightly
against the engine shaft, and away from the drum by the springwrapped around them.
When the engine is turning fast, the inertia of the shoes over-comes the force of the spring. The shoes move outward, pressing
hard against the drum. Now the engine and chain are firmly connected.When the shoes are out against the drum and the chain is turning, there
must be enough friction between the drum and shoes to allow little or noslipping.
As soon as the engine speed drops, the spring overcomes the inertia ofthe shoes, pulling them away from the drum. The engine is separate from thechain again.
If the chain is stuck in a tree, and the operator tries to power it out withthe engine, heat from friction turns the clutch drum blue and warps it out ofshape.
Chain
The chain has tremendous potential for friction and powerloss as it travels around the bar. Energy used overcoming frictionis energy that isn’t available to remove wood fibers from the log.
There are deep grooves in the bar to keep the chain fromflying off the bar, and to keep the chain cutting straight. There isplenty of metal-to-metal contact.
For this reason, there is a constant stream of oil pumped through ahole in the bar to the chain.
If the oil is too thin, it flies off the end of the bar by inertia. Thisleaves the underside of the bar and chain dry of oil. There will alwaysbe a little oil coming off the nose ofthe bar. However, if the oil is too thin,
large amounts will splatter from the nose ofthe bar. To determine this, the operator revsthe engine with the bar pointed at a cleansurface (like snow), looking for the oil splat-ter.
If the oil is too thick, as it might be inthe cold of winter, the bar and chain don’tget enough oil. There is great wear andpower loss due to friction. In subzero temperatures we often thin bar oil withgasoline or kerosene. The operator should listen if the bar sounds dry. If theoil level hasn’t gone down considerably when the gas tank is empty, thin the
Oil flying off bar
Not enough oil onbottom of bar
Low speed.Shoes are in
High speed…shoes haveexpanded out,turning thedrum
Outside drumdoes not turn
Groove
Baroilhole

Chapter 6: Chainsaw Clutch & Chain 57
oil until it flows freely at that temperature.If the oil is the proper consistency, it will pump freely, and will stay with
the chain all the way around the bar.Many saws have an adjustment for the oil flow. Longer bars require more
oil than shorter ones. The location of the adjustment isn’t always obvious, sorefer to the owner’s manual.
While many people use 30w motor oil, professional chainsaw bar oil ismore effective because it is sticky.
All chainsaw manufacturers discourage the use of old crankcase oil fromgenerators or cars for bar oil. I used to think they just wanted to make moneywhen I bought their expensive bar oil, so I used crankcase oil. What I didn’trealize is that there are many iron filings in crankcase oil that cause excessivewear on the bar and chain. Filings can also plug up the oil filter. Once I under-stood this, I immediately started using bar oil or 30w oil from large contain-ers. Bars and chains last longer with commercial bar oil.
Tension
Many chainsaw bars have a roller on the nose. This is to reduce powerloss to friction. The greatest tension on the chain is between the wood andthe sprocket. Most of the time, cutting is done on the bottom of the bar.
When cutting is done on the top of the bar, there is tension along the fulllength of the bar and chain. Friction on the nose is tremendous. Without aroller nose there would be great power loss. Avoid cutting on top of the barwhen possible.
Most professionals turn their bars over daily so the bar will wear evenlyon both sides.
Chainsaws and Fishtraps
Sometimes we use chainsaws to cut river ice when setting fishtraps throughthe ice. It doesn’t hurt a cold saw to be splashed with cold river water. How-ever, icy water can crack a hot cylinder.
There are often rocks in the ice that will ruin the chain. This is particularlytrue if the river has frozen, then thawed again. During the warm spell, the icethat was frozen on the gravel bars breaks free, carrying rocks from the bar. Itdrifts down the river to freeze in a different place.
Loose
Tension
Tensionand frictionall aroundthe bar

58 PART 1: SKILLS, TOOLS, & CRAFTSMANSHIP
Activities
1. Put a weight on a string. Attach a strong rubber band or soft Bungeecord to the string. Hold the loose end of the rubber band and spin theweight around the head. (The dangers of this should be fairly obvious.)Try this with different weights and different strengths of rubber bands.Can the students feel the difference?
2. If students haven’t tried the old water-bucket-around-the-head activ-ity, let them try it. This illustrates inertia quite well.
3. There are two types of chainsaw clutches: those with the sprocket onthe outside of the clutch and those with the sprocket on the inside.Find one of each kind in the village and draw a top view of each.
4. Do this outside. Get an experienced person to run a saw that has thesprocket on the inside and clutch on the outside. Take the cover off andobserve the operation of the clutch. Increase and decrease rpm. Canyou see the shoes go in and out? Describe what you see to someonewho didn’t see the demonstration.
5. Look on the chainsaw in the above activity for the oil flow adjustment.Observe the oil coming out of the saw to supply the bar. Adjust the oilflow. Is the difference obvious? Find the hole in the bar that allows theoil to flow to the chain. Is there a similar hole if the bar is turned over?
6. Get a chainsaw clutch from an old chainsaw. Look at the drum. Does itlook blue from being overheated? Look at the shoes. Test them for fric-tion with other materials. Do they look like they are made of high fric-tion material? What do you think that material is? To get the clutch offyou will probably have to follow these directions:
• Remove the sparkplug.• Put a screwdriver in the sparkplug hole and turn the engine until
you feel the piston is at the bottom of the cylinder. Remove the screw-driver.
• Cram the cylinder full of nylon or other plastic rope.Now you can put a wrench on the nut holding the clutch and the ropewill hold the crankshaft from turning.
7. Test the clutch spring for tension. Is it a strong spring? Does it also lookblue from overheating? Does it stretch evenly or is it dysfunctional?
8. Imagine what would happen if oil got into the clutch. What problemsdo you think would occur if this happened when the saw was␣ operating?
9. Get some 30w oil. Heat it by putting the plastic container in very hotwater. How thin does it get? Do you think it would stay on the bar wellwhen it is that thin? Cool it in a freezer. Feel it. Do you think it wouldpump well at this temperature?
10. Get some commercial bar oil. Put a little on your fingers. How is itdifferent from regular 30w oil? Why do you think this is so?
Chapter 6: Chainsaw Clutch & Chain 59
11. Get some crankcase oil. Wrap a magnet in thin plastic wrap. Immersethe tip of the magnet in the old oil and see if you can pick up the ironfilings that are supposedly in the crankcase oil.
12. Get a chainsaw bar with a roller nose. Does it have a hole to grease, oris it permanently lubricated?
13. Get several bars and chains, new and old. Test them for side motionand wear. How sloppy is the chain in the bar? Does it tend more to-ward one side than another? Which part of the bar is worn the most?Does it look like the owners turned the bar over often, or is one sideworn more than the other?
14. Draw or trace a side view of a chainsaw chain.
15. Ask people in your village what is the best saw they ever owned andwhy. What is the favorite bar length?
16. Ask people in the village how they cut wood before chainsaws. If youcan, fall and buck a tree using that method.
17. Ask people in the village the names of the chainsaws they know orremember. Make a class list. Find on the map the locations where theywere manufactured. (You will need a world map.)
18. Ask in the village if someone can demonstrate how to splice a brokenchainsaw chain.
19. Gently file the materials of the bar, clutch drum, clutch shoes, sprocket,chain dogs, and teeth. Which are hard and which are softer than a file?
20. Have a contest to see who can untangle a chainsaw chain the fastest.(This is often a challenge!) Let students tangle a chain, and pass it tothe next person to untangle.
21. Get an owner’s manual. Draw a picture of two dangerous activities thatshould be avoided.
Student Response
1. What might happen if the chain and engine of a chainsaw were al-ways connected?
2. What are the two main parts of the clutch?
3. How does inertia work in a chainsaw clutch?
4. What is around the shoes that keeps them from flying outward at lowrpm? What would result if it were too loose? Too tight?
5. Draw a chainsaw clutch where the engine is turning at low rpm andthe chain isn’t turning.
60 PART 1: SKILLS, TOOLS, & CRAFTSMANSHIP
6. Draw a chainsaw clutch where the engine is turning at high rpm andthe chain is turning.
7. If there were low friction between the shoes and drum, what wouldhappen when there was a load on the chain?
8. What happens to the shoes when the engine is slowed down afterrunning at high speed?
9. What is happening when the chain is stuck in the tree and the saw isbeing run at high rpm?
10. What happens when chain oil is too thin? Explain or draw it.
11. What happens if the chain oil is too thick?
12. How is professional bar oil different from 30w oil?
13. Why is the use of old crankcase oil discouraged?
14. What is a roller nose on a chainsaw bar? What is the purpose?
15. Draw a chainsaw bar and chain as they are cutting a block. Identify theplace on the bar where the chain is loose. Identify where it is tight.
Math
1. Commercial bar oil is $3 per quart. Henry bought eight quarts and fig-ured that his bar lasted two times longer than if he used free crankcaseoil. A new bar is $30. Did he save money?
2. Would it be cheaper if he ordered an extra bar from a discount place for$22 or commercial chain oil for $2.25?
3. Henry can get bar oil for $3 a quart, or order in bulk, 5 gallons for $32,plus $13 shipping. Is he saving money, and if so, how much? The an-swer can refer to quarts or 5-gallon buckets.
4. Jesse wants to sell cordwood. He figures that each cord for his chain-saw takes 1 quart of bar oil at $2.75, 3/4 gallon of gas at $3.50 pergallon including two-cycle oil. Snowmachine costs are about $21 percord, including wear and tear. It takes 5 hours to cut and haul a cord.How much should he charge to make the equivalent of $10 per hour?$12 per hour?
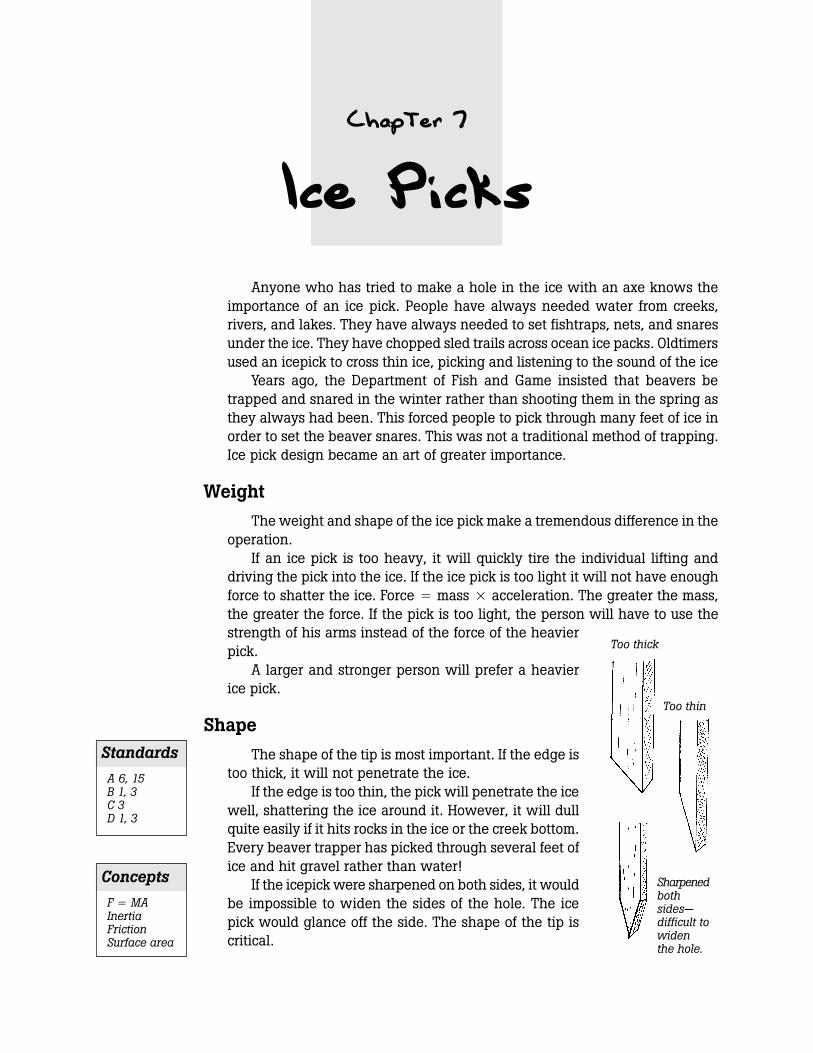
Chapter 7
Ice Picks
Anyone who has tried to make a hole in the ice with an axe knows theimportance of an ice pick. People have always needed water from creeks,rivers, and lakes. They have always needed to set fishtraps, nets, and snaresunder the ice. They have chopped sled trails across ocean ice packs. Oldtimersused an icepick to cross thin ice, picking and listening to the sound of the ice
Years ago, the Department of Fish and Game insisted that beavers betrapped and snared in the winter rather than shooting them in the spring asthey always had been. This forced people to pick through many feet of ice inorder to set the beaver snares. This was not a traditional method of trapping.Ice pick design became an art of greater importance.
Weight
The weight and shape of the ice pick make a tremendous difference in theoperation.
If an ice pick is too heavy, it will quickly tire the individual lifting anddriving the pick into the ice. If the ice pick is too light it will not have enoughforce to shatter the ice. Force z mass x acceleration. The greater the mass,the greater the force. If the pick is too light, the person will have to use thestrength of his arms instead of the force of the heavierpick.
A larger and stronger person will prefer a heavierice pick.
Shape
The shape of the tip is most important. If the edge istoo thick, it will not penetrate the ice.
If the edge is too thin, the pick will penetrate the icewell, shattering the ice around it. However, it will dullquite easily if it hits rocks in the ice or the creek bottom.Every beaver trapper has picked through several feet ofice and hit gravel rather than water!
If the icepick were sharpened on both sides, it wouldbe impossible to widen the sides of the hole. The icepick would glance off the side. The shape of the tip iscritical.
Too thick
Too thin
Sharpenedbothsides—difficult towidenthe hole.
Standards
A 6, 15B 1, 3C 3D 1, 3
Concepts
F z MAInertiaFrictionSurface area
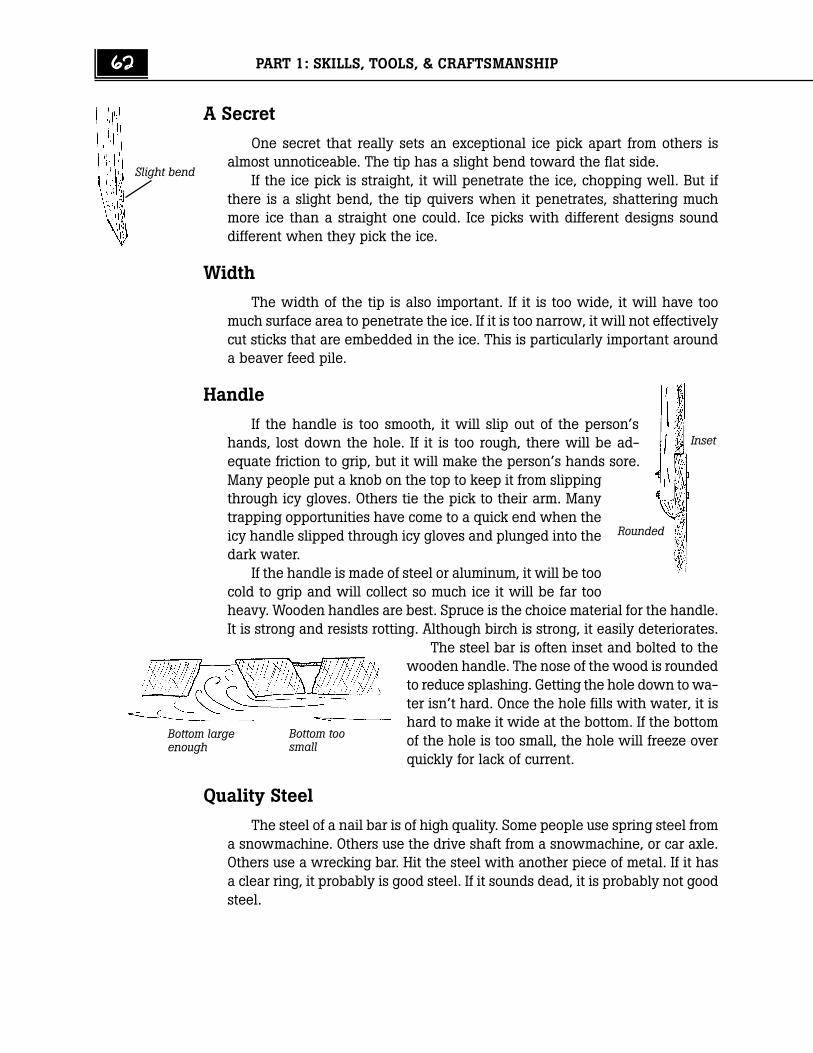
62 PART 1: SKILLS, TOOLS, & CRAFTSMANSHIP
A Secret
One secret that really sets an exceptional ice pick apart from others isalmost unnoticeable. The tip has a slight bend toward the flat side.
If the ice pick is straight, it will penetrate the ice, chopping well. But ifthere is a slight bend, the tip quivers when it penetrates, shattering muchmore ice than a straight one could. Ice picks with different designs sounddifferent when they pick the ice.
Width
The width of the tip is also important. If it is too wide, it will have toomuch surface area to penetrate the ice. If it is too narrow, it will not effectivelycut sticks that are embedded in the ice. This is particularly important arounda beaver feed pile.
Handle
If the handle is too smooth, it will slip out of the person’shands, lost down the hole. If it is too rough, there will be ad-equate friction to grip, but it will make the person’s hands sore.Many people put a knob on the top to keep it from slippingthrough icy gloves. Others tie the pick to their arm. Manytrapping opportunities have come to a quick end when theicy handle slipped through icy gloves and plunged into thedark water.
If the handle is made of steel or aluminum, it will be toocold to grip and will collect so much ice it will be far tooheavy. Wooden handles are best. Spruce is the choice material for the handle.It is strong and resists rotting. Although birch is strong, it easily deteriorates.
The steel bar is often inset and bolted to thewooden handle. The nose of the wood is roundedto reduce splashing. Getting the hole down to wa-ter isn’t hard. Once the hole fills with water, it ishard to make it wide at the bottom. If the bottomof the hole is too small, the hole will freeze overquickly for lack of current.
Quality Steel
The steel of a nail bar is of high quality. Some people use spring steel froma snowmachine. Others use the drive shaft from a snowmachine, or car axle.Others use a wrecking bar. Hit the steel with another piece of metal. If it hasa clear ring, it probably is good steel. If it sounds dead, it is probably not goodsteel.
Slight bend
Bottom largeenough
Bottom toosmall
Rounded
Inset
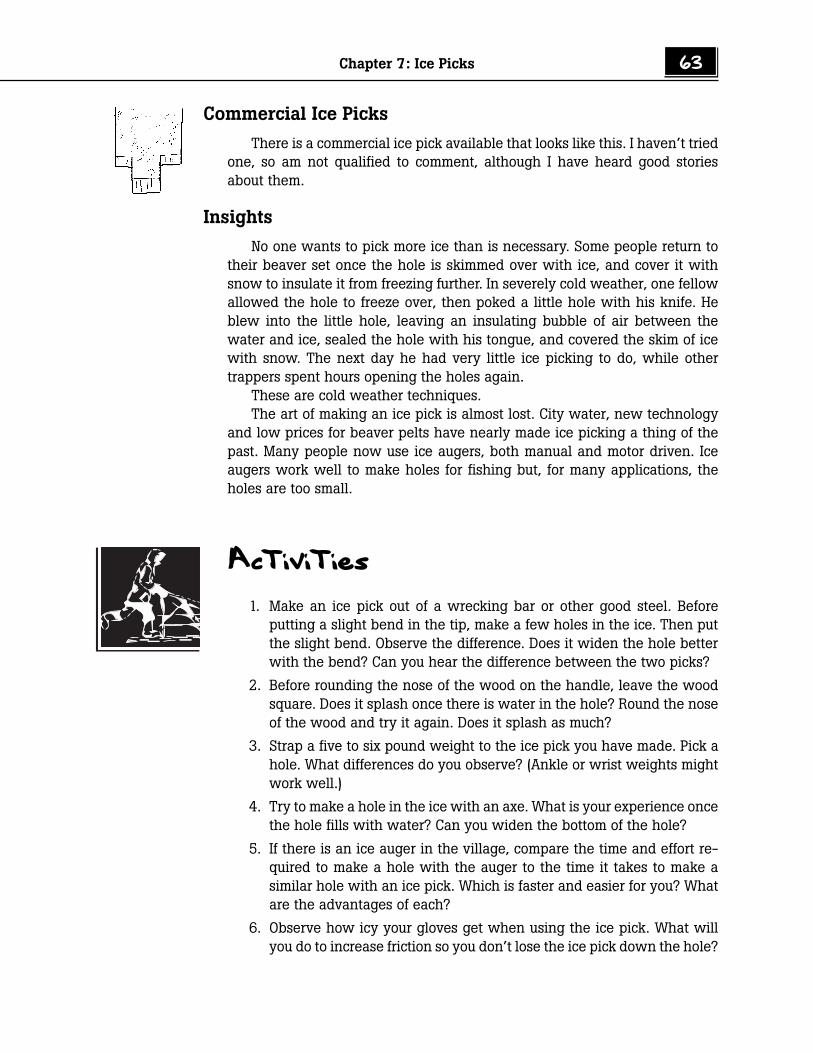
Chapter 7: Ice Picks 63
Commercial Ice Picks
There is a commercial ice pick available that looks like this. I haven’t triedone, so am not qualified to comment, although I have heard good storiesabout them.
Insights
No one wants to pick more ice than is necessary. Some people return totheir beaver set once the hole is skimmed over with ice, and cover it withsnow to insulate it from freezing further. In severely cold weather, one fellowallowed the hole to freeze over, then poked a little hole with his knife. Heblew into the little hole, leaving an insulating bubble of air between thewater and ice, sealed the hole with his tongue, and covered the skim of icewith snow. The next day he had very little ice picking to do, while othertrappers spent hours opening the holes again.
These are cold weather techniques.The art of making an ice pick is almost lost. City water, new technology
and low prices for beaver pelts have nearly made ice picking a thing of thepast. Many people now use ice augers, both manual and motor driven. Iceaugers work well to make holes for fishing but, for many applications, theholes are too small.
Activities
1. Make an ice pick out of a wrecking bar or other good steel. Beforeputting a slight bend in the tip, make a few holes in the ice. Then putthe slight bend. Observe the difference. Does it widen the hole betterwith the bend? Can you hear the difference between the two picks?
2. Before rounding the nose of the wood on the handle, leave the woodsquare. Does it splash once there is water in the hole? Round the noseof the wood and try it again. Does it splash as much?
3. Strap a five to six pound weight to the ice pick you have made. Pick ahole. What differences do you observe? (Ankle or wrist weights mightwork well.)
4. Try to make a hole in the ice with an axe. What is your experience oncethe hole fills with water? Can you widen the bottom of the hole?
5. If there is an ice auger in the village, compare the time and effort re-quired to make a hole with the auger to the time it takes to make asimilar hole with an ice pick. Which is faster and easier for you? Whatare the advantages of each?
6. Observe how icy your gloves get when using the ice pick. What willyou do to increase friction so you don’t lose the ice pick down the hole?
64 PART 1: SKILLS, TOOLS, & CRAFTSMANSHIP
7. Listen closely. Can you hear the difference in the sound of the ice justbefore you punch through and water comes into the hole?
8. Make an ice pick out of a snowmachine spring over 2” wide. Whatdifferences do you see between this ice pick and the first one.
9. Compare the ice pick you have made with a commercially designed icepick if there is one available. If they are both sharp, which one worksbetter for you?
10. Are there any homemade ice picks in the village? Look at them. Whatdo the tips look like? How wide are they? How heavy are they? What isthe average weight? What kind of steel are they made of? Do they ringwhen struck with another piece of steel? (The wooden handle willdeaden the sound to some degree.)
11. What kind of wood is used for the homemade ice pick handles?
12. Talk with the local beaver trappers and, if possible, go out trappingwith them. When you get back, describe to someone else what youlearned.
13. By inquiry in the village, discover the difference between an ice pickused for walking after freeze-up and one used for beaver trapping.
Student Response
1. Why is it important to have an ice pick that has enough mass?
2. Draw an edge that is too thick. Draw one that is too thin.
3. Why is a slight bend put in the tip of some ice picks?
4. Why is friction important on the handle?
5. What is the most common material for an ice pick handle and why?
6. What happens if the bottom of a water hole isn’t widened?
7. Draw a good ice pick, including handle. Identify the parts.
Math
1. Mike has a chance to go beaver trapping with his uncle. A gasoline-driven ice auger costs $209. He can make his own ice pick for $12. Ifthe average price of a beaver pelt is $25, how many beaver does hehave to catch to break even with the cost of the gasoline driven auger?
2. Mike can pick 14 holes a day when the ice is 3’ thick. The next year hetraps, he finds that the ice is 4’ thick. Approximately how many holeswill he make if he picks at the same rate?
Shelters
Chapter 8: Wood Stoves57
Chapter 9: Wall Tents67
Chapter 10: Steambaths71
Chapter 11: Insulation and Vapor Barriers75
Chapter 12: Gas lamps & Stoves83

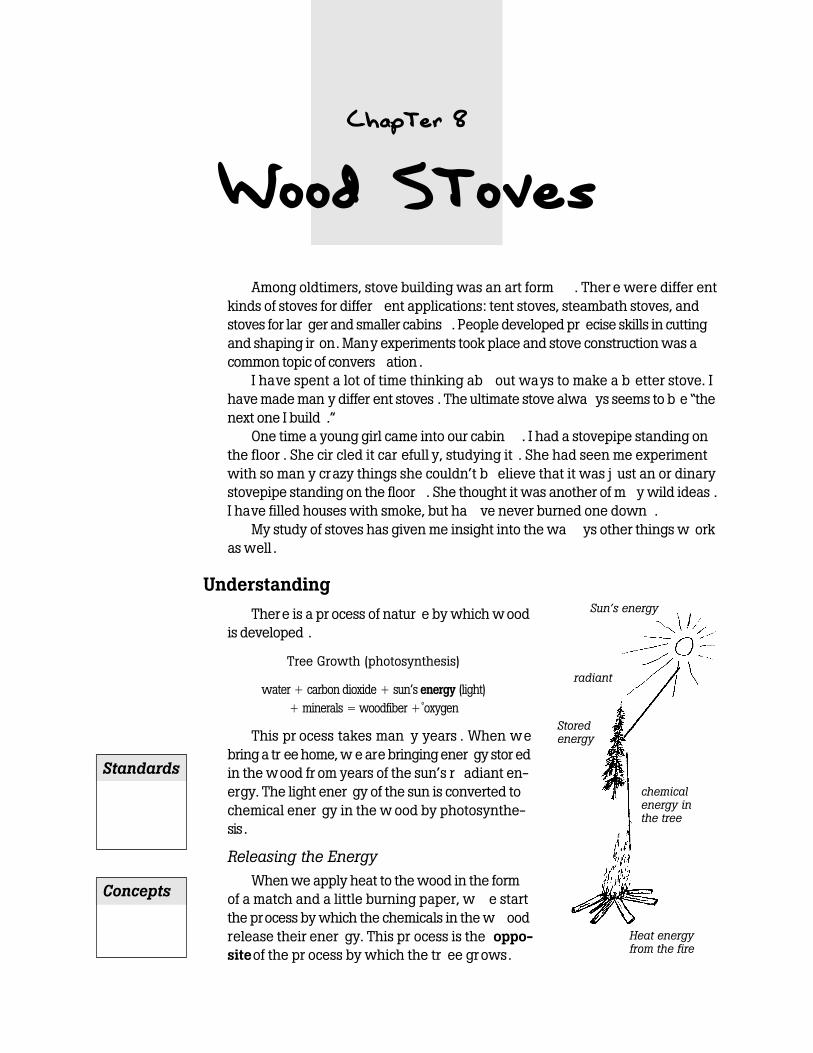
Chapter 8
Wood Stoves
Among oldtimers, stove building was an art form . Ther e were differ entkinds of stoves for differ ent applications: tent stoves, steambath stoves, andstoves for lar ger and smaller cabins . People developed pr ecise skills in cuttingand shaping ir on. Many experiments took place and stove construction was acommon topic of convers ation .
I have spent a lot of time thinking ab out ways to make a b etter stove. Ihave made man y differ ent stoves . The ultimate stove alwa ys seems to b e “thenext one I build .”
One time a young girl came into our cabin . I had a stovepipe standing onthe floor . She cir cled it car efull y, studying it . She had seen me experimentwith so man y crazy things she couldn’t b elieve that it was j ust an or dinarystovepipe standing on the floor . She thought it was another of m y wild ideas .I have filled houses with smoke, but ha ve never burned one down .
My study of stoves has given me insight into the wa ys other things w orkas well .
Understanding
There is a pr ocess of natur e by which woodis developed .
Tree Growth (photosynthesis)
water v carbon dioxide v sun’s energy (light)v minerals z woodfiber v␣ oxygen
This pr ocess takes man y years . When webring a tr ee home, w e are bringing ener gy stor edin the wood fr om years of the sun’s r adiant en-ergy. The light ener gy of the sun is converted tochemical ener gy in the w ood by photosynthe-sis.
Releasing the EnergyWhen we apply heat to the wood in the form
of a match and a little burning paper, w e startthe process by which the chemicals in the w oodrelease their ener gy. This pr ocess is the oppo-site of the pr ocess by which the tr ee grows.
Sun’s energy
chemicalenergy inthe tree
Heat energyfrom the fire
Storedenergy
radiant
Standards
Concepts
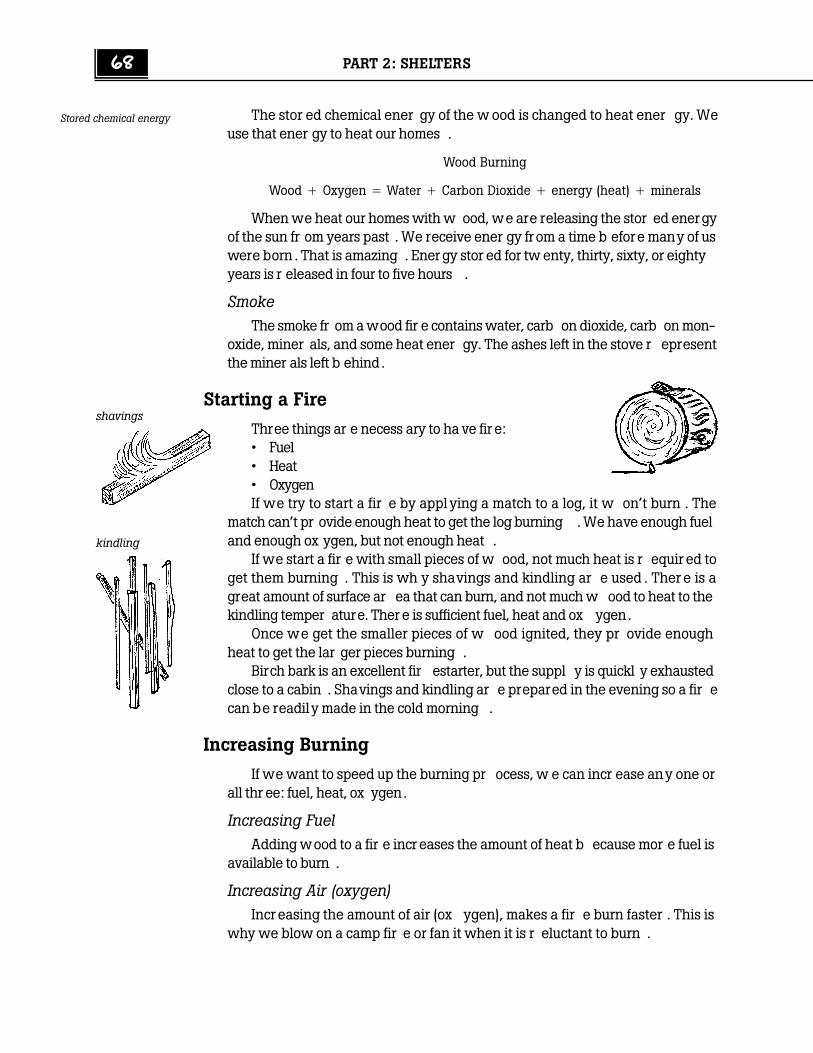
68 PART 2: SHELTERS
The stor ed chemical ener gy of the w ood is changed to heat ener gy. Weuse that ener gy to heat our homes .
Wood Burning
Wood v Oxygen z Water v Carbon Dioxide v energy (heat) v minerals
When we heat our homes with w ood, we are releasing the stor ed energyof the sun fr om years past . We receive ener gy fr om a time b efore many of uswere born . That is amazing . Energy stor ed for tw enty, thirty, sixty, or eightyyears is r eleased in four to five hours .
SmokeThe smoke fr om a wood fir e contains water, carb on dioxide, carb on mon-
oxide, miner als, and some heat ener gy. The ashes left in the stove r epresentthe miner als left b ehind .
Starting a Fire
Three things ar e necess ary to ha ve fir e:• Fuel• Heat• OxygenIf we try to start a fir e by appl ying a match to a log, it w on’t burn . The
match can’t pr ovide enough heat to get the log burning . We have enough fueland enough ox ygen, but not enough heat .
If we start a fir e with small pieces of w ood, not much heat is r equir ed toget them burning . This is wh y shavings and kindling ar e used . Ther e is agreat amount of surface ar ea that can burn, and not much w ood to heat to thekindling temper ature. Ther e is sufficient fuel, heat and ox ygen.
Once we get the smaller pieces of w ood ignited, they pr ovide enoughheat to get the lar ger pieces burning .
Birch bark is an excellent fir estarter, but the suppl y is quickl y exhaustedclose to a cabin . Shavings and kindling ar e prepared in the evening so a fir ecan be readily made in the cold morning .
Increasing Burning
If we want to speed up the burning pr ocess, w e can incr ease any one orall thr ee: fuel, heat, ox ygen.
Increasing FuelAdding wood to a fir e incr eases the amount of heat b ecause mor e fuel is
available to burn .
Increasing Air (oxygen)Incr easing the amount of air (ox ygen), makes a fir e burn faster . This is
why we blow on a camp fir e or fan it when it is r eluctant to burn .
Stored chemical energy
kindling
shavings
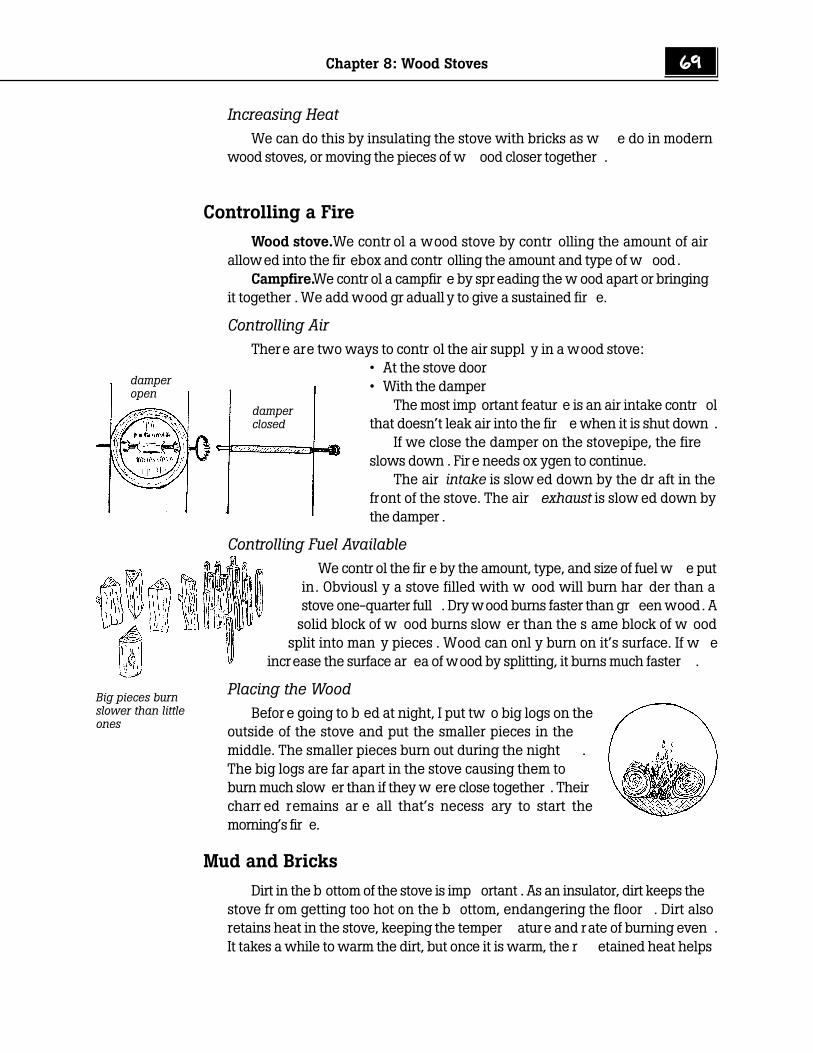
Chapter 8: Wood Stoves 69
Increasing HeatWe can do this by insulating the stove with bricks as w e do in modern
wood stoves, or moving the pieces of w ood closer together .
Controlling a Fire
Wood stove. We contr ol a wood stove by contr olling the amount of airallowed into the fir ebox and contr olling the amount and type of w ood.
Campfire. We contr ol a campfir e by spr eading the w ood apart or bringingit together . We add wood gr aduall y to give a sustained fir e.
Controlling AirThere are two ways to contr ol the air suppl y in a wood stove:
• At the stove door• With the damper
The most imp ortant featur e is an air intake contr olthat doesn’t leak air into the fir e when it is shut down .
If we close the damper on the stovepipe, the fireslows down . Fir e needs ox ygen to continue.
The air intake is slow ed down by the dr aft in thefront of the stove. The air exhaust is slow ed down bythe damper .
Controlling Fuel AvailableWe contr ol the fir e by the amount, type, and size of fuel w e put
in. Obviousl y a stove filled with w ood will burn har der than astove one-quarter full . Dry wood burns faster than gr een wood. A
solid block of w ood burns slow er than the s ame block of w oodsplit into man y pieces . Wood can onl y burn on it’s surface. If w e
increase the surface ar ea of wood by splitting, it burns much faster .
Placing the WoodBefor e going to b ed at night, I put tw o big logs on the
outside of the stove and put the smaller pieces in themiddle. The smaller pieces burn out during the night .The big logs are far apart in the stove causing them toburn much slow er than if they w ere close together . Theircharr ed remains ar e all that’s necess ary to start themorning’s fir e.
Mud and Bricks
Dirt in the b ottom of the stove is imp ortant . As an insulator, dirt keeps thestove fr om getting too hot on the b ottom, endangering the floor . Dirt alsoretains heat in the stove, keeping the temper ature and rate of burning even .It takes a while to warm the dirt, but once it is warm, the r etained heat helps
damperopen
damperclosed
Big pieces burnslower than littleones
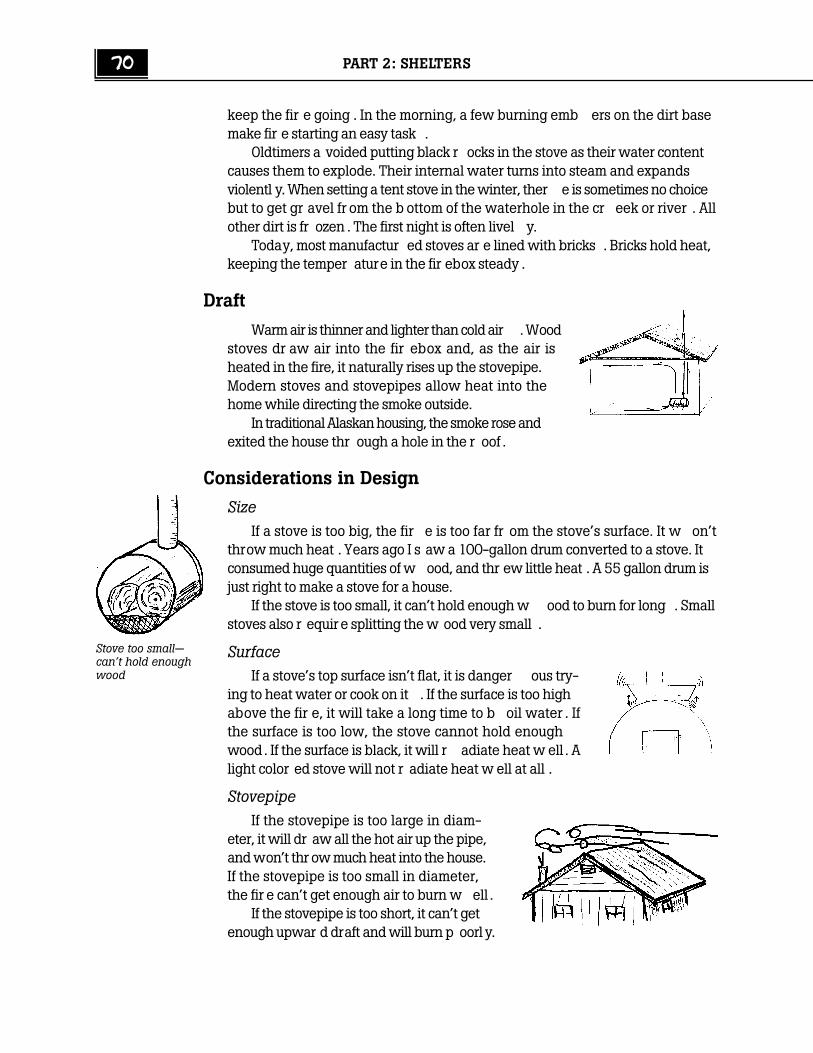
70 PART 2: SHELTERS
keep the fir e going . In the morning, a few burning emb ers on the dirt basemake fir e starting an easy task .
Oldtimers a voided putting black r ocks in the stove as their water contentcauses them to explode. Their internal water turns into steam and expandsviolentl y. When setting a tent stove in the winter, ther e is sometimes no choicebut to get gr avel fr om the b ottom of the waterhole in the cr eek or river . Allother dirt is fr ozen . The first night is often livel y.
Today, most manufactur ed stoves ar e lined with bricks . Bricks hold heat,keeping the temper ature in the fir ebox steady .
Draft
Warm air is thinner and lighter than cold air . Woodstoves dr aw air into the fir ebox and, as the air isheated in the fire, it naturally rises up the stovepipe.Modern stoves and stovepipes allow heat into thehome while directing the smoke outside.
In traditional Alaskan housing, the smoke rose andexited the house thr ough a hole in the r oof .
Considerations in Design
SizeIf a stove is too big, the fir e is too far fr om the stove’s surface. It w on’t
throw much heat . Years ago I s aw a 100-gallon drum converted to a stove. Itconsumed huge quantities of w ood, and thr ew little heat . A 55 gallon drum isjust right to make a stove for a house.
If the stove is too small, it can’t hold enough w ood to burn for long . Smallstoves also r equir e splitting the w ood very small .
SurfaceIf a stove’s top surface isn’t flat, it is danger ous try-
ing to heat water or cook on it . If the surface is too highabove the fir e, it will take a long time to b oil water . Ifthe surface is too low, the stove cannot hold enoughwood. If the surface is black, it will r adiate heat w ell . Alight color ed stove will not r adiate heat w ell at all .
StovepipeIf the stovepipe is too large in diam-
eter, it will dr aw all the hot air up the pipe,and won’t thr ow much heat into the house.If the stovepipe is too small in diameter,the fir e can’t get enough air to burn w ell .
If the stovepipe is too short, it can’t getenough upwar d draft and will burn p oorl y.
Stove too small—can’t hold enoughwood

Chapter 8: Wood Stoves 71
When the wind comes fr om the opp osite side of the house, ther e is an eddyeffect off the r oof . The wind blows down the stovepipe and blows smoke intothe house. The teacher’s quarters in m y second village did this . Sever al timeswe ran out of the house with tears p ouring down our cheeks .
The most danger ous place for highl y flammable cr eosote and soot to ac-cumulate is wher e the pipe emer ges fr om the building . The smoke is con-densed ther e because the pipe is cooled gr eatly at that p oint . This is alsowhere the pipe is closest to the building materials . When a fir e occurs in astovepipe, it is called a “ stack fir e”. Stack fir es have burned man y Alaskanhomes to the gr ound . Nowadays we use insulated metalb estos pipes . Befor emetalb estos, w e had onl y black or gal vanized pipes, and homemade “r oofjacks .”
Air ControlIf the stove can’t contr ol the air flow w ell, the fir e will r age for a while
making the house too hot, then it will go out long b efore morning . If the stoveis too airtight the stovepipe will soot up danger ousl y within a few w eeks .
Modern technology has br ought us wir e brushes to clean our stovepipes .We used to r attle a dog chain tied to a small r ope inside the stovepipe.
Types of Stoves
Tent StoveA tent stove must b e light for tr ansport . We used to make stoves out of
squar e five gallon cans . We cut the tops off and put tw o of them end to end .A stovepipe damper makes a big differ ence in contr olling the fir e in a
camp stove. Lacking a commer cial damper, w e used to slit the stovepipe cr oss-wise with a hacks aw and used a piece of thin metal to slide in an out of theslot as a damper .
Four inch stovepipe is the b est for this kind of stove.
Half-a-Drum StoveThis kind of stove is good for a tent if w eight of tr ans-
port isn’t a big pr oblem . It is also good for a small cabin .The top is flat, and it b oils water and cooks food w ell .
A five inch stovepipe is b est for this kind of stove. Thebest height, accor ding to the oldtimers, is 1 4” fr om bot-tom to top (not rim to rim). Thr ee white r ocks in trip odfashion make good legs .
This is also one of the common types of steambathstove.
Drum StoveThis stove is b etter for houses and lar ger steambaths . A good airtight door
is a must for a home. Such stoves hold large quantities of wood, but can theyget very hot if the air is not contr olled . Commer cial doors made fr om cast ir on
Damper
Dangerousbuildup
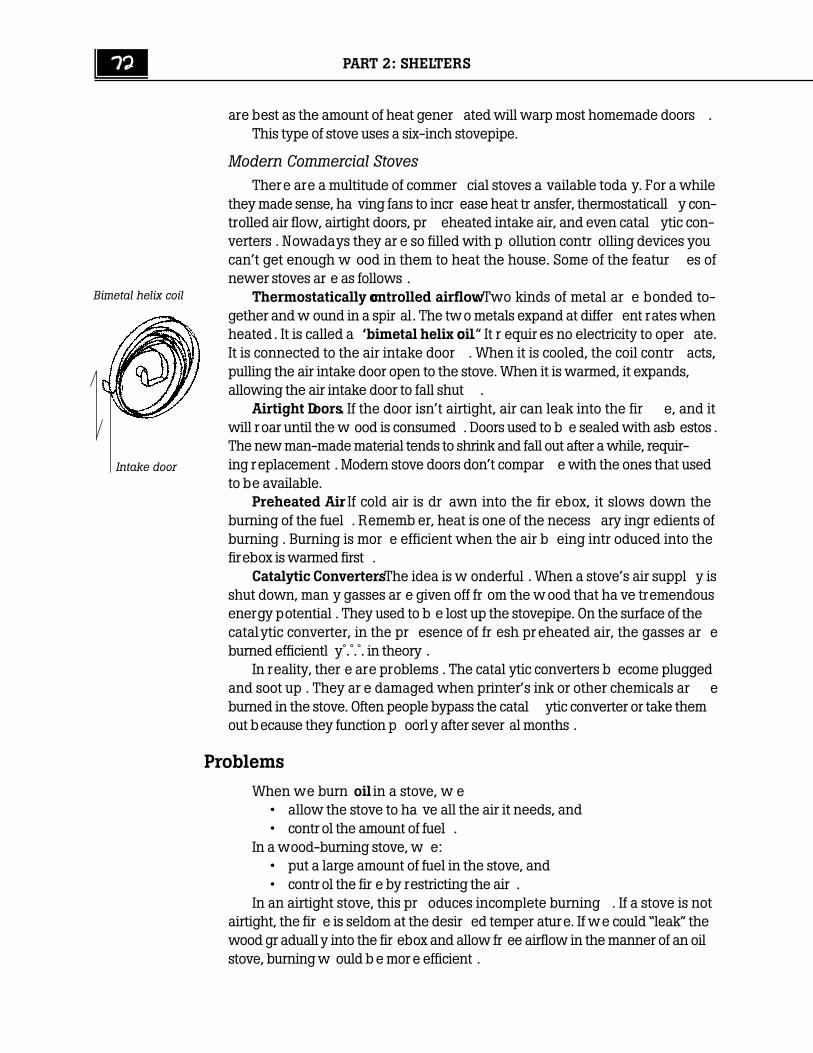
72 PART 2: SHELTERS
are best as the amount of heat gener ated will warp most homemade doors .This type of stove uses a six-inch stovepipe.
Modern Commercial StovesThere are a multitude of commer cial stoves a vailable toda y. For a while
they made sense, ha ving fans to incr ease heat tr ansfer, thermostaticall y con-trolled air flow, airtight doors, pr eheated intake air, and even catal ytic con-verters . Nowadays they ar e so filled with p ollution contr olling devices youcan’t get enough w ood in them to heat the house. Some of the featur es ofnewer stoves ar e as follows .
Thermostatically controlled airflow. Two kinds of metal ar e bonded to-gether and w ound in a spir al. The two metals expand at differ ent rates whenheated . It is called a ‘bimetal helix coil.” It r equir es no electricity to oper ate.It is connected to the air intake door . When it is cooled, the coil contr acts,pulling the air intake door open to the stove. When it is warmed, it expands,allowing the air intake door to fall shut .
Airtight Doors. If the door isn’t airtight, air can leak into the fir e, and itwill roar until the w ood is consumed . Doors used to b e sealed with asb estos .The new man-made material tends to shrink and fall out after a while, requir-ing replacement . Modern stove doors don’t compar e with the ones that usedto be available.
Preheated Air. If cold air is dr awn into the fir ebox, it slows down theburning of the fuel . Rememb er, heat is one of the necess ary ingr edients ofburning . Burning is mor e efficient when the air b eing intr oduced into thefirebox is warmed first .
Catalytic Converters. The idea is w onderful . When a stove’s air suppl y isshut down, man y gasses ar e given off fr om the w ood that ha ve tremendousenergy potential . They used to b e lost up the stovepipe. On the surface of thecatalytic converter, in the pr esence of fr esh pr eheated air, the gasses ar eburned efficientl y␣ .␣ .␣ . in theory .
In reality, ther e are problems . The catal ytic converters b ecome pluggedand soot up . They ar e damaged when printer’s ink or other chemicals ar eburned in the stove. Often people bypass the catal ytic converter or take themout because they function p oorl y after sever al months .
Problems
When we burn oil in a stove, w e• allow the stove to ha ve all the air it needs, and• contr ol the amount of fuel .
In a wood-burning stove, w e:• put a large amount of fuel in the stove, and• contr ol the fir e by restricting the air .
In an airtight stove, this pr oduces incomplete burning . If a stove is notairtight, the fir e is seldom at the desir ed temper ature. If we could “leak” thewood gr aduall y into the fir ebox and allow fr ee airflow in the manner of an oilstove, burning w ould b e mor e efficient .
Bimetal helix coil
Intake door
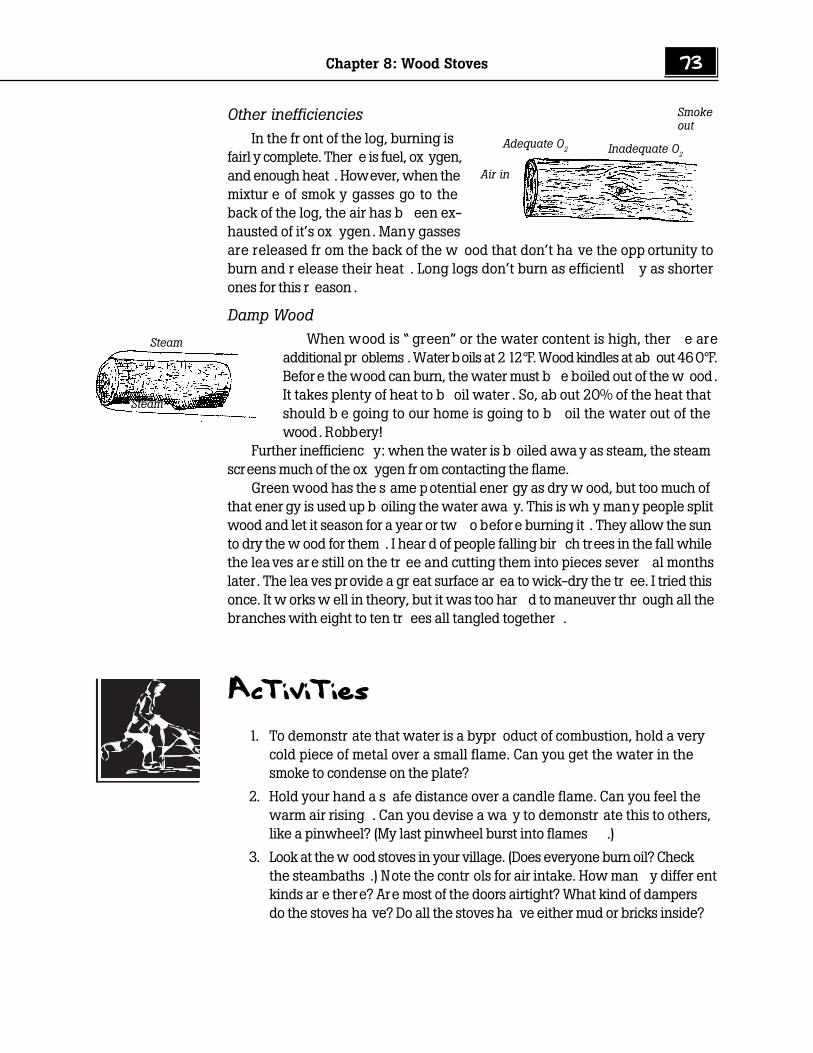
Chapter 8: Wood Stoves 73
Other inefficienciesIn the fr ont of the log, burning is
fairl y complete. Ther e is fuel, ox ygen,and enough heat . However, when themixtur e of smok y gasses go to theback of the log, the air has b een ex-hausted of it’s ox ygen. Many gassesare released fr om the back of the w ood that don’t ha ve the opp ortunity toburn and r elease their heat . Long logs don’t burn as efficientl y as shorterones for this r eason .
Damp WoodWhen wood is “ green” or the water content is high, ther e are
additional pr oblems . Water boils at 212°F. Wood kindles at ab out 460°F.Befor e the wood can burn, the water must b e boiled out of the w ood.It takes plenty of heat to b oil water . So, ab out 20% of the heat thatshould b e going to our home is going to b oil the water out of thewood. Robbery!
Further inefficienc y: when the water is b oiled away as steam, the steamscreens much of the ox ygen fr om contacting the flame.
Green wood has the s ame potential ener gy as dry w ood, but too much ofthat ener gy is used up b oiling the water awa y. This is wh y many people splitwood and let it season for a year or tw o before burning it . They allow the sunto dry the w ood for them . I hear d of people falling bir ch trees in the fall whilethe leaves ar e still on the tr ee and cutting them into pieces sever al monthslater. The lea ves provide a gr eat surface ar ea to wick-dry the tr ee. I tried thisonce. It w orks w ell in theory, but it was too har d to maneuver thr ough all thebranches with eight to ten tr ees all tangled together .
Activities
1. To demonstr ate that water is a bypr oduct of combustion, hold a verycold piece of metal over a small flame. Can you get the water in thesmoke to condense on the plate?
2. Hold your hand a s afe distance over a candle flame. Can you feel thewarm air rising . Can you devise a wa y to demonstr ate this to others,like a pinwheel? (My last pinwheel burst into flames .)
3. Look at the w ood stoves in your village. (Does everyone burn oil? Checkthe steambaths .) Note the contr ols for air intake. How man y differ entkinds ar e there? Are most of the doors airtight? What kind of dampersdo the stoves ha ve? Do all the stoves ha ve either mud or bricks inside?
Steam
Steam
Adequate O2 Inadequate O2
Air in
Smokeout
74 PART 2: SHELTERS
4. Find a wood stove with a bimetal helix coil . Heat it with a blow drier orother s afe heat sour ce. Watch it close. Cool it with a fan or cold water .Watch it open . Gently file b oth sides of the coil . Which is har der? Canyou guess what kind of metals ar e used?
5. Put a very gr een stick of w ood on a burning fir e (a block fr om the top ofthe tree will illustr ate well). After ten to fifteen minutes, open the stovedoor and ob ser ve the steam coming fr om the w ood. Can you hear ithiss?
6. Get an old stovepipe that has b een used on a w ood stove. Scr ape theinside. What does the material smell like? Put the material you ha vescraped on a metal plate and heat it . What happens . Try to burn thematerial . Does it burn? W as the stove losing heat by not completel yburning the w ood?
7. Make a campfir e. Fan the flame. Does this incr ease burning? If so, wh y?Put mor e wood on the fir e. Does the fir e burn str onger? Wh y? Pourwater on the fire. What happens and why?
8. Put a candle in a j ar. Light it . Put a metal cover on the j ar. What hap-pens and why?
9. Discuss the differ ence between the convenience of burning gr een woodversus the efficienc y of burning dry w ood . Ask the oldtimers in thevillage ab out the advantages of each .
10. Send for information on modern commer cial wood stoves . Discuss theadvantages of the differ ent featur es.
11. Talk to some of the oldtimers in your village ab out stoves they used touse for tr avel, for cabins, and homes . Is the information consistent inyour ar ea with what I ha ve presented her e? If ther e are differ ences,why do you think they exist?
Student Response
1. What things go together to make wood?
2. When your house or tent is heated by a wood fire, where did the en-ergy originall y come fr om?
3. What three things does it take to make a fire?
4. What happens if a fir e doesn’t get enough air?
5. With a given amount of air, how can you cause w ood to burn faster?
6. What does mud in the b ottom of the stove do, or fir ebricks in the mod-ern stoves?
7. Comment ab out the size of a stove, surface, size of stovepipe, and airintake.
Chapter 8: Wood Stoves 75
8. In an oil stove w e contr ol the flow of fuel . In a wood stove w e contr olthe flow of what?
9. What ar e the dis advantages of burning gr een wood?
Math
1. How many cubic feet ar e in a cor d of wood? (4’ x 4’ x 8’)
2. How many cor ds are in a pile 8’ x 5’ x 13’?
3. If gr een wood has 2/3 the available heat as dry w ood, and dry w ood is$125 a cor d, what is the fair price for gr een wood if the s ame value isto be obtained?
4. What is the area of four stovepipes, 4”, 5”, 6” and 8”. Is the area of the4” pipe 2/3 the area of the 6” pipe? (When pi is 3. 14)
5. Look at a block of w ood. Measur e the diameter fr om the ages of fifteenand sixteen years . Be kind to yourself; use metric measur ement . If theblock w ere a perfect cir cle, what is the ar ea for each year? How muchdid it incr ease in one year? Do the s ame oper ation b etween thirty-three and thirty-four years . How much did it incr ease? How much gr eateror less was the gr owth in area of the tr ee when it was younger thanwhen it was older? Figur e the differ ence in volume if the block is .5meters long .
6. Compute the volume of the inside of thr ee local stoves . Compute thearea of the stovepipe of each stove. Is there a relationship (bigger stoveshave bigger pipes)?

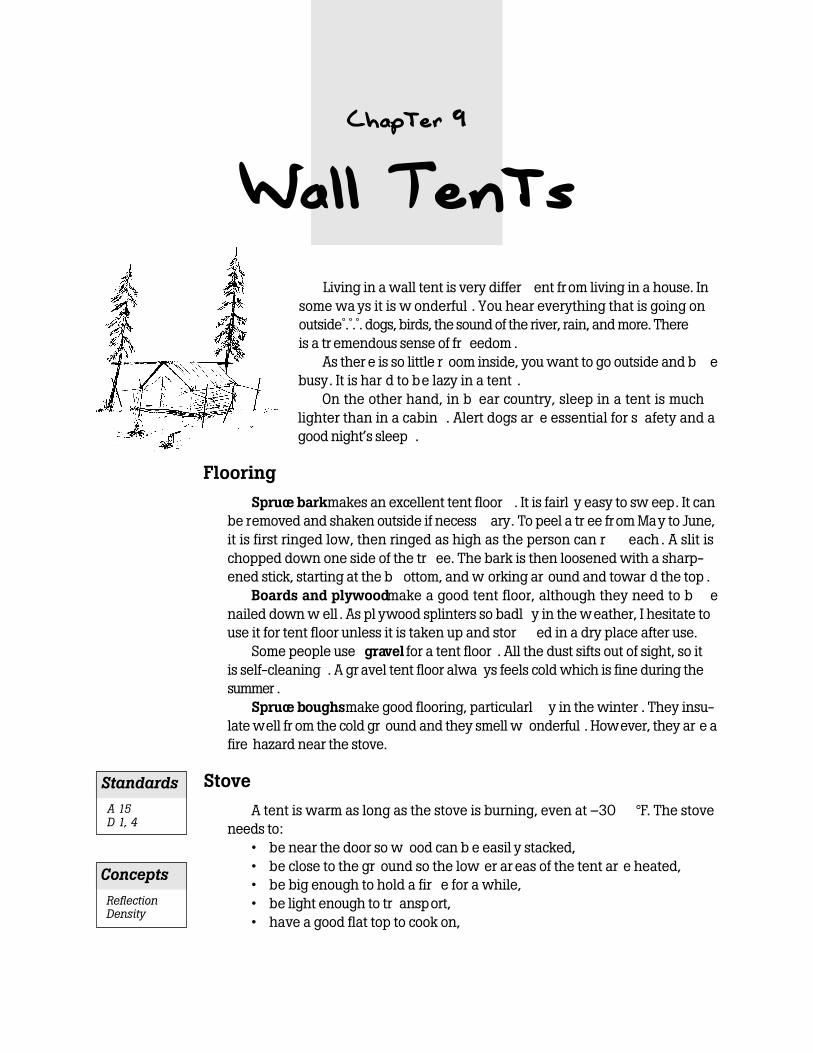
Chapter 9
Wall Tents
Living in a wall tent is very differ ent from living in a house. Insome ways it is w onderful . You hear everything that is going onoutside␣ .␣ .␣ . dogs, birds, the sound of the river, rain, and more. Thereis a tr emendous sense of fr eedom .
As ther e is so little r oom inside, you want to go outside and b ebusy. It is har d to be lazy in a tent .
On the other hand, in b ear country, sleep in a tent is muchlighter than in a cabin . Alert dogs ar e essential for s afety and agood night’s sleep .
Flooring
Spruce bark makes an excellent tent floor . It is fairl y easy to sw eep. It canbe removed and shaken outside if necess ary. To peel a tr ee from May to June,it is first ringed low, then ringed as high as the person can r each . A slit ischopped down one side of the tr ee. The bark is then loosened with a sharp-ened stick, starting at the b ottom, and w orking ar ound and towar d the top .
Boards and plywood make a good tent floor, although they need to b enailed down w ell . As pl ywood splinters so badl y in the weather, I hesitate touse it for tent floor unless it is taken up and stor ed in a dry place after use.
Some people use gravel for a tent floor . All the dust sifts out of sight, so itis self-cleaning . A gr avel tent floor alwa ys feels cold which is fine during thesummer .
Spruce boughs make good flooring, particularl y in the winter . They insu-late well fr om the cold gr ound and they smell w onderful . However, they ar e afire hazard near the stove.
Stove
A tent is warm as long as the stove is burning, even at –30 °F. The stoveneeds to:
• be near the door so w ood can b e easil y stacked,• be close to the gr ound so the low er ar eas of the tent ar e heated,• be big enough to hold a fir e for a while,• be light enough to tr ansport,• have a good flat top to cook on,
Standards
A 15D 1, 4
Concepts
ReflectionDensity
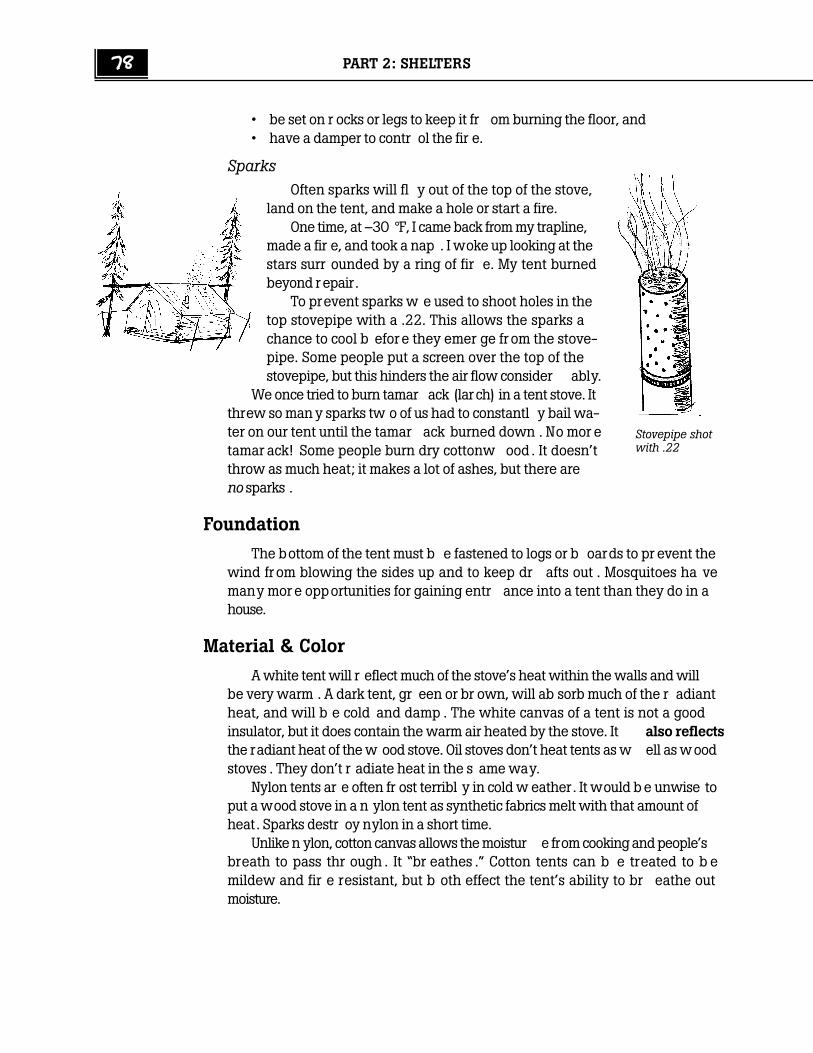
78 PART 2: SHELTERS
• be set on r ocks or legs to keep it fr om burning the floor, and• have a damper to contr ol the fir e.
SparksOften sparks will fl y out of the top of the stove,
land on the tent, and make a hole or start a fire.One time, at –30 °F, I came back from my trapline,
made a fir e, and took a nap . I woke up looking at thestars surr ounded by a ring of fir e. My tent burnedbeyond r epair.
To prevent sparks w e used to shoot holes in thetop stovepipe with a .22. This allows the sparks achance to cool b efor e they emer ge fr om the stove-pipe. Some people put a screen over the top of thestovepipe, but this hinders the air flow consider ably.
We once tried to burn tamar ack (lar ch) in a tent stove. Itthrew so man y sparks tw o of us had to constantl y bail wa-ter on our tent until the tamar ack burned down . No mor etamar ack! Some people burn dry cottonw ood . It doesn’tthrow as much heat; it makes a lot of ashes, but there areno sparks .
Foundation
The bottom of the tent must b e fastened to logs or b oards to pr event thewind fr om blowing the sides up and to keep dr afts out . Mosquitoes ha vemany mor e opportunities for gaining entr ance into a tent than they do in ahouse.
Material & Color
A white tent will r eflect much of the stove’s heat within the walls and willbe very warm . A dark tent, gr een or br own, will ab sorb much of the r adiantheat, and will b e cold and damp . The white canvas of a tent is not a goodinsulator, but it does contain the warm air heated by the stove. It also reflectsthe radiant heat of the w ood stove. Oil stoves don’t heat tents as w ell as woodstoves . They don’t r adiate heat in the s ame way.
Nylon tents ar e often fr ost terribl y in cold w eather. It would b e unwise toput a wood stove in a n ylon tent as synthetic fabrics melt with that amount ofheat. Sparks destr oy nylon in a short time.
Unlike n ylon, cotton canvas allows the moistur e from cooking and people’sbreath to pass thr ough . It “br eathes .” Cotton tents can b e treated to b emildew and fir e resistant, but b oth effect the tent’s ability to br eathe outmoisture.
Stovepipe shotwith .22
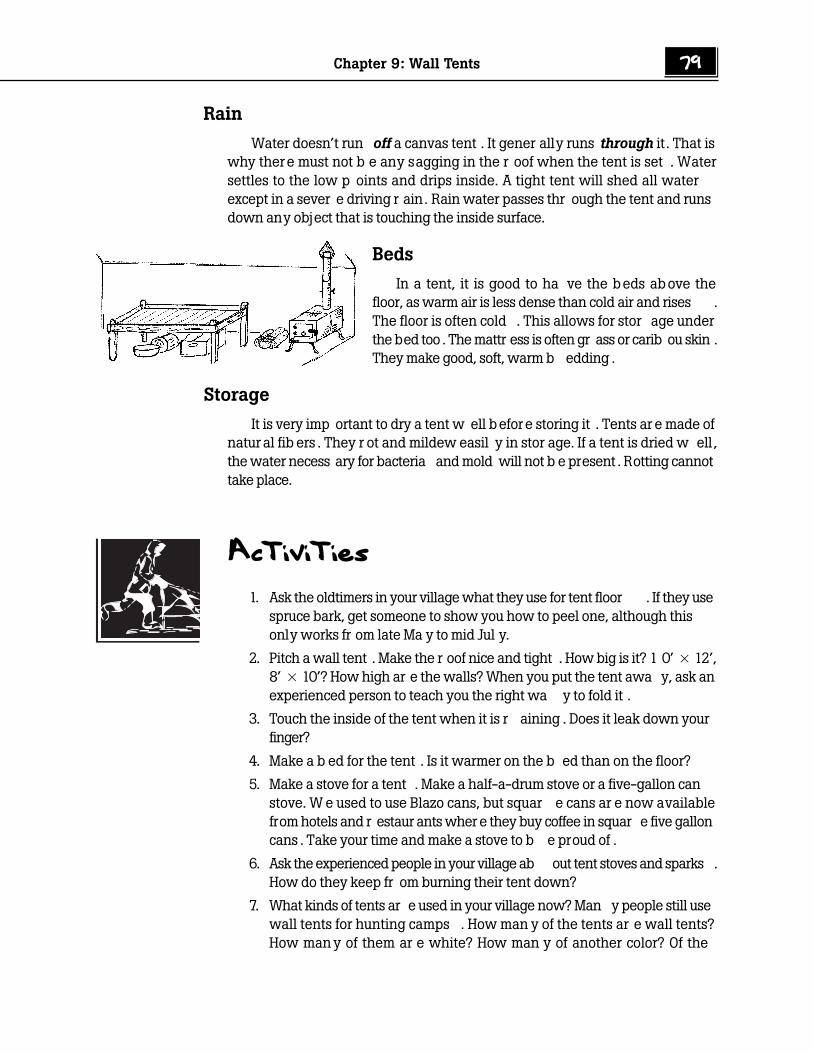
Chapter 9: Wall Tents 79
Rain
Water doesn’t run off a canvas tent . It gener ally runs through it. That iswhy there must not b e any sagging in the r oof when the tent is set . Watersettles to the low p oints and drips inside. A tight tent will shed all waterexcept in a sever e driving r ain. Rain water passes thr ough the tent and runsdown any object that is touching the inside surface.
Beds
In a tent, it is good to ha ve the beds above thefloor, as warm air is less dense than cold air and rises .The floor is often cold . This allows for stor age underthe bed too . The mattr ess is often gr ass or carib ou skin .They make good, soft, warm b edding .
Storage
It is very imp ortant to dry a tent w ell before storing it . Tents ar e made ofnatur al fib ers . They r ot and mildew easil y in stor age. If a tent is dried w ell ,the water necess ary for bacteria and mold will not b e present . Rotting cannottake place.
Activities
1. Ask the oldtimers in your village what they use for tent floor . If they usespruce bark, get someone to show you how to peel one, although thisonly works fr om late Ma y to mid Jul y.
2. Pitch a wall tent . Make the r oof nice and tight . How big is it? 1 0’ x 12’,8’ x 10’? How high ar e the walls? When you put the tent awa y, ask anexperienced person to teach you the right wa y to fold it .
3. Touch the inside of the tent when it is r aining . Does it leak down yourfinger?
4. Make a b ed for the tent . Is it warmer on the b ed than on the floor?
5. Make a stove for a tent . Make a half-a-drum stove or a five-gallon canstove. W e used to use Blazo cans, but squar e cans ar e now availablefrom hotels and r estaur ants wher e they buy coffee in squar e five galloncans . Take your time and make a stove to b e proud of .
6. Ask the experienced people in your village ab out tent stoves and sparks .How do they keep fr om burning their tent down?
7. What kinds of tents ar e used in your village now? Man y people still usewall tents for hunting camps . How man y of the tents ar e wall tents?How man y of them ar e white? How man y of another color? Of the
80 PART 2: SHELTERS
canvas wall tents, do an y have evidence of mildew? Wh y or why not?
8. Ask in the village w hy some people use n ylon dome tents?
Student Response
1. What are four kinds of flooring for a tent? Which is b est in the winteron the snow?
2. What wood burns with the most sparks? With the least?
3. What are two techniques to r educe sparks on a tent?
4. Why is a white tent warmer than a dark one?
5. Does water run off or thr ough canvas tent fabric?
6. What ar e two advantages of ha ving a b ed?
Math
1. What is the differ ence in floor space b etween a 10’ x 12’ tent and an8’ x 10’?
2. Frank’s tent w eighs 72 lbs. His stove and pipes w eigh another 2 7 lbs.He can haul 200 lbs in his sled to his trapline. How many pounds ofgroceries and gas can he haul on the s ame trip?
3. Ed spent $225 for a 1 0’ x 12’ wall tent with 4’ walls . He used it for tw oseasons, but put it awa y wet and it r otted . The tent could ha ve lastedeight years if w ell car ed for . How much did the tent cost him per year?How much should it ha ve cost him? Can you put a price tag on hislaziness?
Chapter 10
Steambaths
Steambaths ha ve been an imp ortant part of the lives of most Alaskans forcenturies . Beyond the obvious purp ose of b eing a place to get clean, theyhave been the center for decision making and spiritual functions .
Many good illustr ations of science principles ar e found in the steambath .
Evaporation
In a steambath, the individual’s b ody perspir es attempting to cool by evapo-ration. It takes heat to evaporate water. As our b odies s acrifice water thr oughthe skin, the evap oration of that water cools the b ody.
The perspir ation that emits fr om the skin carries with it toxins and otherunclean sub stances . The individual is cleaned, not j ust skin deep, but deeperthan skin deep .
Increased CirculationSome people lightl y whip themsel ves with small bundles of brush . This
stimulates blood cir culation that helps bring blood to the surface of the skin .
Wood
Dry wood is very imp ortant for a steambath . Damp wood cannot r adiateenough heat .
An old man on the Yukon- Kuskokwim Delta used w ood scr aps fr om aconstruction site. Among the w ood scr aps were pieces of gr een, pr essur e-treated lumb er. The old man died fr om the gasses given off . Pressur e-treatedwood contains arsenic .
Rocks, steam and condensation
Rocks ar e important in a steambath b ecausethey have enough mass to hold heat and keepthe temper ature in the bath steady . If ther e wereno rocks, the temper ature in the bath w ould riseand fall quickl y.
When water is spilled onto the r ocks, the heat in the bath feels mor eintense. Why?
Evaporation of water r equir es heat . Condens ation r eleases heat . Whenwe spill water on the r ocks, heat is taken fr om the r ocks to evap orate the
Standards
A 1, 2B 1D 1, 3, 4
Concepts
CondensationEvaporationSurface area
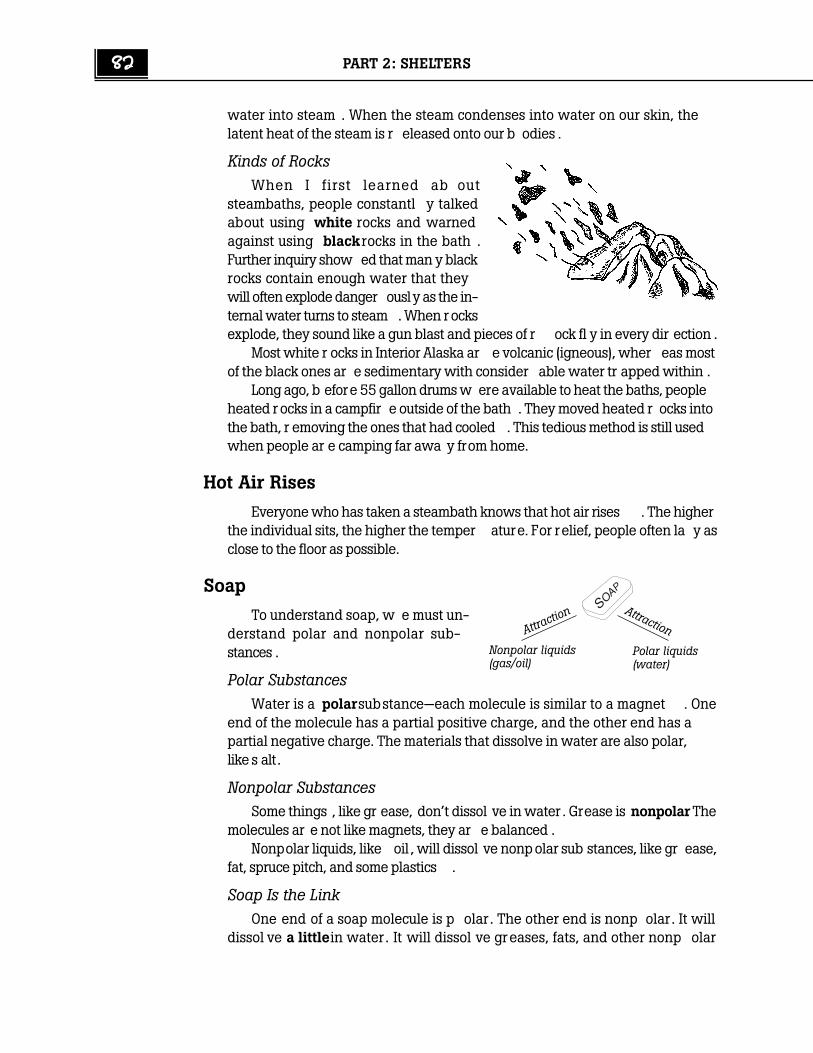
82 PART 2: SHELTERS
water into steam . When the steam condenses into water on our skin, thelatent heat of the steam is r eleased onto our b odies .
Kinds of RocksWhen I first learned ab out
steambaths, people constantl y talkedabout using white rocks and warnedagainst using black rocks in the bath .Further inquiry show ed that man y blackrocks contain enough water that theywill often explode danger ously as the in-ternal water turns to steam . When r ocksexplode, they sound like a gun blast and pieces of r ock fl y in every dir ection .
Most white r ocks in Interior Alaska ar e volcanic (igneous), wher eas mostof the black ones ar e sedimentary with consider able water tr apped within .
Long ago, b efore 55 gallon drums w ere available to heat the baths, peopleheated r ocks in a campfir e outside of the bath . They moved heated r ocks intothe bath, r emoving the ones that had cooled . This tedious method is still usedwhen people ar e camping far awa y from home.
Hot Air Rises
Everyone who has taken a steambath knows that hot air rises . The higherthe individual sits, the higher the temper ature. For relief, people often la y asclose to the floor as possible.
Soap
To understand soap, w e must un-derstand polar and nonpolar sub-stances .
Polar SubstancesWater is a polar substance—each molecule is similar to a magnet . One
end of the molecule has a partial positive charge, and the other end has apartial negative charge. The materials that dissolve in water are also polar,like s alt.
Nonpolar SubstancesSome things , like gr ease, don’t dissol ve in water . Grease is nonpolar. The
molecules ar e not like magnets, they ar e balanced .Nonpolar liquids, like oil , will dissol ve nonpolar sub stances, like gr ease,
fat, spruce pitch, and some plastics .
Soap Is the LinkOne end of a soap molecule is p olar . The other end is nonp olar . It will
dissol ve a little in water. It will dissol ve greases, fats, and other nonp olar
Polar liquids(water)
Attraction
Nonpolar liquids(gas/oil)
Attractio
n
Chapter 10: Steambaths 83
substances . It is a link between water and gr easy dirt that water alone can-not remove.
Conclusion
Showers and bathtub s have replaced the steambath in man y situations,but the s atisfaction of a good steambath cannot b e imitated . Steambaths ar enot likel y to be replaced in time as they pr ovide an ar ena for social events .
Activities
1. Pour rubbing alcohol into your hand . Blow on it . Does it feel cold? Wh y?Try the s ame thing with a small amount of gasoline. Try now withwater. Which cools your hand the most? What causes the cooling?
2. Did/do people in your village whip themsel ves with brush in thesteambath? If so, identify the type of brush used in your ar ea.
3. Bring a thermometer into the steambath . What is the temper ature onthe floor? A t shoulder height? A t ceiling height?
4. Pour water onto the r ocks . Does the temper ature actuall y rise, or does itjust feel hotter?
5. Ask the people in your village ab out the b est rocks for a steambath .Where do they get them? Ask them which r ocks ar e not good, and wh y.Ask someone who knows ab out welding and cutting with an acetylenetorch what they can tell you ab out cutting on concr ete. Do you see an ysimilarities?
6. Try to clean gr ease fr om your hand with water . Try to r emove it withsoap . Soak the soap in water . Does it dissol ve? Put the soap in a littlestove oil or vegetable oil . Does it dissol ve? What can you s ay aboutsoap dissol ving in b oth oil and water?
7. Ask the oldtimers how they used to make steambaths when they wereaway from the village.
8. Ask the oldtimers if ther e were other r easons for taking steambathsbesides cleanliness .
9. Look up “igneous” and “ sedimentary”. What is the differ ence in theirformation .
84 PART 2: SHELTERS
Student Response
1. How does perspiring help to cool us off in a steambath?
2. Why do people whip themsel ves with brush?
3. What causes oxygen deprivation in a steambath?
4. Why are rocks imp ortant in a steambath?
5. Why are white r ocks desir able r ather than black ones?
6. Why is the bath hotter at the ceiling than on the floor?
7. Why does soap w ork w ell to r emove gr ease and oil y dirt?
8. What are polar and nonp olar sub stances?
Math
1. My friend J oe takes a steambath every night of the w eek . From thetime he makes the bath to the time he gets done it takes him ab out2 1/2 hours . What fr action of his life is spent at the steambath?
Chapter 11
Insulation &Vapor Barriers
A vapor barrier is usuall y a sheet of plastic, commonl y called “V isquene,”through which air and water cannot pass .
A home that has a vap or barrier installed pr operl y will be warm, dry, andwill last a long time.
A modern Alaskan house that doesn’t ha ve a vapor barrier, or has oneinstalled impr operl y, will ha ve major pr oblems .
Rotting
Wood will not r ot if it is kept dry . The bacteria that destr oy wood fib ersneed four conditions to gr ow:
• Wood (their food)• Oxygen from the air• Water (moistur e)• HeatIf any of these four is r emoved, the bacteria cannot gr ow. In the fr ame of a
house, ther e is both wood and ox ygen . As soon as ther e is moistur e andenough heat, bacteria can gr ow, destr oying the w ood fib ers . We must keepwater out of our ceilings, walls, and floors whether it is water leaking fr omthe roof or water fr om vap or.
Principle
Warm air can hold mor e water vap or than cool air .When air is warmed, it r emoves water fr om other surfaces until it is s atu-
rated. This is wh y we hang our clothes outside in the summer or over thestove in the winter . Warm air r emove s the water fr om the clothes by evapora-tion.
Water that is suspended in air is called vapor. When warm air is cooled, itmust r elease some of the water vapor it carries . The water condenses out ofthe air. Heat is r eleased when vap or condenses .
Concepts
EvaporationCondensationForms ofenergy
Standards
A 2, 9B 1D 1, 3, 4
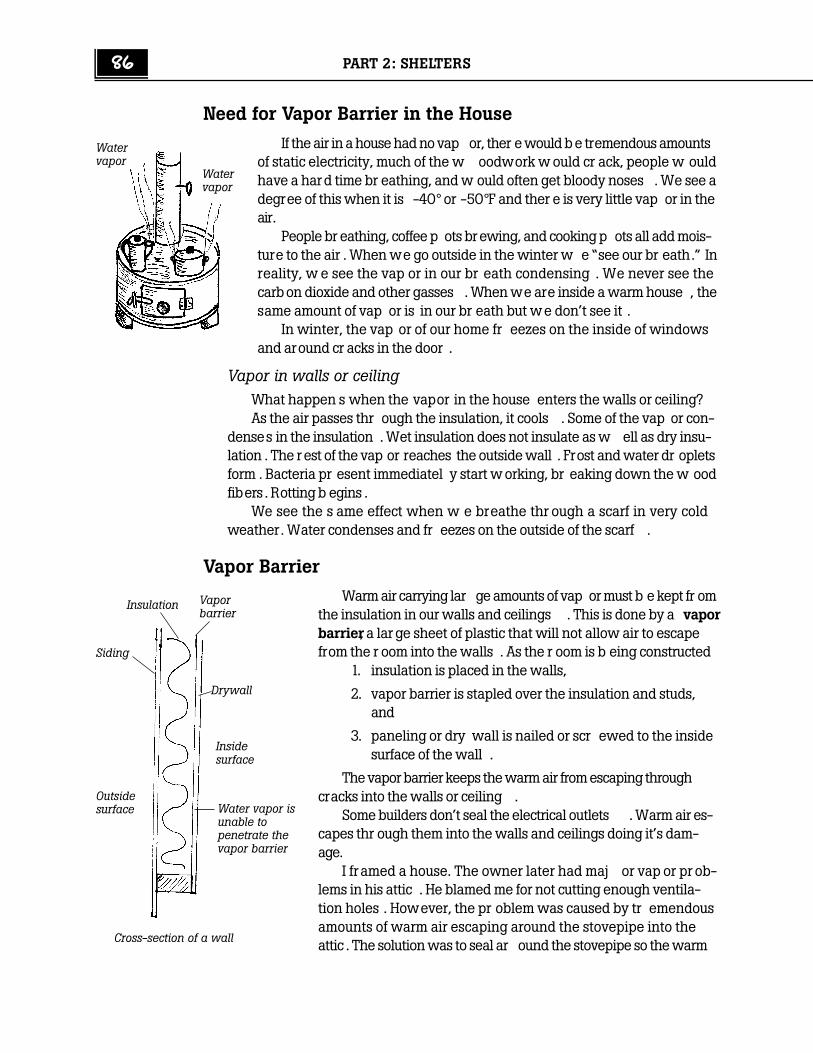
86 PART 2: SHELTERS
Need for Vapor Barrier in the House
If the air in a house had no vap or, ther e would be tremendous amountsof static electricity, much of the w oodwork w ould cr ack, people w ouldhave a hard time br eathing, and w ould often get bloody noses . We see adegree of this when it is -40° or -50°F and ther e is very little vap or in theair.
People br eathing, coffee p ots brewing, and cooking p ots all add mois-ture to the air . When we go outside in the winter w e “see our br eath.” Inreality, w e see the vap or in our br eath condensing . We never see thecarbon dioxide and other gasses . When we are inside a warm house , thesame amount of vap or is in our br eath but we don’t see it .
In winter, the vap or of our home fr eezes on the inside of windowsand around cr acks in the door .
Vapor in walls or ceilingWhat happen s when the vapor in the house enters the walls or ceiling?As the air passes thr ough the insulation, it cools . Some of the vap or con-
denses in the insulation . Wet insulation does not insulate as w ell as dry insu-lation . The r est of the vap or reaches the outside wall . Frost and water dr opletsform . Bacteria pr esent immediatel y start w orking, br eaking down the w oodfibers . Rotting b egins .
We see the s ame effect when w e breathe thr ough a scarf in very coldweather. Water condenses and fr eezes on the outside of the scarf .
Vapor Barrier
Warm air carrying lar ge amounts of vap or must b e kept fr omthe insulation in our walls and ceilings . This is done by a vaporbarrier, a lar ge sheet of plastic that will not allow air to escapefrom the r oom into the walls . As the r oom is b eing constructed
1. insulation is placed in the walls,
2. vapor barrier is stapled over the insulation and studs,and
3. paneling or dry wall is nailed or scr ewed to the insidesurface of the wall .
The vapor barrier keeps the warm air from escaping throughcracks into the walls or ceiling .
Some builders don’t seal the electrical outlets . Warm air es-capes thr ough them into the walls and ceilings doing it’s dam-age.
I framed a house. The owner later had maj or vap or pr ob-lems in his attic . He blamed me for not cutting enough ventila-tion holes . However, the pr oblem was caused by tr emendousamounts of warm air escaping around the stovepipe into theattic . The solution was to seal ar ound the stovepipe so the warm
Watervapor
Watervapor
Siding
Insulation Vaporbarrier
Drywall
Outsidesurface
Insidesurface
Cross-section of a wall
Water vapor isunable topenetrate thevapor barrier
Chapter 11: Insulation and Vapor Barriers 87
moist air couldn’t enter the attic space.
Other Locations in the United States
Interestingly enough, vapor barriers are not used in warmer areas of theUnited States . Warmer places don’t ha ve the sever e differ ences in temper a-ture and vap or content in the air . In Alaska, the thin sheet of plastic vap orbarrier, pr operl y installed, can mean the differ ence between a house lasting ashort fifteen to tw enty years, or a health y sixty to a hundr ed years .
Vapor Barrier and Insulation Work Together
• A room with insulation but no vap or barrier will soon ha ve vapor andfrost in the walls and ceiling .
• A room with a vap or barrier and little or no insulation will fr ost on allcold sp ots . A window is, in effect, a vap or barrier without insulation .The fr ost during cold temper atures is obvious .
• A room that has a good vap or barrier and adequate insulation will keepthe moistur e necess ary for good health in the r oom, will keep the mois-ture out of the walls, and will keep the r oom warm in all parts .
Insulation
There are sever al types of insulation adequate for house construction .• Fiberglass• Foam• SodFiberglass insulation actuall y works tw o ways:• It insulates fr om heat tr ansfer .
Glass does not conduct heat well at all . Put the end of a glass tub e in ahot flame, and hold the other end of the tub e with bar e hands for along time. If you do the same thing to a copper or steel r od, the heatwill quickl y be conducted up the r od to your hand .
• Fiberglass tr aps air .The glass fib ers tr ap air, pr eventing cir culation . In an open space, aircirculates (convection). W arm and cold air constantl y mix . When air istrapped in small p ockets and pr evented fr om cir culating, it is an excel-lent insulator . The thous ands up on thous ands of glass fib ers woventogether keep air fr om cir culating, making a very cozy nest of dead airpockets that insulate the house.
The man-made fib ers and down feathers in winter clothing oper ate onthe same principle of cr eating dead air p ockets . That is wh y wind is so chill-ing. It blows thr ough the dead air spaces in the fib ers, r emoving the insulat-ing dead air .
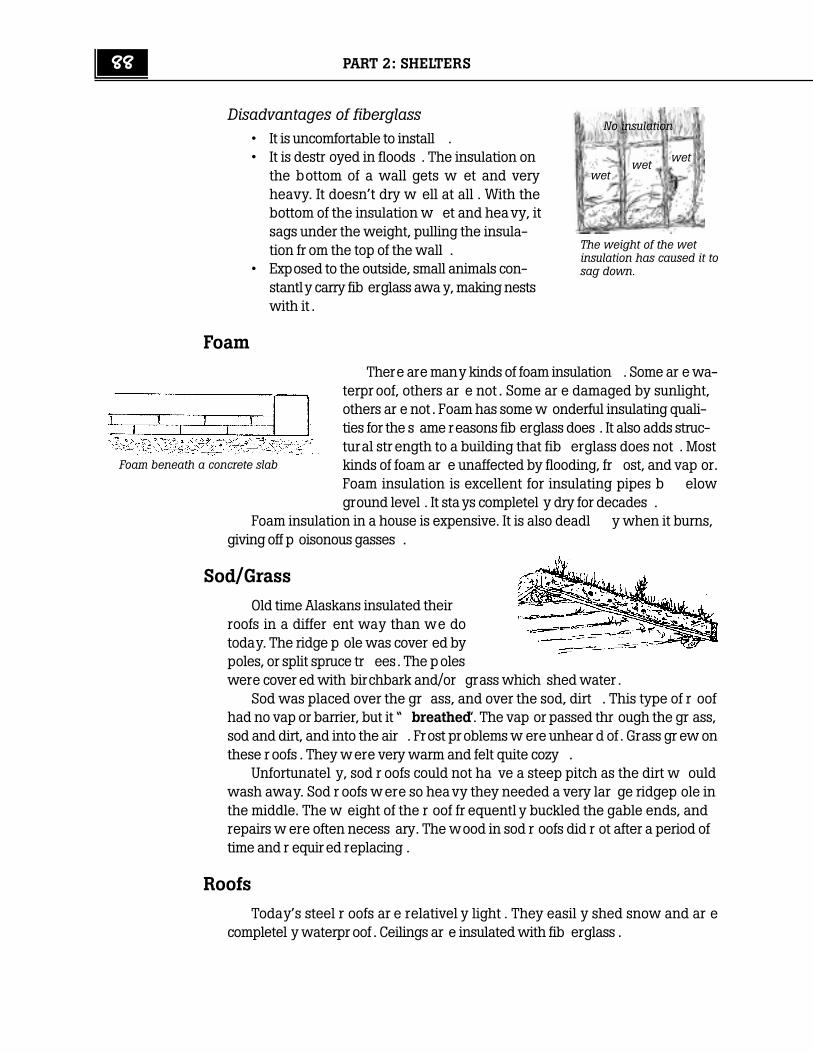
88 PART 2: SHELTERS
Disadvantages of fiberglass• It is uncomfortable to install .• It is destr oyed in floods . The insulation on
the bottom of a wall gets w et and veryheavy. It doesn’t dry w ell at all . With thebottom of the insulation w et and heavy, itsags under the weight, pulling the insula-tion fr om the top of the wall .
• Exposed to the outside, small animals con-stantly carry fib erglass awa y, making nestswith it .
Foam
There are many kinds of foam insulation . Some ar e wa-terpr oof, others ar e not . Some ar e damaged by sunlight,others ar e not . Foam has some w onderful insulating quali-ties for the s ame reasons fib erglass does . It also adds struc-tural str ength to a building that fib erglass does not . Mostkinds of foam ar e unaffected by flooding, fr ost, and vap or.Foam insulation is excellent for insulating pipes b elowground level . It sta ys completel y dry for decades .
Foam insulation in a house is expensive. It is also deadl y when it burns,giving off p oisonous gasses .
Sod/Grass
Old time Alaskans insulated theirroofs in a differ ent way than we dotoday. The ridge p ole was cover ed bypoles, or split spruce tr ees. The poleswere cover ed with birchbark and/or grass which shed water .
Sod was placed over the gr ass, and over the sod, dirt . This type of r oofhad no vap or barrier, but it “ breathed”. The vap or passed thr ough the gr ass,sod and dirt, and into the air . Frost pr oblems w ere unhear d of . Grass gr ew onthese r oofs . They were very warm and felt quite cozy .
Unfortunatel y, sod r oofs could not ha ve a steep pitch as the dirt w ouldwash away. Sod r oofs were so heavy they needed a very lar ge ridgep ole inthe middle. The w eight of the r oof fr equentl y buckled the gable ends, andrepairs w ere often necess ary. The wood in sod r oofs did r ot after a period oftime and r equir ed replacing .
Roofs
Today’s steel r oofs ar e relativel y light . They easil y shed snow and ar ecompletel y waterpr oof . Ceilings ar e insulated with fib erglass .
wetwet
wet
The weight of the wetinsulation has caused it tosag down.
No insulation
Foam beneath a concrete slab
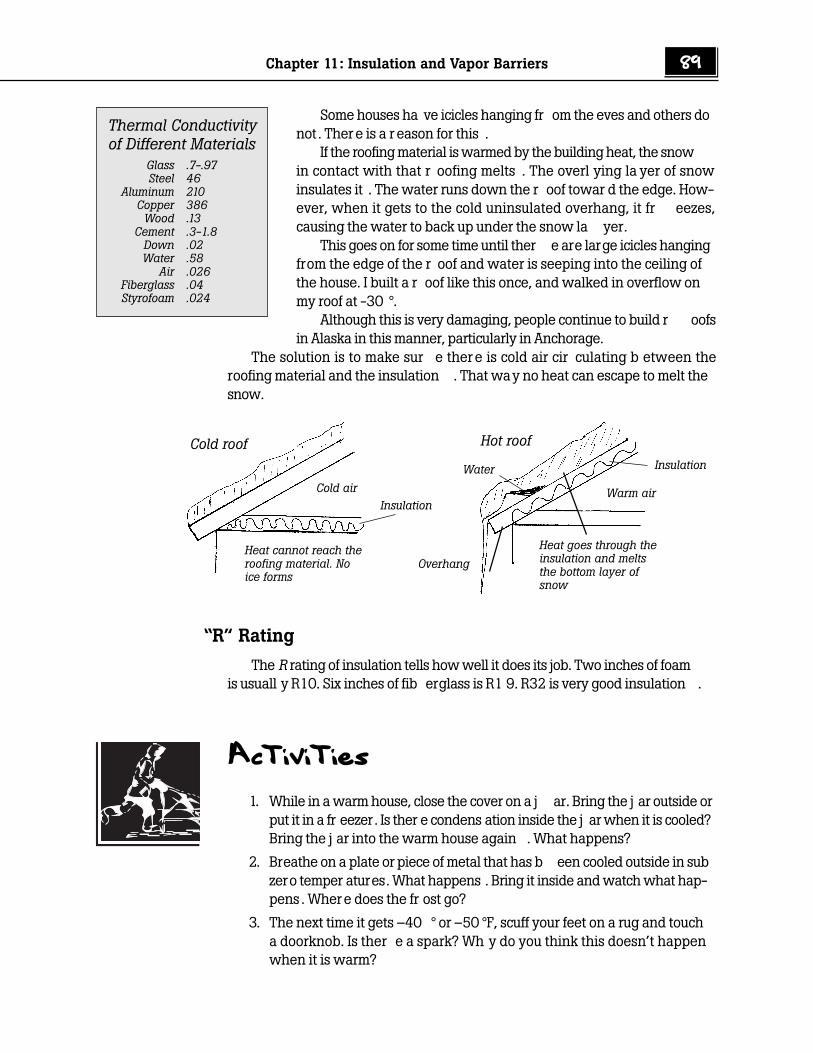
Chapter 11: Insulation and Vapor Barriers 89
Some houses ha ve icicles hanging fr om the eves and others donot. Ther e is a r eason for this .
If the roofing material is warmed by the building heat, the snowin contact with that r oofing melts . The overl ying la yer of snowinsulates it . The water runs down the r oof towar d the edge. How-ever, when it gets to the cold uninsulated overhang, it fr eezes,causing the water to back up under the snow la yer.
This goes on for some time until ther e are large icicles hangingfrom the edge of the r oof and water is seeping into the ceiling ofthe house. I built a r oof like this once, and walked in overflow onmy roof at -30 °.
Although this is very damaging, people continue to build r oofsin Alaska in this manner, particularly in Anchorage.
The solution is to make sur e there is cold air cir culating b etween theroofing material and the insulation . That way no heat can escape to melt thesnow.
“R” Rating
The R rating of insulation tells how well it does its job. Two inches of foamis usuall y R10. Six inches of fib erglass is R1 9. R32 is very good insulation .
Activities
1. While in a warm house, close the cover on a j ar. Bring the j ar outside orput it in a fr eezer. Is ther e condens ation inside the j ar when it is cooled?Bring the j ar into the warm house again . What happens?
2. Breathe on a plate or piece of metal that has b een cooled outside in subzero temper atures. What happens . Bring it inside and watch what hap-pens . Where does the fr ost go?
3. The next time it gets –40 ° or –50 °F, scuff your feet on a rug and toucha doorknob. Is ther e a spark? Wh y do you think this doesn’t happenwhen it is warm?
Cold roof Hot roof
Heat cannot reach theroofing material. Noice forms
Heat goes through theinsulation and meltsthe bottom layer ofsnow
Cold airInsulation
Warm air
Insulation
Overhang
Water
Thermal Conductivityof Different Materials
Glass .7-.97Steel 46
Aluminum 210Copper 386
Wood .13Cement .3-1.8
Down .02Water .58
Air .026Fiberglass .04Styrofoam .024
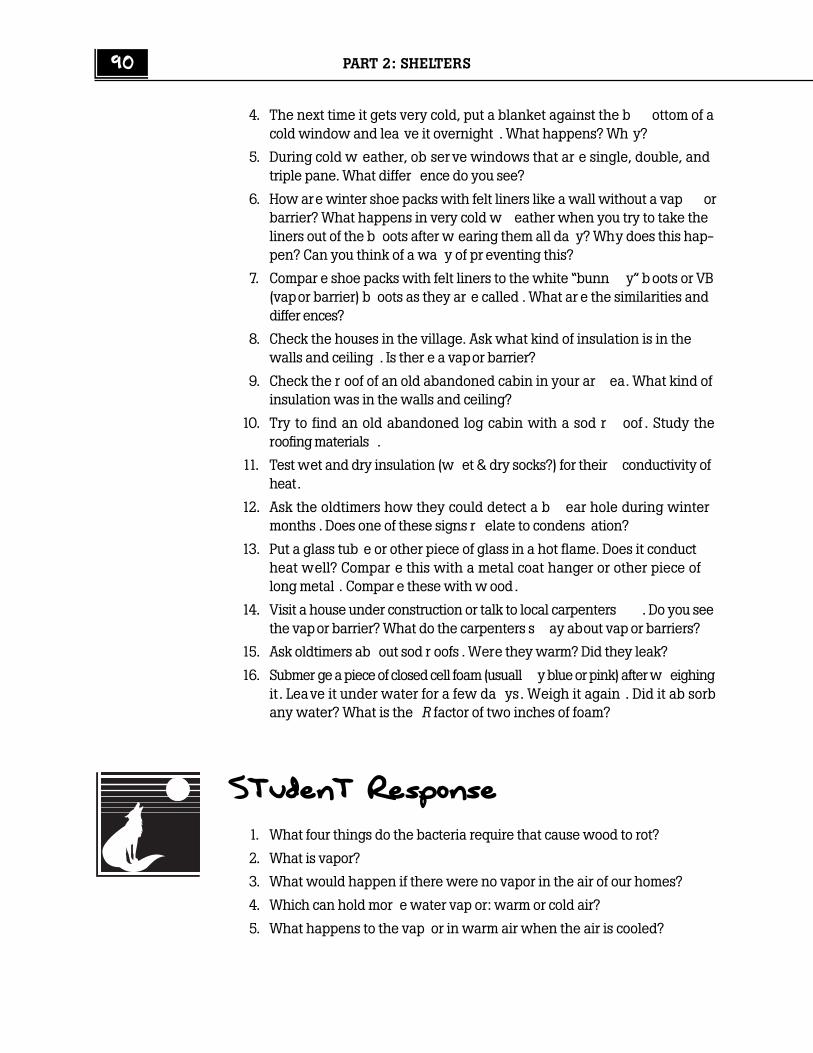
90 PART 2: SHELTERS
4. The next time it gets very cold, put a blanket against the b ottom of acold window and lea ve it overnight . What happens? Wh y?
5. During cold w eather, ob ser ve windows that ar e single, double, andtriple pane. What differ ence do you see?
6. How are winter shoe packs with felt liners like a wall without a vap orbarrier? What happens in very cold w eather when you try to take theliners out of the b oots after w earing them all da y? Why does this hap-pen? Can you think of a wa y of pr eventing this?
7. Compar e shoe packs with felt liners to the white “bunn y” boots or VB(vapor barrier) b oots as they ar e called . What ar e the similarities anddiffer ences?
8. Check the houses in the village. Ask what kind of insulation is in thewalls and ceiling . Is ther e a vapor barrier?
9. Check the r oof of an old abandoned cabin in your ar ea. What kind ofinsulation was in the walls and ceiling?
10. Try to find an old abandoned log cabin with a sod r oof . Study theroofing materials .
11. Test wet and dry insulation (w et & dry socks?) for their conductivity ofheat.
12. Ask the oldtimers how they could detect a b ear hole during wintermonths . Does one of these signs r elate to condens ation?
13. Put a glass tub e or other piece of glass in a hot flame. Does it conductheat well? Compar e this with a metal coat hanger or other piece oflong metal . Compar e these with w ood.
14. Visit a house under construction or talk to local carpenters . Do you seethe vapor barrier? What do the carpenters s ay about vap or barriers?
15. Ask oldtimers ab out sod r oofs . Were they warm? Did they leak?
16. Submer ge a piece of closed cell foam (usuall y blue or pink) after w eighingit. Leave it under water for a few da ys. Weigh it again . Did it ab sorbany water? What is the R factor of two inches of foam?
Student Response
1. What four things do the bacteria require that cause wood to rot?
2. What is vapor?
3. What would happen if there were no vapor in the air of our homes?
4. Which can hold mor e water vap or: warm or cold air?
5. What happens to the vap or in warm air when the air is cooled?
Chapter 11: Insulation and Vapor Barriers 91
6. What happens when vapor gets into the walls of our homes?
7. Draw a cross section of a wall that has insulation and a vap or barrier .
8. What things in our homes naturally put water vapor into the air?
9. If you tried to explain the use of a vapor barrier simply to someone whodidn’t know, what simple rules w ould you give them?
10. What two things make fib erglass good insulation?
11. What are the thr ee dis advantages of fib erglass insulation?
12. What are two disadvantages of foam insulation?
13. Draw a cross section of a sod r oof . Did the oldtimers use a vap orbarrier?
Math
1. A roll of visquene is 8 x 100 feet . Assuming ther e are no overlaps (inreality ther e are). How man y rolls of visquene ar e necess ary to put avapor barrier in a house 24’ x 36’, with walls 8’ high . The outsidewalls and ceiling need a vap or barrier . How man y squar e feet will b eleft over for overlap and other purposes?
2. The above house needs squar e feet of visquene. It comesin rolls of 1 2’ x 100 for $4 7.21 or r olls of 8’ x 100’ for $29.52. What isthe best combination of r olls that can b e purchased and what is thetotal cost?
3. Two inches of foam has an R factor of 1 0. Six inches of fib erglass has anR factor of 1 9 (round off to 20.) A piece of foam is 2’ x 8’ and costs $1 4.Fiberglass costs $3 7 for a bundle that contains 7 8 squar e feet . Which isthe better insulation buy for a squar e foot?
4. A building has 1 276 squar e feet to insulate with six inches of fib er-glass . The price of fib erglass landed on the j obsite is $.4 7 per squar e.What is the cost of insulating the house?
5. Hank was building a 40’ x 56’ shop . He wanted to p our the concr etefloor over 4” of foam . Each piece of foam is 2” x 2’ x 8’. How muchwould this cost if he could get the foam for $1 0.99 each? (R ound off ifyou like.)

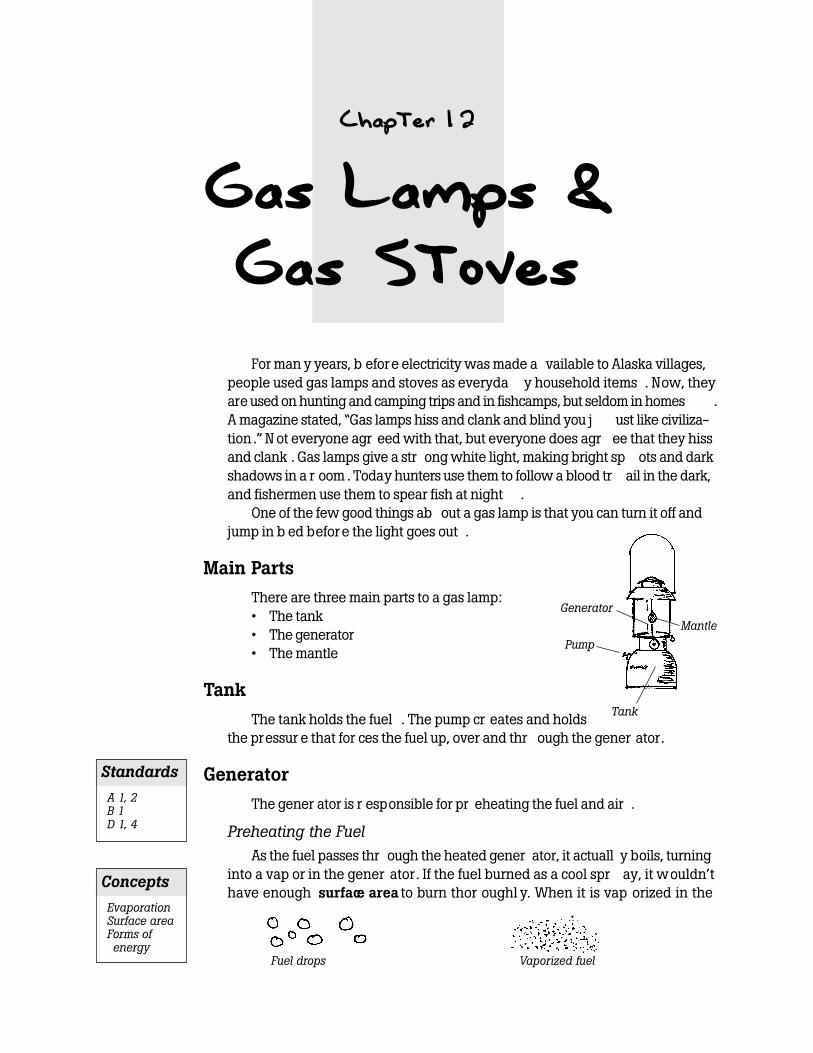
Chapter 12
Gas Lamps &Gas Stoves
For man y years, b efore electricity was made a vailable to Alaska villages,people used gas lamps and stoves as everyda y household items . Now, theyare used on hunting and camping trips and in fishcamps, but seldom in homes .A magazine stated, “Gas lamps hiss and clank and blind you j ust like civiliza-tion .” N ot everyone agr eed with that, but everyone does agr ee that they hissand clank . Gas lamps give a str ong white light, making bright sp ots and darkshadows in a r oom . Today hunters use them to follow a blood tr ail in the dark,and fishermen use them to spear fish at night .
One of the few good things ab out a gas lamp is that you can turn it off andjump in b ed before the light goes out .
Main Parts
There are three main parts to a gas lamp:• The tank• The generator• The mantle
Tank
The tank holds the fuel . The pump cr eates and holdsthe pressur e that for ces the fuel up, over and thr ough the gener ator.
Generator
The gener ator is r esponsible for pr eheating the fuel and air .
Preheating the FuelAs the fuel passes thr ough the heated gener ator, it actuall y boils, turning
into a vap or in the gener ator. If the fuel burned as a cool spr ay, it wouldn’thave enough surface area to burn thor oughl y. When it is vap orized in the
Fuel drops Vaporized fuel
Standards
A 1, 2B 1D 1, 4
Concepts
EvaporationSurface areaForms ofenergy
Tank
Mantle
Generator
Pump
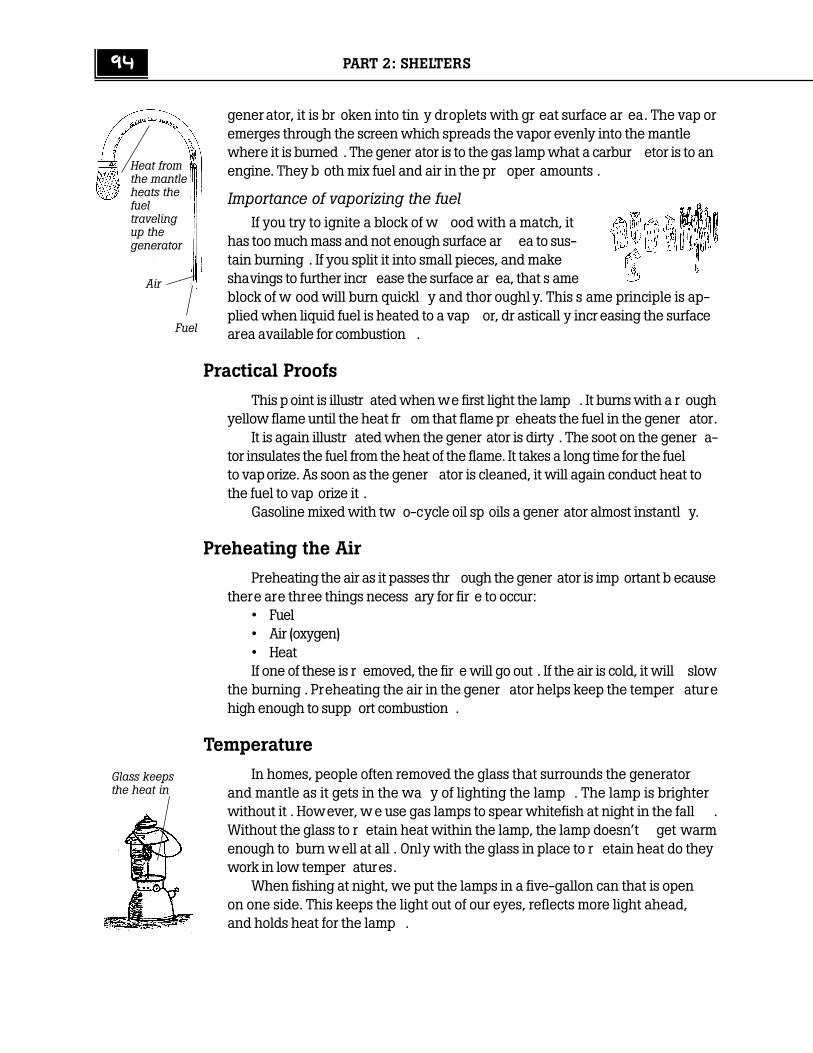
94 PART 2: SHELTERS
generator, it is br oken into tin y droplets with gr eat surface ar ea. The vap oremerges through the screen which spreads the vapor evenly into the mantlewhere it is burned . The gener ator is to the gas lamp what a carbur etor is to anengine. They b oth mix fuel and air in the pr oper amounts .
Importance of vaporizing the fuelIf you try to ignite a block of w ood with a match, it
has too much mass and not enough surface ar ea to sus-tain burning . If you split it into small pieces, and makeshavings to further incr ease the surface ar ea, that s ameblock of w ood will burn quickl y and thor oughl y. This s ame principle is ap-plied when liquid fuel is heated to a vap or, dr asticall y incr easing the surfacearea available for combustion .
Practical Proofs
This p oint is illustr ated when we first light the lamp . It burns with a r oughyellow flame until the heat fr om that flame pr eheats the fuel in the gener ator.
It is again illustr ated when the gener ator is dirty . The soot on the gener a-tor insulates the fuel from the heat of the flame. It takes a long time for the fuelto vaporize. As soon as the gener ator is cleaned, it will again conduct heat tothe fuel to vap orize it .
Gasoline mixed with tw o-cycle oil sp oils a gener ator almost instantl y.
Preheating the Air
Preheating the air as it passes thr ough the gener ator is imp ortant b ecausethere are three things necess ary for fir e to occur:
• Fuel• Air (oxygen)• HeatIf one of these is r emoved, the fir e will go out . If the air is cold, it will slow
the burning . Preheating the air in the gener ator helps keep the temper aturehigh enough to supp ort combustion .
Temperature
In homes, people often removed the glass that surrounds the generatorand mantle as it gets in the wa y of lighting the lamp . The lamp is brighterwithout it . However, w e use gas lamps to spear whitefish at night in the fall .Without the glass to r etain heat within the lamp, the lamp doesn’t get warmenough to burn well at all . Only with the glass in place to r etain heat do theywork in low temper atures.
When fishing at night, we put the lamps in a five-gallon can that is openon one side. This keeps the light out of our eyes, reflects more light ahead,and holds heat for the lamp .
Glass keepsthe heat in
Air
Fuel
Heat fromthe mantleheats thefueltravelingup thegenerator
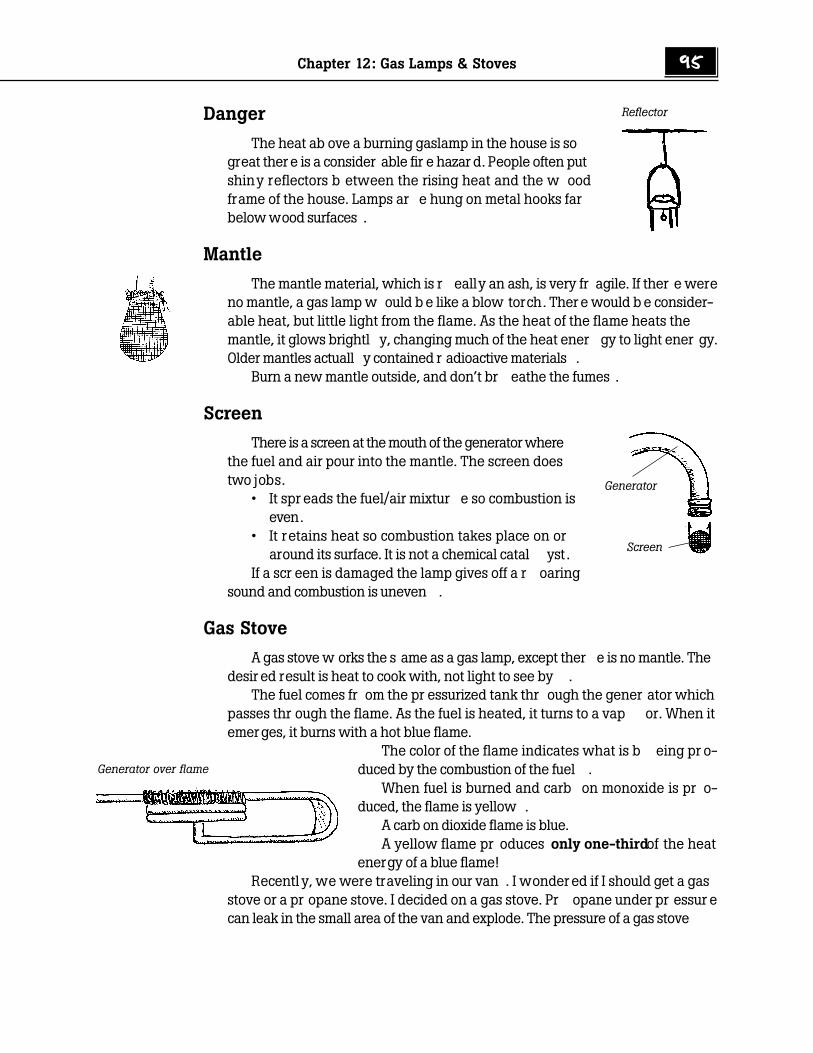
Chapter 12: Gas Lamps & Stoves 95
Danger
The heat ab ove a burning gaslamp in the house is sogreat ther e is a consider able fir e hazar d. People often putshiny reflectors b etween the rising heat and the w oodframe of the house. Lamps ar e hung on metal hooks farbelow wood surfaces .
Mantle
The mantle material, which is r eally an ash, is very fr agile. If ther e wereno mantle, a gas lamp w ould b e like a blow torch. Ther e would b e consider-able heat, but little light from the flame. As the heat of the flame heats themantle, it glows brightl y, changing much of the heat ener gy to light ener gy.Older mantles actuall y contained r adioactive materials .
Burn a new mantle outside, and don’t br eathe the fumes .
Screen
There is a screen at the mouth of the generator wherethe fuel and air pour into the mantle. The screen doestwo jobs.
• It spr eads the fuel/air mixtur e so combustion iseven.
• It retains heat so combustion takes place on oraround its surface. It is not a chemical catal yst.
If a scr een is damaged the lamp gives off a r oaringsound and combustion is uneven .
Gas Stove
A gas stove w orks the s ame as a gas lamp, except ther e is no mantle. Thedesir ed result is heat to cook with, not light to see by .
The fuel comes fr om the pr essurized tank thr ough the gener ator whichpasses thr ough the flame. As the fuel is heated, it turns to a vap or. When itemerges, it burns with a hot blue flame.
The color of the flame indicates what is b eing pr o-duced by the combustion of the fuel .
When fuel is burned and carb on monoxide is pr o-duced, the flame is yellow .
A carb on dioxide flame is blue.A yellow flame pr oduces only one-third of the heat
energy of a blue flame!Recentl y, we were traveling in our van . I wonder ed if I should get a gas
stove or a pr opane stove. I decided on a gas stove. Pr opane under pr essur ecan leak in the small area of the van and explode. The pressure of a gas stove
Reflector
Generator
Screen
Generator over flame
96 PART 2: SHELTERS
can be released . It is s afe to stor e in tight places . Gas stoves ar en’t as conve-nient as pr opane stoves . Gas stoves ar e lighter and cheaper to carry on camp-ing trips in the b oat and sled than pr opane stoves and tanks .
Activities
1. Put a little (r oom temper ature) gas lamp fuel in your hand . Blow on it .Does it feel cold? Wh y? Put a little r oom temper ature stove oil in yourhand. Blow on it . Does it feel as cold? Wh y? Can you explain wh y wedon’t use stove oil in a gas lamp?
2. Cut two identical blocks of w ood . Split one into four parts . Split theother into small kindling . Make tw o campfir es of the s ame size. Put thesplit pieces of the first block on one and the split pieces of the secondon the other . Which burns faster? How much faster? What can you s ayabout incr easing the surface ar ea of fuel?
3. First light an old gas lamp . Let it cool down, then take the gener atorout . If you ar e careful you can do it without br eaking the mantle. Is itblack with soot? Scr ape it clean with a p ocket knife or s andpaper . Re-install it, and light the lamp again . Can you tell the differ ence betweenbefore and after? What is the differ ence and why?
4. Observe. What do you supp ose the little needle is for on the end of thegenerator you just removed?
5. Get someone with the necess ary knowledge to show you how to r e-place a mantle. While the old mantle is off, inspect the scr een. Does ithave any holes?
6. If possible, r esear ch what kind of material is used in the mantle of agas lamp . How is the material unique?
7. Pump the tank full of pressure. Release the pressure. Lubricate the pumpwith a few dr ops of oil, and pump the tank again . Is ther e a differ ence?Why?
8. Ask people in your village if they use gas lamps outdoors in the past .Do they still use them in hunting, whaling, or fishcamps?
9. Light a gas stove. Identify the parts of the flame that ar e producingcarbon dioxide. Identify the parts of the flame that ar e producing car-bon monoxide.
10. With the same amount of water at the same temperature in the sameteapot, time how long it takes to b oil water on the gas stove, on apropane stove, and on an electric stove. Which is faster? Which do youthink is mor e convenient? Which do you think is s afer in the house?
11. With pliers, hold a piece of a br oken mantle in the flame of a candle orgas stove. Does it glow?
Chapter 12: Gas Lamps & Stoves 97
Student Response
1. What are the three main parts of a gas lamp?
2. What is the main purpose of the generator?
3. What happens to fuel in the generator?
4. Draw a picture of fuel as a liquid and the same amount of fuel as avapor.
5. Why does the gener ator pass over the flame in b oth the gas lamp andgas stove?
6. The scr een in a gas lamp does tw o things . What ar e they?
7. Why do whitefish hunters ha ve a har d time with their gas lamps incold temper atures and what is the cur e?
8. What color is the flame when carb on monoxide is pr oduced? Whatcolor is the flame when carb on dioxide is pr oduced?
9. Which is mor e efficient in the pr oduction of heat: combustion to carb onmonoxide or combustion to carb on dioxide? B y what ratio?
Math
1. If a blue pr opane flame gives off 1 500BTU1 how many BTU are given offif the air adj ustment is wr ong and the flame is completel y yellow?(Blue flame: C O2 z xBTU, Yellow flame: C O2 z 1/3x BTU)
2. A 5 gallon can of Blazo fuel costs $38. It lasts Mark 3 months in histrapping cabin . A bottle of pr opane lasts him 7 months at home. Pr o-pane is $105. Which is cheaper per month?
3. Gas lamps don’t w ork w ell with leaded gas . But Blazo fuel is $8 agallon, and leaded gas is $2.25 a gallon . New generators ar e $1.98apiece. Mark is w ondering if it is cheaper to burn cheaper fuel andchange gener ators once a w eek or whether it is cheaper to burn thecorr ect fuel . Which method is cheaper if a gallon of fuel lasts thr eeweeks?
1. BTU is British Thermal Units, a measurement of heat.

Chapter 15: Piloting a Boat89
Chapter 16: Boat Design97
Chapter 17: Magneto & Spark Plugs107
Chapter 18: Carburetors115
Chapter 19: Compression121
Chapter 20: Outboard Motor Lower Unit127
Chapter 21: Outboard Motor Cooling System137
Chapter 22: Dog Sleds143
Chapter 23: Snowmachine Tracks155
Chapter 24: Snowmachine Clutch161
Chapter 25: Snowshoes167
Chapter 26: Winter Trails173
Ways & Meansof Travel

Chapter 15
Piloting a Boat
Reading Skills
Most Alaskans live or hunt on rivers. On almost every Alaskan river thereare a few people who really know how to pilot a boat. They are river scien-tists who operate by basic principles the rest of us need to learn.
Once we are able to read a book, we have the skills to read other books.Once we are able to read a certain river, we discover that we have the skillsto read other rivers also. The signs and patterns are common to all rivers.Repeated travel helps us learn the river better. However, a good pilot cantravel a completely strange river and sight read it the same way you wouldread a new book.
With identical boats, an experienced pilot can go from one place to an-other faster than an inexperienced pilot. How is this possible? He under-stands the forces working for and against his boat, for and against the river.
Three Main Forces
There are three main forces work-ing on the water in a river.
• Gravity pulling the water down-ward towards the sea. Thesteeper the incline, the greaterthe velocity of the water.
• Momentum of the water goesaround a bend. Inertia causesmost of the water to go to theoutside of the bends.
• Friction with banks and riverbottom.
The river channel is often deeper on the outside of bends.On the inside of the bends, the current is slack.Look at the following drawings of a typical bend in a swift river. The two
forces, gravity and inertia, are sometimes working together and sometimescompeting. In the first drawing, the slope of the river isn’t too steep, so inertiacarries most of the water to the outside of the bend, creating a swift deepchannel there.
Shallow
Channel
Current
Standards
A 5, 6, 15B 3C 3D 1, 2, 3
Concepts
F z MAInertiaFriction
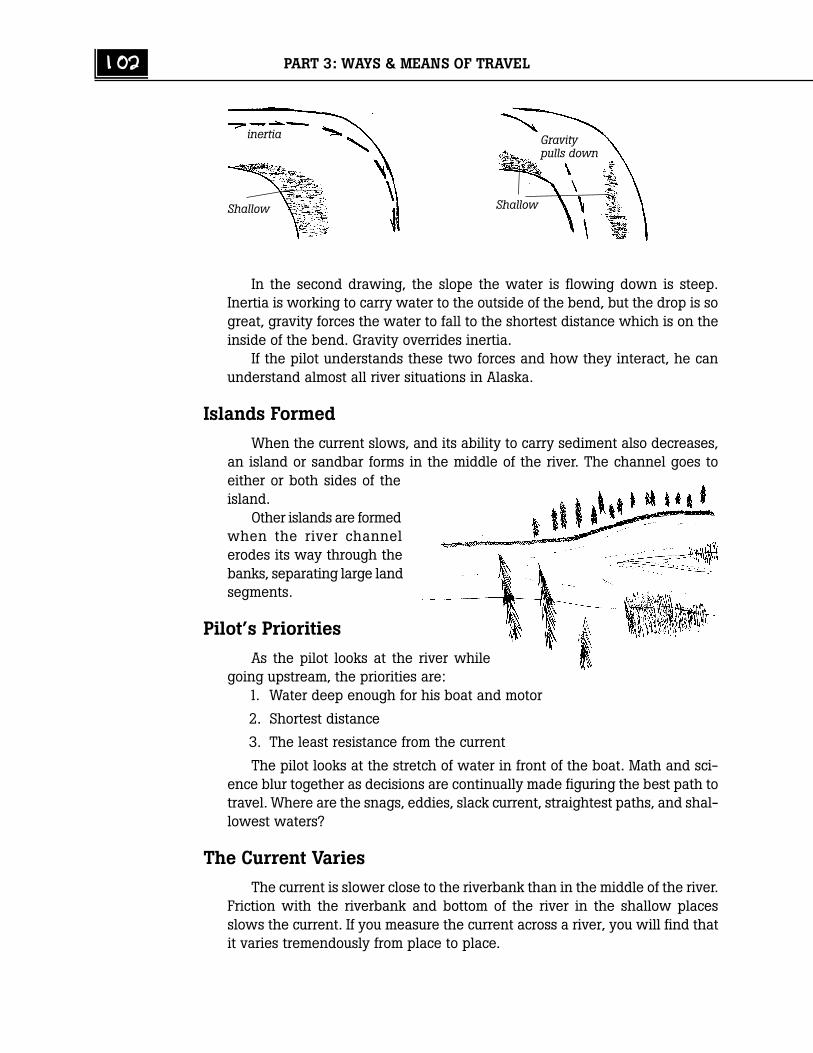
102 PART 3: WAYS & MEANS OF TRAVEL
In the second drawing, the slope the water is flowing down is steep.Inertia is working to carry water to the outside of the bend, but the drop is sogreat, gravity forces the water to fall to the shortest distance which is on theinside of the bend. Gravity overrides inertia.
If the pilot understands these two forces and how they interact, he canunderstand almost all river situations in Alaska.
Islands Formed
When the current slows, and its ability to carry sediment also decreases,an island or sandbar forms in the middle of the river. The channel goes toeither or both sides of theisland.
Other islands are formedwhen the river channelerodes its way through thebanks, separating large landsegments.
Pilot’s Priorities
As the pilot looks at the river whilegoing upstream, the priorities are:
1. Water deep enough for his boat and motor
2. Shortest distance
3. The least resistance from the current
The pilot looks at the stretch of water in front of the boat. Math and sci-ence blur together as decisions are continually made figuring the best path totravel. Where are the snags, eddies, slack current, straightest paths, and shal-lowest waters?
The Current Varies
The current is slower close to the riverbank than in the middle of the river.Friction with the riverbank and bottom of the river in the shallow placesslows the current. If you measure the current across a river, you will find thatit varies tremendously from place to place.
inertia
Shallow Shallow
Gravitypulls down

Chapter 15: Piloting a Boat 103
Salmon are aware of this and travel the path of least resistance in theirjourney upstream. They prefer the shallows at night because they feel safe,but swim on the bottom in the middle of the river during daylight in order toavoid detection.
The current might be six miles per hour (mph) in the middle, eight mphfive feet from the cutbank, and two to three mph right against the bank, twomph on the sandbar side of the river in the shallow places, and minus twomph in the eddy.
A good river pilot takes advantage ofall slack current. Against a cutbank, thewater swirls backwards due to friction withthe bank. Sometimes the stumps and brushkeep a good pilot away from those backcurrents, but traveling close to the cutbankadds several miles per hour to the boat’sspeed as it goes upstream.
EddiesThe water swirls backwards in eddies. The current is actually going in
the opposite direction from the rest of the river. Good pilots search for eddies.Fish rest in eddies and use the current to assist in the upstream effort. The
opposing currents hold a net in perfect position to catch the fish as they headupstream. Because of this, good pilots watch out for nets as they travel theeddies.
Using Rocks and SnagsThe current swirls in low pressure areas behind rocks
and snags. A good pilot enters a place with slack cur-rent behind a rock, gains speed, and shoots out beforecrashing into the rock.
In very shallow water, an experienced pilot knowsthat the water is deeper right beside snags and rocks, asthe water intended for the snag is diverted aside, creatinga mini-channel deep enough for the boat.
Efficiency
A pilot must decide which path upriver gives the least resistance. Obvi-ously it isn’t worth crossing a wide river to get a little help from an eddy.There is a constant give and take in this regard, constant decision-making bythe pilot.
Ground EffectA boat lifts when traveling in shallow water. The pilot hears the motor
speed up as the boat lifts. The shallower the water is, the more lift there is,but there is also a greater the chance of hitting bottom. This is why the pilotpays close attention to the sound of the motor.
Eddy
–2 mph
2 mph
6 mph8 mph
Island
2 mph
6 mph
3 mph
Current
Slack current
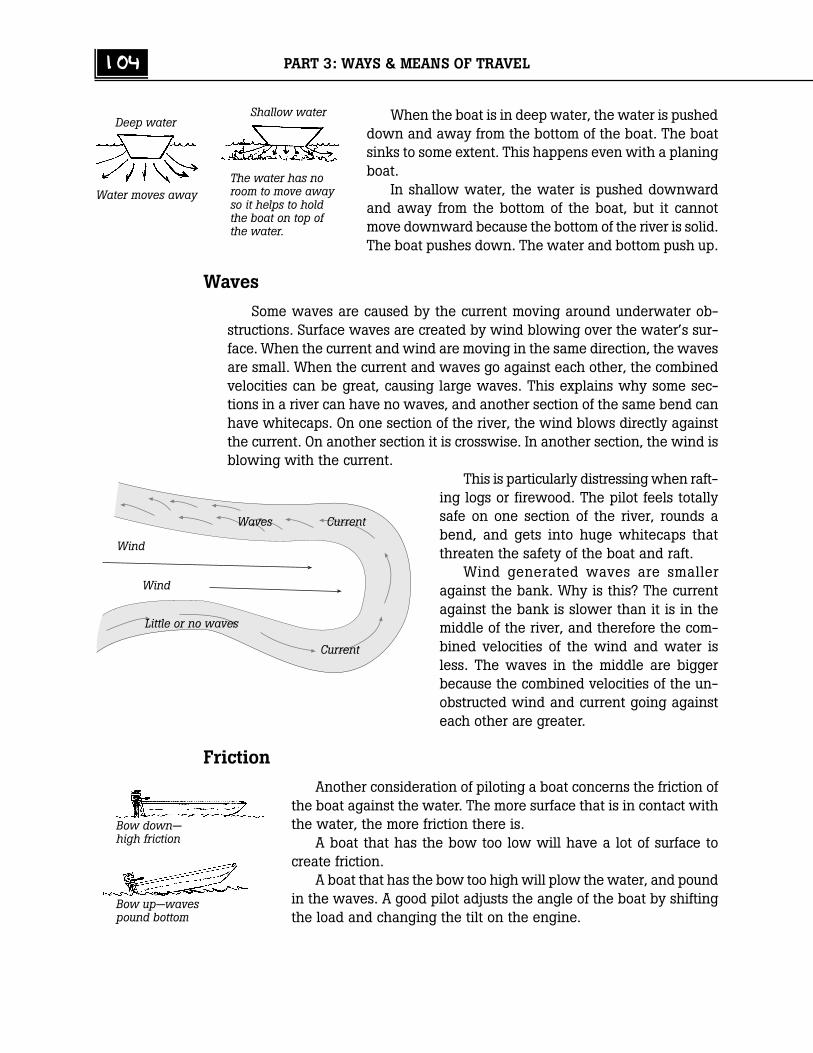
104 PART 3: WAYS & MEANS OF TRAVEL
When the boat is in deep water, the water is pusheddown and away from the bottom of the boat. The boatsinks to some extent. This happens even with a planingboat.
In shallow water, the water is pushed downwardand away from the bottom of the boat, but it cannotmove downward because the bottom of the river is solid.The boat pushes down. The water and bottom push up.
Waves
Some waves are caused by the current moving around underwater ob-structions. Surface waves are created by wind blowing over the water’s sur-face. When the current and wind are moving in the same direction, the wavesare small. When the current and waves go against each other, the combinedvelocities can be great, causing large waves. This explains why some sec-tions in a river can have no waves, and another section of the same bend canhave whitecaps. On one section of the river, the wind blows directly againstthe current. On another section it is crosswise. In another section, the wind isblowing with the current.
This is particularly distressing when raft-ing logs or firewood. The pilot feels totallysafe on one section of the river, rounds abend, and gets into huge whitecaps thatthreaten the safety of the boat and raft.
Wind generated waves are smalleragainst the bank. Why is this? The currentagainst the bank is slower than it is in themiddle of the river, and therefore the com-bined velocities of the wind and water isless. The waves in the middle are biggerbecause the combined velocities of the un-obstructed wind and current going againsteach other are greater.
Friction
Another consideration of piloting a boat concerns the friction ofthe boat against the water. The more surface that is in contact withthe water, the more friction there is.
A boat that has the bow too low will have a lot of surface tocreate friction.
A boat that has the bow too high will plow the water, and poundin the waves. A good pilot adjusts the angle of the boat by shiftingthe load and changing the tilt on the engine.
Deep waterShallow water
Water moves awayThe water has noroom to move awayso it helps to holdthe boat on top ofthe water.
Wind
Wind
Waves Current
Little or no waves
Current
Bow down—high friction
Bow up—wavespound bottom
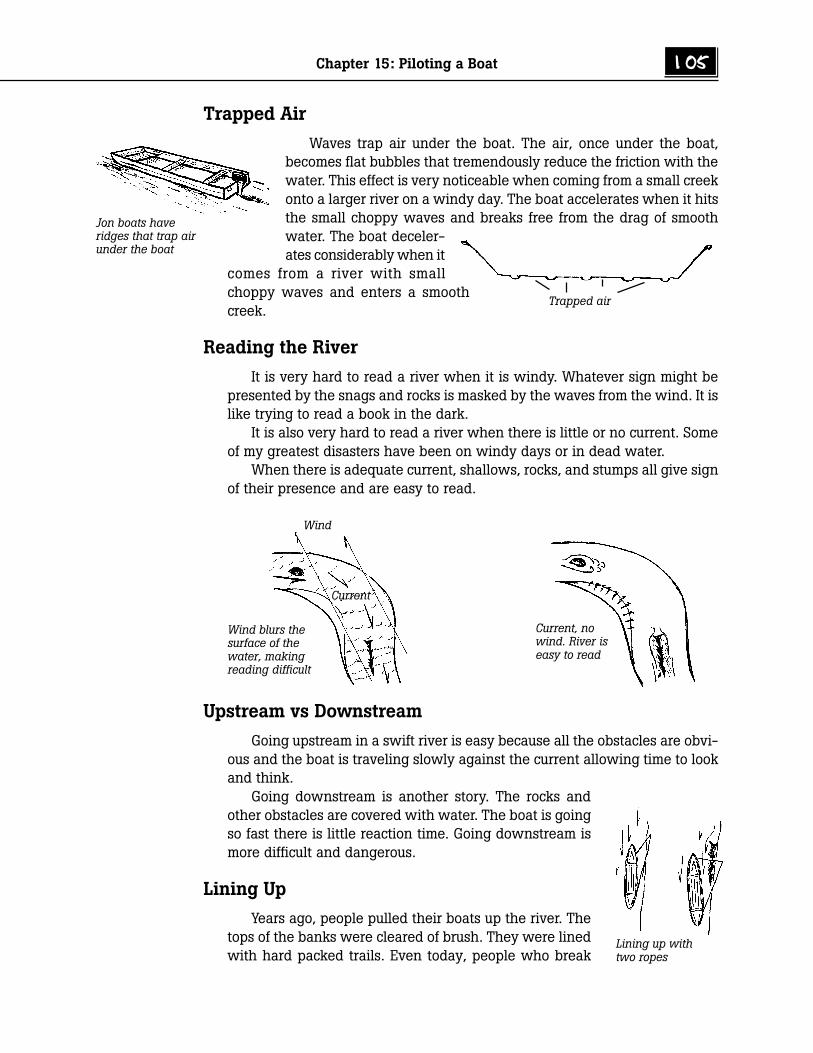
Chapter 15: Piloting a Boat 105
Trapped Air
Waves trap air under the boat. The air, once under the boat,becomes flat bubbles that tremendously reduce the friction with thewater. This effect is very noticeable when coming from a small creekonto a larger river on a windy day. The boat accelerates when it hitsthe small choppy waves and breaks free from the drag of smoothwater. The boat deceler-ates considerably when it
comes from a river with smallchoppy waves and enters a smoothcreek.
Reading the River
It is very hard to read a river when it is windy. Whatever sign might bepresented by the snags and rocks is masked by the waves from the wind. It islike trying to read a book in the dark.
It is also very hard to read a river when there is little or no current. Someof my greatest disasters have been on windy days or in dead water.
When there is adequate current, shallows, rocks, and stumps all give signof their presence and are easy to read.
Upstream vs Downstream
Going upstream in a swift river is easy because all the obstacles are obvi-ous and the boat is traveling slowly against the current allowing time to lookand think.
Going downstream is another story. The rocks andother obstacles are covered with water. The boat is goingso fast there is little reaction time. Going downstream ismore difficult and dangerous.
Lining Up
Years ago, people pulled their boats up the river. Thetops of the banks were cleared of brush. They were linedwith hard packed trails. Even today, people who break
Trapped air
Jon boats haveridges that trap airunder the boat
Wind
Current
Wind blurs thesurface of thewater, makingreading difficult
Current, nowind. River iseasy to read
Lining up withtwo ropes
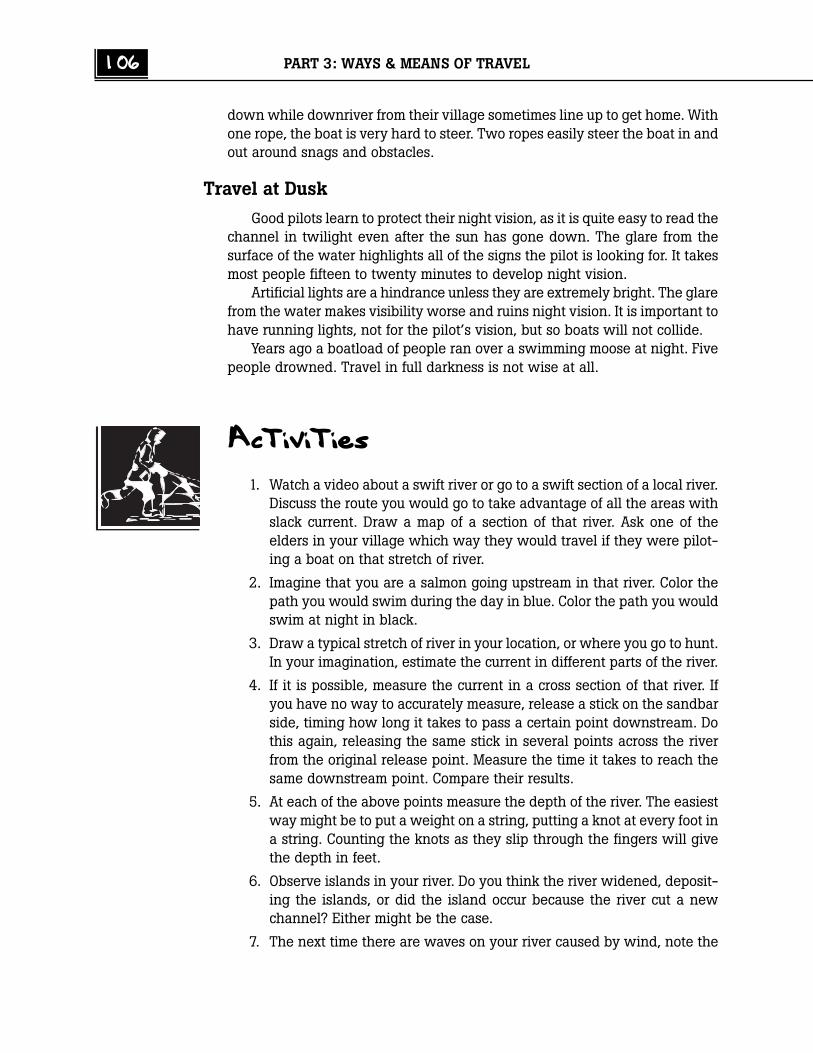
106 PART 3: WAYS & MEANS OF TRAVEL
down while downriver from their village sometimes line up to get home. Withone rope, the boat is very hard to steer. Two ropes easily steer the boat in andout around snags and obstacles.
Travel at Dusk
Good pilots learn to protect their night vision, as it is quite easy to read thechannel in twilight even after the sun has gone down. The glare from thesurface of the water highlights all of the signs the pilot is looking for. It takesmost people fifteen to twenty minutes to develop night vision.
Artificial lights are a hindrance unless they are extremely bright. The glarefrom the water makes visibility worse and ruins night vision. It is important tohave running lights, not for the pilot’s vision, but so boats will not collide.
Years ago a boatload of people ran over a swimming moose at night. Fivepeople drowned. Travel in full darkness is not wise at all.
Activities
1. Watch a video about a swift river or go to a swift section of a local river.Discuss the route you would go to take advantage of all the areas withslack current. Draw a map of a section of that river. Ask one of theelders in your village which way they would travel if they were pilot-ing a boat on that stretch of river.
2. Imagine that you are a salmon going upstream in that river. Color thepath you would swim during the day in blue. Color the path you wouldswim at night in black.
3. Draw a typical stretch of river in your location, or where you go to hunt.In your imagination, estimate the current in different parts of the river.
4. If it is possible, measure the current in a cross section of that river. Ifyou have no way to accurately measure, release a stick on the sandbarside, timing how long it takes to pass a certain point downstream. Dothis again, releasing the same stick in several points across the riverfrom the original release point. Measure the time it takes to reach thesame downstream point. Compare their results.
5. At each of the above points measure the depth of the river. The easiestway might be to put a weight on a string, putting a knot at every foot ina string. Counting the knots as they slip through the fingers will givethe depth in feet.
6. Observe islands in your river. Do you think the river widened, deposit-ing the islands, or did the island occur because the river cut a newchannel? Either might be the case.
7. The next time there are waves on your river caused by wind, note the
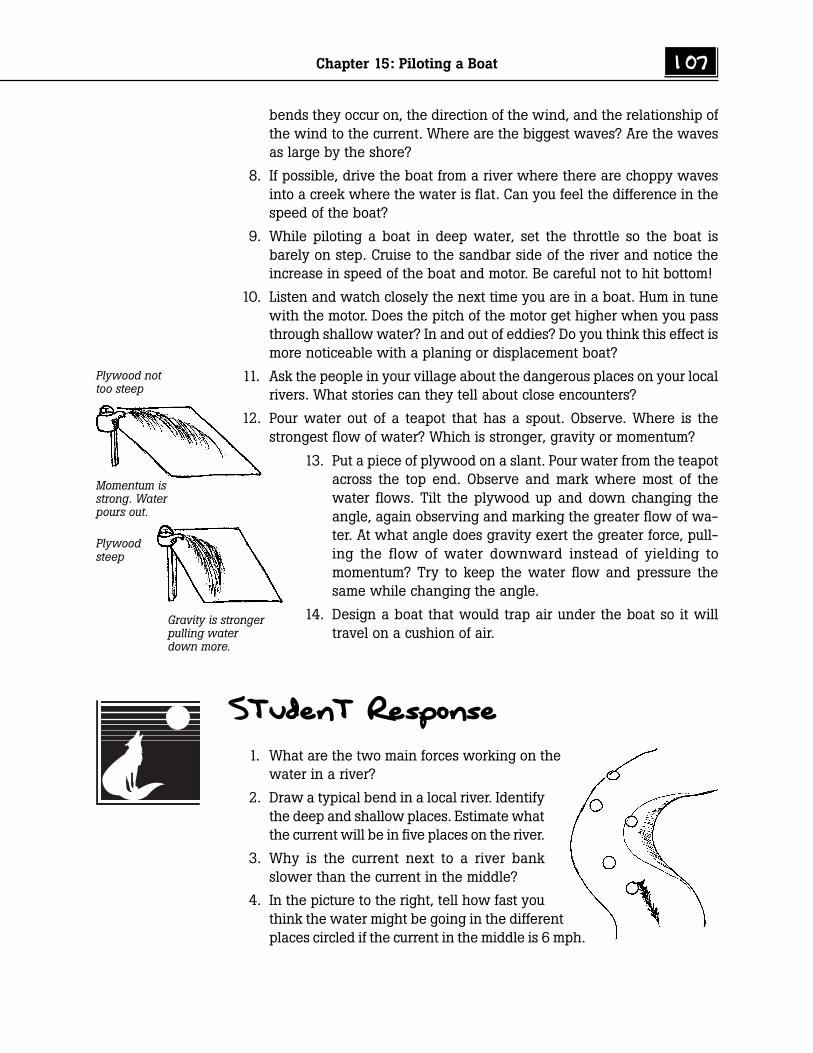
Chapter 15: Piloting a Boat 107
bends they occur on, the direction of the wind, and the relationship ofthe wind to the current. Where are the biggest waves? Are the wavesas large by the shore?
8. If possible, drive the boat from a river where there are choppy wavesinto a creek where the water is flat. Can you feel the difference in thespeed of the boat?
9. While piloting a boat in deep water, set the throttle so the boat isbarely on step. Cruise to the sandbar side of the river and notice theincrease in speed of the boat and motor. Be careful not to hit bottom!
10. Listen and watch closely the next time you are in a boat. Hum in tunewith the motor. Does the pitch of the motor get higher when you passthrough shallow water? In and out of eddies? Do you think this effect ismore noticeable with a planing or displacement boat?
11. Ask the people in your village about the dangerous places on your localrivers. What stories can they tell about close encounters?
12. Pour water out of a teapot that has a spout. Observe. Where is thestrongest flow of water? Which is stronger, gravity or momentum?
Plywood nottoo steep
Momentum isstrong. Waterpours out.
Gravity is strongerpulling waterdown more.
Plywoodsteep
13. Put a piece of plywood on a slant. Pour water from the teapotacross the top end. Observe and mark where most of thewater flows. Tilt the plywood up and down changing theangle, again observing and marking the greater flow of wa-ter. At what angle does gravity exert the greater force, pull-ing the flow of water downward instead of yielding tomomentum? Try to keep the water flow and pressure thesame while changing the angle.
14. Design a boat that would trap air under the boat so it willtravel on a cushion of air.
Student Response
1. What are the two main forces working on thewater in a river?
2. Draw a typical bend in a local river. Identifythe deep and shallow places. Estimate whatthe current will be in five places on the river.
3. Why is the current next to a river bankslower than the current in the middle?
4. In the picture to the right, tell how fast youthink the water might be going in the differentplaces circled if the current in the middle is 6 mph.
108 PART 3: WAYS & MEANS OF TRAVEL
5. What are the three priorities a pilot operates by when traveling up-stream?
6. Draw a picture of a typical bend in a river. Draw a big rock in themiddle of the river. Draw the path a boat might take.
7. Draw a picture showing a boat in ground effect and another in deepwater.
8. Why are the waves caused by wind larger in the middle of the riverthan on the sides of the river?
9. Draw a picture of a boat that is traveling at the best angle for waves.
10. Draw a picture of a boat that is traveling at the best angle for calmwater.
11. Why do small choppy waves help a boat travel a little faster?
12. What are three things to remember or do when traveling at dusk?
Math
1. Pete can travel the from the store to his cabin in 3.5 hours. His son canmake the same trip in 4 hours. If gas is $3 per gallon and the motoruses 4 gallons per hour, how much more does it cost his son to makethe same trip?
2. A boat travels at 16 mph relative to the water. The river’s current aver-ages 9 mph. How long will it take to make a round trip of 22 miles eachway? What is the total time of the 44 mile trip?
3. A boat travels at 16 mph. How long will it take to make a round trip of22 miles each way across a lake? What is the total time of the 44 miletrip?
4. Compare the trip in current and the trip on the lake. Why do you thinkthere is a difference?
5. An outboard motor uses 4 gallons per hour. It can go 21 miles per hour.How many miles per gallon does it use?
6. Another outboard uses 3.2 gallons per hour, and goes 18 miles perhour. Which outboard is more economical?
7. Which of the above outboards is more economical going upstream for72 miles on a river with an average current of 12 miles per hour?
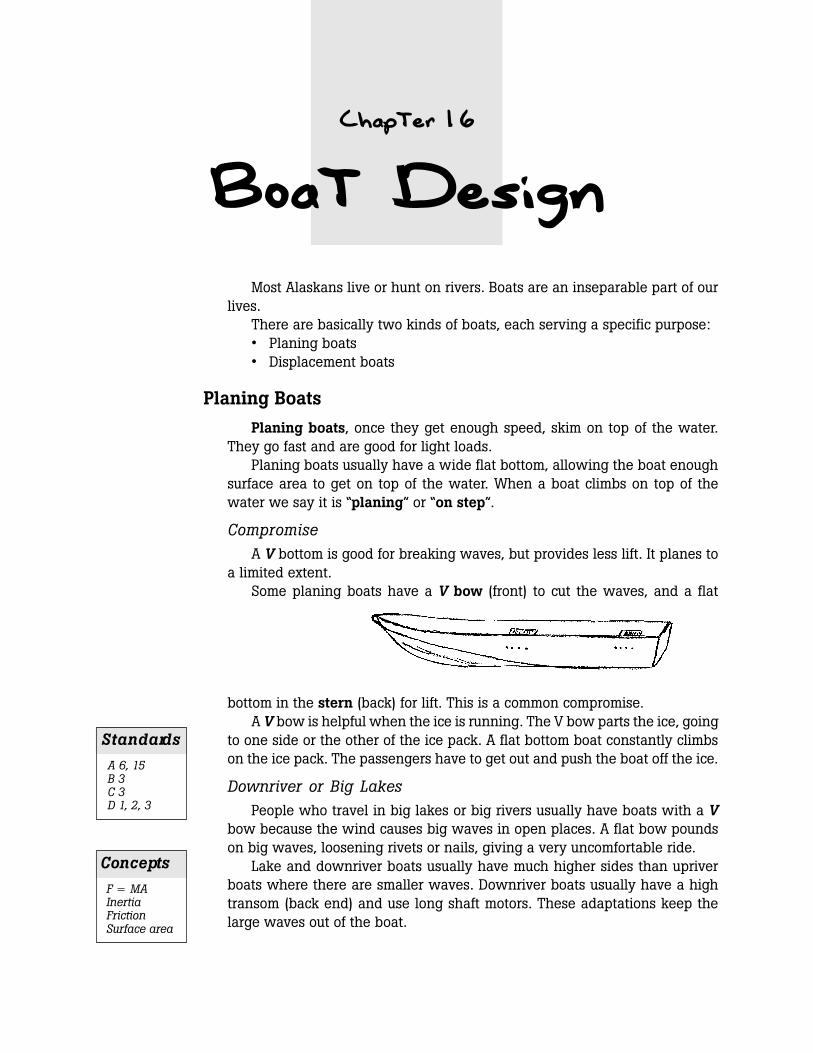
Chapter 16
Boat Design
Most Alaskans live or hunt on rivers. Boats are an inseparable part of ourlives.
There are basically two kinds of boats, each serving a specific purpose:• Planing boats• Displacement boats
Planing Boats
Planing boats, once they get enough speed, skim on top of the water.They go fast and are good for light loads.
Planing boats usually have a wide flat bottom, allowing the boat enoughsurface area to get on top of the water. When a boat climbs on top of thewater we say it is “planing” or “on step”.
CompromiseA V bottom is good for breaking waves, but provides less lift. It planes to
a limited extent.Some planing boats have a V bow (front) to cut the waves, and a flat
bottom in the stern (back) for lift. This is a common compromise.A V bow is helpful when the ice is running. The V bow parts the ice, going
to one side or the other of the ice pack. A flat bottom boat constantly climbson the ice pack. The passengers have to get out and push the boat off the ice.
Downriver or Big LakesPeople who travel in big lakes or big rivers usually have boats with a V
bow because the wind causes big waves in open places. A flat bow poundson big waves, loosening rivets or nails, giving a very uncomfortable ride.
Lake and downriver boats usually have much higher sides than upriverboats where there are smaller waves. Downriver boats usually have a hightransom (back end) and use long shaft motors. These adaptations keep thelarge waves out of the boat.
Standards
A 6, 15B 3C 3D 1, 2, 3
Concepts
F z MAInertiaFrictionSurface area
110 PART 3: WAYS & MEANS OF TRAVEL
Upriver or on Smaller LakesPeople who boat in smaller lakes and narrower rivers prefer boats that
are flat on the bottom from front to back. This kind of planing boat skims ontop of the water especially in shallow conditions.
Boats designed for small lakes and rivers usually have lower sides, lowtransom and short shaft motors.
High sides:• Are often a hindrance to getting in and out of the boat.• Add weight which is critical in shallow water.• Cause the boat to blow around a lot in a side wind, making steering
difficult.
Disadvantages of Planing BoatsThe disadvantages of planing boats are significant.They need a motor big enough to go fast enough to get on step. If the load
is too heavy, a planing boat is like a raft, slow very hard to push. Big motorsuse more gas per hour and cost more to buy and repair. On step, they areeconomical.
There is a sharp breaking point where a planing boat will either be onstep or plowing water trying to get on step. Sometimes fifty pounds makesthe difference between planing at thirty mph or plowing at twelve mph.
We used to figure the gas consumption of a motor at full throttle by divid-ing the horsepower by ten. A forty horsepower would use four gallons anhour. A twenty horsepower used two gallons an hour. Modern motors do bet-ter than that. Perhaps dividing the horsepower by twelve would be a moreaccurate estimate of gallons per hour. The new four-cycle outboards are evenmore efficient, perhaps dividing horsepower by fifteen to get gas consump-tion per hour. Fuel prices are so high now, fuel economy is an importantaspect of buying an outboard motor.
Planing boats are terribly difficult to pole up shallow creeks. The widestern seems to drag all the water in the creek behind it. There is a lakebehind our village. In the creek to the lake, there is a shallow section we call“divorce country” because many husbands and wives get in big argumentstrying to pole their planing boats through there. Oldtimers easily poled theirplaning boats through to the lake.
Displacement Boats
A displacement boat has gentle, gradual lines that cut through the water.It has a smooth shape to push the water out of the way as gradually as pos-sible. A sailboat is an excellent example. A displacement boat cannot go asfast as a planing boat, but it can carry a much bigger load with a small motor.
Oldtimers built and used displacement boats hauling hundreds of poundswith three to five horsepower motors. Canoes, kayaks, and umiaks are alsodisplacement boats. Before motors arrived in Alaska, people poled woodenboats up the river. Often they lined up, pulling the displacement boats by
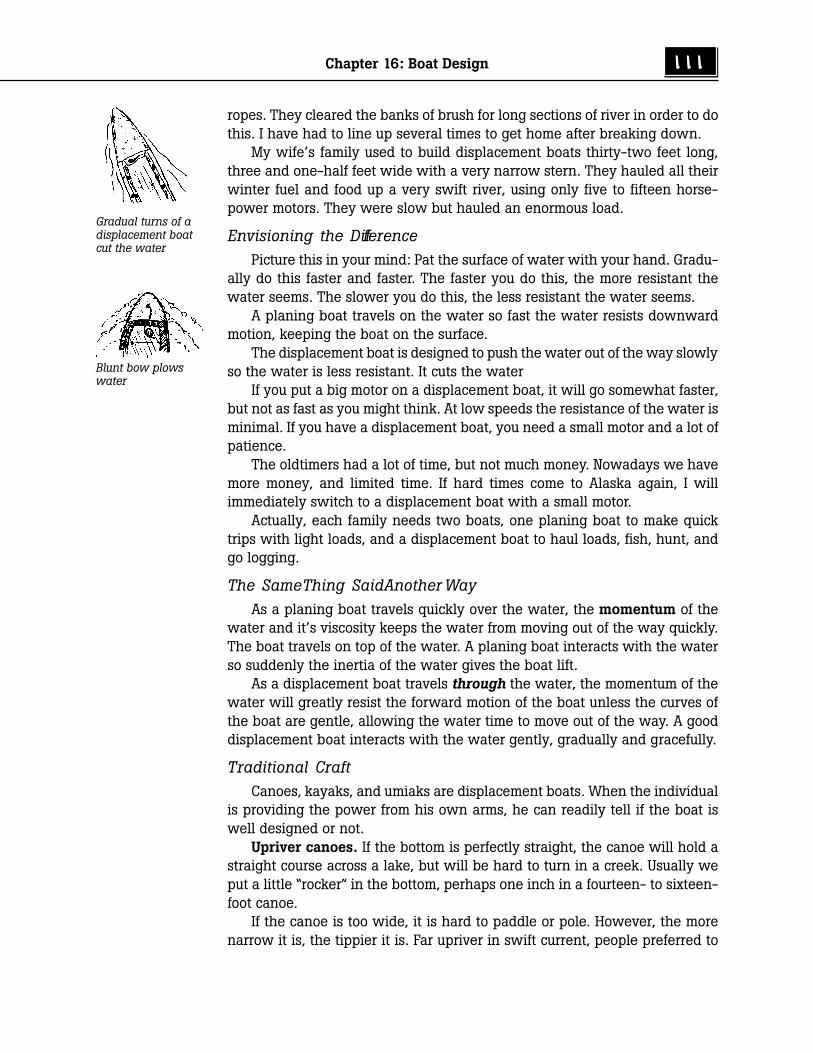
Chapter 16: Boat Design 111
ropes. They cleared the banks of brush for long sections of river in order to dothis. I have had to line up several times to get home after breaking down.
My wife’s family used to build displacement boats thirty-two feet long,three and one-half feet wide with a very narrow stern. They hauled all theirwinter fuel and food up a very swift river, using only five to fifteen horse-power motors. They were slow but hauled an enormous load.
Envisioning the DifferencePicture this in your mind: Pat the surface of water with your hand. Gradu-
ally do this faster and faster. The faster you do this, the more resistant thewater seems. The slower you do this, the less resistant the water seems.
A planing boat travels on the water so fast the water resists downwardmotion, keeping the boat on the surface.
The displacement boat is designed to push the water out of the way slowlyso the water is less resistant. It cuts the water
If you put a big motor on a displacement boat, it will go somewhat faster,but not as fast as you might think. At low speeds the resistance of the water isminimal. If you have a displacement boat, you need a small motor and a lot ofpatience.
The oldtimers had a lot of time, but not much money. Nowadays we havemore money, and limited time. If hard times come to Alaska again, I willimmediately switch to a displacement boat with a small motor.
Actually, each family needs two boats, one planing boat to make quicktrips with light loads, and a displacement boat to haul loads, fish, hunt, andgo logging.
The Same Thing Said Another WayAs a planing boat travels quickly over the water, the momentum of the
water and it’s viscosity keeps the water from moving out of the way quickly.The boat travels on top of the water. A planing boat interacts with the waterso suddenly the inertia of the water gives the boat lift.
As a displacement boat travels through the water, the momentum of thewater will greatly resist the forward motion of the boat unless the curves ofthe boat are gentle, allowing the water time to move out of the way. A gooddisplacement boat interacts with the water gently, gradually and gracefully.
Traditional CraftCanoes, kayaks, and umiaks are displacement boats. When the individual
is providing the power from his own arms, he can readily tell if the boat iswell designed or not.
Upriver canoes. If the bottom is perfectly straight, the canoe will hold astraight course across a lake, but will be hard to turn in a creek. Usually weput a little “rocker” in the bottom, perhaps one inch in a fourteen- to sixteen-foot canoe.
If the canoe is too wide, it is hard to paddle or pole. However, the morenarrow it is, the tippier it is. Far upriver in swift current, people preferred to
Blunt bow plowswater
Gradual turns of adisplacement boatcut the water
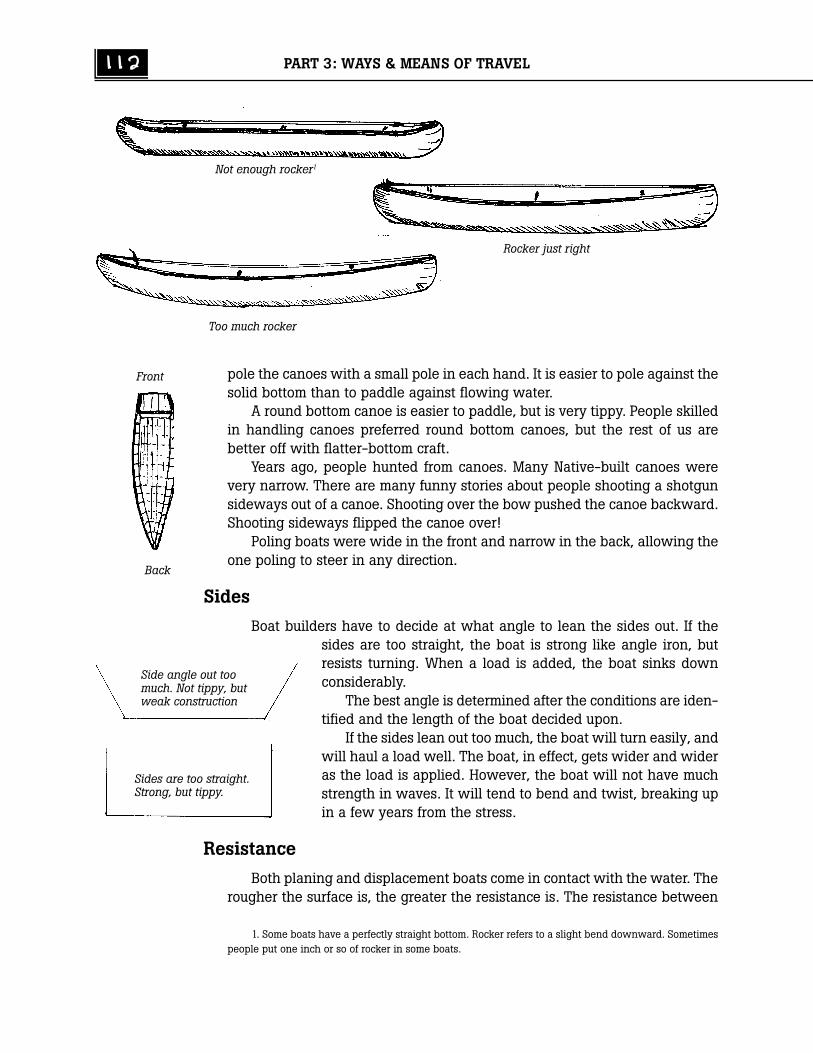
112 PART 3: WAYS & MEANS OF TRAVEL
pole the canoes with a small pole in each hand. It is easier to pole against thesolid bottom than to paddle against flowing water.
A round bottom canoe is easier to paddle, but is very tippy. People skilledin handling canoes preferred round bottom canoes, but the rest of us arebetter off with flatter-bottom craft.
Years ago, people hunted from canoes. Many Native-built canoes werevery narrow. There are many funny stories about people shooting a shotgunsideways out of a canoe. Shooting over the bow pushed the canoe backward.Shooting sideways flipped the canoe over!
Poling boats were wide in the front and narrow in the back, allowing theone poling to steer in any direction.
Sides
Boat builders have to decide at what angle to lean the sides out. If thesides are too straight, the boat is strong like angle iron, butresists turning. When a load is added, the boat sinks downconsiderably.
The best angle is determined after the conditions are iden-tified and the length of the boat decided upon.
If the sides lean out too much, the boat will turn easily, andwill haul a load well. The boat, in effect, gets wider and wideras the load is applied. However, the boat will not have muchstrength in waves. It will tend to bend and twist, breaking upin a few years from the stress.
Resistance
Both planing and displacement boats come in contact with the water. Therougher the surface is, the greater the resistance is. The resistance between
Rocker just right
Too much rocker
Front
Back
Not enough rocker1
Side angle out toomuch. Not tippy, butweak construction
Sides are too straight.Strong, but tippy.
1. Some boats have a perfectly straight bottom. Rocker refers to a slight bend downward. Sometimespeople put one inch or so of rocker in some boats.
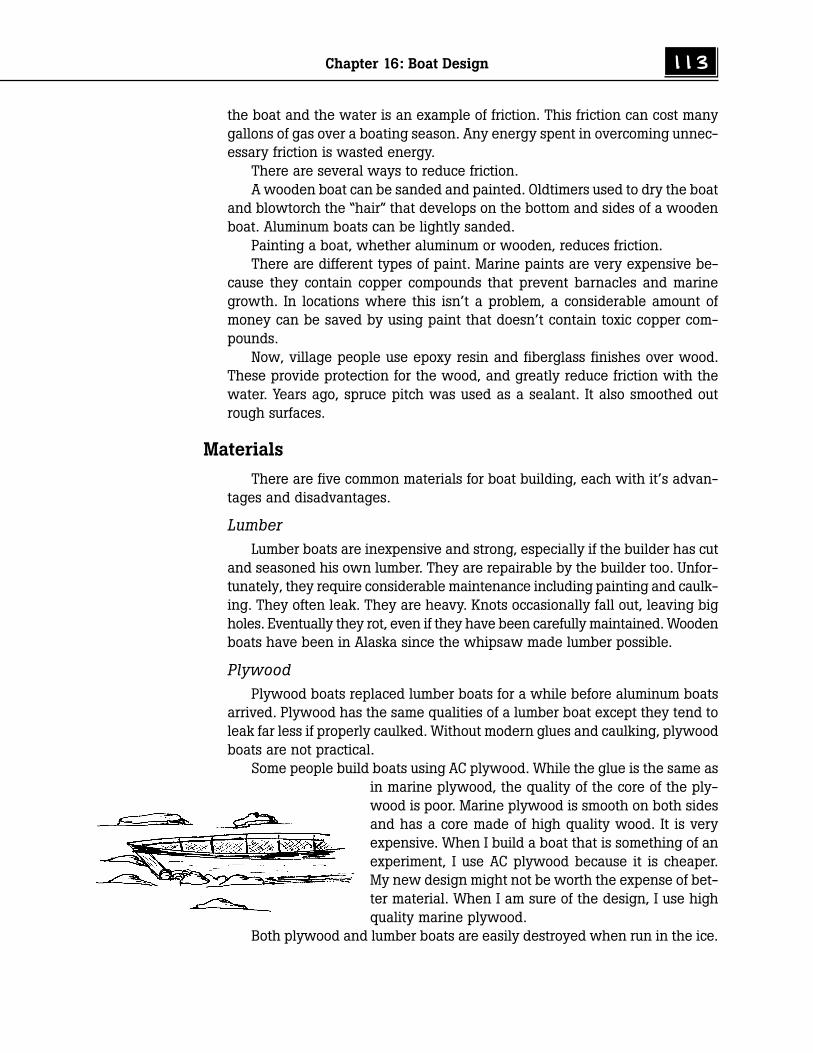
Chapter 16: Boat Design 113
the boat and the water is an example of friction. This friction can cost manygallons of gas over a boating season. Any energy spent in overcoming unnec-essary friction is wasted energy.
There are several ways to reduce friction.A wooden boat can be sanded and painted. Oldtimers used to dry the boat
and blowtorch the “hair” that develops on the bottom and sides of a woodenboat. Aluminum boats can be lightly sanded.
Painting a boat, whether aluminum or wooden, reduces friction.There are different types of paint. Marine paints are very expensive be-
cause they contain copper compounds that prevent barnacles and marinegrowth. In locations where this isn’t a problem, a considerable amount ofmoney can be saved by using paint that doesn’t contain toxic copper com-pounds.
Now, village people use epoxy resin and fiberglass finishes over wood.These provide protection for the wood, and greatly reduce friction with thewater. Years ago, spruce pitch was used as a sealant. It also smoothed outrough surfaces.
Materials
There are five common materials for boat building, each with it’s advan-tages and disadvantages.
LumberLumber boats are inexpensive and strong, especially if the builder has cut
and seasoned his own lumber. They are repairable by the builder too. Unfor-tunately, they require considerable maintenance including painting and caulk-ing. They often leak. They are heavy. Knots occasionally fall out, leaving bigholes. Eventually they rot, even if they have been carefully maintained. Woodenboats have been in Alaska since the whipsaw made lumber possible.
PlywoodPlywood boats replaced lumber boats for a while before aluminum boats
arrived. Plywood has the same qualities of a lumber boat except they tend toleak far less if properly caulked. Without modern glues and caulking, plywoodboats are not practical.
Some people build boats using AC plywood. While the glue is the same asin marine plywood, the quality of the core of the ply-wood is poor. Marine plywood is smooth on both sidesand has a core made of high quality wood. It is veryexpensive. When I build a boat that is something of anexperiment, I use AC plywood because it is cheaper.My new design might not be worth the expense of bet-ter material. When I am sure of the design, I use highquality marine plywood.
Both plywood and lumber boats are easily destroyed when run in the ice.
114 PART 3: WAYS & MEANS OF TRAVEL
AluminumAluminum is an excellent material for boats. It doesn’t rust or rot. It is light
and doesn’t absorb water or leak. It is unharmed when run in ice, and is easyto drag over ice flows. Aluminum boats can last a lifetime if handled carefully.
Unfortunately, with aluminum, the owner can’t design his own boat forhis own purposes unless he has a custom boat made at considerable expense.Aluminum is a bit noisy for hunting. This is particularly noticeable with alu-minum canoes. Aluminum is very difficult or impossible for an owner to repairproperly. Welding aluminum has long been an obstacle for the common per-son. Some aluminum boats have leaky rivets that plague the owner.
With hard use, aluminum boats crack in the transom, on the ribs, and inthe bow where the boat contacts the beach.
FiberglassFiberglass boats are fairly new to Alaska, at least where I am from. Fiber-
glass is unharmed by running in the ice and slides well over ice flows. Itprovides a low friction surface with the water. Fiberglass is strong, and lowmaintenance, but does add considerable weight to a boat. Fiberglass is easyto repair and is easy to apply if the simple directions are followed. Fiberglassbonds well with new lumber and plywood, but usually separates when ap-plied to an old painted boat, even if it is sanded well.
There is one brand of fiberglass boat built in the Lower 48 that can haulan awesome load. The low friction surface of fiberglass combined with thewide bottom providing lift give this boat a very respectable performance.Freight costs on fiberglass boats purchased from Outside are high.
Skin boatsAlthough no longer common in many parts of Alaska, skinboats are still
the whaler’s choice in Barrow and the Arctic. Skins are very strong and flex-ible. They don’t get ice buildup in cold temperatures and are repairable bythe owner. Other than labor, they are free. The disadvantages are:
• Animals, including your own dogs, want to eat your boat. To store it outof the reach of animals often exposes the boat to drying wind andsunlight.
• The skins require frequent oiling.• The skins deteriorate within a few years.• Skin boats are labor-intensive to build. However, this often brings people
of a village together.Brief mention should be given to inflatable boats. They aren’t practical for
village people, but they do fit in airplanes and can be inflated at remotelocations. Many can be driven by outboard motors.
Even less mention will be made of the hideously noisy airboats that plaguesome of Alaska’s rivers.
Chapter 16: Boat Design 115
Activities
1. Look at the different boats in the village. Identify the planing boats anddisplacement boats. Some fishing boats are a compromise between thetwo.
2. What is the average length and width of the boats in your village?What is the average height of the sides in the middle of the boat? Whatis the average angle outward of the sides, in both the middle and back?What is the average angle backward of the transom?
3. Ask a local boat builder what happens if the transom doesn’t haveenough angle.
4. What are the different materials used in boat construction in yourvillage?
5. How does the style of boat in your village compare with those in thedescription in the above text? Are they downriver boats, upriver boats,ocean boats, a combination, or something different?
6. Talk with a local boat builder about boat design. Does he agree ordisagree with some of the thoughts in the above text?
7. Look at a canoe if one is available. Are the turns and curves gradual?Compare this with a planing boat. Which would you rather paddle orpole upstream?
8. Ask the oldtimers about shooting out of a canoe. What precautions mustbe taken?
9. Try poling a planing boat upstream in swift water. Paddle or pole acanoe in the same place. Compare the effort.
10. Compare the bottoms of the boats in your village. Feel them if you can.How rough or smooth are they? If they are rough, how did they get thatway? How would you reduce the friction on each one? Do boats in yourarea need paints with copper compounds to prevent organic growth?
11. Students should slap the surface of a small body of water with theirhand, a board, or paddle. Increase the speed with which it is slapped.Notice that it seems to become “solid” the faster it is slapped. How doesthis apply to a planing boat.
12. Carve a displacement or planing boat from soap or cottonwood bark.
13. Ask oldtimers how they hauled big loads long ago. How is thatdifferent␣ from today?
14. Draw an upriver boat. Draw a downriver boat. Which do you prefer?
15. Ask oldtimers how they built canoes or kayaks. What are the effects ofchanging width? Length? Did they put a rocker in the bottom? How
116 PART 3: WAYS & MEANS OF TRAVEL
high were the sides? What were the problems they had with materi-als? Today we weld and use synthetic caulking. How did they fix leakslong ago?
16. Ask around the village to find out the gas consumption of the new four-cycle outboards. How many gallons per hour for each horsepower rat-ing? Divide the horsepower by the gallons to find the ratio. Comparethis with the gas consumption of newer two-cycle motors.
17. Compare the difference in purchase price of a two-cycle and a four-cycle outboard. The four-cycles are more expensive. What is the priceof gas in your community? Can you figure how many gallons of gas afour-cycle would have to burn to pay for the difference in purchaseprice? This isn’t a simple problem. You will probably have to do it as aclass, but it is one everyone must take into account when buying amotor.
18. Ask in your village how much the boats cost. Compare the cost of thedifferent kinds of boats with each other. Ask people how long eachkind of boat lasts (plywood, fiberglass, aluminum, etc.). In the long run,what is the cheapest kind of boat? Is it also the most useful kind ofboat? Do people still make their own boats? Why?
Student Response
1. What are the two different kinds of boats?
2. Which of these two is better for carrying a big load with a small motor?
3. Which of these two kinds of boats is better for running around with alight load?
4. What is the most important thing to remember in designing a displace-ment boat?
5. A planing boat is better when it is wide or slim?
6. Which planing boat will get on step faster, one with a flat bottom orone with a V bottom?
7. Which planing boat will give a smoother ride in rough water, one witha flat bottom or one with a V bottom?
8. Which is better for your location? Why?
9. What are the advantages of high sides on a boat? What are the disad-vantages?
10. What is the force called that slows a boat with a rough bottom? How isthis remedied with a wooden boat?
Chapter 16: Boat Design 117
11. There are four common materials used in boat construction. List themand one advantage of each.
Math
1. One boat travels 20 miles upstream in a swift river where the averagecurrent is 10 mph. The boat’s speed relative to the water is 20 mph.The boat makes a round trip. Another identical boat and motor travels40 miles on a lake where there is no current. There is no wind actingon either boat. Question: Do they both make the trip in the same time,or is there a difference? If there is a difference, why?
2. Plywood costs $35 a sheet landed in the village. Screws to build a boatare $4.50 a pound. Paint is $22.5 a gallon. The lumber to build the ribsand other parts is $1.25 a board foot. Five gallons of fiberglass resinflown into the village is $89. The fiberglass cloth is $3.00 a linear foot.How much would it cost to build a boat 24’ long? The boat is 4’ wideand will take six sheets of plywood. It will require 4 pounds of screwsand three and a half gallons of paint (only available in gallons.) Add10% for incidental expenses like calking, glue, paint brushes etc. Analuminum boat is $3,200 landed in the village. Which is cheaper? Con-sidering that an aluminum boat lasts twice as long, which is cheaper?

Chapter 17
Magneto &Spark Plugs
Almost everyone in Alaska has been stuck one time or another because of“bad plugs.” Spark plugs are so important that airplanes have two spark plugsin each cylinder, each fed by a different magneto.
Every engine that is fueled by gasoline has spark plugs, whether it is afour wheeler, a chainsaw, or an old-time gasoline washing machine. In adiesel engine the compression is so great that heat generated by compres-sion ignites the fuel.
Healthy spark plugs can make the difference between riding home orwalking, boating home or drifting.
How Spark Plugs Work
The simple explanation is:• The magneto generates electric current in the primary coil.• The secondary coil increases the voltage1 of that current.• The spark plug sparks, igniting the fuel.• The fuel burns.• The gasses expand, driving the piston.• Work is done.
Generating Electricity in the MagnetoIf a powerful magnet is passed by many wires, a current is produced.
There is a permanent magnet on the spinning flywheel. When it spins pastthe primary coil of wire, a current is generated which passes down the wireunder pressure towards the spark plug in the cylinder. The energy of motionis changed to electrical energy.
Secondary CoilUnfortunately, at this point, even though there are enough electrons trav-
eling down the wire, they are not at high enough voltage to cause the sparkplug to spark.
1. Voltage is like pressure that is behind electricity as it travels through a wire. High voltage is likehigh pressure. Low voltage is like low pressure.
Standards
A 6, 9, 15B 3D 1, 3
Concepts
Forms ofenergy
Surface area
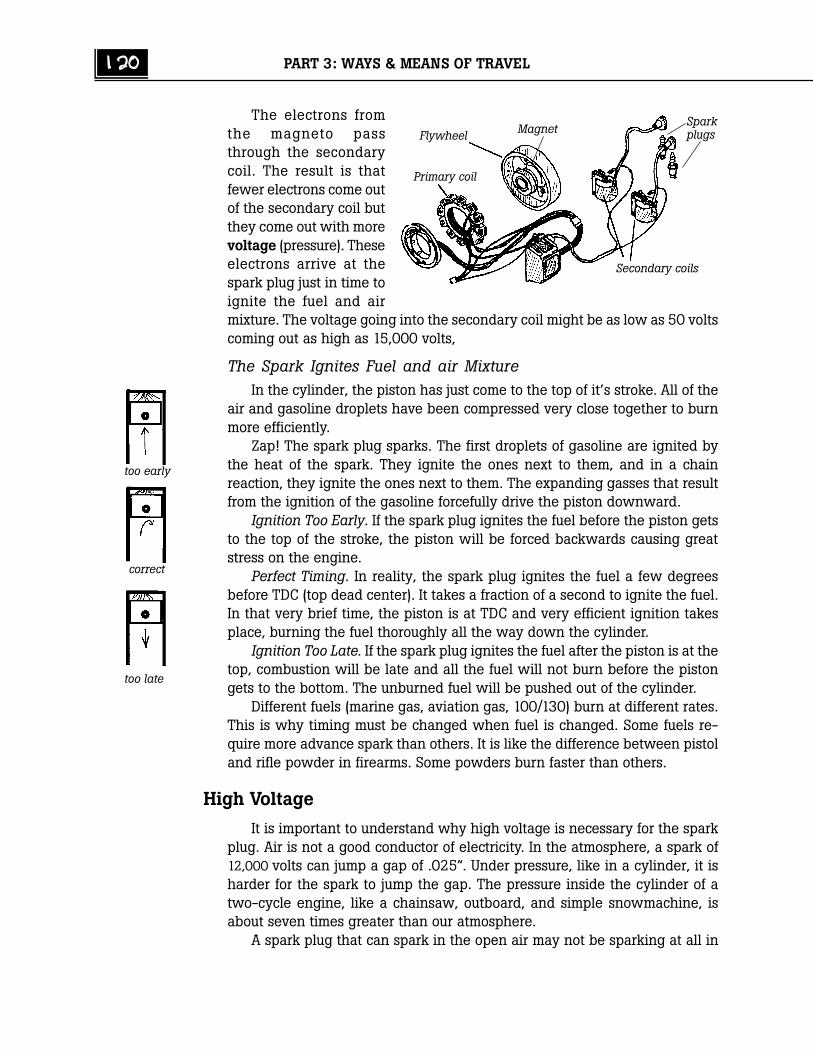
120 PART 3: WAYS & MEANS OF TRAVEL
The electrons fromthe magneto passthrough the secondarycoil. The result is thatfewer electrons come outof the secondary coil butthey come out with morevoltage (pressure). Theseelectrons arrive at thespark plug just in time toignite the fuel and airmixture. The voltage going into the secondary coil might be as low as 50 voltscoming out as high as 15,000 volts,
The Spark Ignites Fuel and air MixtureIn the cylinder, the piston has just come to the top of it’s stroke. All of the
air and gasoline droplets have been compressed very close together to burnmore efficiently.
Zap! The spark plug sparks. The first droplets of gasoline are ignited bythe heat of the spark. They ignite the ones next to them, and in a chainreaction, they ignite the ones next to them. The expanding gasses that resultfrom the ignition of the gasoline forcefully drive the piston downward.
Ignition Too Early. If the spark plug ignites the fuel before the piston getsto the top of the stroke, the piston will be forced backwards causing greatstress on the engine.
Perfect Timing. In reality, the spark plug ignites the fuel a few degreesbefore TDC (top dead center). It takes a fraction of a second to ignite the fuel.In that very brief time, the piston is at TDC and very efficient ignition takesplace, burning the fuel thoroughly all the way down the cylinder.
Ignition Too Late. If the spark plug ignites the fuel after the piston is at thetop, combustion will be late and all the fuel will not burn before the pistongets to the bottom. The unburned fuel will be pushed out of the cylinder.
Different fuels (marine gas, aviation gas, 100/130) burn at different rates.This is why timing must be changed when fuel is changed. Some fuels re-quire more advance spark than others. It is like the difference between pistoland rifle powder in firearms. Some powders burn faster than others.
High Voltage
It is important to understand why high voltage is necessary for the sparkplug. Air is not a good conductor of electricity. In the atmosphere, a spark of12,000 volts can jump a gap of .025”. Under pressure, like in a cylinder, it isharder for the spark to jump the gap. The pressure inside the cylinder of atwo-cycle engine, like a chainsaw, outboard, and simple snowmachine, isabout seven times greater than our atmosphere.
A spark plug that can spark in the open air may not be sparking at all in
Flywheel Magnet
Primary coil
Sparkplugs
Secondary coils
too early
correct
too late
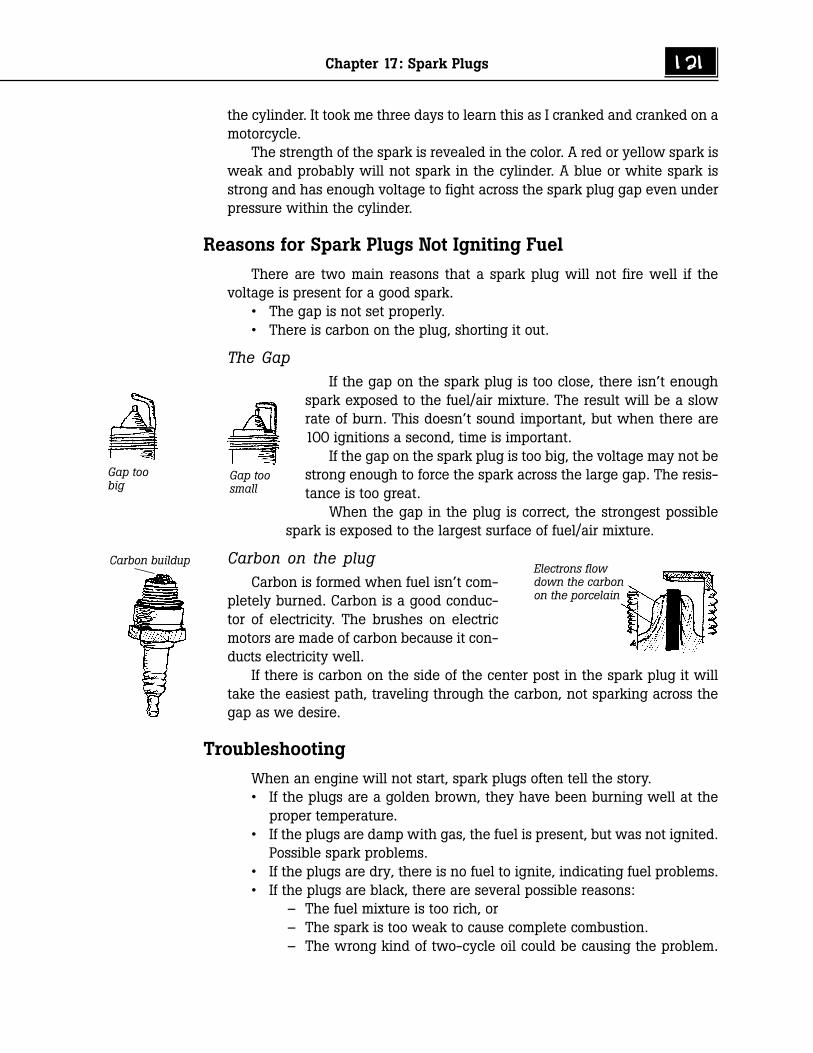
Chapter 17: Spark Plugs 121
the cylinder. It took me three days to learn this as I cranked and cranked on amotorcycle.
The strength of the spark is revealed in the color. A red or yellow spark isweak and probably will not spark in the cylinder. A blue or white spark isstrong and has enough voltage to fight across the spark plug gap even underpressure within the cylinder.
Reasons for Spark Plugs Not Igniting Fuel
There are two main reasons that a spark plug will not fire well if thevoltage is present for a good spark.
• The gap is not set properly.• There is carbon on the plug, shorting it out.
The GapIf the gap on the spark plug is too close, there isn’t enough
spark exposed to the fuel/air mixture. The result will be a slowrate of burn. This doesn’t sound important, but when there are100 ignitions a second, time is important.
If the gap on the spark plug is too big, the voltage may not bestrong enough to force the spark across the large gap. The resis-tance is too great.
When the gap in the plug is correct, the strongest possiblespark is exposed to the largest surface of fuel/air mixture.
Carbon on the plugCarbon is formed when fuel isn’t com-
pletely burned. Carbon is a good conduc-tor of electricity. The brushes on electricmotors are made of carbon because it con-ducts electricity well.
If there is carbon on the side of the center post in the spark plug it willtake the easiest path, traveling through the carbon, not sparking across thegap as we desire.
Troubleshooting
When an engine will not start, spark plugs often tell the story.• If the plugs are a golden brown, they have been burning well at the
proper temperature.• If the plugs are damp with gas, the fuel is present, but was not ignited.
Possible spark problems.• If the plugs are dry, there is no fuel to ignite, indicating fuel problems.• If the plugs are black, there are several possible reasons:
– The fuel mixture is too rich, or– The spark is too weak to cause complete combustion.– The wrong kind of two-cycle oil could be causing the problem.
Carbon buildup
Gap toobig
Gap toosmall
Electrons flowdown the carbonon the porcelain

122 PART 3: WAYS & MEANS OF TRAVEL
When snowmachines first became popular in the late sixties andearly seventies, we had terrible problems because we used out-board motor oil. It didn’t burn completely in the colder wintertemperatures.
– Too much oil in the fuel mixture (two-cycle engines). Some en-gines call for a 20:1 mixture, others 50:1, and yet others 100:1.While too much oil will cause carbon problems in the engine, notenough oil will destroy it! It is far better to err by putting toomuch oil.
– The plugs are too “cold” for the engine. Hotter plugs are hotterduring operation. Colder plugs are colder during operation. If aplug is black, perhaps the engine needs a hotter plug that willretain more heat to burn off the carbon. If a plug is scorchedwhite, it requires a colder plug. This is very important with air-cooled engines. We run snowmachines in temperature differencesof over 80°. The machine’s ability to retain and get rid of heat isdrastically changed during those conditions.
– If the plug is not retaining enough heat, it will carbon. If it isretaining too much heat, the cylinder could get too hot and burna hole in the piston. It might be necessary to use colder plugs inwarm weather, and a hotter plug in colder weather.
If the plugs have white spots on them, it could indicate water in the fuel.If a plug is black with carbon and won’t fire, it can be heated red hot in a
Coleman or propane stove to burn the carbon off. This will make the plugusable for a short time. Some people sandblast plugs to remove carbon. Thisdoes get the carbon off, but leaves a rough surface quickly collect more car-bon.
What could weaken the voltage to the spark plug?• Dirty or worn magneto coil• Improper distance between the magnet on the flywheel and the mag-
neto coil• Broken or dirty wire connections
– from the magneto to secondary coil,– from the secondary coil to the spark plug, or– from the coil to the ground.
• Secondary coil shorting out inside.• Dirty or cracked spark plug.All gasoline engines use spark plugs. The system that generates the spark
is very simple and uses simple electrical principles. A little attention and un-derstanding will prevent or solve a lifetime of mechanical problems.
Dirty spark plug
Chapter 17: Spark Plugs 123
Activities
1. Collect as many different kinds of spark plugs as you can find in thevillage. How many different kinds do you find? How many differentcompanies are represented by the plugs? What differences do you no-tice among them? How many different kinds of engines do these plugsrepresent?
2. Compare the length of the plugs, the length exposed within the cylin-der, the length of the threads, and the diameters. Why do you thinkthere are such differences? Can you find some plugs that are goldenbrown, some black, and some that burned too hot? (You may not, as thegolden and white ones might be still in machines.)
3. What are the differences in the identification numbers of hot and coldplugs from the same manufacturer? If you can’t tell by looking, a manualwill tell the difference.
4. Find old flywheels. Test the magnets for strength. Are they strong orweak magnets?
5. Get an old and a new spark plug of the same kind. Put the plug wire ofan engine (chainsaw is easiest) on each plug. Hold the base of the plugagainst the cylinder of the engine, and crank the engine over. Do yousee a difference in the color of spark in the new and old plug? (It ishard to see the spark in a bright location.)
6. Find a plug that will not fire in the above manner because of carbonand dirt. Carefully clean the center post with a hairpin, or other slimobject. Can you clean it well enough to give a hot blue or white spark?
7. Close the gap on an old plug, and test it against the cylinder. Did thecolor of the spark change when the gap was made smaller?
8. Look up the recommended spark plug gap for three or four differentengines. The recommended gap should be in the manual for the ma-chine. Pick some high and some low compression engines. Why do youthink there are some differences in the recommended gaps?
9. Find out about sandblasting spark plugs. Ask how long a sandblastedplug will stay clean and why.
10. Put the end of a fouled spark plug in the flame of a propane or Colemanstove until it turns red hot. Carefully let it cool. Test the spark beforeand after this. What difference do you see in the spark? Why do youthink this is so?
11. Find a coil that people say is bad. Is there anything visible to indicatethat it doesn’t work well?
12. On a working engine, pull the wire that goes from the magneto to thecoil. While holding the wire, ground your hand against the cylinderand pull the starter rope. Put that wire back and pull the wire from the
124 PART 3: WAYS & MEANS OF TRAVEL
spark plug. Put a screwdriver handle up the sparkplug cap and again ground your hand against thecylinder. Pull the starter rope again. Do it slowly!Can you feel the difference in voltage? (You should!)This will be uncomfortable, but shouldn’t hurt un-less you pull very fast.
13. Ask around the village to see if anyone knows the difference betweena generator and an alternator. What is the difference?
14. Draw a cylinder whose timing is too advanced. Draw one whose tim-ing is too slow. Look in an owner’s manual of a four-cycle engine andfind how many degrees before top dead center (BTDC) the timing shouldbe set.
Student Response
1. Make a simple drawing of the parts of the spark system of an outboardmotor from magneto to spark plug.
2. Where is the electricity generated in an engine?
3. Where is the voltage increased?
4. What does the spark plug do in an engine?
5. Draw and label three cylinders, one firing too soon, one firing too late,and another firing at the proper time.
6. Explain why a spark might jump the gap in open air, and not in thecylinder.
7. What colors indicate the hottest sparks?
8. What colors indicate the weakest sparks?
9. What two things could keep a spark plug from firing well?
10. List five things that could make the spark plug black with carbon?
11. Draw a picture showing how a dirty plug allows the spark to groundout, not jumping the gap.
12. What kind of plug should be used in an air-cooled engine during coldweather? Why?
13. Why would an outboard be able to use one type of plug all the time,and a snowmachine need different plugs in different seasons?
14. List five things that could cause the voltage to a spark plug to be weak.

Chapter 17: Spark Plugs 125
Math
1. The voltage generated by a magneto is 50 volts. The coil increases thisto 15,000 volts. If the magneto is fixed so that it now generates 75volts. How many volts will the coil produce?

Chapter 18
Carburetors
Engines need fuel to burn, but also need proper amounts of oxygen toburn the fuel. Carburetors mix air and fuel in the proper amounts to ensureefficient combustion in the engine.
Only in outboard motor operation does the speed remain fairly constant.In chainsaws, four-wheel ATVs, and snowmachines, the engine speed is con-stantly changing.
Mixing fuel and air properly at all rpms is a challenge.
Improper Mixture
Too Much FuelIf there is too much fuel (too rich), combustion will not be complete, power
will diminish, and carbon will quickly build up in the cylinder.
Not Enough FuelIf an engine doesn’t get enough fuel (too lean), it will lose power, fade
under load, and overheat. Proper mixture at all speeds is important. A leanengine, running too hot, is self destructing as parts warp, wear, and break.
We must also remember that a two-cycle engine mixes the oil and fuel.An engine that is lean on fuel is also lean on oil. If it is lean on oil, friction doesits irreversible damage.
Parts of a Carburetor
There are seven important parts of a carburetor.• Air cleaner• Choke• Carburetor throat and jets• Throttle butterfly• Needle valves• Float or other regulating system• Throttle cable
Air CleanerThe air cleaner is an important part of the carburetor system, especially in
chainsaws where there is so much sawdust in the air. If sawdust or dirt are
Standards
A 2, 15B 3D 1, 3
Concepts
Bernoulli’sprinciple
EvaporationSurface area

128 PART 3: WAYS & MEANS OF TRAVEL
drawn into the carburetor, the carburetor plugs up and sawdustquickly wears and destroys the engine.
If the air cleaner is covered with dirt, the air supply is re-duced and more fuel is drawn into the cylinder. The engine runsfar too rich. An outboard isn’t operated in dusty conditions. Four-wheel ATVs and chainsaws need frequent attention. The aircleaner on a snowmachine can be covered with snow or frost.
Throat of the CarburetorThe throat of the carburetor is nothing more than a narrowed
tube. When air passes through the narrow part, the air must speedup.
Bernoulli’s principlesays that as a liquid or gasspeed up, the pressure is
reduced. Because the velocity of the airin the carburetor throat is increased, thepressure is reduced.
As the fast flowing air passes quicklyover the high and low speed jets, fuel ispushed through the jets into the lowpressure air stream from the bowl be-low. By the time the fuel is in the cylin-der, it has been thoroughly mixed withthe air (oxygen).
Throttle ButterflyThe throttle butterfly is connected to the throttle cable. As the throttle
cable is pulled, the butterfly opens and closes, controlling the airflow. Theamount of air and speed of the air flowing over the jets is changed.
Needle valvesAs an engine needs more fuel at higher speeds, there are actually two
jets, one for low speed and one for high speed. The low speed jet feeds fuelinto the air stream at low speeds. At higher speeds, they do both.
There is a screw that adjusts the amount ofgas available to the jet. It is called the “needlevalve” because the end of it is thin like a needle.Small adjustments of the screw allows preciseamounts of fuel to pass the needle valve and go tothe jet.
Years ago, both the high and low speed needle valves were adjustable.Now, except on chainsaws, only the low speed needle valve can be adjusted.
When an engine runs lean, the first thing people do is tinker with theneedle valves. The main cause of fuel starvation is dirty fuel in the carburetoror a clogged fuel filter. Once an engine is tuned, it seldom needs needle valve
Chainsaw
CarburetorAircleaner
Air flow speeds up—pressure is reduced
Air flow
Atmosphericpressure pushesgas up throughthe jet
Jet
venturi
Highpressure
Carburetor throat
Throttle butterfly
needle valve
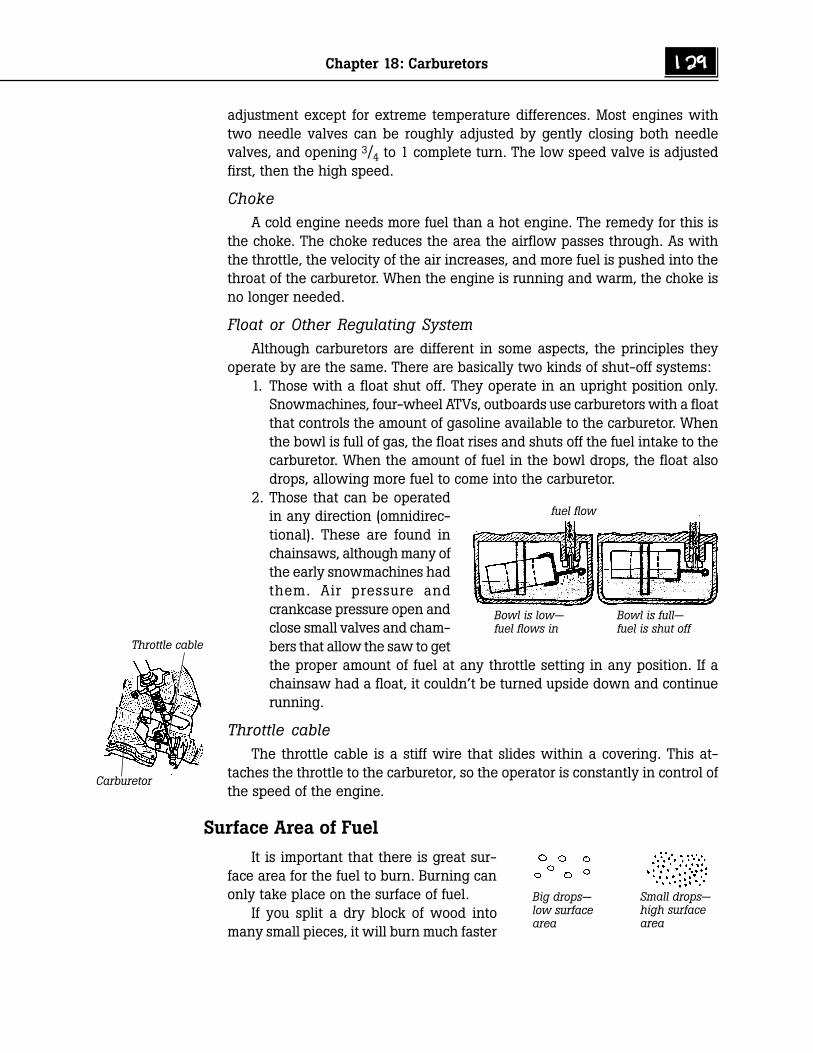
Chapter 18: Carburetors 129
adjustment except for extreme temperature differences. Most engines withtwo needle valves can be roughly adjusted by gently closing both needlevalves, and opening 3/4 to 1 complete turn. The low speed valve is adjustedfirst, then the high speed.
ChokeA cold engine needs more fuel than a hot engine. The remedy for this is
the choke. The choke reduces the area the airflow passes through. As withthe throttle, the velocity of the air increases, and more fuel is pushed into thethroat of the carburetor. When the engine is running and warm, the choke isno longer needed.
Float or Other Regulating SystemAlthough carburetors are different in some aspects, the principles they
operate by are the same. There are basically two kinds of shut-off systems:1. Those with a float shut off. They operate in an upright position only.
Snowmachines, four-wheel ATVs, outboards use carburetors with a floatthat controls the amount of gasoline available to the carburetor. Whenthe bowl is full of gas, the float rises and shuts off the fuel intake to thecarburetor. When the amount of fuel in the bowl drops, the float alsodrops, allowing more fuel to come into the carburetor.
2. Those that can be operatedin any direction (omnidirec-tional). These are found inchainsaws, although many ofthe early snowmachines hadthem. Air pressure andcrankcase pressure open andclose small valves and cham-bers that allow the saw to getthe proper amount of fuel at any throttle setting in any position. If achainsaw had a float, it couldn’t be turned upside down and continuerunning.
Throttle cableThe throttle cable is a stiff wire that slides within a covering. This at-
taches the throttle to the carburetor, so the operator is constantly in control ofthe speed of the engine.
Surface Area of Fuel
It is important that there is great sur-face area for the fuel to burn. Burning canonly take place on the surface of fuel.
If you split a dry block of wood intomany small pieces, it will burn much faster
Bowl is low—fuel flows in
Bowl is full—fuel is shut off
fuel flow
Big drops—low surfacearea
Small drops—high surfacearea
Throttle cable
Carburetor
130 PART 3: WAYS & MEANS OF TRAVEL
than if it is burned in one whole piece. Liquid fuel, like gasoline, will burnquicker if it has more surface area. If a stream of gasoline is injected into thecylinder, it burns much slower than the same amount of gasoline that hasbeen sprayed into a mist.
Oil InjectionLike snowmachines, newer outboard motors have oil injectors that mix
the fuel and oil. The ideal oil/gas mix is different at high and low rpm’s. Theoil injection varies the amount of oil at different speeds.
Icing
Heat is required to turn a liquid into a vapor. Assume the carburetor, fuel,and air are at fifty degrees. The fuel is vaporized in the carburetor. It takesheat to evaporate a liquid to a vapor. The heat comes from the carburetor
walls. As this process continues, the carburetor actually gets ten tofifteen degrees colder than the outside air. The carburetor cools theair passing through the carburetor throat.
As warm air holds more moisture than cooler air, the air, nowcooled in the carburetor, releases its moisture. It can actually formice in a carburetor when the outside temperature is forty to sixtydegrees!
This is why airplane engines have a “carb heat” control to injectwarm air, melting any ice formed in the carburetor.
Activities
1. Find an old carburetor from any machine that utilizes a float. Identifythe parts. Identify how the float controls the amount of gas in the bowl.Is there an artificial rubber seal to shut off the flow of fuel? Take theneedle valves out. Draw the shape of the tip. Don’t touch the tip with afile, but touch the side of the needle valve. Is it hard or soft? Can youfind a screen in the fuel line within the carburetor? What do you thinkwould happen if this became plugged?
2. Look at the air cleaner on several chainsaws. Can you see how the airflow might be slowed down by a dirty air cleaner? How does the owner’smanual say to clean it?
3. Look in the owner’s manual of a chainsaw. What is the standard set-ting for the needle valves? (If no chainsaw is available, try to find an-other engine that has a carb with a high and low speed needle valves.)
4. Take the bar and chain off a chainsaw. Replace the clutch cover (forsafety reasons). Remove the cover from the carburetor. Start the en-gine. Find the idle set screw. Adjust it when the engine is idling. Whathappens?
Fuel vaporizesrequiring heat
45°
25°
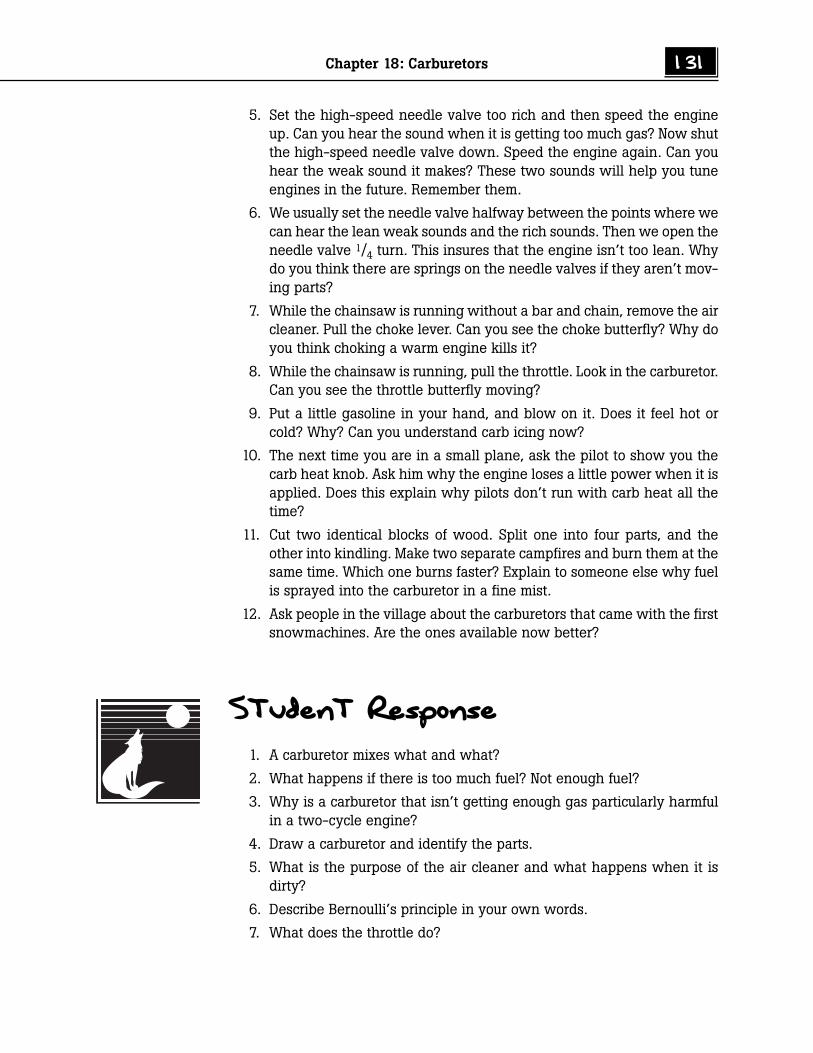
Chapter 18: Carburetors 131
5. Set the high-speed needle valve too rich and then speed the engineup. Can you hear the sound when it is getting too much gas? Now shutthe high-speed needle valve down. Speed the engine again. Can youhear the weak sound it makes? These two sounds will help you tuneengines in the future. Remember them.
6. We usually set the needle valve halfway between the points where wecan hear the lean weak sounds and the rich sounds. Then we open theneedle valve 1/4 turn. This insures that the engine isn’t too lean. Whydo you think there are springs on the needle valves if they aren’t mov-ing parts?
7. While the chainsaw is running without a bar and chain, remove the aircleaner. Pull the choke lever. Can you see the choke butterfly? Why doyou think choking a warm engine kills it?
8. While the chainsaw is running, pull the throttle. Look in the carburetor.Can you see the throttle butterfly moving?
9. Put a little gasoline in your hand, and blow on it. Does it feel hot orcold? Why? Can you understand carb icing now?
10. The next time you are in a small plane, ask the pilot to show you thecarb heat knob. Ask him why the engine loses a little power when it isapplied. Does this explain why pilots don’t run with carb heat all thetime?
11. Cut two identical blocks of wood. Split one into four parts, and theother into kindling. Make two separate campfires and burn them at thesame time. Which one burns faster? Explain to someone else why fuelis sprayed into the carburetor in a fine mist.
12. Ask people in the village about the carburetors that came with the firstsnowmachines. Are the ones available now better?
Student Response
1. A carburetor mixes what and what?
2. What happens if there is too much fuel? Not enough fuel?
3. Why is a carburetor that isn’t getting enough gas particularly harmfulin a two-cycle engine?
4. Draw a carburetor and identify the parts.
5. What is the purpose of the air cleaner and what happens when it isdirty?
6. Describe Bernoulli’s principle in your own words.
7. What does the throttle do?
132 PART 3: WAYS & MEANS OF TRAVEL
8. What do the needle valves do?
9. What does the choke do?
10. What does the float do?
11. Why is it important to increase the surface area of fuel?
12. What is carb icing?
Math
1. A carburetor is set too rich. It uses 7% more gas than it should. Theoperator spends $127 on gas in one month. How much could he saveby tuning his carburetor? 1.07x z 127
2. The pressure in an airplane carburetor throat is 12.9 psi. Atmosphericpressure is 14.7 psi. What is the difference in pressure? The planeclimbs; the atmospheric pressure is now 14.2 psi. What is the pressuredifference now?
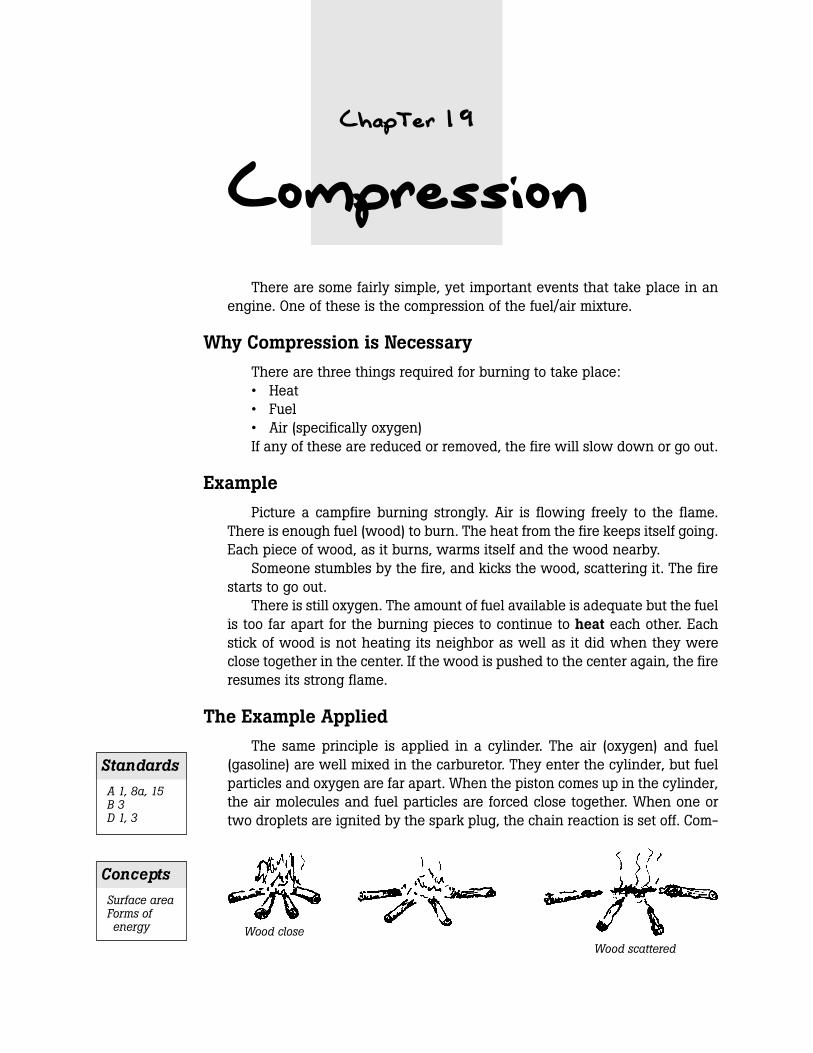
Chapter 19
Compression
There are some fairly simple, yet important events that take place in anengine. One of these is the compression of the fuel/air mixture.
Why Compression is Necessary
There are three things required for burning to take place:• Heat• Fuel• Air (specifically oxygen)If any of these are reduced or removed, the fire will slow down or go out.
Example
Picture a campfire burning strongly. Air is flowing freely to the flame.There is enough fuel (wood) to burn. The heat from the fire keeps itself going.Each piece of wood, as it burns, warms itself and the wood nearby.
Someone stumbles by the fire, and kicks the wood, scattering it. The firestarts to go out.
There is still oxygen. The amount of fuel available is adequate but the fuelis too far apart for the burning pieces to continue to heat each other. Eachstick of wood is not heating its neighbor as well as it did when they wereclose together in the center. If the wood is pushed to the center again, the fireresumes its strong flame.
The Example Applied
The same principle is applied in a cylinder. The air (oxygen) and fuel(gasoline) are well mixed in the carburetor. They enter the cylinder, but fuelparticles and oxygen are far apart. When the piston comes up in the cylinder,the air molecules and fuel particles are forced close together. When one ortwo droplets are ignited by the spark plug, the chain reaction is set off. Com-
Standards
A 1, 8a, 15B 3D 1, 3
Concepts
Surface areaForms ofenergy Wood close
Wood scattered
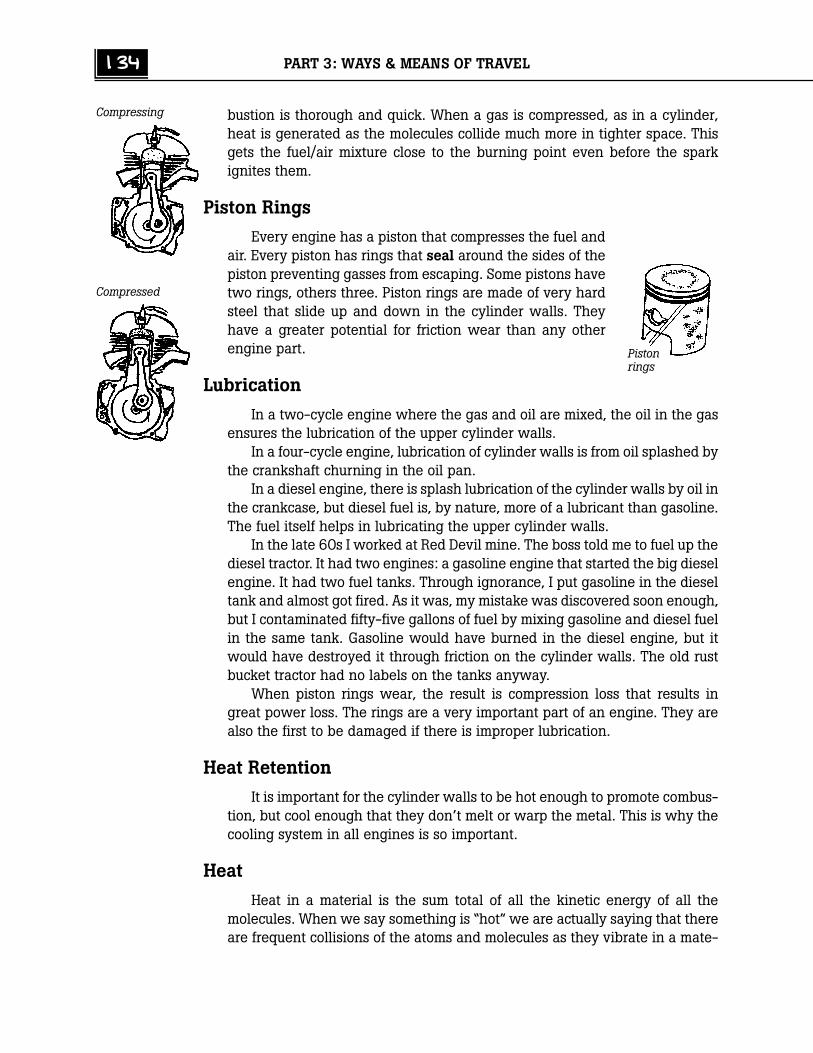
134 PART 3: WAYS & MEANS OF TRAVEL
bustion is thorough and quick. When a gas is compressed, as in a cylinder,heat is generated as the molecules collide much more in tighter space. Thisgets the fuel/air mixture close to the burning point even before the sparkignites them.
Piston Rings
Every engine has a piston that compresses the fuel andair. Every piston has rings that seal around the sides of thepiston preventing gasses from escaping. Some pistons havetwo rings, others three. Piston rings are made of very hardsteel that slide up and down in the cylinder walls. Theyhave a greater potential for friction wear than any otherengine part.
Lubrication
In a two-cycle engine where the gas and oil are mixed, the oil in the gasensures the lubrication of the upper cylinder walls.
In a four-cycle engine, lubrication of cylinder walls is from oil splashed bythe crankshaft churning in the oil pan.
In a diesel engine, there is splash lubrication of the cylinder walls by oil inthe crankcase, but diesel fuel is, by nature, more of a lubricant than gasoline.The fuel itself helps in lubricating the upper cylinder walls.
In the late 60s I worked at Red Devil mine. The boss told me to fuel up thediesel tractor. It had two engines: a gasoline engine that started the big dieselengine. It had two fuel tanks. Through ignorance, I put gasoline in the dieseltank and almost got fired. As it was, my mistake was discovered soon enough,but I contaminated fifty-five gallons of fuel by mixing gasoline and diesel fuelin the same tank. Gasoline would have burned in the diesel engine, but itwould have destroyed it through friction on the cylinder walls. The old rustbucket tractor had no labels on the tanks anyway.
When piston rings wear, the result is compression loss that results ingreat power loss. The rings are a very important part of an engine. They arealso the first to be damaged if there is improper lubrication.
Heat Retention
It is important for the cylinder walls to be hot enough to promote combus-tion, but cool enough that they don’t melt or warp the metal. This is why thecooling system in all engines is so important.
Heat
Heat in a material is the sum total of all the kinetic energy of all themolecules. When we say something is “hot” we are actually saying that thereare frequent collisions of the atoms and molecules as they vibrate in a mate-
Compressing
Compressed
Pistonrings
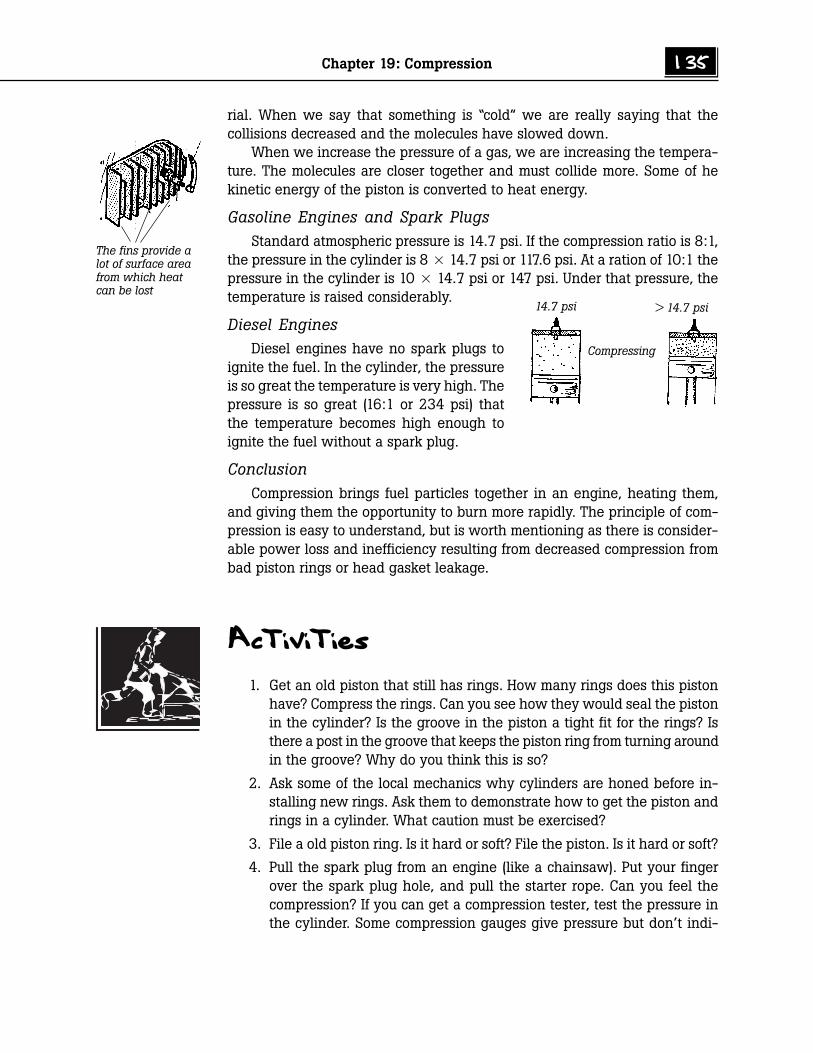
Chapter 19: Compression 135
rial. When we say that something is “cold” we are really saying that thecollisions decreased and the molecules have slowed down.
When we increase the pressure of a gas, we are increasing the tempera-ture. The molecules are closer together and must collide more. Some of hekinetic energy of the piston is converted to heat energy.
Gasoline Engines and Spark PlugsStandard atmospheric pressure is 14.7 psi. If the compression ratio is 8:1,
the pressure in the cylinder is 8 x 14.7 psi or 117.6 psi. At a ration of 10:1 thepressure in the cylinder is 10 x 14.7 psi or 147 psi. Under that pressure, thetemperature is raised considerably.
Diesel EnginesDiesel engines have no spark plugs to
ignite the fuel. In the cylinder, the pressureis so great the temperature is very high. Thepressure is so great (16:1 or 234 psi) thatthe temperature becomes high enough toignite the fuel without a spark plug.
ConclusionCompression brings fuel particles together in an engine, heating them,
and giving them the opportunity to burn more rapidly. The principle of com-pression is easy to understand, but is worth mentioning as there is consider-able power loss and inefficiency resulting from decreased compression frombad piston rings or head gasket leakage.
Activities
1. Get an old piston that still has rings. How many rings does this pistonhave? Compress the rings. Can you see how they would seal the pistonin the cylinder? Is the groove in the piston a tight fit for the rings? Isthere a post in the groove that keeps the piston ring from turning aroundin the groove? Why do you think this is so?
2. Ask some of the local mechanics why cylinders are honed before in-stalling new rings. Ask them to demonstrate how to get the piston andrings in a cylinder. What caution must be exercised?
3. File a old piston ring. Is it hard or soft? File the piston. Is it hard or soft?
4. Pull the spark plug from an engine (like a chainsaw). Put your fingerover the spark plug hole, and pull the starter rope. Can you feel thecompression? If you can get a compression tester, test the pressure inthe cylinder. Some compression gauges give pressure but don’t indi-
Compressing
> 14.7 psi14.7 psi
The fins provide alot of surface areafrom which heatcan be lost
136 PART 3: WAYS & MEANS OF TRAVEL
cate the ratio. If a cylinder has 105.8 psi, what is the compressionratio?
5. Make a campfire with good dry wood. Push the sticks close together.Pull them apart. Does the fire burn faster if the wood is closer?
6. Draw a piston in a cylinder at the bottom of the stroke and the top ofthe stroke. Measure the volume in each position. What is the compres-sion ratio? Now draw a piston in a cylinder that has a high compres-sion ratio.
7. Get a hand pump and pump a bicycle tire. Is it hot? Where does theheat come from?
8. If you can get a simple compression tester, test the compression in asnowmachine, outboard, four wheeler, and chainsaw. What is the dif-ference between them?
9. Some engines have a head gasket and others do not. Ask a local personwho does mechanics which local machines do and which don’t. Howcan he tell if the head gasket is damaged? Where is it most often dam-aged? Can you use any gasket material for a head gasket? Why?
10. Talk to the local power plant operator about the compression in a die-sel engine. How does the fuel get into the engine if the pressure is sogreat? Does a diesel engine have a carburetor? Why?
11. Research how compression is achieved in a jet turbine engine.
Student Response
1. What three things are necessary for something to burn?
2. If a campfire is burning too slowly, what can you do to make it burnfaster besides adding more wood?
3. Why is compression necessary?
4. What is the purpose of piston rings?
5. Draw a cylinder where the fuel is not compressed.
6. Draw a cylinder with the fuel compressed.
7. What is the approximate compression ratio of a gasoline engine?
8. What does psi mean?
9. What can cause compression loss?
Chapter 19: Compression 137
Math
1. If the compression ratio is 9:1 and atmospheric pressure is 14.7 psi,how many psi is there in the cylinder when the piston is at the top ofthe cylinder?
2. If the compression ratio is 16:1 in a diesel engine, what is the pressurein psi?
3. The compression ratio in a chainsaw is supposed to be 7:1, but therings are bad and there is a 15% compression loss. What is the psi inthe cylinder?
4. The compression in a diesel engine is 17:1. How much pressure mustthe fuel pump generate if the fuel is injected when compression is at itsgreatest? Greater than .


Chapter 20
Outboard MotorLower Unit
Those of us who have piloted Alaska’s waters with an outboard havelearned the importance of having a good lower unit. All the power of themotor1 is sent to the lower unit. Great forces work through the lower unit.When it works well, all goes well. When it is damaged, everything comes toa halt. Some people have jet units to drive their boats, but they have cost,weight and maintenance problems that keep them out of the reach of mostvillage people. The simple outboard with a lower unit will be around formany years to come.
Lower units are expensive to repair or replace. For those reasons alone, itis important to understand them.
Gears
The engine turns the drive shaft, butthe drive shaft isn’t spinning in the samedirection as the prop.
How then is the direction of theshaft’s rotation changed? The pinion gearon the end of the drive shaft drives boththe forward and reverse gears at thesame time. All three gears turn together.
Pinion GearsThe pinion gear is smaller, with less
teeth. It turns 2 1/2 times for every revo-lution of the forward and reverse gears.The prop and prop shaft are thereforeturning slower, but with more power(torque) than the engine. The engine has
1 While we call them outboard motors, they are really engines. Electric motors are motors, and pistondriven engines are different. However, here we will use the commonly used term outboard motor in orderto be understood.
Forward andreverse gears
Driveshaft
ShimsSeals
Piniongear
PiniongearForward
gear
Propshaft
Reversegear
Standards
A 15B 3D 1, 3
Concepts
FrictionMechanicaladvantage
LeverageInertiaMass

140 PART 3: WAYS & MEANS OF TRAVEL
a mechanical advantage of 2.5 to 1 over the prop.
ShiftingHow can the forward and reverse gears turn at
the same time? Inside the forward and reverse gearsis the prop shaft which has four large “dogs”. Whenthe shift lever is moved, the dogs connect with ei-ther the forward or reverse gears. Only one of themcan engage the drive shaft at a time. The dogs arestrong. If the forward and reverse gears were alwaysengaging and disengaging with the pinion gear, theywould break off in a moment.
Even though the dogs are thick and made of tough metal, they can bechipped if shifted when the engine is running fast. When this happens, piecesof metal flow through the lower unit grease, causing other chips and bearingwear. Avoid chipping the shift dogs by slowing the engine to the lowest rpmbefore shifting.
Disassembly
Taking a lower unit apart isn’t hard. Describing the process ishard. With the prop off, look around the prop shaft and see a ringthat is screwed into the housing. Often there is a locktab to keep itfrom unscrewing by itself. With the locktab removed, the ring canbe unscrewed. See a local expert if you need help in this. With thering removed, turn the lower unit with the prop shaft down. Hold-ing a hand over the prop shaft so parts don’t fall on the floor, rapthe whole lower unit on a bench or block of wood, hitting on theskeg. Inertia quickly drives the gears, seals, and other parts intothe waiting hand. Science in action!
Grease
Without lower unit grease, friction would destroy the gears and bearingsin the lower unit within minutes. If the grease is too thick, it can’t get into thesmall places and prevent the metal from wearing. If the grease is too thin, itdoesn’t protect the metal parts from grinding each other. Lower unit grease isspecifically designed to work well even if there is a little water in the lowerunit.
An oldtimer had no lower unit grease, so he put wheel bearing grease inhis lower unit. All the gears and bearings were spoiled within two hours.
It is good to change lower unit grease often, as the little metal chips thatbreak off can continue to cause great damage. Fresh grease prevents unnec-essary wear.
The transmission in a helicopter has a magnet to pick up small pieces ofmetal that float about before they damage the unit. Newer outboards have asimilar magnet on the drain plug to pick up chips and filings. Many
Dog
Forwardgear
Reversegear
Rap the lowerunit on theedge of atable
Inertiadrives thegears out
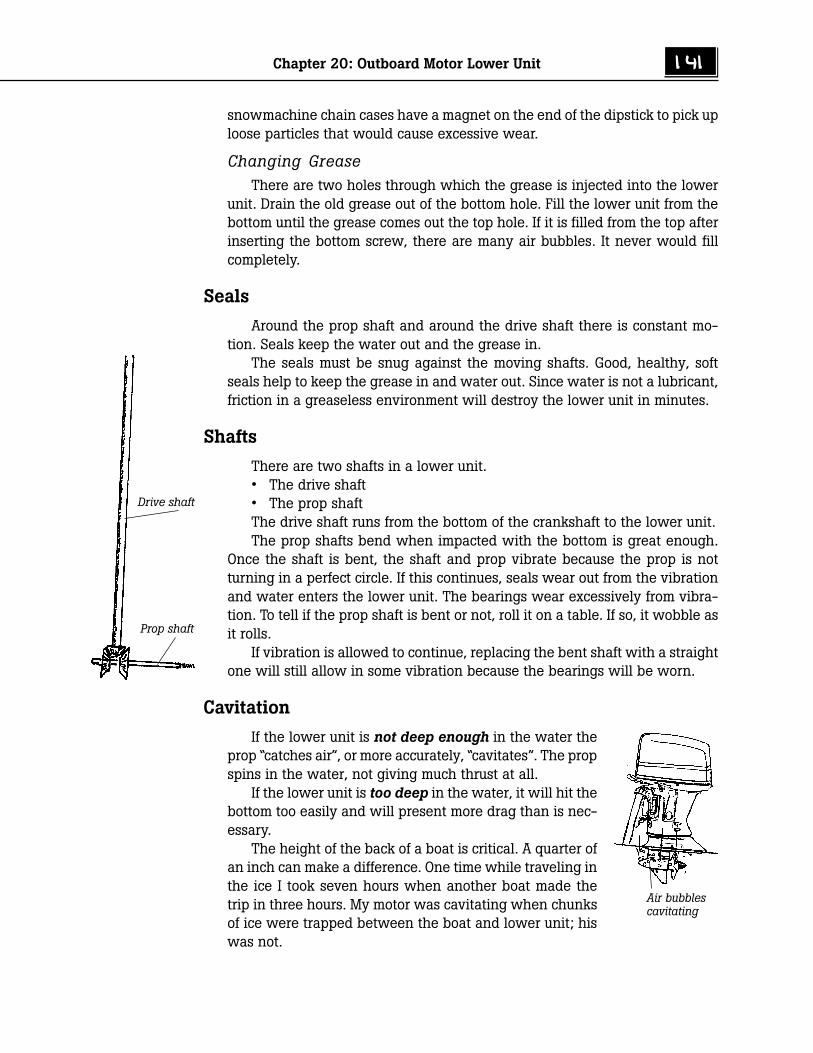
Chapter 20: Outboard Motor Lower Unit 141
snowmachine chain cases have a magnet on the end of the dipstick to pick uploose particles that would cause excessive wear.
Changing GreaseThere are two holes through which the grease is injected into the lower
unit. Drain the old grease out of the bottom hole. Fill the lower unit from thebottom until the grease comes out the top hole. If it is filled from the top afterinserting the bottom screw, there are many air bubbles. It never would fillcompletely.
Seals
Around the prop shaft and around the drive shaft there is constant mo-tion. Seals keep the water out and the grease in.
The seals must be snug against the moving shafts. Good, healthy, softseals help to keep the grease in and water out. Since water is not a lubricant,friction in a greaseless environment will destroy the lower unit in minutes.
Shafts
There are two shafts in a lower unit.• The drive shaft• The prop shaftThe drive shaft runs from the bottom of the crankshaft to the lower unit.The prop shafts bend when impacted with the bottom is great enough.
Once the shaft is bent, the shaft and prop vibrate because the prop is notturning in a perfect circle. If this continues, seals wear out from the vibrationand water enters the lower unit. The bearings wear excessively from vibra-tion. To tell if the prop shaft is bent or not, roll it on a table. If so, it wobble asit rolls.
If vibration is allowed to continue, replacing the bent shaft with a straightone will still allow in some vibration because the bearings will be worn.
Cavitation
If the lower unit is not deep enough in the water theprop “catches air”, or more accurately, “cavitates”. The propspins in the water, not giving much thrust at all.
If the lower unit is too deep in the water, it will hit thebottom too easily and will present more drag than is nec-essary.
The height of the back of a boat is critical. A quarter ofan inch can make a difference. One time while traveling inthe ice I took seven hours when another boat made thetrip in three hours. My motor was cavitating when chunksof ice were trapped between the boat and lower unit; hiswas not.
Drive shaft
Prop shaft
Air bubblescavitating
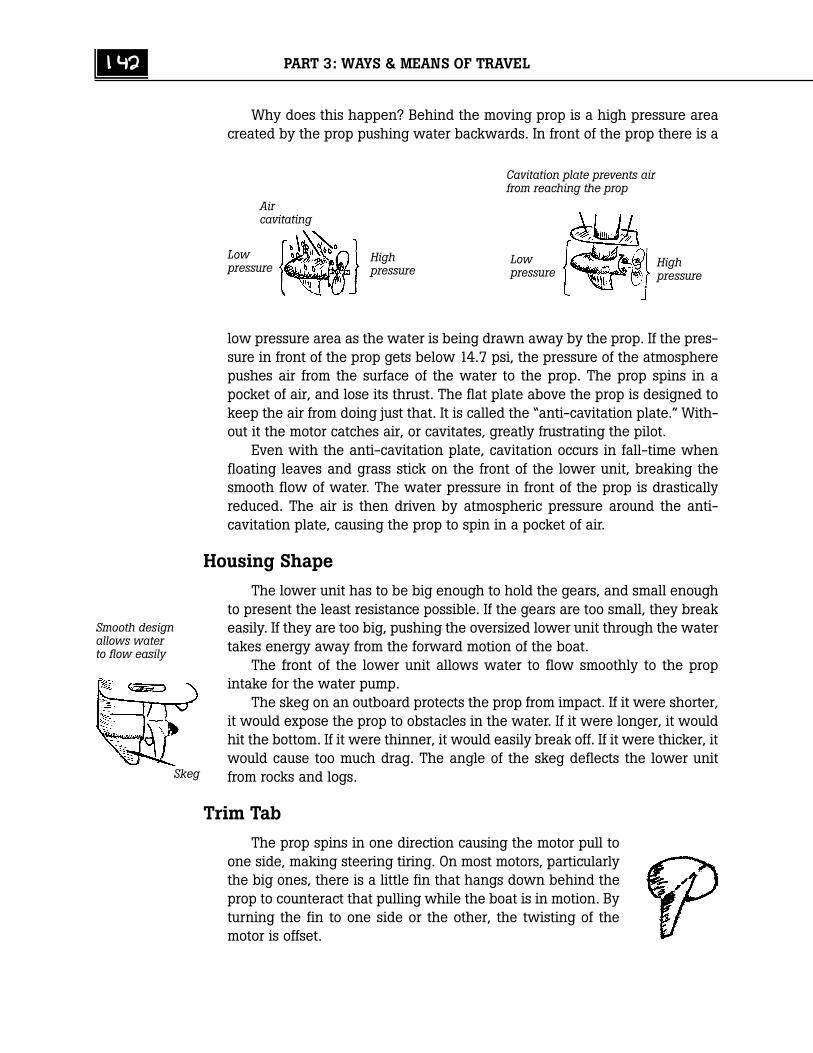
142 PART 3: WAYS & MEANS OF TRAVEL
Why does this happen? Behind the moving prop is a high pressure areacreated by the prop pushing water backwards. In front of the prop there is a
low pressure area as the water is being drawn away by the prop. If the pres-sure in front of the prop gets below 14.7 psi, the pressure of the atmospherepushes air from the surface of the water to the prop. The prop spins in apocket of air, and lose its thrust. The flat plate above the prop is designed tokeep the air from doing just that. It is called the “anti-cavitation plate.” With-out it the motor catches air, or cavitates, greatly frustrating the pilot.
Even with the anti-cavitation plate, cavitation occurs in fall-time whenfloating leaves and grass stick on the front of the lower unit, breaking thesmooth flow of water. The water pressure in front of the prop is drasticallyreduced. The air is then driven by atmospheric pressure around the anti-cavitation plate, causing the prop to spin in a pocket of air.
Housing Shape
The lower unit has to be big enough to hold the gears, and small enoughto present the least resistance possible. If the gears are too small, they breakeasily. If they are too big, pushing the oversized lower unit through the watertakes energy away from the forward motion of the boat.
The front of the lower unit allows water to flow smoothly to the propintake for the water pump.
The skeg on an outboard protects the prop from impact. If it were shorter,it would expose the prop to obstacles in the water. If it were longer, it wouldhit the bottom. If it were thinner, it would easily break off. If it were thicker, itwould cause too much drag. The angle of the skeg deflects the lower unitfrom rocks and logs.
Trim Tab
The prop spins in one direction causing the motor pull toone side, making steering tiring. On most motors, particularlythe big ones, there is a little fin that hangs down behind theprop to counteract that pulling while the boat is in motion. Byturning the fin to one side or the other, the twisting of themotor is offset.
Aircavitating
Lowpressure
Highpressure
Lowpressure
Highpressure
Cavitation plate prevents airfrom reaching the prop
Smooth designallows waterto flow easily
Skeg
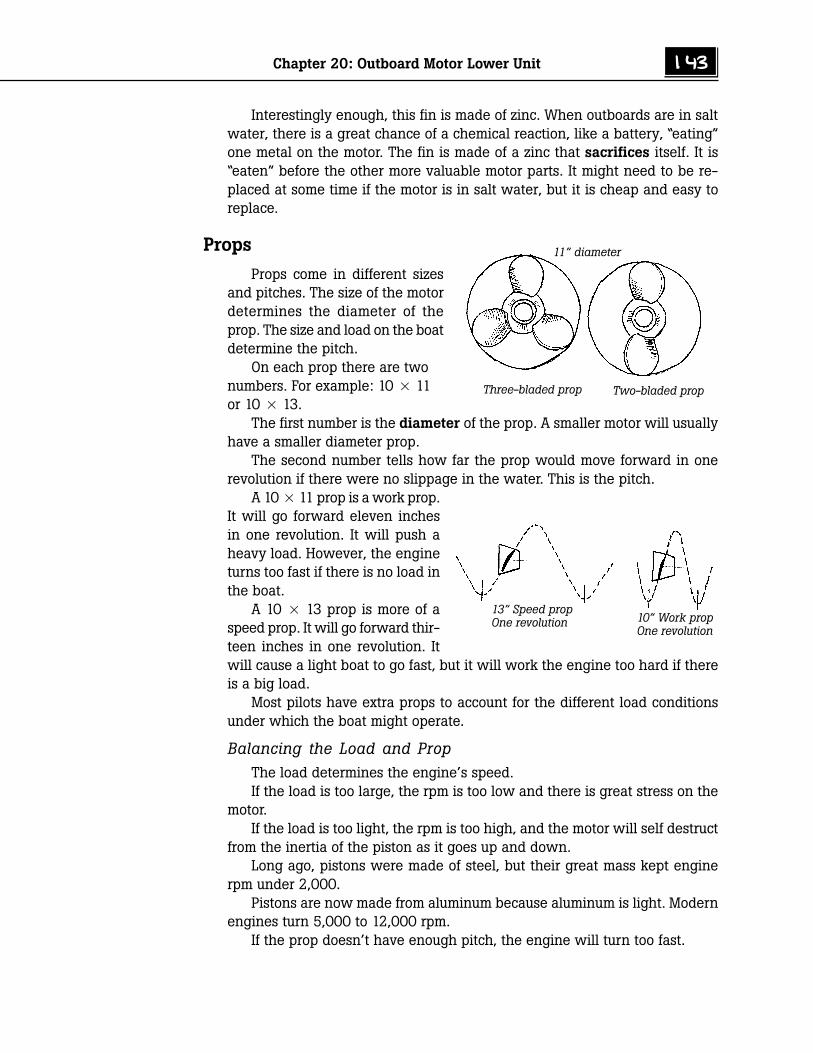
Chapter 20: Outboard Motor Lower Unit 143
Interestingly enough, this fin is made of zinc. When outboards are in saltwater, there is a great chance of a chemical reaction, like a battery, “eating”one metal on the motor. The fin is made of a zinc that sacrifices itself. It is“eaten” before the other more valuable motor parts. It might need to be re-placed at some time if the motor is in salt water, but it is cheap and easy toreplace.
Props
Props come in different sizesand pitches. The size of the motordetermines the diameter of theprop. The size and load on the boatdetermine the pitch.
On each prop there are twonumbers. For example: 10 x 11or 10 x 13.
The first number is the diameter of the prop. A smaller motor will usuallyhave a smaller diameter prop.
The second number tells how far the prop would move forward in onerevolution if there were no slippage in the water. This is the pitch.
A 10 x 11 prop is a work prop.It will go forward eleven inchesin one revolution. It will push aheavy load. However, the engineturns too fast if there is no load inthe boat.
A 10 x 13 prop is more of aspeed prop. It will go forward thir-teen inches in one revolution. Itwill cause a light boat to go fast, but it will work the engine too hard if thereis a big load.
Most pilots have extra props to account for the different load conditionsunder which the boat might operate.
Balancing the Load and PropThe load determines the engine’s speed.If the load is too large, the rpm is too low and there is great stress on the
motor.If the load is too light, the rpm is too high, and the motor will self destruct
from the inertia of the piston as it goes up and down.Long ago, pistons were made of steel, but their great mass kept engine
rpm under 2,000.Pistons are now made from aluminum because aluminum is light. Modern
engines turn 5,000 to 12,000 rpm.If the prop doesn’t have enough pitch, the engine will turn too fast.
11” diameter
Two-bladed propThree-bladed prop
13” Speed propOne revolution 10” Work prop
One revolution
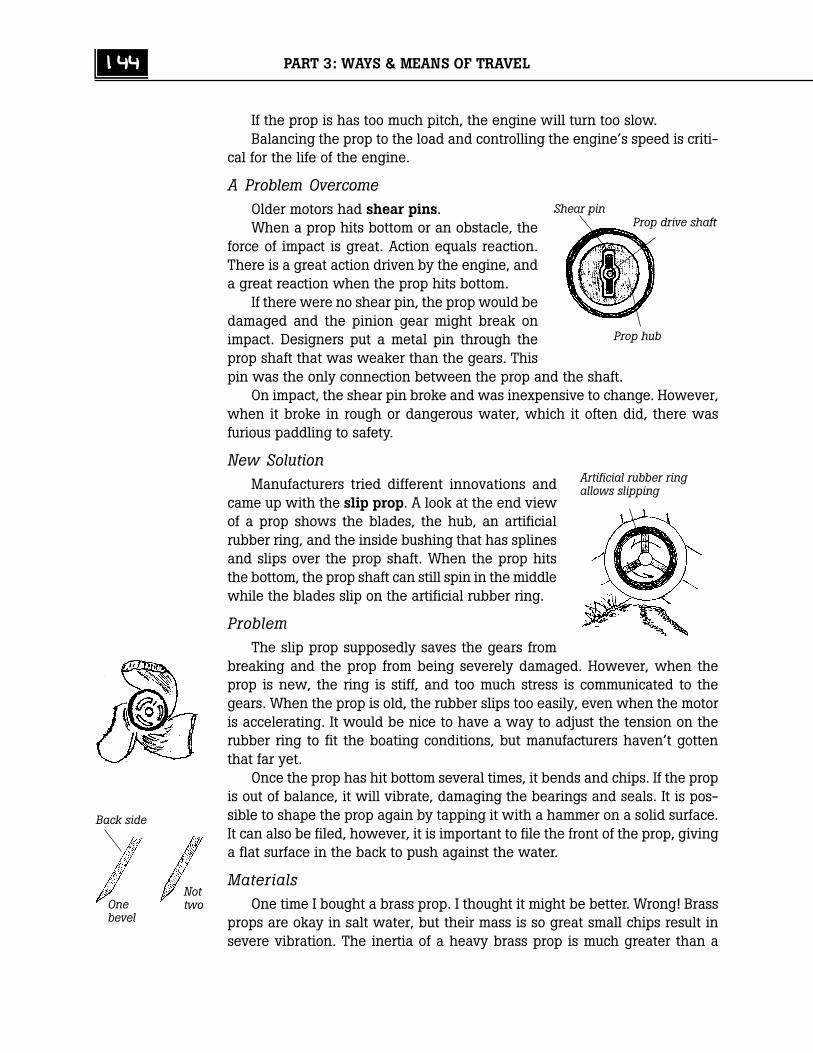
144 PART 3: WAYS & MEANS OF TRAVEL
If the prop is has too much pitch, the engine will turn too slow.Balancing the prop to the load and controlling the engine’s speed is criti-
cal for the life of the engine.
A Problem OvercomeOlder motors had shear pins.When a prop hits bottom or an obstacle, the
force of impact is great. Action equals reaction.There is a great action driven by the engine, anda great reaction when the prop hits bottom.
If there were no shear pin, the prop would bedamaged and the pinion gear might break onimpact. Designers put a metal pin through theprop shaft that was weaker than the gears. Thispin was the only connection between the prop and the shaft.
On impact, the shear pin broke and was inexpensive to change. However,when it broke in rough or dangerous water, which it often did, there wasfurious paddling to safety.
New SolutionManufacturers tried different innovations and
came up with the slip prop. A look at the end viewof a prop shows the blades, the hub, an artificialrubber ring, and the inside bushing that has splinesand slips over the prop shaft. When the prop hitsthe bottom, the prop shaft can still spin in the middlewhile the blades slip on the artificial rubber ring.
ProblemThe slip prop supposedly saves the gears from
breaking and the prop from being severely damaged. However, when theprop is new, the ring is stiff, and too much stress is communicated to thegears. When the prop is old, the rubber slips too easily, even when the motoris accelerating. It would be nice to have a way to adjust the tension on therubber ring to fit the boating conditions, but manufacturers haven’t gottenthat far yet.
Once the prop has hit bottom several times, it bends and chips. If the propis out of balance, it will vibrate, damaging the bearings and seals. It is pos-sible to shape the prop again by tapping it with a hammer on a solid surface.It can also be filed, however, it is important to file the front of the prop, givinga flat surface in the back to push against the water.
MaterialsOne time I bought a brass prop. I thought it might be better. Wrong! Brass
props are okay in salt water, but their mass is so great small chips result insevere vibration. The inertia of a heavy brass prop is much greater than a
Artificial rubber ringallows slipping
Back side
Onebevel
Nottwo
Shear pin
Prop hub
Prop drive shaft

Chapter 20: Outboard Motor Lower Unit 145
light aluminum one. The vibration was so great from the brass prop, it snappedmy prop shaft in a very short time.
Many people are using stainless steel props, as they are tougher, and lastlonger. However, the owner of a prop shop recently told me that aluminumprops are cheaper in the long run. Aluminum easily deforms. Stainless steel ismuch tougher, but the damage is transmitted to the gears, which are far moreexpensive and difficult to change. It is better to change aluminum props thanlower unit gears.
Conclusion
Most outboard motor problems that we have faced in our part of Alaskaare lower unit problems. We travel shallow rocky rivers and lower units giveout long before the upper units wear. Understanding them and treating themcarefully helps lengthen their life, saving money and long trips poling, pad-dling, or drifting home.
Activities
1. Find a complete lower unit. Identify the parts, prop shaft, drive shaft,anti-cavitation plate, skeg, water intake, and engine exhaust.
2. Look at the motors in the village, new ones and old ones. In what waysare they similar? In what ways are they different? Trace the changes inoutboards through time. Ask oldtimers about inboard engines. Howwere they better? How are outboards better?
3. Compare the lower units made today and those of years ago. Ask theoldtimers about the advantages of the shear pin type lower units. Isthere one in a cache somewhere? Why did the outboard manufacturerschange from shear pins to slip props?
4. What kind of metal do you think the gears are made of? Try to filethem. Are they hard or soft? Try to file the drive and prop shafts. Arethey hard or soft?
5. Feel the seals. Are they soft? Are they worn? What holds the seals tightagainst the shaft?
6. Find the intake for the water pump. Why do you think the holes aren’tbigger?
7. On a complete lower unit, turn the prop as if the boat were going for-ward. One side of the prop has low pressure coming from the top; theother side has low pressure coming from the bottom. Identify each. Ifthe prop were to cavitate, which side will it cavitate on?
8. Look at a prop shaft with the gears attached. Explain to someone elsehow the motor shifts from forward to neutral to reverse. Try to draw
146 PART 3: WAYS & MEANS OF TRAVEL
this so someone else can understand by your picture.
9. Change grease in a lower unit. Make sure the bolts are tight once youare done. Did you see the new grease pushing some old grease out ofthe upper hole? Did bubbles come out too? Are you confident that thelower unit is full of grease? Was there any water in the lower unitwhen you first drained it?
10. Stir a clean magnet in the grease that has just been drained from alower unit. Are there any metal chips? (Cover the magnet with thinplastic wrap before doing this to facilitate cleaning.) Rub some of thisgrease between your fingers. Rub some new grease between your fin-gers. Can you feel a difference in friction? In thickness (ability to keepmetal parts from touching each other)?
11. Tap an old drive shaft with another piece of metal. Does it ring, indicat-ing high carbon steel? How was it attached to the end of the crankshaftso it wouldn’t spin? Ask someone what these are called.
12. Roll an old prop shaft on the table. Look closely. Does it wobble, indi-cating that it is bent? What do you think happened to the seals if theshaft was bent?
13. Try paddling a boat with the motor up, out of the water, and thenlower the motor. Paddle again. Note the resistance of the lower unit.Can you now see why design and size are so important? Imagine theresistance at high speeds.
14. Imagine that the prop has just hit a big rock. What parts absorb thestress and shock?
15. Where does the exhaust leave the engine? Why doesn’t it exhaust intothe air?
16. Check five to ten props in the village. What is the average pitch? Arethese mostly working boats or speed boats? Do you see any relation-ship between the prop diameter and the horsepower?
17. Does anyone in your location have a jet boat? Talk with them about theadvantages and disadvantages of jet units. Why don’t more people havea jet unit?
Student Response
1. What gear is at the end of the driveshaft that turns both the forwardand reverse gears?
2. Why is lower unit grease important?
3. Should you fill the lower unit with grease from the bottom or the tophole?
Chapter 20: Outboard Motor Lower Unit 147
4. What do seals do?
5. Why are the thin shims important in a lower unit? Explain or draw.
6. What are the two shafts that turn in a lower unit?
7. Draw a picture of cavitation.
8. What does the skeg do?
9. What does the trim tab do that is behind the prop?
10. A prop is marked 11 x 13. What do each of these two numbers mean?
11. One prop is marked 13 x 13 the other is 11 x 13. Which is the speedprop? Which is the work prop?
12. Why is it important to balance the load and the rpm?
13. Describe or draw a prop that has a shear pin.
14. Describe or draw a slip prop from the rear view.
15. What happens when a prop gets out of balance?
Math
1. Consider that an outboard usually turns 5,500 rpm. How many revolu-tions per second is this? Can you even imagine something moving upand down that fast? How many times a minute can you clap your hands?How many times faster is a piston? (Time and count yourself for a minute.)
2. Find some old forward, pinion, and reverse gears in the village. Countthe teeth on each. How many are there on the pinion gear? On theforward gear? If the forward gear turns one time, how many times hasthe pinion gear turned?
3. Using the information you discovered from the above question, if theengine is turning 5,000 rpm, how many rpm is the prop turning?
4. The pinion gear in my motor turns 2 1/2 times for every turn of theforward gear. The engine is turning 5,000 rpm. How fast in rpm is theprop turning?␣ ␣
5. Find the cost of a new outboard motor. Find the cost of a new lowerunit for the same motor. What percentage of the cost of the wholemotor is the lower unit? (A 30-horsepower Mariner costs $3,200 and awhole new lower unit costs $1,356. Use this example if you can’t findyour own figures.)
6. Pat has to buy parts for his lower unit. Pinion gear $32, forward gear$45, seals $5.75, reverse gear $45, new prop shaft $37, new prop$127, and grease $3.75. How much did it cost him to hit the rock?

148 PART 3: WAYS & MEANS OF TRAVEL
7. A new stainless steel prop is $250. An aluminum prop is only $105.The stainless prop lasts two times longer than the aluminum. Which ismore economical?
8. A speed prop supposedly goes forward 13” for every revolution, but inreality it only goes 6.5”. What percentage of efficiency is this?
9. Frank can get a second hand lower unit for $675 or a new one for$1,172. The used one will last two seasons and the new one will lastfour. Which is more economical?
10. Aluminum props used to cost $15 each in 1972. Now they are $120.What percent increase does this represent?
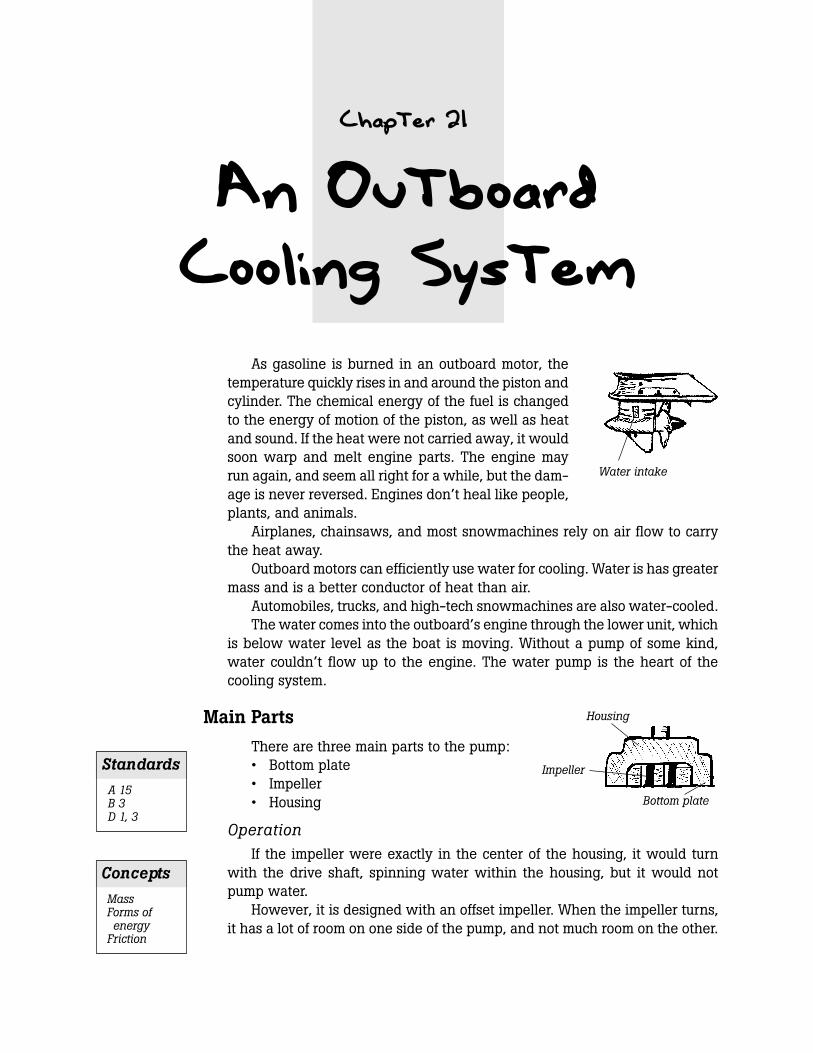
Chapter 21
An OutboardCooling System
As gasoline is burned in an outboard motor, thetemperature quickly rises in and around the piston andcylinder. The chemical energy of the fuel is changedto the energy of motion of the piston, as well as heatand sound. If the heat were not carried away, it wouldsoon warp and melt engine parts. The engine mayrun again, and seem all right for a while, but the dam-age is never reversed. Engines don’t heal like people,plants, and animals.
Airplanes, chainsaws, and most snowmachines rely on air flow to carrythe heat away.
Outboard motors can efficiently use water for cooling. Water is has greatermass and is a better conductor of heat than air.
Automobiles, trucks, and high-tech snowmachines are also water-cooled.The water comes into the outboard’s engine through the lower unit, which
is below water level as the boat is moving. Without a pump of some kind,water couldn’t flow up to the engine. The water pump is the heart of thecooling system.
Main Parts
There are three main parts to the pump:• Bottom plate• Impeller• Housing
OperationIf the impeller were exactly in the center of the housing, it would turn
with the drive shaft, spinning water within the housing, but it would notpump water.
However, it is designed with an offset impeller. When the impeller turns,it has a lot of room on one side of the pump, and not much room on the other.
Housing
Impeller
Bottom plate
Standards
A 15B 3D 1, 3
Concepts
MassForms ofenergy
Friction
Water intake
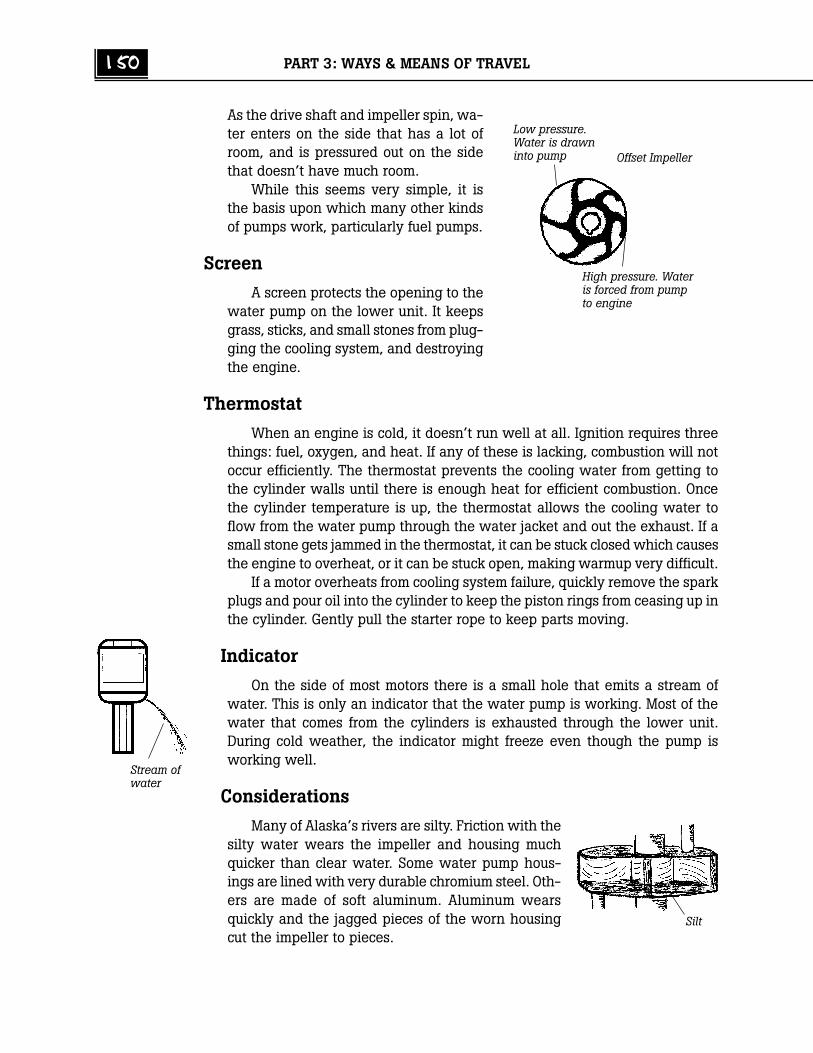
150 PART 3: WAYS & MEANS OF TRAVEL
As the drive shaft and impeller spin, wa-ter enters on the side that has a lot ofroom, and is pressured out on the sidethat doesn’t have much room.
While this seems very simple, it isthe basis upon which many other kindsof pumps work, particularly fuel pumps.
Screen
A screen protects the opening to thewater pump on the lower unit. It keepsgrass, sticks, and small stones from plug-ging the cooling system, and destroyingthe engine.
Thermostat
When an engine is cold, it doesn’t run well at all. Ignition requires threethings: fuel, oxygen, and heat. If any of these is lacking, combustion will notoccur efficiently. The thermostat prevents the cooling water from getting tothe cylinder walls until there is enough heat for efficient combustion. Oncethe cylinder temperature is up, the thermostat allows the cooling water toflow from the water pump through the water jacket and out the exhaust. If asmall stone gets jammed in the thermostat, it can be stuck closed which causesthe engine to overheat, or it can be stuck open, making warmup very difficult.
If a motor overheats from cooling system failure, quickly remove the sparkplugs and pour oil into the cylinder to keep the piston rings from ceasing up inthe cylinder. Gently pull the starter rope to keep parts moving.
Indicator
On the side of most motors there is a small hole that emits a stream ofwater. This is only an indicator that the water pump is working. Most of thewater that comes from the cylinders is exhausted through the lower unit.During cold weather, the indicator might freeze even though the pump isworking well.
Considerations
Many of Alaska’s rivers are silty. Friction with thesilty water wears the impeller and housing muchquicker than clear water. Some water pump hous-ings are lined with very durable chromium steel. Oth-ers are made of soft aluminum. Aluminum wearsquickly and the jagged pieces of the worn housingcut the impeller to pieces.
Offset Impeller
Low pressure.Water is drawninto pump
High pressure. Wateris forced from pumpto engine
Stream ofwater
Silt
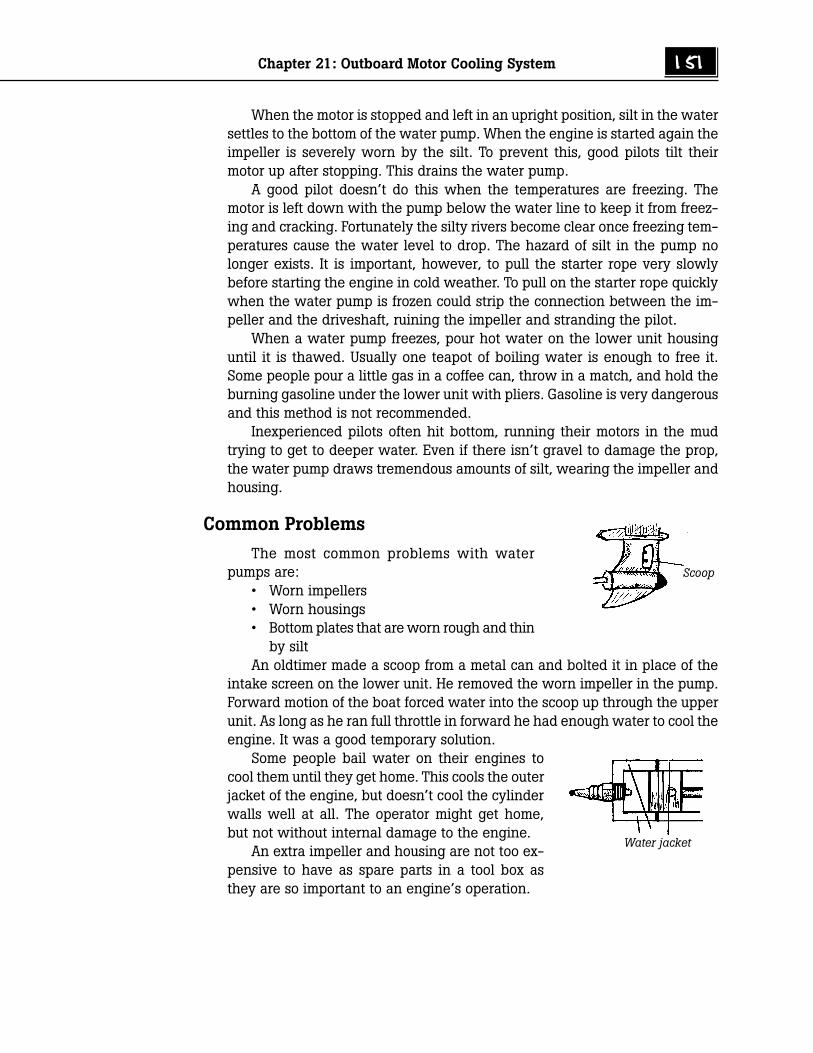
Chapter 21: Outboard Motor Cooling System 151
When the motor is stopped and left in an upright position, silt in the watersettles to the bottom of the water pump. When the engine is started again theimpeller is severely worn by the silt. To prevent this, good pilots tilt theirmotor up after stopping. This drains the water pump.
A good pilot doesn’t do this when the temperatures are freezing. Themotor is left down with the pump below the water line to keep it from freez-ing and cracking. Fortunately the silty rivers become clear once freezing tem-peratures cause the water level to drop. The hazard of silt in the pump nolonger exists. It is important, however, to pull the starter rope very slowlybefore starting the engine in cold weather. To pull on the starter rope quicklywhen the water pump is frozen could strip the connection between the im-peller and the driveshaft, ruining the impeller and stranding the pilot.
When a water pump freezes, pour hot water on the lower unit housinguntil it is thawed. Usually one teapot of boiling water is enough to free it.Some people pour a little gas in a coffee can, throw in a match, and hold theburning gasoline under the lower unit with pliers. Gasoline is very dangerousand this method is not recommended.
Inexperienced pilots often hit bottom, running their motors in the mudtrying to get to deeper water. Even if there isn’t gravel to damage the prop,the water pump draws tremendous amounts of silt, wearing the impeller andhousing.
Common Problems
The most common problems with waterpumps are:
• Worn impellers• Worn housings• Bottom plates that are worn rough and thin
by siltAn oldtimer made a scoop from a metal can and bolted it in place of the
intake screen on the lower unit. He removed the worn impeller in the pump.Forward motion of the boat forced water into the scoop up through the upperunit. As long as he ran full throttle in forward he had enough water to cool theengine. It was a good temporary solution.
Some people bail water on their engines tocool them until they get home. This cools the outerjacket of the engine, but doesn’t cool the cylinderwalls well at all. The operator might get home,but not without internal damage to the engine.
An extra impeller and housing are not too ex-pensive to have as spare parts in a tool box asthey are so important to an engine’s operation.
Water jacket
Scoop
152 PART 3: WAYS & MEANS OF TRAVEL
Activities
1. Take a water pump apart. Identify the three main parts. What causesthe impeller to turn as the shaft turns?
2. Touch the bottom plate of the water pump with a file. Is it harder orsofter than the file? Why do you think this is so?
3. There are two types of metal that water pumps are made of. Find ex-amples of each. Why do you think there is a difference?
4. Put an impeller in a pump housing. With a stick in place of the driveshaft, turn the impeller. Watch the impeller blades extend and com-press. Imagine the water coming in the side where the blades are ex-tending and leaving the side where it is compressing.
5. Find the intake for the water on the lower unit. Is there a screen of anykind? Why do you think the screen is there? Ask people in the villagewhat it is for and what would happen if it were missing.
6. Check the copper tubing that carries the water from the pump to theupper unit. Are there seals where it connects to each?
7. Can you find the thermostat? They are in different places on differentmotors. If possible, remove it. Alternately, pour hot and cold water onit. Can you see it move in response to the temperature difference?
8. If you live near a silty river, collect some water and let it settle over-night. Is there sediment on the bottom of the container? Pour most ofthe water off and rub your hand on the bottom of the container. Canyou see why silt will wear the impeller inside the pump housing?
Student Response
1. What would happen to an outboard if water didn’t circulate around thecylinders? Is this change permanent?
2. What are the three parts of a water pump?
3. With a drawing of the top view, show how a water pump works.
4. What is the purpose of the screen on the lower unit?
5. What is the purpose of a thermostat? How can it malfunction?
6. What does the indicator do? If it is plugged, does that mean the waterpump isn’t working?
7. Why should an outboard motor be tilted up when not in use? Duringwhat season is this not so?
Chapter 21: Outboard Motor Cooling System 153
8. A water pump doesn’t work. The operator improvises a way to gethome. What are the consequences if the improvised water cooling sys-tem doesn’t work?
Math
1. A cheap aluminum impeller housing costs $12. An expensive stainlesssteel one costs $37. However, a housing made from stainless steel lasts4 times longer. Which is cheaper in the long run?

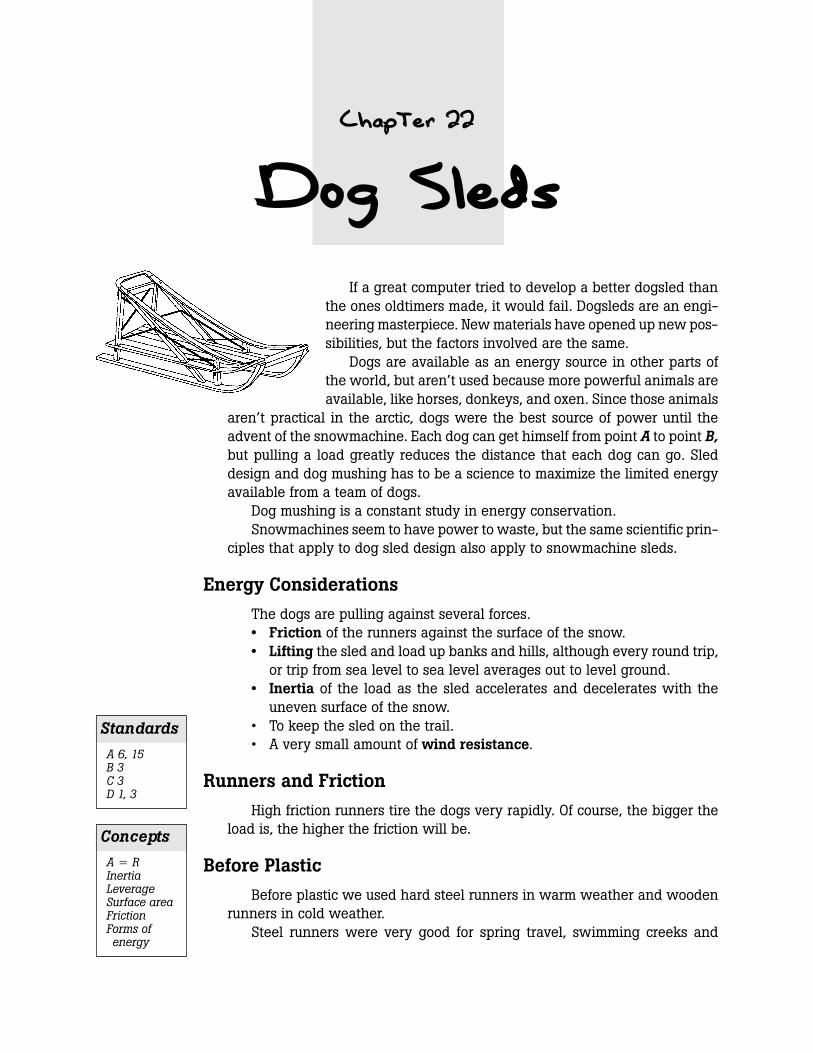
Chapter 22
Dog Sleds
If a great computer tried to develop a better dogsled thanthe ones oldtimers made, it would fail. Dogsleds are an engi-neering masterpiece. New materials have opened up new pos-sibilities, but the factors involved are the same.
Dogs are available as an energy source in other parts ofthe world, but aren’t used because more powerful animals areavailable, like horses, donkeys, and oxen. Since those animals
aren’t practical in the arctic, dogs were the best source of power until theadvent of the snowmachine. Each dog can get himself from point A to point B,but pulling a load greatly reduces the distance that each dog can go. Sleddesign and dog mushing has to be a science to maximize the limited energyavailable from a team of dogs.
Dog mushing is a constant study in energy conservation.Snowmachines seem to have power to waste, but the same scientific prin-
ciples that apply to dog sled design also apply to snowmachine sleds.
Energy Considerations
The dogs are pulling against several forces.• Friction of the runners against the surface of the snow.• Lifting the sled and load up banks and hills, although every round trip,
or trip from sea level to sea level averages out to level ground.• Inertia of the load as the sled accelerates and decelerates with the
uneven surface of the snow.• To keep the sled on the trail.• A very small amount of wind resistance.
Runners and Friction
High friction runners tire the dogs very rapidly. Of course, the bigger theload is, the higher the friction will be.
Before Plastic
Before plastic we used hard steel runners in warm weather and woodenrunners in cold weather.
Steel runners were very good for spring travel, swimming creeks and
Standards
A 6, 15B 3C 3D 1, 3
Concepts
A z RInertiaLeverageSurface areaFrictionForms ofenergy
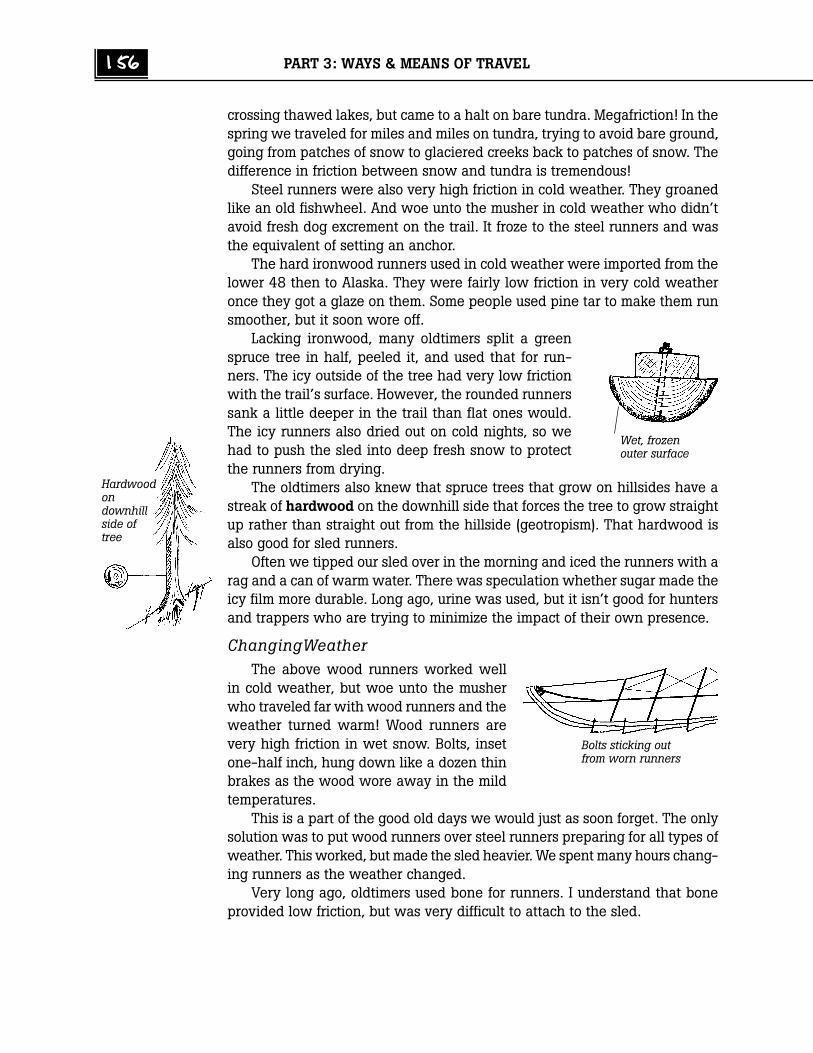
156 PART 3: WAYS & MEANS OF TRAVEL
crossing thawed lakes, but came to a halt on bare tundra. Megafriction! In thespring we traveled for miles and miles on tundra, trying to avoid bare ground,going from patches of snow to glaciered creeks back to patches of snow. Thedifference in friction between snow and tundra is tremendous!
Steel runners were also very high friction in cold weather. They groanedlike an old fishwheel. And woe unto the musher in cold weather who didn’tavoid fresh dog excrement on the trail. It froze to the steel runners and wasthe equivalent of setting an anchor.
The hard ironwood runners used in cold weather were imported from thelower 48 then to Alaska. They were fairly low friction in very cold weatheronce they got a glaze on them. Some people used pine tar to make them runsmoother, but it soon wore off.
Lacking ironwood, many oldtimers split a greenspruce tree in half, peeled it, and used that for run-ners. The icy outside of the tree had very low frictionwith the trail’s surface. However, the rounded runnerssank a little deeper in the trail than flat ones would.The icy runners also dried out on cold nights, so wehad to push the sled into deep fresh snow to protectthe runners from drying.
The oldtimers also knew that spruce trees that grow on hillsides have astreak of hardwood on the downhill side that forces the tree to grow straightup rather than straight out from the hillside (geotropism). That hardwood isalso good for sled runners.
Often we tipped our sled over in the morning and iced the runners with arag and a can of warm water. There was speculation whether sugar made theicy film more durable. Long ago, urine was used, but it isn’t good for huntersand trappers who are trying to minimize the impact of their own presence.
Changing WeatherThe above wood runners worked well
in cold weather, but woe unto the musherwho traveled far with wood runners and theweather turned warm! Wood runners arevery high friction in wet snow. Bolts, insetone-half inch, hung down like a dozen thinbrakes as the wood wore away in the mildtemperatures.
This is a part of the good old days we would just as soon forget. The onlysolution was to put wood runners over steel runners preparing for all types ofweather. This worked, but made the sled heavier. We spent many hours chang-ing runners as the weather changed.
Very long ago, oldtimers used bone for runners. I understand that boneprovided low friction, but was very difficult to attach to the sled.
Wet, frozenouter surface
Hardwoodondownhillside oftree
Bolts sticking outfrom worn runners
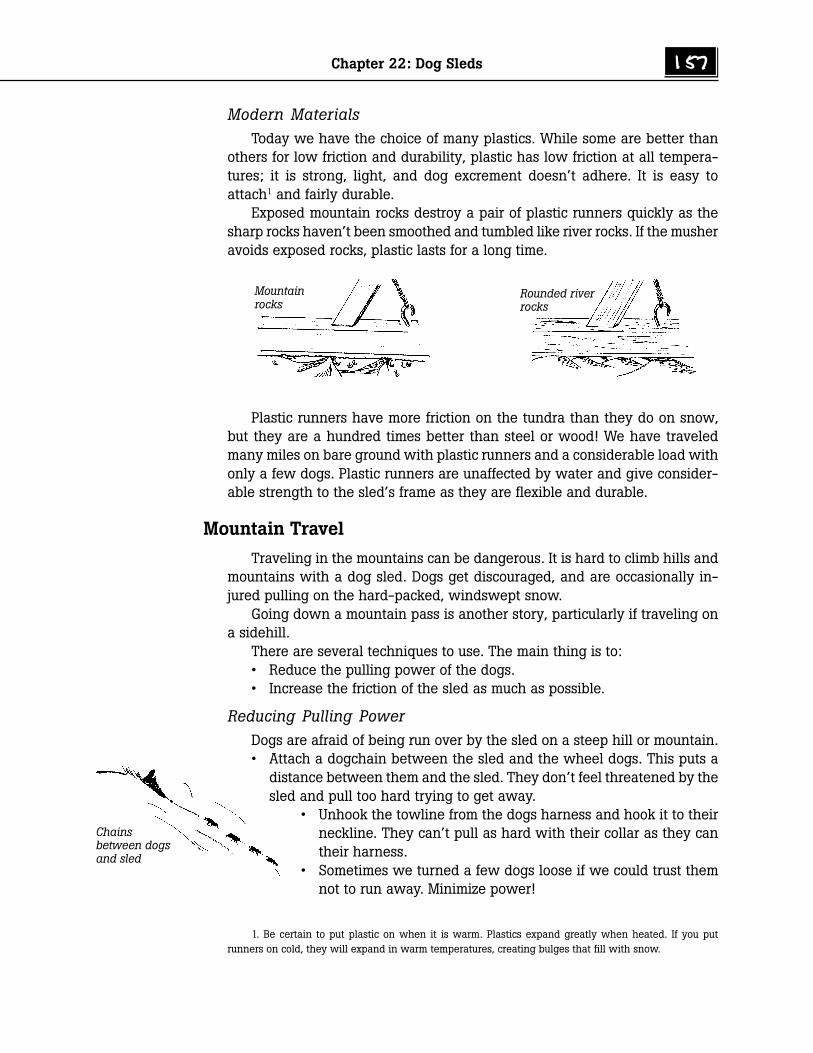
Chapter 22: Dog Sleds 157
Modern MaterialsToday we have the choice of many plastics. While some are better than
others for low friction and durability, plastic has low friction at all tempera-tures; it is strong, light, and dog excrement doesn’t adhere. It is easy toattach1 and fairly durable.
Exposed mountain rocks destroy a pair of plastic runners quickly as thesharp rocks haven’t been smoothed and tumbled like river rocks. If the musheravoids exposed rocks, plastic lasts for a long time.
Plastic runners have more friction on the tundra than they do on snow,but they are a hundred times better than steel or wood! We have traveledmany miles on bare ground with plastic runners and a considerable load withonly a few dogs. Plastic runners are unaffected by water and give consider-able strength to the sled’s frame as they are flexible and durable.
Mountain Travel
Traveling in the mountains can be dangerous. It is hard to climb hills andmountains with a dog sled. Dogs get discouraged, and are occasionally in-jured pulling on the hard-packed, windswept snow.
Going down a mountain pass is another story, particularly if traveling ona sidehill.
There are several techniques to use. The main thing is to:• Reduce the pulling power of the dogs.• Increase the friction of the sled as much as possible.
Reducing Pulling PowerDogs are afraid of being run over by the sled on a steep hill or mountain.• Attach a dogchain between the sled and the wheel dogs. This puts a
distance between them and the sled. They don’t feel threatened by thesled and pull too hard trying to get away.
1. Be certain to put plastic on when it is warm. Plastics expand greatly when heated. If you putrunners on cold, they will expand in warm temperatures, creating bulges that fill with snow.
Mountainrocks
Rounded riverrocks
• Unhook the towline from the dogs harness and hook it to theirneckline. They can’t pull as hard with their collar as they cantheir harness.
• Sometimes we turned a few dogs loose if we could trust themnot to run away. Minimize power!
Chainsbetween dogsand sled
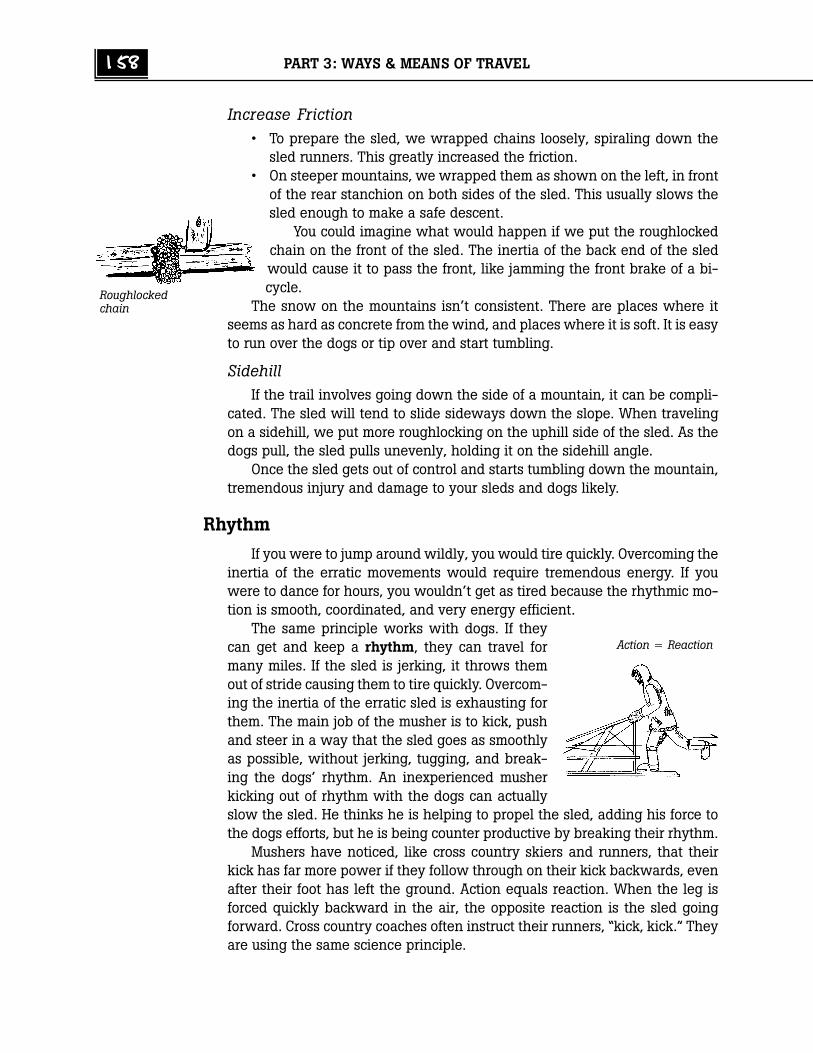
158 PART 3: WAYS & MEANS OF TRAVEL
Increase Friction• To prepare the sled, we wrapped chains loosely, spiraling down the
sled runners. This greatly increased the friction.• On steeper mountains, we wrapped them as shown on the left, in front
of the rear stanchion on both sides of the sled. This usually slows thesled enough to make a safe descent.
You could imagine what would happen if we put the roughlockedchain on the front of the sled. The inertia of the back end of the sledwould cause it to pass the front, like jamming the front brake of a bi-cycle.
The snow on the mountains isn’t consistent. There are places where itseems as hard as concrete from the wind, and places where it is soft. It is easyto run over the dogs or tip over and start tumbling.
SidehillIf the trail involves going down the side of a mountain, it can be compli-
cated. The sled will tend to slide sideways down the slope. When travelingon a sidehill, we put more roughlocking on the uphill side of the sled. As thedogs pull, the sled pulls unevenly, holding it on the sidehill angle.
Once the sled gets out of control and starts tumbling down the mountain,tremendous injury and damage to your sleds and dogs likely.
Rhythm
If you were to jump around wildly, you would tire quickly. Overcoming theinertia of the erratic movements would require tremendous energy. If youwere to dance for hours, you wouldn’t get as tired because the rhythmic mo-tion is smooth, coordinated, and very energy efficient.
The same principle works with dogs. If theycan get and keep a rhythm, they can travel formany miles. If the sled is jerking, it throws themout of stride causing them to tire quickly. Overcom-ing the inertia of the erratic sled is exhausting forthem. The main job of the musher is to kick, pushand steer in a way that the sled goes as smoothlyas possible, without jerking, tugging, and break-ing the dogs’ rhythm. An inexperienced musherkicking out of rhythm with the dogs can actuallyslow the sled. He thinks he is helping to propel the sled, adding his force tothe dogs efforts, but he is being counter productive by breaking their rhythm.
Mushers have noticed, like cross country skiers and runners, that theirkick has far more power if they follow through on their kick backwards, evenafter their foot has left the ground. Action equals reaction. When the leg isforced quickly backward in the air, the opposite reaction is the sled goingforward. Cross country coaches often instruct their runners, “kick, kick.” Theyare using the same science principle.
Roughlockedchain
Action z Reaction
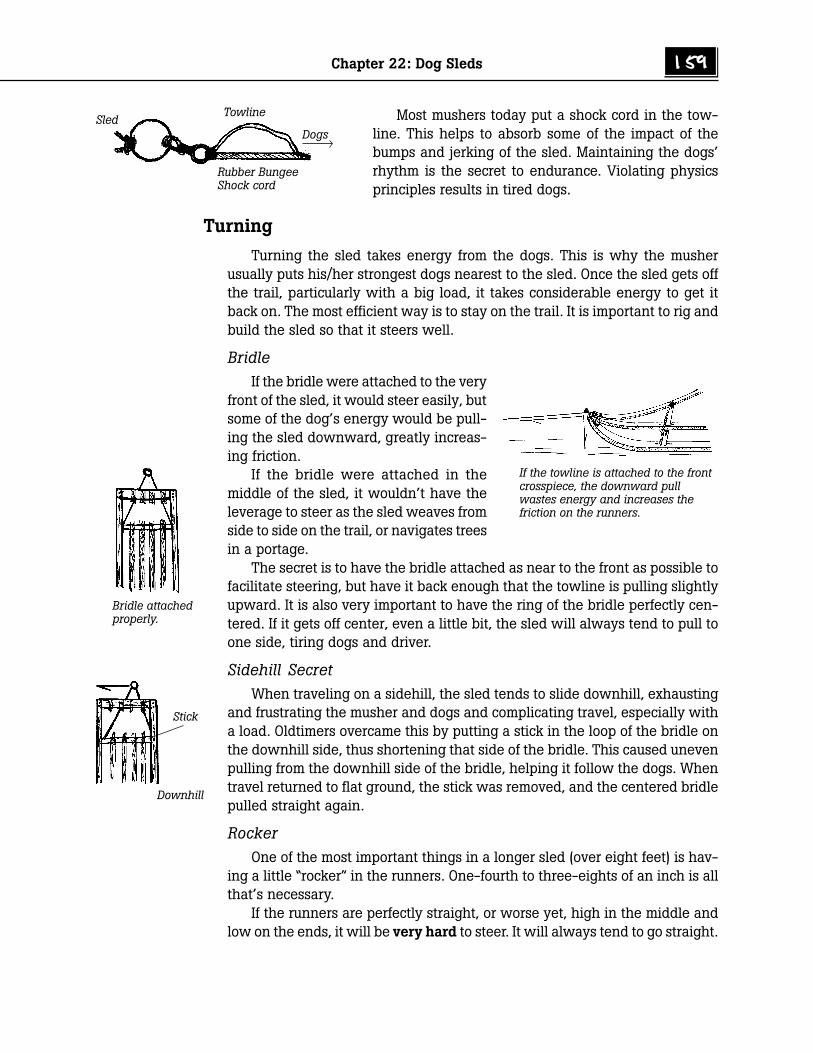
Chapter 22: Dog Sleds 159
Most mushers today put a shock cord in the tow-line. This helps to absorb some of the impact of thebumps and jerking of the sled. Maintaining the dogs’rhythm is the secret to endurance. Violating physicsprinciples results in tired dogs.
Turning
Turning the sled takes energy from the dogs. This is why the musherusually puts his/her strongest dogs nearest to the sled. Once the sled gets offthe trail, particularly with a big load, it takes considerable energy to get itback on. The most efficient way is to stay on the trail. It is important to rig andbuild the sled so that it steers well.
BridleIf the bridle were attached to the very
front of the sled, it would steer easily, butsome of the dog’s energy would be pull-ing the sled downward, greatly increas-ing friction.
If the bridle were attached in themiddle of the sled, it wouldn’t have theleverage to steer as the sled weaves fromside to side on the trail, or navigates treesin a portage.
The secret is to have the bridle attached as near to the front as possible tofacilitate steering, but have it back enough that the towline is pulling slightlyupward. It is also very important to have the ring of the bridle perfectly cen-tered. If it gets off center, even a little bit, the sled will always tend to pull toone side, tiring dogs and driver.
Sidehill SecretWhen traveling on a sidehill, the sled tends to slide downhill, exhausting
and frustrating the musher and dogs and complicating travel, especially witha load. Oldtimers overcame this by putting a stick in the loop of the bridle onthe downhill side, thus shortening that side of the bridle. This caused unevenpulling from the downhill side of the bridle, helping it follow the dogs. Whentravel returned to flat ground, the stick was removed, and the centered bridlepulled straight again.
RockerOne of the most important things in a longer sled (over eight feet) is hav-
ing a little “rocker” in the runners. One-fourth to three-eights of an inch is allthat’s necessary.
If the runners are perfectly straight, or worse yet, high in the middle andlow on the ends, it will be very hard to steer. It will always tend to go straight.
Stick
Downhill
Rubber BungeeShock cord
DogsSled
Towline
If the towline is attached to the frontcrosspiece, the downward pullwastes energy and increases thefriction on the runners.
Bridle attachedproperly.
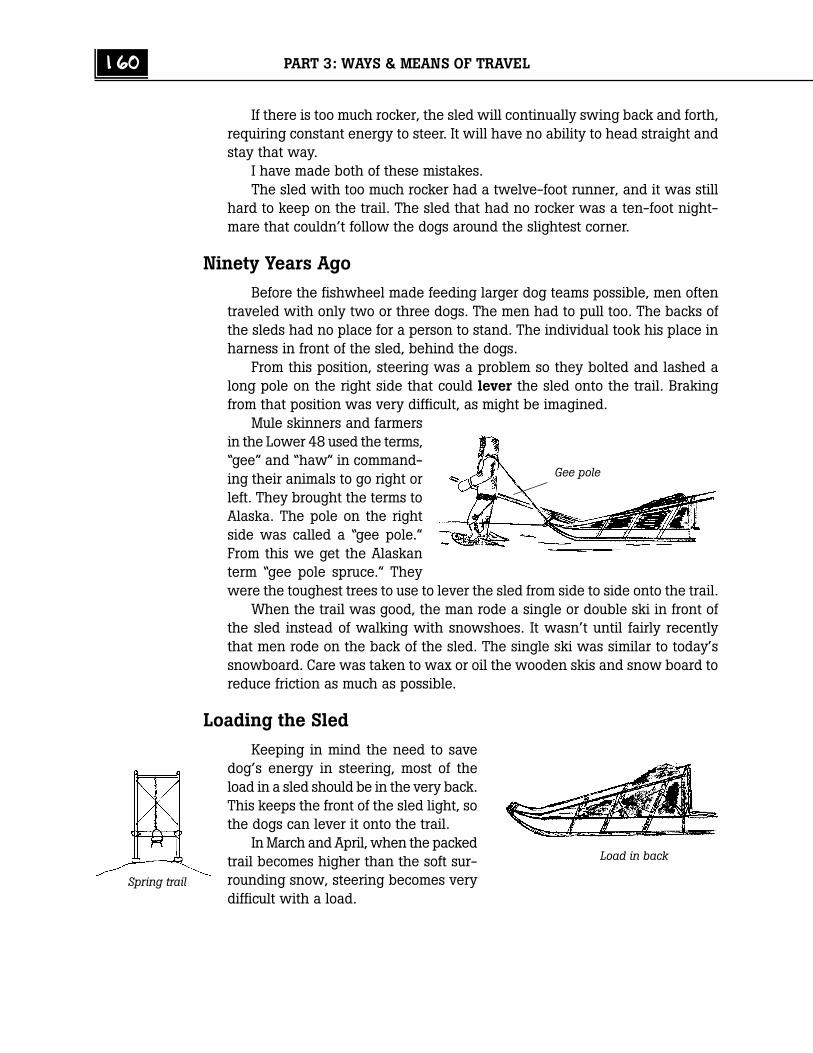
160 PART 3: WAYS & MEANS OF TRAVEL
If there is too much rocker, the sled will continually swing back and forth,requiring constant energy to steer. It will have no ability to head straight andstay that way.
I have made both of these mistakes.The sled with too much rocker had a twelve-foot runner, and it was still
hard to keep on the trail. The sled that had no rocker was a ten-foot night-mare that couldn’t follow the dogs around the slightest corner.
Ninety Years Ago
Before the fishwheel made feeding larger dog teams possible, men oftentraveled with only two or three dogs. The men had to pull too. The backs ofthe sleds had no place for a person to stand. The individual took his place inharness in front of the sled, behind the dogs.
From this position, steering was a problem so they bolted and lashed along pole on the right side that could lever the sled onto the trail. Brakingfrom that position was very difficult, as might be imagined.
Mule skinners and farmersin the Lower 48 used the terms,“gee” and “haw” in command-ing their animals to go right orleft. They brought the terms toAlaska. The pole on the rightside was called a “gee pole.”From this we get the Alaskanterm “gee pole spruce.” Theywere the toughest trees to use to lever the sled from side to side onto the trail.
When the trail was good, the man rode a single or double ski in front ofthe sled instead of walking with snowshoes. It wasn’t until fairly recentlythat men rode on the back of the sled. The single ski was similar to today’ssnowboard. Care was taken to wax or oil the wooden skis and snow board toreduce friction as much as possible.
Loading the Sled
Keeping in mind the need to savedog’s energy in steering, most of theload in a sled should be in the very back.This keeps the front of the sled light, sothe dogs can lever it onto the trail.
In March and April, when the packedtrail becomes higher than the soft sur-rounding snow, steering becomes verydifficult with a load.
Gee pole
Load in back
Spring trail
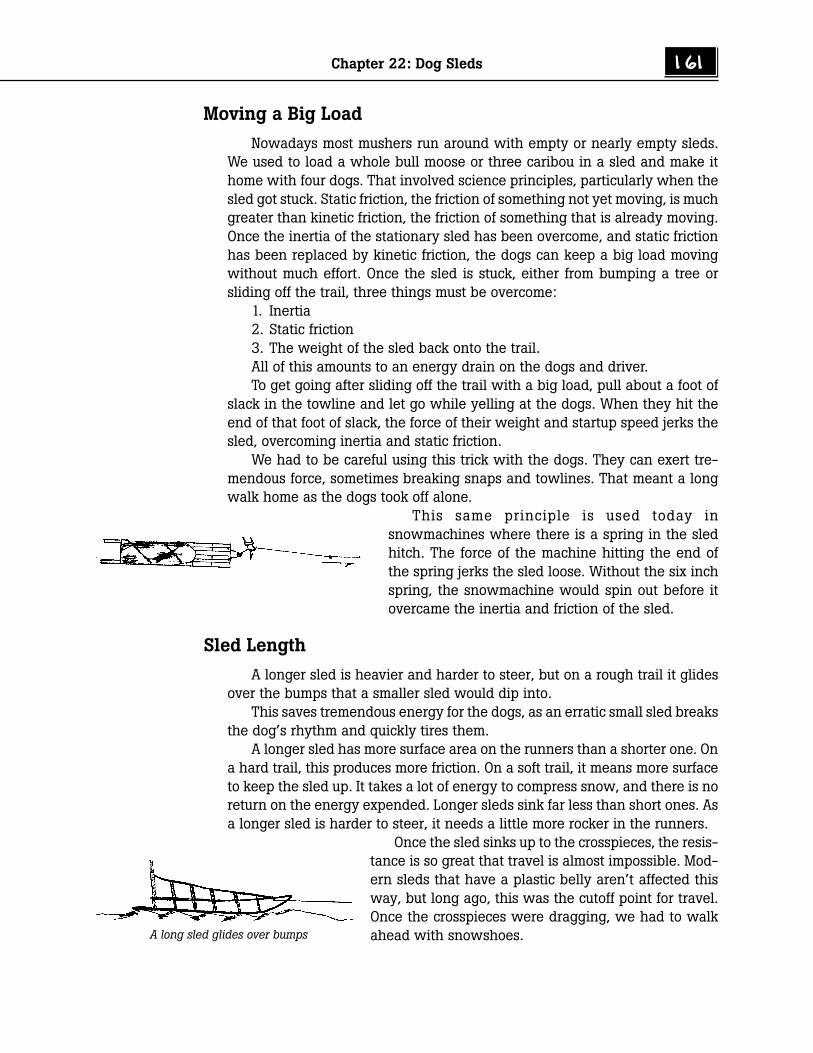
Chapter 22: Dog Sleds 161
Moving a Big Load
Nowadays most mushers run around with empty or nearly empty sleds.We used to load a whole bull moose or three caribou in a sled and make ithome with four dogs. That involved science principles, particularly when thesled got stuck. Static friction, the friction of something not yet moving, is muchgreater than kinetic friction, the friction of something that is already moving.Once the inertia of the stationary sled has been overcome, and static frictionhas been replaced by kinetic friction, the dogs can keep a big load movingwithout much effort. Once the sled is stuck, either from bumping a tree orsliding off the trail, three things must be overcome:
1. Inertia2. Static friction3. The weight of the sled back onto the trail.All of this amounts to an energy drain on the dogs and driver.To get going after sliding off the trail with a big load, pull about a foot of
slack in the towline and let go while yelling at the dogs. When they hit theend of that foot of slack, the force of their weight and startup speed jerks thesled, overcoming inertia and static friction.
We had to be careful using this trick with the dogs. They can exert tre-mendous force, sometimes breaking snaps and towlines. That meant a longwalk home as the dogs took off alone.
This same principle is used today insnowmachines where there is a spring in the sledhitch. The force of the machine hitting the end ofthe spring jerks the sled loose. Without the six inchspring, the snowmachine would spin out before itovercame the inertia and friction of the sled.
Sled Length
A longer sled is heavier and harder to steer, but on a rough trail it glidesover the bumps that a smaller sled would dip into.
This saves tremendous energy for the dogs, as an erratic small sled breaksthe dog’s rhythm and quickly tires them.
A longer sled has more surface area on the runners than a shorter one. Ona hard trail, this produces more friction. On a soft trail, it means more surfaceto keep the sled up. It takes a lot of energy to compress snow, and there is noreturn on the energy expended. Longer sleds sink far less than short ones. Asa longer sled is harder to steer, it needs a little more rocker in the runners.
Once the sled sinks up to the crosspieces, the resis-tance is so great that travel is almost impossible. Mod-ern sleds that have a plastic belly aren’t affected thisway, but long ago, this was the cutoff point for travel.Once the crosspieces were dragging, we had to walkahead with snowshoes.A long sled glides over bumps
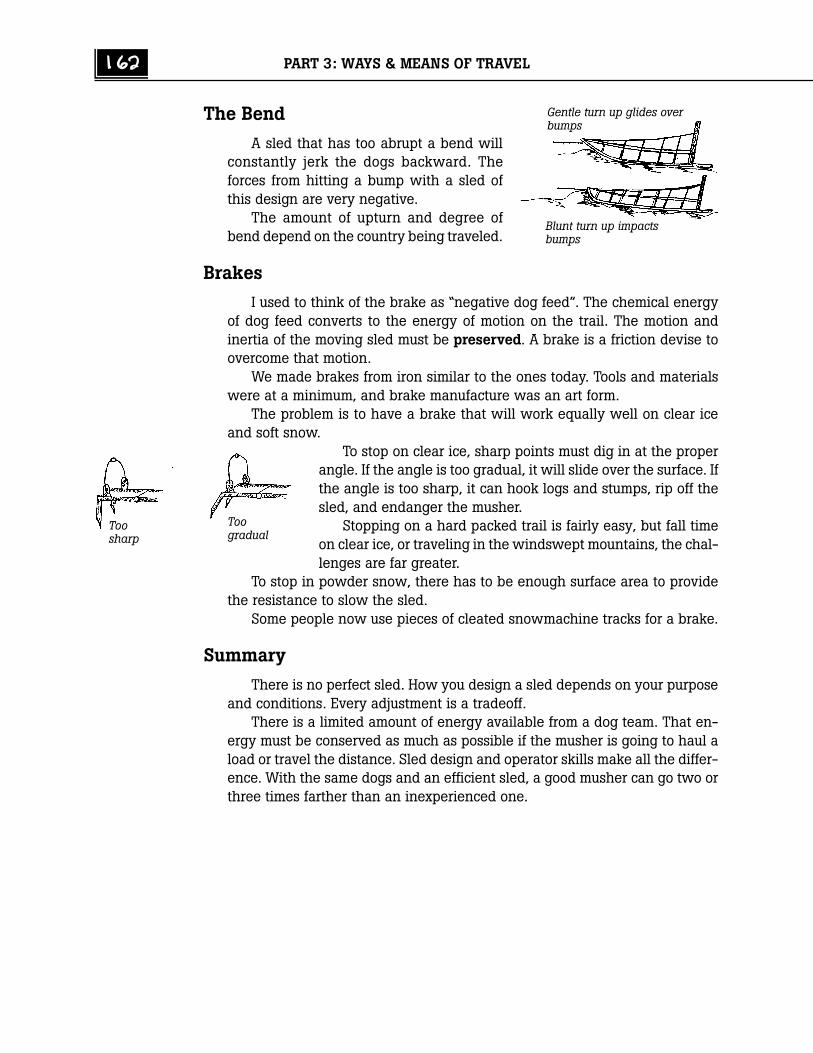
162 PART 3: WAYS & MEANS OF TRAVEL
The Bend
A sled that has too abrupt a bend willconstantly jerk the dogs backward. Theforces from hitting a bump with a sled ofthis design are very negative.
The amount of upturn and degree ofbend depend on the country being traveled.
Brakes
I used to think of the brake as “negative dog feed”. The chemical energyof dog feed converts to the energy of motion on the trail. The motion andinertia of the moving sled must be preserved. A brake is a friction devise toovercome that motion.
We made brakes from iron similar to the ones today. Tools and materialswere at a minimum, and brake manufacture was an art form.
The problem is to have a brake that will work equally well on clear iceand soft snow.
To stop on clear ice, sharp points must dig in at the properangle. If the angle is too gradual, it will slide over the surface. Ifthe angle is too sharp, it can hook logs and stumps, rip off thesled, and endanger the musher.
Stopping on a hard packed trail is fairly easy, but fall timeon clear ice, or traveling in the windswept mountains, the chal-lenges are far greater.
To stop in powder snow, there has to be enough surface area to providethe resistance to slow the sled.
Some people now use pieces of cleated snowmachine tracks for a brake.
Summary
There is no perfect sled. How you design a sled depends on your purposeand conditions. Every adjustment is a tradeoff.
There is a limited amount of energy available from a dog team. That en-ergy must be conserved as much as possible if the musher is going to haul aload or travel the distance. Sled design and operator skills make all the differ-ence. With the same dogs and an efficient sled, a good musher can go two orthree times farther than an inexperienced one.
Gentle turn up glides overbumps
Blunt turn up impactsbumps
Toosharp
Toogradual
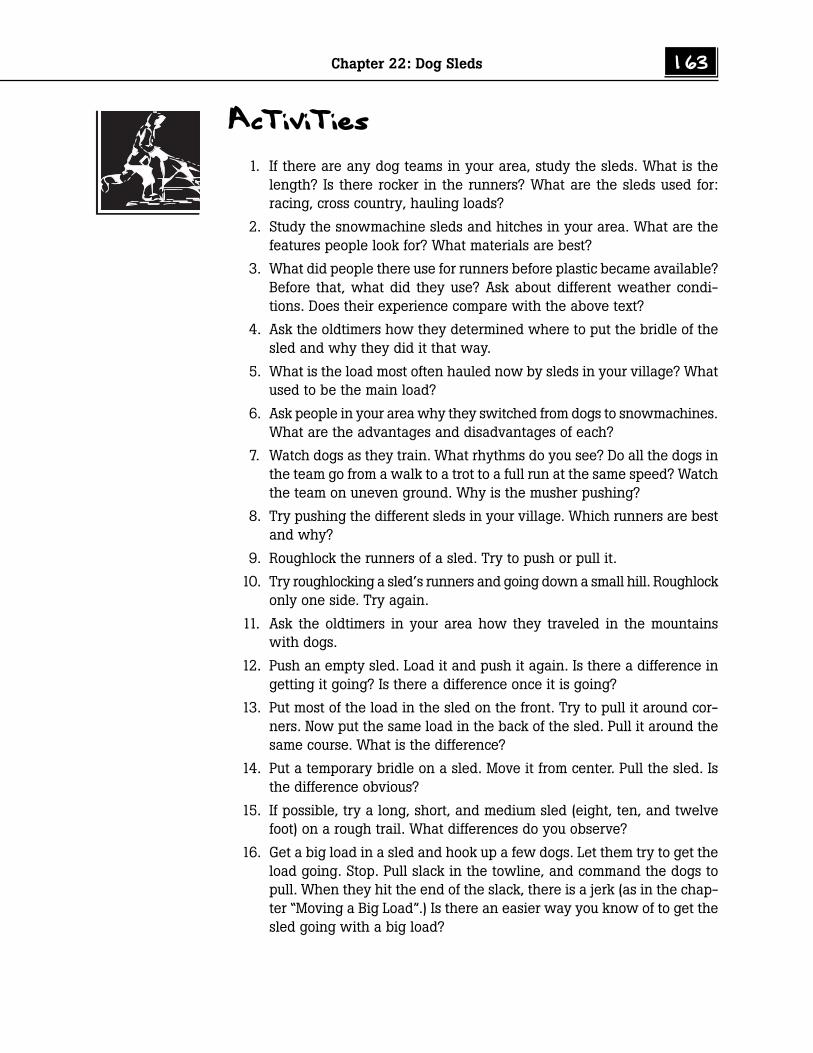
Chapter 22: Dog Sleds 163
Activities
1. If there are any dog teams in your area, study the sleds. What is thelength? Is there rocker in the runners? What are the sleds used for:racing, cross country, hauling loads?
2. Study the snowmachine sleds and hitches in your area. What are thefeatures people look for? What materials are best?
3. What did people there use for runners before plastic became available?Before that, what did they use? Ask about different weather condi-tions. Does their experience compare with the above text?
4. Ask the oldtimers how they determined where to put the bridle of thesled and why they did it that way.
5. What is the load most often hauled now by sleds in your village? Whatused to be the main load?
6. Ask people in your area why they switched from dogs to snowmachines.What are the advantages and disadvantages of each?
7. Watch dogs as they train. What rhythms do you see? Do all the dogs inthe team go from a walk to a trot to a full run at the same speed? Watchthe team on uneven ground. Why is the musher pushing?
8. Try pushing the different sleds in your village. Which runners are bestand why?
9. Roughlock the runners of a sled. Try to push or pull it.
10. Try roughlocking a sled’s runners and going down a small hill. Roughlockonly one side. Try again.
11. Ask the oldtimers in your area how they traveled in the mountainswith dogs.
12. Push an empty sled. Load it and push it again. Is there a difference ingetting it going? Is there a difference once it is going?
13. Put most of the load in the sled on the front. Try to pull it around cor-ners. Now put the same load in the back of the sled. Pull it around thesame course. What is the difference?
14. Put a temporary bridle on a sled. Move it from center. Pull the sled. Isthe difference obvious?
15. If possible, try a long, short, and medium sled (eight, ten, and twelvefoot) on a rough trail. What differences do you observe?
16. Get a big load in a sled and hook up a few dogs. Let them try to get theload going. Stop. Pull slack in the towline, and command the dogs topull. When they hit the end of the slack, there is a jerk (as in the chap-ter “Moving a Big Load”.) Is there an easier way you know of to get thesled going with a big load?
164 PART 3: WAYS & MEANS OF TRAVEL
17. Put a fisherman’s scale on the end of a line from a small sled. Howmany pounds do you have to pull to break the sled free from staticfriction? How many pounds is the sled pulling once it is moving? Ofcourse, some of the resistance while the sled is stopped is from inertia,but much is static friction.
18. Look at the sled brakes in the village or ask the oldtimers what they usedfor a brake. Were the conditions mostly powder snow or clear ice?
Student Response
1. What five things are dogs pulling against when they pull a sled?
2. What kind of runners did the oldtimers have for warm and cold weather?
3. What were some of the local alternatives to ironwood runners importedfrom South America?
4. Why have we changed to plastic?
5. Draw a picture of roughlocking.
6. Describe inertia as it relates to driving a dog sled.
7. Why is rhythm important?
8. What happens if a long sled doesn’t have any rocker in the runners?
9. What happens if the sled has too much rocker?
10. What happens if the bridle on the sled isn’t centered? Explain or drawthe result.
11. Draw a picture that illustrates the advantages of a long sled on a roughtrail.
12. Thinking of the four things that a dog is working against, tell as muchas you can about making the dog’s job easier and increasing the milestraveled in a day.
13. Draw the top view of a sled that would be pulled by a man and twodogs. Include the method by which he would steer.
14. Why is traveling in March or April difficult?
15. What two forces have to be overcome to get a sled moving?
16. Draw a picture showing the disadvantage of a sled with a bend in therunner that is too abrupt.
17. What is the purpose of a sled brake?

Chapter 22: Dog Sleds 165
Math
1. A sled has a runner that is in contact with the snow for 8.5 feet. Eachrunner is 2” wide. (Remember, there are two runners.) The sled, in-cluding driver and load, weigh 275 lbs. What is the pressure in psi ofthe runners? What would it be if the runners were 1.75” wide? 3”wide?

Chapter 23
Snowmachine Tracks
Snowmachines have been in villages long enough that few people underthirty can remember when dog teams were the main form of transportation.
It wasn’t until science and technology develop good material for a trackthat snowmachines had a chance of being practical. A book on the KlondikeGold Rush described a powered vehicle that the builder thought could travelover snow. It had a large steel track with big teeth. The first journey of thissteam powered vehicle was its last. It dug straight down into the earth, un-able to get out.
Material
A track made of steel is too heavy for the light engines used insnowmachines. Besides, a steel track would become an icy mass as soon as itgot into overflow.
Natural rubber stretches too much to be good material for a track, and itdissolves in gas and oil. Kevlar provides flexibility, strength, relatively lowweight, and durability. The strength of the track is increased by putting nyloncords in the track material. This is like putting steel in concrete. The combina-tion of materials is far stronger than either of the materials separately. Thenylon prevents the track from tearing, and the Kevlar keeps the nylon fromwearing.
Oldtimers understood this same principle. They put beaver fur in sprucegum when they patched a hole in a boat. The beaver fur strengthens thesame way the nylon and Kevlar fibers do in the snowmachine track.
Choosing a Track
There are several factors involved in choosing a track:
LengthA longer machine tends to glide over the tops of the bumps and “floats”
more on powder snow. However, if the track is too long it will be hard to steerin tight places and takes more power to turn the track.
Short tracks are better for hard trails and sharp corners, as in racing. If thetrack is too short, the machine will get stuck in soft snow. A short machinetends to give a jerky ride because it goes in and out of all the bumps.
Standards
A 8c, 15B 3D 1, 3
Concepts
Surface areaFriction
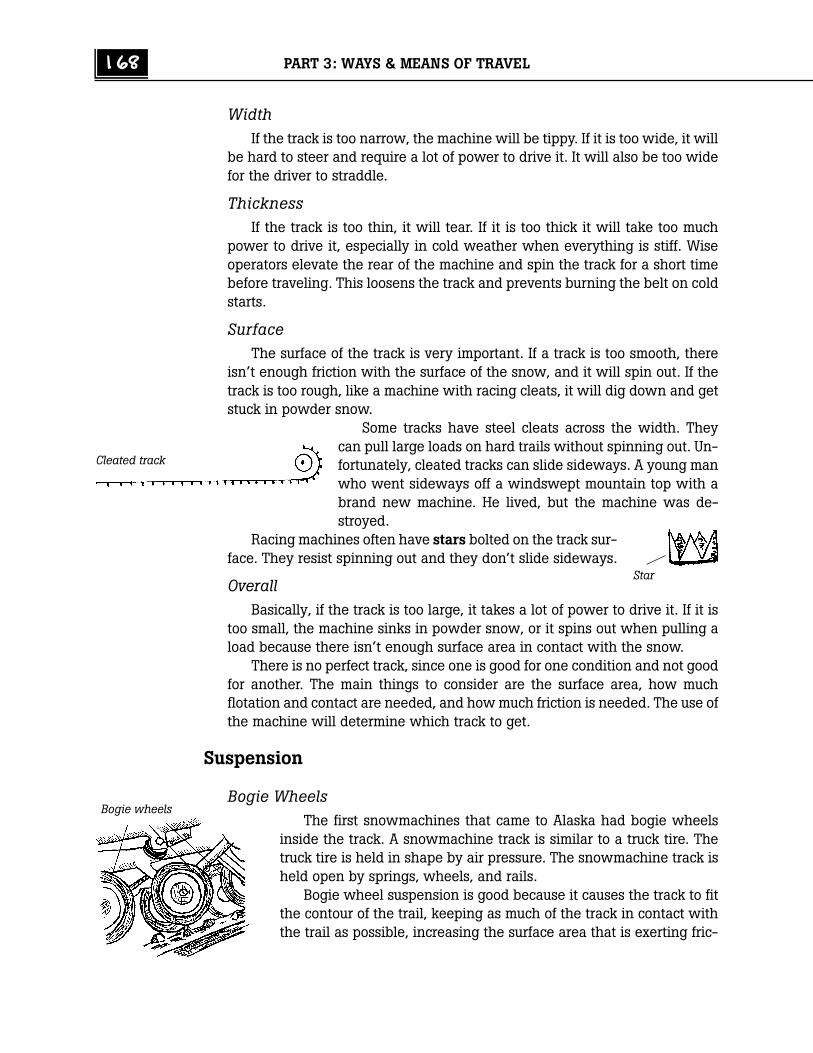
168 PART 3: WAYS & MEANS OF TRAVEL
WidthIf the track is too narrow, the machine will be tippy. If it is too wide, it will
be hard to steer and require a lot of power to drive it. It will also be too widefor the driver to straddle.
ThicknessIf the track is too thin, it will tear. If it is too thick it will take too much
power to drive it, especially in cold weather when everything is stiff. Wiseoperators elevate the rear of the machine and spin the track for a short timebefore traveling. This loosens the track and prevents burning the belt on coldstarts.
SurfaceThe surface of the track is very important. If a track is too smooth, there
isn’t enough friction with the surface of the snow, and it will spin out. If thetrack is too rough, like a machine with racing cleats, it will dig down and getstuck in powder snow.
Some tracks have steel cleats across the width. Theycan pull large loads on hard trails without spinning out. Un-fortunately, cleated tracks can slide sideways. A young manwho went sideways off a windswept mountain top with abrand new machine. He lived, but the machine was de-stroyed.
Racing machines often have stars bolted on the track sur-face. They resist spinning out and they don’t slide sideways.
OverallBasically, if the track is too large, it takes a lot of power to drive it. If it is
too small, the machine sinks in powder snow, or it spins out when pulling aload because there isn’t enough surface area in contact with the snow.
There is no perfect track, since one is good for one condition and not goodfor another. The main things to consider are the surface area, how muchflotation and contact are needed, and how much friction is needed. The use ofthe machine will determine which track to get.
Suspension
Bogie WheelsThe first snowmachines that came to Alaska had bogie wheels
inside the track. A snowmachine track is similar to a truck tire. Thetruck tire is held in shape by air pressure. The snowmachine track isheld open by springs, wheels, and rails.
Bogie wheel suspension is good because it causes the track to fitthe contour of the trail, keeping as much of the track in contact withthe trail as possible, increasing the surface area that is exerting fric-
Star
Cleated track
Bogie wheels
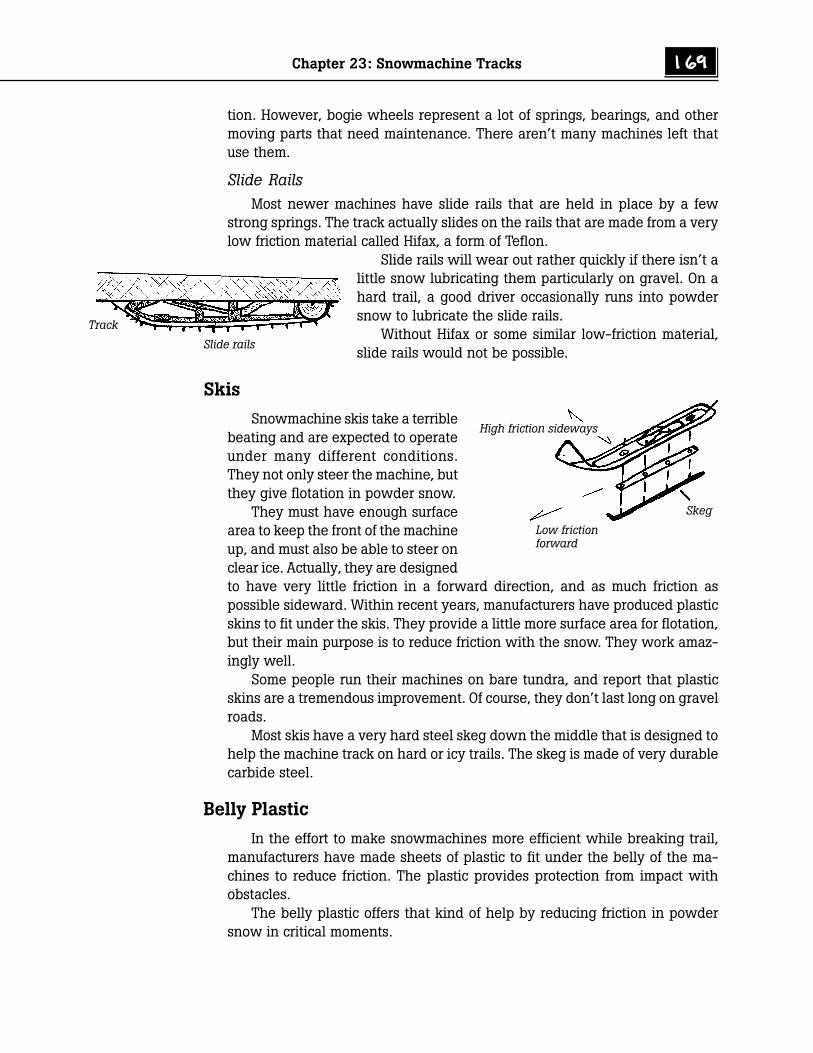
Chapter 23: Snowmachine Tracks 169
tion. However, bogie wheels represent a lot of springs, bearings, and othermoving parts that need maintenance. There aren’t many machines left thatuse them.
Slide RailsMost newer machines have slide rails that are held in place by a few
strong springs. The track actually slides on the rails that are made from a verylow friction material called Hifax, a form of Teflon.
Slide rails will wear out rather quickly if there isn’t alittle snow lubricating them particularly on gravel. On ahard trail, a good driver occasionally runs into powdersnow to lubricate the slide rails.
Without Hifax or some similar low-friction material,slide rails would not be possible.
Skis
Snowmachine skis take a terriblebeating and are expected to operateunder many different conditions.They not only steer the machine, butthey give flotation in powder snow.
They must have enough surfacearea to keep the front of the machineup, and must also be able to steer onclear ice. Actually, they are designedto have very little friction in a forward direction, and as much friction aspossible sideward. Within recent years, manufacturers have produced plasticskins to fit under the skis. They provide a little more surface area for flotation,but their main purpose is to reduce friction with the snow. They work amaz-ingly well.
Some people run their machines on bare tundra, and report that plasticskins are a tremendous improvement. Of course, they don’t last long on gravelroads.
Most skis have a very hard steel skeg down the middle that is designed tohelp the machine track on hard or icy trails. The skeg is made of very durablecarbide steel.
Belly Plastic
In the effort to make snowmachines more efficient while breaking trail,manufacturers have made sheets of plastic to fit under the belly of the ma-chines to reduce friction. The plastic provides protection from impact withobstacles.
The belly plastic offers that kind of help by reducing friction in powdersnow in critical moments.
Slide rails
Track
High friction sideways
Low frictionforward
Skeg
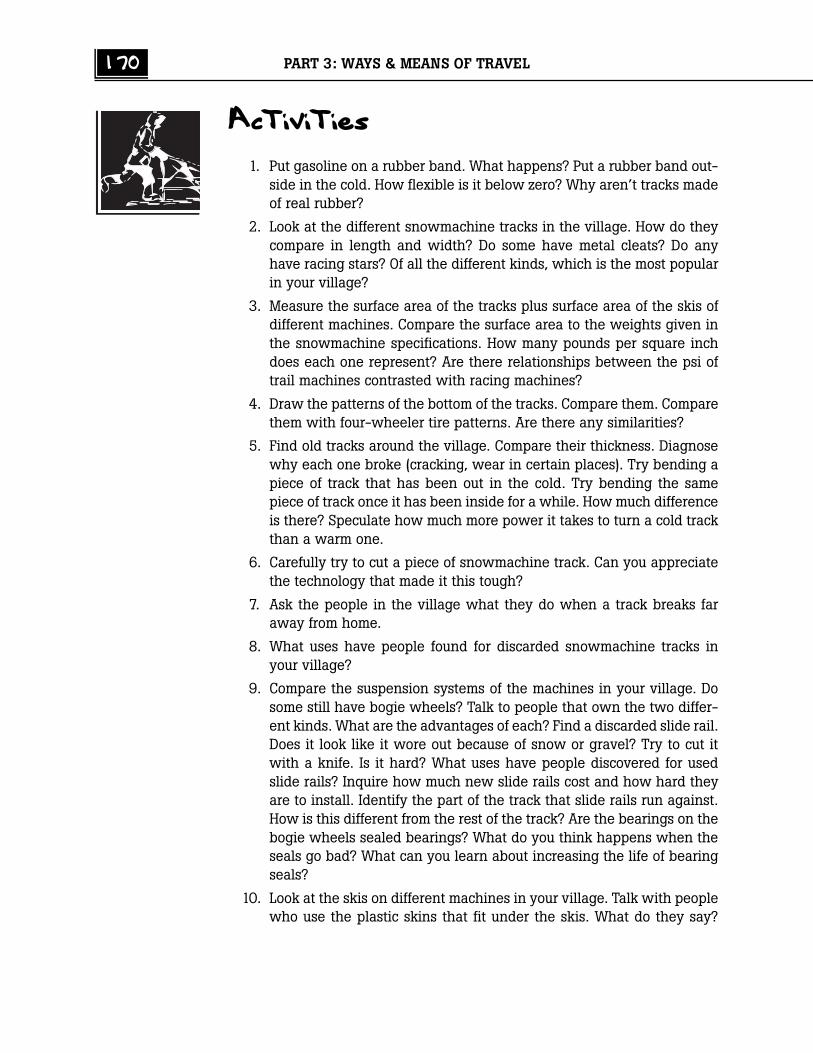
170 PART 3: WAYS & MEANS OF TRAVEL
Activities
1. Put gasoline on a rubber band. What happens? Put a rubber band out-side in the cold. How flexible is it below zero? Why aren’t tracks madeof real rubber?
2. Look at the different snowmachine tracks in the village. How do theycompare in length and width? Do some have metal cleats? Do anyhave racing stars? Of all the different kinds, which is the most popularin your village?
3. Measure the surface area of the tracks plus surface area of the skis ofdifferent machines. Compare the surface area to the weights given inthe snowmachine specifications. How many pounds per square inchdoes each one represent? Are there relationships between the psi oftrail machines contrasted with racing machines?
4. Draw the patterns of the bottom of the tracks. Compare them. Comparethem with four-wheeler tire patterns. Are there any similarities?
5. Find old tracks around the village. Compare their thickness. Diagnosewhy each one broke (cracking, wear in certain places). Try bending apiece of track that has been out in the cold. Try bending the samepiece of track once it has been inside for a while. How much differenceis there? Speculate how much more power it takes to turn a cold trackthan a warm one.
6. Carefully try to cut a piece of snowmachine track. Can you appreciatethe technology that made it this tough?
7. Ask the people in the village what they do when a track breaks faraway from home.
8. What uses have people found for discarded snowmachine tracks inyour village?
9. Compare the suspension systems of the machines in your village. Dosome still have bogie wheels? Talk to people that own the two differ-ent kinds. What are the advantages of each? Find a discarded slide rail.Does it look like it wore out because of snow or gravel? Try to cut itwith a knife. Is it hard? What uses have people discovered for usedslide rails? Inquire how much new slide rails cost and how hard theyare to install. Identify the part of the track that slide rails run against.How is this different from the rest of the track? Are the bearings on thebogie wheels sealed bearings? What do you think happens when theseals go bad? What can you learn about increasing the life of bearingseals?
10. Look at the skis on different machines in your village. Talk with peoplewho use the plastic skins that fit under the skis. What do they say?
Chapter 23: Snowmachine Tracks 171
What is the surface area of the average ski? Compare skegs on thedifferent skis.
11. Measure the distance between the skis on different machines. Is therea difference? If so, why do you think this is so? What do snowmachineowners say about skis being close together or farther apart? Is it impor-tant? If so, under what conditions?
12. Talk to several people who have installed the sheets of plastic underthe belly of the snowmachine. Do they notice a significant difference?Why did they install the plastic in the first place?
13. When did snowmachines first come to your village? Ask the older peoplehow they have changed over the years. What about them has improved?What about them has not improved? Why do they think machines arebetter than dogs?
Student Response
1. Why wouldn’t a track made out of natural rubber last on a snowmachinein Alaska?
2. Why are there nylon cords in the track as well as Kevlar?
3. What is the problem with a very large track?
4. What is the problem with a small track?
5. What is the problem with a track that is too smooth? Too rough?
6. What kind of track would you want to operate in deep powder snow?
7. What kind of track would you want for racing? For pulling big loads onhard trails?
8. Skis are designed to have very little friction in a direction, and considerable friction in a direction.
9. What is the purpose of skis besides steering?
10. Why do some people put plastic skins on skis?
11. Why do some people have belly plastic installed?
Math
1. A machine weighs 375 lbs. The track is 15” x 47” in contact with thetrail. The skis are 5” x 30” each with plastic shoes. What is the aver-age psi of this machine on the surface of the snow?
172 PART 3: WAYS & MEANS OF TRAVEL
2. A racing machine weighs 489 lbs. The track is 15” x 40” in contactwith the snow. The skis are 5” x 24” each. What is the average psi onthe surface of the snow?
3. A long track uses 25% more energy to turn than a short one. Turning ashort track represents 9% of a machine’s effort. If Pete usually spends$350 a year on gasoline approximately how much is he paying for theconvenience of having a long track?
4. Having plastic ski skins and plastic on the belly of a machine saved12% of a machine’s effort. They cost $75 to purchase. If Moxie usuallyspends $425 for gas on his trapline, will the plastic on the skis andbelly pay for themselves in the first year?
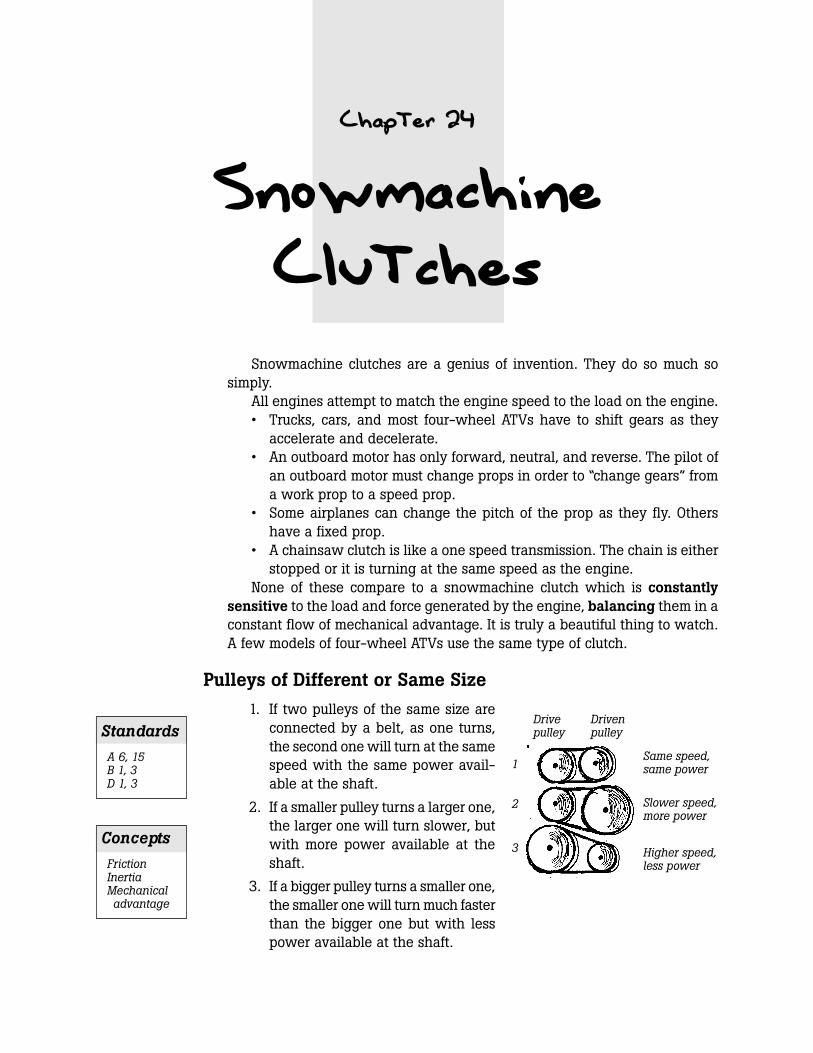
Chapter 24
SnowmachineClutches
Snowmachine clutches are a genius of invention. They do so much sosimply.
All engines attempt to match the engine speed to the load on the engine.• Trucks, cars, and most four-wheel ATVs have to shift gears as they
accelerate and decelerate.• An outboard motor has only forward, neutral, and reverse. The pilot of
an outboard motor must change props in order to “change gears” froma work prop to a speed prop.
• Some airplanes can change the pitch of the prop as they fly. Othershave a fixed prop.
• A chainsaw clutch is like a one speed transmission. The chain is eitherstopped or it is turning at the same speed as the engine.
None of these compare to a snowmachine clutch which is constantlysensitive to the load and force generated by the engine, balancing them in aconstant flow of mechanical advantage. It is truly a beautiful thing to watch.A few models of four-wheel ATVs use the same type of clutch.
Pulleys of Different or Same Size
1. If two pulleys of the same size areconnected by a belt, as one turns,the second one will turn at the samespeed with the same power avail-able at the shaft.
2. If a smaller pulley turns a larger one,the larger one will turn slower, butwith more power available at theshaft.
3. If a bigger pulley turns a smaller one,the smaller one will turn much fasterthan the bigger one but with lesspower available at the shaft.
Standards
A 6, 15B 1, 3D 1, 3
Concepts
FrictionInertiaMechanicaladvantage
Same speed,same power
Slower speed,more power
Higher speed,less power
Drivepulley
Drivenpulley
1
2
3
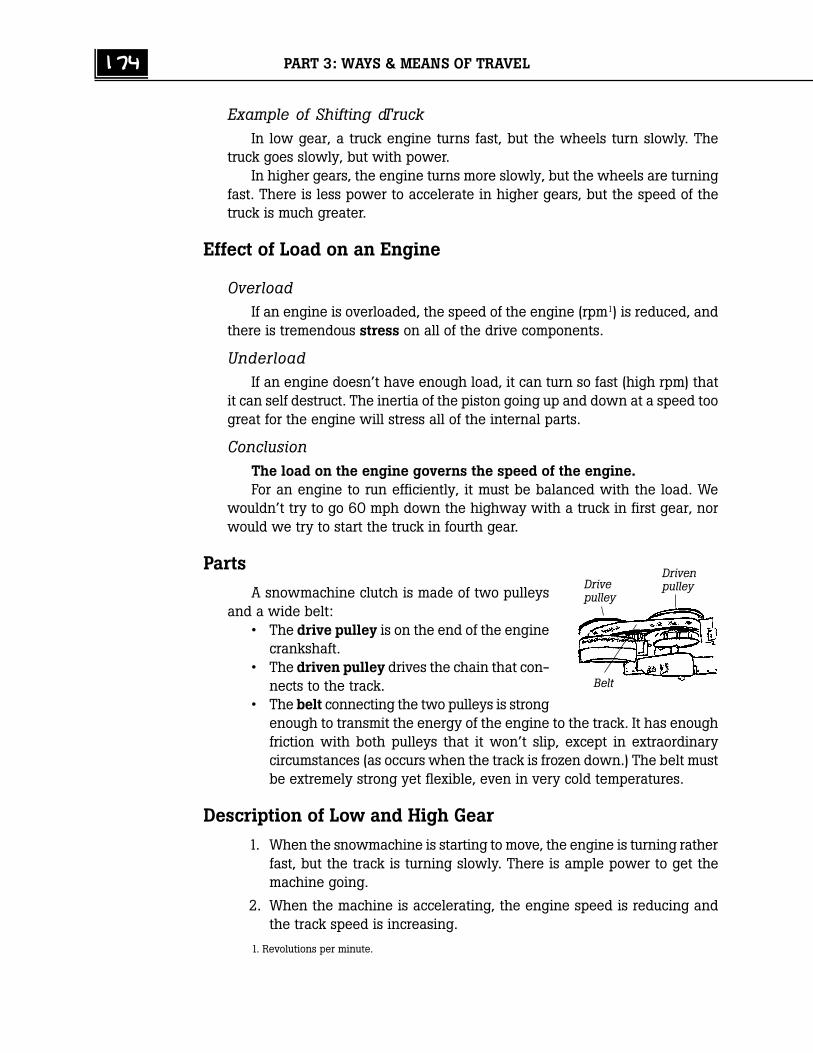
174 PART 3: WAYS & MEANS OF TRAVEL
Example of Shifting a TruckIn low gear, a truck engine turns fast, but the wheels turn slowly. The
truck goes slowly, but with power.In higher gears, the engine turns more slowly, but the wheels are turning
fast. There is less power to accelerate in higher gears, but the speed of thetruck is much greater.
Effect of Load on an Engine
OverloadIf an engine is overloaded, the speed of the engine (rpm1) is reduced, and
there is tremendous stress on all of the drive components.
UnderloadIf an engine doesn’t have enough load, it can turn so fast (high rpm) that
it can self destruct. The inertia of the piston going up and down at a speed toogreat for the engine will stress all of the internal parts.
ConclusionThe load on the engine governs the speed of the engine.For an engine to run efficiently, it must be balanced with the load. We
wouldn’t try to go 60 mph down the highway with a truck in first gear, norwould we try to start the truck in fourth gear.
Parts
A snowmachine clutch is made of two pulleysand a wide belt:
• The drive pulley is on the end of the enginecrankshaft.
• The driven pulley drives the chain that con-nects to the track.
• The belt connecting the two pulleys is strongenough to transmit the energy of the engine to the track. It has enoughfriction with both pulleys that it won’t slip, except in extraordinarycircumstances (as occurs when the track is frozen down.) The belt mustbe extremely strong yet flexible, even in very cold temperatures.
Description of Low and High Gear
1. When the snowmachine is starting to move, the engine is turning ratherfast, but the track is turning slowly. There is ample power to get themachine going.
2. When the machine is accelerating, the engine speed is reducing andthe track speed is increasing.
1. Revolutions per minute.
Drivepulley
Drivenpulley
Belt
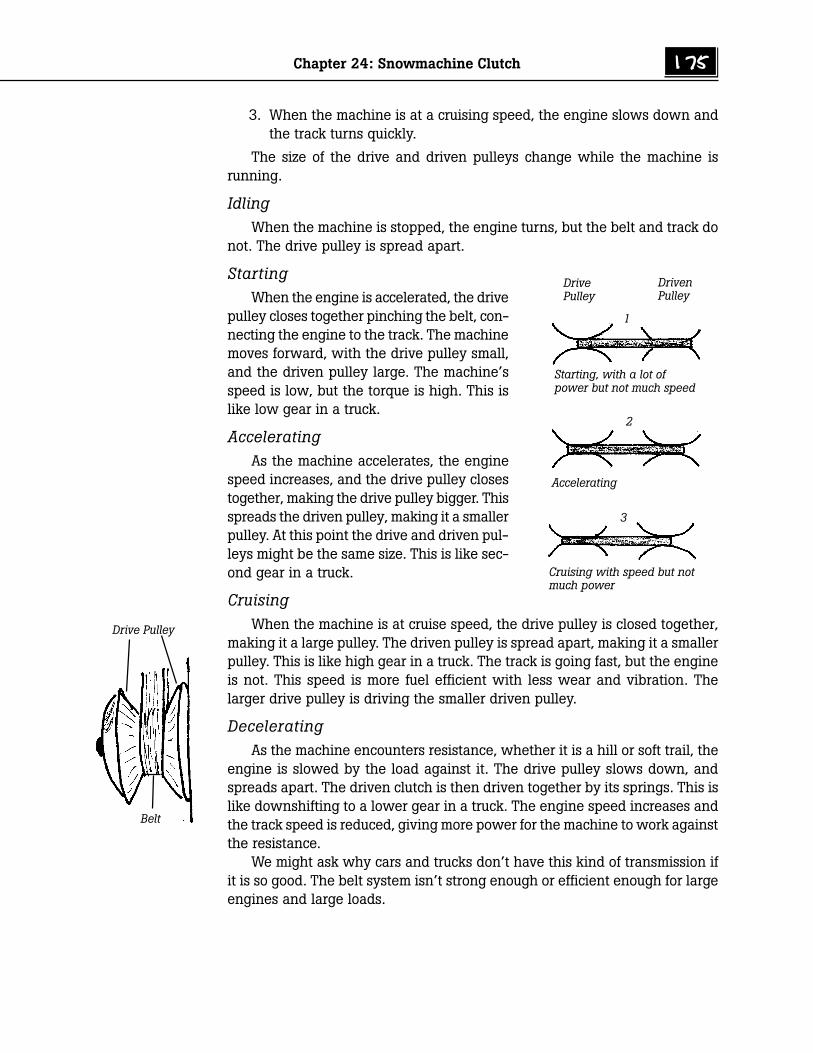
Chapter 24: Snowmachine Clutch 175
3. When the machine is at a cruising speed, the engine slows down andthe track turns quickly.
The size of the drive and driven pulleys change while the machine isrunning.
IdlingWhen the machine is stopped, the engine turns, but the belt and track do
not. The drive pulley is spread apart.
StartingWhen the engine is accelerated, the drive
pulley closes together pinching the belt, con-necting the engine to the track. The machinemoves forward, with the drive pulley small,and the driven pulley large. The machine’sspeed is low, but the torque is high. This islike low gear in a truck.
AcceleratingAs the machine accelerates, the engine
speed increases, and the drive pulley closestogether, making the drive pulley bigger. Thisspreads the driven pulley, making it a smallerpulley. At this point the drive and driven pul-leys might be the same size. This is like sec-ond gear in a truck.
CruisingWhen the machine is at cruise speed, the drive pulley is closed together,
making it a large pulley. The driven pulley is spread apart, making it a smallerpulley. This is like high gear in a truck. The track is going fast, but the engineis not. This speed is more fuel efficient with less wear and vibration. Thelarger drive pulley is driving the smaller driven pulley.
DeceleratingAs the machine encounters resistance, whether it is a hill or soft trail, the
engine is slowed by the load against it. The drive pulley slows down, andspreads apart. The driven clutch is then driven together by its springs. This islike downshifting to a lower gear in a truck. The engine speed increases andthe track speed is reduced, giving more power for the machine to work againstthe resistance.
We might ask why cars and trucks don’t have this kind of transmission ifit is so good. The belt system isn’t strong enough or efficient enough for largeengines and large loads.
Drive Pulley
Belt
Cruising with speed but notmuch power
Accelerating
Starting, with a lot ofpower but not much speed
DrivePulley
DrivenPulley
1
2
3

176 PART 3: WAYS & MEANS OF TRAVEL
The Drive Clutch Responds to the Load on the Engine
The drive pulley has weights that moveout when the engine speed increases. Theyforce the movable half of the drive clutchtowards the other half, making it, in effect,a larger pulley.
When a load is encountered, the en-gine speed drops, and the springs withinthe clutch push it apart, in effect making ita smaller pulley.
The force of the weights in the driveclutch balance with the force of the springsin both the drive and driven clutches. Thoseforces flow against each other, constantlykeeping the load and force of the engine inbalance. Block up the rear end of asnowmachine, and observe the clutchworking as the track spins above theground.
Maintenance
There is a beautiful balance between the pressure of the springs and theforce of the weights in the drive clutch. If any of the parts are not well lubri-cated, that balance will be hindered.
It is important to use polar grease that will not get too thick in very coldweather. The clutch should be sensitive to load, and not be sensitive to tem-perature.
Adjusting the clutchMost machines have a way to tighten or loosen the spring of the driven
clutch. Stronger or weaker springs can be installed.If the spring in the driven clutch is too strong, it resists spreading. In
effect, it gives the machine more power, but causes the engine to operate at ahigher rpm than is healthy. If the spring is too weak, the driven clutch spreadseasily. Top speed is easily reached, but the engine stresses and is weak inacceleration.
Activities
1. Remove the clutch guard from a machine and identify the parts.
2. Block the back of the machine up or suspend it so the track is free fromthe ground. With students at a safe distance, start the engine. Acceler-
As the engine speedincreases, the clutchpushes in
The pressure ofthe springpushes in
For one clutch to movetogether, the other one mustspread apart. They competewith each other, opening andclosing as the engine speedincreases and decreases.
Engine
DriveClutch
DrivenClutch
Chapter 24: Snowmachine Clutch 177
ate and decelerate the engine. Can you see the clutch responding au-tomatically to the throttle changes?
3. Watch the drive clutch. Is it bigger at low or high rpm?
4. Watch the driven clutch. Is it bigger at low or high rpm?
5. Is clutch movement smooth or erratic? If it is not smooth, what doesthis indicate?
6. At below zero temperatures, put polar grease between your fingers onone hand and regular grease between the fingers of the other hand.Can you feel the difference?
7. What would slip if the track were frozen down and the engine acceler-ated? Do you see evidence of this around the clutch?
8. Remove and replace a drive belt. Compare a worn and a new belt forwidth. Find the price of a new belt.
9. Can you see the weights in the drive clutch? If this isn’t possible, try tofind an old one that has been taken apart. Describe how centrifugalforce causes the drive clutch to close together. Draw what you imaginehappening.
10. Compress the spring from both the drive and driven pulleys. Are theystronger or weaker than you thought? Is there a way to tighten thespring on the driven pulley on the machine you are looking at?
11. Improvise some pulleys, even if you have to use a rubber band as adrive belt. Use different size thread spools as pulleys if you can’t findanything else. Predict how many turns the driven spool will turn whenthe drive spool turns once.
12. Drive a four-wheel ATV, accelerating through the gears. While doingthis, try to imagine what would be happening to the drive and drivenpulleys if it had a snowmachine clutch. (Actually, Polaris six-wheelershave a clutch like a snowmachine.)
13. Do you think this kind of clutch would work on an outboard motor,giving better performance?
Student Response
1. How do each of the following attempt to balance the engine speedwith the load?
• Trucks, cars, & four wheelers• Outboard motors• Airplanes
2. What are the three main parts of a snowmachine clutch?
3. Which clutch is on the end of the engine’s driveshaft?
178 PART 3: WAYS & MEANS OF TRAVEL
4. Draw a picture of a big pulley driving a smaller one. If the big pulleyturns once, will the little one turn more or less than one turn?
5. Draw a picture of a smaller pulley driving a bigger one.
6. Draw a picture of two pulleys of the same size.
7. Which of the above pictures illustrates an engine starting to move?
8. Which one of the above illustrates an engine at cruise speed?
9. What is the main advantage of a snowmachine clutch over a trucktransmission?
10. Why couldn’t it be used on a truck or car?
11. What is the advantage of a snowmachine clutch over a chainsaw clutch?
12. What is the governor on an engine? What happens if there isn’t enoughload on an engine? What happens if there is too much load on anengine?
13. What two things does the snowmachine clutch balance?
14. Why is good lubrication important in a snowmachine clutch?
Math
1. A pulley 3” in diameter turns a pulley 2” in diameter. If the first oneturns 50 complete revolutions, how many revolutions does the secondone turn?
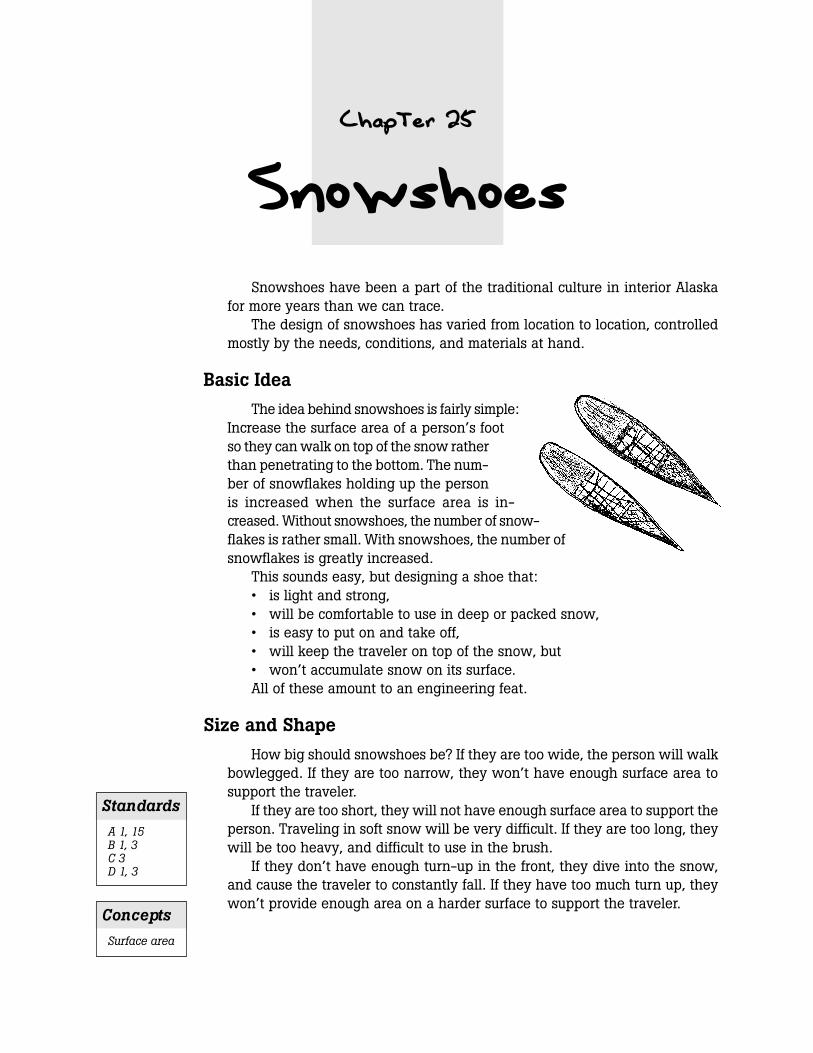
Chapter 25
Snowshoes
Snowshoes have been a part of the traditional culture in interior Alaskafor more years than we can trace.
The design of snowshoes has varied from location to location, controlledmostly by the needs, conditions, and materials at hand.
Basic Idea
The idea behind snowshoes is fairly simple:Increase the surface area of a person’s footso they can walk on top of the snow ratherthan penetrating to the bottom. The num-ber of snowflakes holding up the personis increased when the surface area is in-creased. Without snowshoes, the number of snow-flakes is rather small. With snowshoes, the number ofsnowflakes is greatly increased.
This sounds easy, but designing a shoe that:• is light and strong,• will be comfortable to use in deep or packed snow,• is easy to put on and take off,• will keep the traveler on top of the snow, but• won’t accumulate snow on its surface.All of these amount to an engineering feat.
Size and Shape
How big should snowshoes be? If they are too wide, the person will walkbowlegged. If they are too narrow, they won’t have enough surface area tosupport the traveler.
If they are too short, they will not have enough surface area to support theperson. Traveling in soft snow will be very difficult. If they are too long, theywill be too heavy, and difficult to use in the brush.
If they don’t have enough turn-up in the front, they dive into the snow,and cause the traveler to constantly fall. If they have too much turn up, theywon’t provide enough area on a harder surface to support the traveler.
Concepts
Surface area
Standards
A 1, 15B 1, 3C 3D 1, 3

180 PART 3: WAYS & MEANS OF TRAVEL
Two Types
There are basically two types ofsnowshoes, trail and bearpaw. Trailsnowshoes are usually ten incheswide and fifty-six inches long includ-ing the tail. Bearpaws are shorter androunded on both ends.
The front of trail snowshoes areupturned for deep powder snow. Therounded shape of the bearpaws give a little bounce to the traveler’s step onhard packed snow, acting like a mini-trampoline.
PSI
The pressure that snowshoes exert on the snow can be described in poundsper square inch (psi). A heavier person will sink deeper on the same pair ofsnowshoes than a lighter person because the pounds per square inch of snow-shoe surface is greater.
Both a lighter and a heavier person sink deeper in powder snow becausethe strength of the snow is less than the strength of packed snow.
The optimum size of snowshoes depends on the traveler, snow condi-tions, and use. If the traveler is fairly light or usually travels on hard-packedor drifted snow, small shoes will be enough.
Once the traveler sinks deeper than his knees, traveling becomes verydifficult. In powder snow, I have never found a pair of snowshoes that I thoughtwere too big except in a few experiences fighting through brush.
Oldtimers purposely used smaller snowshoes to break trail a good trail fordogs or other people following behind.
When they ran down a moose, they often used very large snowshoes (sixfeet) to stay on top of the snow and conserve their energy.
BalanceThe front of some snowshoes dive into
the snow, tripping the traveler. To preventthis:
• The front of the snowshoe has moresurface area than the rear.
• The front of the snowshoe is turnedup.
• The rear has more weight.These three features work together to keep the front of the snowshoes
from diving.
The TailSome trail model snowshoes have a long tail. It serves an important pur-
pose. The tail keeps the snowshoe pointing forward, like the keel on a canoe
Trail
Bearpaw
Onesquareinch

Chapter 25: Snowshoes 181
or tail on a kite. Without the tail, the snowshoe would swing from side to side,particularly in the brush, getting hung up, slowing and frustrating the trav-eler.
MeshThe mesh underfoot obviously needs to be bigger and stronger than that
in the front and back.Powder snow demands mesh in the front and back that is smaller and
more tightly woven to provide adequate surface area. Wetter or coarser snowdemands mesh that is thicker and more durable against abrasion.
Materials
FramesA well-chosen birch tree is tougher than all commercial woods sawn from
a tree.Not every birch tree is adequate. Oldtimers spent days and months look-
ing for the right tree with the proper grain that was flexible, durable and withno knots.
Once they found the tree they were looking for, they split the snowshoeframe from the tree. This left the strength of the natural grain intact. Some-times hot water or steam were used to bend the frame. Great care was used toavoid overheating. Heating and steaming weaken the wood.
Commercial snowshoe frames are made from hickory or ash. The wood issawn from planks rather than split, so the grain of the frames are greatlyweakened. All first growth ash and hickory are gone from the United Statesas well as most of the second growth. The hickory and ash harvested now arefrom small, third-growth trees.
Manufacturers have experimented with aluminum alloys. They are verylight and strong. It doesn’t take much imagination to know what happens inoverflow.
WebbingFor webbing, oldtimers used the skin from the belly of a spring moose.
This is the strongest and toughest skin available.There is a real art to making the rawhide as it takes two people working
well together… a true test of a marriage or friendship!We used to skin moose very carefully. Nowadays, it is hard to find a good
skin to work on.Untreated rawhide stretches when it is wet. Unfortunately, dogs like to
eat rawhide and more than a few travelers have cursed their dogs for eatingtheir snowshoes.
Weaving the webbing to snowshoes in a way that is appropriate for localsnow conditions is an art.

182 PART 3: WAYS & MEANS OF TRAVEL
BindingsCommercial bindings available today are functional, but the bindings on
the old time snowshoes were light and could be put on or removed in secondswithout using hands. Manila rope treated with linseed or vegetable oil worksbest for Native-style bindings because it is quiet and doesn’t stretch like syn-thetics. Rawhide stretches too much when wet.
Few things are more miserable than snowshoe bindings that don’t workproperly.
There are some good quality modern bindings, but they are very expen-sive. Complex buckles and straps make travel on thin ice very dangerous.Traditional Native bindings come off with a twist of the foot.
NoiseOiling snowshoes reduces noise when hunting. The friction of wood to
wood, or rawhide to wood produces enough noise to alert animals, particu-larly in very cold weather. The sound of snow being compressed is loud enoughin cold weather. Creaking snowshoes make matters much worse.
CareLinseed oil discourages animals from eating the snowshoe webbing. Snow-
shoes are usually kept outside in a cool dry place, above the reach of animals.While birch has great strength, it tends to rot easily, and oil helps preventthis. As the best snowshoes are very light, the traveler must walk carefully toavoid breaking the frames.
Activities
1. Time someone walking a given distance in deep snow without snow-shoes. Then time the same person with snowshoes.
2. Try different kinds of available snowshoes (trail, bear paw) on differentsnow conditions. Which is easier and why? Which is easier in the brush?On a snowmachine trail? On windswept snow? In powder?
3. Try different kinds of bindings. Which seem better to you? This test isinvalid unless you walk under many different conditions: packed trail,in the brush, up hills, in deep powder, etc. Which bindings and snow-shoes are the quietest?
4. Compute the psi of individuals wearing winter boots and again with apair of snowshoes (their weight divided by the area of the boots orsnowshoes).
5. Ask some of the oldtimers in your village what kinds of snowshoesthey used and why. What did they do to the rawhide (oil, varnish, etc.)to make it waterproof?
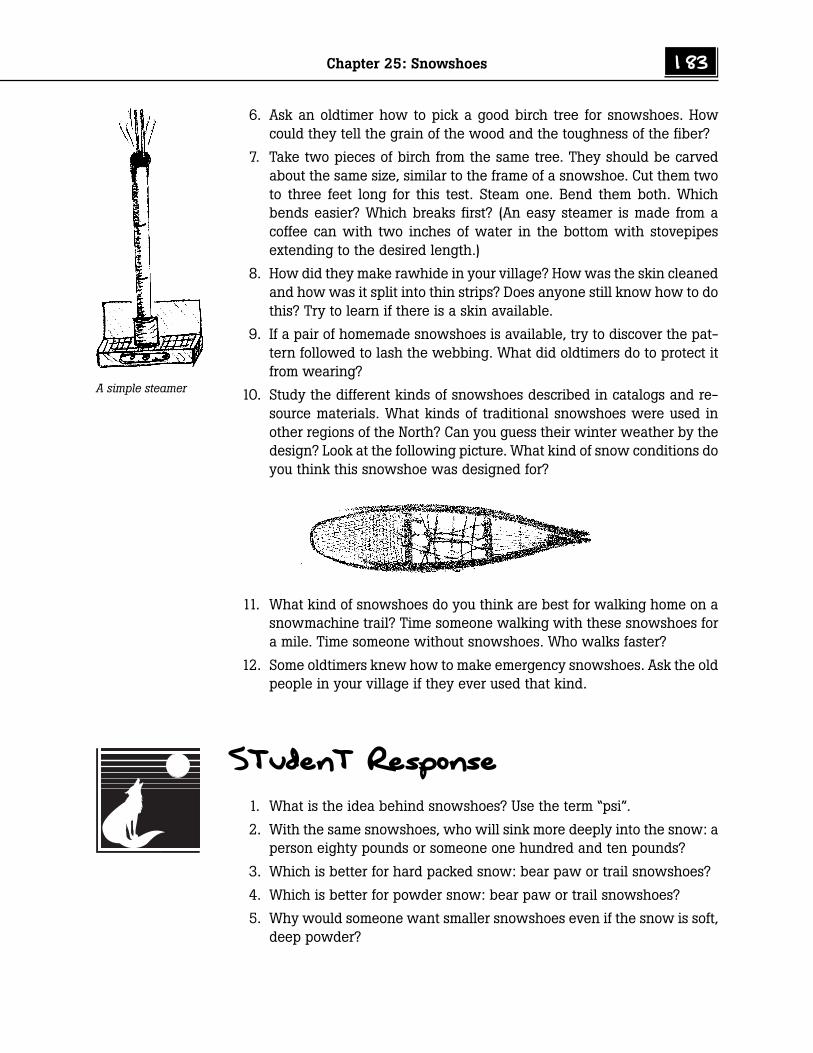
Chapter 25: Snowshoes 183
6. Ask an oldtimer how to pick a good birch tree for snowshoes. Howcould they tell the grain of the wood and the toughness of the fiber?
7. Take two pieces of birch from the same tree. They should be carvedabout the same size, similar to the frame of a snowshoe. Cut them twoto three feet long for this test. Steam one. Bend them both. Whichbends easier? Which breaks first? (An easy steamer is made from acoffee can with two inches of water in the bottom with stovepipesextending to the desired length.)
8. How did they make rawhide in your village? How was the skin cleanedand how was it split into thin strips? Does anyone still know how to dothis? Try to learn if there is a skin available.
9. If a pair of homemade snowshoes is available, try to discover the pat-tern followed to lash the webbing. What did oldtimers do to protect itfrom wearing?
10. Study the different kinds of snowshoes described in catalogs and re-source materials. What kinds of traditional snowshoes were used inother regions of the North? Can you guess their winter weather by thedesign? Look at the following picture. What kind of snow conditions doyou think this snowshoe was designed for?
11. What kind of snowshoes do you think are best for walking home on asnowmachine trail? Time someone walking with these snowshoes fora mile. Time someone without snowshoes. Who walks faster?
12. Some oldtimers knew how to make emergency snowshoes. Ask the oldpeople in your village if they ever used that kind.
Student Response
1. What is the idea behind snowshoes? Use the term “psi”.
2. With the same snowshoes, who will sink more deeply into the snow: aperson eighty pounds or someone one hundred and ten pounds?
3. Which is better for hard packed snow: bear paw or trail snowshoes?
4. Which is better for powder snow: bear paw or trail snowshoes?
5. Why would someone want smaller snowshoes even if the snow is soft,deep powder?
A simple steamer
184 PART 3: WAYS & MEANS OF TRAVEL
6. What purpose does the tail of the snowshoe have?
7. Why aren’t commercially-made snowshoe frames strong?
8. What kind of skin was the toughest to use for traditional lashing? Whatis the disadvantage of this kind of lashing?
9. Why did oldtimers oil their snowshoes?
Math
1. What is the psi of a person weighing 175 lbs on snowshoes that have400 square inches.
2. What is the psi of the same person wearing boots with 48 square inches?Snowshoes increase the surface area the person is exerting force uponby how many times?
3. On a trail snowshoe, measure the surface area in front of the individual’stoe. Measure the surface area behind the individual’s heel. Which isgreater?
4. Compute the psi of the smallest person in the class if they have a stan-dard pair of 10” x 56” snowshoes. How big would the snowshoeshave to be for the largest person in the class to have the same psitherefore sinking the same distance into the snow? You will have tofigure the area of the snowshoes out in several different parts, circles,squares and triangles.
5. A homemade snowshoe weighs 2.2 lbs. Another one made by the Armyis 3.0 lbs. If someone’s step is 2’ and there are 5,280 feet in a mile,how many extra pounds are lifted in a mile? How many extra poundsare lifted on a hunting trip where the person walks 7.4 miles?
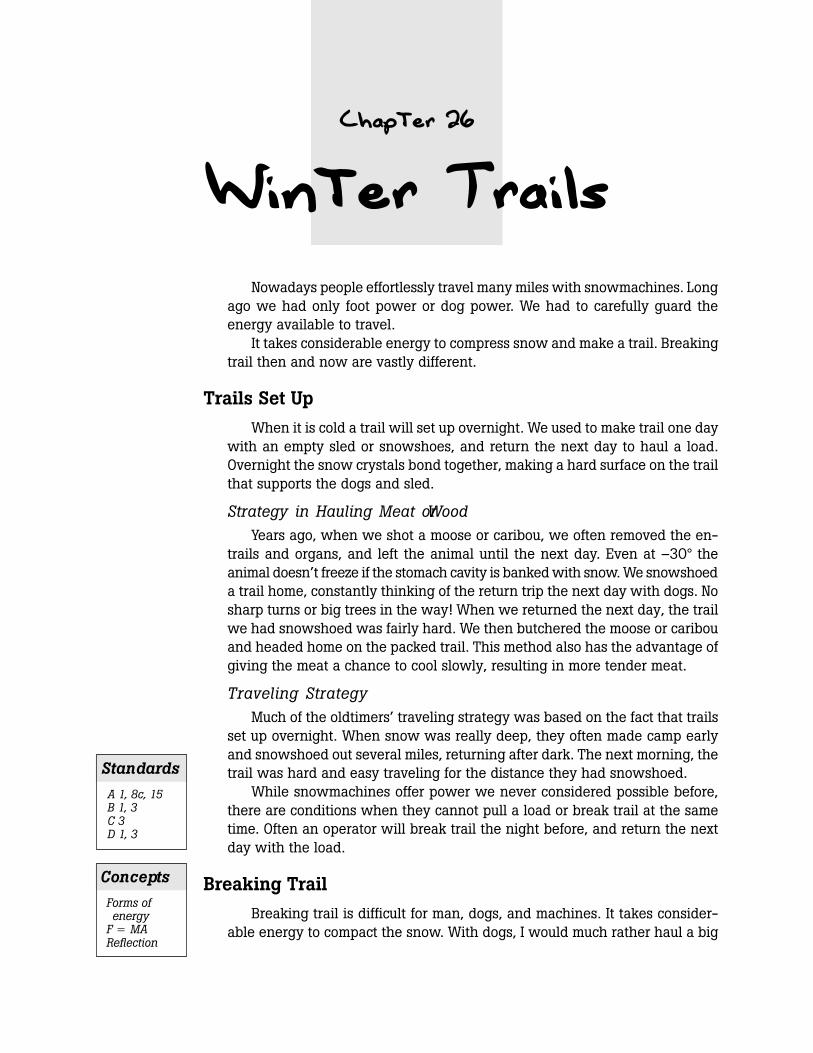
Chapter 26
Winter Trails
Nowadays people effortlessly travel many miles with snowmachines. Longago we had only foot power or dog power. We had to carefully guard theenergy available to travel.
It takes considerable energy to compress snow and make a trail. Breakingtrail then and now are vastly different.
Trails Set Up
When it is cold a trail will set up overnight. We used to make trail one daywith an empty sled or snowshoes, and return the next day to haul a load.Overnight the snow crystals bond together, making a hard surface on the trailthat supports the dogs and sled.
Strategy in Hauling Meat or WoodYears ago, when we shot a moose or caribou, we often removed the en-
trails and organs, and left the animal until the next day. Even at –30° theanimal doesn’t freeze if the stomach cavity is banked with snow. We snowshoeda trail home, constantly thinking of the return trip the next day with dogs. Nosharp turns or big trees in the way! When we returned the next day, the trailwe had snowshoed was fairly hard. We then butchered the moose or caribouand headed home on the packed trail. This method also has the advantage ofgiving the meat a chance to cool slowly, resulting in more tender meat.
Traveling StrategyMuch of the oldtimers’ traveling strategy was based on the fact that trails
set up overnight. When snow was really deep, they often made camp earlyand snowshoed out several miles, returning after dark. The next morning, thetrail was hard and easy traveling for the distance they had snowshoed.
While snowmachines offer power we never considered possible before,there are conditions when they cannot pull a load or break trail at the sametime. Often an operator will break trail the night before, and return the nextday with the load.
Breaking Trail
Breaking trail is difficult for man, dogs, and machines. It takes consider-able energy to compact the snow. With dogs, I would much rather haul a big
Standards
A 1, 8c, 15B 1, 3C 3D 1, 3
Concepts
Forms ofenergy
F z MAReflection
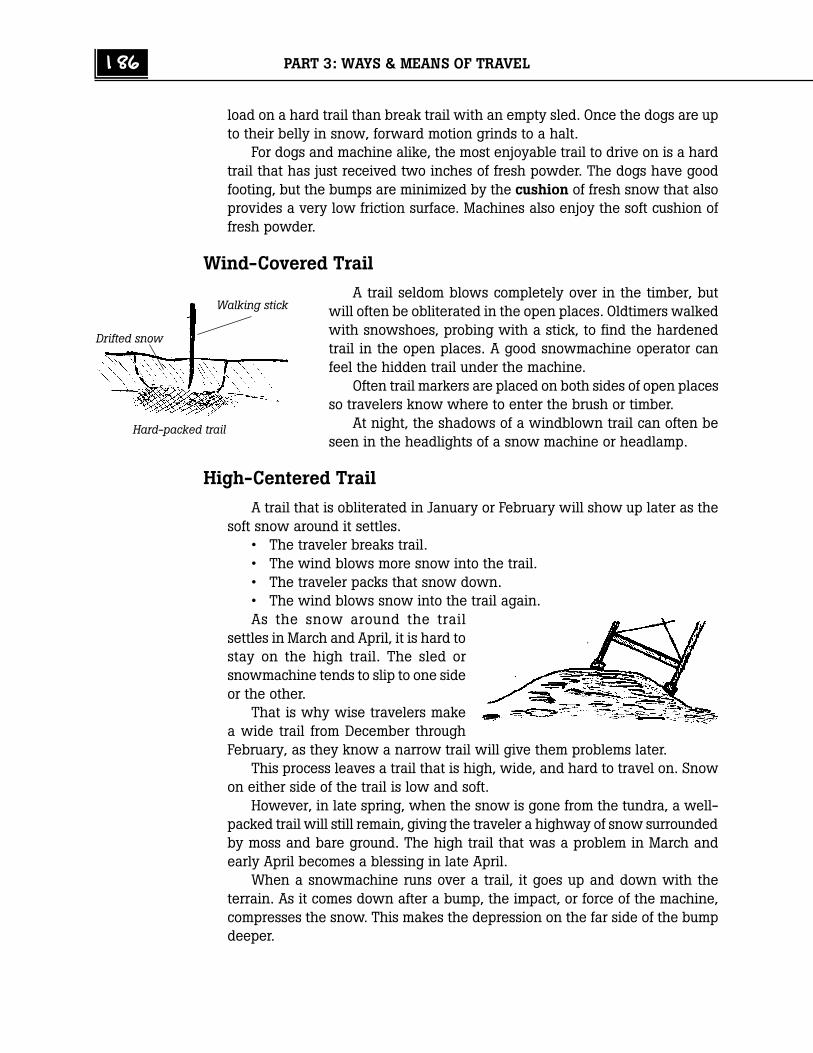
186 PART 3: WAYS & MEANS OF TRAVEL
load on a hard trail than break trail with an empty sled. Once the dogs are upto their belly in snow, forward motion grinds to a halt.
For dogs and machine alike, the most enjoyable trail to drive on is a hardtrail that has just received two inches of fresh powder. The dogs have goodfooting, but the bumps are minimized by the cushion of fresh snow that alsoprovides a very low friction surface. Machines also enjoy the soft cushion offresh powder.
Wind-Covered Trail
A trail seldom blows completely over in the timber, butwill often be obliterated in the open places. Oldtimers walkedwith snowshoes, probing with a stick, to find the hardenedtrail in the open places. A good snowmachine operator canfeel the hidden trail under the machine.
Often trail markers are placed on both sides of open placesso travelers know where to enter the brush or timber.
At night, the shadows of a windblown trail can often beseen in the headlights of a snow machine or headlamp.
High-Centered Trail
A trail that is obliterated in January or February will show up later as thesoft snow around it settles.
• The traveler breaks trail.• The wind blows more snow into the trail.• The traveler packs that snow down.• The wind blows snow into the trail again.As the snow around the trail
settles in March and April, it is hard tostay on the high trail. The sled orsnowmachine tends to slip to one sideor the other.
That is why wise travelers makea wide trail from December throughFebruary, as they know a narrow trail will give them problems later.
This process leaves a trail that is high, wide, and hard to travel on. Snowon either side of the trail is low and soft.
However, in late spring, when the snow is gone from the tundra, a well-packed trail will still remain, giving the traveler a highway of snow surroundedby moss and bare ground. The high trail that was a problem in March andearly April becomes a blessing in late April.
When a snowmachine runs over a trail, it goes up and down with theterrain. As it comes down after a bump, the impact, or force of the machine,compresses the snow. This makes the depression on the far side of the bumpdeeper.
Drifted snow
Walking stick
Hard-packed trail
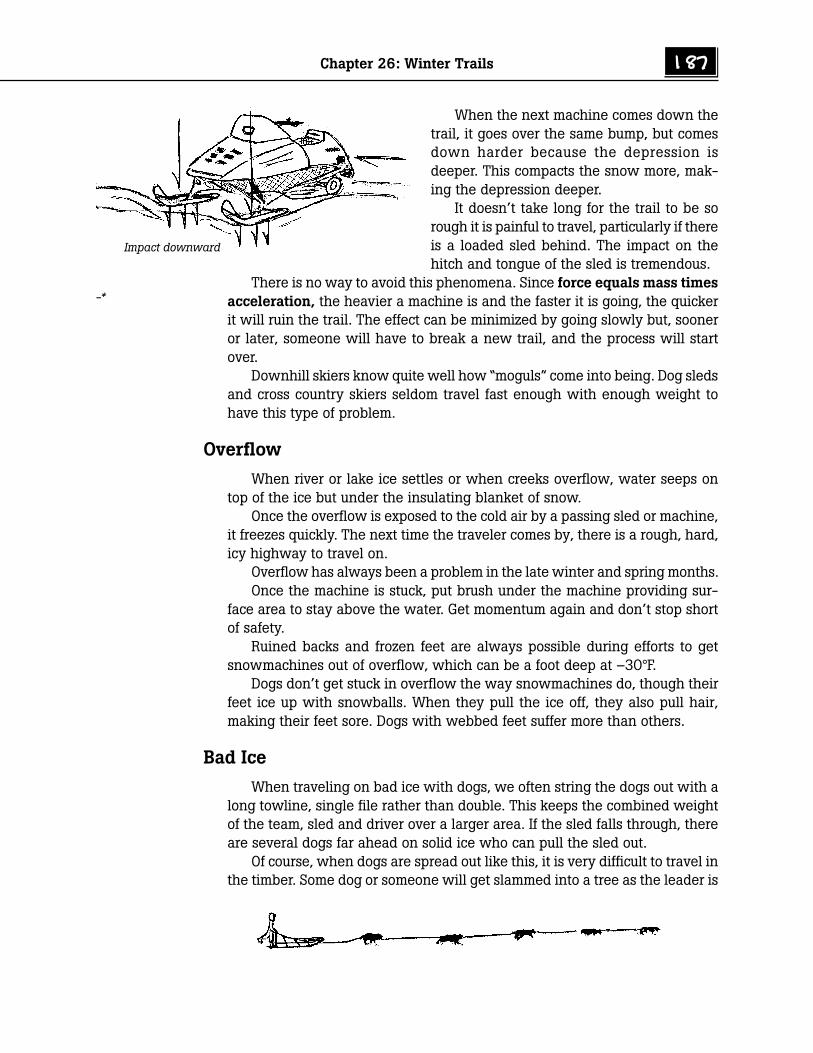
Chapter 26: Winter Trails 187
When the next machine comes down thetrail, it goes over the same bump, but comesdown harder because the depression isdeeper. This compacts the snow more, mak-ing the depression deeper.
It doesn’t take long for the trail to be sorough it is painful to travel, particularly if thereis a loaded sled behind. The impact on thehitch and tongue of the sled is tremendous.
There is no way to avoid this phenomena. Since force equals mass timesacceleration, the heavier a machine is and the faster it is going, the quickerit will ruin the trail. The effect can be minimized by going slowly but, sooneror later, someone will have to break a new trail, and the process will startover.
Downhill skiers know quite well how “moguls” come into being. Dog sledsand cross country skiers seldom travel fast enough with enough weight tohave this type of problem.
Overflow
When river or lake ice settles or when creeks overflow, water seeps ontop of the ice but under the insulating blanket of snow.
Once the overflow is exposed to the cold air by a passing sled or machine,it freezes quickly. The next time the traveler comes by, there is a rough, hard,icy highway to travel on.
Overflow has always been a problem in the late winter and spring months.Once the machine is stuck, put brush under the machine providing sur-
face area to stay above the water. Get momentum again and don’t stop shortof safety.
Ruined backs and frozen feet are always possible during efforts to getsnowmachines out of overflow, which can be a foot deep at –30°F.
Dogs don’t get stuck in overflow the way snowmachines do, though theirfeet ice up with snowballs. When they pull the ice off, they also pull hair,making their feet sore. Dogs with webbed feet suffer more than others.
Bad Ice
When traveling on bad ice with dogs, we often string the dogs out with along towline, single file rather than double. This keeps the combined weightof the team, sled and driver over a larger area. If the sled falls through, thereare several dogs far ahead on solid ice who can pull the sled out.
Of course, when dogs are spread out like this, it is very difficult to travel inthe timber. Some dog or someone will get slammed into a tree as the leader is
Impact downward
-*
188 PART 3: WAYS & MEANS OF TRAVEL
around a bend in the trail others haven’t approached yet.If the front of the sled goes under the ice, the traveler is
in big trouble, so it is important to keep the front up whenthis happens. The harder the dogs pull, the more difficult itis to get the front of the sled above the ice.
Swimming across creeks was standard practice in thespring. The driver needs to get up on the railing of thesled, keeping the back of the sled down, the front up, hop-
ing the creek isn’t too deep. Some of the dogs get across the creek and ontosolid ground when the sled is entering the water. If this looks marginal, thedriver can extend the towline with a long dog chain. This assures that somedogs are on solid ground when the sled hits the water.
Snowmachines don’t have the luxury of being able to swim, althoughthey can skim on water for a ways if they have enough inertia. Some drivershave overestimated the ability of their machine to travel on thin ice and wa-ter. They get a cold bath and a long walk home.
Sunny and Cloudy Days
In winter, when the sun is shining, there are shadows everywhere thatindicate any unevenness of the snow’s surface. The light is coming from onesource in one direction. When the sky is overcast or foggy, it is very difficult tosee uneven features in the terrain. The snow’s surface looks flat because lightis reflected in all directions. There are no shadows. This makes travel some-what dangerous. One time I almost walked off an eight-foot bluff. Everythinglooked flat. On an overcast day, it is hard to see the indentations on the riverthat could indicate that the ice has melted away beneath the snow’s surface.It is safer to travel new country on sunny days.
Fall and Spring Ice
Fall time, the ice is healthy. Fairly thinice can hold considerable weight. Duringthe spring, when the warmed overflowwater has seeped into the river or lake,the ice has turned to long crystals thatdon’t hold together. Ice two feet thick cancrumble under a man’s weight.
Activities
1. Break trail with snowshoes in powder snow. Walk back along the sametrail within an hour. Walk the same trail the next day if it has beencold. What differences do you notice?
Spring ice
Chapter 26: Winter Trails 189
2. Ask oldtimers in the village how they used the fact that trails set upovernight in planning their travels.
3. Ask old people in the village how they can tell which way a moose orcaribou has gone even after the track is blown over. How does thisrelate to the above activities?
4. Observe trails as they emerge “high centered” in March. Ask oldtimersif this was as big a problem with dog teams as it is with snowmachines.
5. Stand on a packed trail. With your eyes closed and a long stick in yourhand, can you feel the trail and walk for 200 yards? Do you think youcould find a trail that is blown over on a lake or the river by this method?
6. Design a rig that could be pulled behind a snowmachine that wouldsmooth out the bumps in the snowmachine trail. Think about hiddenstumps and the need to adjust height.
7. Ask the experienced snowmachine operators in your village for storiesabout overflow. How do they get out when they get stuck? What monthsdoes overflow start in your area?
8. Find out if there are people in your village who fell through the ice andhow they survived.
9. How do people get snowmachines out that fall through the ice? Do themachines usually run after they have been underwater for a while?How do people know where to look for the machine in the open water?
10. After breakup, check the ice chunks on the sides of the river. Breakthem with a stick. Can you see how different it is from the fall ice? Doyou think two feet of that kind of ice is strong?
11. From the oldtimers, ask about five places that usually have bad ice inyour area. How do they tell bad ice right after freeze-up? During thewinter after snow covers the ice? In the spring?
12. Draw a picture of overflow as you imagine it under the snow on theriver.
Student Response
1. Why did people with dog teams break trail one day and haul a load thenext day?
2. Which is harder: breaking trail with an empty sled or hauling a load ona firm trail?
3. How did oldtimers find a trail that was blown over?
4. Draw the process that causes a trail to become high centered in Marchand April.
190 PART 3: WAYS & MEANS OF TRAVEL
5. Why doesn’t overflow freeze under the snow?
6. What did dog mushers do when traveling on bad ice?
7. What is the difference between fall and spring ice?
Math
1. Force z mass x acceleration. A snowmachine has 1/3 of its weight onthe front skis. It weighs 357 lbs. Another machine has 1/4 of its weighton the front skis. It weighs 402 lbs. Which machine impacts the trailharder when going over a bump?
2. Fall ice is 12 times stronger than spring ice. If Aaron can walk on ice2 1/2” thick in the fall, how thick must ice be in the spring to be safe?
Science ConceptsFound in this Book
In order to understand this book and make the connection betweenscience as it is understood and applied in the village and science as prac-ticed by Western scientists, it is important to have a basic understanding ofboth views and the vocabulary associated with both.
Few explanations of science concepts are given in the text as you willprobably go through the book in a different order than it is presented here.When you read words in the text, it is assumed that you know the concept.If you don’t, or if you need a refresher, come to this section and review thescience concept.
The purpose of this book is not to replace existing physics and chemis-try books. For more detailed explanations, any simple high school text willmake things clearer and give good examples.
Newton’s Three Laws
Isaac Newton identified three physical laws that have been influencingman, the earth, and the universe from the beginning of time. They are simple.
Inertia
The law of inertia says that an object continues in its state of rest orcontinues in uniform motion in a straight line until it is acted upon by anoutside force. Something at rest will tend to stay at rest. Something in mo-tion will tend to stay in motion.
Put a 3 x 5 card over the top of a glass or cup. Put a penny in the centerof the card. Snap the card with your finger. What happens to the penny?This demonstrates inertia of an object at rest.
Travel in a boat, fourwheeler, or snowmachine at a constant speed.Throttle down or put on the brakes. Why does your body go forward whenthe machine slows down? This demonstrates that a object in motion (yourbody) will stay in motion until acted upon by an outside force.
192 SCIENCE CONCEPTS
Centrifugal forceYou notice that the law of inertia says that an object continues in uni-
form motion in a straight line. When an object is spun around, like a modelairplane on a string, it has a tendency to go in a straight line, pulling againstthe string. The force of an object to fly away from the center when spun ina circle is called centrifugal force. Centrifugal means “fly away from center.”
F z MA
The second law that Newton described was F z MA.Force z Mass x Acceleration.If an object is accelerated or decelerated, the force causing that change
can be measured by multiplying the mass times the rate of acceleration ordeceleration.
We deal with forces all day, every day. You travel thirty miles per houron a fourwheeler. You stop. Are you hurt? That depends on the rate of de-celeration. If you stop in ten seconds you are not hurt. If you stop instantlywhen the fourwheeler hits a tree, you very well might be.
For a planing boat, there is a critical point where the rate water is pushedaway is high enough that the water seems to become “solid” and the boatgets “on step”, that is, on top of the water rather than plowing through it.
Mass vs WeightThe mass of something and the weight are different. The mass of some-
thing refers to how much matter is in the object. It has just as much mass inouter space as it does on earth. The weight refers to how much gravity ispulling on something. An object could weigh ten pounds here on earth,weigh nothing in outer space, yet the mass would be the same in bothplaces.
As simple scientists here on earth, we often inaccurately refer to themas the same.
AccelerationAcceleration is defined as distance (feet) per second squared.ft/seconds2
Herein is one of the most important concepts in all science. With manyforces, as one variable is increased, the result increases in the same propor-tion. With equations that involve acceleration, the result is squared. Whena variable is increased, the result is squared or reduced by the square.
Let’s look at an example. An object with a mass of ten is at rest. It isaccelerated to ten feet per second.
In one case, it is accelerated to that speed in four seconds.In another case it is accelerated in twice that time, eight seconds.Is the force cut by one-half because the time of acceleration is doubled?
Science Concepts 193
NO! The force required is reduced by one-quarter.This explains why there is a very critical speed at which an airplane
will either fly or stall. The rate at which the air is pushed out of the way issquared. The difference in lift at fifty-six mph and sixty mph can be great.
A z R
The third law that Newton described was A z R. Every action has anequal and opposite reaction. As a bullet hits an animal, the force against theanimal by the bullet is acknowledged. But the animal also exerts an equalforce on the bullet. It is slowed down from very high velocity to zerovelocity.
A woodsman swings an axe at a tree. The axe exerts a force against thetree. The tree exerts a force against the axe.
Each action has and equal and opposite reaction. In the above examplesthe reaction is damaged flesh and severed wood.
Friction
Friction is the resistance to motion between two surfaces that are incontact. We spend much of our lives trying to increase or decrease friction.Without friction it is impossible to light a match. If we don’t avoid friction, achainsaw might not last an afternoon. I have always regarded the under-standing of friction as most important in the North. Since the wheel is veryimpractical without roads and hard surfaces, sleds and boats have beenpushed and pulled in their respective seasons for thousands of years. Fric-tion has made fires, hindered motion, and inserted itself into traditional lifein a multitude of ways.
Friction has two causes:1. Molecular attraction between two surfaces. The molecules actu-
ally form a slight electromagnetic bond with each other.2. Rough surfaces interlock with each other. The rough spots on one
surface mesh with the rough spots on the other. Material is rippedfrom each surface, and there is a constant chattering betweenthe two materials.
There are two types of friction:1. Static friction. Two surfaces are in contact, but are not moving
against each other.2. Sliding (kinetic) friction. Two surfaces are in contact and are
moving against each other.Static friction is greater than kinetic friction. When you get a sled going
on the snow, there are two things you are overcoming:

194 SCIENCE CONCEPTS
• Inertia• Static friction
As the sled is moving, inertia is overcome. There is kinetic friction, butkinetic friction is much less than static friction. It is easier to keep a sledmoving than it is to get it in motion.
Pressure and weight influence friction
While the friction of two surfaces can be measured, the friction can beincreased or decreased by increasing or decreasing the weight or pressurebetween the two. If you drag a file cabinet across the floor, the friction willbe reduced if the drawers are removed to reduce the pressure between thetwo sliding surfaces.
Different surfaces
Different surfaces have different amounts of friction. An unpeeled log isvery hard to drag through the woods. The same log peeled will drag easily.High and low friction.
There are times when we want to increase friction. We put sand orsawdust in paint on stairs to roughen the surface so we won’t slip. Brakeson snowmachines are designed to induce friction to slow down the ma-chine. The kinetic energy of the machine is changed to heat energy in thebrake.
There are times when we try to avoid friction like in bearings and onsled runners.
Byproducts of friction
Friction is a force acting against motion. There is no movement withoutfriction on the earth. Some movements might minimize friction, but all move-ments involve some amount. The byproducts of friction are mostly heat butoccasionally sound. Rub your hands together when they are cold. Do theyget warm? This is a product of friction. Listen to a fishwheel that isn’t lubri-cated. Can you hear it groan? This sound is the product of friction.
Surface Area
Surface area is simply the area of an object that is exposed. A hand thatis closed and one that is open are not different in any way except that thesurface area is different. The mass, chemical composition, density, etc. arethe same in both hands. Mittens and gloves cover the same hand, but theirsurface area is different.
Science Concepts 195
Understanding surface area is important to us for three main reasons.1. Heat transfer and loss are greatly influenced by the surface area
exposed to the heat differences. A chainsaw head has fins toincrease surface area to get rid of heat. A winter traveler curls hishand in his mittens to reduce the surface area that can lose heat.
2. The pressure exerted on a surface is described in terms of poundsper square inch. How many square inches is the force beingexerted upon? Snowshoes increase the surface area a person’sweight is distributed upon. A knife decreases the surface area aworker’s efforts are distributed upon.
3. The surface area that is exposed where a chemical reaction cantake place often determines how rapidly the reaction can occur.When we make shavings to start a fire in the morning, we aresimply increasing the surface area upon which combustion canoccur.
Forms of Energy
There are six forms of energy available to the common person:• Heat• Light• Chemical• Kinetic (motion)• Electrical• Sound
Nuclear energy is not part of our daily lives in Alaska.The six forms of energy can be converted, one to another. Some of the
conversions are quite simple and common. Others are very difficult. Elec-tricity converts easily to all of the other forms of energy. It would be quitedifficult to convert sound to other forms of energy. This subject is addressedmostly in the section on generators.