alignment block kit - nc chassis co
TRANSCRIPT

NC Chassis Co.
Alignment Block Kit
JN 10/1/2015
NC Chassis Co. Alignment Block Kit
1
Pick a Flat Surface
o It is important to pick a flat level surface for this procedure. To assure accuracy in the
measurements we’re going to take; the plates and blocks you are about to use should
be very level with each other.
o Additional tools needed for this procedure are: a firm tape measure, a stagger or small
tape measure, the NC Alignment Block kit, and a ½” open-end wrench.
o The accuracy of this process is important; to establish a good base set-up to assure
future adjustments are as effective as they should be. Over-sight with axle locations can
be a big difference between winning and handling problems that are frustrating and do
not make sense.
Parts to Remove
o Remove the snap ring and/or spacers on the outside of the rear axle hubs from the rear
axle.
o You should also remove the springs from the shocks; so the shocks can be compressed
for the chassis and axles to rest on the blocks.
o It may be faster to leave the springs on the shocks and just remove the top of the shock
from the car. However, leaving the shocks attached to the car allows the shock angle to
be used as a reference point when determining our measurements.
Positioning the Block Kit
o Before we put our blocks and plates in place it is important to understand the purpose
of this kit. This kit will put our radius rod angles in a more neutral setting. The angles of
these rods change the location of the axles; both front and rear. These angles are
constantly changing via different ride heights for different tracks and chassis roll when
on the race track. So we have determined the angle that this kit gives us is about the
best position for our measurements; so the change that does take place under race
conditions is beneficial to the performance of the car.
o First, let’s begin by placing the chassis blocks and axle plates under the front of the car.
You will notice there are 4 different aluminum blocks and 4 different axle plates; each is
engraved to verify its position. For ex- RF stands for right front. Bolt the axle plates
directly to the front hubs. Then place the chassis blocks under the front of the frame
just forward of the belly-pan. Allow the car to rest on the blocks and plates.
o Now proceed to the rear of the chassis. Place the rear axle plates on the rear axle by
sliding them up against the rear hub on each side of the axle. Then place the chassis

NC Chassis Co. Alignment Block Kit
2
blocks under the rear hollow cross tube of the frame; positioning them on the inside of
the left and right corners of the frame. Once those are in place take the provided 5/8
solid bar and slide it thru the rear aluminum chassis blocks.
o IMPORTANT: The RR and LR chassis blocks have a notch to rest the rear frame tube.
There is three different sizes available; ¾”, 7/8”, and 1”. Make sure you have the correct
set for your chassis; you want the chassis block to have an almost snug fit when it cups
the frame tube.
o At this time take a quick glance at all the blocks; try to make sure the chassis and axles
are relaxed on the blocks and the plates are rested well on the table. There should be no
bind in any of the axles. Keep in mind that if the car does not set down completely on
one of the blocks; it’s not a major problem. Try to reposition the block a little to make as
much contact as possible between the table and chassis.
Rear Panhard Bar Setting
o Let’s start with the rear panhard bar location. Based on your race set-up; first put the
panhard in your preferred starting hole locations. For a Grizz we normally start in the
bottom hole of the left birdcage and 3rd hole from the bottom on the right rear bracket.
o Now that the panhard is in the preferred starting position we can adjust the rear axle
off-set in the car. Off-set is the left to right position of the axle within the chassis; which
is adjusted by rotating the rear panhard bar. For the rear of the car we normally start by
shifting the axle so the head of the left rear panhard bolt is just outside the frame.
Another reference point is the left rear radius rods. When the rear off-set is at the
standard position the left rear rods will appear fairly parallel with the outside of the car.
The further left you position the rear axle the tighter the car will be. The further right
the rear axle is positioned the looser the car will be.

NC Chassis Co. Alignment Block Kit
3
Square the Rear Axle / Time the Birdcages
o With the rear axle off-set positioned we can focus on squaring the rear axle. Standing at
the right or left side of the car; get as eye level with the rear axle and the solid bar as
possible. This way the tape measure can be read accurately. Put the end of the tape
measure against the front side of the solid bar and measure to the center line of the
rear axle plate. Refer to the factory measurement sheet for all NC model car
measurements.
o IMPORTANT: When adjusting the birdcages to square the rear axle, be aware of the
rotation of the birdcage also referred as the timing of the birdcage. It is common in
racing to have the birdcage straight-up or 90 degrees with the bottom of frame. Another
way to look at this is having the top and bottom right rear radius rod heims positioned
in the center of the axle. With the Grizzly birdcages the bottom of the brake plate can be
used as a reference point and on the left rear the bottom of the birdcage that extends
forward to the left rear shock can be used as a reference point. Recheck the rear axle
square measurement after setting the birdcage timing.
o It is also common practice for many racers to rotate the top of the birdcage slightly
forward from 90 degrees. A rule of thumb is a ¼ to ½ a turn in the top radius rod or out
of the lower radius rod. RR and LR are pictured.
Front Spindle Alignment
o Timing the steering shaft is very critical. When we time the steering shaft with the front
axle and spindles; the solid 5/8 bar (same bar used to square the rear axle) can be pulled
through the front plates without any bind. This adjustment is made so that at corner
entry the Left Front turns in sync with the Right Front. This helps the car roll to the apex
of the corner with minimal steering input. If this alignment is incorrect and the Left
Front turns to much faster than the Right Front, the Right Front will tend to drive
NC Chassis Co. Alignment Block Kit
4
straight; causing a great deal of bind and resistance in the front end. This is very
important to the performance of the car and must be checked regularly; especially after
any altercation on the racetrack.
o If the front axle was bent, it is typically bent on the right side. With the front axle bent it
is possible to re-align the spindles with each other and allow the bar to move through
the plates without resistance. This should not be interpreted as fixing the bent front
axle. It is important that you stand on the right side of the car and look down directly
over the top of the right front spindle for a visual check. If the axle is bent; the spindle
will be pointing towards you and the end of the axle will be angled back towards the
nerf bar. Replacement of the front axle would be the only solution at this time.
Otherwise if you were to use the bent front axle, your alignment would never be
correct. The Right Front spindle could never turn far enough to the left, because it is
already turned to the left when the wheels are pointed straight.
o A quick visual check can be made of both left and right spindles. Look under the arm of
the spindle; if the gusset is not straight then the arm is bent and needs to be replaced.
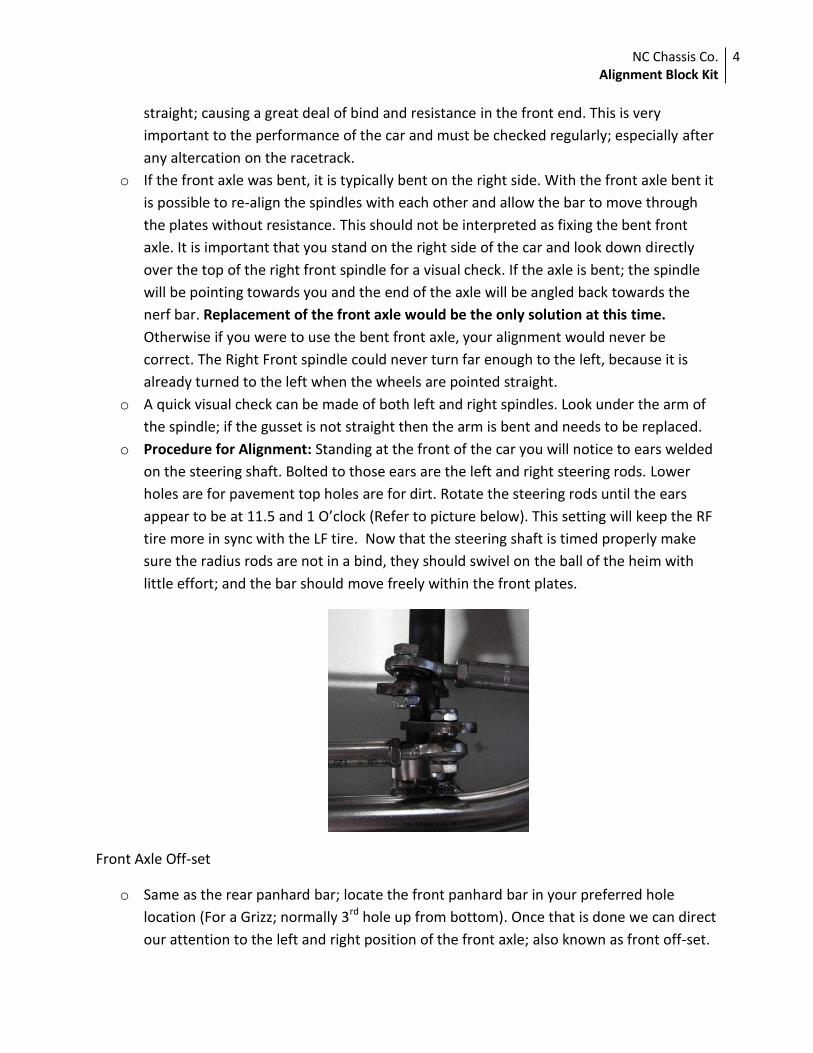
o Procedure for Alignment: Standing at the front of the car you will notice to ears welded
on the steering shaft. Bolted to those ears are the left and right steering rods. Lower
holes are for pavement top holes are for dirt. Rotate the steering rods until the ears
appear to be at 11.5 and 1 O’clock (Refer to picture below). This setting will keep the RF
tire more in sync with the LF tire. Now that the steering shaft is timed properly make
sure the radius rods are not in a bind, they should swivel on the ball of the heim with
little effort; and the bar should move freely within the front plates.
Front Axle Off-set
o Same as the rear panhard bar; locate the front panhard bar in your preferred hole
location (For a Grizz; normally 3rd hole up from bottom). Once that is done we can direct
our attention to the left and right position of the front axle; also known as front off-set.

NC Chassis Co. Alignment Block Kit
5
For a Grizz we remove the outer hood and stand at the front of the car. Then using a
stagger tape; measure from the inside of the RF steel flange, just above the weld across
to the inside edge of the side panel. The starting measurement for the Grizz is 8-5/8”.
Less would be like spacing the RF tire in to improve grip; more would make the front of
the car have less grip.
o This measurement should be double checked when setting the wheelbase.
Wheelbase / Lead / Front Axle Rotation
o The wheelbase and lead are set simultaneously. Wheelbase is the distance from the
center of the rear axle to the center of the front axle. Lead is the difference between the
right and left side wheelbase; the left side being the shorter distance. Lead is an
adjustment some racing mechanics use a lot or very seldom. It is a personal preference.
Track size or shape is the primary reason for changing lead. More lead the easier the car
turns. Most common lead used is between ¼”- ½”.
o At this time set the rotation of the front axle; using the caster plate tool as shown
below. Place this tool on the table, same as the axle plates; and slide it against the front
ears of the right steel flange. Using the right front radius rods, adjust the axle so that
both top and bottom ears are touching the plate. Once this adjustment is made the
front axle rotation is in a stock position. Rotating the axle back will make the steering
more stiff; forward will make it easier to turn.
o The rear plates and front plates will be used for the wheelbase measurement. This
measurement is taken after the front spindles are aligned because the spindles need to
be square with one another and the 5/8 bar needs to be left in the front plates. This
assures an accurate center to center measurement will be taken with the axle plates.
o Begin by hooking the tape measure to the center cut out of the right rear plate and pull
the tape measure forward to the center of the right front plate. Using the right front

NC Chassis Co. Alignment Block Kit
6
radius rods; set the desired wheelbase length. Refer to the factory measurement sheet
for wheelbase suggestions. Once the right side wheelbase is set, move to the left side
and take the same measurement; minus the amount of desired lead. Example: 50” right
side and 49-7/8” left side is a 1/8” of lead.
Completion
o Once the wheelbase is set and you have double checked the rotation of the front axle;
the front and rear axle alignment should be complete and all heim jam nuts should be
tight.
o At NC Chassis we hope this procedure is a benefit to gaining consistency in the
performance of your chassis. On the following page is a chart that breaks down the
measurements discussed in this manual for our different model cars and sizes. Please
use this chart as a guide and feel free to explore different settings to achieve a change in
car handling base on your driver and racetrack.

NC Chassis Co. Alignment Block Kit
7
C h
a s
s i
s M
o d
e l
Rear Axle Square Measurement
Size of chassis (Rollcage height)
31" 33" 35" 76 x 36" 37" 78 x 38" 39" 80 x 40" 41"
17 Grizz 5-1/4" 5-1/4" 5-1/4" 5-1/4"
09 Grizz 5-1/4" 5-1/4" 5-1/4"
07 Grizz 5-1/4" 5-1/4" 5-1/4"
Kong 5-1/4" 5-1/4" 5-1/4"
Extreme 02 5-1/4" 5-1/4" 5-1/4" 5-1/4"
Ultimate 01 5" 5" 5" 5"
Pro 2000 5" 5" 5"
Classic 1900 5" 5" 5"
Grizz Square w/LR Radius Bracket: 5-1/16"
Wheelbase Measurement
31" 33" 35" 76 x 36" 37" 78 x 38" 39" 80 x 40" 41"
17 Grizz 45-1/4" 47-1/8" 48-1/8" 49-1/8"
09 Grizz 47" 48" 49"
07 Grizz 47" 48" 49"
Kong 47-1/4" 48-1/4" 49-1/4"
Extreme 02 48-3/8" 48-3/8" 49-3/8" 49-3/8"
Ultimate 01 48-7/8" 48-7/8" 49-7/8" 49-7/8"
Pro 2000 49-5/8" 50-5/8" 50-5/8"
Classic 1900 46-3/8" 48-3/8" 50-3/8"