all-in-one printerstatic.highspeedbackbone.net/pdf/kodak-esp-9-all-in-one...kodak esp 9 printer user...
TRANSCRIPT
All-in-One Printer print copy scan fax
9
User Guide

Eastman Kodak Company
Rochester, New York 14650
© Eastman Kodak Company, 2008
Kodak is a trademark of Eastman Kodak Company.
The Bluetooth® word mark and logos are owned by the Bluetooth SIG, Inc., and any use of such marks is under license.
©1989-2007 I.R.I.S. (Image Recognition Integrated Systems), All Rights Reserved
P/N 1K3289 B
July 2008
1. Getting Help 1Help Menu . . . . . . . . . . . . . . . . . . . . . . . . . . . . . . . . . . . . . . . . . . . . . . . . . . . . . . . . . . . . . . . . . . .1Getting answers to frequently-asked questions . . . . . . . . . . . . . . . . . . . . . . . . . . . . 2Contacting Kodak Customer Service & Support . . . . . . . . . . . . . . . . . . . . . . . . . . . . 2
Support at Kodak.com . . . . . . . . . . . . . . . . . . . . . . . . . . . . . . . . . . . . . . . . . . . . . . . . . . 2Telephone Customer Support . . . . . . . . . . . . . . . . . . . . . . . . . . . . . . . . . . . . . . . . . . . 3
2. Printer Overview 5All-in-One printer features . . . . . . . . . . . . . . . . . . . . . . . . . . . . . . . . . . . . . . . . . . . . . . . . . . 5Major components of the ESP 9 All-in-One printer . . . . . . . . . . . . . . . . . . . . . . . . . 6
Support for connecting digital memory devices to the printer . . . . . . . . . . 7Memory card slots . . . . . . . . . . . . . . . . . . . . . . . . . . . . . . . . . . . . . . . . . . . . . . . . . . . 7Memory cards supported . . . . . . . . . . . . . . . . . . . . . . . . . . . . . . . . . . . . . . . . . . . . 8USB host port . . . . . . . . . . . . . . . . . . . . . . . . . . . . . . . . . . . . . . . . . . . . . . . . . . . . . . . . 8
Control panel layout . . . . . . . . . . . . . . . . . . . . . . . . . . . . . . . . . . . . . . . . . . . . . . . . . . . . 9LCD display . . . . . . . . . . . . . . . . . . . . . . . . . . . . . . . . . . . . . . . . . . . . . . . . . . . . . . . . . . . . 10
Using the control panel. . . . . . . . . . . . . . . . . . . . . . . . . . . . . . . . . . . . . . . . . . . . . . . . . . . . . . 11Adjusting the control panel position . . . . . . . . . . . . . . . . . . . . . . . . . . . . . . . . . . . . 11About the “touch-sense” buttons on the control panel . . . . . . . . . . . . . . . . . 11Using the 4-way navigation buttons . . . . . . . . . . . . . . . . . . . . . . . . . . . . . . . . . . . 12Using the OK button . . . . . . . . . . . . . . . . . . . . . . . . . . . . . . . . . . . . . . . . . . . . . . . . . . . 13Using the Menu button . . . . . . . . . . . . . . . . . . . . . . . . . . . . . . . . . . . . . . . . . . . . . . . . 13Using the Zoom buttons . . . . . . . . . . . . . . . . . . . . . . . . . . . . . . . . . . . . . . . . . . . . . . . 13Using the Start button . . . . . . . . . . . . . . . . . . . . . . . . . . . . . . . . . . . . . . . . . . . . . . . . . . 14Using the Cancel button . . . . . . . . . . . . . . . . . . . . . . . . . . . . . . . . . . . . . . . . . . . . . . . 14Using the number keypad buttons . . . . . . . . . . . . . . . . . . . . . . . . . . . . . . . . . . . . . 14Using the on-screen keyboard . . . . . . . . . . . . . . . . . . . . . . . . . . . . . . . . . . . . . . . . . 15
Using the All-in-One printer menus . . . . . . . . . . . . . . . . . . . . . . . . . . . . . . . . . . . . . . . . 16Menu layout . . . . . . . . . . . . . . . . . . . . . . . . . . . . . . . . . . . . . . . . . . . . . . . . . . . . . . . . . . . 16Menu structure . . . . . . . . . . . . . . . . . . . . . . . . . . . . . . . . . . . . . . . . . . . . . . . . . . . . . . . . 17Status lights . . . . . . . . . . . . . . . . . . . . . . . . . . . . . . . . . . . . . . . . . . . . . . . . . . . . . . . . . . . . 18
All-in-One printer Home Center software . . . . . . . . . . . . . . . . . . . . . . . . . . . . . . . . . 20Home Center for Windows . . . . . . . . . . . . . . . . . . . . . . . . . . . . . . . . . . . . . . . . . . . . 20Home Center for Macintosh . . . . . . . . . . . . . . . . . . . . . . . . . . . . . . . . . . . . . . . . . . . 21
Table of Contents
Kodak ESP 9 Printer User Guide i

Table of Contents
3. Setting Up Your Printer 23Selecting a printer location . . . . . . . . . . . . . . . . . . . . . . . . . . . . . . . . . . . . . . . . . . . . . . . . . 23Configuring printer settings . . . . . . . . . . . . . . . . . . . . . . . . . . . . . . . . . . . . . . . . . . . . . . . . 23
Configuring basic settings . . . . . . . . . . . . . . . . . . . . . . . . . . . . . . . . . . . . . . . . . . . . . . 23Printer settings options . . . . . . . . . . . . . . . . . . . . . . . . . . . . . . . . . . . . . . . . . . . . . . . . 24
Configuring network settings . . . . . . . . . . . . . . . . . . . . . . . . . . . . . . . . . . . . . . . . . . . . . . 26Configuring an Ethernet network connection . . . . . . . . . . . . . . . . . . . . . . . . . . 26
Ethernet setup . . . . . . . . . . . . . . . . . . . . . . . . . . . . . . . . . . . . . . . . . . . . . . . . . . . . . . 26Configuring a wireless network connection . . . . . . . . . . . . . . . . . . . . . . . . . . . . 26
Configuring basic wireless (WiFi) settings . . . . . . . . . . . . . . . . . . . . . . . . . 27Network Settings options . . . . . . . . . . . . . . . . . . . . . . . . . . . . . . . . . . . . . . . . . . . 27WiFi Setup Wizard. . . . . . . . . . . . . . . . . . . . . . . . . . . . . . . . . . . . . . . . . . . . . . . . . . 27
Connecting to a listed network. . . . . . . . . . . . . . . . . . . . . . . . . . . . . . . . . 27Connecting to an unlisted network. . . . . . . . . . . . . . . . . . . . . . . . . . . . . 28
Setting up an IP address . . . . . . . . . . . . . . . . . . . . . . . . . . . . . . . . . . . . . . . . . . . . . . . . 29Viewing Network Configuration . . . . . . . . . . . . . . . . . . . . . . . . . . . . . . . . . . . . . . . . 29Printing Network Configuration . . . . . . . . . . . . . . . . . . . . . . . . . . . . . . . . . . . . . . . . 29
Setting up the fax. . . . . . . . . . . . . . . . . . . . . . . . . . . . . . . . . . . . . . . . . . . . . . . . . . . . . . . . . . . 29Telephone service delivery systems and All–in–One fax features . . . . . . 30
Multipurpose (broadband) digital telephone systems . . . . . . . . . . . . . . 30Standard telephone systems . . . . . . . . . . . . . . . . . . . . . . . . . . . . . . . . . . . . . . . . 30Digital subscriber line (DSL) telephone systems. . . . . . . . . . . . . . . . . . . . 31
Using cordless telephones with the ESP 9 All–in–One fax . . . . . . . . . . . . . . 31Using voice–messaging services with the ESP 9 All–in–One fax . . . . . . . 31Using an answering machine with the ESP 9 All–in–One fax . . . . . . . . . . . 32Connecting the phone and fax . . . . . . . . . . . . . . . . . . . . . . . . . . . . . . . . . . . . . . . . . 32
Connecting the printer to a digital telephone service line . . . . . . . . . . . 32Connecting the printer to a standard telephone line . . . . . . . . . . . . . . . . 33Connecting the printer to a digital subscriber (DSL) telephone line 34
Specifying Rings to Answer . . . . . . . . . . . . . . . . . . . . . . . . . . . . . . . . . . . . . . . . . . . . 35Setting Fax Auto–Answer . . . . . . . . . . . . . . . . . . . . . . . . . . . . . . . . . . . . . . . . . . . . . . 36Manually receiving fax . . . . . . . . . . . . . . . . . . . . . . . . . . . . . . . . . . . . . . . . . . . . . . . . . 36Specifying a distinctive ring for Fax Auto–Answer . . . . . . . . . . . . . . . . . . . . . 36
Fax Settings Options . . . . . . . . . . . . . . . . . . . . . . . . . . . . . . . . . . . . . . . . . . . . . . . 37
4. Handling Paper 39Handling paper . . . . . . . . . . . . . . . . . . . . . . . . . . . . . . . . . . . . . . . . . . . . . . . . . . . . . . . . . . . . . 39Loading the paper trays . . . . . . . . . . . . . . . . . . . . . . . . . . . . . . . . . . . . . . . . . . . . . . . . . . . .40
Things to keep in mind . . . . . . . . . . . . . . . . . . . . . . . . . . . . . . . . . . . . . . . . . . . . . . . . .40Loading plain paper . . . . . . . . . . . . . . . . . . . . . . . . . . . . . . . . . . . . . . . . . . . . . . . . . . . . 41 Loading photo paper . . . . . . . . . . . . . . . . . . . . . . . . . . . . . . . . . . . . . . . . . . . . . . . 42Loading envelopes . . . . . . . . . . . . . . . . . . . . . . . . . . . . . . . . . . . . . . . . . . . . . . . . . . . . . 42
Loading originals . . . . . . . . . . . . . . . . . . . . . . . . . . . . . . . . . . . . . . . . . . . . . . . . . . . . . . . . . . . 43Loading an original for copying or scanning . . . . . . . . . . . . . . . . . . . . . . . . . . . . 43
ii Kodak ESP 9 Printer User Guide
Table of Contents
5. Viewing and Printing Photos 45Viewing photos. . . . . . . . . . . . . . . . . . . . . . . . . . . . . . . . . . . . . . . . . . . . . . . . . . . . . . . . . . . . .46Configuring photo print settings . . . . . . . . . . . . . . . . . . . . . . . . . . . . . . . . . . . . . . . . . . .46
Print Photos Options . . . . . . . . . . . . . . . . . . . . . . . . . . . . . . . . . . . . . . . . . . . . . . . . . . . 47Printing photos . . . . . . . . . . . . . . . . . . . . . . . . . . . . . . . . . . . . . . . . . . . . . . . . . . . . . . . . . . . . .48
Printing photos from a PictBridge camera . . . . . . . . . . . . . . . . . . . . . . . . . . . . .48Printing photos from non–PictBridge digital cameras, memorycards, and USB flash drives . . . . . . . . . . . . . . . . . . . . . . . . . . . . . . . . . . . . . . . . . . . .48Printing tagged images . . . . . . . . . . . . . . . . . . . . . . . . . . . . . . . . . . . . . . . . . . . . . . . . 50Printing from a Bluetooth–enabled device . . . . . . . . . . . . . . . . . . . . . . . . . . . . . . 50
Range . . . . . . . . . . . . . . . . . . . . . . . . . . . . . . . . . . . . . . . . . . . . . . . . . . . . . . . . . . . . . . . 51Printing multiple photos . . . . . . . . . . . . . . . . . . . . . . . . . . . . . . . . . . . . . . . . . . . . . . . . 51Printing panoramic photos . . . . . . . . . . . . . . . . . . . . . . . . . . . . . . . . . . . . . . . . . . . . . 51
Zooming and cropping photos . . . . . . . . . . . . . . . . . . . . . . . . . . . . . . . . . . . . . . . . . . . . . 52Transferring images to a computer . . . . . . . . . . . . . . . . . . . . . . . . . . . . . . . . . . . . 53Transferring images to a Windows computer . . . . . . . . . . . . . . . . . . . . . . . . . . 53Transferring images to a Macintosh computer . . . . . . . . . . . . . . . . . . . . . . . . . 54
6. Copying 55Simple copying . . . . . . . . . . . . . . . . . . . . . . . . . . . . . . . . . . . . . . . . . . . . . . . . . . . . . . . . . . . . . 55Adjusting copy settings . . . . . . . . . . . . . . . . . . . . . . . . . . . . . . . . . . . . . . . . . . . . . . . . . . . . 55
Copy Document Options . . . . . . . . . . . . . . . . . . . . . . . . . . . . . . . . . . . . . . . . . . . . . . . 56Copy Photo Options . . . . . . . . . . . . . . . . . . . . . . . . . . . . . . . . . . . . . . . . . . . . . . . . . . . . 57
7. Scanning 59Before you start . . . . . . . . . . . . . . . . . . . . . . . . . . . . . . . . . . . . . . . . . . . . . . . . . . . . . . . . . . . . 59Simple scanning . . . . . . . . . . . . . . . . . . . . . . . . . . . . . . . . . . . . . . . . . . . . . . . . . . . . . . . . . . . .60
Simple document scans . . . . . . . . . . . . . . . . . . . . . . . . . . . . . . . . . . . . . . . . . . . . . . . .60Simple image scans . . . . . . . . . . . . . . . . . . . . . . . . . . . . . . . . . . . . . . . . . . . . . . . . . . . . 61Scanning multiple originals simultaneously . . . . . . . . . . . . . . . . . . . . . . . . . . . . 61
Adjusting scan settings . . . . . . . . . . . . . . . . . . . . . . . . . . . . . . . . . . . . . . . . . . . . . . . . . . . . 61Scan Options . . . . . . . . . . . . . . . . . . . . . . . . . . . . . . . . . . . . . . . . . . . . . . . . . . . . . . . . . . . 62
8. Faxing 63Introduction . . . . . . . . . . . . . . . . . . . . . . . . . . . . . . . . . . . . . . . . . . . . . . . . . . . . . . . . . . . . . . . . 63Fax settings. . . . . . . . . . . . . . . . . . . . . . . . . . . . . . . . . . . . . . . . . . . . . . . . . . . . . . . . . . . . . . . . . 63Sending faxes. . . . . . . . . . . . . . . . . . . . . . . . . . . . . . . . . . . . . . . . . . . . . . . . . . . . . . . . . . . . . . . 63
Dialing a fax number on the control panel . . . . . . . . . . . . . . . . . . . . . . . . . . . . .64Selecting a fax recipient from the Fax Phonebook . . . . . . . . . . . . . . . . . . . . . .64Using Quick Dial to select a Fax Phonebook entry . . . . . . . . . . . . . . . . . . . . . 65
Specifying a Quick Dial recipient from the keypad . . . . . . . . . . . . . . . . . . 65Specifying a Quick Dial recipient from the Send Fax menu . . . . . . . . . 66
Canceling faxes . . . . . . . . . . . . . . . . . . . . . . . . . . . . . . . . . . . . . . . . . . . . . . . . . . . . . . . . . . . . 67Receiving faxes . . . . . . . . . . . . . . . . . . . . . . . . . . . . . . . . . . . . . . . . . . . . . . . . . . . . . . . . . . . . . 67
Receiving faxes automatically . . . . . . . . . . . . . . . . . . . . . . . . . . . . . . . . . . . . . . 67Manually receiving faxes. . . . . . . . . . . . . . . . . . . . . . . . . . . . . . . . . . . . . . . . . . . . 67
Kodak ESP 9 Printer User Guide iii
Table of Contents
Fax Phonebook entries . . . . . . . . . . . . . . . . . . . . . . . . . . . . . . . . . . . . . . . . . . . . . . . . . . . . . 67Adding a new Fax Phonebook entry . . . . . . . . . . . . . . . . . . . . . . . . . . . . . . . . . . . . 68Editing an existing Fax Phonebook entry . . . . . . . . . . . . . . . . . . . . . . . . . . . . . . . 68 Deleting an existing Fax Phonebook entry . . . . . . . . . . . . . . . . . . . . . . . . . . . . . 69
Preparing a fax for transmission . . . . . . . . . . . . . . . . . . . . . . . . . . . . . . . . . . . . . . . . . . . 69Printing a fax cover page . . . . . . . . . . . . . . . . . . . . . . . . . . . . . . . . . . . . . . . . . . . . . . . 69Changing Send Fax settings . . . . . . . . . . . . . . . . . . . . . . . . . . . . . . . . . . . . . . . . . . . . 70
Send Fax Options . . . . . . . . . . . . . . . . . . . . . . . . . . . . . . . . . . . . . . . . . . . . . . . . . . . 71Fax reports . . . . . . . . . . . . . . . . . . . . . . . . . . . . . . . . . . . . . . . . . . . . . . . . . . . . . . . . . . . . . . . . . 71
Printing a fax report . . . . . . . . . . . . . . . . . . . . . . . . . . . . . . . . . . . . . . . . . . . . . . . . . . . . 72
9. Maintaining Your Printer 73General care. . . . . . . . . . . . . . . . . . . . . . . . . . . . . . . . . . . . . . . . . . . . . . . . . . . . . . . . . . . . . . . . 73Cleaning the scanner glass . . . . . . . . . . . . . . . . . . . . . . . . . . . . . . . . . . . . . . . . . . . . . . . . . 74Cleaning the scanner lid . . . . . . . . . . . . . . . . . . . . . . . . . . . . . . . . . . . . . . . . . . . . . . . . . . . . 74Monitoring and adjusting the printer's performance. . . . . . . . . . . . . . . . . . . . . . . 75
Maintenance Options . . . . . . . . . . . . . . . . . . . . . . . . . . . . . . . . . . . . . . . . . . . . . . . . . . 76Replacing ink cartridges . . . . . . . . . . . . . . . . . . . . . . . . . . . . . . . . . . . . . . . . . . . . . . . . . . . . 76Replacing the printhead . . . . . . . . . . . . . . . . . . . . . . . . . . . . . . . . . . . . . . . . . . . . . . . . . . . . 79
10. Troubleshooting 83Troubleshooting “quick start” . . . . . . . . . . . . . . . . . . . . . . . . . . . . . . . . . . . . . . . . . . . . . . 83General troubleshooting . . . . . . . . . . . . . . . . . . . . . . . . . . . . . . . . . . . . . . . . . . . . . . . . . . . 83
Printer fails to power on . . . . . . . . . . . . . . . . . . . . . . . . . . . . . . . . . . . . . . . . . . . . . . . . 83Device not recognized . . . . . . . . . . . . . . . . . . . . . . . . . . . . . . . . . . . . . . . . . . . . . . . . .84Ink cartridge not recognized . . . . . . . . . . . . . . . . . . . . . . . . . . . . . . . . . . . . . . . . . . . 85Multiple paper feed . . . . . . . . . . . . . . . . . . . . . . . . . . . . . . . . . . . . . . . . . . . . . . . . . . . . 85Multiple pictures not scanned properly . . . . . . . . . . . . . . . . . . . . . . . . . . . . . . . . 86No communication with computer . . . . . . . . . . . . . . . . . . . . . . . . . . . . . . . . . . . . . 86No paper feed . . . . . . . . . . . . . . . . . . . . . . . . . . . . . . . . . . . . . . . . . . . . . . . . . . . . . . . . . . 87One or more of the colors on the calibration sheet is missing . . . . . . . . . 87Paper jam . . . . . . . . . . . . . . . . . . . . . . . . . . . . . . . . . . . . . . . . . . . . . . . . . . . . . . . . . . . . . . 88Printer not responding . . . . . . . . . . . . . . . . . . . . . . . . . . . . . . . . . . . . . . . . . . . . . . . . . 88Transfer pictures failure . . . . . . . . . . . . . . . . . . . . . . . . . . . . . . . . . . . . . . . . . . . . . . . . 89User guide on the CD is obsolete . . . . . . . . . . . . . . . . . . . . . . . . . . . . . . . . . . . . . . 89Wrong paper size . . . . . . . . . . . . . . . . . . . . . . . . . . . . . . . . . . . . . . . . . . . . . . . . . . . . . . 89Macintosh OS X troubleshooting . . . . . . . . . . . . . . . . . . . . . . . . . . . . . . . . . . . . . .90
Non-intel Mac only: black screen or screen freeze occurs when applying printer settings via the Home Center software . . . . . . . . . . . .90
Windows Vista troubleshooting . . . . . . . . . . . . . . . . . . . . . . . . . . . . . . . . . . . . . . .90WIA (Windows Image Acquisition) error: service has stopped working . . . . . . . . . . . . . . . . . . . . . . . . . . . . . . . . . . . . . . . . . . . . . . . . . . . .90
Home Center software on Windows works incorrectly following software upgrade . . . . . . . . . . . . . . . . . . . . . . . . . . . . . . . . . . . . . . . . . . . . . . . . . . . . . .90
Print troubleshooting . . . . . . . . . . . . . . . . . . . . . . . . . . . . . . . . . . . . . . . . . . . . . . . . . . . . . . . 91Envelope printing incorrect . . . . . . . . . . . . . . . . . . . . . . . . . . . . . . . . . . . . . . . . . . . . 91
iv Kodak ESP 9 Printer User Guide

Table of Contents
Multiple-page document not printing in first-page first order (Macintosh only) . . . . . . . . . . . . . . . . . . . . . . . . . . . . . . . . . . . . . . . . . . . . . . . . . . . 91
PictBridge camera not detected . . . . . . . . . . . . . . . . . . . . . . . . . . . . . . . . . . . . . . . . 92Picture cropped . . . . . . . . . . . . . . . . . . . . . . . . . . . . . . . . . . . . . . . . . . . . . . . . . . . . . . . . 92Picture print smudged . . . . . . . . . . . . . . . . . . . . . . . . . . . . . . . . . . . . . . . . . . . . . . . . . . 92Picture will not print . . . . . . . . . . . . . . . . . . . . . . . . . . . . . . . . . . . . . . . . . . . . . . . . . . . . 92Poor print quality . . . . . . . . . . . . . . . . . . . . . . . . . . . . . . . . . . . . . . . . . . . . . . . . . . . . . . . 93Print skewed or slanted . . . . . . . . . . . . . . . . . . . . . . . . . . . . . . . . . . . . . . . . . . . . . . . . 93Print spotted . . . . . . . . . . . . . . . . . . . . . . . . . . . . . . . . . . . . . . . . . . . . . . . . . . . . . . . . . . .94Print too dark . . . . . . . . . . . . . . . . . . . . . . . . . . . . . . . . . . . . . . . . . . . . . . . . . . . . . . . . . . .94Print too light . . . . . . . . . . . . . . . . . . . . . . . . . . . . . . . . . . . . . . . . . . . . . . . . . . . . . . . . . . .94Printing slow . . . . . . . . . . . . . . . . . . . . . . . . . . . . . . . . . . . . . . . . . . . . . . . . . . . . . . . . . . . 95Printing stops . . . . . . . . . . . . . . . . . . . . . . . . . . . . . . . . . . . . . . . . . . . . . . . . . . . . . . . . . . 95White edges on borderless prints . . . . . . . . . . . . . . . . . . . . . . . . . . . . . . . . . . . . . . 95
Copy troubleshooting . . . . . . . . . . . . . . . . . . . . . . . . . . . . . . . . . . . . . . . . . . . . . . . . . . . . . . 96Copy cut off . . . . . . . . . . . . . . . . . . . . . . . . . . . . . . . . . . . . . . . . . . . . . . . . . . . . . . . . . . . . 96
Scan troubleshooting . . . . . . . . . . . . . . . . . . . . . . . . . . . . . . . . . . . . . . . . . . . . . . . . . . . . . . . 96Scan fails . . . . . . . . . . . . . . . . . . . . . . . . . . . . . . . . . . . . . . . . . . . . . . . . . . . . . . . . . . . . . . . 96Scanned image blank . . . . . . . . . . . . . . . . . . . . . . . . . . . . . . . . . . . . . . . . . . . . . . . . . . . 97
Network troubleshooting. . . . . . . . . . . . . . . . . . . . . . . . . . . . . . . . . . . . . . . . . . . . . . . . . . . 97Wired network troubleshooting . . . . . . . . . . . . . . . . . . . . . . . . . . . . . . . . . . . . . . . . 97
Computer unable to detect the All-in-One printer . . . . . . . . . . . . . . . . . . 97No TCP/IP . . . . . . . . . . . . . . . . . . . . . . . . . . . . . . . . . . . . . . . . . . . . . . . . . . . . . . . . . . 98Printer not found . . . . . . . . . . . . . . . . . . . . . . . . . . . . . . . . . . . . . . . . . . . . . . . . . . . . 99No IP address with cable modem (without a router) . . . . . . . . . . . . . . 101
Wireless troubleshooting . . . . . . . . . . . . . . . . . . . . . . . . . . . . . . . . . . . . . . . . . . . . . 101No SSID . . . . . . . . . . . . . . . . . . . . . . . . . . . . . . . . . . . . . . . . . . . . . . . . . . . . . . . . . . . . 101Weak signal. . . . . . . . . . . . . . . . . . . . . . . . . . . . . . . . . . . . . . . . . . . . . . . . . . . . . . . . 103Cannot connect to network . . . . . . . . . . . . . . . . . . . . . . . . . . . . . . . . . . . . . . . . 103Unsupported authentication or encryption type . . . . . . . . . . . . . . . . . . . 104Invalid WEP Key . . . . . . . . . . . . . . . . . . . . . . . . . . . . . . . . . . . . . . . . . . . . . . . . . . . 104Invalid WPA Passphrase . . . . . . . . . . . . . . . . . . . . . . . . . . . . . . . . . . . . . . . . . . . 105Another device connected to the access point. . . . . . . . . . . . . . . . . . . . . 105
11. Product and Safety Specifications 107Print Performance . . . . . . . . . . . . . . . . . . . . . . . . . . . . . . . . . . . . . . . . . . . . . . . . . . . . . . . . . 107Photo Printing Features . . . . . . . . . . . . . . . . . . . . . . . . . . . . . . . . . . . . . . . . . . . . . . . . . . . 107Copy Document Features . . . . . . . . . . . . . . . . . . . . . . . . . . . . . . . . . . . . . . . . . . . . . . . . . 108Copy Photo Features . . . . . . . . . . . . . . . . . . . . . . . . . . . . . . . . . . . . . . . . . . . . . . . . . . . . . . 108Scanning Features . . . . . . . . . . . . . . . . . . . . . . . . . . . . . . . . . . . . . . . . . . . . . . . . . . . . . . . . . 108Paper Tray Features . . . . . . . . . . . . . . . . . . . . . . . . . . . . . . . . . . . . . . . . . . . . . . . . . . . . . . . 109Ink Tanks . . . . . . . . . . . . . . . . . . . . . . . . . . . . . . . . . . . . . . . . . . . . . . . . . . . . . . . . . . . . . . . . . . 109Connectivity . . . . . . . . . . . . . . . . . . . . . . . . . . . . . . . . . . . . . . . . . . . . . . . . . . . . . . . . . . . . . . . 109Software Support. . . . . . . . . . . . . . . . . . . . . . . . . . . . . . . . . . . . . . . . . . . . . . . . . . . . . . . . . . 110Physical Specifications . . . . . . . . . . . . . . . . . . . . . . . . . . . . . . . . . . . . . . . . . . . . . . . . . . . . 110Warranty . . . . . . . . . . . . . . . . . . . . . . . . . . . . . . . . . . . . . . . . . . . . . . . . . . . . . . . . . . . . . . . . . . 110
Kodak ESP 9 Printer User Guide v
Table of Contents
System Requirements . . . . . . . . . . . . . . . . . . . . . . . . . . . . . . . . . . . . . . . . . . . . . . . . . . . . . 110Windows PC . . . . . . . . . . . . . . . . . . . . . . . . . . . . . . . . . . . . . . . . . . . . . . . . . . . . . . . . . . . 111Macintosh . . . . . . . . . . . . . . . . . . . . . . . . . . . . . . . . . . . . . . . . . . . . . . . . . . . . . . . . . . . . . . 111
Papers Supported . . . . . . . . . . . . . . . . . . . . . . . . . . . . . . . . . . . . . . . . . . . . . . . . . . . . . . . . . . 111Paper Types. . . . . . . . . . . . . . . . . . . . . . . . . . . . . . . . . . . . . . . . . . . . . . . . . . . . . . . . . 111Paper Sizes for PC and Macintosh computers . . . . . . . . . . . . . . . . . . . . . .112
Safety Specifications . . . . . . . . . . . . . . . . . . . . . . . . . . . . . . . . . . . . . . . . . . . . . . . . . . . . . . .112Parts . . . . . . . . . . . . . . . . . . . . . . . . . . . . . . . . . . . . . . . . . . . . . . . . . . . . . . . . . . . . . . . . . . .113Power . . . . . . . . . . . . . . . . . . . . . . . . . . . . . . . . . . . . . . . . . . . . . . . . . . . . . . . . . . . . . . . . . .113Location . . . . . . . . . . . . . . . . . . . . . . . . . . . . . . . . . . . . . . . . . . . . . . . . . . . . . . . . . . . . . . . .113Environment . . . . . . . . . . . . . . . . . . . . . . . . . . . . . . . . . . . . . . . . . . . . . . . . . . . . . . . . . . 114
Regulatory Compliance . . . . . . . . . . . . . . . . . . . . . . . . . . . . . . . . . . . . . . . . . . . . . . . . . . . 114FCC Compliance and Advisory . . . . . . . . . . . . . . . . . . . . . . . . . . . . . . . . . . . . . . . . 114FCC and Industry Canada . . . . . . . . . . . . . . . . . . . . . . . . . . . . . . . . . . . . . . . . . . . . . .115
IC Radiation Exposure Statement . . . . . . . . . . . . . . . . . . . . . . . . . . . . . . . . . . .115Canadian DOC Statement . . . . . . . . . . . . . . . . . . . . . . . . . . . . . . . . . . . . . . . . . .115
German Compliance Statement . . . . . . . . . . . . . . . . . . . . . . . . . . . . . . . . . . . . . . . 116Waste Electrical and Electronic Equipment Labeling . . . . . . . . . . . . . . . . . . 116
A. Glossary 117
B. If you need to call Customer Support 123
Index 125
vi Kodak ESP 9 Printer User Guide
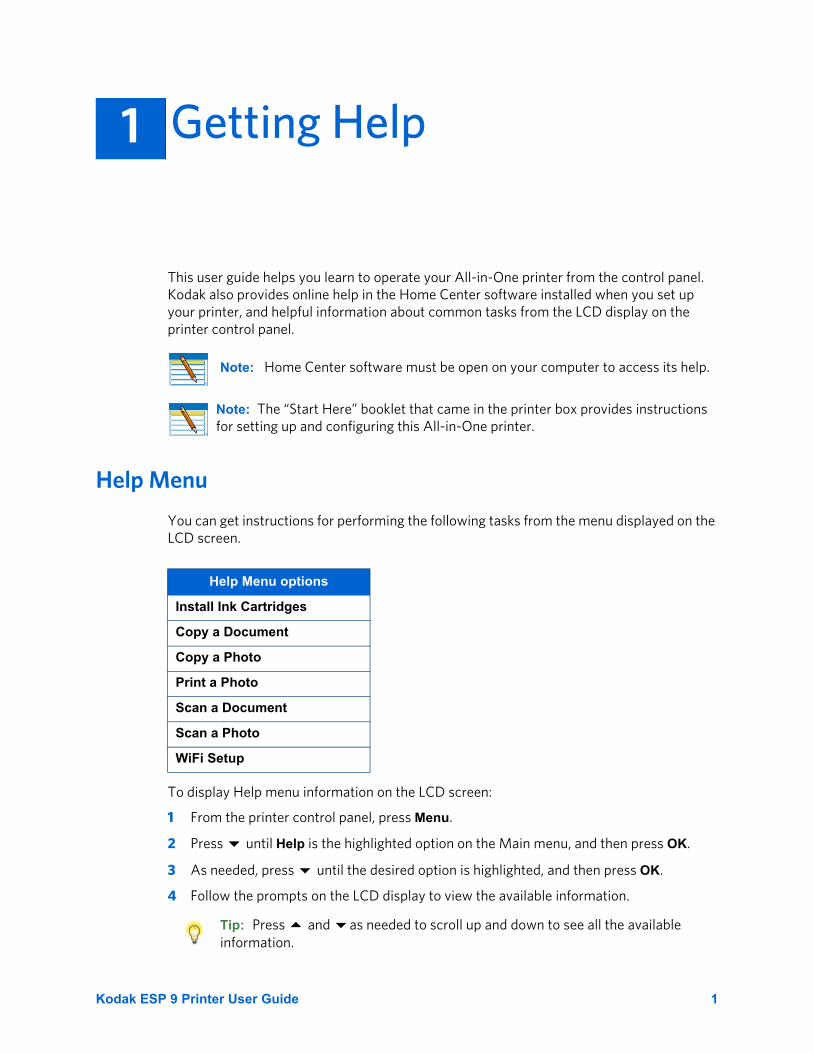
This user guide helps you learn to operate your All-in-One printer from the control panel. Kodak also provides online help in the Home Center software installed when you set up your printer, and helpful information about common tasks from the LCD display on the printer control panel.
Help Menu
You can get instructions for performing the following tasks from the menu displayed on the LCD screen.
To display Help menu information on the LCD screen:
1 From the printer control panel, press Menu.
2 Press until Help is the highlighted option on the Main menu, and then press OK.
3 As needed, press until the desired option is highlighted, and then press OK.
4 Follow the prompts on the LCD display to view the available information.
1 Getting Help
Note: Home Center software must be open on your computer to access its help.
Note: The “Start Here” booklet that came in the printer box provides instructions for setting up and configuring this All-in-One printer.
Help Menu options
Install Ink Cartridges
Copy a Document
Copy a Photo
Print a Photo
Scan a Document
Scan a Photo
WiFi Setup
Tip: Press and as needed to scroll up and down to see all the available information.
Kodak ESP 9 Printer User Guide 1
Getting Help
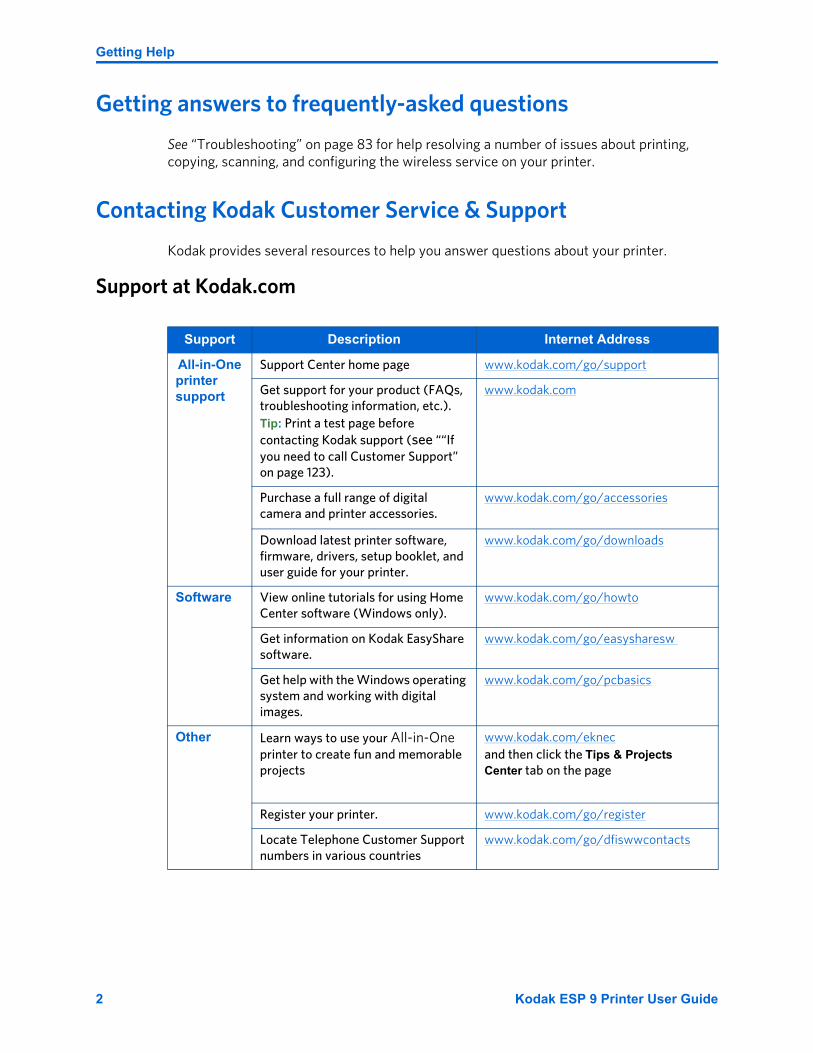
Getting answers to frequently-asked questions
See “Troubleshooting” on page 83 for help resolving a number of issues about printing, copying, scanning, and configuring the wireless service on your printer.
Contacting Kodak Customer Service & Support
Kodak provides several resources to help you answer questions about your printer.
Support at Kodak.com
Support Description Internet Address
All-in-One printer support
Support Center home page www.kodak.com/go/support
Get support for your product (FAQs, troubleshooting information, etc.).Tip: Print a test page before contacting Kodak support (see ““If you need to call Customer Support” on page 123).
www.kodak.com
Purchase a full range of digital camera and printer accessories.
www.kodak.com/go/accessories
Download latest printer software, firmware, drivers, setup booklet, and user guide for your printer.
www.kodak.com/go/downloads
Software View online tutorials for using Home Center software (Windows only).
www.kodak.com/go/howto
Get information on Kodak EasyShare software.
www.kodak.com/go/easysharesw
Get help with the Windows operating system and working with digital images.
www.kodak.com/go/pcbasics
Other Learn ways to use your All-in-One printer to create fun and memorable projects
www.kodak.com/eknecand then click the Tips & Projects Center tab on the page
Register your printer. www.kodak.com/go/register
Locate Telephone Customer Support numbers in various countries
www.kodak.com/go/dfiswwcontacts
2 Kodak ESP 9 Printer User Guide
Chapter 1
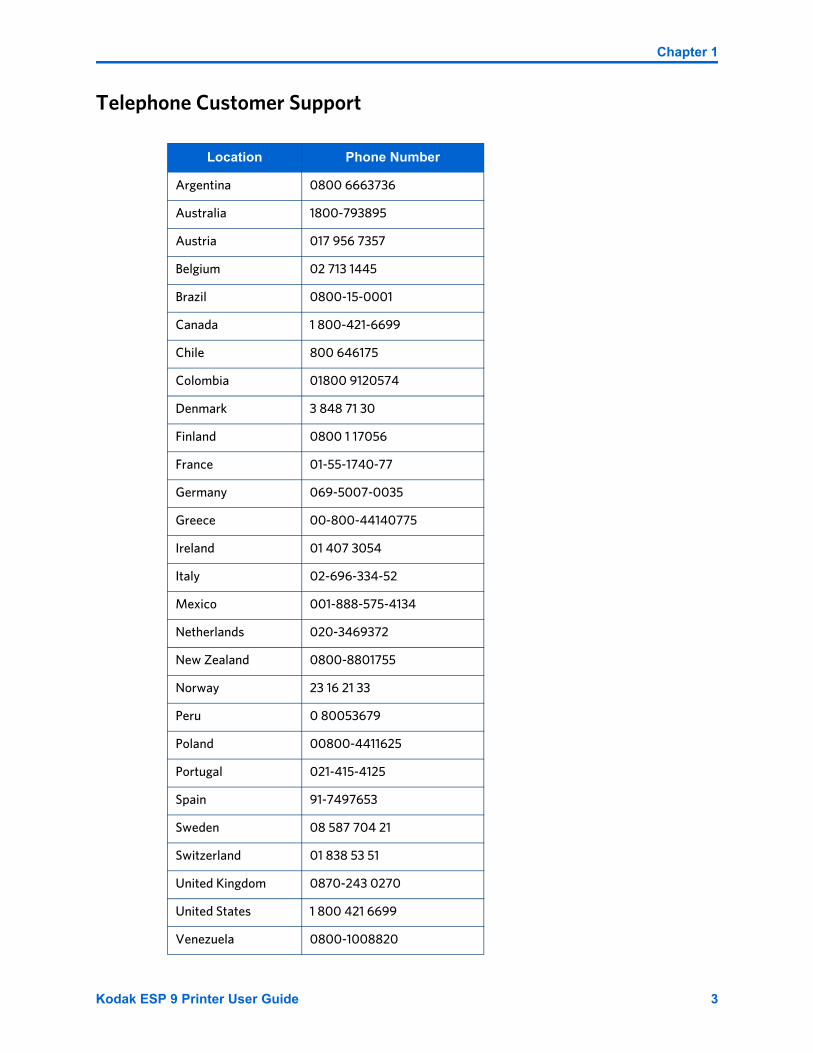
Telephone Customer Support
Location Phone Number
Argentina 0800 6663736
Australia 1800-793895
Austria 017 956 7357
Belgium 02 713 1445
Brazil 0800-15-0001
Canada 1 800-421-6699
Chile 800 646175
Colombia 01800 9120574
Denmark 3 848 71 30
Finland 0800 1 17056
France 01-55-1740-77
Germany 069-5007-0035
Greece 00-800-44140775
Ireland 01 407 3054
Italy 02-696-334-52
Mexico 001-888-575-4134
Netherlands 020-3469372
New Zealand 0800-8801755
Norway 23 16 21 33
Peru 0 80053679
Poland 00800-4411625
Portugal 021-415-4125
Spain 91-7497653
Sweden 08 587 704 21
Switzerland 01 838 53 51
United Kingdom 0870-243 0270
United States 1 800 421 6699
Venezuela 0800-1008820
Kodak ESP 9 Printer User Guide 3

Getting Help
4 Kodak ESP 9 Printer User Guide

The Kodak ESP 9 All-in-One printer allows you to print, copy, scan, and fax images and documents. Although many functions can be operated directly from the control panel, you may also print, store, and manage digital images from a Windows or Macintosh computer connected to the printer via Kodak’s All-in-One printer Home Center software, which installs during the printer setup process. In addition, this printer supports networking, allowing you to access the printer over a wireless (WiFi) or wired (Ethernet) network.
All-in-One printer features
This printer includes:
• A printhead system with two Kodak high-quality pigmented ink cartridges
• An integrated printing accessory that produces two-sided printing from a connected computer
• A bottom paper tray that supports multiple media, including A4, Letter, Legal, 8x10, 5x7 4x6, 4x7, and 4x12 paper, transparencies, and envelopes
• A top paper tray that supports 4x6, 4x7, and 5x7 photo paper and engages and disengages automatically
• A scanner capable of scanning up to A4 (length) and Letter-width originals, and Legal size plain paper through the automatic document feeder
• An automatic document feeder for document copying and fax
• Multi-format memory card support
• A Universal Serial Bus (USB) host port on the front of the printer for connecting a variety of external devices to the printer, including Picture Transfer Protocol (PTP) enabled digital cameras, USB flash (“thumb”) drives, and Kodak Bluetooth USB 2.0 adapters (“dongles”)
• A client USB device port on the back of the printer, for connecting the printer to host Windows or Macintosh computers
• Energy-saving low power mode
• Networking capability, including wireless (WiFi) and wired (Ethernet)
• An innovative touch-control panel, light indicators, and a 3-inch LCD display
2 Printer Overview
Kodak ESP 9 Printer User Guide 5
Printer Overview
• One network (Ethernet) port
• A low-fidelity speaker
• A Fax modem
• A telephone jack
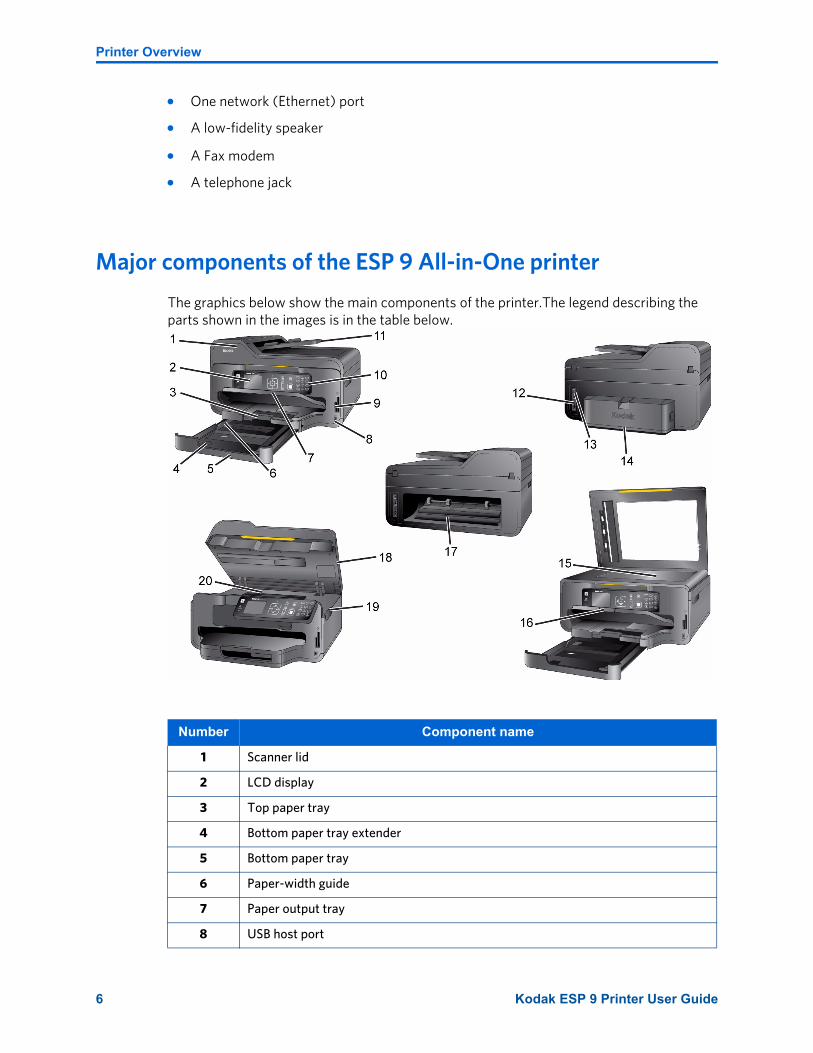
Major components of the ESP 9 All-in-One printer
The graphics below show the main components of the printer.The legend describing the parts shown in the images is in the table below.
Number Component name
1 Scanner lid
2 LCD display
3 Top paper tray
4 Bottom paper tray extender
5 Bottom paper tray
6 Paper-width guide
7 Paper output tray
8 USB host port
6 Kodak ESP 9 Printer User Guide
Chapter 2
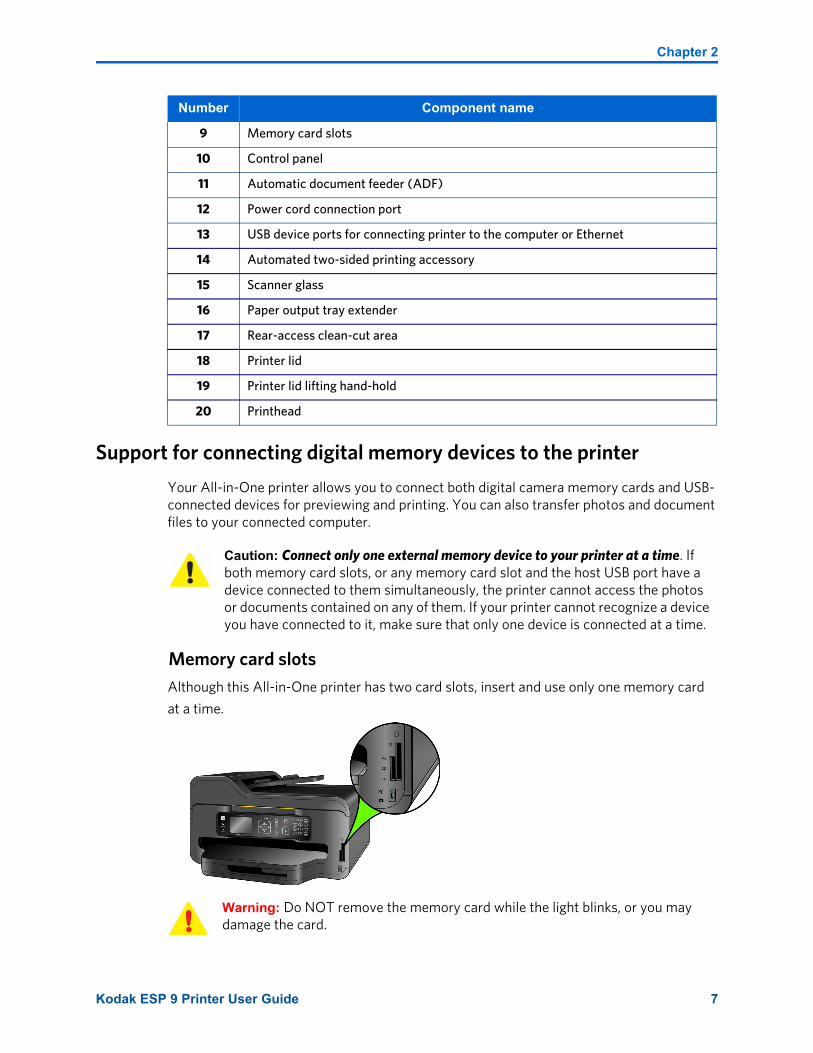
Support for connecting digital memory devices to the printer
Your All-in-One printer allows you to connect both digital camera memory cards and USB-connected devices for previewing and printing. You can also transfer photos and document files to your connected computer.
Memory card slotsAlthough this All-in-One printer has two card slots, insert and use only one memory card
at a time.
9 Memory card slots
10 Control panel
11 Automatic document feeder (ADF)
12 Power cord connection port
13 USB device ports for connecting printer to the computer or Ethernet
14 Automated two-sided printing accessory
15 Scanner glass
16 Paper output tray extender
17 Rear-access clean-cut area
18 Printer lid
19 Printer lid lifting hand-hold
20 Printhead
Number Component name
Caution: Connect only one external memory device to your printer at a time. If both memory card slots, or any memory card slot and the host USB port have a device connected to them simultaneously, the printer cannot access the photos or documents contained on any of them. If your printer cannot recognize a device you have connected to it, make sure that only one device is connected at a time.
Warning: Do NOT remove the memory card while the light blinks, or you may damage the card.
Kodak ESP 9 Printer User Guide 7
Printer Overview
A blue light, located above the memory card slots, blinks while the card is being accessed and stays lit while the card remains in the slot and the printer is on.
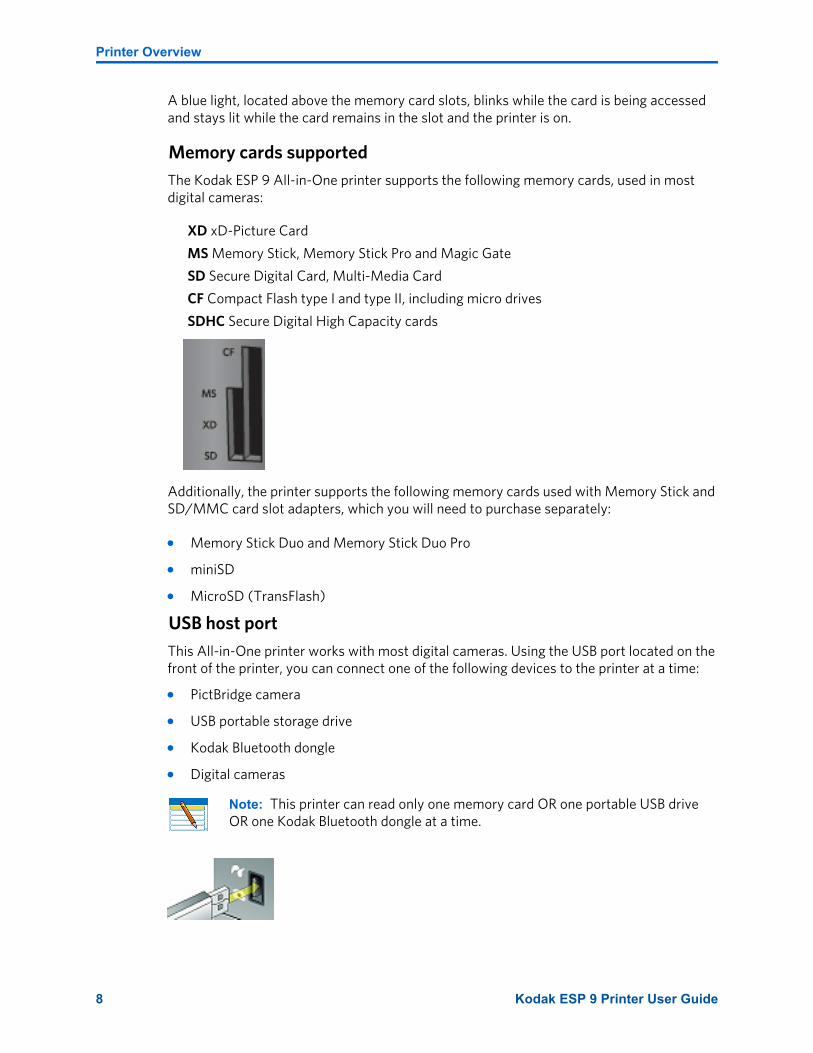
Memory cards supportedThe Kodak ESP 9 All-in-One printer supports the following memory cards, used in most digital cameras:
XD xD-Picture Card
MS Memory Stick, Memory Stick Pro and Magic Gate
SD Secure Digital Card, Multi-Media Card
CF Compact Flash type I and type II, including micro drives
SDHC Secure Digital High Capacity cards
Additionally, the printer supports the following memory cards used with Memory Stick and SD/MMC card slot adapters, which you will need to purchase separately:
• Memory Stick Duo and Memory Stick Duo Pro
• miniSD
• MicroSD (TransFlash)
USB host portThis All-in-One printer works with most digital cameras. Using the USB port located on the front of the printer, you can connect one of the following devices to the printer at a time:
• PictBridge camera
• USB portable storage drive
• Kodak Bluetooth dongle
• Digital cameras
Note: This printer can read only one memory card OR one portable USB drive OR one Kodak Bluetooth dongle at a time.
8 Kodak ESP 9 Printer User Guide
Chapter 2
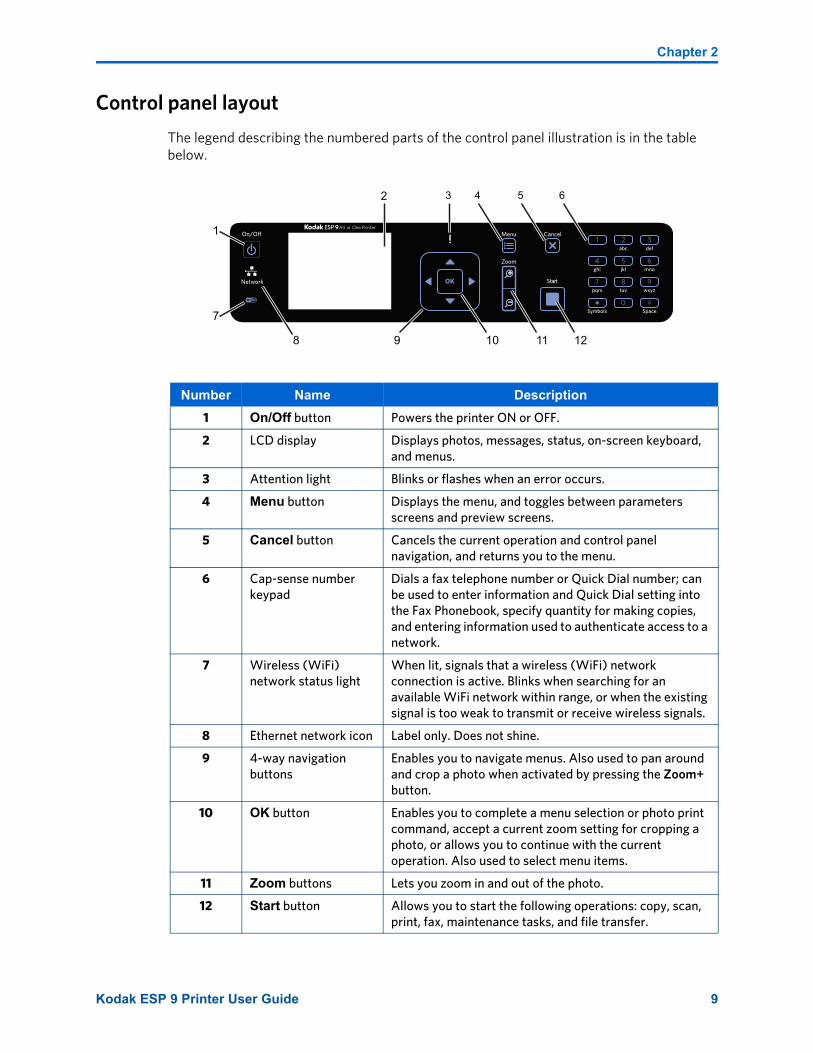
Control panel layout
The legend describing the numbered parts of the control panel illustration is in the table below.
Number Name Description1 On/Off button Powers the printer ON or OFF.
2 LCD display Displays photos, messages, status, on-screen keyboard, and menus.
3 Attention light Blinks or flashes when an error occurs.
4 Menu button Displays the menu, and toggles between parameters screens and preview screens.
5 Cancel button Cancels the current operation and control panel navigation, and returns you to the menu.
6 Cap-sense number keypad
Dials a fax telephone number or Quick Dial number; can be used to enter information and Quick Dial setting into the Fax Phonebook, specify quantity for making copies, and entering information used to authenticate access to a network.
7 Wireless (WiFi) network status light
When lit, signals that a wireless (WiFi) network connection is active. Blinks when searching for an available WiFi network within range, or when the existing signal is too weak to transmit or receive wireless signals.
8 Ethernet network icon Label only. Does not shine.
9 4-way navigation buttons
Enables you to navigate menus. Also used to pan around and crop a photo when activated by pressing the Zoom+ button.
10 OK button Enables you to complete a menu selection or photo print command, accept a current zoom setting for cropping a photo, or allows you to continue with the current operation. Also used to select menu items.
11 Zoom buttons Lets you zoom in and out of the photo.
12 Start button Allows you to start the following operations: copy, scan, print, fax, maintenance tasks, and file transfer.
1
2
8 9 10 11 12
3 4 5 6
7
Kodak ESP 9 Printer User Guide 9
Printer Overview
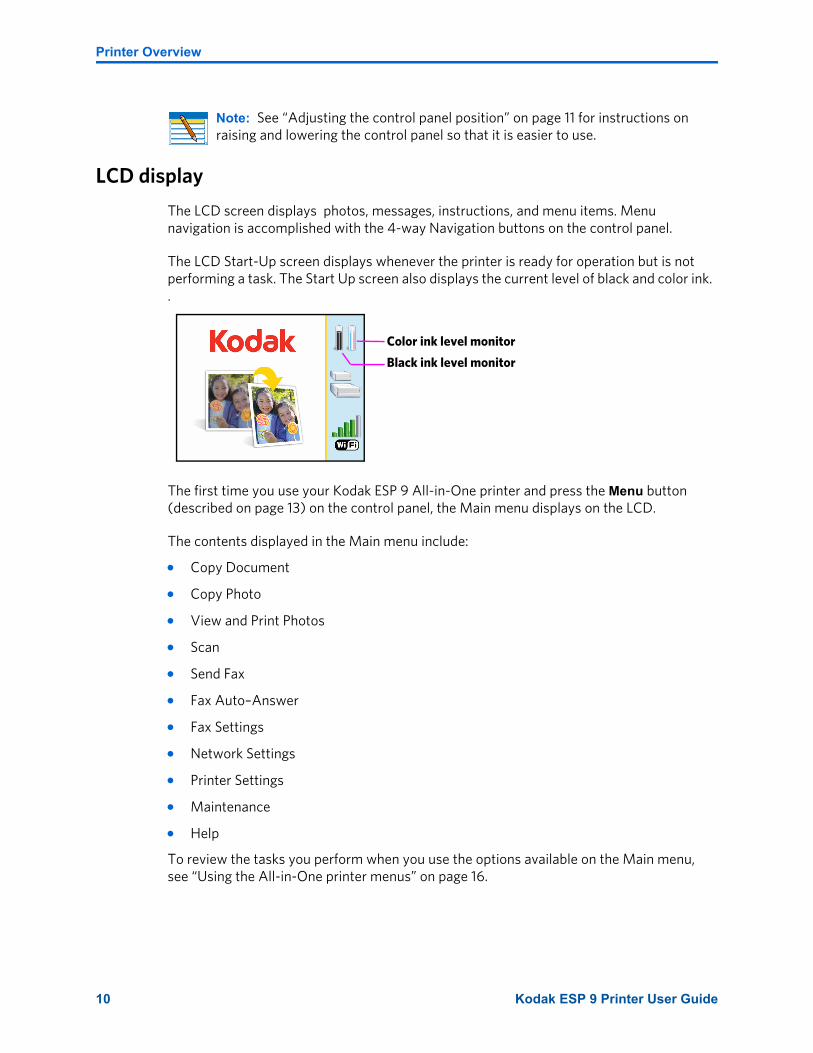
LCD display
The LCD screen displays photos, messages, instructions, and menu items. Menu navigation is accomplished with the 4-way Navigation buttons on the control panel.
The LCD Start-Up screen displays whenever the printer is ready for operation but is not performing a task. The Start Up screen also displays the current level of black and color ink. .
The first time you use your Kodak ESP 9 All-in-One printer and press the Menu button (described on page 13) on the control panel, the Main menu displays on the LCD.
The contents displayed in the Main menu include:
• Copy Document
• Copy Photo
• View and Print Photos
• Scan
• Send Fax
• Fax Auto–Answer
• Fax Settings
• Network Settings
• Printer Settings
• Maintenance
• Help
To review the tasks you perform when you use the options available on the Main menu, see “Using the All-in-One printer menus” on page 16.
Note: See “Adjusting the control panel position” on page 11 for instructions on raising and lowering the control panel so that it is easier to use.
Color ink level monitor
Black ink level monitor
10 Kodak ESP 9 Printer User Guide
Chapter 2
Using the control panel
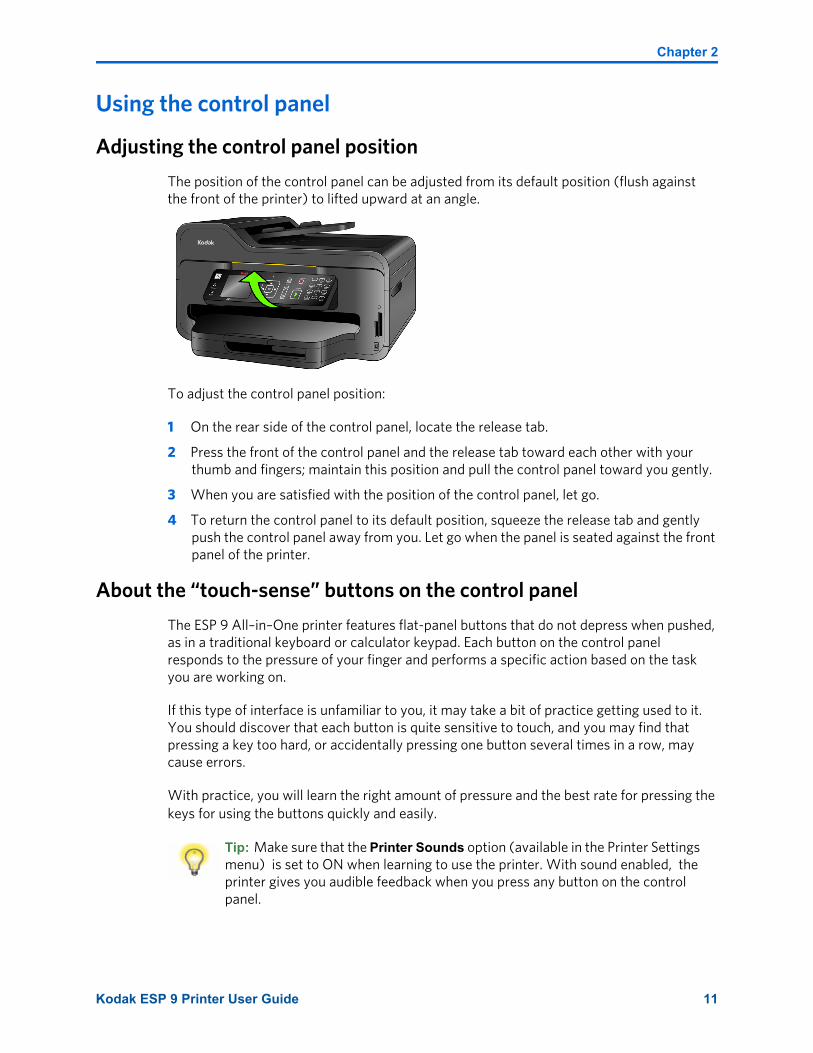
Adjusting the control panel position
The position of the control panel can be adjusted from its default position (flush against the front of the printer) to lifted upward at an angle.
To adjust the control panel position:
1 On the rear side of the control panel, locate the release tab.
2 Press the front of the control panel and the release tab toward each other with your thumb and fingers; maintain this position and pull the control panel toward you gently.
3 When you are satisfied with the position of the control panel, let go.
4 To return the control panel to its default position, squeeze the release tab and gently push the control panel away from you. Let go when the panel is seated against the front panel of the printer.
About the “touch-sense” buttons on the control panel
The ESP 9 All–in–One printer features flat-panel buttons that do not depress when pushed, as in a traditional keyboard or calculator keypad. Each button on the control panel responds to the pressure of your finger and performs a specific action based on the task you are working on.
If this type of interface is unfamiliar to you, it may take a bit of practice getting used to it. You should discover that each button is quite sensitive to touch, and you may find that pressing a key too hard, or accidentally pressing one button several times in a row, may cause errors.
With practice, you will learn the right amount of pressure and the best rate for pressing the keys for using the buttons quickly and easily.
Tip: Make sure that the Printer Sounds option (available in the Printer Settings menu) is set to ON when learning to use the printer. With sound enabled, the printer gives you audible feedback when you press any button on the control panel.
Kodak ESP 9 Printer User Guide 11
Printer Overview
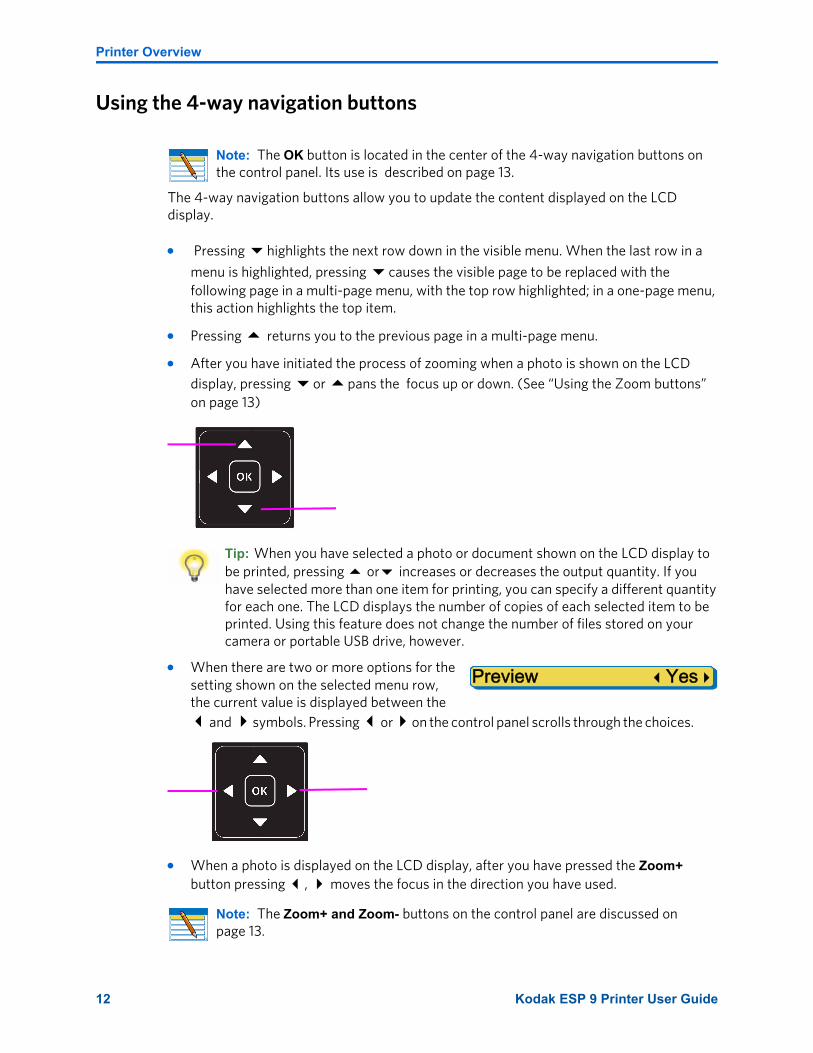
Using the 4-way navigation buttons
The 4-way navigation buttons allow you to update the content displayed on the LCD display.
• Pressing highlights the next row down in the visible menu. When the last row in a
menu is highlighted, pressing causes the visible page to be replaced with the following page in a multi-page menu, with the top row highlighted; in a one-page menu, this action highlights the top item.
• Pressing returns you to the previous page in a multi-page menu.
• After you have initiated the process of zooming when a photo is shown on the LCD display, pressing or pans the focus up or down. (See “Using the Zoom buttons” on page 13)
• When there are two or more options for the setting shown on the selected menu row, the current value is displayed between the
and symbols. Pressing or on the control panel scrolls through the choices.
• When a photo is displayed on the LCD display, after you have pressed the Zoom+ button pressing , moves the focus in the direction you have used.
Note: The OK button is located in the center of the 4-way navigation buttons on the control panel. Its use is described on page 13.
Tip: When you have selected a photo or document shown on the LCD display to be printed, pressing or increases or decreases the output quantity. If you have selected more than one item for printing, you can specify a different quantity for each one. The LCD displays the number of copies of each selected item to be printed. Using this feature does not change the number of files stored on your camera or portable USB drive, however.
Note: The Zoom+ and Zoom- buttons on the control panel are discussed on page 13.
Preview Yes
12 Kodak ESP 9 Printer User Guide
Chapter 2
• When you are viewing a group of photos stored on a portable memory storage device such as a USB drive, pressing the or the button allows you to scroll through the images.
• Continuing to press any of the 4-way navigation buttons causes them to repeat the action until you release it.
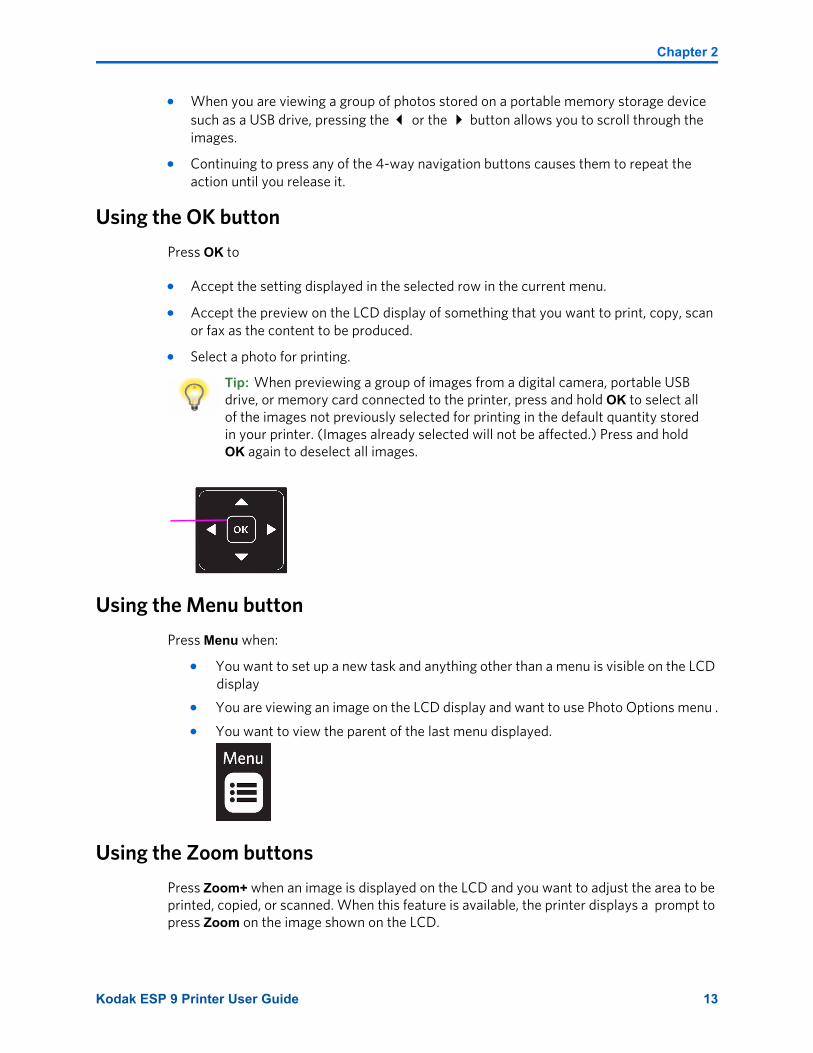
Using the OK button
Press OK to
• Accept the setting displayed in the selected row in the current menu.
• Accept the preview on the LCD display of something that you want to print, copy, scan or fax as the content to be produced.
• Select a photo for printing.
Using the Menu button
Press Menu when:
• You want to set up a new task and anything other than a menu is visible on the LCD display
• You are viewing an image on the LCD display and want to use Photo Options menu .
• You want to view the parent of the last menu displayed.
Using the Zoom buttons
Press Zoom+ when an image is displayed on the LCD and you want to adjust the area to be printed, copied, or scanned. When this feature is available, the printer displays a prompt to press Zoom on the image shown on the LCD.
Tip: When previewing a group of images from a digital camera, portable USB drive, or memory card connected to the printer, press and hold OK to select all of the images not previously selected for printing in the default quantity stored in your printer. (Images already selected will not be affected.) Press and hold OK again to deselect all images.
Kodak ESP 9 Printer User Guide 13
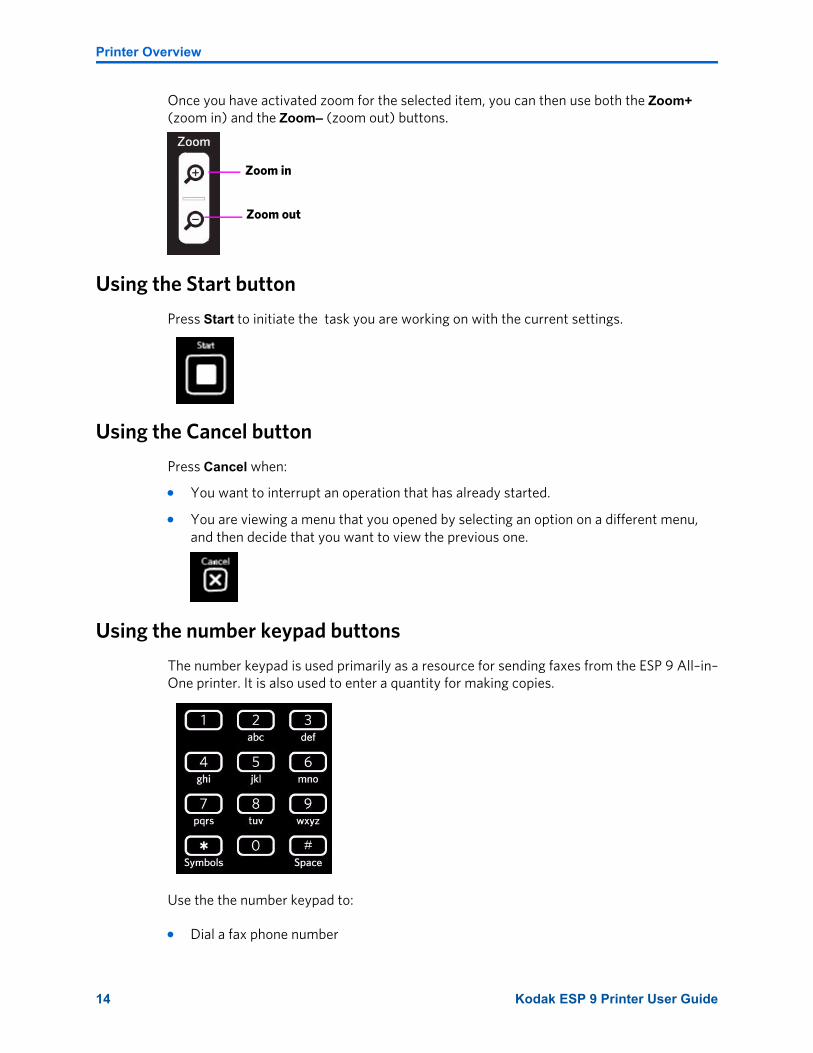
Printer Overview
Once you have activated zoom for the selected item, you can then use both the Zoom+ (zoom in) and the Zoom– (zoom out) buttons.
Using the Start button
Press Start to initiate the task you are working on with the current settings.
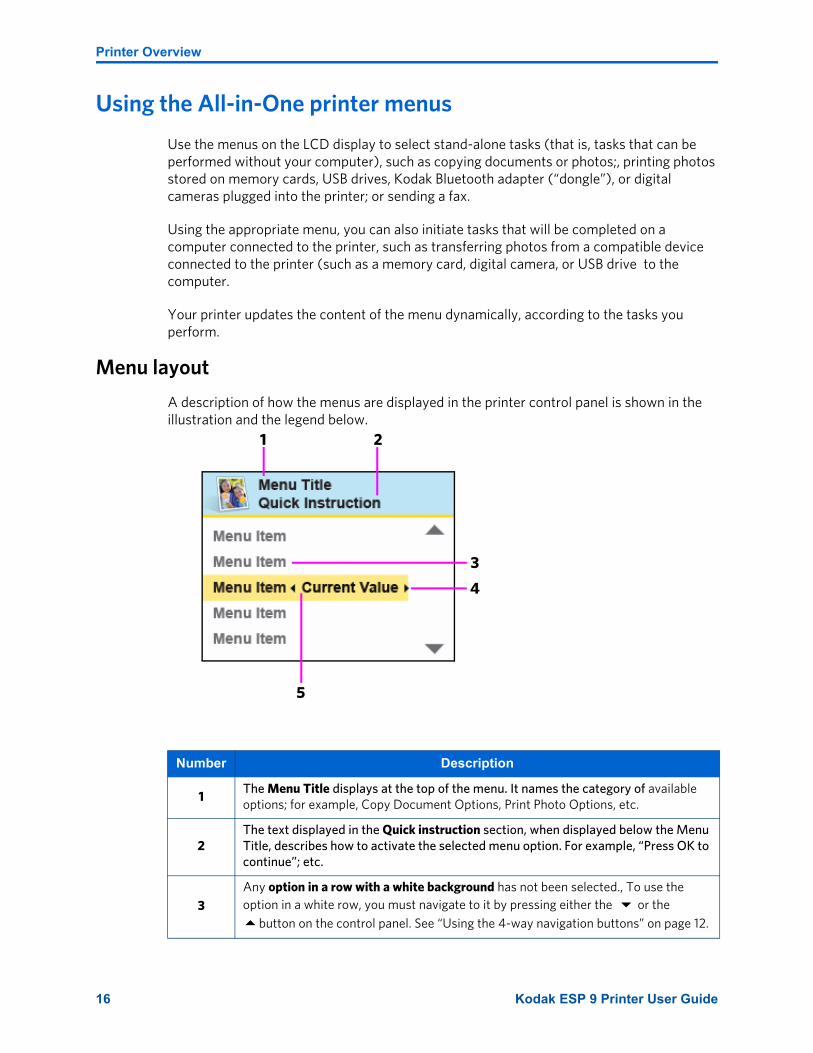
Using the Cancel button
Press Cancel when:
• You want to interrupt an operation that has already started.
• You are viewing a menu that you opened by selecting an option on a different menu, and then decide that you want to view the previous one.
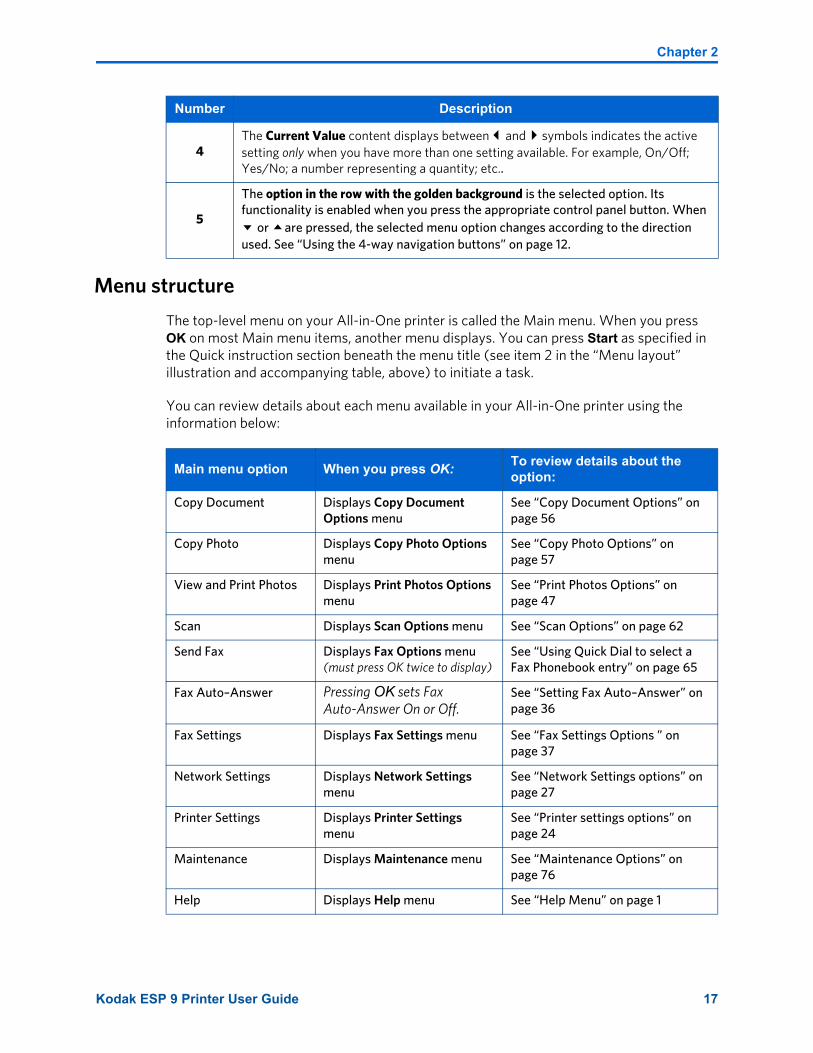
Using the number keypad buttons
The number keypad is used primarily as a resource for sending faxes from the ESP 9 All–in–One printer. It is also used to enter a quantity for making copies.
Use the the number keypad to:
• Dial a fax phone number
Zoom in
Zoom out
14 Kodak ESP 9 Printer User Guide
Chapter 2
• Enter the Quick Dial number for an entry in the Fax Phonebook
• Enter the fax telephone number for an entry in the Fax Phonebook
• Enter a quantity for making copies of a document or photo
As on a telephone dial pad, which the number keypad resembles, each key on the ESP 9 number keypad (except for the 1 key and the zero key) is associated with both a numerical value and with either three or four alphabetic characters, with typographic symbols, or with symbols and a space (used to separate two alphanumeric characters).
Using the on-screen keyboard
The on-screen keyboard displays in the ESP 9 All-in-One printer LCD for the following tasks performed on the control panel:
• Entering authentication information, such as a security string, for connecting the printer to a wired (Ethernet) or wireless (WiFi) network, in the Network Settings menu
• Entering or editing your Fax Sender information in the Fax Settings menu
• Entering or editing the fax recipient Name in the Fax Phonebook
To maneuver around the on-screen keyboard, use the 4–way navigation buttons, described on page 12, and the OK button, described on page 13.
Tip: Many ESP 9 users find it helpful setting the Printer Sounds option (available in the Printer Settings menu) to ON when using the number keypad. Because most keys can express more than one alphanumeric character, depending on how many times it is pressed, the audible feedback helps users to press each key at the proper speed. This prevents “jumping” past the desired value, which can happen if a key is pressed too quickly .
Kodak ESP 9 Printer User Guide 15
Printer Overview
Using the All-in-One printer menus
Use the menus on the LCD display to select stand-alone tasks (that is, tasks that can be performed without your computer), such as copying documents or photos;, printing photos stored on memory cards, USB drives, Kodak Bluetooth adapter (“dongle”), or digital cameras plugged into the printer; or sending a fax.
Using the appropriate menu, you can also initiate tasks that will be completed on a computer connected to the printer, such as transferring photos from a compatible device connected to the printer (such as a memory card, digital camera, or USB drive to the computer.
Your printer updates the content of the menu dynamically, according to the tasks you perform.
Menu layout
A description of how the menus are displayed in the printer control panel is shown in the illustration and the legend below.
Number Description
1The Menu Title displays at the top of the menu. It names the category of available options; for example, Copy Document Options, Print Photo Options, etc.
2The text displayed in the Quick instruction section, when displayed below the Menu Title, describes how to activate the selected menu option. For example, “Press OK to continue”; etc.
3Any option in a row with a white background has not been selected., To use the option in a white row, you must navigate to it by pressing either the or the
button on the control panel. See “Using the 4-way navigation buttons” on page 12.
1 2
5
4
3
16 Kodak ESP 9 Printer User Guide
Chapter 2
Menu structure
The top-level menu on your All-in-One printer is called the Main menu. When you press OK on most Main menu items, another menu displays. You can press Start as specified in the Quick instruction section beneath the menu title (see item 2 in the “Menu layout” illustration and accompanying table, above) to initiate a task.
You can review details about each menu available in your All-in-One printer using the information below:
4The Current Value content displays between and symbols indicates the active setting only when you have more than one setting available. For example, On/Off; Yes/No; a number representing a quantity; etc..
5
The option in the row with the golden background is the selected option. Its functionality is enabled when you press the appropriate control panel button. When
or are pressed, the selected menu option changes according to the direction used. See “Using the 4-way navigation buttons” on page 12.
Number Description
Main menu option When you press OK: To review details about the option:
Copy Document Displays Copy Document Options menu
See “Copy Document Options” on page 56
Copy Photo Displays Copy Photo Options menu
See “Copy Photo Options” on page 57
View and Print Photos Displays Print Photos Options menu
See “Print Photos Options” on page 47
Scan Displays Scan Options menu See “Scan Options” on page 62
Send Fax Displays Fax Options menu (must press OK twice to display)
See “Using Quick Dial to select a Fax Phonebook entry” on page 65
Fax Auto–Answer Pressing OK sets Fax Auto-Answer On or Off.
See “Setting Fax Auto–Answer” on page 36
Fax Settings Displays Fax Settings menu See “Fax Settings Options ” on page 37
Network Settings Displays Network Settings menu
See “Network Settings options” on page 27
Printer Settings Displays Printer Settings menu
See “Printer settings options” on page 24
Maintenance Displays Maintenance menu See “Maintenance Options” on page 76
Help Displays Help menu See “Help Menu” on page 1
Kodak ESP 9 Printer User Guide 17
Printer Overview
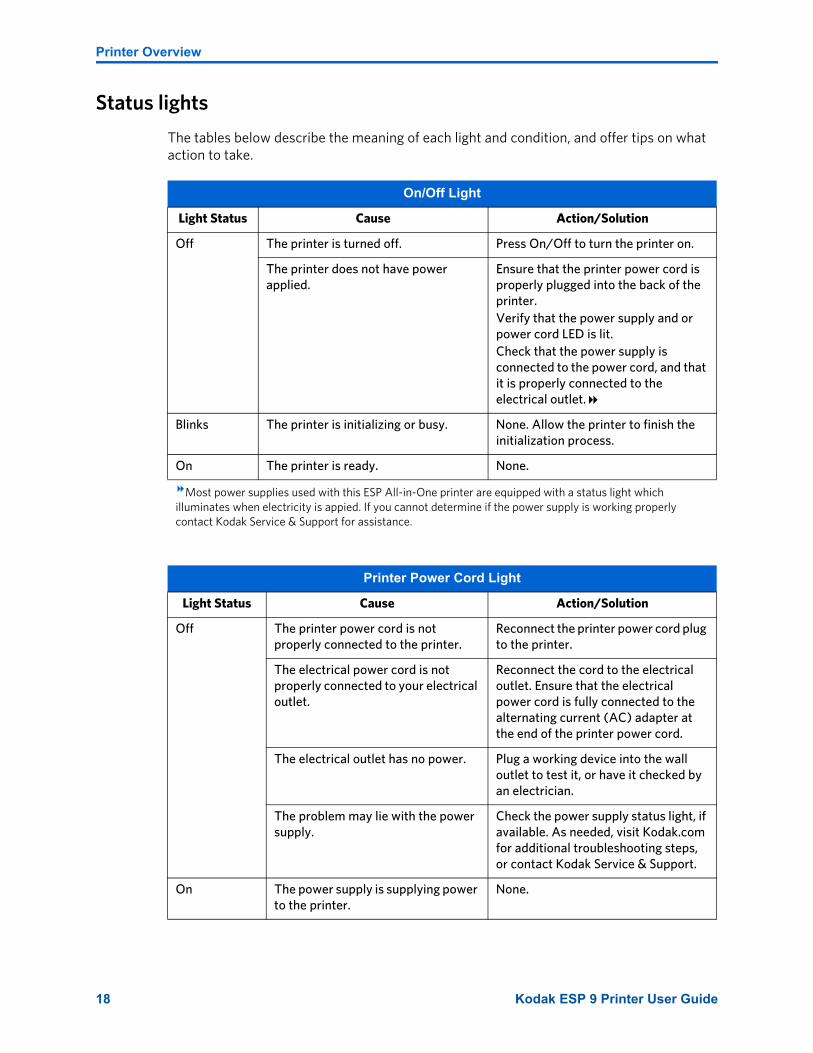
Status lights
The tables below describe the meaning of each light and condition, and offer tips on what action to take.
On/Off Light
Light Status Cause Action/Solution
Off The printer is turned off. Press On/Off to turn the printer on.
The printer does not have power applied.
Ensure that the printer power cord is properly plugged into the back of the printer. Verify that the power supply and or power cord LED is lit.Check that the power supply is connected to the power cord, and that it is properly connected to the electrical outlet.
Blinks The printer is initializing or busy. None. Allow the printer to finish the initialization process.
On The printer is ready. None.
Most power supplies used with this ESP All-in-One printer are equipped with a status light which illuminates when electricity is appied. If you cannot determine if the power supply is working properly contact Kodak Service & Support for assistance.
Printer Power Cord Light
Light Status Cause Action/Solution
Off The printer power cord is not properly connected to the printer.
Reconnect the printer power cord plug to the printer.
The electrical power cord is not properly connected to your electrical outlet.
Reconnect the cord to the electrical outlet. Ensure that the electrical power cord is fully connected to the alternating current (AC) adapter at the end of the printer power cord.
The electrical outlet has no power. Plug a working device into the wall outlet to test it, or have it checked by an electrician.
The problem may lie with the power supply.
Check the power supply status light, if available. As needed, visit Kodak.com for additional troubleshooting steps, or contact Kodak Service & Support.
On The power supply is supplying power to the printer.
None.
18 Kodak ESP 9 Printer User Guide
Chapter 2
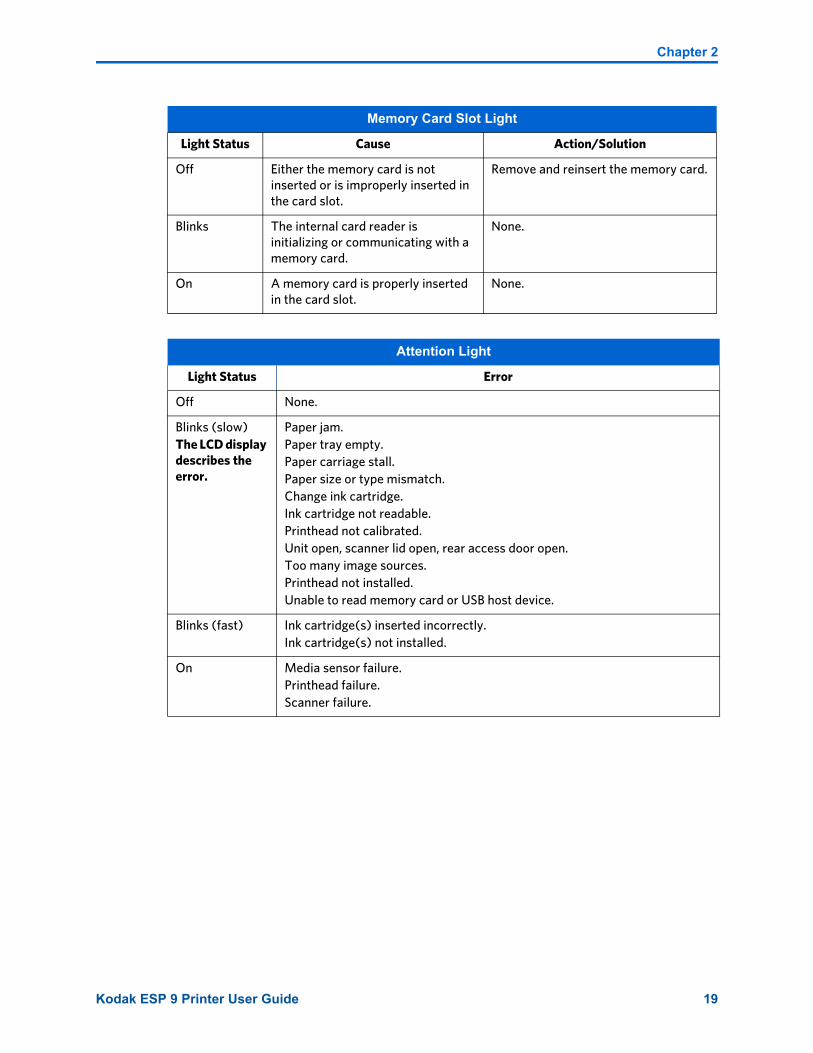
Memory Card Slot Light
Light Status Cause Action/Solution
Off Either the memory card is not inserted or is improperly inserted in the card slot.
Remove and reinsert the memory card.
Blinks The internal card reader is initializing or communicating with a memory card.
None.
On A memory card is properly inserted in the card slot.
None.
Attention Light
Light Status Error
Off None.
Blinks (slow)The LCD display describes the error.
Paper jam.Paper tray empty.Paper carriage stall.Paper size or type mismatch.Change ink cartridge.Ink cartridge not readable.Printhead not calibrated.Unit open, scanner lid open, rear access door open.Too many image sources.Printhead not installed.Unable to read memory card or USB host device.
Blinks (fast) Ink cartridge(s) inserted incorrectly.Ink cartridge(s) not installed.
On Media sensor failure.Printhead failure.Scanner failure.
Kodak ESP 9 Printer User Guide 19
Printer Overview
All-in-One printer Home Center software
Kodak Home Center software is installed on your computer during the setup process. The software functionality for Windows or Macintosh users is described below.
Home Center for Windows
Once installed, Kodak All-in-One printer Home Center software allows you to print, copy, scan, and configure your All-in-One printer from your Windows XP or Vista computer.
To open the Home Center software window on your computer, use the Home Center icon on the Desktop or in the Start Menu.
From the All-in-One printer Home Center main menu, selecting one of the six menu items enables you to:
• Scan pictures and documents
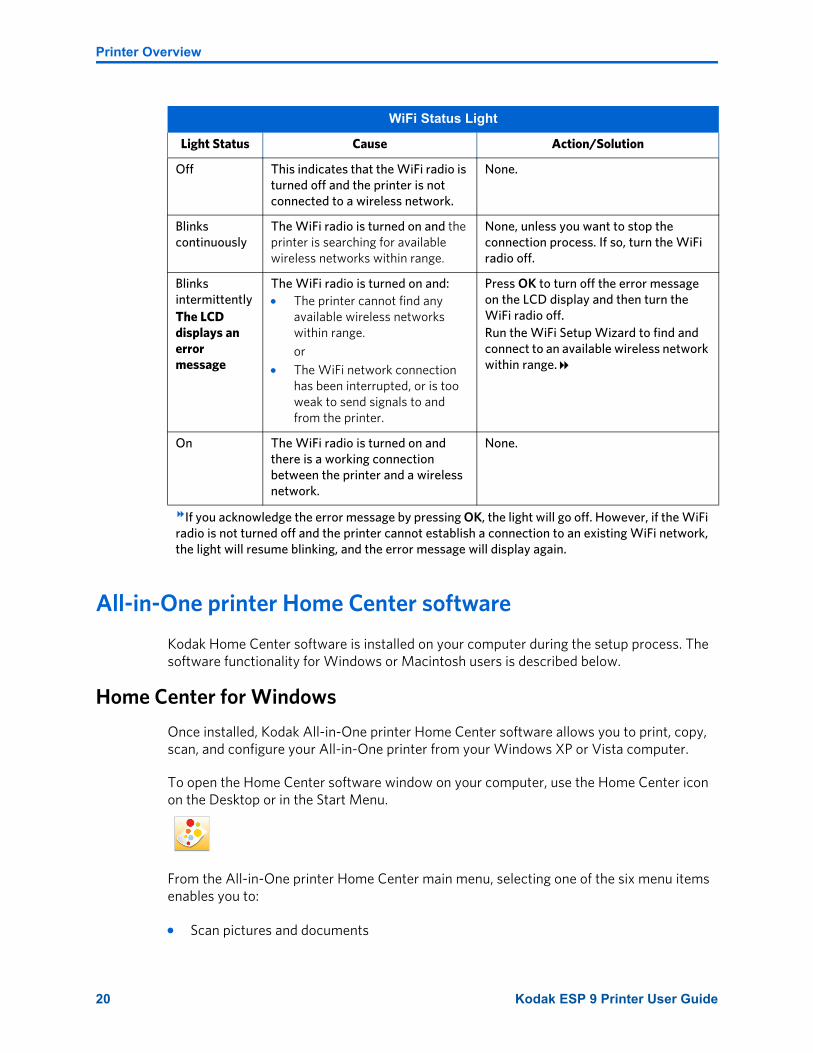
WiFi Status Light
Light Status Cause Action/Solution
Off This indicates that the WiFi radio is turned off and the printer is not connected to a wireless network.
None.
Blinks continuously
The WiFi radio is turned on and the printer is searching for available wireless networks within range.
None, unless you want to stop the connection process. If so, turn the WiFi radio off.
Blinks intermittentlyThe LCD displays an error message
The WiFi radio is turned on and:• The printer cannot find any
available wireless networks within range.
or• The WiFi network connection
has been interrupted, or is too weak to send signals to and from the printer.
Press OK to turn off the error message on the LCD display and then turn the WiFi radio off.Run the WiFi Setup Wizard to find and connect to an available wireless network within range.
On The WiFi radio is turned on and there is a working connection between the printer and a wireless network.
None.
If you acknowledge the error message by pressing OK, the light will go off. However, if the WiFi radio is not turned off and the printer cannot establish a connection to an existing WiFi network, the light will resume blinking, and the error message will display again.
20 Kodak ESP 9 Printer User Guide
Chapter 2
• Enhance and copy pictures
• Enhance and print images
• Configure settings for printing, copying, and scanning from the control panel
• Access the Kodak Tips and Projects Center Web site.
• Order supplies from the Kodak Web site.
The functions of the three small icons located in the upper-right corner of the Home Center window are shown below:
Home Center for Macintosh
After installing the software on your Macintosh OS X computer, you can select the Home Center from the System Preference's Print & Fax pane by selecting your All-in-One printer in the Printer List, clicking the Print Queue button, and clicking the Utility icon. Or, you can use the Home Center icon displayed in your Dock.
The Home Center window displays three tabs: Select, Setup, and Maintenance.
From the Select tab, you can select your All-in-One printer from a list of connected printers.
From the Setup tab, you can configure stand-alone printing, copying, and scanning settings:
• AiO Printer: This option lets you:
• Synchronize your printer’s date and time to the computer.
• Select what quality you prefer for printing on plain (not photo-quality) paper.
• Specify whether a date will be printed on the front of a photo printed from the All-in-One printer.
• Specify whether the printer automatically applies “scene balance” to digital pictures it prints.
• Change the name of the printer.
• Scan: This option lets you configure settings for scanning, saving, and specifying the application(s) used for opening and editing scanned pictures and documents.
Returns you to the main Home Center window
Displays the Status Monitor
Displays a Help panel for the Home Center software.
Kodak ESP 9 Printer User Guide 21

Printer Overview
From the Maintenance tab, you can:
• Print a test page
• Align the printhead
• Run a printhead nozzle correction
• Clean the printhead
• Click About this Printer to view the printer model number, its Kodak Service Number, and the version of printer firmware used to operate the printer
From both the Setup and Maintenance and tabs you can:
• Order Supplies: This option allows you to order supplies online from the Kodak web site.
• View/Hide Status: This option opens a drawer displaying the configuration status of your All-in-One printer.
22 Kodak ESP 9 Printer User Guide
Use this chapter to set up and start using your Kodak All-in-One printer.
Selecting a printer location
Place your printer on a clean, flat surface in a dry, well-ventilated location, away from direct sunlight. Avoid areas with high levels of dust and debris. Do not expose the printer and paper to ventilation ducts, open doors, or high traffic, as airborne particles can affect picture quality.
Allow enough space on all sides of the printer to comfortably connect and disconnect cables, change ink cartridges, as well as remove and load paper.
To ensure getting good signals from your networked computer(s), minimize obstacles between the network router and the printer (and other wireless devices, such as Bluetooth–enabled camera phones, etc.). The printer will function best with as clear a “line of sight” as possible between it and the router.
In addition, keep the printer away from microwaves, and away from 2.4 GHz wireless telephone handsets.
Configuring printer settings
Printer settings can be adjusted in two ways: via the control panel or the Home Center software that comes with your printer (see Home Center Help for more details).
Configuring basic settings
1 From the control panel, press Menu.
2 Press until Printer Settings is selected, and then press OK.
3 Press until the parameter you want to configure is selected, and then press OK. To review the available options and settings, see “Printer settings options” on page 24.
4 Press or to configure the Date and Time, Tagged Image Printing, Control Panel Settings, Language, Country/Region, or Reset All Settings.
3 Setting Up Your Printer
Kodak ESP 9 Printer User Guide 23
Setting Up Your Printer
5 Press or as needed to change the default value. The default value is displayed at the right margin of the setting. When the setting is highlighted, the current value is bracketed between the and symbols.
6 Press OK to save the setting(s).
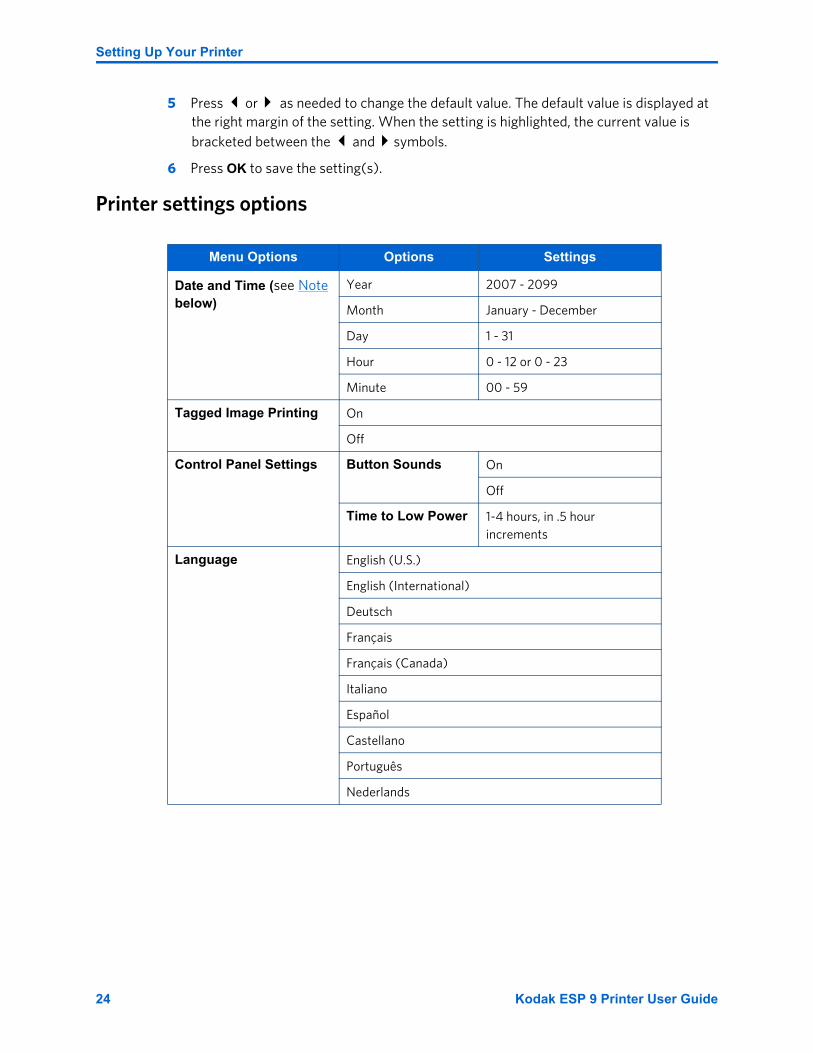
Printer settings options
Menu Options Options Settings
Date and Time (see Note below)
Year 2007 - 2099
Month January - December
Day 1 - 31
Hour 0 - 12 or 0 - 23
Minute 00 - 59
Tagged Image Printing On
Off
Control Panel Settings Button Sounds On
Off
Time to Low Power 1-4 hours, in .5 hour increments
Language English (U.S.)
English (International)
Deutsch
Français
Français (Canada)
Italiano
Español
Castellano
Português
Nederlands
24 Kodak ESP 9 Printer User Guide
Chapter 3
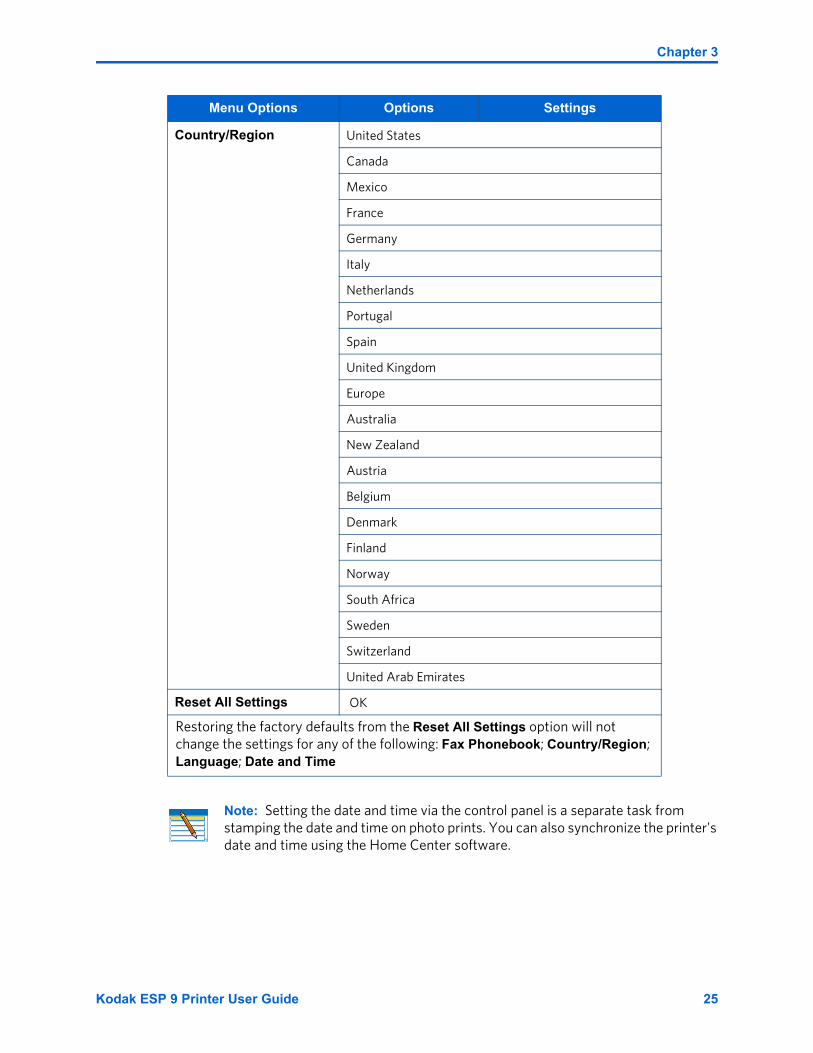
Country/Region United States
Canada
Mexico
France
Germany
Italy
Netherlands
Portugal
Spain
United Kingdom
Europe
Australia
New Zealand
Austria
Belgium
Denmark
Finland
Norway
South Africa
Sweden
Switzerland
United Arab Emirates
Reset All Settings OK
Restoring the factory defaults from the Reset All Settings option will not change the settings for any of the following: Fax Phonebook; Country/Region; Language; Date and Time
Note: Setting the date and time via the control panel is a separate task from stamping the date and time on photo prints. You can also synchronize the printer's date and time using the Home Center software.
Menu Options Options Settings
Kodak ESP 9 Printer User Guide 25

Setting Up Your Printer
Configuring network settings
You can connect your ESP All-in-One printer to a wired (Ethernet) network or to a wireless (WiFi) network. You may refer to the “Start Here” booklet that came with your printer, or review the following sections as needed.
Configuring an Ethernet network connection
You will need the following items to connect the All–in–One printer printer to a wired (Ethernet) network:
• A functional Ethernet network that includes a router, switch, or hub with an Ethernet port.
• A CAT-5 (or higher) Ethernet cable
Ethernet setup1 Plug one end of the Ethernet cable into the Ethernet port located on the back of the All–
in–One printer and the other end into an available port on your Ethernet router or hub.
2 Turn on the printer, if necessary.
3 From the control panel, press Menu.
4 Press until Network Settings is selected, and then press OK.
5 If you see the setting: Turn WiFi Radio Off, press OK now. This disconnects any existing wireless (WiFi) network connections.
6 Use the Manual IP Address to change the IP Address. See your network provider for assistance.
Configuring a wireless network connection
You can connect your printer to a 802.11 wireless (WiFi) network from the All-in-One printer control panel.
26 Kodak ESP 9 Printer User Guide
Chapter 3
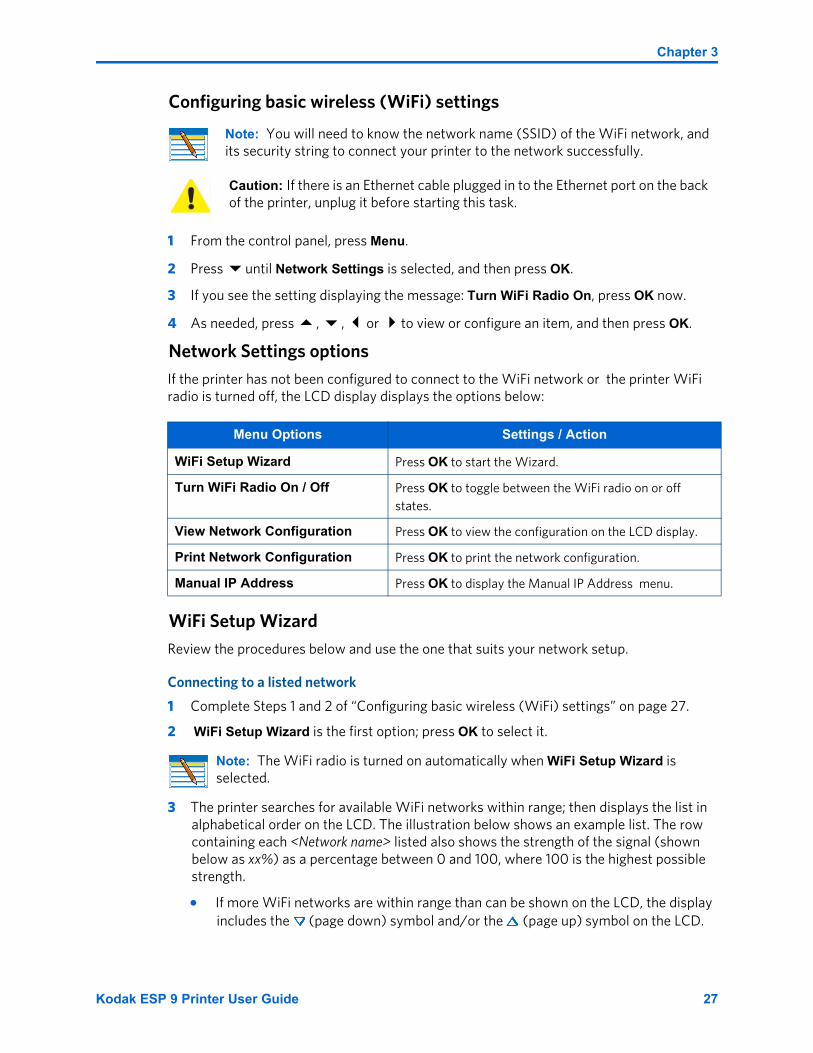
Configuring basic wireless (WiFi) settings
1 From the control panel, press Menu.
2 Press until Network Settings is selected, and then press OK.
3 If you see the setting displaying the message: Turn WiFi Radio On, press OK now.
4 As needed, press , , or to view or configure an item, and then press OK.
Network Settings optionsIf the printer has not been configured to connect to the WiFi network or the printer WiFi radio is turned off, the LCD display displays the options below:
WiFi Setup WizardReview the procedures below and use the one that suits your network setup.
Connecting to a listed network
1 Complete Steps 1 and 2 of “Configuring basic wireless (WiFi) settings” on page 27.
2 WiFi Setup Wizard is the first option; press OK to select it.
3 The printer searches for available WiFi networks within range; then displays the list in alphabetical order on the LCD. The illustration below shows an example list. The row containing each <Network name> listed also shows the strength of the signal (shown below as xx%) as a percentage between 0 and 100, where 100 is the highest possible strength.
• If more WiFi networks are within range than can be shown on the LCD, the display includes the (page down) symbol and/or the (page up) symbol on the LCD.
Note: You will need to know the network name (SSID) of the WiFi network, and its security string to connect your printer to the network successfully.
Caution: If there is an Ethernet cable plugged in to the Ethernet port on the back of the printer, unplug it before starting this task.
Menu Options Settings / Action
WiFi Setup Wizard Press OK to start the Wizard.
Turn WiFi Radio On / Off Press OK to toggle between the WiFi radio on or off states.
View Network Configuration Press OK to view the configuration on the LCD display.
Print Network Configuration Press OK to print the network configuration.
Manual IP Address Press OK to display the Manual IP Address menu.
Note: The WiFi radio is turned on automatically when WiFi Setup Wizard is selected.
Kodak ESP 9 Printer User Guide 27
Setting Up Your Printer
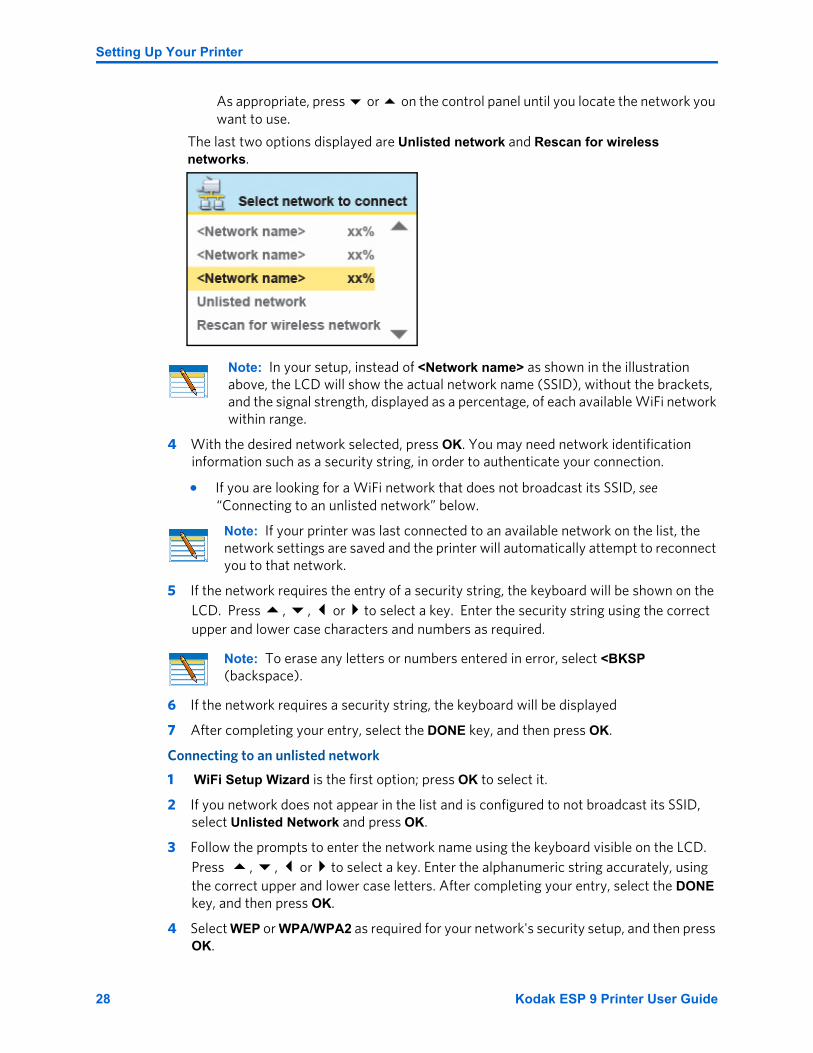
As appropriate, press or on the control panel until you locate the network you want to use.
The last two options displayed are Unlisted network and Rescan for wireless networks.
4 With the desired network selected, press OK. You may need network identification information such as a security string, in order to authenticate your connection.
• If you are looking for a WiFi network that does not broadcast its SSID, see “Connecting to an unlisted network” below.
5 If the network requires the entry of a security string, the keyboard will be shown on the LCD. Press , , or to select a key. Enter the security string using the correct upper and lower case characters and numbers as required.
6 If the network requires a security string, the keyboard will be displayed
7 After completing your entry, select the DONE key, and then press OK.
Connecting to an unlisted network
1 WiFi Setup Wizard is the first option; press OK to select it.
2 If you network does not appear in the list and is configured to not broadcast its SSID, select Unlisted Network and press OK.
3 Follow the prompts to enter the network name using the keyboard visible on the LCD. Press , , or to select a key. Enter the alphanumeric string accurately, using the correct upper and lower case letters. After completing your entry, select the DONE key, and then press OK.
4 Select WEP or WPA/WPA2 as required for your network's security setup, and then press OK.
Note: In your setup, instead of <Network name> as shown in the illustration above, the LCD will show the actual network name (SSID), without the brackets, and the signal strength, displayed as a percentage, of each available WiFi network within range.
Note: If your printer was last connected to an available network on the list, the network settings are saved and the printer will automatically attempt to reconnect you to that network.
Note: To erase any letters or numbers entered in error, select <BKSP (backspace).
28 Kodak ESP 9 Printer User Guide
Chapter 3
5 Enter the security information required using the LCD display keyboard.
• Press , , or to select a key. Select <BKSP to erase any incorrect characters. Then select DONE and press OK.
6 After the confirmation message appears on the LCD, press OK to display the Network Settings menu.
Setting up an IP address
1 From the Network Settings menu, select Manual IP Address and press OK.
2 Select one of the options displayed:
• Dynamic (DHCP) • Automatic (Private) • Manual (Static) Then press OK to continue.
3 Depending on the IP address type specified, you may be prompted to enter an IP address, a Subnet Mask, a Gateway Address; and a DNS Server address. Press OK after making each entry. See your network provider for more information.
Viewing Network Configuration
When you select this option, the printer displays the configuration settings for both Ethernet and WiFi networks on the LCD.
Printing Network Configuration
When you select this option, the printer prints current network configuration settings. Settings with no values will be displayed as zeros.
Setting up the fax
Your Kodak ESP 9 All-in-One printer allows you to send and receive faxes, set up quick dials, and other fax options from the control panel.
For more information about sending and receiving faxes using this All-in-One printer, see Chapter 8, “Faxing” on page 63.
.
Note: If your home or office setup is not described in this section, set up the All-in-One printer fax connection as you would a regular phone. See “Connecting the printer to a standard telephone line” on page 33.
Warning: Use only the phone cord supplied in the All-in-One printer box to connect your telephone wall jack and the port labeled Line-In on the back of the printer. Using any other phone cord may prevent you from sending and receiving faxes.
Kodak ESP 9 Printer User Guide 29
Setting Up Your Printer
Telephone service delivery systems and All–in–One fax features
Before setting up your ESP 9 All–in–One printer for faxing, determine which type of telephone service you use.
Multipurpose (broadband) digital telephone systemsIf you use one of the following types of telephone services, you use a multipurpose, or “broadband” digital system:
• Internet telephone (also known as Voice–Over–Internet–Protocol or VOIP)
• Cable telephone
These systems transmit telephone signals across the same cables that transmit Internet or cable television signals.They require the use of computer or cable modems to route telephone traffic to your telephone or fax machine.
By connecting the telephone cable that came with your printer to the computer or cable modem and also to the ESP 9, your printer can successfully send and receive faxes over this type of telephone system.
Standard telephone systemsSometimes called “Plain Old Telephone Systems” (POTS), this type of telephone service relies on a network of dedicated telephone wiring that cannot be used to transmit any other type of signal.
Your printer needs only the standard telephone cable that came with your printer, connected to both the printer and to the wall telephone jack, in order to send and receive faxes through the standard wall telephone jack.
If your telephone service is: Review this section first:
Internet Phone (VOIP) telephone service “Multipurpose (broadband) digital telephone systems” below
Cable telephone delivered by a cable television service
“Multipurpose (broadband) digital telephone systems” below
Standard telephone service “Standard telephone systems” on page 30
Digital subscriber line (DSL) telephone service “Digital subscriber line (DSL) telephone systems” on page 31
Caution: You should also read the following sections before connecting your ESP 9 to your telephone system.
• “Using cordless telephones with the ESP 9 All–in–One fax” on page 31
• “Using voice–messaging services with the ESP 9 All–in–One fax” on page 31
• “Using an answering machine with the ESP 9 All–in–One fax” on page 32
30 Kodak ESP 9 Printer User Guide
Chapter 3
Digital subscriber line (DSL) telephone systems A DSL telephone system is a dedicated telephone service that, like multipurpose digital systems, transmits packets of digital data over cables. Unlike multipurpose systems, DSL networks use the wires of a local telephone network to transmit its signals.
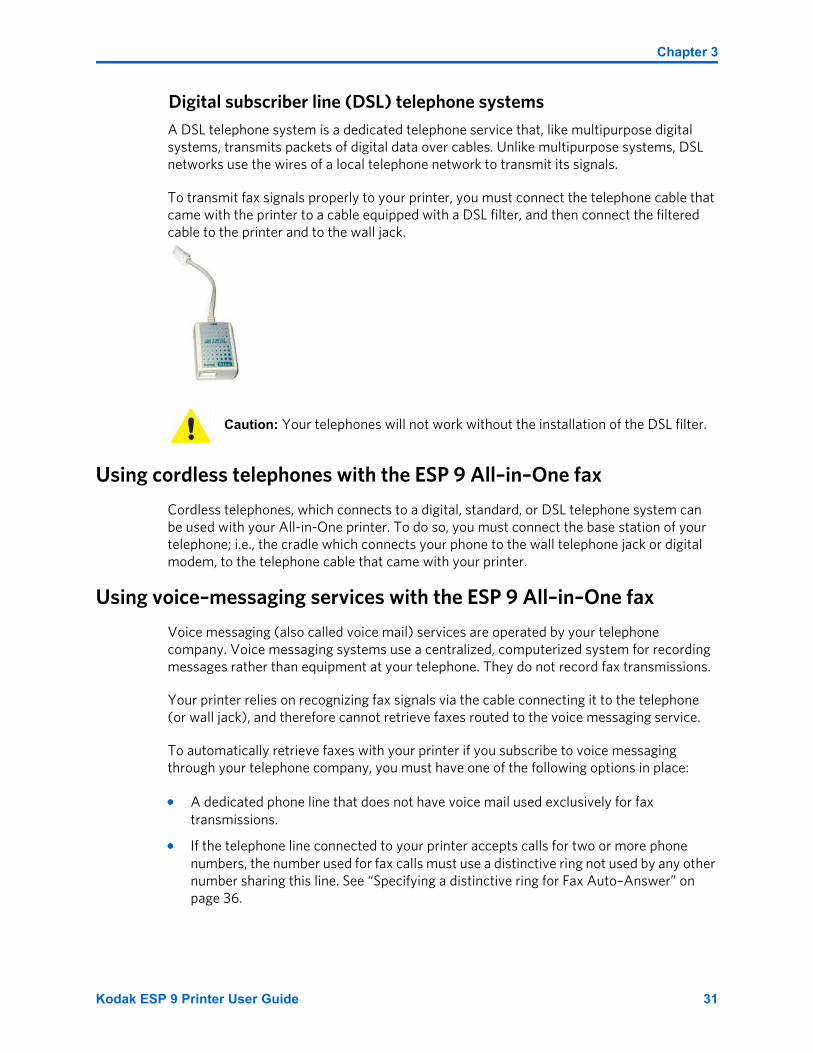
To transmit fax signals properly to your printer, you must connect the telephone cable that came with the printer to a cable equipped with a DSL filter, and then connect the filtered cable to the printer and to the wall jack.
Using cordless telephones with the ESP 9 All–in–One fax
Cordless telephones, which connects to a digital, standard, or DSL telephone system can be used with your All-in-One printer. To do so, you must connect the base station of your telephone; i.e., the cradle which connects your phone to the wall telephone jack or digital modem, to the telephone cable that came with your printer.
Using voice–messaging services with the ESP 9 All–in–One fax
Voice messaging (also called voice mail) services are operated by your telephone company. Voice messaging systems use a centralized, computerized system for recording messages rather than equipment at your telephone. They do not record fax transmissions.
Your printer relies on recognizing fax signals via the cable connecting it to the telephone (or wall jack), and therefore cannot retrieve faxes routed to the voice messaging service.
To automatically retrieve faxes with your printer if you subscribe to voice messaging through your telephone company, you must have one of the following options in place:
• A dedicated phone line that does not have voice mail used exclusively for fax transmissions.
• If the telephone line connected to your printer accepts calls for two or more phone numbers, the number used for fax calls must use a distinctive ring not used by any other number sharing this line. See “Specifying a distinctive ring for Fax Auto–Answer” on page 36.
Caution: Your telephones will not work without the installation of the DSL filter.
Kodak ESP 9 Printer User Guide 31
Setting Up Your Printer
If neither of these configurations is available to you, you cannot accept faxes on your printer in the Fax Auto–Answer mode. You can accept them manually, though. See “Manually receiving fax” on page 36.
Using an answering machine with the ESP 9 All–in–One fax
If you use an answering machine to retrieve and record messages from telephone callers when you are not available to pick up the handset, you can set up your telephone to work with both the answering machine and the printer.
However, because answering machines cannot recognize fax calls or record fax signals for conversion later to a fax printout, care must be taken if you plan to accept fax calls automatically.
Before using your printer to accept faxes automatically when you are also using an answering machine, make sure the answering machine is connected correctly to the printer (see the illustrtations that follow). Make sure the answering machine is set to answer calls before the printer. See “Specifying Rings to Answer” on page 35
Connecting the phone and fax
Identify the type of fax connection appropriate for you from the information below, and follow the instructions to configure your printer for sending and receiving faxes.
Connecting the printer to a digital telephone service lineIf the telephone line you intend to use for faxing through the All-in-One printer is configured to either an Internet phone service or to a cable phone service, connect your printer to the phone as described below:
1 Disconnect the phone cord from the wall jack that connects your modem to the telephone wall jack and plug it into the port labeled LINE-In on your printer.
2 If you use an answering machine:
• Connect your answering machine to the EXT-Out port on the back of your All-in-One printer.
Type of Fax connections Fax setup procedure
Multipurpose (broadband) digital telephone systems
“Connecting the printer to a digital telephone service line” below.
Standard telephone systems “Connecting the printer to a standard telephone line” on page 33.
Digital subscriber line (DSL) telephone systems
“Connecting the printer to a digital subscriber (DSL) telephone line” on page 34.
Caution: The answering machine should be set to a fewer number of rings than the Rings to Answer setting. This will ensure that the answering machine picks up first. See “Specifying Rings to Answer” on page 35.
32 Kodak ESP 9 Printer User Guide

Chapter 3
Connecting the printer to a standard telephone lineIf you have a dedicated phone line that does not receive any voice calls, connect your printer to the Line-In on the printer as described below.
1 Connect one end of the phone cord supplied with your printer to your telephone wall jack and the other end to the port labeled Line-In.
2 When the phone rings your printer is set to answer automatically after the number of rings set in the Rings to Answer setting. See “Specifying Rings to Answer” on page 35.
3 If you use an answering machine, connect your answering machine to the plug it into the port labeled EXT-Out on your printer. Set the number the of rings on your answering machine to a lower number of rings than the Rings to Answer settings on your All-in-One printer. If you are using a dedicated telephone line to send or receive faxes, LINE-In
Note: Check with your cable television provider to make sure you can send and receive faxes over your digital telephone service.
Kodak ESP 9 Printer User Guide 33

Setting Up Your Printer
port on your printer. Do not connect the answering machine to the EXT-Out port on your printer. .
If you have a separate fax line on that does not receive any voice calls, connect your printer to the phone line as described below.
Connecting the printer to a digital subscriber (DSL) telephone lineIf you use a digital subscriber line (DSL), you must connect a DSL filter between the telephone wall jack and your Kodak All–in–One printer. Without the DSL filter for your digital subscriber line, you not be able to send and receive faxes.
1 Obtain a DSL filter from your DSL provider.
2 Connect the one end of the phone cord supplied with your Kodak ESP 9 All–in–One printer to the open port on the DSL filter, and the other to the printer port labeled Line-In.When the phone rings your printer is set to answer automatically after the number of rings set in the Rings to Answer setting. See “Specifying Rings to Answer” on page 35.
3 If you use an answering machine, connect your answering machine to the port labeled EXT-Out on your printer. This provides a direct connection between the printer and your answering machine.
Caution: When the phone rings, your printer will answer after the number of rings set in the Rings to Answer setting. The incoming fax will be received when the printer detects there is an incoming fax. See “Specifying Rings to Answer” on page 35.
34 Kodak ESP 9 Printer User Guide
Chapter 3
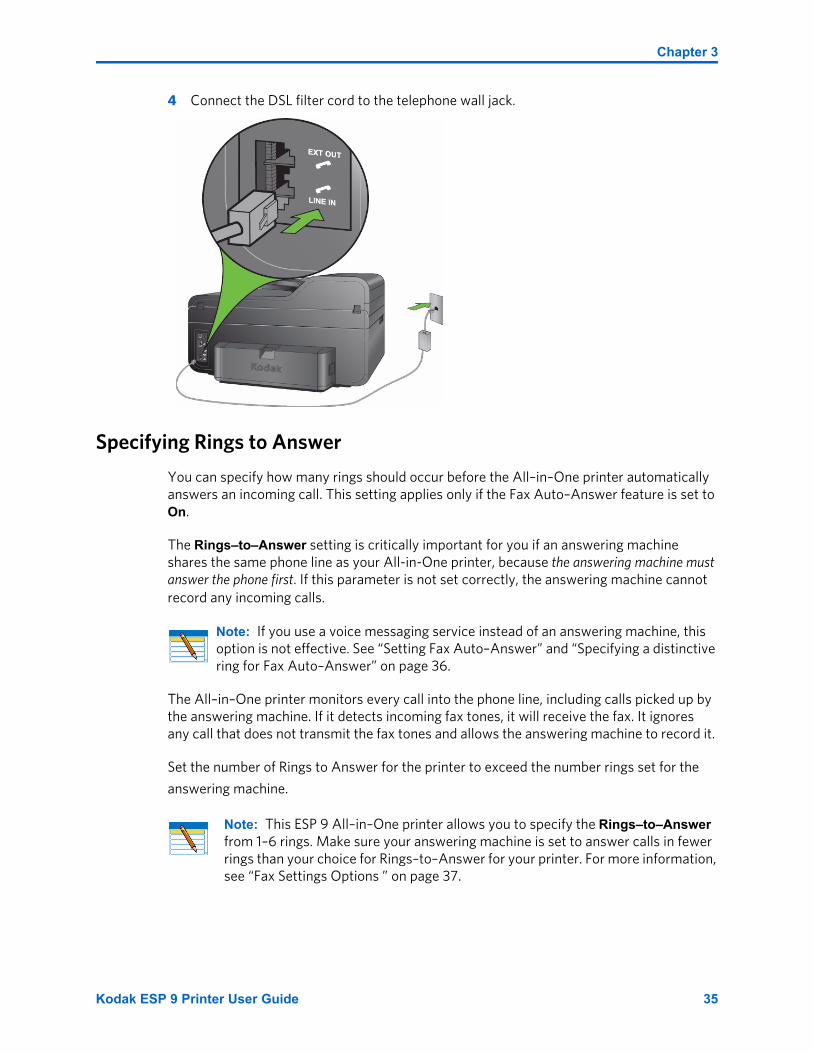
4 Connect the DSL filter cord to the telephone wall jack.
Specifying Rings to Answer
You can specify how many rings should occur before the All–in–One printer automatically answers an incoming call. This setting applies only if the Fax Auto–Answer feature is set to On.
The Rings–to–Answer setting is critically important for you if an answering machine shares the same phone line as your All-in-One printer, because the answering machine must answer the phone first. If this parameter is not set correctly, the answering machine cannot record any incoming calls.
The All–in–One printer monitors every call into the phone line, including calls picked up by the answering machine. If it detects incoming fax tones, it will receive the fax. It ignores any call that does not transmit the fax tones and allows the answering machine to record it.
Set the number of Rings to Answer for the printer to exceed the number rings set for the
answering machine.
Note: If you use a voice messaging service instead of an answering machine, this option is not effective. See “Setting Fax Auto–Answer” and “Specifying a distinctive ring for Fax Auto–Answer” on page 36.
Note: This ESP 9 All–in–One printer allows you to specify the Rings–to–Answer from 1–6 rings. Make sure your answering machine is set to answer calls in fewer rings than your choice for Rings–to–Answer for your printer. For more information, see “Fax Settings Options ” on page 37.
Kodak ESP 9 Printer User Guide 35
Setting Up Your Printer
Setting Fax Auto–Answer
When set to On, the All–in–One printer accepts incoming fax transmissions automatically, based on the number set in Rings–to–Answer (discussed on page 35).
If your fax phone line is configured to work through a computer modem, disable Fax Auto-Answer)
Manually receiving fax
If Fax Auto–Answer is set to Off, there are two ways to accept an incoming fax and print it with the All–in–Oneprinter. You can:
• Press the Start button on the All–in–One printer control panel when you pick up the telephone handset and hear fax tones.
• Using any phone that uses the same telephone line used by the All–in–One printer for fax, dial the Remote Access Code: 234.
Specifying a distinctive ring for Fax Auto–Answer
If you have one phone line shared by two or more phone numbers, your telephone service provider may be able to provide distinctive ring patterns for each phone number. For example, if you have designated one number as the number for receiving and sending faxes, you may have a ring pattern different than the pattern used for the phone number used for your personal voice calls or your business voice calls.If you have voice mail on your shared phone line that you use for sending or receiving faxes and do not have access to distinctive ring through your telephone service, you should disable Fax Augo-Answer.
By using the Distinctive Ring feature on the ESP 9 All-in-One printer, when the printer detects the ring pattern specified for incoming faxes, it will automatically answer the call and receive the fax.
If two or more phone numbers are shared, set the Distinctive Ring feature to answer one of the lines and set Fax Auto–Answer to On. See “Specifying Rings to Answer” on page 35 to review how to use Fax Auto–Answer with an answering machine.
• Also see the note discussing voice messaging services on page 36 if you have this type of fax setup and subscribe to voice messaging through your telephone company. Configuring fax settings
Note: Some phone system features may not be available with pulse dialing, which is slower than tone dialing. Contact your telephone company if you are unsure as to which setting to use .
Tip: Is your All–in–One printer located in a separate room from a telephone with the same number used by the ESP 9 All-in-One printer? If so, remember to dial 234 when you pick up the phone and hear incoming fax tones.
Note: If you use one phone number and one phone line exclusively for faxes, set Distinctive Ring to Any. For more information about the Fax Settings menu, see “Fax Settings Options ” on page 37.
36 Kodak ESP 9 Printer User Guide
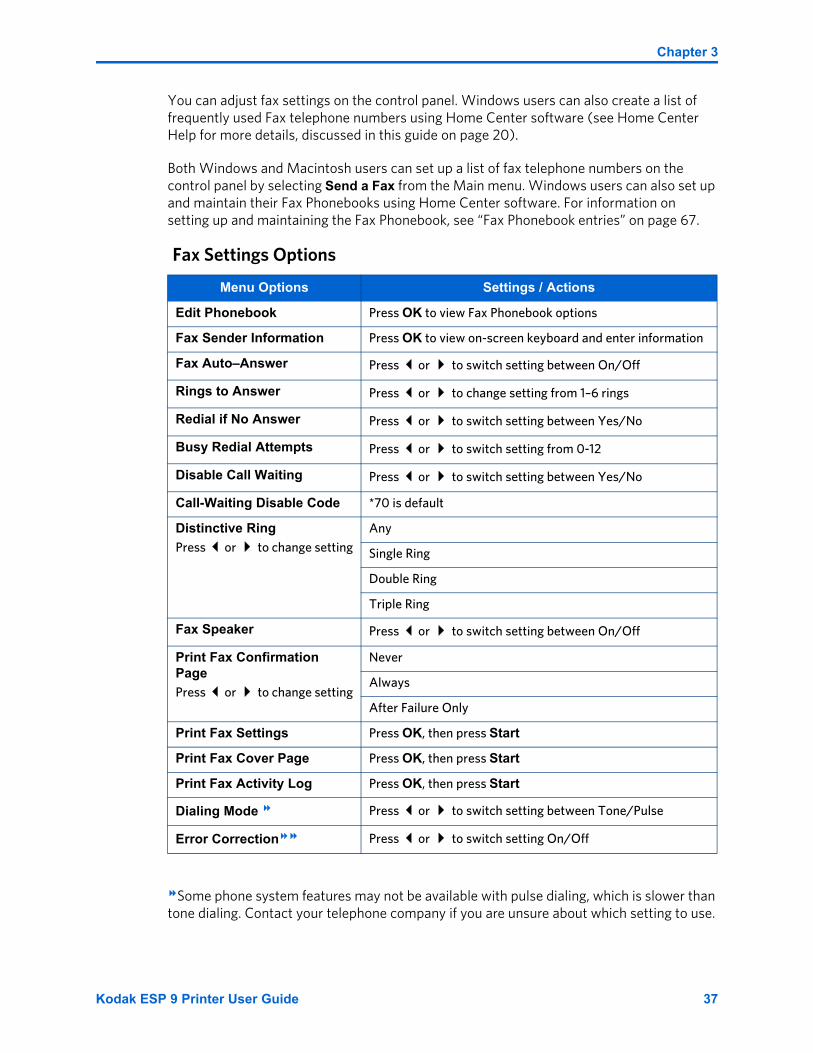
Chapter 3
You can adjust fax settings on the control panel. Windows users can also create a list of frequently used Fax telephone numbers using Home Center software (see Home Center Help for more details, discussed in this guide on page 20).
Both Windows and Macintosh users can set up a list of fax telephone numbers on the control panel by selecting Send a Fax from the Main menu. Windows users can also set up and maintain their Fax Phonebooks using Home Center software. For information on setting up and maintaining the Fax Phonebook, see “Fax Phonebook entries” on page 67.
Fax Settings Options
Some phone system features may not be available with pulse dialing, which is slower than tone dialing. Contact your telephone company if you are unsure about which setting to use.
Menu Options Settings / Actions
Edit Phonebook Press OK to view Fax Phonebook options
Fax Sender Information Press OK to view on-screen keyboard and enter information
Fax Auto–Answer Press or to switch setting between On/Off
Rings to Answer Press or to change setting from 1–6 rings
Redial if No Answer Press or to switch setting between Yes/No
Busy Redial Attempts Press or to switch setting from 0-12
Disable Call Waiting Press or to switch setting between Yes/No
Call-Waiting Disable Code *70 is default
Distinctive RingPress or to change setting
Any
Single Ring
Double Ring
Triple Ring
Fax Speaker Press or to switch setting between On/Off
Print Fax Confirmation Page Press or to change setting
Never
Always
After Failure Only
Print Fax Settings Press OK, then press Start
Print Fax Cover Page Press OK, then press Start
Print Fax Activity Log Press OK, then press Start
Dialing Mode Press or to switch setting between Tone/Pulse
Error Correction Press or to switch setting On/Off
Kodak ESP 9 Printer User Guide 37
Setting Up Your Printer
When the Error Correction mode is enabled, the printer detects errors during transmis-sion. Using this feature, the All-in-One printer will automatically re-transmit the fax. Although the Error Correction mode increases send time on poor phone lines, the fax is transmitted much more reliably.
1 From the control panel, press Menu.
2 Press until Fax Settings is selected, and then press OK.
3 Press until the option you want to configure is selected, and then press OK.
4 As needed, press or to set the desired sub-setting, as in configuring your sender name and telephone numbers.
5 As needed, press or to change the setting.
6 Press OK to save the setting(s).
Note: Error Correction is only applied to black-and-white faxes sent from the All-in-One printer. This feature does not affect the reliable transmission of faxes being received.
38 Kodak ESP 9 Printer User Guide

Your Kodak All-in-One printer accepts print stock of various types and sizes, including letter-and legal-size plain paper, photo paper, transparencies, T-shirt transfers, envelopes, cards, and labels. It automatically detects the size and whether or not photo paper is loaded into the paper tray. Kodak photo paper contains barcodes that allow your All-in-One printer to detect the paper type that optimize your photo prints.
The bottom paper tray accepts media from 6 to 9 inches wide, and from 7–14 inches long (see the Note on page 41); its capacity is 100 sheets of 20 lb. plain paper. The top tray capacity is 40 sheets of 4X6, 4X7, or 5X7 inch paper.
The automatic document feeder (ADF) on the ESP 9 All-in-One printer accepts up to 35 sheets of plain paper.
Handling paper
Follow the precautions below when handling paper:
• Hold the paper by the edges; avoid placing your fingerprints on it.
• Do not touch the glossy side of photo paper.
• Store paper flat, away from direct sunlight and heat (such as in a car parked in the sun).
4 Handling Paper
Warning: The printer cannot sense photo paper loaded in the automatic document feeder (ADF), and will not feed photo paper into the printer for either copy (document) or fax operations.
Kodak ESP 9 Printer User Guide 39
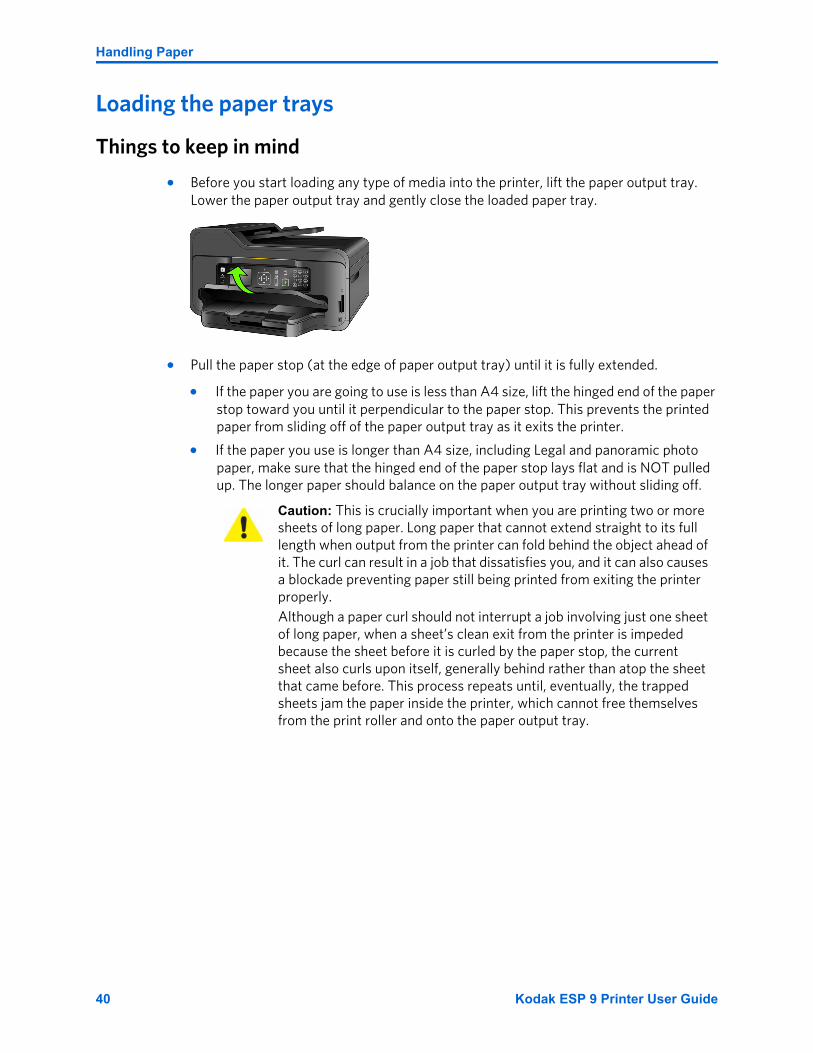
Handling Paper
Loading the paper trays
Things to keep in mind
• Before you start loading any type of media into the printer, lift the paper output tray. Lower the paper output tray and gently close the loaded paper tray.
• Pull the paper stop (at the edge of paper output tray) until it is fully extended.
• If the paper you are going to use is less than A4 size, lift the hinged end of the paper stop toward you until it perpendicular to the paper stop. This prevents the printed paper from sliding off of the paper output tray as it exits the printer.
• If the paper you use is longer than A4 size, including Legal and panoramic photo paper, make sure that the hinged end of the paper stop lays flat and is NOT pulled up. The longer paper should balance on the paper output tray without sliding off.
Caution: This is crucially important when you are printing two or more sheets of long paper. Long paper that cannot extend straight to its full length when output from the printer can fold behind the object ahead of it. The curl can result in a job that dissatisfies you, and it can also causes a blockade preventing paper still being printed from exiting the printer properly. Although a paper curl should not interrupt a job involving just one sheet of long paper, when a sheet’s clean exit from the printer is impeded because the sheet before it is curled by the paper stop, the current sheet also curls upon itself, generally behind rather than atop the sheet that came before. This process repeats until, eventually, the trapped sheets jam the paper inside the printer, which cannot free themselves from the print roller and onto the paper output tray.
40 Kodak ESP 9 Printer User Guide
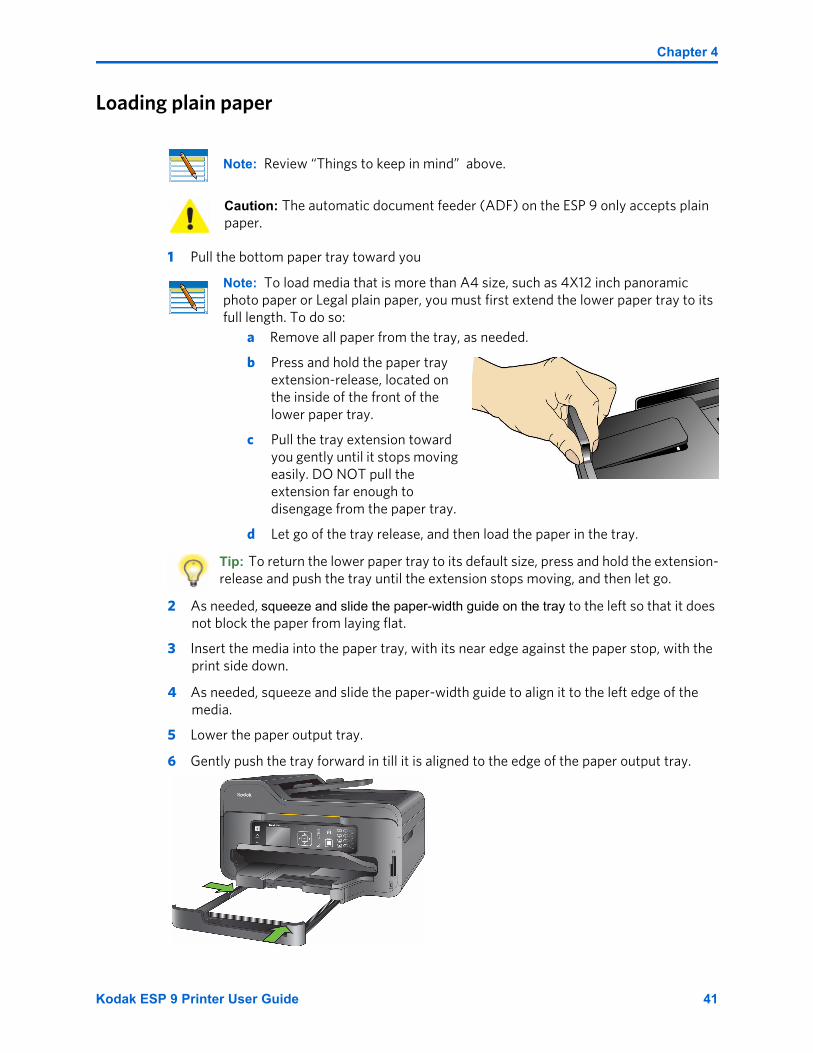
Chapter 4
Loading plain paper
1 Pull the bottom paper tray toward you
2 As needed, squeeze and slide the paper-width guide on the tray to the left so that it does not block the paper from laying flat.
3 Insert the media into the paper tray, with its near edge against the paper stop, with the print side down.
4 As needed, squeeze and slide the paper-width guide to align it to the left edge of the media.
5 Lower the paper output tray.
6 Gently push the tray forward in till it is aligned to the edge of the paper output tray.
Note: Review “Things to keep in mind” above.
Caution: The automatic document feeder (ADF) on the ESP 9 only accepts plain paper.
Note: To load media that is more than A4 size, such as 4X12 inch panoramic photo paper or Legal plain paper, you must first extend the lower paper tray to its full length. To do so:
a Remove all paper from the tray, as needed.
b Press and hold the paper tray extension-release, located on the inside of the front of the lower paper tray.
c Pull the tray extension toward you gently until it stops moving easily. DO NOT pull the extension far enough to disengage from the paper tray.
d Let go of the tray release, and then load the paper in the tray.
Tip: To return the lower paper tray to its default size, press and hold the extension-release and push the tray until the extension stops moving, and then let go.
Kodak ESP 9 Printer User Guide 41
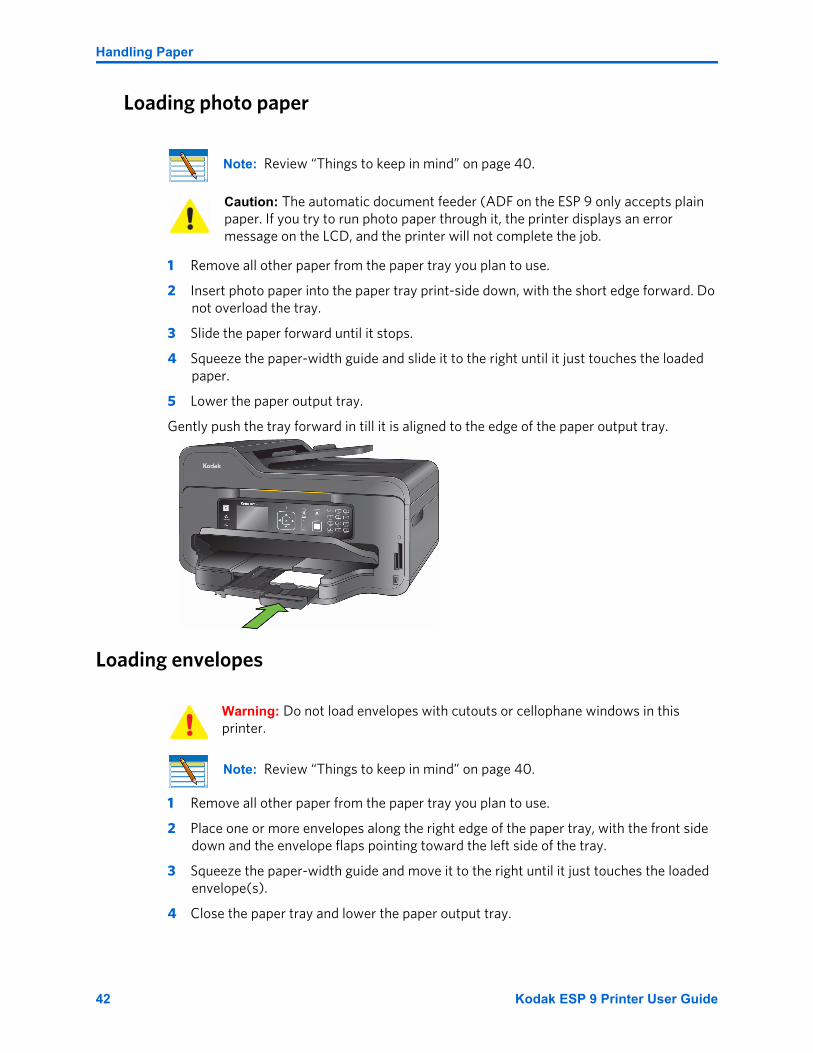
Handling Paper
Loading photo paper
1 Remove all other paper from the paper tray you plan to use.
2 Insert photo paper into the paper tray print-side down, with the short edge forward. Do not overload the tray.
3 Slide the paper forward until it stops.
4 Squeeze the paper-width guide and slide it to the right until it just touches the loaded paper.
5 Lower the paper output tray.
Gently push the tray forward in till it is aligned to the edge of the paper output tray.
Loading envelopes
1 Remove all other paper from the paper tray you plan to use.
2 Place one or more envelopes along the right edge of the paper tray, with the front side down and the envelope flaps pointing toward the left side of the tray.
3 Squeeze the paper-width guide and move it to the right until it just touches the loaded envelope(s).
4 Close the paper tray and lower the paper output tray.
Note: Review “Things to keep in mind” on page 40.
Caution: The automatic document feeder (ADF on the ESP 9 only accepts plain paper. If you try to run photo paper through it, the printer displays an error message on the LCD, and the printer will not complete the job.
Warning: Do not load envelopes with cutouts or cellophane windows in this printer.
Note: Review “Things to keep in mind” on page 40.
42 Kodak ESP 9 Printer User Guide
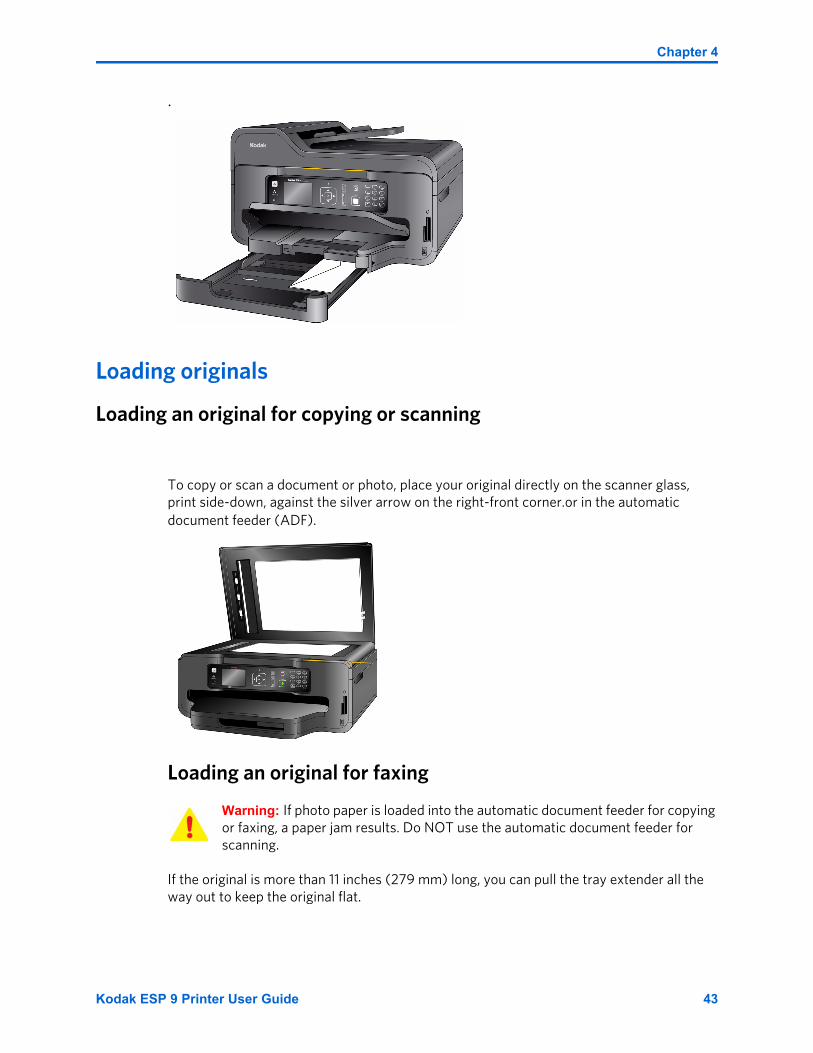
Chapter 4
.
Loading originals
Loading an original for copying or scanning
To copy or scan a document or photo, place your original directly on the scanner glass, print side-down, against the silver arrow on the right-front corner.or in the automatic document feeder (ADF).
Loading an original for faxing
If the original is more than 11 inches (279 mm) long, you can pull the tray extender all the way out to keep the original flat.
Warning: If photo paper is loaded into the automatic document feeder for copying or faxing, a paper jam results. Do NOT use the automatic document feeder for scanning.
Kodak ESP 9 Printer User Guide 43

Handling Paper
1 Place the original (plain paper only) print side up into the ADF.
2 Align the paper-width guides with the edges of the paper to center the original in the
ADF tray.
Note: If you are faxing only one page or if you are Faxing anything printed on photo paper, you can place the original on the scanner glass. See “Loading an original for copying or scanning” on page 43.
44 Kodak ESP 9 Printer User Guide

You can print .jpeg (.jpg) photo images directly from PictBridge cameras connected to the front panel of your All-in-One printer. You can print virtually any file type from digital cameras, USB flash (“thumb”) drives, and memory cards connected to the front panel on your All-in-One printer. You can also print files from a PC or Mac computer connected to your All-in-One printer computer.
Although your printer is compatible with the Kodak 8-in-1 USB card reader (sold separately) as well as other Kodak USB card readers, it may not compatible with other manufacturers’ card readers.
5 Viewing and Printing Photos
Note: For assistance on printing from a connected computer to your printer, refer to the instructions from the software application (such as a word-processing or image-editing program) used to send the file to the printer or review your computer’s operating system instructions.
Caution: Never load photo paper into the automatic document feeder (ADF) on the ESP 9; the ADF only accepts plain paper. If you load photo paper in the ADF, the printer displays a warning on the LCD, and will not complete the job.
Warning: Do not remove a storage device (memory card, USB drive, or digital camera) from the printer while it is being accessed, or you may damage the files on it. Safely remove or disconnect the device. You can safely remove the storage device when the blue status light located above the memory card slots stops blinking.
Kodak ESP 9 Printer User Guide 45
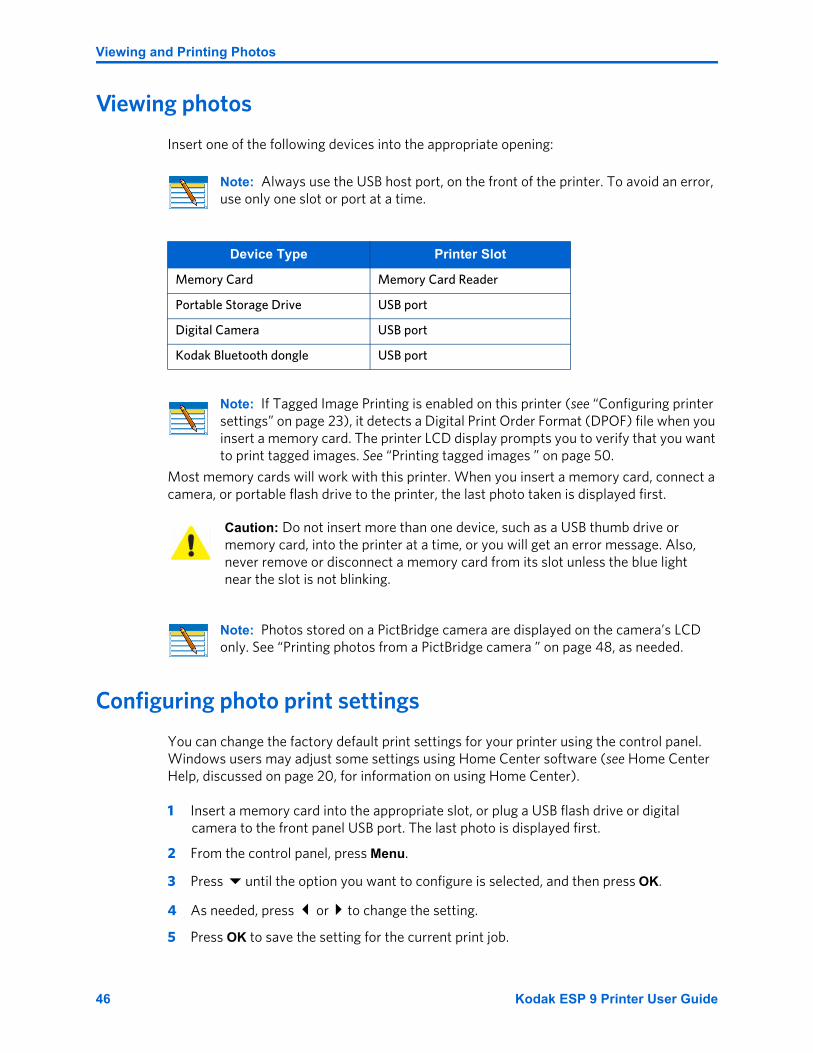
Viewing and Printing Photos
Viewing photos
Insert one of the following devices into the appropriate opening:
Most memory cards will work with this printer. When you insert a memory card, connect a camera, or portable flash drive to the printer, the last photo taken is displayed first.
Configuring photo print settings
You can change the factory default print settings for your printer using the control panel. Windows users may adjust some settings using Home Center software (see Home Center Help, discussed on page 20, for information on using Home Center).
1 Insert a memory card into the appropriate slot, or plug a USB flash drive or digital camera to the front panel USB port. The last photo is displayed first.
2 From the control panel, press Menu.
3 Press until the option you want to configure is selected, and then press OK.
4 As needed, press or to change the setting.
5 Press OK to save the setting for the current print job.
Note: Always use the USB host port, on the front of the printer. To avoid an error, use only one slot or port at a time.
Device Type Printer Slot
Memory Card Memory Card Reader
Portable Storage Drive USB port
Digital Camera USB port
Kodak Bluetooth dongle USB port
Note: If Tagged Image Printing is enabled on this printer (see “Configuring printer settings” on page 23), it detects a Digital Print Order Format (DPOF) file when you insert a memory card. The printer LCD display prompts you to verify that you want to print tagged images. See “Printing tagged images ” on page 50.
Caution: Do not insert more than one device, such as a USB thumb drive or memory card, into the printer at a time, or you will get an error message. Also, never remove or disconnect a memory card from its slot unless the blue light near the slot is not blinking.
Note: Photos stored on a PictBridge camera are displayed on the camera’s LCD only. See “Printing photos from a PictBridge camera ” on page 48, as needed.
46 Kodak ESP 9 Printer User Guide

Chapter 5
6 To save the setting as the default value, select Save as Default and press OK.
7 As needed, press or until View Photos is selected in the Print Photos menu, and then press OK to return to viewing and selecting photos for printing. Or, press Start to print the selected photo(s) with the selected settings.
Print Photos Options .
Your All-in-One printer automatically adjusts the print output to the best available quality for images printed on photo paper. You need to set Plain Paper Quality to Draft, Normal or Best only when printing images or documents on plain printer paper.
Menu Options View Settings / Select Settings
View Photos OK
Transfer All to PC OK
Rotate This Photo OK
Quantity or 1- 99
Tray Selection or Top Tray
Bottom Tray
Print Size or 3.5x5
4x6
4x7 (High Def)
4x12 (Panoramic)
5x7
8x10
8.5x11
(2x3) Wallet
Quality or Normal
Best
Draft
Color or Color
Black & White
Scene Balance or On
Off
Add Date to Prints or No
Yes
Save as Defaults OK
Kodak ESP 9 Printer User Guide 47

Viewing and Printing Photos
This printer is capable of automatically adjusting scene balance improvements (or the brightness) of photos printed from camera cards and USB connected devices. The default is On.
The default setting does not print the date on the photo print.
Printing photos
Printing photos from a PictBridge camera
You can print photos directly from a PictBridge camera, which controls photo selection and printing.
1 Load the desired paper tray with photo paper, print side down.
2 Connect a PictBridge camera to the USB port located on the front panel of your printer.
3 Use your PictBridge camera to select and print the photos.
Printing photos from non–PictBridge digital cameras, memory cards, and USB flash drives
Caution: This printer does not support portable USB “flash” drives that:
• Require third party access software
• Are encrypted
• Contain multiple partitions.
• Were formatted using any of the following file storage systems:
• New Technology File System (NTFS)
• Mac OS Standard (HFS) or Mac OS Extended (HFS Plus)
The printer can read data stored USB flash drives formatted using only the File Allocation Table (FAT) system.
If a flash drive is plugged into the USB port on the front panel that the printer cannot read, the printer does not display photos, makes an audible sound (“beep”), and displays an error message on the LCD display.
See the first Tip on the following page for a work–around if your flash drive cannot be read by your printer.
48 Kodak ESP 9 Printer User Guide
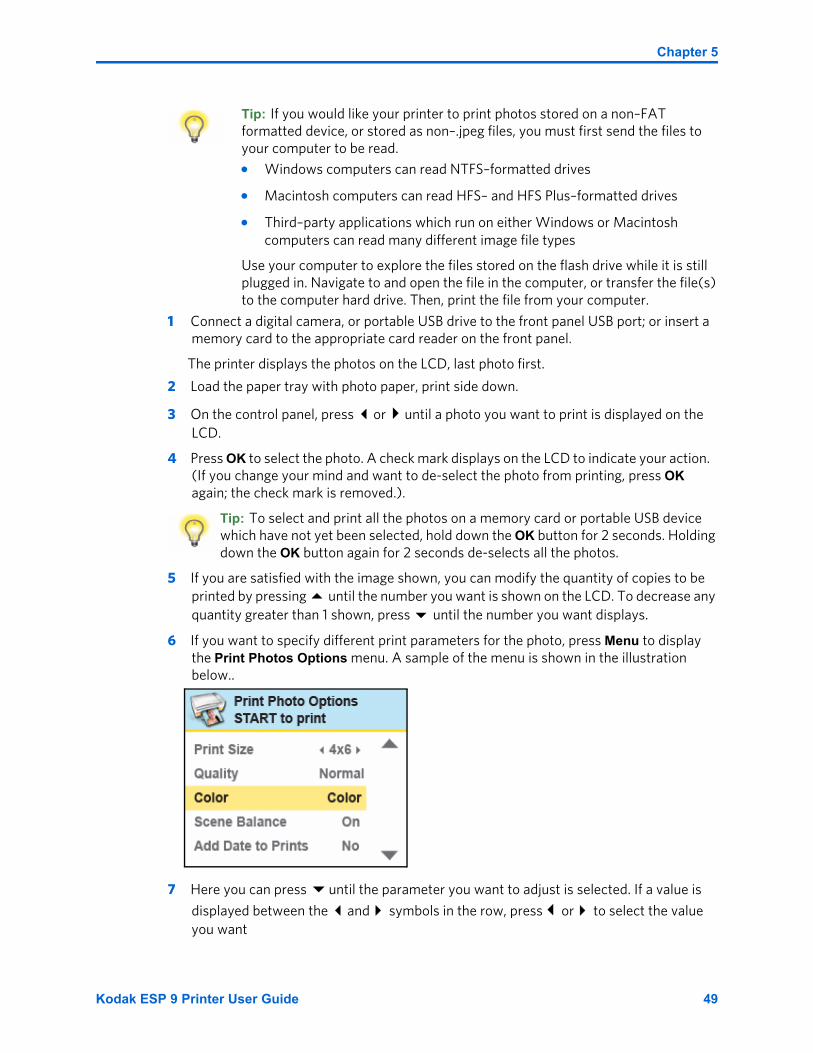
Chapter 5
1 Connect a digital camera, or portable USB drive to the front panel USB port; or insert a memory card to the appropriate card reader on the front panel.
The printer displays the photos on the LCD, last photo first.
2 Load the paper tray with photo paper, print side down.
3 On the control panel, press or until a photo you want to print is displayed on the LCD.
4 Press OK to select the photo. A check mark displays on the LCD to indicate your action. (If you change your mind and want to de-select the photo from printing, press OK again; the check mark is removed.).
5 If you are satisfied with the image shown, you can modify the quantity of copies to be printed by pressing until the number you want is shown on the LCD. To decrease any quantity greater than 1 shown, press until the number you want displays.
6 If you want to specify different print parameters for the photo, press Menu to display the Print Photos Options menu. A sample of the menu is shown in the illustration below..
7 Here you can press until the parameter you want to adjust is selected. If a value is
displayed between the and symbols in the row, press or to select the value you want
Tip: If you would like your printer to print photos stored on a non–FAT formatted device, or stored as non–.jpeg files, you must first send the files to your computer to be read.
• Windows computers can read NTFS–formatted drives
• Macintosh computers can read HFS– and HFS Plus–formatted drives
• Third–party applications which run on either Windows or Macintosh computers can read many different image file types
Use your computer to explore the files stored on the flash drive while it is still plugged in. Navigate to and open the file in the computer, or transfer the file(s) to the computer hard drive. Then, print the file from your computer.
Tip: To select and print all the photos on a memory card or portable USB device which have not yet been selected, hold down the OK button for 2 seconds. Holding down the OK button again for 2 seconds de-selects all the photos.
Kodak ESP 9 Printer User Guide 49
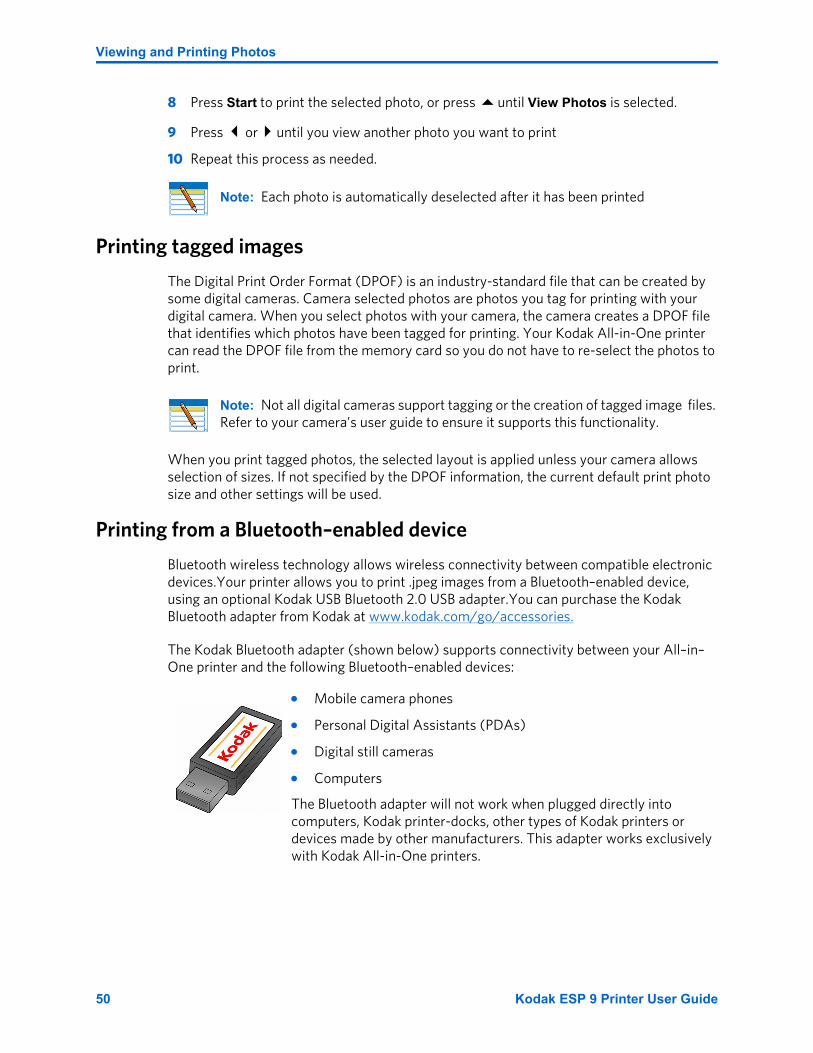
Viewing and Printing Photos
8 Press Start to print the selected photo, or press until View Photos is selected.
9 Press or until you view another photo you want to print
10 Repeat this process as needed.
Printing tagged images
The Digital Print Order Format (DPOF) is an industry-standard file that can be created by some digital cameras. Camera selected photos are photos you tag for printing with your digital camera. When you select photos with your camera, the camera creates a DPOF file that identifies which photos have been tagged for printing. Your Kodak All-in-One printer can read the DPOF file from the memory card so you do not have to re-select the photos to print.
When you print tagged photos, the selected layout is applied unless your camera allows selection of sizes. If not specified by the DPOF information, the current default print photo size and other settings will be used.
Printing from a Bluetooth–enabled device
Bluetooth wireless technology allows wireless connectivity between compatible electronic devices.Your printer allows you to print .jpeg images from a Bluetooth–enabled device, using an optional Kodak USB Bluetooth 2.0 USB adapter.You can purchase the Kodak Bluetooth adapter from Kodak at www.kodak.com/go/accessories.
The Kodak Bluetooth adapter (shown below) supports connectivity between your All–in–One printer and the following Bluetooth–enabled devices:
Note: Each photo is automatically deselected after it has been printed
Note: Not all digital cameras support tagging or the creation of tagged image files. Refer to your camera’s user guide to ensure it supports this functionality.
• Mobile camera phones
• Personal Digital Assistants (PDAs)
• Digital still cameras
• Computers
The Bluetooth adapter will not work when plugged directly into computers, Kodak printer-docks, other types of Kodak printers or devices made by other manufacturers. This adapter works exclusively with Kodak All-in-One printers.
50 Kodak ESP 9 Printer User Guide
Chapter 5
To enable Bluetooth wireless connectivity, plug the Kodak Bluetooth adapter into the USB port located on the front panel of your printer.
Bluetooth devices do not use a Print command. You must use the device’s Send functionality to transmit an image stored on it to the All–in–One printer. Only one file can be sent from the device at a time. Once received, your printer will print the image automatically using the default settings.
RangeWhen the device and the printer are connected, you can send photos from your Bluetooth device to the printer. Your printer supports connectivity to one Bluetooth device at a time.
For the highest transfer speed, Kodak recommends keeping a maximum distance of 10 meters (32.8 feet) between Bluetooth devices, as they may not work reliably beyond this range.
Printing multiple photos
When you select a print size that is smaller than the paper size, this printer automatically lays out multiple photos using the least amount of space, minimizing paper waste when separating the photos.
Printing panoramic photos
You can print a panoramic photo on 4 x 12 paper, or two panoramic photos on U.S. letter or A4 paper; some cropping will occur.
Note: Before you can transmit photos to your printer from a Bluetooth–enabled device, you must first “pair” the printer and the device so that they can communicate. This “pairing” is performed from your device’s interface. Review the instructions for pairing that came with you Bluetooth–enabled device, as needed.
When the device is searching for other Bluetooth enabled devices to pair with, if your printer is within range of the device (see “Range” below), your printer will appear in the list, with a name starting with ESP. (Your device may allow you to rename it, as appropriate.)
If your device prompts you for the printer’s personal identification number (PIN) to authenticate and initiate the connection, enter 1111.
Kodak ESP 9 Printer User Guide 51
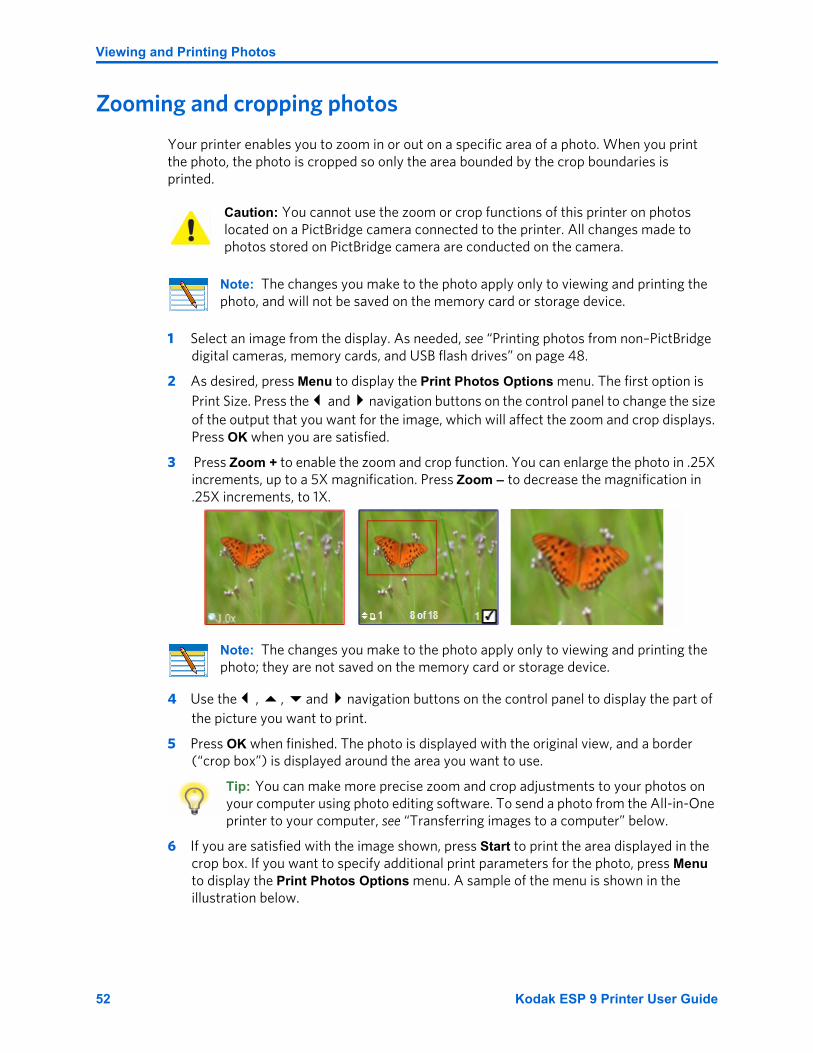
Viewing and Printing Photos
Zooming and cropping photos
Your printer enables you to zoom in or out on a specific area of a photo. When you print the photo, the photo is cropped so only the area bounded by the crop boundaries is printed.
1 Select an image from the display. As needed, see “Printing photos from non–PictBridge digital cameras, memory cards, and USB flash drives” on page 48.
2 As desired, press Menu to display the Print Photos Options menu. The first option is Print Size. Press the and navigation buttons on the control panel to change the size of the output that you want for the image, which will affect the zoom and crop displays. Press OK when you are satisfied.
3 Press Zoom + to enable the zoom and crop function. You can enlarge the photo in .25X increments, up to a 5X magnification. Press Zoom – to decrease the magnification in .25X increments, to 1X.
4 Use the , , and navigation buttons on the control panel to display the part of the picture you want to print.
5 Press OK when finished. The photo is displayed with the original view, and a border (“crop box”) is displayed around the area you want to use.
6 If you are satisfied with the image shown, press Start to print the area displayed in the crop box. If you want to specify additional print parameters for the photo, press Menu to display the Print Photos Options menu. A sample of the menu is shown in the illustration below.
Caution: You cannot use the zoom or crop functions of this printer on photos located on a PictBridge camera connected to the printer. All changes made to photos stored on PictBridge camera are conducted on the camera.
Note: The changes you make to the photo apply only to viewing and printing the photo, and will not be saved on the memory card or storage device.
Note: The changes you make to the photo apply only to viewing and printing the photo; they are not saved on the memory card or storage device.
Tip: You can make more precise zoom and crop adjustments to your photos on your computer using photo editing software. To send a photo from the All-in-One printer to your computer, see “Transferring images to a computer” below.
52 Kodak ESP 9 Printer User Guide

Chapter 5
7 Here you can press until the parameter you want to adjust is selected. If a value is
displayed between the and symbols in the row, press or to select the value you want
8 Press Start to print the selected photo, or press until View Photos is selected. Press OK.
9 Press or until you view another photo you want to print.
10 Repeat this process as needed.
Transferring images to a computer
You can transfer .jpg, .mov, or .wav files to your Windows or Macintosh computer from a digital camera, memory card, device connected to your printer via a Kodak Bluetooth dongle, and portable (USB) thumb drive connected to this All-in-One printer.
Transferring images to a Windows computer
1 Connect the device to the appropriate slot on the front panel of your printer.
2 From the control panel press Menu to display the Print Photos menu on the LCD display.
3 Press until Transfer All to PC is highlighted, and click OK.
4 Press Start.
Note: If you want to print multiple copies of a photo displayed on the LCD, you can press until the number you want is shown. To decrease any quantity greater than 1 shown, press until the number you want displays.
Note: To transfer large files, such as video files, from a memory card to a computer, Kodak recommends using a card reader attached directly to the computer instead of transferring the file(s) via the All-in-One printer.Likewise, Kodak recommends transferring large groups of image files (400 or more) stored on a memory card to a computer via a card reader connected to the computer.
Kodak ESP 9 Printer User Guide 53
Viewing and Printing Photos
5 Follow the prompt on the computer.
Transferring images to a Macintosh computer
1 Connect the device to the appropriate slot on the front panel of your printer.
2 From the control panel, press Menu to display the options on the computer monitor (for a PictBridge camera) or the printer LCD display (all other devices).
3 Press until Transfer All to PC is highlighted.
4 Press OK.
5 When a transfer or connection message appears on the monitor, click Yes.
6 Press Start.
7 Use iPhoto or Image Capture to complete the transfer.
54 Kodak ESP 9 Printer User Guide
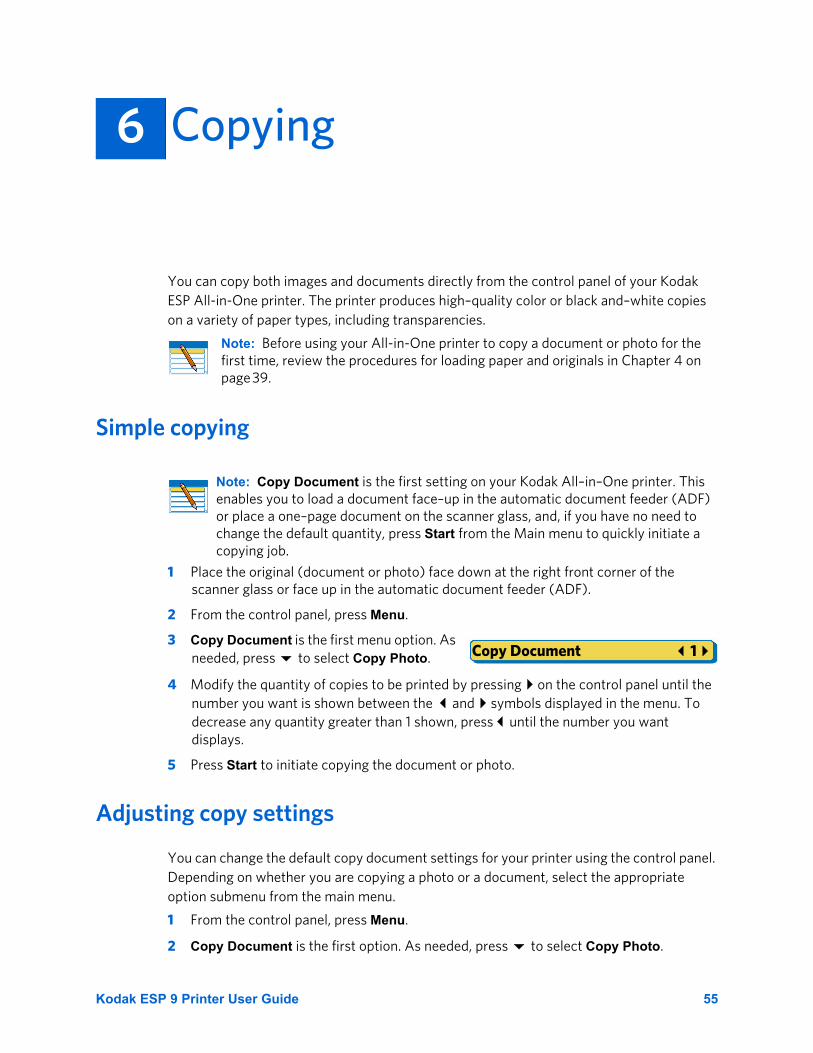
You can copy both images and documents directly from the control panel of your Kodak ESP All-in-One printer. The printer produces high–quality color or black and–white copies on a variety of paper types, including transparencies.
Simple copying
1 Place the original (document or photo) face down at the right front corner of the scanner glass or face up in the automatic document feeder (ADF).
2 From the control panel, press Menu.
3 Copy Document is the first menu option. As needed, press to select Copy Photo.
4 Modify the quantity of copies to be printed by pressing on the control panel until the number you want is shown between the and symbols displayed in the menu. To decrease any quantity greater than 1 shown, press until the number you want displays.
5 Press Start to initiate copying the document or photo.
Adjusting copy settings
You can change the default copy document settings for your printer using the control panel. Depending on whether you are copying a photo or a document, select the appropriate option submenu from the main menu.
1 From the control panel, press Menu.
2 Copy Document is the first option. As needed, press to select Copy Photo.
6 Copying
Note: Before using your All-in-One printer to copy a document or photo for the first time, review the procedures for loading paper and originals in Chapter 4 on page 39.
Note: Copy Document is the first setting on your Kodak All–in–One printer. This enables you to load a document face–up in the automatic document feeder (ADF) or place a one–page document on the scanner glass, and, if you have no need to change the default quantity, press Start from the Main menu to quickly initiate a copying job.
Copy Document 1
Kodak ESP 9 Printer User Guide 55
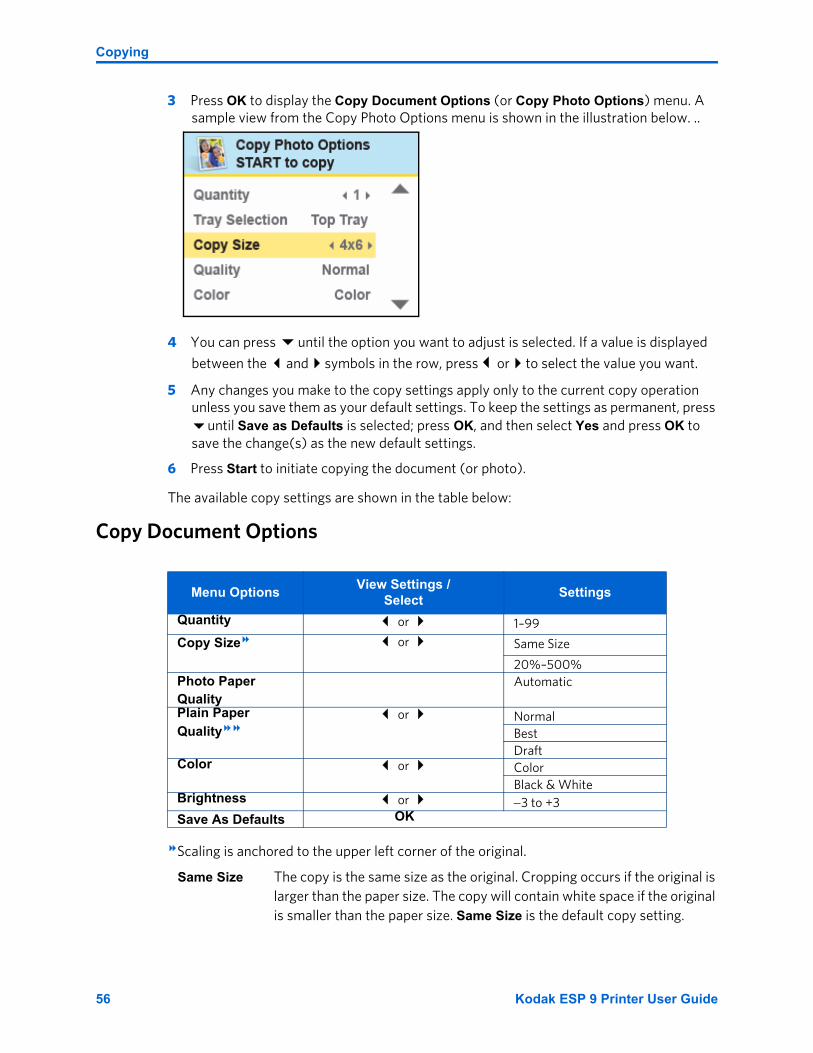
Copying
3 Press OK to display the Copy Document Options (or Copy Photo Options) menu. A sample view from the Copy Photo Options menu is shown in the illustration below. ..
4 You can press until the option you want to adjust is selected. If a value is displayed
between the and symbols in the row, press or to select the value you want.
5 Any changes you make to the copy settings apply only to the current copy operation unless you save them as your default settings. To keep the settings as permanent, press
until Save as Defaults is selected; press OK, and then select Yes and press OK to save the change(s) as the new default settings.
6 Press Start to initiate copying the document (or photo).
The available copy settings are shown in the table below:
Copy Document Options
Scaling is anchored to the upper left corner of the original.
Menu Options View Settings / Select Settings
Quantity or 1–99
Copy Size or Same Size
20%–500%Photo Paper Quality
Automatic
Plain Paper Quality
or NormalBestDraft
Color or ColorBlack & White
Brightness or −3 to +3Save As Defaults OK
Same Size The copy is the same size as the original. Cropping occurs if the original is larger than the paper size. The copy will contain white space if the original is smaller than the paper size. Same Size is the default copy setting.
56 Kodak ESP 9 Printer User Guide

Chapter 6
Plain paper quality output:
Copy Photo Options
You need to specify a quality only for plain paper. If photo paper is loaded in the paper tray, the printer will output the best available quality using the Automatic setting. To review the settings for plain paper copying, see "Plain paper quality output " on page page 57.
Scaling Press the or to set the scaling for your image. The choices are Same Size, which is 100%, Fit to Page to enlarge or reduce the image to fit on the page.
Draft Produces the fastest print speed, but the lowest quality.
Normal Delivers high-quality output and is the default setting. Normal prints faster than Best.
Best Produces the highest quality for all paper and eliminates the banding (striping) effect that sometimes occurs in Draft and Normal modes. Best is the slowest print speed. If Kodak photo paper is loaded in the paper tray, this setting is used.
Menu Options View Settings / Select Settings
Quantity or 1–99Copy Size or 4x6
4x7 (High Def)
4x12 (Panoramic)
5x7
8x10
8.5x11
(Wallet) 2x3
Photo Paper Quality or Automatic
Plain Paper Quality or NormalBestDraft
Color or Color
Black & White
Brightness or −3 to +3
Preview or No
Yes
Save As Defaults OK
Kodak ESP 9 Printer User Guide 57

Copying
58 Kodak ESP 9 Printer User Guide
Scanning converts text and images from documents and pictures placed on the scanner glass into electronic data, and then sends the data to your computer. To scan using the ESP 9 All-in-One printer, the printer must be connected to a computer. You can scan to the following destinations:
• Kodak Home Center
• Memory card or USB flash drive connected to the printer using the appropriate opening on the front panel of the computer
• Third–party scanner software application
• As a file on your computer
Before you start
Before you start scanning with this All-in-One printer, Kodak recommends that you use the Home Center software to configure the default scan settings. This way, you can easily manage the scan in your computer. See “All-in-One printer Home Center software” on page 20 for additional information.
Using the Home Center software, you can adjust the following default settings for scanned photos and documents:
• Applications used for file destination(s).
• File type used to save the scan.
• The default setting for saved documents is .pdf (Portable Document Format). With third–party .pdf viewer software installed, this type of file can be viewed on Web pages or computers. You may also save a scanned document as .rtf (Rich Text Format). This is a standard file type which can be opened and edited in standard word–processing software applications.
7 Scanning
Caution: If you save a document scan to an application, the scan cannot be later accessed by optical character recognition (OCR) software. If you want to be able to edit the text of the document after scanning it, save the scanned document as a file.
Kodak ESP 9 Printer User Guide 59
Scanning
• The default setting for image files is .jpeg (Joint Photographic Experts Group) format. This standard file type can be opened and edited in standard image editing software applications, and can be view on Web pages.
• File storage location for saved scans.
• Windows: Document scans are saved by default in the My Documents folder, and images are saved in the My Pictures folder. They are stored by default in these locations in a folder titled with the current date,
• Macintosh: All scans are saved by default in a folder with the current date in the Documents folder.
• Rule for naming scan files.
• By default, scans are named “scan1”, “scan2”, etc.
• Default scan resolution and photo enhancement preferences.
• Color or black-and-white (Windows only).
• Print quality for scanning documents.
Before initiating a scan, you can also preview the scan in Home Center, and crop the output as desired. When you are satisfied with the intended results, you can initiate the scan directly from Home Center. See Home Center Help for instructions. To review how to access Home Center help, see “All-in-One printer Home Center software” on page 20.
Simple scanning
Simple document scans
1 Place the original document at the right front corner of the scanner glass.
2 From the control panel, press Menu.
3 Press until Scan is selected. Press OK.
4 Press until Scan To is selected. Note that, if your printer is connected to a local computer, the default setting is USB Connected Computer. If you are connected to a network, all of the available computers are listed in alphabetical order.
5 Note that the default Scan What setting is Document.
6 Press until Scan Destination is selected. As needed, press or to specify which application on the computer will open the file. Kodak Home Center software appears on the list by default.
7 Press Start.
8 When the Scanner dialog window displays on your computer, follow the prompts to finish the scanning process.
60 Kodak ESP 9 Printer User Guide

Chapter 7
Simple image scans
1 Complete Steps 1–4 from “Simple document scans” on page 60.
2 Press until Scan What is selected. Press to specify Photo.
3 Complete Steps 6–8 from “Simple document scans” on page 60.
Scanning multiple originals simultaneously
When the Scan What option is set to Photo in the Home Center software, your All-in-One printer can detect multiple photos placed on the scanner glass. Allow some space on the scanner glass between each item, and use the Home Center software to save each photo as a separate file. Any images on the scanner glass that overlap are interpreted by the software as a single image file.
Adjusting scan settings
You can change the default scan settings for your printer using the control panel. When you change scan settings from the control panel, the settings apply only to the current scan job. To apply scan settings to all future scan jobs, you can save your changes.
1 From the control panel, press Menu.
2 Press until Scan is selected.
3 Press OK to display the Scan Options menu. A sample of the menu is shown in the illustration below.
4 Here you can press until the option you want to adjust is selected. If a value is
displayed between the and symbols in the row, press or to select the value you want.
Caution: Although you can scan a document using the Photo option and save it as an image (.jpeg) file, you will not be able to edit the text later in your computer. If you want to edit a scanned document later, make sure that you scan it as a Document, not as a Photo.
Caution: Home Center cannot interpret two or more documents, photos, or a combination of documents and photos, as separate scanned items when the Scan What option is set to Document.
Kodak ESP 9 Printer User Guide 61
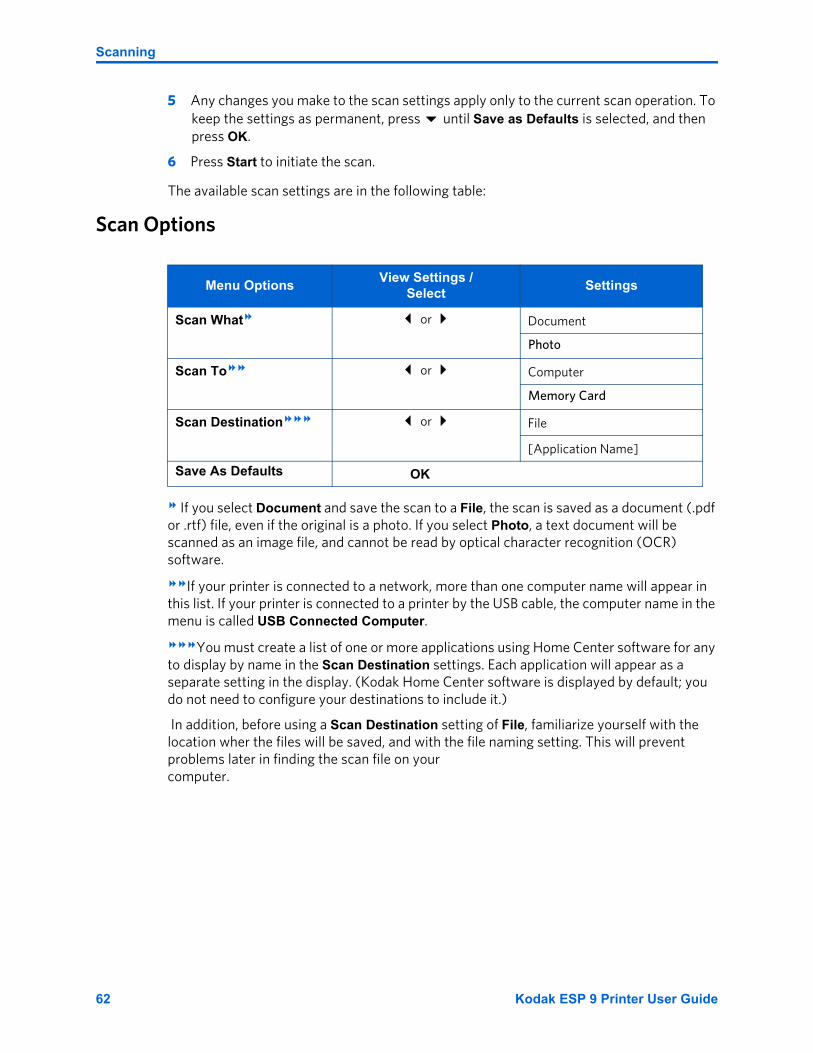
Scanning
5 Any changes you make to the scan settings apply only to the current scan operation. To keep the settings as permanent, press until Save as Defaults is selected, and then press OK.
6 Press Start to initiate the scan.
The available scan settings are in the following table:
Scan Options
If you select Document and save the scan to a File, the scan is saved as a document (.pdf or .rtf) file, even if the original is a photo. If you select Photo, a text document will be scanned as an image file, and cannot be read by optical character recognition (OCR) software.
If your printer is connected to a network, more than one computer name will appear in this list. If your printer is connected to a printer by the USB cable, the computer name in the menu is called USB Connected Computer.
You must create a list of one or more applications using Home Center software for any to display by name in the Scan Destination settings. Each application will appear as a separate setting in the display. (Kodak Home Center software is displayed by default; you do not need to configure your destinations to include it.)
In addition, before using a Scan Destination setting of File, familiarize yourself with the location wher the files will be saved, and with the file naming setting. This will prevent problems later in finding the scan file on your computer.
Menu Options View Settings / Select Settings
Scan What or Document
Photo
Scan To or Computer
Memory Card
Scan Destination or File
[Application Name]
Save As Defaults OK
62 Kodak ESP 9 Printer User Guide
Introduction
Your Kodak ESP 9 All-in-One printer allows you to send and receive faxes (including color faxes), assign and use quick dial settings for frequently used fax recipients, and select a number of fax options from the control panel.
Fax settings
Configuring the ESP 9 to send and receive fax transmissions is discussed in Chapter 3, “Setting Up Your Printer” .
Sending faxes
Your printer provides three ways to send faxes. Use the procedure described below that best meets your needs:
8 Faxing
Note: On a Windows PC connected to the All-in-One printer, you can create and manage the Fax Phonebook using Home Center software. See Home Center Help for more information. Home Center software is discussed on page 20. This feature is not available from Home Center software on a Macintosh.
Caution: Faxing only receives and transmits single-sided documents.
If you want to send a fax to… Use this procedure:
Someone not listed in your Fax Phonebook “Dialing a fax number on the control panel” , below.
An entry listed in your Fax Phonebook “Selecting a fax recipient from the Fax Phonebook” , below.
A Fax Phonebook entry assigned a Quick Dial number
“Using Quick Dial to select a Fax Phonebook entry” on page 65.
Kodak ESP 9 Printer User Guide 63
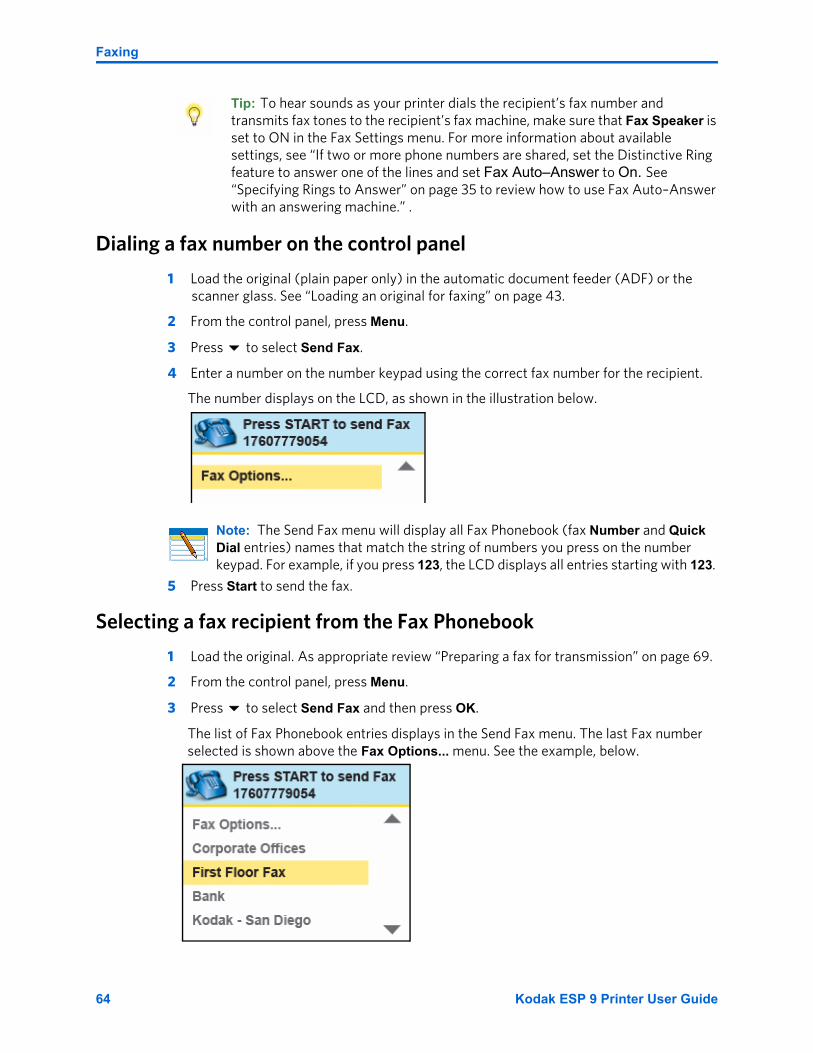
Faxing
Dialing a fax number on the control panel
1 Load the original (plain paper only) in the automatic document feeder (ADF) or the scanner glass. See “Loading an original for faxing” on page 43.
2 From the control panel, press Menu.
3 Press to select Send Fax.
4 Enter a number on the number keypad using the correct fax number for the recipient.
The number displays on the LCD, as shown in the illustration below.
5 Press Start to send the fax.
Selecting a fax recipient from the Fax Phonebook
1 Load the original. As appropriate review “Preparing a fax for transmission” on page 69.
2 From the control panel, press Menu.
3 Press to select Send Fax and then press OK.
The list of Fax Phonebook entries displays in the Send Fax menu. The last Fax number selected is shown above the Fax Options... menu. See the example, below.
Tip: To hear sounds as your printer dials the recipient’s fax number and transmits fax tones to the recipient’s fax machine, make sure that Fax Speaker is set to ON in the Fax Settings menu. For more information about available settings, see “If two or more phone numbers are shared, set the Distinctive Ring feature to answer one of the lines and set Fax Auto–Answer to On. See “Specifying Rings to Answer” on page 35 to review how to use Fax Auto–Answer with an answering machine.” .
Note: The Send Fax menu will display all Fax Phonebook (fax Number and Quick Dial entries) names that match the string of numbers you press on the number keypad. For example, if you press 123, the LCD displays all entries starting with 123.
64 Kodak ESP 9 Printer User Guide

Chapter 8
4 To use the last fax number used, press Start now. Otherwise, press until the desired recipient is selected, and then press OK.
The Fax phone number of the selected entry displays in the menu header, replacing any previous number. See the illustration below.
5 Press Start to send the fax.
Using Quick Dial to select a Fax Phonebook entry
By assigning up to ten contacts in your Fax Phonebook with a number between 0 (zero) and 9, the Quick Dial feature in your ESP 9 All-in-One printer allows you to create shortcuts for quickly sending Faxes to them.
There are two ways to use the Quick Dial feature for sending faxes.
Specifying a Quick Dial recipient from the keypad1 Load the original. As appropriate review “Preparing a fax for transmission” on page 69.
2 From the control panel, press Menu.
3 Press to select Send Fax and then press OK.
4 Select the appropriate key on the control panel’s keypad associated with the Quick Dial entry, and then press Start. For example, press 8 to specify the entry assigned the Quick Dial value of “08.” See the illustration below.
Note: To configure a fax recipient as a Quick Dial entry, review “Fax Phonebook entries” on page 67.
Kodak ESP 9 Printer User Guide 65
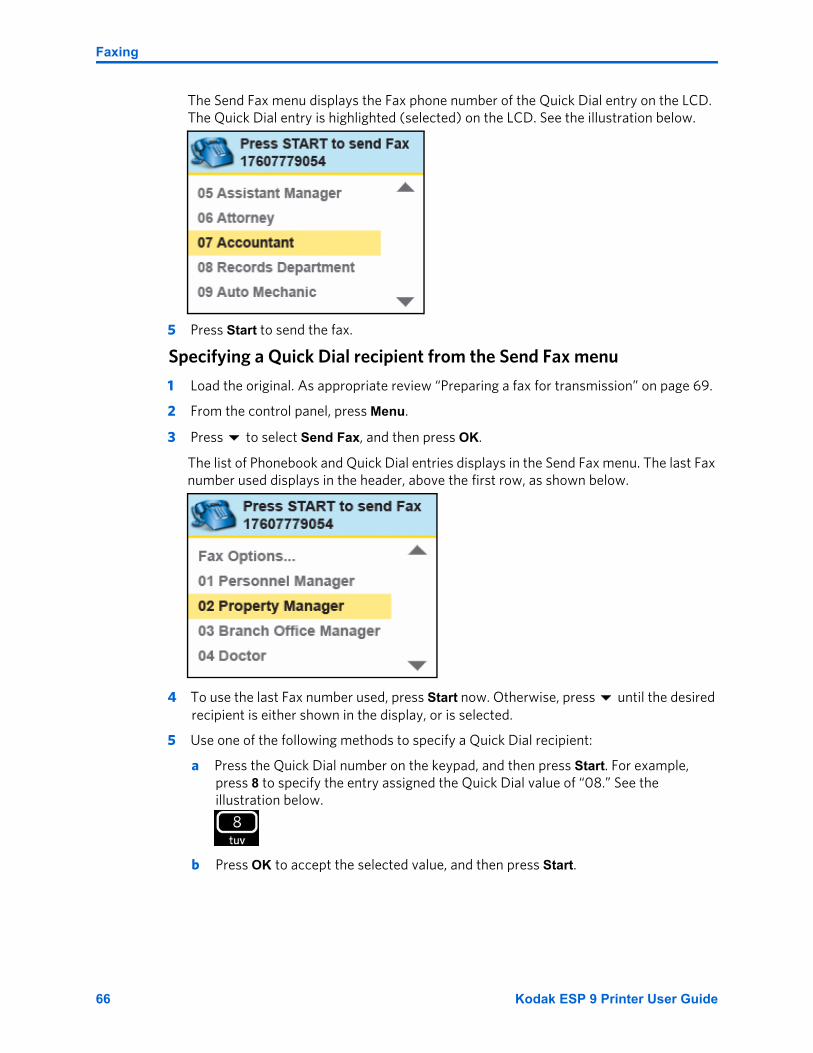
Faxing
The Send Fax menu displays the Fax phone number of the Quick Dial entry on the LCD. The Quick Dial entry is highlighted (selected) on the LCD. See the illustration below.
5 Press Start to send the fax.
Specifying a Quick Dial recipient from the Send Fax menu
1 Load the original. As appropriate review “Preparing a fax for transmission” on page 69.
2 From the control panel, press Menu.
3 Press to select Send Fax, and then press OK.
The list of Phonebook and Quick Dial entries displays in the Send Fax menu. The last Fax number used displays in the header, above the first row, as shown below.
4 To use the last Fax number used, press Start now. Otherwise, press until the desired recipient is either shown in the display, or is selected.
5 Use one of the following methods to specify a Quick Dial recipient:
a Press the Quick Dial number on the keypad, and then press Start. For example, press 8 to specify the entry assigned the Quick Dial value of “08.” See the illustration below.
b Press OK to accept the selected value, and then press Start.
66 Kodak ESP 9 Printer User Guide
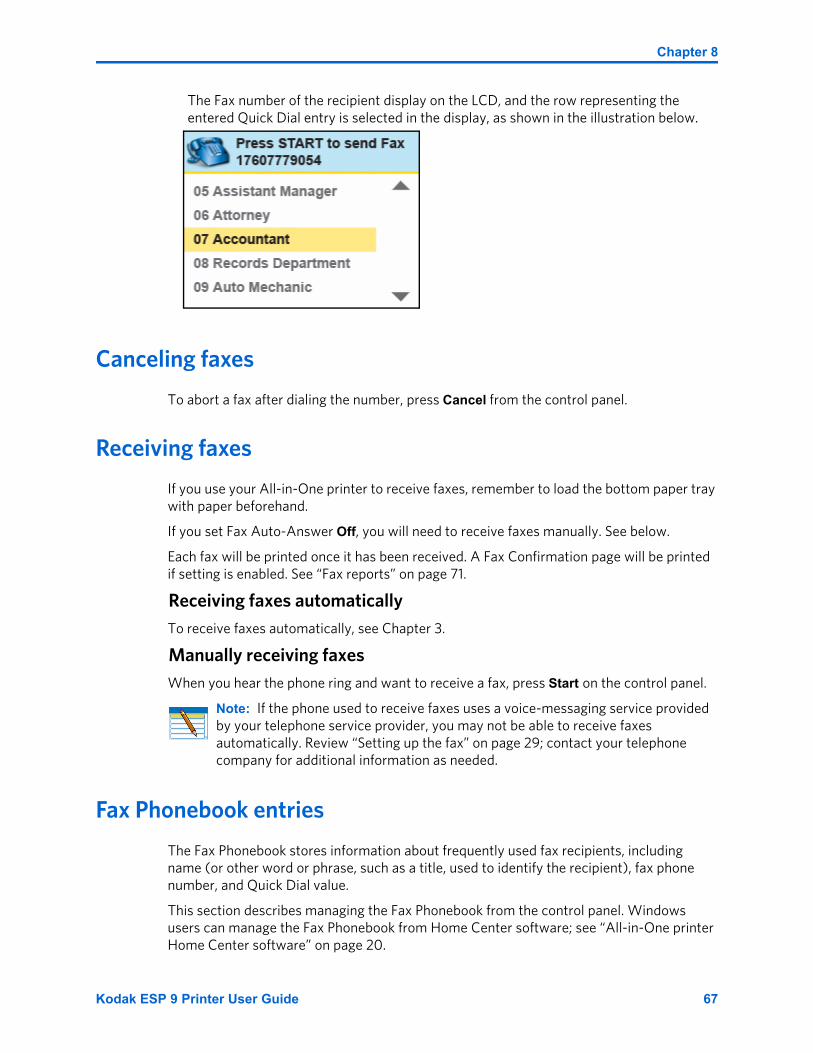
Chapter 8
The Fax number of the recipient display on the LCD, and the row representing the entered Quick Dial entry is selected in the display, as shown in the illustration below.
Canceling faxes
To abort a fax after dialing the number, press Cancel from the control panel.
Receiving faxes
If you use your All-in-One printer to receive faxes, remember to load the bottom paper tray with paper beforehand.
If you set Fax Auto-Answer Off, you will need to receive faxes manually. See below.
Each fax will be printed once it has been received. A Fax Confirmation page will be printed if setting is enabled. See “Fax reports” on page 71.
Receiving faxes automaticallyTo receive faxes automatically, see Chapter 3.
Manually receiving faxesWhen you hear the phone ring and want to receive a fax, press Start on the control panel.
Fax Phonebook entries
The Fax Phonebook stores information about frequently used fax recipients, including name (or other word or phrase, such as a title, used to identify the recipient), fax phone number, and Quick Dial value.
This section describes managing the Fax Phonebook from the control panel. Windows users can manage the Fax Phonebook from Home Center software; see “All-in-One printer Home Center software” on page 20.
Note: If the phone used to receive faxes uses a voice-messaging service provided by your telephone service provider, you may not be able to receive faxes automatically. Review “Setting up the fax” on page 29; contact your telephone company for additional information as needed.
Kodak ESP 9 Printer User Guide 67

Faxing
Adding a new Fax Phonebook entry
1 From the control panel, press Menu.
2 Press to select Send Fax and press OK.
3 Select Fax Options and press OK.
4 Select Edit Phonebook and press OK.
The Edit Phonebook menu displays on the LCD.
5 Press to select Add New Entry and press OK.
6 If the fax number field fails to display automatically on the LCD, press OK to select the Number field in the Edit Phonebook Entry menu.
The number field is highlighted.
7 Using the keypad on the control panel, enter the fax number in the field displayed on the LCD and then press OK.
8 When you are finished entering the fax phone number, press OK.
9 Press to select Name and press OK.
10 Using the LCD on-screen keyboard, enter a name for the recipient.
• Notice the abc/123 key is highlighted. As needed, press OK to display the ABC/123 key. Toggle between these two keys by pressing OK as needed.
• Here, press , , or to select a key. Use the BKSP key to erase an incorrect entry. Select the Done key when you are finished, and then press OK.
11 To assign a Quick Dial number to this name, press to select highlight Quick Dial and press OK.
12 Enter a number between 0 and 9 on the keypad on the control panel, and then press OK.
13 Press to select DONE when the entry is complete, and press OK.
14 To continue to add entries to the Fax Phonebook, repeat this procedure.
Editing an existing Fax Phonebook entry
1 From the control panel, press Menu.
2 Press to select Send Fax and press OK.
3 Select Fax Options and press OK.
4 Select Edit Phonebook and press OK.
The Edit Phonebook menu displays on the LCD.
Note: This option is also accessible by selecting Edit Phonebook from the Fax Settings menu.
Note: This option is also accessible by selecting Edit Phonebook from the Fax Settings menu.
68 Kodak ESP 9 Printer User Guide
Chapter 8
5 Press to select Edit Entry and press OK.
6 Press to select the desired Phonebook entry and press OK.
7 Select the field you want to edit, and press OK.
8 Using the LCD display keyboard or the control panel keypad, edit the entry as needed. Select Done on the LCD display keyboard to indicate that you are finished using it.
9 Select Done when the entry is complete, and press OK.
10 Select another item to edit; or, press Cancel to display the Edit Phonebook menu.
Deleting an existing Fax Phonebook entry
1 From the control panel, press Menu.
2 Press to select Send Fax and press OK.
3 Select Fax Options and press OK.
4 Select Edit Phonebook and press OK.
5 Press to select Delete Entry and then press OK.
6 Press to select the desired Phonebook entry and press OK.
7 Follow the prompts displayed on the LCD, and press OK to delete the entry displayed or cancel to go back to select an entry to delete.
8 Select Done when the entry is complete, and press OK.
9 Select another item to delete; or, press Cancel to display the Edit Phonebook menu.
Preparing a fax for transmission
Before sending a fax, load the original (plain paper only) print side up in the automatic document feeder (ADF). See “Loading an original for faxing” on page 43.
Printing a fax cover page
If you do not create a fax cover sheet using a third-party application (for example, word-processing software), you can print one with the ESP 9 All-in-One printer.
1 Before sending your Fax, press Menu from the control panel.
2 Press to select Fax. Settings and press OK.
3 Press to select Print Fax Cover Page and press OK.
Note: This option is also accessible by selecting Edit Phonebook from the Fax Settings menu.
Caution: Never load photo paper into the automatic document feeder (ADF) on the ESP 9; the ADF only accepts plain paper. If you load photo paper in the ADF, the printer displays a warning on the LCD, and will not send the Fax.
Kodak ESP 9 Printer User Guide 69

Faxing
4 Load 8.5x11 or A4 paper as needed, and then and press Start.
The printer produces a Fax cover sheet, which provides space for entering the following:
• Information about the recipient (company, Fax number, recipient name)
• Information about the sender (company, Fax number, phone number, sender name)
• Number of pages in the Fax, including the cover page
• Message to the recipient
5 Complete the items on the cover sheet as appropriate.
6 Place the Fax Cover Sheet before the first page of the original document used for your fax transmission.
7 Use one of the following procedures to send the fax:
• “Dialing a fax number on the control panel” on page 64
• “Selecting a fax recipient from the Fax Phonebook” on page 64
• “Using Quick Dial to select a Fax Phonebook entry” on page 65
Changing Send Fax settings
If, before sending your fax, you want to modify any fax settings, you can use the Send Fax Options menu now.
1 From the control panel, press Menu.
2 Press to select Send Fax and then press OK.
Fax Options is selected by default.
3 Press OK to display the Send Fax Options menu.
4 Press to select an item you want to change.
• To change the Resolution, Color or Brightness items, press the or buttons on the control panel to change the value for the setting; then press OK.
• If you select Edit Phonebook, press OK. See “Fax Phonebook entries” on page 67 to review the procedure for adding, editing, or deleting a Fax Phonebook entry. When you are finished, press Menu to return to the Send Fax Options menu.
• Any changes you make in the Edit Phonebook menu are saved when you complete each entry.
• Any changes you make to the fax settings apply only to the current fax operation.
5 If you want to save the changes as default settings, press to select Save as Defaults and then press OK.
6 If you have not created a fax cover page, you can do so before sending your fax. See “Printing a fax cover page” on page 69. Otherwise, use one of the following procedures to send the fax:
• “Dialing a fax number on the control panel” , below
• “Selecting a fax recipient from the Fax Phonebook” on page 64
• “Using Quick Dial to select a Fax Phonebook entry” on page 65
70 Kodak ESP 9 Printer User Guide
Chapter 8
Send Fax Options
The available fax settings are shown below:
Fax reports
The following reports are available from the Fax Settings menu:
The printer also generates a Fax Lost Job report, which contains details about the time, date, and fax number. This option is NOT available as an option in the Fax Settings menu. Rather, if a fax was not received because your printer lost power (for instance, due to an electrical power outage), the printer automatically generates a Fax Lost Job report when power returns to the printer (and it is turned on). This feature allows you to notify the sender(s) about any fax that could not be received due to loss of power, and you can request re–transmission, as appropriate.
Menu Options View Settings / Select Settings
Edit Phonebook OK Add New Entry
Edit Entry
Delete Entry
Resolution or Standard
Fine
Photo
Color or Color
Black & White
Brightness or -3 to +3
Save As Defaults OK
Fax report name Contains: To print:
Print Fax Confirmation Page
Details about faxes, one fax at a time, based on the menu setting.
Set the value for this option to Never, Always, or After Failure Only in the Fax Settings menu on the LCD display. Note: This report cannot be run from the control panel; it is generated automatically only after sending a fax, and only based on the setting.
Fax Settings Information about the printer and a summary of the current fax settings for the device. See “Fax Settings Options ” on page 37.
Press OK to select, then press Start.
Fax Activity Log Details about the last 30 faxes sent and received.
Press OK to select, then press Start.
Kodak ESP 9 Printer User Guide 71
Faxing
Printing a fax report
1 Load 8.5x11 or A4 paper into the bottom paper tray, as needed.
2 From the control panel, press Menu.
3 Press to select Fax Settings and press OK.
4 Press to select Print Fax Confirmation Page and press OK
5 As appropriate, press or to change the Print Fax Confirmation Page setting.
6 Press until the desired report (Print Fax Settings or Print Fax Activity Log only) is selected.
7 Press OK to select the option; and then press Start to print the report.
Note: This report cannot be run from the control panel; the ESP 9 will output this report only after you send a fax, and only based on the setting. If you change this setting, press OK to save the setting, and then press Cancel to exit the Fax Settings menu; or, you can continue (see Step 5)
Note: The option to Print Fax Cover Page is also available in the Fax Settings menu; see “Printing a fax cover page” on page 69.
72 Kodak ESP 9 Printer User Guide
Your Kodak ESP 9 All-in-One printer requires little maintenance. However, Kodak recommends cleaning the scanner glass and lid backing regularly to remove dust and fingerprints. Fingerprints and other debris on the glass or lid backing could slow down the printer’s performance, and affect the quality and accuracy of scanning.
Service agreements are available in some countries. Contact dealers for Kodak products for more information.
For recycling and or disposal information, contact your local authorities. In the U.S., visit the Electronics Industry Alliance Web site at www.eiae.org.
General care
• To clean the printer, wipe the outside with a clean, dry cloth.
• Keep the surrounding area vacuumed and litter-free.
• Protect the printer from tobacco smoke, dust, sand, other small particles (such as crumbs), and liquid spills.
• Avoid placing objects on the printer.
• Keep the printer supplies away from direct sunlight and out of high-temperature environments.
• Do not allow chemicals, such as suntan lotion, to come into contact with the painted surface of the printer.
• If the printer has been exposed to bad weather or has water inside it, turn it off and let it dry completely. If this does not solve the problem, contact customer support (see “Contacting Kodak Customer Service & Support” on page 2).
9 Maintaining Your Printer
Caution: Always disconnect the power on the this All-in-One printer before cleaning it. Do not use harsh or abrasive cleaners or organic solvents on the printer or any of its parts.
Kodak ESP 9 Printer User Guide 73
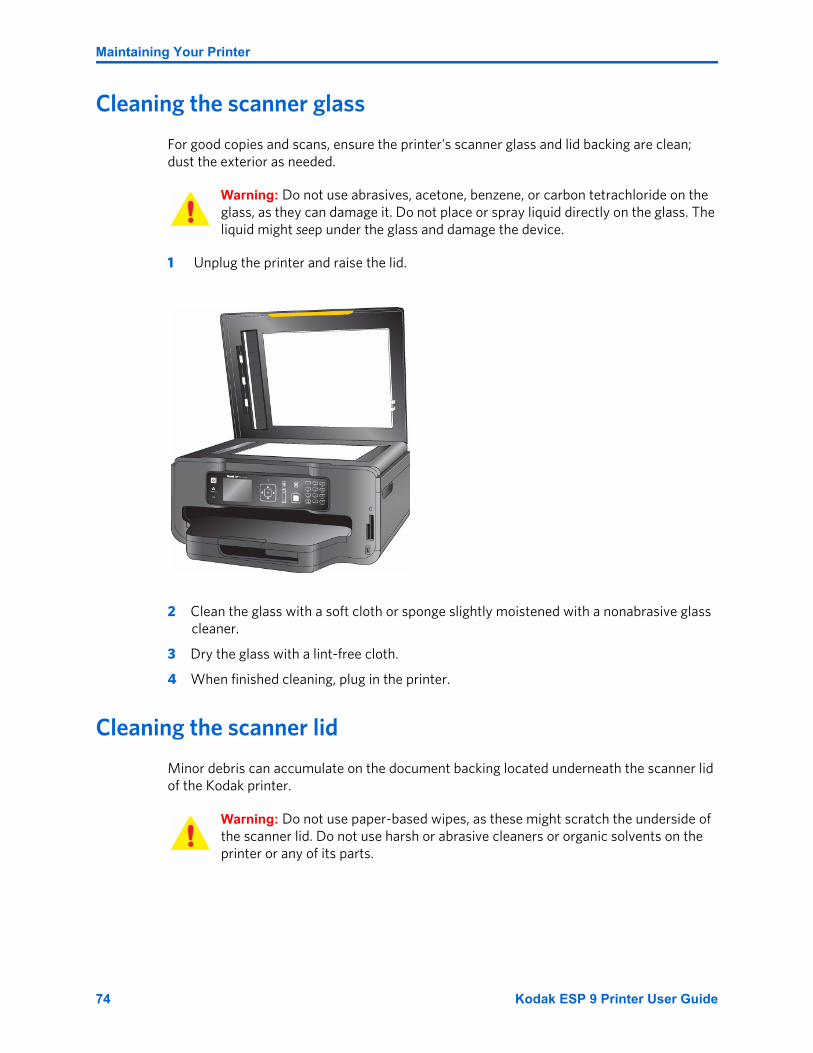
Maintaining Your Printer
Cleaning the scanner glass
For good copies and scans, ensure the printer's scanner glass and lid backing are clean; dust the exterior as needed.
1 Unplug the printer and raise the lid.
2 Clean the glass with a soft cloth or sponge slightly moistened with a nonabrasive glass cleaner.
3 Dry the glass with a lint-free cloth.
4 When finished cleaning, plug in the printer.
Cleaning the scanner lid
Minor debris can accumulate on the document backing located underneath the scanner lid of the Kodak printer.
Warning: Do not use abrasives, acetone, benzene, or carbon tetrachloride on the glass, as they can damage it. Do not place or spray liquid directly on the glass. The liquid might seep under the glass and damage the device.
Warning: Do not use paper-based wipes, as these might scratch the underside of the scanner lid. Do not use harsh or abrasive cleaners or organic solvents on the printer or any of its parts.
74 Kodak ESP 9 Printer User Guide
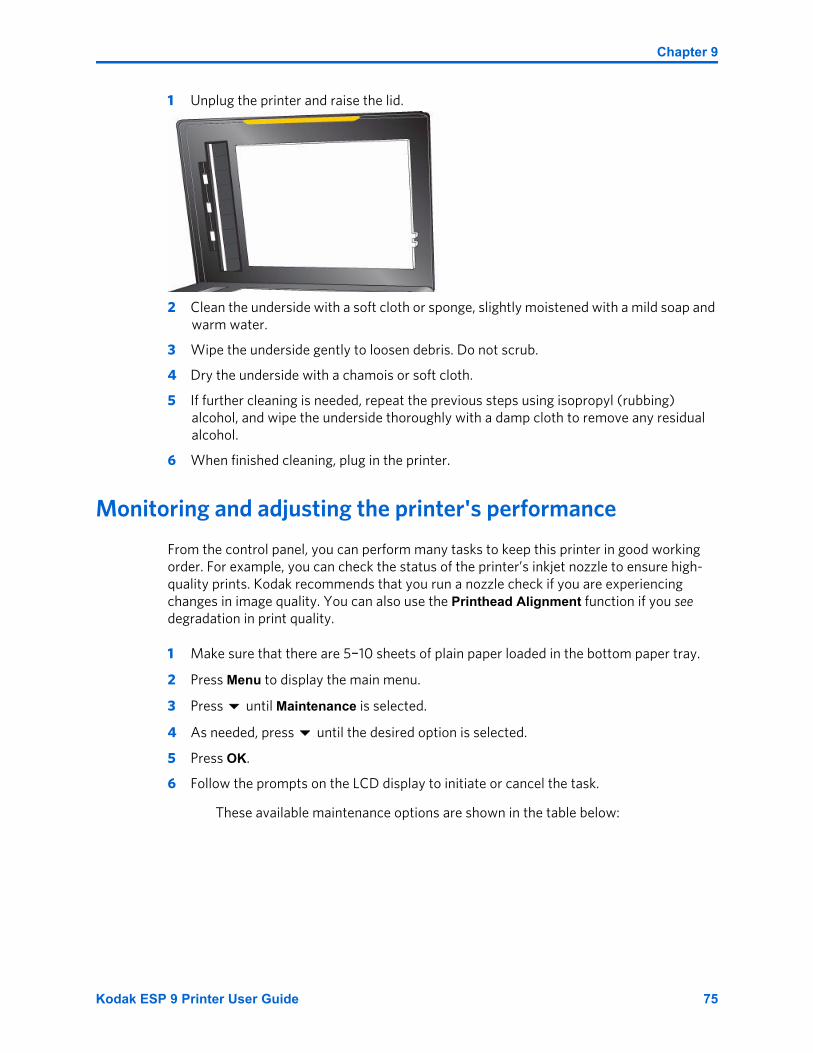
Chapter 9
1 Unplug the printer and raise the lid.
2 Clean the underside with a soft cloth or sponge, slightly moistened with a mild soap and warm water.
3 Wipe the underside gently to loosen debris. Do not scrub.
4 Dry the underside with a chamois or soft cloth.
5 If further cleaning is needed, repeat the previous steps using isopropyl (rubbing) alcohol, and wipe the underside thoroughly with a damp cloth to remove any residual alcohol.
6 When finished cleaning, plug in the printer.
Monitoring and adjusting the printer's performance
From the control panel, you can perform many tasks to keep this printer in good working order. For example, you can check the status of the printer’s inkjet nozzle to ensure high-quality prints. Kodak recommends that you run a nozzle check if you are experiencing changes in image quality. You can also use the Printhead Alignment function if you see degradation in print quality.
1 Make sure that there are 5–10 sheets of plain paper loaded in the bottom paper tray.
2 Press Menu to display the main menu.
3 Press until Maintenance is selected.
4 As needed, press until the desired option is selected.
5 Press OK.
6 Follow the prompts on the LCD display to initiate or cancel the task.
These available maintenance options are shown in the table below:
Kodak ESP 9 Printer User Guide 75
Maintaining Your Printer
Maintenance Options
Replacing ink cartridges
Your Kodak printer uses separate black and color ink cartridges. The ink levels are shown on the control panel and in the printer software.
1 Make sure the printer is turned on.
Menu Options Select
Check Ink Levels OK
Check Paper Levels OK
Nozzle Check OK
Printhead Alignment OK
Clean Printhead OK
Print Test Page OK
Format Memory Card OK
Warning: Formatting will erase all the data on a memory card.
Tip: A printhead alignment and a check of the inkjet nozzle can also be initiated from the Home Center software.
Windows: Open the Home Center Help panel by clicking Help on the Home Center window, as needed. Click Maintenance, and then click Nozzle Check or Printhead Alignment.
Macintosh: Open Home Center window from the dock, and click Maintenance, and then click Nozzle Correction or Printhead Alignment.
Caution: For the best quality prints, store ink cartridges in locations where the temperature does not exceed 85°F (30°C).
Warning: Use genuine Kodak ink cartridges to ensure best results and avoid printhead damage not covered under warranty. Third-party ink cartridges may not contain the necessary information to notify you before the ink cartridge is empty.
76 Kodak ESP 9 Printer User Guide

Chapter 9
2 Open the printer access door by lifting from the recessed hand-holds on the sides of the unit
The printhead moves to an accessible position for handling the ink cartridges. The ink cartridges are seated in the printhead.
3 Wait until the printhead stops moving, and then pinch the latch on the old ink cartridge with your thumb and forefinger and lift it out of the printhead.
4 Open the box containing the new ink cartridge.
Note: You can take your used ink cartridges to most office supply or electronics stores for safe disposal.
1 Printhead
2 Color ink cartridge
3 Black ink cartridge
Kodak ESP 9 Printer User Guide 77
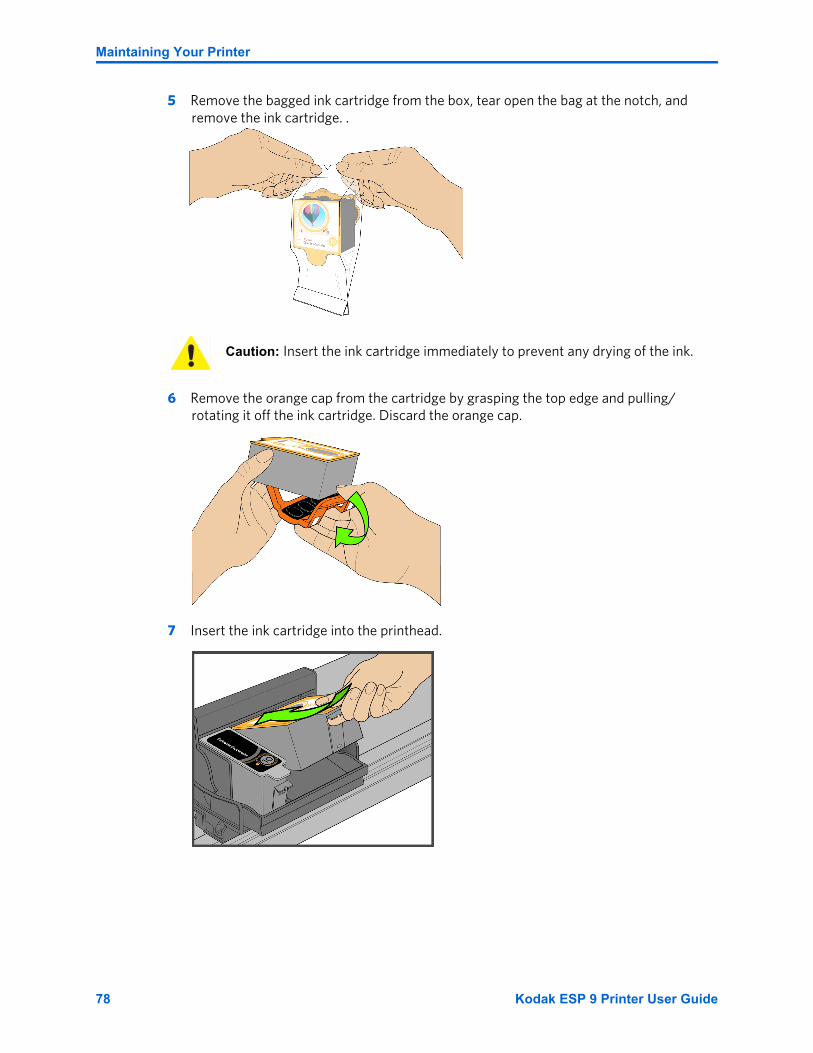
Maintaining Your Printer
5 Remove the bagged ink cartridge from the box, tear open the bag at the notch, and remove the ink cartridge. .
6 Remove the orange cap from the cartridge by grasping the top edge and pulling/rotating it off the ink cartridge. Discard the orange cap.
7 Insert the ink cartridge into the printhead.
Caution: Insert the ink cartridge immediately to prevent any drying of the ink.
78 Kodak ESP 9 Printer User Guide

Chapter 9
8 Press down on the tab until you hear a click and feel the latch snap into position.
9 Close the printer access door. The printhead moves to its ready position and prepares the new ink cartridge for use (this could take up to a minute).
Replacing the printhead
If your printhead is damaged or broken, you may replace it yourself.
1 Make sure your printer is turned on.
2 Open the printer access door by lifting from the recessed hand-holds on the sides of the unit.
Note: Listen carefully during this step; make sure you hear the ink cartridges click into place in the printhead. This seats the cartridges properly, and prevents ink from being dispensed incompletely during your print or copy jobs.
Kodak ESP 9 Printer User Guide 79
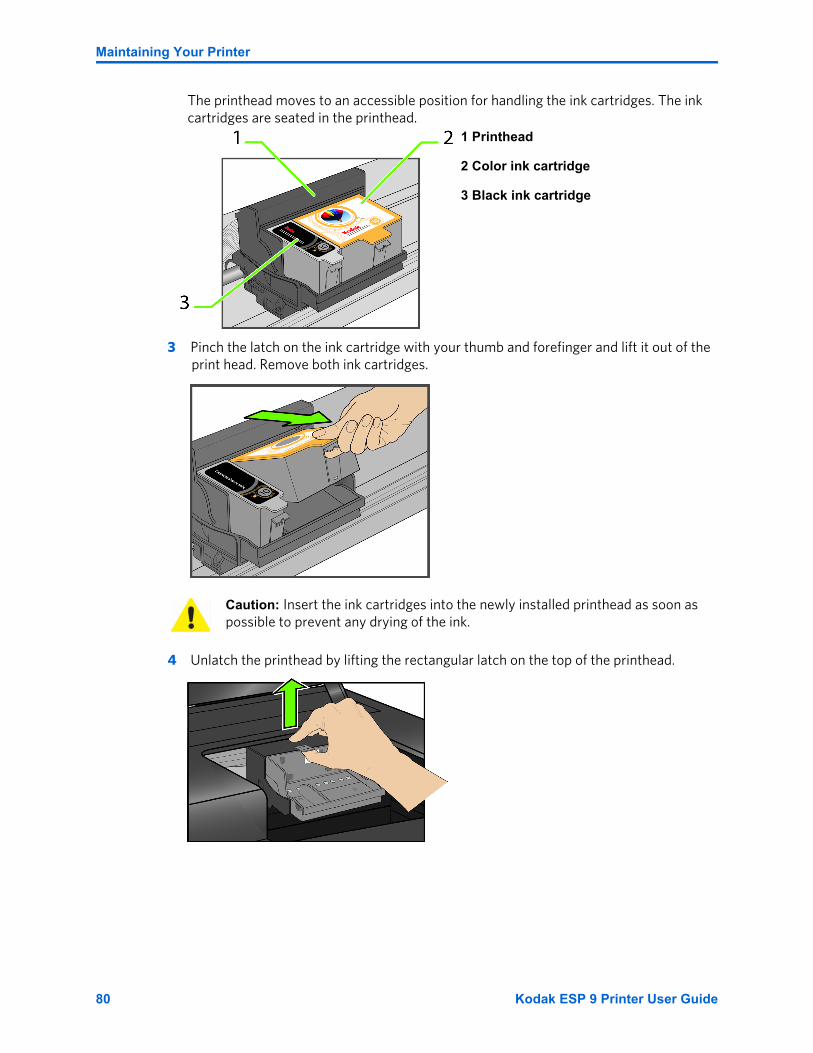
Maintaining Your Printer
The printhead moves to an accessible position for handling the ink cartridges. The ink cartridges are seated in the printhead.
3 Pinch the latch on the ink cartridge with your thumb and forefinger and lift it out of the print head. Remove both ink cartridges.
4 Unlatch the printhead by lifting the rectangular latch on the top of the printhead.
Caution: Insert the ink cartridges into the newly installed printhead as soon as possible to prevent any drying of the ink.
1 Printhead
2 Color ink cartridge
3 Black ink cartridge
80 Kodak ESP 9 Printer User Guide
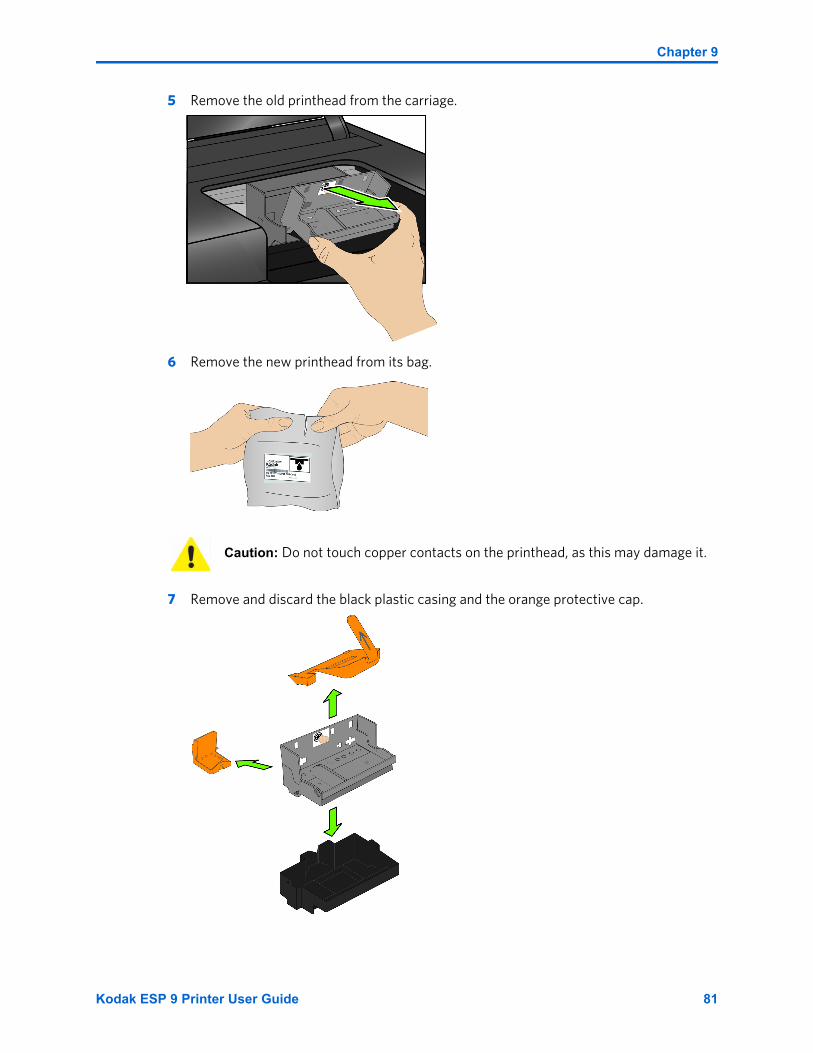
Chapter 9
5 Remove the old printhead from the carriage.
6 Remove the new printhead from its bag.
7 Remove and discard the black plastic casing and the orange protective cap.
Caution: Do not touch copper contacts on the printhead, as this may damage it.
Kodak ESP 9 Printer User Guide 81
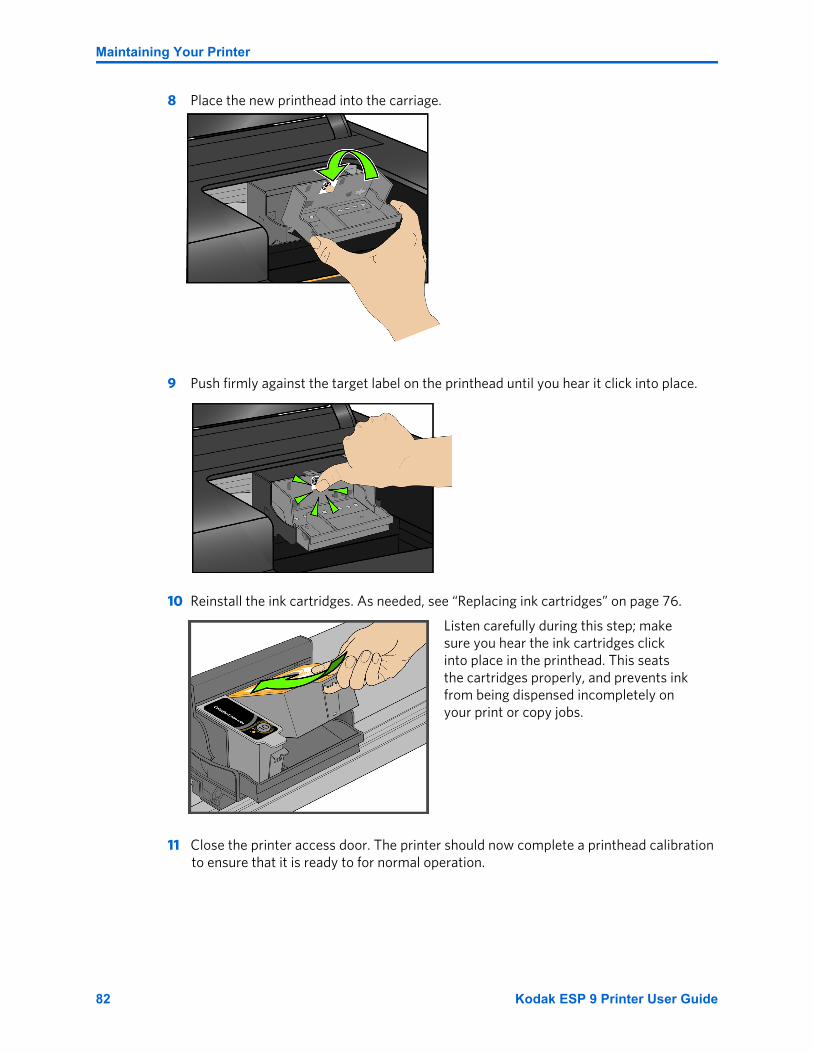
Maintaining Your Printer
8 Place the new printhead into the carriage.
9 Push firmly against the target label on the printhead until you hear it click into place.
10 Reinstall the ink cartridges. As needed, see “Replacing ink cartridges” on page 76.
11 Close the printer access door. The printer should now complete a printhead calibration to ensure that it is ready to for normal operation.
Listen carefully during this step; make sure you hear the ink cartridges click into place in the printhead. This seats the cartridges properly, and prevents ink from being dispensed incompletely on your print or copy jobs.
82 Kodak ESP 9 Printer User Guide

Troubleshooting “quick start”
Kodak provides several methods to help you troubleshoot your All-in-One printer issues. Here are some quick tips:
• Turn off your printer and then unplug it. Wait five seconds, and then plug the power cord back into the printer. Finally, turn the printer back on.
• Confirm that you are using a 2.0 USB cable to connect the printer to your computer. If you need to buy one, they are available online at www.kodak.com/go/aio, or from your local electronics and printer retailer.
• Make sure that you have the most up-to-date All-in-One printer software and Help files from the Internet. Visit www.kodak.com/go/support to download the latest files.
• View the troubleshooting information found in Kodak Home Center software on your computer. After opening Home Center, click the question mark (?) button:
• Macintosh: The button is located at the lower-left of the Home Center window.
• Windows: The button is located at the upper-right of the Home Center window.
Use the Help window to view troubleshooting topics. (Windows users can also select Troubleshoot from the Help panel on the main Home Center window.)
• You can also get troubleshooting help at the Kodak Web site. Visit www.kodak.com/go/support for support for your Kodak printer.
General troubleshooting
Printer fails to power on
Probable Cause
The power supply is not properly connected.
10 Troubleshooting
Note: Many issues with degradation in performance or print quality can be resolved by meeting or exceeding the recommended system requirements. See Chapter 11 on page 83.
Kodak ESP 9 Printer User Guide 83
Troubleshooting
Corrective Action
• Make sure the electrical power cord is connected to the alternating current power adapter, and is plugged into a grounded power outlet or power strip.
• If using a power strip, make sure it is turned on.
• If using a switched power outlet, make sure the switch is on.
• Make sure the power outlet is supplying power.
• Verify the light on the Kodak printer power cord plug is lit.
Probable Cause 2
The USB cable was unplugged from the printer and then reconnected; or, power to the printer is interrupted.
Corrective Action
• Restart the computer
Probable Cause 3
The USB cable is not 2.0 compliant.
Corrective Action
• Replace the USB cable with a USB 2.0 compliant cable.
• Restart the computer
If none of the above corrects the problem, contact Kodak support.
Device not recognized
Probable Cause
Any of the following can prevent your Kodak All-in-One printer from reading a connected device (digital camera, USB drive, or memory card).
• The camera is turned OFF.
• The USB connector on a USB drive is not fully inserted into the USB port.
• The memory card is not completely inserted, or is not inserted into the correct card slot.
• The file system on the device is corrupt.
• More than one device is inserted at a time.
• The USB device is not supported.
• The USB cable is faulty.
Note: For optimal quality and performance, use a good-quality high speed USB 2.0 cable. When connecting to the Kodak All-in-One printer, use the USB ports located in the back of the computer. Any USB 2.0 hubs that are used should be self-powered.
84 Kodak ESP 9 Printer User Guide
Chapter 10
Corrective Action
• Correct any connection problems and try again.
• If the file system is corrupt, reformat it.
• Disconnect the unsupported device.
Ink cartridge not recognized
Probable Cause 1
The color or black ink cartridge installed was not recognized.
Corrective Action
Install a genuine Kodak ink cartridge.
Probable Cause 2
One of the ink cartridges needs to be replaced.
Corrective Action
Replace the ink cartridge.
Multiple paper feed
Probable Cause
Multiple sheets of paper were pulled through printer.
Corrective Action
1 Remove the paper from the paper tray.
2 Carefully “fan” the paper to keep the sheets from sticking together.
3 Reload the paper tray. Do not overfill.
4 Press OK.
Note: If the USB drive uses an NTFS or HFS formatting system, the printer may not be able to read it. Macintosh users may need to transfer these files directly to their computer, and then printing to the printer from there.
Warning: Generic or non-Kodak ink cartridges may not function with the All-in-One printer. Kodak recommends using genuine Kodak ink cartridges.
Caution: Kodak Inkjet paper is recommended for your Kodak All-in-One printer.
Kodak ESP 9 Printer User Guide 85
Troubleshooting
Multiple pictures not scanned properly
When scanning or copying, the Kodak printer can detect multiple images on the scanner glass, straighten them, and create individual files. If you are having trouble with this feature, check the following:
Probable Cause 1
Your photos are not placed optimally on the scanner glass.
Corrective Action
• Make sure that your photos do not overlap.
• Place photos away from the edges of the scanner glass.
• Some images do not scan well. Light-colored images may not be detected as separate images.
• You may need to make adjustments to the scanning area using the Preview feature in the Kodak Home Center.
Probable Cause 2
The scanner glass is dirty.
Corrective Action
Make sure the scanner glass is completely clean or the photos might not scan properly (see “Cleaning the scanner glass” on page 74).
Probable Cause 3
The scanner lid is dirty.
Corrective Action
Clean the scanner lid (see “Cleaning the scanner lid” on page 74).
Probable Cause 4
The Scan What Document option on the Scan menu was selected, instead of the Scan What Photo option.
Corrective Action
Scan the photos again in the appropriate format.
No communication with computer
Probable Cause
Your Kodak printer is not connected to your computer.
Corrective Action
• Make sure your printer is plugged in and turned on.
86 Kodak ESP 9 Printer User Guide
Chapter 10
• Make sure you are using the proper USB cable (USB 2.0).
• If you are using a USB hub to connect the USB cable to the computer, make sure that it has power. Use a self-powered (connected to an electrical outlet) USB hub instead of one that uses the computer’s internal power.
• Check the connection from your computer to your printer. Ensure that the square end of the USB cable is plugged in to the USB port on the back of your printer, and the flat end into a USB port on your computer.
• You may need to disconnect other printers or scanners from your computer.
• After checking connections, restart your computer.
• Make sure your computer meets the minimum system requirements, otherwise upgrade your system if necessary.
For more information on connecting your printer to your computer, see the Start Here booklet that came with your printer.
No paper feed
Probable Cause
The paper tray may be empty, or there may be a problem with the paper in the tray.
Corrective Action
If the tray is empty, load paper into the paper tray, then resume printing. Check for a message from the printer status monitor (Windows) or the printer queue window (Macintosh) on your computer. Check for a problem with the paper in the tray.
To check the paper
1 Inspect the paper and make sure no paper sheets are damaged in any way. Reload with new paper, if necessary.
2 Carefully “fan” the paper to keep the sheets from sticking together.
3 Reload the paper tray. Do not overfill.
4 Press OK.
One or more of the colors on the calibration sheet is missing
Probable Cause
The printhead is not installed correctly. If the printhead has been working properly, it may have come loose.
Caution: Kodak Inkjet paper is recommended for your Kodak All-in-One printer.
Kodak ESP 9 Printer User Guide 87
Troubleshooting
Corrective Action
If the printhead has come loose:
1 Open the printer access door, and then remove the black and color ink cartridges.
2 Press the printhead release button.
3 Lift the printhead out.
4 Reinsert the printhead and ink cartridges.
If this does not resolve your printing issue, contact Kodak Service and Support.
Paper jam
Probable Cause
The paper did not advance, was not picked up properly from the paper tray, or is lodged inside the printer.
Corrective Action
1 Remove the paper from the tray you used when the jam occurred.
2 Turn off the printer.
3 Open the rear access area and pull the paper out from the rollers without tearing it.
4 Reload the paper tray, but do not overfill it.
5 Turn the printer on.
6 Press OK.
Printer not responding
Probable Cause
The firmware or software is not in a ready state.
Corrective Action
• Turn the printer off and turn it back on.
• If the problem persists, unplug the power cord from the power supply and plug it back in.
• If the problem continues to persist, restart your computer.
Note: See “Replacing the printhead” on page 79 for illustrated instructions for performing this procedure.
Caution: Kodak Inkjet paper is recommended for your Kodak All-in-One printer.
Caution: If the paper tears while removing it, make sure you remove all the torn pieces. More jams are likely to occur when torn pieces are left in the printer.
88 Kodak ESP 9 Printer User Guide
Chapter 10
Transfer pictures failure
Problem
Nothing happens when you try to transfer photos to the computer.
Corrective Action
• Remove the memory card or USB device and reinsert it.
• Check the power connection to the computer.
• If you are trying to transfer photos from a memory card and a PictBridge camera is connected, disconnect the camera.
• Close any unnecessary software applications, and minimize any remaining application windows. Follow any messages on the screen that may have been hidden by other windows.
• Disconnect then reconnect the USB cable from the printer to the computer.
• Make sure you are using a high-quality USB cable which is communicating with the computer. (See “No communication with computer” on page 86.)
• If the pictures are on a USB device, make sure it uses a supported file system (see “Device not recognized” on page 84).
• Make sure your computer meets the minimum system requirements for using your printer (see ““General troubleshooting” on page 83). Upgrade your system if necessary.
User guide on the CD is obsolete
Probable Cause
The User Guide has been updated since the software CD was released.
Corrective Action
• Download the most recent version of the User Guide from Kodak.com.
Wrong paper size
Probable Cause
The print size or paper size you selected may be larger or smaller than the paper found in the paper tray.
Corrective Action
1 Replace the paper in the paper tray with the correct size.
2 Press OK.
If the situation continues, contact Kodak support.
Kodak ESP 9 Printer User Guide 89

Troubleshooting
Macintosh OS X troubleshooting
Non-intel Mac only: black screen or screen freeze occurs when applying printer settings via the Home Center softwareProbable Cause
This error only occurs with non-Intel Macintosh computers running Leopard OS version 10.5. Apple has confirmed that there are problems running the latest version (Leopard) on G5 processors.
Corrective Action
• Upgrade to Macintosh OS 10.5.2.
Windows Vista troubleshooting
WIA (Windows Image Acquisition) error: service has stopped workingProbable Cause 1
The USB cable is unplugged and reconnected to the printer or when the printer terminated error.
Probable Cause 2
Power is interrupted. This results in the inability to connect a camera and transfer pictures from the camera. Neither the camera nor the printer is visible through the Transfer All to My PC option on the Print Photo Options menu.
Corrective Action
• Restart the computer and printer.
Home Center software on Windows works incorrectly following software upgrade
Probable Cause
Some changes in the Home Center software on Windows systems may have been affected by enabled Security and/or User Account Control settings.
Corrective Action
1 Right-click on the Home Center icon (shortcut) on the Desktop.
2 Select Properties.
3 Select the Compatibility tab.
4 Check the box that says “Run the program as an administrator.”
90 Kodak ESP 9 Printer User Guide

Chapter 10
Print troubleshooting
Use this section to resolve print problems.
Envelope printing incorrect
Probable Cause
The envelopes are not loaded correctly.
Corrective Action
1 Remove the envelopes from the paper tray.
2 Straighten the stack of envelopes against a flat surface. Reload the stack into the paper tray print side down, with the envelope flap aligned to the left.
3 Squeeze the paper guide and slide it to the right until it touches the edge of the envelopes.
Multiple-page document not printing in reverse order (Windows only)
Probable Cause
The print settings on your computer are set to print the first page of your document first.
Corrective Action
Configure the printer to print the document in reverse order, so the pages are in the correct order when printing is complete.
To set a Windows PC to print in reverse order:
1 On the Windows Desktop, click Start > Settings > Control Panel.
2 In the Control Panel window, open Printers or Printers and Faxes.
3 In the Windows Explorer window, Right-click on the Kodak All-in-One printer in the Name column, and then select Printing Preferences.
4 On the Printing Preferences window, select Print last page first on the General tab.
Multiple-page document not printing in first-page first order (Macintosh only)Probable Cause
The print settings on your computer are set to print the document in reverse order.
Corrective Action
Configure the printer to print the document first-page first.
Note: On a Macintosh, Reverse Page Order printing is the default setting. See “To set a Macintosh to print the first page of a document first:” below
Kodak ESP 9 Printer User Guide 91
Troubleshooting
To set a Macintosh to print the first page of a document first:
1 On the File menu, select Print.
2 On the Print dialog, select Paper Handling.
3 Select the Normal Page Order option.
PictBridge camera not detected
Probable Cause
The camera is not communicating with the printer.
Corrective Action
• Make sure the camera is turned on.
• Check the USB connections from the PictBridge camera to the printer.
• If disconnected, reconnect the USB cable from the PictBridge camera to the printer.
• Make sure the connected camera is PictBridge-compatible. See your camera or device user’s guide for details.
• Check the camera batteries.
Picture cropped
• Change the picture quality setting (or resolution) on your digital camera to 3:2. See your camera user’s guide for details.
• Adjust cropped photos using the Kodak Home Center software (Windows only) or other image editing software on your computer.
• If you are printing from an application on your computer, select the proper paper size from the printer options.
Picture print smudged
Probable Cause
Fingerprints are on the glossy side of paper.
Corrective Action
Handle paper by the edges.
Picture will not print
A selected picture does not print.
Note: Cropping may vary, depending on the selected picture size and size of the output paper. The dimensions of the photo on the camera are slightly different from each paper size so a portion will be cropped to fit perfectly on whatever paper size was selected.
92 Kodak ESP 9 Printer User Guide
Chapter 10
Probable Cause 1
• The image file may be corrupt.
Corrective Action
• Review the picture on the camera or computer and delete it if necessary.
Probable Cause 2
• The image file may not be in JPEG format.
Corrective Action
• The Kodak printer can print only JPEG files in stand-alone mode. Connect the printer to a computer and use software to print other image formats.
Poor print quality
Probable Cause
• Low resolution image file or the printer may need maintenance.
Corrective Action
• Align the printhead (see “Monitoring and adjusting the printer's performance” on page 75).
• Perform a nozzle check with the Home Center software.
• Clean the printhead from Home Center, or from the Maintenance menu on the printer control panel. If the printhead is clogged, the printouts should begin to improve with two or three cleanings. Repeat the cleaning cycle until the printout stops improving.
• If the problem still persists, you may need to replace the printhead (see “Replacing the printhead” on page 79.)
Print skewed or slanted
Probable Cause 1
The paper is not properly loaded in the tray..
Corrective Action
Realign the paper in the paper tray.
1 Remove paper and check for wrinkles and tears.
2 Slide the paper-width guide away from the paper.
3 Straighten the stack of paper against a flat surface, and reload it into the paper tray.
4 Slide the paper-width guide up against the edge of the paper.
Caution: Kodak Inkjet paper is recommended for your Kodak All-in-One printer.
Kodak ESP 9 Printer User Guide 93

Troubleshooting
Probable Cause 2
More than one type or size of paper is loaded.
Corrective Action
Load only one type or size of paper at a time.
Print spotted
Probable Cause
Paper may be dirty.
Corrective Action
Use a dry, lint-free cloth to wipe clean. For excessive dirt or debris, thoroughly clean the paper tray, and load new paper.
Print too dark
• Try retaking the picture with the flash on, or move within the flash range of the camera. Refer to your camera user’s guide for details.
• Adjust the exposure compensation on your camera, and try taking the picture again. Refer to your camera user’s guide for details.
• Edit the picture using Kodak Home Center (Windows only) or other image editing software.
• Make sure the printer is not placed in direct sunlight or is not operating in a high-temperature environment.
Print too light.
• Make sure the paper is loaded with the print side face down. Reload it if necessary.
• Try taking the picture again with the flash off. Refer to your camera user’s guide for details.
• Adjust the exposure compensation on your camera and try taking the picture again. Refer to your camera user’s guide for details.
• Edit the picture on your computer.
Note: When you are not using the printer, keep paper tray covers closed to keep dust and debris from collecting on the paper or inside the printer.
Caution: For best results, use Kodak paper and ink cartridges for your Kodak All-in-One printer.
94 Kodak ESP 9 Printer User Guide
Chapter 10
Printing slow
• Make sure the printer is not placed in direct sunlight or is not operating in a high-temperature environment (higher than 95° Fahrenheit or 35° Celsius).
• Close any unnecessary software applications.
• Make sure your computer meets the minimum system requirements. Upgrade your system if necessary.
Printing stops
Printing stops during mid-print. Paper stops feeding, and status light may blink.
To check the paper:
1 Remove any loose paper from the printer. Check the paper access door in the rear of the printer.
2 Inspect the paper supplies and reload with new paper if necessary.
3 Carefully “fan” the paper to keep the sheets from sticking together.
4 Reload the paper tray. Do not overload.
5 Press Start to continue
White edges on borderless prints
Probable Cause 1
White edges can appear when there are slight misalignments between the printer and paper. Some software applications are able to “hide” these small misalignments so that the prints look borderless.
Corrective Action
• Realign the paper in the tray.
• Use the application's Fit to Page/Fill Page option, or resize the picture so it is slightly larger than the paper size.
Probable Cause 2
If the image's proportions or dimensions are not compatible with the selected paper size, the print usually will not be borderless. For example, if a square image is printed on 4 x 6-inch paper, it will often print as a 4 x 4 inch image, with white edges on each side of the print job.
Note: When printing a large number of prints, printing may slow down to prevent the printhead from overheating..
Caution: For best results, use Kodak paper and ink cartridges for your Kodak All-in-One printer.
Kodak ESP 9 Printer User Guide 95

Troubleshooting
Corrective Action 2
Crop the image so it is compatible with the selected paper size.
Copy troubleshooting
Copy cut off
Probable Cause
The original is larger than the paper loaded.
Corrective Action
When the original is larger than the paper loaded, use the Fit to Page feature to reduce copy size to fit the size of the paper loaded.
Scan troubleshooting
Scan fails
Probable Cause 1
Your computer is not turned ON.
Corrective Action
Turn on your computer.
Probable Cause 2
Your Kodak printer is not connected to your computer.
Corrective Action
Connect your Kodak printer to your computer with a standard USB cable.
Probable Cause 3
The Kodak Home Center software is not installed.
Corrective Action
Insert the Kodak printer installation CD and install the software.
Probable Cause 4
Your computer system resources may be low.
Corrective Action
• Turn off your computer and the printer, and then turn them back on.
• If the problem still persists, try scanning at a lower resolution.
96 Kodak ESP 9 Printer User Guide

Chapter 10
Probable cause 5
The memory card you are scanning to does not have enough free space to save the scanned photo.
Corrective action
Remove some files from the memory card to free up some space.
Scanned image blank
Probable Cause
Your original is not placed correctly on the scanner glass.
Corrective Action
Place your original face down in the proper corner of the scanner glass.
Network troubleshooting
Wired network troubleshooting
Computer unable to detect the All-in-One printerProbable Cause 1
Cables are not connected properly.
Corrective Action
Check the following cables to ensure they are properly connected.
• Cables between the hub or router and your computer
• Cables between the All-in-One printer and the hub or router
• Cables to and from your modem or printer Internet connection (if applicable)
Probable Cause 2
Your Local Area Network card (LAN card) is not set up properly.
Corrective Action
Verify the setup of your LAN card.
To check your LAN card (Windows)
1 Open the Control Panel.
2 Double-click System.
3 In the System Properties dialog box, click the Hardware tab.
4 Click Device Manager.
Kodak ESP 9 Printer User Guide 97
Troubleshooting
5 Make sure your card shows up under Network Adapters.
6 Refer to the documentation that came with your card.
To check your LAN card (Macintosh)
1 Click the Apple icon on the Menu bar.
2 Select About This Mac and then click More Info. The System Profiler is displayed.
3 In the System Profiler, click Network.
4 Make sure your LAN card appears in the list.
Probable Cause 3
You do not have an active network connection.
Corrective Action
Check to see if you have an active network connection.
To see if you have an active network connection
Check the two Ethernet indicator lights on the top and bottom of the RJ-45 Ethernet jack on the back of the printer. The lights indicate the following:
To establish an active network connection
1 Check the cable connections from the All-in-One printer to your gateway, router, or hub to ensure connections are secure.
2 If the connections are secure, turn off the power on the All-in-One printer, and then turn it on again. Press the On/Off button on the control panel to turn the printer off, and press it again to turn it back on. Also, turn off the power on your router or hub, and then turn it on again.
No TCP/IPProbable Cause
Your Local Area Network (LAN) card is not installed properly.
Corrective Action
Make sure your LAN card is installed properly and set up for TCP/IP. See the instructions that came with your LAN card.
Top light If this light is a solid green, the device is properly connected to the network, and communications have been established. If the top light is off, there is no network connection.
Bottom light This yellow light flashes when data is being sent or received by the device over the network.
98 Kodak ESP 9 Printer User Guide

Chapter 10
Printer not foundProbable Cause 1
The All-in-One printer is not turned on.
Corrective Action
Turn on the printer.
Probable Cause 2
You do not have an active network connection.
Corrective Action
Make sure you have an active network connection.
To make sure your network connection is active
1 If the connections are secure, turn off the power on the All-in-One printer, and then turn it on again. Press the On/Off button on the control panel to turn the printer off, and press it again to turn it back on. Also, turn off the power on your router or hub, and then turn it on again.
2 Check the cable connections from the printer to your gateway, router, or hub to ensure connections are secure.
3 Make sure the printer is connected to the network with a CAT-5 or better Ethernet cable.
Probable Cause 3
Cables are not connected properly.
Corrective Action
Check the following cables to ensure they are connected properly.
• Cables between the All-in-One printer and the hub or router
• Cables between the hub or router and your computer
• Cables to and from your modem or printer Internet connection (if applicable)
Probable Cause 4
A firewall, anti-virus, or anti-spyware application is preventing the printer from accessing your computer.
Corrective Action
Uninstall the All-in-One printer software, and then reboot your computer. Temporarily disable the firewall, anti-virus, or anti-spyware, and then reinstall the printer software. You can re-enable your firewall, anti-virus, or anti-spyware application after installation is complete. If you see firewall pop-up messages, you must accept or allow the pop-up messages. For more information, see the documentation provided with the firewall software.
Kodak ESP 9 Printer User Guide 99
Troubleshooting
Probable Cause 5
A Virtual Private Network (VPN) is preventing the printer from accessing your computer.
Corrective Action
Try temporarily disabling the VPN before proceeding with the installation.
Probable Cause 6
The Ethernet cable is not plugged in to the router, switch, or hub. The cable may also be defective.
Corrective Action
Try reinserting the cables. Or, if necessary, try a different cable.
Probable Cause 7
The All-in-One printer is assigned an AutoIP address instead of DHCP.
Corrective Action
This indicates that the printer is not connected properly to the network. Check the following:
• Make sure all cables are connected properly and securely.
• If the cables are connected properly, your access point, router, or home gateway might not be sending an address. If this is the case, you might need to reset the device.
• Make sure the All-in-One printer is on the correct network.
• Restart your All-in-One printer.
Probable Cause 8
The printer is on the wrong Subnet or gateway.
Corrective Action
Print a network configuration page, and verify that the router and printer are on the same subnet and gateway.
To print the network configuration page
1 On the control panel of the printer, press Menu.
2 Press until Network Settings is highlighted, and then press OK.
3 Press until Print Network Configuration is highlighted, and then press OK.
Note: The All-in-One printer functionality will be limited during VPN sessions.
100 Kodak ESP 9 Printer User Guide
Chapter 10
No IP address with cable modem (without a router)Probable Cause
If you have a computer with a cable modem, a separate Local Area Network (LAN) for your other computers, and no DHCP or router, you must use AutoIP to assign IP addresses to the other computers and to the printer.
Corrective Action
To obtain an IP address for the computer with the cable modem
Your Internet Service Provider (ISP) assigns either a static or dynamic IP address to the computer with the cable modem.
To assign IP addresses to the remaining computers and the All-in-One printer
Use AutoIP to assign IP addresses to the remaining computers and the printer. Do not assign a static IP address.
Wireless troubleshooting
No SSIDProbable Cause 1
Your access point is not broadcasting its network name (SSID) because the Broadcast SSID option is turned off.
Corrective Action
Access the Embedded Web Server and turn on the Broadcast SSID option.
Probable Cause 2
The access point (infrastructure) or computer (ad hoc) is out of range.
Corrective Action
In order to establish a good signal between the printer and access point (infrastructure) or computer (ad hoc), try doing the following things separately or in combination.
• If there is a long distance between your computer or access point and the printer, move them closer together.
• If there are metal objects (such as a metal bookcase or refrigerator) in the transmission path, clear the path between the printer and the computer or access point.
• If a cordless telephone, microwave, or other device that emits radio signals transmitting at 2.4 GHz is nearby, move it farther away to reduce radio interference.
Kodak ESP 9 Printer User Guide 101
Troubleshooting
Probable Cause 3
The SSID is not visible because it is at the bottom of the list.
Corrective Action
Press to scroll to the bottom of the list. Infrastructure entries are listed first and ad hoc entries last.
Probable Cause 4
The access point firmware needs updating.
Corrective Action
Check for firmware updates for your access point on the manufacturer's Web site. Update the firmware on the access point.
Probable Cause 5
Your wireless adapter on your computer is not broadcasting the SSID (ad hoc).
Corrective Action
Verify that the wireless adapter is broadcasting the SSID. Print a network configuration page from the All-in-One printer, and verify that the SSID for the wireless adapter appears on the network configuration page. If the wireless adapter is not broadcasting the SSID, see the documentation that came with your computer.
Probable Cause 6
The firmware for the wireless adapter on your computer needs updating (ad hoc).
Corrective Action
Check for firmware updates for your wireless adapter on the manufacturer's Web site, and then update the firmware.
Probable Cause 7
An Ethernet cable is connected to the printer.
Note: Devices like wireless speakers or wireless gaming accessories can emit radio interference at 2.4 GHz. You can verify this on your wireless desktop or laptop computer by viewing sporadic signal bars in your WiFi status utility. Repositioning your computer away from these sources of signal interference can improve your computer network performance. For example:
• Do place the AP/router in a central room.
• Do not place wireless entertainment devices between the AP/router and wireless computer.
• Do not place wireless entertainment devices between the AP/router and WiFi All-in-One printer.
102 Kodak ESP 9 Printer User Guide
Chapter 10
Corrective Action
Unplug the Ethernet cable.
Weak signalProbable Cause
The access point is too far away or there is interference.
Corrective Action
• If there is a long distance between your computer or access point and the printer, move them closer together.
• If there are metal objects (such as a metal bookcase or refrigerator) in the transmission path, clear the path between the printer and the computer or access point.
• If a cordless telephone, microwave, or other device that emits radio signals transmitting at 2.4 GHz is nearby, move it farther away to reduce radio interference. See Note on page page 105.
Cannot connect to networkProbable Cause 1
The equipment is not turned on.
Corrective Action
Turn on the networked devices, such as the access point for an infrastructure network, or the computer for an ad hoc network. For more information on how to turn on the access point, see the documentation that came with your access point.
Probable Cause 2
The All-in-One printer is not receiving a signal.
Corrective Action
Move the access point and the printer closer together. Then go through setup again.
Probable Cause 3
You have entered the SSID incorrectly.
Corrective Action
Enter the SSID correctly. Remember that the SSID is case-sensitive.
Probable Cause 4
You have entered the WEP key incorrectly.
Corrective Action
Enter the WEP key correctly. Remember that the WEP key is case-sensitive.
Kodak ESP 9 Printer User Guide 103
Troubleshooting
Probable Cause 5
The wireless settings on the printer do not match the wireless settings of your access point.
Corrective Action
Print a network configuration page to compare the wireless settings of the printer with the wireless settings for your access point. Change either the device or access point settings so that both the printer and the access point have matching wireless settings.
Probable Cause 6
You entered the wrong mode (ad hoc or infrastructure) or security type.
Corrective Action
Enter the correct mode or security type. Print a network configuration page to compare the wireless settings of the printer with the wireless settings for your access point. Change either the device or access point settings so that both the printer and the access point have matching wireless settings.
Probable Cause 7
MAC filtering is enabled on your access point.
Corrective Action
Keep MAC filtering enabled, but change the settings to allow the access point to communicate with the printer.
Unsupported authentication or encryption typeProbable Cause
Your network is configured with an authentication protocol not supported by the Kodak All-in-One printer.
Corrective Action
Open the Embedded Web Server of your access point and change the security settings. Use one of the supported protocol types.
Invalid WEP KeyProbable Cause 1
An invalid WEP key was entered.
Note: Types not supported include WPS, WPA2-Enterprise, LEAP, PEAP, EAP-MD5, EAP-TLS, and EAP-TTLS.
104 Kodak ESP 9 Printer User Guide
Chapter 10
Corrective Action
If you do not know the WEP key, see the documentation that came with your access point/router. The WEP key is stored within the access point. Usually you can find the WEP key by logging on to the Embedded Web Server of your access point through your computer.
Probable Cause 2
The WEP key index setting of your access point does not match the WEP key index setting of the All-in-One printer.
Corrective Action
The printer is looking for a WEP key index of 1. If the WEP key index setting was changed on the access point, open the Embedded Web Server for the printer and update the index setting to match the index setting of your access point. Once you've updated the index setting on the printer, repeat the setup procedure.
Invalid WPA PassphraseProbable Cause
You have entered the WPA passphrase incorrectly.
Corrective Action
Enter the correct passphrase. Make sure it has between 8 and 63 characters, and matches the passphrase programmed in the access point (case sensitive).
Another device connected to the access pointProbable Cause
Another device in the vicinity connected to your access point before the All-in-One printer was able to connect.
Corrective Action
Cancel the setup and start over.
Note: Some access points provide more than one WEP key. Make sure you use the first WEP key (index 1) when setting up your wireless network.
Kodak ESP 9 Printer User Guide 105

Troubleshooting
106 Kodak ESP 9 Printer User Guide
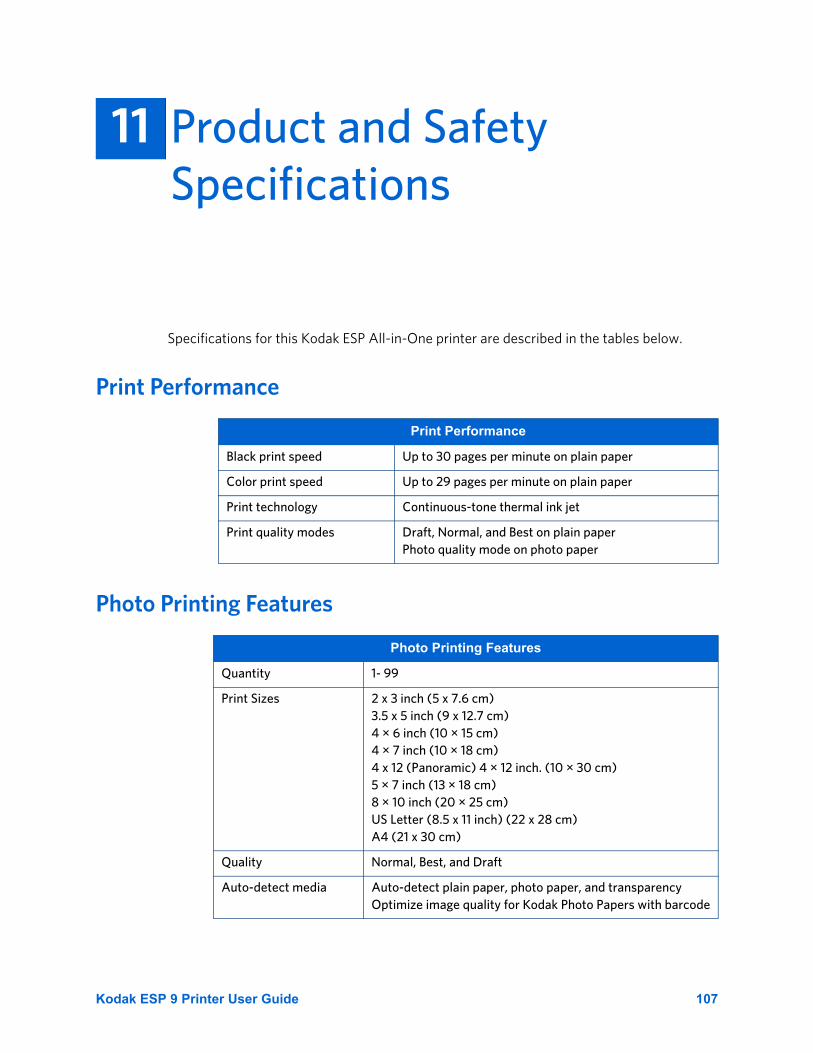
Specifications for this Kodak ESP All-in-One printer are described in the tables below.
Print Performance
Photo Printing Features
11 Product and Safety Specifications11
Print Performance
Black print speed Up to 30 pages per minute on plain paper
Color print speed Up to 29 pages per minute on plain paper
Print technology Continuous-tone thermal ink jet
Print quality modes Draft, Normal, and Best on plain paperPhoto quality mode on photo paper
Photo Printing Features
Quantity 1- 99
Print Sizes 2 x 3 inch (5 x 7.6 cm)3.5 x 5 inch (9 x 12.7 cm)4 × 6 inch (10 × 15 cm)4 × 7 inch (10 × 18 cm)4 x 12 (Panoramic) 4 × 12 inch. (10 × 30 cm)5 × 7 inch (13 × 18 cm)8 × 10 inch (20 × 25 cm)US Letter (8.5 x 11 inch) (22 x 28 cm)A4 (21 x 30 cm)
Quality Normal, Best, and Draft
Auto-detect media Auto-detect plain paper, photo paper, and transparencyOptimize image quality for Kodak Photo Papers with barcode
Kodak ESP 9 Printer User Guide 107
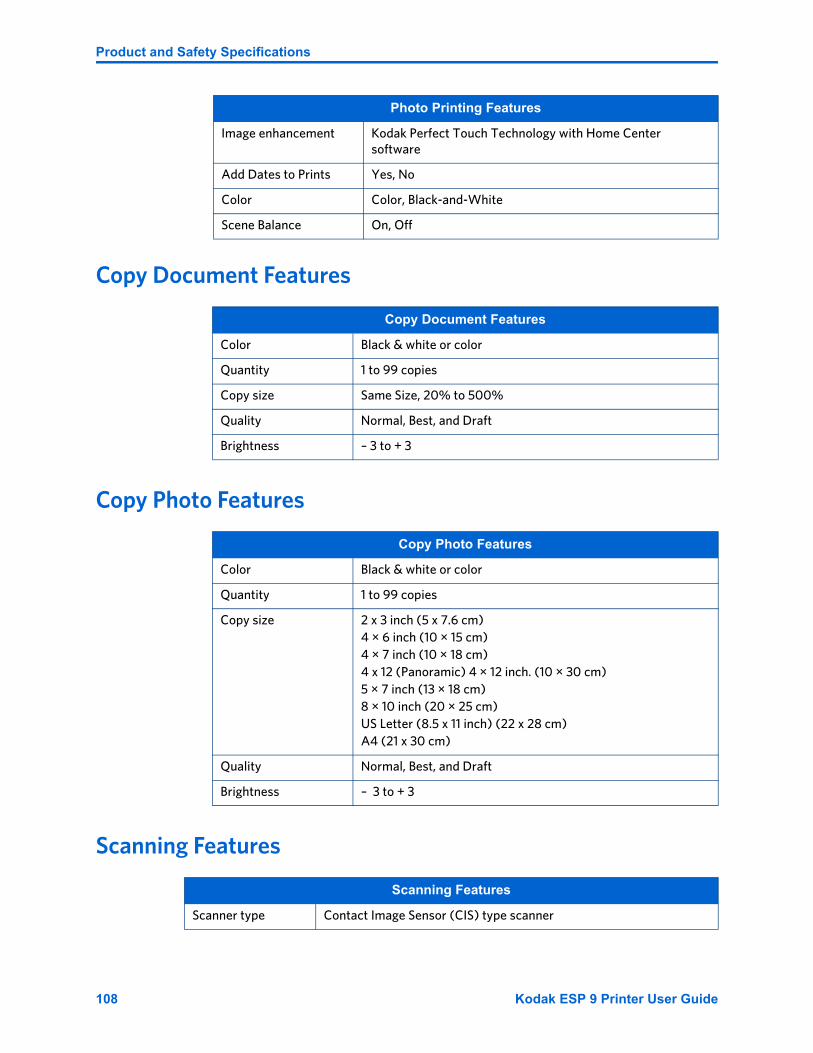
Product and Safety Specifications
Copy Document Features
Copy Photo Features
Scanning Features
Image enhancement Kodak Perfect Touch Technology with Home Center software
Add Dates to Prints Yes, No
Color Color, Black-and-White
Scene Balance On, Off
Copy Document Features
Color Black & white or color
Quantity 1 to 99 copies
Copy size Same Size, 20% to 500%
Quality Normal, Best, and Draft
Brightness – 3 to + 3
Copy Photo Features
Color Black & white or color
Quantity 1 to 99 copies
Copy size 2 x 3 inch (5 x 7.6 cm)4 × 6 inch (10 × 15 cm)4 × 7 inch (10 × 18 cm)4 x 12 (Panoramic) 4 × 12 inch. (10 × 30 cm)5 × 7 inch (13 × 18 cm)8 × 10 inch (20 × 25 cm)US Letter (8.5 x 11 inch) (22 x 28 cm)A4 (21 x 30 cm)
Quality Normal, Best, and Draft
Brightness – 3 to + 3
Scanning Features
Scanner type Contact Image Sensor (CIS) type scanner
Photo Printing Features
108 Kodak ESP 9 Printer User Guide
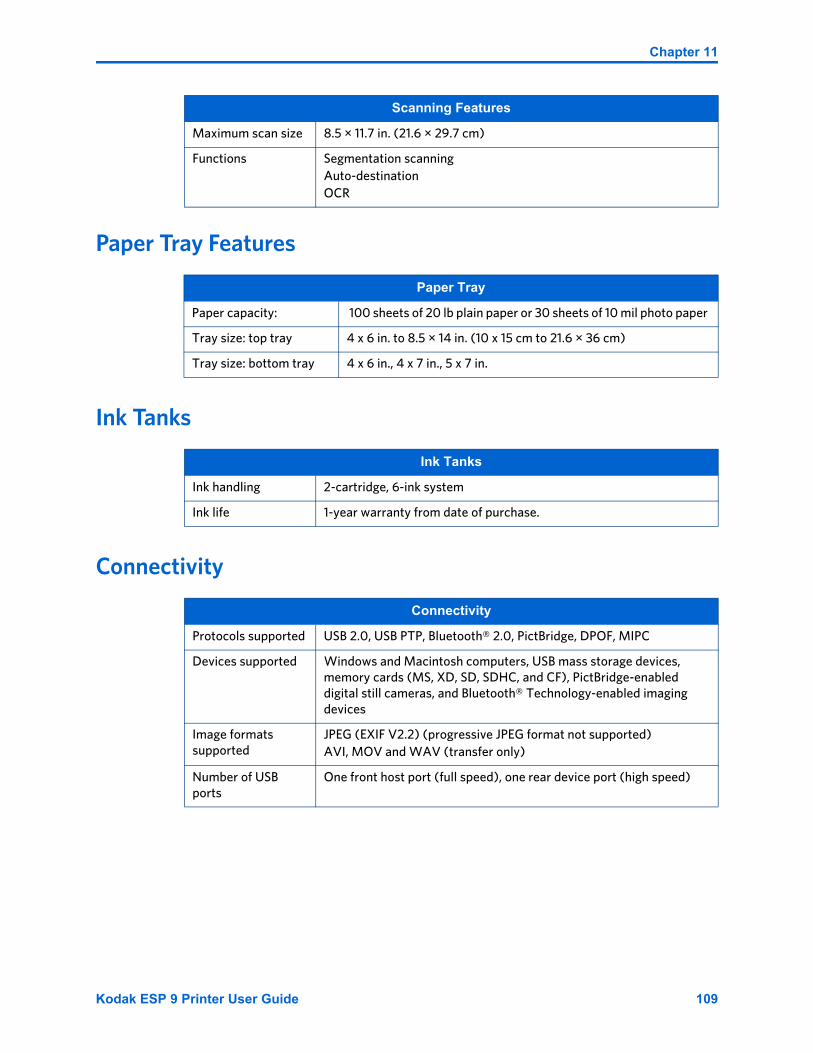
Chapter 11
Paper Tray Features
Ink Tanks
Connectivity
Maximum scan size 8.5 × 11.7 in. (21.6 × 29.7 cm)
Functions Segmentation scanningAuto-destinationOCR
Paper Tray
Paper capacity: 100 sheets of 20 lb plain paper or 30 sheets of 10 mil photo paper
Tray size: top tray 4 x 6 in. to 8.5 × 14 in. (10 x 15 cm to 21.6 × 36 cm)
Tray size: bottom tray 4 x 6 in., 4 x 7 in., 5 x 7 in.
Ink Tanks
Ink handling 2-cartridge, 6-ink system
Ink life 1-year warranty from date of purchase.
Connectivity
Protocols supported USB 2.0, USB PTP, Bluetooth® 2.0, PictBridge, DPOF, MIPC
Devices supported Windows and Macintosh computers, USB mass storage devices, memory cards (MS, XD, SD, SDHC, and CF), PictBridge-enabled digital still cameras, and Bluetooth® Technology-enabled imaging devices
Image formats supported
JPEG (EXIF V2.2) (progressive JPEG format not supported)AVI, MOV and WAV (transfer only)
Number of USB ports
One front host port (full speed), one rear device port (high speed)
Scanning Features
Kodak ESP 9 Printer User Guide 109

Product and Safety Specifications
Software Support
Physical Specifications
Warranty
System Requirements
The following specifications are subject to change without notice.
Software Support
Application support
Third-party image management applications or Kodak EasyShare Software for photos; optical character reader (OCR) support for documents
Media support Plain paper, photo paper, envelopes, greeting cards, transparencies, labels, t-shirt transfers
Scanner support TWAIN and WIA import, including EasyShare Software, segmentation scanning
File transfer support
Automatic color, contrast, sharpness improvements upon transfer to PC
Update support Software and firmware updates available through web support
Physical Specifications
Power US: 110–120 VAC, 60 HzWW: 110–240 VAC, 50–60 Hz Output: 36 VDC24V AC adapter (100-240 VAC 50/60 Hz)
Dimensions 445mm x 254mm x 427mm[W × H x D] (17.52 inches x 10.0 inches x 16.81 inches)
Weight 10kg (22 lbs)
Operating range 5°C (41°F) to 35°C (95°F), 15 to 85 % RH (non-condensing), and atmospheric pressure to approximately 10,000 ft ASL)
Full IQ environmental range
15°C (59°F) to 30°C (86°F), and 20 to 80 % RH
Warranty
Product One year from purchase (with proof of purchase).
Printhead One year from purchase (with proof of purchase).
110 Kodak ESP 9 Printer User Guide
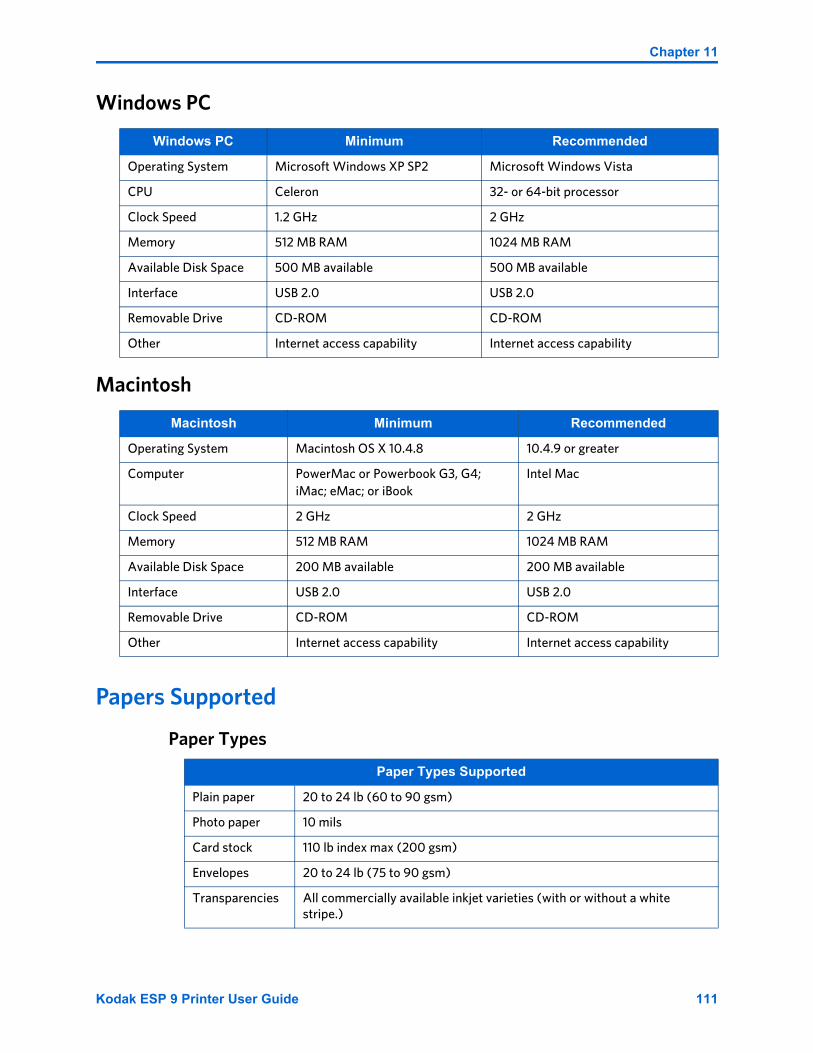
Chapter 11
Windows PC
Macintosh
Papers Supported
Paper Types
Windows PC Minimum Recommended
Operating System Microsoft Windows XP SP2 Microsoft Windows Vista
CPU Celeron 32- or 64-bit processor
Clock Speed 1.2 GHz 2 GHz
Memory 512 MB RAM 1024 MB RAM
Available Disk Space 500 MB available 500 MB available
Interface USB 2.0 USB 2.0
Removable Drive CD-ROM CD-ROM
Other Internet access capability Internet access capability
Macintosh Minimum Recommended
Operating System Macintosh OS X 10.4.8 10.4.9 or greater
Computer PowerMac or Powerbook G3, G4;iMac; eMac; or iBook
Intel Mac
Clock Speed 2 GHz 2 GHz
Memory 512 MB RAM 1024 MB RAM
Available Disk Space 200 MB available 200 MB available
Interface USB 2.0 USB 2.0
Removable Drive CD-ROM CD-ROM
Other Internet access capability Internet access capability
Paper Types Supported
Plain paper 20 to 24 lb (60 to 90 gsm)
Photo paper 10 mils
Card stock 110 lb index max (200 gsm)
Envelopes 20 to 24 lb (75 to 90 gsm)
Transparencies All commercially available inkjet varieties (with or without a white stripe.)
Kodak ESP 9 Printer User Guide 111
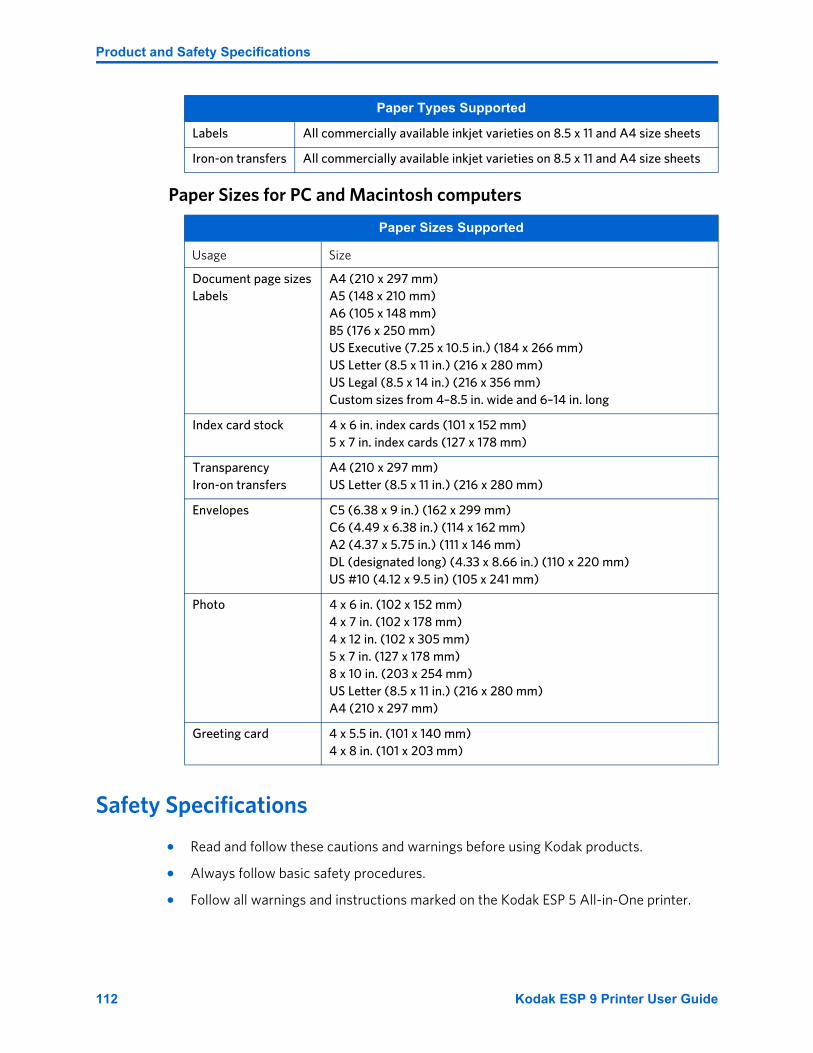
Product and Safety Specifications
Paper Sizes for PC and Macintosh computers
Safety Specifications
• Read and follow these cautions and warnings before using Kodak products.
• Always follow basic safety procedures.
• Follow all warnings and instructions marked on the Kodak ESP 5 All-in-One printer.
Labels All commercially available inkjet varieties on 8.5 x 11 and A4 size sheets
Iron-on transfers All commercially available inkjet varieties on 8.5 x 11 and A4 size sheets
Paper Sizes Supported
Usage Size
Document page sizesLabels
A4 (210 x 297 mm)A5 (148 x 210 mm)A6 (105 x 148 mm)B5 (176 x 250 mm)US Executive (7.25 x 10.5 in.) (184 x 266 mm)US Letter (8.5 x 11 in.) (216 x 280 mm)US Legal (8.5 x 14 in.) (216 x 356 mm)Custom sizes from 4–8.5 in. wide and 6–14 in. long
Index card stock 4 x 6 in. index cards (101 x 152 mm)5 x 7 in. index cards (127 x 178 mm)
TransparencyIron-on transfers
A4 (210 x 297 mm)US Letter (8.5 x 11 in.) (216 x 280 mm)
Envelopes C5 (6.38 x 9 in.) (162 x 299 mm)C6 (4.49 x 6.38 in.) (114 x 162 mm)A2 (4.37 x 5.75 in.) (111 x 146 mm)DL (designated long) (4.33 x 8.66 in.) (110 x 220 mm)US #10 (4.12 x 9.5 in) (105 x 241 mm)
Photo 4 x 6 in. (102 x 152 mm)4 x 7 in. (102 x 178 mm)4 x 12 in. (102 x 305 mm)5 x 7 in. (127 x 178 mm)8 x 10 in. (203 x 254 mm)US Letter (8.5 x 11 in.) (216 x 280 mm)A4 (210 x 297 mm)
Greeting card 4 x 5.5 in. (101 x 140 mm)4 x 8 in. (101 x 203 mm)
Paper Types Supported
112 Kodak ESP 9 Printer User Guide
Chapter 11
Parts
Power
Location
Caution: Do not disassemble this product; there are no user-serviceable part(s) inside. Refer servicing to Kodak’s qualified service personnel.
Warning: Keep out of reach of children. Ink may be harmful if swallowed.
Caution: If the power cord or plug is frayed or damaged, the equipment gets wet, or the equipment does not operate normally when the operating instructions are followed, unplug your printer from the power outlet and have qualified service personnel service your printer.
Caution: The alternating current (AC) adapter power supply is equipped with a three-wire grounding type plug. If you cannot insert the plug into the power outlet, contact an electrician to check or replace the power outlet.
Caution: For added protection from damage during a lightning storm, or when your printer and its associated alternating current (AC) adapter are unused for long periods of time, unplug the AC adapter from the power outlet.
Warning: Pushing objects through the equipment openings can result in an electric shock or fire.
Caution: Do not plug the alternating current (AC) adapter into a household extension cord.
Warning: The use of an accessory not recommended by Kodak could cause fire, an electric shock, or injury.
Caution: To prevent your printer from overheating, do not block or cover the slots and openings in the equipment, place it near a heat register, or install it in a cabinet without proper ventilation.
Caution: Do not use your printer near water, or spill liquid on it.
Kodak ESP 9 Printer User Guide 113
Product and Safety Specifications
Environment
For more information, go to www.Kodak.com/go/MSDS.
Regulatory Compliance
FCC Compliance and Advisory
This equipment has been tested and found to comply with the limits for a Class B digital device, pursuant to Part 15 of the FCC Rules. These limits are designed to provide reasonable protection against harmful interference in a residential installation.
This equipment generates, uses, and can radiate radio frequency energy and, if not installed or used in accordance with the instructions, may cause harmful interference to radio communications. However, there is no guarantee that interference will not occur in a particular installation.
Warning: Do not place your printer on an unstable cart, stand, bracket, or table; this risks damaging the equipment and injuring people.
Caution: Excessive dust levels may damage internal parts.
Caution: Unplug the equipment from the electrical outlet before cleaning.
Caution: Dropping your printer may damage the housing and result in extensive damage that will require replacement or repair by a qualified technician to restore normal operation.
Warning: Do not expose this product to liquid, moisture, or extreme temperatures. Kodak alternating current (AC) adapters are intended for indoor use only. The use of controls, adjustments, or procedures other than those specified herein may result in exposure to shock and/or electrical or mechanical hazards.
Caution: Adjust only those controls covered in the user guide or setup instructions.
114 Kodak ESP 9 Printer User Guide

Chapter 11
If this equipment does cause harmful interference to radio or television reception, which can be determined by turning the equipment off and on, you are encouraged to try to correct the interference by one or more of the following measures: 1) reorient or relocate the receiving antenna; 2) increase the separation between the equipment and the receiver; 3) connect the equipment to a different outlet (on a circuit) than the one the receiver is connected to; 4) consult the dealer or an experienced radio/TV technician for additional suggestions.
Any changes or modifications not expressly approved by the party responsible for compliance could void the user's authority to operate the equipment.
Any changes or modifications not expressly approved by the party responsible for compliance could void the user's authority to operate the equipment. To ensure compliance with FCC regulations, use only the shielded interface cables provided with the product, or additional specified components or accessories that can be used with the installation of the product.
FCC and Industry Canada
This device complies with RSS-210 of the Industry Canada Rules. Operation is subject to the following two conditions:
1 This device may not cause interference.
2 This device must accept any interference, including interference that may cause undesired operation of the device
This device has been designed to operate with an antenna having a maximum gain of 1.8dB.
Antenna having a higher gain is strictly prohibited per regulations of Industry Canada. The required antenna impedance is 50 ohms.
To reduce potential radio interference to other users, the antenna type and its gain should be so chosen that the EIRP is not more than required for successful communication.
IC Radiation Exposure Statement
IMPORTANT NOTE: This equipment complies with IC radiation exposure limits set forth for an uncontrolled environment. This equipment should be installed and operated with minimum distance 20 cm between the radiator and your body.
Canadian DOC StatementDOC Class B Compliance—This Class B digital apparatus complies with Canadian ICES-003.
Caution: When using the Bluetooth interface with a Kodak printer, the transmitter must not be collocated or operated in conjunction with any other antenna or transmitter.
Kodak ESP 9 Printer User Guide 115

Product and Safety Specifications
Observation des normes-Class B—Cet appareil numérique de la classe B est conforme à la norme NMB-003 du Canada.
German Compliance Statement
Noise emissions for this equipment do not exceed 70 dBa.
This equipment is not intended for use in the work place in accordance with BildscharbV regulations.
“Das Gerät ist nicht für die Benutzung am Bildschirmarbeitsplatz gemäß BildscharbV vorgesehen.”
Waste Electrical and Electronic Equipment Labeling
Caution: There is a risk of explosion if the battery is replaced by an incorrect type. Dispose of used batteries according to the instructions. Contact your local Kodak representative or refer to www.kodak.com/go/recycle for additional information on the collection and recovery programs for batteries.
Achtung Explosionsrisiko wenn die Batterie durch einen inkorrekten Typen ersetzt wird. Entsorgung der Batterie gemäss der Gebrauchsanweisung. Bitte kontaktieren Sie Ihren lokalen Kodak Repräsentanten oder www.kodak.com/go/recycle für mehr Informationen über das Sammeln und Wiederverwerten von Batterien.
In the European Union, this symbol indicates that when the last user wishes to discard this product, it must be sent to appropriate facilities for recovery and recycling. Contact your local Kodak representative or refer to www.kodak.com/go/recycle for additional information on the collection and recovery programs available for this product.
116 Kodak ESP 9 Printer User Guide

AAd hoc The Kodak All-in-One printer communicates directly with each device on the network. No wireless access point is used. This is also called a peer-to-peer network. On an Apple Macintosh, ad hoc is called computer-to-computer.
All-in-One printer All-in-One printer
BBluetooth An industrial specification for wireless personal area networks (PANs). Bluetooth provides a way to connect and exchange information between devices such as mobile phones, laptops, PCs, printers, digital cameras, and video game consoles over a secure, globally unlicensed short-range radio frequency. The Bluetooth specifications are developed and licensed by the Bluetooth Special Interest Group.
CComputer-to-computer See Ad hoc.
DDPI dots per inch
DPOF Digital Print Order File. This file allows the user of a digital camera to define which captured images on the storage card are to be printed, together with information on the number of copies or other image information such as paper size, image title text, image orientation, contact information and more.
EESP EasyShare Printer
Ethernet A family of computer networking technologies for local area networks (LANs). It defines a number of wiring and signaling standards of network access at the Media Access Control (MAC)/Data Link Layer, and a common addressing format.
A Glossary
Kodak ESP 9 Printer User Guide 117
Glossary
EXIF Exchangeable Image File Format. A standard for storing interchange information in image files, especially those using JPEG compression. Most digital cameras now use the EXIF format.
Gateway Address A node on a network that serves as an entrance to another network. A node in this instance can be a computer or some other device.The address of the default gateway is assigned by the installation software, unless you have already set a manual IP address.
HHostname The TCP/IP name assigned to the device by the installation software.
IInfrastructure The Kodak All-in-One printer communicates with other network devices through a wireless access point, such as a wireless router or base station.
IP Address Internet Protocol address. This address uniquely identifies the device on the network. IP addresses are assigned dynamically through DHCP or AutoIP. Static IP addresses can be set up. An invalid IP address during installation will prevent your network components from seeing the Kodak All-in-One printer
JJPEG Joint Photographic Experts Group. The name of the committee that developed the image file format. JPEG is a compressed image file format. JPEG is a “lossy” format, which means some quality is lost when the image is compressed.
KKodak Perfect Touch Automatically corrects for common image flaws and “mistakes,” such as shadows, and backlighting. Kodak Perfect Touch technology also enhances the desirable qualities of pictures, for vibrant color and richer detail. This feature is available when scanning or copying pictures. Color restoration and Kodak Perfect Touch can be used together to enhance pictures. This feature is not available when scanning black and white pictures.
KPT Kodak Perfect Touch.
MMAC Media Access Control. The Media Access Control address identifies the Kodak All-in-One printer. This is a unique 12-digit identification number assigned to networking hardware for identification, including routers, switches, and other such devices. No two pieces of hardware have the same MAC address. Some Internet service providers (ISPs) require that you register the MAC address of the Network Card or LAN Adapter that was connected to your cable or DSL modem during installation.
118 Kodak ESP 9 Printer User Guide
Chapter A
NNetwork Configuration The protocol used to assign the IP address to the device. For this Kodak All-in-One printer, the network configuration is:
• AutoIP: The installation software automatically determines the configuration parameters.
• DHCP: The configuration parameters are supplied by a dynamic host configuration protocol (DHCP) server on the network. On small networks, this could be a router.
• Manual: The configuration parameters are set manually, such as a static IP address.
• Not Specified: The mode used when the Kodak All-in-One printer is initializing.
OOCR Optical character recognition.
PPeer-to-peer network See ad hoc.
PictBridge A Camera and Imaging Products Association standardized technology that allows printing of images between any PictBridge compliant digital camera and any PictBridge compliant printer. Thus, you can print from a memory card in a digital camera directly to a printer, regardless of brand. No computer is necessary. Each device is automatically recognized by the other. The camera compares its PictBridge functions to the functions of the printer. The camera then displays the supported functions on menus on the LCD display or in the viewfinder. Once a PictBridge digital camera is connected to a compliant printer, print options appear on the camera monitor (LCD). The camera menu system is used to select settings such as print size, layout, media type, and date. You can print a single image displayed on the camera, print two or more images, or print all of the images on the memory card. You can print part of an image by first cropping it within the camera and even create index prints (contact sheets). To find out if a camera or printer is PictBridge compatible, look for the PictBridge logo on the packaging or check the manual for specifications.
PTP Picture Transfer Protocol. A standard for transferring pictures from a digital camera.
RRed Eye The red-eye effect in flash photography is caused by the light from the flash reflecting off the blood vessels and interior eye tissue in humans. Animal eye glow from reflections is caused by a different internal eye structure, which is much like a mirror. When not enough time elapses between the flash and exposure (as with most compact cameras), the light of the flash occurs too fast for the iris of the eye to close the pupil. The flash of light is focused by the lens of the eye onto the blood-rich retina at the back of the
Kodak ESP 9 Printer User Guide 119

Glossary
eye. The image of the illuminated retina is then focused by the lens of the eye back to the camera, resulting in a red appearance of the eye on the picture.
SSSID Service Set Identifier: A unique identifier (up to 32 characters) that differentiates one wireless local area network (WLAN) from another. The SSID is also known as the network name. The name of the network to which the Kodak All-in-One printer is connected is called its SSID.
Speed The speed at which data is transmitted over a network. Speeds include 10TX-Full, 10TX-Half, 100TX-Full, and 100TX-Half.
Subnet Mask A subnet is an IP address assigned by the installation software to make an additional network available as part of a larger network. Subnets are specified by a subnet mask. This mask determines which of the Kodak All-in-One printer IP address bits identify the network and subnet, and which bits identify the device itself. Kodak recommends that the All-in-One printer and the computers that use it all reside on the same subnet.
TTagged Images See DPOF.
UUSB Universal Serial Bus. A connection protocol between a peripheral device and a computer, allowing electronic data/signals to be transmitted back and forth. It is used commonly to connect a portable storage device such, as a “thumb” or “flash” drive, to a PC or Macintosh desktop or laptop computer. The Kodak All-in-One printer has a USB port on the front panel for external USB devices to plug into, and another one on the back panel to connect the printer to a computer via a USB cable.
WWEP Wired Equivalent Privacy. A deprecated algorithm to secure wireless networks. Wireless networks broadcast messages using radio, so are more susceptible to eavesdropping than wired networks. WEP was intended to provide confidentiality comparable to that of a traditional wired network.
WiFi Wireless Fidelity. A common “shorthand” name for wireless computer networking.
WPA Wi-Fi Protected Access. A class of systems to secure wireless (Wi-Fi) computer networks. WPA is designed to work with pre-WPA wireless network interface cards (through firmware upgrades), but not necessarily with first generation wireless access points. WPA2 implements the full standard, but will not work with some older network cards.
120 Kodak ESP 9 Printer User Guide

Chapter A
WPS Wireless Provisioning Services. A standards-based and integrated platform to provide secure WiFi hotspots. WPS enables enterprises to easily provide guest access with enhanced security to private wireless Internet and corporate networks.
Kodak ESP 9 Printer User Guide 121

Glossary
122 Kodak ESP 9 Printer User Guide
When you contact Kodak Customer Support for All-in-One printer assistance, the service representative may ask you for some background information, as well as information about your specific issue. If you can have ready access to it, it may save you time.
Useful for the Kodak service technician:
• Kodak Service Number (located inside or on the outside of the printer)
• Printer model number (located on back of the printer).
• Control panel error message, if any
• A printed test page (see “Monitoring and adjusting the printer's performance” on page 75)
• Computer model and operating system
• Computer processor type and speed (MHz)
• Amount of computer memory (RAM) and free hard disk space • Exact Home Center error message received, if applicable
Windows PC only:
• Exact printer error message received in the printer status monitor
• Version of Kodak Home Center software. (From the Home Center Help panel, click
the Info button to view the About box)
B If you need to call Customer Support
Kodak ESP 9 Printer User Guide 123

If you need to call Customer Support
124 Kodak ESP 9 Printer User Guide
Symbols.jpg . . . . . . . . . . . . . . . . . . . . . . . . . . . . . . . . . . . 62.pdf files . . . . . . . . . . . . . . . . . . . . . . . . . . .61, 64.rtf files . . . . . . . . . . . . . . . . . . . . . . . . . . . .61, 64*70. See Call-Waiting Disable Code
Numerics1111 See Personal identification number2.0 USB See USB234. See Fax Auto-Answer4-way navigation buttons . . . . . . . . . . . . 9, 128-in-1 card reader See Kodak
AAborting See CancelAd hoc, definition . . . . . . . . . . . . . . . . . . . . . 121Add Date to Prints . . . . . . . . . . . . . . . . . . . . 49Add Fax Phonebook entry . . . . . . . . . . . . . 70Adjusting
Control panel . . . . . . . . . . . . . . . . . . . . . 10Copy settings . . . . . . . . . . . . . . . . . . . . . 57Printer performance . . . . . . . . . . . . .2, 97Scan settings . . . . . . . . . . . . . . . . . . . . . . 63
Align the printhead . . . . . . . . . . . . . . . . . . . . 23Apple Macintosh See MacintoshArrows See 4-way navigation buttonsAttention light . . . . . . . . . . . . . . . . . . . . . . . . . 9Auto-Answer. See Fax Auto-AnswerAuto-detect . . . . . . . . . . . . . . . . . . . . . . . . . . 111AutoIP, definition . . . . . . . . . . . . . . . . . . . . 123Automated fax cover page . . . . . . . . . . . . . .71Automated two-sided printing accessory 7Automatic document feeder . . . . . . . . . . 5, 7Automatic fax reception . . . . . . . . . . . . . . . 38Automatically receive Faxes . . . . . . . . . . . 69
BBattery recycling . . . . . . . . . . . . . . . . . . . . . 120Black ink cartridge . . . . . . . . . . . . . . . . . 79, 82Black print speed . . . . . . . . . . . . . . . . . . . . . . 111Blinking green light . . . . . . . . . . . . . . . . . . . . . 8Bluetooth
Definition . . . . . . . . . . . . . . . . . . . . . . . . .121Dongle . . . . . . . . . . . . . . . . . . . . . . . . . . . . 52PairingPrinting from . . . . . . . . . . . . . . . . . . . . . . 52Range . . . . . . . . . . . . . . . . . . . . . . . . . . . . . 53
Bluetooth dongle . . . . . . . . . . . . . . . . . . . . . . . 8Borderless prints, white edges on . . . . . . . 99Bottom paper tray . . . . . . . . . . . . . . . . . . . . . . 6Broadband telephone See Digital telephone
systemsBusy fax number . . . . . . . . . . . . . . . . . . . . . . 37Busy Redial Attempts . . . . . . . . . . . . . . . . . . 39Button
4-way navigation . . . . . . . . . . . . . . . . . . 12Cancel . . . . . . . . . . . . . . . . . . . . . . . . . . . . 14Menu . . . . . . . . . . . . . . . . . . . . . . . . . . . . . 13Number keypad . . . . . . . . . . . . . . . . . . . 14OK . . . . . . . . . . . . . . . . . . . . . . . . . . . . . . . . 13Start . . . . . . . . . . . . . . . . . . . . . . . . . . . . . . 14Zoom . . . . . . . . . . . . . . . . . . . . . . . . . . . . . 13
CCable,USB . . . . . . . . . . . . . . . . . . . . . . . . . . . . 91Cables, USB 2.0 compliant . . . . . . . . . . . . . 88Call-Waiting Disable Code . . . . . . . . . . . . . 39Camera troubleshooting . . . . . . . . . . . . . . . 88Canadian DOC Statement . . . . . . . . . . . . 119Cancel button . . . . . . . . . . . . . . . . . . . . . . .9, 14Canceling a fax . . . . . . . . . . . . . . . . . . . . . . . . 69Card reader, Kodak 8-in-1 . . . . . . . . . . . . . . 47Castellano (Iberian/Spanish) . . . . . . . . . . 26Changing See Edit. See also Replacing
Index
Kodak ESP 9 Printer User Guide 125
Check ink levels . . . . . . . . . . . . . . . . . . . . . . . 78Chemicals to avoid coming in contact with
the printer . . . . . . . . . . . . . . . . . . . . . . . . . . 75Clean the printhead . . . . . . . . . . . . . . . . . . . 78Cleaning the printer . . . . . . . . . . . . . . . . . . . 75
Cleaning supplies to avoid . . . . . . . . . 77Client port . . . . . . . . . . . . . . . . . . . . . . . . . . . . . 5Color ink cartridge . . . . . . . . . . . . . . . . 79, 82Color print speed . . . . . . . . . . . . . . . . . . . . . . 111Communication between printer and
computer, troubleshooting . . . . . . . . . . 90Compliance See RegulationsComponents . . . . . . . . . . . . . . . . . . . . . . . . . . . 6Computer-to-computer See Ad hocConfiguration
Ethernet network . . . . . . . . . . . . . . . . . . 28Configuring
Ethernet settings . . . . . . . . . . . . . . . . . . 28Network settings . . . . . . . . . . . . . . . . . . 28Wireless settings . . . . . . . . . . . . . . . . . . 28
Connecting phone and fax . . . . . . . . . . . . . 34Connectivity, specifications . . . . . . . . . . . . 113Control panel . . . . . . . . . . . . . . . . . . . . 7, 9, 50
Adjusting . . . . . . . . . . . . . . . . . . . . . . . . . 10Copy Document . . . . . . . . . . . . . . . . . . . . . . 57
Settings . . . . . . . . . . . . . . . . . . . . . . . . . . . 58Copy Photo . . . . . . . . . . . . . . . . . . . . . . . . . . . 57
Settings . . . . . . . . . . . . . . . . . . . . . . . . . . . 59Copy problems, troubleshooting . . . . . . 100Copy settings, adjusting . . . . . . . . . . . . . . . 57Copying . . . . . . . . . . . . . . . . . . . . . . . . . . . . . . 57Cropped pictures, troubleshooting . . . . . 96Cropping photos . . . . . . . . . . . . . . . . . . . . . . 54Customer Support See Support
DDanger See SafetyDark print, troubleshooting . . . . . . . . . . . . 98Dedicated Fax Line . . . . . . . . . . . . . . . . . . . . 35Delete Fax Phonebook entry . . . . . . . . . . . .71Device not recognized, troubleshooting 88DHCP, definition . . . . . . . . . . . . . . . . . . . . . 123Dialing Mode . . . . . . . . . . . . . . . . . . . . . . . . . 39Digital Print Order File, definition . . . . . . . 121Digital Subscriber (DSL) Line . . . . . . . . . . 36Disable Call Waiting . . . . . . . . . . . . . . . . . . 39Display See LCD DisplayDistinctive Ring . . . . . . . . . . . . . . . . . . . .38, 39DNS Server Address, definition . . . . . . . . 121Document paper sizes . . . . . . . . . . . . . . . . . 116
Document print order, troubleshooting . 95Document, copy . . . . . . . . . . . . . . . . . . . . . . . 57Dongle See BluetoothDownload printer updates . . . . . . . . . . . . . . 2dpi, definition . . . . . . . . . . . . . . . . . . . . . . . . .121DPOF . . . . . . . . . . . . . . . . . . . . . . . . . . . . . . . . . 52Draft quality . . . . . . . . . . . . . . . . . . . . . . . . . . 59
EEasyShare software . . . . . . . . . . . . . . . . . . . . . 2Edit Fax Phonebook entry . . . . . . . . . . . . . . 70Electrical or Electronic equipment labeling
See LabelingEnabling error correction, fax . . . . . . . . . . .40Energy See PowerEnvelope sizes . . . . . . . . . . . . . . . . . . . . . . . 116Envelopes, loading . . . . . . . . . . . . . . . . . . . . . 45Environmental hazards . . . . . . . . . . . . . . . 118Error Correction . . . . . . . . . . . . . . . . . . . . . . . 39Error Correction mode, fax . . . . . . . . . . . . .40Error correction, fax See FaxESP, definition . . . . . . . . . . . . . . . . . . . . . . . . .121Español (Latin-American Spanish) . . . . . 26Ethernet network status light . . . . . . . . . . . . 9Ethernet network, configuring . . . . . . . . . . 28Ethernet, definition . . . . . . . . . . . . . . . . . . . .121European Union recycling . . . . . . . . . . . . . 120EXIF, definition . . . . . . . . . . . . . . . . . . . . . . . 122
FFax
Busy number . . . . . . . . . . . . . . . . . . . . . . 37Dialing on control panel . . . . . . . . . . . . 66Enabling error correction . . . . . . . . . . .40Error Correction mode . . . . . . . . . . . . .40Receiving . . . . . . . . . . . . . . . . . . . . . . . . . 69
Automatically . . . . . . . . . . . . . . . . . 69Manually . . . . . . . . . . . . . . . . . . . . . . 69
Receiving automatically . . . . . . . . . . . . 38Receiving manually . . . . . . . . . . . . . . . . 38Redial . . . . . . . . . . . . . . . . . . . . . . . . . . . . . 37Remode Access Code . . . . . . . . . . . . . . 38Sending . . . . . . . . . . . . . . . . . . . . . . . .65, 71
with automatic cover page . . . . . 71Setting the dial mode . . . . . . . . . . . . . . 38Specifying distinctive ring . . . . . . . . . . 38Specifying rings to answer . . . . . . . . . 37
Fax Activity Log . . . . . . . . . . . . . . . . . . . 39, 73Fax Auto-Answer . . . . . . . . . . . . . . . . . . . . . 38
Off . . . . . . . . . . . . . . . . . . . . . . . . . . . . . . . . 69
126 Kodak ESP 9 Printer User Guide
Fax confirmation . . . . . . . . . . . . . . . . . . . . . . 73Fax Confirmation Page . . . . . . . . . . . . . . . . 39Fax Cover Page . . . . . . . . . . . . . . . . . . . . . . . 39Fax cover page . . . . . . . . . . . . . . . . . . . . . . . . .71Fax cover sheet. See also Fax cover page 72Fax dial keypad . . . . . . . . . . . . . . . . . . . . . . . . 9Fax Lost Job report . . . . . . . . . . . . . . . . . . . . 73Fax recipients, selecting . . . . . . . . . . . . . . . 66Fax reports . . . . . . . . . . . . . . . . . . . . . . . . . . . 65Fax Settings . . . . . . . . . . . . . . . . . . . . . . . . . . . 39Fax Speaker . . . . . . . . . . . . . . . . . . . . . . . 39, 66FCC compliance . . . . . . . . . . . . . . . . . . . . . . 118File transfer support . . . . . . . . . . . . . . . . . . .114Flash drive See Portable storage deviceFormatting a memory card in the printer 78
GGateway Address, definition . . . . . . . . . . 122German Compliance Statement . . . . . . . 120Green light . . . . . . . . . . . . . . . . . . . . . . . . . . . . . 8Greeting card size paper . . . . . . . . . . . . . . . 116
HHandling originals . . . . . . . . . . . . . . . . . . . . . 41Hazards
Environmental . . . . . . . . . . . . . . . . . . . . 118Parts . . . . . . . . . . . . . . . . . . . . . . . . . . . . . 117Placing the printer safely . . . . . . . . . . . 117Power . . . . . . . . . . . . . . . . . . . . . . . . . . . . 117
HelpControl panel options . . . . . . . . . . . . . . . . 1Home Center software . . . . . . . . . . . . . . 1Macintosh . . . . . . . . . . . . . . . . . . . . . . . . 87Windows . . . . . . . . . . . . . . . . . . . . . . . . . 87
HFS Plus See Mac OS Standard . . . . . . . . 50HFS See Mac OS Standard . . . . . . . . . . . . . 50Home Center software
Macintosh . . . . . . . . . . . . . . . . . . . . . . . . 22Maintenance options . . . . . . . . . . . . . . 78Ordering supplies through . . . . . . . . . 22Scanning with . . . . . . . . . . . . . . . . . . . . . .61Troubleshooting . . . . . . . . . . . . . . . . . . . 94troubleshooting the printer . . . . . . . . 87Windows . . . . . . . . . . . . . . . . . . . . . . . . . .21
Host port . . . . . . . . . . . . . . . . . . . . . . . . . . . . . . 5Hostname, definition . . . . . . . . . . . . . . . . . 122Hub See USB
IIC Radiation Exposure Statement . . . . . . 119Image Capture software . . . . . . . . . . . . . . . 56Image formats supported . . . . . . . . . . . . . .113Image quality
Setting . . . . . . . . . . . . . . . . . . . . . . . . . . . . 50Troubleshooting . . . . . . . . . . . . . . . . . . . 77
Index card stock sizes . . . . . . . . . . . . . . . . 116Industry Canada rules . . . . . . . . . . . . . . . . 119Ink cartridge
Disposal . . . . . . . . . . . . . . . . . . . . . . . . . .80Installing . . . . . . . . . . . . . . . . . . . . . . . . . . 85Replacing . . . . . . . . . . . . . . . . . . . . . . . . . 78Storing . . . . . . . . . . . . . . . . . . . . . . . . . . . . 78
Ink cartridge not recognized, troubleshooting . . . . . . . . . . . . . . . . . . . . . 89
Ink levels . . . . . . . . . . . . . . . . . . . . . . . . . . . . . . 78Ink, preventing drying out . . . . . . . . . . . . . .80Installing ink cartridges . . . . . . . . . . . . . . . . 85IP Address . . . . . . . . . . . . . . . . . . . . . . . . . . . . 31
Definition . . . . . . . . . . . . . . . . . . . . . . . . 122iPhoto software . . . . . . . . . . . . . . . . . . . . . . . 56Iron-on transfers . . . . . . . . . . . . . . . . . . . . . 116
JJammed paper, troubleshooting . . . . . . . . 92JPEG, definition . . . . . . . . . . . . . . . . . . . . . . 122
KKeyboard See On-screen keyboard . . . . 15Keypad See Number keypad . . . . . . . . . . . 14Keypad buttons . . . . . . . . . . . . . . . . . . . . . . . 14Keypad, Fax . . . . . . . . . . . . . . . . . . . . . . . . . . . . 9Kodak
Bluetooth dongle . . . . . . . . . . . . . . . . . . . 8Ink cartridges . . . . . . . . . . . . . . . . . . . . . . 78Support Center . . . . . . . . . . . . . . . . . . . . . 2Web site . . . . . . . . . . . . . . . . . . . . . . . . . . . 2
Kodak 8-in-1 USB card reader . . . . . . . . . . 47Kodak Bluetooth dongleKodak Perfect Touch . . . . . . . . . . . . . 112, 122Kodak Service Number . . . . . . . . . . . . . . . 127
Locate in Home Center (Macintosh)software . . . . . . . . . . . . . . . . . . . . . . . 23
Kodak.com . . . . . . . . . . . . . . . . . . . . . . . . . 2, 87Download printer updates from . . . . . 2Tips & Projects Center . . . . . . . . . . . . . . 2
KPT See Kodak Perfect Touch
Kodak ESP 9 Printer User Guide 127
LLabel sizes . . . . . . . . . . . . . . . . . . . . . . . . . . . . 116Labeling, Waste Electrical and Electronic
Equipment in European Union . . . . . . 120Last page first, printing . . . . . . . . . . . . . . . . 95LCD Display . . . . . . . . . . . . . . . . . . . . . . . . . . 10LCD display . . . . . . . . . . . . . . . . . . . . . . . . . . . . 6Light print, troubleshooting . . . . . . . . . . . . 98Lights, interpreting signals from the printer
9Loading the paper tray . . . . . . . . . . . . . . . . . 42
MMAC Address, definitition . . . . . . . . . . . . 122Mac OS Standard format (HFS) . . . . . . . . 50Macintosh
Formatted USB drives not recognized bythe printer . . . . . . . . . . . . . . . . . . . . . 89
Help . . . . . . . . . . . . . . . . . . . . . . . . . . . . . . 87Home Center software . . . . . . . . . . . . 22Print the first page of a document first
96Software . . . . . . . . . . . . . . . . . . . . . . . . . . 56System requirements . . . . . . . . . . . . . . 115Troubleshooting, black screen or screen
freeze . . . . . . . . . . . . . . . . . . . . . . . . . 94Main menu . . . . . . . . . . . . . . . . . . . . . . . . . . . .18Maintenance . . . . . . . . . . . . . . . . . . . . . . . . . 75
Troubleshooting options . . . . . . . . . . . 97Maintenance Settings . . . . . . . . . . . . . . . . . 78Manual fax reception . . . . . . . . . . . . . . . . . . 38Manual IP Address, definition . . . . . . . . . 123Manually receive Faxes . . . . . . . . . . . . . . . . 69Media Access Control address See MAC
AddressMedia supported . . . . . . . . . . . . . . . . . . . . . . 115Memory cards . . . . . . . . . . . . . . . . . . . .7, 8, 10
Compatible . . . . . . . . . . . . . . . . . . . . . . . 47Formatting . . . . . . . . . . . . . . . . . . . . . . . . 78Printing photos from . . . . . . . . . . . . . . . 50Removing . . . . . . . . . . . . . . . . . . . . . . . . . . 7Slots . . . . . . . . . . . . . . . . . . . . . . . . . . . . . 6, 9Troubleshooting . . . . . . . . . . . . . . . . . . . 88Types supported . . . . . . . . . . . . . . . . . . . 8
Menu button . . . . . . . . . . . . . . . . . . . . . . . . 9, 13Menus . . . . . . . . . . . . . . . . . . . . . . . . . . . . . . . .16
Main . . . . . . . . . . . . . . . . . . . . . . . . . . . . . .18Model number. See Printer model numberModifying See Edit. See also Adjusting
Monitoring printer performance . . . . . . . . 77Multiple originals, scanning . . . . . . . . . . . . 63Multiple photo printing . . . . . . . . . . . . . . . . 53Multiple photos See PrintingMultiple-page documents, printing in
reverse order . . . . . . . . . . . . . . . . . . . . . . . . 95
NNetwork
Configuring . . . . . . . . . . . . . . . . . . . . . . . 28Network configuration, definition . . . . . . 123Network Settings . . . . . . . . . . . . . . . . . . . . . . 29Network settings, configuring . . . . . . . . . . 28Network settings, Ethernet . . . . . . . . . . . . . 28Network settings, Wireless . . . . . . . . . . . . 28No communication with computer,
troubleshooting . . . . . . . . . . . . . . . . . . . . .90Noise emission . . . . . . . . . . . . . . . . . . . . . . . 120Nozzle check . . . . . . . . . . . . . . . . . . . . . . . . . . 78Number keypad
Using . . . . . . . . . . . . . . . . . . . . . . . . . . . . . 14
OObsolete User Guide . . . . . . . . . . . . . . . . . . 93OCR, definition . . . . . . . . . . . . . . . . . . . . . . . 123OK button . . . . . . . . . . . . . . . . . . . . . . . . . . 9, 13On/Off . . . . . . . . . . . . . . . . . . . . . . . . . . . . . . . . 9On/Off button . . . . . . . . . . . . . . . . . . . . . . . . . 9On-screen keyboard . . . . . . . . . . . . . . . . . . . 70
Using . . . . . . . . . . . . . . . . . . . . . . . . . . . . . 15Optical Character Definition See OCROrdering supplies . . . . . . . . . . . . . . . . . . . . . 22Originals
Handling . . . . . . . . . . . . . . . . . . . . . . . . . . 41Scanning . . . . . . . . . . . . . . . . . . . . . . . . . . 63
PPairing, BluetoothPanoramic photo paper, using . . . . . . . . . . 53Panoramic photos, printing . . . . . . . . . . . . 53Paper
Sizes supported . . . . . . . . . . . . . . . . . . 116Troubleshooting . . . . . . . . . . . . . . . . . . . 93Types supported . . . . . . . . . . . . . . . . . .115
Paper feed, troubleshooting . . . . . . . . .89, 91Paper jam
Troubleshooting . . . . . . . . . . . . . . . . . . . 92Paper output tray . . . . . . . . . . . . . . . . . . . . . . . 6Paper output tray extender . . . . . . . . . . . . . . 7Paper stop . . . . . . . . . . . . . . . . . . . . . . . . . . . . 42
128 Kodak ESP 9 Printer User Guide
Paper tray . . . . . . . . . . . . . . . . . . . . . . . . . . . . . 6Bottom . . . . . . . . . . . . . . . . . . . . . . . . . . . . 6Extender . . . . . . . . . . . . . . . . . . . . . . . . . . . 6Loading . . . . . . . . . . . . . . . . . . . . . . . . . . . 42Top . . . . . . . . . . . . . . . . . . . . . . . . . . . . . . . . 6
Paper tray extension-release . . . . . . . . . . . 43Paper-width guide . . . . . . . . . . . . . . . . . . . . . . 6Parts hazards . . . . . . . . . . . . . . . . . . . . . . . . . 117Peer-to-peer network See Ad hocPhonebook
Add entry . . . . . . . . . . . . . . . . . . . . . . . . . 70Delete entry . . . . . . . . . . . . . . . . . . . . . . .71Edit entry . . . . . . . . . . . . . . . . . . . . . . . . . 70Selecting recipient . . . . . . . . . . . . . . . . . 66
Photo paperLoading . . . . . . . . . . . . . . . . . . . . . . . . . . . 45Setting image quality . . . . . . . . . . . . . . 50
Photo paper sizes . . . . . . . . . . . . . . . . . . . . . 116Photocopy . . . . . . . . . . . . . . . . . . . . . . . . . . . . 57Photos
Cropping . . . . . . . . . . . . . . . . . . . . . . . . . 54Panoramic . . . . . . . . . . . . . . . . . . . . . . . . 53Printing . . . . . . . . . . . . . . . . . . . . . . . . . . . 50Printing multiple . . . . . . . . . . . . . . . . . . 53Select and print all . . . . . . . . . . . . . . . . . .51Setting image quality . . . . . . . . . . . . . . 50Transferring . . . . . . . . . . . . . . . . . . . . . . 50
PictBridge cameraDefinition . . . . . . . . . . . . . . . . . . . . . . . . 123Displaying photos on . . . . . . . . . . . . . . 48Printing photos from . . . . . . . . . . . . . . . 50Troubleshooting . . . . . . . . . . . . . . . . . . . 96
Picture Transfer Protocol See PTPPIN. See Personal identification numberPoor print quality . . . . . . . . . . . . . . . . . . . . . . 97Portable storage device
Encrypted . . . . . . . . . . . . . . . . . . . . . . . . . 50Multiple partitions on . . . . . . . . . . . . . . 50Printing photos from . . . . . . . . . . . . . . . 50Third-party access software . . . . . . . 50Types not supported . . . . . . . . . . . . . . 50
Power cord connection port . . . . . . . . . . . . 7Power hazards . . . . . . . . . . . . . . . . . . . . . . . . 117Power not working, troubleshooting . . . . 87Print
Last page first . . . . . . . . . . . . . . . . . . . . . 95Print a test page . . . . . . . . . . . . . . . . . . . . . . . 23Print Fax Activity Log . . . . . . . . . . . . . . . . . . 39Print Fax Confirmation Page . . . . . . . . . . . 39Print Fax Cover Page . . . . . . . . . . . . . . . . . . 39
Print Fax Settings . . . . . . . . . . . . . . . . . . 39, 73Print order . . . . . . . . . . . . . . . . . . . . . . . . . . . . 52Print order, Macintosh . . . . . . . . . . . . . . . . . 96Print problems, troubleshooting . . . . . . . . 95Print quality, troubleshooting . . . . . . . . . . . 87Print skewed or slanted, troubleshooting 97Print smudged, troubleshooting . . . . . . . . 96Print spotted, troubleshooting . . . . . . . . . . 98Print Test Page . . . . . . . . . . . . . . . . . . . . . . . . 78Print too dark, troubleshooting . . . . . . . . . 98Print too light, troubleshooting . . . . . . . . . 98Printer
Configuring network settings . . . . . . . 28Ethernet . . . . . . . . . . . . . . . . . . . . . . . 28Wireless . . . . . . . . . . . . . . . . . . . . . . 28
Personal identification number . . . . . 53Updates from Kodak.com . . . . . . . . . . . 2
Printer access door . . . . . . . . . . . . . .7, 79, 82Printer fails to power on,
troubleshooting . . . . . . . . . . . . . . . . . . . . . 87Printer lid . . . . . . . . . . . . . . . . . . . . . . . . . . . . . . 7Printer lid lifting hand-hold . . . . . . . . . . . . . . 7Printer location, selecting . . . . . . . . . . . . . . 25Printer model number . . . . . . . . . . . . . . . . 127Printer not responding, troubleshooting . 92Printer performance, monitoring and
adjusting . . . . . . . . . . . . . . . . . . . . . . . . . . . . 77Printer Settings . . . . . . . . . . . . . . . . . . . . . . . . 26Printer status lights . . . . . . . . . . . . . . . . . . . . . 9Printer supplies . . . . . . . . . . . . . . . . . . . . . . . 22
at Kodak.com . . . . . . . . . . . . . . . . . . . . . . 2Maintaining . . . . . . . . . . . . . . . . . . . . . . . 75Ordering from Home Center . . . . . . . 22Recycling . . . . . . . . . . . . . . . . . . . . . . . . . 75
Printhead . . . . . . . . . . . . . . . . . . . . . . . . . . . . . . 7Alignment . . . . . . . . . . . . . . . . . . . . . 23, 77Damage, avoiding . . . . . . . . . . . . . . . . . 78Damaged or broken . . . . . . . . . . . . . . . . 82Removing . . . . . . . . . . . . . . . . . . . . . . . . . 83Replacing . . . . . . . . . . . . . . . . . . . . . . . . . 82
PrintingFax cover page . . . . . . . . . . . . . . . . . . . . 71From a computer . . . . . . . . . . . . . . . . . . 47from Bluetooth . . . . . . . . . . . . . . . . . . . . 52Multiple photos . . . . . . . . . . . . . . . . . . . 53Multiple-page document in
reverse order . . . . . . . . . . . . . . . . . . . 95Panoramic photos . . . . . . . . . . . . . . . . . 53Photos
Memory cards . . . . . . . . . . . . . . . . . 50
Kodak ESP 9 Printer User Guide 129
PictBridge camera . . . . . . . . . . . . . 50Portable storage device . . . . . . . . 50PTP camera . . . . . . . . . . . . . . . . . . . 50
Tagged image photos . . . . . . . . . . . . . . 52Troubleshooting . . . . . . . . . . . . . . . . . . . 95
Printing stops, troubleshooting . . . . . . . . . 99Printing too slow, troubleshooting . . . . . . 99Protecting the printer . . . . . . . . . . . . . . . . . . 75PTP camera, printing photos from . . . . . . 50PTP, definition . . . . . . . . . . . . . . . . . . . . . . . 123Pulse See Fax
QQuality settings
Best . . . . . . . . . . . . . . . . . . . . . . . . . . . . . . 59Draft . . . . . . . . . . . . . . . . . . . . . . . . . . . . . 59Normal . . . . . . . . . . . . . . . . . . . . . . . . . . . 59
Quality,troubleshooting . . . . . . . . . . . . . . . 97
RRear-access cleanout area . . . . . . . . . . . . . . 7Receiving Faxes
Automatically . . . . . . . . . . . . . . . . . . . . . 69Manually . . . . . . . . . . . . . . . . . . . . . . . . . 69
Receiving faxesAutomatically . . . . . . . . . . . . . . . . . . . . . 38Manually . . . . . . . . . . . . . . . . . . . . . . . . . 38
Recovery See RecyclingRecycling
Battery . . . . . . . . . . . . . . . . . . . . . . . . . . 120European Union . . . . . . . . . . . . . . . . . . 120Printer or printing supplies . . . . . . . . . 75
Red Eye, definition . . . . . . . . . . . . . . . . . . . 123Redial fax number . . . . . . . . . . . . . . . . . . . . . 37Redial if No Answer . . . . . . . . . . . . . . . . . . . 39Register the printer . . . . . . . . . . . . . . . . . . . . . 2Regulations
Canadian . . . . . . . . . . . . . . . . . . . . . . . . . 119FCC . . . . . . . . . . . . . . . . . . . . . . . . . .118, 119IC radiation exposure . . . . . . . . . . . . . . 119
Regulatory compliance . . . . . . . . . . . . . . . . 118Remote Access Code for Fax . . . . . . . . . . 38Remove See DeleteRemoving a memory device from the printer
47Removing the printhead . . . . . . . . . . . . . . . 83Replacing ink cartridges . . . . . . . . . . . . . . . 78Reversing document print order . . . . . . . . 95Ring pattern, telephone. See FaxRings to Answer . . . . . . . . . . . . . . . . . . . . . . 39
SSafety
Environmental . . . . . . . . . . . . . . . . . . . . 118Parts . . . . . . . . . . . . . . . . . . . . . . . . . . . . . .117Placing the printer . . . . . . . . . . . . . . . . .117Power . . . . . . . . . . . . . . . . . . . . . . . . . . . . .117
Safety requirements . . . . . . . . . . . . . . . . . . 116Same size copies . . . . . . . . . . . . . . . . . . . . . . 58Scale Percent copies . . . . . . . . . . . . . . . . . . . 59Scaling copy size . . . . . . . . . . . . . . . . . . . . . . 59Scan Destination . . . . . . . . . . . . . . . . . . . . . .64Scan settings, adjusting . . . . . . . . . . . . . . . . 63Scanned image is blank,
troubleshooting . . . . . . . . . . . . . . . . . . . . 101Scanner glass . . . . . . . . . . . . . . . . . . . . . . . . . . 7
Cleaning . . . . . . . . . . . . . . . . . . . . . . . . . . 76Damage, avoiding . . . . . . . . . . . . . . . . . 76
Scanner lid . . . . . . . . . . . . . . . . . . . . . . . . . . .6, 9Cleaning . . . . . . . . . . . . . . . . . . . . . . . . . . 77
Scanning . . . . . . . . . . . . . . . . . . . . . . . . . . . . . . 61Multiple originals . . . . . . . . . . . . . . . . . . 63Problem troubleshooting . . . . . . . . . . 100Using Home Center software . . . . . . . 61
Scene Balance . . . . . . . . . . . . . . . . . . . . . . . . .49Screen . . . . . . . . . . . . . . . . . . . . . . . . . . . .6, 9, 11Select and print all photos . . . . . . . . . . . . . 51Selecting fax recipient, from Phonebook 66Selecting printer setup location . . . . . . . . 25Self-powered USB hub . . . . . . . . . . . . . . . . . 91Sending faxes . . . . . . . . . . . . . . . . . . . . . .65, 71Service agreements . . . . . . . . . . . . . . . . . . . . 75Set up a network connection to the
printer . . . . . . . . . . . . . . . . . . . . . . . . . . . . . . 28Setting fax dial mode . . . . . . . . . . . . . . . . . . 38Settings
Ethernet . . . . . . . . . . . . . . . . . . . . . . . . . . 28Network . . . . . . . . . . . . . . . . . . . . . . . . . . 28Wireless network . . . . . . . . . . . . . . . . . . 28
Setup, selecting location for the printer . 25Shared Phone Line . . . . . . . . . . . . . . . . . . . . . 34Sizes of copies . . . . . . . . . . . . . . . . . . . . . . . . 59Slow printing,troubleshooting . . . . . . . . . . 99Software See also Home CenterSpecifying distinctive ring, fax . . . . . . . . . . 38Specifying rings to answer, fax . . . . . . . . . 37Spots on print . . . . . . . . . . . . . . . . . . . . . . . . . 98SSID, definition . . . . . . . . . . . . . . . . . . . . . . . 124Star 70. See Call-Waiting Disable CodeStart button . . . . . . . . . . . . . . . . . . . . . . . . .9, 14
130 Kodak ESP 9 Printer User Guide
Status check, performing . . . . . . . . . . . . . . 77Status lights . . . . . . . . . . . . . . . . . . . . . . . . . . . 9Status Monitor . . . . . . . . . . . . . . . . . . . . . . . . 22Storing ink cartridges . . . . . . . . . . . . . . . . . . 78Subnet, definition . . . . . . . . . . . . . . . . . . . . 124Supplies, ordering . . . . . . . . . . . . . . . . . . . . . 22Support . . . . . . . . . . . . . . . . . . . . . . . . . . . . . 1, 87
at Kodak.com . . . . . . . . . . . . . . . . . . . . . . 2Telephone numbers . . . . . . . . . . . . . . . . 3
Web site . . . . . . . . . . . . . . . . . . . . . . . 2System requirements . . . . . . . . . . . . . . . . . .114
TTagged images . . . . . . . . . . . . . . . . . . . . . . . . 52
Printing . . . . . . . . . . . . . . . . . . . . . . . . . . . 52Technical Support See SupportTelephone company, when to contact . .36,
38Telephone ring pattern. See Fax. See also
Fax Auto-AnswerTest page, printing . . . . . . . . . . . . . . . . . . . . 78Thumb drive See Portable storage deviceTone See FaxTouching the scanner glass . . . . . . . . . . . . 75Transfer picture failure, troubleshooting 93Transferring, photos . . . . . . . . . . . . . . . . . . . 50Transparency sizes . . . . . . . . . . . . . . . . . . . . 116Troubleshooting . . . . . . . . . . . . . . . . . . . . . . 87
at Kodak.com . . . . . . . . . . . . . . . . . . . . . . 2Camera . . . . . . . . . . . . . . . . . . . . . . . . . . . 88Copy problems . . . . . . . . . . . . . . . . . . . 100Cropped picture . . . . . . . . . . . . . . . . . . . 96Device not recognized . . . . . . . . . . . . . 88Document print order . . . . . . . . . . . . . 95Home Center software . . . . . . . . . . . . 94Ink cartridge not recognized . . . . . . . 89Macintosh . . . . . . . . . . . . . . . . . . . . . . . . 94Macintosh-formatted USB drive . . . . 89Maintenance options . . . . . . . . . . . .2, 97Memory cards . . . . . . . . . . . . . . . . . . . . 88No communication with computer . 90Paper . . . . . . . . . . . . . . . . . . . . . . . . . . . . . 93Paper feed . . . . . . . . . . . . . . . . . . . . . 89, 91Paper jam . . . . . . . . . . . . . . . . . . . . . . . . . 92PictBridge camera . . . . . . . . . . . . . . . . . 96Picture smudged . . . . . . . . . . . . . . . . . . 96Print quality . . . . . . . . . . . . . . . . . . . . . . . 87Print skewed or slanted . . . . . . . . . . . . 97Print spotted . . . . . . . . . . . . . . . . . . . . . . 98Print too dark . . . . . . . . . . . . . . . . . . . . . 98
Print too light . . . . . . . . . . . . . . . . . . . . . . 98Printer fails to power on . . . . . . . . . . . . 87Printer not responding . . . . . . . . . . . . . 92Printing . . . . . . . . . . . . . . . . . . . . . . . . . . . 95Printing stops . . . . . . . . . . . . . . . . . . . . . 99Printing too slow . . . . . . . . . . . . . . . . . . 99Scanning problems . . . . . . . . . . . . . . . 100Status lights . . . . . . . . . . . . . . . . . . . . . . . 19Transfer picture failure . . . . . . . . . . . . . 93Water inside the printer . . . . . . . . . . . . 75White edges on borderless prints . . . 99WIA error . . . . . . . . . . . . . . . . . . . . . . . . .94Windows Vista . . . . . . . . . . . . . . . . . . . .94
UUniversal serial bus
Definition . . . . . . . . . . . . . . . . . . . . . . . . 124Device port . . . . . . . . . . . . . . . . . . . . . .7, 9Port . . . . . . . . . . . . . . . . . . . . . . . . . . . . . .8, 9
Update . . . . . . . . . . . . . . . . . . . . . . . . . . . . . . 114Printer software, firmware, drivers . . . 2
Updating the User Guide . . . . . . . . . . . . . . . 93Upper paper tray . . . . . . . . . . . . . . . . . . . . . . . 5USB
Cable . . . . . . . . . . . . . . . . . . . . . . . . . . . . . 91Card readers, supported . . . . . . . . . . . 47Definition . . . . . . . . . . . . . . . . . . . . . . . . 124Device port . . . . . . . . . . . . . . . . . . . . . .7, 9Host port . . . . . . . . . . . . . . . . . . . . . . . . . . 6Hub, self-powered . . . . . . . . . . . . . . . . . 91Port . . . . . . . . . . . . . . . . . . . . . . . . . . . . . .8, 9
USB 2.0 compliant cables . . . . . . . . . . . . . . 88USB device ports . . . . . . . . . . . . . . . . . . . . . . . 7User Guide
Outdated . . . . . . . . . . . . . . . . . . . . . . . . . 93Updating . . . . . . . . . . . . . . . . . . . . . . . . . . 93
UsingNumber keypad . . . . . . . . . . . . . . . . . . . 14On-screen keyboard . . . . . . . . . . . . . . . 15
Using Fax Quick Dial . . . . . . . . . . . . . . . . . . . 67
VVista troubleshooting . . . . . . . . . . . . . . . . . .94
WWarranty . . . . . . . . . . . . . . . . . . . . .78, 113, 114Waste labeling . . . . . . . . . . . . . . . . . . . . . . . 118Waste See LabelingWater exposure, troubleshooting . . . . . . . 75WEP, definition . . . . . . . . . . . . . . . . . . . . . . . 124
Kodak ESP 9 Printer User Guide 131
White edges on borderless prints, troubleshooting . . . . . . . . . . . . . . . . . . . . . 99
WIA error, troubleshooting . . . . . . . . . . . . 94WiFi Radio . . . . . . . . . . . . . . . . . . . . . . . . . . . . 29WiFi Setup Wizard . . . . . . . . . . . . . . . . 29, 30WiFi, definition . . . . . . . . . . . . . . . . . . . . . . 124Windows
Help . . . . . . . . . . . . . . . . . . . . . . . . . . . . . . 87Home Center softwareSystem requirements . . . . . . . . . . . . . . 115
Windows Vista troubleshooting . . . . . . . . 94WIA error . . . . . . . . . . . . . . . . . . . . . . . . 94
Wireless network status light . . . . . . . . . . . 9Wireless network, configuring . . . . . . . . . 28Wireless printing, BluetoothWPA, definition . . . . . . . . . . . . . . . . . . . . . . 124WPS, definition . . . . . . . . . . . . . . . . . . . . . . 125
ZZoom . . . . . . . . . . . . . . . . . . . . . . . . . . . . . . . . .13Zoom buttons . . . . . . . . . . . . . . . . . . . . . . . . . 9Zooming photos . . . . . . . . . . . . . . . . . . . . . . 54
132 Kodak ESP 9 Printer User Guide

*1K3289*1K3289
1K3289 B