allegra fort myers - florida gulf coast university allegra fort myers navigating the florida golf...
TRANSCRIPT

1
Allegra Fort Myers
Navigating the Florida Golf Coast University Storefront User Guide – Version 1 – April 2014
Introduction Copy the storefront URL to your web browser
https://xmpie-prod.allegranet.com/appfrontend/security.accv3?org=fortmyers
We recommend Google Chrome, Internet Explorer 8+ (with Acrobat Reader), or Safari (with Acrobat Reader).
Log-in with the credentials that were provided for you. Typically, your User Name will be your first initial
last name (For example: John Doe’s User Name would be “jdoe”.) and the password is “allegra”.
o Once you login, it is highly recommended to select the “My Account” link and update your
password, hint question and hint answer.
If you do not already have log-in credentials, contact your administrator or select the “Register Here” link.
Note: When registering, you will need to know the Security Code. Please call your
Administrator for this code. o Once you are registered, log-in with your credentials.
Select a Category
Select a category you wish to shop in.

2
Selecting a Product
You may search for Products in the list on the left hand side of the page.
o Products are organized by Categories
o There is a search text box field where you may search for products.
To review more information about a product (For example, product description, quantity, price
information, etc.), click the “Quick View” button on the product thumbnail.
Navigation
Continue through the ordering process.
Step 2: Upon selecting an individual product, Please enter a
name and optionally a description. This is useful for locating
and reordering a product using the Misc. reports (Please see
page 4 for details.).
o If a product requires personalization, such as a
business card, fill in all the required information.
Select the “Preview Proof” link option to view the
product with your personalized information before
selecting the Continue button.
Select the desired quantity (Step 3) for the product.
Review the Product and add it to the cart (Step 4).
3
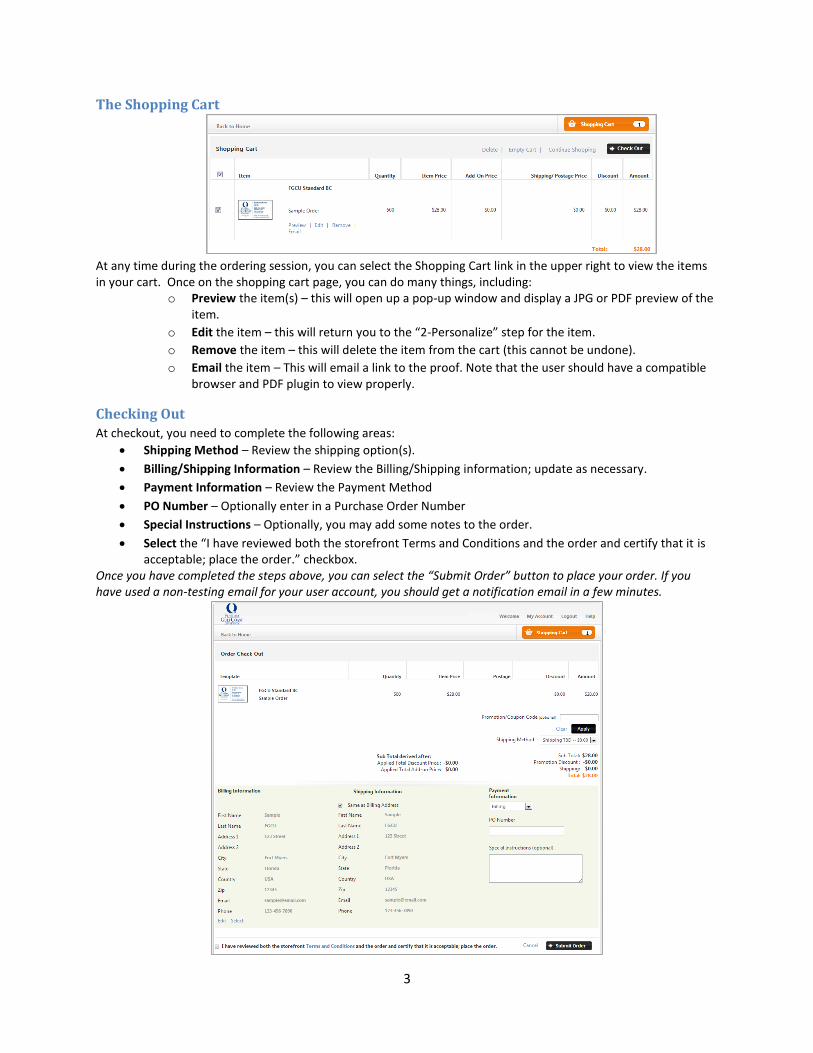
The Shopping Cart
At any time during the ordering session, you can select the Shopping Cart link in the upper right to view the items in your cart. Once on the shopping cart page, you can do many things, including:
o Preview the item(s) – this will open up a pop-up window and display a JPG or PDF preview of the item.
o Edit the item – this will return you to the “2-Personalize” step for the item.
o Remove the item – this will delete the item from the cart (this cannot be undone).
o Email the item – This will email a link to the proof. Note that the user should have a compatible browser and PDF plugin to view properly.
Checking Out
At checkout, you need to complete the following areas:
Shipping Method – Review the shipping option(s).
Billing/Shipping Information – Review the Billing/Shipping information; update as necessary.
Payment Information – Review the Payment Method
PO Number – Optionally enter in a Purchase Order Number
Special Instructions – Optionally, you may add some notes to the order.
Select the “I have reviewed both the storefront Terms and Conditions and the order and certify that it is acceptable; place the order.” checkbox.
Once you have completed the steps above, you can select the “Submit Order” button to place your order. If you have used a non-testing email for your user account, you should get a notification email in a few minutes.

4
Viewing Orders
Select the View Orders icon on the Home Screen
You will be presented with a listing of all your previous orders
Scroll to find a specific order number o Alternatively, you may choose to use other report features to locate your order.
The "Order Number” Report is used to locate a specific order The “Fulfillment Type” Report is used to search for a specific type of product. For
example:
Print (Variable/Static Items)
Inventory
Etc. The “Payment Method” Report is used to filter orders by “Billing” or “Credit Card” The “Product Name” Report is used to locate a specific product placed by its name The “Status” Report can be useful for stores with the Approval Process enabled. You
may easily locate products that have been Completed, Pending Approval, etc. The “Misc” Report is used to locate an order by its “Customized item name”
This is entered in for each product on Step 2 of the ordering process:
Select the Order Number to review the order placed. o The following Actions can be made to each product:
Reorder: Click this link to reorder a product. View Proof: View either a JPG or PDF final of the product.