alpha active 4 system - freecorsicamoreav.free.fr/doc technique/doc tech anti escarre... ·...
TRANSCRIPT

Service Manual
ALPHA ACTIVE® 4 SYSTEM

Alpha Active 4 Service Manual
Issue 1April 2010 SER0018 Page i
CONTENTS
CHAPTER 1Introduction . . . . . . . . . . . . . . . . . . . . . . . . . . . . . . . . . . . . . 1
About This Manual . . . . . . . . . . . . . . . . . . . . . . . . . . . . . . . . . . . . . . . . 1
Numbering and Cross-Referencing in this Manual . . . . . . . . . . . . . . . . . . . . . 1
Warnings, Cautions and Notes . . . . . . . . . . . . . . . . . . . . . . . . . . . . . . . 1
Technical Description . . . . . . . . . . . . . . . . . . . . . . . . . . . . . . . . . . . . . . 1
Alpha Active 4 Pump . . . . . . . . . . . . . . . . . . . . . . . . . . . . . . . . . . . . 1
Cycle Options . . . . . . . . . . . . . . . . . . . . . . . . . . . . . . . . . . . . . . . . 2
Alpha Active 4 Mattress Replacement. . . . . . . . . . . . . . . . . . . . . . . . . . . . 2
Pneumatic and Electrical Diagrams . . . . . . . . . . . . . . . . . . . . . . . . . . . . . . . 3
Front Panel . . . . . . . . . . . . . . . . . . . . . . . . . . . . . . . . . . . . . . . . . . . . 5
Controls and Indicators. . . . . . . . . . . . . . . . . . . . . . . . . . . . . . . . . . . . . . 5
On/Off Switch . . . . . . . . . . . . . . . . . . . . . . . . . . . . . . . . . . . . . . . . 5
Alarm/Mute . . . . . . . . . . . . . . . . . . . . . . . . . . . . . . . . . . . . . . . . . 5
Mode Select . . . . . . . . . . . . . . . . . . . . . . . . . . . . . . . . . . . . . . . . . 5
Auto-firm Mode . . . . . . . . . . . . . . . . . . . . . . . . . . . . . . . . . . . . . . . 5
Pressure Control. . . . . . . . . . . . . . . . . . . . . . . . . . . . . . . . . . . . . . . 5
Cycle Time. . . . . . . . . . . . . . . . . . . . . . . . . . . . . . . . . . . . . . . . . . 5
Alarms and Indicators . . . . . . . . . . . . . . . . . . . . . . . . . . . . . . . . . . . . . . 6
Service Indicator/Pump Fault . . . . . . . . . . . . . . . . . . . . . . . . . . . . . . . . 6
Power Fail Indicator . . . . . . . . . . . . . . . . . . . . . . . . . . . . . . . . . . . . . 6
CHAPTER 2Troubleshooting. . . . . . . . . . . . . . . . . . . . . . . . . . . . . . . . . . . 1
Troubleshooting Table . . . . . . . . . . . . . . . . . . . . . . . . . . . . . . . . . . . . . . 1
CHAPTER 3Maintenance . . . . . . . . . . . . . . . . . . . . . . . . . . . . . . . . . . . . . 1
Pump Service . . . . . . . . . . . . . . . . . . . . . . . . . . . . . . . . . . . . . . . . . . 1
Pump Maintenance Checks . . . . . . . . . . . . . . . . . . . . . . . . . . . . . . . . . . . 1
Mattress Service . . . . . . . . . . . . . . . . . . . . . . . . . . . . . . . . . . . . . . . . . 2
Mattress Maintenance Checks . . . . . . . . . . . . . . . . . . . . . . . . . . . . . . . . . . 2
Alarm Functions . . . . . . . . . . . . . . . . . . . . . . . . . . . . . . . . . . . . . . . . . 2
Power Fail Alarm . . . . . . . . . . . . . . . . . . . . . . . . . . . . . . . . . . . . . . 2
Low Pressure Indicator . . . . . . . . . . . . . . . . . . . . . . . . . . . . . . . . . . . 2
Service Pump/Fault . . . . . . . . . . . . . . . . . . . . . . . . . . . . . . . . . . . . . 2

Alpha Active 4 Service Manual
Issue 1Page ii SER0018 April 2010
CHAPTER 4Testing. . . . . . . . . . . . . . . . . . . . . . . . . . . . . . . . . . . . . . . . 1
Mattress Visual Inspection . . . . . . . . . . . . . . . . . . . . . . . . . . . . . . . . . . . . 1
Pump Visual Inspection . . . . . . . . . . . . . . . . . . . . . . . . . . . . . . . . . . . . . . 1
Pump Flow, Pressure, and Function Test. . . . . . . . . . . . . . . . . . . . . . . . . . . . . 1
Flow and Pressure Checks. . . . . . . . . . . . . . . . . . . . . . . . . . . . . . . . . . 1
Electrical Testing . . . . . . . . . . . . . . . . . . . . . . . . . . . . . . . . . . . . . . . . . 2
Electrical Safety Checks - Class II . . . . . . . . . . . . . . . . . . . . . . . . . . . . . . 2
Functional Test . . . . . . . . . . . . . . . . . . . . . . . . . . . . . . . . . . . . . . . . 3
Power Fail Alarm Check . . . . . . . . . . . . . . . . . . . . . . . . . . . . . . . . . . . 3
Low Pressure Alarm Check . . . . . . . . . . . . . . . . . . . . . . . . . . . . . . . . . 3
Service Alarm Check . . . . . . . . . . . . . . . . . . . . . . . . . . . . . . . . . . . . . 3
Mattress Inflation Test. . . . . . . . . . . . . . . . . . . . . . . . . . . . . . . . . . . . . . . 3
End Setting . . . . . . . . . . . . . . . . . . . . . . . . . . . . . . . . . . . . . . . . . . . . 4
CHAPTER 5Pump Repair . . . . . . . . . . . . . . . . . . . . . . . . . . . . . . . . . . . . 1
General . . . . . . . . . . . . . . . . . . . . . . . . . . . . . . . . . . . . . . . . . . . . . . 1
Removing the Air Filter . . . . . . . . . . . . . . . . . . . . . . . . . . . . . . . . . . . . . . 3
Replacing the Air Filter . . . . . . . . . . . . . . . . . . . . . . . . . . . . . . . . . . . . . . 3
Removing The Bed Hooks . . . . . . . . . . . . . . . . . . . . . . . . . . . . . . . . . . . . 5
Replacing the Bed Hooks . . . . . . . . . . . . . . . . . . . . . . . . . . . . . . . . . . . . . 5
Removing the Mains/Power Fuses . . . . . . . . . . . . . . . . . . . . . . . . . . . . . . . . 7
Installing the Mains/Power Fuses . . . . . . . . . . . . . . . . . . . . . . . . . . . . . . . . . 7
Removing the Front Case . . . . . . . . . . . . . . . . . . . . . . . . . . . . . . . . . . . . . 9
Replacing the Front Case . . . . . . . . . . . . . . . . . . . . . . . . . . . . . . . . . . . . . 9
Removing the Display PCB . . . . . . . . . . . . . . . . . . . . . . . . . . . . . . . . . . . 11
Installing the Display PCB. . . . . . . . . . . . . . . . . . . . . . . . . . . . . . . . . . . . 11
Removing the Compressor Assembly. . . . . . . . . . . . . . . . . . . . . . . . . . . . . . 13
Installing the Compressor Assembly . . . . . . . . . . . . . . . . . . . . . . . . . . . . . . 13
Removing the Microswitch Assembly . . . . . . . . . . . . . . . . . . . . . . . . . . . . . . 15
Installing the Microswitch Assembly . . . . . . . . . . . . . . . . . . . . . . . . . . . . . . 15
Removing the Rotor/Stator Assembly. . . . . . . . . . . . . . . . . . . . . . . . . . . . . . 15
Installing the Rotor/Stator Assembly . . . . . . . . . . . . . . . . . . . . . . . . . . . . . . 15
Removing the Gearbox Assembly . . . . . . . . . . . . . . . . . . . . . . . . . . . . . . . 15
Installing the Gearbox Assembly . . . . . . . . . . . . . . . . . . . . . . . . . . . . . . . . 15
Removing the Transformer . . . . . . . . . . . . . . . . . . . . . . . . . . . . . . . . . . . 17
Installing the Transformer . . . . . . . . . . . . . . . . . . . . . . . . . . . . . . . . . . . . 17
Removing the Main PCB . . . . . . . . . . . . . . . . . . . . . . . . . . . . . . . . . . . . 19
Alpha Active 4 Service Manual
Issue 1April 2010 SER0018 Page iii
Replacing the Main PCB . . . . . . . . . . . . . . . . . . . . . . . . . . . . . . . . . . . . . 19
Removing Power Fail Battery . . . . . . . . . . . . . . . . . . . . . . . . . . . . . . . . . . 21
Replacing Power Fail Battery . . . . . . . . . . . . . . . . . . . . . . . . . . . . . . . . . . 21
Removing the On/Off Switch . . . . . . . . . . . . . . . . . . . . . . . . . . . . . . . . . . . 23
Installing the On/Off Switch . . . . . . . . . . . . . . . . . . . . . . . . . . . . . . . . . . . 23
Removing the Fuse Holder Housing . . . . . . . . . . . . . . . . . . . . . . . . . . . . . . . 25
Installing the Fuse Holder Housing. . . . . . . . . . . . . . . . . . . . . . . . . . . . . . . . 25
Removing the Mains/Power Cable . . . . . . . . . . . . . . . . . . . . . . . . . . . . . . . . 27
Installing the Mains/Power Cable . . . . . . . . . . . . . . . . . . . . . . . . . . . . . . . . 27
Removing the Terminal Block . . . . . . . . . . . . . . . . . . . . . . . . . . . . . . . . . . 29
Installing the Terminal Block . . . . . . . . . . . . . . . . . . . . . . . . . . . . . . . . . . . 29
CHAPTER 6Mattress Repair . . . . . . . . . . . . . . . . . . . . . . . . . . . . . . . . . . . 1
General . . . . . . . . . . . . . . . . . . . . . . . . . . . . . . . . . . . . . . . . . . . . . . 1
Alpha Active 4 Cell Layout . . . . . . . . . . . . . . . . . . . . . . . . . . . . . . . . . . . . 1
Removing The Top Cover . . . . . . . . . . . . . . . . . . . . . . . . . . . . . . . . . . . . 3
Installing the Top Cover . . . . . . . . . . . . . . . . . . . . . . . . . . . . . . . . . . . . . 3
Removing Cell Assembly. . . . . . . . . . . . . . . . . . . . . . . . . . . . . . . . . . . . . 5
Installing Cell Assembly . . . . . . . . . . . . . . . . . . . . . . . . . . . . . . . . . . . . . 5
Replacing Manifold Tubing . . . . . . . . . . . . . . . . . . . . . . . . . . . . . . . . . . . . 7
Removing CPR Assembly . . . . . . . . . . . . . . . . . . . . . . . . . . . . . . . . . . . . 9
Installing CPR Assembly . . . . . . . . . . . . . . . . . . . . . . . . . . . . . . . . . . . . 9
Removing Static Feed Check Valves . . . . . . . . . . . . . . . . . . . . . . . . . . . . . . 11
Installing Static Feed Check Valves . . . . . . . . . . . . . . . . . . . . . . . . . . . . . . . 11
Removing 3-Way Connector . . . . . . . . . . . . . . . . . . . . . . . . . . . . . . . . . . . 13
Installing 3-Way Connector . . . . . . . . . . . . . . . . . . . . . . . . . . . . . . . . . . . 13
CHAPTER 7Technical Specification . . . . . . . . . . . . . . . . . . . . . . . . . . . . . . . 1
Pump . . . . . . . . . . . . . . . . . . . . . . . . . . . . . . . . . . . . . . . . . . . . . . . 1
Mattress . . . . . . . . . . . . . . . . . . . . . . . . . . . . . . . . . . . . . . . . . . . . . 2
Mattress Size Information . . . . . . . . . . . . . . . . . . . . . . . . . . . . . . . . . . . . 2
Cover Specification. . . . . . . . . . . . . . . . . . . . . . . . . . . . . . . . . . . . . . . . 3
Cleaning Symbols . . . . . . . . . . . . . . . . . . . . . . . . . . . . . . . . . . . . . . . . 3
CHAPTER 8Spare Parts . . . . . . . . . . . . . . . . . . . . . . . . . . . . . . . . . . . . . 1
Pump Assembly Parts List . . . . . . . . . . . . . . . . . . . . . . . . . . . . . . . . . . . . 1

Alpha Active 4 Service Manual
Issue 1Page iv SER0018 April 2010
Mattress Assembly Parts List . . . . . . . . . . . . . . . . . . . . . . . . . . . . . . . . . . . 1
CHAPTER 9Service Contact Details. . . . . . . . . . . . . . . . . . . . . . . . . . . . . . . 1
Alpha Active 4 Service Manual Introduction
Issue 1 Chap 1April 2010 SER0018 Page 1
CHAPTER 1
INTRODUCTION
1 About This Manual
ArjoHuntleigh strongly recommend that their equipment is only serviced by trained personnel and provide courses for customers who wish to become licensed to service their own equipment. In no event will ArjoHuntleigh be responsible for any service performed by customers or third parties.
This manual contains information on maintenance, servicing, repair, troubleshooting and testing for the Alpha Active 4 system, which comprises of a pump and a mattress replacement.
Read and understand this manual before attempting to service or repair the equipment.
Numbering and Cross-Referencing in this ManualFor all chapters in this manual:
• Page, section and paragraph numbering re-start at “1”.• Figure and table numbering continue from the previous chapter.• Cross-references, which include a chapter number (and/or chapter title) refer to text in a different
chapter. Cross-references which do NOT include any chapter number (or chapter title) refer to text within the same chapter.
Warnings, Cautions and NotesWARNINGS given in this manual identify possible hazards in procedures or conditions which, if not correctly followed, could result in death, injury or other serious adverse reactions.
CAUTIONS given in this manual identify possible hazards in procedures or conditions which, if not correctly followed, could result in equipment failure or damage.
Notes given in this manual are used to explain or amplify a procedure or condition.
WARNING: BEFORE PERFORMING ANY SERVICE OR MAINTENANCE PROCEDURES, ENSURE THAT THE EQUIPMENT HAS BEEN ADEQUATELY DECONTAMINATED.
WARNING: VOLTAGES IN EXCESS OF 30 VOLTS RMS OR 50 VOLTS DC CAN, IN CERTAIN CIRCUMSTANCES, BE LETHAL. WHEN WORKING ON EQUIPMENT REQUIRING EXPOSURE TO LIVE, UNPROTECTED CONDUCTORS WHERE SUCH VOLTAGES ARE PRESENT, EXTREME CARE MUST BE EXERCISED.
2 Technical Description
The Alpha Active 4 system comprises of a mattress replacement and pump. The product can be used on hospital and domestic beds in both domestic and care environments. The bed base must be suitable for the specified mattress size.
Alpha Active 4 PumpThe Alpha Active 4 pump comprises of a moulded case with non slip feet on the base and integral hanging brackets.
Introduction Alpha Active 4 Service Manual
Chap 1 Issue 1Page 2 SER0018 April 2010
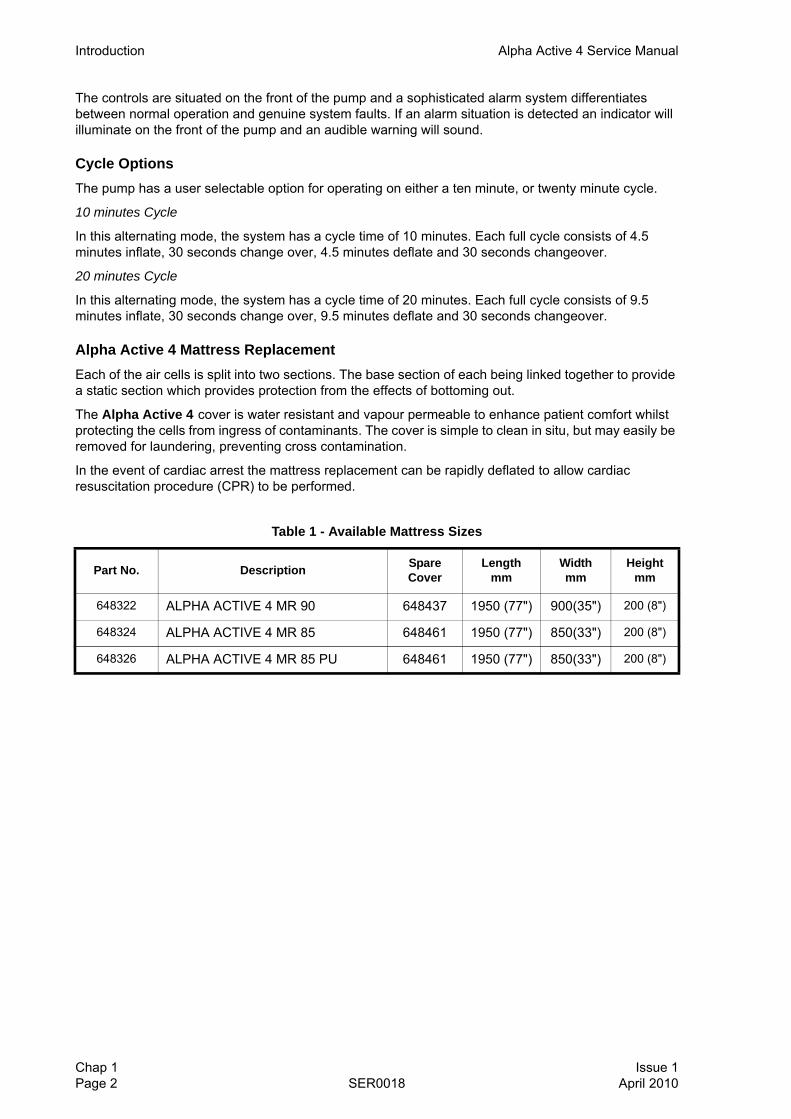
The controls are situated on the front of the pump and a sophisticated alarm system differentiates between normal operation and genuine system faults. If an alarm situation is detected an indicator will illuminate on the front of the pump and an audible warning will sound.
Cycle OptionsThe pump has a user selectable option for operating on either a ten minute, or twenty minute cycle.
10 minutes Cycle
In this alternating mode, the system has a cycle time of 10 minutes. Each full cycle consists of 4.5 minutes inflate, 30 seconds change over, 4.5 minutes deflate and 30 seconds changeover.
20 minutes Cycle
In this alternating mode, the system has a cycle time of 20 minutes. Each full cycle consists of 9.5 minutes inflate, 30 seconds change over, 9.5 minutes deflate and 30 seconds changeover.
Alpha Active 4 Mattress ReplacementEach of the air cells is split into two sections. The base section of each being linked together to provide a static section which provides protection from the effects of bottoming out.
The Alpha Active 4 cover is water resistant and vapour permeable to enhance patient comfort whilst protecting the cells from ingress of contaminants. The cover is simple to clean in situ, but may easily be removed for laundering, preventing cross contamination.
In the event of cardiac arrest the mattress replacement can be rapidly deflated to allow cardiac resuscitation procedure (CPR) to be performed.
Table 1 - Available Mattress Sizes
Part No. Description Spare Cover
Length mm
Width mm
Height mm
648322 ALPHA ACTIVE 4 MR 90 648437 1950 (77") 900(35") 200 (8")
648324 ALPHA ACTIVE 4 MR 85 648461 1950 (77") 850(33") 200 (8")
648326 ALPHA ACTIVE 4 MR 85 PU 648461 1950 (77") 850(33") 200 (8")
Alpha Active 4 Service Manual Introduction
Issue 1 Chap 1April 2010 SER0018 Page 3
3 Pneumatic and Electrical Diagrams
Figure 1 - Pneumatic System Diagram
Introduction Alpha Active 4 Service Manual
Chap 1 Issue 1Page 4 SER0018 April 2010
Figure 2 - Electrical Diagram
*Connectors J1, J2 and J7 must be connected to their relevant terminals on the Main PCB.
Alpha Active 4 Service Manual Introduction
Issue 1 Chap 1April 2010 SER0018 Page 5
4 Front Panel
4.1 Below is a diagram of the Alpha Active 4 pump front panel. For more detail on the function of each button, see below.
5 Controls and Indicators
On/Off SwitchLocated on the right side of the pump unit, the On/Off switch will illuminate green when the pump is on.
Alarm/MuteDuring an alarm condition the sound of the alarm can be muted by pressing this button. The yellow indicator will then flash intermittently but the alarm will be muted.
Mode SelectThe mode selector allows the mode of operation to be selected.
Two modes of operation are available, Alternating or Static (non-alternating) . The indicator next to the respective icon indicates the currently selected mode.
Auto-firm ModeSelects the Auto-firm, non-alternating mode. The orange indicator will illuminate when the pump is in this mode. Autofirm operates for 30 minutes.
Pressure Control
Two buttons (+ and -) are used to set the pressure inside the mattress replacement and therefore the amount of support the patient receives.
The pressure setting is indicated by the green indicator above the selected setting.
Cycle TimeA single button allows the cycle time to be selected for the most appropriate patient therapy.
The cycle time setting is indicated by the green indicator above the selected setting.
AlarmsComfort Control
Cycle Time Alarm Mute Mode Selector Auto-firm Mode

Introduction Alpha Active 4 Service Manual
Chap 1 Issue 1Page 6 SER0018 April 2010
6 Alarms and Indicators
Low Pressure IndicatorThe red Low Pressure indicator is illuminated whenever the pump detects low pressure within the mattress replacement. An audible alarm will sound unless cancelled by the mute button.
The indicator will extinguish once normal pressure is reached. Refer To “Troubleshooting” on page 14 for possible causes of Low Pressure.
Service Indicator/Pump FaultThe yellow Service/pump fault indicator will illuminate and remain on if the pump has detected an internal fault. An audible alarm will sound unless cancelled by the mute button.
Power Fail IndicatorThe red Power Fail indicator will illuminate when a mains power failure has been detected. An audible alarm will sound until power is restored or the pump is switched off using the on/off switch.
Alpha Active 4 Service Manual Troubleshooting
Issue 1 Chap 2April 2010 SER0018 Page 1
CHAPTER 2
TROUBLESHOOTING
1 Troubleshooting Table
The following table contains fault symptoms, their possible causes and suggests steps to rectify the problem. These may occur during initial installation and power up.
Table 2 - Troubleshooting Table
Symptom Possible Cause Action
Low Pressure Alarm(Mattress)
Tube-set not connected securely Check the tube-set connector and ensure it is securely fitted to the pump.
CPR not fully closed. Close CPR Unit
Cell Leak. Trace and replace faulty part.
Low Pressure Alarm (Pump)
Damaged/Disconnected tube. Check/Replace.
Faulty Compressor Check/Replace.(Chapter 5, Page 13, Section 12).
Blocked Air Filter Check/Replace.(Chapter 5, Page 3, Section 2).
Power Fail Alarm Power has been removed from the pump.
Blown Fuse.
Re-apply power or switch the pump off.
Check/Replace.(Chapter 5, Page 7, Section 6).
Service Alarm Pump has detected an internal fault. Trace and replace faulty part.
Faulty Microswitch Test and Replace if required.(Chapter 5, Page 15, Section 14).
Faulty Gearbox Check/Replace if required. (Chapter 5, Page 15, Section 18).

Troubleshooting Alpha Active 4 Service Manual
Chap 2 Issue 1Page 2 SER0018 April 2010
Alpha Active 4 Service Manual Maintenance
Issue 1 Chap 3April 2010 SER0018 Page 1
CHAPTER 3
MAINTENANCE
WARNING: BEFORE DISMANTLING THE PUMP, ENSURE UNIT HAS BEEN ISOLATED FROM THE POWER SUPPLY BY REMOVING THE CORD PLUG FROM THE WALL OUTLET.
WARNING: A POTENTIAL ELECTRICAL SHOCK HAZARD EXISTS WHEN THE BACK COVER IS REMOVED, EVEN WITH THE PUMP SWITCHED OFF.
CAUTION: Static Sensitive DevicesThis pump should only be opened by personnel trained in ESD methods and with appropriate equipment and anti-static protection.
1 Pump Service
A pump should be serviced every 12 months. To carry out a service on the pump, do the following:
1.1 Carry out the Pump Maintenance Checks (Refer to Page 1, Section 2).
1.2 Replace the air inlet filter.
2 Pump Maintenance Checks
If any parts are found to be damaged they must be replaced in accordance with Pump Repair.
2.1 Visually inspect the following for damage, wear and potential faults:
• Base of Pump Check base is free from debris.
• Inlet Filter Check condition.
• Compressor Check compressor seating.
• Electrical Connections Check connections are secure and completely insulated.
• Tubing Check completely pushed on and are kink free.
• Power Switch Check switch illuminates when ON.
• Wiring Check wiring is intact.Check electrical insulation are not damaged.
• Air flow Check air flow is alternating.
• Outlet Tubes Check tubes are secure.
Maintenance Alpha Active 4 Service Manual
Chap 3 Issue 1Page 2 SER0018 April 2010
3 Mattress Service
To carry out a service on the mattress, do the following:
3.1 Carry out the Mattress Maintenance Checks (Refer to Page 2, Section 4).
4 Mattress Maintenance Checks
If any parts are found to be damaged they must be replaced in accordance with Mattress Repair.
4.1 Visually inspect the following for damage, wear and potential faults:
4.2 Carry out a function test on the pump/mattress system in accordance with Chapter 4.
5 Alarm Functions
Power Fail AlarmSwitch pump off at mains/power socket, leaving the pump switched on. The red power fail indicator will illuminate when a mains power failure has been detected. An audible alarm will sound until power is resumed or the pump is switched off using the on/off button.
Low Pressure Indicator5.1 Block the air outlets on the pump.
5.2 Switch the pump on and allow Low Pressure indicator to extinguish.
5.3 Remove the blockage from the air outlets. The red Low Pressure indicator will illuminate and and audible alarm will sound.
Service Pump/FaultThe yellow service/pump fault indicator will illuminate and remain on if the pump has detected an internal fault. Refer to Troubleshooting to help diagnose the fault, refer to Chapter 2.
• Base and Top Cover Check for tears, staining, clarity of printed labels.
• Base/Top cover Zip Check the zip runs freely and condition of zip teeth.
• Fixing Straps Check condition and security.
• Connectors Check for damage and security.
• Tubing Check for security and ensure no kinks or twists.
• Cells Check for damage.
• Manifold Check for damage and security.
• Press Studs Check condition.
• CPR Check operation of Fast Deflate mechanism.
• Tubeset Assembly Check for damage and security of connection.
Alpha Active 4 Service Manual Testing
Issue 1 Chap 4April 2010 SER0018 Page 1
CHAPTER 4
TESTING
CAUTION: Electrostatic discharge can seriously damage the Main PCB. Prior to replacing it, adequate earthing precautions must be taken.
Note: In all cases the pump and mattress must be tested together as a system.
1 Mattress Visual Inspection
Ensure that the mattress is checked as follows:
1.1 All studs must be secure and all inlet connectors fitted securely.
1.2 The mattress contains 19 cells which are studded to both sides of the mattress. The bottom of each cell connected to the static feed, the top half connected to the alternating feed (the head section cells top half are connected to the static feed). Ensure that the cells are retained centrally by the loops in the base cover.
2 Pump Visual Inspection
2.1 Ensure there are no cracks or marks on the pump case. Ensure the labels are intact and readable. Check there are no marks or fractures in the Pump outlet module.
2.2 Ensure the mains lead is fully secure and there are no cuts or damage to the cable.
3 Pump Flow, Pressure, and Function Test
You will also need:
• A sphygmomanometer or pressure gauge (0-160mmHg)• A flow meter (0-10 litres/minute)
To carry out a system functional test complete the following procedures:
• Flow and Pressure Checks• Electrical Testing• Functional Test
The following procedures must be carried out after a service or major repair of the pump. To test/calibrate pump correctly, the following equipment (or equivalent) is required:
Note: All test equipment must be calibrated to national or international standards.
Flow and Pressure Checks3.1 Set the pressure control on the pump to maximum (200kg) setting.
3.2 Connect a dual flow pressure meter, via a valve, to whichever outlet is working.
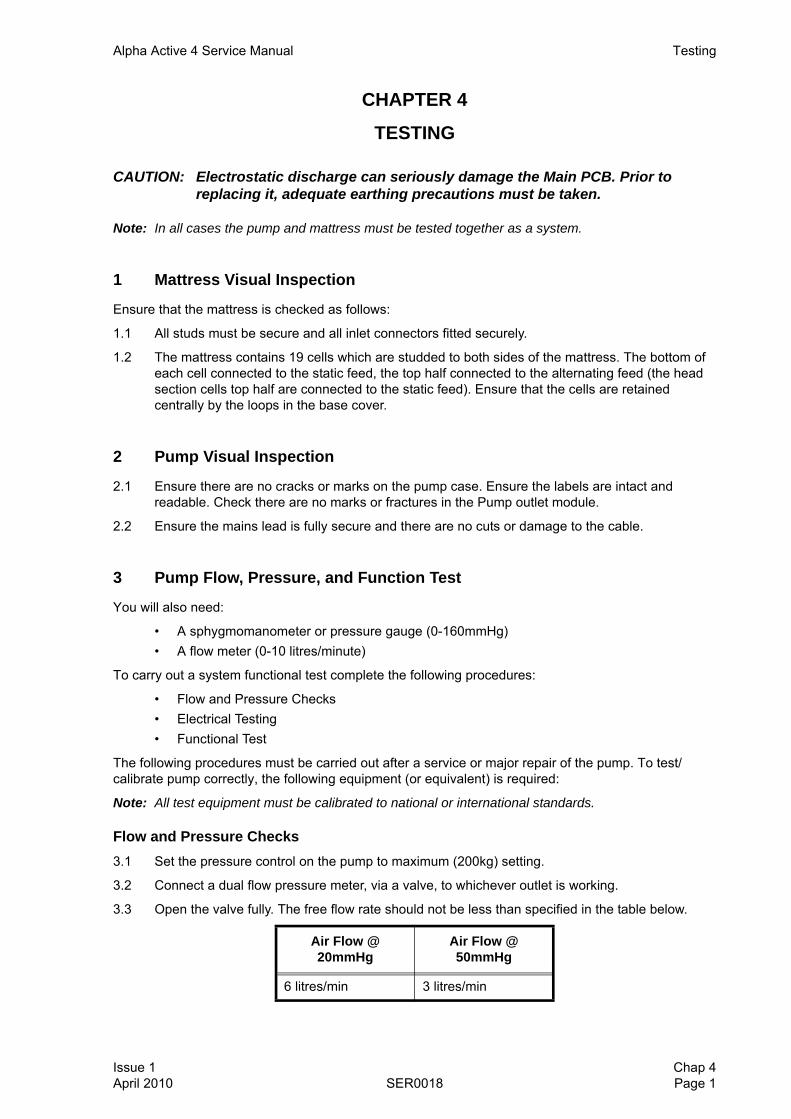
3.3 Open the valve fully. The free flow rate should not be less than specified in the table below.
Air Flow @ 20mmHg
Air Flow @ 50mmHg
6 litres/min 3 litres/min
Testing Alpha Active 4 Service Manual
Chap 4 Issue 1Page 2 SER0018 April 2010
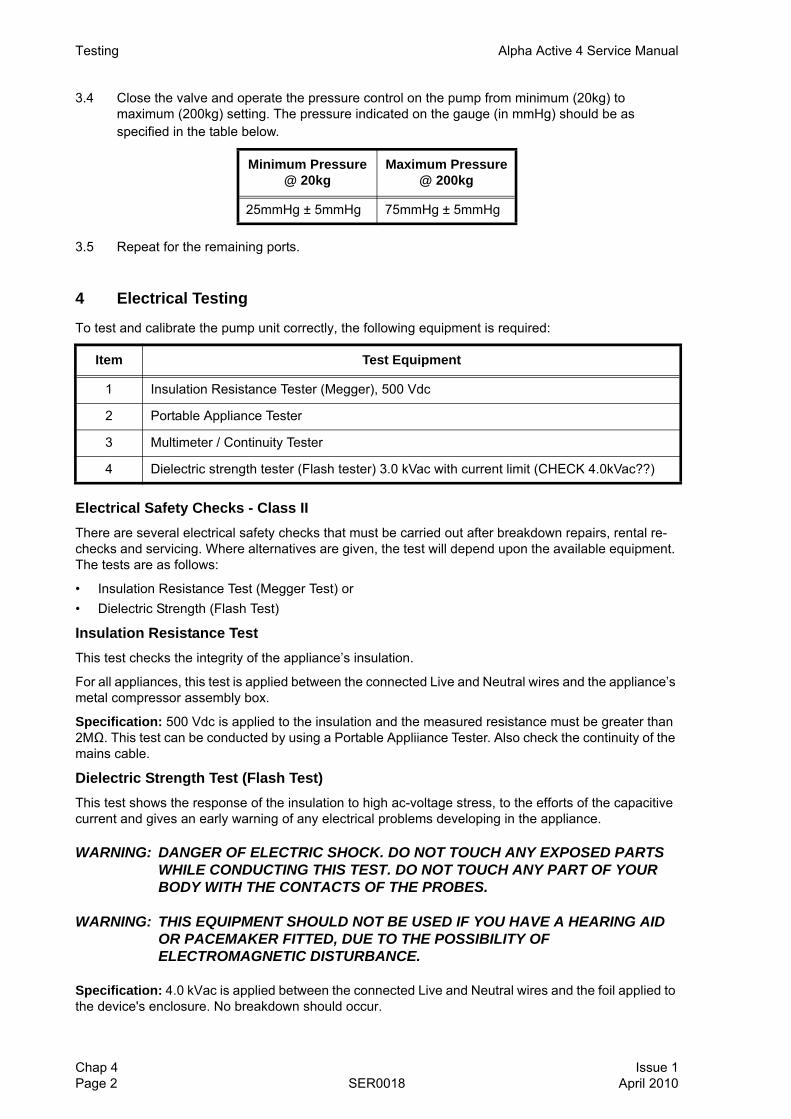
3.4 Close the valve and operate the pressure control on the pump from minimum (20kg) to maximum (200kg) setting. The pressure indicated on the gauge (in mmHg) should be as specified in the table below.
3.5 Repeat for the remaining ports.
4 Electrical Testing
To test and calibrate the pump unit correctly, the following equipment is required:
Electrical Safety Checks - Class IIThere are several electrical safety checks that must be carried out after breakdown repairs, rental re-checks and servicing. Where alternatives are given, the test will depend upon the available equipment. The tests are as follows:
• Insulation Resistance Test (Megger Test) or• Dielectric Strength (Flash Test)
Insulation Resistance TestThis test checks the integrity of the appliance’s insulation.
For all appliances, this test is applied between the connected Live and Neutral wires and the appliance’s metal compressor assembly box.
Specification: 500 Vdc is applied to the insulation and the measured resistance must be greater than 2MΩ. This test can be conducted by using a Portable Appliiance Tester. Also check the continuity of the mains cable.
Dielectric Strength Test (Flash Test)This test shows the response of the insulation to high ac-voltage stress, to the efforts of the capacitive current and gives an early warning of any electrical problems developing in the appliance.
WARNING: DANGER OF ELECTRIC SHOCK. DO NOT TOUCH ANY EXPOSED PARTS WHILE CONDUCTING THIS TEST. DO NOT TOUCH ANY PART OF YOUR BODY WITH THE CONTACTS OF THE PROBES.
WARNING: THIS EQUIPMENT SHOULD NOT BE USED IF YOU HAVE A HEARING AID OR PACEMAKER FITTED, DUE TO THE POSSIBILITY OF ELECTROMAGNETIC DISTURBANCE.
Specification: 4.0 kVac is applied between the connected Live and Neutral wires and the foil applied to the device's enclosure. No breakdown should occur.
Minimum Pressure@ 20kg
Maximum Pressure@ 200kg
25mmHg ± 5mmHg 75mmHg ± 5mmHg
Item Test Equipment
1 Insulation Resistance Tester (Megger), 500 Vdc
2 Portable Appliance Tester
3 Multimeter / Continuity Tester
4 Dielectric strength tester (Flash tester) 3.0 kVac with current limit (CHECK 4.0kVac??)

Alpha Active 4 Service Manual Testing
Issue 1 Chap 4April 2010 SER0018 Page 3
Note: The voltage levels used for this test, may stress and weaken the insulation. This test is therefore not recommended as a routine test. It should only be used after a major assembly/disassembly has been carried out.
Functional TestTests must be carried out using a 220-240V 50Hz power supply.
Test Setup and Initial Switch On
4.1 Set the pressure control to minimum (20kg) and ensure that all three outlet ports are open to atmosphere.
4.2 Connect the mains/power cable to a suitable power socket outlet and then set the on/off switch to ‘on’. Verify that the green indicator in the switch is illuminated. Verify that the red LOW PRESSURE indicator is illuminated. Use the fingers or flowtron stopper (part number CAS077) to close all three ports and verify that the LOW PRESSURE indicator goes off.
Power Fail Alarm Check4.3 With the pump operating, disconnect the power supply at the power socket outlet. Verify that,
within 5 seconds, the red POWER FAIL indicator flashes in conjunction with an audible alarm. Reconnect the power supply. Verify the POWER FAIL indicator is extinguished.
Low Pressure Alarm Check4.4 Close all three ports. Operate the on/off switch to ‘on’. verify that, after 10 seconds, the SOLID
LOW PRESSURE indicator is extinguished.
4.5 Open all ports to atmosphere. Verify that, after 10 seconds, the red LOW PRESSURE indicator flashes in conjunction with the audible alarm.
Service Alarm CheckTo check the operation of the Service alarm it is necessary to have the case halves open.
WARNING: ENSURE PUMP IS DISCONNECTED FROM THE POWER SUPPLY.
4.6 Open the case halves (Refer to Chapter 5, Page 9, Section 8).
4.7 Disconnect the micro switch from the PCB connector, J4 (Chapter 1, Page 4, Section 2).
4.8 Close the case halves.
4.9 Connect the mains/power cable to a suitable power socket outlet and close all three ports. Operate the on/off switch to ‘on’.
4.10 The service indicator should operate within 10 seconds.
4.11 Operate the on/off switch to ‘off’ position, disconnect the power supply at the power socket outlet.
4.12 Open the case halves and reconnect the micro switch to the PCB connector, J4. (Chapter 1, Page 4, Section 2).
4.13 Close the case halves (Refer to Chapter 5, Page 9, Section 8).
4.14 Connect the mains/power cable to a suitable power socket outlet and close both ports. Operate the on/off switch to ‘on’.
4.15 The service indicator should be extinguished.
5 Mattress Inflation Test
5.1 Test the complete system to ensure correct operation.

Testing Alpha Active 4 Service Manual
Chap 4 Issue 1Page 4 SER0018 April 2010
6 End Setting
6.1 Disconnect the mattress from the pump and coil up the mains cable. Expel all the air from the mattress. The system is now ready to be packed.

Alpha Active 4 Service Manual Pump Repair
Issue 1 Chap 5April 2010 SER0018 Page 1
CHAPTER 5
PUMP REPAIR
WARNING: BEFORE DISMANTLING THE PUMP, ENSURE UNIT HAS BEEN ISOLATED FROM THE POWER SUPPLY BY REMOVING THE CORD PLUG FROM THE WALL OUTLET.
1 General
This chapter details repair procedures for the Alpha Active 4 Pump Unit. All repairs should be carried out by ArjoHuntleigh approved service personnel.
If any cable ties are cut so as to enable removal of parts, replacement ties must be fitted as part of the install procedure.
Table 3 defines the test requirements which must be carried out following certain repairs:
To carry out a flow, pressure and function test on the pump refer to Chapter 4, Page 1, Section 3.
To carry out the electrical tests on the pump refer to Chapter 4, Page 2, Section 4.
Table 3 - Repair to Testing Requirements
Components / Assemblies Function Test Electrical Safety Tests
Front Casing Yes Yes
Rear Casing No Yes
Display PCB Yes Yes
Main PCB Yes Yes
Bed Hooks No Yes
Compressor Yes Yes
Rotor/Stator Assembly Yes Yes
Mains Lead No Yes
Mains Switch No Yes
Terminal Block No Yes
Transformer No Yes
Air Filter Yes Yes
Oulet Connector Yes Yes

Pump Repair Alpha Active 4 Service Manual
Chap 5 Issue 1Page 2 SER0018 April 2010
Figure 3 - Replace the Air Filter
Table 4 - Replace the Air Filter Parts List
Item Part Number Description Qty
10 648402 Rear Case Alpha Active 3 and 4 1
20 648405 Air Filter Cover 1
- 648404 Air Filter Replacement 1
10
20
Alpha Active 4 Service Manual Pump Repair
Issue 1 Chap 5April 2010 SER0018 Page 3
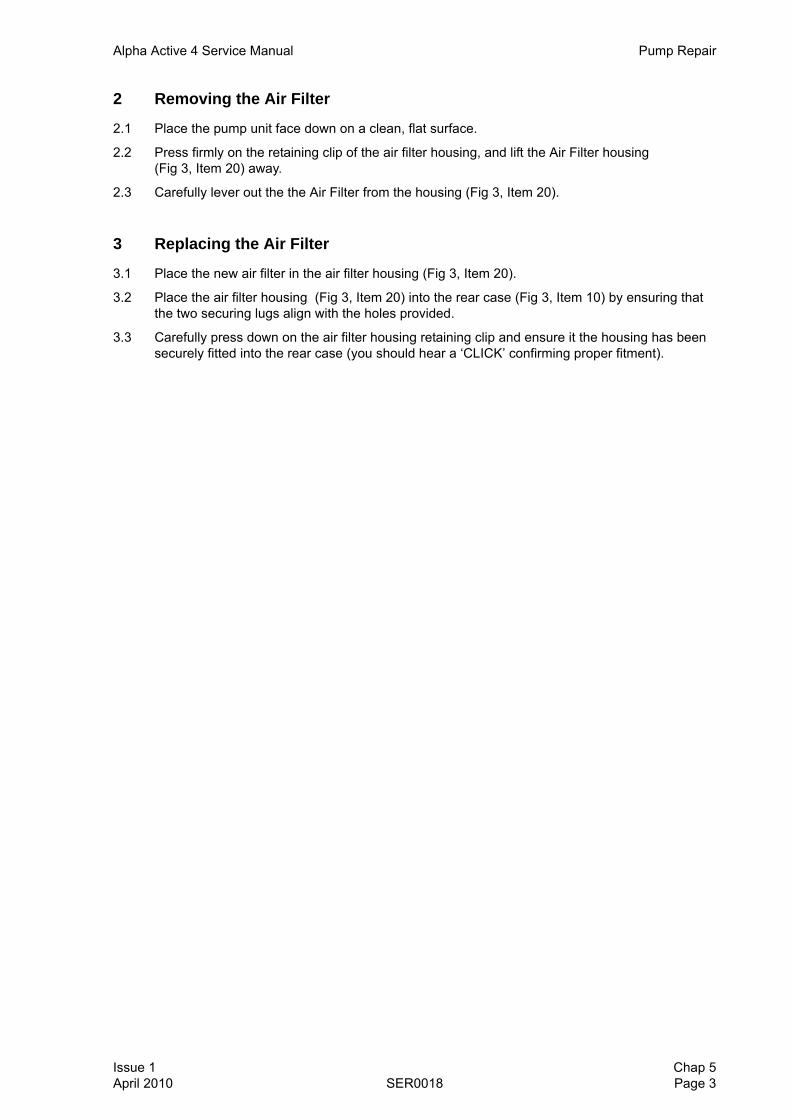
2 Removing the Air Filter
2.1 Place the pump unit face down on a clean, flat surface.
2.2 Press firmly on the retaining clip of the air filter housing, and lift the Air Filter housing (Fig 3, Item 20) away.
2.3 Carefully lever out the the Air Filter from the housing (Fig 3, Item 20).
3 Replacing the Air Filter
3.1 Place the new air filter in the air filter housing (Fig 3, Item 20).
3.2 Place the air filter housing (Fig 3, Item 20) into the rear case (Fig 3, Item 10) by ensuring that the two securing lugs align with the holes provided.
3.3 Carefully press down on the air filter housing retaining clip and ensure it the housing has been securely fitted into the rear case (you should hear a ‘CLICK’ confirming proper fitment).
Pump Repair Alpha Active 4 Service Manual
Chap 5 Issue 1Page 4 SER0018 April 2010
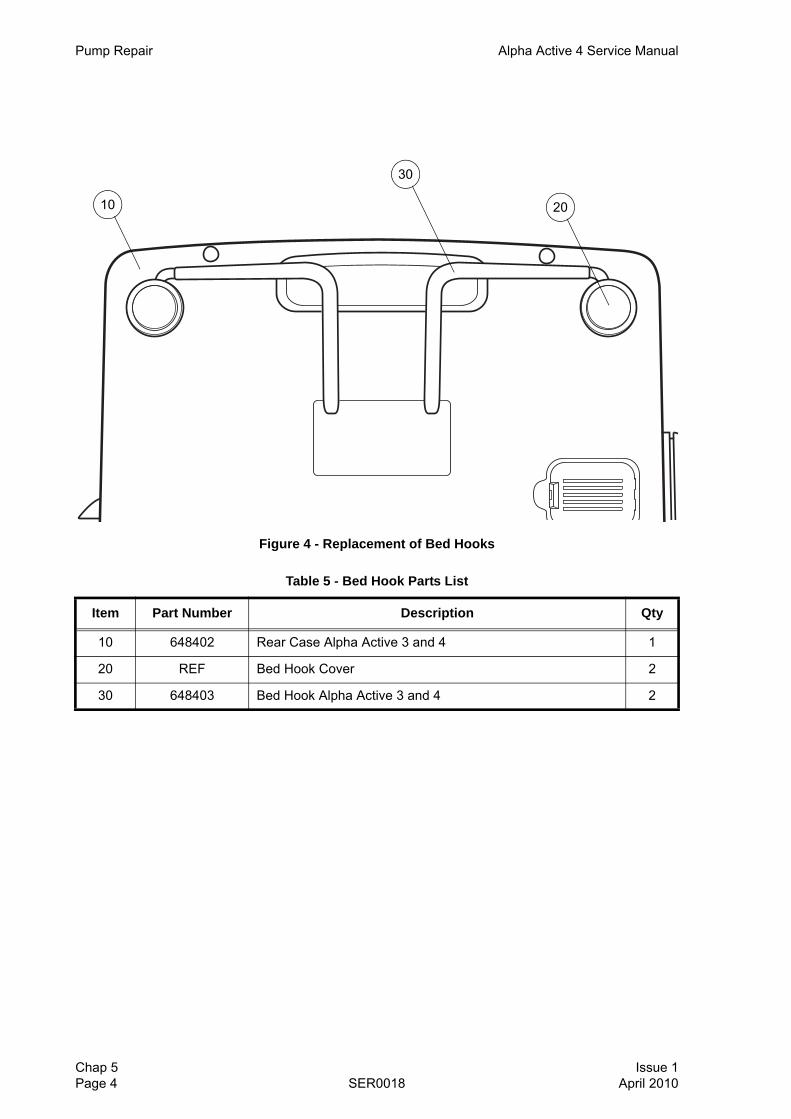
Figure 4 - Replacement of Bed Hooks
Table 5 - Bed Hook Parts List
Item Part Number Description Qty
10 648402 Rear Case Alpha Active 3 and 4 1
20 REF Bed Hook Cover 2
30 648403 Bed Hook Alpha Active 3 and 4 2
10 20
30
Alpha Active 4 Service Manual Pump Repair
Issue 1 Chap 5April 2010 SER0018 Page 5
4 Removing The Bed Hooks
4.1 Place the pump unit face down on a clean, flat surface.
4.2 Ensure the Bed Hook is folded against the pump.
4.3 Using a small flat tool, remove the Bed Hook Cover by inserting the tool into the aperture on the top edge of the cover.
4.4 Remove the two securing screws from the Bed Hook Bracket.
Note: You may be required to gently lever the bracket away from the pump in order to fully remove it. If so, do this via the top edge of the recess, and ensure you place a free hand over the bracket to prevent its loss.
4.5 Rotate the hook 90° and remove from the pump casing.
4.6 Repeat Para 4.2 to Para 4.5 for the other Hook.
5 Replacing the Bed Hooks
5.1 Firmly insert the new Hook (Fig 4, Item 30) at 90° to the pump case, into the corresponding recess.
5.2 Whilst applying pressure to the hook, rotate it so it is folded in against the pump.
5.3 Position the Bed Hook Bracket and fit the two retaining screws.
5.4 To refit the Bed Hook Cover.
5.4.1 Clean all previous glue residue off from both the cover and the recess lip.
5.4.2 Apply an instant adhesive (Loctite 460 or similar) to the lip within the recess of the pump case.
5.4.3 Firmly press the Bed Hook cover into position.
5.5 Repeat for the other Hook.
5.6 Assemble the case (Refer to Page 9, Section 9).
Pump Repair Alpha Active 4 Service Manual
Chap 5 Issue 1Page 6 SER0018 April 2010
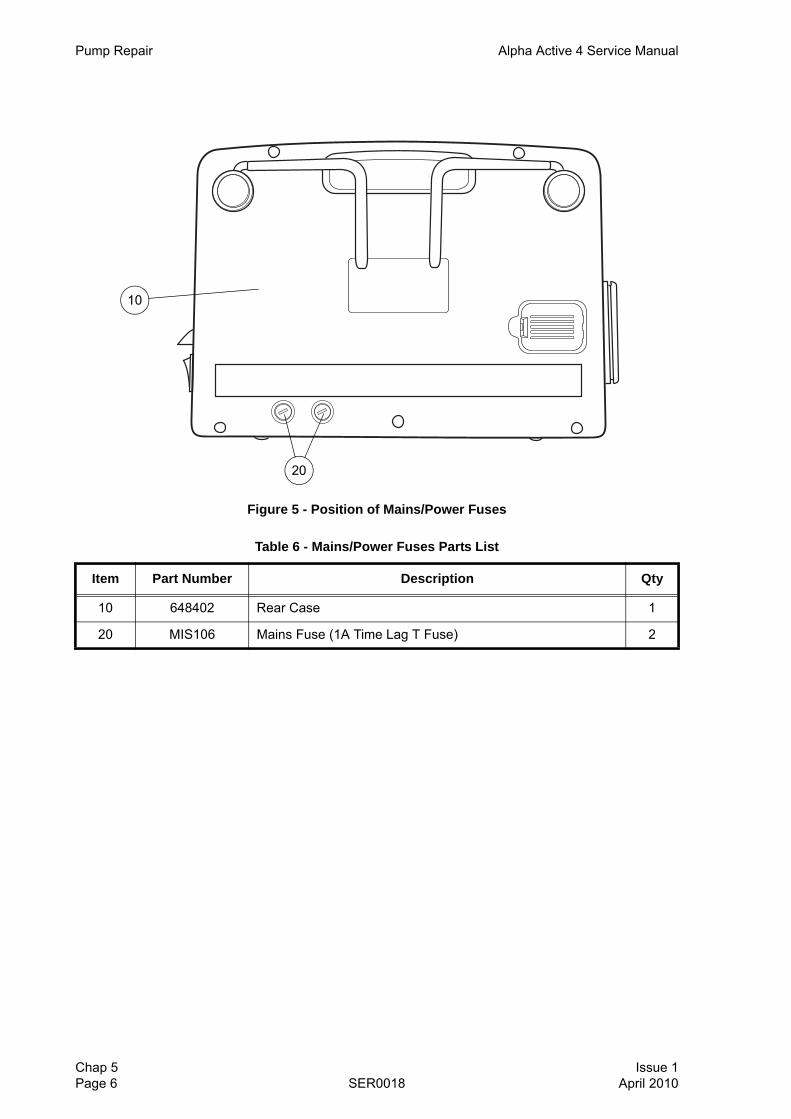
Figure 5 - Position of Mains/Power Fuses
Table 6 - Mains/Power Fuses Parts List
Item Part Number Description Qty
10 648402 Rear Case 1
20 MIS106 Mains Fuse (1A Time Lag T Fuse) 2
10
20
Alpha Active 4 Service Manual Pump Repair
Issue 1 Chap 5April 2010 SER0018 Page 7
6 Removing the Mains/Power Fuses
WARNING: BEFORE DISMANTLING THE PUMP, ENSURE UNIT HAS BEEN ISOLATED FROM THE POWER SUPPLY BY REMOVING THE CORD PLUG FROM THE WALL OUTLET.
6.1 Place the pump unit face down on a clean, flat surface.
6.2 Using a flatbladed screwdriver, remove the fuse holder from the back of the rear case by unscrewing anti-clockwise.
6.3 Pull the blown fuse from its holder.
7 Installing the Mains/Power Fuses
7.1 Firmly push the new fuse into its holder.
7.2 Place the fuse holder into position on the back of the rear case.
7.3 Using a flatbladed screwdriver tighten clockwise until tight.
Pump Repair Alpha Active 4 Service Manual
Chap 5 Issue 1Page 8 SER0018 April 2010
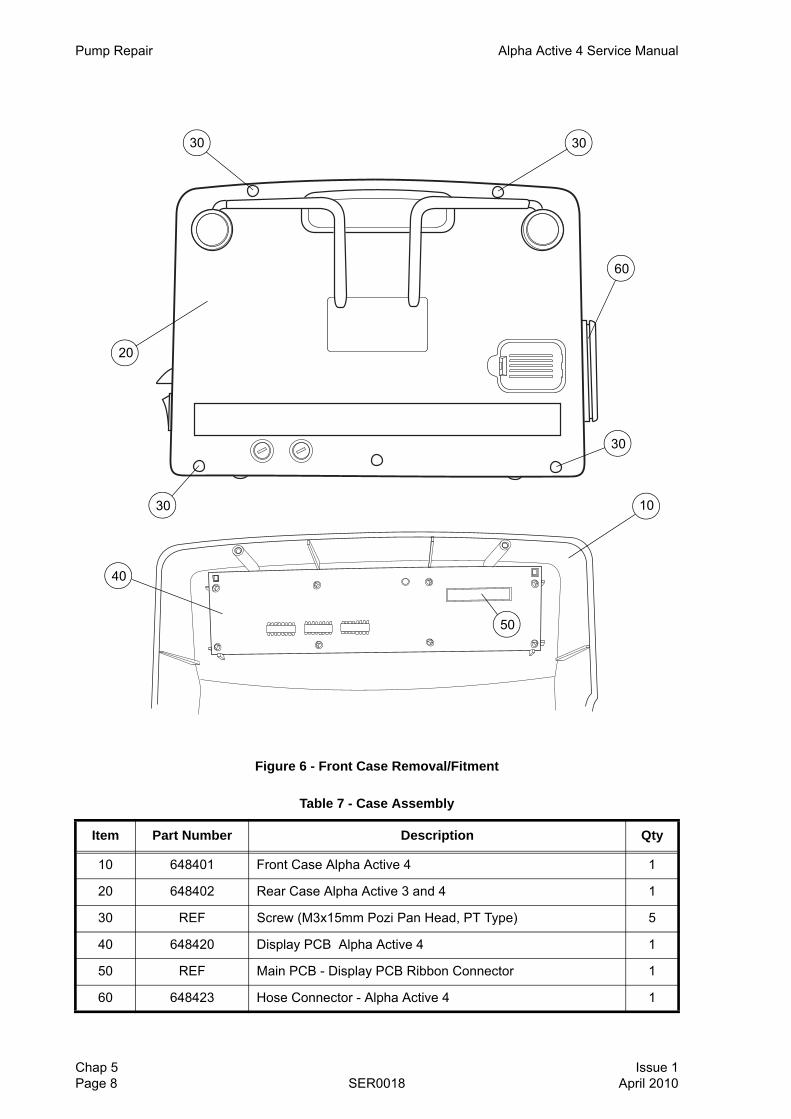
Figure 6 - Front Case Removal/Fitment
Table 7 - Case Assembly
Item Part Number Description Qty
10 648401 Front Case Alpha Active 4 1
20 648402 Rear Case Alpha Active 3 and 4 1
30 REF Screw (M3x15mm Pozi Pan Head, PT Type) 5
40 648420 Display PCB Alpha Active 4 1
50 REF Main PCB - Display PCB Ribbon Connector 1
60 648423 Hose Connector - Alpha Active 4 1
30
30
20
10
40
30
50
30
60
Alpha Active 4 Service Manual Pump Repair
Issue 1 Chap 5April 2010 SER0018 Page 9
8 Removing the Front Case
WARNING: BEFORE DISMANTLING THE PUMP, ENSURE UNIT HAS BEEN ISOLATED FROM THE POWER SUPPLY BY REMOVING THE CORD PLUG FROM THE WALL OUTLET.
8.1 Place the pump unit face down on a clean, flat surface.
8.2 Unscrew the five screws (Fig 6, Item 30).
8.3 Carefully turn the pump over, collecting the five screws (Fig 6, Item 30), keeping them in a safe place.
8.4 Carefully pull apart the two cases, ensuring the compressor remains in the rear case.
Note: The front case contains a PCB connected via a ribbon to the main PCB in the rear case.
8.5 Within the front case, on the Display PCB pull apart the two ribbon securing clips.
8.6 Remove the ribbon from the Display PCB.
8.7 The front case is now removed.
9 Replacing the Front Case
9.1 Place the pump rear case (Fig 6, Item 20) on a flat surface with the inner components facing upward.
9.2 Plug the Main PCB - Display PCB ribbon cable into the rear of the display PCB ribbon connector (Fig 6, Item 50) within the front case.
9.3 Using thumbs carefully push down on the ribbon connector until the two securing clips ‘click’ into place over it.
9.4 Place the front case (Fig 6, Item 10) on top of the rear case (Fig 6, Item 20) ensuring that no wires are trapped.
9.5 Carefully turn the pump over so the front is face down. Install the five screws (Fig 6, Item 30) to the rear case and tighten.
Pump Repair Alpha Active 4 Service Manual
Chap 5 Issue 1Page 10 SER0018 April 2010
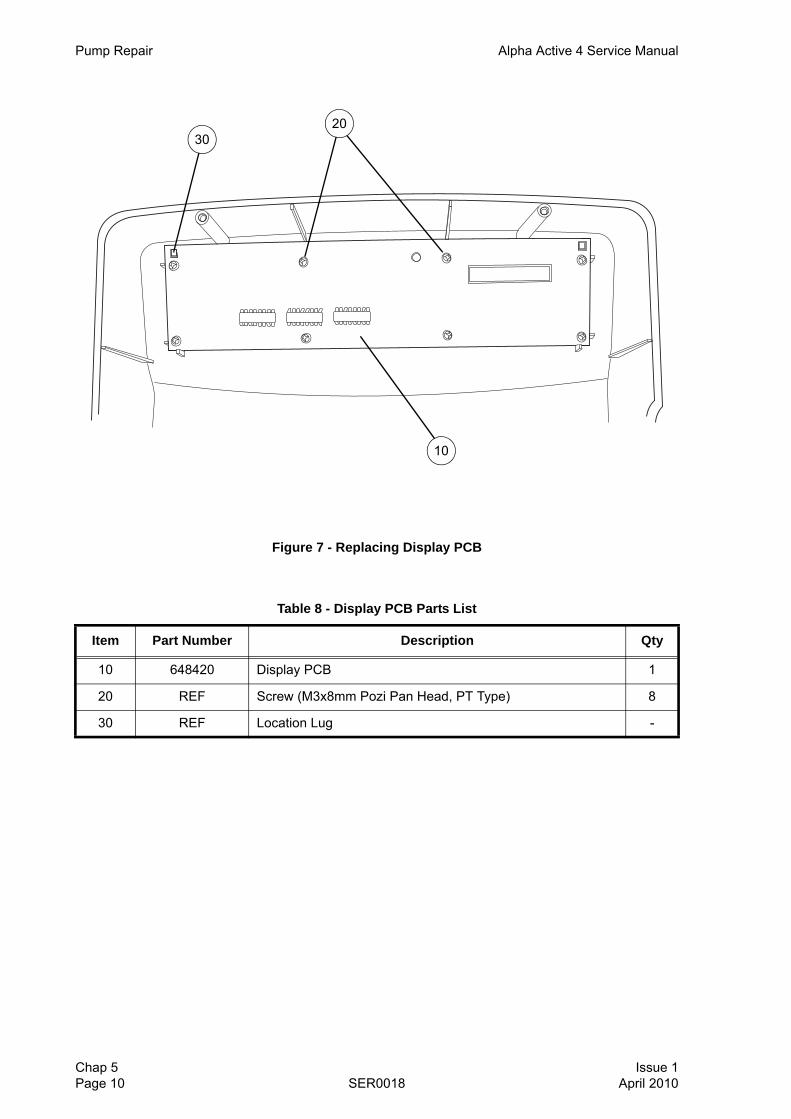
Figure 7 - Replacing Display PCB
Table 8 - Display PCB Parts List
Item Part Number Description Qty
10 648420 Display PCB 1
20 REF Screw (M3x8mm Pozi Pan Head, PT Type) 8
30 REF Location Lug -
20
10
30

Alpha Active 4 Service Manual Pump Repair
Issue 1 Chap 5April 2010 SER0018 Page 11
10 Removing the Display PCB
10.1 Remove the Front case (Refer to Page 9, Section 8).
10.2 Remove the eight fixing screws (Fig 7, Item 20) from the display PCB.
10.3 Carefully lift the Display PCB (Fig 7, Item 10) out of the front casing.
11 Installing the Display PCB
11.1 Insert the base of the Display PCB (Fig 7, Item 10) into position within the front casing, guiding the square holes on the PCB to the location lugs (Fig 7, Item 30) within the front case.
11.2 Refit the eight fixing screws (Fig 7, Item 20).
11.3 Replace the Front case (Refer to Page 9, Section 9).

Pump Repair Alpha Active 4 Service Manual
Chap 5 Issue 1Page 12 SER0018 April 2010
Figure 8 - Compressor Fitment/Removal
Table 9 - Compressor Assembly
Item Part Number Description Qty
10 648408 Compressor 1
20 REF Compressor Outlet -
30 REF Compressor Mounting Plate -
40 648425 Terminal Block 1
50 REF T-Piece Connector 1
40
50
30
20
10

Alpha Active 4 Service Manual Pump Repair
Issue 1 Chap 5April 2010 SER0018 Page 13
12 Removing the Compressor Assembly
12.1 Remove the front case (Refer to Page 9, Section 8).
12.2 Remove the two red wires from the Terminal Block terminals T5 and T6.
12.3 Pull these wires free from other wiring within the rear case, noting the routing of the wires.
12.4 Remove the Compessor air outlet feed (Fig 8, Item 20) from the compressor (Fig 8, Item 10).
12.5 Lift the compressor assembly (Fig 8, Item 10) away.
13 Installing the Compressor Assembly
13.1 Place the compressor assembly into the rear case, ensuring the mounting plate (Fig 8, Item 30) sits in its moulding within the case.
13.2 Replace the compressor air feed (Fig 8, Item 20) to the new compressor (Fig 8, Item 10).
13.3 Route the compressor wires as required and connect to the appropriate terminals on the Terminal Block.
13.4 Reassemble the case (Refer to Page 9, Section 9).

Pump Repair Alpha Active 4 Service Manual
Chap 5 Issue 1Page 14 SER0018 April 2010
Figure 9 - Removing the Rotor/Stator Assembly
Table 10 - Rotor/Stator Assembly
Item Part Number Description Qty
10 648422 Rotor/Stator Alpha Active 4 1
20 REF Screw (M3x10mm Pozi Pan Head, PT Type) 2
30 REF Rotor/Stator Spade Connectors -
40 648427 Gearbox Assembly 1
50 648417 Microswitch 1
60 REF Microswitch Securing Screw (M3x15mm Pozi Pan Head, PT Type)
2
10 2030
40
Microswitch omitted for clairity
A
B
C
D
6050

Alpha Active 4 Service Manual Pump Repair
Issue 1 Chap 5April 2010 SER0018 Page 15
14 Removing the Microswitch Assembly14.1 Remove the front case (Refer to Page 9, Section 8).
14.2 Remove the two spade connectors from the Rotor/Stator microswitch, noting wires/connections.
14.3 Remove the two securing screws (Fig 9, Item 60) that hold the microswitch in place.
14.4 You can now remove the Microswtich (Fig 9, Item 50).
15 Installing the Microswitch Assembly15.1 Place the microswitch (Fig 9, Item 50) into position and secure with the two securing screws.
15.2 Re-connect the two spade connectors to the microswitch.
15.3 Re-fit the front case (Refer to Page 9, Section 9).
16 Removing the Rotor/Stator Assembly16.1 Remove the front case (Refer to Page 9, Section 8).
16.2 Remove the four tubing connections to the Rotor/Stator, noting their connection locations.
16.3 Remove the two spade connectors from the Rotor/Stator microswitch, noting wires/connections.
16.4 Push down on the Rotor/Stator assembly Fig 9, Item 10, and remove the securing pin (D).
16.5 Remove the complete rotor/stator assembly (C,B,A) from the top of the gearbox.
17 Installing the Rotor/Stator Assembly17.1 Refering to Figure 9:
17.1.1 Place the spring (A) onto the gearbox spindle as shown.
17.1.2 Place the bottom of the Rotor/Stator (B) onto the gearbox spindle.
17.1.3 Pushing down on the bottom section of the Rotor/Stator, place the top half of the Rotor/Stator (C) onto the gearbox spindle AND while applying pressure, slide the securing pin (D) through the spindle as shown.
17.1.4 Ensure the securing pin (D) is seated within the recess on the top of the rotor/stator assembly.
17.2 Re-connect the two spade connectors to the Rotor/Stator microswitch.
17.3 Connect the four tubing connections to the Rotor/Stator.
17.4 Re-fit the front case (Refer to Page 9, Section 9).
18 Removing the Gearbox Assembly18.1 Remove the rotor/stator assembly (Refer to Page 15, Section 16).
18.2 Remove the two securing screws (Fig 9, Item 20).
18.3 Remove the Gearbox-PCB connector from J3 on the Main PCB.
18.4 You can now remove the Gearbox Assembly (Fig 9, Item 40).
19 Installing the Gearbox Assembly19.1 Place Gearbox assembly (Fig 9, Item 40) into position in the rear case, ensuring the wires exit
the Gearbox in the direction of the compressor.
19.2 Secure with the two securing screws (Fig 9, Item 20).
19.3 Refer to “Installing the Rotor/Stator Assembly”.

Pump Repair Alpha Active 4 Service Manual
Chap 5 Issue 1Page 16 SER0018 April 2010
Figure 10 - Removing the Transformer
Table 11 - Transformer
Item Part Number Description Qty
10 648429 Transformer Alpha Active 4 1
20 REF Screw (M3x10mm Pozi Pan Head, PT Type) 2
20
10

Alpha Active 4 Service Manual Pump Repair
Issue 1 Chap 5April 2010 SER0018 Page 17
20 Removing the Transformer
20.1 Remove the front case (Refer to Page 9, Section 8).
20.2 On the main PCB, disconnect the transformer connection from J1.
20.3 Remove the red wires from Terminals T3 and T4 on the Terminal Block.
Note: Ensure the capacitor remains connected to Terminals T3 and T4.
20.4 Remove the two securing screws (Fig 10, Item 20) that hold the transformer (Fig 10, Item 10) in place.
20.5 You can now remove the transformer (Fig 10, Item 10).
21 Installing the Transformer
21.1 Place the transformer (Fig 10, Item 10) into position in the rear case, ensuring it is correctly seated and orientation is so that the Main PCB wires are in the direction of the PCB.
21.2 Fit the two securing screws (Fig 10, Item 20).
21.3 Re-connect the red wires to Terminals T3 and T4 on the Terminal Block.
Note: Ensure red wires run under all tubing, and that the capacitor remains connected to Terminals T3 and T4.
21.4 Re-connect the transformer connection to the Main PCB J1.
21.5 Re-fit the front case (Refer to Page 9, Section 9).
Pump Repair Alpha Active 4 Service Manual
Chap 5 Issue 1Page 18 SER0018 April 2010
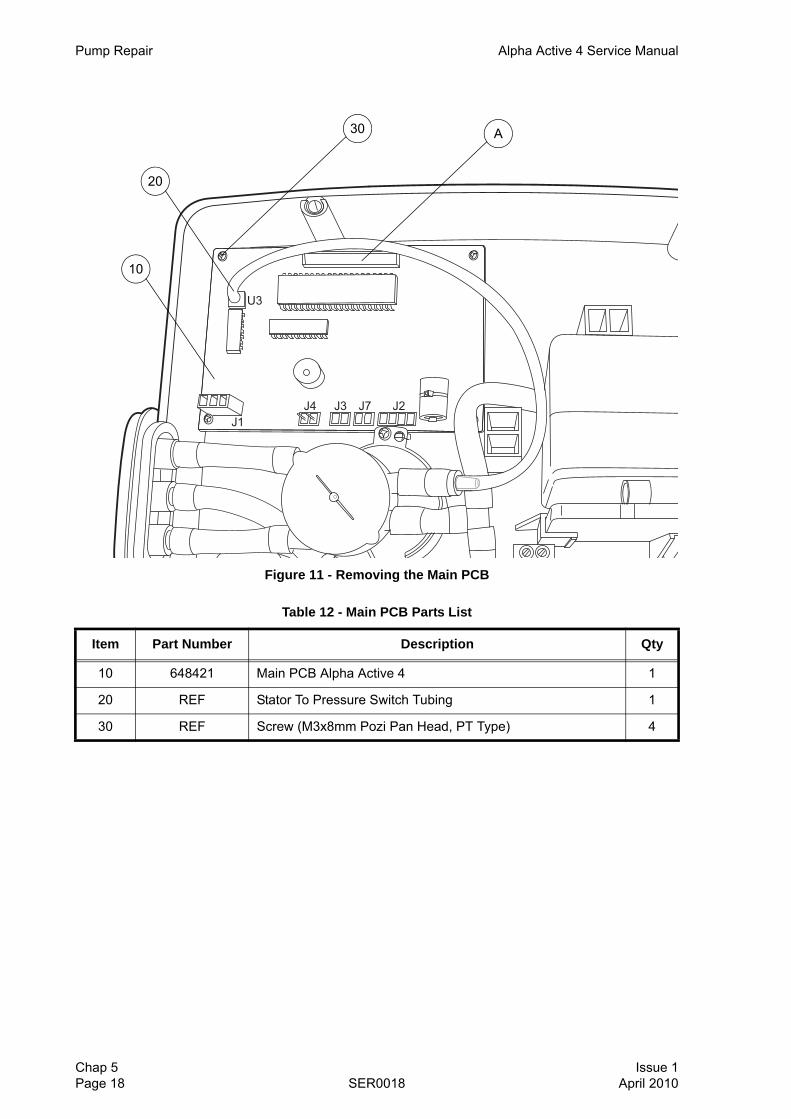
Figure 11 - Removing the Main PCB
Table 12 - Main PCB Parts List
Item Part Number Description Qty
10 648421 Main PCB Alpha Active 4 1
20 REF Stator To Pressure Switch Tubing 1
30 REF Screw (M3x8mm Pozi Pan Head, PT Type) 4
30
20
10
A
Alpha Active 4 Service Manual Pump Repair
Issue 1 Chap 5April 2010 SER0018 Page 19
22 Removing the Main PCB
22.1 Remove the front case (Refer to Page 9, Section 8).
22.2 On the Main PCB (Fig 11, Item 10), pull apart the two ribbon securing clips, at connector ‘A’.
22.3 Remove the ribbon cable from the Main PCB (Fig 11, Item 10).
22.4 On the main PCB, disconnect:
22.4.1 The transformer connection from J1.
22.4.2 The Rotor/Stator microswitch cable from J4.
22.4.3 The Rotor/Stator cable from J3.
22.4.4 The twin live connector from J7.
22.4.5 The 4-way connector from J2.
22.4.6 The Rotor/Stator tubing (Fig 11, Item 20) from U3.
22.5 Remove the four corner fixing screws (Fig 11, Item 30) and lift the Main PCB (Fig 11, Item 10) out of the pump case.
23 Replacing the Main PCB
23.1 Place the Main PCB with its component side facing upward, into position in the rear case, ensuring alignment of the four corner fixing holes in Main PCB (Fig 11, Item 10) with the pillars in the rear case. Fit the four retaining screws (Fig 11, Item 30).
23.2 Connect to the Main PCB:
23.2.1 The Rotor/Stator tubing to U3.
23.2.2 The 4-way connector to J2.
23.2.3 The twin live connector to J7.
23.2.4 The Rotor/Stator cable to J3.
23.2.5 The Rotor/Stator microswitch cable to J4.
23.2.6 The transformer connection to J1.
23.3 Plug the ribbon cable into the connector on the Main PCB within the rear case.
Note: If Main PCB - Display PCB ribbon cable has been disconnected from both the PCB’s, ensure upon re-connecting that the location keys are in correct orientation.
23.4 Using thumbs, carefully push down on the ribbon connector until the two securing clips ‘click’ into place over it.
23.5 Re-fit the front case (Refer to Page 9, Section 9).

Pump Repair Alpha Active 4 Service Manual
Chap 5 Issue 1Page 20 SER0018 April 2010
Figure 12 - Removing the Power Fail Battery
Table 13 - Power Fail Battery Parts List
Item Part Number Description Qty
10 648421 Main PCB Alpha Active 4 1
20 648428 Battery 1
30 BP196 Cable Tie 1
3010
20
Alpha Active 4 Service Manual Pump Repair
Issue 1 Chap 5April 2010 SER0018 Page 21
24 Removing Power Fail Battery
24.1 Remove the front case (Refer to Page 9, Section 8).
24.2 Remove the Main PCB (Refer to Page 19, Section 22).
24.3 De-solder the battery connections from the PCB.
25 Replacing Power Fail Battery
25.1 Place the battery (Fig 12, Item 20) onto the PCB (Fig 12, Item 10) ensuring the correct polarity.
25.2 Solder both the positive and negative connections.
25.3 Secure battery to PCB using tie wrap (Fig 12, Item 30).
25.4 Replace the PCB (Refer to Page 19, Section 23).
25.5 Re-fit the front case (Refer to Page 9, Section 9).

Pump Repair Alpha Active 4 Service Manual
Chap 5 Issue 1Page 22 SER0018 April 2010
Figure 13 - Removing the On/Off Switch
Table 14 - On/Off Switch Parts
Item Part Number Description Qty
10 648407 Mains (On/Off) Switch 1
Rear of On/Off Switch10

Alpha Active 4 Service Manual Pump Repair
Issue 1 Chap 5April 2010 SER0018 Page 23
26 Removing the On/Off Switch
26.1 Remove the front case (Refer to Page 9, Section 8).
26.2 Lift the On/Off switch (Fig 13, Item 10) away from the rear pump case.
26.3 Remove the two live spade connectors from the back of the On/Off Switch (terminals 1 and 1A).
26.4 Remove the two neutral spade connectors from the back of the On/Off Switch (terminals 2 and 2A).
26.5 You can now remove the On/Off Switch (Fig 13, Item 10).
27 Installing the On/Off Switch
27.1 Re-connect the live spade connector that runs from the Main PCB to terminal 1 (Refer to Figure 13)on the rear of the On/Off Switch.
27.2 Re-connect the live spade connector that runs from a fuse holder to terminal 1a (Refer to Figure 13) on the rear of the On/Off Switch.
27.3 Re-connect the neutral spade connector that runs from the Terminal block and Main PCB to spade terminal 2 (Refer to Figure 13) on the rear of the On/Off Switch.
27.4 Re-connect the neutral spade connector that runs from a fuse holder to spade terminal 2a (Refer to Figure 13) on the rear of the On/Off Switch.
27.5 Place the On/Off Switch (Fig 13, Item 10) into position in the rear case, ensuring the two live wires are facing outwards from the case.
27.6 Re-fit the front case (Refer to Page 9, Section 9).
Pump Repair Alpha Active 4 Service Manual
Chap 5 Issue 1Page 24 SER0018 April 2010
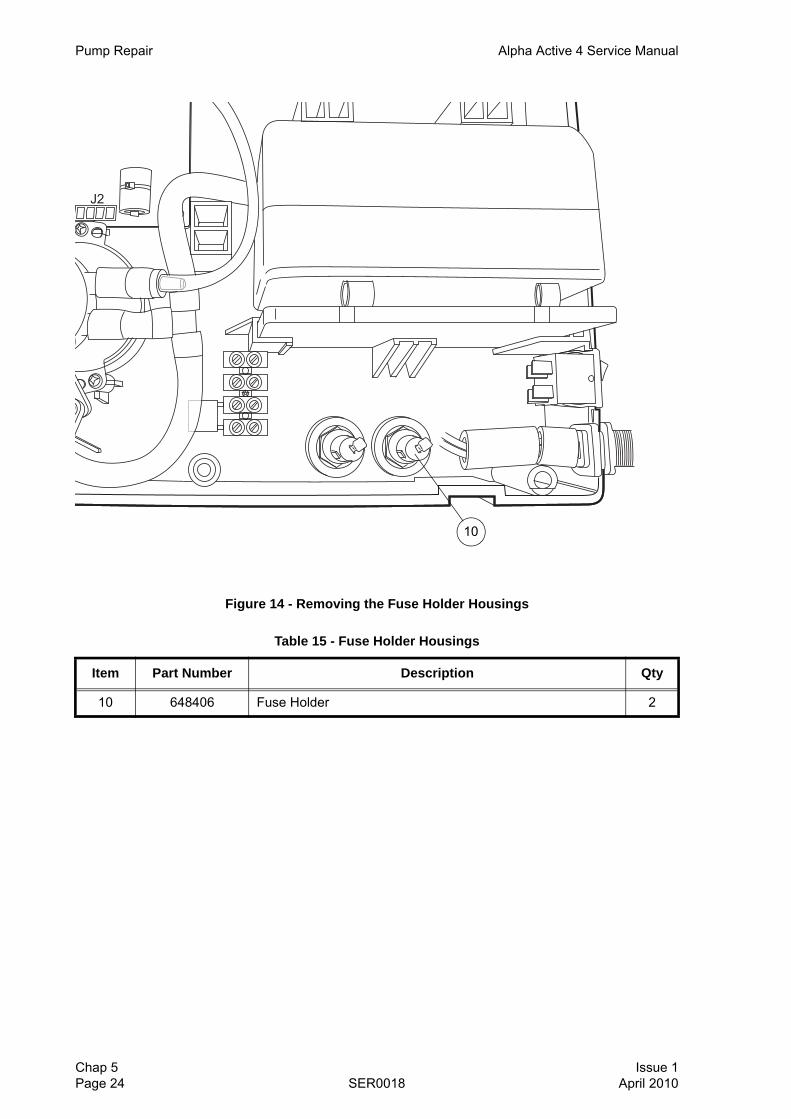
Figure 14 - Removing the Fuse Holder Housings
Table 15 - Fuse Holder Housings
Item Part Number Description Qty
10 648406 Fuse Holder 2
10

Alpha Active 4 Service Manual Pump Repair
Issue 1 Chap 5April 2010 SER0018 Page 25
28 Removing the Fuse Holder Housing
28.1 Remove the front case (Refer to Page 9, Section 8).
28.2 For the right Fuse Holder Housing:
28.2.1 Remove the live Mains/Power Cable spade connector from the side of the fuse holder.
28.2.2 Remove the live On/Off Switch spade connector from the top of the fuse holder.
28.2.3 Unscrew nut and remove the Fuse Holder from the pump.
28.3 For the left Fuse Holder Housing:
28.3.4 Remove the neutral Mains/Power Cable spade connector from the side of the fuse holder.
28.3.5 Remove the neutral On/Off Switch spade connector from the top of the fuse holder.
28.3.6 Unscrew nut and remove the Fuse Holder from the pump.
29 Installing the Fuse Holder Housing
29.1 For the right Fuse Holder Housing:
29.1.1 Secure the Fuse Holder to the pump.
29.1.2 Connect the live On/Off Switch spade connector to the top of the fuse holder.
29.1.3 Connect the live Mains/Power Cable spade connector to the side of the fuse holder.
29.2 For the left Fuse Holder Housing:
29.2.4 Secure the Fuse Holder to the pump.
29.2.5 Connect the neutral On/Off Switch spade connector to the top of the fuse holder.
29.2.6 Connect the neutral Mains/Power Cable spade connector to the side of the fuse holder.
29.3 Re-fit the front case (Refer to Page 9, Section 9).

Pump Repair Alpha Active 4 Service Manual
Chap 5 Issue 1Page 26 SER0018 April 2010
Figure 15 - Removing the Mains/Power Cable
Table 16 - Mains/Power Cable
Item Part Number Description Qty
10 648410 Mains Cable Euro - Alpha Active 4 1
20 648447 Ferrite 28mm 1
30 648449 Ferrite 12mm 1
10
20 30
Alpha Active 4 Service Manual Pump Repair
Issue 1 Chap 5April 2010 SER0018 Page 27
30 Removing the Mains/Power Cable
30.1 Remove the front case (Refer to Page 9, Section 8).
30.2 Remove the live spade connection from the side of the right fuse holder.
30.3 Remove the neutral spade connection from the side of the left fuse holder.
30.4 Remove the two ferrite beads from the Mains/Power Cable.
30.5 You can now remove the Mains/Power Cable.
31 Installing the Mains/Power Cable
31.1 Place the Mains/Power Cable in position in the side of the rear case.
31.2 Re-connect the neutral spade connector to the side of the left fuse holder.
31.3 Re-connect the live spade connector to the side of the right fuse holder.
31.4 Re-fit the front case (Refer to Page 9, Section 9).

Pump Repair Alpha Active 4 Service Manual
Chap 5 Issue 1Page 28 SER0018 April 2010
Figure 16 - Removing the Terminal Block
Table 17 - Terminal Block
Item Part Number Description Qty
10 648425 Terminal Block Alpha Active 4 1
20 REF Screw (M3x15mm Pozi Pan Head, PT Type) 1
30 648449 Filter Capacitor 1
10
30
20
30
Alpha Active 4 Service Manual Pump Repair
Issue 1 Chap 5April 2010 SER0018 Page 29
32 Removing the Terminal Block
32.1 Remove the front case (Refer to Page 9, Section 8).
32.2 Remove the red Transformer wires and the capacitor from Terminals T3 and T4 on the Terminal Block (Fig 16, Item 10).
32.3 Remove the red Main PCB wires from Terminals T1 and T2 on the Terminal Block (Fig 16, Item 10).
32.4 Remove the two live wires from Terminal T8 on the Terminal Block (Fig 16, Item 10).
32.5 Remove the neutral wire from Terminal T7 on the Terminal Block (Fig 16, Item 10).
32.6 Remove the two red compressor wires from Terminals T5 and T6 on the Terminal Block (Fig 16, Item 10).
32.7 Remove the single securing screw (Fig 16, Item 20).
32.8 You can now remove the Terminal Block (Fig 16, Item 10).
33 Installing the Terminal Block
CAUTION: Whilst completing the installation, ensure all wires are free from entrapment.
33.1 Place the Terminal Block (Fig 16, Item 10) into position ensuring it is seated correctly.
33.2 Replace the single securing screw (Fig 16, Item 20).
33.3 Replace the two red compressor wires to Terminals T5 and T6 on the Terminal Block (Fig 16, Item 10).
33.4 Replace the neutral wire from the Main PCB Connector J2 and the On/Off switch to Terminal T7 on the Terminal Block (Fig 16, Item 10).
33.5 Replace the two live wires from the Main PCB Connector J2 and the On/Off switch to Terminal T8 on the Terminal Block (Fig 16, Item 10).
33.6 Replace the red Transformer wires, and the capacitor to Terminals T3 and T4 on the Terminal Block (Fig 16, Item 10).
33.7 Replace the red Main PCB wires to Terminals T1 and T2 on the Terminal Block (Fig 16, Item 10).
33.8 Re-fit the front case (Refer to Page 9, Section 9).

Pump Repair Alpha Active 4 Service Manual
Chap 5 Issue 1Page 30 SER0018 April 2010
Alpha Active 4 Service Manual Mattress Repair
Issue 1 Chap 6April 2010 SER0018 Page 1
CHAPTER 6
MATTRESS REPAIR
1 General
This chapter details repair procedures for the Alpha Active 4 Mattress Replacement. All repairs should be carried out by ArjoHuntleigh approved service personnel.
It is easier to carry out the repair procedures in this chapter if the mattress is fully deflated first. Disconnect the tubeset between the mattress and the pump to deflate the mattress.
After carrying out a service or any of these repairs on the mattress, check the following:
1.1 All press studs on the mattress are connected.
1.2 All cell assemblies are securely held by their straps. The repair will normally have disturbed the position of the other cells, and they should be re-positioned accordingly.
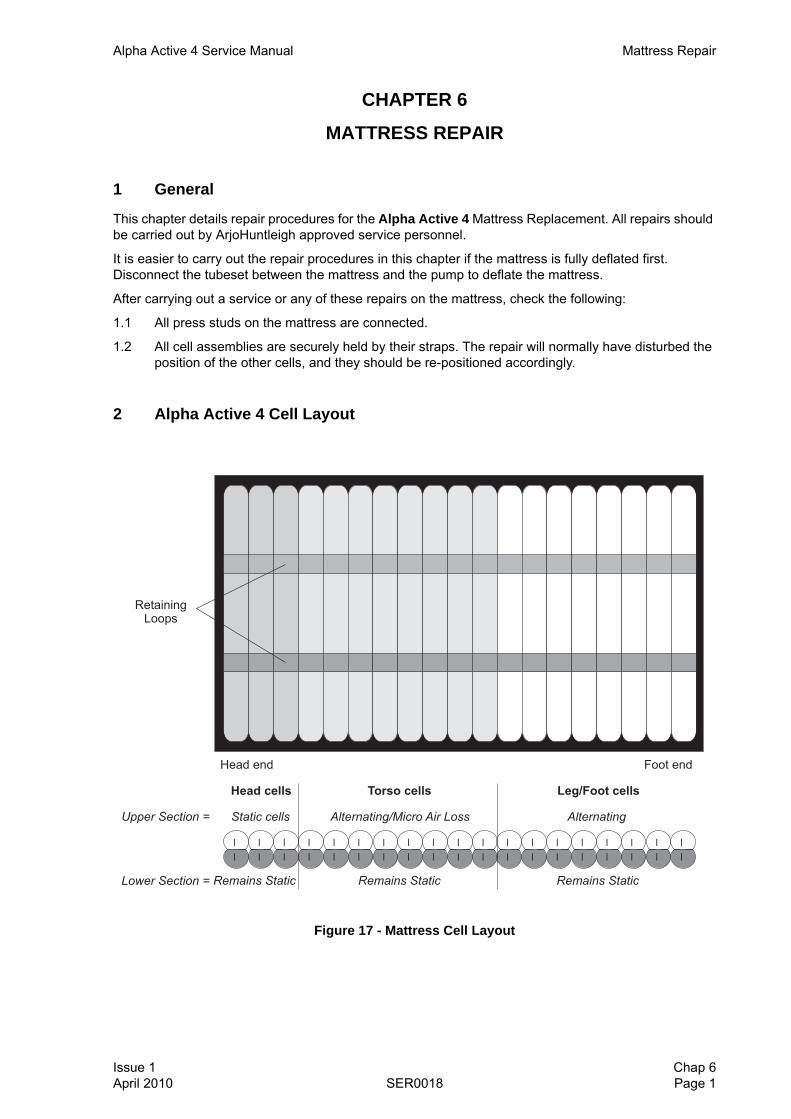
2 Alpha Active 4 Cell Layout
Figure 17 - Mattress Cell Layout
Mattress Repair Alpha Active 4 Service Manual
Chap 6 Issue 1Page 2 SER0018 April 2010
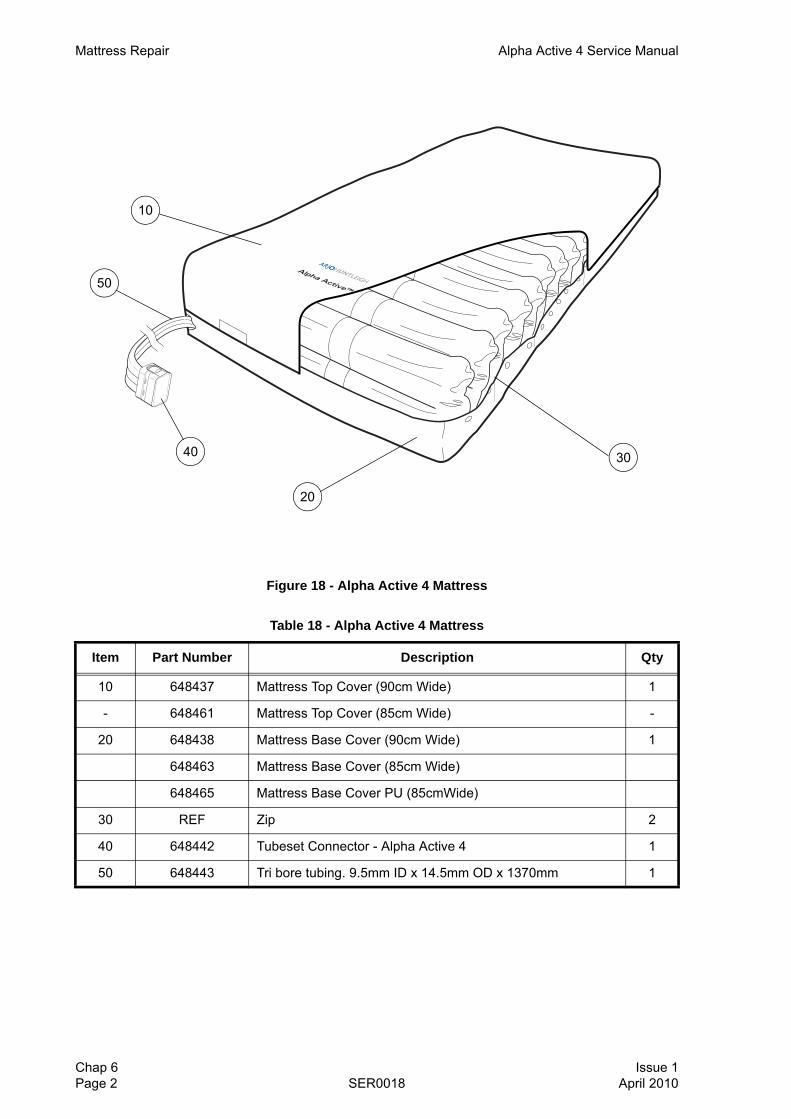
Figure 18 - Alpha Active 4 Mattress
Table 18 - Alpha Active 4 Mattress
Item Part Number Description Qty
10 648437 Mattress Top Cover (90cm Wide) 1
- 648461 Mattress Top Cover (85cm Wide) -
20 648438 Mattress Base Cover (90cm Wide) 1
648463 Mattress Base Cover (85cm Wide)
648465 Mattress Base Cover PU (85cmWide)
30 REF Zip 2
40 648442 Tubeset Connector - Alpha Active 4 1
50 648443 Tri bore tubing. 9.5mm ID x 14.5mm OD x 1370mm 1
20
10
3040
50

Alpha Active 4 Service Manual Mattress Repair
Issue 1 Chap 6April 2010 SER0018 Page 3
3 Removing The Top Cover
3.1 Fully unroll the mattress on a suitable surface.
3.2 Undo the zips (Fig 18, Item 30) on both sides of the top cover.
3.3 Remove the top cover.
4 Installing the Top Cover
4.1 Position the top cover (Fig 18, Item 10) on to the mattress. Make sure the feet symbol is at the foot end of the mattress.
4.2 Secure the two zips on the long sides of the mattress (Fig 18, Item 30) to the correct side of the top cover (Fig 18, Item 10).
Mattress Repair Alpha Active 4 Service Manual
Chap 6 Issue 1Page 4 SER0018 April 2010
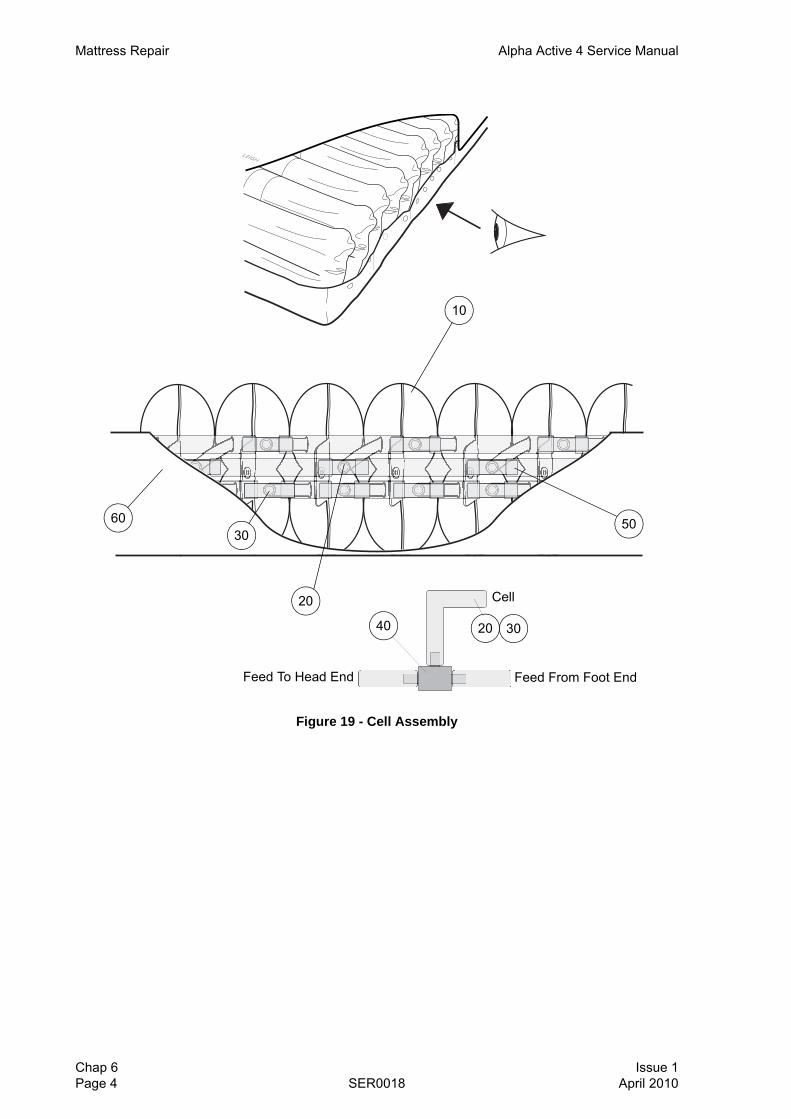
Figure 19 - Cell Assembly
20
10
30
40
60
Cell
Feed From Foot EndFeed To Head End
50
20 30

Alpha Active 4 Service Manual Mattress Repair
Issue 1 Chap 6April 2010 SER0018 Page 5
5 Removing Cell Assembly
5.1 Remove the top cover, (Refer to Page 3, Section 3).
5.2 Disconnect the press studs from each end of the cell ((Fig 19, Item 60).
5.3 Disconnect the lower (Fig 19, Item 30) and upper (Fig 19, Item 20) cell feed connectors from the T-Pieces (Fig 19, Item 40).
5.4 Pull the cell out of the retaining loop in the base cover and remove from the mattress.
6 Installing Cell Assembly
6.1 Pass the cell through the loop on the air pad cover and centralise the cell.
6.2 Connect the upper (Fig 19, Item 20) and lower (Fig 19, Item 30) cell feed connectors to each T-Pieces (Fig 19, Item 40).
Note: Installing the cell feeds is made easier if the cell connector and/or T-Piece is wetted immediately prior to insertion.
6.3 Reconnect the male press studs to the female studs (Fig 19, Item 60) at the end of the cell.
6.4 Install the top cover (Refer to Page 3, Section 4).
Table 19 - Cell Assembly Parts List
Item Part Number Description Qty
10 648439 Standard Cell (90cm Wide) 11
648440 Ventilated Cell (90cm Wide) 8
648467 Standard Cell (85cm Wide)
648468 Ventilated Cell (85cm Wide)
648470 Standard Cell PU(85cm Wide)
648471 Ventilated Cell PU (85cm Wide)
20 REF Upper Cell Feed (Part of Item 10) -
30 REF Lower (Static) Cell Feed (Part of Item 10) -
40 REF T-Piece 38
50 REF Single Bore Tubing -
- REF Press Stud Male 1
60 REF Press Stud Female (Located Inside Mattress Base Cover) 1
Mattress Repair Alpha Active 4 Service Manual
Chap 6 Issue 1Page 6 SER0018 April 2010
Figure 20 - Manifold Tubing
80
80
90
10
20
20
20
20
20
20
20
20
20
20
20
20
20
20
20
20
20
30
30 30
30
40
50
50
20
80 20
60
60
60
60
60
60
60
70
A
B - Continued from point ‘A’

Alpha Active 4 Service Manual Mattress Repair
Issue 1 Chap 6April 2010 SER0018 Page 7
7 Replacing Manifold Tubing
7.1 Remove the top cover, (Refer to Page 3, Section 3).
7.2 Disconnect the press studs from each end of the cell ((Fig 19, Item 60).
7.3 Disconnect the lower (Fig 19, Item 30) and upper (Fig 19, Item 20) cell feed connectors from the T-Pieces (Fig 19, Item 40).
7.4 Connect the upper (Fig 19, Item 20) and lower (Fig 19, Item 30) cell feed connectors to each T-Pieces (Fig 19, Item 40).
Note: Installing the cell feeds is made easier if the cell connector and/or T-Piece is wetted immediately prior to insertion.
7.5 Reconnect the male press studs to the female studs (Fig 19, Item 60) at the end of the cell.
7.6 Install the top cover (Refer to Page 3, Section 4).
Table 20 - Cell Assembly Parts List
Item Part Number Description Qty
10 REF 50mm (Cut to length from 648436)
20 REF 84mm (Cut to length from 648436)
30 REF 40mm (Cut to length from 648436)
40 REF 140mm (Cut to length from 648436)
50 REF 64mm (Cut to length from 648436)
60 REF 184mm (Cut to length from 648436)
- 648436 Single bore tubing: ID 9.5mm x OD14.5mm
70 648443 Tri Bore Tubing
80 648444 Static Check Valve 3
90 648441 CPR 1

Mattress Repair Alpha Active 4 Service Manual
Chap 6 Issue 1Page 8 SER0018 April 2010
Figure 21 - CPR Assembly
Table 21 - CPR Assembly Parts List
Item Part Number Description Qty
10 648441 CPR 1
10
Head Cells Removed For Drawing Clarification

Alpha Active 4 Service Manual Mattress Repair
Issue 1 Chap 6April 2010 SER0018 Page 9
8 Removing CPR Assembly
8.1 Remove the top cover, (Refer to Page 3, Section 3).
8.2 Disconnect the press studs from cells either side of the CPR assembly.
8.3 Disconnect the feed tubes from either side of the CPR unit.
8.4 Remove CPR Assembly from mattress (Fig 21, Item 10).
9 Installing CPR Assembly
9.1 Connect the feed tubes from either side of the CPR unit.
Note: Installing the feed tubes is made easier if the CPR unit connectors are wetted immediately prior to insertion.
9.2 Reconnect the press studs to each end of the cell.
9.3 Install the top cover (Refer to Page 3, Section 4).

Mattress Repair Alpha Active 4 Service Manual
Chap 6 Issue 1Page 10 SER0018 April 2010
Figure 22 - Static Feed Check Valve
Table 22 - Static Section Feed Valve Parts List
Item Part Number Description Qty
10 648444 Static Feed Check Valve 3
20 BP196 Tie Wrap 6
20
10
To Cells To Pump
YellowRed
Alpha Active 4 Service Manual Mattress Repair
Issue 1 Chap 6April 2010 SER0018 Page 11
10 Removing Static Feed Check Valves
Note: There are 3 Static Feed Check Valves on the Alpha Active 4. Two at the head end, and one at the foot end.
10.1 Remove the top cover, (Refer to Page 3, Section 3).
10.2 Release the pop studs on three surrounding cells for easier access to the Check Valve.
10.3 Remove the two cable ties (Fig 22, Item 20) located on either side of the Check Valve (Fig 22, Item 10) barbs.
10.4 Seperate the tubes away from the Check Valve.
10.5 Remove the Check Valve (Fig 22, Item 10).
11 Installing Static Feed Check Valves
CAUTION: Ensure correct orientation is followed during this installation (Refer to Page 10, Figure 22).
11.1 Place the Check Valve (Fig 22, Item 10) in position.
11.2 Connect the two tubes to the Check Valve (Fig 22, Item 10) barbs.
11.3 Secure the tubing with two cable ties (Fig 22, Item 20).
11.4 Secure the three cells pop studs that were released in Para 10.2.
11.5 Install the top cover (Refer to Page 3, Section 4).

Mattress Repair Alpha Active 4 Service Manual
Chap 6 Issue 1Page 12 SER0018 April 2010
Figure 23 - 3-Way Connector
Table 23 - 3-Way Connector Parts List
Item Part Number Description Qty
10 648442 3-Way Connector 1
20 648443 Tri bore tubing. 9.5mm ID x 14.5mm OD x 1370mm 1
20
10
10
20
10
Alpha Active 4 Service Manual Mattress Repair
Issue 1 Chap 6April 2010 SER0018 Page 13
12 Removing 3-Way Connector
12.1 With the tubeset (Fig 23, Item 20) held securely in one hand, pull the top of the 3-way connector (Fig 23, Item 10) away from the tubeset as shown in Figure 23 1.
12.2 Pull the bottom of the 3-way connector away from the tubeset (Figure 23 2).
12.3 You can now pull the 3-way connector away 3 (Fig 23, Item 10).
13 Installing 3-Way Connector
Note: Orientation of this part is un-important.
13.1 Align the tubeset (Fig 23, Item 20) with the barbs on the rear of the 3-way connector (Fig 23, Item 10).
13.2 Push the tubeset fully onto the connector until all three tubes contact the base of the connector.
13.3 Ensure the 3-way connector (Fig 23, Item 10) is securely fitted to the tubeset (Fig 23, Item 20).

Mattress Repair Alpha Active 4 Service Manual
Chap 6 Issue 1Page 14 SER0018 April 2010

Alpha Active 4 Service Manual Technical Specification
Issue 1 Chap 7April 2010 SER0018 Page 1
CHAPTER 7
TECHNICAL SPECIFICATION
PUMPModel: Alpha Active 4
Part Numbers: 648311 UK
648314 German
648315 Euro
648319AU Australia
Supply Voltage: 230V
Supply Frequency: 50-60Hz
Power Input: 230VA
Size: (L)280mm x (W)205mm x (H)112mm
Weight: 2.5kg
Case Material: ABS Plastic
Plug Fuse Rating: 5A to BS1362 (UK ONLY)
Pump Fuse Rating: T1AL 250V
Degree of protectionagainst electric shock:
Class II, Double Insulated
Type BF
Degree of protectionagainst liquid ingress: IPX0
Mode of operation: Continuous
Cycle Times: 10 mins 20 mins
Inflate - 4.5 mins Inflate - 9.5 mins
Crossover - 30 secs Crossover - 30 secs
Deflate - 4.5 mins Deflate - 9.5 mins
Crossover - 30 secs Crossover - 30 secs
SYMBOLS
O (Off)PowerDisconnects from the mains supply
Do not dispose of in the domestic refuse
Alternating Current Double Insulated
I (On)PowerConnects to the mains supply
Refer to accompanying documents
Type BF Refer to the User Manual
Dangerous voltageFuse(If shown on pump label)
Ref: Model number SN: Serial Number
i
Technical Specification Alpha Active 4 Service Manual
Chap 7 Issue 1Page 2 SER0018 April 2010
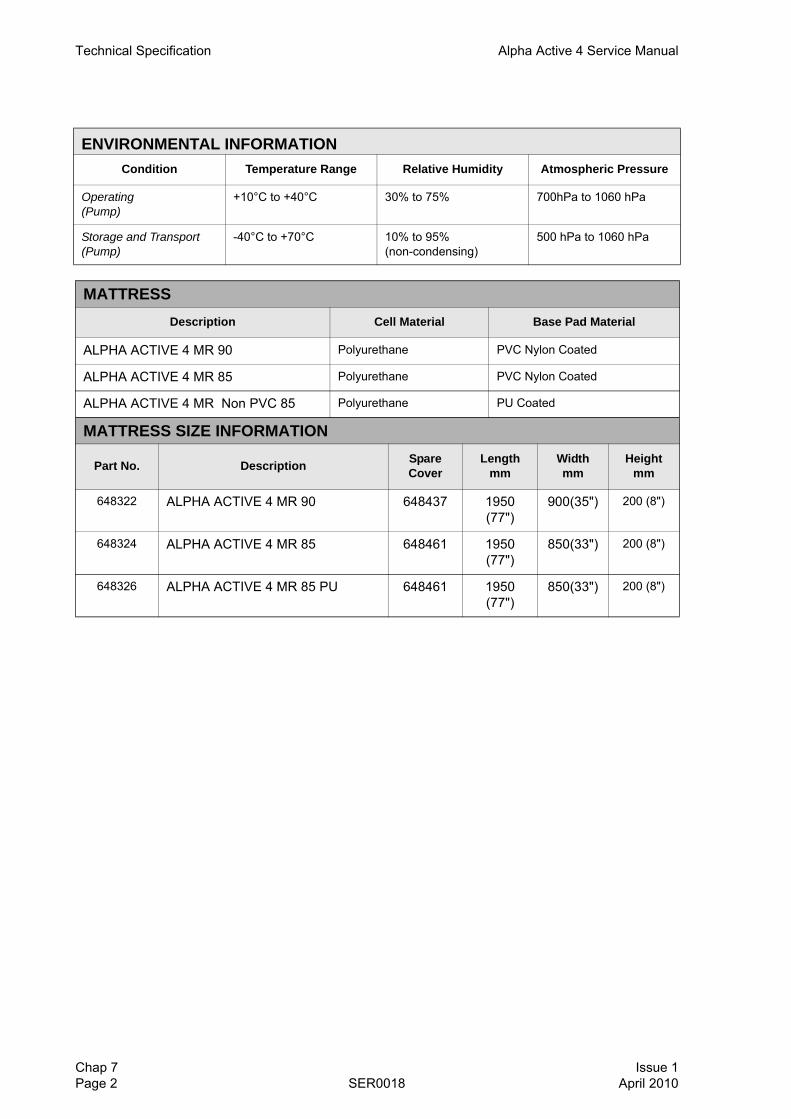
ENVIRONMENTAL INFORMATIONCondition Temperature Range Relative Humidity Atmospheric Pressure
Operating(Pump)
+10°C to +40°C 30% to 75% 700hPa to 1060 hPa
Storage and Transport(Pump)
-40°C to +70°C 10% to 95%(non-condensing)
500 hPa to 1060 hPa
MATTRESSDescription Cell Material Base Pad Material
ALPHA ACTIVE 4 MR 90 Polyurethane PVC Nylon Coated
ALPHA ACTIVE 4 MR 85 Polyurethane PVC Nylon Coated
ALPHA ACTIVE 4 MR Non PVC 85 Polyurethane PU Coated
MATTRESS SIZE INFORMATION
Part No. Description Spare Cover
Length mm
Width mm
Height mm
648322 ALPHA ACTIVE 4 MR 90 648437 1950 (77")
900(35") 200 (8")
648324 ALPHA ACTIVE 4 MR 85 648461 1950 (77")
850(33") 200 (8")
648326 ALPHA ACTIVE 4 MR 85 PU 648461 1950 (77")
850(33") 200 (8")
Alpha Active 4 Service Manual Technical Specification
Issue 1 Chap 7April 2010 SER0018 Page 3
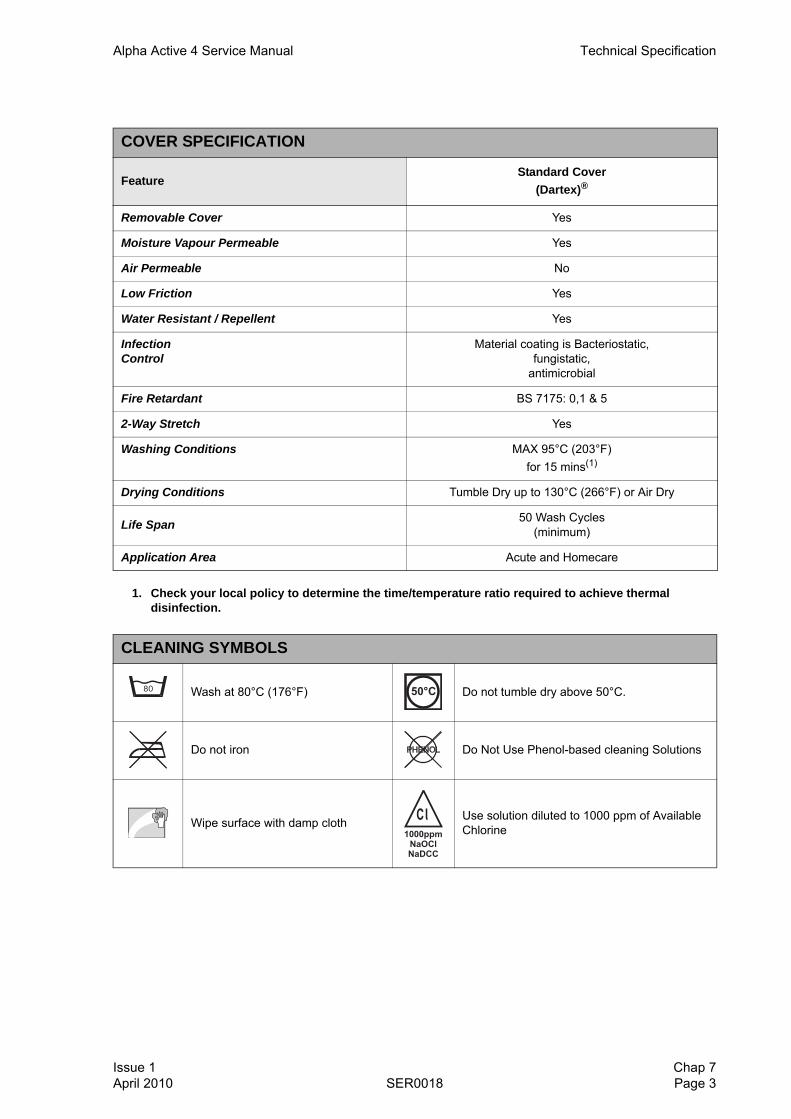
COVER SPECIFICATION
FeatureStandard Cover
(Dartex)®
Removable Cover Yes
Moisture Vapour Permeable Yes
Air Permeable No
Low Friction Yes
Water Resistant / Repellent Yes
InfectionControl
Material coating is Bacteriostatic,fungistatic,
antimicrobial
Fire Retardant BS 7175: 0,1 & 5
2-Way Stretch Yes
Washing Conditions MAX 95°C (203°F)for 15 mins(1)
1. Check your local policy to determine the time/temperature ratio required to achieve thermal disinfection.
Drying Conditions Tumble Dry up to 130°C (266°F) or Air Dry
Life Span 50 Wash Cycles(minimum)
Application Area Acute and Homecare
CLEANING SYMBOLS
Wash at 80°C (176°F) Do not tumble dry above 50°C.
Do not iron Do Not Use Phenol-based cleaning Solutions
Wipe surface with damp cloth Use solution diluted to 1000 ppm of Available Chlorine

Technical Specification Alpha Active 4 Service Manual
Chap 7 Issue 1Page 4 SER0018 April 2010

Alpha Active 4 Service Manual Spare Parts
Issue 1 Chap 8April 2010 SER0018 Page 1
CHAPTER 8
SPARE PARTS
1 Pump Assembly Parts List
2 Mattress Assembly Parts List
Part Number Description Fig - Item Qty
648410 • Mains/Power Cable - Euro 15-10 1
648418 • Mains/Power Cable - UK - -
648419 • Mains/Power Cable - AUS - -
648447 • Ferite 28mm 15-20 1
648449 • Ferite 12mm 15-30 1
648401 • Front Case 6-10 1
648402 • Rear Case 3-10 1
648403 • Bed Hook 4-30 2
648404 • Air Filter 3-NA 1
648405 • Air Filter Grill 3-20 1
648420 • Display PCB 6-40 1
648421 • Main PCB 11-10 1
648428 • Battery 12-20 1
648425 • Terminal Block 16-10 1
648408 • Compressor 8-10 1
648422 • Rotor/Stator Assembly 9-10 1
648429 • Transformer 10-10 1
648449 • Filter Capacitor 16-30 1
MIS106 • Mains Fuse (1A Time Lag T Fuse) 5-20 2
648423 • Hose Connector Alpha Active 4 6-60 1
648406 • Fuse Holder 14-10 2
648407 • Mains Switich 13-10 1
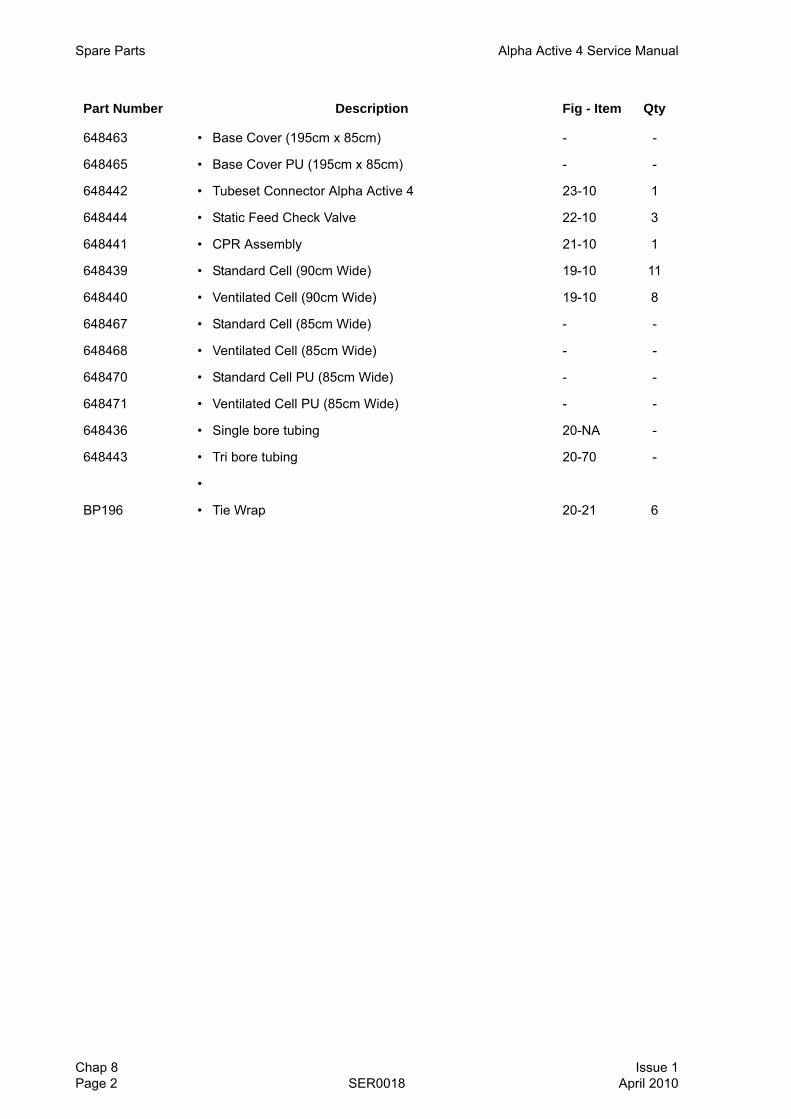
Part Number Description Fig - Item Qty
648437 • Top Cover (195cm x 90cm) - printed with logo 18-10 1
648461 • Top Cover (195cm x 85cm) - printed with logo - -
648438 • Base Cover (195cm x 90cm) 18-20 1
Spare Parts Alpha Active 4 Service Manual
Chap 8 Issue 1Page 2 SER0018 April 2010
648463 • Base Cover (195cm x 85cm) - -
648465 • Base Cover PU (195cm x 85cm) - -
648442 • Tubeset Connector Alpha Active 4 23-10 1
648444 • Static Feed Check Valve 22-10 3
648441 • CPR Assembly 21-10 1
648439 • Standard Cell (90cm Wide) 19-10 11
648440 • Ventilated Cell (90cm Wide) 19-10 8
648467 • Standard Cell (85cm Wide) - -
648468 • Ventilated Cell (85cm Wide) - -
648470 • Standard Cell PU (85cm Wide) - -
648471 • Ventilated Cell PU (85cm Wide) - -
648436 • Single bore tubing 20-NA -
648443 • Tri bore tubing 20-70 -
•
BP196 • Tie Wrap 20-21 6
Part Number Description Fig - Item Qty

Alpha Active 4 Service Manual Service Contact Details
Issue 1 Chap 9April 2010 SER0018 Page 1
CHAPTER 9
SERVICE CONTACT DETAILS
Africa Australia
Huntleigh Africa (Pty) LtdWilliam Cruywagen AvenueStand 120, Klerksoord, PretoriaT +27 12 542 4680F +27 12 542 4982
ArjoHuntleigh Pty LimitedPO Box 330Hamilton HillWestern Australia 6963T +61 8 9 337 4111F +61 8 9 337 9077
Belgium Denmark
ArjoHuntleigh NV SAStapelplein 70, 9000 Gent, BelgiumT +32 9 265 8770F +32 9 265 8771
ArjoHuntleigh A/SVassingerødvej 52, 3540 Lynge, DenmarkT +45 4 913 8486F +45 4 913 8487
France Germany
HNE Médical451 Chemin de ChampivostBP20, 69579 Limonest, Cedex, FranceT +33 (0)4 78 66 62 66F +33 (0)4 78 66 62 67
HNE Huntleigh Nesbit EvansHealthcare GmbHIm Hülsenfeld 19, 40721 Hilden, GermanyT +49 (0)2103 97 11 0F +49 (0)2103 97 11 80
Holland India
ArjoHuntleigh BVAntennestraat 45, 1322 AH Almere, HollandT +31 36 533 5588F +31 36 547 5075
ArjoHuntleigh India Pvt. Ltd8, Shah Industrial estateOff, Shah Industrial estateOff Veera Desai RoadAndheri (West)Mumbai – 400 053India
Middle East New Zealand
Huntleigh Technology PLC307 Sh. Zayed RoadDubaiUnited Arab Emirates
ArjoHuntleigh LtdUnit 6/38 Eaglehurst RoadEllerslie, Auckland, NZT +64 9 525 2488F +64 9 525 2433
Singapore Sweden
ArjoHuntleigh Pte LimitedBlock 603, Elias Road, #08-232Singapore 510603T +61 8 9 309 3083F +60 8 9 309 4582
Huntleigh Liljenberg ABBox 30012200 61 Limhamm, SwedenT +46 40 36 03 50F +46 40 49 43 75
Service Contact Details Alpha Active 4 Service Manual
Chap 9 Issue 1Page 2 SER0018 April 2010
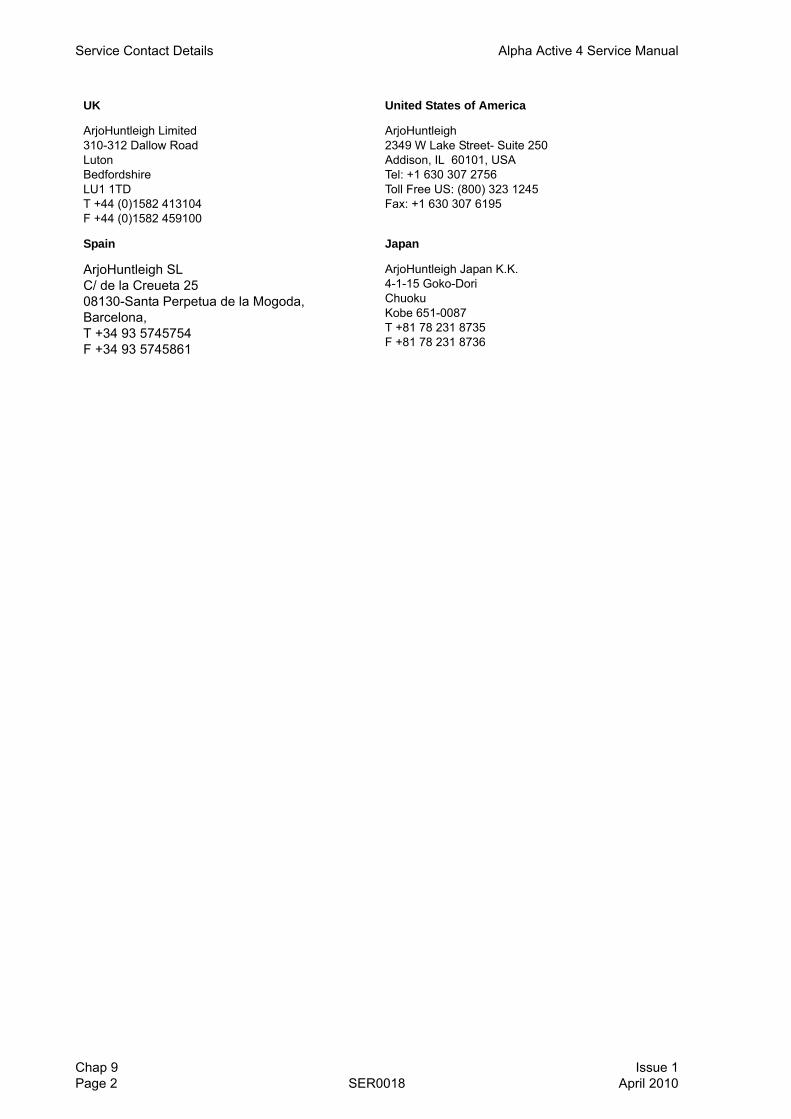
UK United States of America
ArjoHuntleigh Limited310-312 Dallow RoadLutonBedfordshireLU1 1TDT +44 (0)1582 413104F +44 (0)1582 459100
ArjoHuntleigh2349 W Lake Street- Suite 250Addison, IL 60101, USATel: +1 630 307 2756Toll Free US: (800) 323 1245Fax: +1 630 307 6195
Spain Japan
ArjoHuntleigh SLC/ de la Creueta 2508130-Santa Perpetua de la Mogoda, Barcelona,T +34 93 5745754F +34 93 5745861
ArjoHuntleigh Japan K.K.4-1-15 Goko-DoriChuokuKobe 651-0087T +81 78 231 8735F +81 78 231 8736


SE
R00
18_0
1 A
pril
2010