alphapat user manual - smsystems.co.in · the trade names metrel, smartec, eurotest, ... Ì read...
TRANSCRIPT

BetaGTPlus MI 3304 OmegaGTPlus MI 3305
User Manual Ver. 1.1, Code no. 20 751 336
2
Distributor: Manufacturer: Metrel d.d. Ljubljanska cesta 77 SI-1354 Horjul E-mail: [email protected] http://www.metrel.si © 2008 Metrel
Mark on your equipment certifies that this equipment meets the requirements of the EU (European Union) concerning safety and electromagnetic compatibility regulations
The trade names Metrel, Smartec, Eurotest, Autosequence are trademarks registered or pending in Europe and other countries.
No part of this publication may be reproduced or utilized in any form or by any means without permission in writing from METREL.

OmegaGTPlus / BetaGTPlus Table of contents
3
Table of contents 1 General description................................................................................................5
1.1 Warnings ....................................................................................................6 1.2 Warning markings on connector panel .......................................................6 1.3 Standards applied ......................................................................................6
2 Instrument description...........................................................................................8 2.1 Front panel .................................................................................................8 2.2 Symbols and messages ...........................................................................10 2.3 Help menus ..............................................................................................14
3 Main menu and test modes..................................................................................15 3.1 VDE organizer..........................................................................................15
3.1.1 VDE organizer – general ..........................................................................16 3.1.2 VDE organizer operation ..........................................................................18 3.1.3 Performing autotest sequences................................................................19 3.1.4 Example of creating a test sequence with VDE organizer........................24
3.2 Custom autotests menu ...........................................................................25 3.2.1 Deleting an existing custom test sequence ..............................................26 3.2.2 Viewing, modifying of existing custom autotest ........................................26 3.2.3 Saving custom autotest sequence............................................................27
3.3 Project autotest menu ..............................................................................28 3.3.1 Comparison of results (evaluation of result trends) ..................................32
3.4 Working with barcodes and RFID tags .....................................................32 3.4.1 Working with RFID tags............................................................................33 3.4.2 Working with barcode reader ...................................................................35
3.5 Single test menu.......................................................................................37 3.6 User / appliance data menu .....................................................................37
3.6.1 Users submenu ........................................................................................38 3.6.2 Appliances submenu................................................................................39 3.6.3 Test sites submenu ..................................................................................39 3.6.4 Locations submenu ..................................................................................40
3.7 Memory operation menu ..........................................................................40 3.8 Data upload / download menu..................................................................41 3.9 Setup menu..............................................................................................42
3.9.1 Date and time...........................................................................................42 3.9.2 Language selection ..................................................................................43 3.9.3 Print header..............................................................................................43 3.9.4 Instrument data ........................................................................................44 3.9.5 Contrast adjustment .................................................................................45 3.9.6 Instrument settings ...................................................................................45 3.9.7 Setting the instrument to initial values ......................................................46 3.9.8 Communication settings ...........................................................................47 3.9.9 Password .................................................................................................48
4 Single test mode...................................................................................................50
5 Measurements ......................................................................................................51 5.1 Earth bond resistance ..............................................................................51 5.2 Insulation resistance.................................................................................52

OmegaGTPlus / BetaGTPlus Table of contents
4
5.2.1 Insulation resistance on class I appliances ..............................................53 5.2.2 Insulation resistance on class II appliances (Insulation S) .......................54
5.3 Substitute leakage current........................................................................56 5.3.1 Substitute leakage current on class I appliances .....................................56 5.3.2 Substitute leakage current on class II appliances ....................................58
5.4 Differential current ....................................................................................59 5.5 Touch leakage current..............................................................................61 5.6 Polarity test ..............................................................................................62 5.7 Clamp current measurement....................................................................64 5.8 RCD test...................................................................................................66
5.8.1 Single RCD trip-out time test....................................................................67 5.8.2 Automatic RCD test..................................................................................67
5.9 Functional test ..........................................................................................69 5.10 Flash test (MI 3305 – OmegaGTPlus only) ..............................................70
6 Data operations ....................................................................................................73 6.1 Saving autotest results .............................................................................73 6.2 Recall / delete / send to output of results .................................................74
6.2.1 Results view .............................................................................................75 6.2.2 Deleting results ........................................................................................75 6.2.3 Downloading and printing results .............................................................76
7 Maintenance..........................................................................................................79 7.1 Periodic calibration ...................................................................................79 7.2 Fuses .......................................................................................................79 7.3 Service .....................................................................................................79 7.4 Cleaning ...................................................................................................79
8 Technical specifications ......................................................................................80 8.1 Earth bond resistance ..............................................................................80 8.2 Insulation resistance.................................................................................80 8.3 Substitute leakage current........................................................................81 8.4 Differetial current ......................................................................................82 8.5 Touch leakage current..............................................................................82 8.6 Polarity test ..............................................................................................82 8.7 Clamp current...........................................................................................82 8.8 Trip-out time of portable RCD ..................................................................83 8.9 Functional test ..........................................................................................83 8.10 Flash test (MI 3305 – OmegaGTPlus only) ..............................................83 8.11 General data ............................................................................................84
9 Instrument set and accessories ..........................................................................85

OmegaGTPlus / BetaGTPlus General description
5
1 General description Congratulations on your purchase of the instrument and its accessories from METREL. The instrument was designed on basis of rich experience, acquired through many years of dealing with electrictrical appliance test equipment. The multifunctional portable test instrument OmegaGTPlus / BetaGTPlus is intended to perform all measurements for testing the electrical safety of portable electrical equipment. The following tests can be performed:
earth bond resistance, insulation resistance, substitute leakage current, differential leakage current, touch leakage current, IEC cord polarity test, leakage and TRMS load currents with current clamp, portable RCD test, functional test, flash test (MI 3305 OmegaGTPlus only).
The instrument has ability to organize measurements listed above into test sequences that are perfomed as autotests. Generation of autotests is device-dependent and is based on requirements of selected VDE 0701 or VDE 0702 standard. Some instrument's highlights:
large graphic LCD display with resolution of 240 × 128 dots, with back-light, over 6500 memory locations in data flash memory for autotest results, four communication ports (USB and RS232C) for communication with PC,
barcode reader or printers, soft touch keyboard with cursor keys, built in real time clock, fully compatible with new METREL PATLink PRO PC software package, best suited for periodic testing, fast testing with barcode identification systems, test data can be uploaded from PC, comparisons between old and new test results can be performed on site, enables printing of test labels on site.

OmegaGTPlus / BetaGTPlus General description
6
1.1 Warnings In order to reach high level of operator safety while carrying out various measurements using OmegaGTPlus / BetaGTPlus instrument, as well as to keep the test equipment undamaged, it is necessary to consider the following general warnings:
Read this user manual carefully, otherwise use of the instrument may be dangerous for the operator, for the instrument or for the equipment under test!
If the test equipment is used in manner not specified in this user manual the protection provided by the equipment may be impaired!
Use only correctly earthed mains outlets to supply the instrument!
Do not use the instrument and accessories if any damage is noticed!
In case a fuse has blown follow the instructions in this user manual to replace it!
Instrument servicing and calibration is allowed to be carried out only by a competent authorized person!
Use only standard or optional test accessory supplied by your distributor!
1.2 Warning markings on connector panel Refer to chapter 2.1 Front panel!
1.3 Standards applied The OmegaGTPlus / BetaGTPlus instrument is manufactured and tested according to the following regulations, listed below. Electromagnetic compatibility (EMC)
EN 61326
Electrical equipment for measurement, control and laboratory use – EMC requirements Class B (Portable equipment used in controlled EM environments)
Safety (LVD)
EN 61010 - 1 Safety requirements for electrical equipment for measurement, control, and laboratory use – Part 1: General requirements
EN 61010 - 31 Safety requirements for hand-held probe assemblies for electrical measurement and test

OmegaGTPlus / BetaGTPlus General description
7
Functionality
VDE404-1
Prüf- und Messeinrichtungen zum Prüfen der elektrischen Sicherheit von elektrischen Geräten Allgemeine Anforderungen
VDE404-2
Prüf- und Messeinrichtungen zum Prüfen der elektrischen Sicherheit von elektrischen Geräten Prüfeinrichtungen für Prüfungen nach Instandsetzung, Änderung oder für Wiederholungsprüfungen
VDE 0701 Instandsetzung, Anderung und Prüfung elektrischer Geräte VDE 0702 Wiederholungsprüfungen an elektrischen Geräten

OmegaGTPlus / BetaGTPlus Instrument description
8
2 Instrument description 2.1 Front panel
Front panel Legend:
1..............Mains switch with indication lamp. 2..............Two T16 A / 250 V fuses for instrument protection. 3..............Mains supply cord. 4..............240 × 128 dots graphic matrix display with backlight. 5..............LN and PE sockets for testing the insulation resistance and substitute leakage
current of fixed installed appliances. Warning! These sockets are intented only for the connection to deenergized appliances.
7..............PRCD socket for testing portable residual current devices. Warning! This socket is intented only for connection of portable RCDs.
8..............IEC appliance connector for testing supply cords. Warning! The connector input is only for testing purposes; do not connect it to mains supply!
9..............Test probe (earth bond) connector, also used as an input in some class 2 measurements: Insulation resistance, substitute and touch leakage currents (reffered to as socket S).
10............Test socket (230 V). Warning! Dangerous voltage is present on the test socket during the measurement. Maximum output current is 16 A, test only appliances with maximum rated supply current not higher than 16 A!
11............Cursor keys and ENTER key. 12............Alpha-numeric keyboard. 13............STOP key. 14............START key. 15............ESCAPE key. 16............Current clamp adapter input sockets.

OmegaGTPlus / BetaGTPlus Instrument description
9
Warning! Do not connect any voltage source on this input. It is intended only for connection of current clamp with current output. Maximum input current is 30 mA!
17............Function keys. 18............USB connector. 19............PC / printer connector. 20............Barcode reader connector. 21............Label printer connector on back side (support for PrintekMobile MtP300 serial
printer).

OmegaGTPlus / BetaGTPlus Instrument description
10
Safety pre-tests Before performing a measurement, the instrument performs a series of pre-tests to ensure safety and to prevent any damage. These safety pre-tests check for:
• any external voltage against earth on test socket, • excessively high leakage current, • excessively high touch leakage current, • Short circuit or too low resistance between L and N on appliance, • Correctly applied mains voltage to the test socket.
If pre-tests fail, an appropriate warning message will be displayed. The warnings and measures that have to be taken are described in chapter 2.2 Symbols and messages.
2.2 Symbols and messages
Mains voltage is not correct or PE is not
connected. Check mains voltage and PE connection!
Improper supply voltage warning. Possible causes: No earth connection or other wiring problem on
supply socket. Incorrect mains voltage.
Determine and eliminate the problem before proceeding!
L and N are crossed.
Press START key to
continue.
The instrument works normally also in the case when L and N are interchanged. Check polarity of line and neutral wires on test socket.
Warning!
Instrument is connected to the IT earthing system or PE
not connected. Press START key to
continue.
Supply voltage warning. Possible causes: no earth connection, instrument connected to IT earthing system.
Press the START key to continue if instrument is connected to IT earthing system.
OmegaGTPlus / BetaGTPlus Instrument description
11
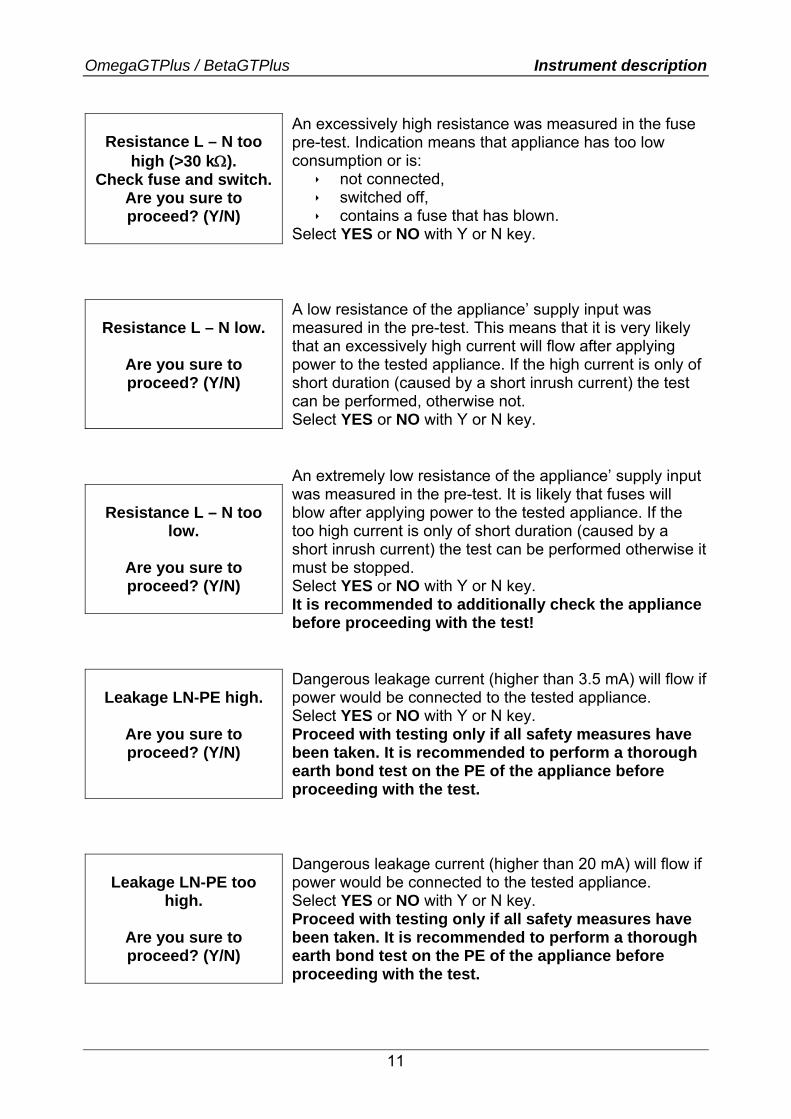
Resistance L – N too
high (>30 kΩ). Check fuse and switch.
Are you sure to proceed? (Y/N)
An excessively high resistance was measured in the fuse pre-test. Indication means that appliance has too low consumption or is:
not connected, switched off, contains a fuse that has blown.
Select YES or NO with Y or N key.
Resistance L – N low.
Are you sure to proceed? (Y/N)
A low resistance of the appliance’ supply input was measured in the pre-test. This means that it is very likely that an excessively high current will flow after applying power to the tested appliance. If the high current is only of short duration (caused by a short inrush current) the test can be performed, otherwise not. Select YES or NO with Y or N key.
Resistance L – N too
low.
Are you sure to proceed? (Y/N)
An extremely low resistance of the appliance’ supply input was measured in the pre-test. It is likely that fuses will blow after applying power to the tested appliance. If the too high current is only of short duration (caused by a short inrush current) the test can be performed otherwise it must be stopped. Select YES or NO with Y or N key. It is recommended to additionally check the appliance before proceeding with the test!
Leakage LN-PE high.
Are you sure to proceed? (Y/N)
Dangerous leakage current (higher than 3.5 mA) will flow if power would be connected to the tested appliance. Select YES or NO with Y or N key. Proceed with testing only if all safety measures have been taken. It is recommended to perform a thorough earth bond test on the PE of the appliance before proceeding with the test.
Leakage LN-PE too
high.
Are you sure to proceed? (Y/N)
Dangerous leakage current (higher than 20 mA) will flow if power would be connected to the tested appliance. Select YES or NO with Y or N key. Proceed with testing only if all safety measures have been taken. It is recommended to perform a thorough earth bond test on the PE of the appliance before proceeding with the test.

OmegaGTPlus / BetaGTPlus Instrument description
12
Leakage LN-PE or EB-
PE too high!
Are you sure to proceed? (Y/N)
Dangerous leakage current (higher than 20 mA) will flow if power would be connected to the tested appliance. Select YES or NO with Y or N key. Proceed with testing only if all safety measures have been taken. It is recommended to perform a thorough earth bond test on the PE of the appliance before proceeding with the test.
Measurement aborted! Differential leakage too
high!
An exceptionally high leakage current (higher than about 5 mA) was measured through PE test terminal or PE socket during the pre-test or test.
Leakage test probe-PE too high!
An exceptionally high leakage current (higher than about 5 mA) was measured through S test terminal during the pre-test.
External voltage on test socket too high!
DANGER! Voltage on test socket or LN/PE terminals is higher than 20 V (AC or DC) approximately! Disconnect the appliance under test from the instrument immediately and determine why external voltage was detected!
External voltage on test probe too high!
DANGER! Voltage on test probe (S) is higher than 25 V (AC or DC) approximately! Disconnect the test probe from the appliance and determine why external voltage was detected!

OmegaGTPlus / BetaGTPlus Instrument description
13
Test was skipped for safety!
Instrument skipped the required test because of a failed previous test.
Instrument overheated!
Measurement is
aborted!
Temperature of internal components of the instrument reached their top limit. Measurement is prohibited until the internal temperature has reduced.
Warning!
More than 80 % of memory is occupated. Stored data should be
downloaded to PC.
Instrument memory is almost full. Download stored results to PC.
Warning! Calibration has been
expired.
Recalibration of the instrument is required. Contact your dealer.
Connect earth bond test probe in this test.
Remove the earth bond clip, especially if it is connected to any part that will begin to rotate or move when power is applied.

OmegaGTPlus / BetaGTPlus Instrument description
14
Warning! A high voltage is / will be present on the instrument output! (Insulation test voltage, flash test voltage (MI 3305 only) or mains voltage).
The appliance under test should be switched on (to ensure that the complete circuit is tested).
Connect the lead to be tested to the IEC plug.
Connect current clamp adapter in this test.
Test passed.
Test failed.
Some tests in the autotest sequence were skipped, but all performed tests passed.
2.3 Help menus Key:
F2 (HELP) Opens help screen (if defined). The help screens are available in single and autotest modes. Help menu contains connection diagrams between appliance under test and the OmegaGTPlus / BetaGTPlus instrument for test functions.
Possibility for using help function Help screen example
Keys:
F1 (PgUp) F2 (PgDown) Scroll through additional help screens of selected function if available.
START ESC Close help screen and restore selected test function start menu.

OmegaGTPlus / BetaGTPlus Main menu and test modes
15
3 Main menu and test modes The OmegaGTPlus / BetaGTPlus instrument has a user-friendly manipulation. Most of the actions can be done by using only few keys. Menu tree of the instrument is simple to understand and easy to operate. From the Main menu different instrument operation modes can be set:
VDE organizer (see 3.1), Custom autotest (see 3.2), Project autotests (see 3.3), Barcodes / RFID tags (see 3.4), Single test menu (see 3.5), Modifying data for tested equipment
(see 3.6) Memory operations (see 3.7), Data transfer (see 3.8) and Settings (see 3.9).
Main menu
Keys:
/ Select the operating mode. ENTER Enters selected mode. After the instrument is switched on, the last accessed menu will be displayed. Main feature of the instrument are Autotests that can be accessed through three mentioned possibilities:
VDE Organizer (see 3.1), Custom autotest (see 3.2), and Project autotest (see 3.3).
Autotest is the fastest and easiest way to test appliances. A pre-programmed autotest sequence runs all the tests needed to verify the selected appliance. Complete autotest results can be stored together with appliance name and all belonging information. Note:
Press ESC key one or more times to return to Main menu from any submenu or selected function
3.1 VDE organizer This menu offers selection and performing of VDE compatible test sequence. The sequence setup and its parameters are exactly the same as suggested in the VDE701/702 standards. Following actions can be taken after entering the VDE organizer menu:

OmegaGTPlus / BetaGTPlus Main menu and test modes
16
Test sequence can be executed, Test sequence can be stored as a
configurable autotest.
VDE organizer menu
Keys:
/ Select the item. / Modify the item value.
F1 (VIEW) Opens view of all related tests and their parameters. START Opens menu for performing tests according to organizer. ESC Returns to Main menu.
3.1.1 VDE organizer – general VDE organizer is a configuration tool for performing VDE 0701/ VDE 0702 compatible appliance test sequences. The instrument returns the appropriate test sequence and parameters on base of entered appliance data (class, accessible conductive parts, nominal power etc). The test sequence is made according to the flowchart below.

OmegaGTPlus / BetaGTPlus Main menu and test modes
17
VDE Organizer flowchart With the VDE organizer any VDE 0701 or VDE 0702 compatible test sequence can be created. The sequences cover virtually any maintenance or periodic test, regardless of appliance type, safety class, supply cord length, fuse type, etc. All limits and tests comply with the currently valid VDE standards and regulations. In case of any changes, a firmware upgrade will be available at your distributor or from Metrel directly.

OmegaGTPlus / BetaGTPlus Main menu and test modes
18
3.1.2 VDE organizer operation Displayed data is organized as shown in VDE organizer flowchart. Only data relevant for selected standard and class is displayed, other data is hidden.
Example of VDE organizer screen
Main entry items - general:
Standard Organizer reference standard selection [VDE701, VDE702] Appliance class Safety classification of tested appliance [1, 2, 3]
Visual test Selected function will be performed as a part of the test sequence – data cannot be changed.
Keys:
/ Select the organizer item. / Set parameter in selected (highlighted) item.
ESC Returns to previous menu. F1 (VIEW) Enters View (test sequence) menu. In this menu test sequence setup can
be checked. START Starts automatic sequence as currently set in VDE organizer.
Refer to chapter 3.1.3 Performing autotest sequences for more information.
VDE organizer view
Keys in View menu:
/ Select test item. START Starts automatic sequence as currently set in VDE organizer.
Refer to chapter 3.1.3 Performing autotest sequences for more information.
F3 (SAVE AS) Opens dialog for saving current organizer sequence as special autotest.
F1 (BACK) Returns to mains organizer menu. ESC Returns to previous menu.

OmegaGTPlus / BetaGTPlus Main menu and test modes
19
3.1.3 Performing autotest sequences Once the any of autotest sequence is selected it can be performed. Keys:
START Starts of selected autosequence execution. ESC Returns back main menu. Main principle is that after each successfully finished procedure in the autosequence, the next procedure is automatically prepared for execution and waits for operator to prepare new test setup (optional) and start the test. Notes:
Only visual test waits the operator to press the proper keys. Pay attention on correct wiring when preparing test setup. Press Help to see
suggested test setup. Consider the displayed warnings before starting measurement! Attached display figures are mainly selected for VDE Organizer. They are valid
also for any other autotest sequence. Disabled tests are excluded from decision of proper condition for further tests in
autotest sequence. Visual inspection function During visual inspection the following items should be checked for damages:
Appliance plug, Appliance enclosure, Appliance mains cord.
Visual test menu
Keys:
F1 (PASSall) All observed items are proper without any damages. F2 (PASS) Currently selected observed item is in order. F3 (FAIL) Currently selected observed item is damaged. F4 (SKIP) Skip inspection to the next test function. F5 (END) Finish currently performing autotest. ESC Returns back autotest entry menu.

OmegaGTPlus / BetaGTPlus Main menu and test modes
20
Other measuring functions Measuring functions use common principle for access. Keys:
START Starts the measurement. F2 (HELP) Displays test circuit for the measurement (test setup). F4 (SKIP) Skip inspection to the next test function. F5 (END) Finish currently performing autotest. ESC Returns back autotest entry menu. Key during measurement:
STOP Stops the measurement. Keys after finished measurement defined as single measurement:
START Closes current autotest function and opens next. F2 (HELP) Displays test circuit for the measurement (test setup). F3 (REPEAT) Prepares possibility to repeat the measurement. F4 (SKIP) Skip inspection to the next test function. F5 (END) Finish currently performing autotest. ESC Returns back autotest entry menu. Keys after finished measurement defined as continuous measurement:
START Repeats current autotest function again. ENTER Closes current autotest function and opens next. F2 (HELP) Displays test circuit for the measurement (test setup). F3 (REPEAT) Prepares possibility to repeat the measurement. F4 (SKIP) Skip inspection to the next test function. F5 (END) Finish currently performing autotest. ESC Returns back autotest entry menu. Screen snapshots and notes
Earth bond measurement

OmegaGTPlus / BetaGTPlus Main menu and test modes
21
Note: The test probe for class II appliances
could influence result!
Insulation resistance measurement
Note: Use the test probe for class II
appliances and class II parts of class I appliances!
Insulation resistance measurement – Class II
Note: The test probe for class II appliances
could influence result!
Substitute leakage current measurement

OmegaGTPlus / BetaGTPlus Main menu and test modes
22
Note: Use the test probe for class II
appliances and class II parts of class I appliances!
Substitute leakage current measurement - Class II
Notes: If any of the earth bond resistance,
insulation resistance, or substitute leakage current measurements have failed in selected autotest sequence, the differential current measurement is prohibited!
If leakage current measurement fails, test sequence will be finished.
The instrument automatically changes L/N polarity of connected appliance.
Differential current measurement
Note: The instrument has possibility to
measure substitute and differential leakage and thus not need to measure PE leakage (see * on organizer flowchart).
Leakage current
Note: If any of the earth bond resistance,
insulation resistance, substitute leakage current or leakage current measurements have failed or were skipped in selected autotest sequence, the touch leakage current measurement is prohibited!
The earth bond test probe shall be used

OmegaGTPlus / BetaGTPlus Main menu and test modes
23
for measuring touch leakage current! The instrument automatically changes
L/N polarity of connected appliance.
Touch leakage current measurement
Note: If any of earth bond resistance,
insulation resistance, substitute leakage current, leakage current or touch leakage current measurements have failed or were skipped in selected autotest sequence, the functional test is prohibited!
Functional test – apparent power measurement
Polarity test
Note: If any of earth bond resistance,
insulation resistance, substitute leakage current, leakage current or touch leakage current measurements have failed or were skipped in selected autotest sequence, the TRMS clamp current test is prohibited!
TRMS current measurement using current clamps

OmegaGTPlus / BetaGTPlus Main menu and test modes
24
Note: If any of earth bond resistance,
insulation resistance, substitute leakage current, leakage current, touch leakage current or TRMS current clamp measurements have failed or were skipped in selected autotest sequence, the PRCD test is prohibited!
RCD test
3.1.4 Example of creating a test sequence with VDE organizer A periodic test of an iron will be performed.
Type: flatiron ABCUn 230V, 50Hz, 1000VA:
The iron can be classified as followed:
For a periodic testing a VDE702 test is relevant. The iron can be classified as a Class I appliance with isolated metal part and
short supply cord. Example of test sequence configuration: Displayed item Activity
1 Standard: VDE702 Selection of standard: - Select VDE702.
2 Appliance class: 1 Selection of appliance safety class: - Select Class 1.
3 Visual test Information that visual test will be included in the VDE702 / Class1 procedure.
4 Accessible conductive parts? YES Question if there is an isolated conductive part on the appliance: - Confirm with yes.

OmegaGTPlus / BetaGTPlus Main menu and test modes
25
5 Cord length (Earth bond) L: < 0.3Ω/<=5m
Selection of Earth bond limit value on base of known supply cable length: - Select appropriate length.
6 Insulation test applicable? YES
Question if insulation test is applicable: - Confirm with yes. Insulation and substitute leakage measurements will be included in the test sequence with this confirmation.
7 Insulation test Heating elements L: >0.3 MΩ
Classification of appliance: - Classify the iron as a standard appliance.
8 Insulation test Accessible cond. Parts L: >2.0 MΩ
Information that insulation resistance measurement of Class 2 parts will be included in the (VDE702 / Class1 / with isolated conductive parts) test procedure.
9 Leakage test method: Leakage
Selection of leakage current test method: - Select substitute leakage measurement.
10 Limit / Appliance type General appliance L < 3.5mA
Classify the iron as an standard appliance with power <3.5 kW.
11 Touch leakage method: Substitute leakage Limit < 0.5mA
Information that substitute leakage current measurement class 2 parts will be included in the (VDE702 / Class1 / with isolated conductive parts) test procedure.
3.2 Custom autotests menu The menu contains list of custom prepared autosequences. The sequence can be performed or can be modified / adapted for special appliance and stored or sent to the PC for further purposes (as well test reports can be printed out, etc). 24 pre-programmed autotest sequences are added to the list by default. Up to 50 custom autotest sequences can be pre-programmed in this autotest mode. An alternative is to pre-program the sequences in the PC software PATLink LITE and upload them to the instrument. Refer to chapter 3.8 Upload test data for more information. The initial autotest sequences can be restored to default settings by selecting Original settings in Setup menu.
Custom autotest menu

OmegaGTPlus / BetaGTPlus Main menu and test modes
26
Keys:
/ Select the specific test sequence. F1 (VIEW) Opens view of selected test sequence with all related tests and their
parameters. F3 (DELETE) Removes selected test, see chapter 3.2.1 Deleting an existing
custom test sequence. F5 (SEND) Sends autotest sequence to the RFID tag. START Opens menu for performing tests according to organizer. See chapter
3.1.3 Performing autotest sequences. ESC Returns to Main menu.
3.2.1 Deleting an existing custom test sequence
Delete selected custom autotest sequence
Keys:
Y Confirms deleting of selected autotest sequence. Any other key Return back to custom autotest menu without changes. Note:
First custom autotest sequence can not be deleted from the list. If only one custom autotest is defined it cannot be deleted from the list!
3.2.2 Viewing, modifying of existing custom autotest
Existing custom autotest sequence can be viewed, modified and stored. Reason is that test functions and their parameters can be adopted to real test requirements of the appliance under test.
View of selected test sequence
Keys in test sequence view mode:
F1 (BACK) Returns back to custom autotest menu. F2 (SAVE) Stores test sequence with current options under the same name. F3 (SAVE AS) Stores test sequence with current options to the different name.

OmegaGTPlus / BetaGTPlus Main menu and test modes
27
F4 (EDIT) Opens menu for modifying parameters of selected test function. / Select test function in the sequence.
START Starts running the selected function. See chapter 3.1.3 Performing autotest sequences.
ESC Returns back to custom autotest menu. Modification of autotest sequence The key F4 (EDIT) as mentioned above enable to modify selected function.
Modification parameters of selected test function
Keys:
/ Select the parameter. / Modify value of selected parameter (highlighted).
F1 (VIEW) Accepts modified function and returns to the view of selected test sequence.
ESC Returns to the view of selected test sequence. Mode is general parameter of each test function in autotest sequence with the following possible values: [disabled, single, continuous].
disabled Test function will not be involved in appliance test, normally it is not needed.
single The test function is performed only once per autotest sequence run.
continuous Repeated option where the test function could be preformed as many times as operator needs.
Rest parameters ale directly adjusted to each test function.
3.2.3 Saving custom autotest sequence
Custom autotest sequence can bi saved even if it was or was not modified. There are two options to save the autotest sequence to the same name or save under new name. Saving is possible only in the view of selected autotest sequence menu; see chapter 3.2.2 above.

OmegaGTPlus / BetaGTPlus Main menu and test modes
28
Save option
Save as option
Autotest custom save menus Keys:
/ Select character in line. Alphanumeric Enters character. SHIFT+ Alphanumeric Enters small letter or special character.
Deletes character left to cursor. F1 (SAVE) Confirms saving custom autotest sequence under
entered name. F2 (UNDO) Cancels saving. ESC Returns back to custom autotest menu. Note:
Exit without saving will lose all modified settings of selected autosequence immediately after returning to Custom autotest menu.
If you want to save more than 50 autotests, the »Out of memory« message is displayed.
3.3 Project autotest menu The first step when performing a Project Autotest is to recall stored appliance data from the instruments memory. The procedure is similar as if test results are to be recalled from the instrument’s memory. The Project Autotest search menu is a tool that simplifies and speeds up repeated (periodic) testing of appliances. The main idea is to re-use known and stored data about the tested appliance. Hints Test sequence If the sequence is not changed (usually the sequences are not
changing for the same appliance) the user does not need to care about setting the right test sequence and parameters.
Appliance data ID number, names, descriptions, addresses, comments are not needed to be re-entered again. Old data are offered by default
Old test results Actual Project Autotest test results can be compared with the previous ones. The instrument automatically calculates the trends for each measurement.
Old test results can be uploaded from PC back to the instrument. This brings further advantages:

OmegaGTPlus / BetaGTPlus Main menu and test modes
29
Old test results do not occupy the instrument’s memory and can be temporarily uploaded only for the purpose of re-testing,
Test results /appliance data can be moved / shared among different test instruments,
Appliance data can be pre-entered on the computer and then sent to the instrument.
Project Autotest menu example
Keys:
/ Select the item. / Select character in line.
Alphanumeric Enters character. SHIFT+ Alphanumeric Enters small letter or special character.
Deletes character left to cursor. F1 (FIND) Opens menu for searching between existing auotest
projects F2 (UNDO) Resets modified value to previous state. F3 (TYPE) Opens items modifications. ESC Returns to Main menu. When searching for stored autotest results the following filters can be used to narrow the hits:
Appliance number, Test site, Location Date from and date to, User.
To search for all stored results, enter »*« in the all filters.
Project autotest result menu

OmegaGTPlus / BetaGTPlus Main menu and test modes
30
Keys:
/ F1 (PgUp) F2 (PgDown)
Select the appliance that should be retested.
START Starts execution of the autosequence for selected appliance (retest). See 3.1.3 Performing autotest sequences.
ENTER Opens more detailed information of appliance results and data. ESC Returns to Main menu. Appliance tickers Each appliance is marked with a ticker at the right end of the line. The tickers help to faster find the appliance to be retested from the offered list. Their meaning is following: PC The stored appliance data was uploaded from PC PC The stored appliance data was uploaded from PC
It was already used for a new Project autotest measurement. I The stored appliance data was performed with the instrument and stored. I The stored appliance data was performed with the instrument and stored.
It was already used for a new Project autotest measurement. Keys in appliance view:
/ F1 (PgUp) F2 (PgDown)
Scroll displayed items.
ENTER Opens more detailed information of appliance results and data. ESC Returns to Main menu. F5 (MORE) Switches between different appliance data views.
View results menu examples Notes on retesting the selected appliance:
The Autotest sequence will be the same as it was for the selected Project autotest.
Exactly same appliance data (except time and user) will be offered as stored in the selected Project autotest.
The new autotest will get an »I« ticker. The original autotest will get a »I « ticker (if it was made with the instrument, or PC ticker (if it was uploaded from the PC).

OmegaGTPlus / BetaGTPlus Main menu and test modes
31
Result of appliance (re)testing After finished testing the results can be:
Viewed, Saved, Sent to output device or PC.
After finished autotest menu Keys:
/ Select the device data. / Select character in line.
alphanumeric Enters character. SHIFT+ alphanumeric Enters small letter or special character.
Deletes character left to cursor. F1 (SAVE) Stores results of test under defined appliance number and
returns to project autotest result menu. F2 (UNDO) Resets modified value of device data to previous state. F3 (SEND) Sends results to one of output devices. F4 (VIEW) Opens resultas of autotest ESC Returns to Main menu.
View Project autotest results menu
Keys:
/ F1 (PgUp) F2 (PgDown)
Scroll displayed items.
F4 (TREND) Starts comparison of last measured data with stored to show the trend.
F5 (MORE) Switches between different appliance data views. ESC Returns to Main menu.

OmegaGTPlus / BetaGTPlus Main menu and test modes
32
3.3.1 Comparison of results (evaluation of result trends)
If an autotest sequence was performed from the Project Autotest menu an additional option TREND is offered in the View result menu after the autotest is finished but not saved.
Trend of measured data
Keys:
/ F1 (PgUp) F2 (PgDown)
Scroll displayed items.
F5 (RESULT) Return to view the last results. ESC Returns to Main menu. Meaning of trend symbols:
New result of particular test is better than last result. Examples: New insulation resistance result is higher.than old result. New earth bond result is lower than old one.
Difference between old and new result of particular test is so small that can be treated as the same. Example: New insulation resistance result stays at the same level as old result.
New result of particular test is worse than last result. Examples: New insulation resistance result is lower than old result. New earth bond result is higher than old one.
Note:
If the test results are close to the limit they should be compared with old results. If the trends are worsening it must be reconsidered if the appliance is still safe. If the results stay stable the appliance can be treated as safe in general.
3.4 Working with barcodes and RFID tags Barcode/tag menu supports operation with barcodes and RFID tags. From this menu the following actions can be performed:
Test sequences for appliances under test can be read from barcode labels. Test sequences and stored measurement results for tested appliance can be
downloaded (uploaded) from (to) the RFID tags.

OmegaGTPlus / BetaGTPlus Main menu and test modes
33
Barcode / TAG menu
Keys:
/ Select the device. ENTER Opens menu for selected device. ESC Returns to Main menu.
3.4.1 Working with RFID tags
To use RFID system connect RFID reader/writer to DB-9 female BARCODE connector first. See RFID reader/writer user manual for more information.
Connecting RFID tag reader/writer to the OmegaGT Plus / BetaGT Plus instrument Note:
Because of limited memory space of RFID tags, the following data are not stored in RFID tags:
o Appliance name o Repairing code, o Comments.

OmegaGTPlus / BetaGTPlus Main menu and test modes
34
Loading data from RFID tags to the instrument Select Tag test from Barcode / tag menu and press the ENTER key to confirm. The OmegaGTPlus / BetaGTPlus instrument is now ready to accept RFID tag data.
RFID tag menu
Once the data from RFID tag have been successfully received, the following menu is displayed:
RFID tag menu
Keys:
/ Select the option. ENTER Opens menu for selected option. ESC Returns to Barcode/tag menu. If no results were stored in RFID tag, the view results option won’t be displayed. The following actions can be performed now:
new reading from RFID tag, view autotest sequence, view autotest results, start autotest sequence.
How to view autotest sequence from RFID tag From the TAG menu select View autotest and press ENTER key to confirm. Refer to chapter 3.2.2 Viewing/modifying of existing custom autotest. How to start autotest sequence from RFID tag From the TAG menu select Start new autotest and press ENTER key. Refer to chapter 3.1.3 Performing autotest sequences.

OmegaGTPlus / BetaGTPlus Main menu and test modes
35
How to view autotest results from RFID tag From the TAG menu select View results and press ENTER key to confirm. Refer to chapter 6.2.1 Results view. How to send an autotest sequence to RFID tag From the Autotest custom menu press the F5 (SEND) key. Selected autotest sequence is loaded to the RFID tag using RFID reader/writer.. See RFID reader/writer user manual for more information. How to send an autotest sequence/results to RFID tag Autotest sequence/results can be sent to RFID TAG from the Save results or Recall memory menu. Press the F3 (SEND) key. When sending data from Recall results menu select TAG reader/writer option first and press ENTER key to confirm. Selected data from the instrument are loaded to the RFID tag using RFID reader/writer. See RFID reader/writer user manual for more information.
3.4.2 Working with barcode reader
Barcode technology supports the following functions:
reading 24 pre-defined autotest shortcut codes from barcode labels, reading appliance numbers from barcode labels.
Two Barcode systems are supported. Refer to Appendix A for detailed information. Connect barcode reader to the DB-9 female BARCODE connector first. Use only barcode reader supplied by your distributor or METREL directly.
Connecting barcode reader to the OmegaGT Plus / BetaGT Plus instrument

OmegaGTPlus / BetaGTPlus Main menu and test modes
36
Reading autotest sequence using barcode From the Barcode/tag menu select Barcode test and press ENTER key. The following menu is displayed:
Barcode test menu
Keys:
F1 (VIEW) Views selected autotest sequence. Refer to chapter 3.2.2 Viewing/modifying of existing custom autotest.
START Starts selected autotest sequence. Refer to chapter 3.1.3 Performing autotest sequence.
/ numeric keypad
Selects new autotest sequence.
ESC Returns to Barcode/tag menu. Last used autotest sequence is displayed. The two-digit autotest code can also be selected by using the barcode reader. The code read from the barcode label is accepted, when two short beeps are emitted. Reading appliance number using barcode With the barcode reader also appliance number can be read from barcode label.
Adding appliance number in save results / search results menu
The appliance number from the barcode label is accepted, when two short beeps are emitted.

OmegaGTPlus / BetaGTPlus Main menu and test modes
37
3.5 Single test menu In single test menu individual tests can be performed.
Single test menu
Keys:
/ Select the test / measuring function: - <Earth bond>, Resistance of bonding to protective earth connection. - <Insulation>, Insulation resistance test. - <Insulation S.>, Insulation resistance test with probe. - <Substitute leakage>, Substitute leakage current test. - <Substitute leakage S.> Substitute leakage current test with probe. - <Leakage>, Differential current measurement, - <Touch leakage>, measurement of touch leakage current. - <Polarity test>, test the regularity of cord connections. - <Clamp current >, measurement of clamp current. - <PRCD test>, Test of portable residual current device. - <Power>, Testing consumption of tested appliance.
ENTER Enters selected test. ESC Returns to Main menu. Note:
That measurement results performed in this mode cannot be stored. See chapter 5 Single test mode for detailed description about the single test mode.
3.6 User / appliance data menu In this menu lists of user / appliance data default names can be edited. An alternative is to upload the lists from PC.
Edit user appliance data main menu

OmegaGTPlus / BetaGTPlus Main menu and test modes
38
Keys:
/ Select the item. ENTER Enters selected item menu. ESC Returns to Main menu. Existing user names and appliance data can also be downloaded and edited using PC software and then uploaded to the instrument. Refer to the chapter 3.8 Data upload / download menu for detailed information.
3.6.1 Users submenu
In this menu user names for up to 15 different users can be entered, edited and selected.
Users list
Keys:
/ Select the user. F1 (EDIT) Opens menu for user name modification. ENTER Confirms selected user. ESC Returns to users / appliance data menu. User name modification
Users name modification menu
Keys:
/ Select character in line. alphanumeric Enters character. SHIFT + alphanumeric Enters small letter or special character.
Deletes character left to cursor. F1 (SAVE) Opens menu for user name modification. F2 (UNDO) Confirms selected user. ESC Returns to users list.

OmegaGTPlus / BetaGTPlus Main menu and test modes
39
3.6.2 Appliances submenu In this menu, default lists of appliance names (up to 100) can be edited. An alternative is to upload the names from PC software. Refer to the chapter 3.8 Data upload / download menu for detailed information.
Edit Set appliances menu
Keys:
/ F2 (PgUp) F3 (PgDown)
Select the appliance.
F1 (EDIT) Opens menu for appliance name modification. ENTER Confirms selected appliance. ESC Returns to users / appliance data menu. Appliance rename See 3.6.1 Users submenu (User name modification).
3.6.3 Test sites submenu
In this menu default lists of test site / building names (up to 100) can be edited. An alternative is to upload the names from PC software. The existing lists can be downloaded to PC too. Refer to the chapter 3.8 Data upload / download menu for detailed information.
Set test site menu
Keys:
/ F2 (PgUp) F3 (PgDown)
Select the building.
F1 (EDIT) Opens menu for building name modification.

OmegaGTPlus / BetaGTPlus Main menu and test modes
40
ENTER Confirms selected building. ESC Returns to users / appliance data menu. Building rename See 3.6.1 Users submenu (User name modification).
3.6.4 Locations submenu
In this menu default lists of location / room names (up to 100) can be edited. An alternative is to upload the names from the PC. The existing lists can also be downloaded to PC. Refer to the chapter 3.8 Data upload / download menu for detailed information.
Set locations main
Keys:
/ F2 (PgUp) F3 (PgDown)
Select the location.
F1 (EDIT) Opens menu for location name modification. ENTER Confirms selected location. ESC Returns to users / appliance data menu. Location rename See 3.6.1 Users submenu (User name modification).
3.7 Memory operation menu This menu is intended for operation with stored results. Parameter types provide various searching options to optimize selection of stored appliance data and test results that can be:
- recalled, - sent to printer or PC or any other output and - deleted.

OmegaGTPlus / BetaGTPlus Main menu and test modes
41
Memory operation menu
Parameter types are: [----, appliance, user, building, location, date]. Keys:
/ Select the item. F1 (FIND) Starts searching stored results by applied parameters. F2 (UNDO) Resets modified value to previous state. F3 (TYPE) Modifies searching options by changing order or disabling (----) of
parameter type. ESC Returns to Main menu. See chapter 6 Data operations for more information.
3.8 Data upload / download menu In this menu it is possible to upload different data from PC to the instrument:
stored test results and data (results, parameters, notes) list of default appliance and test site names.
The data to be uploaded are selected in the PC SW package and are:
Users, Appliances, Test sites / buildings, Locations / rooms.
Upload of test results menu
Keys:
/ Select the operating mode. ESC Returns to Main menu.

OmegaGTPlus / BetaGTPlus Main menu and test modes
42
For detailed information on data uploading / downloading refer to help menus of PC software PATLink PRO.
3.9 Setup menu In this menu general instrument parameters can be set.
Setup menu
Keys:
/ Select the setting. ENTER Opens menu for modification of selected setting. ESC Returns to main menu. Following settings can be applied:
Setting date and time, Selection of language, Preparation of printed header lines, Recalling and clearing stored results, Setting contrast, Other instrument settings, Setting the instrument to initial values, Selection of communication port, Selection of password.
3.9.1 Date and time
Date and time can be set in this menu.
Date and time menu

OmegaGTPlus / BetaGTPlus Main menu and test modes
43
Keys:
/ Select the field to be changed. / Select the setting.
F1 (SAVE) Saves new settings and returns to main settings menu. F2 (UNDO) Recovers currently modified setting. ESC Returns to main settings menu without changes. Notes:
Date is attached to the saved autotest results! Date format is DD-MM-YYYY (day–month–year). Date entry is checked for regularity and not accepted in case of irregular date!
3.9.2 Language selection
The instrument supports different languages.
Language menu
Keys:
/ Select language option. ENTER Confirms and enter selected language. ESC Returns to main settings menu.
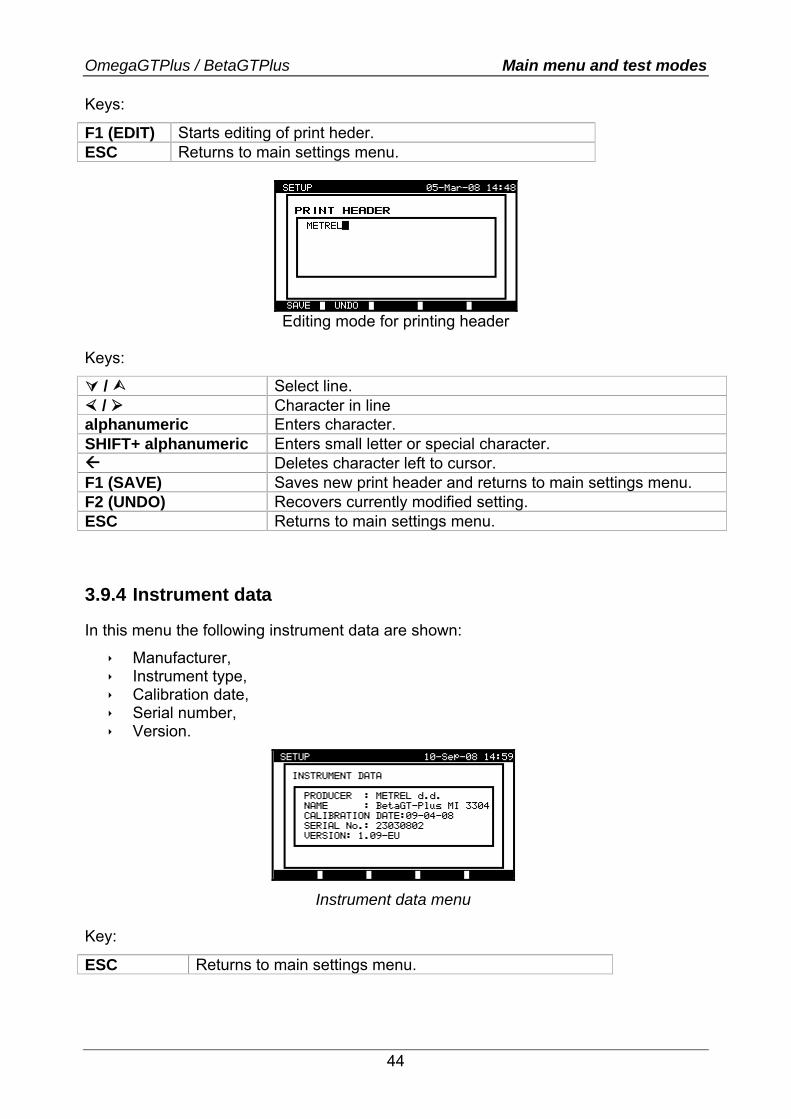
3.9.3 Print header
Instrument supports preparing custom defined print header. The header is merged to autotest results when they are directly printed on serial printer.
Printing header menu
OmegaGTPlus / BetaGTPlus Main menu and test modes
44
Keys:
F1 (EDIT) Starts editing of print heder. ESC Returns to main settings menu.
Editing mode for printing header
Keys:
/ Select line. / Character in line
alphanumeric Enters character. SHIFT+ alphanumeric Enters small letter or special character.
Deletes character left to cursor. F1 (SAVE) Saves new print header and returns to main settings menu. F2 (UNDO) Recovers currently modified setting. ESC Returns to main settings menu.
3.9.4 Instrument data
In this menu the following instrument data are shown:
Manufacturer, Instrument type, Calibration date, Serial number, Version.
Instrument data menu Key:
ESC Returns to main settings menu.

OmegaGTPlus / BetaGTPlus Main menu and test modes
45
Note: Operator cannot change any instrument data!
3.9.5 Contrast adjustment Contrast can be adjusted with the contrast option.
Contrast menu Keys:
/ Adjust contrast. F1 (SAVE) Saves new settings and returns to main settings menu. F2 (UNDO) Recovers currently modified setting. ESC Returns to main settings menu without changes.
3.9.6 Instrument settings
When autotest is completed, various data about appliance and other belonging data can be added to the autotest results before saving them. Instrument settings submenu enables to customize all those data.
Instrument settings menu
Keys:
/ Select the setting. F1 (EDIT) ENTER Opens menu for modification of selected setting.
ESC Returns to main settings menu.

OmegaGTPlus / BetaGTPlus Main menu and test modes
46
There are the following instrument settings:
Item Possible settings Appliance no. [increment, replicate, blank] Test site [replicate, blank] Location [replicate, blank] User [replicate, blank] Appliance name [replicate, blank] Retest period [replicate, blank] Repairing code [replicate, blank] Comment [replicate, blank] Barcode system [single, double]
Meaning of possible settings are:
blank Appropriate field is set to blank in Save results menu. replicate Last entered string is used in an appropriate field when new autotest
sequence is finished. increment Appliance number is automatically incremented when new autotest
sequence is finished.
Modification of selected setting
Keys:
/ Modify setting of selected item. F1 (SAVE) Saves setting of selected item, F2 (UNDO) Recovers currently modified setting. ESC Returns to main settings menu. The instrument supports special label printers (Printek MtP, Intermec EasyCoder C4). When printing barcodes to the special printer, two different options can be set in Barcode systems submenu. If single option is selected, only appliance name is printed out as a barcode on appliance barcode label. When double is selected, both autotest shortcut code and appliance name are printed out as a barcode on appliance barcode label.
3.9.7 Setting the instrument to initial values
The Original settings menu sets some parameters of the instrument into their initial values.

OmegaGTPlus / BetaGTPlus Main menu and test modes
47
Menu for setting initial values
Keys:
Y Accepts initial settings. N, ESC Returns to main setting menu without changes. Initial values: Parameters in single test mode Reset all User defined tests Clear all Autotest sequences Added 24 pre-programmed autotests Menus All set to initial structure. Baud rate 115200 baud. Printer data transfer Set to hardware flow control (DSR/DTR). Note:
The instrument will ask for password before opening menu if the password is enabled, see chapter 3.9.9 Password.
3.9.8 Communication settings The communication port and baud rate for communication with PC can be selected in this menu.
Communication menu
Keys:
/ Select the setting. ENTER Opens menu for modification of selected setting. ESC Returns to main settings menu.

OmegaGTPlus / BetaGTPlus Main menu and test modes
48
Communication settings
Keys:
/ Select the option. F1 (SAVE) ENTER Accepts selected option.
ESC Returns to communication settings menu. Note:
Only one port can be active at one time.
3.9.9 Password
The instrument enables password protection for the following activities:
Entering Edit user menu, Entering Edit measurements menu, Deleting stored results, Entering menu for Setting the instrument to initial values.
By default, the instrument is delivered from production with disabled password protections. All functions are normal accessible. The protection is activated once the password is entered. After the password is entered, each time the instrument asks for password when the listed activities shall be accessed.
Menu for entering the first password Setting the first password Keys:
/ Select character in line. alphanumeric Enters character. SHIFT+ alphanumeric Enters small letter or special character.
Deletes character left to cursor.

OmegaGTPlus / BetaGTPlus Main menu and test modes
49
ENTER Opens menu for confirmation of new password. ESC Returns to main settings menu without changes.
Confirmation request or change the existing password Confirmation or change existing password Keys:
/ Select character in line. alphanumeric Enters character. SHIFT+ alphanumeric Enters small letter or special character.
Deletes character left to cursor. ENTER Confirms the password. ESC Returns to main settings menu without changes. Notes:
Please take a note of applied password and keep it in a safe place. When first password and later confirmation are confirmed with the key ENTER
and without any alphanumeric entry then the password will remain disabled.

OmegaGTPlus / BetaGTPlus Single test mode
50
4 Single test mode In single test mode individual tests can be performed. This is especially helpful when you suspect one or more faults in the tested appliance. Note:
The measurement results cannot be saved in this mode!
Single test menu
Entering the selected function will open its menu. Display organization in general can be seen in the figure below.
Typical single test display
Menu line
Main function indication
Result field
Test parameters field
Message field
Function tabs Keys:
F1 (EDIT) Enters test parameters field. F2 (HELP) Opens help menu.
Starts running the selected function. START STOP Abort function in progress.
ESC Returns to Main menu. Notes:
Once the measurement parameters are set, the settings are kept until new changes are made or the instrument is reset to the default configuration.
To keep new settings in case of power fail return to main menu before turning the power off.

OmegaGTPlus / BetaGTPlus Measurements
51
5 Measurements 5.1 Earth bond resistance This test ensures that the connections between the protective conductor terminal in the mains plug of the appliance and accessible conductive parts of the appliance (metal housing) are satisfactory and of sufficiently low resistance. This test has to be performed on Class 1 (earthed) appliances. A high current is normally used to stress the connections under fault conditions. 200 mA test current is used to prevent damage that may be caused by testing when using high currents. This is often necessary when sensitive electronics such as computers and other information technology equipment is tested. The instrument measures the resistance between test socket PE terminal and test probe.
Earth bond menu Test parameters for earth bond resistance measurement
OUTPUT Test current [200 mA, 10 A, 25 A] LIMIT Maximum resistance [0.01 Ω ÷ 0.09 Ω, 0.1 Ω ÷ 0.9 Ω, 1 Ω ÷ 9 Ω] TIME Measuring time [5 s, 10 s, 30 s, 60 s, 120 s, 180 s] Test circuit for earth bond resistance measurement
Measurement of earth bond resistance of class I appliance

OmegaGTPlus / BetaGTPlus Measurements
52
Earth bond resistance measurement procedure
Select the EARTH BOND function. Set output test current. Set limit value. Set measuring time. Connect device under test to the instrument. Connect earth bond clip into its socket on the instrument. Connect alligator of earth bond clip to accessible metal parts of the device
under test (see figure above). Press the START key for measurement.
Examples of earth bond resistance measurement results
Note:
Consider displayed warnings before starting measurement!
5.2 Insulation resistance Insulation resistance between live conductors and earthed (or isolated) accessible metal parts is checked. This test disclosed fault caused by pollution, moisture, deterioration of insulation metal etc. The capacitive part of leakage currents is not measured because of the DC test voltage. Test parameters for insulation resistance measurement
OUTPUT Test voltage [250 V, 500 V] LIMIT (Insulation)
Minimum resistance [0.10 MΩ, 0.30 MΩ, 0.50 MΩ, 1.00 MΩ, 2.00 MΩ, 4.0 MΩ, 7.0 MΩ, 10.0 MΩ, none]
LIMIT (Insulation S.)
Minimum resistance [0.10 MΩ, 0.25 MΩ, 0.50 MΩ, 1.00 MΩ, 2.00 MΩ, 4.0 MΩ, 7.0 MΩ, 10.0 MΩ, none]
TIME Measuring time [5 s, 10 s, 30 s, 60 s, 120 s, 180 s] Notes:
The appliance under test should be de-energized before the measurement! Consider any warning on the display before starting the measurement! Do not touch the appliance under test during the measurement or before it is fully
discharged! The message »Discharging…« is displayed while the voltage on appliance under test is higher than 20 V!
Do not disconnect the appliance under test from the instrument during the measurement or before it is automatically discharged!

OmegaGTPlus / BetaGTPlus Measurements
53
5.2.1 Insulation resistance on class I appliances
The instrument measures the insulation resistance between:
Main test socket (L+N) and PE test terminals, LN and PE test sockets.
Insulation menu Test circuits for CLASS I insulation resistance measurement
Measurement of insulation resistance of class I appliance
Measurement of insulation resistance of fixed installed appliances of Class I

OmegaGTPlus / BetaGTPlus Measurements
54
Insulation resistance measurement procedure for CLASS I
Select the Insulation function. Set output test voltage. Set limit value. Set measuring time. Connect device under test to the instrument (see figures above). When appliance has isolated accessible metal parts, use S probe (earth bond
clip), see 5.2.2 Insulation resistance on class 2 appliances. For fixed equipment:
• Disconnect mains supply of the fixed equipment; • Connect L test socket of the instrument to L and N of the fixed equipment; • Connect PE test socket of the instrument to metallic enclosure of thefixed
equipment. Press the START key for measurement.
Examples of insulation resistance measurement results
Note:
When probe is applied during measurement of Class I appliance then the result represents parallel value of both measured insulation resistances.
5.2.2 Insulation resistance on class II appliances (Insulation S)
The instrument measures the insulation resistance between:
Main test socket (L+N) and S test terminals, LN and S test sockets.
Insulation S. menu

OmegaGTPlus / BetaGTPlus Measurements
55
Test circuits for CLASS II insulation resistance measurement
Measurement of insulation resistance of class II appliance
Measurement of insulation resistance of accessible isolated conductive parts of fixed
installed appliances Insulation resistance measurement procedure for CLASS II
Select the desired Insulation S. function. Set output test voltage. Set limit value. Set measuring time. Connect device under test to the instrument. Connect probe (earth bond clip) into its socket on the instrument. Connect probe to conductive accessible part that is insulated from PE (see
figures above). Press the START key for measurement.
Example of insulation S. resistance measurement results

OmegaGTPlus / BetaGTPlus Measurements
56
5.3 Substitute leakage current Leakage currents between live conductors and isolated accessible metal parts (housing, screws, handles etc.) are checked with this test. Capacitive leakage paths are included in the result too. The current flowing at test voltage of 40 Vac is measured and scaled to the value at nominal mains supply voltage of 230 Vac. Test parameters for substitute leakage current measurement
OUTPUT Test voltage [40 V] LIMIT (Substitute)
Maximum current [0.25 mA, 0.50 mA, 0.75 mA, 1.00 mA, 1.50 mA, 2.50 mA, 3.50 mA, 4.00 mA, 4.50 mA, 5.00 mA, 5.50 mA, 6.00 mA, 7.00 mA, 8.00 mA, 9.00 mA, none]
LIMIT (Substitute S.)
Maximum current [0.25 mA, 0.50 mA, 0.75 mA, 1.00 mA, 1.50 mA, 2.50 mA, 3.50 mA, none]
TIME Measuring time [5 s, 10 s, 30 s, 60 s, 120 s, 180 s] Notes:
Consider any displayed warning before starting measurement! Substitute leakage current may differ substantially from that of conventional
leakage current test because of the way the test is performed. For example, the difference in both leakage measurements will be affected by the presence of neutral to earth noise suppression capacitors.
5.3.1 Substitute leakage current on class I appliances
The instrument measures the substitute leakage current between:
Main test socket (L+N) and PE test terminals, LN and PE test sockets.
Sub leakage menu

OmegaGTPlus / BetaGTPlus Measurements
57
Test circuits for CLASS I substitute leakage current measurement
Measurement of substitute leakage current of class I appliance
Measurement of substitute leakage current of fixed installed appliances of class I
Substitute leakage current measurement procedure for CLASS I
Select the Sub leakage function. Set limit value. Set measuring time. Connect device under test to the instrument (see figures above). When appliance has isolated accessible metal parts, use S probe (earth bond
clip), see 5.3.2 Substitute leakage current on class 2 appliances. For fixed equipment:
• Disconnect mains supply of the fixed equipment; • Connect L test socket of the instrument to L and N of the fixed equipment; • Connect PE test socket of the instrument to metallic enclosure of the fixed
equipment. Press the START key for measurement.

OmegaGTPlus / BetaGTPlus Measurements
58
Examples of substitute leakage current measurement results
5.3.2 Substitute leakage current on class II appliances
The instrument measures leakage current between:
Main test socket (L+N) and S test terminals, LN and S test sockets.
Sub leakage S. menu
Test circuits for CLASS II substitute leakage current measurement
Measurement of substitute leakage current of class II appliance

OmegaGTPlus / BetaGTPlus Measurements
59
Measurement of substitute leakage of accessible isolated conductive parts of fixed
installed appliances Substitute leakage current measurement procedure for CLASS II
Select the Sub leakage S. function. Set limit value. Set measuring time. Connect device under test to the instrument (see figures above). For fixed equipment connect PE socket of the instrument to metallic
enclosure of fixed equipment. Press the START key for measurement.
Example of substitute leakage current measurement results
Notes:
Consider any displayed warning before starting measurement! Substitute leakage current may differ substantially from that of conventional
leakage current test because of the way the test is performed. For example, the difference in both leakage measurements will be affected by the presence of neutral to earth noise suppression capacitors.
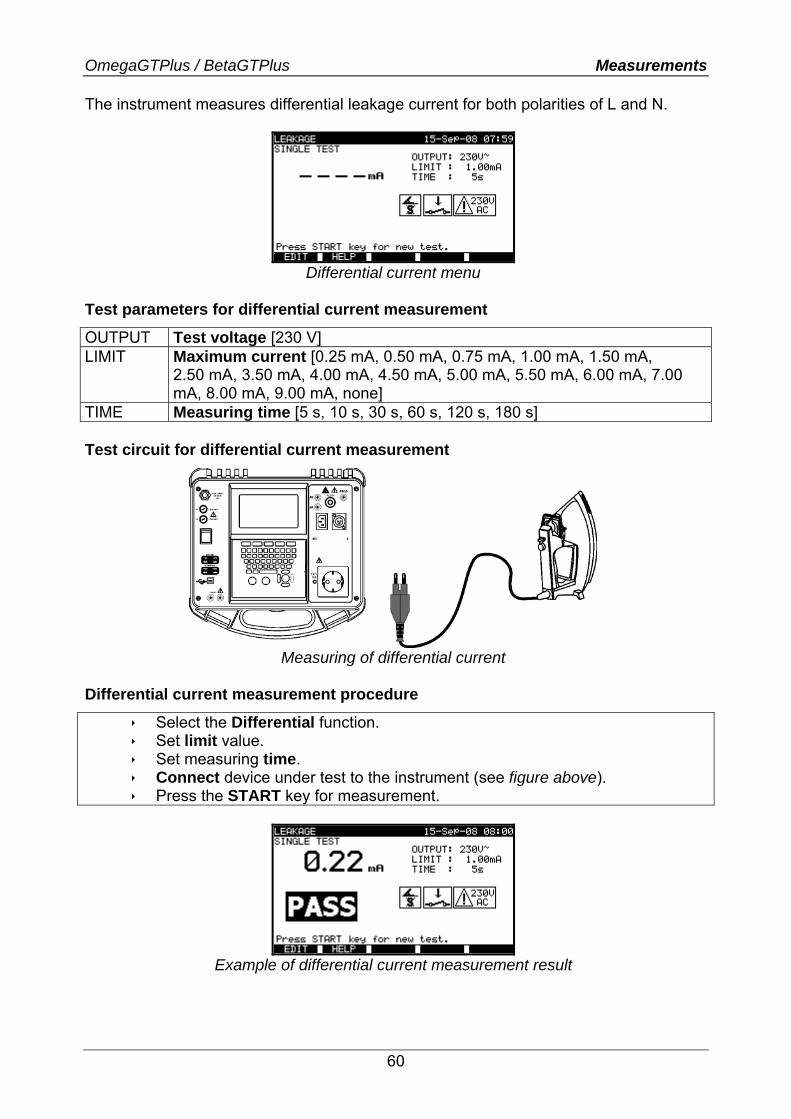
5.4 Differential current The purpose of this test is to determine the sum of all leakages flowing from the live conductor to the earth. Because the differential method for determining leakage current is used the full and true appliance leakage current is always measured, although there can exist parallel current paths to ground. Differential current measurement is frequency weighted for perception / reaction according the standards IEC 60990 and VDE 0404-3.
OmegaGTPlus / BetaGTPlus Measurements
60
The instrument measures differential leakage current for both polarities of L and N.
Differential current menu
Test parameters for differential current measurement
OUTPUT Test voltage [230 V] LIMIT
Maximum current [0.25 mA, 0.50 mA, 0.75 mA, 1.00 mA, 1.50 mA, 2.50 mA, 3.50 mA, 4.00 mA, 4.50 mA, 5.00 mA, 5.50 mA, 6.00 mA, 7.00 mA, 8.00 mA, 9.00 mA, none]
TIME Measuring time [5 s, 10 s, 30 s, 60 s, 120 s, 180 s] Test circuit for differential current measurement
Measuring of differential current
Differential current measurement procedure
Select the Differential function. Set limit value. Set measuring time. Connect device under test to the instrument (see figure above). Press the START key for measurement.
Example of differential current measurement result

OmegaGTPlus / BetaGTPlus Measurements
61
Notes: The appliance is connected to the mains voltage. Make sure that the appliance
with moving parts is safely mounted or protected to prevent possible danger to operator or damage to the appliance!
Consider any displayed warning before starting measurement! The instrument automatically changes L/N polarity of connected appliance.
5.5 Touch leakage current This test determines the current that would flow if a person touches the appliance. Measurement is based on a human body model with resistance of 2 kΩ and frequency weighted for perception / reaction according the standards IEC 60990 and VDE 0404-3. Both AC and DC components of touch leakage current are detected. The instrument measures the leakage current flowing through the S probe into earth. The appliance under test can be powered from the mains test socket or directly from the installation (fixed installed equipment). The instrument measures touch leakage current for both polarities of L and N.
Touch leakage menu
Test parameters for touch leakage current measurement
OUTPUT System voltage [230 V] LIMIT
Maximum current [0.25 mA, 0.50 mA, 0.75 mA, 1.00 mA, 1.50 mA, 2.00 mA, none]
TIME Measuring time [5 s, 10 s, 30 s, 60 s, 120 s, 180 s] Test circuits for touch leakage current measurement
Measurement of touch leakage current
OmegaGTPlus / BetaGTPlus Measurements
62
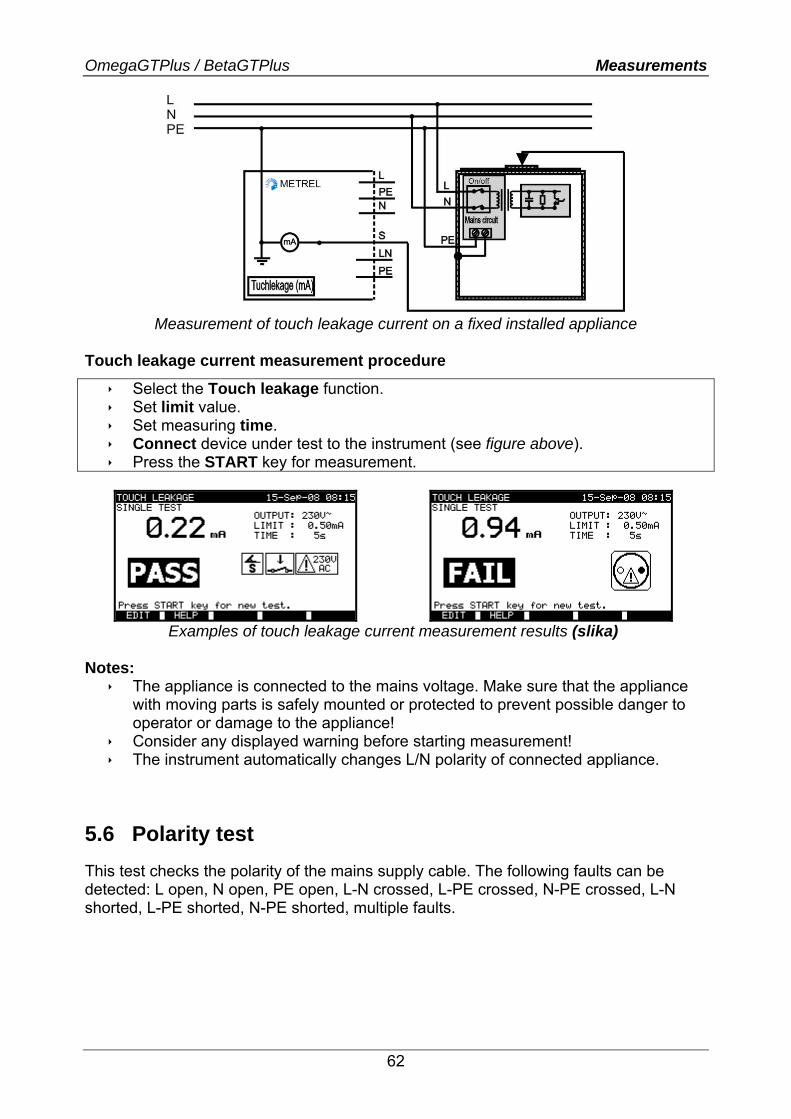
Measurement of touch leakage current on a fixed installed appliance
Touch leakage current measurement procedure
Select the Touch leakage function. Set limit value. Set measuring time. Connect device under test to the instrument (see figure above). Press the START key for measurement.
Examples of touch leakage current measurement results (slika)
Notes:
The appliance is connected to the mains voltage. Make sure that the appliance with moving parts is safely mounted or protected to prevent possible danger to operator or damage to the appliance!
Consider any displayed warning before starting measurement! The instrument automatically changes L/N polarity of connected appliance.
5.6 Polarity test This test checks the polarity of the mains supply cable. The following faults can be detected: L open, N open, PE open, L-N crossed, L-PE crossed, N-PE crossed, L-N shorted, L-PE shorted, N-PE shorted, multiple faults.

OmegaGTPlus / BetaGTPlus Measurements
63
Polarity test menu
Test circuit for polarity test
Polarity test of IEC cord
Polarity test procedure
Select the Polarity test function. Connect tested cable to the instrument (see figure above). Press the START key for measurement.
Example of polarity test result
Note:
Consider any displayed warning before starting test!
OmegaGTPlus / BetaGTPlus Measurements
64
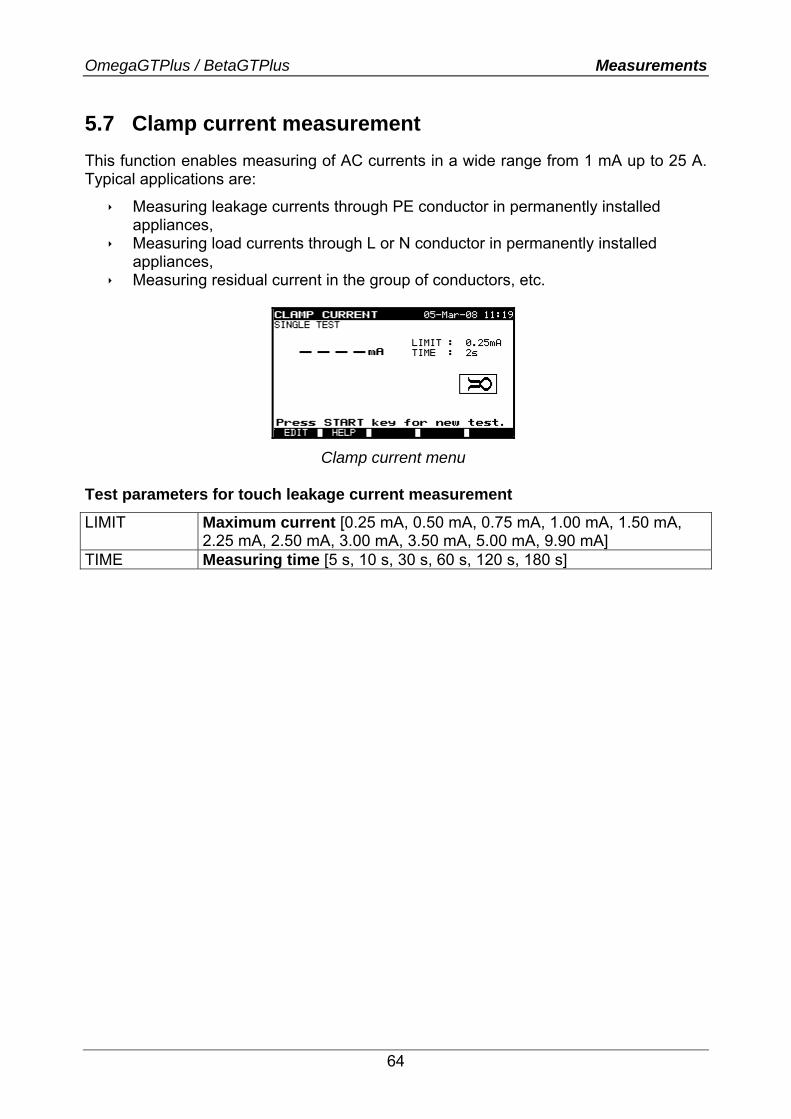
5.7 Clamp current measurement This function enables measuring of AC currents in a wide range from 1 mA up to 25 A. Typical applications are:
Measuring leakage currents through PE conductor in permanently installed appliances,
Measuring load currents through L or N conductor in permanently installed appliances,
Measuring residual current in the group of conductors, etc.
Clamp current menu Test parameters for touch leakage current measurement
LIMIT
Maximum current [0.25 mA, 0.50 mA, 0.75 mA, 1.00 mA, 1.50 mA, 2.25 mA, 2.50 mA, 3.00 mA, 3.50 mA, 5.00 mA, 9.90 mA]
TIME Measuring time [5 s, 10 s, 30 s, 60 s, 120 s, 180 s]

OmegaGTPlus / BetaGTPlus Measurements
65
Test circuit for clamp current measurement
Connecting current clamp to the instrument
Clamp current measurement procedure
Select the Clamp current function. Set limit value. Set measuring time. Connect the current clamp to the instrument (see figure above). Put the current clamp around wire(s) that has to be measured. Press the START key for measurement.
Example of clamp current measurement result Notes:
Consider any displayed warning before starting measurement! When measuring leakages neighbour magnetic fields and capacitive coupling
(especially from the L and N conductors) can disturb the results. It is recommended that the clamp is as close as possible to the grounded surface and away from wires and other objects under voltage or carrying current.
Displayed current represents r.m.s. value for current clamp with ratio 1000:1. Use test clamp supplied by METREL or other with similar characteristics (current
output, ratio 1000:1, appropriate measurement range; consider error of test clamp when evaluating measured results)!
Current clamps Metrel A 1074 and A 1019 are suitable for use with the instrument in range of 0.2 A ÷ 20 A. Below 0.2 A they can be used as indicator only. They are not suitable for leakage current measurements.
The only Metrel current clamp, suitable for leakage current measurements, is A 1018 (1000 A/1 A).

OmegaGTPlus / BetaGTPlus Measurements
66
5.8 RCD test The purpose of this test is to ensure proper operation of residual current devices built-in in appliances and portable residual current devices. The following measurements and tests can be performed:
Trip-out time, and RCD autotest.
RCD single test menu RCD autotest menu
Test parameters for RCD test
IΔN Rated RCD residual current [10 mA, 15 mA, 30 mA] MODE Type of RCD test [single, auto] If MODE = single Multi Actual test current IΔN [x ½, x 1, x 5] Phase Starting angle [0°, 180°, (0°,180°)]
RCD test current starting polarities
Trip-out time limits Trip-out times according to EN 61008 / EN 61009: ½×IΔN
*) IΔN 5×IΔN General RCDs (non-delayed) tΔ > 300 ms tΔ < 300 ms tΔ < 40 ms *) Minimum test period for current of ½×IΔN, RCD shall not trip-out. Maximum test times related to selected test current for general (non-delayed) RCD Standard ½×IΔN IΔN 5×IΔN EN 61008 / EN 61009 400 ms 400 ms 40 ms The instrument is intended for testing of General (non-delayed) RCDs, which are suited for:
Alternating residual current (AC type, marked with symbol), PRCD socket of the instrument operates as current sink for fault current which is sourced on L entry of tested appliance.

OmegaGTPlus / BetaGTPlus Measurements
67
Circuits for testing RCD
Testing of portable RCD (PRCD)
5.8.1 Single RCD trip-out time test
Trip-out time measurement verifies the sensitivity of an RCD at different residual currents. Trip-out time measurement procedure
Select the RCD test function. Select Single test mode. Set test parameters (if necessary). Connect tested device to the test socket of the instrument (see figures
above). Connect test lead from PRCD socket of the instrument to the secondary side
of tested PRCD, terminal L. Press the START key to perform measurement. Reactivate tested PRCD when both phases are selected to finish with test
with opposite phase.
Example of RCD test result
5.8.2 Automatic RCD test
RCD autotest function is intended to perform complete RCD testing and measurement of belonging parameters (contact voltage, fault loop resistance and trip-out time at different residual currents) in one set of automatic tests, guided by the instrument. If any

OmegaGTPlus / BetaGTPlus Measurements
68
false parameter is noticed during the RCD autotest, then individual parameter test has to be used for further investigation.
RCD auto test menu
RCD autotest procedure
RCD Autotest steps Notes Select the RCD test function. Set Auto test mode. Select rated IΔN (if necessary). Connect tested device to the test socket of the
instrument (see figures above).
Connect test lead from PRCD socket of the instrument to the secondary side of tested PRCD, terminal L.
Press the TEST key. Start of test Test with IΔN, 0° (step 1). RCD should trip-out Re-activate RCD. Test with IΔN, 180° (step 2). RCD should trip-out Re-activate RCD. Test with 5×IΔN, 0° (step 3). RCD should trip-out Re-activate RCD. Test with 5×IΔN, 180° (step 4). RCD should trip-out Re-activate RCD. Test with ½×IΔN, 0° (step 5). RCD should not trip-out
Test with ½×IΔN, 180° (step 6). RCD should not trip-out End of test.
Step 1
Step 2

OmegaGTPlus / BetaGTPlus Measurements
69
Step 3
Step 4
Step 5 and
Step 6
Individual steps in RCD autotest
The test passes if the RCD:
Does not trip out at ½×IΔN tests, Trips inside predefined time limits at IΔN, and 5×IΔN tests.
Notes:
Consider any displayed warning before starting measurement! For appliances with integrated RCD the housing must be opened to access the
RCD’s L output terminal. Mains voltage is applied to the device under test. Do not touch the equipment
under test or the test leads during the test.
5.9 Functional test The function is intended to make functional test or check of the appliance and parallel to this, the power consumption is measured and displayed as apparent power.
Leakage menu

OmegaGTPlus / BetaGTPlus Measurements
70
Test parameters for Functional test
OUTPUT System voltage [230 V] TIME Measuring time [5 s, 10 s, 30 s, 60 s, 120 s, 180 s] Circuit for functional test
Functional test
Functional test procedure
Select the Functional test function. Set measuring time. Connect tested appliance to the instrument (see figure above). Press the START key for measurement.
Example of apparent power measurement result
Notes:
The appliance is connected to the mains voltage. Make sure that the appliance with moving parts is safely mounted or protected to prevent possible danger to operator or damage to the appliance!
Consider any displayed warning before starting measurement!
5.10 Flash test (MI 3305 – OmegaGTPlus only) The purpose of this test is to ensure that the insulation material of the appliance can withstand high voltage transients and short overvoltages.

OmegaGTPlus / BetaGTPlus Measurements
71
Flash test menu
Test parameters for flash test
OUTPUT Test voltage [1500 V, 3000 V] LIMIT Maximum current [1.00 mA, 1.50 mA, 2.00 mA, 2.25 mA] TIME Measuring time [5 s, 10 s, 30 s, 60 s, 120 s, 180 s] Test circuits for flash test
For Class I appliances, a test voltage of 1.5 kVAC is applied between main test socket (L+N) and PE test terminals.
Flash test on Class I appliance
For Class II appliances, a test voltage of 3 kVAC is applied between main test socket (L+N) and FLASH test terminals.
Flash test on Class II appliance

OmegaGTPlus / BetaGTPlus Measurements
72
Flash test procedure for CLASS I:
Select the Flash test function. Set output test voltage. Set limit value. Set measuring time. Connect device under test to the instrument (see figures above). Press the START key for measurement.
Flash test procedure for CLASS II:
Select the Flash test function. Set output test voltage. Set limit value. Set measuring time. Connect device under test to the instrument (see figures above). Connect flash probe into its socket on the instrument. Connect flash probe to the device under test (see figures above). Press the START key for measurement.
Examples of flash test results
Notes:
Consider any warning on the display before starting measurement. Do not touch the equipment under test or the test leads during the test – a
dangerous voltage will be present. Appliance ON/OFF switches must be switched on. Before applying the test, check that the components in the appliance can
withstand the test voltage without any damage. IT appliances are especially sensitive.

OmegaGTPlus / BetaGTPlus Data operations
73
6 Data operations After the autotest sequence is completed, measurement results can be:
Viewed, Saved to the flash memory of the instrument, Send to PC, Test report can be send to print out on serial printer, Appliance label can be printed out.
6.1 Saving autotest results After the autotest sequence is completed, Save results menu is displayed.
Important data can be added to the autotest results in this menu. The following data can be appended to test results for saving:
Appliance number and its name, Test site and location, Retest period, Repairing code, Comments.
Save results menu
Keys:
/ Select the item. / Select character in line.
alphanumeric Enters character. SHIFT+ alphanumeric Enters small letter or special character.
Deletes character left to cursor. F1 (SAVE) Saves test results and returns to last autotest menu. F2 (UNDO) Resets modified item to previous state. F3 (SEND) Sends one of output device. F4 (VIEW) Open display of test results. ESC Returns to Main menu.

OmegaGTPlus / BetaGTPlus Data operations
74
Building data for items
Appliance no. Up to 10 alphanumeric or special characters can be entered. Appliance number can also be read with a barcode reader.
Test site, Location, Appliance name
Up to 15 alpha-numeric or special characters can be entered. Names can also be selected from the list of 100 predefined names for each parameter.
Retest period 2 numeric characters can be entered. Repairing code Up to 20 alpha-numeric or special characters can be entered. Comments Up to 25 alpha-numeric or special characters can be entered. All parameters added to the autotest results have in general a possibility to be replicated or default set to blank when saving new autotest results. Appliance number can also be automatically incremented when new autotest sequence is finished. For detailed description refer to chapter 3.9.6 Instrument settings. Notes:
The date and time are automatically attached to the saved results. The autotest results cannot be stored if the Appliance no. field is empty. User field cannot be edited.
6.2 Recall / delete / send to output of results After entering selection and searching the recall menu appears. The instrument shows complete numbers of found results.
Memory recall menu – list of stored autotest results
Keys:
/ Select stored autotest result. F1 (PgUp) Opens previous page in list of test results. F2 (PgDown) Opens next page in list of test.
F3 (SEND) Sends autotest results of selected appliance to one of output devices, see 6.2.3 Downloading and printing results.
F4 (SENDall) Sends all autotest results from selection to one of output devices, see 6.2.3 Downloading and printing results.
F5 (DELETE) Deletes results, see 6.2.2 Deleting Results. ENTER Opens results view of selected autotest result, see 6.2.1 Results
view.. ESC Returns to Main menu.

OmegaGTPlus / BetaGTPlus Data operations
75
6.2.1 Results view
For each autotest result can be observed:
All functions applied, Test parameters for each and Results with Pass/Fail indication.
View results menu
Keys:
, F1 (PgUp) Opens previous page of test results. , F2 (PgDown) Opens next page of test results.
F5 (MORE) Switches between detailed results view and complete list of appliance data.
ESC Returns memory recall menu.
6.2.2 Deleting results
It is possible to delete stored autotest results. There are three possibilities:
Delete of currently selected autotest result, Delete all results found and selected by search criteria and Delete complete stored results.
Request Confirmation
Delete results menu Keys:
/ Select deleting option. F5 (DELETE) Deletes results according to selected option. ESC Returns to memory recall menu.

OmegaGTPlus / BetaGTPlus Data operations
76
Keys to confirm deleting: Y Confirms deleting in deletes selected option. N ESC Returns to memory recall menu without deleting.
6.2.3 Downloading and printing results
The instrument offers the following possibilities to send selected result or selection to:
- PC (to store and later operations on stored results), - serial printer for fast report printing, - label printer, and - RFID tag. It is possible to send data to selected output after:
autotest sequence is completed, or recalling stored results from the instrument memory.
Send results menu
Common keys:
/ Select send output option. ENTER Starts sending to selected output. ESC Returns to memory recall menu. Output dependent options PC Keys for transfer to PC: F1 (BAUD) Opens menu for selection of data transfer speed. F2 (COMM) Opens menu for interface selection. See chapter 3.9.8 Communication settings.
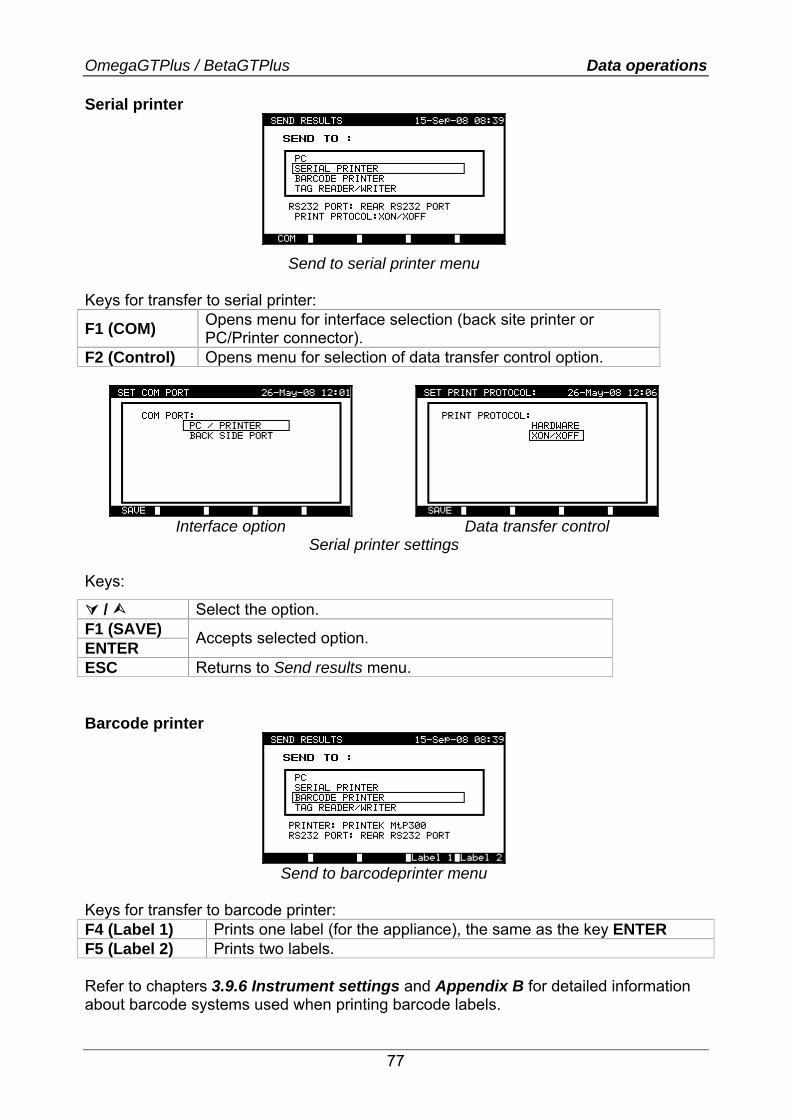
OmegaGTPlus / BetaGTPlus Data operations
77
Serial printer
Send to serial printer menu Keys for transfer to serial printer:
F1 (COM) Opens menu for interface selection (back site printer or PC/Printer connector).
F2 (Control) Opens menu for selection of data transfer control option.
Interface option Data transfer control
Serial printer settings Keys:
/ Select the option. F1 (SAVE) ENTER Accepts selected option.
ESC Returns to Send results menu. Barcode printer
Send to barcodeprinter menu
Keys for transfer to barcode printer: F4 (Label 1) Prints one label (for the appliance), the same as the key ENTER F5 (Label 2) Prints two labels. Refer to chapters 3.9.6 Instrument settings and Appendix B for detailed information about barcode systems used when printing barcode labels.
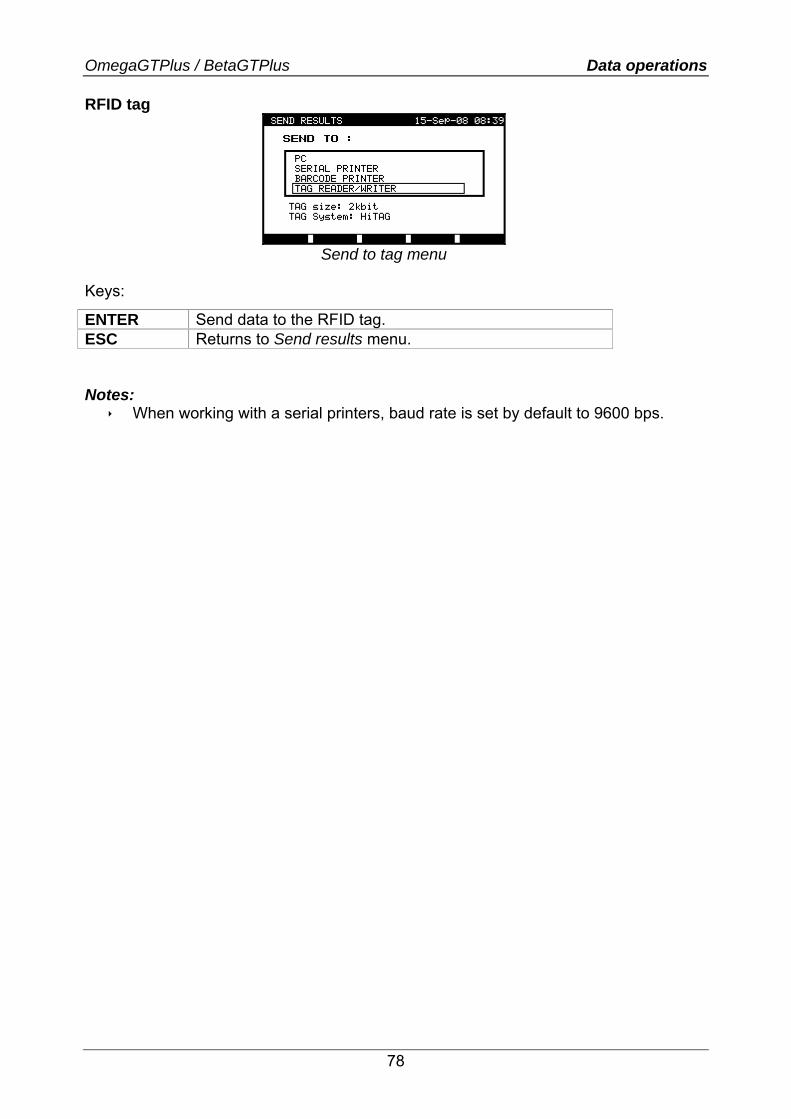
OmegaGTPlus / BetaGTPlus Data operations
78
RFID tag
Send to tag menu
Keys:
ENTER Send data to the RFID tag. ESC Returns to Send results menu. Notes:
When working with a serial printers, baud rate is set by default to 9600 bps.
OmegaGTPlus / BetaGTPlus Maintenance
79
7 Maintenance 7.1 Periodic calibration It is essential that all measuring instruments are regularly calibrated in order for the technical specification listed in this manual to be guaranteed. We recommend an annual calibration. The calibration should be done by an authorized technical person only.
7.2 Fuses There are two fuses available from front panel:
F1 = F2 = T 16 A / 250 V (32 × 6,3 mm): intended for instrument protection. If the instrument does not respond after connection to mains supply, disconnect the mains supply and accessories and then check these fuses. For position of fuses refer to chapter 2.1 Front panel. Warning!
Switch off the instrument and disconnect all test accessories and mains cord before replacing the fuses or opening the instrument. Disconnect all test leads and the instrument mains cord before removing fuse cover!
Replace blown fuse with the same type.
7.3 Service For repairs under or out of warranty time please contact your distributor for further information. Unauthorized person is not allowed to open the MI 3304 / MI 3305 instrument. There are no user replaceable components inside the instrument.
7.4 Cleaning Use soft patch slightly moistened cloth with soap water or alcohol to clean the surface of the instrument. Leave the instrument to dry totally before using it. Notes:
Do not use liquids based on petrol or hydrocarbons! Do not spill cleaning liquid over the instrument!

OmegaGTPlus / BetaGTPlus Technical specifications
80
8 Technical specifications 8.1 Earth bond resistance Earth bond resistance readout (4 A, 10 A, 25 A)
Range Resolution Accuracy 0.00 Ω ÷ 1.99 Ω 0.01 Ω ±(5 % of reading + 3 digits)
2.00 Ω ÷ 19.99 Ω 0.01 Ω ±10 % Earth bond resistance readout (200 mA)
Range Resolution Accuracy 0.00 Ω ÷ 1.99 Ω 0.01 Ω ±(5 % of reading + 3 digits)2.00 Ω ÷ 9.99 Ω 0.01 Ω ±(5 % of reading + 5 digits)10.0 Ω ÷ 19.9 Ω 0.1 Ω ±(5 % of reading + 5 digits)
Test currents............. 25 A and 10 A into 100 mΩ at mains voltage of 230 V AC
200 mA into 2 Ω at mains voltage of 230 V AC Open circuit voltage .. < 6 V AC at mains voltage of 230 V AC Pass levels ............... 0.01 Ω ÷ 0.09 Ω, 0.10 Ω ÷ 0.90 Ω, 1.00 Ω ÷ 9.00 Ω Test duration............. 5 s, 10 s, 30 s, 60 s, 120 s, 180 s Output....................... S test probe connector – test socket (PE) Test method 4-wire measurement, floating to earth
8.2 Insulation resistance Class I Insulation resistance readout
Range Resolution Accuracy 0.000 MΩ ÷ 0.500 MΩ 0.001 MΩ ±(10 % of reading + 5 digits)0.501 MΩ ÷ 1.999 MΩ 0.001 MΩ 2.00 MΩ ÷ 19.99 MΩ 0.01 MΩ 20.0 MΩ ÷ 199.9 MΩ 0.1 MΩ
±(5 % of reading + 3 digits)
Nominal voltages ...... 250 V DC, 500 V DC (- 0 %, + 10 %) Measuring current..... min. 1 mA at 250 kΩ (250 V), 500 kΩ (500 V) Short circuit current... max. 2.0 mA Pass levels ............... 0.10 MΩ, 0.30 MΩ, 0.50 MΩ, 1.00 MΩ, 2.00 MΩ, 4.0 MΩ,
7.0 MΩ, 10.0 MΩ, none Test duration............. 5 s, 10 s, 30 s, 60 s, 120 s, 180 s Output....................... test socket Test method.............. floating to earth Auto discharge after test.

OmegaGTPlus / BetaGTPlus Technical specifications
81
Class II Insulation resistance readout
Range Resolution Accuracy 0.000 MΩ ÷ 0.500 MΩ 0.001 MΩ ±(10 % of reading + 5 digits)0.501 MΩ ÷ 1.999 MΩ 0.001 MΩ 2.00 MΩ ÷ 19.99 MΩ 0.01 MΩ 20.0 MΩ ÷ 199.9 MΩ 0.1 MΩ
±(5 % of reading + 3 digits)
Nominal voltages ...... 250 V DC, 500 V DC (- 0 %, + 10 %) Measuring current..... min. 1 mA at 250 kΩ (250 V), 500 kΩ (500 V) Short circuit current... max. 2.0 mA Pass levels ............... 0.10 MΩ, 0.25 MΩ, 0.50 MΩ, 1.00 MΩ, 2.00 MΩ, 4.0 MΩ,
7.0 MΩ, 10.0 MΩ, none Test duration............. 5 s, 10 s, 30 s, 60 s, 120 s, 180 s Output....................... test socket – S test probe connector Test method.............. floating to earth Auto discharge after test.
8.3 Substitute leakage current Class I Substitute leakage current readout
Range Resolution Accuracy 0.00 mA ÷ 19.99 mA 0.01 mA ±(5 % of reading + 5 digits)
Open circuit voltage .. < 50 V AC at mains voltage of 230 V AC Short circuit current... < 40 mA Pass levels ............... 0.25 mA, 0.50 mA, 0.75 mA, 1.00 mA, 1.50 mA, 2.50 mA,
3.50 mA, 4.00 mA, 4.50 mA, 5.00 mA, 5.50 mA, 6.00 mA, 7.00 mA, 8.00 mA, 9.00 mA, none
Test duration............. 5 s, 10 s, 30 s, 60 s, 120 s, 180 s Output test socket
Test method.............. floating to earth Displayed current is calculated to rated supply voltage of 230 V. Class II Substitute leakage current readout
Range Resolution Accuracy 0.00 mA ÷ 19.99 mA 0.01 mA ±(5 % of reading + 5 digits)
Open circuit voltage .. < 50 V AC at mains voltage of 230 V AC Short circuit current... < 40 mA Pass levels ............... 0.25 mA, 0.50 mA, 0.75 mA, 1.00 mA, 1.50 mA, 2.50 mA,
3.50 mA, none Test duration............. 5 s, 10 s, 30 s, 60 s, 120 s, 180 s Output....................... test socket – S test probe connector Test method.............. floating to earth Displayed current is calculated to rated supply voltage of 230 V.

OmegaGTPlus / BetaGTPlus Technical specifications
82
8.4 Differetial current Differential leakage current readout
Range Resolution Accuracy 0.00 mA ÷ 9.99 mA 0.01 mA ±(5 % of reading + 5 digits)
Pass levels ............... 0.25 mA, 0.50 mA, 0.75 mA, 1.00 mA, 1.50 mA, 2.50 mA, 3.50 mA, 4.00 mA, 4.50 mA, 5.00 mA, 5.50 mA, 6.00 mA, 7.00 mA, 8.00 mA, 9.00 mA, none
Test duration............. 5 s, 10 s, 30 s, 60 s, 120 s, 180 s Output....................... test socket Polarity L-N............... automatic polarity change on test socket Measurement:........... current measurement circuit according to VDE 0404-3, Anhang A,
Figure A1, IEC 60990 Figure F2
8.5 Touch leakage current Touch leakage current readout
Range Resolution Accuracy 0.00 mA ÷ 1.99 mA 0.01 mA ±(10 % of reading + 5 digits)
Pass levels ............... 0.25 mA, 0.50 mA, 0.75 mA, 1.00 mA, 1.50 mA, 2.00 mA, none Test duration............. 5 s, 10 s, 30 s, 60 s, 120 s, 180 s Output....................... test socket – S test probe connector Polarity L-N............... automatic polarity change on test socket Measurement:........... current measurement circuit according to VDE 0404-3, Anhang A,
Figure A1, IEC 60990 Figure F2
8.6 Polarity test Test voltage .............. < 50 V AC Detects ..................... Pass, L-open, N-open, PE-open, L-N crossed, L-PE crossed,
N-PE crossed, L-N shorted, L-PE shorted, N-PE shorted, multiple faults
Output....................... test socket – IEC socket
8.7 Clamp current True RMS current readout using 1000:1 current clamp
Range Resolution Accuracy*) 0.00 mA ÷ 9.99 mA 0.01 mA ±(5 % of reading + 5 digits)10.0 mA ÷ 99.9 mA 0.1 mA ±(5 % of reading + 5 digits)100 mA ÷ 999 mA 1 mA ±(5 % of reading + 5 digits)1.00 A ÷ 9.99 A 0.01 A ±(5 % of reading + 5 digits)10.0 A ÷ 24.9 A 0.1 A ±(5 % of reading + 5 digits)
*) Consider accuracy of current transformer.
Pass levels ............... 0.25 mA, 0.50 mA, 0.75 mA, 1.00 mA, 1.50 mA, 2.25 mA, 2.50 mA, 3.00 mA, 3.50 mA, 5.00 mA, 9.90 mA

OmegaGTPlus / BetaGTPlus Technical specifications
83
Test duration............. 5 s, 10 s, 30 s, 60 s, 120 s, 180 s Input current clamp terminals
8.8 Trip-out time of portable RCD Portable RCD trip-out time readout
Range Resolution Accuracy 0 ms ÷ 1999 ms(½×IΔN) 1 ms 0 ms ÷ 300 ms (IΔN) 1 ms 0 ms ÷ 40 ms (5×IΔN) 1 ms
±3 ms
Test currents (IΔN) ............. 10 mA, 15 mA, 30 mA Test current multipliers ..... ½×IΔN, IΔN, 5×IΔN Start angle ........................ 0°, 180°, both Test modes....................... single, autotest Output............................... PRCD probe connector – test socket Trip out times according to EN 61008 / EN 61009
½×IΔN IΔN 5×IΔN tΔ > 300 ms tΔ < 300 ms tΔ < 40 ms
8.9 Functional test Apparent power readout
Range Resolution Accuracy 0.00 kVA ÷ 4.00 kVA 0.01 kVA ±(5 % of reading + 3 digits)
Test duration............. 5 s, 10 s, 30 s, 60 s, 120 s, 180 s Output....................... test socket
8.10 Flash test (MI 3305 – OmegaGTPlus only) Flash current readout
Range Resolution Accuracy 0.00 - 2.50 mA 0.01 mA ±(5 % of reading + 5 digit)
Test voltage .............. 1500 V AC, 3000 V AC Output resistance...... 480 kΩ@1500 V, 960 kΩ@3000 V Limits ........................ 1.00 mA, 1.50 mA, 2.00 mA, 2.25 mA Timer ........................ 2 s, 3 s, 5 s, 10 s, 30 s, 60 s, 120 s, 180 s Output....................... Class 1: test socket Class 2: test socket (L+N) – flash probe connector

OmegaGTPlus / BetaGTPlus Technical specifications
84
8.11 General data Rated supply voltage .........................230 V AC (±10 %, 50 or 60 Hz) Max. power consumption...................150 VA (without tested appliance) Maximum appliance current...............16 A Overvoltage category.........................Cat II / 300 V Protection classification .....................I Pollution degree.................................2 Degree of protection ..........................IP 50 (closed and locked cover) Case ..................................................shock proof plastic / portable
Display...............................................240*128 dots graphic matrix display with backlight
Dimensions (w×h×d)..........................33.5 cm × 16.0 cm × 33.5 cm Weight (with standard accessories) ...8.4 kg
Memory..............................................6800 memory locations
RS232 interfaces .............................. 1200 bps ÷ 115200 bps, 1 start bit, 8 data bits, 1 stop bit
RS232 connectors .............................9-pin subminiature type D, female Label printer connector.......................6-pin DIN connector, female USB interface ....................................1200 bps ÷ 115200 bps USB connector...................................type B Reference conditions Reference temperature range............5 °C ÷ 35 °C Reference humidity range..................35 % ÷ 65 % RH
Operation conditions Working temperature range ...............-10 °C ÷ +50 °C Maximum relative humidity ................85 % RH (0 °C ÷ 40 °C), non-condensing
Storage conditions Temperature range ............................-10 °C ÷ +60 °C Maximum relative humidity ................90 % RH (-10 °C ÷ +40 °C)
80 % RH (40 °C ÷ 60 °C) The error in operating conditions could be at most the error for reference conditions (specified in the manual for each function) +0.2 % of measured value per °C + 1 digit, unless otherwise specified in the manual for particular function. Fuses Instrument protection .........................2 x T16 A / 250 V, 6.3 × 32 mm
Safety pre-tests External voltage between L and PE or N and PE (DC and AC) Excessive leakage between L and PE Short circuit or too low resistance between L and N
Connectivity (fuse) pre-test • Appliance not switched on or too high resistance between L and N
Maximum resistance for connectivity pre-test .................................. 30 kΩ
OmegaGTPlus / BetaGTPlus Instrument set and accessories
85
9 Instrument set and accessories Standard set of the instrument
Instrument MI 3305 – OmegaPATPlus / MI 3304 – BetaPATPlus Additional bag for accessories inside carrying case Test probe (earth bond clip) Flash test probe (MI 3305 only) PRCD test probe Test lead (1.5 m, green) Test lead (1.5 m, black) Test tip (green) Test tip (black) Aligator clip (green) Aligator clip (black) PC software PATLink PRO with RS232 and USB cables User manual Production verification data
Optional accessories See the attached sheet for a list of optional accessories that are available on request from your distributor.

OmegaGTPlus / BetaGTPlus Appendix A
86
Appendix A 24 pre-programmed autotest sequences No. Name Description
1 702_Kl_1_Iso
Testing according to VDE 702. Class 1 appliance. Insulation resistance and substitute leakage current measurements are selected.
2 702_Kl1_Iso_BLT
Testing according to VDE 702. Class 1 appliance with isolated accessible conductive parts. Insulation resistance and substitute leakage current measurements are selected.
3 702_Kl_1_Ia Testing according to VDE 702. Class 1 appliance. Differential leakage current measurement is selected.
4 702_Kl_1_Ia_BLT
Testing according to VDE 702. Class 1 appliance with isolated accessible conductive parts. Differential leakage current and touch leakage current measurements are selected.
5 702_Kl_2_Iso
Testing according to VDE 702. Class 2 appliance with isolated accessible conductive parts. Insulation resistance and substitute leakage current measurements are selected.
6 702_Kl_2_Ibs Testing according to VDE 702. Class 2 appliance. Touch leakage current measurement is selected.
7 702_Kl_1_IsoIa
Testing according to VDE 702. Class 1 appliance. Insulation resistance and differential leakage current measurements are selected.
8 702Kl1_IsoIaBLT
Testing according to VDE 702. Class 1 appliance with isolated accessible conductive parts. Insulation resistance, differential leakage current and touche leakage current measurements are selected.
9 702_Kl_2_IsoIbs
Testing according to VDE 702. Class 2 appliance with isolated accessible conductive parts. Insulation resistance and touch leakage current measurements are selected.
10 702_Kl_2 Testing according to VDE 702. Class 2 appliance without any isolated accessible conductive parts.
11 701_Kl_1_Iso
Testing according to VDE 701. Class 1 appliance. Insulation resistance and substitute leakage current measurement are selected.
12 701_Kl1_Iso_BLT
Testing according to VDE 701. Class 1 appliance with isolated accessible conductive parts. Insulation resistance and substitute leakage current measurements are selected.

OmegaGTPlus / BetaGTPlus Appendix A
87
24 pre-programmed autotest sequences (cont’d)
No. Name Description
13 701_Kl_1_Ia Testing according to VDE 701. Class 1 appliance. Differential leakage current measurement is selected.
14 701_Kl_1_Ia_BLT
Testing according to VDE 701. Class 1 appliance with isolated accessible conductive parts. Differential leakage current and touch leakage current measurements are selected.
15 701_Kl_2_Iso
Testing according to VDE 701. Class 2 appliance with isolated accessible conductive parts. Insulation resistance and substitute leakage current measurements are selected.
16 701_Kl_2_Ibs Testing according to VDE 701. Class 1 appliance. Touch leakage current measurement is selected.
17 701_Kl_1_IsoIa
Testing according to VDE 701. Class 1 appliance. Insulation resistance and differential leakage current measurements are selected.
18 701Kl1_IsoIaBLT Testing according to VDE 701. Class 1 appliance with isolated accessible conductive parts. Insulation resistance, differential leakage current and touch leakage current measurements are selected.
19 701_Kl2_Iso_Ibs
Testing according to VDE 701. Class 2 appliance with isolated accessible conductive parts. Insulation resistance and touch leakage current measurements are selected.
20 701_Kl_2 Testing according to VDE 701. Class 2 appliance without any isolated accessible conductive parts.
21 701_Kl_3_Iso Testing according to VDE 701. Class 3 appliance with isolated accessible conductive parts.
22 702_Kl_3_Iso Testing according to VDE 702. Class 3 appliance with isolated accessible conductive parts.
23 701_Kl_3 Testing according to VDE 701. Class 3 appliance without any isolated accessible conductive parts.
24 702_Kl_3 Testing according to VDE 702. Class 3 appliance without any isolated accessible conductive parts.

OmegaGTPlus / BetaGTPlus Appendix A
88
24 pre-programmed autotest sequences table
Autotest shortcut code 01 02 03 04
702_Kl_1_Iso
702_Kl1_Iso_BLT
702_Kl_1_Ia 702_Kl_1_Ia_BLT
Visual test Output 200 mA 200 mA 200 mA 200 mA Limit 0.30 Ω 0.30 Ω 0.30 Ω 0.30 Ω Earth bond Time 5 s 5 s 5 s 5 s Output 500 V 500 V Limit 1.00 MΩ 1.00 MΩ Insulation Time 5 s 5 s Output 500 V Limit 2.00 MΩ Insulation
(probe) Time 5 s Output 40 V 40 V Limit 3.50 mA 3.50 mA Sub leakage Time 5 s 5 s Output 40 V Limit 0.50 mA Sub leakage
(probe) Time 5 s Output 230 V 230 V Limit 3.50 mA 3.50 mA Differential
leakage Time 180 s 180 s Output 230 V Limit 0.50 mA Touch
leakage Time 180 s Output Limit Power Time Output Limit TRMS clamp
current Time
Polarity test

OmegaGTPlus / BetaGTPlus Appendix A
89
24 pre-programmed autotest sequences table (cont’d)
Autotest shortcut code 05 06 07 08 702_Kl_2_Iso 702_Kl_2_Ibs 702_Kl_1_IsoIa 702_Kl1_IsoIaBLT
Visual test Output 200 mA 200 mA Limit 0.30 Ω 0.30 Ω Earth bond Time 5 s 5 s Output 500 V 500 V Limit 1.00 MΩ 1.00 MΩ Insulation Time 5 s 5 s Output 500 V 500 V Limit 2.00 MΩ 2.00 MΩ
Insulation (probe)
Time 5 s 5 s Output Limit Sub leakage Time Output 40 V Limit 0.50 mA Sub leakage
(probe) Time 5 s Output 230 V 230 V Limit 3.50 mA 3.50 mA Differential
leakage Time 180 s 180 s Output 230 V 230 V Limit 0.50 mA 0.50 mA Touch
leakage Time 180 s 180 s Output Limit Power Time Output Limit TRMS clamp
current Time
Polarity test

OmegaGTPlus / BetaGTPlus Appendix A
90
24 pre-programmed autotest sequences table (cont’d)
Autotest shortcut code 09 10 11 12 702_Kl_2_IsoIbs 702_Kl_2 701_Kl_1_Iso 701_Kl1_Iso_BLT Visual test
Output 200 mA 200 mA Limit 0.30 Ω 0.30 Ω Earth bond Time 5 s 5 s Output 500 V 500 V Limit 1.00 MΩ 1.00 MΩ Insulation Time 5 s 5 s Output 500 V 500 V Limit 2.00 MΩ 2.00 MΩ
Insulation (probe)
Time 5 s 5 s Output 40 V 40 V Limit 3.50 mA 3.50 mA Sub leakage Time 5 s 5 s Output 40 V Limit 0.50 mA Sub leakage
(probe) Time 5 s Output Limit Differential
leakage Time Output 230 V Limit 0.50 mA Touch leakage Time 180 s Output 230 V 230 V Limit Power Time 180 s 180 s Output Limit TRMS clamp
current Time
Polarity test

OmegaGTPlus / BetaGTPlus Appendix A
91
24 pre-programmed autotest sequences table (cont’d)
Autotest shortcut code 13 14 15 16 701_Kl_1_Ia 701_Kl1_Ia_BLT 701_Kl_2_Iso 701_Kl_2_IbsVisual test
Output 200 mA 200 mA Limit 0.30 Ω 0.30 Ω Earth bond Time 5 s 5 s Output Limit Insulation Time Output 500 V Limit 2.00 MΩ Insulation
(probe) Time 5 s Output Limit Sub leakage Time Output 40 V Limit 0.50 mA Sub leakage
(probe) Time 5 s Output 230 V 230 V Limit 3.50 mA 3.50 mA Differential
leakage Time 180 s 180 s Output 230 V 230 V Limit 0.50 mA 0.50 mA Touch
leakage Time 5 s 180 s Output 230 V 230 V 230 V 230 V Limit Power Time 180 s 180 s 180 s 180 s Output Limit TRMS clamp
current Time
Polarity test

OmegaGTPlus / BetaGTPlus Appendix A
92
24 pre-programmed autotest sequences table (cont’d)
Autotest shortcut code 17 18 19 20
701_Kl1_IsoIa 701Kl1_IsoIaBLT 701_Kl2_Iso_I
bs 701_Kl_2
Visual test Output 200 mA 200 mA Limit 0.30 Ω 0.30 Ω Earth bond Time 5 s 5 s Output 500 V 500 V Limit 1.00 MΩ 1.00 MΩ Insulation Time 5 s 5 s Output 500 V 500 V Limit 2.00 MΩ 2.00 MΩ Insulation
(probe) Time 5 s 5 s Output Limit Sub leakage Time Output Limit Sub leakage
(probe) Time Output 230 V 230 V Limit 3.50 mA 3.50 mA Differential
leakage Time 180 s 180 s Output 230 V 230 V Limit 0.50 mA 0.50 mA Touch
leakage Time 180 s 180 s Output 230 V 230 V 230 V 230 V Limit Power Time 180 s 180 s 180 s 180 s Output Limit TRMS clamp
current Time
Polarity test

OmegaGTPlus / BetaGTPlus Appendix A
93
24 pre-programmed autotest sequences table (cont’d)
Autotest shortcut code 21 22 23 24 701_Kl_3_Iso 702_Kl_3_Iso 701_Kl_3 702_Kl_3 Visual test
Output Limit Earth bond Time Output Limit Insulation Time Output 500 V 500 V Limit 0.25 MΩ 0.25 MΩ Insulation
(probe) Time 5 s 5 s Output Limit Sub leakage Time Output Limit Sub leakage
(probe) Time Output Limit Differential
leakage Time Output Limit Touch
leakage Time Output 230 V 230 V Limit Power Time 180 s 180 s Output Limit
TRMS current clamp Time Polarity test

OmegaGTPlus / BetaGTPlus Appendix A
94
METREL GmbH VDE tester test type card
Code Autotest sequence name and descriptions Limits Barcode
01 702_Kl_1_Iso
Testing according to VDE 702. Class 1 appliance. Insulation resistance and substitute leakage current measurements are applicable.
Earth bond: 0.30 Ω Insulation: 1.00 MΩ Sub leakage: 3.50mA
01
02 702_Kl1_Iso_BLT
Testing according to VDE 702. Class 1 appliance with isolated accessible cinductive parts. Insulation resistance and substitute leakage current measurements are applicable.
Earth bond: 0.30 Ω Insulation: 1.00 MΩ Insulation - S: 2.00 MΩ Sub leakage: 3.50 mA Sub leakage - S: 0.50 mA
02
03 702_Kl_1_Ia
Testing according to VDE 702. Class 1 appliance. Prüfung für Differenzstrom wird eingestellt.
Earth bond: 0.30 Ω Leakage: 3.50 mA
03
04 702_Kl_1_Ia_BLT
Testing according to VDE 702. Class 1 appliance with isolated accessible conductive parts. Prüfungen für Differenz- und Berührungsstrom werden eingestellt.
Earth bond: 0.30 Ω Leakage: 3.50 mA Touch leakage: 0.50 mA
04
05 702_Kl_2_Iso
Testing according to VDE 702. Class 2 appliance with isolated accessible conductive parts. Insulation resistance and substitute leakage current measurements are applicable.
Insulation - S: 2.00 MΩ Sub leakage - S: 0.50 mA
05
06 702_Kl_2_Ibs
Testing according to VDE 702. Class 2 appliance. Prüfung für Berührungsstrom wird eingestellt.
Touch leakage: 0.50 mA
06
07 702_Kl_1_IsoIa
Testing according to VDE 702. Class 1 appliance. Prüfungen für Isolation und Differenzstrom werden eingestellt.
Earth bond: 0.30 Ω Insulation: 1.00 MΩ Leakage: 3.50 mA
07
08 702Kl1_IsoIaBLT
Testing according to VDE 702. Class 1 appliance with isolated accessible conductive parts. Prüfungen für Isolation, Differenz- und Berührungsstrom werden eingestellt.
Earth bond: 0.30 Ω Insulation: 1.00 MΩ Insulation - S: 2.00 MΩ Leakage: 3.50 mA Touch leakage: 0.50 mA 08

OmegaGTPlus / BetaGTPlus Appendix A
95
METREL GmbH VDE tester test type card (cont'd)
Code Autotest sequence name and descriptions Limits Barcode
09 702_Kl_2_IsoIbs
Testing according to VDE 702. Class 2 appliance with isolated accessible conductive parts. Prüfungen für Isolation und Berührungsstrom werden eingestellt.
Insulation - S: 2.00 MΩ Touch leakage: 0.50 mA
09
10 702_Kl_2
Testing according to VDE 702. Class 2 appliance without any isolated accessible conductive parts.
10
11 701_Kl_1_Iso
Testing according to VDE 701. Class 1 appliance. Insulation resistance and substitute leakage current measurements are applicable.
Earth bond: 0.30 Ω Insulation: 1.00 MΩ Sub leakage: 3.50 mA 11
12 701_Kl1_Iso_BLT
Prüfung nach VDE 701. Class 1 appliance with isolated accessible conductive parts. Insulation resistance and substitute leakage current measurements are applicable.
Earth bond: 0.30 Ω Insulation: 1.00 MΩ Insulation - S: 2.00 MΩ Sub leakage: 3.50 mA Sub leakage - S: 0.50 mA 12
13 701_Kl_1_Ia
Testing according to VDE 701. Class 1 appliance. Prüfung für Differenzstrom wird eingestellt.
Earth bond: 0.30 Ω Leakage: 3.50 mA
13
14 701_Kl_1_Ia_BLT
Testing according to VDE 701. Class 1 appliance with isolated accessible conductive parts. Prüfungen für Differenz- und Berührungsstrom sind eingestellt.
Earth bond: 0.30 Ω Leakage: 3.50 mA Touch leakage: 0.50 mA
14
15 701_Kl_2_Iso
Testing according to VDE 701. Class 2 appliance with isolated accessible conductive parts. Insulation resistance and substitute leakage current measurements are applicable.
Insulation - S: 2.00 MΩ Sub leakage - S: 0.50 mA
15
16 701_Kl_2_Ibs
Testing according to VDE 701. Class 1 appliance. Prüfung für Berührungsstrom wird eingestellt.
Touch leakage: 0.50 mA
16

OmegaGTPlus / BetaGTPlus Appendix A
96
METREL GmbH VDE tester test type card (cont'd) Code Autotest sequence name and descriptions Limits Barcode
17 701_Kl_1_IsoIa
Testing according to VDE 701. Class 1 appliance. Prüfungen für Isolation und Differenzstrom werden eingestellt.
Earth bond: 0.30 Ω Insulation: 1.00 MΩ Leakage: 3.50 mA 17
18 701Kl1_IsoIaBLT
Testing according to VDE 701. Class 1 appliance with isolated accessible conductive parts. Prüfungen für Isolation, Differenz- und Berührungsstrom werden eingestellt.
Earth bond: 0.30 Ω Insulation: 1.00 MΩ Insulation - S: 2.00 MΩ Leakage: 3.50 mA Touch leakage: 0.50 mA 18
19 701_Kl2_Iso_Ibs
Testing according to VDE 701. Class 2 appliance with isolated accessible conductive parts. Prüfungen für Isolation und Berührungsstrom werden eingestellt.
Insulation -S: 2.00 MΩ Touch leakage: 0.50 mA
19
20 701_Kl_2 Testing according to VDE 701. Class 2 appliance without any isolated accessible conductive parts.
20
21 701_Kl_3_Iso
Testing according to VDE 701. Class 3 appliance with isolated accessible conductive parts.
Insulation - S: 0.25 MΩ
21
22 702_Kl_3_Iso
Testing according to VDE 702. Class 3 appliance with isolated accessible conductive parts.
Insulation - S: 0.25 MΩ
22
23 701_Kl_3 Testing according to VDE 701. Class 3 appliance without any isolated accessible conductive parts.
23
24 702_Kl_3 Testing according to VDE 702. Class 3 appliance without any isolated accessible conductive parts.
24

OmegaGTPlus / BetaGTPlus Appendix B
97
Appendix B The instrument OmegaGTPlus / BetaGTPlus supports two barcode formats when printing appliance labels. Autotest shortcut code and appliance number Autotest shortcut codes are represented as a two digit code. These autotest codes can also be represented by the barcode. Using the barcode reader, the instruments can accept autotest shortcut code from barcode label.
01 Autotest shortcut code
Also appliance number can be read from barcode label. Single / double barcode system If single barcode system is selected in the instrument, only appliance name is printed out as a barcode on appliance barcode label. When double barcode system is selected in the instrumen, both autotest shortcut code and appliance name are printed out as a barcode on appliance barcode label.
1 tag, barcode system:
single (top label) 1 tag, barcode system: double (bottom label)
2 tags, barcode system: double
2 tags, barcode system: single
Examples of appliance labels

OmegaGTPlus / BetaGTPlus Appendix B
98
01 Autotest shortcut code $ Separator 4455821981 Appliance number Refer to chapter 3.9.6 Instrument settings for barcode system selection. Notes:
Special character »$« between autotest shortcut code and appliance name (ID number) is used to distinguish shortcut code from appliance name.
Only appliance ID is printed out on the 2nd appliance label (power supply cord label).

OmegaGTPlus / BetaGTPlus Appendix B
99

OmegaGTPlus / BetaGTPlus Appendix B
100