alumina all ceramic restorations the magic of … · alumina all ceramic restorations key words:...
TRANSCRIPT

DAILY TECHNIQUE
58 | AUGUST 2005 AUGUST 2005 | 59
DAILY TECHNIQUE
Alumina All Ceramic Restorations
Key words:Aluminacopings,
soft tissue,VM7,
single centralrestoration,restorative
team
Matching the single anterior crown to natural dentition is not the challenge itwas twenty years ago. Today’s materials allow the dental laboratory technicianto fabricate single anteriors in a simple manner that produces all of the illusivequalities of natural dentition. Mixing stains and modifiers to create the illusionof depth and translucency is no longer necessary. Most ceramic materialsproduced today mimic natural teeth through enhanced optical properties. Thisdoes not mean that fabricating a single central incisor does not require effort,time or talent. As always, the technician’s hands and knowledge ultimatelydecide the quality of the final outcome. In addition, the laboratory technicianmust observe and understand the characteristics of the materials they use andthe natural teeth they are trying to replicate. The ceramist must also understandthat every patient’s teeth differ in shape, thickness, size and optical properties.
The Magic ofIllusion Using Vita VM7Pinhas Adar MDT, CDT
Fig. 1a. Pre-operative view of a young girl with composite bonding ontooth #9.
Fig. 1c. Post-operative view of a single Spinnell crown with Vita dur Alpha.
This article features VitaVM7 (Vident, Brea, CA.USA). Vita VM7 is a veneering material that iscompatible with any Alumina-based coping with a CTE of 7.2 - 7.9 which includes Vita Inceram,Spinell Alumina and Procera. The wearcharacteristics of the VM7 material are very similarto natural enamel and its low solubility makes ithighly durable in the oral environment producinga long wear life.1 It possesses enhanced color stabilityeven after multiple firings and can be layered tocreate a perfect match with the adjacent dentition.
In contrast to popular belief, reproducing a singlecentral is possibly the easiest restoration in dentistry.It is however, probably the most time consumingfor the technician and the most costly to the patient.What makes reproducing the single central easy isthat the natural tooth provides us with the perfectguide. The adjacent tooth exhibits all the detailand characteristics necessary to create a matchingcrown. Technicians that couple this informationwith today’s materials and the techniques pioneeredby various ceramists from around the world, willfind that the single central can be matched quitepredictably. However, additional steps are regularly
required to achieve such success. A perfect exampleis that the first crown made often becomes thecustom shade guide. This guide then serves as thedefinitive roadmap for matching the naturaldentition. These extra steps, however, ultimatelyresult in an increased time commitment from thepatient, dentist and laboratory technician.
The first step in fabricating a single unit is tounderstand nature and realize that every clinicianand technician has unique capabilities andlimitations.
The patient Figure 1a wanted to replace thecrown on #9 that did not match her existingnatural dentition. When observing natural teeth,it is quickly discovered that not all teeth arecreated equal. The right amount of internallayering and translucency must be incorporatedinto the single tooth restoration in order to blendwith the natural environment (Figs. 1b,c).
The patient in Figure 2a also had a single crownon #9 that did not match her existing natural teeth.In this case the natural teeth have a lot of opacity
Fig. 2a. Pre-operative view of an old crown on a patient that disliked thelifelessness of the crown.
Fig. 2b. Post-operative view of the new Spinell crown shows theharmonious blend with the natural environment in both texture andinternal characterization.
Fig. 1b. The finished veneer crown.

DAILY TECHNIQUE
60 | AUGUST 2005 AUGUST 2005 | 61
DAILY TECHNIQUE
Fig. 4a. Pre operative view of an unhappy patient with #8 afterorthodontic eruption.
Fig. 4b. Prepped tooth showing the dark tooth structure.Fig. 3a. Pre-operative view of a crown illustrating the inadequate softtissue health and violation of the biological width.
Fig. 3b. Orthodontic eruption of the previous crown to bring the softtissue and bone towards the incisal.
Fig. 4c. Alumina coping on the master die. Fig. 4d. Alumina coping overlayed with 50% Liner Effect EL1 and 50% EL5.
The patient shown in Figure 4a disliked her singlecentral incisor #8. Orthodontic eruption hadpreviously been done to level the soft tissue asdescribed in the previous case. The tooth was thenprepared (Fig. 4b), impressions taken and atemporary fabricated. A final master model wasmade from the impression so that an Aluminacoping could be constructed.
An Alumina coping can be fabricated in two ways.In the first, the Alumina is cut back at the marginto create a porcelain shoulder. If the finish line ofthe preparation is deep enough subgingivally, asecond technique can be used. In this case, acutback of the Alumina coping and subsequentporcelain margin are not necessary (Fig. 4c). Withany all-ceramic substructure there is a lack offluorescence and this optical challenge must beovercome. A more fluorescent powder (calledEffect Liner) can be used around the subgingivalarea to alleviate this problem. These powders canbe used to control the fluorescence in therestoration as well as support light distribution.Since dentin fluoresces more strongly than
Fig. 3c. Post-operative view of the single Alumina crown with VitaVM7 notethe harmonious blend with the adjacent natural environment and a muchhealthier soft tissue profile after developing a better emergence profile.
requiring a slightly different layering techniquethan for the previous case. The abundant opacityand calcifications must be carefully placed to mimicthe natural situation.
The inflammation and gray shadowing of thesurrounding soft tissues compromise the estheticsof the single crown (Fig. 3a). Metal shining throughthe crown can cause this grayness, but in this caseit is caused by a biologic width infringement. Nomatter how good the ceramist is the illusion ofreality will never be achieved without correctingthe tissue.
To overcome this challenge, orthodontics wereperformed in order to erupt the old crown,repositioning the soft tissue and bone levels incisally(Fig. 3b). This was followed by a surgical procedureto idealize the biological width. Figure 3c showsthe final single crown restoration. The soft tissuehas adapted nicely exhibiting improved gingivalarchitecture and color in harmony with theadjacent teeth.
“No matter howgood the
ceramist is theillusion of
reality willnever beachievedwithout
correcting thetissue.”
Fig. 5a. An ultraviolet light showing the fluorescent quality of the linerand the lack of fluorescence in the actual Alumina coping.
Fig. 5b. Supporting the value with Base Dentine 1M1.

AUGUST 2005 | 63
DAILY TECHNIQUEDAILY TECHNIQUE
62 | AUGUST 2005
Fig. 5c. Full contour build up of dentin 1M1. Fig. 5d. Cutting back the incisal in an irregular manner.
Fig. 6d. Applying incisal light on the mesial and distal.
Fig. 6a-c. Different angles demonstrate the cut backs used to develop the space for the enamel.
Fig. 6e. Applying 50% Incisal light mixed 50% with EE9. Fig. 6f. Completing the incisal wall with a segmental build up.
enamel, this is the perfect area to place EffectLiner in order to increase light conductivity andprevent shadowing.
To develop the highly color saturated cervical areafor this patient, Effect Liner EL1 is mixed withEL5 (60:40%). Mixing the very light EL1 with EL5develops high color saturation similar to theadjacent natural tooth (Fig. 4d). In Figure 5a thecoping with the Liner material is illuminated withultraviolet light, demonstrating the impressivefluorescent qualities of this Liner product afterfiring. This high fluorescence will illuminate thesurrounding soft tissues around the crown. Whenthere is a need to overcome spacing problems dueto insufficient tooth reduction, various Liners canbe overlaid on the entire Alumina coping to createeither brightness or darkness. This also creates amore fluorescent layer over the Aluminasubstructure to produce the optimum result evenwithout ideal space for proper crown thickness.
Next, Base Dentine is applied to support thevalue. If the Base Dentin is not used to supportthe brightness, the pure dentin will appear low invalue. Figure 5b shows that the dentin build upextends beyond the incisal of the Alumina coping.Be careful not to cover the Effect Liner with theBase Dentine in order to allow the Liner’s opticalproperties to shine through the body of the crown.The Liner can, however, be covered with standarddentin to control the contrast.
Once the Base Dentine is applied it is overlaidwith a dentin. In this particular case the BaseDentine and dentin shade are 1M1 (3D ShadeGuide, Vita). The cervical Liner can now be overlaid.Always build up the dentin shade to full contourin order to visualize the outcome (Fig. 5c). Oncethe shape is realized, it is easier to return to thesame shape after the cutback. After the full contourhas been determined, space for the incisal layersmust be made either by cutting back with aninstrument or brush (Fig. 5d). The cutback mustbe irregular so it can better blend with the incisallayer and avoid a definite demarcation between
the layers. Allow sufficient space for the incisallayers proximally, incisally and facially. Figure 6ashows the incisal view of the cutback. Figures 6band c show the lateral view compared with theadjacent natural central. It is important to look atthe build up from every angle in order to determinethe sufficient space required for the incisal layers.In this case a very routine mixture of Incisal Light,Incisal Light mixed with Incisal Effect EE9 (50:50%)and pure Incisal Effect EE9 were used. The buildupis started by applying Incisal Light to the mesialand distal of the incisal third (Fig. 6d). Once themesial and distal corners are built to the correctheight, continue building with a 50:50 mixture ofIncisal Light plus EE9 (Fig. 6e). Repeat these stepsuntil the incisal frame is complete (Fig. 6f).
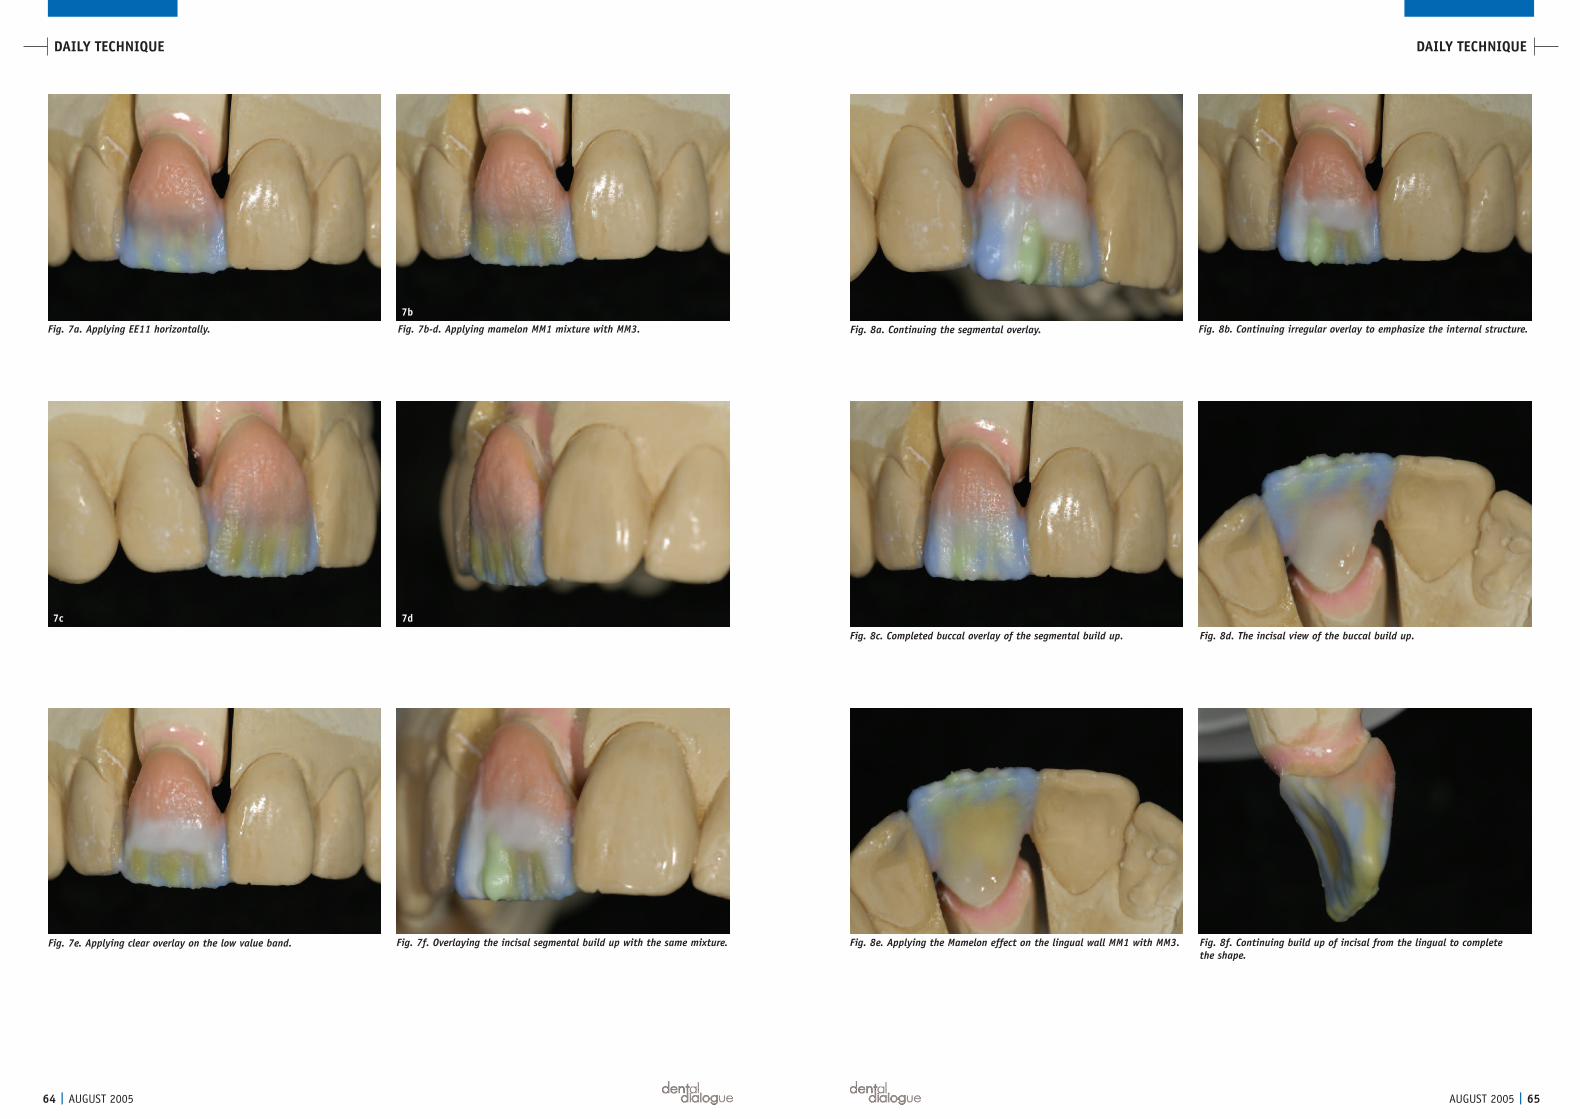
The canvas is now created and the internal effectscan be applied. In this case there is a slight lowvalue band on the incisal third just below themamelons. The Incisal Effect EE11 is mixed withstain liquids so that it becomes very fluid. It is thenpainted on the surface to create the desired depthand horizontal band (Fig. 7a). The mameloneffects are achieved by mixing MM1 with MM3 ina 50:50 ratio with stain liquid. Stain liquidimproves handling and makes it easier to mimicthe internal structures found in the incisal ofnatural teeth. Figures 7a-d provide different viewsof the mamelon application. Note that there is stillsufficient space for the enamel overlay to completethe build up. To further enhance the low valueband, a clear incisal ceramic is overlaid in a thinlayer (Fig. 7e). To complete the build-up theincisal effects are overlaid with the same mixtureand in the same segmental manner as before,(Fig. 7f). A mixture of Incisal Light and EE9 mixedhalf and half with clear (Figs. 8a, b) is placed overthe entire shape and built slightly larger than fullcontour to account for shrinkage (Fig. 8c).
Figure 8d shows the facial-incisal view of thedeveloped layers. The incisal edge must be in linewith the adjacent tooth. If the incisal has to berepositioned, it should be manipulated while theceramic is moist so that the effects will move with it.
6a
6c
6b
“It is importantto look at thebuild up fromevery angle inorder todetermine thesufficient spacerequired for theincisal layers.”
AUGUST 2005 | 65
DAILY TECHNIQUEDAILY TECHNIQUE
64 | AUGUST 2005
Fig. 7a. Applying EE11 horizontally. Fig. 7b-d. Applying mamelon MM1 mixture with MM3. Fig. 8a. Continuing the segmental overlay. Fig. 8b. Continuing irregular overlay to emphasize the internal structure.
Fig. 8c. Completed buccal overlay of the segmental build up.
Fig. 7e. Applying clear overlay on the low value band. Fig. 7f. Overlaying the incisal segmental build up with the same mixture.
Fig. 8d. The incisal view of the buccal build up.
Fig. 8f. Continuing build up of incisal from the lingual to complete the shape.
Fig. 8e. Applying the Mamelon effect on the lingual wall MM1 with MM3.
7b
7d7c

AUGUST 2005 | 67
DAILY TECHNIQUEDAILY TECHNIQUE
66 | AUGUST 2005
Fig. 9a. Applying a mixture of 1M1 with incisal light half and half todevelop the halo effect on the incisal edge.
Fig. 9b. Completed first bake on the model.
Fig. 10a-b. Drying the internal structure before baking to position it before overlaying enamels.
for one minute followed by immediate removalfrom the muffle. This will guarantee that the effectswill stay in the same position that they were appliedin. After baking, evaluate the restoration in themouth again (Fig. 11a). This ensures that nothinghas moved and there is no need for furtherenhancement.
Once the internal characterization is completeand stabilized, overlay the crown (Fig. 11b) withmore translucent layers. For this, Opal Translucentshades EO1 and EO3 were overlaid. Around thecervical area, Incisal Effect EE4 diluted with IncisalEffect EE6 was used. These layers should be in verythin increments so that the internal structure willshine through the effects.
The biggest challenge is to visualize the final shapeand thickness, in order to develop the effects atthe right depth. Once the translucent layers areoverlaid, the effects should be visible in thecompleted crown. After the second bake, use thesolid model to check the contact points andcontours, trimming the soft tissue away so that the
Due to the lack of spacing on the lingual side,effects are added using an MM1 with MM3 mixture(Fig. 8e). Incisal is then added (Fig. 8f) to completethe lingual shape. While the ceramic is still wet, a 50:50 mixture of Dentin 1M1 and enamel isadded around the incisal edge to create the haloeffect (Fig. 9a). Once the first bake is completed(Fig. 9b) it is easy to see the internal structure thatwas developed in the build up. The tooth is still asmaller version of what the final will be. Thechance to add or take away effects is still possibleif necessary.
At this point we try the crown in the mouth. Duringthis step, pay special attention to the internalcharacterizations. You may choose to make themamelons stronger or add other effects like whitestriations or a band of low value. These additionaleffects are quickly dried under the ceramic furnace(Fig. 10a) so that they will not move. Then set-firethe effects in a quick bake (Fig. 10b) with a startingtemperature of 600ºC with a dry time of 1 minute.The high temperature should be 800ºC with a rateof climb 80ºC per minute. Hold this temperature
Fig. 11a. Further characterization stabilizing internal structure intra-orally.
Fig. 11b. Overlaying more translucent and opal effects to complete thefinal shape and build up on a solid model.
Fig. 11c. Shaping and contouring the second bake on a solid model before final glaze.
“The biggestchallenge is to
visualize thefinal shape and
thickness, inorder to
develop theeffects at theright depth.”
10a 10b
Fig. 12. Final crown after glaze and manual polishing.

AUGUST 2005 | 69
DAILY TECHNIQUEDAILY TECHNIQUE
68 | AUGUST 2005
Fig. 13b-c. Lateral view of the final alumina crown intraorally.
Fig. 13a. The smile view of the final crown intraorally.
13b
13c
full pageAD

AUGUST 2005 | 71
DAILY TECHNIQUEDAILY TECHNIQUE
70 | AUGUST 2005
BioMaster Ceramist Pinhas Adar studied initially in Tel Aviv, Israel and then with Mr. Willi Geller in Zurich,Switzerland. He has more than twenty-five years of experience in all phases of dental laboratorytechnology. Mr. Adar practices, teaches and does research from his laboratory in Atlanta, Georgia. Mr. Adar works together with leading clinicians worldwide and specializes in the many facets of porcelainesthetic restorations on both natural teeth and osseointegrated implants. He is the president of AdarInternational, Inc., and an active member of the American Academy of Esthetic Dentistry and theInternational Oral Design group. He is also a center for Oral Design International. He is the UScoordinator for Oral Design, USA. He is on the advisory board of the Amara Institute. He is on theeditorial board of the Quintessence Yearly Journal, the Journal of Esthetic Dentistry and the Journal of Collaborative Techniques.
Mr. Adar has lectured and presented live television programs in the United States, Europe, Israel, the Far East and Australia,as well as a multitude of programs nationally on the multidisciplinary approaches in optimizing esthetics. He has the distinctionof being the first ceramist to address an international meeting of the American College of Prosthodontists.
He has developed instructional videotapes on all aspects of porcelain laminate veneers, and has contributed chapters in textson posterior ceramic restoration and porcelain laminate veneers, published by Quintessence Publishing Co., Inc. He has contributedtext to a multi-disciplinary book published by Quintessence Publishing Co., as well as numerous magazine articles. He is alsoone of the co-authors for the upcoming Quintessence book entitled “Porcelain Laminate Veneers - An Esthetic Essential”.
He is currently working on the production of educational DVD’s for the dental industry on different topics such as porcelainlaminate veneers, crowns, temporaries, etc.
Mr. Adar is an accomplished artist, and produces various works of sculpture as a creative outlet. His passion is to teach and seta new standard in dentistry.
P r o d u c t L i s t
Indication
Diamond polishingpasteFine structure ceramicsCeramic materialsCeramic effect materialsDiscoloration treatmentFull ceramic frameworkFull ceramic frameworkFull ceramic frameworkFull ceramic framework
Name
Karat
VM7Vitadur AlphaInternoAlzentVITA In-CreamVITA In-Cream SpinellVITA In-Cream ZirkoniaProcera
Manufacturer/Distributor
VITA
VITAVITAVITAVITAVITAVITAVITANobel Biocare
crown fits all the way down without interference.Using diamond burs, develop the final surfacetexture (Fig. 11c).
Once the final anatomy and texture is completed,sandblast the crown with 50-micron aluminumoxide using low pressure to clean the surface, andthen steam clean the crown. Apply glaze liquidand run the restoration through a rapid glaze firingcycle. The starting temperature of the glaze cycleis 550ºC with an 80ºC per minute rate of climb to900ºC, with a one-minute hold. The crown shouldthen be manually polished with rubber wheels and diamond paste (Fig. 12). Figures 13a-c showvarious intra oral views of the finished crown(Alumina coping layered with VitaVM7). It blendsharmoniously with the adjacent teeth and appearsvery lifelike. The emergence profile of the newVitaVM7 crown provides better soft tissue support.
When matching a single central incisor, it is crucialthat all members of the restorative team recognizethe importance of creating color and architecturalharmony with the surrounding soft tissues. In orderto achieve this, adequate tooth reduction is essential.Tooth preparation requirements vary dependingon the clinical situation and the type of restorationemployed. In some cases, more aggressive toothpreparation is required in order to accommodatesignificant volumes of opaque material needed toneutralize the dark underlying tooth structure. Inother instances where the color and brightness ofthe underlying tooth structure is desirable, a lessaggressive tooth reduction can be realized. Themorphology, emergence profile, surface texture andthe tooth luster must be duplicated in a precisemanner. Manual polishing is one of the keys fordeveloping the illusion that the crown is a real tooth.
In nature no two teeth are alike, but there is alwaysharmony and a sense of belonging. Successfullyreproducing this in a single central restorationdepends not only on the skills of the ceramist, butthe entire restorative team. This includes the patientwho ultimately must make the time commitmentneeded to realize the desired outcome. Althoughthe single unit is one of the easiest things to do indentistry, it is also one of the most time consuming.Time is always an irretrievable commodity and there
“In nature notwo teeth are
alike, but thereis some sort of
harmony and a feeling ofbelonging.”
is no replacement for it. Time is money, and thisfact makes the single central an expensiverestoration to fabricate.
Acknowledgements:
Thanks to the following people for personal andprofessional influences: Baruch Indig, my firstexposure to the wonderful field of dental technologyas well as my first inspiration at the age of 14. WilliGeller, who was instrumental to my career. Since Iwas 15 years old I have had the privilege of havinghim for a mentor. My dental friends, colleaguesand family members - Team Atlanta – Drs. RonaldGoldstein, David Garber, Maurice and HenrySalama, Brian Beaudreau, Angela Hedlund andAnita Tate. Claude Seiber who developed theceramic VitaVM7 and shared his knowledge withmany others including me. A special thanks to mywife, friend and soul mate who made this articlepossible. Special thanks to all of the manufacturerswho develop new products everyday and make thisprofession even more exciting
Pinhas Adar MDT, CDTOral Design Center, AtlantaA Division of Adar International Inc.www.adarinternational.com
Reference Literature
1. Suckert R. Functional Anterior Esthetics. VerlagNeuer Merkur, 1990.
2. Sieber, C.: Voyage: Visions in Color and Form: Berlin Quintessenz, 1994.
3. Adar P. The art of illusion. dental dialogue 07/03: 726-740.
4. Belser, U. Magne, M. Magne, P.: Natural and restaurative oral aesthetics: Rational and basic strategies for aesthetic rehabilitaions. J. Esth. Dent. 1993, 161-173.
5. Reichel K. We don’t need caviar all the time. Ceramic Layering Techniques. teamwork media1998: 140-151.
6. Belser U, Magne M. Adhesive-Fastened CeramicRestorations. Quintessenz Verlag GmbH 2002: 84-87; 140-145; 164-167.
7. Sieber C, Thiel N. Optic opportunities – Spinellluminaries. Die Quintessenz der Zahntechnik 1994: 1041-1051.
8. Tarnow, D. et al.: The effect of the distance fromthe contact point to the crest of bone on the presence or absence of the interproximal dentalpapilla. J Periodontal, 1992, 63, 995-1004.
9. Orth, C.F.: A modification of the connective tissue graft procedure for the treatment of typeII and type III ridge deformities. Int J Periodontics Restorative Dent. 1996, 16 /3, 266-77.
10. Miller, P.D.Jr.: Ridge augmentation under existing fixed prothesis simplified technique. JPeriodontol 1986; 57 /12, 742-5.
11. Cohen, E. S.: Ridge enhancement and socket preservation utilizing the subepithelial connective tissue graft: a case report. Pract Periodontics Aesth Dent 1995, 7/2, 53-8, quiz 60.
12. Wang, P.D.; Pitman, D.P.; Jans, H.H.: Ridge augmentation using a subepithelial connectivetissue pedicle graft. Pract Periodontics AesthetDent 1993, 5 /2, quiz 52.
13. Langer, B.; Calagna, L.: The subepithelial connective tissue graft. J. Prosth. Dent. 1980, 44, 363.
14. Allen, P.E.; Gainza, A.C.; Farthlin, G.G.; Newbold, D.A.: Improved technique for localized ridge augmentation. A report of 21 cases. J Periodontol 1985, 56, 187.
15. Kaldahl, W.B.; Tussing, G.J; Wentz, F.M.; Walker, J.A.: Achieving an esthetic appearancewith a fixed.
16. Claus H. Vita In-Ceram, a new method for fabricating oxidized ceramic frameworks for crowns and bridges. Die Quintessenz der Zahntechnik 1990, 16: 35-46.
17. Feher J, Lüthy O, Loeffel O, Pietrobon N,
Schärer P. The effect of a simplified fabricationtechnique on the stability of In-Ceram materials.Die Quintessenz der Zahntechnik1998, 24: 241-246.
18. Fischer J, Schmid M, Kappert HF, Strub JR. The structural composition of the dental ceramic core materials In-Ceram and the thermal expansion of its individual components.Deutsche Zahnärtzliche Zeitschrift 1991, 46: 461-463.
19. Kappert HF, Altvater A. Clinical investigation of the adaptability and functional occlusion behavior of In-Ceram crowns and bridges. Deutsche Zahnärtzliche Zeitschrift 1991, 46.
20. Magne P, Belser U. Esthetic improvements andin vitro investigation of In-Ceram Alumina andSpinell ceramics. Die Quintessenz 1998, 49: 151-158.
21. Paul, S.J.; Pietrobon, N.; Schärer, P.: The New In-Ceram Spinell System- A Case Report. The International Journal of Periodontics and Restorative Dentistry 1995, 15, 521-527.
22. Steber C. Illumination in the anteriors. Die Quintessenz der Zahntechnik1989, 15: 913-924 (1-12).
23. Heffernan, M.J.; Aquilino, S.A.; Diaz-Arnold, A.M.; Haselton, D.R.; Stanford, C.M.; Vargas, M.A.: Relative tranlucency of sic all-ceramic-systems.: Part I: Core materials. J Prosthet Dent 2002, 88, 1, 4-9.
24. Borges, G.A. Sophr, A.M. de Goes, M.F.Sobrinho, L.C. Chan, D.C.N.:Effect of etching and airborne particle on the microstructure of different dental ceramics: J Prosthet Dent 2003, 89, 479-488.