amadeus selling platform ticket€¦ · amadeus selling platform ticket . note: this module...
TRANSCRIPT
Amadeus Iran
Amadeus Selling Platform Ticket
Note: This module contains Amadeus Selling Platform Ticket, updated in March, 2013. Copyright © 2013, Amadeus-Iran All rights reserved. Edition 1.0 Published by: Amadeus-Iran Educational System and Service No.6, Shafagh (17th) St., Bokharest Ave. Tehran, Iran Fax: INT +9821 88706606 March 2013
Table of Contents i
Amadeus Iran Training Module
Table of Contents Preface ……………………………………………………………………… 1
Introduction………………………………………………….………….…. 1 Course Objectives…………………………………………………........... 1
Chapter 1: Introduction to Ticket and Document.……..…………….. 3
Issuing Tab………………………......................................................... 3 Following up Tab………………........................................................... 3 Sales Report Tab……………………................................................... 3
Chapter 2: Issuing Travel Documents……………………….…...……. 5 Issuing Document from the Issuing Tab……………………….……… 6 Customizing Print options………….…………………………………… 7 Ticket and e-ticket options...………………………………………….… 7 E-ticket receipt option…………………………………………….……… 10 Itinerary option……………………….…………………………………… 11 Issuing documents from the PNR……………………………………… 13 Chapter 3: Refund, Void and other Follow up Actions………………. 14
Follow up Actions from the PNR or Query Report….……………….. 15 Voiding a Ticket…………………………………………………………. 17 Reinstating a Ticket…………………………………………………….. 17 Fully Refund a Ticket……………...…..……………………………….. 17 Partially Refund a Ticket….……………………………………………. 18 Refunding Taxes……………………….……………………………….. Electronic Ticket Display..………….…………………………………..
21 23
Electronic Ticket Explanation...……….……………………………….. Display e-ticket History…..………….…………………………………..
24 25
Voiding or Reinstating an E-ticket…….……………………………….. Revalidating an E-ticket….………….…………………………………..
26 26
Exchanging an e-ticket…………..…….……………………………….. Displaying the original e-ticket.…….…………………………………..
27 27
Copying or Printing the e-ticket Display..……………….……………..
28

Preface 1
Amadeus Iran Training Module
Before You Start
Introduction
This user guide describes Amadeus Ticket, one of the key modules of Amadeus Selling Platform. It explains how to use Amadeus Ticket from an end-user point of view.
Objectives
After you have read this user guide, you will be able to:
• Issuing travel document, follow up and display sales report
• Refund and Void and other follow up actions
Where Do I Go for Help?
Amadeus Selling Platform online help provides you with task-based help at screen level. Press F1 in a screen to display instructions on how to perform a task, related tasks and background information.

Chapter 1: Introduction to Ticket and Documents 3
Amadeus Iran Training Module
Chapter 1
Introduction to Ticket and Documents
The Ticket and Documents tab allows you to issue travel documents, manage document stocks, display sales reports, and refund, void or reinstate documents.
The Ticket and Documents module includes the following tabs:
Issuing Tab
Let’s you issue electronic tickets, invoices, itineraries, e-ticket itinerary receipts and etc.
Follow-up Tab
Let’s you retrieve the e-ticket record for electronic tickets and the refund record. You can perform follow-up actions, like partial or full refunds, which are automatically reported in the sales reports.
Sales Reports Tab
Let’s you display and print sales reports from which you can perform follow-up actions, like partial or full refunds. You can also display the e-ticket record and perform void or reinstate transactions.

Chapter 2: Issuing Travel Documents 5
Amadeus Iran Training Module
Chapter 2
Issuing Travel Documents
You use the Issuing tab within the Ticket and Documents module to issue the following travel documents:
• Electronic tickets
• E-ticket itinerary receipts
• Invoices
• Itineraries
6 Chapter 2: Issuing Travel Documents
Amadeus Iran Training Module
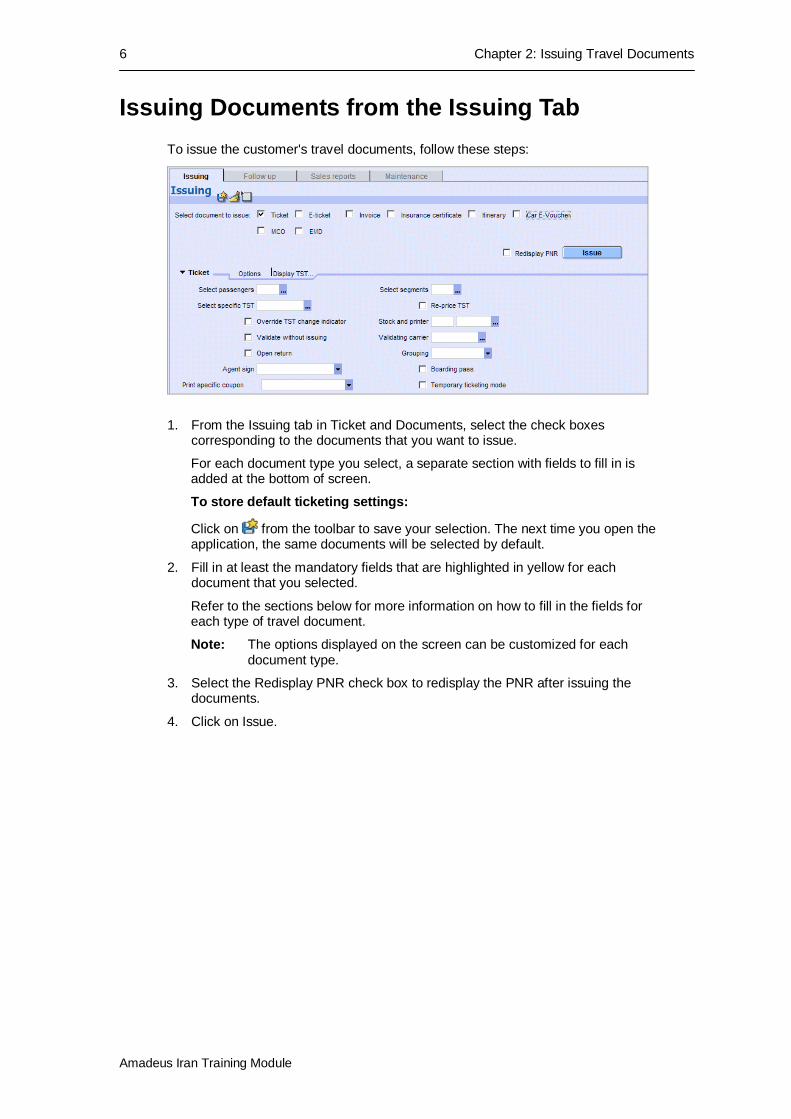
Issuing Documents from the Issuing Tab To issue the customer's travel documents, follow these steps:
1. From the Issuing tab in Ticket and Documents, select the check boxes corresponding to the documents that you want to issue.
For each document type you select, a separate section with fields to fill in is added at the bottom of screen.
To store default ticketing settings:
Click on from the toolbar to save your selection. The next time you open the application, the same documents will be selected by default.
2. Fill in at least the mandatory fields that are highlighted in yellow for each document that you selected.
Refer to the sections below for more information on how to fill in the fields for each type of travel document.
Note: The options displayed on the screen can be customized for each document type.
3. Select the Redisplay PNR check box to redisplay the PNR after issuing the documents.
4. Click on Issue.
Chapter 2: Issuing Travel Documents 7
Amadeus Iran Training Module
Customizing Print Options
You can easily customize your screen by displaying only the print options that you use most to issue the customer's documents. To add or remove options, follow these steps:
1. From the Issuing tab in Ticket and Documents, select the documents for which you want to set issuing options. For each document type you select, a separate section is added at the bottom of the screen.
2. Click on the document's Options tab.
3. From the drop-down menu that appears, click on an option that you want to add.
The options already in use are ticked on the list. You can remove an option by clicking on it again from the menu.
Note: You cannot remove mandatory fields.
The corresponding fields are added to your screen display. The selection of fields is automatically saved and will be displayed by default the next time you access the Issue tab.
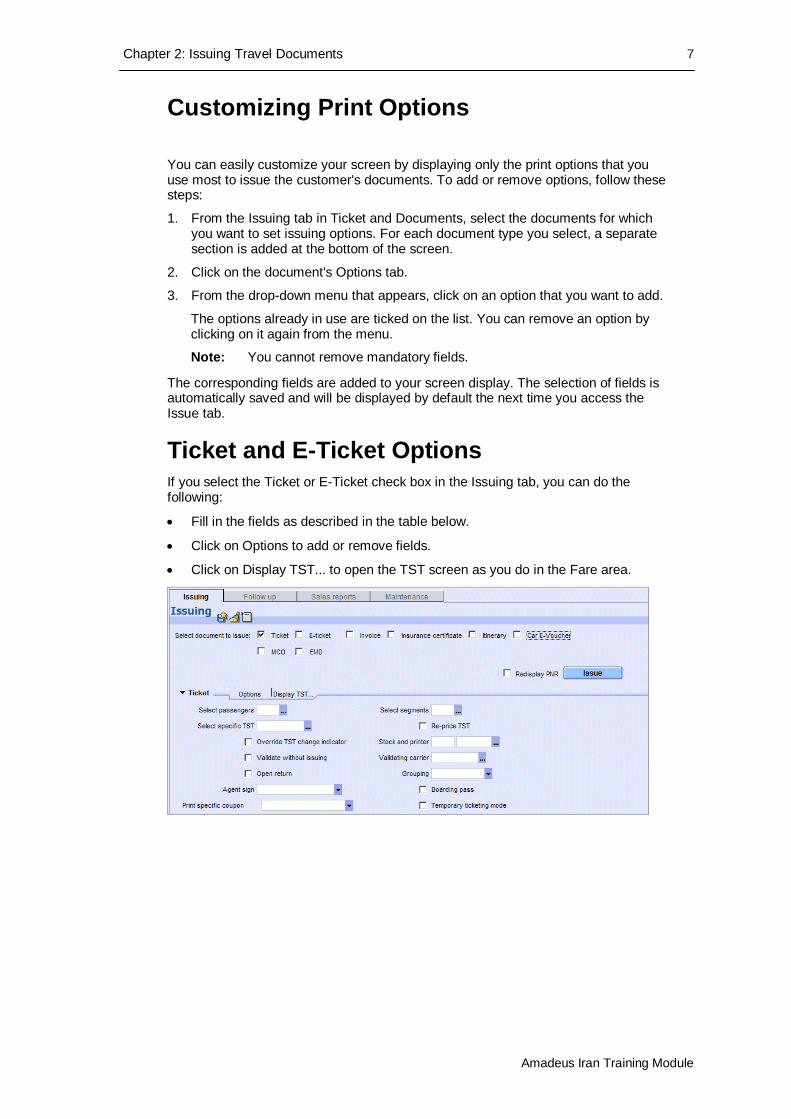
Ticket and E-Ticket Options If you select the Ticket or E-Ticket check box in the Issuing tab, you can do the following:
• Fill in the fields as described in the table below.
• Click on Options to add or remove fields.
• Click on Display TST... to open the TST screen as you do in the Fare area.
8 Chapter 2: Issuing Travel Documents
Amadeus Iran Training Module
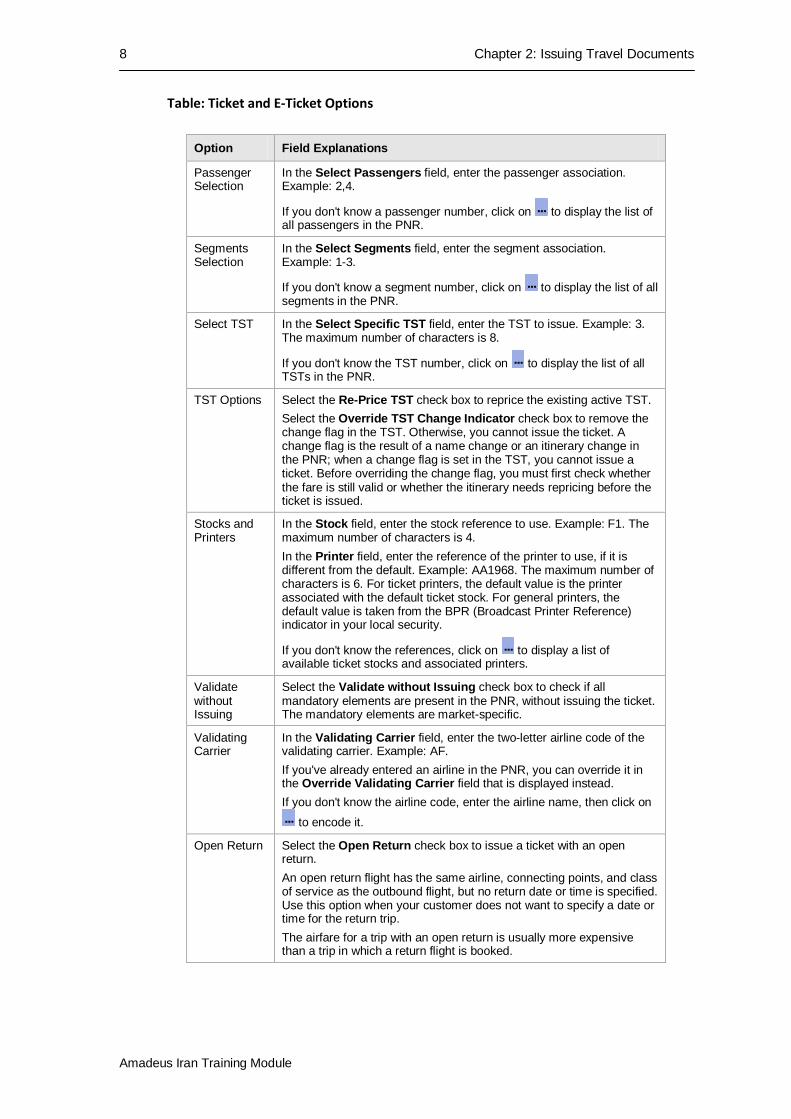
Table: Ticket and E-Ticket Options
Option Field Explanations
Passenger Selection
In the Select Passengers field, enter the passenger association. Example: 2,4.
If you don't know a passenger number, click on to display the list of all passengers in the PNR.
Segments Selection
In the Select Segments field, enter the segment association. Example: 1-3.
If you don't know a segment number, click on to display the list of all segments in the PNR.
Select TST In the Select Specific TST field, enter the TST to issue. Example: 3. The maximum number of characters is 8.
If you don't know the TST number, click on to display the list of all TSTs in the PNR.
TST Options Select the Re-Price TST check box to reprice the existing active TST. Select the Override TST Change Indicator check box to remove the change flag in the TST. Otherwise, you cannot issue the ticket. A change flag is the result of a name change or an itinerary change in the PNR; when a change flag is set in the TST, you cannot issue a ticket. Before overriding the change flag, you must first check whether the fare is still valid or whether the itinerary needs repricing before the ticket is issued.
Stocks and Printers
In the Stock field, enter the stock reference to use. Example: F1. The maximum number of characters is 4. In the Printer field, enter the reference of the printer to use, if it is different from the default. Example: AA1968. The maximum number of characters is 6. For ticket printers, the default value is the printer associated with the default ticket stock. For general printers, the default value is taken from the BPR (Broadcast Printer Reference) indicator in your local security.
If you don't know the references, click on to display a list of available ticket stocks and associated printers.
Validate without Issuing
Select the Validate without Issuing check box to check if all mandatory elements are present in the PNR, without issuing the ticket. The mandatory elements are market-specific.
Validating Carrier
In the Validating Carrier field, enter the two-letter airline code of the validating carrier. Example: AF. If you've already entered an airline in the PNR, you can override it in the Override Validating Carrier field that is displayed instead. If you don't know the airline code, enter the airline name, then click on
to encode it.
Open Return Select the Open Return check box to issue a ticket with an open return. An open return flight has the same airline, connecting points, and class of service as the outbound flight, but no return date or time is specified. Use this option when your customer does not want to specify a date or time for the return trip. The airfare for a trip with an open return is usually more expensive than a trip in which a return flight is booked.
Chapter 2: Issuing Travel Documents 9
Amadeus Iran Training Module
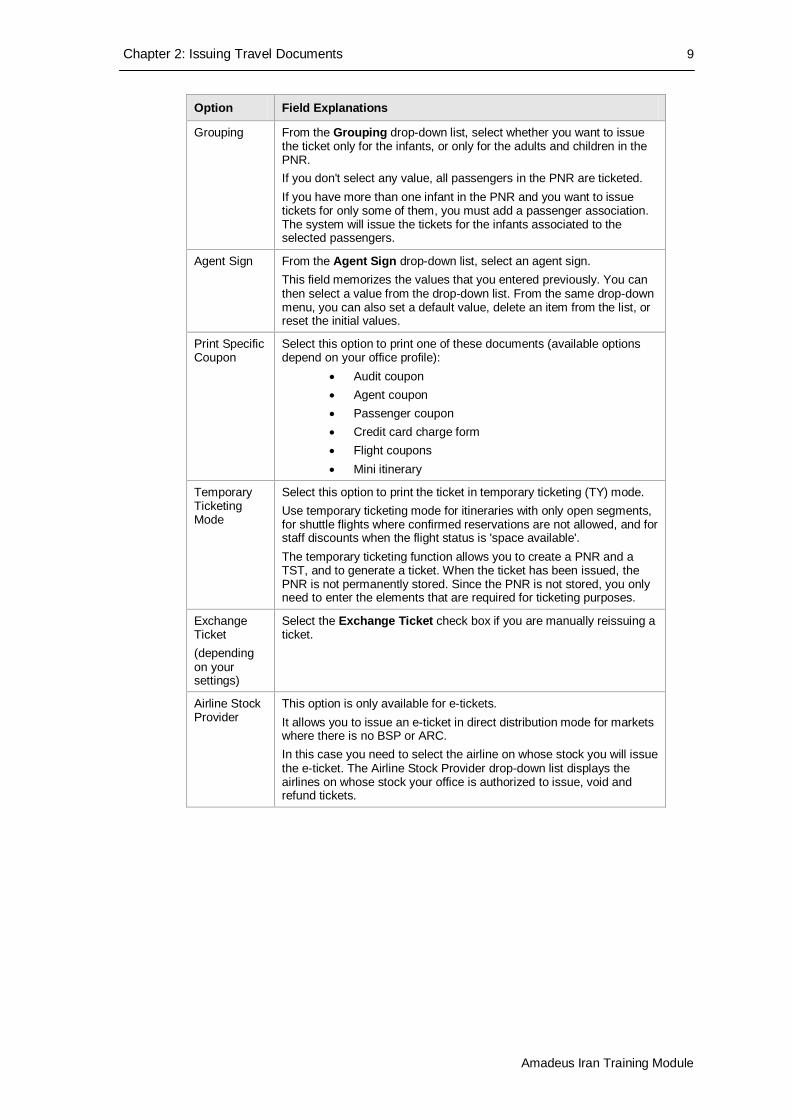
Option Field Explanations
Grouping From the Grouping drop-down list, select whether you want to issue the ticket only for the infants, or only for the adults and children in the PNR. If you don't select any value, all passengers in the PNR are ticketed. If you have more than one infant in the PNR and you want to issue tickets for only some of them, you must add a passenger association. The system will issue the tickets for the infants associated to the selected passengers.
Agent Sign From the Agent Sign drop-down list, select an agent sign. This field memorizes the values that you entered previously. You can then select a value from the drop-down list. From the same drop-down menu, you can also set a default value, delete an item from the list, or reset the initial values.
Print Specific Coupon
Select this option to print one of these documents (available options depend on your office profile):
• Audit coupon • Agent coupon • Passenger coupon • Credit card charge form • Flight coupons • Mini itinerary
Temporary Ticketing Mode
Select this option to print the ticket in temporary ticketing (TY) mode. Use temporary ticketing mode for itineraries with only open segments, for shuttle flights where confirmed reservations are not allowed, and for staff discounts when the flight status is 'space available'. The temporary ticketing function allows you to create a PNR and a TST, and to generate a ticket. When the ticket has been issued, the PNR is not permanently stored. Since the PNR is not stored, you only need to enter the elements that are required for ticketing purposes.
Exchange Ticket (depending on your settings)
Select the Exchange Ticket check box if you are manually reissuing a ticket.
Airline Stock Provider
This option is only available for e-tickets. It allows you to issue an e-ticket in direct distribution mode for markets where there is no BSP or ARC. In this case you need to select the airline on whose stock you will issue the e-ticket. The Airline Stock Provider drop-down list displays the airlines on whose stock your office is authorized to issue, void and refund tickets.
10 Chapter 2: Issuing Travel Documents
Amadeus Iran Training Module
E-Ticket Receipt Options If you select the E-Ticket Receipt check box in the Issuing tab, you can do the following:
• Fill in the fields as described in the table below.
• Click on Options to add or remove fields.
• Click on Preview... to preview the e-ticket itinerary receipt in a separate window. Toolbar icons are provided to copy the receipt, print it or save it to a file.
If you save the file, it will be saved to the following path: C:\Documents and Settings\[userID]\Application Data\Amadeus\ITR
The file name consists of PassengerName_RecLoc_Date.txt and can be modified. Example: FoxAlan_AB67YH_14NOV2008.txt
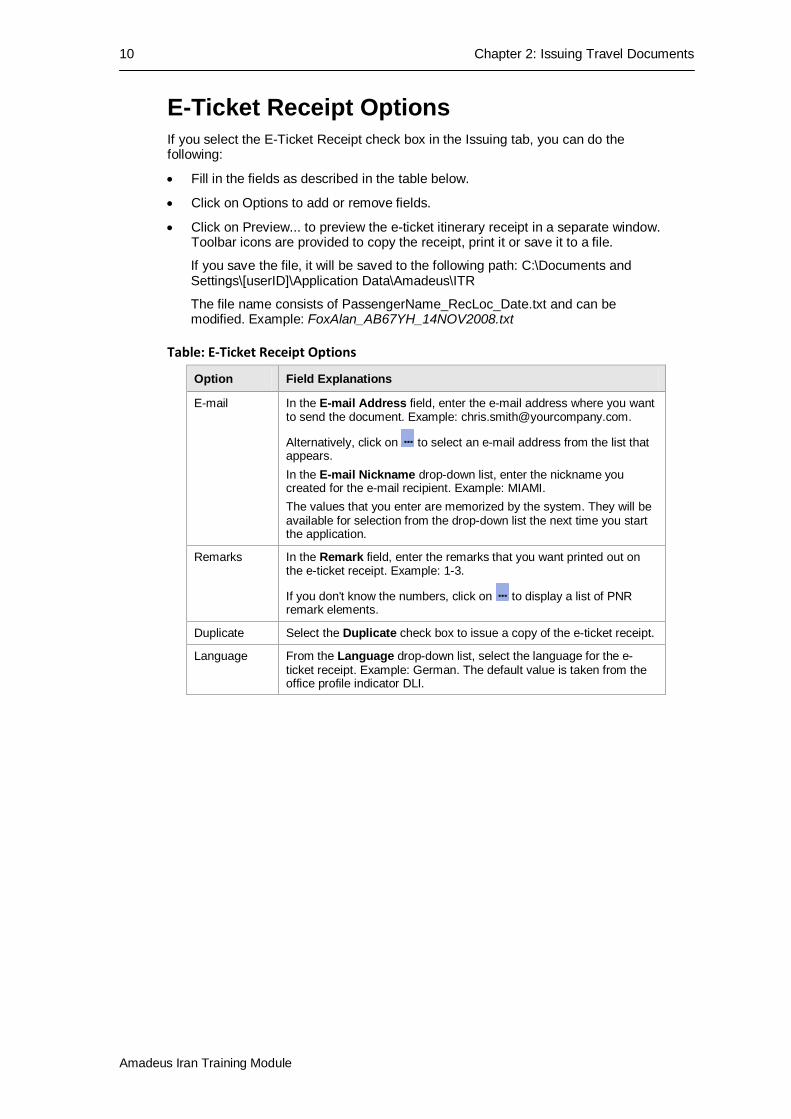
Table: E-Ticket Receipt Options
Option Field Explanations
E-mail In the E-mail Address field, enter the e-mail address where you want to send the document. Example: [email protected].
Alternatively, click on to select an e-mail address from the list that appears. In the E-mail Nickname drop-down list, enter the nickname you created for the e-mail recipient. Example: MIAMI. The values that you enter are memorized by the system. They will be available for selection from the drop-down list the next time you start the application.
Remarks In the Remark field, enter the remarks that you want printed out on the e-ticket receipt. Example: 1-3.
If you don't know the numbers, click on to display a list of PNR remark elements.
Duplicate Select the Duplicate check box to issue a copy of the e-ticket receipt.
Language From the Language drop-down list, select the language for the e-ticket receipt. Example: German. The default value is taken from the office profile indicator DLI.

Chapter 2: Issuing Travel Documents 11
Amadeus Iran Training Module
Itinerary Options If you selec t the Itinerary check box in the Issuing tab, you can do the following:
• Fill in the fields as described in the table below.
• Click on Options to add or remove fields.
• Click on Preview... to preview the itinerary in a separate window. Toolbar icons are provided to copy the itinerary, print it or save it to a file.
If you save the file, it will be saved to the following path: C:\Documents and Settings\[userID]\Application Data\Amadeus\Itinerary
The file name consists of PassengerName_RecLoc_Date.txt and can be modified. Example: FoxAlan_AB67YH_14NOV2008.txt
12 Chapter 2: Issuing Travel Documents
Amadeus Iran Training Module
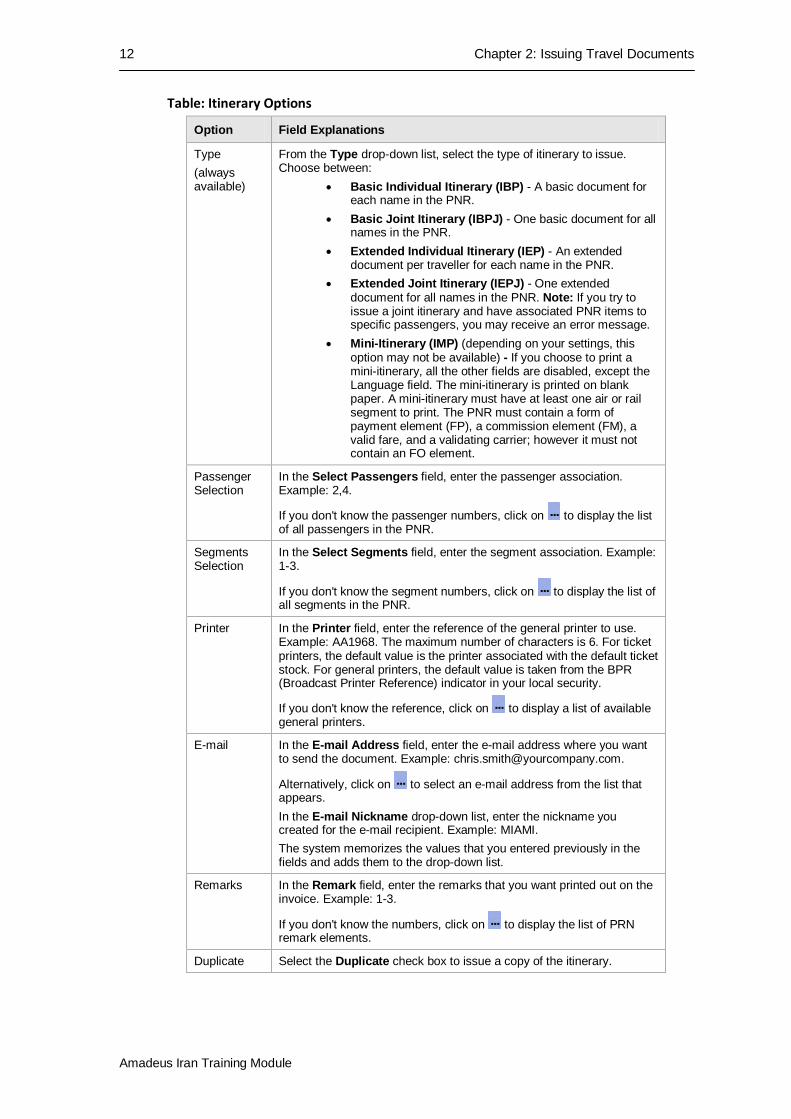
Table: Itinerary Options
Option Field Explanations
Type (always available)
From the Type drop-down list, select the type of itinerary to issue. Choose between:
• Basic Individual Itinerary (IBP) - A basic document for each name in the PNR.
• Basic Joint Itinerary (IBPJ) - One basic document for all names in the PNR.
• Extended Individual Itinerary (IEP) - An extended document per traveller for each name in the PNR.
• Extended Joint Itinerary (IEPJ) - One extended document for all names in the PNR. Note: If you try to issue a joint itinerary and have associated PNR items to specific passengers, you may receive an error message.
• Mini-Itinerary (IMP) (depending on your settings, this option may not be available) - If you choose to print a mini-itinerary, all the other fields are disabled, except the Language field. The mini-itinerary is printed on blank paper. A mini-itinerary must have at least one air or rail segment to print. The PNR must contain a form of payment element (FP), a commission element (FM), a valid fare, and a validating carrier; however it must not contain an FO element.
Passenger Selection
In the Select Passengers field, enter the passenger association. Example: 2,4.
If you don't know the passenger numbers, click on to display the list of all passengers in the PNR.
Segments Selection
In the Select Segments field, enter the segment association. Example: 1-3.
If you don't know the segment numbers, click on to display the list of all segments in the PNR.
Printer In the Printer field, enter the reference of the general printer to use. Example: AA1968. The maximum number of characters is 6. For ticket printers, the default value is the printer associated with the default ticket stock. For general printers, the default value is taken from the BPR (Broadcast Printer Reference) indicator in your local security.
If you don't know the reference, click on to display a list of available general printers.
E-mail In the E-mail Address field, enter the e-mail address where you want to send the document. Example: [email protected].
Alternatively, click on to select an e-mail address from the list that appears. In the E-mail Nickname drop-down list, enter the nickname you created for the e-mail recipient. Example: MIAMI. The system memorizes the values that you entered previously in the fields and adds them to the drop-down list.
Remarks In the Remark field, enter the remarks that you want printed out on the invoice. Example: 1-3.
If you don't know the numbers, click on to display the list of PRN remark elements.
Duplicate Select the Duplicate check box to issue a copy of the itinerary.
Chapter 2: Issuing Travel Documents 13
Amadeus Iran Training Module
Option Field Explanations
Language From the Language drop-down list, select the language for the invoice. Example: German. The default value is taken from the office profile indicator DLI.
Time Format From the Time Display drop-down list, select the time format in which to print the itinerary. The invoice is printed with the time format (12-hour or 24-hour clock) you have associated to your agent sign. Select another time format to override your time format preference. Example: 12-hour clock (12:00).
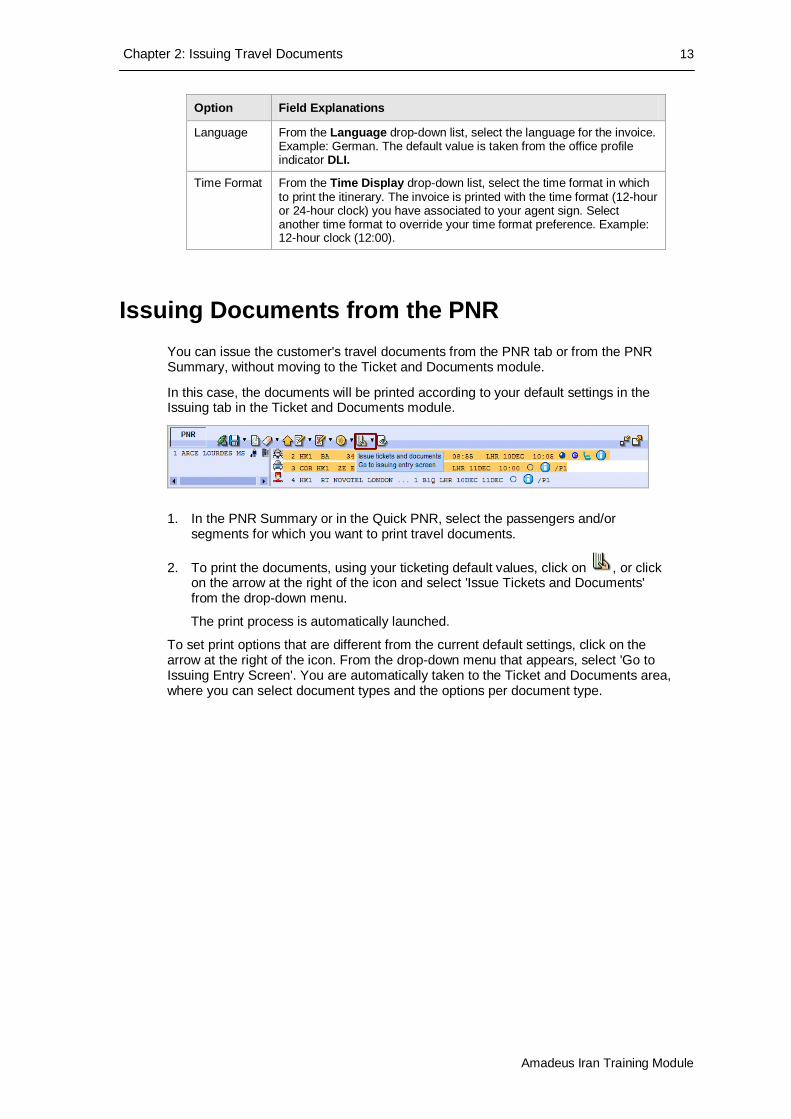
Issuing Documents from the PNR You can issue the customer's travel documents from the PNR tab or from the PNR Summary, without moving to the Ticket and Documents module.
In this case, the documents will be printed according to your default settings in the Issuing tab in the Ticket and Documents module.
1. In the PNR Summary or in the Quick PNR, select the passengers and/or segments for which you want to print travel documents.
2. To print the documents, using your ticketing default values, click on , or click on the arrow at the right of the icon and select 'Issue Tickets and Documents' from the drop-down menu.
The print process is automatically launched.
To set print options that are different from the current default settings, click on the arrow at the right of the icon. From the drop-down menu that appears, select 'Go to Issuing Entry Screen'. You are automatically taken to the Ticket and Documents area, where you can select document types and the options per document type.

Chapter 3: Refund, Void and other Follow-up Actions 14
Amadeus Iran Training Module
Chapter 3
Refund, Void and Other Follow-up Actions
Follow-up actions include post-sales activities to modify a sale, such as refunding, voiding or reinstating paper and electronic tickets.
You can access follow-up actions from different areas in the application: from the Follow Up tab in the Ticket and Documents module, from the PNR element and from the Query report.
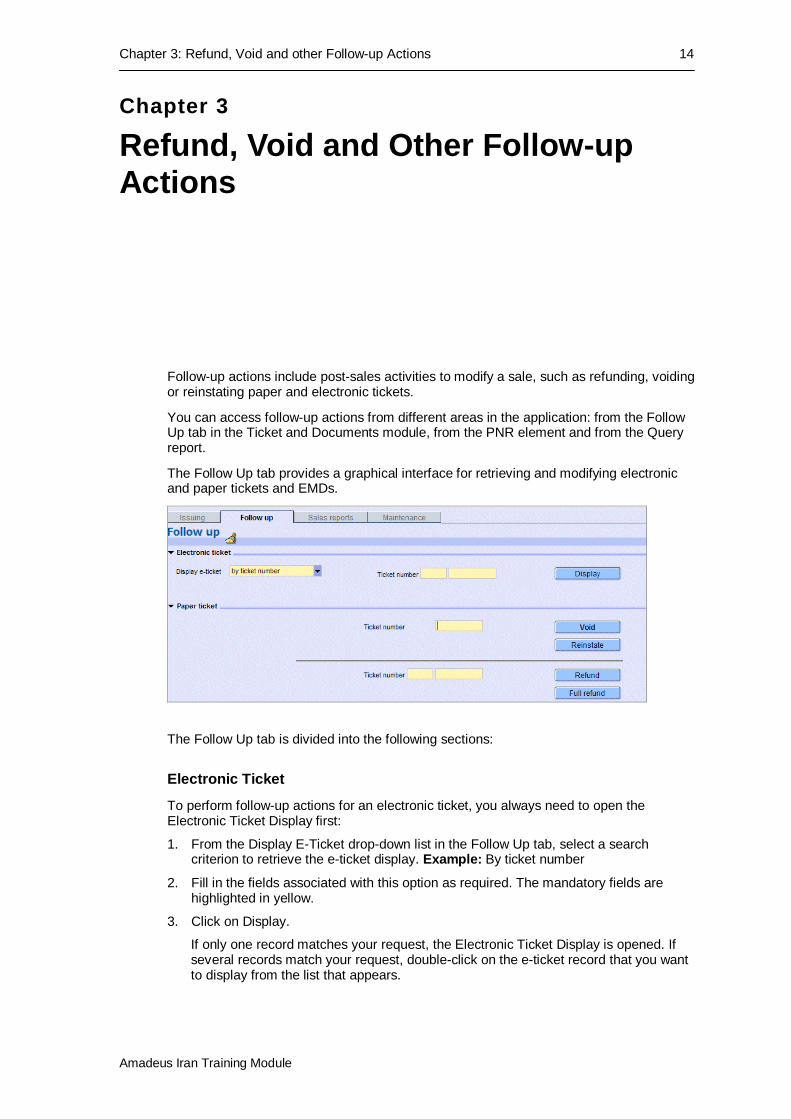
The Follow Up tab provides a graphical interface for retrieving and modifying electronic and paper tickets and EMDs.
The Follow Up tab is divided into the following sections:
Electronic Ticket
To perform follow-up actions for an electronic ticket, you always need to open the Electronic Ticket Display first:
1. From the Display E-Ticket drop-down list in the Follow Up tab, select a search criterion to retrieve the e-ticket display. Example: By ticket number
2. Fill in the fields associated with this option as required. The mandatory fields are highlighted in yellow.
3. Click on Display.
If only one record matches your request, the Electronic Ticket Display is opened. If several records match your request, double-click on the e-ticket record that you want to display from the list that appears.
15 Chapter 3: Refund, Void and other Follow-up Actions
Amadeus Iran Training Module
From the electronic ticket display, you can then, for example, refund, void, revalidate or exchange the e-ticket.
Follow-up Actions from the PNR or the Query Report
You can also access follow-up actions from the PNR fare element or from the Query report:
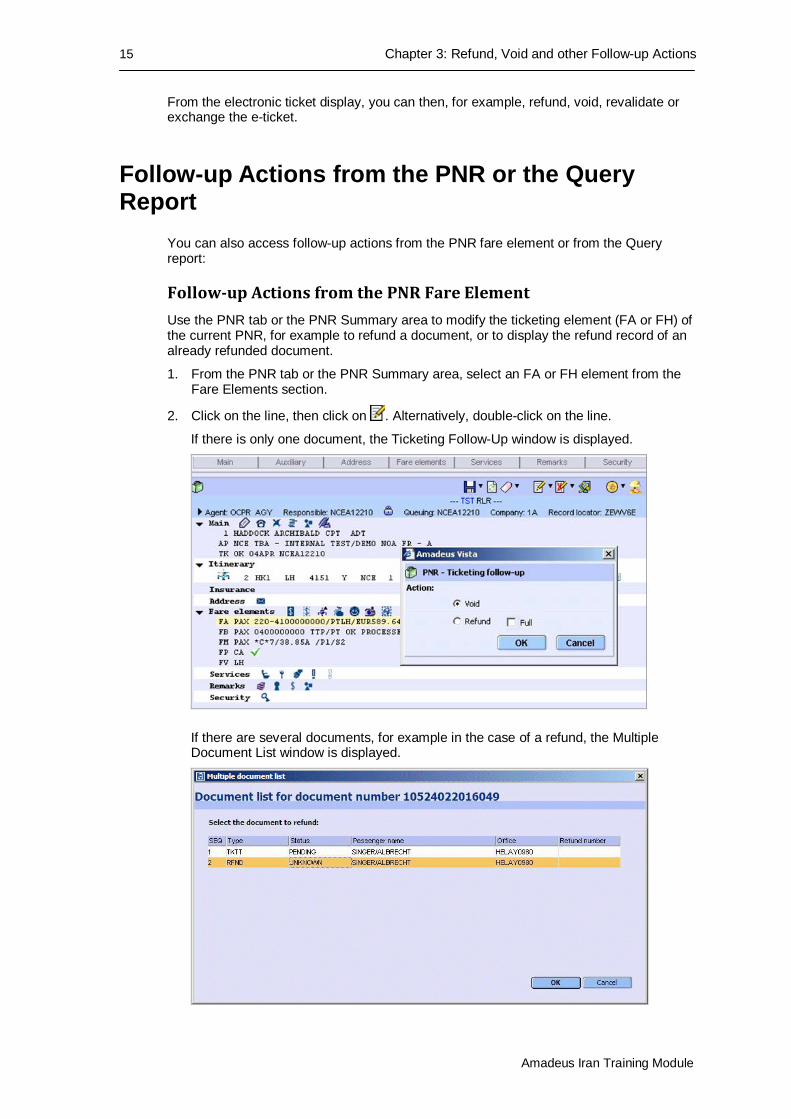
Follow-up Actions from the PNR Fare Element Use the PNR tab or the PNR Summary area to modify the ticketing element (FA or FH) of the current PNR, for example to refund a document, or to display the refund record of an already refunded document.
1. From the PNR tab or the PNR Summary area, select an FA or FH element from the Fare Elements section.
2. Click on the line, then click on . Alternatively, double-click on the line.
If there is only one document, the Ticketing Follow-Up window is displayed.
If there are several documents, for example in the case of a refund, the Multiple Document List window is displayed.
Chapter 3: Refund, Void and other Follow-up Actions 16
Amadeus Iran Training Module
3. Select the document to refund and click on OK.
4. Review the information in the Refund Record pop-up window. If you make any updates to the information, click on Save Changes. Otherwise, click on Process Refund.
Depending on the ticket type, possible follow-up actions may vary as follows:
Table: Follow-Up Actions Depending on the Ticket Type
Ticket Type Possible Actions
FA with ET (electronic ticket)
Display the e-ticket record.
FA with EV (voided electronic ticket)
Display the voided e-ticket record.
FA with ER (refunded electronic ticket)
Display the refund record.
FHE Display the e-ticket record. Modify the PNR element.
FHA or FHM Void. Refund (Partial). Full Refund. Tax Refund. Modify the PNR element.
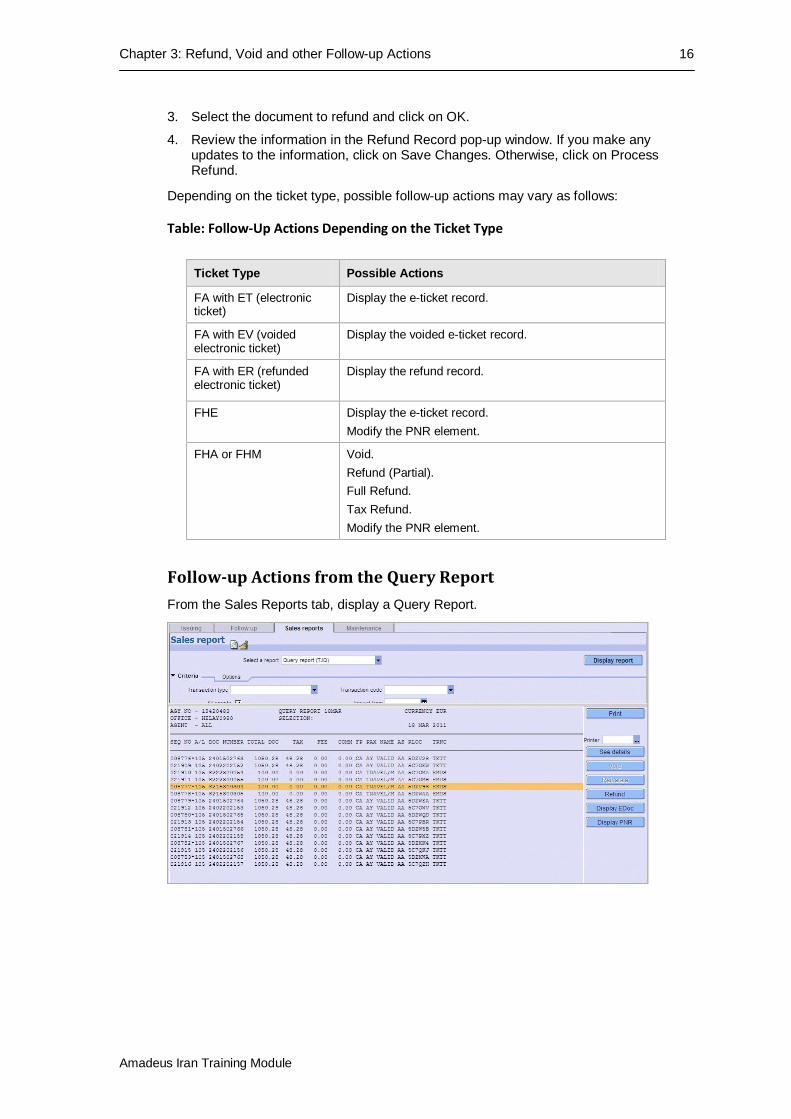
Follow-up Actions from the Query Report From the Sales Reports tab, display a Query Report.
17 Chapter 3: Refund, Void and other Follow-up Actions
Amadeus Iran Training Module
Voiding a Ticket You can void unused tickets within the current sales period.
For e-tickets, you can only void unused coupons with an 'O' (open for use) or 'A' (airport control) status code, otherwise an error message is returned.
When you void an e-ticket, a void request is sent to the airline. The existing FA element for that ticket is removed from the PNR, stored in PNR history, and replaced by a new FA element that includes the V status code, indicating that the ticket has been voided. The record is also automatically cancelled in the sales report, as long as the cancellation is within the current sales period (CANX code). All coupon statuses are changed to 'V' (void) in the e-ticket display.
To void a ticket:
1. For paper tickets: In the Follow-Up tab, enter the 10-digit airline ticket number.
For e-tickets: In the Follow-Up tab, enter or select the e-ticket number and click on Display to open the e-ticket display.
2. Click on Void.
3. Click on OK from the confirmation pop-up window.
A message to confirm that the ticket has been voided successfully is displayed.
Reinstating a Ticket After you have voided a ticket, you can reinstate the ticket.
1. For e-tickets: In the Follow-Up tab, enter or select the e-ticket number and click on Display to open the e-ticket display.
2. Click on Reinstate. A confirmation pop-up window is displayed.
3. Click on OK.
A message to confirm that the ticket has been reinstated successfully is displayed
Fully Refunding a Ticket When a ticket has not been used and the sales period is over, you cannot void the ticket: you must process a full refund. The refund process is fully automated.
When you refund a ticket, the refund document is printed but not displayed on your screen. The refund appears on the Query report and is reported to the BSP/ARC stock provider. The stock provider then settles the refund between the validating airline and your agency.
1. For e-tickets: In the Follow-Up tab, enter or select the e-ticket number and click on Display to open the e-ticket display.
Click on Refund.
A message to confirm that the refund has been processed successfully is displayed.
Chapter 3: Refund, Void and other Follow-up Actions 18
Amadeus Iran Training Module
Partially Refunding a Ticket When a ticket has been partially used and the sales period is over, you cannot void the ticket: you must process a partial refund. The refund appears on the Query report and is reported to the BSP/ARC stock provider. The stock provider then settles the refund between the validating airline and your agency.
When you request a partial refund, the refund record is displayed.
It is automatically filled with the original sales data, if it can be retrieved from the document database. If no data is retrieved, a blank refund record is displayed and you have to enter the details of the refund manually. The fields that you are allowed to change depend on the refund table for your stock provider.
You have to manually change the ticket data in the refund record. You must delete the used taxes from the refundable tax record before processing the refund record. If tax data for the refund is not retrieved from the Document database, you must enter it manually in the refundable tax record.
To partially refund a document:
1. For e-tickets: In the Follow-Up tab, enter or select the e-ticket number and click on Display to open the e-ticket display.
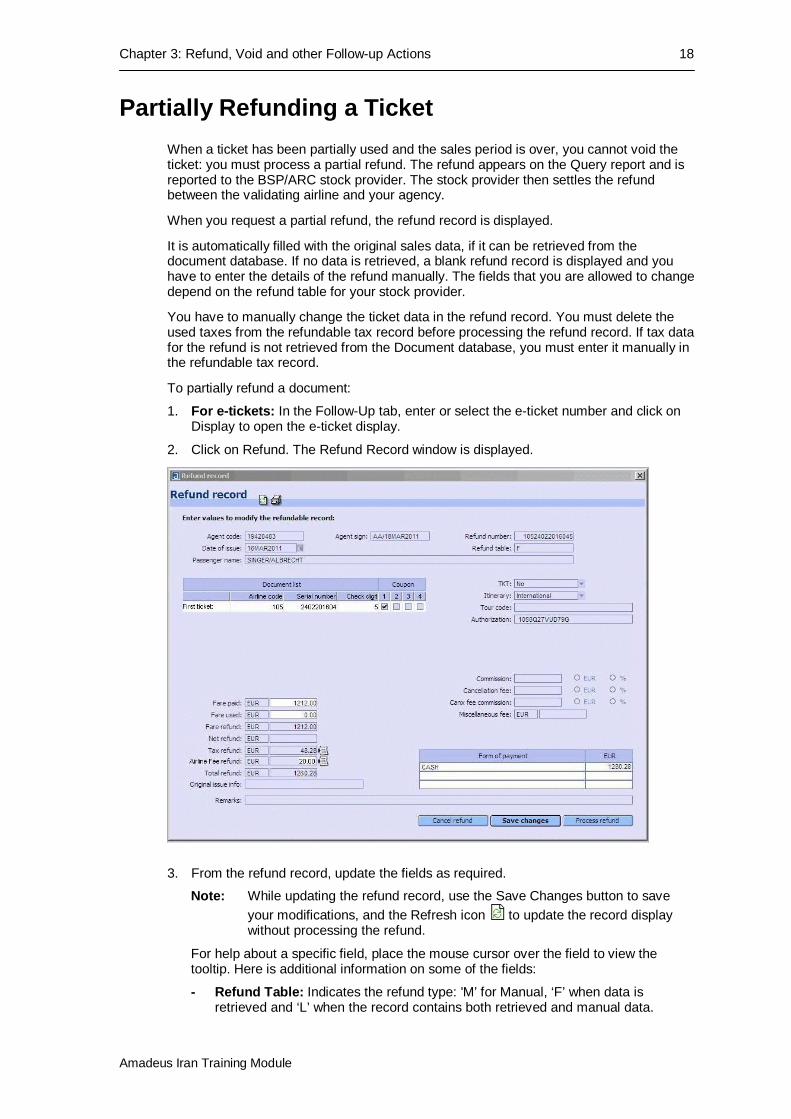
2. Click on Refund. The Refund Record window is displayed.
3. From the refund record, update the fields as required.
Note: While updating the refund record, use the Save Changes button to save your modifications, and the Refresh icon to update the record display without processing the refund.
For help about a specific field, place the mouse cursor over the field to view the tooltip. Here is additional information on some of the fields:
- Refund Table: Indicates the refund type: 'M’ for Manual, ‘F’ when data is retrieved and ‘L’ when the record contains both retrieved and manual data.
19 Chapter 3: Refund, Void and other Follow-up Actions
Amadeus Iran Training Module
- Document List and Coupon Number table:
Airline Code: The 3-digit airline code. Example: 057
Serial Number: The 10-digit ticket or document number that you are refunding. Example: 4410586619
Check Digit: The check digit of the ticket or document that you are refunding. Example: 2
Coupon: Select the unused coupon numbers (1, 2, 3 or 4) to be refunded.
- TKT: Set to Yes if there are coupons to be refunded.
- Authorization: The airline code for refund authorization (up to 14 alphanumeric characters). Example: 10504Q59QBXE9C. For e-ticket refunds, use the ESAC (Electronic Settlement Authorization Code) provided by the airline.
- Fare Paid: The original or equivalent fare paid for the document to be refunded. You can only update the field if no information could be retrieved.
- Fare Used: If the ticket has been partially used, enter the fare amount of the coupons that have been used and cannot be refunded.
- Fare Refund: The fare to be refunded (the difference between the fare paid and the fare used).
- Net Refund: The Net Remit Indicator and the Net Fare to be refunded (if the document was issued with an incentive ticketing method).
- Tax Refund: The total amount of refundable taxes. If there is only one tax to refund, enter its amount in this field. Example: 12.92
If more than one tax exists in the document to refund, click on to display the Refundable Tax Record window.
- Airline Fee Refund: The total amount of refundable airline fees. If there is only one fee to refund, enter its amount in this field. Example: 20.00
If more than one fee exists in the document to refund, click on to display the Refundable Airline Fee Record window.
- Total Refund: The total amount to be refunded: Fare refund + Tax refund – (Cancellation Fee + Miscellaneous Fee). This field is not editable.
- Original Issue Info: Original Issue information from the FO element if an exchange document is to be refunded.
- Commission: The commission that applies to the original sale of the document you are refunding. Depending on the option button that you select, enter either an amount (Example: 50.00), or a percentage (Example: 10).
- Cancellation Fee: The cancellation penalty amount or percentage that applies to the refundable fare amount. Examples: the amount of 50.00 or the percentage of 19.
- Canx Fee Commission: The commission percentage or amount that applies to the cancellation penalty charged for the refund. Example: the percentage of 10 or the amount of 25.00.
- Miscellaneous Fee: The amount of the fee used to cover administration charges to process the refund.
- Form of Payment Type: The form of payment used for the original sales (the same form of payment will be used for the refund).
- Form of Payment Amount: The total refund amount.
4. Click on Process Refund to process the partial refund.
Chapter 3: Refund, Void and other Follow-up Actions 20
Amadeus Iran Training Module
A message to confirm that the refund has been processed successfully is displayed. The refund is stored in the document database and the ticket is displayed with the RFND transaction code in the sales reports.
For an e-ticket, the coupon status is automatically set to 'R' for 'Refunded'.
21 Chapter 3: Refund, Void and other Follow-up Actions
Amadeus Iran Training Module
Refunding Taxes If a ticket has not been used or only been partially used, but the fare is non-refundable, you may still be able to refund certain unused taxes.
You refund the taxes from the Refund Record window:
1. For e-tickets: In the Follow-Up tab, enter or select the e-ticket number and click on Display to open the e-ticket display. Click on Refund.
2. Select Tax Refund and click on OK.
The Refund Record window is displayed. The Fare Used amount is automatically set to the Fare Paid amount.
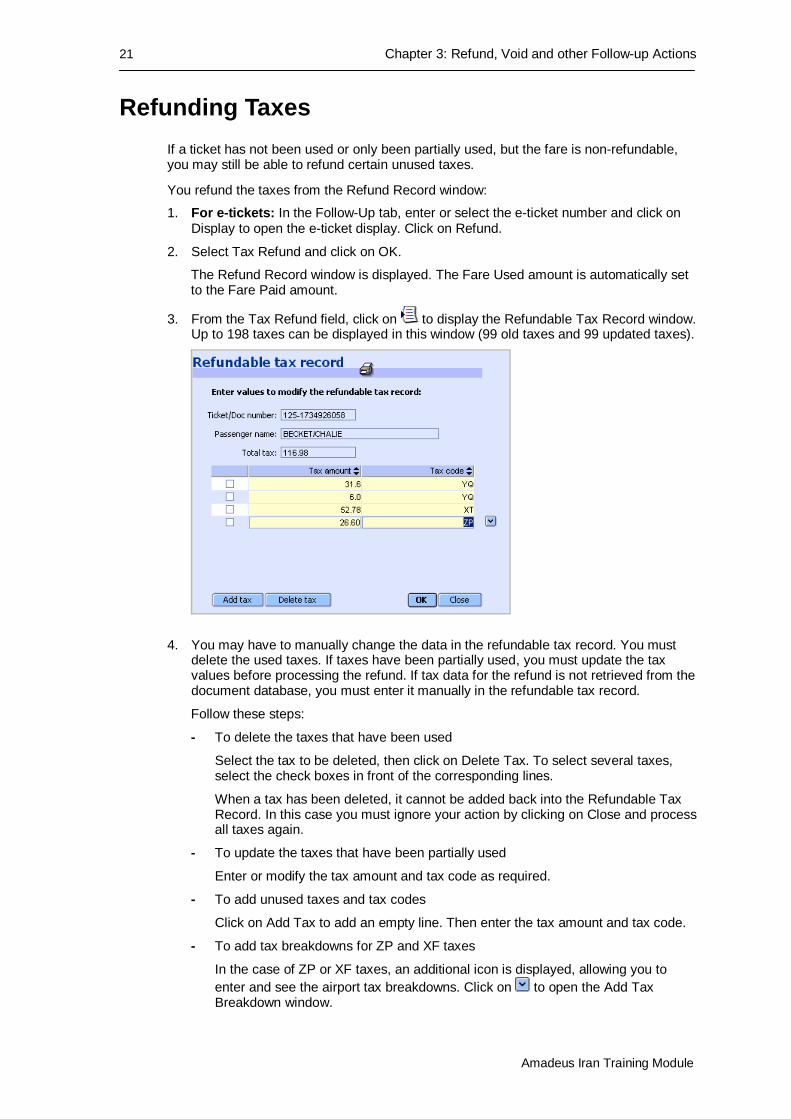
3. From the Tax Refund field, click on to display the Refundable Tax Record window. Up to 198 taxes can be displayed in this window (99 old taxes and 99 updated taxes).
4. You may have to manually change the data in the refundable tax record. You must delete the used taxes. If taxes have been partially used, you must update the tax values before processing the refund. If tax data for the refund is not retrieved from the document database, you must enter it manually in the refundable tax record.
Follow these steps:
- To delete the taxes that have been used
Select the tax to be deleted, then click on Delete Tax. To select several taxes, select the check boxes in front of the corresponding lines.
When a tax has been deleted, it cannot be added back into the Refundable Tax Record. In this case you must ignore your action by clicking on Close and process all taxes again.
- To update the taxes that have been partially used
Enter or modify the tax amount and tax code as required.
- To add unused taxes and tax codes
Click on Add Tax to add an empty line. Then enter the tax amount and tax code.
- To add tax breakdowns for ZP and XF taxes
In the case of ZP or XF taxes, an additional icon is displayed, allowing you to enter and see the airport tax breakdowns. Click on to open the Add Tax Breakdown window.
Chapter 3: Refund, Void and other Follow-up Actions 22
Amadeus Iran Training Module
You can then add or delete taxes and enter city code and amount for each tax.
Click on OK to validate your update and close the window.
To print the refundable tax list, click on at the top of the window.
5. Once you have updated the Refundable Tax Record window, click on OK, then on Close to close the window.
The Tax Refund field in the Refund Record is automatically updated with the total amount of taxes to be refunded.
6. From the refund record, update any other fields as required and click on Process Refund.
A message to confirm that the partial refund has been processed successfully is displayed.
23 Chapter 3: Refund, Void and other Follow-up Actions
Amadeus Iran Training Module
Working with the Electronic Ticket Display The electronic ticket display provides all the information related to the e-ticket.
From the electronic ticket display, you can perform various follow-up actions, such as refunding, voiding or revalidating the e-ticket.
Note: After performing an action on the e-ticket display, click on to refresh the coupon status on your display.
Opening the Electronic Ticket Display
From the Follow-up Tab 1. From the Follow-up tab in the Ticket and Documents module, select a search criterion
from the Display E-Ticket drop-down list. Example: By ticket number
2. Fill in the fields associated with this option as required. The mandatory fields are highlighted in yellow.
3. Click on Display to open the Electronic Ticket Display.
If only one record matches your request, the e-ticket display window is opened. If several records match your request, double-click on the e-ticket record that you want to display from the list that appears.
From the PNR Fare Element 1. In the PNR tab or PNR Summary area, select the FA or FH element for an electronic
ticket.
2. Click on the line, then click on . Alternatively, double-click on the line.
From the Sales Report Tab 1. From the Sales Report tab, display a Query Report In the Query report, select a
transaction line that shows TKKT in the TRNC column to indicate an electronic ticket.
2. Click on Display E-ticket.
Chapter 3: Refund, Void and other Follow-up Actions 24
Amadeus Iran Training Module
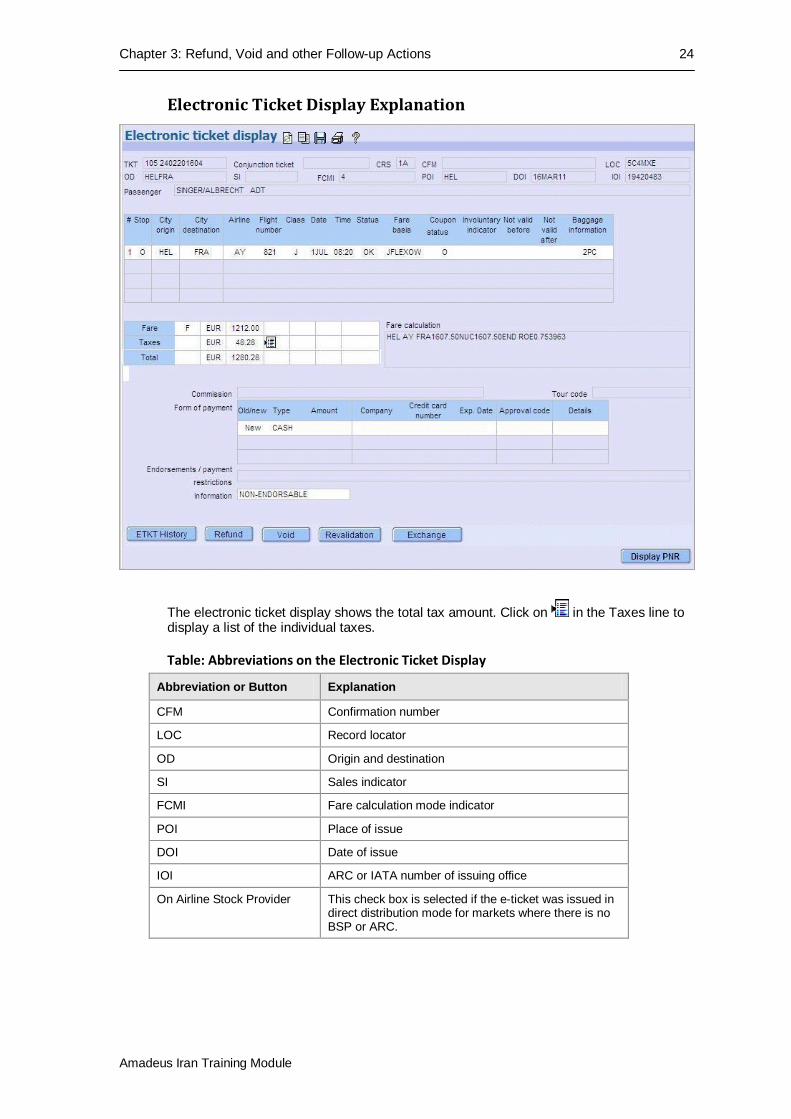
Electronic Ticket Display Explanation
The electronic ticket display shows the total tax amount. Click on in the Taxes line to display a list of the individual taxes.
Table: Abbreviations on the Electronic Ticket Display
Abbreviation or Button Explanation
CFM Confirmation number
LOC Record locator
OD Origin and destination
SI Sales indicator
FCMI Fare calculation mode indicator
POI Place of issue
DOI Date of issue
IOI ARC or IATA number of issuing office
On Airline Stock Provider This check box is selected if the e-ticket was issued in direct distribution mode for markets where there is no BSP or ARC.
25 Chapter 3: Refund, Void and other Follow-up Actions
Amadeus Iran Training Module
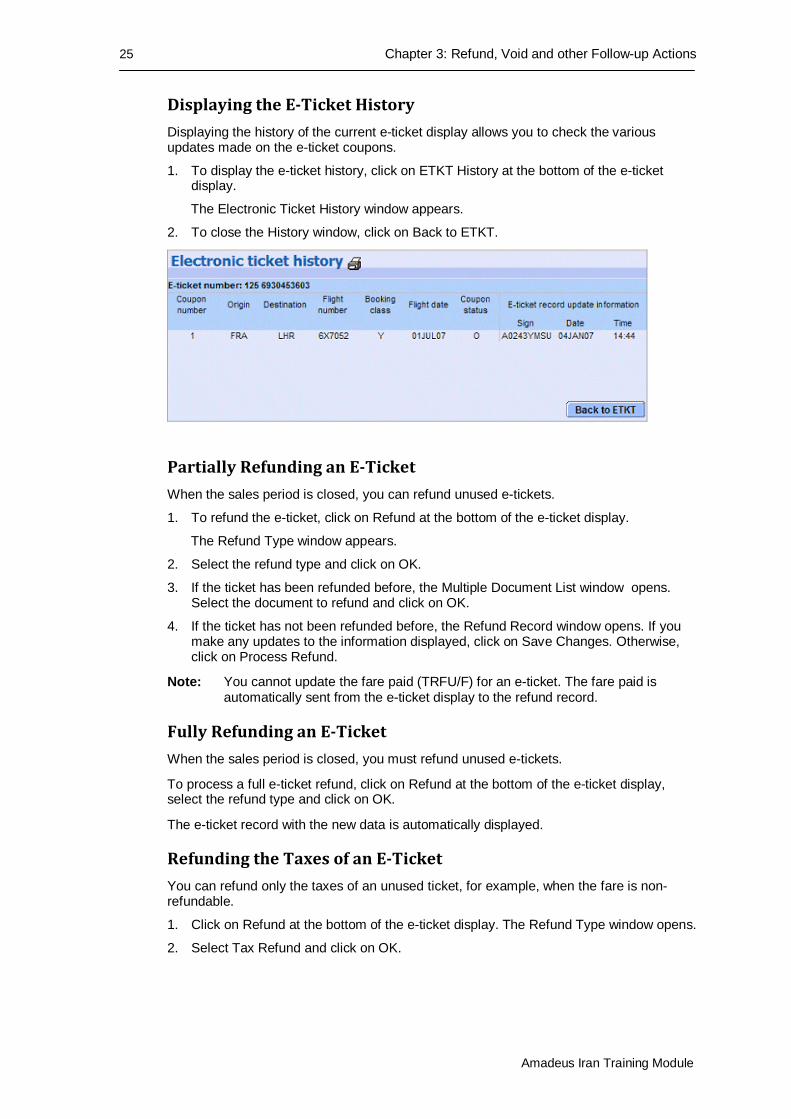
Displaying the E-Ticket History Displaying the history of the current e-ticket display allows you to check the various updates made on the e-ticket coupons.
1. To display the e-ticket history, click on ETKT History at the bottom of the e-ticket display.
The Electronic Ticket History window appears.
2. To close the History window, click on Back to ETKT.
Partially Refunding an E-Ticket When the sales period is closed, you can refund unused e-tickets.
1. To refund the e-ticket, click on Refund at the bottom of the e-ticket display.
The Refund Type window appears.
2. Select the refund type and click on OK.
3. If the ticket has been refunded before, the Multiple Document List window opens. Select the document to refund and click on OK.
4. If the ticket has not been refunded before, the Refund Record window opens. If you make any updates to the information displayed, click on Save Changes. Otherwise, click on Process Refund.
Note: You cannot update the fare paid (TRFU/F) for an e-ticket. The fare paid is automatically sent from the e-ticket display to the refund record.
Fully Refunding an E-Ticket When the sales period is closed, you must refund unused e-tickets.
To process a full e-ticket refund, click on Refund at the bottom of the e-ticket display, select the refund type and click on OK.
The e-ticket record with the new data is automatically displayed.
Refunding the Taxes of an E-Ticket You can refund only the taxes of an unused ticket, for example, when the fare is non-refundable.
1. Click on Refund at the bottom of the e-ticket display. The Refund Type window opens.
2. Select Tax Refund and click on OK.
Chapter 3: Refund, Void and other Follow-up Actions 26
Amadeus Iran Training Module
Voiding or Reinstating an E-Ticket After an e-ticket has been issued, you can void the unused e-ticket coupons within the current sales period. All coupons in the e-ticket record must have a status code 'O' (open for use) or 'A' (airport control), otherwise an error message is returned.
To void an e-ticket, click on Void at the bottom of the e-ticket display.
Once you have voided a ticket, the button changes to Reinstate, and you can undo the void action.
Revalidating an E-Ticket You can revalidate an e-ticket after any of the following have changed in the PNR, as long as there is no change to the fare:
• Airline
• Flight number
• Class of service
• Date or time of flight
• Airport of arrival or departure (within the same city)
The prerequisites for an e-ticket revalidation are:
• An FV element showing the validating carrier must be present in the PNR, and the validating carrier must allow revalidation.
• An FA or FHE element exists in the PNR.
Note: This function is market- and airline-specific.
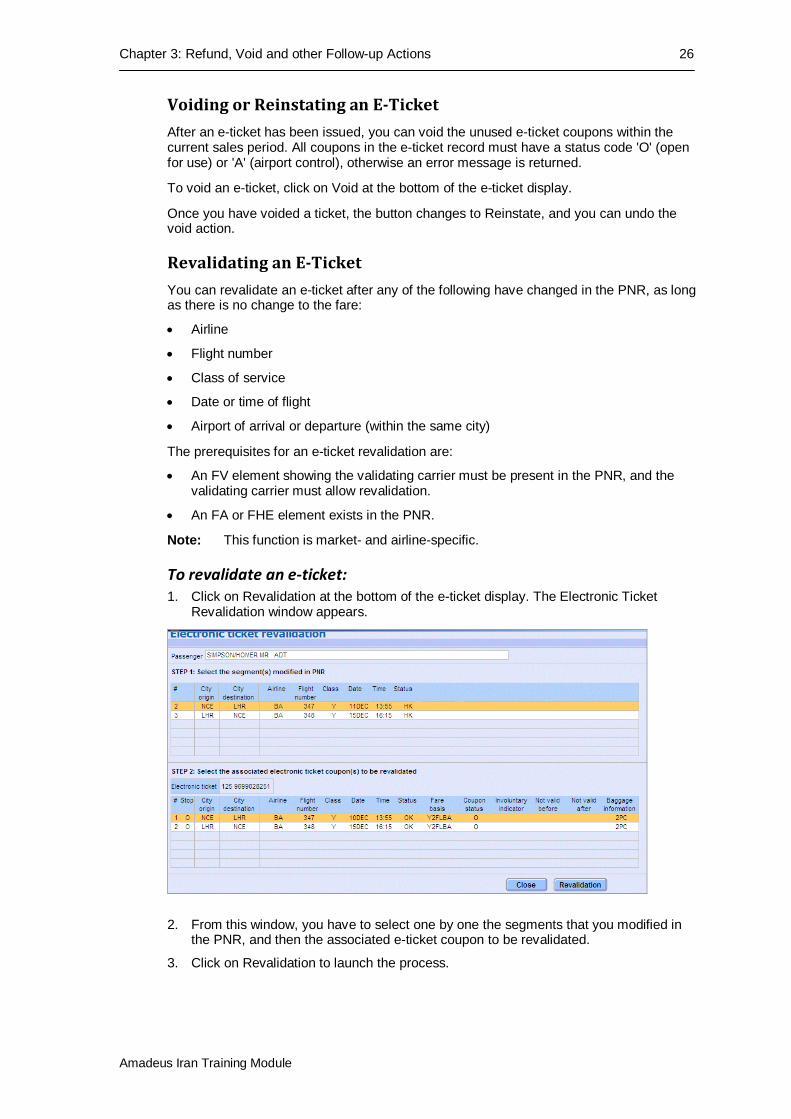
To revalidate an e-ticket: 1. Click on Revalidation at the bottom of the e-ticket display. The Electronic Ticket
Revalidation window appears.
2. From this window, you have to select one by one the segments that you modified in the PNR, and then the associated e-ticket coupon to be revalidated.
3. Click on Revalidation to launch the process.
27 Chapter 3: Refund, Void and other Follow-up Actions
Amadeus Iran Training Module
Exchanging/Reissuing an E-Ticket You can exchange an e-ticket if you have made modifications to air segments in the PNR that lead to a change in the fare, for example if you changed the class, the airport or the passenger name.
In this case, the original payment is taken into account as a partial payment (the original FA element is converted into an FO element), and a new FA element is created for the remaining amount.
The prerequisites for an e-ticket exchange are:
• The PNR has been repriced and a new TST has been created after a Rebook.
• An FV element showing the validating carrier is present in the PNR, and the validating carrier allows revalidation.
• An FA or FHE element exists in the PNR.
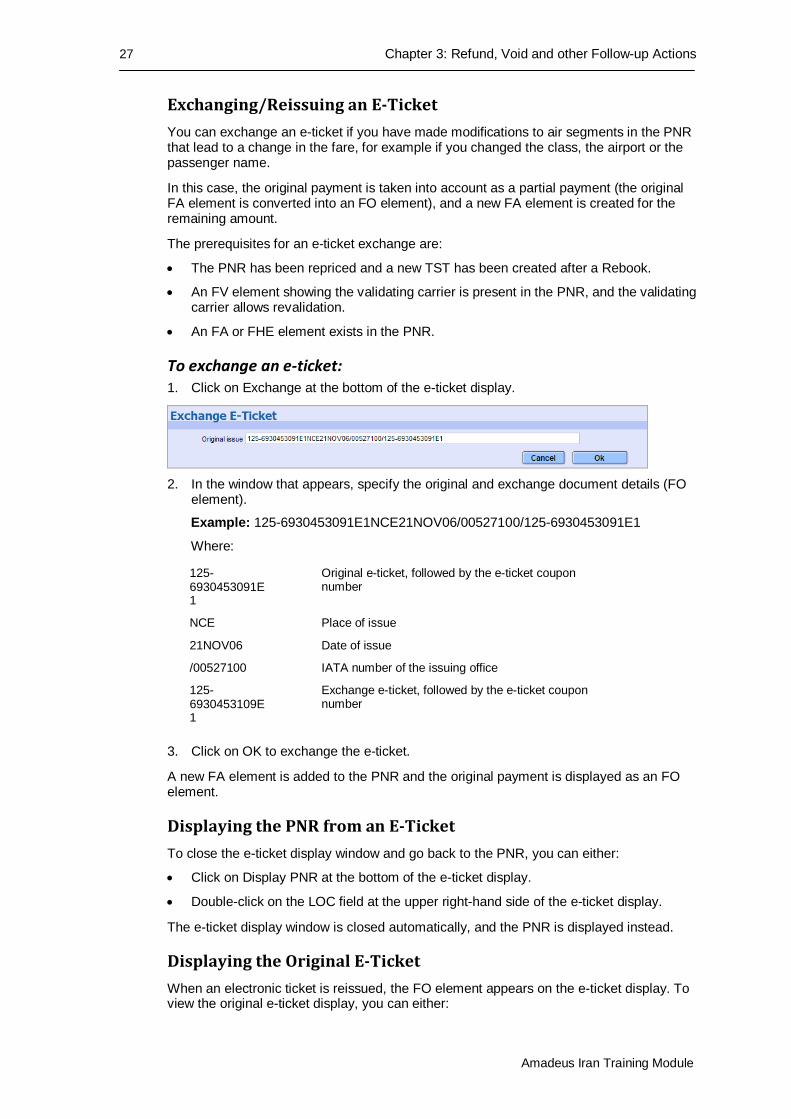
To exchange an e-ticket: 1. Click on Exchange at the bottom of the e-ticket display.
2. In the window that appears, specify the original and exchange document details (FO
element).
Example: 125-6930453091E1NCE21NOV06/00527100/125-6930453091E1
Where:
125-6930453091E1
Original e-ticket, followed by the e-ticket coupon number
NCE Place of issue
21NOV06 Date of issue
/00527100 IATA number of the issuing office
125-6930453109E1
Exchange e-ticket, followed by the e-ticket coupon number
3. Click on OK to exchange the e-ticket.
A new FA element is added to the PNR and the original payment is displayed as an FO element.
Displaying the PNR from an E-Ticket To close the e-ticket display window and go back to the PNR, you can either:
• Click on Display PNR at the bottom of the e-ticket display.
• Double-click on the LOC field at the upper right-hand side of the e-ticket display.
The e-ticket display window is closed automatically, and the PNR is displayed instead.
Displaying the Original E-Ticket When an electronic ticket is reissued, the FO element appears on the e-ticket display. To view the original e-ticket display, you can either:
Chapter 3: Refund, Void and other Follow-up Actions 28
Amadeus Iran Training Module
• Click on Display Origin E-TKT at the bottom of the e-ticket display.
• Double-click on the Form of Origin field on the e-ticket display.
The e-ticket display window is closed automatically, and the old e-ticket display is opened instead.
Copying or Printing the E-Ticket Display
Click on to print the current e-ticket display.
Click on to copy the e-ticket display to the clipboard. You can then paste it into a Word document or an e-mail.
