amicus mobile guide - amicus attorney
TRANSCRIPT

Amicus Mobile Guide © 2013 Gavel & Gown Software Inc. 1
Amicus Mobile Guide
Applies to:
Amicus Mobile
Contents
About Amicus Mobile .......................................................................................................................................................... 2 What you need ........................................................................................................................................................ 2 How it works ............................................................................................................................................................ 3
For Administrators - Installation and configuration ............................................................................................................. 4 Configuring Firm Settings for BlackBerry devices ................................................................................................... 4 Licensing Amicus Mobile users ............................................................................................................................... 4
For Users - Installation and configuration ........................................................................................................................... 5 Windows Mobile: Installing Amicus Mobile on your device ..................................................................................... 5 BlackBerry: Installing Amicus Mobile on your device .............................................................................................. 7 Marking your Files for use in Amicus Mobile ........................................................................................................... 8 Preferences/Settings ............................................................................................................................................... 9 Initializing Amicus Mobile ...................................................................................................................................... 10 Windows Mobile: Uninstalling Amicus Mobile ....................................................................................................... 11 BlackBerry: Uninstalling Amicus Mobile ................................................................................................................ 11 Windows Mobile: Installing Amicus Mobile on a reset or replacement device ...................................................... 11
Using Amicus Mobile ........................................................................................................................................................ 12 Logging In .............................................................................................................................................................. 12 Get Started ............................................................................................................................................................ 12 Edit Settings .......................................................................................................................................................... 13 Edit my Phone Exclusion List ................................................................................................................................ 13 Exchange with Amicus Attorney ............................................................................................................................ 14 Using Outlook Synchronization ............................................................................................................................. 15 Download full text of a field.................................................................................................................................... 15 Use the Timer (on a Windows Mobile device) ....................................................................................................... 15 Add or Remove a File on an item .......................................................................................................................... 16 Add or Remove a Contact on an item ................................................................................................................... 16 View Files .............................................................................................................................................................. 16 Work with a File ..................................................................................................................................................... 16 View or add Contacts on a File ............................................................................................................................. 17 View Firm Members on a File ................................................................................................................................ 17 E-mail a Person on a File ...................................................................................................................................... 17 Call a Person on a File .......................................................................................................................................... 18 Add an Appointment on a File ............................................................................................................................... 18 Add a Task on a File ............................................................................................................................................. 18 Add a Time Entry on a File .................................................................................................................................... 18 Add a Note on a File .............................................................................................................................................. 19 View Time Entries.................................................................................................................................................. 19 Add a Time Entry ................................................................................................................................................... 19 View Notes ............................................................................................................................................................ 19 Add a Note ............................................................................................................................................................ 20 Send a Sticky ........................................................................................................................................................ 20 Receive a Sticky .................................................................................................................................................... 20 Work in the Call Center ......................................................................................................................................... 21 Add a Call .............................................................................................................................................................. 21
Amicus Mobile Guide © 2013 Gavel & Gown Software Inc. 2
Work with a Call .................................................................................................................................................... 21 Work with a Phone Message ................................................................................................................................. 22
Appendix A: Installing IIS .................................................................................................................................................. 23 Appendix B: Determining your IP address ........................................................................................................................ 24 Appendix C: Troubleshooting ............................................................................................................................................ 25
Other Issues .......................................................................................................................................................... 26
About Amicus Mobile
Amicus Mobile is an add-on product for Amicus Attorney Premium Edition users seeking real-time
connectivity on their handheld device to their Amicus Files, Contacts, Notes and Stickies, Phone
Calls, Messages, unposted Time Entries, and more. It allows Amicus users to stay connected when
away from the office. You can do time entries, make notes or add appointments on a file, record
phone calls and even send stickies to colleagues. And it works both ways. If your assistant takes a
phone message for you, the message appears in the Call Center on the mobile device. You can even
continue working offline when out of range and unable to connect. Amicus Mobile uses the calendar,
tasks, contact manager, and e-mail built into the device to complement the workflow. This
information is shared with Amicus Attorney through integration with Outlook.
Amicus Mobile runs on Pocket PC or Smartphone devices with Windows Mobile, and on BlackBerry
devices. Amicus Mobile requires separate installation, configuration, and licensing.
What you need
To install and run Amicus Mobile, various components are required. Devices require Windows
Mobile 5 or 6, or BlackBerry Software Version 4.2 or higher. For full requirements, including those
for the Amicus Mobile Server, see the Amicus Mobile Hardware & Software Requirements, available
from the Support > Technical Resource Guides section of our website.
Corresponding versions of Amicus Attorney and Amicus Mobile are required.
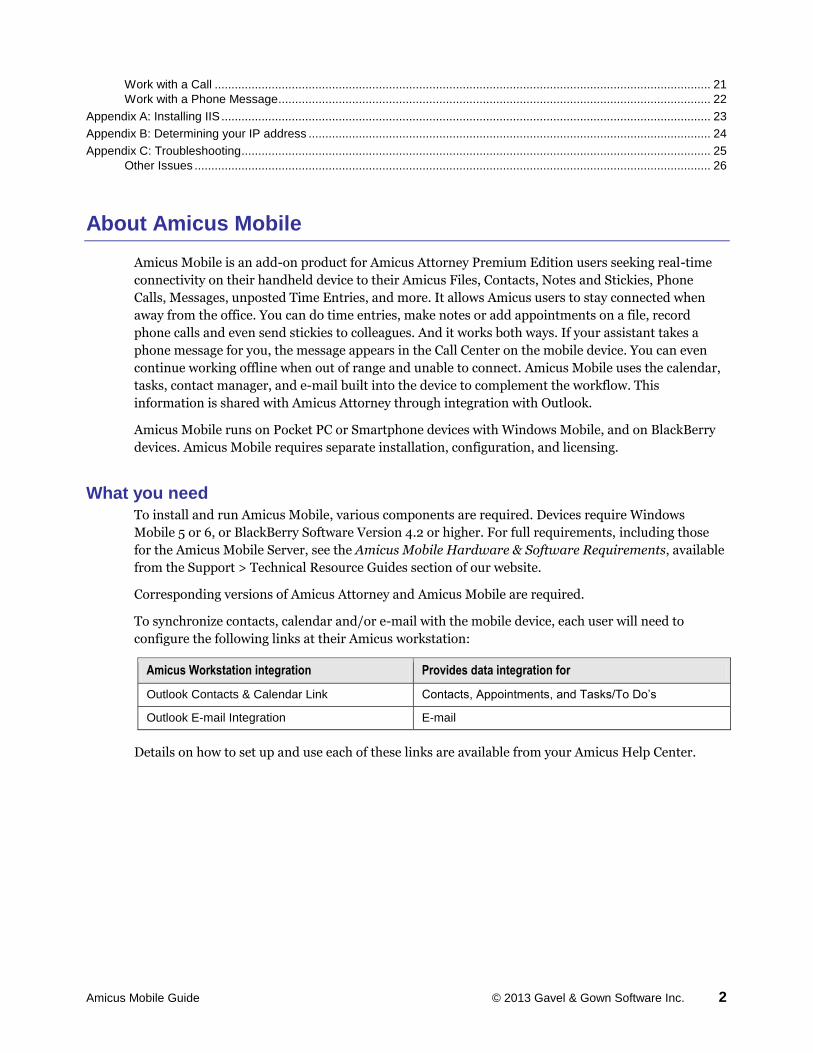
To synchronize contacts, calendar and/or e-mail with the mobile device, each user will need to
configure the following links at their Amicus workstation:
Amicus Workstation integration Provides data integration for
Outlook Contacts & Calendar Link Contacts, Appointments, and Tasks/To Do’s
Outlook E-mail Integration E-mail
Details on how to set up and use each of these links are available from your Amicus Help Center.
Amicus Mobile Guide © 2013 Gavel & Gown Software Inc. 3
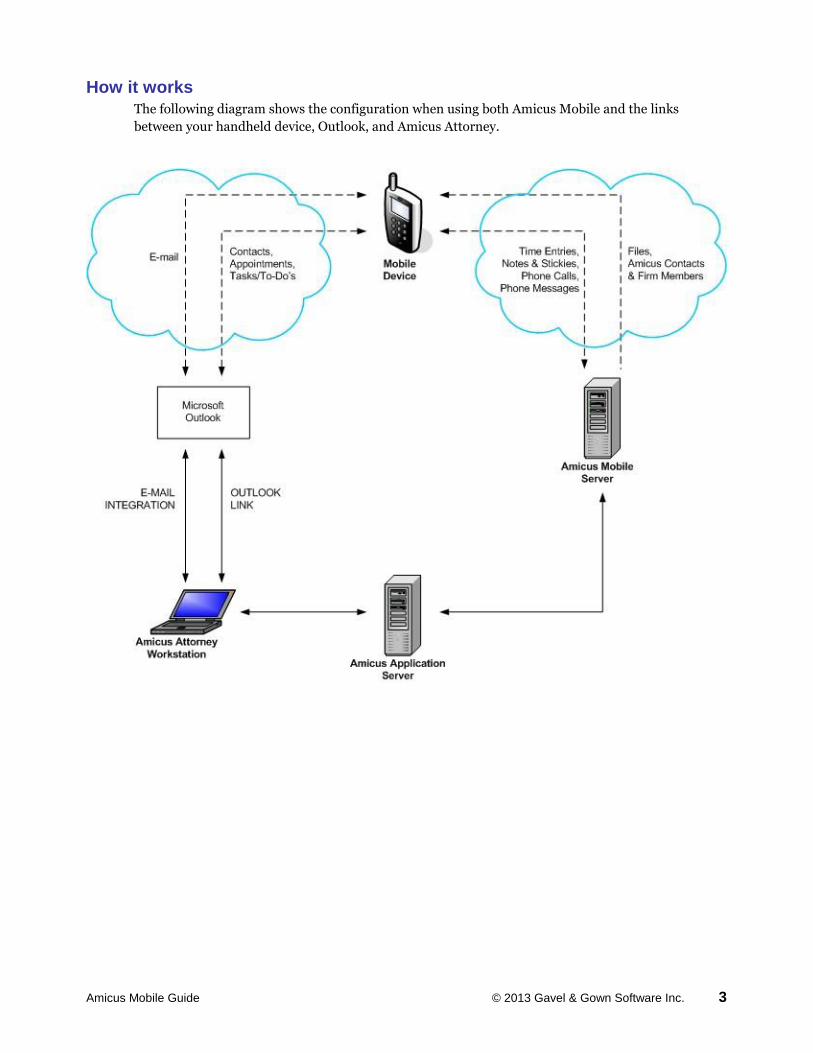
How it works
The following diagram shows the configuration when using both Amicus Mobile and the links
between your handheld device, Outlook, and Amicus Attorney.
Amicus Mobile Guide © 2013 Gavel & Gown Software Inc. 4
For Administrators - Installation and configuration
Implementing Amicus Mobile is a multi-step process. The Amicus Mobile Install Guide provides
important information about each of the following:
Web server readiness
Installing Amicus Mobile Server
Licensing Amicus Mobile users
The Web server is the computer on which you install Amicus Mobile Server.
Microsoft Internet Information Services (IIS) 5 or higher must first be installed and configured
on the Web server. For details on installing IIS, see Appendix A of this Guide.
The Web server must have a publicly accessible, static IP address and/or a registered Web
domain name, and provide an Internet connection bandwidth sufficient for the number of users
(DSL equivalent). If you are not sure what the IP address is, see Appendix B of this Guide.
Configuring Firm Settings for BlackBerry devices
If you wish to support BlackBerry devices, log in to Amicus Attorney and configure Firm Settings as
follows.
In General - Firm Basics, enter the Web server’s Address as follows:
http://ServerIPAddress:PortNumber or http://ServerDomainName:PortNumber
(where :PortNumber is required only if the Web server is not set to use TCP default port 80)
Ensure that the General - Notifications settings have been configured for the firm. The E-mail
Notifications function is used to send BlackBerry users their Amicus Mobile installation link.
Licensing Amicus Mobile users
For purposes of licensing, Amicus Mobile licenses are integrated into your Amicus Firm Licensing
File. To use Amicus Mobile, a user requires both an Amicus Attorney license and an Amicus Mobile
license. You can purchase a number of Amicus Mobile licenses up to or equal to the number of Firm
Member licenses.
1 If you have not obtained a new Firm Licensing File since purchasing Amicus Mobile licenses, you
must send a License Request e-mail. For details, see the ―Managing Users > Licensing users‖
topic in the Administrator Help, available from the Help Center in Amicus Attorney.
2 In Amicus Attorney, apply your provided Firm Licensing File which includes Amicus Mobile
licenses.
3 In User Management, assign an Amicus Mobile licenses to each appropriate Firm Member by
selecting their Mobile checkbox.
Amicus Mobile Guide © 2013 Gavel & Gown Software Inc. 5
For Users - Installation and configuration
Implementing Amicus Mobile requires each user to perform the following procedures:
Installing Amicus Mobile on your handheld device
Marking your Files for use in Amicus Mobile
Configuring and initializing Amicus Mobile on your device
Windows Mobile: Installing Amicus Mobile on your device
1 Cradle the mobile device at your Amicus Attorney Workstation and ensure that it is connected
(via ActiveSync or Windows Mobile Device Center).
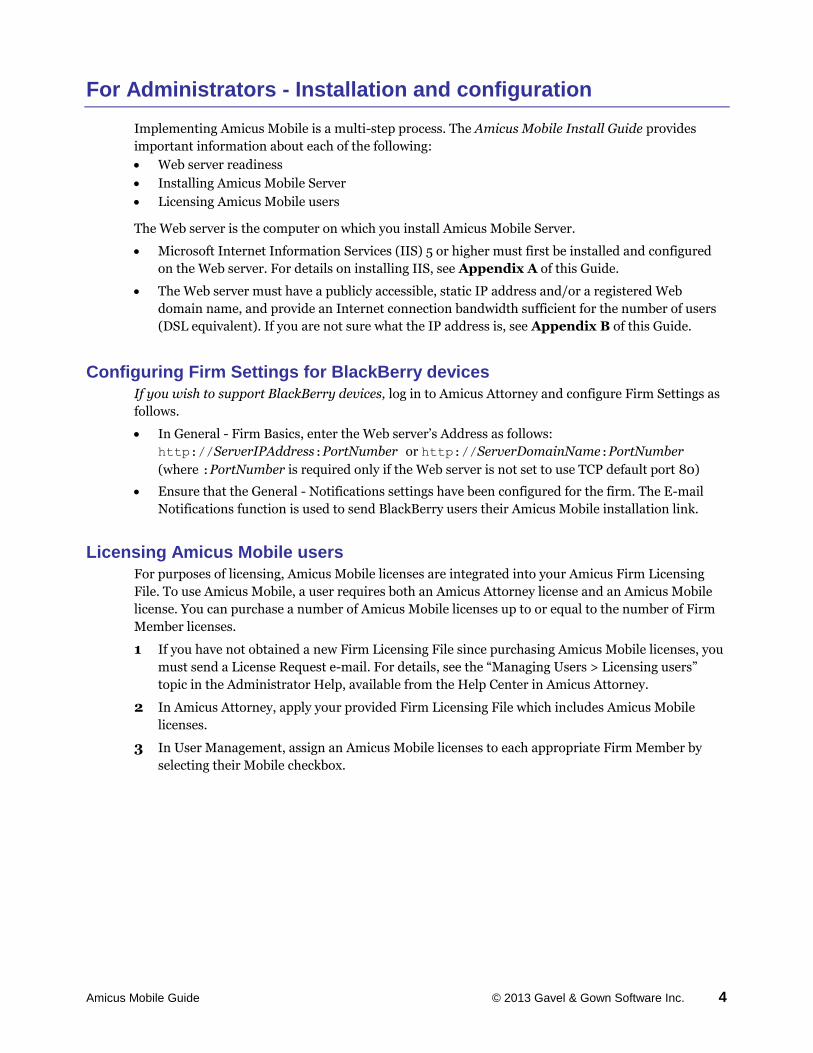
2 Log in to Amicus Attorney and go to Office > Preferences > My Application – My Amicus Mobile.
3 Select the Windows Mobile option and then click the Device Pre-Install Check button. You
might b e prompted to install Microsoft .NET Compact Framework 2.0 on the device.
4 After a successful check, click Install Now.
5 Click ―I agree‖ to the License Agreement and the follow the onscreen instructions.
6 When finished, click Close.
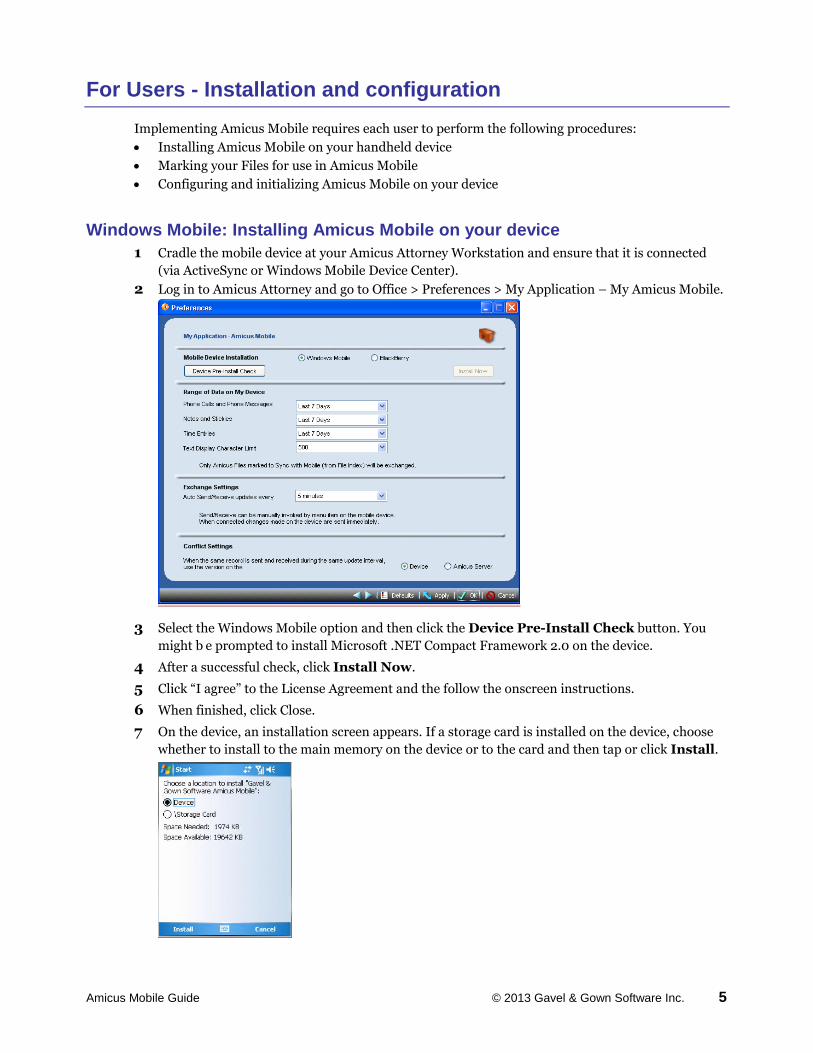
7 On the device, an installation screen appears. If a storage card is installed on the device, choose
whether to install to the main memory on the device or to the card and then tap or click Install.
Amicus Mobile Guide © 2013 Gavel & Gown Software Inc. 6
8 Tap or click OK to close the message stating that Amicus Mobile has been successfully installed.
9 Uncradle your device from the Workstation.
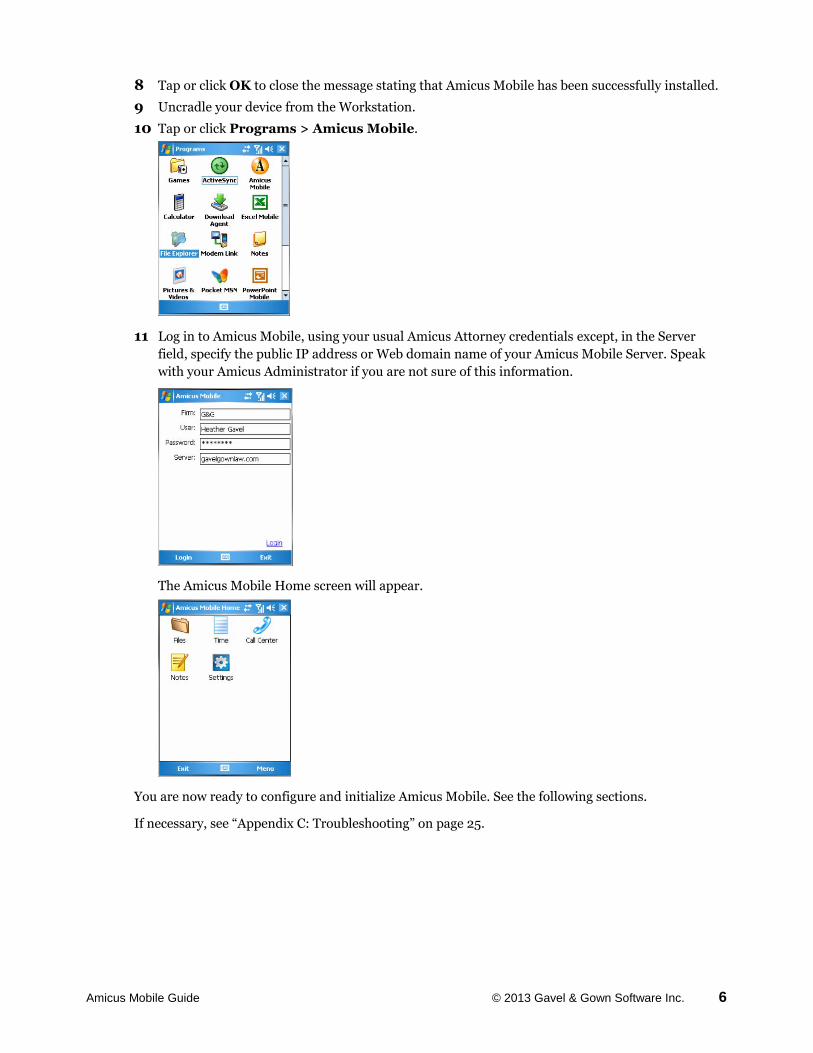
10 Tap or click Programs > Amicus Mobile.
11 Log in to Amicus Mobile, using your usual Amicus Attorney credentials except, in the Server
field, specify the public IP address or Web domain name of your Amicus Mobile Server. Speak
with your Amicus Administrator if you are not sure of this information.
The Amicus Mobile Home screen will appear.
You are now ready to configure and initialize Amicus Mobile. See the following sections.
If necessary, see ―Appendix C: Troubleshooting‖ on page 25.
Amicus Mobile Guide © 2013 Gavel & Gown Software Inc. 7
BlackBerry: Installing Amicus Mobile on your device
1 Log in to Amicus Attorney and ensure that you have a Primary E-mail Address defined in your
Profile in Amicus.
TIP: If you added or changed your Primary E-mail Address in the current Amicus session, log out
of Amicus and back in before proceeding.
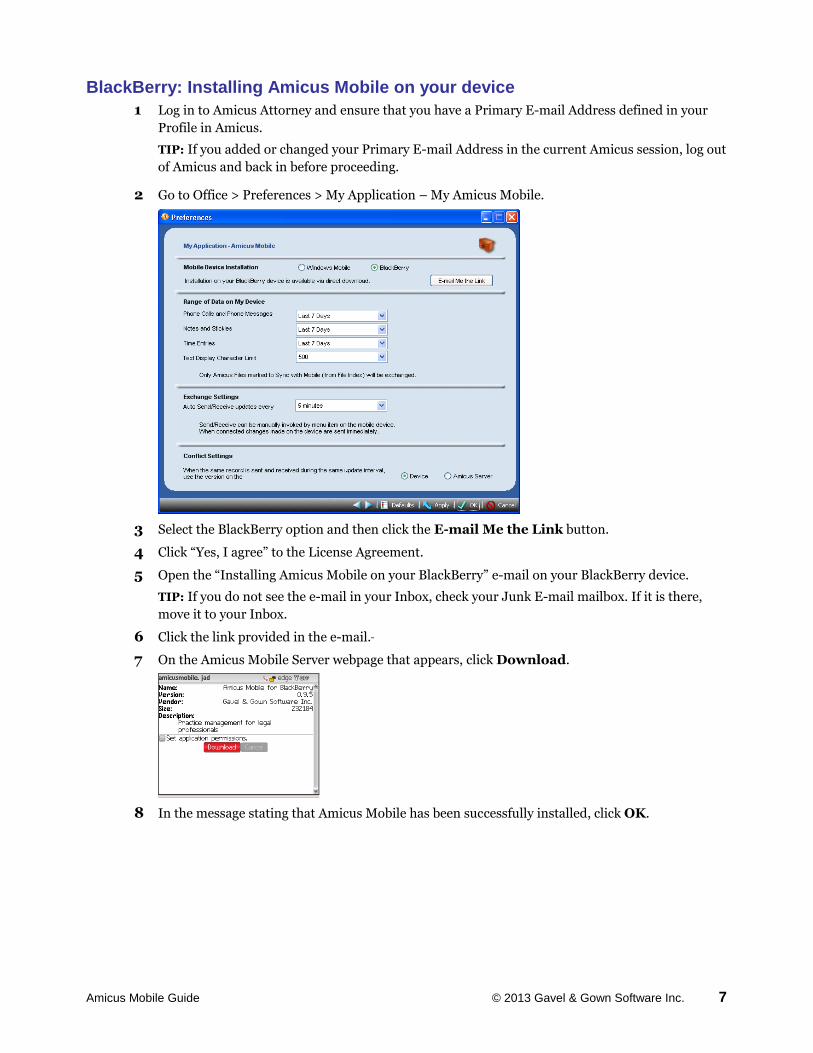
2 Go to Office > Preferences > My Application – My Amicus Mobile.
3 Select the BlackBerry option and then click the E-mail Me the Link button.
4 Click ―Yes, I agree‖ to the License Agreement.
5 Open the ―Installing Amicus Mobile on your BlackBerry‖ e-mail on your BlackBerry device.
TIP: If you do not see the e-mail in your Inbox, check your Junk E-mail mailbox. If it is there,
move it to your Inbox.
6 Click the link provided in the e-mail.
7 On the Amicus Mobile Server webpage that appears, click Download.
8 In the message stating that Amicus Mobile has been successfully installed, click OK.

Amicus Mobile Guide © 2013 Gavel & Gown Software Inc. 8
9 Click Applications > Amicus Mobile.
10 Log in to Amicus Mobile, using your usual Amicus Attorney credentials except, in the Server
field, specify the public IP address or Web domain name of your Amicus Mobile Server. Speak
with your Amicus Administrator if you are not sure of this information.
The Amicus Mobile Home screen will appear.
You are now ready to configure and initialize Amicus Mobile. See the following sections.
If necessary, see ―Appendix C: Troubleshooting‖ on page 25.
Marking your Files for use in Amicus Mobile
Before initializing, you should select the Files you wish to include on your device. Once you have been
licensed as an Amicus Mobile user, Amicus Attorney provides a way for you to do this.
In Amicus Attorney, go to the Files Index and select the Mobile checkbox for each File you want made
available for use in Amicus Mobile. This controls which ones are available to you; it does not affect
which ones are available to other Firm Members.
TIPS:
To mark or unmark several Files at once, select them in the Files list and, from the Actions menu,
choose ―Synchronize with Mobile‖ or ―Remove from Mobile‖, as appropriate.
To work with a long list of marked Files, you might find it convenient to use a sublist of only
those items. In the Files Index, right-click the column header and choose Show Group By. Then
drag the Mobile heading to the indicated position.
If you cannot select or clear the Mobile checkbox for a File, it may because it is a File that you have
been restricted from editing.
Amicus Mobile Guide © 2013 Gavel & Gown Software Inc. 9
Preferences/Settings
Some preference settings determine the amount of data synchronized and displayed on your device.
Selecting a shorter range or amount of data will save space, reduce long lists, and enable faster
synchronization. In subsequent synchronizations, items outside of the range will be automatically
removed from the device. Amicus Mobile preferences/settings may be set from either Amicus
Attorney or Amicus Mobile. (Not all options are available for setting in Amicus Attorney.)
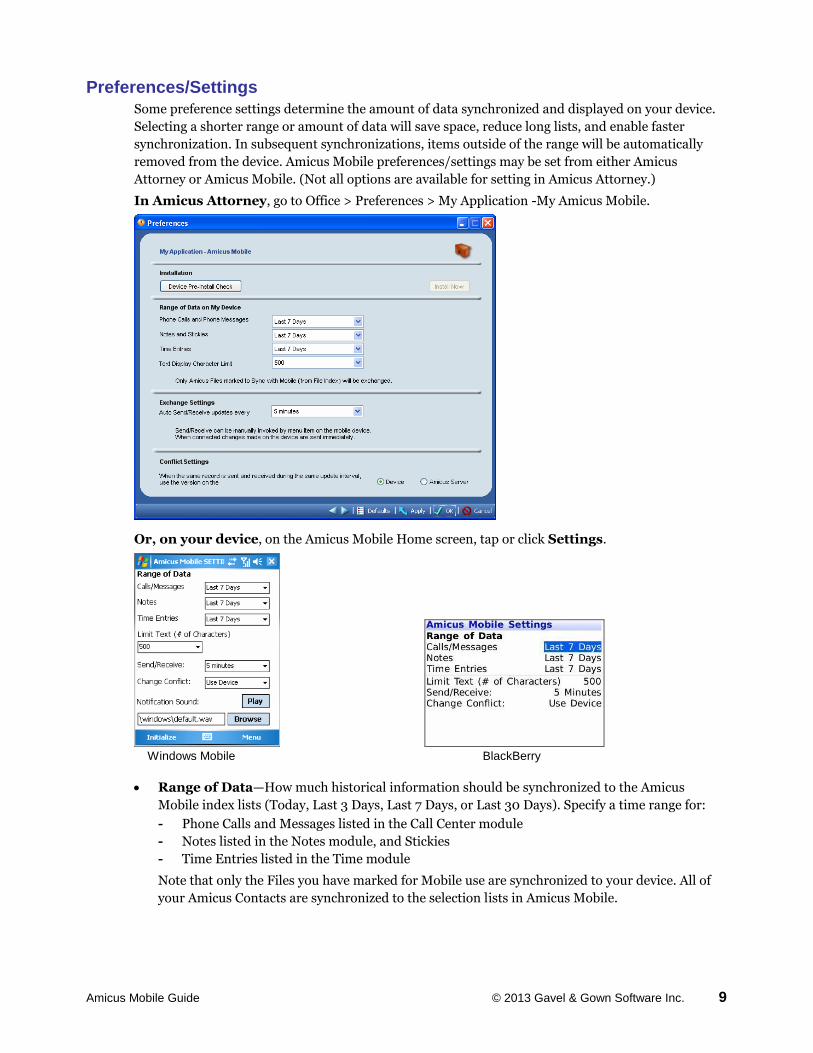
In Amicus Attorney, go to Office > Preferences > My Application -My Amicus Mobile.
Or, on your device, on the Amicus Mobile Home screen, tap or click Settings.
Windows Mobile BlackBerry
Range of Data—How much historical information should be synchronized to the Amicus
Mobile index lists (Today, Last 3 Days, Last 7 Days, or Last 30 Days). Specify a time range for:
- Phone Calls and Messages listed in the Call Center module
- Notes listed in the Notes module, and Stickies
- Time Entries listed in the Time module
Note that only the Files you have marked for Mobile use are synchronized to your device. All of
your Amicus Contacts are synchronized to the selection lists in Amicus Mobile.
Amicus Mobile Guide © 2013 Gavel & Gown Software Inc. 10
Maximum length of multi-line text fields synchronized to Amicus Mobile (500, 1000,
2000, 5000 characters, or Do Not Limit).
If only partial contents of a text field are shown on the device based on this preference, you may
nevertheless click a command to get the field’s full contents. (You cannot edit a partial text field
in Amicus Mobile until its full contents have been loaded.)
This setting does not affect the length of new text you enter on your device.
Data refresh frequency (every 2 minutes, 5 minutes, 15 minutes, 30 minutes, or Never). To
save service provider data plan costs and battery reserves, select a longer period or Never and
then tap or click Menu > Send/Receive in Amicus Mobile on the device only when desired. Note
that while connected, changes made on the device are sent immediately.
Conflict resolution priority—When synchronizing a record that has been changed in both
Amicus Mobile and Amicus Attorney (Firm Database), indicate which version should be kept.
Notification sound (WINDOWS MOBILE ONLY)—Sound played on device whenever a Sticky note
or Phone Message arrives. This option is only available on the device.
Phone Exclusions
Amicus Mobile will prompt you to create a Phone Call record upon inbound and outbound calls on
your device. At the time of a call, you will be given the opportunity to exclude this prompt from
occurring for that phone number. You can also manage this exclusion list from Settings on the device.
Tap or click Menu > Phone Exclusion List. You can add items by selecting individual Amicus
Contacts—their Primary Phone number is added to the list. To remove an item, select it and tap or
click Remove. (This setting is only available on the device.)
Initializing Amicus Mobile
1 In the Files index in Amicus Attorney, ensure that you have marked those Files you want made
available for use in Amicus Mobile.
2 On your device, on the Amicus Mobile Home screen, tap or click Settings.
3 Ensure that the settings/preferences are set appropriately. These determine the amount of data
synchronized and displayed on your device. For details, see ―Preferences/Settings‖ on page 9.
4 Tap or click Initialize (or Menu > Initialize). This process might take several minutes,
depending on your settings and database size.
Initializing on a BlackBerry device: During the initialization process, you might not be able to
pick up incoming calls or make outgoing calls.
You are now ready to use Amicus Mobile. For detailed instructions, see ―Using Amicus Mobile‖ on
page 12.
Amicus Mobile Guide © 2013 Gavel & Gown Software Inc. 11
Windows Mobile: Uninstalling Amicus Mobile
You may wish to uninstall Amicus Mobile from your Windows Mobile device and your workstation.
Removing the application from the device:
1 Ensure that you have exited Amicus Mobile.
2 Tap or click Start > Settings > System > Remove Programs.
3 Select ―Gavel & Gown Software Amicus Mobile‖ in the list and tap or click Remove.
4 In the ―The selected program will be permanently removed‖ message, tap or click Yes.
5 If a message appears, saying that Amicus Mobile was not completely removed and ―Do you want
to remove it from the list‖, tap or click No. This might occur if you did not first exit Amicus
Mobile—return to step 1.
To save space, you may also remove the Amicus Mobile data and log files from your device:
1 On the device, tap or click Start > Programs > File Explorer and navigate to My Device (or
Storage Card) > Application Data.
2 Select the Amicus folder and tap or click Menu > Delete.
Removing the application from the workstation:
In Windows Add/Remove Programs (or Programs and Features), select ―Amicus Mobile‖ in the
list and click Remove.
BlackBerry: Uninstalling Amicus Mobile
You may wish to uninstall Amicus Mobile from your BlackBerry device. Perform the following steps
on the BlackBerry:
1 Ensure that you have exited Amicus Mobile.
2 Click Applications > Options > Advanced Options > Applications.
3 Select ―Amicus Mobile for BlackBerry‖ in the list and click Menu > Delete.
Windows Mobile: Installing Amicus Mobile on a reset or replacement device
If you have performed a hard reset on your device, or have a new, replacement device, you can install
Amicus Mobile quickly as follows:
1 Cradle the mobile device at your Amicus Attorney Workstation and ensure that it is connected
(via ActiveSync or Windows Mobile Device Center).
2 In Microsoft ActiveSync, choose Tools > Add/Remove Programs.
Or, in Windows Mobile Device Center, choose Programs and Services > More > Add/Remove
Programs.
3 Select the checkboxes next to ―Gavel & Gown Software Amicus Mobile‖ and (if not grayed out)
―Microsoft .NET CF 2.0‖, and click OK.
After installation, log in to Amicus Mobile on the device and Initialize.
Amicus Mobile Guide © 2013 Gavel & Gown Software Inc. 12
Using Amicus Mobile
The following topics describe how to use Amicus Mobile on your handheld device.
Basic functions
These instructions use Windows Mobile terminology to describe selecting items and opening menus. The
actions on BlackBerry devices might be slightly different.
Selecting an item:
- WINDOWS MOBILE: Tap or click the item.
- BLACKBERRY: Click the item, or select it and then either click the trackwheel or trackball or click Enter.
Opening a menu:
- WINDOWS MOBILE: Tap or click Menu.
- BLACKBERRY: Click the Menu key or the trackball.
Logging In
1 Tap or click Programs/Applications > Amicus Mobile.
1 In the Firm ID, User ID, and Password fields, enter your usual Amicus Attorney credentials.
2 In the Server field, enter the public IP address or Web domain name of your Amicus Mobile Server,
provided to you by your Amicus Administrator.
3 Tap or click Login.
IMPORTANT: Before opening another user’s Office in Amicus Attorney, exit Amicus Mobile.
WINDOWS MOBILE Tips:
If the device is currently cradled at a workstation, you might instead need to enter your network’s computer
name for the Amicus Mobile Server in the Server field. (See Appendix C on page 25.)
Amicus Mobile remembers all your Server names that have provided successful logins. It provides them for
selection from a drop-down or fly-out list in the Server field. If you wish to enter a new Server name:
- On a Pocket PC device, simply enter the name in the Server field.
- On a Smartphone device, select Add in the fly-out list and then enter the name.
If desired, you can clear the Server name list. Go to Settings and tap or click Menu > Clear Server List.
Only the current name will be left.
When a device returns from standby mode, its Internet connection might not reactivate automatically,
preventing a successful login to Amicus Mobile. If this occurs, reactivate the connection by opening the
Web browser on the device and navigating to the Internet. (You may now close the Web browser.) Then
log in to Amicus Mobile.
Get Started Before using Amicus Mobile, we recommend you first initialize your data.
1 On the Home screen, tap or click Settings.
2 Ensure the options are set appropriately. These determine the amount of data synchronized and displayed
on your device.
3 Tap or click Initialize (or Menu > Initialize). This process might take several minutes, depending on your
settings and database size.
See also:
“Edit Settings” on page 13
Amicus Mobile Guide © 2013 Gavel & Gown Software Inc. 13
Edit Settings
1 On the Home screen, tap or click Settings.
2 Edit the settings as desired:
Range of Data to synchronize.
Maximum length of multi-line text fields.
Data refresh frequency. Note that when connected, changes made on the device are sent
immediately.
Conflict resolution priority.
WINDOWS MOBILE: Sound played on device when a Sticky note or Phone Message arrives.
3 To edit the list of Contacts for whom you will not be prompted to create Call records, tap or click Menu >
Phone Exclusion List.
4 BLACKBERRY: To update your Billing Categories, Billing Rates and Values, and Activity Codes on the
device, you can click Menu > Billing Rates/Codes. This is quicker than performing a full Initialize.
Tips:
The range of data or maximum length of text field options might affect performance and service provider
data plan charges. After changing these setting, we recommend that you Initialize again.
BLACKBERRY: To see the Amicus Mobile version number, click Menu > About.
BLACKBERRY: Notification sound and actions on the device when a Sticky note or Phone Message arrives
are controlled by the BlackBerry’s Profiles application. To access its settings, click Applications >
Profiles, click Advanced, click the active Profile in the list, and then click Amicus Mobile in the list.
See also:
“Edit my Phone Exclusion List” on page 13
Edit my Phone Exclusion List Amicus Mobile prompts you to create a Phone Call record upon inbound and outbound calls. At that time, you
are given the opportunity to add that number to your Phone Exclusion list, to prevent any future prompts for that
particular number. You may edit the list as follows:
1 On the Home screen, tap or click Settings.
2 Tap or click Menu > Phone Exclusion List.
3 The list shows the phone numbers for which a call record prompt will not appear.
4 To add an Amicus Contact’s primary phone number, tap or click Menu > Add. In the Select list, select a
Contact and tap or click Select. To jump directly to a particular Contact in the Select list, type the
beginning of their name in the field above the list.
5 To remove a number, select it in the list and tap or click Menu > Remove.
Amicus Mobile Guide © 2013 Gavel & Gown Software Inc. 14
Exchange with Amicus Attorney Amicus Mobile manages the synchronization of your Amicus Files, Notes, Stickies, Phone Calls, Messages,
unposted Time Entries, as well as your Contact lists for assignment on other Amicus records. Calendar items,
Contact details and E-mail are synchronized through Outlook (see below).
While connected:
Changes made in Amicus Mobile are sent immediately.
Changes made in Amicus Attorney are received automatically based on your data refresh frequency
Setting.
To exchange data manually when desired, tap or click Menu > Send/Receive from any module screen
(Files, Notes, etc.) in Amicus Mobile.
While not connected:
Data is not exchanged. You can work with local data, provided you have initialized Amicus Mobile. Your
changes will be queued for sending when you next connect. Items that have not yet been sent are marked
in Amicus Mobile lists by an icon (red in Windows Mobile and blue in BlackBerry).
Tips:
To avoid roaming charges while travelling, set your Data Refresh Frequency setting to Never. You may
manually Send/Receive updates when and if required.
To keep lists up-to-date in Amicus Mobile, we recommend that you click Settings and then Initialize
occasionally. These lists include your Billing Rates, Activity Codes, etc.
BLACKBERRY: To update your Billing Categories, Billing Rates and Values, and Activity Codes on the
device, you can click Settings and then Menu > Billing Rates/Codes. This process is quicker than a full
Initialize.
WINDOWS MOBILE: When a device returns from standby mode, its Internet connection might not reactivate
automatically, preventing any exchanges with Amicus Attorney. To reactivate the connection, open the
Web browser on the device and navigate to the Internet. (You may close the Web browser afterward.)
See also:
“Using Outlook Synchronization” on page 15
Amicus Mobile Guide © 2013 Gavel & Gown Software Inc. 15
Using Outlook Synchronization Amicus Mobile uses the Calendar, Contact details, and E-mail built into your device. This information is shared
with Amicus Attorney through the Outlook link and integration. Your device has an Outlook Mobile application
(or equivalent), which handles the exchange of information with your Outlook, and then Outlook and Amicus
Attorney in turn synchronize, all invisibly to you.
WINDOWS MOBILE: Outlook synchronization with your device can take place either:
Directly when connected with your workstation (cradled); or
You can sync Outlook Mobile on most Windows Mobile phones over-the-air, but note that:
- Over-the-air synchronization of Outlook Mobile data requires Microsoft Exchange 2003 or 2007 Server
properly configured for this purpose.
- Outlook Mobile synchronization features and functionality vary by device and service provider, and
may be subject to network limitations. See your device manufacturer, service provider, and/or system
administrator for details.
BLACKBERRY: The features and functionality of BlackBerry synchronization with Outlook vary by device and
service provider, and may be subject to network limitations. See your device manufacturer, service provider,
and/or system administrator for details.
Tips:
If you are set up for over-the-air synchronization of Outlook with your device, Amicus Attorney should
remain open on your workstation to ensure that everything in Amicus stays up-to-date. Otherwise new or
updated appointments, tasks, and contacts entered through your device will not appear in Amicus Attorney
until you next log in to Amicus Attorney at your workstation. Ensure that the workstation is set to never
hibernate or sleep—do this from Control Panel > Power Options.
For best results, we recommend that you configure the device, the Outlook Link, and the Exchange Server
to work in complementary fashion. Ensure that the same types of information (Contacts, Tasks, and/or
Appointments) are synchronized between your device and Outlook as between Amicus Attorney and
Outlook. Similarly, set comparable exchange intervals (e.g. not 5 minutes for one and 2 hours for another)
because only the longest interval will determine the frequency of complete exchanges.
See also:
“Exchange with Amicus Attorney” on page 14
Download full text of a field If the text of a field is grayed out and truncated, tap or click Menu > Download Text to get its full contents. You
may edit a field only if its full contents are loaded. This affects your Notes, received Stickies, and Phone Calls
and Messages.
Tips:
One of your Settings controls the maximum amount of text automatically received.
See also:
“Edit Settings” on page 13
Use the Timer (on a Windows Mobile device) The Timer starts automatically whenever you make or receive a phone call. You may also start and stop the
timer in a Call or Time Entry:
To start the Timer, tap or click Start.
To stop the Timer, tap or click Stop.
You may also directly enter or edit the time in the duration field if desired.
Amicus Mobile Guide © 2013 Gavel & Gown Software Inc. 16
Add or Remove a File on an item You can add and remove File assignments on Notes and Stickies, Time Entries, and Phone Calls and
Messages.
To add a File, tap or click Files. In the Select list, select one and tap or click Select. To jump directly to a
particular File in a Select list, type the beginning of its name in the field above the list.
To remove a File, tap or click any of the assigned Files listed. In the Remove list, select one and tap or
click Remove.
Add or Remove a Contact on an item You can add and remove Contact assignments on Notes and Stickies.
To add a Contact, tap or click Contact. In the Select list, select one and tap or click Select. To jump
directly to a particular Contact in a Select list, type the beginning of their name in the field above the list.
To remove a Contact, tap or click any of the assigned Contacts listed. In the Remove list, select one and
tap or click Remove.
See also:
“View or add Contacts on a File” on page 17
View Files
1 On the Home page, tap or click the Files icon.
2 Your Files marked in Amicus Attorney for Mobile use are listed by Short File Name.
Tips:
To jump directly to a particular File, type the beginning of the Short File Name above the list.
To view the details of a File, select it in the list and tap or click View (or Menu > View).
If you do not see a particular File, be sure it is flagged in Amicus Attorney for Mobile use.
See also:
“Work with a File” on page 16
Work with a File
1 On the Home page, tap or click the Files icon.
2 Your Files marked for Mobile use are listed.
3 Select a File in the list and tap or click View (or Menu > View).
4 The File Edit screen displays the File information. You can:
“View or add Contacts on a File” on page 17
“View Firm Members on a File” on page 17
“E-mail a Person on a File” on page 17
“Call a Person on a File” on page 18
“Add an Appointment on a File” on page 18
“Add a Task on a File” on page 18
“Add a Time Entry on a File” on page 18
“Add a Note on a File” on page 19
See also:
“View Files” on page 16
Amicus Mobile Guide © 2013 Gavel & Gown Software Inc. 17
View or add Contacts on a File
1 On the Home page, tap or click the Files icon.
2 Select a File in the list and tap or click View (or Menu > View).
3 The File Edit screen lists the Contacts on the File.
To expand the list of Contacts, or to add Contacts, tap or click the list.
1 The Contacts on File list shows their Name, Phone, and Role.
2 To add a Contact to the File, tap or click Menu > Add. In the Select list, select a Contact and tap or click
Select. Repeat to assign to more Contacts.
See also:
“E-mail a Person on a File” on page 17
“Call a Person on a File” on page 18
View Firm Members on a File
1 On the Home page, tap or click the Files icon.
2 Select a File in the list and tap or click View (or Menu > View).
3 The File Edit screen lists the Firm Members on the File.
To expand the list of Firm Members, tap or click the list.
1 The Firm Members on File list shows their Name, Phone, and Role.
See also:
“E-mail a Person on a File” on page 17
“Call a Person on a File” on page 18
E-mail a Person on a File
1 On the Home page, tap or click the Files icon.
2 Select a File in the list and tap or click View (or Menu > View).
3 Tap or click the list of Contacts or Firm Members.
4 Select a Contact or Firm Member and tap or click Menu > E-mail.
5 An e-mail screen appears, addressed to the Contact or Firm Member. Enter the text of your message and
then tap or click Send.
Tips:
For integration purposes, choose a messaging account that is configured in Outlook on your Amicus
Attorney Workstation. You must have E-mail Integration enabled in Amicus Attorney.
The e-mail Subject field includes “File”, the Short File Name and your initials within square brackets. Do
not remove this text as it will be used by Amicus Attorney to automatically save the E-mail on the File.

Amicus Mobile Guide © 2013 Gavel & Gown Software Inc. 18
Call a Person on a File
1 On the Home page, tap or click the Files icon.
2 Select a File in the list and tap or click View (or Menu > View).
3 Tap or click the list of Contacts or Firm Members.
4 Select a Contact or Firm Member and tap or click Call. (This command is available only if the Contact or
Firm Member has a stored Phone Number.)
5 You are asked whether to dial the person’s primary phone number. Tap or click Yes to call. When you end
the call, you might be prompted to record the call, that is, add a Call record.
Tips:
If the File has a single Contact assigned, you do not need to expand the Contact list and select them.
Simply tap or click Call on the File Edit screen.
You may create a call record in all cases. After selecting a person in the list, tap or click Menu > Call
Record.
See also:
“Add a Call” on page 21
Add an Appointment on a File
1 On the Home page, tap or click the Files icon.
2 Select a File in the list and tap or click View (or Menu > View).
3 Tap or click Menu > Appointment.
4 The Appointment screen of your native device Calendar appears. Edit the information as desired.
Tips:
The Appointment’s Summary field includes “File” and the Short File Name. Do not remove this text as it will
be used by Amicus Attorney to automatically save the Appointment on the File.
Add a Task on a File
1 On the Home page, tap or click the Files icon.
2 Select a File in the list and tap or click View (or Menu > View).
3 Tap or click Menu > To Do.
4 The Tasks screen of Mobile Calendar appears. Edit the description as desired.
Tips:
The Task’s Notes includes the text “File” and the Short File Name. Do not remove this text as it will be
used by Amicus Attorney to automatically save the To Do on the File.
Add a Time Entry on a File
1 On the Home page, tap or click the Files icon.
2 Select a File in the list and tap or click View (or Menu > View).
3 Tap or click Time Entry.
4 The Time Entry screen appears. Enter information as desired.
Tips:
If you are displaying a particular File, on the Amicus File (Edit) screen, tap or click Edit > Time Entry.
The Time Entry is assigned by default to the File.
See also:
“Add a Time Entry” on page 19
Amicus Mobile Guide © 2013 Gavel & Gown Software Inc. 19
Add a Note on a File
1 On the Home page, tap or click the Files icon.
2 Select a File in the list and tap or click View (or Menu > View).
3 Tap or click Menu > Note.
4 Enter the text of your Note.
5 The Note is assigned by default to the File and its Contacts.
See also:
“Add a Note” on page 20
“Add or Remove a File on an item” on page 16
“Add or Remove a Contact on an item” on page 16
View Time Entries
1 On the Home page, tap or click the Time icon.
2 Your recent unposted Time Entries are listed by date and time, most recent first. The duration, Short File
Name, and description are shown.
3 To see all Time Entries, regardless of date, tap or click Show All.
4 To see Time Entries for a particular date, select a date, or tap or click the arrows to go from one day to the
next.
Tips:
To view the details of a Time Entry, tap or click it in the list. (Or, select it in the list and tap or click Menu >
Edit.)
To delete a Time Entry, select it in the list and tap or click Menu > Delete.
Add a Time Entry
1 On the Home page, tap or click the Time Entry icon.
2 Tap or click New (or Menu > New).
3 The Time Entry screen appears. Enter information as desired.
Tips:
You can also add a Time Entry on a Phone Call or Note.
See also:
“Add a Note on a File” on page 19
“Add or Remove a File on an item” on page 16
“Add or Remove a Contact on an item” on page 16
View Notes
1 On the Home page, tap or click the Notes icon.
2 Your recent unassociated Notes and all today’s Notes are listed by date and time, the most recent first.
Tips:
To view the details of a Note, tap or click it in the list.
To delete a Note, select it in the list and tap or click Menu > Delete.
See also:
“Download full text of a field” on page 15
Amicus Mobile Guide © 2013 Gavel & Gown Software Inc. 20
Add a Note
1 On the Home page, tap or click the Notes icon.
2 Tap or click New (or Menu > New).
3 Enter the text of your Note.
4 To assign the Note to a File or Contact, tap or click Files or Contacts. In the Select list, select one and tap
or click Select. Repeat to assign to more Files or Contacts.
Tips:
Leave the To (Firm Member) field blank unless you want to send the Note as a Sticky.
See also:
“Add a Note on a File” on page 19
“Add or Remove a File on an item” on page 16
“Add or Remove a Contact on an item” on page 16
Send a Sticky
1 On the Home page, tap or click the Notes icon.
2 Tap or click New (or Menu > New).
3 In the To field, select a Firm Member.
4 Enter the text of your Sticky Note.
5 Optionally, to assign the Note to a File or Contact, tap or click Files or Contacts. In the Select list, select
one and tap or click Select. Repeat to assign to more Files or Contacts.
See also:
“Add or Remove a File on an item” on page 16
“Add or Remove a Contact on an item” on page 16
Receive a Sticky When a Sticky arrives, it appears in a full screen. You can:
Tap or click Menu > Delete to remove it.
Tap or click X or Menu > Close to save it as a Note.
Tap or click Reply (or Menu > Reply) to send a Sticky reply to the sender.
Tap or click Menu > Forward to send the Sticky to another Firm Member.
Tips:
If you Close a Sticky, it will appear on your Notes list upon the next data refresh interval, or earlier if you
tap or click Menu > Send/Receive from any module screen (Files, Notes, etc.).
See also:
“Download full text of a field” on page 15
“Add or Remove a File on an item” on page 16
“Add or Remove a Contact on an item” on page 16
Amicus Mobile Guide © 2013 Gavel & Gown Software Inc. 21
Work in the Call Center
1 On the Home page, tap or click the Call Center icon.
2 Your recent outstanding Phone Calls and Messages and all today’s Calls and Messages are listed by date
and time, the most recent first.
3 You can select a Call or Message in the list and tap or click:
Call (or Menu > Call) to call the person back.
Menu > Edit to open its details. Or tap or click it in the list.
Menu > Dealt With to mark it as Dealt With (not outstanding).
Menu > Delete. to delete it.
Menu > Time Entry to add a Time Entry on it.
4 You can also:
Tap or click Menu > New Call to make a call.
See also:
“Add a Call” on page 21
“Work with a Call” on page 21
“Work with a Phone Message” on page 22
“Add a Time Entry” on page 19
Add a Call
1 You might be prompted to add a Call record upon starting or ending an inbound or outbound call. You may
also add a call by displaying the Contact or Firm Member list on a File and tapping or clicking Menu > Call
Record.
2 The Amicus Call screen shows details that you can edit. You can also tap or click:
Menu > Time Entry to add a Time Entry on it.
Menu > Follow Up to add a Task based on it. The Tasks screen of Mobile Calendar appears. Edit the
description as desired.
Tips:
When sent to Amicus Attorney, the Phone Call will be automatically associated with the Person, based on
a name match. You require a Caller ID phone service in order for the association to occur on Phone Call
records made from inbound calls.
BLACKBERRY: To see the prompt to add a Call record, bring Amicus Mobile to the top of any other
applications running.
See also:
“Download full text of a field” on page 15
“Call a Person on a File” on page 18
Work with a Call
1 On the Home page, tap or click the Call Center icon.
2 Your recent outstanding Calls and all today’s Calls are listed.
3 Select a Call in the list and tap or click Menu > Edit. Or tap or click it in the list.
4 The Amicus Call screen shows details that you can edit. You can also tap or click:
Menu > Time Entry to add a Time Entry on it.
Menu > Follow Up to add a Task based on it. The Tasks screen of Mobile Calendar appears. Edit the
description as desired.
Call (or Menu > Call) to call the person.
See also:
“Add a Time Entry” on page 19
Amicus Mobile Guide © 2013 Gavel & Gown Software Inc. 22
Work with a Phone Message
1 On the Home page, tap or click the Call Center icon.
2 Your recent outstanding Phone Messages and all today’s Phone Messages are listed.
3 Select a Phone Message in the list and tap or click Menu > Edit. Or tap or click it in the list.
4 The Amicus Phone Message screen shows details that you can edit. You can also tap or click:
Menu > Follow Up to add a Task based on it. The Tasks screen of Mobile Calendar appears. Edit the
description as desired.
Call (or Menu > Call) to call the person.
See also:
“Download full text of a field” on page 15
Amicus Mobile Guide © 2013 Gavel & Gown Software Inc. 23
Appendix A: Installing IIS
In all of the following cases, ensure that the Internet Information Services Snap-In and World
Wide Web Services checkboxes have not been cleared. (These components are selected by default.)
To install IIS under Windows XP Professional:
1 Go to Windows Control Panel > Add or Remove Programs and click Add/Remove Windows
Components at the left.
2 Select the Internet Information Services (IIS) checkbox and click Next.
3 Follow the onscreen instructions. You might be prompted to insert your Windows CD. When
finished, you might be prompted to restart the computer.
To install IIS under Windows Server 2003:
1 Go to Windows Control Panel > Add or Remove Programs and click Add/Remove Windows
Components at the left.
2 Choose Application Server, select the Internet Information Services (IIS) checkbox,
click Next.
3 Follow the onscreen instructions. You might be prompted to insert your Windows CD.
4 From Start > Programs > Administrative Tools > Internet Information Services (IIS)
Manager, navigate to Web Service Extensions at the left, and ensure that ASP.NET at the
right is Allowed.
To install IIS under Windows 7 or Vista:
1 Go to Windows Control Panel > Programs and Features and click ―Turn Windows features on
or off‖ at the left.
2 Select the Web Server (IIS) checkbox and, within the Web Management Tools feature
group, select the IIS 6 Management Compatibility checkbox and its sub-option
checkboxes. Also, under World Wide Web Services > Application Development
Features, select the ASP.NET checkbox. Click OK.
3 Follow the onscreen instructions. You might be prompted to insert your Windows CD. When
finished, you might be prompted to restart the computer.
To install IIS under Windows Server 2008:
1 Go to Windows Control Panel > Programs and Features and click ―Turn Windows features on
or off‖ at the left.
2 In the Server Manager screen, navigate to Server Manager > Roles at the left, and click Add
Roles in the Roles Summary section at the right.
3 In the Add Roles Wizard, choose Server Roles at the left, select the Web Server (IIS)
checkbox at the right, and click Next.
4 In the Select Role Services screen, select the Web Server > Security > Windows
Authentication checkbox. Also select all the Management Tools > IIS 6 Management
Compatibility checkboxes, and select the Application Development > ASP.NET
checkbox. Click Next.
5 Follow the onscreen instructions. You might be prompted to insert your Windows CD.
Amicus Mobile Guide © 2013 Gavel & Gown Software Inc. 24
Appendix B: Determining your IP address
1 At the Web server, go to Windows Start and choose Run.
2 In the Run dialog, enter cmd and click OK.
3 In the DOS window, enter ipconfig and press <ENTER>.
4 The IP Address should be shown, e.g. 199.188.22.111. Under Windows 7, Vista, and Server
2008, it is named IPv4Address.
5 If one IP address is shown, use that one. If more than one IP address is shown, one or all
might be valid for use—to check, see below.
If multiple IP addresses under Windows XP Professional or Server 2003:
1 Go to Windows Control Panel > Administrative Tools > Internet Information Services (IIS)
Manager
2 Navigate to Web Sites > Default Web Site at the left.
3 Right-click on Default Web Site and choose Properties.
4 In the Properties dialog that appears, examine the IP Address field. If the IP address is ―All
Unassigned‖, then any of the addresses that were shown from the ipconfig command can be
used. If a particular IP address is shown, it is the only one that can be used.
If multiple IP addresses under Windows 7, Vista, or Server 2008:
1 Go to Windows Control Panel > Administrative Tools > Internet Information Services (IIS)
Manager
2 Navigate to ComputerName > Web Sites > Default Web Site at the left.
3 Select Default Web Site and, in the Actions list at the right, choose Bindings.
4 In the Site Bindings dialog that appears, examine the IP Address field. If the IP address is an
asterisk (*), then any of the addresses that were shown from the ipconfig command can be
used. If a particular IP address is shown, it is the only one that can be used.

Amicus Mobile Guide © 2013 Gavel & Gown Software Inc. 25
Appendix C: Troubleshooting
Installing Amicus Mobile Server on Small Business Server 2008 Installing Amicus Mobile Server is installed on a server running Windows Small Business Server
2008, requires additional IIS configuration. Please contact Gavel & Gown Technical Services for
details. (Issue 20258)
Windows Mobile: Unable to log in while device is cradled at a computer on a
local network If a user needs to connect with the Amicus Mobile Server while their device is cradled at a computer
on a local network, and access via a public IP Address or Web Domain Name is prevented by
their current configuration, the following workaround may be performed :
1 In ActiveSync (or Windows Mobile Device Center), go to the Connection Settings and set the
―This computer is connected to‖ option to ―Work Network‖ (rather than ―The Internet‖).
2 Log in to Amicus Mobile using, in the Server field, your network’s computer name for the
Web server.
NOTES:
Later, when you wish to log in after uncradling the device, you will need to enter your public IP
Address or Web Domain Name in the Server field in the Login screen:
- On a Pocket PC device, simply enter the address or name in the Server field.
- On a Smartphone device, select Add in the fly-out list and then enter the address or name.
Amicus Mobile remembers all your Server names that have provided successful logins, and then
provides them for selection from a fly-out list on the Login screen. If desired, you can clear this
list on the device: go to Settings and tap or click Menu > Clear Server List. Only the current
name will be left.
BlackBerry: Connection not available If you cannot log in to Amicus Mobile on a BlackBerry device, check that the device’s APN (Access
Point Name) connection is properly set for your data provider. Details are available from your
provider. (Issue 20418)
Connection not available occasionally When a device returns from standby mode, its Internet connection might not reactivate
automatically. This could prevent a successful login to Amicus Mobile. Or, if you are already logged
in, exchanges with Amicus Attorney might not occur. To reactivate the connection, open the Web
browser on the device and navigate to the Internet. (You may then close the Web browser.) Log in to
Amicus Mobile.
Amicus Mobile Guide © 2013 Gavel & Gown Software Inc. 26
Amicus Attorney changes are not exchanging to Amicus Mobile After opening another Office as a Guest, any changes made subsequently in Amicus Attorney might
fail to exchange to your Mobile device. (Changes made on your device will continue to exchange to
Amicus Attorney.) (Issue 20260)
Proceed as follows:
WINDOWS MOBILE: If an Amicus Attorney Patch (available from our website) has been installed on
your Amicus Workstation (and you have uninstalled, reinstalled, and reintitialized Amicus
Mobile on the device), then exit both Amicus Mobile and Amicus Attorney and then log in to
Amicus Mobile and reinitialize.
BLACKBERRY: Simply reinitialize Amicus Mobile.
Windows Mobile: Log file A daily log of key activities is maintained by Amicus Mobile on the Windows Mobile device. In the
course of assisting you with a problem, Gavel & Gown Technical Support might ask you to check this
log. Use File Explorer (available from Start or Start > Programs) and navigate to My Device (or
Storage Card) > Application Data > Amicus > AmicusLogs. The log files are named
Log_Month_Date_Year, e.g. Log_Jun_25_08.
Logs for the most recent 10 days are maintained. Earlier ones are automatically deleted to save space.
Other Issues
24334/33120—On some BlackBerry devices: although new Time Entries can be created, existing Time Entries cannot be edited or deleted. These devices are Style 9670, Storm2 9500 series, Storm 9500 series, Pearl 9100, and Tour 8830. Edits and deletions of Time Entries should be done at the Amicus Workstation.
22893—Initializing Amicus Mobile on a BlackBerry device fails if the names of any Amicus Contacts or Firm Members contain an accented letter or special character.
20258—Amicus Mobile Server might not work if installed on a server running Windows Small Business Server 2008 or later. Other websites and HTTP services provided by that server might also fail. SOLUTION: IIS requires additional configuration after Amicus Mobile Server has been installed. Please contact Technical Support for assistance.
18676—Viewing the details of a Phone Message in Amicus Mobile does not automatically mark it as having been read.
18666—If you have two calls (due to Call Waiting), switching away from one call to the other does not trigger the prompt to create a Phone Call record on that call in Amicus Mobile. WORKAROUND: To create a Phone Call record on the call you are ending first, tap or click End Call rather than simply switching away from it. In a few moments, your phone will ring to resume your other call. Note, however, that if you choose to create a Phone Call record on this other call as well, its duration field will include only the time since the call was resumed.
18665—A Phone Call record created upon completion of an inbound or outbound call on an Amicus Mobile device records the end time rather than the start time of the call.
18663/18664—In Amicus Mobile, you are permitted to assign Contacts to a File that you have been restricted from editing. (These assignments do not, however, affect Amicus Attorney.)
18655/18656—If a Time Entry is created on a Phone Call in Amicus Mobile, the Time Entry icon might still be shown for that record in Communication lists in Amicus Attorney.

Amicus Mobile Guide © 2013 Gavel & Gown Software Inc. 27
18639—Changes to Contact information in Amicus Attorney (name, primary phone number, primary e-mail address) are not exchanged to the Contact On File lists in Amicus Mobile until that File has
been changed in Amicus Attorney and exchanged to Amicus Mobile.
18633—When sending a new Sticky from the Notes module, the “To” selection list of Firm Members does not reflect additions, deletions, or name changes done in Amicus Attorney since you last Initialized Amicus Mobile. WORKAROUND: Reinitialize Amicus Mobile occasionally.
18615—When replying to a Sticky on a Smartphone device, the number pad is activated and the corresponding alphabetic letters cannot be entered in the message field. WORKAROUND: Navigate out of the message field and then go back.
18569—If a Time Entry is created in Amicus Mobile on a File that is set to a Flat Rate or Other hourly billing rate, it will be sent to Amicus Attorney with a Rate Value of 0.
18563—If a File is currently locked by another user, you can still select or clear its Mobile checkbox in the Files Index but this action has no effect. No warning message appears.
18277—Some Windows Mobile devices when set to portrait orientation might truncate the left side of the Settings screen. WORKAROUND: Set the device orientation to landscape while configuring Settings.
For further information, contact
Gavel & Gown Software Inc.
Phone: 800-472-2289
416-977-6633
Fax: 416-977-2563
www.amicusattorney.com
Copyright © 2013 Gavel & Gown Software Inc. All rights reserved.
AMICUS and AMICUS ATTORNEY are registered trademarks,
and AMICUS ACCOUNTING,AMICUS MOBILE, AMICUS
MOBILE SERVER, and DO are trademarks of Gavel & Gown
Software Inc.
All other trademarks referenced are the property of their respective
owner. Gavel & Gown Software Inc. disclaims any proprietary
interest in trademarks other than its own.
February 2013