an active speaker deploying 1927 era...
TRANSCRIPT
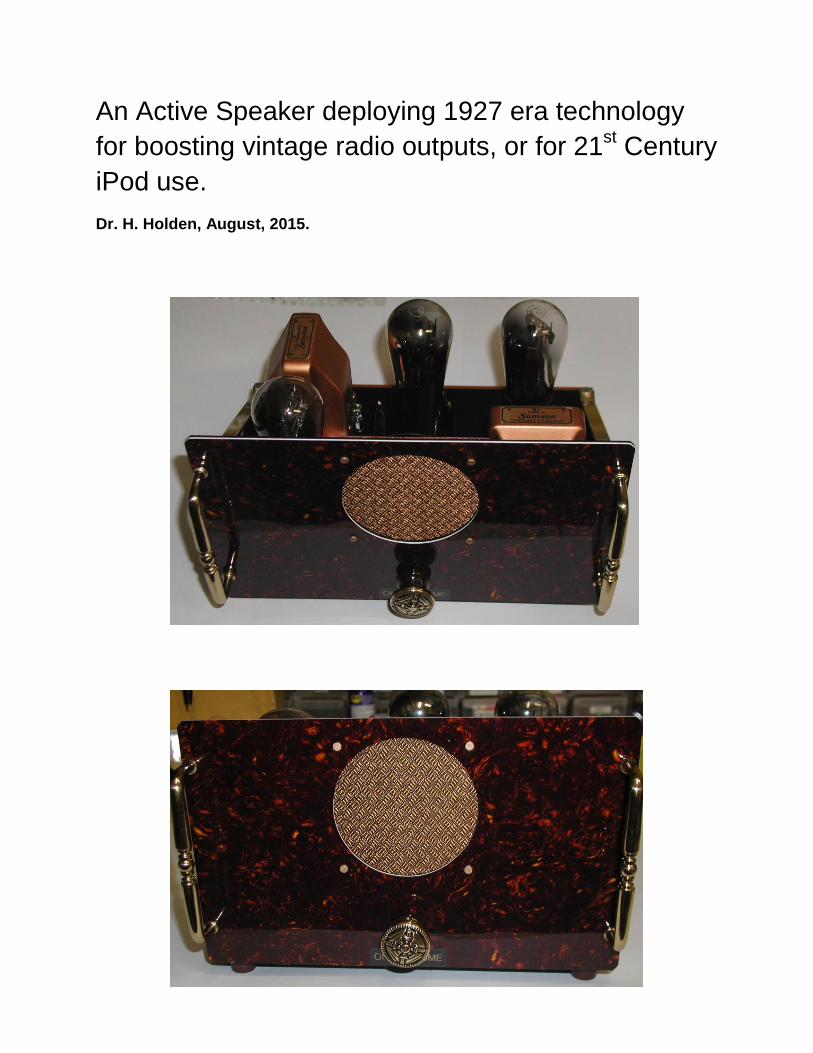
An Active Speaker deploying 1927 era technology
for boosting vintage radio outputs, or for 21st Century
iPod use.
Dr. H. Holden, August, 2015.

Introduction:
After studying and restoring the Grebe MU-1 radio from the mid 1920’s it occurred to me
that it would be great to have an “active speaker” for it. This modern term had not been
coined in the 1920’s but is commonplace today.
Most radios of the 1920’s era had a simple single triode output stage based on a UX-
201-A style triode tube or the UX-112-A. These developed relatively low audio power,
typically 80 to 150 milli-watts to drive a horn or cone speaker of the time. However
higher power tubes were available to drive larger speakers and some radios had more
substantial audio output stages. They relied on battery eliminators rather than actual
batteries to power them.
By 1929 some “add on amplifiers” such as the Loftin–White had arrived on the scene.
These were a direct coupled class A amplifier based on a 24 and 45 type tube. The
direct coupling avoided the cost of an additional inter-stage transformer and it also
avoided the vagaries of the audio frequency response of the inter-stage transformer.
The Loftin –White design pre-dated the Williamson amplifier with KT66 beam tetrodes
which appeared in 1947. The Loftin-White amplifier allowed the audio power to be
boosted to the 1 watt arena. However it needed an HT supply of 450V @ 30mA or 13.5
watts total from the HT supply alone (excluding filament supplies) and could not run on
batteries. It used a mains power transformer and a type 80 rectifier. The overall power
consumption was 35 watts, for the 1 watt output. Being a class A type the power
consumption didn’t change to any great extent regardless of the listening volume.
I had considered building a Loftin –White style amplifier, however my calculations
indicated it should have been possible in the mid to late 1920’s to build a good 2 watt
output class AB amplifier, which would have about 4.5 watts total HT power
consumption (depending on the tube bias) with zero sound output and about 7 watts
dissipation at full volume (excluding the filaments). Also if battery tubes were used the
filament total power could be kept to about 3.75W. This could be done by running two
UX-171-A output triodes in class AB1, but it would require inter-stage transformer
coupling and be a push pull design. It would also require moderately high negative grid
bias voltages for the UX-171-A’. The UX-112-A could be the driver tube. These tubes all
have 5V @ 0.25A filaments and this made me think of some beautiful National
Semiconductor 5V regulators I had acquired when working with Atari’s Pong game and
still had in the junk box.
By 1935 special twin grid triode battery tubes for class B operation such as the 49
arrived. This meant the output tubes could be run at zero negative grid bias, having a
very low idling current of only a few mA and no requirement for bias batteries. It turned
out that tubes like the 49 can also be run in “space charge mode” where the inner grid is
positively biased. This acts as a virtual cathode and the tube HT can be as low as 6V
and the tube still have useful gain. This concept was exploited in the famous “Hiker’s
One” regenerative radios of the 1937 era. It was an active time in electronics in that the
Pentode was making its debut in the early 1930’s and ultimately pentodes and beam
tetrodes would dominate in audio amplifier work in the following years.
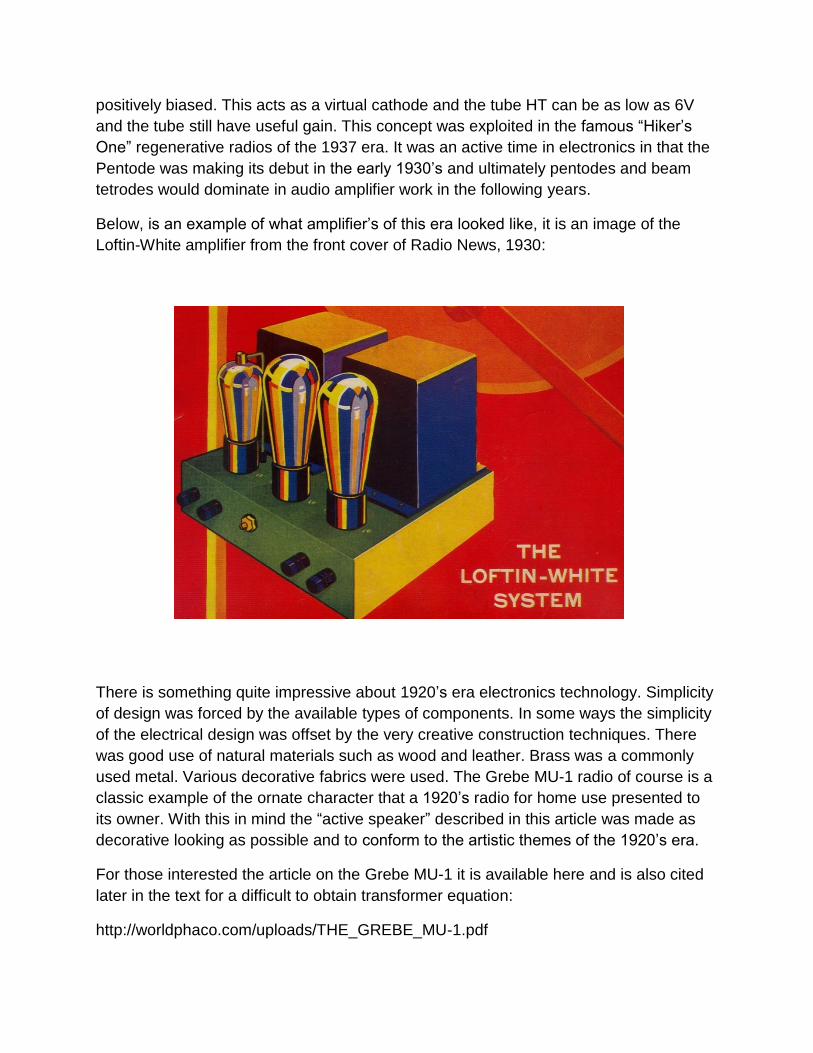
Below, is an example of what amplifier’s of this era looked like, it is an image of the
Loftin-White amplifier from the front cover of Radio News, 1930:
There is something quite impressive about 1920’s era electronics technology. Simplicity
of design was forced by the available types of components. In some ways the simplicity
of the electrical design was offset by the very creative construction techniques. There
was good use of natural materials such as wood and leather. Brass was a commonly
used metal. Various decorative fabrics were used. The Grebe MU-1 radio of course is a
classic example of the ornate character that a 1920’s radio for home use presented to
its owner. With this in mind the “active speaker” described in this article was made as
decorative looking as possible and to conform to the artistic themes of the 1920’s era.
For those interested the article on the Grebe MU-1 it is available here and is also cited
later in the text for a difficult to obtain transformer equation:
http://worldphaco.com/uploads/THE_GREBE_MU-1.pdf
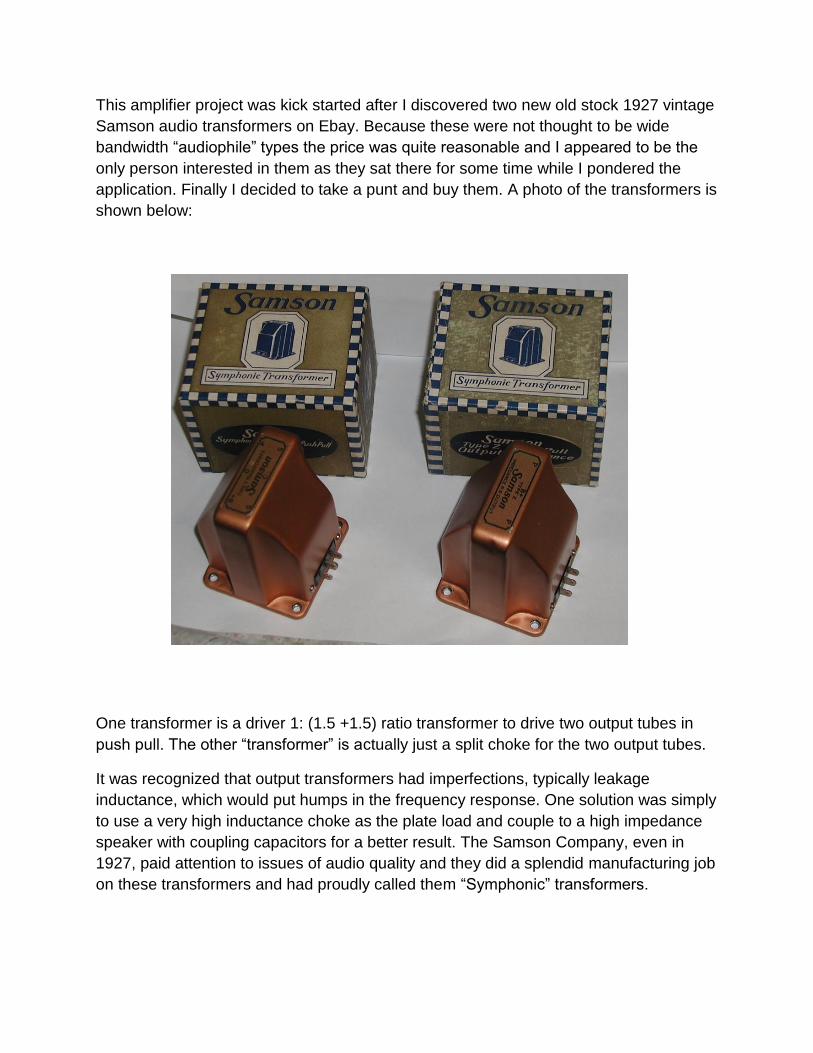
This amplifier project was kick started after I discovered two new old stock 1927 vintage
Samson audio transformers on Ebay. Because these were not thought to be wide
bandwidth “audiophile” types the price was quite reasonable and I appeared to be the
only person interested in them as they sat there for some time while I pondered the
application. Finally I decided to take a punt and buy them. A photo of the transformers is
shown below:
One transformer is a driver 1: (1.5 +1.5) ratio transformer to drive two output tubes in
push pull. The other “transformer” is actually just a split choke for the two output tubes.
It was recognized that output transformers had imperfections, typically leakage
inductance, which would put humps in the frequency response. One solution was simply
to use a very high inductance choke as the plate load and couple to a high impedance
speaker with coupling capacitors for a better result. The Samson Company, even in
1927, paid attention to issues of audio quality and they did a splendid manufacturing job
on these transformers and had proudly called them “Symphonic” transformers.
Single ended: Class A, Push Pull Class AB1, Class AB2 and Class B amplifiers:
Single ended:
Most radios of the 1920’s era had single ended or Class A audio output stages. These
are characterized by plate current flowing over the whole 360 degrees of the input grid
voltage cycle. Often the speaker itself, or headphones, were the actual plate loads for
early tubes such as the 201A. As time progressed typically the speakers had lower
range impedances and an impedance matching transformer was used.
The matching transformer has many advantages. The first was that maximum power
could be delivered to the load by choosing the correct transformer turn’s ratio. Secondly,
power losses due to DC currents and winding wire resistances were eliminated in the
secondary or speaker circuit and thirdly, the safety benefit of isolating the speaker from
the HT supply. The other benefits were that the average plate voltage could be close to
the HT voltage because the winding resistance is much lower than the transformer’s
impedance. This increased the dynamic range of allowable plate voltage for any HT
voltage and the plate voltage, due to stored magnetic energy, could rise well above the
HT voltage value. Also DC currents and the polarizing effects of them via the
reproduction device (speaker) are eliminated. Also the transformer acts as a band-pass
filter.
The typical output stage is configured such that the tube’s control grid is never driven
positive with respect to its cathode (or filament in a directly heated tube). The grid to
cathode voltage (bias) in the class A amplifier is set for a specific value of static (no
signal) plate current and keeps the grid in the negative region with respect to the
cathode. The static value of plate current via the transformer primary magnetizes the
transformer core. This is why a transformer for a class A amplifier often has the E & I
laminations “butt stacked” and spaced with an air gap to prevent magnetic saturation of
the core. This magnetization induces more non-linear distortion due to the curvature of
the transformer magnetization curve.
Generally the plate current swings above and below its static value with grid drive signal
over a range where the tube’s transfer characteristic (grid voltage to anode current) is
fairly linear.
In designing single ended class A tube amplifiers and deciding on the load resistance, a
load line is drawn on the plate voltage (x axis) vs plate current (y axis) on the tube’s
data sheet for the plate characteristics, the slope of which (voltage/current) determines
the plate load resistance.
The formulae for calculating the load resistance, power output and distortion for
amplifiers with triodes, beam power tubes or pentodes, is in RCA’s tube handbooks.
Part of the design process is to ensure that the tube is not run above its maximum
power dissipation rating. If a tube is run above the maximum ratings, the electrode
structures in the tube climb to a higher temperature than when they were manufactured,
this releases gases and poisons the cathode/filaments, degrading the tube.
The dynamic transfer characteristic of the tube (grid drive voltage vs output current) is
not linear so distortion of the reproduced signal is generated especially at high output
levels. This non linearity produces a series of frequency components in the output, or a
“power spectrum”, in which there is the original frequency, two times, three times, four
times, five times the original frequency etc, the dominant distortions being 2nd and 3rd
harmonic in nature.
2nd harmonic distortion is dominant in the class A amplifier, while 3rd harmonic distortion
dominates in the push pull amplifier. This is because second harmonic distortion and all
the even harmonics are cancelled in the push pull configuration, provided, that is, that
the tubes are closely matched.
(Of note: it is possible run a single pentode in class A operation with the correct load
resistance for zero second harmonic distortion. This is not physically possible with a
class A transistor. The method of how to do this is outlined on page 553, Sec 18-5,
Electronics Devices & Circuits, Millman & Halkias 1967, McGraw-Hill.)
One other important distinguishing factor for class A is that the average plate current is
not affected appreciably by the audio output level, so there is little ripple induced on the
power supply proportional to the sound level. This made them suitable for battery
operation, where often the internal resistance of the B battery was quite significant.
However class A is power hungry which is a disadvantage for battery use.
Push pull:
In RCA’s Radiotron handbook from the 1932, it was advised that two output triodes
could be run in parallel class A to double the output power over one tube. Or one could
boost the power to double in the push pull class A configuration. They stated that for the
push pull connection the power output was the same as running the tubes in parallel but
the drive voltage requirement was double. This made the push pull class A connection
seem unappealing to a designer reading the text, although there was a glib mention of
the fact that more than double the output power was possible by increasing the bias.
In the RCA handbooks to follow and by 1934 in the Radiotron Designer’s Handbook,
there was much more detail on the advantages of the push pull connection. They
outlined how to bias the tubes into class AB1 and AB2 or class B for substantially more

than double the output power from two tubes compared to what the same two tubes
could safely generate in parallel class A. It appears that these concepts took a few
years to gel in the minds of designers at the time.
In class AB1 for example, just as in class A, the grid voltage never exceeds the cathode
voltage (no grid current is drawn, and hence the 1 suffix) but plate current flows for less
than 360 degrees of the grid input voltage cycle at least at high signal drive levels. Each
tube’s resting or “no signal plate current” is lower than in the class A condition due to
increased bias voltage. This increased bias allows a greater drive voltage before the
grid to cathode voltage approaches zero, this allows more output from the tube without
the tube’s overall dissipation being exceeded compared to class A. While one tube’s
anode current is increasing, the other is decreasing hence the push pull naming.
Second harmonic distortion (typical of the single ended class A amplifier) as well as HT
power supply ripple (hum) on the HT feed to the output stage tend to cancel in the push
pull configuration and the increased efficiency is too hard to ignore. Generally speaking
push pull output stags are affected by third harmonic distortion.
At low drive signal levels in class AB1 each tube, with small excursions of plate current,
behave as class A amplifiers but with maximum signal they shift toward the class AB
where each tube is conducting for less than 360 degrees of the input grid voltage cycle.
In class AB2 the grid drive voltage is allowed to exceed the cathode potential and grid
currents may occur at peak drive levels (indicated by the 2 suffix). This places a higher
demand on the driver stage to deliver drive power. The same applies to class B in that
the driver circuit now has to supply energy to the grid circuits of the output tubes. In
class B the plate current flows in each tube for 180 degrees of the input grid voltage
cycle and the grids are generally drawing current during this cycle. Tubes designed for
class B service (such as a type 49) are run at zero grid bias and the grids are driven
positive with respect to the cathode (filament) to generate increased plate current and
driven negative to cut off one tube while the other tube is conducting. This is why inter-
stage transformers for class B use, to drive the output tube grids, are usually step down
transformers (from the plate of the previous class A driver stage). On the other hand,
inter-stage transformers for class A or AB1 use are generally step up transformers as
the grid power demands are negligible and the extra gain (voltage magnification by the
transformer) is helpful.

Ideal Plate to Plate resistance (Rpp) for Push Pull Output Triodes:
Generally for push pull output stages the load impedance of importance, seen by the
two tubes together, is “plate to plate” resistance. This makes the transformer turns ratio
easier to calculate.
For purposes of explanation imagine a centre tapped choke or ideal inductor of a very
high inductance (and very high impedance to AC) supplying the two plates with DC from
the HT applied to the center tap. If the plate to plate circuit is loaded by a 10k resistance
for example, then each tube, in the absence of the other tube, sees ¼ of that or 2.5k. Or
imagine the plate voltage on one tube dropping by one volt, at the same time the plate
voltage on the other tube increases by one volt due to transformer action. The voltage
gain measured across the choke is 2. So the result is an effective transformer step up
voltage ratio of 2, which is equivalent to an impedance ratio of 4. The centre tapped
choke, or transformer primary winding, therefore has an “autotransformer function”. This
does not happen if the plate loads were resistances it is a transformation property of the
centre tapped transformer primary.
So relating to the diagram above the resistance Rpp imposed between the plates is:
Rpp = 4.RL
If one tube plate is looking into a primary winding N1 on its own, when N2 = 2N1, then
the impedance seen is RL/4. And if there is no N2 and the load resistance is placed
directly across the plates as a plate to plate load or Rpp, the impedance seen by one
tube alone is Rpp/4 or:
RL
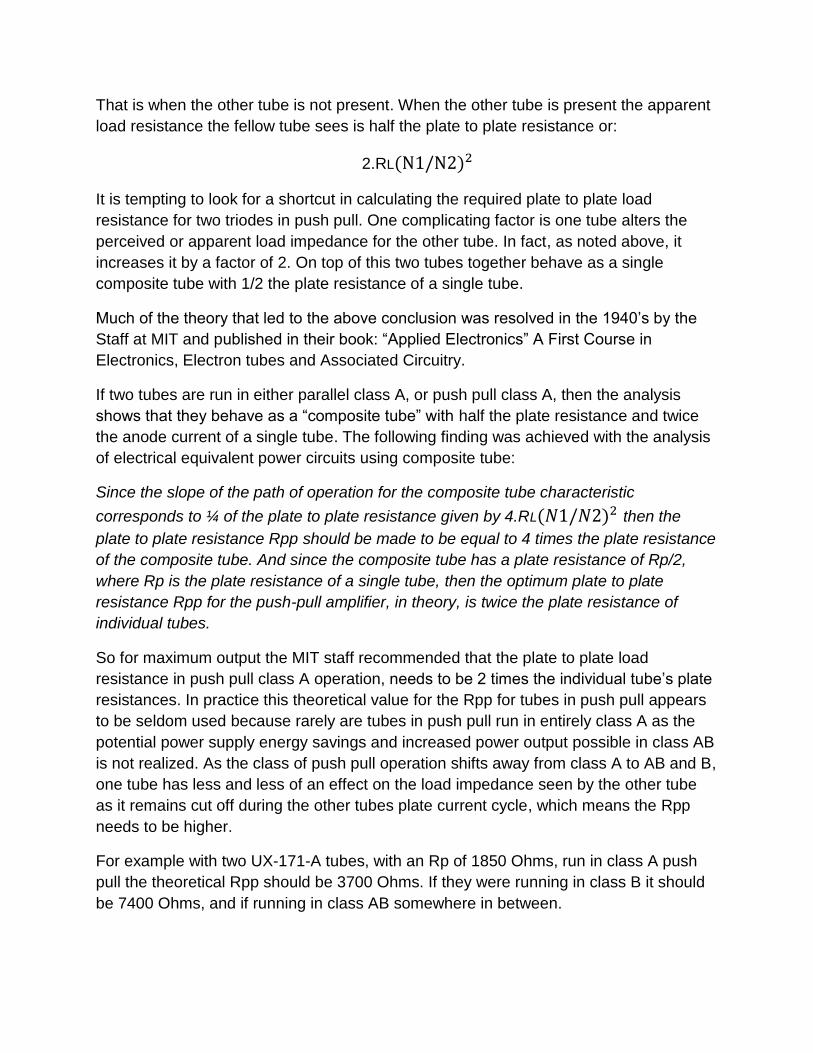
That is when the other tube is not present. When the other tube is present the apparent
load resistance the fellow tube sees is half the plate to plate resistance or:
2.RL
It is tempting to look for a shortcut in calculating the required plate to plate load
resistance for two triodes in push pull. One complicating factor is one tube alters the
perceived or apparent load impedance for the other tube. In fact, as noted above, it
increases it by a factor of 2. On top of this two tubes together behave as a single
composite tube with 1/2 the plate resistance of a single tube.
Much of the theory that led to the above conclusion was resolved in the 1940’s by the
Staff at MIT and published in their book: “Applied Electronics” A First Course in
Electronics, Electron tubes and Associated Circuitry.
If two tubes are run in either parallel class A, or push pull class A, then the analysis
shows that they behave as a “composite tube” with half the plate resistance and twice
the anode current of a single tube. The following finding was achieved with the analysis
of electrical equivalent power circuits using composite tube:
Since the slope of the path of operation for the composite tube characteristic
corresponds to ¼ of the plate to plate resistance given by 4.RL then the
plate to plate resistance Rpp should be made to be equal to 4 times the plate resistance
of the composite tube. And since the composite tube has a plate resistance of Rp/2,
where Rp is the plate resistance of a single tube, then the optimum plate to plate
resistance Rpp for the push-pull amplifier, in theory, is twice the plate resistance of
individual tubes.
So for maximum output the MIT staff recommended that the plate to plate load
resistance in push pull class A operation, needs to be 2 times the individual tube’s plate
resistances. In practice this theoretical value for the Rpp for tubes in push pull appears
to be seldom used because rarely are tubes in push pull run in entirely class A as the
potential power supply energy savings and increased power output possible in class AB
is not realized. As the class of push pull operation shifts away from class A to AB and B,
one tube has less and less of an effect on the load impedance seen by the other tube
as it remains cut off during the other tubes plate current cycle, which means the Rpp
needs to be higher.
For example with two UX-171-A tubes, with an Rp of 1850 Ohms, run in class A push
pull the theoretical Rpp should be 3700 Ohms. If they were running in class B it should
be 7400 Ohms, and if running in class AB somewhere in between.
The better method to help to determine the plate to plate resistance in practice is done
graphically with a load line to suit the individual tubes involved.
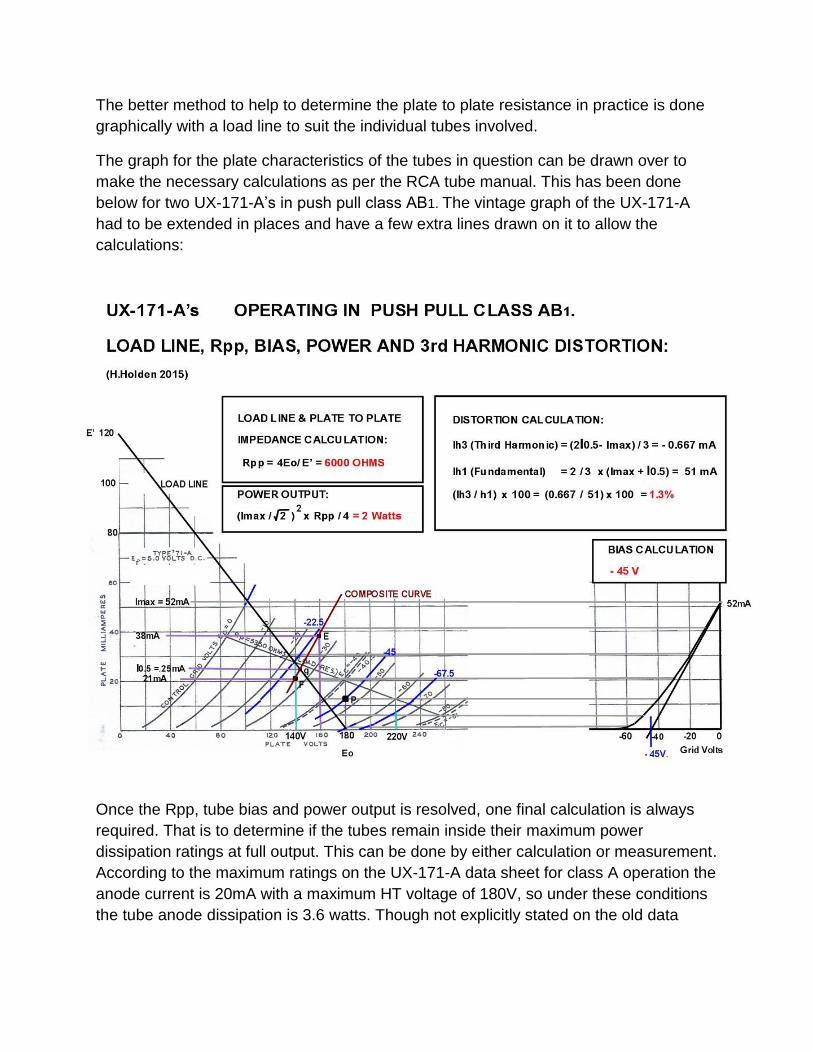
The graph for the plate characteristics of the tubes in question can be drawn over to
make the necessary calculations as per the RCA tube manual. This has been done
below for two UX-171-A’s in push pull class AB1. The vintage graph of the UX-171-A
had to be extended in places and have a few extra lines drawn on it to allow the
calculations:
Once the Rpp, tube bias and power output is resolved, one final calculation is always
required. That is to determine if the tubes remain inside their maximum power
dissipation ratings at full output. This can be done by either calculation or measurement.
According to the maximum ratings on the UX-171-A data sheet for class A operation the
anode current is 20mA with a maximum HT voltage of 180V, so under these conditions
the tube anode dissipation is 3.6 watts. Though not explicitly stated on the old data
sheets, as there is no maximum power dissipation figure documented, this is probably
the maximum power dissipation for the UX-171-A.
Power output to the load is calculated using the equation as shown above or direct
measurement of the voltage across the load with the knowledge of the load impedance.
For this amplifier the calculations give 2 watts output which agreed with measurements.
The HT power input to the two tubes at full power is obtained from the average plate
current formula (RCA manual) as 0.636 x Imax x Eo, so 0.636 x 0.052 x 180 = about 6
watts, or it can easily be measured with a current meter in the HT feed to the output
stage at full output and multiplying by 180v. Therefore the power input to the two output
tubes is around 6W at full output. Subtracting the 2 watts output leaves a total
dissipation of 4 watts or only 2 watts dissipation per tube, well within their ratings.
This indicates that more power could safely be obtained from the pair of UX-171-A
tubes, possibly 2.5 watts or thereabouts, however my small speaker is only 2W rated
and more drive signal would be required, so I was happy with the 2 watts output and
running the tubes well under their maximum ratings.
Also the no signal anode dissipation for the two output tubes together is only about 3.5
watts depending on the exact bias voltage and the particular pair of tubes. The total
power taken from the HT system, including the driver tube, at full output is about 7.2
watts for the 2 watt audio output and less most of the time at normal listening levels
closer to 4W. This is vastly superior to the original Loftin-White direct coupled class A
amplifier dissipating around 13.5 watts from the HT system alone for a 1 watt output, yet
this UX-171-A push-pull amplifier is made from components of the same vintage.
By comparison if the two UX-171-A tubes were run in parallel class A instead, the power
dissipation for the two tubes, regardless of volume setting would be 7.2 watts and the
output power only 1.4 watts. This demonstrates the vast improvement in efficiency of
class AB amplifiers over class A, to say nothing of the near total absence of second
harmonic distortion and low third harmonic distortion. Although obviously the class A
driver stage in this amplifier would have some second harmonic distortion.
Since the output transformer (or a choke) in a class AB or class B system has equal and
opposite currents in the plate windings there is no net magnetization of the core unlike
class A. To maintain a good bass response the transformer can be physically smaller
than its class A counterpart and it can have interleaved laminations, rather than an air
gapped stack. Distortion resulting from DC core magnetization is eliminated as well as
second harmonic distortion largely cancelled. The plate voltage is able to rise higher
than the HT voltage on the tube being driven out of conduction by the other tube driven
into conduction and the voltage being stepped up on the other tube’s anode.

Matched Tubes ?
It is important that the output tubes are matched both for transconductance (dynamic
properties) and static properties such as the plate current at the operating grid bias
voltage. If the former is not correct then 2nd harmonic distortion is increased due to
imbalance and if the latter is not correct the transformer has unbalanced magnetization
currents which can add to the distortion. I bought tube pairs described by the sellers as
“matched”. But most sellers match only for transconductance on the tube tester and the
static currents in some pairs were wildly different. So be cautious if you are told the
tubes are “matched pairs”, it might be a stretch of the imagination and some people call
tubes matched when they look physically the same.
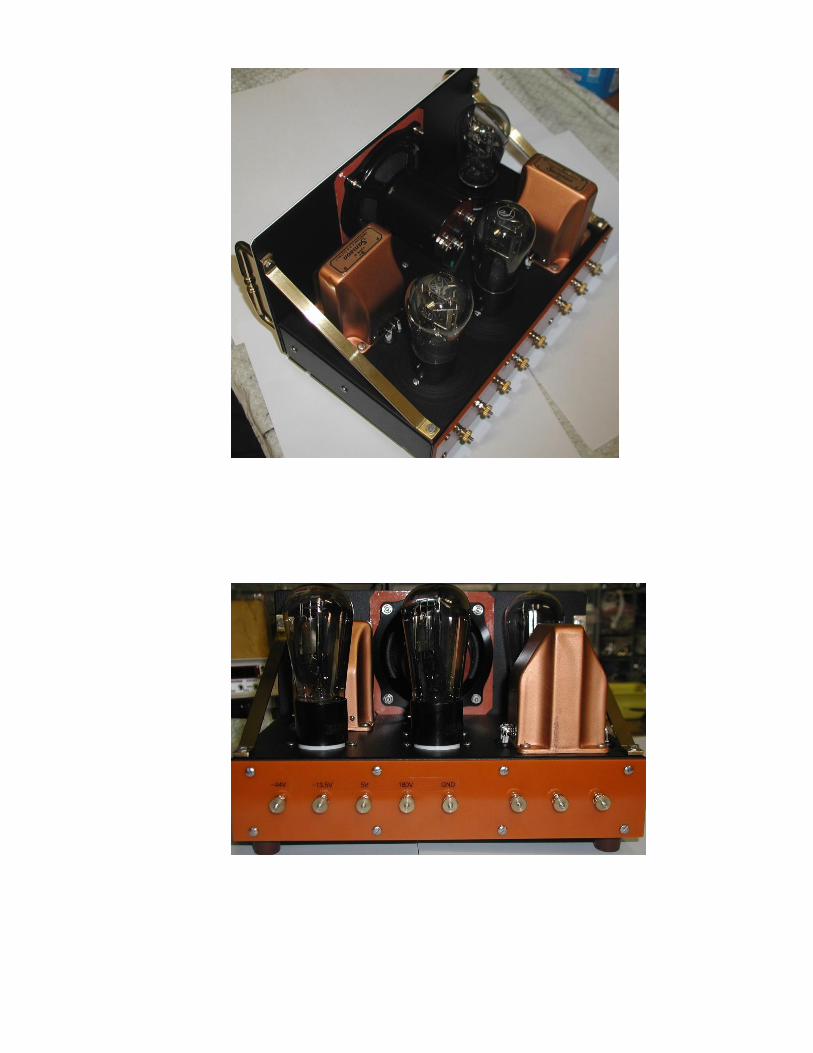
Building the amplifier:
Firstly I started with a pre-painted 10 inch wide steel chassis from Hammond. These
chassis have a very fine crinkle finish with a vintage look to them. While aluminium is
much easier to work/cut/file it is not as physically strong and not as good to support
heavy objects like transformers. While working on the chassis all the surfaces were
protected with plastic tape. I purchased two base plates for the chassis, one for the
base as it was intended and the other to tip on its side to make part of the front panel
assembly. Once all the holes were cut to my design all the cut edges (being bare steel)
were smoothed and painted to help prevent future rusting as shown in the photo below:
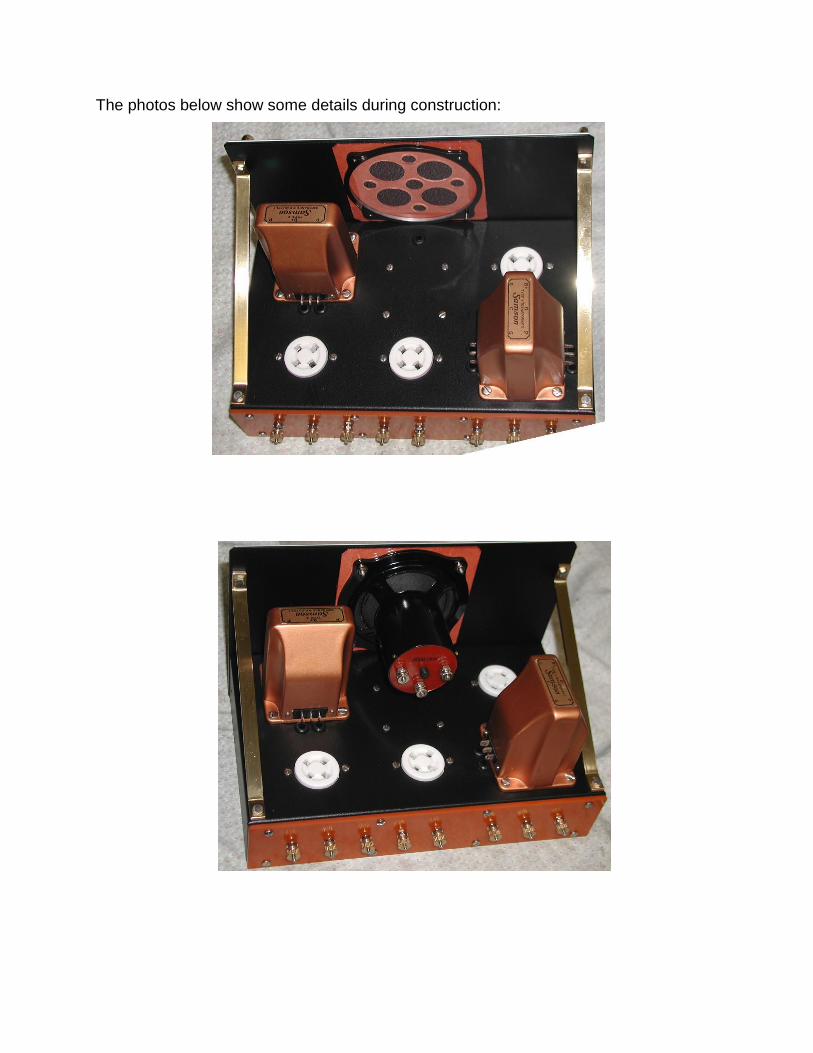
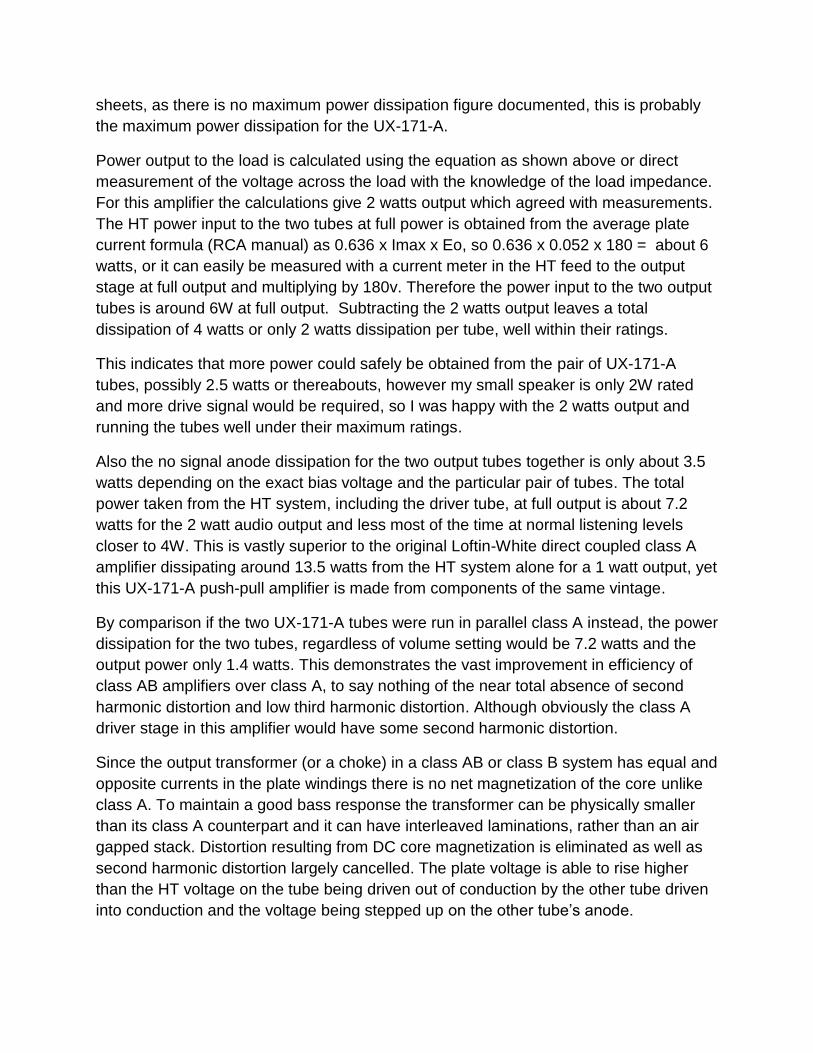
The photos below show some details during construction:
Since the small 8 Ohm 2 watt speaker chosen had a round edge, a metal flange was
made to clamp it on.
The front panel is a Tortoise Shell laminate which is a product designed for “scratch
plates” on electric and other guitars and is sold by Australian Luthier’s Supplies.
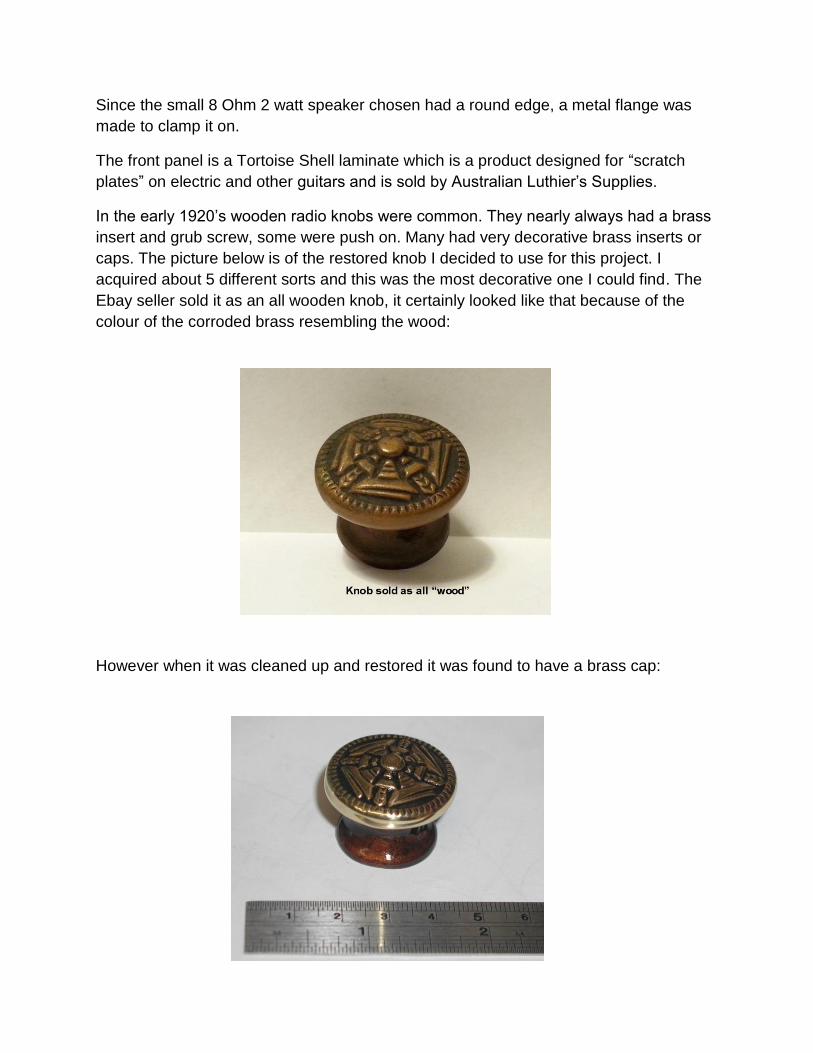
In the early 1920’s wooden radio knobs were common. They nearly always had a brass
insert and grub screw, some were push on. Many had very decorative brass inserts or
caps. The picture below is of the restored knob I decided to use for this project. I
acquired about 5 different sorts and this was the most decorative one I could find. The
Ebay seller sold it as an all wooden knob, it certainly looked like that because of the
colour of the corroded brass resembling the wood:
However when it was cleaned up and restored it was found to have a brass cap:
The brass handles are cupboard door accessories, with an exact 4 inch hole spacing
which matched the pre-punched holes in the Hammond chassis bottom which was used
as a backing for the tortoise shell front panel. The brass bar supporting the front panel
to the rear chassis is 3mm x 10mm bent and drilled, polished & lacquered.
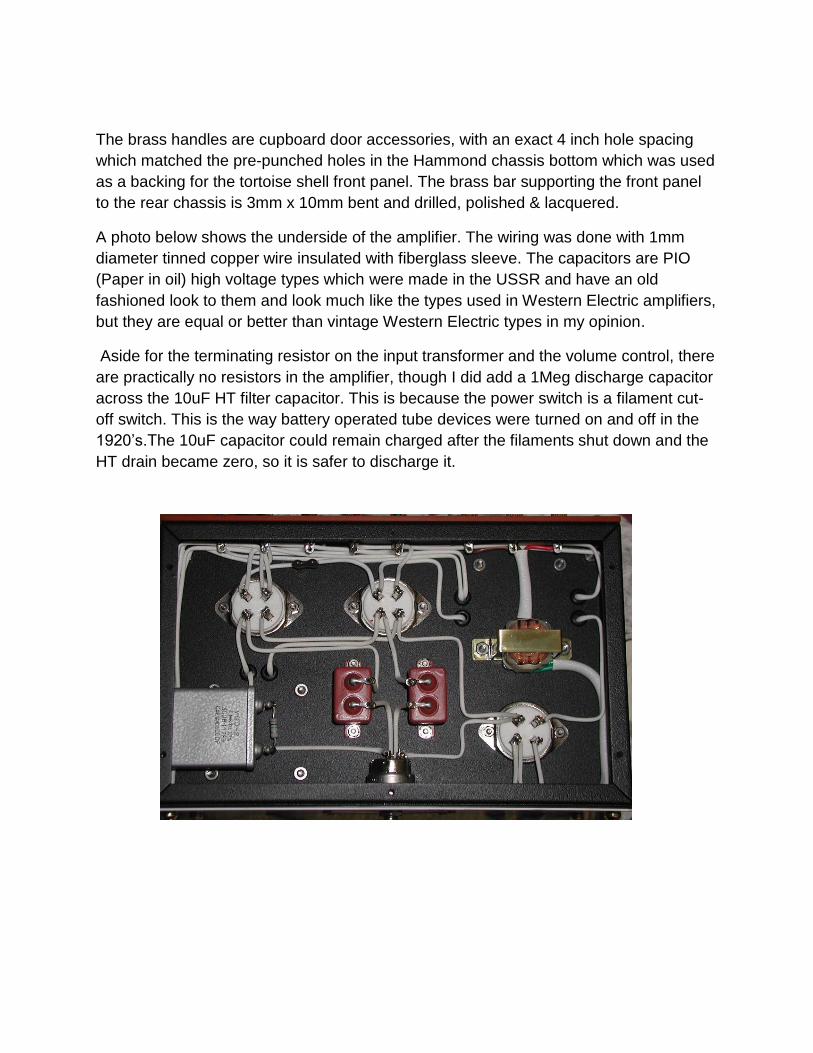
A photo below shows the underside of the amplifier. The wiring was done with 1mm
diameter tinned copper wire insulated with fiberglass sleeve. The capacitors are PIO
(Paper in oil) high voltage types which were made in the USSR and have an old
fashioned look to them and look much like the types used in Western Electric amplifiers,
but they are equal or better than vintage Western Electric types in my opinion.
Aside for the terminating resistor on the input transformer and the volume control, there
are practically no resistors in the amplifier, though I did add a 1Meg discharge capacitor
across the 10uF HT filter capacitor. This is because the power switch is a filament cut-
off switch. This is the way battery operated tube devices were turned on and off in the
1920’s.The 10uF capacitor could remain charged after the filaments shut down and the
HT drain became zero, so it is safer to discharge it.

Threads were cut into the chassis material with a 4-40 UNC roll tap for the screws that
attach the rear insulated panel and the metal base plate. This gives a better result than
self tapping screws often used on steel chassis. All the screws used are stainless steel.
The speaker cloth was stretched on a surface and glued to a cardboard backing which
had holes punched to support the fabric against prying fingers and allow the sound
pressure waves to pass through.
The photo below shows the base plate which carries rubber feet, screwed on with the 4-
40 UNC machine screws & nuts. The screws retaining the rubber feet are sleeved with
a metal bush as they always should be when rubber feet are retained with screws, or
the rubber gets compressed too much and loosens later along with the screws. Stick on
rubber feet are a very lazy but popular modern option and always fall off when the glue
deteriorates, so I never use them:
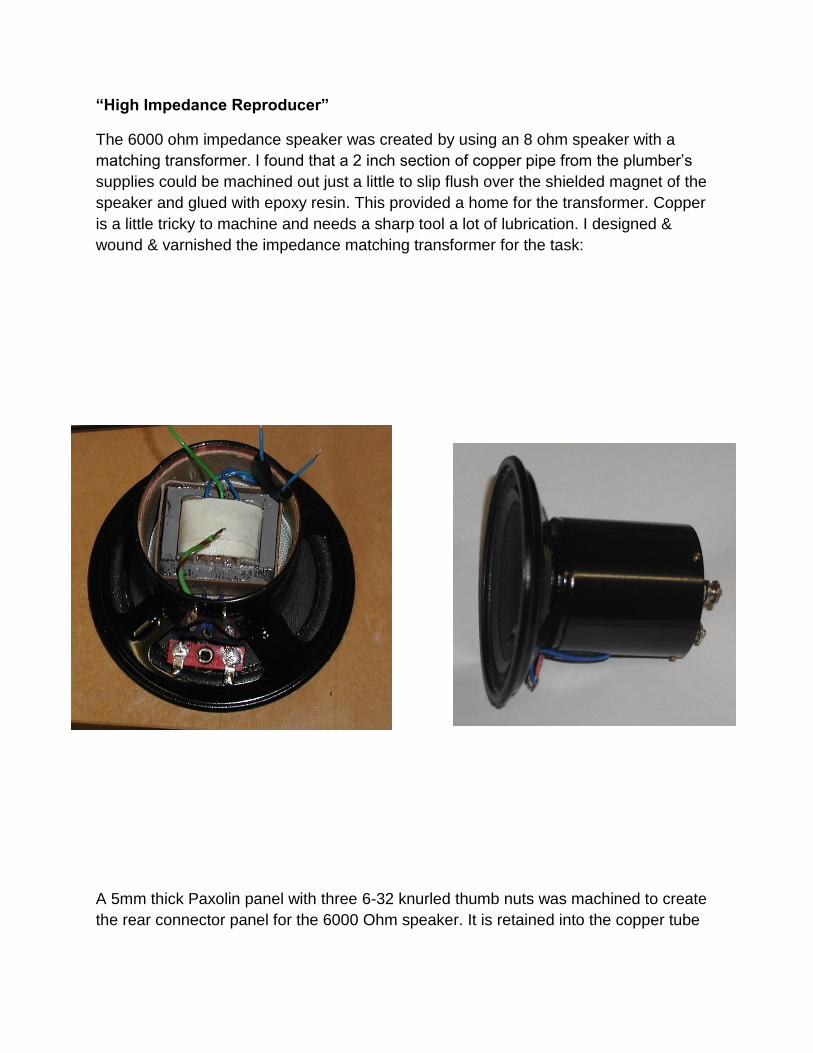
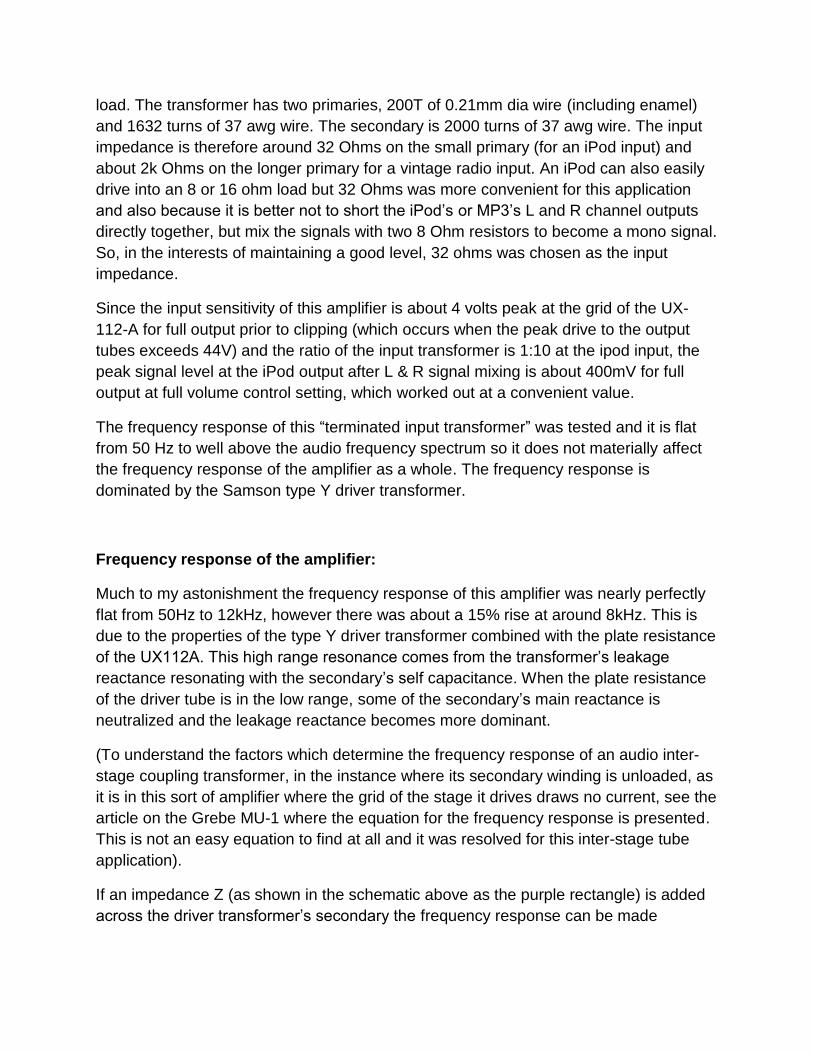
“High Impedance Reproducer”
The 6000 ohm impedance speaker was created by using an 8 ohm speaker with a
matching transformer. I found that a 2 inch section of copper pipe from the plumber’s
supplies could be machined out just a little to slip flush over the shielded magnet of the
speaker and glued with epoxy resin. This provided a home for the transformer. Copper
is a little tricky to machine and needs a sharp tool a lot of lubrication. I designed &
wound & varnished the impedance matching transformer for the task:
A 5mm thick Paxolin panel with three 6-32 knurled thumb nuts was machined to create
the rear connector panel for the 6000 Ohm speaker. It is retained into the copper tube

section with three 1.6mm hex head screws which came from a model railway parts
supplier.
The transformer (hand wound on a modified lathe with a turns counter) has a 4000 turn
center tapped primary of 37 awg wire on a bobbin for a 1 cm square laminated grain
oriented iron core. It has a total DC resistance of about 380 Ohms and a very large
primary inductance well over 70H. The secondary is composed from 140 turns of 0.31
mm diameter (including enamel) and the DC resistance is about 2 ohms. Due to the
relative small size of the transformer, its secondary resistance and to a lesser extent the
primary DC resistance adds a little to the total impedance. The transformer itself is a
25:1 turns ratio (impedance ratio of 625) the measured input impedance of the
transformer with the 8 ohm speaker connected is around 6200 Ohms or close to 6k.
This value was calculated to be around the optimal plate to plate load resistance for the
two vintage UX-171-A tubes running in Class AB1 with a bias voltage of -44 to -46v.
The schematic for the amplifier is shown below:
The input transformer T1 was created on a similar 1cm square bobbin and core. Since
the input to the amplifier must act as an isolated dummy speaker load for a typical
1920’s radio the input impedance was set by terminating the transformer into a 3k3
load. The transformer has two primaries, 200T of 0.21mm dia wire (including enamel)
and 1632 turns of 37 awg wire. The secondary is 2000 turns of 37 awg wire. The input
impedance is therefore around 32 Ohms on the small primary (for an iPod input) and
about 2k Ohms on the longer primary for a vintage radio input. An iPod can also easily
drive into an 8 or 16 ohm load but 32 Ohms was more convenient for this application
and also because it is better not to short the iPod’s or MP3’s L and R channel outputs
directly together, but mix the signals with two 8 Ohm resistors to become a mono signal.
So, in the interests of maintaining a good level, 32 ohms was chosen as the input
impedance.
Since the input sensitivity of this amplifier is about 4 volts peak at the grid of the UX-
112-A for full output prior to clipping (which occurs when the peak drive to the output
tubes exceeds 44V) and the ratio of the input transformer is 1:10 at the ipod input, the
peak signal level at the iPod output after L & R signal mixing is about 400mV for full
output at full volume control setting, which worked out at a convenient value.
The frequency response of this “terminated input transformer” was tested and it is flat
from 50 Hz to well above the audio frequency spectrum so it does not materially affect
the frequency response of the amplifier as a whole. The frequency response is
dominated by the Samson type Y driver transformer.
Frequency response of the amplifier:
Much to my astonishment the frequency response of this amplifier was nearly perfectly
flat from 50Hz to 12kHz, however there was about a 15% rise at around 8kHz. This is
due to the properties of the type Y driver transformer combined with the plate resistance
of the UX112A. This high range resonance comes from the transformer’s leakage
reactance resonating with the secondary’s self capacitance. When the plate resistance
of the driver tube is in the low range, some of the secondary’s main reactance is
neutralized and the leakage reactance becomes more dominant.
(To understand the factors which determine the frequency response of an audio inter-
stage coupling transformer, in the instance where its secondary winding is unloaded, as
it is in this sort of amplifier where the grid of the stage it drives draws no current, see the
article on the Grebe MU-1 where the equation for the frequency response is presented.
This is not an easy equation to find at all and it was resolved for this inter-stage tube
application).
If an impedance Z (as shown in the schematic above as the purple rectangle) is added
across the driver transformer’s secondary the frequency response can be made
completely flat over the 50Hz to 12kHz zone, dropping -3dB down at the high end at
around 13 to 13.5kHz.
A 220k resistor placed across the secondary of the Samson Y transformer flattened the
response with only a small drop in gain. However, this amplifier, in the interests of
simplicity and austerity does not have a tone control. I found after a listening test with a
range of source material, it was better to roll the high frequency response off below
12kHz. A 560pF capacitor was perfect for this task as well as eliminating the 8 kHz rise
just as the 220k resistor option had.
I never imagined when I conceived this amplifier that I would have to wind back its high
frequency response for comfortable listening. The frequency response of the speaker is
obviously playing a part here. Also I was very surprised by the good Bass response due
to the fact the Samson had made their transformers & chokes with very high range
inductances. The type Z choke for example is specified at 18 Henry per side,
corresponding to 72H plate to plate inductance, quite impressive for 1923 considering
the limited range of iron cores at that time. The -3dB point for the whole amplifier at the
low frequency end is 34Hz, not that the small sized panel mounted speaker could
reproduce this frequency at any reasonable sound pressure level.
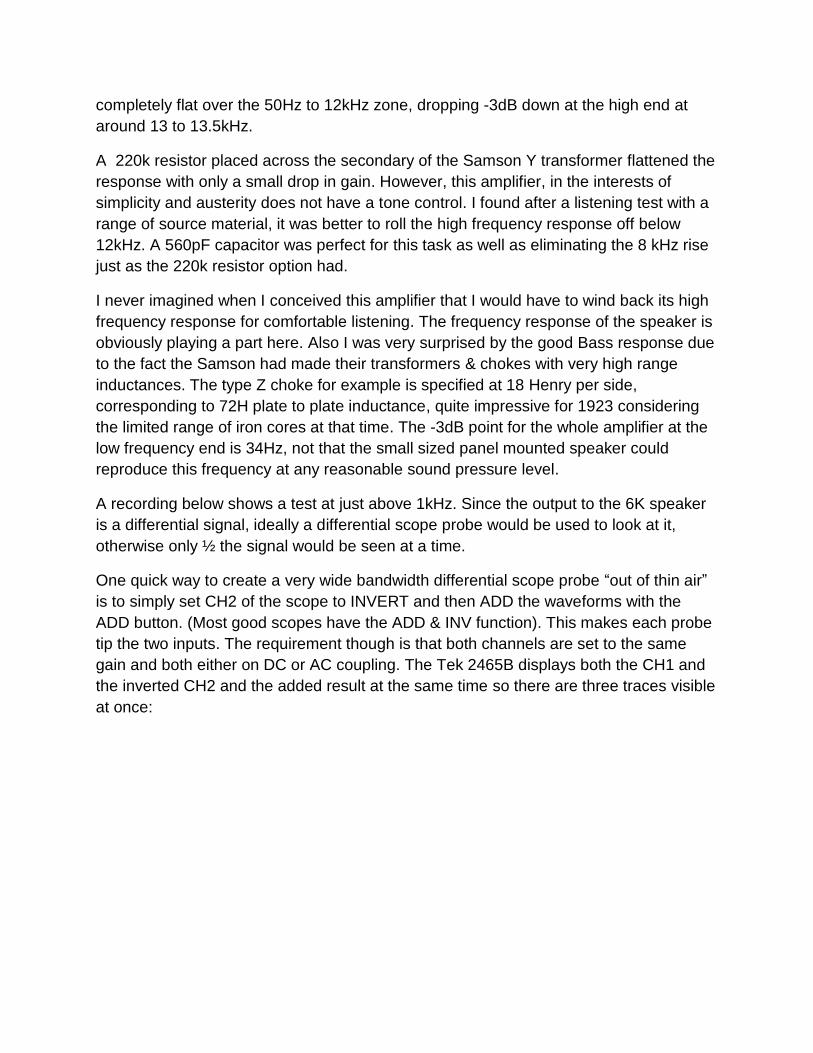
A recording below shows a test at just above 1kHz. Since the output to the 6K speaker
is a differential signal, ideally a differential scope probe would be used to look at it,
otherwise only ½ the signal would be seen at a time.
One quick way to create a very wide bandwidth differential scope probe “out of thin air”
is to simply set CH2 of the scope to INVERT and then ADD the waveforms with the
ADD button. (Most good scopes have the ADD & INV function). This makes each probe
tip the two inputs. The requirement though is that both channels are set to the same
gain and both either on DC or AC coupling. The Tek 2465B displays both the CH1 and
the inverted CH2 and the added result at the same time so there are three traces visible
at once:
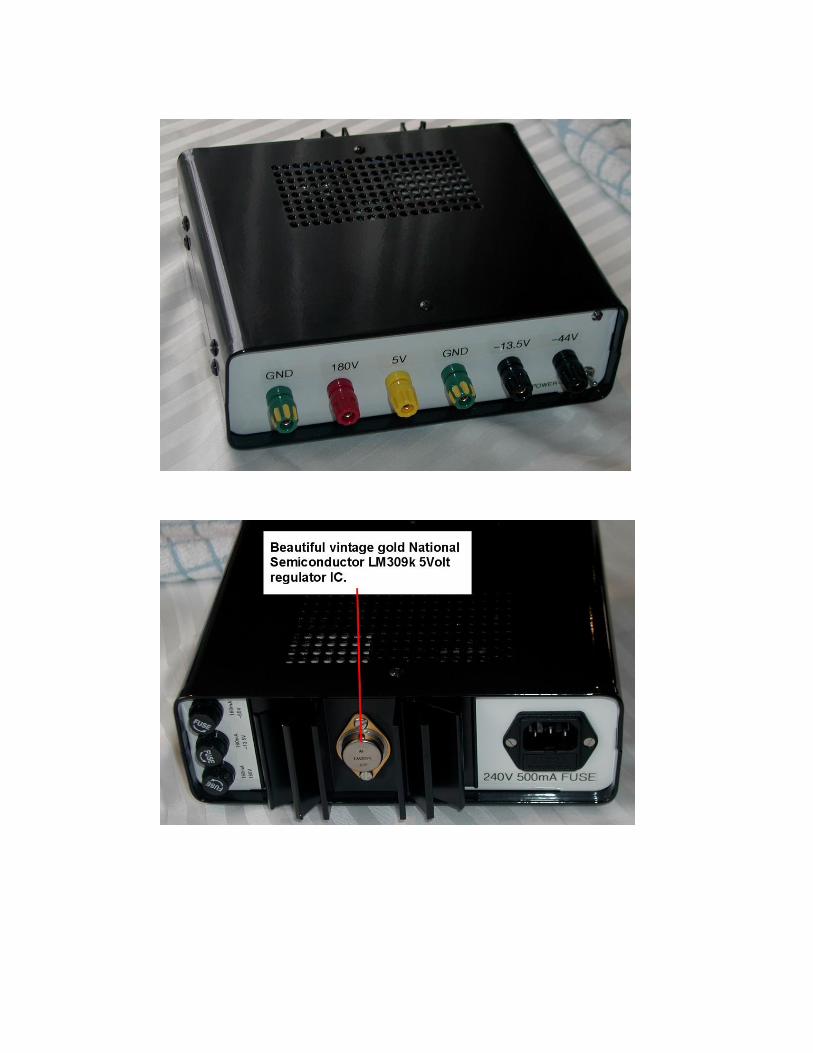
Battery Eliminator:
Since the tubes are “battery tubes” in the 1920’s this sort of amplifier would have been
powered by batteries, or perhaps a battery eliminator. I constructed a battery eliminator
along similar lines to the one I made for the Grebe MU-1 radio. The schematic and
images of it are shown below. For the 5V filament supply it uses a vintage 1970’s gold
plated National LM309k which is 1A capable. National created this masterpiece of
practically bullet-proof integration to run the power hungry TTL IC’s of the 1970’s era.
Having the negative side of the filaments grounded means that the +5v filament supply
contributes a little to the overall negative grid bias.
The 5V total current consumption of the 3 tube filaments is in this amplifier is 0.75A.
One Jaycar MM2002 transformer was un-stacked and its secondary winding bobbin re-
wound to create the required transformer for the 180V and the -13.5 and -44V bias

supplies. These transformers are handy in that the mains winding is on a separate
bobbin making this process of modifying it relatively easy.
Initially the design also had fusing on the negative bias supplies, but in the end I
decided to simply current limit them with 330 Ohm resistors to allow for any accidental
shorts. If the bias to the output tubes drops out they draw excessive current possibly
putting the output choke at risk which has a rated current carrying capacity of only
75mA.There is no direct current drawn from the bias supplies by the tube grids. In early
days the bias batteries, typically dry LeClanche types, would last their shelf life.
The BY448 in series with the -13.5V supply from the emitter of the MJE350 prevents
failure of the MJE350 if the -44V rail accidently gets shorted into the -13.5V rail.

Summary:
The active speaker created from vintage tubes and transformers has exceeded my
expectations. While no formal distortion measurements have been performed yet, only
calculated for the output stage at 1.3% 3rd harmonic distortion, the output to the speaker
over the audio range of 50Hz to 12kHz is a perfect looking sine wave on the scope right
up to maximum 2 watt power output where output stage clipping occurs. Increasing the
output tube’s bias to -55V resulted in the appearance of some crossover distortion so
the bias value was settled on -44v to -46v. With that figure the total HT current drain is
24mA, composed of about 7mA for the UX-112-A and about 8.5 mA for each UX-171-A.
This equates to a total idling power consumption (on the HT side of things) of about 4.3
watts, and the power consumption goes up at full volume to about 7 watts. Much lower
power dissipation than a Loftin –White amplifier and it has twice the audio power output
too.
No doubt the performance and efficiency of converting the electrical output power to
actual sound is improved by the modern speaker which has a much more powerful
magnet than a typical permanent magnet cone speaker of the 1920’s era. The only way
at that point in history to have a reasonably efficient cone speaker was to have an
electromagnet with many turns of fine wire.
It is quite remarkable that such good performance is available from these simple triodes
and a circuit virtually devoid of resistors. Yet the 1927 vintage Samson transformers
combined with these triodes of the era produces a result that is very impressive. It is
also a remarkable fact that the high quality Samson transformers are still working fine
nearly 90 years after they were made, as are the triodes. It is self evident that this
vintage technology is incompatible with modern manufacturing and life-cycle (built in
obsolescence) considerations. What company in this day and age would make
electronic apparatus with such a quality build that it possessed a 100 year life span or
likely more ?
************************************************************************************************