an angler’s cabinet - erbstößer gmbh -...
TRANSCRIPT

• Step by Step constructioninstruction.
• A complete bill of materials.
• Exploded view and elevationdrawings.
• How-to photos with instructivecaptions.
• Tips to help you complete theproject and become a betterwoodworker.
To download these plans,you will need Adobe Reader
installed on your computer. If you want to geta free copy, you can get it at: Adobe Reader.
Having trouble downloading the plans?• If you're using Microsoft Internet
Explorer, right click on the download linkand select "Save Target As" to downloadto your local drive.
• If you're using Netscape, right click onthe download link and select "Save LinkAs" to download to your local drive.
WJ072
“America’s leading woodworking authority”™
An Angler’s Cabinet
Published in Woodworker’s Journal “The Home Woodworker:Classic Projects for Your Shop and Home”
WOODWORKER'S JOURNAL ©2007 ALL RIGHTS RESERVED
Published in Woodworker’s Journal “The Home Woodworker:Classic Projects for Your Shop and Home”
This plan brought to you by:

WOODWORKER'S JOURNAL ©2007 ALL RIGHTS RESERVED
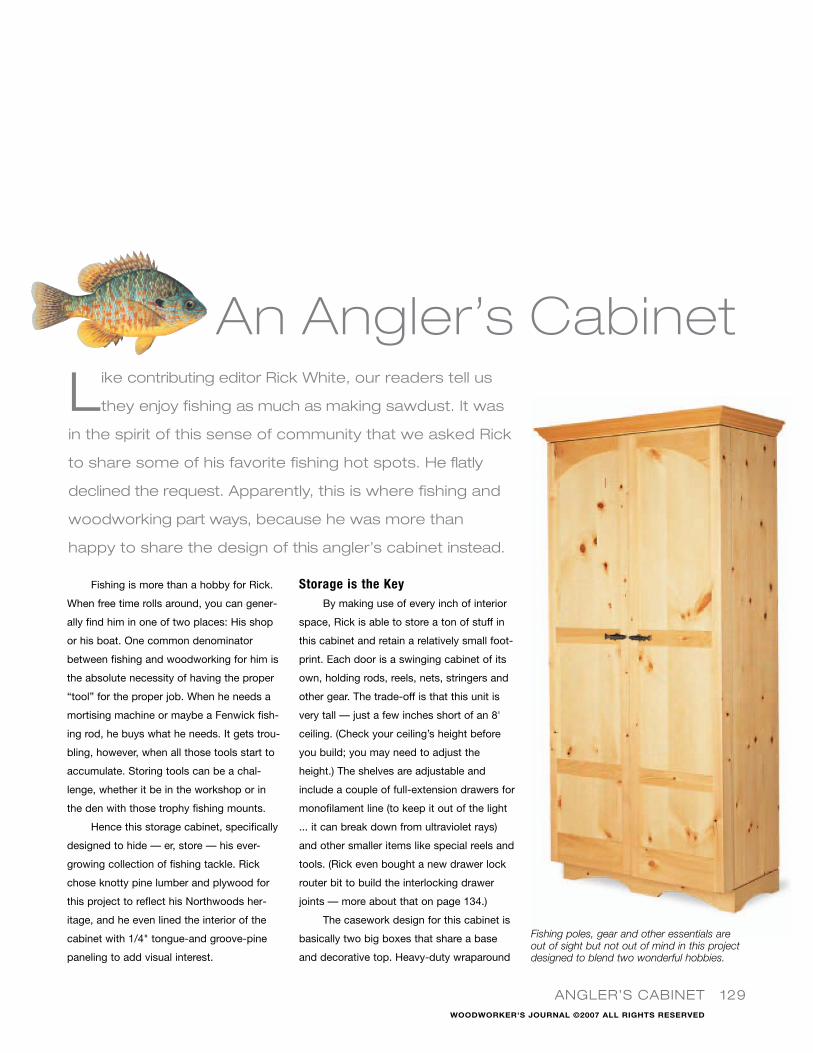
Fishing is more than a hobby for Rick.
When free time rolls around, you can gener-
ally find him in one of two places: His shop
or his boat. One common denominator
between fishing and woodworking for him is
the absolute necessity of having the proper
“tool” for the proper job. When he needs a
mortising machine or maybe a Fenwick fish-
ing rod, he buys what he needs. It gets trou-
bling, however, when all those tools start to
accumulate. Storing tools can be a chal-
lenge, whether it be in the workshop or in
the den with those trophy fishing mounts.
Hence this storage cabinet, specifically
designed to hide — er, store — his ever-
growing collection of fishing tackle. Rick
chose knotty pine lumber and plywood for
this project to reflect his Northwoods her-
itage, and he even lined the interior of the
cabinet with 1/4" tongue-and groove-pine
paneling to add visual interest.
Storage is the KeyBy making use of every inch of interior
space, Rick is able to store a ton of stuff in
this cabinet and retain a relatively small foot-
print. Each door is a swinging cabinet of its
own, holding rods, reels, nets, stringers and
other gear. The trade-off is that this unit is
very tall — just a few inches short of an 8'
ceiling. (Check your ceiling’s height before
you build; you may need to adjust the
height.) The shelves are adjustable and
include a couple of full-extension drawers for
monofilament line (to keep it out of the light
... it can break down from ultraviolet rays)
and other smaller items like special reels and
tools. (Rick even bought a new drawer lock
router bit to build the interlocking drawer
joints — more about that on page 134.)
The casework design for this cabinet is
basically two big boxes that share a base
and decorative top. Heavy-duty wraparound
ANGLER’S CABINET 129
Like contributing editor Rick White, our readers tell us
they enjoy fishing as much as making sawdust. It was
in the spirit of this sense of community that we asked Rick
to share some of his favorite fishing hot spots. He flatly
declined the request. Apparently, this is where fishing and
woodworking part ways, because he was more than
happy to share the design of this angler’s cabinet instead.
An Angler’s Cabinet
Fishing poles, gear and other essentials areout of sight but not out of mind in this projectdesigned to blend two wonderful hobbies.
WOODWORKER'S JOURNAL ©2007 ALL RIGHTS RESERVED

130 HOME PROJECTS
Door Exploded View
1
10
1010
2
3
4
5
6
7
8
9
99
9
9
9
11
11
12
12
13
14
15
3/4" 3/4"
115/16"
20"
441/4"
377/8"
18"
35" R.
8"
84"
3/8"
3/8"
3/8"
3/8"
3/8"
3/8"2"
2"
3"
3/8"
3/8"
3/8"
2" 6"
10
10
9 9
11
12
13
14
15
Top Door Rail(Front View)
Door Frame and Panel(Front View)
Middle Door Rail(Front View)
Note: All door grooves are 3/8"
deep by 1/4" wide.
Note: After makingthe top rail, dry-
assemble the doorand use that top
rail (held 3/8"proud) to strikeyour line on the
top of this panel.
Note: Grain continuityon the panels, from
top to bottom and sideto side (i.e., both
doors), will enhancethe appearance of
your cabinet.
Bottom Door Rail(Front View)
WOODWORKER'S JOURNAL ©2007 ALL RIGHTS RESERVED
ANGLER’S CABINET 131
MATERIAL LIST—CARCASS & DOOR
T x W x L
1 Carcass Sides (4) 3/4" x 213/16" x 84"
2 Carcass Tops and Bottoms (4) 3/4" x 213/16" x 19"
3 Fixed Shelves (2) 3/4" x 18" x 19"
4 Divider Shelves (6) 3/4" x 17" x 19"
5 Rod Base Shelves (2) 3/4" x 10 5/8" x 19"
6 Rod Divider Shelves (2) 3/4" x 105/8" x 19"
7 Carcass Backs (2) 1/4" x 19" x 831/4"
8 Pine Edging (1) 1/8" x 3/4" x 75'
9 Door Stiles (4) 3/4" x 2" x 84"
10 Middle Rails (4) 3/4" x 3" x 163/4"
11 Bottom Rails (2) 3/4" x 6" x 163/4"
12 Top Rails (2) 3/4" x 8" x 163/4"
13 Bottom Panels (2) 1/4" x 17" x 123/4"
14 Middle Panels (2) 1/4" x 17" x 24"
15 Top Panels (2) 1/4" x 17" x 343/4"
piano hinges support the doors and some fancy, fish-
shaped pulls dress the unit. If you have a well outfit-
ted shop and a measure of determination, you might
be able to polish off this piece in a long weekend.
Constructing the Big BoxSlice up your sheet stock first, cutting the four
sides and their tops and bottoms (pieces 1 and 2)
from knotty pine plywood (see the Cutting Diagram on
page 134). RIck chose to make one large box for each
compartment of the cabinet. After you assemble each
box, slice the door sections off the front of each one,
ensuring perfectly matched doors and cabinet sec-
tions. Before you start assembly, look to the Elevation
Drawings on the facing page for the locations of the
dadoes and rabbets you’ll need to plow for the
shelves and back, and the tops and bottoms.
Be sure to check the actual thickness of your
lumber and plywood before you start the various
machining operations — even manufactured stock
can vary in thickness. Once you’ve completed your
machining, join the sides, tops and bottoms with glue
and screws set into counterbored holes. (Plug the
holes later with flat-topped pine plugs.) Now make the
fixed shelves and divider shelves (pieces 3 and 4) that
go into the gear storage side of the cabinet. On the
rod-holding side you will need to make matching pairs
of rod divider and rod base shelves (pieces 5 and 6).
The Scaled Drawings on page 134 show the shapes
and machining details for these solid-lumber pieces.
Lastly, mount the plywood backs (pieces 7) into each
compartment, making sure the units are square before
the glue cures.
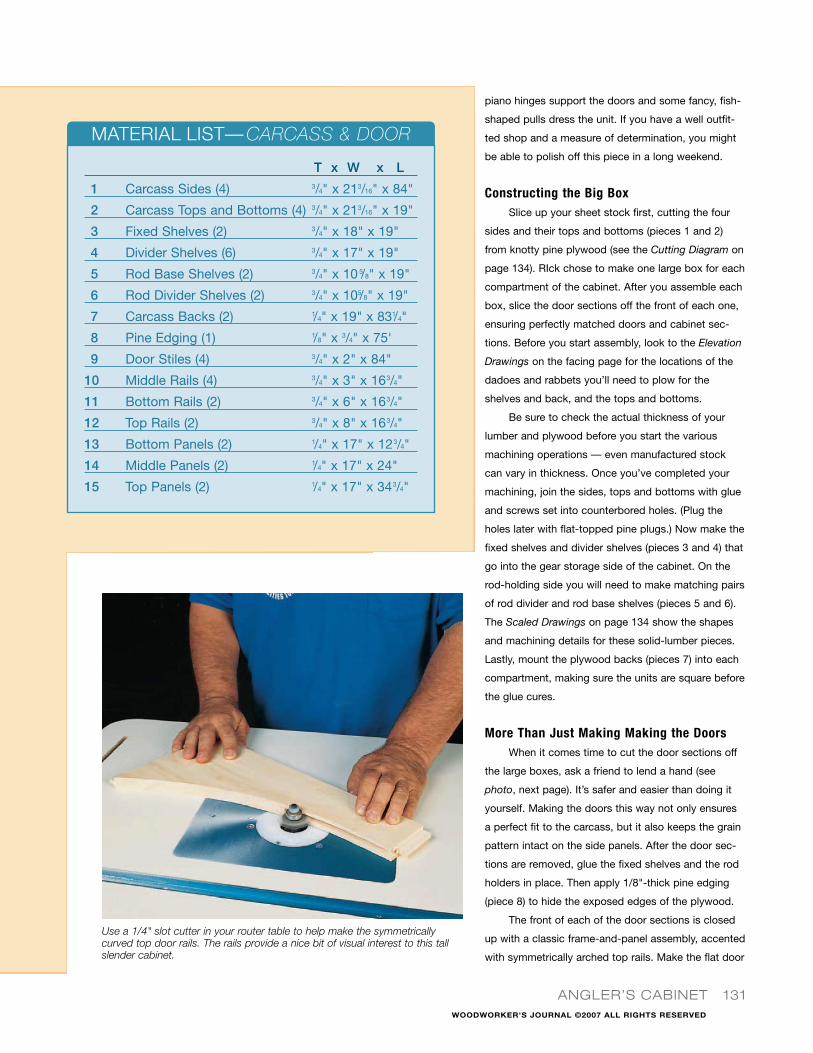
More Than Just Making Making the DoorsWhen it comes time to cut the door sections off
the large boxes, ask a friend to lend a hand (see
photo, next page). It’s safer and easier than doing it
yourself. Making the doors this way not only ensures
a perfect fit to the carcass, but it also keeps the grain
pattern intact on the side panels. After the door sec-
tions are removed, glue the fixed shelves and the rod
holders in place. Then apply 1/8"-thick pine edging
(piece 8) to hide the exposed edges of the plywood.
The front of each of the door sections is closed
up with a classic frame-and-panel assembly, accented
with symmetrically arched top rails. Make the flat door
Use a 1/4" slot cutter in your router table to help make the symmetricallycurved top door rails. The rails provide a nice bit of visual interest to this tallslender cabinet.
WOODWORKER'S JOURNAL ©2007 ALL RIGHTS RESERVED

132 HOME PROJECTS
Left Box Exploded View
11
43/4"
393/8"
123/4"107/8" 103/16"
1/8"
181/16"
3"
1/8"
1/4"1/4"
3/4"
3/4"
3/4"
3/4"
3/4"
3/4"
3/4"
3/4"
19"
30
31
29
32
31
30
3434
33
31
12
13
14
15
3/4" 3/4"
115/16"
16"
1
1
2
2
7Carcass Sides
(Side Views)
Carcass Top and Bottom (Back Edge)
Note: Alldadoes andrabbets are 1/4" deep.
Left Box Right Box
Note: Middleshelves are on
shelf pins.
Rip line
Rip line
Crown Molding(Full-size: You can
purchase these piecescommonly at the
lumberyard.)
3/8"
1/4"
2 Look for a helpinghand when it’s time
to rip the carcassassembly in two.
WOODWORKER'S JOURNAL ©2007 ALL RIGHTS RESERVED

ANGLER’S CABINET 133
Crown & Pedestal Exploded View
30
31
29
32
31
30
3434
33
31
12
13
14
15
3/4" 3/4"
115/16"
16"
31 34
33
32
29 3334
28
31
30
35
Left Box Right Box
Optional flyrod opening8" x 8"
Spacers areadded to fillgap createdby hinges.
Carcass: (Section View)
CL
24
23
Pedestal Front (Scale Drawing)
Pedestal Sides (Scale Drawing)
One square equals one inch
1
10
2
3
4
5
6
7
8
9
11
12
13
14
15
16
17
18
19
20
21
22
23
24
24
26
28
23
2723
25
25
Note: Reveal strips areheld 1/4" back fromperimeter to create
a shadow line.
WOODWORKER'S JOURNAL ©2007 ALL RIGHTS RESERVED

134 HOME PROJECTS
Knotty pine plywood is a goodchoice for this cabinet because ithas the stability of regular ply-wood combined with the beautyof knotty pine lumber. You willneed to purchase this plywood ata full-service lumberyard — onethat commonly deals with cabi-net-grade hardwood and ply-wood. (While you’re there, pickup the crown molding.) Use thecutting diagrams at right for siz-ing down each sheet of plywood.
CUTTING DIAGRAM FOR 3/4" KNOTTY PINE PLYWOOD
1 1 1 1
2
2
2
2
3
3
4
4
4
4
4
4
26
29
Drawer Exploded View
6
5
11
2"3" Dia.
1" Dia.
13/8" Dia.
21/2"
1/2"
51/4"
91/4"
4"
4" 4"
4"
87/8"
Rod Base and Divider Shelves(Top Views)
(Machining may vary. Useyour own rods and reelsfor final determination.)
Trim 7/16" off the back edges of the base and divider shelves that fit in the door.
We used a drawer lock bit (above) to formthe corner joinery on his drawers. The bitcuts an interlocking joint in both the sides
and front/back with one set-up in your routertable. Be sure to lightly mark the orientation
of your stock before machining.
Simply changethe orientation
of your stockand the fence
position for theopposing cuts.
16
18
1819
19
22
Drawer Corner(Top View)
18
18
1919
WOODWORKER'S JOURNAL ©2007 ALL RIGHTS RESERVED

ANGLER’S CABINET 135
panels with 1/4" knotty pine plywood.
Select straight pine lumber to make the
stiles and rails (pieces 9 through 12) and cut
these pieces to size. Tight knots are accept-
able, as they add to the overall rustic look of
the cabinet. Start the machining by plowing
a 1/4"-wide by 3/8"-deep groove down the
length of the stiles’ inside edges, using a
1/4" dado head. Do the same to the appro-
priate edges of the middle and bottom rails.
Now set up your miter gauge and employ
the same dado head to form the full-width
tenons at the ends of all the rails. (The top
rails remain rectangular for the moment.)
On a large, flat work surface, temporari-
ly clamp the stiles and rails together as they
will appear on the front of the cabinet. (You
don’t need the panels during this test
assembly.) Make sure the clamp-up is
square and true. At the center seam, meas-
ure down 377⁄8" and strike a 35" radius
across the top rails to create their gentle
curve. Disassemble the clamp-up and take
the top rails over to your band saw. Cut the
arcs and then sand the rough saw marks
smooth while holding the rails together as a
pair. Chuck a 1/4" bearing-guided slot cutter
in your router table and plow a groove cen-
tered along the curved edge of each rail, as
shown in the photo on page 131.
With that done, you’re ready to cut up
your 1/4" knotty pine plywood to form the
flat panel sections (pieces 13, 14 and 15) of
the door. The key here is to select material in
such a way that the grain flows visually
across the front of both doors and through
the rails. Test-fit the door assemblies togeth-
er, leaving off the curved top rails. Lay the
curved rails on top of the assemblies (but
hold them 3/8" proud of the top of the door
stiles), and use the curved bottom edge to
strike a pencil line onto the upper door
panel. Take the top panels to the band saw
and cut the curve right on the pencil line.
You may want to scribe the line with a shop
knife to prevent grain tear-out. Do one final
test-fit before you glue and clamp the door
subassemblies together. Then secure the
door fronts to the cut-off door assemblies
with glue and finish nails. Scrape and sand
the doors smooth, and you’re ready to move
on to making the drawers.
Making the Drawers, Index Holesand Top Opening
The two drawers are made mostly of
1/2" material (pieces 16 through 21) with
1/4" plywood bottoms (pieces 22). We used
a drawer lock router bit (see drawings on the
previous page) to form the drawers’ corner
joints. It works slick: Just cut the sides,
fronts and backs to size, plow the 1/4" bot-
tom dadoes (1/4" up from the bottoms), and
use the bit to rout the corner joints on your
router table. A little test-fitting on some
scrap lumber is all the set-up that’s required.
Once the drawer boxes are glued up,
mount them in the cabinet on full-extension
drawer slides and use double-sided tape to
fit the faces to the front of each drawer. Nice
and easy. With the drawers ready to go,
move on to drilling the index holes for the
shelf support pegs.
If you’re a fly fisher, one last detail you
may want to include is the opening at the
top of the rod holder side the cabinet. Rick
bored it so his fly rods could extend out
through the top. You may not need this
detail, as the interior height is sufficient for
most ordinary fishing rods. Make this open-
ing with a jigsaw, and cover the exposed
plywood with your 1/8" pine edging.
Adding the Crowning TouchesThis cabinet sits on a separate pedestal
and is capped off with crown molding (pur-
chased), held in place with some bracing.
The pedestal is framed up with a front, backTongue-and-groove pine paneling is a final detail in this Northwoods fishing cabinet. Finished withorange shellac, this project will look great in your den, cabin or vacation home.
A little hardware splurge adds a rustic touchand some identity to this angler’s cabinet.
WOODWORKER'S JOURNAL ©2007 ALL RIGHTS RESERVED

and two side pieces as well as a center sup-
port beam (pieces 23 through 25). See the
Exploded View Drawing on page 133 for
construction details. Band-saw the exposed
front and side members of the pedestal with
the decorative curves shown in the Scaled
Drawings on page 133. Glue and screw the
base together and drop the base top (piece
26) in place to square up the subassembly.
Glue cleats (pieces 27) in each corner to
provide a little extra support. Now trim out
the pedestal with 1/4"-thick reveal strips
(piece 28) mitered around the top edge,
holding them back 1/4". These strips sepa-
rate the carcass from the base (and, later,
the crown molding), and create a pleasing
shadow line. They also allow the large doors
to swing freely.
Next, create the crown molding sub-
assembly. Wrap the crown molding around a
3/4" plywood cap (pieces 29, 30 and 31). On
the underside of the cap secure more of the
reveal strip with glue and small brads. Next,
cut an opening to match the fly rod hole in
the top of the rod holder side the cabinet. (If
you didn’t include this detail, ignore this
step.) Finally, install bracing (pieces 32
through 34) to add support to the top’s
crown molding (see drawings).
A word to the wise: Because the cabi-
net is so tall, install the base and top after
you’ve placed the cabinet in your room. This
will make it a lot easier to set the cabinet
upright in a typical house with 8-foot ceil-
ings. Mount the subassemblies prematurely
and the cabinet may not fit.
Adding Some Fishy HardwareWith most of the work done, temporari-
ly mount the pedestal and base to the cabi-
net. Then hang the doors, using wrap-
around piano hinges for strength and dura-
bility. You will have to notch the wrapping
aspect of the hinges to fit around the fixed
shelves. To accommodate the thickness of
the hinges, glue several small spacers
(pieces 35) in place.
Rick selected specialty fish-shaped
pulls on the doors and drawers. You can buy
it from Rockler (800-610-0883 or www.rock-
ler.com). Then mount magnetic catches to
hold the doors shut. Finally, to add to the
Northwoods theme, cut and fit 1/4" pine
tongue-and-groove paneling (piece 36)
inside the cabinet and doors. Glue it in place
(see photo on page 135) and use a few
small brads for insurance.
Finishing Up with ShellacAfter the paneling is in place, it’s time
for a thorough sanding inside and out
(always a pain!) followed by several coats of
orange shellac (see the tip on mixing shellac
on the next page). Sand lightly after the first
coat to remove any dust nibs. After that, you
can apply the remaining coats without sand-
ing — shellac partially dissolves the layer of
finish underneath and fuses to it for a good
bond without sanding. You just can’t beat
orange shellac as a finish on pine lumber. It
brings out the beauty of the grain and knots
and adds a real warmth to the wood.
Now, all you have to do is figure out a
way to quietly get all your fishing gear into
the cabinet without anyone noticing how
much stuff you actually own!
136 HOME PROJECTS
MATERIAL LIST—DRAWERS, PEDESTAL & CROWN
T x W x L
16 Small Drawer Face (1) 1/2" x 6" x 181/4"
17 Large Drawer Face (1) 1/2" x 12" x 181/4"
18 Sm. Drawer Front and Back (2)1/2" x 6" x 171/4"
19 Sm. Drawer Sides (2) 1/2" x 6" x 17"
20 Lg. Drawer Front and Back (2) 1/2" x 12" x 171/4"
21 Lg. Drawer Sides (2) 1/2" x 12" x 17"
22 Drawer Bottoms (2) 1/4" x 161/2" x 17"
23 Pedestal Front and Back (2) 3/4" x 4 1/4" x 40"
24 Pedestal Sides (2) 3/4" x 41/4" x 18"
25 Pedestal Support Beam (1) 3/4" x 3 1/2" x 161/2"
26 Pedestal Top (2) 3/4" x 161/2" x 38 1/2"
27 Support Cleats (4) 3/4" x 3/4" x 31/2"
28 Reveal Strip (1) 1/4" x 3/4" x 250"
29 Crown Cap (1) 3/4" x 2111/16" x 39 1/2"
30 Crown Front Molding* (1) 3/4" x 3 5/8" x 45"
31 Crown Side Molding* (2) 3/4" x 3 5/8" x 22"
32 Crown Long Brace* (1) 3/4" x 2" x 433/4"
33 Crown Medium Braces* (2) 3/4" x 2" x 217/8"
34 Crown Short Braces* (2) 3/4" x 2" x 13 3/16"
35 Door Spacers (6) 1/8" x 3/4" x 2"
36 Pine Paneling (1) 1/4" x 40 sq. ft.
WOODWORKER'S JOURNAL ©2007 ALL RIGHTS RESERVED

ANGLER’S CABINET 137
Quick Tips
Floor Kill SwitchIf you frequently cut large sheets of plywood for
casework, you know how hard it is to reach the
table saw’s switch when something goes wrong.
Many catalog and retail outlets sell a foot-operated
switch that is plugged into the wall, then the saw is
plugged into the switch. By placing the switch a
couple of feet in front of the saw, but a little to one
side, you can easily reach it in an emergency, yet
avoid accidentally turning off the saw in the middle
of a cut.
Mixing and Storing ShellacShellac flakes are mixed with denatured alcohol in
various ratios, or cuts. One pound of shellac mixed
with one gallon of alcohol produces what is called
a “one-pound cut.” A three-pound cut would still
only have one gallon of alcohol, but three pounds
of flakes. The lower the cut, the thinner the mix.
That means more coats, but a smoother applica-
tion. It’s all a matter of personal preference. Either
way, make sure you buy fresh flakes, as older
stock will give you some serious application
headaches. You can also buy shellac as premixed
liquid in a can, but it will typically be closer to a
three-pound cut. Thin it with denatured alcohol,
just as do with flake shellac.
Even fresh flake shellac can take several hours to
dissolve in alcohol. You can speed up the process
by pulverizing the flakes in a plastic freezer bag
with a rolling pin or by chopping them up in a cof-
fee grinder.
Whether you mix flakes or liquid shellac to your
desired cut, be sure to do the mixing in a clean,
plastic or glass container. Shellac will react with
metal — be it a coffee can or metal lid — which
will change its color. Store mixed shellac for
no more than six months, and test it before
you use it on scrap. If the shellac doesn’t
cure to a hard film in a few hours, it’s too old
and should be discarded.
Table Saw Blade Alignment JigThis little jig (above and below) slides in the miter gauge
slot on your table saw and makes it possible to align
the blade perfectly with the slot. Make it from two
pieces of scrap and drive a hex-head lag bolt into the
end. To use it, set the head of the bolt so it just barely
grazes the saw blade at the front of the blade, as close
to the teeth as possible. Then slide the jig to the back
of the blade and without moving the bolt, check again
to see if any minor realignment is required. Most
experts agree that both the front and the rear of the
blade should be exactly parallel with the miter slot —
as well as to the rip fence.
WOODWORKER'S JOURNAL ©2007 ALL RIGHTS RESERVED