an introduction to creating your own mt4 alerts · expert4x - an introduction to creating your own...
TRANSCRIPT
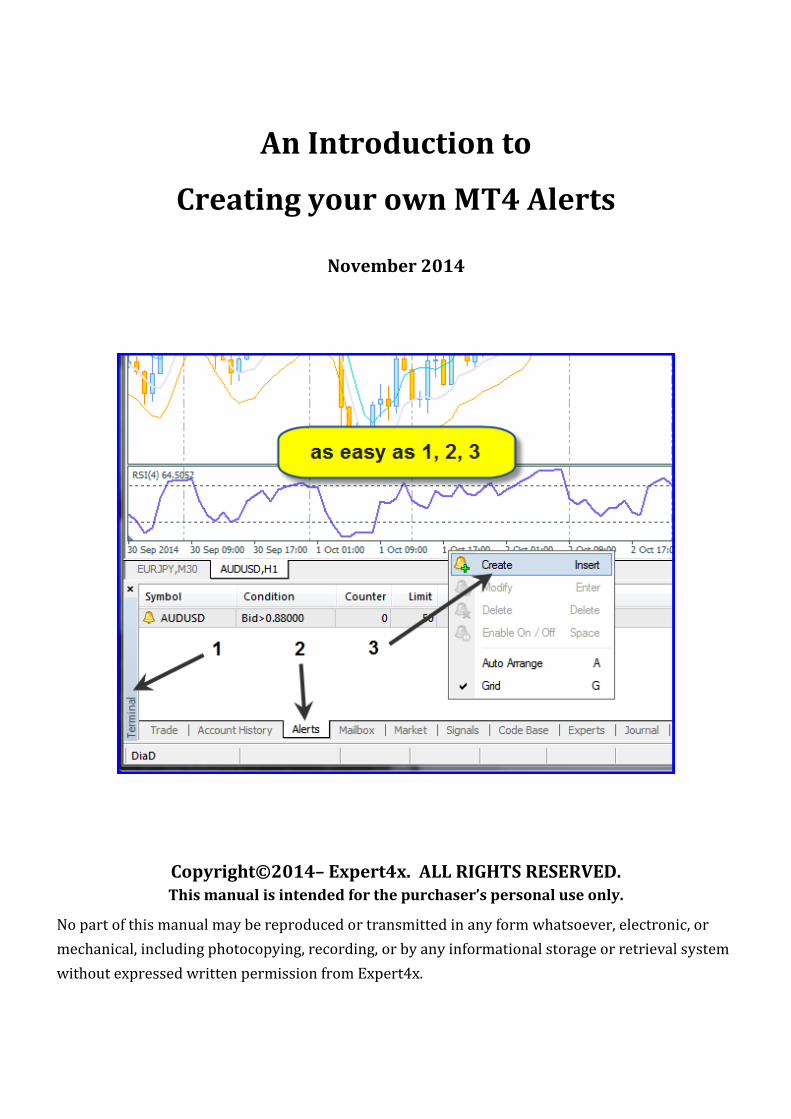
An Introduction to
Creating your own MT4 Alerts
November 2014
Copyright©2014– Expert4x. ALL RIGHTS RESERVED. This manual is intended for the purchaser’s personal use only.
No part of this manual may be reproduced or transmitted in any form whatsoever, electronic, or
mechanical, including photocopying, recording, or by any informational storage or retrieval system
without expressed written permission from Expert4x.
Expert4x - An Introduction to Creating your own MT4 Alerts November 2014
Page 2 of 26
Contents
What is a Metatrader Alert? ....................................................................................................................................... 3
Why do traders use an Alert? ..................................................................................................................................... 3
Types of alerts ............................................................................................................................................... 3
When to use an alert ...................................................................................................................................... 3
How to create a Price Alert in Metatrader ...................................................................................................... 4
Alert Management ................................................................................................................................................... 10
Multiple Alerts ......................................................................................................................................................... 10
Alert Actions ............................................................................................................................................................. 11
The need to have MT4 running and connected to the internet ........................................................................... 11
Sound Alert ........................................................................................................................................................... 12
File Alert ................................................................................................................................................................ 14
Mail Alert .............................................................................................................................................................. 16
Notification ........................................................................................................................................................... 23
Problem Solving ....................................................................................................................................................... 26
Expert4x - An Introduction to Creating your own MT4 Alerts November 2014
Page 3 of 26
What is a Metatrader Alert? Metatrader has an Alert facility built into the trading platform. It is designed to alert the trader when a pre-
determined market condition is met.
Why do traders use an alert? Traders often want to be able to move away from their computer monitors and take a break from looking at their
charts. But they don’t want to miss a potential trade that they have been patiently waiting for. This is where
alerts can make the life of a trader a bit easier. By setting an alert a trader can be notified if a certain condition
has been met.
Types of alerts There are two methods to receive alerts from your Metatrader platform (MT4). The first is to use the Alert
mechanism built into MT4. The second way is to use a purpose built indicator that runs within MT4. This course
will cover the first method: using the Alert service that comes with MT4.
When to use an alert It is important to consider the type of alert you will use and how it relates to your trading style. If you scalp a few
pips as price moves up & down then alerts probably won’t work for you. By the time you get the alert and get
back to the computer the trading opportunity has probably passed. Also a sound alert will be almost
instantaneous where an email alert may take minutes to negotiate the internet and come through to you.
Many traders consider that alerts other than sound are best applied to trading strategies that use the one hour
charts and higher. This way any delay in receiving an alert has less effect because there isn’t a rush to get to the
chart and set a trade.
Note: if you are using an email client on your computer make sure the email program you are using checks for
emails regularly. My email client is scheduled to receive emails every minute. When it was originally setup it was
set to receive every 15 minutes – that is a long delay for trading!
Expert4x - An Introduction to Creating your own MT4 Alerts November 2014
Page 4 of 26
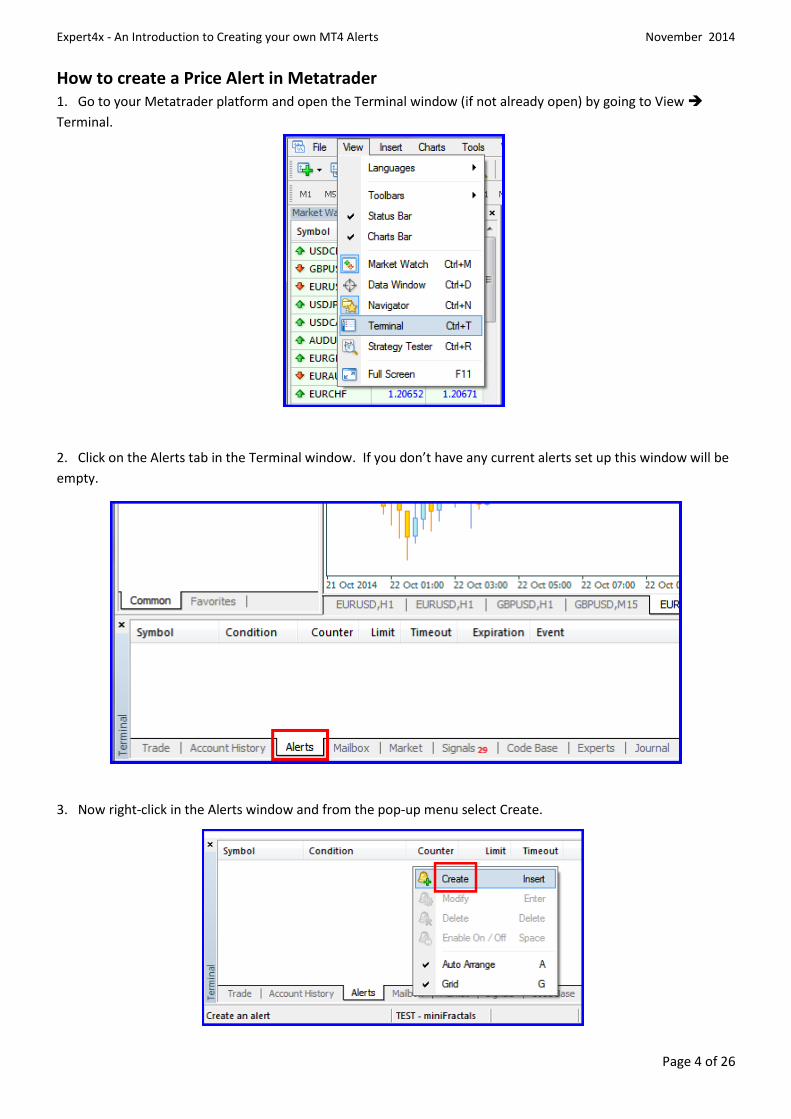
How to create a Price Alert in Metatrader 1. Go to your Metatrader platform and open the Terminal window (if not already open) by going to View
Terminal.
2. Click on the Alerts tab in the Terminal window. If you don’t have any current alerts set up this window will be
empty.
3. Now right-click in the Alerts window and from the pop-up menu select Create.
Expert4x - An Introduction to Creating your own MT4 Alerts November 2014
Page 5 of 26
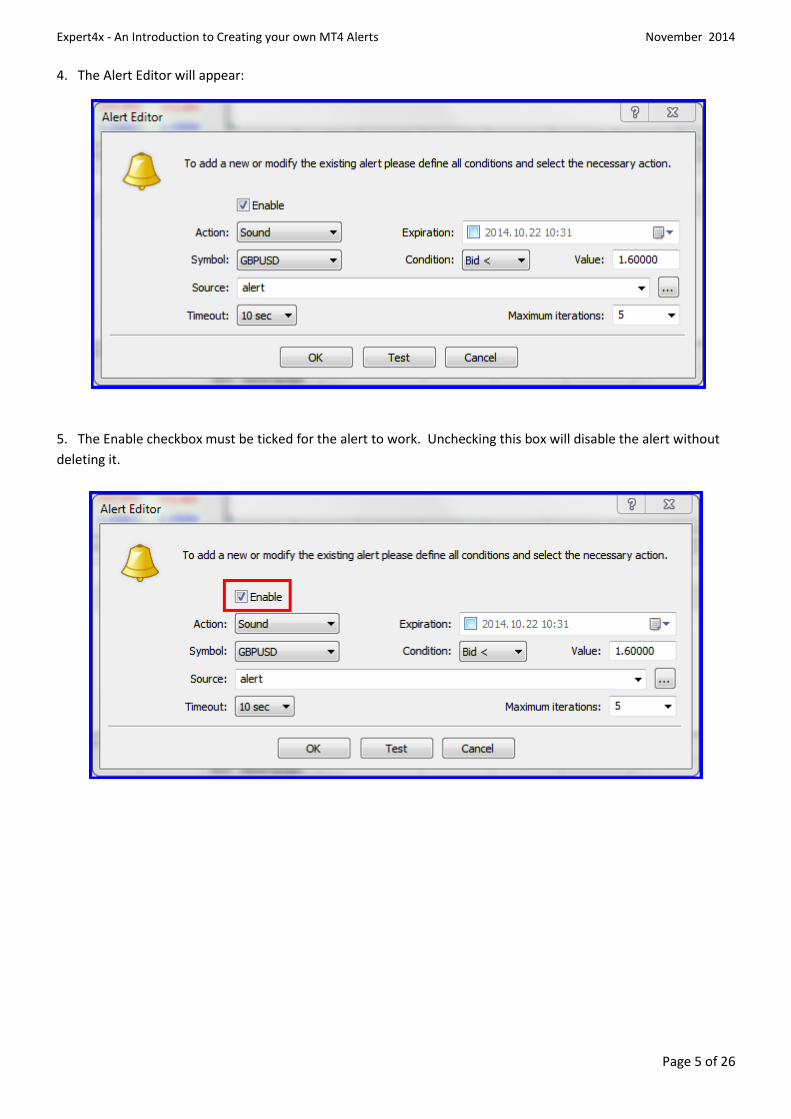
4. The Alert Editor will appear:
5. The Enable checkbox must be ticked for the alert to work. Unchecking this box will disable the alert without
deleting it.
Expert4x - An Introduction to Creating your own MT4 Alerts November 2014
Page 6 of 26
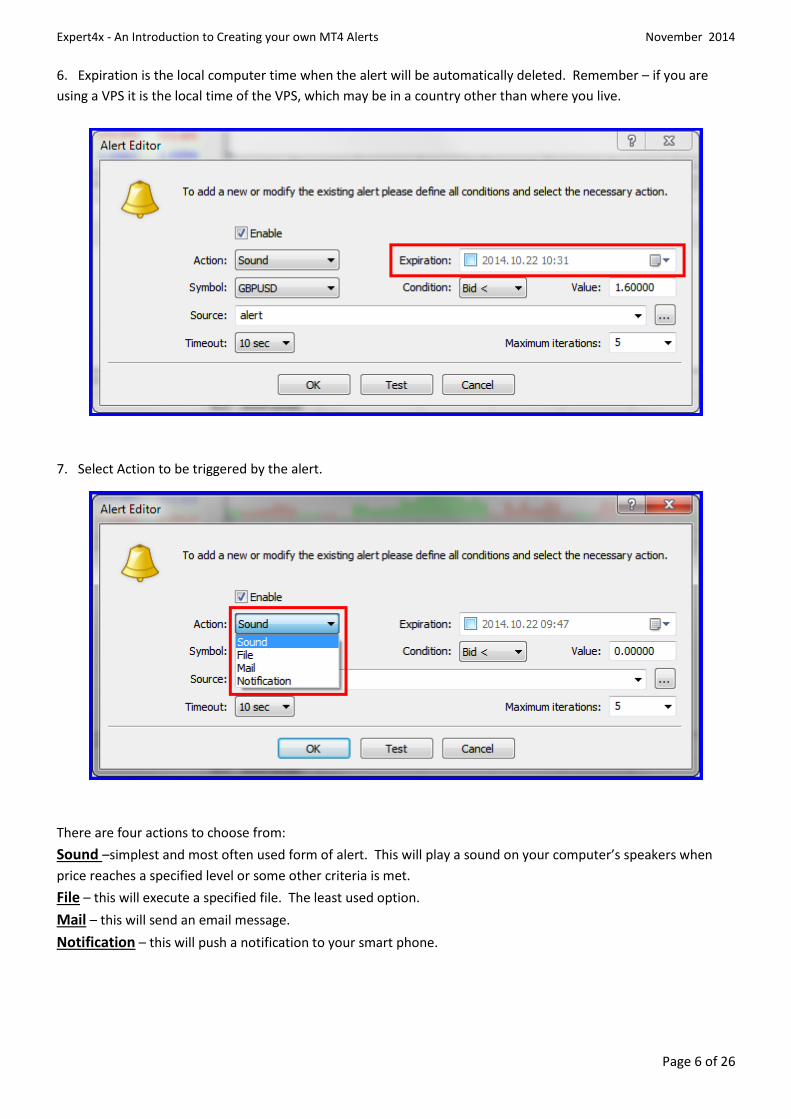
6. Expiration is the local computer time when the alert will be automatically deleted. Remember – if you are
using a VPS it is the local time of the VPS, which may be in a country other than where you live.
7. Select Action to be triggered by the alert.
There are four actions to choose from:
Sound –simplest and most often used form of alert. This will play a sound on your computer’s speakers when
price reaches a specified level or some other criteria is met.
File – this will execute a specified file. The least used option.
Mail – this will send an email message.
Notification – this will push a notification to your smart phone.

Expert4x - An Introduction to Creating your own MT4 Alerts November 2014
Page 7 of 26
8. Now you can select the Symbol for the alert, Condition and Value. The Symbol is selected from a list of all
Symbols available in the Market Watch window. Select from five Conditions that will trigger an alert and then
type the required price level where the alert is to be triggered.
These are the Conditions that will trigger an alert:
Bid > — If the current Bid price exceeds the specified value, the alert will trigger.
Bid < — If the current Bid price is less than the specified value, the alert will trigger.
Ask > — If the current Ask price exceeds the specified value, the alert will trigger.
Ask < — If the current Ask price less than the specified value, the alert will trigger.
Time = — As soon as this time comes, the alert will trigger.
9. Select the required Source. The display will vary depending on which Action is selected.

Expert4x - An Introduction to Creating your own MT4 Alerts November 2014
Page 8 of 26
10. Select the Timeout required. This is the period between alerts being triggered.
11. Set the Maximum iterations to determine the maximum number of times the alert will be triggered before
being turned off. If you want a different number to those in the dropdown list you may type any number directly
into the box – such as “20”, as shown in the screenshot.
Expert4x - An Introduction to Creating your own MT4 Alerts November 2014
Page 9 of 26
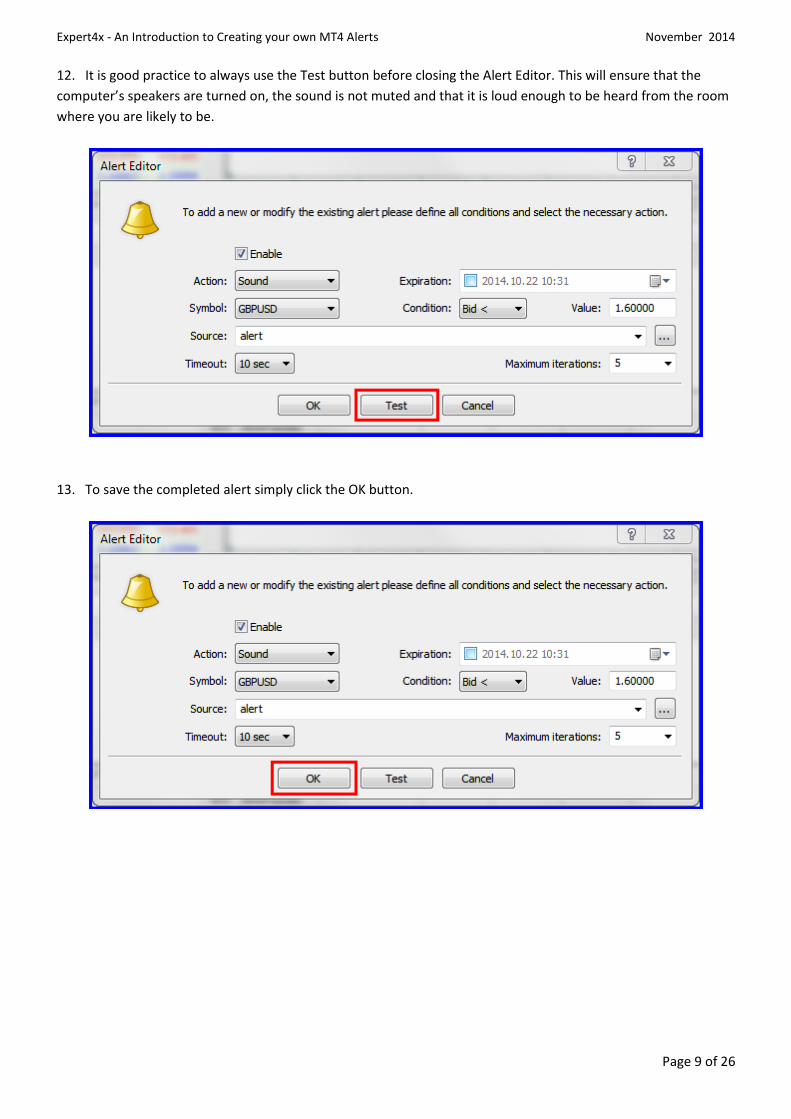
12. It is good practice to always use the Test button before closing the Alert Editor. This will ensure that the
computer’s speakers are turned on, the sound is not muted and that it is loud enough to be heard from the room
where you are likely to be.
13. To save the completed alert simply click the OK button.
Expert4x - An Introduction to Creating your own MT4 Alerts November 2014
Page 10 of 26
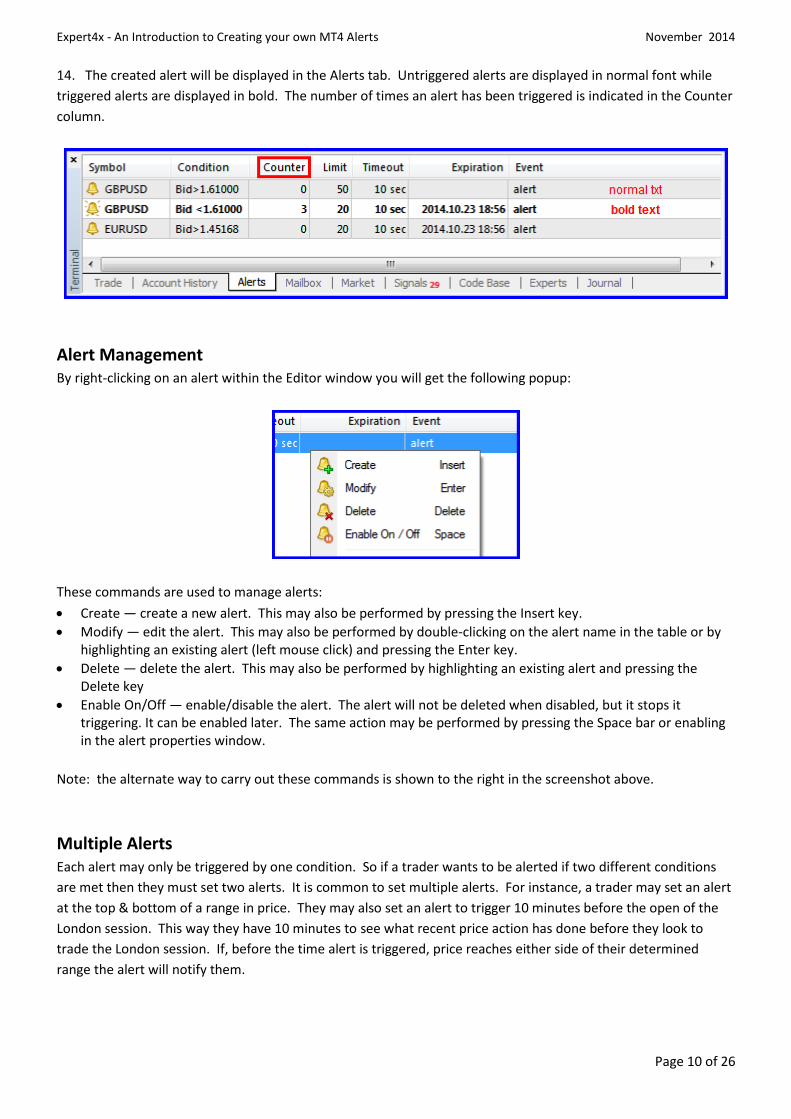
14. The created alert will be displayed in the Alerts tab. Untriggered alerts are displayed in normal font while
triggered alerts are displayed in bold. The number of times an alert has been triggered is indicated in the Counter
column.
Alert Management By right-clicking on an alert within the Editor window you will get the following popup:
These commands are used to manage alerts:
Create — create a new alert. This may also be performed by pressing the Insert key.
Modify — edit the alert. This may also be performed by double-clicking on the alert name in the table or by highlighting an existing alert (left mouse click) and pressing the Enter key.
Delete — delete the alert. This may also be performed by highlighting an existing alert and pressing the Delete key
Enable On/Off — enable/disable the alert. The alert will not be deleted when disabled, but it stops it triggering. It can be enabled later. The same action may be performed by pressing the Space bar or enabling in the alert properties window.
Note: the alternate way to carry out these commands is shown to the right in the screenshot above.
Multiple Alerts Each alert may only be triggered by one condition. So if a trader wants to be alerted if two different conditions
are met then they must set two alerts. It is common to set multiple alerts. For instance, a trader may set an alert
at the top & bottom of a range in price. They may also set an alert to trigger 10 minutes before the open of the
London session. This way they have 10 minutes to see what recent price action has done before they look to
trade the London session. If, before the time alert is triggered, price reaches either side of their determined
range the alert will notify them.
Expert4x - An Introduction to Creating your own MT4 Alerts November 2014
Page 11 of 26
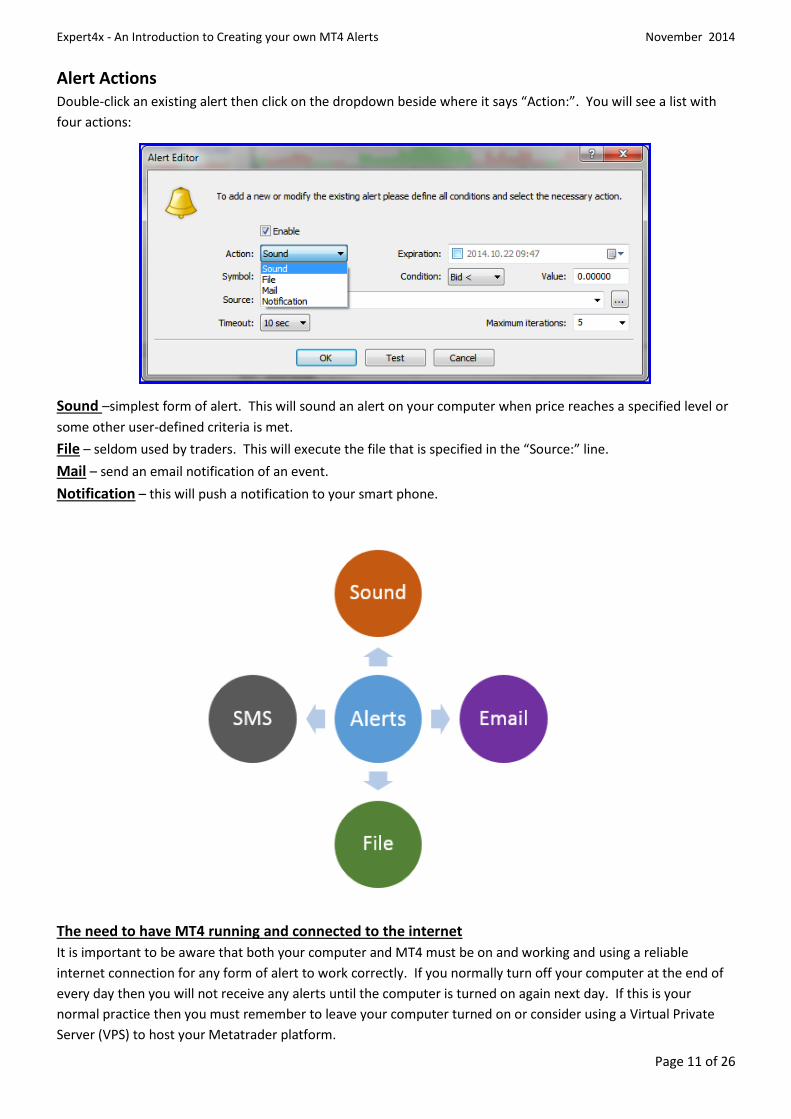
Alert Actions Double-click an existing alert then click on the dropdown beside where it says “Action:”. You will see a list with
four actions:
Sound –simplest form of alert. This will sound an alert on your computer when price reaches a specified level or
some other user-defined criteria is met.
File – seldom used by traders. This will execute the file that is specified in the “Source:” line.
Mail – send an email notification of an event.
Notification – this will push a notification to your smart phone.
The need to have MT4 running and connected to the internet
It is important to be aware that both your computer and MT4 must be on and working and using a reliable
internet connection for any form of alert to work correctly. If you normally turn off your computer at the end of
every day then you will not receive any alerts until the computer is turned on again next day. If this is your
normal practice then you must remember to leave your computer turned on or consider using a Virtual Private
Server (VPS) to host your Metatrader platform.
Expert4x - An Introduction to Creating your own MT4 Alerts November 2014
Page 12 of 26
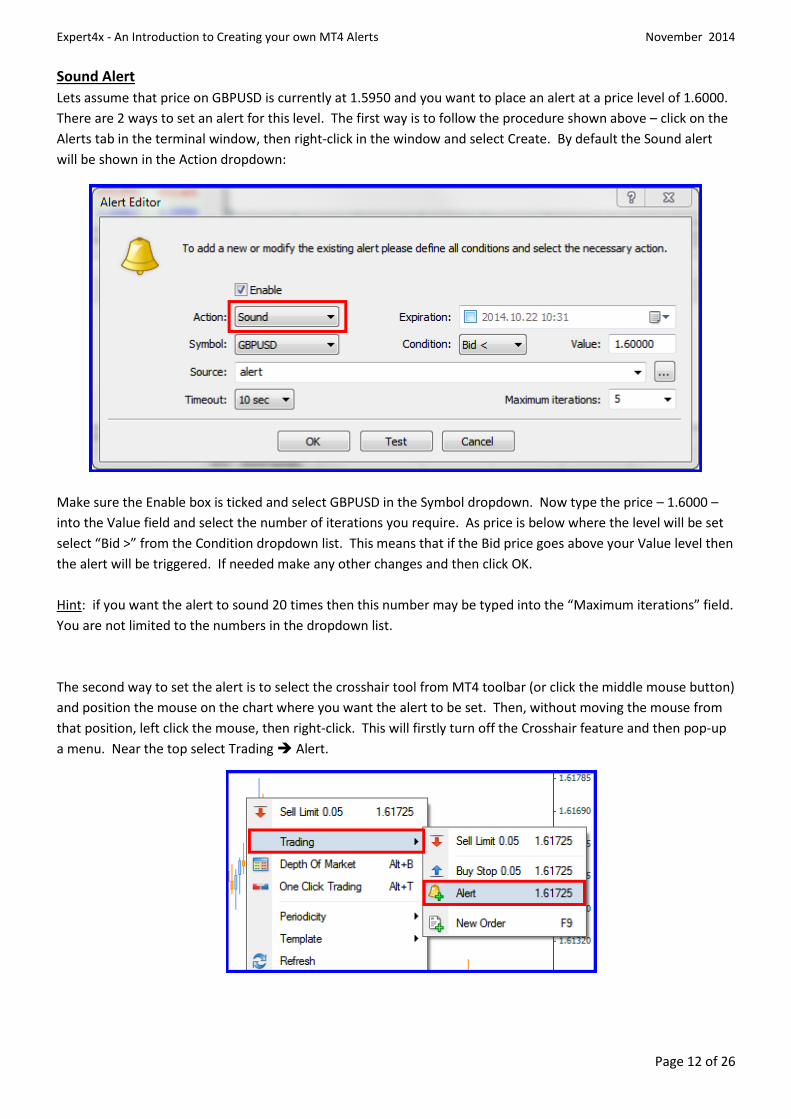
Sound Alert
Lets assume that price on GBPUSD is currently at 1.5950 and you want to place an alert at a price level of 1.6000.
There are 2 ways to set an alert for this level. The first way is to follow the procedure shown above – click on the
Alerts tab in the terminal window, then right-click in the window and select Create. By default the Sound alert
will be shown in the Action dropdown:
Make sure the Enable box is ticked and select GBPUSD in the Symbol dropdown. Now type the price – 1.6000 –
into the Value field and select the number of iterations you require. As price is below where the level will be set
select “Bid >” from the Condition dropdown list. This means that if the Bid price goes above your Value level then
the alert will be triggered. If needed make any other changes and then click OK.
Hint: if you want the alert to sound 20 times then this number may be typed into the “Maximum iterations” field.
You are not limited to the numbers in the dropdown list.
The second way to set the alert is to select the crosshair tool from MT4 toolbar (or click the middle mouse button)
and position the mouse on the chart where you want the alert to be set. Then, without moving the mouse from
that position, left click the mouse, then right-click. This will firstly turn off the Crosshair feature and then pop-up
a menu. Near the top select Trading Alert.

Expert4x - An Introduction to Creating your own MT4 Alerts November 2014
Page 13 of 26
This will create an alert at the level specified by the mouse position. It is shown on the right hand side of the
chart by a short dashed line with an arrow.
As this level is above current market price the alert will be set by default to sound an alert 5 times when the Bid
price crosses above the specified level. If you want to change any of the alert settings it is easily done by going to
the Alerts tab at the bottom of the Terminal window. Simply right-click on the alert & select Modify from the
pop-up menu (or double click the alert in the Alert tab window).
The simplest and quickest way to change the level of the alert is to click and hold down the left mouse button on
the alert line and then drag the alert line to the new position. Then release the mouse button.
Note: if you have ticked “Use ‘Alt’ key to drag trade levels” under Tools Options Charts then you will also
need to press the Alt key while doing the above procedure to drag the alert line to a new level.
Hint: if you wish to change the colour of the alert line press F8 on the keyboard. This will open the chart
Properties box. Change the colour of the “Ask line” – this is also the colour used for the alert line.

Expert4x - An Introduction to Creating your own MT4 Alerts November 2014
Page 14 of 26
File Alert
It is possible to execute a file when an alert is triggered. However, the File Alert is seldom used by many traders.
Open the Alerts Editor (see page 3), click the dropdown arrow beside Action and select File..
Now you have to select a file to be executed when the alert is triggered. To the right of the Source textbox is a
button with three dots – an ellipsis.
Expert4x - An Introduction to Creating your own MT4 Alerts November 2014
Page 15 of 26
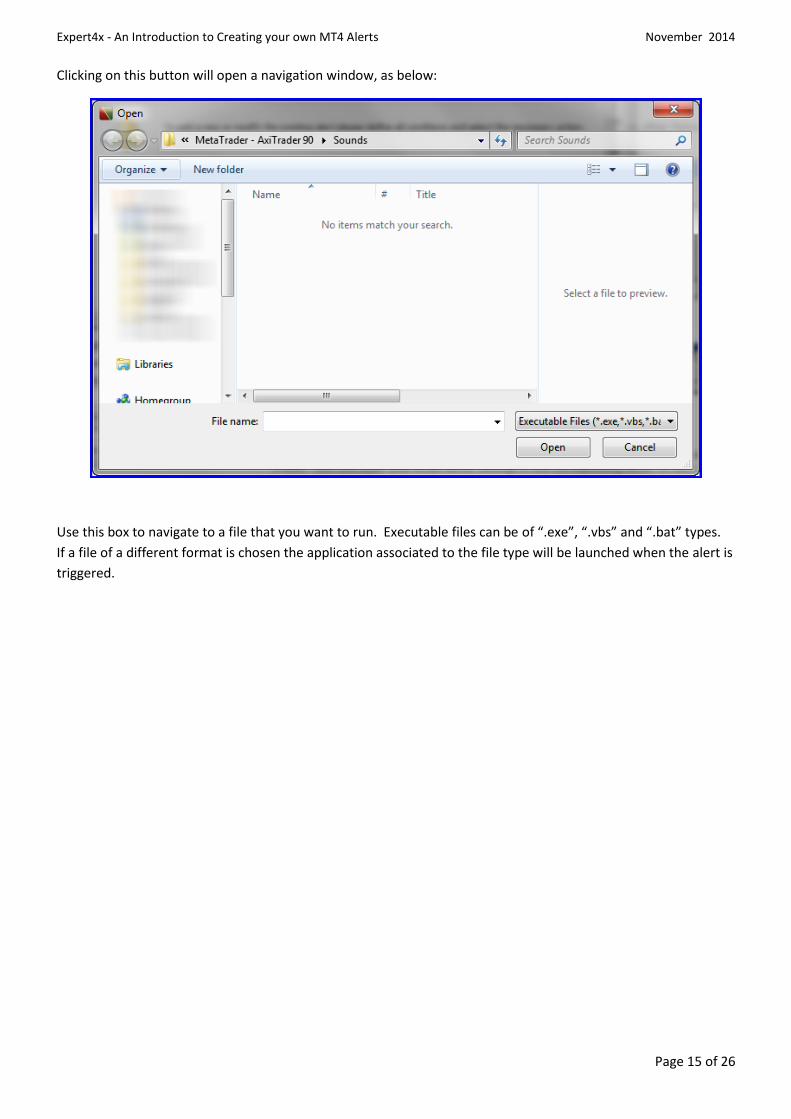
Clicking on this button will open a navigation window, as below:
Use this box to navigate to a file that you want to run. Executable files can be of “.exe”, “.vbs” and “.bat” types.
If a file of a different format is chosen the application associated to the file type will be launched when the alert is
triggered.
Expert4x - An Introduction to Creating your own MT4 Alerts November 2014
Page 16 of 26
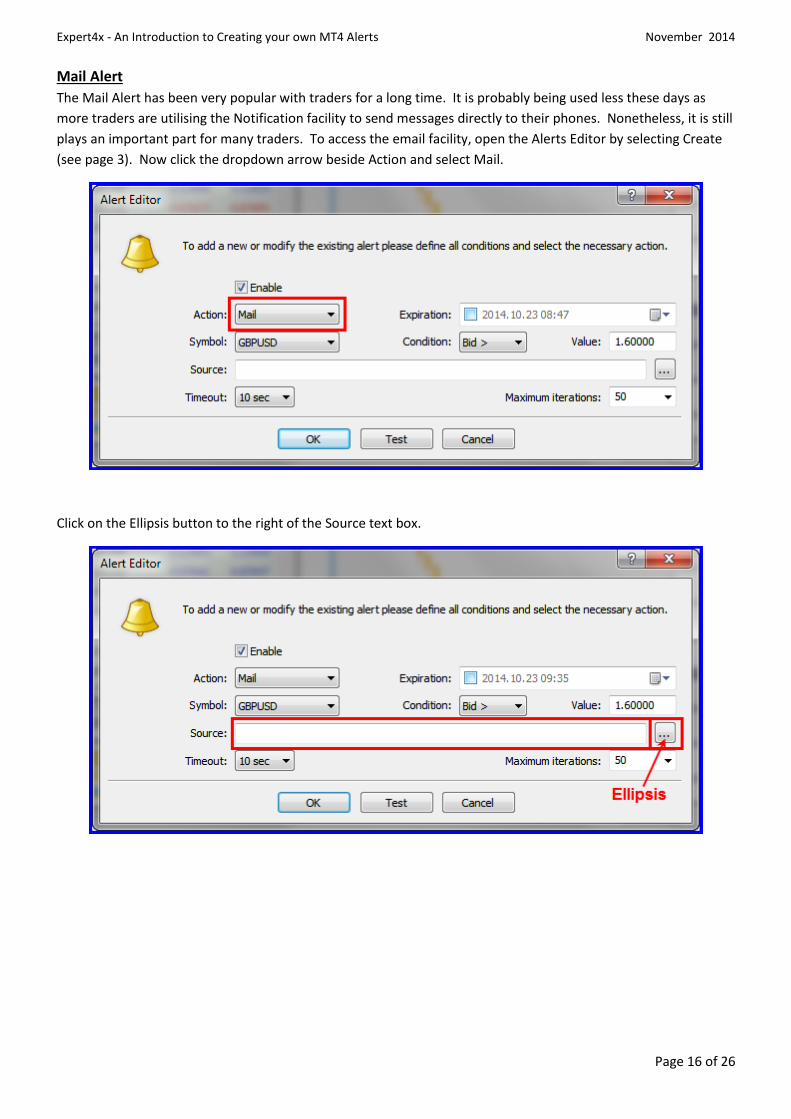
Mail Alert
The Mail Alert has been very popular with traders for a long time. It is probably being used less these days as
more traders are utilising the Notification facility to send messages directly to their phones. Nonetheless, it is still
plays an important part for many traders. To access the email facility, open the Alerts Editor by selecting Create
(see page 3). Now click the dropdown arrow beside Action and select Mail.
Click on the Ellipsis button to the right of the Source text box.
Expert4x - An Introduction to Creating your own MT4 Alerts November 2014
Page 17 of 26
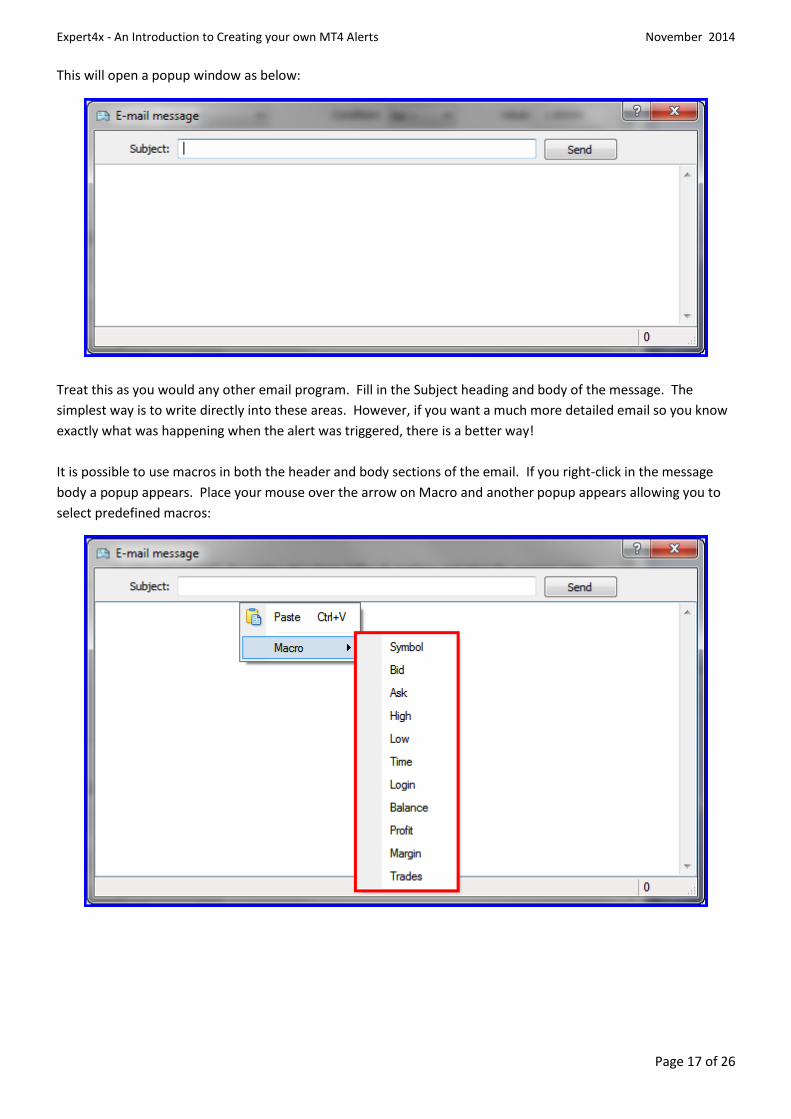
This will open a popup window as below:
Treat this as you would any other email program. Fill in the Subject heading and body of the message. The
simplest way is to write directly into these areas. However, if you want a much more detailed email so you know
exactly what was happening when the alert was triggered, there is a better way!
It is possible to use macros in both the header and body sections of the email. If you right-click in the message
body a popup appears. Place your mouse over the arrow on Macro and another popup appears allowing you to
select predefined macros:
Expert4x - An Introduction to Creating your own MT4 Alerts November 2014
Page 18 of 26
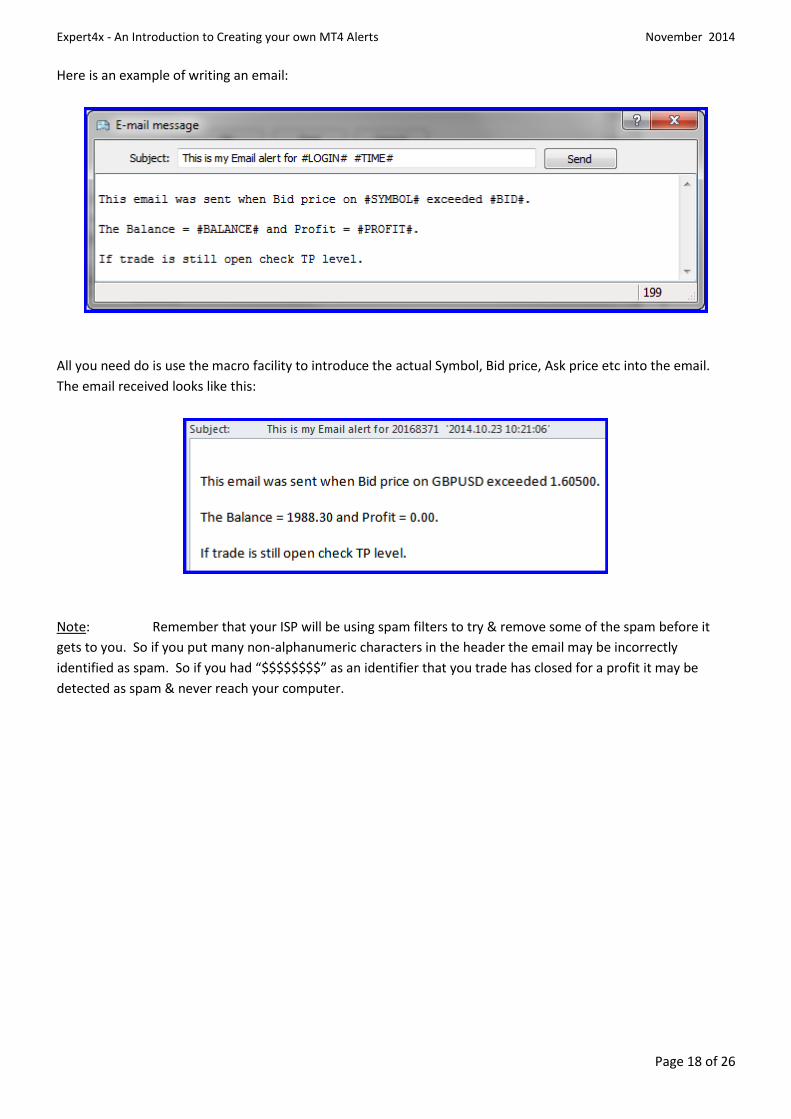
Here is an example of writing an email:
All you need do is use the macro facility to introduce the actual Symbol, Bid price, Ask price etc into the email.
The email received looks like this:
Note: Remember that your ISP will be using spam filters to try & remove some of the spam before it
gets to you. So if you put many non-alphanumeric characters in the header the email may be incorrectly
identified as spam. So if you had “$$$$$$$$” as an identifier that you trade has closed for a profit it may be
detected as spam & never reach your computer.
Expert4x - An Introduction to Creating your own MT4 Alerts November 2014
Page 19 of 26
Now that you know how to access and write the email we need to make sure you can send it. While this sounds
like it should be an easy process it is complicated by the fact that Metatrader does not support SSL authentication
used by many email services. (SSL is an acronym for Secure Sockets Layer – this is a cryptographic protocol
designed to provide secure communication over the internet.)
If you have an email account setup with your Internet Service Provider (ISP) then you probably received details of
your email account from them. Have a look on those details and see if your service uses SSL protocol.
Alternatively, go to their customer service web page, as many ISPs list their internet setting for clients to use. Or
go to your email client and look at the account settings to see if SSL is used; or ask your ISP directly. You will also
need your email details for a later stage.
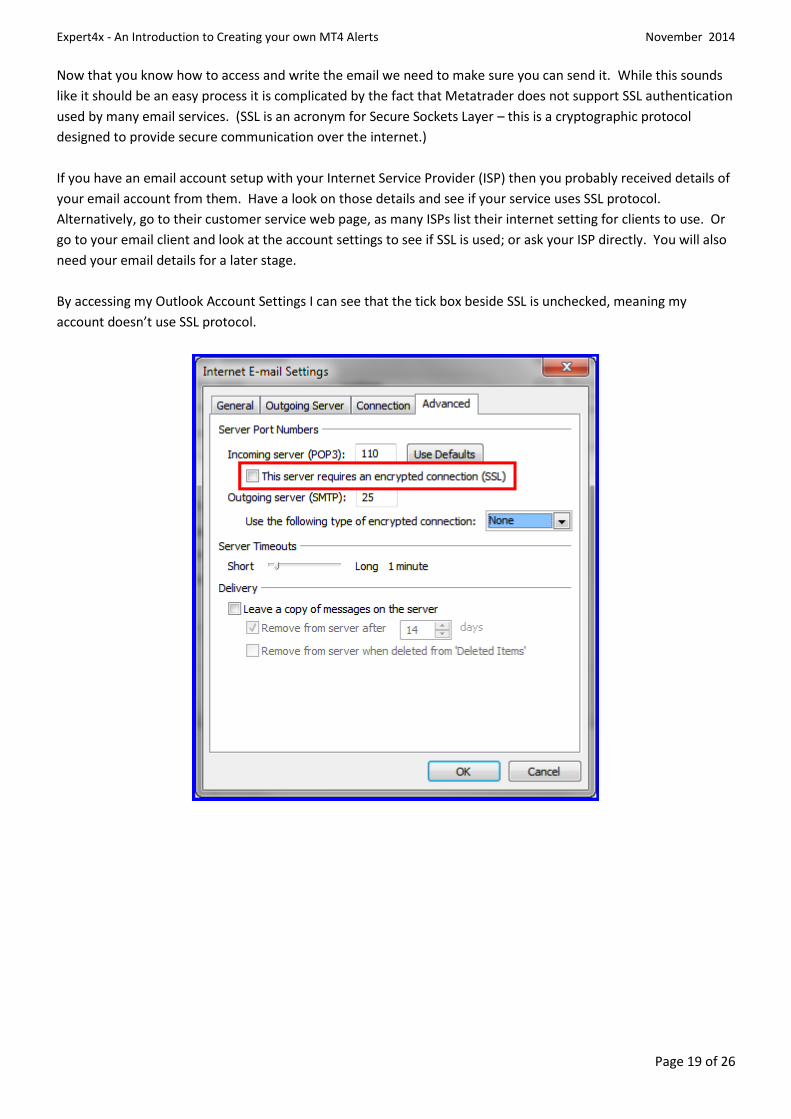
By accessing my Outlook Account Settings I can see that the tick box beside SSL is unchecked, meaning my
account doesn’t use SSL protocol.

Expert4x - An Introduction to Creating your own MT4 Alerts November 2014
Page 20 of 26
For those who have an email client that doesn’t use SSL authentication the setup for emails is relatively
straightforward. Firstly, click on Tools Options.
This will open the Options window. Go to the Email tab.
Expert4x - An Introduction to Creating your own MT4 Alerts November 2014
Page 21 of 26
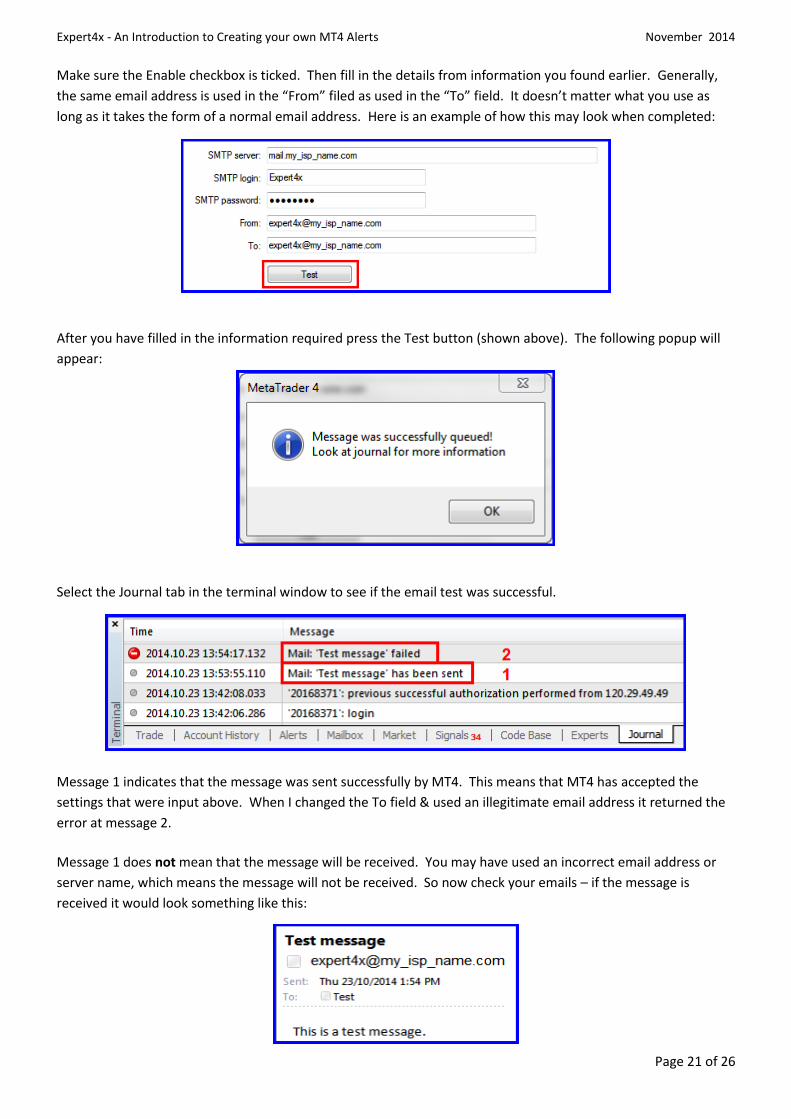
Make sure the Enable checkbox is ticked. Then fill in the details from information you found earlier. Generally,
the same email address is used in the “From” filed as used in the “To” field. It doesn’t matter what you use as
long as it takes the form of a normal email address. Here is an example of how this may look when completed:
After you have filled in the information required press the Test button (shown above). The following popup will
appear:
Select the Journal tab in the terminal window to see if the email test was successful.
Message 1 indicates that the message was sent successfully by MT4. This means that MT4 has accepted the
settings that were input above. When I changed the To field & used an illegitimate email address it returned the
error at message 2.
Message 1 does not mean that the message will be received. You may have used an incorrect email address or
server name, which means the message will not be received. So now check your emails – if the message is
received it would look something like this:

Expert4x - An Introduction to Creating your own MT4 Alerts November 2014
Page 22 of 26
Some popular email clients, such as Hotmail, yahoo mail, gmail, and many others use SSL authentication. This
means that if you want MT4 to send an email to your gmail account, for example, you need to use an SMPT relay
software such as GMX or some other variety.
Example of the process: MT4 Email GMX Gmail Server
For this example we will set up an account with GMX in order for MetaTrader to send emails to a gmail account.
Firstly, go to http://www.gmx.com/ and open an account – this is free & straightforward.
Then open the Options window by clicking on Tools Options.
1. Ensure the checkbox beside “Enable” is ticked. 2. Then enter the “SMTP Server” name and your GMX login and password. The “:587” appended to the server
address is signifying that it will use port 587 on the mail server. 3. Use the same GMX email address for the “From” field. 4. In the “To” field enter the email address where you want the email to be delivered.
It will look similar to this:
Now click the Test button and check the message in the Journal tab of Terminal. If the message has been sent successfully the Journal will show “Mail: ‘Test message’ has been sent”. Now log into your gmail account. You should find a message sent from MT4 via GMX has been delivered to your inbox. In my tests I was receiving a message within a few seconds after sending from MT4 by refreshing the GMX inbox.
Expert4x - An Introduction to Creating your own MT4 Alerts November 2014
Page 23 of 26
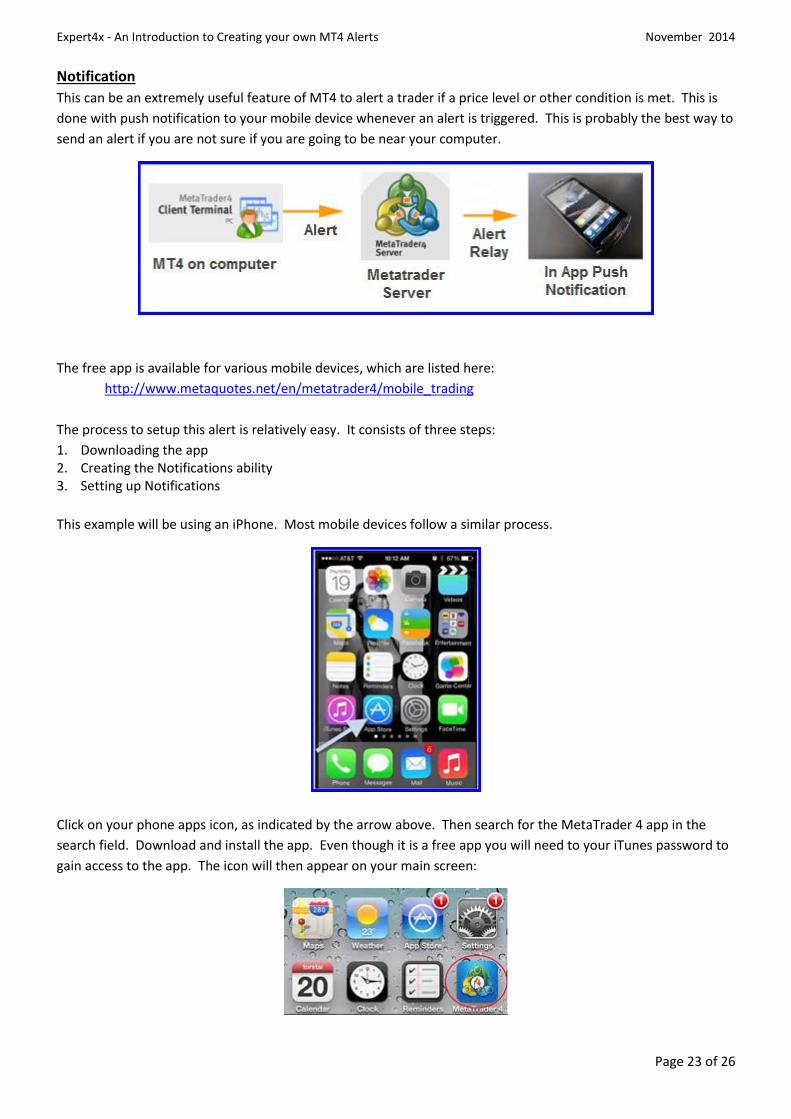
Notification
This can be an extremely useful feature of MT4 to alert a trader if a price level or other condition is met. This is
done with push notification to your mobile device whenever an alert is triggered. This is probably the best way to
send an alert if you are not sure if you are going to be near your computer.
The free app is available for various mobile devices, which are listed here:
http://www.metaquotes.net/en/metatrader4/mobile_trading
The process to setup this alert is relatively easy. It consists of three steps:
1. Downloading the app 2. Creating the Notifications ability 3. Setting up Notifications
This example will be using an iPhone. Most mobile devices follow a similar process.
Click on your phone apps icon, as indicated by the arrow above. Then search for the MetaTrader 4 app in the
search field. Download and install the app. Even though it is a free app you will need to your iTunes password to
gain access to the app. The icon will then appear on your main screen:
Expert4x - An Introduction to Creating your own MT4 Alerts November 2014
Page 24 of 26
Then open MT4 on your mobile device. When the application loads, find the MetaQuotes ID, which is available
from Settings Messages. Keep a record of this number to use in the next step.
Open MT4 on your computer. Go to Tools Options and click the Notification tab. The following window will
open:
Make sure the checkbox beside “Enable Push Notifications” is ticked. This checkbox allows alert messages from
the Terminal window to be sent to your mobile device. If you also want to be informed about successful trade
operations (such as an order being placed or closing) you can tick also “Notify of trade transactions”. Now enter
the MetaQuotes ID where indicated. Click the Test button. An alert should be soon be received on your mobile
device. If the message was received correctly you can close the window by clicking OK.
Hint: if you received the test message OK but didn’t get an audible warning that the message had arrived you
should go to the About section on the phone’s menu and enable sounds.
Note: alerts on your desktop version of Metatrader are nearly instantaneous. Emails & Notifications can take
substantially longer. Best-case scenario is probably 1 second for mobile notifications. Sometimes it may take 20 –
30 seconds, especially if you are in a lower quality reception area. Emails will possibly take a few minutes to as
much as a couple of hours to be received. So don’t rely on receiving an alert quickly. Set you alerts to allow time
to receive them & then get back to your charts in order to make your trading decisions.
Expert4x - An Introduction to Creating your own MT4 Alerts November 2014
Page 25 of 26
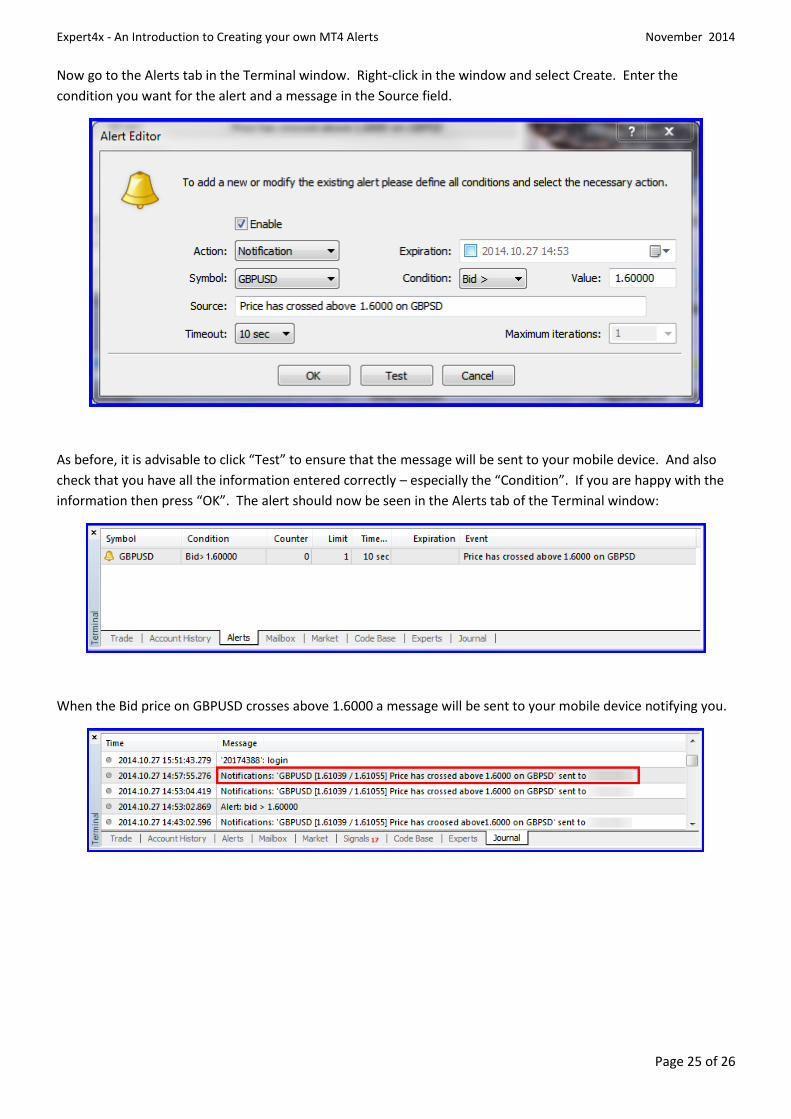
Now go to the Alerts tab in the Terminal window. Right-click in the window and select Create. Enter the
condition you want for the alert and a message in the Source field.
As before, it is advisable to click “Test” to ensure that the message will be sent to your mobile device. And also
check that you have all the information entered correctly – especially the “Condition”. If you are happy with the
information then press “OK”. The alert should now be seen in the Alerts tab of the Terminal window:
When the Bid price on GBPUSD crosses above 1.6000 a message will be sent to your mobile device notifying you.

Expert4x - An Introduction to Creating your own MT4 Alerts November 2014
Page 26 of 26
Problem Solving
Why isn’t the alert working?
The following are general problems that could relate to any type of alert:
Is the alert set on the correct chart?
Is the price set correctly? Be careful to have the “<” and “>” operators the correct way around.
Has the alert already been triggered and is now expired?
Was the computer turned on when the alert would have triggered?
Why doesn’t the alert line show on the face of the chart?
Check the colour used for the Ask price on chart as this colour is also used for the alert line. Is it the same colour as chart background? Is it set to “none”?
Navigate to Tools Options Charts. “Show trade levels” must be ticked for the alert line to appear on a chart.
Why doesn’t the alert make any sound?
Are the computer speakers turned on?
Is the volume turned up loud enough?
Why don’t I receive an email alert?
Navigate to Tools Options Email. Is the data still filled in correctly? Click “Test” again and look in the Journal tab. Is there a comment saying it has failed? (See page 21)
Do you receive the Test Message correctly?
If you have a problem try going over all the steps from page 16 onward.
Why don’t I receive a Notification on my mobile device?
Navigate to Tools Options Notifications. Is the data still filled in correctly? Click “Test” and look in the Journal tab. Is there a line in the Journal tab indicating that the test notification is working correctly? (See page 23)
If the test message was not sent correctly check the setup steps from page 22.
Is your mobile device turned on?
Is it in an area that receives good signal?