an introduction to editing video with adobe premiere pro...
TRANSCRIPT

1
An Introduction to Editing Video with Adobe Premiere Pro 1.5 Contents Page
1 - Preparing to edit 3
2 - Starting Premiere, Creating a new Project, and the Premiere Interface 4
2a - Creating a new Project 4
2b -The Premiere Interface 5
3 - Capturing your video 6
3a - Capturing from miniDV: 6
3b - Capturing from VHS: 7
4 - Trimming and Assembling your program 8
4a - Trimming Clips 8
4b - Editing Your Program. 9
4c - Adding Subsequent Clips to your Program 10
4d - Adding Transitions 11
4e - Additional Useful Editing Features: 12
4f - Sound 15
5 - Outputting Your Finished Video 16

2
An Introduction to Video Editing Using Adobe Premiere Pro 1.5 This guide is intended to show you how to capture video and perform simple editing operations using Adobe Premiere. Whilst Premiere offers many features comparable with those found in professional editing systems that cost a lot more, these are outside the scope of this document, but are covered in the Adobe Premiere manual. In this guide, we have broken down the process of editing into 4 main stages, which need to take place sequentially: 1 - Preparing to edit – this is when you choose what portions of your video you want to use, and what order you want to use them in 2 - Starting Premiere and creating a new Project – this is when you create a new Project. In Premiere, a Project comprises all the things you need for your edited program – it holds references to all the media clips you will create in section (3), and all the editing decisions you make in section (4) 3 - Capturing your video – this is when you digitise your selected material into the computer 4 - Trimming and Assembling your program – this is where you select the exact parts of the video you want to use, and arrange them in the sequence you determine in (1) 5 - Outputting your program – this is where you record your finished work back onto miniDV or output it in some digital format for use in a PowerPoint presentation, CD-ROM etc

3
1 - Preparing to edit This is probably the most important stage of the whole editing process, and time spent in preparation will definitely save you time when you come to do your editing. What you need to prepare: First, in an ideal world, you would create a “story board”, or at least a list of shots you need in your video, before you even go out and film them, but this is not always possible. You should however plan your sequence of shots now, before really doing anything else. Second, we invariably shoot more than we are actually going to use in our final program, so we need to go through our footage to identify the best portions to assemble our sequence decided upon above. This process is known as logging, and can be desperately tedious and time consuming, but has to be done. It basically entails watching through your material and noting down the time codes of the beginning and end points of the bits you want, along with any comments that might be useful later e.g. “good take” or “dodgy sound” etc The time code is an exact reference to your location on the tape, expressed as time from the beginning of the tape. Note:
– whilst the time code is expressed exactly in hours, minutes, seconds and frames, you only need to worry about minutes and seconds when you are logging. Frame by frame selection of your footage can be done in Premiere after you have captured your footage.
After you have logged the shots, you can combine this information with your planned sequence to prepare a “paper edit”. This is a document that lists the shots you want in the correct sequence, along with the time codes of the original material you identified during the logging process. The following shows an example of a paper edit for a short sequence illustrating a researcher preparing and analysing a sample in a laboratory
Shot # Description/Comments/File name In Out 1 Wide shot researcher walking in to lab –labwide1.avi 02.22 02.32 2 mid shot walking up to bench and picking up sample-
labwide2.avi 03.45 03.55
3 Close up of putting sample into machine – machine1.avi 05.12 05.25 4 Researcher walks back out of lab – labwide3.avi 06.12 06.25 Dissolve to… 5 Walks back in – labwide3.avi 07.13 07.23 6 Close up on machine display – machine2.avi 08.30 08.45
Once you have done this, you are ready to start Premiere.

4
2 - Starting Premiere, Creating a new Project
1) Switch on the computer and the DV player. 2) Create a new project folder for your work: where you store your project depends on what
machine you are using. It is very useful to include your name and date though, if this is a multi-user machine, and to liaise with whoever is in charge of it as they may have a specific place.
2a - Creating a new Project
1) Open Adobe Premiere Pro 1.5 by double clicking the icon 2) Select ‘new project’ * 3) On the ‘Load Preset’ tab, choose your format. We suggest DV-Pal standard 32kHz 4) Go to ‘location’ and browse to select where you are going to store your project, i.e. in the
project folder created earlier. 5) You can also create your new project at this stage, if it has not already been done. Please give
it a meaningful name – not ‘test’! Click OK
* Note – if you are returning to complete work you started in another session, at stage 2 click the Open… button and locate your allocated folder
Presets tab
Click OK to create new Project
Browse to select your Project folder

5
2b -The Premiere Interface You will now see the main Premiere interface, similar to the diagram below. If the last user left it with a messy layout, a default layout of the work area can be loaded by selecting Window>workspace>editing
The Premiere work area is divided into 3 main sections: • The Project window – this will list all the media clips (or ‘shots’) that you use in your program. The
Effects tab, also found in the project window, is where you can choose from a range of transitions and effects, to apply to clips on the Timeline window.
• The Monitor window – this itself contains the Source and Program windows shown above. You
will use the Source window to trim your clips, and the Program Window to view your edits, both covered in section 4.
• The Timeline window – this is where you arrange your individual clips in the order you planned
earlier. This is also where you can apply gradual transitions between clips, add special effects etc. We will explore these individual windows later. Assuming you’ve started with a new blank project and that you’ve logged all your shots, you can now capture, or digitise your footage.
Project Window Effects tab
Timeline
Monitor windows: Source Programme
Work area bar

6
3 - Capturing your video You can capture source material from miniDV, DV CAM or VHS. You can also import a whole range of other media. 3a - Capturing from miniDV:
1) Choose File, Capture from the main menu. You will see the Capture window below.
2) Before you capture any video, rewind your tape to approximately 10 seconds before the bit that you want to capture starts – you can use the Sony deck controllers to control the miniDV deck directly from the Capture window
3) Click the Play button in the Capture window to start the tape, then Click the red Record button to start digitising
4) Press the Escape key on the keyboard to stop digitising. 5) Enter an appropriate filename if you want to save the video 6) The newly created video file should now appear in your project window
Repeat steps 1 to 6 for all your necessary footage. This is one stage in the operation that is definitely made a lot simpler and quicker if you have made adequate preparation as described in section 1.
Record Button
Choose “Same as Project” here to set media file locations for your project
Sony deck controllers
7
3b - Capturing from VHS: You may need help with setting up your machine to do this.
1) Choose File, Capture from the main menu 2) You will see the Capture window above 3) Rewind your tape to approximately 10 seconds before the bit you want to capture starts,
using the controls on the VHS deck 4) Press Play on the VHS machine to start playing your tape 5) Click on the Record button in the Capture window to start capturing video on to the
computer. Press the Escape key on the keyboard to stop digitising. 6) Enter an appropriate filename if you want to save the video 7) The newly created video file should now appear in your project window
Repeat steps 1 to 7 for all your necessary footage. This is one stage in the operation that is definitely made a lot simpler and quicker if you have made adequate preparation as described in section 1. 3c - Importing other pre-digitised media:
1) Go to file>import>files of type and a list of all importable material will appear. 2) If your material is on the list, you can browse to your source file, click ‘open’ and it will join
the rest of your media in the project window. Now that you have acquired your digital video footage, you can proceed to editing proper, and start assembling your program.

8
4 - Trimming and Assembling your program You will almost certainly now find that your digitised clips have a few unwanted seconds at the beginning and end. Because of this you need to Trim the clips before you then Assemble them. 4a - Trimming Clips
1) Click to select the clip you wish to trim in the Project window– this should be the first clip you want in your edited program
2) Drag and drop this clip over onto the Source (left-hand) monitor 3) Use the Play/Stop buttons to find the beginning, or In point of the part you want to use –
you can use the Frame back/forward controls. There is also a shuttle and a jog wheel, or you can input your time-code number, if you have an accurate log
4) Click on the Set In Point button under the Source window - you should see a graphical representation of the position of your In point underneath the Source window
5) Repeat step (3) to locate the end, or Out point of your clip. 6) Click on the Set Out Point button under the Source window – you will now see a
graphical representation of the In, Out and selected portion of your clip under the Source window.
n.b If your clips do not play smoothly, right-click on the screen, select ‘quality’ and then choose ‘draft quality’
Set In/Out buttons Play, Stop, Frame
Back/Forward buttons
Drag clip from here into here

9
Now that the first clip has been trimmed, you are ready to start editing your program 4b - Editing Your Program. Editing the program now entails sequentially trimming and adding clips to the Timeline in the order you want them. The Timeline window provides a graphical representation of your edited program, showing the position of your clips sequentially from left to right, in time. It also enables you to perform some very sophisticated editing and special effects, including superimposing numerous channels, or Tracks, of video and audio.
1) Click and drag your first trimmed clip from the Source window into the Video 1 track in the timeline, as shown below
2) You will see the audio component of your clip added to the Audio 1 track
Mark Out button
Mark In button
Frame back/forward buttons Play, Stop buttons
Click and drag trimmed clip from Source window into Video 1 track
Video 1 Track
Audio 1 Track
Edit Line
10
3) You should also see the first frame of your program appear in the Program window now. This is because the Program window always displays what is in the Timeline at whatever point the Edit Line is currently located – in this case the beginning of the program
4) To play your shot either press play on the programme window, or hit the space bar. 5) You will now see the edit line move from left to right across the timeline, and the
corresponding clip/s will appear in the Program window. 4c - Adding Subsequent Clips to your Program Adding the rest of your clips to your program is effectively now just a process of repeating the Trimming and Assembly procedures you have just done.
1) Select your second clip from the Project window, and Trim it appropriately as you did your first clip.
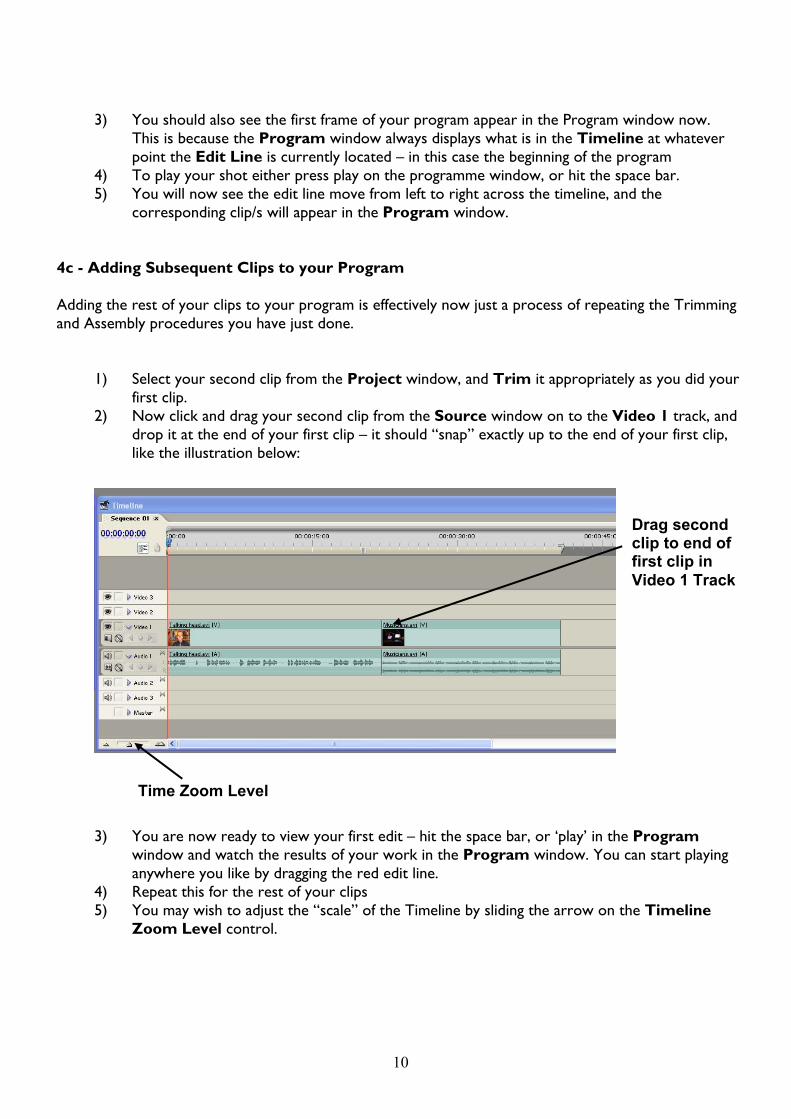
2) Now click and drag your second clip from the Source window on to the Video 1 track, and drop it at the end of your first clip – it should “snap” exactly up to the end of your first clip, like the illustration below:
3) You are now ready to view your first edit – hit the space bar, or ‘play’ in the Program
window and watch the results of your work in the Program window. You can start playing anywhere you like by dragging the red edit line.
4) Repeat this for the rest of your clips 5) You may wish to adjust the “scale” of the Timeline by sliding the arrow on the Timeline
Zoom Level control.
Drag second clip to end of first clip in Video 1 Track
Time Zoom Level

11
4d - Adding Transitions In our example so far, the editing has comprised assembling a sequence, which effectively jumps, or cuts instantly from the end of one clip to the beginning of another. Sometimes you may want to add a transition between clips so that the cut is gradual rather than immediate. With such an array of different transitions available in Premiere, it might be difficult to decide when to use a straight cut, and when to go for one of the available transitions. Fortunately, the last 100 years of cinema and television production has arrived at a very simple rule of thumb to help you decide which one to use: • Use a straight cut to signify sequential action, such as a dialogue between two people, or a
laboratory procedure. • Use a transition to signify either the passage of time, a move to another location, or both. Be warned! Overuse of transitions complicates the process, and can look very tacky… So, with the example of our lab sequence at the beginning of this guide, we used a series of cuts to illustrate the sequential process of preparing the samples for analysis; but then we used a dissolve transition between shots 4 & 5 to convey the passage of time between preparing the sample and coming back to take the reading. When creating a transition, you will need to use more of the shots (clips) than before, as the two shots are superimposed for a period of time. We will be transitioning from one shot to another To add a transition:
1) Put the from clip on Video 1 track, as normal 2) Trim a new clip as described above 3) Drag the new (to) clip onto Video 2 track on the timeline, making
sure that there is some overlap between it and the from clip 4) Select the effects palette in the Project
Window, then video transitions, then cross dissolve (or any other choice you care for)
5) Drag it onto the beginning of the clip on Video 2 *
6) It should appear like the illustration (right) 7) To change the length of the transition, just drag
the end of the transition, but don’t take it past the end of your ‘from’ shot, or you will end up with black in your transition, not pictures!
8) You should save your work again now 9) Play the sequence and amend as desired. 10) You will now see a red bar above the section
with the transition. Hit Enter to render the effect, which also allows Premier to play it in real time.
* NOTE: the transition should be applied to the highest level video track, in this case track 2. If you apply it to a lower level track it won’t show.
Drag second clip onto Video 2 track with "overlap"
Drag "Cross Dissolve" transition onto the start of the clip on Video 2

12
4e - Additional Useful Editing Features: Deleting Clips From Your Program You will invariably find you have made a mistake in your editing, and that you want to remove a clip that you have added to the Timeline. Premiere allows you to delete a clip from your Timeline in one of two ways: • Lifting a clip removes it from the Timeline, but leaves a gap in the Timeline the same length as the
clip you have removed • Extracting a clip removes the clip from the timeline, and closes the resulting gap, by shuffling all the
clips in the timeline along by the appropriate amount.
Lifting the clip leaves a gap in the Timeline……
Extracting the clip closes the gap between the clips either side…
To Lift a clip from the Timeline:
• Click on the clip in the Timeline and press the Delete key on the keyboard
You want to remove the second clip in the timeline:

13
To Extract a clip from the Timeline:
• Click on the clip in the Timeline, right click and select Ripple Delete. Inserting A Clip Between Existing Clips in Your Program Just as often as you may find you need to delete a clip from your program, you will find that you want to insert a clip between two existing clips on your Timeline. As with deleting clips, Premiere gives you two options for inserting new clips into your program • Inserting a clip puts the clip you are working with in the Source window into the Timeline at the
specified In point. It then shunts all the clips that come after the In point along by the same length as the clip you have inserted. This results in the length of your program being extended by the length of the new clip
• Overlaying a clip also puts the clip you are working with in the Source window into the Timeline at
the specified In point, but this time it overwrites any clips that fall after the In point within the duration of the new clip. This does not increase the overall length of your program, it simply replaces what was already there with your new clip.
In both cases it requires you to set an In point in the Timeline window as well as In and Out points in the Source window.
1) Trim the clip you want to insert as described in section 3 above 2) Click on the Set In button underneath the Program window to set the In point on the
Timeline window - You should see the In point marker appear in the Timeline window 3) To Insert the new clip click on the Insert button underneath the Source window 4) To Overlay the new clip, click on the Overlay button underneath the Source window

14
Caution - when you are Overlaying a clip you are basically replacing what was already there with a new clip. This is essentially a destructive process, so make sure that this is really what you want to do. Always Save your Project before doing this. Premiere does, however, offer several levels of Undo so you can usually get back to where you were! Crtl-Z for Undo, ctrl-Shift-Z for Redo. (There’s also a History window that you can use to step back through your work.)
Go To Next and Previous Edit buttons
Mark In/Out buttons for Timeline NOT Source clip
Edit Point at In point between two clips on Timeline
Insert button
Overlay button

15
4f - Sound It is quite easy to do cross fades from one sound to another, and this is available in the effects palette. Use the same techniques as described above for video transitions. Sound can be a complicated process, but, in a nutshell, you can use more than one ‘layer’ of sound when you are editing, to combine more than one sound e.g. music and the sound from the source clip. If you do this, you will almost inevitably want to adjust the levels of the individual tracks. You can adjust the sound levels of each track by first clicking the triangular button next to the ‘audio 1’ label, then pressing the tiddly little button like a circle. If you select this you will see a number of key frames (marker points) describing the sound level of each track. You can go to these and drag them louder or quieter. And also add extra ones using the buttons just to the right . For more information about sound mixing, consult the Adobe premier manual.
“Tiddly little button”
Key frames

16
5 - Outputting Your Finished Video You now have all the basic skills to assemble your video. When you are happy with your edited programme you will then want output your work. Premiere allows you to output to either
• Mini DV • Video file for use in a power point presentation, CD Rom etc • DVD movie
It is worth ‘rendering’ your video if you have put many video effects in, as it will play better. The red line at the top of the video tracks shows what needs rendering.
It’s nice to have a bit of black run-up at the start of your video, and at the end as well. To insert black, go to the icons at the bottom of the project window, select the square with one corner folded in (new item) and select ‘black video’, then drag in into the source monitor, and add to the timeline - 10 seconds at the start and 30 at the end is good. This is particularly useful if you are outputting straight to DVD movie, so that it doesn’t cut out in a really abrupt way at then end.
If you only wish to export part of your video, adjust the work area bar (see page 5) on Premiere’s timeline to cover the section of programme you wish to export.
5a - Exporting to Tape
1) n.b. Use a new tape. Do not destroy your source material. Label and date your tape.
2) Press “Play” and “Record” together on the DV recorder’s front panel to record at least 10 seconds worth of blank recording at the front of the tape to make sure that timecode is written up to and a little beyond 00:00:10:00. (This gives Premiere the required length of run-up before it starts writing to tape.)
3) In Premiere, go to file>export>export to tape 4) Click on record
5b - Exporting to other media
1) Go to file>export>Adobe Media Encoder 2) select the file format you want from the menu e.g. Mpeg 1 (for use in Powerpoint
presentations). 3) On the preset menu change to PAL not NTSC 4) Click OK 5) Save the file – browse to find your project folder and put it there. Give it a name and save.
5c - Writing to CD-ROM
1) Save your project as an encoded file (see 5b above) 2) Minimise the Premiere window 3) Go to your project folder, find the file. Play it to check it’s there and working OK. 4) Select ‘burn CDs’ on the PC, then ‘make a data CD’. 5) Insert a blank CD into the lower of the 2 drives. 6) Follow steps onscreen.

17
5d – Writing a DVD
Premiere can write your project to a DVD which will play on a “set top” DVD player. However, it can only create a very simple disc that plays your video immediately on insertion, without any clickable menus, although you can insert chapter markers. 1) Insert a blank DVD into the DVD writer (lower drive). 2) File/Export/Export to DVD 3) Select encoding options ensuring that you select one of the PAL options, NOT NTSC. 4) Click Record 5) Wait – could be a considerable time!