an introductory exercise in modeling using starlogo tng ... · an introductory exercise in modeling...
TRANSCRIPT

An Introductory Exercise In Modeling Using StarLogo TNG
This handout refers to the slides in the accompanying presentation. The project is broken down into 8 simple stages. The support files represent the model at the end of each stage so, if pupils get lost, they can reload the file from the end of the last stage. The exercise is taken from the support material provided by StarLogoTNG. Further material can be viewed on their website: http://education.mit.edu/drupal/starlogo-tng/learn
Modeling An Epidemic In this tutorial we will create a simple model of an epidemic - a model in which red agents represent sick individuals and green agents represents healthy individuals. When a red individual touches a green one, the green one will get sick. Then we add a recovery variable that can be adjusted by the user and graph the changing number of sick and healthy agents. Stage 1: Setup Slide
3
First, we’ll create some agents and put them on the screen. Move to the Setup portion of the canvas, either by scrolling to that section or using the minimap at the top of the screen. Grab a Clear Everyone block from the Setup and Run tab of the Block Factory and drag it onto the Setup area.
Slide 4
Click on My Blocks and then click on the Turtles tab. Drag out a Create Turtles and Do block and attach it beneath the Clear Everyone block. When the Create Turtles and Do block comes out it has the number 10 attached to it. Change that number to something between 100 and 500 (use smaller numbers on slower/older systems).
Slide 5
Inside the Do section of that block grab a Set Color block from the Traits tab in the Factory. Attach the Set Color block to the Do section and change the color from Red to Green by clicking on the drop down menu that appears when you hover over the Red block.

Slide 6
Now open the Turtle's tab again and grab a Scatter Turtles block and attach it to the bottom of the stack.
Slide 7
Finally, go to the Setup and Run tab of the Factory and grab a Setup block and put the stack that you created inside of the Setup block. The Setup block runs once to set the initial conditions of the simulation. In this case, we want to delete all agents from the previous run, create 500 turtle agents and set their color to green (to represent 500 healthy individuals), and scatter them randomly in Spaceland. Note that turtles are the default agent, but both the name and shape can be changed in the Breed Editor.
Slide 8
Click on Edit Breeds button near the top of the canvas to open the Breed Editor. Select the Basic Shapes category and choose the sphere shape. Click OK
Slide 9
To test the Setup block, look at the Runtime space connected to Spaceland. You should see a button named Setup. Click it and you will see the agents created and dispersed

Stage 2: Seeding The Infection Slide
11
Now let's infect some of the Turtles to start. Go to the Setup and Run tab and get a Run Once block and drag it onto the Setup area. Click on where it says Run Once and edit the name to say Infect.
Slide 12
Go to the Logic tab and grab an If block and attach it to the Run Once block. Note that this block has two parts - a test section and a then section.
Slide 13
We want to infect individuals at the start with a 10% chance. We'll do that by instructing the turtle agents to each draw a random number between 1 and 100, and if that number is less than 10 they will be infected. Now go to the Math tab and get a <= block and attach it to the rounded (boolean) port on the If block where it says Test. Grab a Random block from the Math tab, attach it to the left part of the <= block and change the number to 100. Then grab a pink number 1 block from the Math tab, attach it to the right part of the <= block, and change the number to 10.
Slide 14
Finally get a Set Color block from the Traits category and attach it to the Then part of the If block. You can leave the color as red. Remember, the red color means that the turtle agent is infected.

Slide 15
Look at the Runtime space and you should now see a button named Infect in addition to your setup block. Click setup once and then Infect once. You should see several red spheres and a lot of green ones.
Stage 3: Introducing Motion Slide
17
Let's get the agents in motion. Navigate to the Runtime space of the Canvas by using the scrollbars or minimap.
Slide 18
Grab a Forever block from the Setup and Run tab and put it on the Runtime space. Change the name of the Forever block to Run by clicking on the text and editing the name.
Slide 19
From the Movement tab get a Forward block, then a Right Block, and then a Left block and attach them to the Forever Block.
Slide 20
Delete the 90 from the Left and Right blocks by dragging those numbers to the trash.
Slide 21
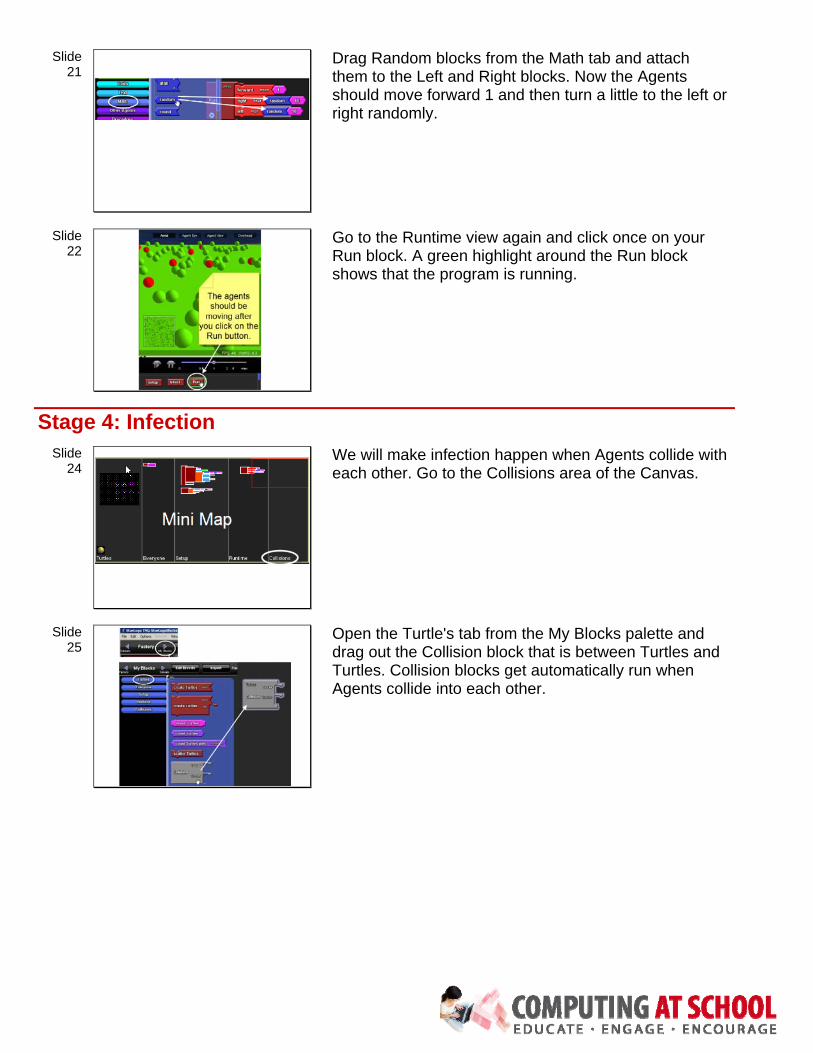
Drag Random blocks from the Math tab and attach them to the Left and Right blocks. Now the Agents should move forward 1 and then turn a little to the left or right randomly.
Slide 22
Go to the Runtime view again and click once on your Run block. A green highlight around the Run block shows that the program is running.
Stage 4: Infection Slide
24
We will make infection happen when Agents collide with each other. Go to the Collisions area of the Canvas.
Slide 25
Open the Turtle's tab from the My Blocks palette and drag out the Collision block that is between Turtles and Turtles. Collision blocks get automatically run when Agents collide into each other.

Slide 26
We will use an If block to test if the collidee turtle is red. If so, then the turtle agent will turn its own color to red, to show that it's been infected by the turtle that it collided with. Connect an If block (from the Logic tab) to the top Turtles section of the Collision block.
Slide 27
Grab an = block (from the Math tab) and attach it to the Test port on the If block.
Slide 28
On the left side of the = attach a Color-Of block from the Other Agents tab.. Then attach a Collidee block (from the Other Agents tab) to the Color-Of block . This reports the color of the Agent who was just collided into.
Slide 29
We want to see if this is red, so grab a Red block from the Colors palette and attach it to the right side of the = block. Put a Set Color Red block in the Then part of the If block.
Slide 30
Collision blocks only get run once for each pair of collisions. So the top and bottom of the collision should be the same in this case, in order to make sure to check both cases whether either one is infected. It is easy to copy the set of blocks you just created to the bottom portion by clicking on the If block, press Ctrl-C to copy, and press Ctrl-V to paste it. Then attach the new copy to the bottom Turtles section of the Collision block.

Slide 31
Run your model by clicking on the Run button in the Runtime window. You should see the infection spreading as more turtles turn red.
Stage 5: Recovery So far we haven’t built in any concept of recovery. We want a variable that we can alter to represent different probabilities of recovery.
Slide 33
Go to the Everyone section of the Canvas. We want to create a Shared number variable controlled by a slider that determines the probability of recovery. So let's go to the Variables tab and grab a Shared number variable. Drag it out to the Everyone section and rename it Recovery.
Slide 34
Now go to the Setup and Run tab and get a Slider block to attach to the left hand side of the Recovery variable. Look at the Runtime window and you should see the slider appear. Now, whenever the slider is moved, the value of the Recovery variable is set accordingly. Since the Recovery variable represents a percentage, you want the variable's value to be set between 0 and 100. To change the upper limit of the slider, click on the number on the bottom right end of the slider and change it to 100.
Slide 35
To use the variable in the model, let's go back to the Turtles section of the canvas. We're going to make a new Procedure that defines how Turtles recover. Go to the Procedures palette and get a Procedure block. Put it on the a Turtle's canvas. Rename the procedure Recover.
Slide 36
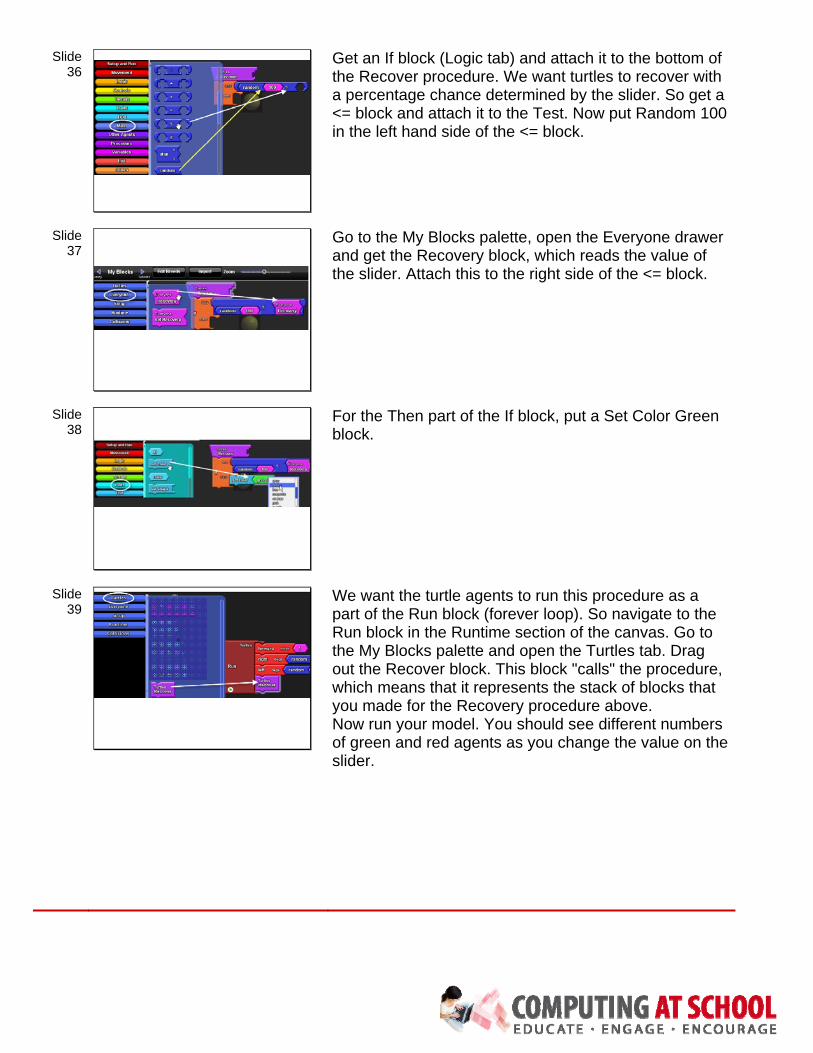
Get an If block (Logic tab) and attach it to the bottom of the Recover procedure. We want turtles to recover with a percentage chance determined by the slider. So get a <= block and attach it to the Test. Now put Random 100 in the left hand side of the <= block.
Slide 37
Go to the My Blocks palette, open the Everyone drawer and get the Recovery block, which reads the value of the slider. Attach this to the right side of the <= block.
Slide 38
For the Then part of the If block, put a Set Color Green block.
Slide 39
c
We want the turtle agents to run this procedure as a part of the Run block (forever loop). So navigate to the Run block in the Runtime section of the canvas. Go to the My Blocks palette and open the Turtles tab. Drag out the Recover block. This block "calls" the procedure, which means that it represents the stack of blocks that you made for the Recovery procedure above. Now run your model. You should see different numbers of green and red agents as you change the value on the slider.

Stage 6: Immunity In many populations some individuals start out with some immunity to a disease. We can easily model that here, by giving some of the agents "immunity." We will create a new variable for each agent that can be set to True if the agent is immune to the disease, and False if the turtle can get sick.
Slide 41
c
Go to the Variables tab and drag out an Agent Boolean block onto the Turtles space of the Canvas. You'll see that it gets labeled Turtles Agents Boolean. Change the name of this block to Immune by selecting and editing the Agents Boolean text. Go to the My Blocks palette, open the Turtles tab and you'll see some new blocks there. These Turtles now have a new variable to work with, and you can get or set the Immunity variable with these blocks.
Slide 42
We will set the Immunity variable to be true for some randomly selected turtles during Setup. Move to the Setup canvas section and grab a new If-Else block from the Logic tab. Attach the If-Else block beneath the Set Color block in the Setup block.
Slide 43
For the test condition, make it say random 100 <= 10, using the same structure as you did for the Infect block. Grab one of the new Set Immune blocks from the Turtle's tab and place it in the Then part of the If-Else block. Go to the Factory palette, click on the Logic tab, and drag out a True block to connect it to the Set Immune block. The first part of the block says with a 10% chance, a turtle agent sets the Immune variable to True (indicating immunity).
Slide 44
Get a second Set Immune block from the Turtles tab and attach it to the Else part of the If-Else block. Click on the Logic tab, drag out the False block and connect it to the Set Immune block. This says, if a turtle agent didn't get selected to be immune, the agent sets its Immunity variable to False. The Setup block should now look like this:

Slide 45
Now we have created some immune agents that are roughly 10% of the population. But they won't know what being "immune" means until you define it. Go to the Turtles section of the Canvas. Drag out a new Procedure block (like you did with Recover) from the Procedures tab. Rename the procedure Check for Immunity.
Slide 46
Get a new If block and attach it to the Check for Immunity procedure. For the test, get an = block from the Logic tab and then insert an Immune variable value from the Turtles Drawer (My Blocks palette) on the left side of the = block. Fill the right hand side with a False block (from Logic tab). This will check to see if the Immune variable for an agent is False (meaning not immune). For the Then part, fill in Set Color Red. This will only turn non-immune (susceptible) agents red.
Slide 47
Finally, go to the collision block and drag the two Set Color Reds to the trash. Why? Because we want to check for immunity instead.
Slide 48
In their place, drag out two Check for Immunity procedure call blocks from the Turtles Drawer (My Blocks palette). Run the model and you should see fewer red agents then you did before.

Stage 7: Monitoring The Situation So just how do you know if there are fewer red agents then there were before? It would be useful to monitor this by showing the number of red agents while the simulation is running.
Slide 50
Grab a Monitor block from the Setup and Run tab and drop it in the Setup section of the canvas. Change the name of the Monitor to Infections.
Slide 51
From the Turtles drawer (My Blocks palette), get a Count Turtles With block and attach it to the right side of the Monitor block. Grab an = block from the Logic tab and attach it to the Count Turtles With block. Fill in the left side of the = block with the Color trait from the Traits tab and the right side with Red from the Colors tab.
Slide 52
Look at the Runtime view and run your model. There is now a Monitor telling you how many Infected agents are currently out there.
Stage 8: Graphing It would also be useful to see how the numbers of infected and healthy agents compare over time. You can analyze their numbers with a line graph.
Slide 54
Go to the Setup and Run tab and drag out a Line Graph block. We want to count the number of infected and healthy agents. So, similar to how we created a monitor from the previous step, drag out the Count Turtles With block (Turtles tab) along with the appropriate color blocks and = blocks onto the canvas.

Slide 55
Look at the Runtime window and watch the values in the line graph change over time as the epidemic runs. Double-click on the Line Graph block for an enlarged view. Play with the Slider in the Runtime window and watch how the infected agents compare with the healthy agents as you lessen or lengthen the recovery time.
Stage 9: Over To You Try showing all the Immune turtles as a certain color. Try adding code to make the Turtles immune after they recover. What do you think will happen to the numbers of infected and healthy over time? The initial immune rate is set via a procedure with a fixed rate. Change this so you can set the initial immunity via a slider like the infection rate. You can now investigate a simple model of vaccination. With these basic skills you can start improving the model. Is vaccination risk free? How can we model that? Our model simply depicts infected agents. You may be infected but lead a perfectly healthy life. Modify the model to distinguish between infection and death. How can we model that?