analyze technical and tactical performance competition ... performance ref man.pdf · lucie lebel,...
TRANSCRIPT

Analyze Technical and Tactical Performance
Competition Skydiving Reference Manual


Analyze Technical and Tactical Performance: Competition Skydiving: Reference Manual
© Coaching Association of Canada/Canadian Sport Parachuting Association 2011
ACKNOWLEDGEMENTS
Main Writer David Hill
Contributors Veronica Planella, MA
Alan Wrigley, PhD
Don Watts
Robert Laidlaw
Martin Lemay
Vincent Lemay
Evolution, Canadian Formation Skydiving Team
Production Lucie LeBel, MATRA ● gs Translation Services Inc., Tressa Sorochan, Louise Wood
The Coaching Association of Canada expresses its thanks to Canadian Sport Centre Pacific operating as PacificSport for their permission to adapt material.

Analyze Technical and Tactical Performance: Competition Skydiving: Reference Manual
© Coaching Association of Canada/Canadian Sport Parachuting Association 2011
TABLE OF CONTENTS 1. Introduction ....................................................................................................................... 1
1.1 Purpose of the Document ........................................................................................... 1 1.2 The Analyze Performance Referent Model ................................................................. 1
2. The Five Phases of Movement ......................................................................................... 6 2.2 Key Elements ............................................................................................................. 7
3. Planes of Motion ............................................................................................................... 9
4. Two-stage Process of Observing Skills ..........................................................................10 4.1 Stage 1: The Pre-observation Stage ..........................................................................10 4.2 Stage 2: The Observation Stage ................................................................................. 6
5. Principles of Biomechanics .............................................................................................17 5.1 Principle #1: Balance and Stability ............................................................................17 5.2 Principle #2: Use All Joints in Order...........................................................................19 5.3 Principle #3: Impulse .................................................................................................21 5.4 Principle #4: Reaction Forces ....................................................................................23 5.5 Principle #5: Direction ...............................................................................................24 5.6 Principle #6: Angular Motion ......................................................................................25 5.7 Principle #7: Angular Momentum ...............................................................................27 5.8 Principle #8: Streamlining ..........................................................................................29
6. Progression in Technique ................................................................................................32 6.1 Ways to Communicate Measurement Findings on Performance to Athletes ..............32
Sample Worksheets for Reference Material ..........................................................................33 Monitoring and Tracking Technical and Tactical Performance Worksheet ...........................33 Data Analysis Worksheet ...................................................................................................34 Data Analysis Worksheet ...................................................................................................35 Monitoring and Tracking Technical and Tactical Performance Worksheet ...........................36 Data Analysis Worksheet ...................................................................................................37 Data Analysis Worksheet ...................................................................................................38
7. Great Ideas .......................................................................................................................39
The Collection, Use, and Disclosure of Personal Information The Coaching Association of Canada (CAC) in cooperation with its National Coaching Certification Program (NCCP) partners collect, use and disclose only such information from individuals as is required for the purpose of providing services or information to them, managing NCCP coach education records, conducting research and such other purposes as described in CAC’s Privacy Policy.
CAC does not sell, trade, barter, or exchange for consideration any Personal Information obtained. CAC’s collection, use and disclosure of personal information shall be done in accordance with its Privacy Policy, a copy of which is available at www.coach.ca

Analyze Technical and Tactical Performance: Competition Skydiving: Reference Manual
© Coaching Association of Canada/Canadian Sport Parachuting Association 2011 1
1. INTRODUCTION
1.1 Purpose of the Document This Reference Material provides additional information to help you through the Analyze Technical and Tactical Performance workshop. It was developed to deepen your understanding and knowledge of key coaching topics relevant to Analyzing Performance. We recommend that you consult this guide regularly even after your training is complete. You should receive this Reference Material along with the Coach Workbook when you register for the Analyzing Performance workshop.
This document will help you – as a future CSPA competition coach – Analyze Performance in a more effective way for your athletes in the Learn to Compete (L2C), Train to Compete (T2C) and Train to Win (T2W) stages of CSPA’s Long Term Athlete Development (LTAD) program.
1.2 The Analyze Performance Referent Model The Analyze Performance Referent Model shown on the next two pages illustrates the three-phase model for analyzing technical and tactical performance used in this document.
1.2.1 The Intention Phase Think of a skill or tactic that is commonly used in your sport, and then think about how athletes should perform the key elements — the details of skills that affect final performance — of each movement phase. This is the intended performance.
1.2.2 The Detection Phase The detection phase involves:
Observing performance. The observation will require you to choose several vantage points to best identify the outcome and key elements. Different vantage points may reveal different key elements or other potential influences on performance. It is important that the observation strategy provide the best picture of the intended performance.
Detecting gaps. As you observe performance, you will begin looking for gaps between observed and intended performance.
Identifying reasons for the gaps. Reasons for gaps include equipment, the environment, psychology, athletic abilities, tactics, technique, and biomechanics.
You may cycle through these steps several times before making a decision on what to correct. The key question is: When does the gap between observed and intended performance reach a point that makes a coaching intervention necessary?
1.2.3 The Correction Phase The correction phase helps you close the gap between observed and intended performance. Corrective measures include teaching interventions, modifications of activities or drills, and

Analyze Technical and Tactical Performance: Competition Skydiving: Reference Manual
© Coaching Association of Canada/Canadian Sport Parachuting Association 2011 2
competitive interventions. Applying the corrective measure requires that you consider how you will implement it in practice or competition.

Analyze Technical and Tactical Performance: Competition Skydiving: Reference Manual
© Coaching Association of Canada/Canadian Sport Parachuting Association 2011 3
Analyze Technical and Tactical Performance: Competition Skydiving: Reference Manual
© Coaching Association of Canada/Canadian Sport Parachuting Association 2011 4
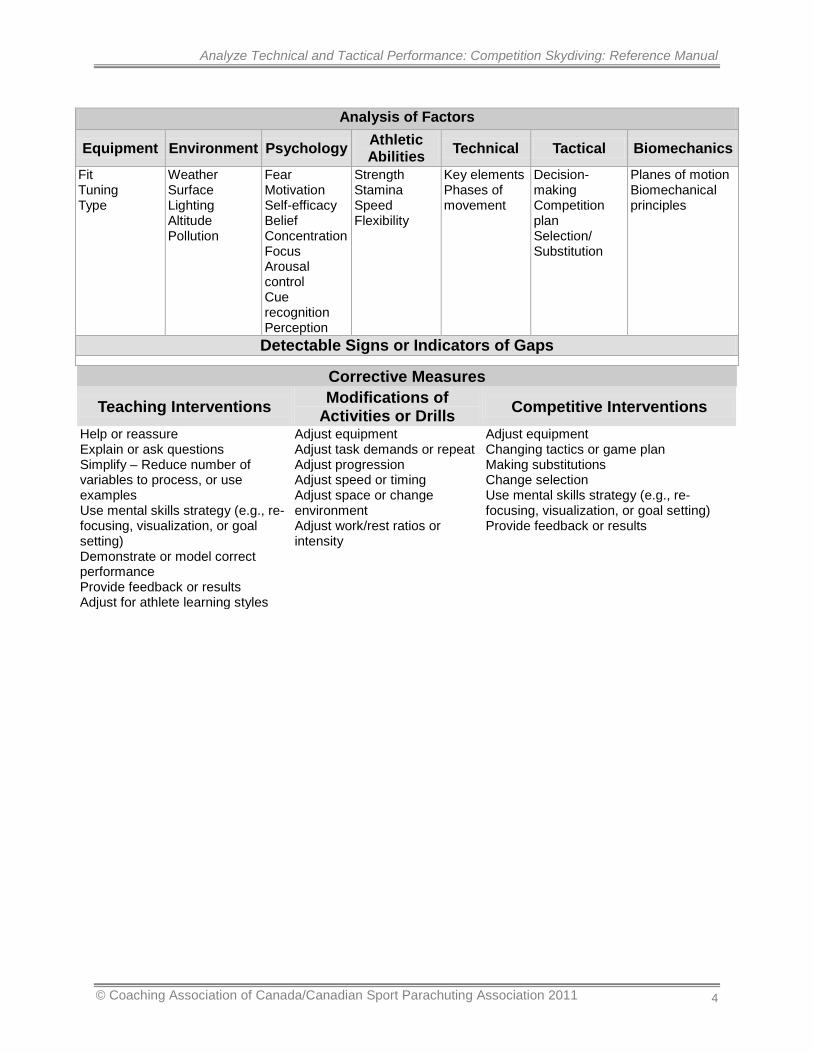
Corrective Measures
Teaching Interventions Modifications of Activities or Drills Competitive Interventions
Help or reassure Explain or ask questions Simplify – Reduce number of variables to process, or use examples Use mental skills strategy (e.g., re-focusing, visualization, or goal setting) Demonstrate or model correct performance Provide feedback or results Adjust for athlete learning styles
Adjust equipment Adjust task demands or repeat Adjust progression Adjust speed or timing Adjust space or change environment Adjust work/rest ratios or intensity
Adjust equipment Changing tactics or game plan Making substitutions Change selection Use mental skills strategy (e.g., re-focusing, visualization, or goal setting) Provide feedback or results
Analysis of Factors
Equipment Environment Psychology Athletic Abilities Technical Tactical Biomechanics
Fit Tuning Type
Weather Surface Lighting Altitude Pollution
Fear Motivation Self-efficacy Belief Concentration Focus Arousal control Cue recognition Perception
Strength Stamina Speed Flexibility
Key elements Phases of movement
Decision-making Competition plan Selection/ Substitution
Planes of motion Biomechanical principles
Detectable Signs or Indicators of Gaps

Analyze Technical and Tactical Performance: Competition Skydiving: Reference Manual
© Coaching Association of Canada/Canadian Sport Parachuting Association 2011 5
SAMPLE SKILL INVENTORY: SKYDIVING Sample Skills Inventory: Formation Skydiving
Exits Flying and Random skills Blocks and piece flying Big way Speed star
Front, Center, Rear, Dive
Non-linked exit training, diving
Linked 2-4-6 & 8 way
4 way piece: star, apposed diamond, stairstep diamond, zipper, meeker
Flying skills:
Neutral, forward, backward, down, up, sideward, turn 90° & 180°, grip taking.
Star turns
Open accordion
Murphy turns
Diamond flying
4 Way O.C, I.C., Tail, Point Freeflown exit training
Linked 2 way: star, line, open accordion, stairstep, accordian, cat
Linked 4: A, B and C pool
Linked top blocks: A, B and C
Tactic: 4 piece and transition, first point launch
Flying skills + Center turns 360° and 540° center turns, superpositional, grip plan, key plan
Random: A pool: B, E, F, M, O B pool: A, C, H, J, N, P C pool: D, J, K, L, Q
Block first points: A, B, and C pool
Blocks:
A: 7, 9, 21 B: 2, 3, 4, 14, 15, 17, 19, 20 C: 1, 5, 6, 8, 10, 11, 12, 13, 16, 18, 22
Tactics: turn piece flat
turn piece vertical
Full Draw: Random and block
8 Way Front dive, center dive, rear dive F. front, Front, center, rear, R. rear Basic piece: Linked: partial, 5-3, 3-2-3 Linked 8: A, B, and C pool Linked Top blocks: A, B, and C pool Tactic: partial, basic 8, or first point launch
All flying skills Random: A, B, and C pool Block first points: A, B, and C pool
Blocks A, B, and C pool Tactics: scramble back, or straight engineering, non-repeating Full Draw; random and block

Analyze Technical and Tactical Performance: Competition Skydiving: Reference Manual
© Coaching Association of Canada/Canadian Sport Parachuting Association 2011 6
2. THE FIVE PHASES OF MOVEMENT In general, skills may be broken into five phases:
1. Preliminary movements
2. Backswing movements
3. Force-producing movements
4. The critical instant
5. The follow-through
2.1.1 Preliminary movements Preliminary movements are the movements participants perform to get ready for a skill. These movements usually include both footwork and body-positioning movements to establish balance. In formation skydiving the preliminary movement may be the set up in the door of the aircraft for a specific piece launch. In freefall starting from a solid neutral body position is a key discipline point.
2.1.2 Backswing movements Backswing movements are the movements participants make just before they execute force-producing movements. Examples include the backswing in tennis shots, the arm recovery in swimming. This particular phase occurs on exit where an initiating leg swing or poised crouch in the door will help move on an exit launch.
2.1.3 Force-producing movements Force-producing movements are the movements participants execute to produce force for impact or propulsion. Examples include the forehand stroke in badminton and the leg drive out of the hack in curling. These movements often occur so fast that they are hard to follow. It is usually a good idea to first get a general impression of a skill's timing and then focus on specific body parts. During freefall maneuvers to move from formation to formation it is an advantage to be able to apply rapid impulse moves for aggressive starts and stops.
2.1.4 The critical instant The critical instant is the point that determines a skill's effectiveness: the instant of release of a bowling ball, the moment of contact in a squash drive, and the instant of takeoff in the high jump. Ideally, the participant applies the right amount of force in the right position at the right time at the critical instant. A good example is performing a freefall center turn, the initiation requiring equal input from the upper and lower body at precisely the same time. If initiation is staggered the turn will move out of place. The terms commonly used when there is an imbalance in the initiation phase are chest turn or knee turn.
Participants cannot do anything at the critical instant to alter its effectiveness; instead, they must make any necessary changes before the critical instant. In sum, this part of a skill is called the critical instant, but the most significant part of the skill is the force-producing phase.
It is often difficult to see the critical instant — it passes very quickly. Having a sound understanding of the skill, observing the skill from a number of angles, and using visual aids such as videos all make it easier to focus properly on the critical instant.

Analyze Technical and Tactical Performance: Competition Skydiving: Reference Manual
© Coaching Association of Canada/Canadian Sport Parachuting Association 2011 7
2.1.5 The follow-through The follow-through refers to the body movements that occur after the critical instant. This part of skills is very important — it slows body parts down gradually and helps prevent injury. Observing movements that occur during the follow-through may occasionally provide information about the critical instant. An example is the finish of the golf swing after hitting the golf ball. In formation skydiving the follow through is our discipline to pass through our neutral body position between every move. This allows us to be balanced and in control for our stopping action. This sequence of neutral-move-neutral-move-neutral-move, or neutral-start-coast-stop-neutral is a fundamental control tactic.
2.2 Key Elements Key elements are the details of skills that affect final performance. These details are often far removed from the final performance itself. For example, divers' technique at takeoff is far removed from their entry into the water — but the key elements of the takeoff play a major role in determining entry into the water!
The process of identifying key elements is simplified if you identify these elements for each phase. In every case, key elements must be stated in terms of SPECIFIC BODY MOVEMENTS and must be OBSERVABLE. For example, a rear float or tail’s exit set up, key elements of the preliminary movements include the following:
Right hand on bar and right foot in door, weight shifted forward into wind.
The knee is flexed, and body low in the door.
The upper body is turned squarely to line of flight.
The grip is picked up in a way to maintain balance.
The following table is a sample of a table that you might use to list and describe the key elements of a skill in each of the phases. In the table, you select a skill, describe or draw the skill in each of its five phases, and identify the key elements of each phase.

Analyze Technical and Tactical Performance: Competition Skydiving: Reference Manual
© Coaching Association of Canada/Canadian Sport Parachuting Association 2011 8
SAMPLE TABLE FOR RECORDING KEY ELEMENTS
Name of Skill:
Skydiving examples provided to match the phase
Purpose of Skill: see above
Phase Description/Drawing Key Elements Preliminary Movements
Neutral Body position: mantis
Head lift high, upper back arched up Knees at shoulder width Heels over knees, ankles curled inwards Elbows dropped, forearms lifted 45° Hands in front of face
Backswing Movements
Outside center: meeker launch
Both hands on bar and right foot in door, weight shifted forward into wind
The knee is flexed, and body slightly low in the door
Left leg swings out and back to initiate launch action
Force-producing Movements
Track for separation
Drop knees slightly at the hip joint Straighten leg and lock at the knee Straighten feet and point toes Perform rapidly in order
Critical Instant
Center turn: equal initiation timing
Drop knee to about 45° at the hip joint Lift opposite knee Drop elbow to 45° Drop hand to 45° while lifting elbow slightly Initiation must be at the same time and balanced
Follow-through
Neutral: mantis
Head lift high, upper back arched up Knees at shoulder width Heels over knees, ankles curled inwards Elbows dropped, forearms lifted 45° Hands in front of face

Analyze Technical and Tactical Performance: Competition Skydiving: Reference Manual
© Coaching Association of Canada/Canadian Sport Parachuting Association 2011 9
3. PLANES OF MOTION The following graphic shows the three planes of motion of the body.
The dividers represent the dynamic planes of motion that the human body is capable of moving throughout in daily activities.
The three basic planes of motion are:
Frontal Plane (left-to-right movements). Movements such as:
Bending side to side, e.g., stretching — bringing one arm over the head by the ear, reaching down with the other arm to the lateral side of the knee joint. A skydiving example is the lateral movement of the knee to the side while dripping it down into the airflow on turns or sideward movements.
Sagittal Plane (front-to-back movements). Movements such as:
Doing a front tuck in a dive
Stretching forward to touch the toes Fall rate control in skydiving requires a constant flexing of the torso forward and backwards in the wind to press on or release air to change vertical speed.
Transverse Plane (cross-sectional movements). Movements such as:
Twisting the upper body to the left or right, e.g., turning to look behind to receive a pass in football. The performance of the basic landing fall is one example, or the transition from head up
flying to head down utilizing the cartwheel technique.
Analyze Technical and Tactical Performance: Competition Skydiving: Reference Manual
© Coaching Association of Canada/Canadian Sport Parachuting Association 2011 10
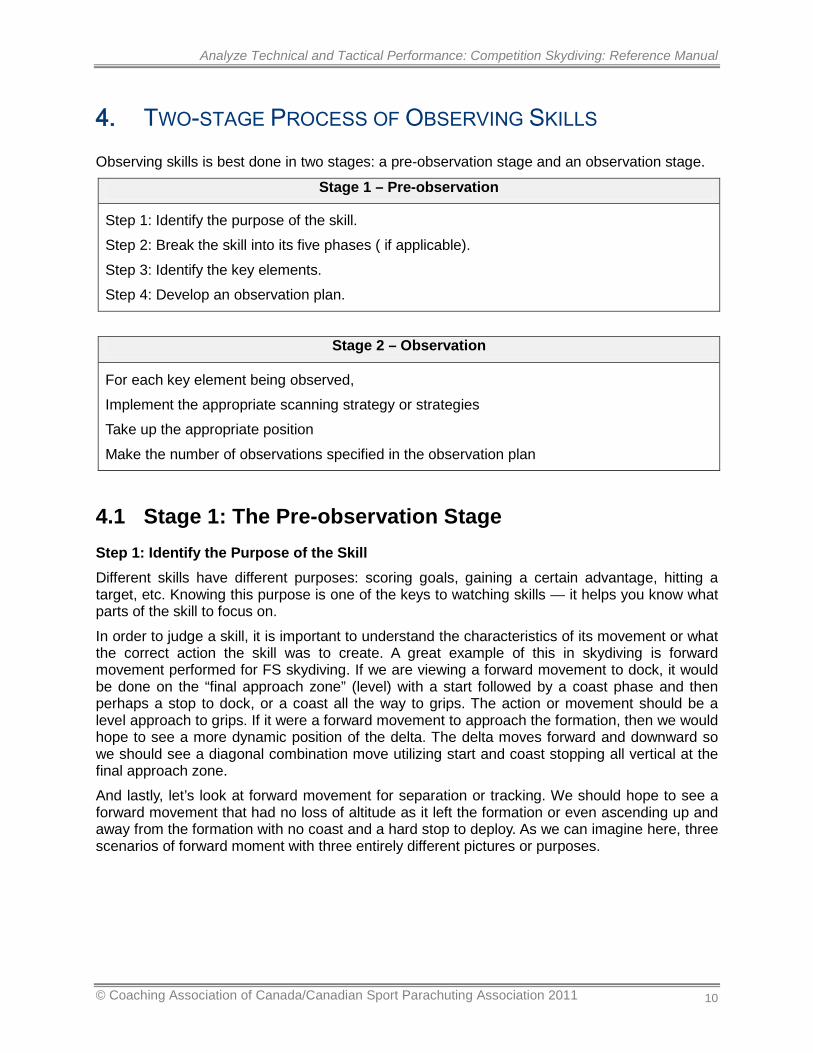
4. TWO-STAGE PROCESS OF OBSERVING SKILLS Observing skills is best done in two stages: a pre-observation stage and an observation stage.
Stage 1 – Pre-observation
Step 1: Identify the purpose of the skill.
Step 2: Break the skill into its five phases ( if applicable).
Step 3: Identify the key elements.
Step 4: Develop an observation plan.
Stage 2 – Observation
For each key element being observed,
Implement the appropriate scanning strategy or strategies
Take up the appropriate position
Make the number of observations specified in the observation plan
4.1 Stage 1: The Pre-observation Stage Step 1: Identify the Purpose of the Skill Different skills have different purposes: scoring goals, gaining a certain advantage, hitting a target, etc. Knowing this purpose is one of the keys to watching skills — it helps you know what parts of the skill to focus on.
In order to judge a skill, it is important to understand the characteristics of its movement or what the correct action the skill was to create. A great example of this in skydiving is forward movement performed for FS skydiving. If we are viewing a forward movement to dock, it would be done on the “final approach zone” (level) with a start followed by a coast phase and then perhaps a stop to dock, or a coast all the way to grips. The action or movement should be a level approach to grips. If it were a forward movement to approach the formation, then we would hope to see a more dynamic position of the delta. The delta moves forward and downward so we should see a diagonal combination move utilizing start and coast stopping all vertical at the final approach zone.
And lastly, let’s look at forward movement for separation or tracking. We should hope to see a forward movement that had no loss of altitude as it left the formation or even ascending up and away from the formation with no coast and a hard stop to deploy. As we can imagine here, three scenarios of forward moment with three entirely different pictures or purposes.
Analyze Technical and Tactical Performance: Competition Skydiving: Reference Manual
© Coaching Association of Canada/Canadian Sport Parachuting Association 2011 11
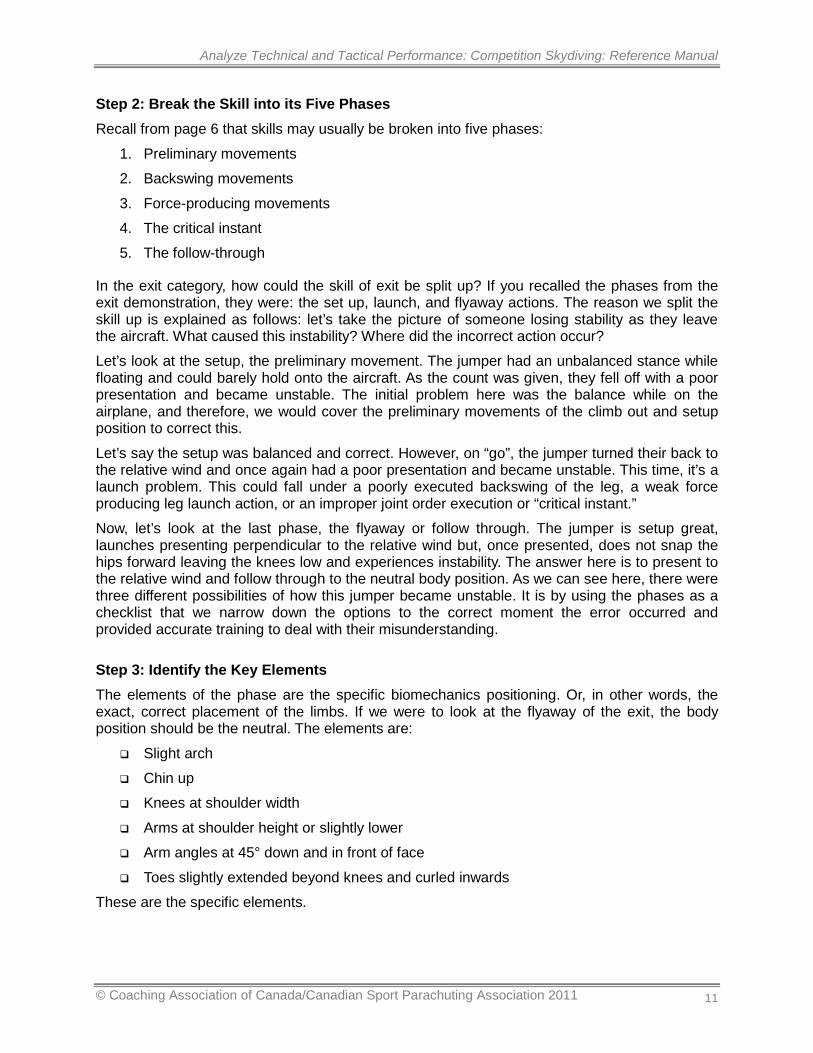
Step 2: Break the Skill into its Five Phases Recall from page 6 that skills may usually be broken into five phases:
1. Preliminary movements
2. Backswing movements
3. Force-producing movements
4. The critical instant
5. The follow-through
In the exit category, how could the skill of exit be split up? If you recalled the phases from the exit demonstration, they were: the set up, launch, and flyaway actions. The reason we split the skill up is explained as follows: let’s take the picture of someone losing stability as they leave the aircraft. What caused this instability? Where did the incorrect action occur?
Let’s look at the setup, the preliminary movement. The jumper had an unbalanced stance while floating and could barely hold onto the aircraft. As the count was given, they fell off with a poor presentation and became unstable. The initial problem here was the balance while on the airplane, and therefore, we would cover the preliminary movements of the climb out and setup position to correct this.
Let’s say the setup was balanced and correct. However, on “go”, the jumper turned their back to the relative wind and once again had a poor presentation and became unstable. This time, it’s a launch problem. This could fall under a poorly executed backswing of the leg, a weak force producing leg launch action, or an improper joint order execution or “critical instant.”
Now, let’s look at the last phase, the flyaway or follow through. The jumper is setup great, launches presenting perpendicular to the relative wind but, once presented, does not snap the hips forward leaving the knees low and experiences instability. The answer here is to present to the relative wind and follow through to the neutral body position. As we can see here, there were three different possibilities of how this jumper became unstable. It is by using the phases as a checklist that we narrow down the options to the correct moment the error occurred and provided accurate training to deal with their misunderstanding.
Step 3: Identify the Key Elements The elements of the phase are the specific biomechanics positioning. Or, in other words, the exact, correct placement of the limbs. If we were to look at the flyaway of the exit, the body position should be the neutral. The elements are:
Slight arch
Chin up
Knees at shoulder width
Arms at shoulder height or slightly lower
Arm angles at 45° down and in front of face
Toes slightly extended beyond knees and curled inwards
These are the specific elements.

Analyze Technical and Tactical Performance: Competition Skydiving: Reference Manual
© Coaching Association of Canada/Canadian Sport Parachuting Association 2011 12
Once we all have a complete understanding of the purpose, phases and elements, we now understand the skills well enough to recognize when they are not being executed correctly. Now, we can set our observation plan.
Step 4: Develop an Observation Plan An observation plan is a plan covering how, when, and where to observe. Developing such a plan is essential to observing skills well — if you try to see everything, you may well see nothing.
Developing an observation plan consists of doing the following:
Deciding which key elements to observe. The key elements you decide to observe should be related to the main goals of the practice. For example, if you want to help participants improve the actions leading up to a takeoff in a jump, you should select only key elements preceding the takeoff.
Now that all the phases and elements have been identified, it is important to choose the key elements to observe or set a priority of observation. A good example of this is a dive down to a formation. Imagine yourself looking at the freeze frame image on a video of a jumper forming a delta. What would be the key elements you would want to see? It is our knowledge of what is most important which makes our choice of which corrections to emphasize and will make the big differences on the following jump. In this example, the arch followed by legs extended would be the most important. You should know the key elements for each and every skill in the program to be an effective problem solver.
Choosing scanning strategies. Scanning strategies are strategies designed to help you do the following:
Decide how to best observe key elements.
Decide what parts of the body or environment to focus on.
Determine whether you need to observe several key elements at the same time.
The following are some tips to help you develop an appropriate scanning strategy:
The points on which you focus affect what you see. For example, if you try to get a general impression of the whole, you will probably NOT get a clear impression of how any particular body part is moving, and vice versa.
It is a good idea to start by scanning — it gives you a general picture of the participant's performance. Then focus on key elements.
The extremities — the arms and legs, for instance — usually move faster than the body. Since it is hard to see fast-moving extremities, focus first on slower moving parts, then on faster moving ones.
It helps to watch a given movement or combination of movements long enough to be able to describe what you see.

Analyze Technical and Tactical Performance: Competition Skydiving: Reference Manual
© Coaching Association of Canada/Canadian Sport Parachuting Association 2011 13
Selecting your position. Your position — where you watch a skill from — is one of the keys to sound observation. After all, you need to be in the right place at the right time to see the right things!
The best position for viewing varies from skill to skill and from key element to key element. The following tips should help you choose your position:
Try to position yourself at a right angle to the plane of the participant's motion — it gives you the best vantage point.
Move around as you observe skills — different positions tell you different things.
Position yourself far enough from participants to overcome problems associated with their speed as they move across your field of vision.
Position yourself opposite the midpoint of the distance travelled and far enough away to see the entire movement when movements extend over some distance.
Get quite close to participants if you want to focus on the individual phases of a skill.
Choose settings with horizontal or vertical reference lines if orientation is important.
Position yourself outside large, busy areas so that they are behind you.
During practice Generally, taking a big picture view or stepping back from the practice to see the entire body/team or performance helps to make a complete scan. Certain skills may require you to be closer to the skill execution to help make immediate corrections minimizing improper practice.
During the jump The place to video is from a high angle on the outer edge of the team. This provides the best angle to show all of the grips to ourselves as coaches but also the judges in competition.
Canopy control Canopy is best coached from close to the target area. The closer the coach can be, the more specific technique can be observed. If using a video camera to record landings, a position out front and/or slightly to the side of the canopy’s line of flight will help to get the best footage of the flare.
Deciding on the number of observations. The exact number of observations depends on the skill in question. Ideally, you should observe a participant as many times as it takes to get the information you need.
In other sports, it may be easy to decide on a number of repetitions to view and evaluate. In freefall, the number of repetitions is usually difficult to predict. If multiple points of view are required, it would best be done by splitting the jump into a percentage or altitude to switch positions. An example of this is to have the performance shot from a steep angle until 6,000 feet and then have the video come down on level to catch arch, elbows and knee work until break off in which the videographer could follow a team member during the track.

Analyze Technical and Tactical Performance: Competition Skydiving: Reference Manual
© Coaching Association of Canada/Canadian Sport Parachuting Association 2011 14
SAMPLE DETAILED OBSERVATION PLAN SKILL Sideward movement
TASK To analyze overall technique
Observation Number Key Elements Purpose of
Observation Position Scanning Strategies
Observed Performance
1 All key elements To view whole skill
Perpendicular to midpoint
Scan entire skill Skill completed
2
Neutral mantis Hip to knee joint flex down and hip to opposite knee up Shoulder to elbow drop down with shoulder to elbow raised slightly on opposite side
Lead with dropped knee Initiation of legs and arms is symmetrical Initiating motion is to be perpendicular to target
Perpendicular from start to finish with no change in proximity or level
Scan initiation of both lower and upper body.
Place your drawing here
3
Neutral mantis Observe balanced neutral mantis with slight arch and proper knee width
Perpendicular and neutral at prior to countering action Finishing distance + to start distance Well timed Coast
Watch for a return to neutral between starting and stopping
Place your drawing here
3
Hip to knee joint flex down and hip to opposite knee up (opposite direction) Shoulder to elbow drop down with shoulder to elbow raised slightly on opposite side (opposite direction) Neutral mantis
Counter with dropped knee Initiation of legs and arms is symmetrical Initiating motion is to be stopped perpendicular to target
Well timed SCS with zero momentum dock.
Scan initiation of both lower and upper body.

Analyze Technical and Tactical Performance: Competition Skydiving: Reference Manual
© Coaching Association of Canada/Canadian Sport Parachuting Association 2011 15
Analysis Worksheet
Area Phase Elements Set up Exit
Launch
Shape
Observation Number
Sequential
Key Elements
Purpose of Observation
Position Scanning Strategies
Observed Performance
Altitude Break off
180°
Track
Flare/wave/look

Analyze Technical and Tactical Performance: Competition Skydiving: Reference Manual
© Coaching Association of Canada/Canadian Sport Parachuting Association 2011 16
4.2 Stage 2: The Observation Stage In the observation stage, you carry out the separate steps that make up your observation plan. In particular, for each of the key elements you have decided to observe, you need to do as follows:
Implement the appropriate scanning strategy or strategies
Take up the appropriate position
Make the number of observations specified in your observation plan
Tips for Carrying out the Observation To carry out these steps well, you need to be completely familiar with the phases of the skill in question and its key elements. Here are some tips to help you effectively carry out the observation:
Ensure that the phases of the skill are second nature to you.
Put your observation plan in chart form and record your observations on the chart. Choose or design a form that suits you. Use stick figures to describe the skill.
During the observation, focus single-mindedly on observation. Block out distractions as well as you can. By recognizing potential distractions, you should be able to minimize or eliminate them. Some factors to consider are:
• Intensity and size — the more intense and larger an object is, the more likely it is to attract your attention. For example, large objects near participants you are observing can attract your attention and make it harder for you to focus on performance.
• Contrast — objects whose color contrasts sharply with what you are trying to observe distract you from the task at hand.
• Movement — movement attracts attention. To focus well on one body or object, you need to be aware of other moving bodies and objects.
• The environment — the type of surroundings, equipment, etc., may affect your ability to concentrate on specific body movements.
• Internal distractions — your own feelings, tension about competition, motivation, biases, etc., can distract you and limit your skills of observation.

Analyze Technical and Tactical Performance: Competition Skydiving: Reference Manual
© Coaching Association of Canada/Canadian Sport Parachuting Association 2011 17
5. PRINCIPLES OF BIOMECHANICS This section summarizes eight principles of biomechanics that can help you in your day-to-day coaching and presents examples of the application of each principle.
5.1 Principle #1: Balance and Stability 5.1.1 Statement of the Principle Balance and stability are determined by the relationship among a body or object’s mass, centre of gravity, line of gravity, and base of support
Key Terms
Mass Mass is the total quantity of matter contained in an object. Mass is a measure of resistance to linear motion, and it is usually measured in kilograms. Greater mass means greater resistance to motion — a 95-kg athlete has much more resistance to linear motion than one weighing 45 kg.
Centre of gravity (or centre of mass)
The centre of gravity of an athlete is an imaginary point around which all the mass of the athlete is equally distributed. The centre of gravity changes its position as the athlete changes his/her position. There are times in sport when an athlete’s centre of gravity is outside his or her body.
Line of gravity The line of gravity is a straight line, drawn to the centre of the earth, from the centre of gravity of the body or object.
Base of support The base of support is the area bounded by all points of contact with the ground.
The greater the mass The lower the centre of gravity The wider the base of support The closer the line of gravity is to the
centre of the base of support The more stable the athlete or object is
5.1.2 Applications of the Principle Mass The greater their mass, the more stable athletes are. For example, heavier wrestlers have an advantage over lighter ones, because the opponent must use more force to pull them off balance. In sequential formation skydiving we work towards a body weight that allows us to move quickly and stop quickly. The heavier we are the more energy it takes to stop moves.

Analyze Technical and Tactical Performance: Competition Skydiving: Reference Manual
© Coaching Association of Canada/Canadian Sport Parachuting Association 2011 18
Centre of Gravity The lower their centre of gravity, the more stable athletes will be. Football players who want to be more stable often bend their knees and flex at the waist — it lowers their centre of gravity. As we all know the low center of gravity the more stable, however, to move more rapidly in the air a slightly arched to flat body position is preferred. Base of Support The larger their base of support, the more stable athletes will be. Wrestlers who want to be more stable often spread their feet apart — it widens their base. Advancing jumpers who want to participate in formation skydiving work on shifting their body position to a narrower stance, the mantis. The lack smaller base of support allows for faster movements.
5.1.3 The Position of the Centre of Gravity Relative to the Base of Support The centre of gravity must be within the base of support for athletes to be stable. In other words, the line of gravity must fall within the base. See the figure below.
The location of the centre of gravity usually changes as athletes' arms and legs move, and so does balance. If a swimmer on the edge of a pool deck moves his or her arms forward, the centre of gravity moves forward, and balance may be lost. During the exit set up keeping centered over your base of support will allow for a balanced and successful launch.
External Weight The addition of an external weight changes the position of the centre of gravity, and problems with stability may increase. The centre of gravity of an athlete lifting a weight, for example, is in the centre of the athlete's own weight plus the weight of the bar. Moving the bar too far forward or back can move the centre of gravity outside the base of support and lead to a loss of control. The loss of a body part can also create difficulties — after all, the centre of gravity shifts, and adaptations are necessary. For instance, some one-legged high jumpers have trouble using a fast hopping approach to the bar because of their asymmetric weight distribution. External weight isn’t as exaggerated as in other sports. Team members will wear weight to help achieve overall relativity with the other team members. We do recommend supplementing the use of weight with diet and a strength training program target to produce muscle mass. As previously stated in the stability characteristic of mass, the heavier we are the harder it is to start
Analyze Technical and Tactical Performance: Competition Skydiving: Reference Manual
© Coaching Association of Canada/Canadian Sport Parachuting Association 2011 19
and more importantly stop moves. One other issue to consider under this heading is a poorly fitting rig. If the gear shifts on our back during aggressive starts and stops this will create flying difficulties.
Movement and Balance In some skills, athletes move and try to keep their balance. For example, wrestlers lower their centre of gravity while their opponent tries to pull them off balance — it helps them stay balanced. And if an opponent tries to pull wrestlers off balance in a forward direction, they can shift their weight over the back edge of the base. Balance in freefall is begins with a comfortable neutral body position. The jumpsuit selection and flying style help achieve this fundamental goal. On exits our set up position in the door and the application of a wide base or lowering the center of gravity helps us to maintain the set up during aircraft direction shifts.
Instability There are many times when athletes want to be less stable so they can move as fast as possible in a certain direction. For example, in the sprint start, athletes move their centre of gravity far forward over the base of support, thus decreasing their stability in the direction of the run. This position helps them start faster — when they bring their hands up, they are in an unstable position and tend to topple forward, because the centre of gravity is now outside the base of support. In cases where the base of support has been entirely removed, athletes are totally unstable. For instance, wide receivers in football are totally unstable when they are in the air, and so they are susceptible to losing their balance when hit. The high performance neutral position is achieved by narrowing the stance more between turns and sideward movement. Advanced fliers not only flex the body through the torso (sagittal plane) but also vary their knee width (frontal plane) between maneuvers.
5.2 Principle #2: Use All Joints in Order 5.2.1 Statement of the Principle To achieve maximum speed of a body segment or object, use all joints in order, from largest and slowest to smallest and fastest, through the largest range of motion possible. In body flight this is one of the most important principles. To deflect or push air is much more efficiently achieved by using the main body surface or torso.
Key Terms Joint range of motion refers to the amount of movement at a joint. Joint range of motion is measured in degrees (°).
Analyze Technical and Tactical Performance: Competition Skydiving: Reference Manual
© Coaching Association of Canada/Canadian Sport Parachuting Association 2011 20
5.2.2 Applications of the Principle
Maximum Possible Speed Maximum possible speed at impact or release is the goal of many skills. Such speed is achieved by adding the speeds of the preceding segments and transferring this speed to the final segment or to the implement — hand, foot, racquet, stick, etc. — used to propel another object. For example, to maximize speed, a javelin thrower does as follows:
The transition from one joint to another starts with the hips, trunk and shoulders perpendicular (or facing away from) the desired direction of the throw.
As the athlete starts the throw, the trunk and hips rotate first, causing the upper body to lag behind. Having a body part lag behind places a significant stretch on the muscles, which will result in a greater muscle contraction. This will contribute to the speed of the body segment or object.
As the athlete continues the throw, the shoulders rotate through and the arm lags behind.
As each segment rotates in sequence, speed increases so that maximum speed is transferred to the javelin at the point of release.
All fundamental skills in body flight are effected by using more joints. The tracking example used earlier is a great example of this but not to exclude all forward, back, down, up, heading changes and sideward movements. The body flight concept is best initiated from our largest joints and is accentuated by following through to the extremities.
Speed and Implement Length The speed at the end of a body segment or implement is directly proportional to the implement's length, provided the speed of the swing is the same. Golfers therefore use longer clubs to hit the ball farther — they can hit the ball twice as fast if they can swing at the same speed with a club twice as long.
Skills Calling Mainly for Maximum Speed Skills calling mainly for maximum speed are timed sequentially — larger, slower joints start the movement, and faster joints contribute once the preceding joint reaches peak speed. The baseball throw is a skill of maximum speed; athletes use — in order — the legs, pelvis, trunk, shoulder, elbow, wrist, and fingers.
Maximum Force In skills calling mainly for maximum force, athletes should perform slower, controlled movements at high intensity. In these skills, body segments usually move at the same time, especially if the object is heavy or both hands are used at once. The squat in weightlifting is a skill of maximum force. The more joints athletes use in a movement, the more muscles they contract and the more force they can exert. For example, a hard slap shot in hockey involves the legs, hips, shoulders, arms, and stick — and leaving out one joint would reduce the shot's force. And football kickers

Analyze Technical and Tactical Performance: Competition Skydiving: Reference Manual
© Coaching Association of Canada/Canadian Sport Parachuting Association 2011 21
with soccer-style technique are bringing in one more joint movement to provide force to the leg — the rotation of the hip joint inward during the swing.
5.3 Principle #3: Impulse 5.3.1 Statement of the Principle Impulse is the product of force and the length of time the force is applied.
Key Terms
Momentum is the amount of motion an athlete or object has developed.
Linear momentum is the amount of linear motion, and it equals mass times velocity.
Impulse refers to the application of force over a period of time that results in a change in the amount of momentum an athlete or object has. This relationship is referred to as the impulse-momentum relationship.
5.3.2 Applications of the Principle Impulse can be generated over a long or short period of time. Impulse is critical in sport situations that require changes in speed and direction of movement, and it applies most commonly to jumping skills.
Maximum Force over a Short Period Sprinters start in a flexed position and apply as much force as possible over a short period of time to increase speed from rest. The impulse is produced for the entire time the athlete is in contact with the blocks. The athlete drives his or her limbs through a full range of motion to create more force. Impulse is a key goal to move towards high performance flying. The ability to rapidly and precisely change our body to “push” the air creates snappy high acceleration moves. Impulse in combination with well timed start-coast-stop’s is the essence of sequential formation skydiving.
Smaller Force over a Longer Period
The running start in bobsleigh is one of many situations in sport where impulse is created by applying a smaller force over a longer period of time. Bobsledders have up to 65 m to increase the speed of their sled. This is necessary because the sleds are so heavy. The athletes lean into the sled and plant the front foot while flexed at the knees and hips, then extend forcefully, propelling the sled forward. The more force the team creates over the starting distance, the sooner the team can jump into the sled, and the higher the speed it can reach earlier in the race.

Analyze Technical and Tactical Performance: Competition Skydiving: Reference Manual
© Coaching Association of Canada/Canadian Sport Parachuting Association 2011 22
Novice versus Experienced Athletes Novice athletes have less range of motion than experienced athletes during force production. The arm drive of novice athletes is also more limited than that of experienced athletes, reducing the net force produced. The result is a smaller impulse, which produces a slower change in speed. When coaching beginning team and individuals the focus on the start-coast-stop process and the length of time spent in the coast phase allows the novice athlete to make precise controlled moves. As the novice achieves success in doing the moves correctly they are encouraged to start more aggressively and more importantly, the emphasis of a well timed and correct stopping action is our gauge as to whether they can fly faster or need to remain at the current intensity of training until the mind and body work as one.
Change in Direction
Athletes often need to make sudden changes in direction while moving at high speeds. For example, a football player avoiding would-be tacklers must produce maximal force in a minimal time to propel himself or herself as far away from the defender as possible without giving away the intended change of direction. If the football player does not produce enough impulse, the change in direction will be reduced, and so will the player’s ability to avoid the defender. In advanced body flight a certain percentage of any drawn sequence will require a single fundamental skill. However, a lot of the moves will require a combination of two or more skills at once. In other words, we are super-imposing one skill over another performing super positioning. Coaching technique at this level shifts away from the technical mechanics of skill execution. The flier performs these moves through desire, visual reference, cross reference, and a feel for the move. These movements are complex tasks and encouraging your athletes to “let go” and “trust” themselves is the best training or intervention strategy. Analyze the “pictures” on the video and relative positioning of the athlete to the other team members and give generalized technical suggestions, i.e. a bit more knee dig at the outfacing picture, rather than an overall biomechanical critique.
Force Absorption Forces often have to be absorbed, for example, to prevent injury, to catch an object, or to control an object. Force absorption occurs when athletes catch a fly ball, receive a pass in broomball, or land on mats in karate and judo. In cases where force absorption is necessary, the athlete or object has developed a certain amount of momentum, and it has to be dissipated over time or distance. This change in momentum requires the application of an impulse. For example, skilled fielders catching a fly ball reach out with the glove and flex the arms inward as the ball contacts the glove; this increases the time for which force is applied. By contrast, unskilled players often keep the glove in one place at impact, and all the force is applied at once. The activity of formation skydiving is a contact activity, however the end goal is to be stopped in position prior to making contact. In training the “stop then grip” discipline may take a while to master. Therefore, a force absorption technique called “stiff arming” is applied. This is done be reaching forward and tensing the arm(s) and applying a controlled contraction once contact has been made.

Analyze Technical and Tactical Performance: Competition Skydiving: Reference Manual
© Coaching Association of Canada/Canadian Sport Parachuting Association 2011 23
Range of Motion
In general, if a skill calls for maximal application of force, the joint should be moved through a larger range of motion — force is applied for longer, and impulse is greater. In the volleyball spike jump, for example, the player who crouches the deepest before jumping often jumps highest because the leg joints move through the greatest range of motion. Most of the time a formation skydiver works at maintaining a tighter body position and resists breaking form. Excessive arm and leg action is referred to as “noisy flying”. In saying this, there are a lot of flying styles and there are some who do open up a bit more in their flying stance than others. Of course our separation skills or tracking ability is a skill where a full range of motion is beneficial.
5.4 Principle #4: Reaction Forces 5.4.1 Statement of the Principle For every action, there is an equal and opposite reaction.
Key Terms Linear motion is any movement that occurs along a straight or curved path where all parts of the body or object move an equal distance in the same direction.
Angular motion is motion that occurs about an axis of rotation. For every action produced in the air, there is an equal and opposite reaction about the same axis of rotation.
5.4.2 Applications of the Principle This principle is the foundation of all movement and can be observed in all sport skills. It applies to both linear and angular motion.
Linear Motion Sprinting. As the sprinter pushes against the starting blocks (the action), he or she exerts a force against the block. Because of the resistance of the ground, the blocks in effect push back (reaction force). The reaction force is the same size as the force the athlete applied to the blocks, but opposite in direction. Speed Skating. Short track speed skaters push against the ice (applies a force against the ice) through the blade of the skate. The ice pushes back on the skate blade with a force equal in size but opposite in direction. Without this reaction force, the skate blade would continue to slide along the ice, and no forward movement of the athlete would occur. This particular principle is one all skydivers are familiar with. Our entire sport is made up of redirecting air. Whether it is becoming a human surf board or the downward trim of our parachutes starting the entire aerodynamic process to create lift.

Analyze Technical and Tactical Performance: Competition Skydiving: Reference Manual
© Coaching Association of Canada/Canadian Sport Parachuting Association 2011 24
Angular Motion High Jumping. To clear his or her feet, a high jumper moving over the bar brings the head up (the action), which causes the feet to come up in reaction to the movement of the head. Hurdling.
Approaching the Hurdle. As the athlete approaches the hurdle near top speed, he or she must quickly and efficiently raise the lead leg to a position slightly above the hurdle to avoid hitting the hurdle. To accomplish this, the athlete flexes the upper body forward and down when pushing off the ground. The axis of rotation is at the waist. The upper leg must come up to counter the movement of the upper body. This reaction of the lower leg helps the athlete raise the lead leg more quickly.
Clearing the Trail Leg. As the athlete clears the hurdle, he or she must clear the trail leg, which is positioned horizontally and out to the side. As the athlete rotates the leg to return it to his or her midline to continue the running stride, the upper body counters this movement by rotating about a vertical axis of rotation through the trunk.
5.5 Principle #5: Direction 5.5.1 Statement of the Principle In accuracy skills, the path of the hand or implement must be aligned with the target for as long as possible during delivery; this is called flattening the arc. Flattening the arc means that the pathway of the arm or implement does not trace out a perfect parabolic arc during delivery but is flattened to keep the hand or implement facing forward for a longer period of time.
5.5.2 Applications of the Principle Importance of a Long Step in the Direction of the Target In the windmill pitch in softball, skilled pitchers flatten the arc of their arm by, among other things, taking a long step forward and using a full range of trunk rotation and shoulder flexion. This extends the arm’s pathway and flattens the arc during release. Similarly, in the forehand drive in tennis, the player flattens the arc of the arm by, among other things, taking a long step forward. By contrast, novice softball pitchers often fail to take a step in the direction of the pitch, thus reducing their ability to flatten the arc. This reduces their ability to flatten the arc.
Importance of Rotation and Flexion
In the forehand drive in tennis, the player flattens the arc of his or her arm with, among other things, a full range of arm motion in horizontal flexion, often accompanied by wrist flexion and lower-arm rotation. Rotation of the trunk in the direction of the hit also helps extend the arc of the racquet.
Error Detection and Correction Look for abbreviated movements when athletes are not flattening the arc as well as they should be able to, given their stage of development.

Analyze Technical and Tactical Performance: Competition Skydiving: Reference Manual
© Coaching Association of Canada/Canadian Sport Parachuting Association 2011 25
For example, if a young baseball player has a poor swing, carefully observe his or her step forward, trunk rotation, trunk flexion, range of arm movement at the shoulders. If any of these movements are abbreviated, the swing will be shortened and therefore less effective. The “direction “ principle takes on a slightly different application for skydivers. Newton’s First Law of Motion states, “every body will remain in a state of constant motion or rest unless acted upon by an outside force”. Due our environment being a fluid dynamic once momentum has been gained it is more difficult to change direction. If I am spinning and performing a sideward movement in combination the direction I originally start is the direction my body will want to follow. More exaggerated movements are necessary to alter the original flight path, or in other words, I must apply an outside force.
5.6 Principle #6: Angular Motion 5.6.1 Statement of the Principle Angular motion is created by the application of a force acting at some distance from the axis of rotation of a body or object. In other words, the force does NOT act directly through the centre of gravity.
Key Terms The axis of rotation is an imaginary line perpendicular to the plane of rotation and passing through an athlete’s or object’s centre of gravity.
Linear motion is motion along a straight line. Linear motion is produced by the application of a force that is acting directly through the athlete’s or object’s centre of gravity. For example, if the force applied directly through the body’s centre of gravity is vertical, the athlete’s linear motion will be vertical.
Angular motion is motion about a fixed point or fixed axis.
Torque equals force times the perpendicular distance from the force to the axis of rotation.
Moment of inertia is a measure of resistance to angular motion. Moment of inertia depends on mass and the square of the distance between the centre of gravity and the axis of rotation. For example, in the leg recovery in sprinting, the distance from the axis is the distance from the hip joint to the centre of mass of each leg segment (see figure below). When sprinters tuck their leg by flexing the knee maximally, the distance from the hip to the lower leg segment can decrease by as much as one-half; this decreases the moment of inertia by the square of one-half, or by as much as one-quarter!

Analyze Technical and Tactical Performance: Competition Skydiving: Reference Manual
© Coaching Association of Canada/Canadian Sport Parachuting Association 2011 26
5.6.2 Applications of the Principle Rotation of the Entire Body
In many cases, gravity is one of the forces acting at some distance from the axis of rotation. For instance, as a diver leans back, his or her centre of gravity moves behind the axis of rotation, which is the edge of the tower as long as the diver is in contact with it. Because of the pull of the earth, the athlete’s mass is the applied force. And since that force is acting at some distance from the axis of rotation, the result is a torque and angular motion once the diver is airborne.
When a linebacker tackles an opponent by grasping the feet, the linebacker is applying an off-centre force that will cause the whole body to rotate about the feet. Similarly, wrestlers try to pull their opponents over by applying forces to the shoulders, thereby creating torque and perhaps rotating the opponent to the canvas.
Moment of Inertia and Energy Expenditure Muscles have to generate torque to move body segments or implements about a given axis of rotation. If athletes can reduce their moment of inertia, less torque will be needed to move body segments or implements about a given axis of rotation.

Analyze Technical and Tactical Performance: Competition Skydiving: Reference Manual
© Coaching Association of Canada/Canadian Sport Parachuting Association 2011 27
For example, swimmers who flex their shoulder and elbow as they move the arm closer to the body during recovery reduce the moment of inertia of their arm, decrease the amount of torque required to rotate the arm about the shoulder joint, and lower their energy expenditure. Similarly, paddlers who bend their arms and bring the paddle closer to their body use less energy in their recovery.
The gait of amputee runners illustrates the adaptations necessary when the moment of inertia cannot be reduced. Prosthetic limbs remain extended during recovery, and this extended position slows down the recovery. Athletes often compensate by taking two hopping steps on their normal limb while the prosthetic limb is being recovered, and they can take a longer stride with this limb. These actions may partially compensate for the energy it takes to recover an extended limb.
Free-Limb Motion Free limbs can assist in the production of rotation AND increase the magnitude of forces against the ground. Free limbs must, however, complete their swings while athletes are still in contact with the ground; otherwise, no reaction forces are produced! There are many examples of free-limb motion. The acceleration of free limbs upward during sprinting produces a reaction force downward on the body; this force is transmitted to the supporting surface and produces an equal and opposite reaction force against the limbs. Similarly, high jumpers and long jumpers forcefully swing their free leg and arms upward while the takeoff leg is extending — it increases the forces driving them upward and forward. Turbulence in the oncoming air, and the object still moves toward the area of low pressure, but the low spinning speed causes the location of this turbulence and the high- and low-pressure areas to vary. The angular motion principle definitely works in with our tracking ability. A jumper can extend their legs and produce a acceleration and resulting velocity. However, if the jumper stretches making the body longer the extra 4 inches produces an much greater result. Center turns are a very important fundamental skill for a formation skydiver. Our ability as coaches to understand and analyze center turns is one of the more complex performance analysis we do. We understand that the offsetting of the elbows and knees to deflect air is an important aerodynamic factor. The other factor is the equal length of the legs and arms (toe tip to fingertip) from our center axis point. If the arms length from center is shorter than the leg length the rotation point of the turn will be through the chest, or chest turn. In other words, the legs are driving around the upper body faster than the arm forces can match.
5.7 Principle #7: Angular Momentum 5.7.1 Statement of the Principle The angular momentum of a person or object remains constant while airborne, unless external torque is applied.
This principle is known as the law of conservation of angular momentum.

Analyze Technical and Tactical Performance: Competition Skydiving: Reference Manual
© Coaching Association of Canada/Canadian Sport Parachuting Association 2011 28
Key Terms
Angular momentum is the amount of angular motion possessed by an athlete or object. Athletes possess angular momentum in situations in which they are free to rotate about an axis. Angular momentum is the product of an athlete’s moment of inertia and his or her angular velocity.
Angular velocity refers to how fast a body or object is spinning; it is usually measured as degrees per unit of time.
5.7.2 Applications of the Principle The conservation of angular momentum is very important in airborne sports. Close attention must be paid to how athletes can manipulate their moment of inertia by altering the positions of their body segments to increase and decrease angular velocity, i.e., increase and decrease the rate at which they spin.
Figure Skating
As figure skaters enter a spin, they position their limbs away from their axis of rotation to increase their moment of inertia. This in turn allows them to decrease their angular velocity, or rate of spin. As skaters continue to spin, they move their limbs closer to their axis of rotation, which decreases their moment of inertia and increases their rate of spin. Lastly, as skaters exit their spin, they reduce their angular velocity by moving their limbs away from their axis of rotation, which increases their moment of inertia. Novice skaters are less skilful both at manipulating their moment of inertia and at applying torque to the ice surface.
Diving
Changing their moment of inertia affects divers’ angular velocity. For example, divers wishing to do high-velocity spins assume a tuck position; those wanting to perform medium-velocity spins assume a pike position; and those whose goal is slow-velocity spins assume the layout position.

Analyze Technical and Tactical Performance: Competition Skydiving: Reference Manual
© Coaching Association of Canada/Canadian Sport Parachuting Association 2011 29
Long Jump In the long jump, athletes manipulate their angular momentum to prevent unwanted forward rotation of their trunk. Because of the high speed of their run-up, long jumpers have a tendency to rotate forward at the trunk. To counter this, long jumpers perform a hitch-kick while airborne. This allows them to store all their angular momentum in their limbs and prevents their trunk from rotating forward prematurely, which would cause their feet to land in the pit earlier. As we advance to more aggressive flying styles the application of changing or body position from bigger to smaller while rotating can have benefits and create problems. When performing center turns from and open position (hands comfortably forward equaling leg length) following initiation to about 90° drawing the hands in under your chin with a symmetrical and equal retraction of your feet (toes over knees) your turn velocity will increase with no extra input or deflection required. To stop the turn return the hands and feet to their original position or further extended and the turn will slow requiring less stopping input. If this tightening of the body position is done unequally, or poorly timed, the turn will wobble. This principle can also apply to partner work, i.e. Zigzag-marquis. Rather than fly up tight to your piece partner we keep the formation “shaped” or “boxed out.” When the center partner initiates I assist letting him or her fly forward by extending my arms, as the “door” opens allowing us to start our move we fly forward into our partner compressing the piece size, as it completes the rotation we can open up slowing the piece and reducing the amount of stopping input needed.
5.8 Principle #8: Streamlining 5.8.1 Statement of the Principle The resistance to a body or object as it moves through air or water is determined by its size, surface, and shape. More specifically, the resistance to the motion of a body or object moving through air or water is increased when the object is not streamlined, i.e., has a large surface area or a rough surface.
Key Terms
Streamlining refers to minimizing the surface area of an object facing the direction of motion and making this surface as smooth as possible so that the flow of water or air past it is smooth, not turbulent. When these lines of flow are parallel, the flow is said to be streamlined. The perfect streamlined shape is the foil: rounded in the front and tapered in the back to ensure smooth fluid flow and minimal turbulent flow.
5.8.2 Applications of the Principle Streamlining is important in sports that require athletes to move through air or water in the shortest time possible. The greater the athlete’s speed, the more important streamlining is, as higher velocities result in higher drag forces.

Analyze Technical and Tactical Performance: Competition Skydiving: Reference Manual
© Coaching Association of Canada/Canadian Sport Parachuting Association 2011 30
Swimming Swimmers can improve their streamlining by aligning their bodies horizontally in the water, wearing swim suits that decrease the water’s resistance their movement, cutting their hair short, and shaving their body hair.
Speed Skating In speed skating, athletes decrease air resistance by flexing their knees and bending at their waist to decrease the cross-sectional area exposed to the oncoming air. Speed skaters also wear special suits that decrease air resistance by smoothing out their “skin” surface and allowing the air to move more freely around their body.
Sliding Sports Downhill skiers wear thin nylon ski suits and streamlined helmets to decrease air resistance. Even the poles in downhill skiing contribute to streamlining: they are shaped to conform to the athlete’s body and decrease the overall surface area. Skiers also bend their legs and lean well forward to decrease the area of the body facing the oncoming air. Athletes competing in bobsled, luge, skeleton, and skiing all wear suits specially designed to decrease air resistance. Even ice hockey players now wear jerseys are form-fitting and made with smoother material.
Skydiving, being in a fluid environment, as much as we are working our physical skills we are also presenting our body to the airflow aerodynamically. Resistance or “drag” is created as we pass through the air in any direction. To move more quickly changing our body to minimize resistance, or “streamlining” will allow us to move faster with less effort. Tracking is the most obvious skill. A backwards movement can be improved by simply narrowing the knees together. Problems with backwards moves are unintentionally widening the knees causing more of an airbrake. In closing the above principles are extremely helpful to the coach to recognize the critical moments of errors as they happen. Our understanding of human motion (biomechanics) combined with a solid understanding of the aerodynamics of Body Flight is a must. Realizing how the body will react in this fluid environment will allow you to foresee the errors. Otherwise, when you see an arm push outwards unintentionally, or the elbows drawn back to a lazy “W” during a turn, you will anticipate the resultant reaction before it actually occurs. This recognition of the critical moment and what it is about to create is foresight.

Analyze Technical and Tactical Performance: Competition Skydiving: Reference Manual
© Coaching Association of Canada/Canadian Sport Parachuting Association 2011 31
BIOMECHANICS PRINCIPLES: SUMMARY TABLE
Biomechanical Principle Athletes' Actions Principle #1: Balance and Stability When athletes want to become stable, they should
lower their centre of gravity widen their base of support place their centre of gravity in the middle of the base of support increase their mass
When athletes want to move quickly (become less stable), they should
raise their centre of gravity narrow their base of support move their centre of gravity outside the base of support decrease their mass
Principle #2 Use All Joints in Order When athletes want to exert maximum force, they should
use as many joints as possible use joints simultaneously
When athletes want to produce maximum speed, they should
use as many joints as possible use all joints in order, from largest and slowest to smallest and fastest
Principle #3: Impulse When athletes want to apply maximum force, they should
move their joints through a larger range of motion
Principle #4: Reaction Forces When athletes want to move in one direction, they should
apply a force in the opposite direction
Principle #5: Direction When athletes want to hit a target, they should
align the path of their hand or the implement with the target for as long as possible
Principle #6: Angular Motion When athletes want to create motion about a fixed point or fixed axis, they should
apply force some distance from the axis of rotation
Principle #7: Angular Momentum When athletes want to spin faster, they should
decrease their moment of inertia
Principle #8: Streamlining When athletes want to increase their speed in air or water, they should
be as streamlined as possible
For more information on biomechanics and sport technique, see the second edition of Sport Mechanics for Coaches, by Gerry Carr and published in 2004 by Human Kinetics.

Analyze Technical and Tactical Performance: Competition Skydiving: Reference Manual
© Coaching Association of Canada/Canadian Sport Parachuting Association 2011 32
6. PROGRESSION IN TECHNIQUE Athletes move through a progression as they improve their technique. Here are some tips on how to develop a desired technique more quickly:
First, the skill should be one smooth motion with no pauses. Each segment should start moving as the previous one reaches maximum speed in a fluid motion.
Second, look for a stretch on the limb muscles. In overhand sport skills, the anterior chest muscles should usually be on stretch. For example, when a volleyball player serves, there is a huge stretch on the pectoral muscles. By contrast, in kicking sports skills, the anterior thigh muscles or quadriceps should be on stretch.
Third, look for joints being used out of sequence. The big trunk, shoulder, and hip joints need to be used before the knee, ankle, elbow, and wrist joints.
Fourth, ensure that the athlete has a long follow-through over which to decelerate his or her joints. This decreases the chance of injury by dispersing force over a larger time period.
Direct coaches to additional articles, books, and online resources on biomechanics principles. Provide coaches with the names of local individuals and organizations with subject matter expertise in biomechanics
6.1 Ways to Communicate Measurement Findings on Performance to Athletes
During Error Detection During Error Correction Tools Tools
Statistical analyses Statistical comparison to other athletes Statistical comparison to an accepted standard of performance Charts, tables, graphs Computer-enhanced charts and graphs, e.g., force curves Checklists
Statistical analyses showing changes Statistical comparison to an accepted standard of performance showing closing of gaps Charts, tables, graphs showing progress Computer-enhanced charts and graphs, e.g., force curves showing changes Checklists
Processes Processes Coach-athlete 1-1 discussion of a final Athlete self-analysis checklist of performance – with or without videos Coach checklist of athlete analysis followed by discussion Peer assessment of an athlete’s performance with feedback – with or without videos or checklists Group analysis of performance
Coach-athlete discussion on development factors Before and after correction comparisons (videos) on changes Personal reflection on changes – feelings, thoughts Peer assessment with feedback Visualization of expected performance Group analysis of performance

Analyze Technical and Tactical Performance: Competition Skydiving: Reference Manual
© Coaching Association of Canada/Canadian Sport Parachuting Association 2011 33
SAMPLE WORKSHEETS FOR REFERENCE MATERIAL
Monitoring and Tracking Technical and Tactical Performance Worksheet
Sport/Discipline Skill or Tactic Outcome
Factor Equipment/
Environment Psychological
Affective/ Cognitive
Physical Tactical Technical
Wha
t to
Mea
sure
E.g., Weather E.g., Performance Readiness
E.g., Strength E.g., Busts
E.g., Number of successful formation sequence pages
How
to M
easu
re
E.g., Temperature/ Conditions/ Humidity
E.g., Questionnaire, Scale Anticipation analysis Trend analysis
E.g., Physical Test
E.g., Where they occurred, when they occurred, how they occurred
E.g., Type of draw, more random or more blocks
Whe
n to
Mea
sure
E.g., Average for period of competition
E.g., Before competition, post-competition, pre-training, or post-training
E.g., General Preparatory Phase and Specific Preparatory Phase
E.g., During practice and Competitive Period
E.g., During competition or practice. Use video of jump

Analyze Technical and Tactical Performance: Competition Skydiving: Reference Manual
© Coaching Association of Canada/Canadian Sport Parachuting Association 2011 34
Data Analysis Worksheet (Sports to modify worksheet appropriately to suit their context)
Sport: Example — Team Sport
Identify the overall outcome
Improve score Increase scoring opportunity Targeting/cross referencing
Team best Change in time (speed) Greater precision
How is this measured? E.g., quicker transition times between points
Identify the tactic or technical element that most impacts the
outcome
Busts Transition Interim execution Change in pace Change in rhythm
Change in rate Amount of time Physical factor Mental factor Equipment or environment factor Optimal line/straight line movement
Identify measures that could be tracked for tactical or technical elements Where or when
did it occur? What preceded it?
(Who was involved?) What happened after? (Who was involved?)
Exit Which problem formation or move out of the 5-6 formations
Set up in the door Break in grip synchronicity Player:
Formation piece spun due to poor launch timing Lack of all grips on –all grips off resulting in busts on point x, y, and z. Player:
Measured by… Video Stop watch Peer evaluation Gates
Measured by… Video and team members Visual observation on video and team feedback
Measured by… Visual observation and team feedback Visual observation on video and team feedback
How would you analyze the data? Compare number of busts to number of scoring opportunities Calculate % of each technical element prior to and after bust Calculate frequency of players involved Compare % of technical element to scoring opportunity
Data Analysis Worksheet (Sports to modify worksheet appropriately to suit their context)

Analyze Technical and Tactical Performance: Competition Skydiving: Reference Manual
© Coaching Association of Canada/Canadian Sport Parachuting Association 2011 35
Sport: Example — Individual Sport
Identify the overall outcome
Improve score Follow game plan Consistency Gate or disc accuracy
Improved overall placement Change in time (speed) Greater precision
How is this measured? Overall event time
Identify the tactic or technical element that most impacts the
outcome
Busts Transition Change in pace Change in rhythm Set up or entry point
Change in rate Amount of time Physical factor Mental factor Equipment or environment factor Optimal line
Identify measures that could be tracked for tactical or technical elements Where or when
did it occur? What preceded it?
(Who was involved?) What happened after? (Who was involved?)
Late to set up, height Usually some type of wind change
Slow opening with poor spot Change in conditions
Disqualified Lack of speed or accuracy
Measured by… Speed through gate Rushed approach lacking precision on landing
Measured by… Total distance, short Poor score
Measured by… Total distance Larger distance score
How would you analyze the data? Compare time in combination to overall time Compare average time in combination for top 3, to average time in combination of 10th – 12 Compare % of time in combinations for each parachutist and overall finish
th

Analyze Technical and Tactical Performance: Competition Skydiving: Reference Manual
© Coaching Association of Canada/Canadian Sport Parachuting Association 2011 36
Monitoring and Tracking Technical and Tactical Performance Worksheet
Sport/Discipline Skill or Tactic Outcome
Factor Equipment/
Environment Psychological
Affective/ Cognitive
Physical Tactical Technical
Wha
t to
Mea
sure
E.g., Weather E.g., Performance Readiness
E.g., Strength E.g., Busts
E.g., Number of successful formation sequence pages
How
to M
easu
re
E.g., Temperature/ Conditions/ Humidity
E.g., Questionnaire, Scale Anticipation analysis Trend analysis
E.g., Physical Test
E.g., Where they occurred, when they occurred, how they occurred
E.g., Type of draw, more random or more blocks
Whe
n to
Mea
sure
E.g., Average for period of competition
E.g., Before competition, post-competition, pre-training, or post-training
E.g., General Preparatory Phase and Specific Preparatory Phase
E.g., During practice and Competitive Period
E.g., During competition or practice. Use video of jump
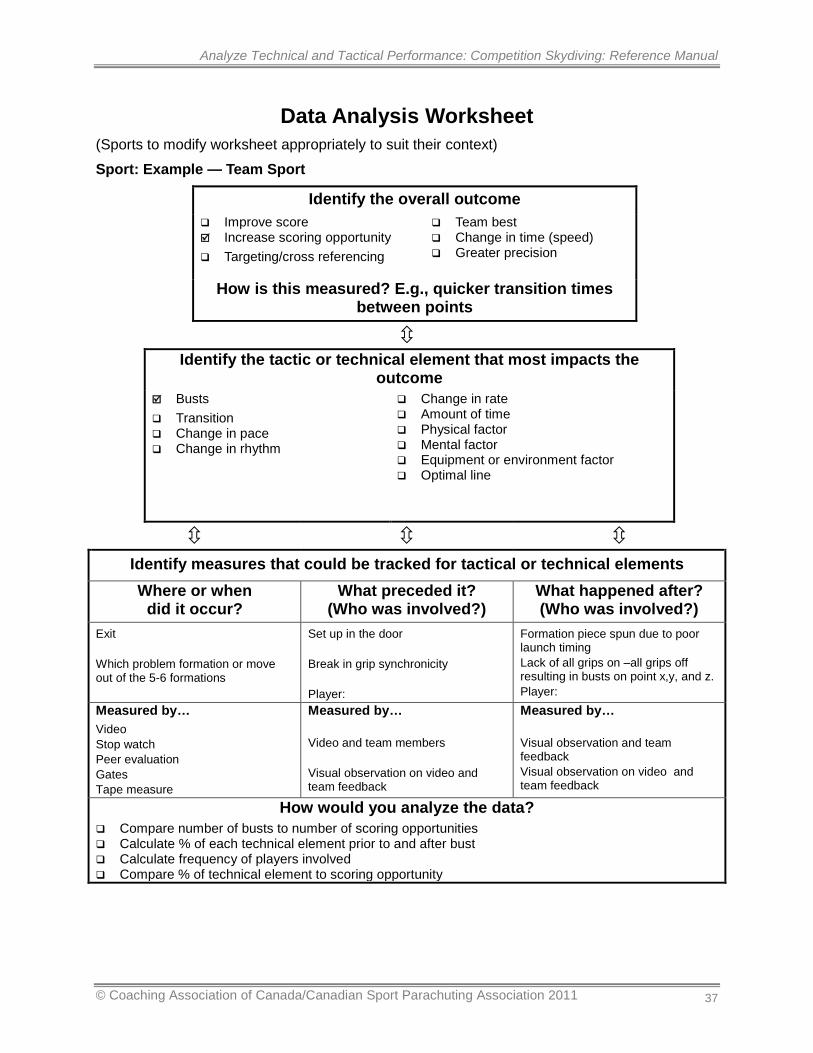
Analyze Technical and Tactical Performance: Competition Skydiving: Reference Manual
© Coaching Association of Canada/Canadian Sport Parachuting Association 2011 37
Data Analysis Worksheet (Sports to modify worksheet appropriately to suit their context)
Sport: Example — Team Sport
Identify the overall outcome
Improve score Increase scoring opportunity Targeting/cross referencing
Team best Change in time (speed) Greater precision
How is this measured? E.g., quicker transition times between points
Identify the tactic or technical element that most impacts the
outcome
Busts Transition Change in pace Change in rhythm
Change in rate Amount of time Physical factor Mental factor Equipment or environment factor Optimal line
Identify measures that could be tracked for tactical or technical elements Where or when
did it occur? What preceded it?
(Who was involved?) What happened after? (Who was involved?)
Exit Which problem formation or move out of the 5-6 formations
Set up in the door Break in grip synchronicity Player:
Formation piece spun due to poor launch timing Lack of all grips on –all grips off resulting in busts on point x,y, and z. Player:
Measured by… Video Stop watch Peer evaluation Gates Tape measure
Measured by… Video and team members Visual observation on video and team feedback
Measured by… Visual observation and team feedback Visual observation on video and team feedback
How would you analyze the data? Compare number of busts to number of scoring opportunities Calculate % of each technical element prior to and after bust Calculate frequency of players involved Compare % of technical element to scoring opportunity

Analyze Technical and Tactical Performance: Competition Skydiving: Reference Manual
© Coaching Association of Canada/Canadian Sport Parachuting Association 2011 38
Data Analysis Worksheet (Sports to modify worksheet appropriately to suit their context) Sport: Example — Individual Sport
Identify the overall outcome
Improve score Increase scoring opportunity Amount of possession Hitting/Targeting
Territory gained Change in time (speed) Greater precision
How is this measured? Overall event time
Identify the tactic or technical element that most impacts the
outcome
Busts Transition Change in pace Change in rhythm
Change in rate Amount of time Physical factor Mental factor Equipment or environment factor Optimal line
Identify measures that could be tracked for tactical or technical elements Where or when
did it occur? What preceded it?
(Who was involved?) What happened after? (Who was involved?)
3 to 4 combinations per race (hairpin or flush) Usually some type of terrain change
Rhythmical turns Change in terrain Right or left entry
Disqualified Right or left exit Change in terrain
Measured by… % of race gates in combination, or number of gates before and between combinations
Measured by… Time at gate prior to combination Speed at gate (speed gun)
Measured by… Time at gate after combination Record total time in combinations Speed at gate (speed gun)
How would you analyze the data? Compare time in combination to overall time Compare average time in combination for top 3, to average time in combination of 10th – 12 Compare % of time in combinations for each racer and overall finish in race
th
Compare entry and exit speeds or speeds over different runs

Analyze Technical and Tactical Performance: Competition Skydiving: Reference Manual
© Coaching Association of Canada/Canadian Sport Parachuting Association 2011 39
New friends in coaching from this workshop… For coaching tips and
more information about coaching workshops, visit the Coaching Association of Canada website at:
www.coach.ca
7. GREAT IDEAS

Analyze Technical and Tactical Performance: Competition Skydiving: Reference Manual
© Coaching Association of Canada/Canadian Sport Parachuting Association 2011 40