ancient skills prepper
TRANSCRIPT
Ancient Skills © Stephen R. Coote. Electronic edition. 1
Ancient Skills
An introduction to:
Primitive Fire Lighting Primitive Cordage Bows and Arrows Primitive Pottery
Rawhide and Hide Glue Primitive Blacksmithing
And more�..
Stephen Coote
Copyright © Stephen R. Coote, Nelson, New Zealand. First published 2002
ISBN No: 0-473-08720-0

Ancient Skills © Stephen R. Coote. Electronic edition. 2
Introduction What skills are important? To some people it might be the ability to operate a computer or drive a car. Things were different for our ancestors. They needed to know how to use what they could find in their natural environment to keep themselves alive and comfortable. This book is an introduction to some of these skills. Knowledge of these skills could be extremely useful to someone in a wilderness survival situation. But there is a broader value in learning these things: we can have a better understanding of what has happened in the past; we can develop a more practical, self-sufficient outlook on life; and our appreciation for the natural world can grow. Primitive crafts may provide a satisfying outlet for our creativity and they can be a lot of fun. In the following pages you will read about things I have experimented with. I don�t claim to be an expert in anything that I have written about, and I urge you to keep three things in mind: 1. There is often more than one way of doing something, no matter what people say. Do
what safely works for you, and be open to other ideas. Try to understand the basic principles behind any operation and adapt them to your circumstances. If you don�t have the resources that somebody says that you need to get something done, don�t give up immediately. Perhaps you could start with what you do have and see how things work out.
2. The saying: �If you don�t ask, you don�t get� doesn�t apply to everything, but you
may be surprised at what is available for the asking. If you think someone might be able to help you learn, or help you obtain whatever you need, then find the right person and respectfully ask for what you want. Of course, you have to be prepared to give as well � but I think that eventually most folk find that giving of this nature is one of the most satisfying things in life.
3. Don�t limit yourself. If others have done something, then it is likely you can too. To
me persistence is more important than what the world might say about your ability� so keep trying. Besides, I feel that sometimes we have more ability than we think we have.
Have fun�Best wishes�.Stephen Coote. Nelson, New Zealand.
Ancient Skills © Stephen R. Coote. Electronic edition. 3
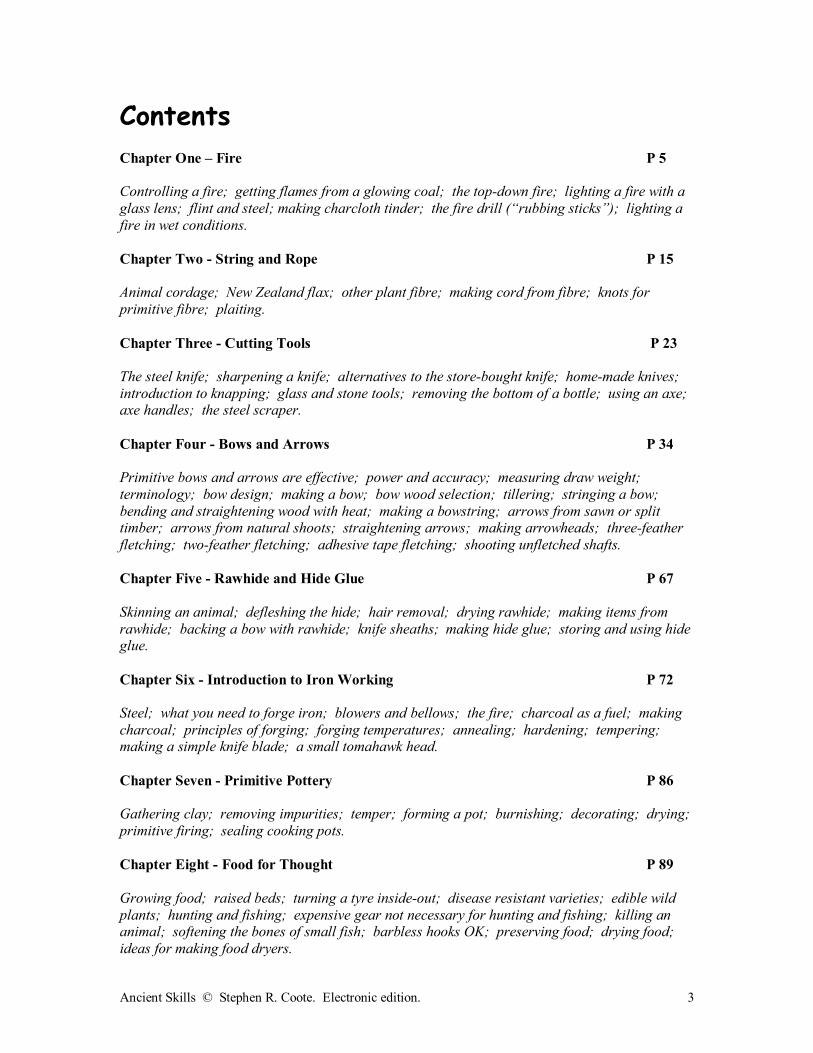
Contents Chapter One � Fire P 5 Controlling a fire; getting flames from a glowing coal; the top-down fire; lighting a fire with a glass lens; flint and steel; making charcloth tinder; the fire drill (�rubbing sticks�); lighting a fire in wet conditions. Chapter Two - String and Rope P 15 Animal cordage; New Zealand flax; other plant fibre; making cord from fibre; knots for primitive fibre; plaiting. Chapter Three - Cutting Tools P 23 The steel knife; sharpening a knife; alternatives to the store-bought knife; home-made knives; introduction to knapping; glass and stone tools; removing the bottom of a bottle; using an axe; axe handles; the steel scraper. Chapter Four - Bows and Arrows P 34 Primitive bows and arrows are effective; power and accuracy; measuring draw weight; terminology; bow design; making a bow; bow wood selection; tillering; stringing a bow; bending and straightening wood with heat; making a bowstring; arrows from sawn or split timber; arrows from natural shoots; straightening arrows; making arrowheads; three-feather fletching; two-feather fletching; adhesive tape fletching; shooting unfletched shafts. Chapter Five - Rawhide and Hide Glue P 67 Skinning an animal; defleshing the hide; hair removal; drying rawhide; making items from rawhide; backing a bow with rawhide; knife sheaths; making hide glue; storing and using hide glue. Chapter Six - Introduction to Iron Working P 72 Steel; what you need to forge iron; blowers and bellows; the fire; charcoal as a fuel; making charcoal; principles of forging; forging temperatures; annealing; hardening; tempering; making a simple knife blade; a small tomahawk head. Chapter Seven - Primitive Pottery P 86 Gathering clay; removing impurities; temper; forming a pot; burnishing; decorating; drying; primitive firing; sealing cooking pots. Chapter Eight - Food for Thought P 89 Growing food; raised beds; turning a tyre inside-out; disease resistant varieties; edible wild plants; hunting and fishing; expensive gear not necessary for hunting and fishing; killing an animal; softening the bones of small fish; barbless hooks OK; preserving food; drying food; ideas for making food dryers.

Ancient Skills © Stephen R. Coote. Electronic edition. 4
Chapter Nine � Survival P 96 Attitude, clear thinking and preparedness; relevant knowledge desirable; warmth; water; food; survival kit. Chapter Ten - Ancient Wisdom P 98 Ideas to consider; good qualities; experience influenced by thinking; relating to others; intuition; everyone is special; be yourself; think for yourself.
Ancient Skills © Stephen R. Coote. Electronic edition. 5
Chapter One
FIRE Fire can keep you warm, cook your food and provide you with light. Today many folk don�t use fire at all, and if a fire is needed it can easily be started with matches or some other factory-made product. But there is more to learn about fire than simply just how to light one.
CONTROLLING YOUR FIRE Before you light your fire make sure it won�t get bigger than intended. Keep it well away from anything it could spread to. You might have to clear the plant growth away and maybe even soak the surrounding area with water. Be aware that a small spark from a fire can travel quite a long way and start another fire, so this is something to keep in mind, especially in windy conditions. A small fire can be beaten out with something like shovel, a leafy branch or a wet sack; it can be smothered by covering with earth or rocks, but a well-aimed bucket of water is one of the best options. It is best to never leave a fire unattended, and never leave young children unsupervised near a fire. When you have finished with the fire make sure it is completely extinguished - a tiny glowing coal may restart a fire a long time later. Be aware that it may be illegal to light a fire outdoors without a permit, and in some areas fires may never be allowed. It is a good idea to make the fire only just big enough to do the job you have in mind.
GET EVERYTHING READY FIRST
Have plenty of kindling and firewood on hand. It would be frustrating to struggle to get a fire going only to watch it die because you can�t get the fuel to it fast enough. Make sure there is nothing flammable that will be too close to your fire before you light it. And have a plan in your mind of how you will quickly extinguish the fire if you need to.
GETTING FLAMES FROM A GLOWING COAL This is an important skill to master. It can be easier to make a glowing coal than it is to get a flame from the coal. To get a flame you need dry, finely divided flammable material, sometimes referred to as tinder. It is best to experiment, but I have used newspaper that has been screwed up and twisted around a few times to soften it and to take the glaze from the surface. Tissue paper and fine, dry grass have also worked for me. Very fine dry wood shavings and other plant materials would be worth trying as well. Glowing coals may be produced by a variety of methods, some of which will be explained soon. One of the most common sources is the remains of another fire - the one you had going yesterday for instance. You might be surprised at how long a small coal will stay glowing under the ashes. Prepare a ball of tinder. Something the size of a tennis ball should be plenty. I have seen fires lit
Ancient Skills © Stephen R. Coote. Electronic edition. 6
with much less. Make sure that the ball is not too tightly squashed - gaps are necessary to allow air to reach the hot part of the tinder. Pick up the glowing coal (with a leaf, perhaps) and place it on top of the ball and blow the coal gently. Blowing down onto the coal has given good results, but you may need to keep your head to one side to avoid the smoke. The tinder should �catch� and start to glow. Keep blowing and the area that is burning should increase and more heat will be generated. If you blow too hard you won�t get flames. Sometimes it seems best to give a series of puffs. Keep going until flames appear. Sometimes the tinder will catch then go out. This may be because the tinder is unsuitable, or because it is packed too tightly, or not tightly enough. The adjacent pieces of tinder making up the bundle need to be close enough for the heat to travel, but there needs to be enough space for the air to circulate. The tinder may be held in your hand if you are careful, but it may be better to place it on the ground. Rather than blow, you could experiment using a fan of some sort, or you could place the tinder in a loosely woven basket and twirl it around gently.
FUEL Things like thin dry twigs and dry dead leaves catch fire more easily than bigger pieces of wood, and you need some of this material to start your fire. This is called �kindling� and it should easily start to burn when you place your flaming tinder ball underneath it. The heat from the burning kindling will ignite larger pieces of wood. Don�t overload your new fire with fuel in case you smother it.
THE �TOP DOWN� FIRE The �top down� method of building a fire will often save firewood and give a cleaner burn (less smoke and unburned fuel). The top-down method is good for rubbish fires, and a fire constructed this way should burn longer. To make a top-down fire get your kindling burning on top of your main pile of fuel. When the kindling is lit at the bottom of the pile of fuel, the flames quickly rise through the pile and get most of it burning simultaneously. When the flames start at the top of the pile, the process can be slowed down. This is a good principle to keep in mind if you ever have to clear scrubby land. If you burn downhill or against the wind, the fire should travel at a slower rate and make a better job of burning the rubbish, whereas a fire travelling with the wind (or uphill) can rush through leaving a lot of rubbish behind.
�THIN FIRES MORE ECONOMICAL THAN THICK� I remember seeing these words on the door of an old woodstove I once used. They are good words to remember. If you are using a fire to cook it may be best to use just enough wood to keep the food simmering. If you use more wood much of the heat goes straight into the air because the pot or the oven can only absorb so much heat in a given time. However if you are using a fire to do something like melt metal you could keep a slow fire going for a year without achieving anything. In this case you might have to make the fire roar for the whole process.
Ancient Skills © Stephen R. Coote. Electronic edition. 7
LIGHTING A FIRE WITHOUT MATCHES AND LIGHTERS ETC
There are several different ways of obtaining a glowing coal using �low-tech� methods. Where there is intense sunlight, a glass lens (magnifying glass) can be used to focus the sun�s rays on to tinder. This is a very effective, simple method. The lens is held so that the maximum amount of sunlight can enter the lens. The lens is moved closer or further from the tinder until the rays coming through the lens are focused into an intense spot. If everything is favourable, there will be sufficient heat in this spot to ignite the tinder. Be aware that you should never look directly at the sun (even when wearing sunglasses), and I would suggest that you should avoid looking directly at the bright spot made by the lens) although wearing dark sunglasses should offer some protection in this instance. And I would further suggest you keep magnifying glasses out of the hands of children until they are responsible enough to use them wisely. I have found that a large, single glass lens works best.
FLINT AND STEEL
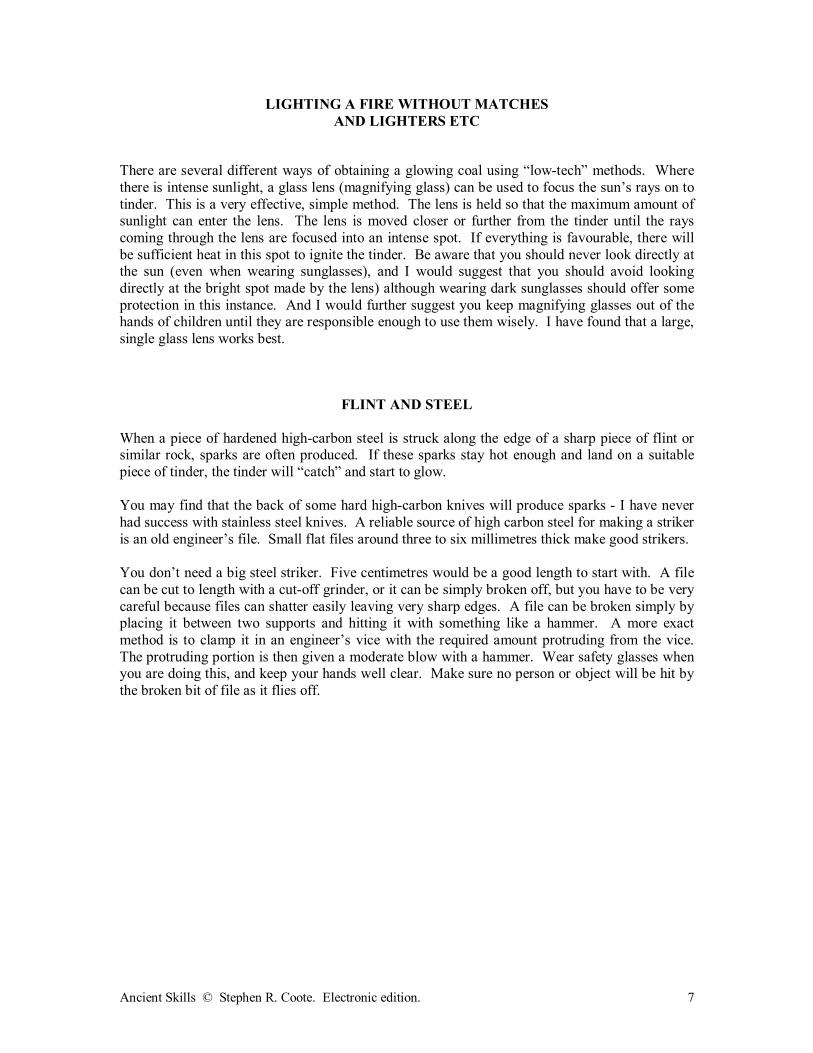
When a piece of hardened high-carbon steel is struck along the edge of a sharp piece of flint or similar rock, sparks are often produced. If these sparks stay hot enough and land on a suitable piece of tinder, the tinder will �catch� and start to glow. You may find that the back of some hard high-carbon knives will produce sparks - I have never had success with stainless steel knives. A reliable source of high carbon steel for making a striker is an old engineer�s file. Small flat files around three to six millimetres thick make good strikers. You don�t need a big steel striker. Five centimetres would be a good length to start with. A file can be cut to length with a cut-off grinder, or it can be simply broken off, but you have to be very careful because files can shatter easily leaving very sharp edges. A file can be broken simply by placing it between two supports and hitting it with something like a hammer. A more exact method is to clamp it in an engineer�s vice with the required amount protruding from the vice. The protruding portion is then given a moderate blow with a hammer. Wear safety glasses when you are doing this, and keep your hands well clear. Make sure no person or object will be hit by the broken bit of file as it flies off.
Ancient Skills © Stephen R. Coote. Electronic edition. 8
The thin edge of the file is used to strike sparks. After you have got a piece of file you will need to remove any dangerous sharp edges and any file teeth that are on the striking edge of your new striker. This is easily done on a grinding wheel (make sure you know what you are doing before you use one of these hazardous machines). When you are grinding, ensure that the steel does not
Ancient Skills © Stephen R. Coote. Electronic edition. 9
get much hotter than boiling water on the striking edge. If it gets too hot it may lose some of its essential hardness. Keep it cool by dipping it in water. It heats quickly. One sign of over-heating is discoloration of the ground edge. If you don�t have a grinder, then simply rubbing the edge on a sharpening stone or even a firm rock should do the trick eventually. I like to round the corners on a striker to make it more gentle on my hands and pockets. Strikers were made in special shapes in the flint and steel era, but a simple rectangle of file steel will make sparks. You could forge your own authentic looking striker if you wanted to (see �iron working�). The best showers of sparks seem to be struck from freshly broken edges on the flint. If you can�t find flint, then you could experiment with other hard rocks like agate, chert or quartz. Avoid rocks with lots of cracks and flaws, they often don�t keep a sharp edge for long. The edge of the striker should strike a rapid glancing blow across the sharp edge of the rock - the angular relationship of the steel to the flint has been described as being similar to the relationship of the bow to the strings of a violin. Be careful of the sharp edges of the rock - and be aware that fine chips may fly into your face while striking a spark. By striking away from the body and keeping the face well away, most folk seem to avoid problems - but until you are sure of what you are doing I suggest you wear safety glasses. Holding the tinder close to the spark is a critical part of the operation. The sparks don�t stay hot for long, so the tinder should be as close as possible. One method is to hold a wad of tinder on top of the flint as close to the striking edge as possible. The striker is used in the other hand and is struck against the flint with a downward motion. Another method is to hold the striker vertically above a wad of tinder that is sitting on the ground. The flint is then struck down on the striker. Incidentally, most of the hot sparks seem to come from the metal, not the flint. I have heard that some natural plant materials can be used as tinder for this method of firelighting. I have not had success with any. To me the most reliable tinder is �charcloth� made from 100% cotton fabric. Here�s how I make it: I get old cotton rag and rip it into squares of about three or four centimetres. It has to be pure cotton - synthetic fibres won�t work. I then loosely place some of these squares into an old tin can that has the lid cut right out of it. The tin shouldn�t be more than about one-third filled with the loosely packed rag. Next I squash the top of the can together. With a pair of pliers I fold over the top centimetre or so of the squashed-together top of the can to slightly over a right angle to ensure it is closed fairly tightly. I then toss the can in a fire. After a short time smoke starts to come from the folded-over top of the can (the smoke may start to burn). When the smoke (or flame) coming from the can almost dies away, I remove the can from the fire using a pair of pliers. When the can is cool, it may be opened and the charcloth removed. If the can is opened while the cloth is still hot, it may ignite and burn away. Good charcloth is generally quite fragile, and will fall apart easily. I have heard of charcloth being made by smothering burning cotton rag with dry sand once it has reached the right stage. Some batches of charcloth may not work too well. Perhaps this is due to some cloth being impregnated with a substance like a dye or washing powder. Or it may be because too much was being made at once, and the volatiles in the cotton couldn�t escape properly while being heated. Perhaps it wasn�t heated long enough.

Ancient Skills © Stephen R. Coote. Electronic edition. 10
You might find that other plant fibre will make tinder similar to charcloth. It can be a challenge to get the charcloth to stay in one piece while striking a light. Once the cloth has caught a spark, it can be transferred to a tinder ball as described earlier in this chapter.
Ancient Skills © Stephen R. Coote. Electronic edition. 11
Ancient Skills © Stephen R. Coote. Electronic edition. 12
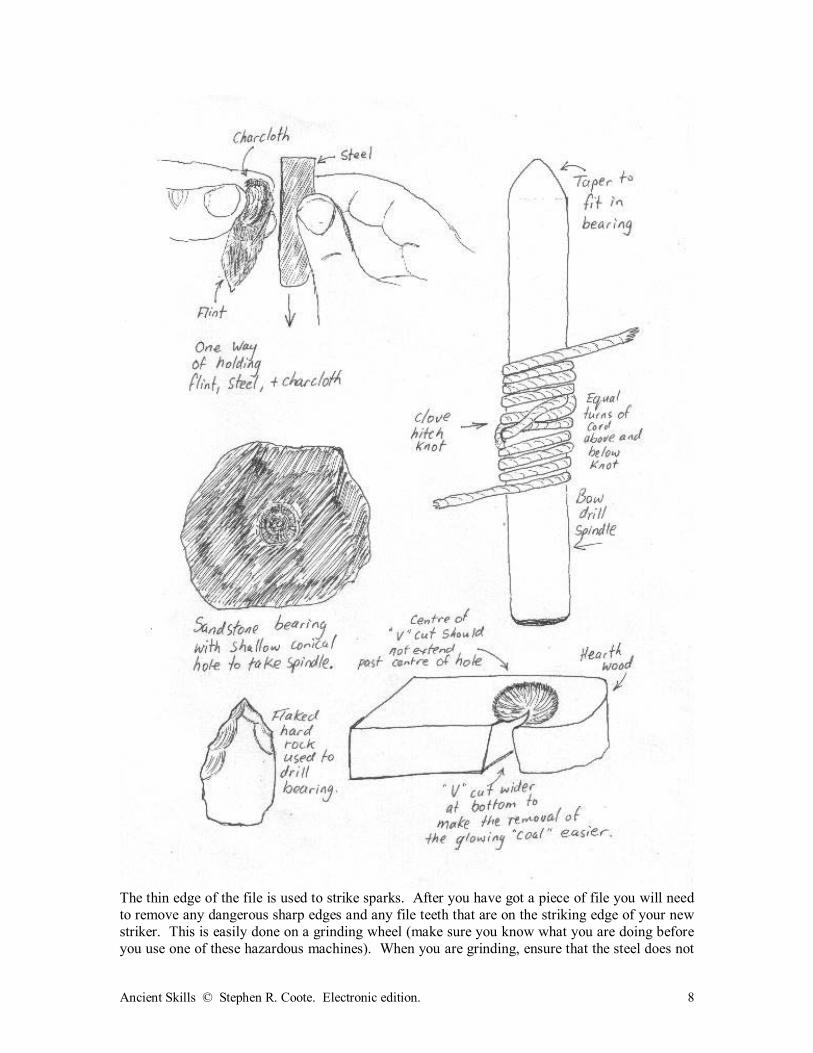
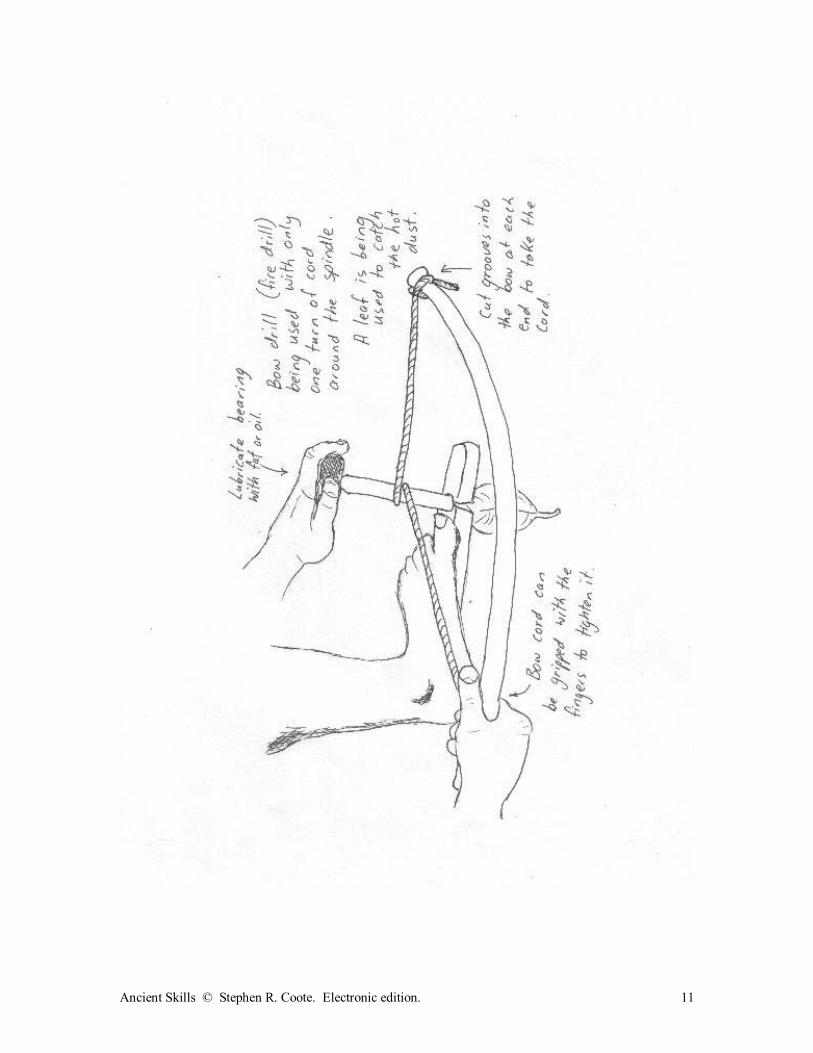
FIRE BY FRICTION This is a �rubbing sticks� method of firelighting. Although it is a truly primitive method, it doesn�t necessarily take long to get a fire going if you have everything prepared. Friction causes heat. You only have to rub your hands together to realise this. There are several methods of friction firelighting, but I am going to describe the method I have had success with - the bow drill. Other methods may not require as much time or skill to make the essential equipment, but they seem to require more physical skill and effort to produce fire. However I don�t want to discourage you from experimenting - other methods do work. With the bow drill method, heat is generated when a blunt wooden spindle is rotated in a shallow depression in a wooden base-board. A slot in the base-board collects a pile of fine dust created by the drilling action of the spindle. If suitable materials are being used, the heat generated soon ignites the dust and a glowing coal is formed. If a leaf (or something similar) is placed under the slot, a quick knock to the baseboard causes the coal to fall on to the leaf and the coal can then be placed on a ball of tinder where flames can be produced. The spindle is rotated by having the string of a short bow wrapped around it. The top of the spindle is pointed, and this point sits in a depression in a �bearing block� which may be a piece of stone, bone, hardwood, antler, or shell. The operator holds the bearing block in place with one hand and holds the bow in the other. The bow is moved back and forth, thus causing the spindle to rotate. The base-board may need to be anchored with your foot. I have made bearing blocks from stone. If a natural depression can be found in a suitable stone no further work is required. I have used a hard stone with a sharp point to drill a depression into soft sedimentary rock. Too deep a hole might cause too much friction at the bearing; too shallow a hole may let the drill flip out too easily. I found that lubricating the bearing with fat made a huge difference, but be careful not to let any fat (or oil) get on to the fireboard or bottom of the drill. A good length for a bow would be 60 to 70 centimetres, but smaller and bigger ones have started fires. The bow stick should have a natural bow shape before the string is attached, and it should be reasonably stiff to avoid flexing in use. A stick of two centimetres or more in diameter should be fine. I have used store-bought synthetic cord and cord made from plant fibre for the job. Most references to bow-drills I have seen show only one wrap of cord going around the drill - and this has certainly worked for me. However, to get enough friction to drive the spindle, the cord has to be fairly tight, and it can cause the drill to fling out of the bow if the spindle slips out of the bearing or base-board. A better method may be to have plenty of cord and to tie a knot, perhaps a clove hitch, around the centre of the spindle. Then several wraps are taken around the drill - half the wraps above the knot, and half below it (see diagram). A typical spindle might be up to two centimetres in diameter, and maybe 35 centimetres long. The drill end should be fairly flat, but a slightly rounded tip may help it stay in the hole in the base-board if the hole is shallow. The bearing end needs to be whittled down to almost a point using an even taper. A blunt taper may drag too much; a sharp taper will wear quickly. A typical base-board might be up to15 millimetres thick, about 30 centimetres long and maybe four or five centimetres wide. The overall size is unimportant, but thinner wood should heat up quicker. A shallow depression is formed near the edge of the board. This can be done with the bowdrill itself, or perhaps a knife or sharp stone can be used. A carpenter�s brace and bit does a
Ancient Skills © Stephen R. Coote. Electronic edition. 13
fine job while you are experimenting. A triangular slot then has to be whittled from the edge of the board to almost the centre of the depression. If the slot is too wide it won�t work too well, and the drill wears the hole out too fast. If the slot is too narrow it may affect its dust-catching ability, and the narrowness of the slot may prevent enough air reaching the coal that is forming. So as a starting point, if the depression is 20 millimetres in diameter, then the triangle might be, say, five millimetres wide where it cuts through the circumference of the circle. To help remove the glowing dust pile from the board, the slot should be wider at the bottom of the baseboard compared to the width on top. A simple base-board can be made by lashing two sticks of suitable material together. The natural groove between the sticks helps to hold the drill in place. If a dust slot isn�t automatically formed by imperfectly matching sticks, then one will have to be made - perhaps by cutting the sticks before they are finally bound together. Make sure there is plenty of space for dust to collect and for air to get to the dust. When you start drilling with this device you will probably find it is fairly easy to create plenty of smoke. But smoke doesn�t necessarily mean you are going to get a coal. Selection of materials can make a big difference. You may have success using the same material for the base and the drill. Some say that the drill and the base should be made of different materials, one harder than the other. Resinous or oily woods may be unsuitable. Certainly the wood should be well seasoned. By experimenting with local materials, you should eventually come up with a combination that works. You might find information in your library or museum. Perhaps there are some enthusiasts or tribal elders in your area who know what has worked. I have seen quite a bit of information on the internet. Native New Zealand trees can be used: I have had success with mahoe for a baseboard and either kaikomako or kawakawa for the drill. I have also produced glowing coals using combinations of willow, poplar, and thick portions of old man�s beard clematis vine. When using the bowdrill you have to develop a sense for how fast you should drill and how much pressure you need to apply at the bearing. In theory, maximum speed and pressure should generate the most heat, but this might drill the hole too quickly without making a coal. Sometimes a shiny black glaze forms in the hole. You may find that you can change your technique to help prevent this forming - otherwise you may have to scrape it away. While there is a glaze you are unlikely to be making a coal. Sometimes you may need to flatten the end of your drill because it can become quite rounded. The idea is to generate plenty of heat and make a nice pile of fine dust in the slot. Once the smoke starts don�t immediately look for a coal. Keep drilling for maybe 30 seconds, then take a look. The coal often burns for much longer than you might expect, so there�s no need to rush to get it to the tinder ball.
LIGHTING A FIRE IN WET CONDITIONS This can be a challenge. However dead standing trees and some fallen wood can often yield fuel that is dry enough to burn. Small twigs and branches can be pulled from the tree by hand, but an axe will enable you to harvest firewood from much bigger branches. Sometimes some shrubs or ferns will have plenty of fairly dry, dead kindling material under the shelter of the canopy of the plant. A roaring fire can be kept burning in quite heavy rain, but it is much better if some sort of shelter can be provided. An overhanging rock, or maybe some sort of an improvised roof can be used to
Ancient Skills © Stephen R. Coote. Electronic edition. 14
provide at least partial shelter. If the ground is very wet, then the fire can be built on a pile of heat-resistant rocks. Logs will provide a good base for a fire that doesn�t have to burn for long. A fire can even be built over a river or swamp if a suitable structure is made to elevate it above the water. Without shelter, lighting a fire in wet weather can be very frustrating. Waterproof matches are a good choice of firelighter in these conditions. If you have dry kindling, dry tinder and dry firelighting tools, and some sort of shelter to keep them dry during the firelighting operation, you should end up with a fire. This shelter may be as simple as a rain cape. Wet charcloth is extremely unlikely to take a spark from a steel when wet. Wet tinder will be reluctant to burst into flame if you manage to get a glowing coal on to it. If you possess, or manage to find, some dry fine tinder, it may be worth persisting with a damp bow drill to light your fire. The heat generated by drilling may dry out the wood enough to produce a glowing coal. Because of this it could be said that a good bow drill, in experienced hands, is a more reliable method of firelighting than conventional matches when things get damp. If you are going to be staying in a wet area, then the problem of making and maintaining a fire in wet conditions is something you should think about.
Ancient Skills © Stephen R. Coote. Electronic edition. 15
Chapter Two
STRING AND ROPE Cordage is of major importance to someone living primitively. It can be used to trap an animal, catch a fish, tie a shelter together or make a weapon. Clothing and baskets can be made by weaving fibrous material. Certain local vines, grasses, shoots, leaves, roots or bark can be used directly as cord for some purposes. Sometimes the fibre has to be extracted from the plant material to meet a certain need.
ANIMAL CORDAGE Animals are a source of cordage. Hair, sinew, intestine and skin can all be turned into useful material. Some rawhide (dried animal skin) can make very strong rope (see a later chapter for a description of rawhide). By removing an animal�s skin as a tube, a long cord can be made by cutting around the tube, although variations in thickness might be found between different parts of the skin. The neck skin may provide acceptably uniform thickness all the way around in some animals. Another way of getting a decent length of cord from a skin is to cut a spiral strip from a flat bit of skin. If cut from a dry skin, this will be quite curly, like a long apple peel, but by soaking and stretching the cord, it should dry out to be fairly straight. Care has to be taken to maintain an even width while cutting cord from hide. By plaiting or twisting several cords together a strong rope can be made. If used wet, rawhide lashing will shrink as it dries, pulling the joint together firmly. Dry rawhide cord is strong, but it will become soft (and maybe smelly) if it gets wet. By rubbing something like fat into the rawhide, it may become somewhat resistant to water. I have never used intestines or sinew for cordage, so I don�t feel qualified to say much about them. I understand that sinew should be dried, and then pounded lightly to separate it into smaller fibres - this fibre can then be twisted together like plant fibre. Dried sinew can be quite hard, so by making it a little damp it may be easier to twist together. Certainly small pieces of sinew used to make arrows should be quite wet before use. It shrinks and glues itself together a little as it dries. I think if you treated intestine like rawhide you would get passable results. Dried intestine and sinew are both affected by water.
NEW ZEALAND FLAX (HARAKEKE) Because I have plenty of NZ flax (Phormium tenax) growing near me, I haven�t been forced to experiment with other materials. Certain varieties of this flax can be a source of wonderful long, strong, easily extracted fibres. The local name for this fibre is �muka�. All varieties of harakeke have relatively strong leaves that can be used directly for cordage, even if they aren�t a good muka variety - although some leaves seem to be stronger than others. If you are going to cut flax leaves in New Zealand, be sure you have permission. Be aware, too, that the indigenous people have certain principles they like to follow when working with this special plant. The leaves grow in clumps. Cut the leaves as close to the base as possible, and avoid damaging the centre three leaves because the clump grows from the centre.
Ancient Skills © Stephen R. Coote. Electronic edition. 16
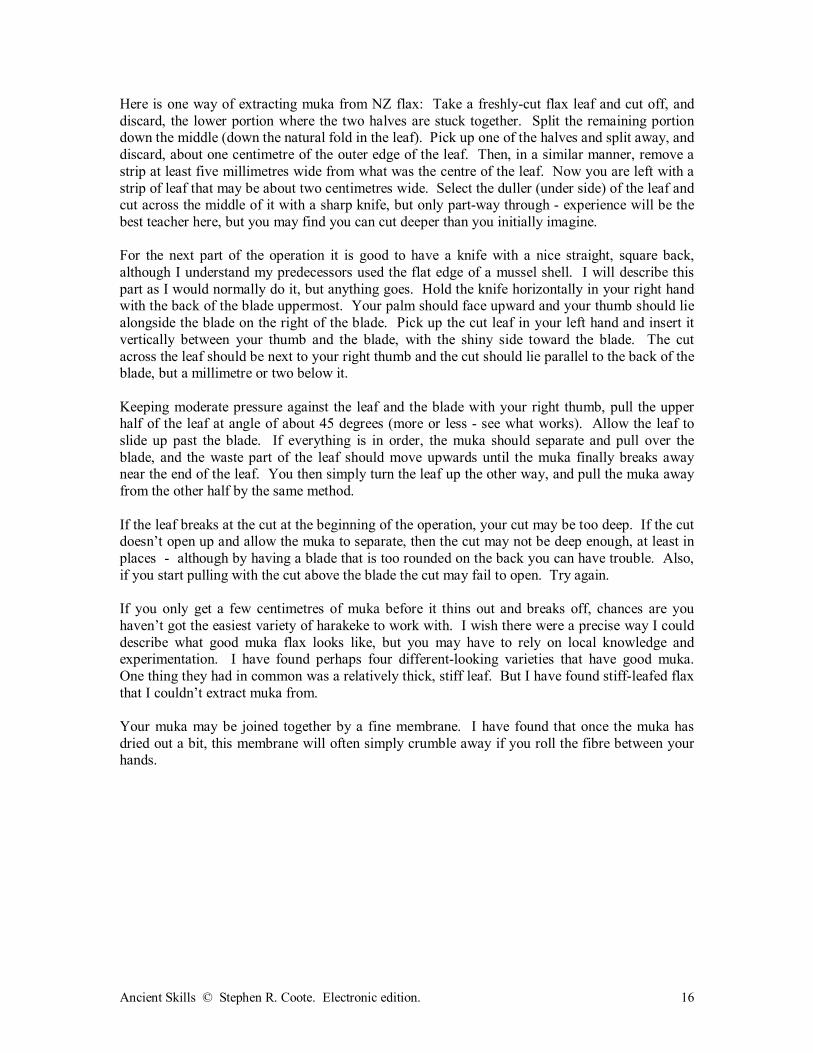
Here is one way of extracting muka from NZ flax: Take a freshly-cut flax leaf and cut off, and discard, the lower portion where the two halves are stuck together. Split the remaining portion down the middle (down the natural fold in the leaf). Pick up one of the halves and split away, and discard, about one centimetre of the outer edge of the leaf. Then, in a similar manner, remove a strip at least five millimetres wide from what was the centre of the leaf. Now you are left with a strip of leaf that may be about two centimetres wide. Select the duller (under side) of the leaf and cut across the middle of it with a sharp knife, but only part-way through - experience will be the best teacher here, but you may find you can cut deeper than you initially imagine. For the next part of the operation it is good to have a knife with a nice straight, square back, although I understand my predecessors used the flat edge of a mussel shell. I will describe this part as I would normally do it, but anything goes. Hold the knife horizontally in your right hand with the back of the blade uppermost. Your palm should face upward and your thumb should lie alongside the blade on the right of the blade. Pick up the cut leaf in your left hand and insert it vertically between your thumb and the blade, with the shiny side toward the blade. The cut across the leaf should be next to your right thumb and the cut should lie parallel to the back of the blade, but a millimetre or two below it. Keeping moderate pressure against the leaf and the blade with your right thumb, pull the upper half of the leaf at angle of about 45 degrees (more or less - see what works). Allow the leaf to slide up past the blade. If everything is in order, the muka should separate and pull over the blade, and the waste part of the leaf should move upwards until the muka finally breaks away near the end of the leaf. You then simply turn the leaf up the other way, and pull the muka away from the other half by the same method. If the leaf breaks at the cut at the beginning of the operation, your cut may be too deep. If the cut doesn�t open up and allow the muka to separate, then the cut may not be deep enough, at least in places - although by having a blade that is too rounded on the back you can have trouble. Also, if you start pulling with the cut above the blade the cut may fail to open. Try again. If you only get a few centimetres of muka before it thins out and breaks off, chances are you haven�t got the easiest variety of harakeke to work with. I wish there were a precise way I could describe what good muka flax looks like, but you may have to rely on local knowledge and experimentation. I have found perhaps four different-looking varieties that have good muka. One thing they had in common was a relatively thick, stiff leaf. But I have found stiff-leafed flax that I couldn�t extract muka from. Your muka may be joined together by a fine membrane. I have found that once the muka has dried out a bit, this membrane will often simply crumble away if you roll the fibre between your hands.
Ancient Skills © Stephen R. Coote. Electronic edition. 17
Ancient Skills © Stephen R. Coote. Electronic edition. 18
OTHER PLANT FIBRE It would be dishonest of me to speak with authority on other plant fibres because my experience with them is so limited. But here are some general ideas that I have come across: Some plants will yield fibre if the stalks are twisted between the hands, or pounded between two smooth surfaces. It may be best to split the dried stalks of some plants and try to peel the fibre away from the harder part of the stalk, but soaking in water (and partial rotting) may help the fibre separate. Some outer bark can be used in strips straight from the tree, but some useful inner barks have to be removed with the outer bark and soaked until it separates easily from the outer bark. Removing bark damages a tree, so perhaps this knowledge is best kept as a theory unless your life depends on it, although fallen trees could be used to experiment with.
Ancient Skills © Stephen R. Coote. Electronic edition. 19
Ancient Skills © Stephen R. Coote. Electronic edition. 20
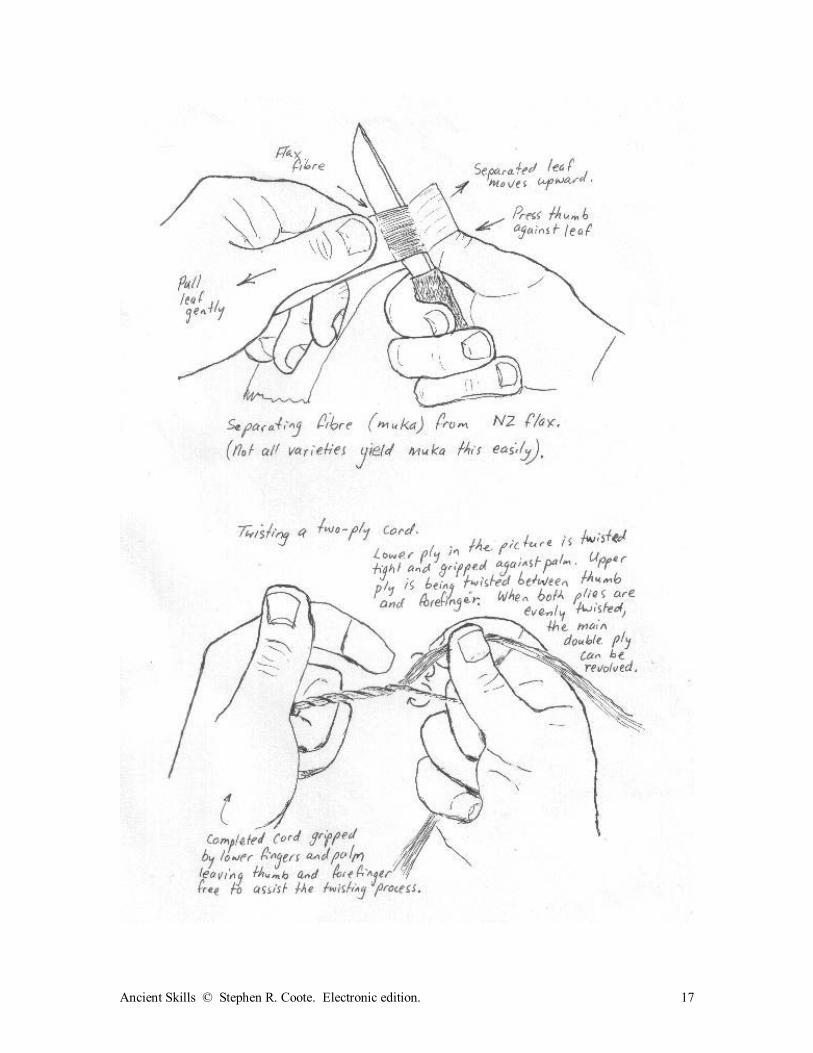
MAKING A TWO-PLY CORD FROM FIBRE
Until you have tried this, it can seem to be a bit of a mystery. The principle itself is quite simple, but the production of a long length of evenly sized cord takes a bit of practice. However, even lumpy, tapered cord is useful for something - so if your first effort is less than perfect, it may still be handy. Here�s how it works: get a piece of soft string about 60 centimetres long. Tie one end to something that won�t move. Start twisting (revolving) the free end of the string. If the string already has a twist in it, that is the direction you should twist also. Keep the string stretched. Keep twisting the string in the same direction (between your thumb and forefinger perhaps) until it is wound up quite tightly. Ensure that the string does not unwind when you go to renew your grip between twists. When you have finished twisting, keep hold of the free end of the still-stretched string with one hand and grasp the middle of the string between your other thumb and forefinger. Move the free end of the string toward the tied end, while at the same time moving the middle of the string sideways, keeping tension on the string. When the two ends meet, release your grip on the middle of the string and watch what happens. A twisted two-ply cord should now appear. The cord may not be wonderfully even, but it should give you an idea of how the system works. As I have said before, there is more than one way of doing things. Here�s one way of making a two ply cord from a bundle of fibre. Tease the fibre out so that you can pick up individual strands. Pick up enough strands to make a cord of the thickness you want. Stretch these fibres between the thumb and forefinger of each hand, but make sure you hold the bundle a few centimetres off centre - it is best to have one �tail� longer than the other. Have about five centimetres of fibre between your hands. Twist the fibres by revolving them. Twist them until they become tightly wound up. Don�t let them unwind if you have to renew your grip, and keep them stretched. When the right amount of twist has been applied, bring your hands together and allow the two-ply cord to form (as described before). You can now pinch the junction of the individual plies (�tails�) between the thumb and forefinger of one hand and continue to twist each ply in turn between the thumb and forefinger of your other hand. When one ply has been wound up, you can grip it between your spare fingers and palm on the hand that is doing the twisting while you twist the other ply in the same direction as the first. When both plies are twisted evenly you can release your grip on the �made� end of the cord and it should revolve by itself to form more two-ply cord, but I sometimes find it better to wind it myself while keeping even tension on the individual plies - this can make the cord more evenly twisted - but make sure you twist the cord the way it would naturally want to twist. I find that I make only a few millimetres of cord each twist cycle using this method. When making cord with the method just described, the tricky part is holding one tail (or ply) as you twist the other. Have the longest tail going down the hole formed by your loosely clenched hand, then as soon as you have twisted it, you can clench the three spare fingers against your palm and grip the tail. Because the tail is being gripped from further down than where it was twisted, it is inclined to unwind a little so you need to make sure you wind it extra tightly to compensate for this. And the closer to your thumb you grip it, the less twist you will lose. Note that you only need to have this special gripping arrangement for one tail provided that you always start with the same tail. You can swap the tails after you have added more fibre to the shortest one - the shortest tail will then become the longer one.
Ancient Skills © Stephen R. Coote. Electronic edition. 21
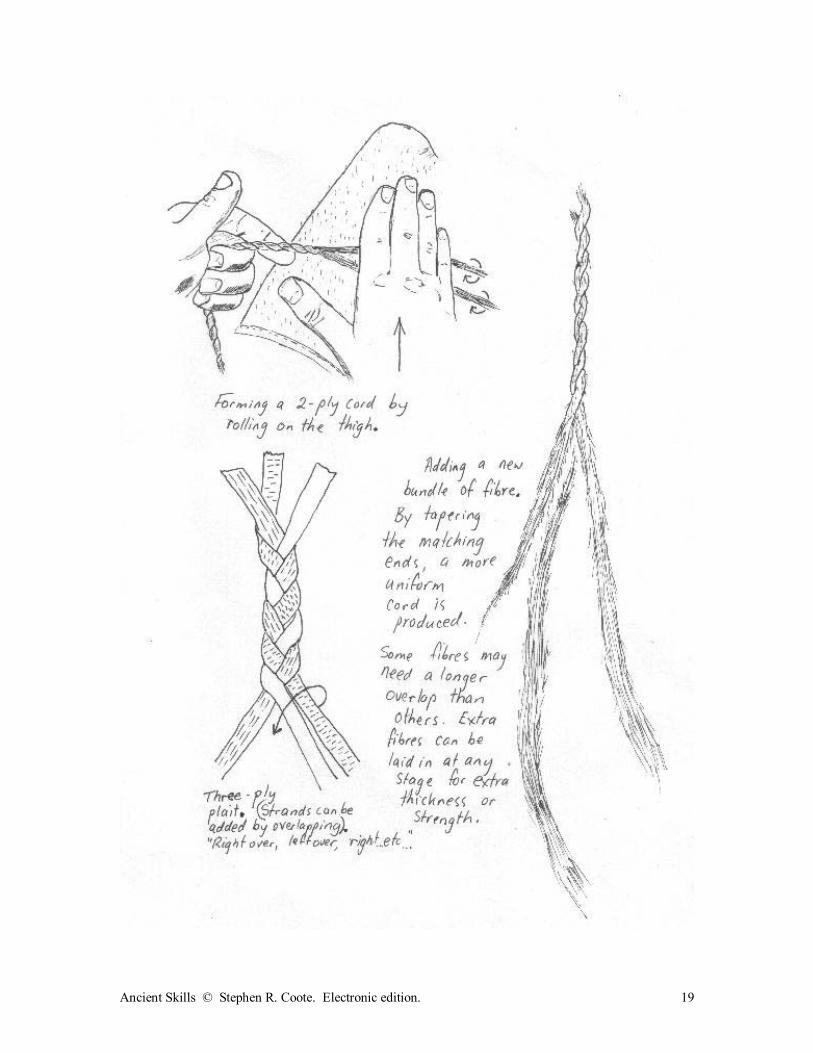
Don�t worry if you are having trouble with the methods I describe (see diagram). Once you know what good cord should look like, you will be able to figure out what is best for you. You could sit on the ground and jam the cord under your foot and work one ply with each hand. Or you could have the luxury of having four hands by working with a partner. Another way is to hook the loop formed at the beginning of the cord over a nail while you twist the fibres one way, and then pass the plies over each other in the other direction to form the cord. If you can do it, and if the fibre is suitable, a quick way to twist the plies it to roll them simultaneously between your palm and your thigh while the other hand grasps the formed end of the cord. When the rolling hand has gone down the thigh as far as it can go, it stops moving but it is still clamping the plies tightly. The other hand then relaxes its grip on the cord, allowing it to naturally revolve and form more cord. I have had trouble getting nice even cord with the thigh method, but this may be partly due to the fact that the fibre I use most can be a bit coarse and stiff. Having damp fibre may help. To make a long cord you have to keep adding more fibre. Basically all you have to do is lay the right amount of new fibre alongside the untwisted tail end with the right amount of overlap and simply twist them together. I suggest starting with a minimum overlap of five centimetres for fine fibre, and more for coarse - but experimentation will soon show you what works. It is best not to join new fibre into both plies at once, so that is why you keep one ply longer than the other. In order to keep the cord more uniform in thickness it is good to have the ply tapering in thickness as it nears the end, then you can match this taper (in reverse) with the new fibres as you add them in. If all the fibres are uniform in thickness throughout their length, and if they all end in the same place, the ply end won�t be tapered. To make the end tapered, you can shorten and/or thin some of the fibres; perhaps by careful scraping with a sharp knife. If the fibres are all the same length in each bundle, you can instantly taper both ends by pulling some of the fibres lengthwise to alter their start and stop points in the bundle. To get the most strength from your cord it is important that both plies have similar thickness, and that both plies are twisted as evenly as possible. If one ply is straighter than the other it will probably be taking most of the load and you will be getting only about half the strength out of the cord that you should get. And if the individual plies are not twisted tightly enough, the spliced fibre joins may pull apart.
THREE-PLY CORD The principle behind three-ply is the same as the two-ply just described. All you need is a third strand. Naturally it is harder to hold and work with; but the end product will have a more rounded cross section, it may be stronger, and you will have cordage that can be spliced in a traditional manner (e.g. eye splice). To start off a hand-laid three-ply cord you could bind the three strands together.
KNOTS Knots generally weaken a cord, and this seems to be particularly true with some primitive cordage. Some knots are better than others. I have a general rule that you should avoid sudden
Ancient Skills © Stephen R. Coote. Electronic edition. 22
changes in direction in the part of the cord that is taking the most strain. Take a thin bit of vine for instance, or maybe a reed or a willow shoot. If you grasp an undamaged length between your hands and try to stretch it without bending it at all, it is relatively hard to break. If you bend it by rotating your hand it may break at the bend. But if you tie a simple knot in it, it is virtually guaranteed to break at the knot (that is, if it doesn�t break at the knot while you are tying it). So while the strain is parallel with the length of the fibres everything is fine. So if you keep this principle in mind, you can see this is one reason why it is sensible to add extra fibres into the end of a bowstring, for instance, where it will be fixed to the nock of the bow. Imagine that you want to suspend a heavy object from a tree with a bit of primitive cord. For a start it might be best to pick a bigger branch to tie to rather than a smaller one - the change of angle won�t be so sudden. I would then recommend you take one complete turn around the branch before you tie the tail end of the cord to the main part; in other words, don�t tie to the main cord the first time you come to it, go around once more. Now tie the tail to the main part of the cord (or another branch), but when you do, make sure it is the tail part that does all the twisting because there is less strain on the tail than the main part of the cord. If you tied a bowline knot around the branch, this would necessitate a loop being put in the main strain-bearing part of the cord and you would weaken it more than you had to. You might wonder what specific knot should be used for primitive cordage. There is no best knot for all applications. A knot is meant to merely provide enough friction to hold the cord in place. From the description of making fibre cordage above it can be seen that a simple tight twist on overlapping fibres is enough to hold them in place. And if you look at a basket you will seldom see knots, but the withes are simply tucked in or twisted to keep the basket together. For some applications, a lashing with many turns of fine, strong flexible fibre may be an option rather than trying to knot a bigger cord.
PLAITING Plaiting is useful when it comes to making things from natural fibre. An eye can be plaited into the end of a plaited cord. A three-ply plait makes a flat strap. A four-ply round plait can make a nice round-sectioned braid. To make a long piece of plaited cordage from sections of leaf or vine, new pieces of material are added in with long overlaps and, once again, it is best not to be joining on to each strand in the same place, so start off with uneven lengths of strand. After the plait is finished, any odd bits sticking out (at the joins) can be trimmed off neatly.
Ancient Skills © Stephen R. Coote. Electronic edition. 23
Chapter Three
CUTTING TOOLS
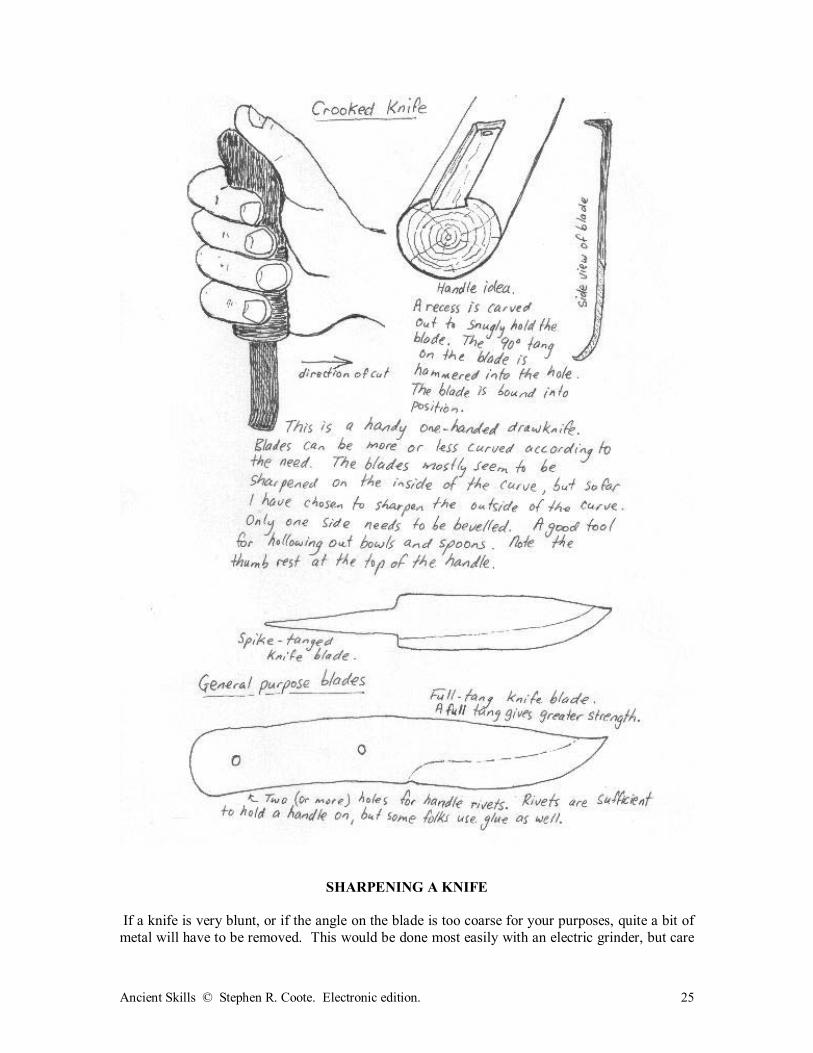
THE STEEL KNIFE Knives were of primary importance in primitive times, and they are still one of the most useful tools we have today. I like to carry one at all times, but unfortunately they are often regarded as weapons rather than tools, and being seen with one can cause problems. However a small pocketknife or multi-tool seems to be acceptable in many social circumstances, and these are certainly very useful. What is the ideal knife? That depends on the task it needs to do. If I could have only one knife for living in primitive conditions I would be looking for some specific qualities. For a start it would need to be strong and reliable. So for that reason I would probably choose one where the blade steel was relatively thick and extended full width to the bottom of the handle. So this means I would have a fixed blade sheath knife rather than a folding knife. The handle would have to be large enough to fit my hand comfortably - this makes it easier to use when your hands are wet or cold, and I believe it can give you greater control in using the knife for some jobs. The handle would be shaped for a good grip both for comfort, and to help prevent my hand slipping on to the blade and being cut. If the knife had any guard at all between the blade and the handle it would be small. Guards can get in the way, and a knife with a large guard won�t fit in the simple tube-type sheaths that I prefer. A hole through the bottom of the handle would enable a cord to be tied to the knife to help prevent its loss in some tricky circumstances. A blade between five and eight centimetres long is all that is necessary for many tasks. Longer blades can make some jobs harder and more dangerous, and more blade makes a heavier knife that is more of a nuisance to carry. A longer blade is useful when a longer slicing action is required, for example slicing bread or cutting through a lot of cordage. A wide blade will perform many tasks adequately, it will generally be stronger than a narrow blade, and it can be sharpened more often before it wears away; but a narrower blade can perform more intricate tasks. I�d pick a blade no wider than 25 millimetres at the base. A very sharp, tapered point is handy for some work, but it is more likely to snap off with hard use than a more rounded point. I would never have the blade sharpened on both edges. This is unnecessary and dangerous. I have owned some reliable knives with plain carbon steel blades. They can rust, but they have served me well. I have had some stainless steel blades that I didn�t like, but this doesn�t mean that all stainless steel knives are no good. But if I had to pick one knife, it would have a good quality plain carbon steel blade. A knife like I have just described needs to be kept in a sheath. A simple �tube� sheath that the knife slides snugly into is ideal. I like to keep away from added complications like domes and straps. Only a small portion of the handle needs to protrude from a tube sheath - just enough to grip with your thumb and forefinger when you need your knife. My tube sheaths are generally
Ancient Skills © Stephen R. Coote. Electronic edition. 24
home-made, and they have a pair of parallel slots cut into them near the top so a belt or cord can be threaded through. A knife hanging vertically from a belt around your waist is fine for most occasions. Unfortunately, however, you may find it is out of the reach of your one free hand when you really want it in a hurry. To be prepared for these occasions, the sheath can be fixed to the belt so it lies more or less horizontally. The knife can then be located in front of you where it can readily be pulled from the sheath with either hand. Be careful though, if your knife is too loose in the sheath it may fall out in this position. This method of carrying is comfortable, your knife is less likely to get caught up in scrub, and it is unlikely to interfere with anything else you are carrying like a pack, a rifle, or a quiver of arrows.
Ancient Skills © Stephen R. Coote. Electronic edition. 25
SHARPENING A KNIFE If a knife is very blunt, or if the angle on the blade is too coarse for your purposes, quite a bit of metal will have to be removed. This would be done most easily with an electric grinder, but care
Ancient Skills © Stephen R. Coote. Electronic edition. 26
has to be taken to ensure that the knife edge does not overheat and thus ruin the temper. Also grinders can be dangerous - you must guard your eyes from sparks and be sure you have been properly instructed how to use one. A grinder can grab a knife and pull it from your hand. A file can be used on some knives, although my idea of a well-tempered blade is one that is hard enough so a new fine file will barely scratch it. However, I have had some knives which served well that could be filed relatively easily. If you can neither grind nor file your blade, then a coarse sharpening stone or emery tape will eventually get the job done. Be very careful when filing a blade and think carefully about where your fingers are. Holding the blade in vice or a clamp is an option, but be aware that you can be setting a lethal booby trap if you leave the knife in the vice or clamp. It is easy for people not to be aware of the blade as they move around. Once the right blade shape and thickness has been achieved, final sharpening can be done. But how do you tell if a knife is sharp? I think if it does its intended job well enough, then it is probably sharp enough. To me a really sharp knife will shave dry hair from my arm, and a knife is generally still sharp enough if every point on the edge will still grab my thumbnail (rather than slide) when it is dragged across it at right angles. Another test involves a sheet of paper - if the paper is held vertically and the blade slices through without tearing then it is fairly sharp. If you use a knife often you will soon get to know the difference between blunt and sharp. Sometimes a knife may be blunt because the edge is worn and has become too wide and rounded. Sometimes a fine edge appears to be blunt because the edge has actually folded over - the edge is still sharp, but it has bent away. Sometimes you can feel this bent edge - it will catch against your fingernail on one side of the blade. A bent edge can often be straightened by stroking it against a sharpening steel, or by stropping it on something like leather, cardboard, paper or wood. A sharpening steel is held in one hand and the blade is �sliced� along the steel with the other hand, first one side, then the other. The back of the blade has to be lifted just enough so that the cutting edge is in contact with the steel, and a moderate pressure has to be used to hold the knife against the steel. Sometimes the first few strokes are done backwards with the cutting edge being dragged across the steel. Then a number of strokes are done forwards, with the cutting edge being pushed. I like to move the blade in a slicing arc - I place the base of the blade at the end of the steel and rotate it toward the handle of the steel so that the whole length of the blade contacts the steel in one stroke. If the steel is a short one you can compensate by moving your hands apart while performing the action. If the steel has no hand guard you can fit a heavy rubber washer on the steel to help protect your fingers. It would be good if you could find an expert to show you how they use a steel. You don�t have to own a steel to have sharp knives, but a steel is useful for quickly and hygienically restoring an edge if you do a lot of work with a fine-edged knife (like meat, fish or vegetable processing). Stropping is done by dragging each side of the cutting edge in turn across the stropping surface. The back of the blade is generally lifted quite high as stropping is often done at a relatively large angle. Commercially-made leather strops used to be available for sharpening blade razors. Having an expert demonstrate stropping technique is helpful, but if you start with a honed blade and experiment you should soon figure it out. Besides straightening an edge, I feel that steeling and stropping do abrade a small amount of steel from the blade and thus can truly �sharpen� and re-shape an edge. By adding abrasive like grinding paste or sand to a stropping surface, this abrasion can be speeded up.
Ancient Skills © Stephen R. Coote. Electronic edition. 27
For the final sharpening of a new knife, or for sharpening a worn blade, I generally use two flat sharpening stones. One is a medium grit stone and the other is a very hard, fine natural stone. I keep the stones lubricated with water or dishwashing detergent while I am sharpening. (Oil can be used, but it is messier and can end up in your food). When your stone is flat and new you can apply pressure to the blade as you push the cutting edge forward across the stone. But if the stone has a few bumps or hollows, it might be best to drag the cutting edge backwards across the stone. If you push it forward it is likely to catch and damage the edge. If you ever use an ordinary rock to sharpen your knife then it would probably be best to drag the edge backwards over this too. If you have a selection of stones, the coarsest one should generally be used first and the finest stone last. You have to keep the cutting edge of the blade firmly against the stone, and raise the back of the blade to create the correct cutting angle. You need to hold the blade at the right angle constantly as you rub it on the stone. If your knife is going to be used just for cutting up steak or fish on a wooden board, then a fine angle will be good. If your knife is to be used for general chores then the angle should be greater (blunter). A knife with a larger angle can still have a shaving-sharp edge. A fine (thinner) edge will bend or chip more easily than a fatter edge, but the finer edge, while in good condition, should slice with less effort. A razor blade has a fine edge and a cold chisel cuts steel with a fat edge - knives and axes fit somewhere in between. With many stones, as the sharpening is done, a �feather� of fine steel generally forms on the edge of the blade. This bends away from the edge as you sharpen and may not get cut off by the grit in the stone. Dragging the blade may produce more of a feather edge than when the blade is pushed edge first across the stone. This feather edge may be hard to notice with the naked eye, but it will often be there. I find that my fine, hard natural stone polishes the edge and seems to remove any significant feather. This stone is flat enough for me to push the edge forward over it. I sometimes raise the back of my knife a little more on this stone (compared to the coarser stone) to increase the angle, and I think this helps. This blunter angle does not extend very far up the cutting edge of the knife because it is created by just a few strokes on a very fine stone. But eventually, after using the fine stone a few times, you might have to make the edge thinner with a coarser stone. Steeling and stropping should also remove a feather edge. You could just use one medium grit stone and then go straight to a strop and you would have a very sharp knife. I have heard of some folk who prefer the more �saw-toothed� edge that a file or coarse stone might produce (for cutting rope, perhaps). So anything goes. There is no need to rush out and buy a selection of expensive sharpening gear. Experiment to see what works for you and don�t be worried about having to follow one right way. I have used diamond hones, round hones, synthetic stones of various types, natural stones, sharpening steels and rocks I have found lying around. They all have their place. Even cheap sharpening stones gave good results. But if I could buy only two items to sharpen with, they would be a large medium-grit stone with hard bonding so it didn�t wear away too quickly, and a small pocket-sized stone of similar material to carry on the trail.
Ancient Skills © Stephen R. Coote. Electronic edition. 28
Ancient Skills © Stephen R. Coote. Electronic edition. 29
ALTERNATIVES TO THE STORE-BOUGHT KNIFE Steel knives that do an excellent job can be made from scrap steel without too much trouble. The blades can be cut or ground from suitable material, or they can be forged from red-hot steel. This is covered briefly in the section on iron working. Knives you make yourself may not be as pretty as some you can buy, but they will still do a great job. But home-made knives can be made to look better and perform better than many purchased knives if you want to invest the time. The steel used to make knives can be purchased, but many other items can be recycled as perfectly good blades. Saw blades, old files and other tools, and car springs are good choices. Although plain iron and mild steel will make knives that are better than nothing, knife blades should generally be made from medium or high carbon steel. High-speed steel keeps a very good edge, but it is very hard and cannot be softened easily by the home craftsman. This makes it a little more difficult to sharpen, and drilling holes through it is virtually impossible by conventional means. It is also a relatively brittle material and generally cannot tolerate much bending force. However a high-speed steel power-hacksaw blade can quickly be ground into a simple knife that will give good service. Broken or blunt high-speed hacksaw blades are sometimes discarded by engineering companies. What if you are stuck in the wilderness without any sort of knife? You have to improvise with what is around you. By bashing a cord between two rocks you can cut through it. A stick of dense wood charred in a fire and scraped or rubbed on a rock until pointed and sharp will make an implement that can spear a fish or an animal. Fire can also be used to burn through a tree you want to fell, or it can be used carefully to hollow out a wooden object. Some bones and shells can be used for cutting or scraping if ground to a sharp edge, or perhaps if freshly broken. If you have the time, you could grind a rock against another to form a chisel edge. But ground stone edges are seldom as sharp as a broken edge. A variety of rocks will form some sort of a cutting edge if freshly broken. A large river boulder smashed in half by throwing it against another rock may produce an edge that can be used for chopping. But some finely grained hard rocks (and glass) will produce a razor-sharp edge if broken. If you find a fairly flat stone made from something like flint, chert, obsidian or baked argillite, you could try simply striking it sharply on the narrow edge with a hard stick or a rounded rock. It may well break away to form a very useful blade, or perhaps several blades if you want to use any small sharp flakes that form. Many primitive folk worked out how to create useful sharp edges and shape the stones to their own design by flaking pieces off the stone in a certain manner. This is called knapping (or flint knapping). There are a number of enthusiasts around today who have learned how to knap, and some are very skilled at it.
Ancient Skills © Stephen R. Coote. Electronic edition. 30
Certain stones, if they are relatively free of impurities and flaws, will flake relatively consistently in a certain way if pressure (or a hammer blow) is applied in a consistent manner. Once this principle is understood, it can be utilised to shape and sharpen the stone according to the need of the knapper. Some materials, like obsidian, glass or flint, will flake with pressure applied by a pointed tool made from something like antler or copper. Other, tougher, materials may need to be worked with judiciously placed blows from a hammer made of stone, wood, bone or antler. Some stones are unsuitable for any kind of knapping. After a little research I managed to make some functional arrowheads from flint and glass, but I am by no means an expert at knapping. There is good information around about knapping in books and on the internet. Below is some basic information to get started with. Protect yourself from sharp edges and splinters, and avoid breathing rock and glass dust. Glass and obsidian appear to be among the easiest materials to knap and they produce very sharp edges, however they are more brittle than other materials. Other materials may be tougher, but they may be harder to work and not form such a sharp edge. You must protect yourself against sharp edges and flying splinters. Safety glasses should be used, and the hand holding the piece being knapped should be protected with leather or thick fabric. Naturally if you are stuck in the wilderness you may not have safety glasses, but if you become proficient by practising with safety glasses at home you will find that your flaking will become more predictable and you will learn how to reduce the risk of producing flying splinters. Glass is a readily available material you can practice on. You will produce a heap of hazardous flakes when you work with glass, so be sure to dispose of them safely. It is a good idea to use coloured glass so you can more easily see any splinters. I have heard of plate glass being used, but the flat bases of bottles are a good source. Sometimes the base can be made to break away cleanly from the rest of the bottle by dropping a metal rod into it while the bottle is held at a slight angle. A steel rod about 100 to 130 millimetres long and about eight or ten millimetres in diameter would be a good one to experiment with. Hold the bottle over a bucket while you do this to catch any splinters. You may not succeed in breaking the bottom out cleanly every time. Sometimes the rod just makes a hole big enough to fall through, but you can still try to remove the bottom by revolving the bottle and trying again. If you don�t have a metal rod of the right weight, you could try one or several 100 millimetre (four-inch) nails, or even a handful of pebbles. Shake the bottle up and down. Sometimes parts of the side of the bottle will come away with the base. You may be able to remove these with light sweeping strokes of a suitable hammer stone. A durable flaking tool can be made from a piece of copper wire or rod about four or more millimetres in diameter. A length of this metal can be mounted in a wooden handle so that suitable amount protrudes. One centimetre is all that needs to protrude, but a thicker or stiffer piece of metal could stick out further without bending. If your metal rod is thick you should file the diameter down a bit at the point, and round it slightly. Perhaps a point like the end of a flat screwdriver could be experimented with. Any other metal, like a steel nail, could be tried if copper is unavailable. In a really primitive situation antler, bone or hardwood would have to be tried as a tool material, or perhaps you would have to use a light hammerstone instead and settle for a finished tool that wasn�t as good as a pressure-flaked one. To learn about knapping you could start by trying to make a uniformly flaked edge on a piece of broken glass. As you look at the edge of the glass you might find that it has broken cleanly so
Ancient Skills © Stephen R. Coote. Electronic edition. 31
that the edge is close to 90 degrees (a right angle) from the two faces of the glass. This would be good. However sometimes the break may happen at an angle so that one face is greater than 90 degrees from the edge, and one face forms an angle of less than 90 degrees with the edge. You could start to flake by using the edge that is less than 90 degrees, or you could make the edge closer to 90 degrees by abrading the edge on a sharpening stone or a suitable rock. Flaking is done by applying pressure to the �platform� on the workpiece, and the platform is generally an edge that is 90 degrees or less from the face of the workpiece. This is an important basic principle. (See diagram). In our example, the platform is the thin edge of the glass. Hold the glass in one hand by sandwiching it between a folded piece of leather or thick cloth so the glass does not contact your flesh. Keep the workpiece pressed against your palm with the thumb or fingers of the same hand. Take your flaking tool in your other hand and place the point against the edge of the glass. For this exercise the point should sit just above the imaginary centre line on the edge. Push straight into the glass. Holding this inwards pressure, apply pressure gently downwards and increase this pressure until a flake comes away from the glass. The idea is not to let the tool slip: you have to try to jam it firmly into position. Abrading the edge of the glass with a coarse stone may help to prevent the tool slipping. Now turn the workpiece over and apply your tool to a position immediately next to the flake you have just made and take a flake off the other face. This is not directly opposite the other flake, but just off to one side. Keep turning the piece over and taking off flakes until a nice patterned edge is produced. You may have to abrade the edge throughout the process to create the 90-degree angle you need. The workpiece does not have to be gripped in the hand. It can be held on protective padding against the thigh or it can be held against a soft pad on a bench. No matter which way it is held, be sure to protect your �holding� hand well against sharp flakes and for the times when your flaking tool slips. Be careful not to let your tool hand collide with the flaked edge if the tool slips. To make a nice thin, sharp tool the longer the flake the better. Longer flakes are harder to produce. By being able to produce flakes that travel over half the width of the workpiece, you can thin it down. This is important if you want to consistently create nice flaked knives or arrowheads. It seems that learning to �flake� isn�t too hard, but making consistent long flakes to a nice pattern can be a challenge. If the workpiece needs to be thinned, you could give the edge a light abrading to form a platform that will allow you to make new flakes along the same edge. However thin workpieces are most easily made from thin pieces of material. If you need to remove a lot of material to produce a point, you can do it by flaking more away from that area. Grooves (for binding arrowheads for instance) can be flaked away using narrow tools. To break useful flakes from a lump (or �core�) of knappable material you can use a big pressure flaking tool in some circumstances, or you can use a hammer (stone, wood or antler) directly or with a punch made from soft metal, antler, bone or wood. Be prepared for the formation of some very sharp and fast-moving flakes. It appears that the platform principle that applies to pressure flaking also applies to flaking by hammering.
Ancient Skills © Stephen R. Coote. Electronic edition. 32
Flaked tools may sometimes be more useful fitted to a handle. They can be glued into a slotted piece of antler or wood, or perhaps be bound in with strips of wet rawhide or sinew. Knapped, sharp arrowheads of the right design can be very effective if used for hunting. There is some good information available on knapping. I have only introduced you to the concept.
AXES An axe is a tool of great value to someone living close to the land. The main thing I have to say about them is to be careful when using one. If chopping downwards as you might if you were splitting firewood, try to keep the handle at least as low as the head as you swing the axe. If the handle is higher than the head, the head can swing toward you. If you miss what you are aiming for, or if the axe glances off the wood, you could be in trouble unless the handle is lower than the head. If you keep the handle lower than the head when the axe misses, then the head should hit the ground before it hits you. You can buy some beautiful new axes, but I have found that often folks have some nice old axe and hatchet heads lying around in their sheds. You may be able to buy an old head cheap at a garage sale or junk shop. New handles should be made from tough, straight-grained wood. Splitting a handle from a log is one way of getting relatively straight grain. If the head still has part of the handle still attached, you can drill and/or punch it out. Making a new handle is not difficult. A handle does not need to have a fancy shape to work well, although it is good to have a wider portion at the end to stop your hand slipping off. Once you have made the handle the right shape and size to be a snug �hammer fit� into the head, cut a slot in the middle of the handle at the head end that will run parallel with the head. This slot should be nearly as deep as the distance that the handle will go into the head. A hard, thin wooden wedge is driven into this slot once the handle is hammered into place. This wedge spreads the handle and jams it tightly in the head. Take care not to damage the handle when driving it into the head. You could make your handle a little over length and then shorten it once the head is fastened in place. Sometimes you may have to file away burrs from the inside of the head to allow the handle to enter and fit properly. Handles should not have abrupt changes in thickness near the head, as they may break at this point. Have a gentle taper between changes in size. If you research the subject you may find pictures of hafted stone axes. Perhaps you would like to try forging a simple flat steel blade and hafting it to a wooden handle in a similar manner to the way a stone blade is fastened. I would not like to be without a good steel axe or hatchet.
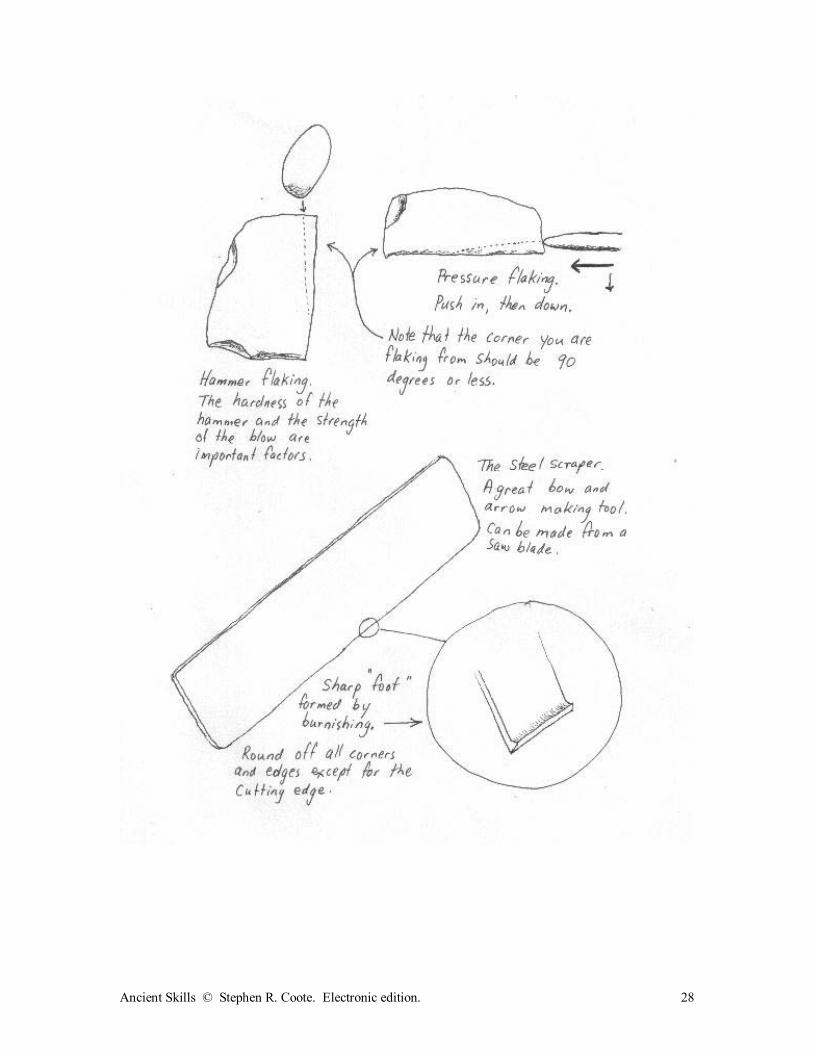
THE STEEL SCRAPER This is not particularly primitive, but it is a very useful tool for making wooden implements. A well-made scraper is a wonderful tool to use in bow and arrow manufacture.
Ancient Skills © Stephen R. Coote. Electronic edition. 33
I have made scrapers from pieces of circular saw blade about two millimetres thick. The dimensions are not critical, but my scrapers might be 30 or 40 millimetres wide and 150 millimetres long. One of the long edges is used for scraping but all the other edges and all the corners are rounded off to make it safer to hold and use. I clamp the strip of steel in a vice with the scraping edge upwards. I file this edge to be as flat as I can make it, and so the edge is at right angles to the sides. I use a smooth file, and then I sometimes use a flat oilstone to finish the job. Whatever you do, try to keep the edge as square and as sharp as possible - don�t round it off with sloppy filing. I then get a smooth length of fairly hard steel, like a large, good quality screwdriver. I use this like a file to burnish a small �foot� or hook on one side of the scraping edge. I do this by tilting the screwdriver at about five degrees downwards and by applying considerable pressure as I �file� the edge. As the screwdriver is pushed across the edge in a sweeping diagonal movement, the steel in the scraper should flow to form a small foot on the scraper edge. Even a small foot you can hardly see and barely feel can be enough to make a wonderful scraping edge (see diagram). Some steel can be too hard to form a decent foot. Some steel may be too soft to hold a decent edge, but soft steel may be slightly work-hardened by the burnishing process so you could experiment with using steel that might otherwise be considered unsuitable. I wrap the ends of my scrapers with tape to make them nicer to hold. The �foot� should face the direction the scraper moves in. Experiment with holding the scraper at various angles to the wood to get the best result. Sometimes chatter marks can be eliminated by holding the scraper diagonally across the marks while scraping. Commercial cabinet scrapers can sometimes be purchased from tool stores.
Ancient Skills © Stephen R. Coote. Electronic edition. 34
Chapter Four
BOWS AND ARROWS The accuracy and effectiveness of primitive bows and arrows should not be underestimated. With a bow carved from a branch and an arrow made from a dried fern stalk I killed a wild pig with one shot. I have hunted for many years with a rifle, but that successful hunt with my own hand-made equipment has been my most satisfying so far. Even if you have no desire to hunt, primitive archery can be a very fulfilling pastime. It adds considerable enjoyment to time spent outdoors... the keen primitive bowyer is always on the lookout for nice straight branches to use for bows or arrows. There are always new ideas and materials to experiment with. This is a huge topic. I will cover just a few basic ideas. I still have much to learn.
DRAW LENGTH Draw length is the distance between the back of the bow (the side of the bow facing away from the archer) to the bowstring when the archer has the bow at normal full draw. Many bows have a maximum draw length that should not be exceeded or the bow is very likely to break. Generally an archer with a long draw length needs a longer bow than someone with a shorter draw length. A large person may have arms long enough to pull back the string, quite comfortably, a distance of thirty inches or more (an inch is 2.54 centimetres). Although I can draw about 27 inches I have chosen to use a draw length of about 23 inches - this allows me to use shorter bows and a more flexible shooting stance.
POWER AND ACCURACY One way of describing the strength of a bow is to talk about its draw weight. This is generally expressed in pounds (a kilogram is about 2.2 pounds). It takes a certain force to pull back the string of a bow. It takes less force to draw the string a short distance than it does to pull the string to full draw so, to mean anything, the draw length has to be noted for the stated draw weight. I believe that the minimum weight of a bow to be used for hunting anything bigger than a rabbit should be 40 pounds at your draw length (although the bow I got my pig with pulled around 35 pounds). A 40-pound bow can, at a sensible range, drive a heavy, sharp hunting arrow right through an animal like a goat or a deer. Even a 10 or 15 pound bow can be very dangerous. An arrow should generally go further propelled from a heavier bow than it will if shot from a lighter one, but this is not always the case. Some bows are more efficient than others. A well-designed 30-pound bow could conceivably outdistance a poor quality bow of 45 pounds. Some bow materials and bow designs seem to have a better �snap� to them. Bow design is a big topic that I have only just begun to explore, but that hasn�t stopped me making bows that work well enough to hunt with.
Ancient Skills © Stephen R. Coote. Electronic edition. 35
How far should a bow shoot? Light arrows especially designed for distance shooting shot from powerful, efficient bows can go several hundred metres. Arrows that are used for hunting are generally heavier and thus don�t travel as far as these special arrows. I have heard of one place where there is evidently a rule for bowhunters stating that bows used have to be powerful enough to send an arrow 120 yards (around 110 metres). My bows and hunting arrows don�t always comply with this. In movies you may have seen an archer split one arrow, sitting in the bullseye, by hitting it with another one. I haven�t come across anyone in real life who can do this on request, and it is probably a good thing because arrows take such a long time to make. At present, on my better days when practising, I might get the majority of my arrows in a 10 centimetre circle at a distance of around 12 metres. I hope to get better, but meanwhile my level of accuracy means I shouldn�t really shoot at a deer-sized animal further than about 20 metres away. This is my �ethical shooting distance� to reduce the risk of an injured animal escaping. Some archers using modern compound bows with sights may shoot much further and more accurately than I can with my primitive gear, but I would rather keep using my �natural� bows and arrows. My philosophy is that if I am going to depend on factory-made equipment to hunt with then I may as well use a rifle (and I do quite often). However modern bows perform very well and many people like them.
MEASURING DRAW WEIGHT Be careful measuring draw weight - there is a lot of energy stored in a drawn bow. If something breaks or slips out of position, damage can be done. By holding the bow and drawing it to the correct draw length with a suitable spring weighing scale you can read the draw weight directly off the scale. If you have a set of bathroom scales it is easy to measure draw weight. Get a sturdy piece of wood (like a piece of broom handle) slightly longer than your normal arrow length. Cut a groove in one end of it like an oversized arrow nock. Measure from the bottom of this nock and make a mark around the stick at the desired draw length. At this mark cut a groove around the stick or tightly bind a cord around it. This groove or cord will enable you to feel when your bow is at full draw. Nock this stick to your bow as you would nock an arrow. Place the plain end of the stick against the centre of the bathroom scales and carefully push down on your bow until you reach the correct draw length. You can then read the approximate draw weight on the scale dial.
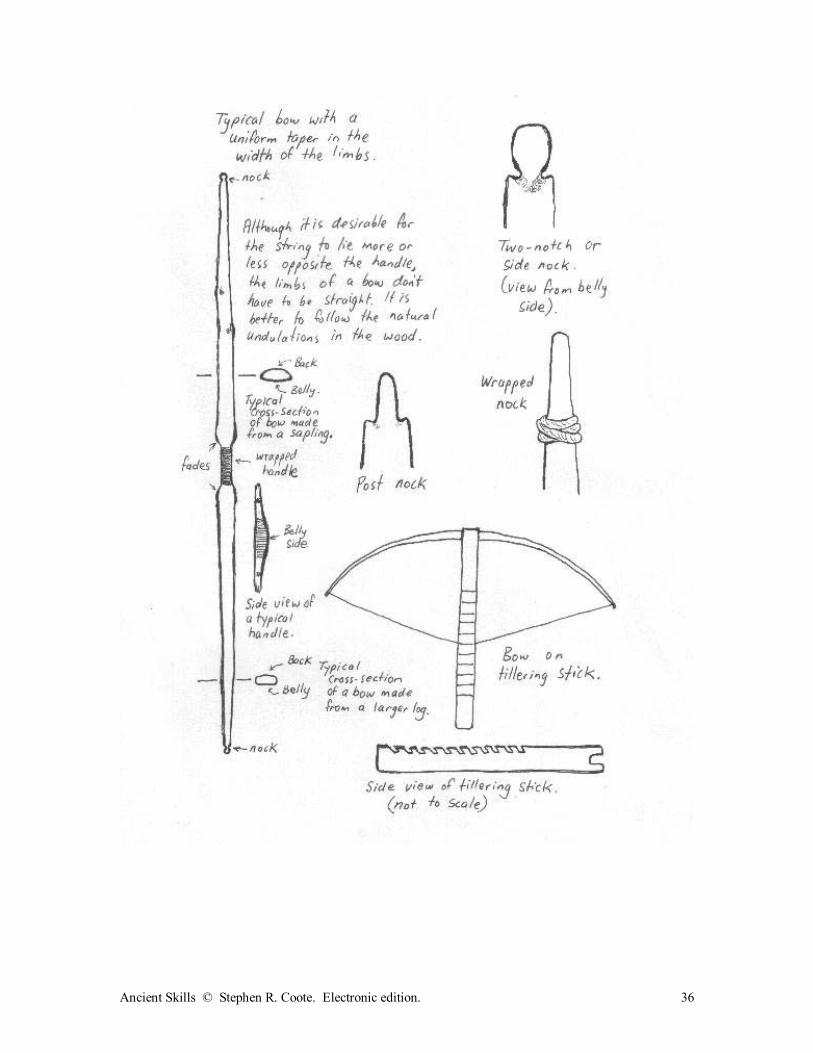
Ancient Skills © Stephen R. Coote. Electronic edition. 36
Ancient Skills © Stephen R. Coote. Electronic edition. 37
TERMINOLOGY Archer�s paradox: the way in which an arrow bends to go around a bow as it is shot. If it didn�t bend, it might shoot to one side because generally the arrow is shot from one side of the bow - not the centre. As the string gets closer to the bow it can pull the nock end of the arrow closer to the middle of the bow, thus pushing the point of the arrow sideways from the line of fire as the arrow pivots around the bow. Thus an arrow needs the right degree of �bendiness�. (See �spine�). Back of bow: the surface of the bow that faces away from the archer. The back of the bow, when strung, is under tension. The back of the bow may be flat, or crowned (which means that it has a convex cross-section). A bow cut from a sapling will generally have a significantly crowned back because the sapling is round. A bow split from a large diameter log will have less crown. A bow cut from a board will generally have a flat back unless the bowyer decides to crown it. Backing: a material (e.g. sinew, rawhide, fibre, cloth or cordage) fixed to the back of the bow. Backing the bow makes it less likely to break, and if it does break it is less likely to fly to bits and strike the archer. Glued-on sinew backing is said to improve the performance of a bow. While most backings are glued into place, cordage backing is lashed into position and it can be tensioned by twisting the cords with a small toggle. Belly: the surface of the bow facing the archer. The belly is under compression when the bow is strung. A belly may be crowned or flat. Bowyer: a person who makes bows. Brace height: the distance between the stave and the string when the bow is strung but not drawn. Typically this might be the distance between the top of your thumb and the base of your fist while giving the �thumbs up� sign. Broadhead: a blade-like arrowhead generally used for hunting. Fades: when a bow has limbs that are wider than the handle, there is a tapered portion at the base of each limb as the width from the handle increases to meet the limb. These tapered portions are called the �fades�. Fletch/fletching: the vanes or �flights� on the arrow. Generally these are feathers, but other things may be used. Limb: A bow has two limbs. These are the �bendy� bits. On a �D� bow the limbs meet in the middle (the whole bow bends). On a bow with a stiff, non-working handle the limbs are separated by the handle. Nock (on arrow): the slot or groove that the bowstring fits into. Nock (on bow): the point at which the bowstring is fastened. A bow has a nock at each end. A nock may be formed by cutting grooves in the ends of the limbs, or it may simply be a �lump� formed by cordage of some sort wrapped around the bow, or some other device. Serving: fine cord wrapped around the bowstring to protect it from wear. This is generally applied at the arrow nocking area, and perhaps also around the loop. The serving also increases the diameter of the string and helps to keep the string in a uniform shape thus providing a more
Ancient Skills © Stephen R. Coote. Electronic edition. 38
consistent fit into the arrow nock. Spine: a term used to describe the flexibility of an arrow. Shorter arrows, or arrows shot from lighter bows need to be more flexible than longer arrows or arrows shot from heavier bows. The weight of an arrowhead also has an effect on spine. An arrow that is too stiff may fly to one side of the line of sight. Devices can be used to measure spine, but arrows can be tested by simply shooting them. An arrow that is too stiff can be made more flexible by reducing its thickness with a scraper or sandpaper. Stave: the piece of wood from which a bow is made. String follow: A simple bowstave is typically straight. Sometimes after manufacture and shooting, a bow may remain a little bent when it is unstrung. More than an inch or two of string follow is sometimes regarded as undesirable (from a performance point of view), but it doesn�t prevent the bow from being used. Tillering: the art of shaping the bow limbs to achieve the desired bend in the bow.
MAKING A BOW A simple branch with a string tied to it can shoot an arrow accurately, and possibly with sufficient power to use it as a makeshift hunting weapon. However it is unlikely to be as efficient and long-lived as a bow of better design. Making a bow can consume considerable time, and the beginner may find that often a bow will break while being made or within the first few shots. I have broken many bows. But I also have some survivors that work well. The aim should be to learn from each experience. Good bows can be made from a straight-grained plank of wood. However I am going to describe making one from a sapling or a split log.
BOW DESIGN Your bow should be more than twice as long as your draw length. If you are making a �D� bow which will bend over its whole length I suggest you make it twice your draw length plus at least 20% more. If your bow is to have a stiff handle, then I suggest a length of twice your draw length plus about 20% plus the length of the stiff handle and fades portion. If you find that bows made to this formula keep breaking, then you could try making them longer and/or wider. As you gain experience you are likely to be able to make a successful bow which is shorter than the �safe� guidelines I have given. A bow that is too long will have more mass in its limbs than it needs and thus be not as efficient as a shorter bow. But a shorter bow will be nearer its breaking point at full draw. Some folks say a longer bow can help you shoot more accurately, but a shorter bow is easier to manoeuvre through thick scrub. A simple guideline for the beginner would be to make the first bow as tall as him/herself. How do you decide what your draw length is? To a certain extent your physical size will affect your draw length, but your style of shooting will also be a factor. When I started shooting arrows I adopted a target-shooting stance I had read about. My bow arm was held straight, and my drawing hand pulled the arrow alongside my cheek. This meant that my draw length was over 27 inches (I am using inches rather than centimetres because it seems that many archers think in terms of inches). After mixing with other bow hunters and thinking about what I wanted to do, I shortened my draw to allow my bow arm to bend at the elbow and to make the corner of my
Ancient Skills © Stephen R. Coote. Electronic edition. 39
mouth my anchor point. This gave me a more flexible stance and the ability to use shorter bows and arrows. I also found that the bowstring didn�t slap my forearm like it had previously so I didn�t need a wrist guard. A bow will have more power as its limbs are made wider or thicker. Theoretically, the less mass in the limbs the better - particularly the tips of the limbs. By making thicker limbs (i.e. more wood between the front and back of the bow) you may gain some efficiency, but I would advise the beginner to take the safer path of making them wider to obtain the desired draw weight. By doubling the width of the limb (and leaving the thickness the same) you should double the draw weight, but theoretically you may be able to double the draw weight leaving the width the same and only adding a few millimetres of thickness to the limbs. Not all woods seem strong enough to make bows of a sensible length with thick, narrow limbs. With an untested bow wood, a limb width of two inches (approx. 51 mm) at the base might be a good starting point. I have heard of some bows having limbs over three inches (approx.76mm) wide. If you want to experiment and try to gain some efficiency, you could try making narrow, non-bending tips on your limbs. However, all sorts of bows will shoot arrows, and the simplest of bent sticks can shoot accurately and put meat on the table. Having fun, and shooting accurately are more important than increasing velocity and range. Before cutting your stave to length you should decide whether your bow is to have a stiff handle or not. Some folks think a stiff-handled bow is easier to shoot and may not jolt their hand as much when shot. A bow that does not have a stiff handle area shares the load along its entire length and it enables you to have a shorter bow for the same draw weight. Some people may pick a style of bow according to their preference of appearance or tradition. It doesn�t matter what you choose to do initially. I will describe the manufacture of a bow with a stiff handle because I have had the most experience with this style, and because a stiff handle bow is suited to the use of very wide limbs if necessary. The reader should be able to make a fully bending bow by adapting the ideas in this chapter. Here is an important thing to remember: the back of a bow is subject to extreme tension, and any damage on the back is likely to lead to a broken bow. With the type of bow I am describing, wood should not be removed from the back of the bow. Only remove wood from the sides and the belly, and keep the back free from any sort of damage. The younger wood nearer the outside of the log is nearly always used for the back of the bow. In many cases you will see the back of your potential bow as soon as you strip the bark from your stave. Some bow woods and designs call for the removal of wood from the back. This may be appropriate if the bow is going to have some backing stuck to it, or if a whole growth ring surface is left intact on the back of the bow. Sometimes it may be felt that a bow has too much crown on the back, so some of the crown is removed. However the general rule is don�t cut through the growth rings on the back of a bow. By making a bow a little longer than you need, you may get away with having a few faults in the limbs because the load is spread along more wood.
BOW WOOD SELECTION Many species of wood will make a useful bow. Yew, Osage orange, black locust and hickory are named as traditional bow woods but the list is not limited to these few. I have read that any wood with a specific gravity of around 0.5 or more when seasoned is worth experimenting with, and I agree. I do not recommend poplar or willow, but if it is all you have you should experiment with
Ancient Skills © Stephen R. Coote. Electronic edition. 40
it - perhaps with the right design and maybe a suitable backing you may get it to perform well enough. I have made successful bows from a New Zealand wood called kanuka (Kunzea ericoides). The bow with which I got my first arrow-killed pig was made, I think, from Olearia paniculata. One of my favourite bows was made from a stave given to me by my friend Ed, who called it �elm�. I find it satisfying to try to use whatever is available locally. Whatever wood you choose, I recommend that it is as straight as possible, and free from side branches, knots or any form of damage. Some people have the idea that a bow should be made from a stick that already has a bow shape - this is generally not the case. I prefer my bows to be straight when not strung, although they may �follow the string� a little and stay bent when the string is removed (and this is not really a problem). Some bows are designed to have a backward bend when unstrung. A beginner will probably find it best to work with a straight bow. A thin sapling can be used to make a good bow. My best bow for some years was made from a kanuka sapling of around two inches in diameter. If you have to cut a stave from a larger log, you may have to split the log to get the stave(s). The only way I have managed to split a log evenly (by starting at one end) is to split it in half first and then split each half into halves if necessary. I have found that the split may wander too much if you attempt to do it too far off centre. I generally split logs by driving a heavy slasher (brush hook) blade into the end of the log with a wooden club (if you hit the blade with a steel hammer you will damage the blade and maybe cause a chip to fly into your face so be careful). The blade can be driven down the whole length of the log by hitting each end of the blade in turn, or wedges can be driven into the split opened by the slasher blade. Sometimes I have used a pair of crowbars to open the split. Wedges would be better than a slasher blade for larger logs. On occasions when the log has split in a �corkscrew� fashion, I have discarded the log. You can rough out your bow to slightly oversized dimensions while the stave is still green, or you can leave the whole stave to season. I have found it much easier to cut green wood compared to seasoned wood, so I generally do a lot of work on the stave while it is green (but I do not bend the stave until it has seasoned). If you choose to leave the whole stave to season then you may find it is easier to remove the bark while it is still green. If the bark won�t simply peel off, be very careful with any tools you use so you don�t damage the outside wood on the log which will eventually become the back of your bow. It is a good idea to coat the ends of the stave with glue or water-based paint to help prevent splitting. If you have roughly shaped your bow you may like to lash it to something straight to help prevent warping. You may even like to try bending it slightly backwards over a suitably shaped former and tying it in position to dry. Some folk say you should leave a stave for a long time (at least several months) to season. I have made a bow from a green roughed-out stave after hanging it near my woodstove for around two weeks. Seasoning times are likely to be affected by stave size, wood types, temperature, humidity, and air movement. I have never measured moisture levels in wood, but I have read that the moisture level of some bow woods should be down to about eight to fifteen percent before being used. Hanging a stave in a dry, airy place for several months should work, but there is nothing wrong in experimenting with rapid seasoning. If you have some suitable scales, you could weigh the stave on a regular basis. When it ceases to lose weight during favourable drying conditions, then it is probably dry enough. If you bend a green stave, it may stay a little bent. And although unseasoned bows will still shoot an arrow, they are not likely to perform as well as a fully seasoned bow.
Ancient Skills © Stephen R. Coote. Electronic edition. 41
If you have a stave which turns out to be a bit crooked, you may find that is still works well enough as a bow if the string lies more or less above the handle when strung (that is, the string should not lie too far to one side of the handle). Some people like to make �snakey� bows. However it is possible to straighten (or bend) wood with the aid of heat. The process is described below.
MAKING THE BOW There is more than one way of making a bow. I am simply going to describe the manufacture of what I think is a good bow for a beginner. This bow is made from one piece of wood. If you can�t find a sapling or log that is suitable, then a bow can be cut from a board, or it can be made from two shorter lengths of wood joined at the handle with a special spliced joint and strong glue. Information on making a variety of bows is available, but if the reader can�t find any further information it still may be possible to make whatever is desired using the hints given in this book along with a little common sense and experimentation. If you have to use a board for a bow, make sure that the grain is as straight as possible and does not �run off� the back or the edges of the board. I would suggest that you make a board bow a little longer than usual, and maybe you could glue some strong fabric or fibre to the back to help prevent breakage (rawhide is a good natural alternative). All sorts of tools can be used to cut a tree and make a bow, but an elaborate selection of tools is not absolutely necessary. A sturdy sharp knife would be all that is needed to shape a bow if you could have only one tool and, if necessary, that �knife� could be a sharp rock flake. Some tools can speed up the operation, but bow making shouldn�t be rushed. If I could have only two tools to make a bow, I would choose a good hatchet and a good scraper (see �steel scraper� in the tools section of this book). The first step is to draw the outline of your bow on to the stave (although if you have a good �eye� for proportion, complete marking out may not be necessary). Remember that the side closest the bark will become the back of your bow and should not be damaged. Generally, however, the back of the bow will be the smoothest to make your marks on for the outline. If you have a stave made from a small sapling that is a bit �wavy�, you can have a wavy bow provided that the string will lie more or less over the middle of the handle. However wavy bows might be a bit tricky for a beginner to deal with, so I am going to assume that the stave is relatively straight. Draw a centre line down the stave (I use a soft pencil). Mark the middle point on this centre line. Make lines at right angles to the centre line two inches (approx. 51 mm) above and two inches below the middle point. This is your handle length. Now make marks across the stave at two inches above and two inches below your handle... these points mark the outer ends of the fades - the starting points for the limbs. The width of the bow now has to be marked. Make the handle about an inch and a quarter (around 32 mm) wide by making marks five eighths of an inch (approx. 16mm) each side of the centre line. Make the base of the limbs about two inches wide (51mm) by making a mark an inch each side of the centre line (make it wider if you think that your wood isn�t very strong). Next go to the end of each limb and make a mark three-eighths of an inch (approx. 10mm) either side of the centre line. This will give a limb width of three-quarters of an inch (approx. 20mm) at the tips. With the aid of something that has a straight edge, join the marks from the fades to the tips to form the outline of your limbs.
Ancient Skills © Stephen R. Coote. Electronic edition. 42
The maximum thickness (the dimension from the back to the belly) of the bow will be at the handle. For a start you should make the handle about one and a quarter inches thick (around 32mm). The limbs of the bow will probably be around three eighths of an inch thick at the nocks (around 10mm). Feel free to depart from the dimensions I have given. And if you find that one of the lines marking the side of a limb passes through a knot or some other problem, then it may be a good idea to depart from the line for a short distance and cut around the outside of the knot so as to leave more wood to keep the area strong. You may also like to change the handle dimensions to suit your grip. If the handle isn�t thick enough it may bend (or break), but you will soon get to see what works and what doesn�t. The tips of the limbs are another thing you might like to experiment with. Some bows have very narrow tips and perform well, but very narrow tips may require a greater thickness to ensure that they are strong enough. The limbs of this bow will have a fairly even taper from the fades to the tips. I have described this design because I feel it may be the easiest type for a beginner to tiller, but this is not the only limb design that will work. You may, for instance, like to have more or less parallel limbs for half their length or more with only the last portion of the limbs tapering to the tips. Popular opinion would probably say that the belly of this bow should be more or less flat. I find that a slightly convex belly is easier to work with. Some, apparently successful, bows have a very high crown on the belly, but I haven�t had much experience with bows like this. You can reduce the stave to near its finished dimensions with a hatchet, machete, drawknife, knife or saw. Be careful removing wood from around the fades - whittle, saw or rasp carefully - sometimes wood will split further than you intend it to. As you get nearer the finished dimensions it would be wise to use a spokeshave or a rasp or a cabinet scraper and take a little more time over the process rather than ruin a good stave. A sharp knife will make a serviceable scraper if the blade is held at right angles to the wood. As you work with the wood you will see how to work �with the grain�. If you try to cut against the grain in some circumstances you may find that you cause it to split or tear. Take your time and don�t attempt to remove too much at once. You may be satisfied to use a scraper to remove the final wood to the outline, or you may prefer to use a file or sandpaper. At this stage you can reduce the bow to its final width, but the thickness should be oversize to allow for the tillering process. While working on a bow it is good to have some device to hold it steady. If you do use a vice or clamps, be sure that you don�t damage the wood - especially the back. I have clamped or lashed staves to a narrow rail fixed between two fence posts. My current clamping device is a traditional woodworkers �shaving horse� with which I can clamp the bow by pushing my foot against a lever while the bow lies along the top of a plank. But it is possible to make a good bow without any clamping device. The initial hatchet work is done with the stave held vertically on a chopping block. Finer work can be done with one end of the stave jammed against the base of a tree or a wall, and the other end jammed against your stomach while you stand and bend over the stave and work on it with both hands.
TILLERING I think this is the most challenging part of making a good bow. The finished bow should have the desired draw weight and a nice, even tiller. Some bows are designed to have slightly different limbs, and certain bow designs have some areas of the limbs �working� more than other areas, but in general you should have a nice, fair curve with each working part of the limb doing its
Ancient Skills © Stephen R. Coote. Electronic edition. 43
share of the bending. For the bow I am describing, both limbs should be the same. In brief, this is how tillering is done� The bow is strung (initially with a string that is longer than usual), and the shape of the bow is carefully observed whilst it is bent with a force less than, or equal to, the desired draw weight. If the shape is near perfect, then wood is removed evenly from both limbs once the bow is unstrung. If the bend is imperfect, then wood is removed in greater quantity from some areas in order to correct the bend. Initially the bow is only slightly bent at the proper draw weight, but as work progresses the bow is drawn further and further. When your stave has natural bends and blemishes it can be hard to judge the tiller. By making your first bows a little longer and wider than normal you may compensate for small errors that you make in tillering. Before tillering begins you have to know the desired draw weight and the desired draw length. When you are bending the bow during the tillering process you should not, as a rule, bend the bow beyond the desired draw length or weight. So how do you judge the draw weight during tillering? You could measure it with a set of scales, but I generally judge it by �feel� (and I have often produced underweight bows as a result! - so be careful). A heavy pull and a long draw will produce a powerful weapon, but a bow with a lighter draw and shorter draw length is more likely to be a success where the bow wood is unproven and/or the bowyer lacks experience. It pays to try to make a bow that is initially a few pounds over the desired draw weight. This allows for any losses that may arise after final polishing or after the first shooting is done. Proceed slowly. Some folks recommend that you bend your bow many times after you have removed wood to let it �settle in� before you remove more wood - I have not always done this, but this may apply to some types of wood more than others. Use only tools you can control well, and which will not take off more wood than intended. The final stages of tillering are best done by light scraping, filing or sanding. Take care. By removing only a tiny extra portion of wood you can make a huge difference to the bend (and power) of a limb. The first test of a bow�s bend is often done by grasping the handle area in one hand and the top of one limb in the other, and bending the lower limb against the ground by pushing against the handle (some folk call this �floor tillering�), but after these first checks tillering is best done with a string fixed to the bow. Don�t make a mistake and bend the bow backwards. In the early stages it is safer and easier to use a cord that is longer and stronger than a normal bowstring. Before a string can be fixed to the bow, nocks will have to be cut into the ends of the limbs. On the wide bow I am describing, the nocks need be nothing more than a pair of slots filed or whittled into the sides of the limbs at a distance of about five eighths of an inch (approx. 16mm) from the tips of the limbs. The slots needn�t be too deep (say four millimetres or just over an eighth of an inch), and they should slope at an angle of about 45 degrees toward the handle on the belly side, and they should also slope toward the centre of the stave on the belly side so that together they form a shape like the top half of a �V� (see diagram). The slots should be wide enough to hold the string without squashing it. A thin round file is ideal for making nock slots but, whatever you use, be sure to leave a nice smooth surface and remove all sharp edges. Don�t cut across the back of the stave when making nocks. On some longer bows I have simply whittled the ends of the limbs to leave short posts to hold the string. Don�t remove any wood from the front or back of the bow if you are making post nocks - just whittle it away from the sides. At the point where the posts meet the limb tips, you have to
Ancient Skills © Stephen R. Coote. Electronic edition. 44
ensure that the shape suits the string so it is not damaged and so the loop will not slip down the limb. If the transition between the post and the limb is tapered the wrong way, the string may be pulled down the limb. Round off the sharp edges of the wood where the string will contact them. You can test the tiller by drawing the bow by hand and looking at yourself side-on in a mirror, or you might like to try sitting on the ground and looking down on the bow while you draw it with your foot braced against the handle. However it may be better to attach the bow to a device which will hold it drawn so you can view the curve of the limbs from a distance. This device may be some kind of tillering stick or tillering post. A simple tillering stick might consist of a sturdy forked stick that is a bit longer than the intended draw length of the bow. The handle portion of the bow sits in the fork. A series of slots are sawn into the stick to hold the bowstring at whatever draw length is required. To hold the string securely, the bottom of the slots should slope toward the fork. A length of milled timber will make a good tillering stick, but a slot will need to be cut into one end of the timber to take the handle of the bow and prevent it from slipping. Sometimes a bow may break while being tillered, so a pulley-operated tillering post (or similar device) may be a safer option. Here is the principle behind this idea: the handle of the strung bow sits in a slot on the top of a vertical post. At the bottom of the post a pulley is securely fastened into place. A rope passes through the pulley and is attached to the bowstring with a smooth hook. This rope can be pulled from a distance. Instead of having a post you could have a suitable bracket firmly fixed to a wall or bench. To help ensure that the bow is not over-drawn, it helps to have a mark on the post (or wall) showing maximum draw. You may have no difficulty in judging your tiller by eye as you progress. However a series of parallel lines or a similar pattern behind your tillering device may help you better see the quality of the bend in the limbs. Another idea is to take a short flat piece of wood and run it along the belly side of the limbs. The gap between the wood and the limbs of a simple drawn bow should be virtually the same all along the limbs (but if the limb is kinked you may have to take this into account). If the bend seems fairly right except for a small �flat� portion on the limb, then you should mark this stiff area, remove the bow from the tillering device, unstring the bow, and then carefully remove a small amount of belly wood from the stiff area. Don�t forget to draw the bow several times before checking the tiller again. Sometimes it may be appropriate to remove some wood while the bow is still strung. If you discover that one small portion of the bow is bending more than the rest you must quickly note where this weak spot is and relax the bow as soon as possible. You then have to remove wood from most places on the belly except for the weak area. A small weak area on a limb may cause the limb to fail in a relatively short time. So be careful and work slowly. I have at times intended to make a bow of forty or more pounds, but have ended up with something around 20 or 30 pounds because of hasty tillering. You can�t put wood back on to a stave. Before you tiller to your final draw length you should remove the long tillering string and fit a bow string of the correct length (see instructions below for stringing). And before you do the final tillering it is a good idea to shoot some arrows and leave the bow strung (or even drawn on the tiller stick) for a while to see if the tiller changes. Some people even advocate slightly overdrawing the bow� I can see the advantage of this, and even if it breaks it is better that it breaks early rather than one day when you are out hunting with it.
Ancient Skills © Stephen R. Coote. Electronic edition. 45
Sometimes a well-tillered bow may break anyway. Just put it down to experience and try to understand what happened. Then start on another one. If your bow ends up weaker than planned, sometimes you can cut a little off the end of each limb to shorten the bow, and thus increase the draw weight. You would have to make new nocks.
STRINGING THE BOW I prefer to string my bows this way� I slip the loop over the top limb and let it slide down the limb below the nock. The other end of the string is fastened to the other nock. The handle of the bow is held firmly in my left hand with the belly facing away from me. The tip of the lower nock is jammed against the instep of my left foot. I push the upper limb of the bow with my right hand while pulling the handle toward me. My right hand also grips the upper loop of the string. As the bow bends I slide the top loop of the string upwards and place it in the nock. I don�t pull the bow directly towards me; I pull it slightly sideways so that if something slips or breaks it is less likely to strike me in the face. I also turn my head to my left to protect my eyes and this means that I have to slide the string into place by �feel� rather than looking at what I am doing. This method of stringing works best with two-notch or post nocks - wrapped nocks don�t allow the loop to slide up the limb easily. If your bow is relatively strong and/or your nock and string loop are not suited to this method of stringing the bow, then you may have to use another method. Sometimes I have strung a bow by placing the lower limb tip on top of my left foot with the belly facing upward. I then step over the bow with my right leg. I hold the upper limb with my right hand and lift the bow as high as necessary to get the belly side of the handle behind my right thigh. I use my left hand to put the string in place while I bend the bow with my right hand. (The string will already be fastened to the lower nock and should pass in front of your right leg). When the bow is strung correctly you will find that your right leg is between the stave and the string. Care has to be taken not to over-bend any part of the bow during this process. Sometimes a particularly long or heavy bow can be strung by placing the lower limb on the ground with the belly facing upward. The right hand grips the upper limb just below the upper nock (this end of the bow will be about 60cm above the ground). The left knee is then placed on the handle area and the weight of the body is brought down on the handle. The string is already fastened to the lower nock, and when the bow is bent enough the string is fixed to the upper nock. The string has to be the correct length to give the right brace height (see earlier definition). A smaller brace height may be less stressful to the bow, but might cause other problems. I unstring the bow when it is not in use. Whatever you do to string (or unstring) your bow, be careful. There is a lot of energy stored in even a slightly bent bow. Make sure it is pointed in a safe direction when you are stringing/unstringing it. It could cause significant damage if something slipped or broke unexpectedly. Keep it well away from your face.
Ancient Skills © Stephen R. Coote. Electronic edition. 46
BENDING AND STRAIGHTENING WOOD USING HEAT I have really only included this heading to make you aware that bows can be sometimes straightened or formed to a special design by heating and bending the wood. I have used heat to straighten arrows quite often, but have only used heat to straighten bent staves a couple of times. Bow limbs (or portions of them) can be boiled or steamed to make them supple enough to bend. I have little experience with this method of heating so I can�t write about it with authority. However this is a process that has been widely used by woodworkers and information is available. Directly heating the limb over hot coals, a gas flame, or an electric cookstove is another method. Before you start to heat the stave, you need to be prepared to actually bend the wood. This might be done over a cloth pad on your knee, or in a forked branch of a sturdy tree. A hole in a fence post of the right shape can be handy too. Some bowyers make a special forming jig to shape recurved limb tips. The area to be heated should have cooking oil or fat rubbed into it. This seems to help prevent scorching and it may help to transfer the heat into the wood. Keep the wood moving as you hold it near the heat source and don�t hold it too close. Rotate the wood to heat right around the bend area. If the wood gets scorched you may ruin your bow. Work slowly to let the heat penetrate right into the wood. When the wood is too hot to touch for more than an instant it may be ready to bend. Try bending it gently for a start, but don�t work too slowly or the wood may become too cold before you finish. You should find that heated wood �gives� more readily than an unheated stave. If it springs back too much you may need more heat. Bend the wood slightly past the position you want it to end up in and hold it there for a short time while it cools. You may not succeed with this at every attempt, but it is a process that is well worth experimenting with.
FINISHING THE BOW The bow can be sanded with fine sandpaper to give a smooth surface. Slightly �round off� all corners. The back of the bow can be burnished by rubbing it firmly with a smooth rock or a glass bottle. The application of a little oil or fat may help the burnishing process, but this may prevent some paints or glues from sticking to the bow. Burnishing imparts a nice finish and some folk think it may actually help to make the wood more durable. It is a good idea to apply some sort of coating to the bow to protect it from moisture. This may simply be done by rubbing warm fat into the wood on a regular basis. Commercial oils, varnish or paint would also be suitable. The handle may be wrapped with cord or covered with something like leather. Detailed instruction on laminated bows and special backings is beyond the scope of this book (see chapter on hide). However if you do want to apply a glued-on backing, be sure to remove any grease or oil before you apply the glue. A simple cord backing may be an option worth investigating if a backing is desired. I prefer the simplicity of an unbacked bow, but backing offers certain advantages. I try to store my bows lying flat, away from extremes of heat or moisture.
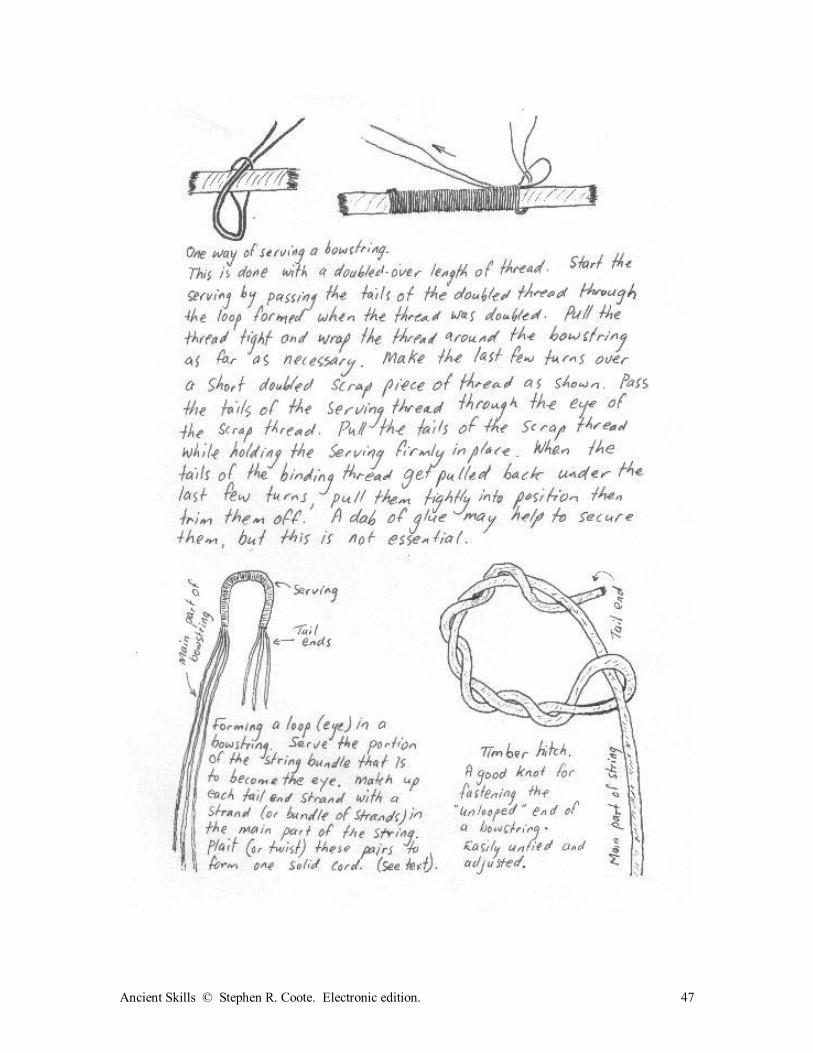
Ancient Skills © Stephen R. Coote. Electronic edition. 47
Ancient Skills © Stephen R. Coote. Electronic edition. 48
THE BOWSTRING One advantage of using a lighter bow is that it allows you to use weaker bowstrings. Very strong strings can be made from natural materials, but the beginner may have difficulty producing strong strings that are thin enough, or procuring the materials with which to make them. The breaking strain of a string should be about four or five times the draw weight of the bow. Strings that are too thick for a standard arrow nock can be used with special nocks and a special pinch grip. Most bowstrings nowadays seem to be made of many strands of relatively thin synthetic thread. Information on making these strings is available, as are supplies of special bowstring material. If you want a modern string and can�t buy thread specifically made for bowstrings, then select a thread with minimum stretch otherwise the efficiency of your bow may be reduced. Polyester thread is a good choice. I have made strings using heavy polyester sewing thread that I obtained from a sailmaker, and from the spun polyester thread used to sew up fertiliser sacks. Although I am yet to try it, I have often thought that by unravelling a length of synthetic rope I would have a bountiful supply of raw material for bowstrings. Linen thread has been used to make bowstrings for many years. It is a strong, natural fibre. It may be hard to find nowadays. I have found that a bowstring does not have to be made from many threads like the commercial ones. I have made good strings using three lengths of polyester butchers� twine, and a friend has used one length of synthetic hay baling twine. If you want to try using a single strong cord for a string, use knots that don�t reduce the breaking strain too much. A simple loop made by tying a figure-eight knot would be better, I think, than a bowline. Strings can have a loop at both ends, or they can have one loop while the other end is tied, often with a timber hitch. The latter option offers the advantages of being able to adjust the brace height and being able to use the string on a bow of a different length. In the cordage section of this book you will find information on how to make a cord from natural fibre. It is probably easier to be shown how to do this rather than try to learn it by reading, but hopefully you will get the idea. It is possible to make a loop on one end of a natural fibre cord (or any multi-strand bowstring) by folding a short length over (say 13 cm) at one end to form an eye. The last 11 centimetres or so of this folded over section is then divided into two �tails� (or three if you are making a three-strand cord) and these tails are twisted into the main part of the cord as it is made. It is a good idea to lay some extra fibre into the cord at the loop, and into the other end of the string where it will be tied to the nock. You can make a single-loop string out of synthetic threads virtually in the same way that I have described making one out of natural fibre. You should cut lengths of thread that are quite a bit longer than your bow because the twisting shortens them a little, and you need to allow extra for the loop and the knot at the other end. The long strands can get tangled as you twist them together in two bundles, but it is a manageable process if you are careful. Some synthetic threads are more �slippery� than others, and this is not a helpful quality when you are trying to braid a string as the loop can pull loose (I have used slippery threads to make successful strings with a plaited loop - see below). When you have braided the full length of the string, you should tie a simple knot in the end to stop it unravelling, and then serve the nocking area of the string, and maybe around the eye also. I serve the string just below the loop to help prevent the splice (or plait) unravelling.
Ancient Skills © Stephen R. Coote. Electronic edition. 49
I serve my strings by cutting some serving thread of the right length and folding it in half. I pass the doubled thread around the bowstring and feed the two ends of the thread (that are lying together) through the loop formed where the thread was folded in half and pull this newly formed �noose� tight around the bowstring. I then wrap the doubled thread around the bowstring, pulling it tight and keeping the loops close together. Care has to be taken to stop the two strands crossing over one another and becoming untidy and �lumpy�. Before the last six or so wraps are made, I lie a doubled loop of scrap thread along the string to be served with the two tails lying over the area that has already been served, and with the doubled (loop) end lying at a point beyond where the serving is to finish. As a guide, when doubled, this thread should be about 20 centimetres long. I then apply the remaining wraps around the bowstring (and over this new bit of thread). The serving thread ends are then passed through the loop of the thread I have just laid in place. Pinching the end of the serving to stop it unravelling, I then pull the tail ends of the other thread until I have pulled the end of the serving cord under the final wraps. I pull these ends tight and snip them off just clear of the serving. The �pull-through� cord is discarded. I have used spun polyester sack sewing thread for serving (see diagram). Here is how I make a bowstring with a plaited loop. You need a minimum of three strands for this. If three strands of a certain cord provide sufficient strength (and thickness), then they are all you need. You can use any number of smaller strands to obtain the strength and thickness required. I will not attempt to explain how to plait, but this is a widely known skill. It is the same braid that many women use for their hair, so a teacher should be readily available (see diagram in chapter on string). Work out how many strands are required and cut them to be at least 40 centimetres (about16 inches) longer than your bow. Place them together as if they were already a bowstring. Tie one end of this bundle to something of a small diameter like a nail hammered into a bench. Stretch the bundle and tie the other end to something else so that the string stays stretched. Starting at a distance of about 13 centimetres (approx. 5 inches) from the end of the string tied to the nail, and working toward the middle of the bowstring, apply a serving along the string until you have about four or five centimetres covered with the serving. This serving should protect the loop of the bowstring against wear, and it also helps to hold everything together as you plait the cords together under the eye. If your bow is particularly wide at the nocks and you need a bigger loop, then you might like to serve a longer portion of the string (and of course a smaller served length is required for a small nock on a thin limb). You will see that it is an advantage to have the bowstring stretched over an open area so that it is easy to apply your serving thread. Now untie the bowstring from whatever you have it attached to. Fold the string over on itself with the centre of the bend being the centre of the loop serving you have just applied. Hook this bend over something like a nail or coat hook. Divide both ends of this string into three even (or nearly even) bundles. If you have only three thick strands then each �bundle� will only contain one strand. Some of my strings were made from 17 strands, so I had two bundles of six and one of five. Now �pair off� the three bundles of strands on the main part of the string with the three shorter bundles on the other side of the loop. In other words, each long bundle will have one of the shorter bundles lying alongside it. Holding the corresponding bundles tightly together, plait the strand pairs together until you have plaited past the ends of the small bundles. While plaiting, try to keep even tension on every thread. This will keep the string neat and it will help to distribute the load evenly on the finished bowstring. Bind a small serving at the end of the plait to stop it unravelling. With the small serving binding the end of the plait, slip the loop over your hook. Keeping the three bundles (or cords) separated, pull them from the end and ensure that all the strands are
Ancient Skills © Stephen R. Coote. Electronic edition. 50
pulled tight and are not tangled. With the string fully extended (and with the loop still over the hook), twist (i.e. revolve) every individual bundle about twenty times. After each bundle has been twisted (�wound up�) keep hold of it to stop it unravelling. This is a little tricky to do on your own, but it can be done. When all three bundles have been twisted, stretch the bundles toward you to ensure that all strands will take an even load, then unhook the loop from the nail, while still holding the tail ends together in one hand. The whole string should revolve to form a lightly twisted cord. You may have to stroke and stretch the cord to make the strands lie together tidily. If it is twisted to your satisfaction (and it doesn�t need many twists) then you can tie a simple knot in the tail end of the string to hold it together. (This twisting of the strands is similar to what is described in the chapter on string). The strands making up your string are very likely to be twisted already. The direction of any twisting that you do should be the same way the individual strands are twisted. I often separate the strands at the tail end of the string and plait the last few inches to hold it together before I tie the knot to stop the strands unravelling. Be sure to keep an even tension on all the strands throughout the whole process so that they each take their share of the strain. You can now stretch the string and apply a serving to the arrow nocking area. I sometimes do this when the string is on the bow. Beeswax can be rubbed into the string to help hold the fibres in place.
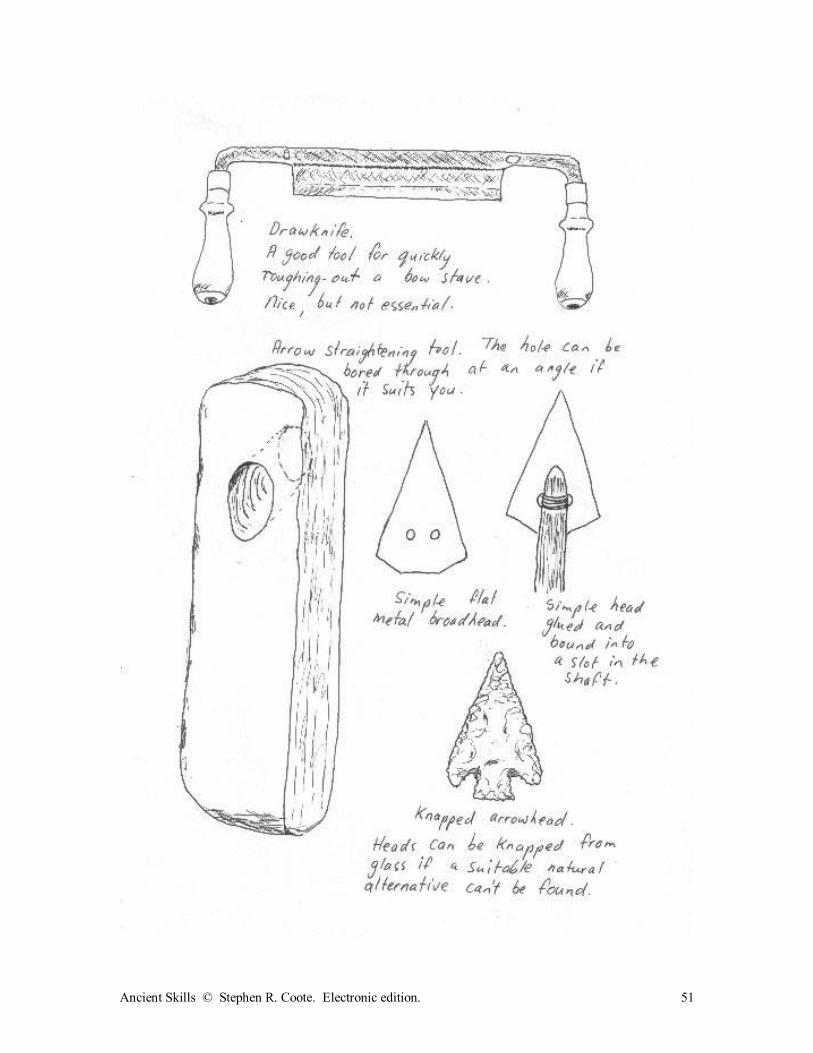
Ancient Skills © Stephen R. Coote. Electronic edition. 51
Ancient Skills © Stephen R. Coote. Electronic edition. 52
ARROWS
A poor bow may make a reasonable job of shooting a good arrow, but an excellent bow will not make a poor arrow fly well. Arrows, however, can have some imperfections and still be accurate. Shafts do not have to be perfectly round, and they can have variations in thickness. Minor kinks in the shaft are acceptable provided that the arrow is fairly straight over all (bent arrows seldom fly well). Arrows can be made from natural shoots. I have cut shoots from Scotch broom (Cytisus scoparius), barberry (Berberis glaucocarpa), plum, hazelnut, willow and a green bamboo that doesn�t kink or bulge excessively at the nodes. I have even used dried bracken fern stalks. The ripe stalks were cut from living fern (dead ones are too brittle) and dried indoors. I found that the stalks shrunk to nearly half their diameter, so I had to find really fat stalks. Many species of trees and bushes will produce shoots that can be turned into arrows. Some trees will send up nice shoots if they have been cut back severely. If you keep looking you should find something. Some trees make better arrows than others. Some are tougher, and some have less tendency to warp. Some natural shoots might be exactly the right size and stiffness when cut from the bush, but others will have to be reduced in diameter, at least for part of their length. Experiment. Garden supply shops sometimes stock thin bamboo plant stakes that can be used for arrows. Bamboo shafts are hollow, and you may like to strengthen the nock area by gluing a short plug of solid wood inside the bamboo at the nock end before you cut the nock. You may also have to remove the lumpy nodes from the shaft. You may have to sand or scrape the outside of bamboo to get glue to stick to it well. Shafts can also be cut from planks with a straight grain, or can even split from logs or planks. Sometimes strong, straight-grained doweling can make a good arrow. With doweling or sawn plank arrows you have to be careful to avoid shafts where the grain runs at too much of an angle to the shaft. Such shafts may break unexpectedly leaving a sharp end to penetrate your bow arm as you shoot. No matter what your arrows are made from, in the interests of safety you should check them for damage before you shoot them. There is no universal �best� length for an arrow. Generally your arrow should be longer than your chosen draw length, particularly if you have sharp arrowheads. Your arrows should ideally be all of a similar weight to keep your shooting consistent, so this means that you should try to keep your arrows in sets of a similar length. Some primitive arrows might be over a metre long. Short arrows are convenient to carry and to draw from the quiver. Sometimes it is hard to find long enough material to make long arrows from; but my current view is that longer arrows seem to help the archer be more accurate, so I try to make arrows that are at least 50mm longer than my drawlength. Arrows that are 300mm longer than your draw would be worth experimenting with. Light arrows may travel further, but I favour heavier arrows for hunting because I believe they can carry more energy. I am also inclined to think that they will be deflected less by obstructions on the way to the target (but you should always try to avoid obstructions). And although I haven�t done any scientific tests, I think heavy arrows may help me achieve more consistent accuracy. What diameter should an arrow be? It is really more a question of getting the right �stiffness�
Ancient Skills © Stephen R. Coote. Electronic edition. 53
(spine) of arrow for your bow. Some shaft materials are stiffer than others. As a guide, my arrows are generally between about seven to ten millimetres in diameter (say just over quarter of an inch to about three-eighths of an inch). (See definition of �spine� earlier in this chapter). Some archers take spine very seriously, and they use devices to measure it. I test my arrows by comparing them to others, and by shooting them from my bow. More is written on this below. It is a good idea to get slightly oversized material, and then it can be reduced in diameter until it is just right for the bow from which it is to be shot. The worst spine problems I had became apparent when I was trying to use some very wide broadheads� when the arrow deflected it tended to plane because of the wide surface of the broadhead. With long arrows and sensible broadheads I feel that I don�t have to be quite as concerned about arrow spine.
MAKING ARROWS Natural shoots can make very good arrows. I dry the shoots indoors where I can keep an eye on them. Generally I would try to dry the shoots with the bark peeled off, but I would leave the bark on if the particular type of shoot seemed prone to cracking as it dried. Sometimes shoots can be dry enough to make arrows from in about two weeks if the conditions are favourable. As you experiment you will soon work out how long to dry them. Good shoots become quite resilient and can stay quite straight. As they dry I pick them up individually on a regular basis and try to straighten them by hand. Where there is a sharp kink, or when the kink is close to one end, I often use an arrow-straightening tool to bend the shaft back to a straight line. An arrow straightener needs to be nothing more than a piece of wood with a hole through one end. The edges of the hole are rounded to avoid denting the shaft. My current favourite is cut from the handle area of a bow that broke. It is roughly 20 millimetres thick and about 150 millimetres long. The shaft is fed through the hole until the centre of the bend is alongside the tool. Holding the shaft in one hand, I hold the tool in the other and gently try to lever the shaft as required. I have drilled a large hole in my straightener so I can fit the oversized shoots through it. Even fully seasoned arrow shafts can sometimes be straightened at room temperature. However heat may be required for stubborn bends (see the description above about bending wood with heat). A candle flame can provide enough heat to straighten an arrow. I suggest that you wipe fat or cooking oil over the area to be heated, and that you don�t attempt to straighten the arrow until it is quite hot. Keep the arrow moving and at a sensible distance from the heat to avoid charring. Allow time for the heat to penetrate the shaft. If a natural shoot needs to be reduced in diameter, it can be whittled, scraped, abraded or planed as described below. Some natural shoots can still make effective arrows even if they don�t grow perfectly straight on the parent bush. And although side-shoots can create problems on an arrow shaft, it does not mean that you should not try to make arrows from shoots with twigs growing from them. Some shoots shrink and warp more than others as they dry. You can cut shoots that are quite big in diameter if you are prepared to reduce them to the right size. I generally reduce large shoots to size after they have been dried and straightened. Square sticks that have been sawn or split can be made round by planing. I use a small carpenter�s plane. The shafts can be placed in a groove that has been chiselled or routed into a plank. The groove should have a �stop� at the end to prevent the shaft moving out as the plane pushes against it. I start by planing the corners in turn to get a more or less octagonal shaft, and then I plane the corners of the octagon and so on.
Ancient Skills © Stephen R. Coote. Electronic edition. 54
I planed my first arrows while they were held in a groove long enough to contain the whole shaft. Lately I have used a shorter groove that leaves a short portion of the arrow sticking out. This enables me to rotate the arrow with one hand while I plane with the other. When the front half of the arrow is planed I then turn the arrow end for end and plane the other half. This is quicker. (Sometimes I just simply plane the shafts on a flat surface while holding them). Woodworkers know that sometimes wood will plane much better in one direction than another, and this quick method requires the planing to be done in both directions. However I believe that difficult planing often results from non-parallel grain, so if I have difficulty planing it is time to examine the shaft carefully and maybe reject it if the grain is bad. If the plane is adjusted to take a fine cut, and if it is sharp, it should cut fairly well in any direction. The shaft can be finished by sanding. Of course arrows can be made without a plane. You can use a knife, scraper, sandpaper or an abrasive rock. An arrow doesn�t have to be perfectly round in cross section to bring home the bacon. When shafts have nearly been brought to the final diameter I have sometimes hammered them through a hole of the right size that has been drilled in a piece of flat steel about 10 millimetres thick. If the hole edge is not chamfered it leaves a crude cutting edge that may shave excess material from the shaft. Sometimes a slightly oversized shaft has gone through the hole without any shavings coming off it� I assume that the wood was compressed into shape, and this may be a good thing. If the shaft is too big, sometimes it may jam and break. I have found that this process can leave marks on the shaft. Shafts should be cut a little longer for this because the hammering can damage the end. Any natural arrow shaft may bend no matter how it was made, although some materials are better than others. Shafts should be straight before you add fletchings, heads and decorations, but they may still bend once they are completed. It is said that burnishing a shaft helps to keep it straight. I haven�t done this much, but burnishing seemed to improve some soft willow shafting I once used. I just vigorously rubbed the straightened shaft all over with a smooth rock while the shaft was lying on a table. A small amount of cooking oil wiped over the shaft can help to make a nice job when burnishing, but oil may prevent glue sticking to the shaft. I cut my nock grooves into the arrow with three metal-cutting hacksaw blades that are bound together. I then tidy up the groove with a very sharp pocketknife blade or sandpaper. The groove should be about twice the depth of the string diameter. The string should fit snugly into the nock, and it is good if the arrow is able to hang from the string without falling off. The nock shouldn�t be so narrow that the arrow will tend to split as the string is forced into the nock. Sometimes I have had one side of the nock split away from the arrow during normal use (and this can be frightening because the arrow can slap you). A tight binding of thread immediately below the nock will help to strengthen it. Sometimes good shafts can be a bit thin to have a decent nock cut into them. I once split the shaft and forced in a small wedge of wood to open the split to form the nock on shafts like this. I used a sharp knife blade to make the split. The wedge was glued into place. I bound the shaft under and around the wedge to help hold it together. The newly formed increase in diameter at the nock didn�t seem to affect accuracy. Theoretically this type of nock should be stronger than one made by cutting into the shaft because the full amount of wood is still in place at the nock area. If you want to paint, varnish or oil your shafts it may be best to do this after you have made the
Ancient Skills © Stephen R. Coote. Electronic edition. 55
nocks (and any slots needed to hold arrowheads), but before you add the point or the fletching. This will allow you to apply this protective finish to every part of the arrow. Be aware though, that some finishes may prevent glue from sticking properly. Some folk like to make a fancy paint job on arrows, and some of these look really good. I have simply wiped fat into some shafts, and I have protected others by dunking a rag in varnish and wiping the shafts with the rag.
ARROW HEADS You don�t need a special arrow head to make the arrow fly properly, although it is probably best if the point of balance of the finished arrow is slightly forward of centre, and a head can help achieve this. You can have fun shooting arrows with no attached heads and these may be good enough to kill small game if that is all you have. In a survival situation you could simply sharpen the wooden shaft for larger animals. It is said that wood can be made harder by heating it, so if you charred the tips in a fire and scraped away the charred wood to form the point you might find that the points could be made to be slightly sharper and more durable. I recommend that sharp broadheads should always be used for hunting. In some places the law defines the types of arrowhead that can be used for hunting. For a blunt head you can use an empty cartridge case of a suitable size, or you can bind the end of the arrow with fine wire (soldering it in place perhaps). The end can be bound with thread or natural cordage, but wire should last longer. I have used fibre-reinforced adhesive tape. Sharp hunting heads are generally made from steel nowadays, but heads made from glass, certain types of rock, and bone can all be effective if they are sharp, well designed, and securely fastened to a shaft that is heavy enough. You can make your own steel broadheads. The type I am about to describe are called �trade points� because they are similar in design to the types of arrowhead that were used in trade with the American Indians. Unlike many commercial broadheads, these do not have a socket into which the shaft fits. The heads are cut from flat steel and they are glued and bound into a slot on the shaft. The best steel to use will have more spring and hardness than ordinary mild steel, although mild steel will make an effective head. Softer steel will not hold a sharp edge for as long, and it will bend more easily, but it will work. Steel cut from old saw blades is often a good choice. If you want to use a forge, then maybe you could hammer some out of thicker steel (see the chapter on iron working). You could try any sort of steel, but mild steel that is too thin will bend too easily. I have made a number of heads out of 16-gauge stainless steel sheet (around 1.5 mm thick). Long narrow broadheads may penetrate better (in theory) compared to shorter, sturdier heads, but they may bend or curl more easily as well. It is said that a length to width ratio of three to one is good to aim for, but unless the material is particularly tough I feel that a head with a slightly smaller length to width ratio may be more durable. With proper care, steel heads can be cut out with a hand-held electric grinder fitted with a cut-off disk. The steel has to be held securely in a vice or clamp, and the grinder has to be used in the proper manner. And safety goggles should always be worn. Even experienced operators have had the work jam and cutting blades shatter, so unless you really know what you are doing, don�t attempt it. One simple type of flat head I make can be cut out entirely on a metal-cutting guillotine. This head does not have a tang but it needs to have two holes drilled in it near the base for a binding cord to pass through and around the arrow shaft once the head is seated in the
Ancient Skills © Stephen R. Coote. Electronic edition. 56
slot. Harder steel may be cut with a plasma cutter. Softer steel (or annealed steel) can be cut with a fine-toothed hacksaw� and this is the method that is likely to suit most folks. Heads can be sharpened with a file if they aren�t too hard. A bench-mounted electric grinder may be an easier option, but be careful. It may be a good idea to hold the heads with self-locking pliers so you don�t have your fingers near the wheel. Sometimes a grinder can �grab� the steel with unpleasant consequences. Wear safety goggles. Small steel broadheads could be made by beating a thick nail out flat with a hammer. A general engineering workshop, or sheet-metal business, might be able to supply you with cut out broadhead blanks at a reasonable price. It can be a nice feeling to have a big supply of heads stashed away. Instead of having a barbed broadhead, I prefer to cut the base of my heads at a slope that will allow the head to be pulled easily from the target. I think this is good for hunting arrows, because if the arrow hits in a non-lethal place there is a greater possibility that the head will dislodge from the body of the animal thus allowing the cut to heal. The width of a hunting broadhead is sometimes governed by law. I generally make my heads about 26 mm wide (just over an inch). Heads used for small game don�t need to be as wide as this. I have found that two hacksaw blades bound together will cut a slot of the right width to take a trade point. If your shaft material splits nicely, you might find you could split the shaft to take the point. In this case you would need to apply a tight binding below the head to prevent the split travelling further down the shaft. By splitting the shaft you still have all the original wood fibre in place to keep it strong. When you cut a slot you weaken the wood. See what works for you. Whatever you do, make sure that the head is firmly fixed in to the shaft. If the head tends to get driven into the shaft on impact, thus splitting the shaft, it will be inefficient as a hunting tool. I glue and bind my trade points into position. I have used commercial hot-melt glue, and homemade hide glue. Melted pitch glue would be another option. Sharp arrowheads can be very dangerous. Use and store them sensibly, and keep them out of the reach of children. Practising with broadhead tipped arrows in an area frequented by the public may not be a good idea - the anti-weapon fraternity may be offended, and children may pick up lost arrows. Broadheads used for hunting should be kept as sharp as possible.
FLETCHING From what I have discovered so far, it seems that a good three-feather fletch probably can�t be beaten. For maximum speed the feathers should be long and narrow and applied parallel to the arrow shaft. Wider feathers applied in a helical (rather than parallel) fashion can provide greater stability if necessary. A traditional fletch of three feathers is not the only option. I have enjoyed using a two-feather fletch (which has worked well), and I have had good results with fletching made from packaging tape. A two-feather fletch can cut your feather requirements by 33%, and the arrow can be nocked without having to ensure that the cock feather is facing away from the bow (as is done with a three-fletch). Furthermore I think that a simple two-fletch is generally easier and quicker
Ancient Skills © Stephen R. Coote. Electronic edition. 57
to produce than a three-fletch. Sometimes feathers are hard to find, so soft, wide adhesive tape can provide a cheap solution.
FEATHERS I have used goose, seagull and commercial chicken feathers. Discarded feathers can be found on the seashore and in areas frequented by any large birds such as ducks. My goose feathers were obtained from a friend who hunts geese. It is generally only large wing and tail feathers that are used for fletching. In some countries it may be an offence to be in possession of feathers from certain protected species of birds, so make sure you are doing the right thing. Turkey and goose feathers have been traditional favourites, but many other types of bird can provide feathers that will work, even if they aren�t quite as stiff as the traditional ones. If you ever look at a bird�s wings, you will notice that the main feathers on one wing look different to those on the other wing. It is best to use only right wing, or only left wing, feathers on any one arrow. Feathers from different wings curve in different directions, so if you have left and right wing feathers together on one arrow they may try to spin the arrow both ways at the same time. However if you do mix your feathers you will probably find that the arrow will fly better than an arrow with no fletchings at all. For any type of feather fletching, try to use three (or two) feathers that are very similar in shape, stiffness and size.
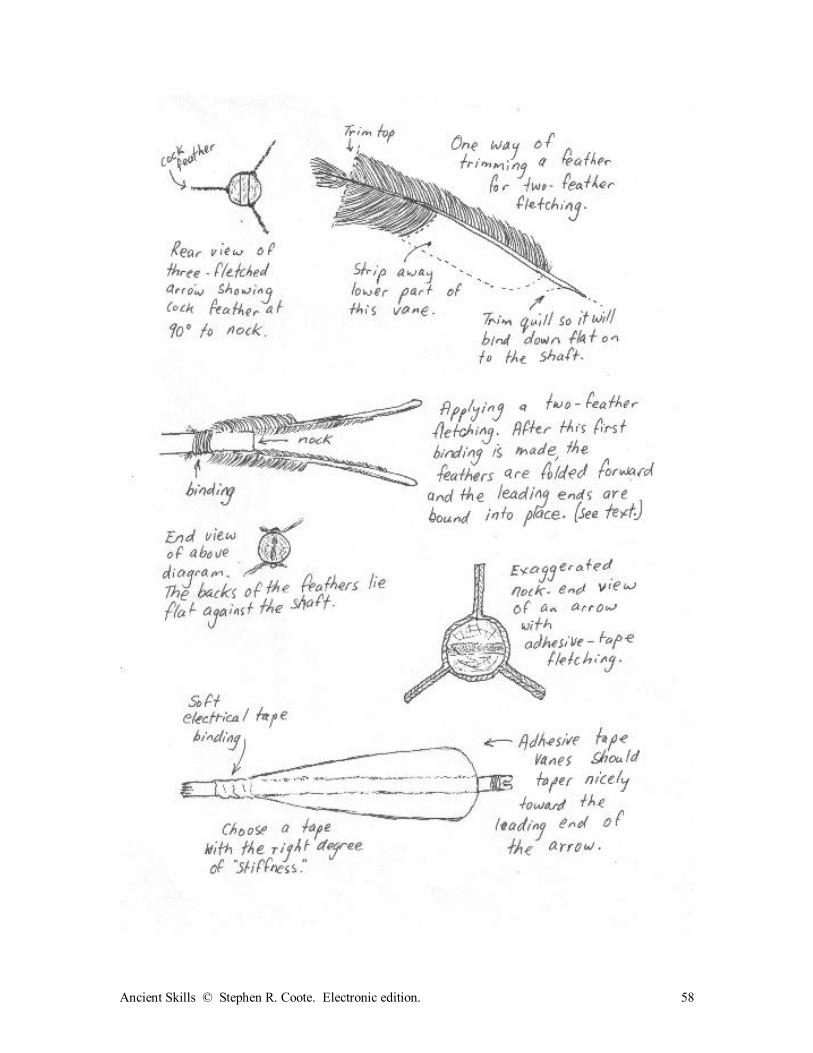
Ancient Skills © Stephen R. Coote. Electronic edition. 58
Ancient Skills © Stephen R. Coote. Electronic edition. 59
THE THREE-FLETCH
I like fletchings that are around 125 millimetres long (about five inches) or longer. However I have seen shorter fletches that work well. If you have to use shorter fletching, it may be better to leave it a little wider to present more surface area. Long fletching can be trimmed quite low. You only use one side of the feather for this fletch. Feathers can be split lengthwise with a sharp blade down through the middle of the quill, and then the excess quill is trimmed off. You may find that sharp scissors and sandpaper will work for trimming, but I generally just use a thin, sharp knife. It is important to keep the base of the trimmed quill at 90 degrees to the vane so the vane will sit correctly on the arrow. You may like to devise some sort of a gentle clamp to hold the feather for the trimming process. Vanes can be �stripped� from the feather. Hold the feather upright with the quill pointing downwards. At the very tip of the feather, pinch one side of it with your thumb and forefinger. Pinch the other side with your other hand. Pull your hands apart and pull at a slightly �downwards� angle on the side you want to use for your fletch. Hopefully this side of the feather will start to tear away from the quill. Continue tearing the feather until the whole side is detached. You may have to experiment with your technique (pull angles, best place to hold etc), and you may have a few failures, but you should succeed eventually. The stripped vane may look a bit flimsy before you glue it to the arrow, but you will probably find it stays stiff enough when glued into position. I have heard that fresh feathers strip more easily than old ones, but I haven�t experimented enough to know whether the difference is significant. Maybe it is for some types of feather. Now that you have your vanes you can fasten them to your shaft. One vane generally sits at right angles to the nock (and will point away from the bow when shot). The other two vanes are spaced at equal distances from each other around the shaft. In other words the vanes sit at 120 degrees from each other. Sometimes the arrows are applied in a helical fashion to help the shaft spin. I have found that the feathers don�t have to be applied at exactly the right spacing to fly well enough. And most of my arrows have parallel fletching rather than helical. There are various ways of going about fastening the vanes to the shaft. I have done a quick job by using a hot melt glue gun, but sometimes the glue became unstuck (maybe I could have used a more suitable glue). There are special jigs you can use to hold the vanes in place while the glue sets. You can use fine pins for this purpose also. Some vanes can be simply tied on with fine thread. I suggest that all vanes are thoroughly bound at the top and bottom, and this may be enough to hold some feathers in place, but it may be better to wind a helix of fine thread down the shaft between the feathers� pinnules. The pinnules should mostly join with each other again once you have finished if you gently push them together. Six to eight turns of thread may be enough. This thread should be pulled tight and firmly bound into place at each end of the vane. If feathers are to be bound without gluing, then it may be best to use feathers that still have some quill on them rather than stripped feathers. Don�t locate any fletching too close to the nock end. Keep it far enough away to allow your string fingers to stay clear of the vanes. Here�s a good way of applying a three-feather fletch. Make up a thick batch of warm hide glue. This should get �tacky� fairly quickly. Apply a dab of glue to the tail end of a vane and press it
Ancient Skills © Stephen R. Coote. Electronic edition. 60
into position on the shaft. I usually start with the cock feather. Hold the vane in place for a short time while the glue partially sets. Then do the same thing with the other two vanes. The arrow is then set aside to allow the glue bond to get stronger. When the glue has set enough, apply glue to the whole length of the underside of the three vanes and stretch them into position. At this stage the vanes can be held in position until the glue holds strongly enough, or the front end of the vanes can be bound with thread. Another idea is to temporarily anchor each vane with a dressmaker�s pin. Sometimes the vane has to be pressed against the shaft to ensure that a bond is formed. Other glue, beside hide glue, will work for fletching. Hide glue can get tacky quickly which is an advantage, but other methods can be used to hold the feathers in place while the glue sets. Dressmaker�s pins are one option. Glue from a hot-melt gun sets very quickly. When the glue is dry, I apply a tight binding of thread around each end of the fletching. Before this is done, a small amount of the feather material is trimmed from the quill. This enables a tidy job to be made of the binding. The binding can be applied in a similar manner to the serving on a bowstring (as described earlier). Glue can be applied to the binding to hold it in place. At the leading end of the fletch (the end nearest the arrowhead) it is important to not have any sharp quill exposed where it could easily cut your bow hand when you shoot. You should think about this when you are preparing your vanes. Sometimes a high quill can be flattened by squashing it with another arrow shaft or something similar. The binding applied over the leading edge of the quills not only helps hold them in place, it should be done in such a way to protect your hand from these sharp bits of quill. Sharp bits of hard glue can also be dangerous, so remove them if you find any.
THE TWO-FLETCH Feathers selected for this need a reasonably wide vane on both sides of the quill. Because the whole quill says intact along most of the feather in this method, it is best to select feathers with smaller diameter quills. Big quills may interfere with arrow performance, and to me they don�t look right on an arrow. It may also be best to select feathers with reasonably straight quills, because curved quills tend to make the fletch bend away from the shaft. I have had success using tail feathers about 170 millimetres long. The two-fletch method is hard to describe in writing, but once you have seen a successful two-fletch, everything should become obvious. Three fletch vanes are generally aligned so that one feather always lies at right angles to the bow, and the other two are evenly spaced around the shaft. With the two fletch method alignment isn�t quite as critical, but I think it is best to place the feathers so that the quills don�t strike your hand or the bow directly as the arrow is shot. I try to place mine at about 20 degrees from the plane of the nock slot. If the quills lie in a position at right angles with the nock, one of them will always strike against the bow. If they are tied above and below the nock one of them will always strike your hand. Once you have tried to fletch an arrow or two you should see what I mean. Strip the bottom two-thirds (more or less) off one vane on both feathers (see diagram). Trim the top of the feathers to leave a short length of quill exposed (say 10 millimetres), but don�t trim all the feather material off because what is left will be more easily gripped by the binding than a thin, bare quill would be (see diagram). Make a mark (actual or imaginary) around your arrow shaft at a distance of about 25 millimetres from the nock. Take the feathers and place them back to back with the concave sides of the feather touching each other and the quills pointing in the same direction. Take the arrow shaft and hold it near the feathers. The arrow should point in the
Ancient Skills © Stephen R. Coote. Electronic edition. 61
opposite direction to that pointed to by the thick end of the quills. Lay the nock end of the shaft between the feathers so that the mark below the nock lines up with the point where the short bit of �trimmed� quill starts to emerge from the tip of the feather. Bind thread over the short quill tip to hold the feathers in place - be sure that the feathers are exactly where you want them in relation to the nock before you tighten the thread. At this stage the feathers are tied in place �upside down� with most of the feather trailing behind the nock end of the shaft. The thick ends of the quill have to be trimmed in order to get them sitting correctly on the shaft when you bind them in place. The side to be trimmed is the stripped side of the feather, and it has to be trimmed so that the base of the quill is at right angles to the vane on the opposite side of the cut. Carefully cut away at least half the thickness of the quill for a distance of maybe 15 millimetres at the very end of the base of the quill. Now bend the feathers over and lie them along the shaft so that the thick end of the quill is now pointing the same way as the arrowhead. Gently rotate each feather 90 degrees so that the newly cut flat part of the quill will sit against the shaft. Carefully stretch the feathers along the shaft and bind the front part of the quill into position. If you pull the feather too hard you may snap the thin quill at the top binding, or dislodge it (if the centre of the feather wants to bend away from the shaft you can bind it down later). Take care to squash down the front tip of the quill before you bind (if necessary) to ensure that it will ride smoothly over your hand, or any obstruction, and cover the front end of the quill with the binding to add further protection. I generally lay these fletchings parallel with the shaft, rather than bother with a helical type of fletch. Sometimes when the feathers are quite curved, they bend out from the shaft. To counteract this you can part the pinnules of the feathers at the point of maximum bend and apply a small binding to hold the fletchings closer to the shaft. You may like to apply glue to your feather bindings to help make them more durable and secure.
ADHESIVE TAPE FLETCHING This is not a strictly primitive fletching method, but it is a cheap, do-it-yourself fletching solution that can work well enough. I have tried different ways of using tape, but I have had the best success with a three-fletch configuration. Some tapes are more suitable than others. The correct �stiffness� is hard to describe, but it shouldn�t be too flimsy or too stiff. Remember that the fletch should be able to bend out of the way as it comes in contact with your hand or the bow. I have had success with tape made for repairing rips in plastic hay bale covers. I have also got reasonable performance from two or three other types that I have tried. Tape that comes on rolls about 48 millimetres wide is convenient to use. Cut three bits of tape about 150 millimetres (about six inches) long. Pick up one piece and bend it lengthwise to form a �U� with the sticky side outwards. The base of this �U� is stuck lengthwise along the shaft. Now pick up the second piece and bend it like the first one. This one will be stuck in position a third of the way around the shaft from the first one, while the first bit of tape is still bent in the �U� position to keep it out of the way. Things can get a bit tricky here because the two bits of tape can stick to each other before you are ready. If you feel that the two bits of tape are sitting in the right position, you can allow the two adjacent wings of tape to stick to each other, thus forming the first complete vane. Mould the tape against the shaft to get it to stick well. The two bits of tape will sometimes stick without being exactly in the right position thus skewing the vane or making it lumpy. It may still fly reasonably in some cases, but it
Ancient Skills © Stephen R. Coote. Electronic edition. 62
doesn�t look good. Now the third piece of tape is applied in a similar manner (see diagram). A big challenge with this tape fletching is to get three nice, flat, evenly spaced vanes. This should come with practice. Another challenge is to end up with the vanes where you want them in relation to your nock so that you get the conventional �cock and hen feather� configuration with the cock feather at right angles to the plane of the nock. Once you have the tape firmly pressed into place, you can trim the vanes with sharp scissors. I have found it necessary to have the vanes tapering down to nothing at the leading end so that they ride nicely past the bow and my bow hand. Keep the vanes as narrow as possible. Make the taper as long as possible. I apply a tight wrap of soft insulation tape over the very front end of these plastic vanes to stop them catching and pulling away.
SHOOTING UNFLETCHED SHAFTS It is a good idea to test your unfletched arrows by shooting them at full draw from your bow. If the arrow shoots well without feathers, it should shoot well when it has a full set of fletching. You might like to start shooting the bare shafts at a distance of five or ten paces, but some bare shafts may still be flying well at much greater ranges. The shafts should have their arrowheads already fitted, because the weight and shape of the heads can affect performance. This procedure has a lot to do with archer�s paradox and spine (see definitions near the beginning of this chapter). If you shoot your arrow from the left side of your bow and the arrow is too stiff, then the arrow may fly to the left and fly erratically. If it is not stiff enough it may fly erratically and possibly even shoot to the right. (The opposite applies if you shoot from the right side of the bow). If your arrow flies poorly, make sure you check it for straightness before you make an assumption about incorrect stiffness. Be aware that shooting an arrow at less than your normal draw length may cause it to act like an arrow that is too stiff. Over drawing it may have the opposite effect. The weight of the arrowhead also affects the apparent spine of an arrow. By fitting a heavier head to an arrow, you may make a stiff arrow fly better. Arrows that are too stiff can be reduced in diameter, a little at a time, by scraping or abrading. Reducing diameter in the centre section of the shaft will have the greatest effect. Arrows do not have to be exactly the same diameter throughout their whole length to shoot well. If you are using bamboo arrows, or some other arrow material that you do not want to reduce too much in diameter, you could try using longer shafts if the arrows appear to be too stiff. A bow with a narrower, or offset handle, may be able to shoot arrows with a variation in spine without much apparent difference in performance. Where arrows have to travel around a wider handle, then spine may become more important. By canting your bow to the right, a right-handed shooter may be able to somewhat offset the tendency of a stiff arrow to fly to the left. (The opposite applies to left-handed shooters). Hunting arrows should hit the target squarely to achieve maximum penetration. By bare shaft testing and tuning your hunting arrows you should help ensure that they fly well. If you want to test shafts fitted with delicate heads, you could shoot them at something like folded

Ancient Skills © Stephen R. Coote. Electronic edition. 63
heavy jute sacking hung from a washing line. Make sure nothing critical is located behind the sacking in case you miss, or in case you have under-estimated the penetrating power of your arrows.
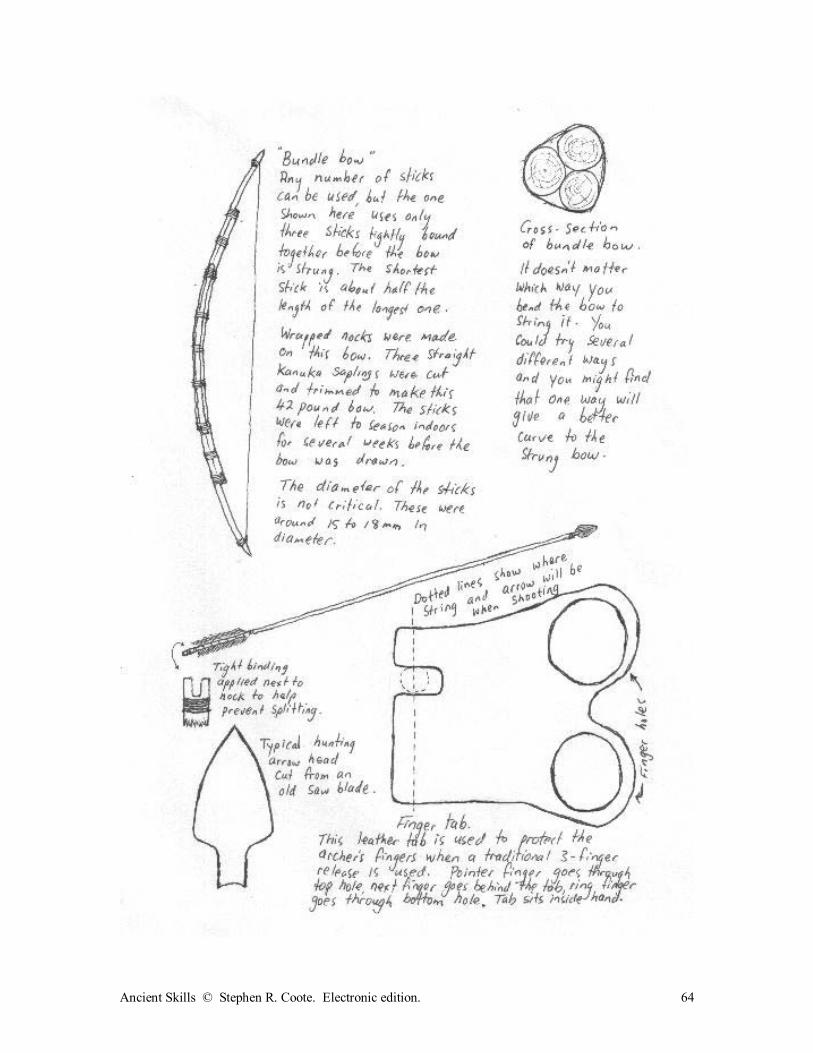
Ancient Skills © Stephen R. Coote. Electronic edition. 64
Ancient Skills © Stephen R. Coote. Electronic edition. 65
SHOOTING A whole book could be written on shooting, but here are just a few things to get you started. There is no one right way to shoot. I am right-handed. I hold the handle (or the middle) of the bow in my left hand and draw the string with my right hand. The arrow sits on the left side of the bow. The opposite would generally apply to a left-handed person. If your bow has an arrow rest, the arrow sits on this. If you have a bow made according to the instructions in this book it won�t have a rest, so the arrow sits on top of your bow hand. I generally grip the bow tightly. Other people hold it very lightly. Sometimes I will hold a spare arrow or two by gripping them in my bow hand along with the bow. The arrows sit along the back of the bow. I find it is more convenient to reload the bow with these arrows compared with trying to pull arrows from a quiver. I draw the string with my index finger located above the arrow, and my middle and ring finger located below the arrow. The string should sit somewhere between the ends of the fingers and the first joint of the fingers. If the string sits in the joints of the fingers you may have difficulty releasing the string smoothly. When you are just starting to shoot, or if you shoot a powerful bow, you may want to use a shooting glove or a leather tab to protect your fingers (see diagram). If the draw weight of your bow is relatively light, or if you have a strong pinch grip, then an arrow can be drawn by pinching it between your thumb and forefinger. If you care to research the subject you will find that other methods of drawing the arrow have been used as well. To be consistently accurate, other things should be kept consistent like draw length, nocking point on the string, the length of time the bow is drawn, and smoothness of release. You may need to experiment to find the best nocking point for your arrows. Some folk fit a small sleeve or binding to their string to mark the point once they have found it. The arrow is generally nocked fairly close to the middle of the string (some folks recommend nocking slightly above centre), and the arrow should generally lie close to right angles with the string. I keep my bow arm slightly bent at the elbow, and I tilt the top limb slightly to my right. My head generally tilts slightly to the right also. With the bow fully drawn, the middle finger of my string hand just touches the corner of my mouth. My right eye is generally directly above the arrow at this stage. I line up my arrow with the target and I try to let my instinct tell me how high to point it. I try not to hold the bow at full draw for too long before I shoot. A few seconds should be enough. Less may be better. I keep both eyes open while shooting, but I use my right eye to line up the arrow with the target. Ensure that your bow arm is held steadily in position, and try to keep it there while releasing the arrow and for a short period after the release. Release the string by straightening your fingers, but take care to not move your string arm sideways. I like to pull my string arm straight back slightly as I release. �Follow through� with this arm just as you follow through with your bow arm by making an effort to hold it in position for a moment after the arrow has gone. In fact, follow through with your whole body.
Ancient Skills © Stephen R. Coote. Electronic edition. 66
It may be best to practice with just one arrow because different arrows may fly differently. And to practice for hunting I think it is best to take every shot at a different range. Here is some often-repeated advice. When shooting at something, pick a very small spot to shoot at. Don�t shoot at the whole target; concentrate on a tiny spot within the centre of the target - imaginary or otherwise. Be specific. Look only at the spot you want to hit. Experiment to see what works for you. Have fun and try to do everything without thinking about it too much. Once you have become reasonably competent shooting from a conventional standing position, you might like to experiment with shooting from different positions. If you want to hunt with your bow then you should only take shots that are within the range at which you are competent. For deer this might be the distance at which you can consistently place arrows in a 150-millimetre circle. And you should learn about the correct places on an animal into which the arrows should go.
Ancient Skills © Stephen R. Coote. Electronic edition. 67
Chapter Five RAWHIDE AND HIDE GLUE
MAKING RAWHIDE Rawhide is dried animal skin. It is a very strong, durable material of immense value to the primitive craftsman. It can be used to make knife sheaths, bowstrings, rope and other useful items. It can get soft and may stretch if exposed to excessive dampness, but this can be at least partially prevented by coating it with fat or wax. Rawhide can be made by the following process: 1. Skinning the animal (avoiding damage to the skin) 2. Scraping away any fat or flesh left on the skin (�defleshing�) 3. Removal of hair (if desired) 4. Stretching the skin by tying it to a frame or nailing/pegging it to a flat surface 5. Drying the skin in a dry, airy location. Skinning is best learned from someone who has experience. However you should be able to figure it out on your own if you have to. I prefer to use a short, sharp knife with a curved point for this task. I start by cutting through the skin around the legs below the knee joint. The knife won�t go in too deep here because the legs are bony. A cut is then made from each cut in the back legs along the back of the leg to the anus. To start this cut I grip the hoof (or paw) in my left hand and insert the knife under the skin, blade uppermost, at one of the cuts previously made around the legs. The knife is then simply pushed for the length of the cut. A sharp knife should slide through the skin with relative ease. If you have to use a blunt knife or a sharp rock, then you may have to make sawing cuts and things won�t be so neat. With practice you shouldn�t cut into the meat too much. A similar cut is then made from the cuts around the front legs to the chest. The next cut extends from the anus right along the underside of the animal to the head. If the animal hasn�t already been gutted, you need to be careful not to let the knife go too deep and cut into the gut cavity. It doesn�t really matter if you do accidentally cut into the intestines, but things can be kept cleaner if you don�t. The animal can be completely skinned on the ground if necessary, but I like to work the skin loose from the back legs at this stage and then hang the animal up by the back legs so it is clear of the ground. This helps to keep the meat cleaner. I prefer to pull the skin away rather than use a knife whenever possible. This can reduce the risk of damage to the skin or the meat. But often a knife will have to be used. A freshly killed animal that is still warm is generally easier to skin than a cold, stiff animal. To start peeling the skin away from the flesh you may have to pull on the skin with one hand and carefully use your other hand to make controlled slices with the knife. Naturally this peeling should start at one of the cuts already made. Don�t cut toward yourself. Practice makes perfect. After a while you should see how best to use your knife to avoid damage. Just keep working at the skin until you have taken it all off. I often cut through the tail bone joint with my knife and leave the tail attached to the skin, but it doesn�t really matter what you do.
Ancient Skills © Stephen R. Coote. Electronic edition. 68
It is very likely that there will be pieces of flesh or fat left on the skin. It is probably best to remove these before you dry the hide. I have found that any fat left on the hide may penetrate into the hide if it gets warm as it dries. While this may not matter in many cases, I suspect that the fat may be a hindrance if you intend using the rawhide to back a bow as it may prevent the glue sticking properly. Furthermore, lumps of excess matter can slow the drying process, attract flies, and encourage decay. However, having said that, I have found bits of dried fat and meat fairly easy to remove from a dried hide. See what works for you. Defleshing is probably the most tedious part of making rawhide. I am yet to discover an easy method or an ideal tool. I generally have laid the skin over a smooth plank or log, flesh side up, and then pushed and pulled some sort of a scraper against the flesh to tear it from the hide. Care has to be taken to ensure that the hide isn�t ripped or cut. I have tried all sorts of scraping tools including a blunted knife and old hatchet heads. Hair can be removed by scraping it from the dried hide, or it can be �slipped� loose by placing it in a mixture of wood ashes and water before it is stretched to dry. I believe that the hair would still eventually loosen in plain water, but I have always used ashes because that is what other people have done. If you are trying to loosen the hair by soaking, examine the hide daily and stir it around to ensure all the hair is exposed to the liquid. As soon as the hair starts to slip (test by pulling), remove the skin, rinse it in fresh water, and get to work with your scraper. Skins often tend to smell a bit rotten when removed from the liquid. I suspect all sorts of bacteria could be present, so take care to keep yourself clean. And if you choose to dry-scrape the hair off, avoid breathing the dust that you make. While I feel duty-bound to mention these precautions, I am aware that thousands of skins must have been processed by our ancestors and I have never come across any evidence that it is particularly hazardous. The hide can be tacked to a wooden floor, or something similar, to keep it stretched while it is drying. I think it is better to make a frame from four branches or planks, and then tie the skin to the frame. This can allow air to easily circulate around both sides of the skin. The frame can be simply bound together with strong cord. The cord that ties the skin to the frame passes through small knife slits made near the edge of the skin. An animal�s body isn�t flat, so the skin doesn�t roll out particularly flat. However if you stretch it on the frame to dry you should find that it dries out to be fairly flat. Dried rawhide is quite stiff. Making rawhide is not too difficult. I have found the biggest cause of failure is due to the neighbourhood dogs that chew or drag off the occasional skin.
MAKING USEFUL ITEMS FROM RAWHIDE I have used rawhide as a reinforcing backing strip on wooden bows, and to make knife sheaths. To back my bows I used dried rawhide that had been slightly softened by keeping it damp for a while. I stuck it down with warm hide glue. Because hide glue starts to set fairly quickly, this operation has to be carefully planned and carried out. Glue has to be applied to the rawhide and the bow. Care has to be taken to ensure that the bow is clean and grease-free so the glue will stick. As soon as possible after the backing has been applied, it should be firmly bound into place with something like a bandage. The backing should be slightly oversize, and then trimmed to size after the glue has dried. I would leave the glue to set for a few days before unwrapping the bandage and I would then leave the bow for a further week or two before bending it. If you find patches where the rawhide has lifted you could try dampening the area and heating it to soften the glue (perhaps you could use a laundry iron on low heat if you can�t think of a more primitive
Ancient Skills © Stephen R. Coote. Electronic edition. 69
option). If you don�t have a long enough piece of rawhide to do the whole bow, you can use two shorter strips and overlap them at the handle. Be aware that moisture will soften rawhide and hide glue (and it can affect wooden bow performance too), so it is best to apply a protective coating to the whole bow. Animal fat is the primitive solution, but something like polyurethane varnish might suit you better. To make a rawhide knife sheath it is a good idea to wet the rawhide to make it soft. The softened hide can then be stretched around a wooden model of the knife and sewn together. The wooden �knife� stays in the sheath until it has dried. I have never bothered to make a wooden model - I have used the knife itself with a few layers of plastic clingwrap wrapped around it. If your sheath is to have a couple of simple slits in it so it can be hung from a belt, it is a good idea to insert a thin strip of wood through these slits (as if it were a belt) to keep the slits open while the sheath dries. If you choose to make the sheath by having the sewn joint by the cutting edge of the blade, it may be a good idea to insert a narrow strip of rawhide between the two sides of the sheath. The stitching goes through all three layers. The middle strip helps to prevent the stitches being cut by the blade. When the rawhide dries it shrinks considerably. If you use sinew or rawhide lacing to sew the sheath it will shrink too and probably will still look neat enough. However if you use synthetic thread you may find that the stitches look loose and untidy when the sheath has dried. You could re-stitch it at this stage if you think it is worth it I prefer to use what some people call a saddle thread to sew leather. A needle is threaded to each end of the thread. One needle is passed through the first hole, and the thread is pulled through so that the amount of thread on each side of the hole is roughly equal. The needles are then pushed through each hole from both sides and the thread is pulled tight. So each hole, other than the first, has the thread going through it twice - once from each direction. The two ends of the thread are tied together at the last hole. To make the knot sit nicely on one side of the work being sewn, one needle may have to be passed back through the second-to-last hole to bring both ends of the thread to one side. To make holes in the hide for sewing you need some kind of an awl. I made one by screwing a long pozidrive woodscrew into the end of a stick. This screw was threaded for only part of its length. At least twenty millimetres of screw was left protruding from the stick. The head of the screw was then cut off and the shank of the screw sharpened to have four flat facets on the point. A primitive awl can be made from a sharpened bone. Some sort of protective coating should be rubbed into your sheath to at least partially protect it from moisture. I have used a warm mixture of fat and beeswax. There seems to be plenty of information around on leather working. I am sure much of this could be adapted to working with rawhide. Buckskin and leather are softer materials that can be made from animal hides. Both can be made with the aid of naturally occurring materials. Buckskin is basically made from a hide which has been thoroughly impregnated with some sort of fatty substance, like animal brains or egg yolks. Once the damp hide has been saturated with the fat, it is worked back and forth around a post or a rope until it dries. It can be cold-smoked to
Ancient Skills © Stephen R. Coote. Electronic edition. 70
impart a nice colour, and this may also offer some further protection against moisture and rot. Leather can be made by soaking a hide in a strong tannin solution made by soaking a suitable type of bark in water. It would be best to do some research before putting a lot of effort into making buckskin or leather.
HIDE GLUE Properly made hide glue can be a very strong adhesive. I have made successful glue from fresh, wet hide and sinew scraps; and from bug-infested rawhide that has been dried for a year or so. I have also made it from hide which still has hair attached. The hide does not dissolve during the process and it is discarded once the glue substance has been extracted from it. It is made by simmering scraps of hide (along with any hooves and sinew scraps) in clean water. The smaller these pieces are, the faster the glue substance should be extracted from them. I have read that the water shouldn�t be allowed to reach boiling point to achieve the best results, but I have to admit that some of my batches of glue have boiled for a short time without any obvious damage being done. I don�t have a thermostat on my woodstove. The process can take a long time, and it can fill your kitchen with an aroma that may not be enjoyed by everybody. After the hide has simmered for several hours the �juice� may start to get thicker. At this stage I generally remove the hide scraps (and any other rubbish) from the pot and continue gently heating the fluid until it gets noticeably thicker. The fluid can be strained through a piece of loosely woven cloth. Sometimes I have made a batch of glue over several days because I only had my stove burning for a short time each day. It could be a good idea to elevate the pot higher above the heat using fireproof metal objects of some sort if you find it is hard to keep the heat low enough. When the fluid gets reasonably thick, it has become hide glue. You can use it at this stage, or you can dry it so it will store for a long time at room temperature. When it cools, the fluid may form a jelly or a thick leathery substance. You could gently heat up the jelly some more to drive off more moisture, but if you have the leathery stuff just set it aside to dry until it is quite hard. If you choose to dry it by heating it further, be sure not to let the temperature get close to boiling point. If you choose to dry the jellied glue at room temperature you may find that small patches of mould form on the glue while it is drying. I have simply wiped the mould off with a paper towel and just carried on drying the stuff without noticing any bad effects, but if the rot really set in I would consider discarding the batch. As the glue dries it is likely to stick to whatever it is touching. You could try threading lumps of stiff jellied glue onto a string or a thin stick. Dried glue can get so hard it will shatter when hit with a hammer. Sometimes it may stick to the pot when you are making it. You can either mix in some water to soften the glue, or you may get it out by shattering it. Mind your eyes as little bits of hard, sharp glue may fly everywhere.
Ancient Skills © Stephen R. Coote. Electronic edition. 71
I store dried glue in a screw-top jar. To use hard glue, it has to be returned to a liquid state. This involves water and heat. There is no definite rule as to how much water should be added, because both thin and thick glues will eventually dry out to form a bond. Thin glue may penetrate better, but thicker glue will get tackier in a shorter time. It may be helpful to soak chips of glue in the water for a while before you gently heat it up to dissolve it and to get to the right consistency. As a guideline you could try just covering the solid glue with water. You are less likely to damage the glue by overheating if you heat it indirectly. An old tin can makes a good glue pot. This can is placed in a pot of water that is being heated. Stirring will hasten the dissolving process. If you are going to glue sinew or rawhide, then the glue shouldn�t be so hot that it will cook the sinew or rawhide. If the glue is too hot to touch with your finger, then it is probably too hot for sinew. Any surface that is to be glued should be clean and free of grease or oil. Sometimes it may be appropriate to pre-heat and dampen the surface to get the glue to bond. I don�t know how long the �shelf life� is for this made-up glue. It might be best if only enough is made up for the job at hand. Thoroughly dried virgin glue should store well for a very long time if kept away from moisture. In a primitive situation, glue might have to be made in a fired clay pot.
Ancient Skills © Stephen R. Coote. Electronic edition. 72
Chapter Six
INTRODUCTION TO IRON WORKING
Iron is a wonderful, and important, material. So much human industry has depended on the ability to shape and harden iron. Even simple iron implements like knives, chisels, axeheads, spear points, arrowheads, fish hooks and awls can make a huge difference to what man can achieve. Iron is seldom found naturally in its metallic form. Our ancestors may have found the occasional iron meteorite they could shape into a useful tool, but generally if iron is required it has to be smelted from iron ore. The production of iron is relatively simple, but it requires a lot of heat and considerable knowledge. However it is not beyond the realms of possibility for an enthusiast to produce it on a small scale in relatively primitive conditions. Instruction for smelting iron from ore is not included in this book, but the information is available.
STEEL Pure iron is a relatively soft metal that cannot be hardened by heat treatment. Steel is the name given to iron which has had a certain amount of carbon added into its structure. Low carbon, or mild, steel is a useful and very common form of steel, but it cannot readily be hardened by heat treatment. With more carbon in the metal, medium carbon and high carbon steels are formed. Medium and high carbon steels can be heat-treated to impart certain qualities to steel like hardness, toughness and �springiness�. Iron which contains more carbon than high carbon steel is called �cast iron� - useful for many things, but generally not suitable for making articles in a blacksmith�s forge. Although not always regarded as strictly correct, the name �iron� is often applied to a variety of metal alloys which contain a large proportion of iron. Besides carbon, other elements are sometimes added to steel to give it certain qualities. By grinding a sample of unknown steel on an electric grinder you can sometimes get an idea of its carbon content. If you compare, for example, sparks from a file to the sparks from a nail, you will see a difference. If a sample of the steel becomes significantly harder when quenched, then it probably contains a significant amount of carbon (see �hardening� below).
WHAT YOU NEED TO FORGE IRON You need fuel such as gas, charcoal or coal; you need a forge in which to burn the fuel and contain the heat; and you need tools like a hammer, anvil, and tongs. A container to hold water is essential.... sometimes you need water to quench the item you are making, or to cool your tongs, or maybe even to extinguish a fire you don�t want. Some steels are better quenched in oil so you may need a separate metal container for that (with a metal lid). And don�t forget the safety glasses.
Ancient Skills © Stephen R. Coote. Electronic edition. 73
If you are using charcoal or coal as a fuel, then generally some sort of device like a blower or bellows to supply air to the fire will be needed. You also need an area in which you can safely light up your forge. Forging can create sparks, smoke and noise so you need to consider your neighbours and your surroundings. Another requirement is some iron to forge. All sorts of steel objects can be recycled into something new. I suggest it is a good idea to avoid heating objects that have been coated with another metal like zinc, cadmium or lead because toxic fumes may be given off. Mild steel or plain wrought iron is relatively easy to forge and can be used to make all sorts of items, but if extra springiness or hardness is needed, then medium or high carbon steel should be used. Old coil springs or leaf springs from vehicles are often easy to obtain and generally the steel is excellent for making knives etc. Old files and other tools are well worth experimenting with. Old steel objects can be found in all sorts of places. If you have to buy steel it may be more economical to try a recycling centre, a scrap yard, or a car-wrecking yard before you go to a steel merchant. One problem with scrap steel is that often the piece you have is too big. If it can�t be cut with a hacksaw then perhaps it can be cut off with an electric disc grinder. You could get someone to cut large pieces with an oxy-acetylene plant or a plasma cutter. If your piece of steel is of a manageable size but too hard to cut, you could anneal the steel by heating it in your forge to critical temperature (this will be explained later) and then burying it in something like ash to allow it to cool slowly. This should generally soften the steel enough to allow you to saw or drill it. Some alloys of iron are not easy to anneal. Steel can also be �hot cut�. When steel is heated until it reaches forging temperature it can be laid on a hard surface and cut with something like a heavy chisel. Alternatively, the steel can be cut by laying it over a suitable blade and then striking it with the hammer. Although some very useful and attractive objects can be made in a forge using little else besides hammer, tongs and anvil, other tools will be needed for some tasks. An engineer�s vice, a hacksaw and some files are important. Holes can be drilled with very primitive implements (that you could make yourself) but an electric drill and a selection of high-speed steel drill bits make life easier (a bench drill, or drill press is excellent). An electric grinder is useful and can save time, but is not absolutely necessary. I use electricity to power my drill, grinder and forge blower (an old hair-dryer), but I have made steel objects without using any electricity. Muscle-powered blowers work well, as do hand-drills, hacksaws and files. With practice, much grinding and cutting can be made unnecessary through skilful forge work. Holes can be punched through hot steel, thus sometimes eliminating the need to drill. Any sort of steel hammer can be used for forge work, but a heavy hammer can move more metal in one blow than a light hammer. Some smiths have a large selection of hammers, others make do with less. When you are striking hard objects together (like a hammer on steel) there is a strong possibility that small chips can break away from one of the striking surfaces. These chips can contain a lot of energy and do a lot of damage, so I recommend that safety glasses or goggles are worn when doing work like this.
Ancient Skills © Stephen R. Coote. Electronic edition. 74
You can make your own tongs, but old tongs can sometimes be bought second-hand. Small objects can often be held well enough with pliers, and self-locking pliers make fine tongs for some work. If you just want to work on one end of a long bar of steel you may not need any tongs at all. You don�t need a �proper� anvil. The main purpose of an anvil is to provide a suitable surface to beat hot metal on. Old pieces of iron machinery, offcuts of heavy steel bars, or a piece of railway iron will suffice for many forging jobs. If your improvised anvil is a bit light and tends to move around too much, you might like to set it in concrete. A good quality blacksmith�s anvil is a useful item, but often will be expensive. A sledgehammer head is a good makeshift anvil for smaller jobs.
BLOWERS AND BELLOWS
A simple fire may get smaller pieces of steel hot enough to forge, but generally a solid-fuel fire needs air to be blown into it to achieve the desired hot-working temperature. Air is generally fed into a forge through a pipe called a tuyere. This may blow air sideways into the fire, or it can be arranged to blow air straight up from the bottom of the fire. Another system is to have a horizontal pipe lying across the bottom of the fire with a series of holes drilled in the top of the pipe - the air reaches the fire through these holes, thus allowing a �long� fire to be made. One end of the pipe is sealed, and air is blown into the open end. A blowpipe can be used to take air from your lungs to the fire without using a tuyere. This would really only be practical for small jobs, but it does work. A simple fan or a domestic fire bellows would also be better than nothing. A hair dryer makes a good blower for a charcoal fire. A second-hand one won�t cost much, and the heat part doesn�t need to work - all you need is the fan. In fact it is best not to use the heating element because this uses much more electricity. The amount of air reaching the fire needs to be adjusted and this can be done by having a �butterfly� or slide across the tuyere entrance which can be opened or closed according to your need. By having the hair dryer nozzle a short distance from the tuyere, you can move a piece of sheet metal to partially block the hole as required - or you can simply move the hair dryer to a different angle to alter the air flow. Some old vacuum cleaners can have a hose fitted to their �blow� end and thus can be used as a forge blower. Hand-cranked blowers can sometimes be purchased second-hand, and these are a good option for a small forging operation. A simple manual blower could be home-made, as could a variety of bellows. I have experimented with a simple tube-bellows and have had passable results. My bellows were made from a piece of steel pipe about 600 millimetres long with a bore of about 80 millimetres. The bottom of the pipe was blocked with a piece of steel plate, and a hole was bored through the wall as close to the bottom as possible. A short length of pipe with a 25-millimetre bore was then welded over this hole to act as a nozzle to direct the air into the tuyere. A plunger was made up from a broom handle with a disc of wood on the end. The disc was about 40 millimetres thick, and it had a greased, soft leather skirt tacked to its circumference. The skirt extended about 20 millimetres below the disc. The disc was a slightly loose fit into the pipe. When the plunger was plunged down into the pipe it forced a stream of air out through the nozzle. When the plunger was lifted it sucked air into the pipe partially through the nozzle and partially through the gap between the leather skirt and the pipe.
Ancient Skills © Stephen R. Coote. Electronic edition. 75
If air is sucked back into a bellows through the nozzle you will often get forge gas sucked in with it. This can lead to an explosion in the bellows, or it may bring enough heat back into the bellows to damage them. By keeping a gap between the bellows nozzle and the tuyere entrance you may avoid this problem, but it can be a problem to keep everything aligned. A simple one-way flap valve fitted into the nozzle is another possible solution. So that I could have my bellows in a more comfortable place, I extended my nozzle with a piece of rubber bicycle tube and another short length of steel pipe. There is no reason why a simple cardboard or plastic tube would not make a workable bellows, provided you kept them a safe distance from the fire and provided you solved the hot gas sucking problem at the nozzle end. Bellows like this would probably work best with a simple sideways-operating tuyere which might consist of nothing more than a short length of steel pipe with a bore of about 35 millimetres. Big forging jobs would need more air than small jobs, and a single cardboard tube might not provide all the air you need. A pair of tube bellows with the plungers worked alternately would provide a steadier flow of air. If you can get someone to take a turn at working the bellows, you can concentrate on the hot steel. I have by no means described all the methods of getting air into your fire. Anything that moves air could be experimented with. Think about, for instance, how much air could be moved by forcing a bucket, upside down, into a larger container of water. In ancient times, a type of bag bellows was made from animal skin. Tube-type bellows don�t have to be round - why not make one from timber? Perhaps you could make a double-acting wooden box bellows that blew air during both the in and out strokes.
THE FIRE All you need is a shallow hole dug into a firmly packed pile of clay or soil. However more elaborate blacksmith�s fireplaces, or forges, can be made from a variety of materials. A metal container lined with dried clay should make a suitable forge. Wood ash can be used as a forge lining material, and ash can be added, removed and moulded according to the size of the fire required for a particular job. Special refractory clays and firebricks can be purchased, and these are very suitable for forge construction. A simple side-entry tuyere is all you need to get started. My first tuyere was a length of black steel pipe with a bore of about 35 millimetres in diameter. Avoid pipe with any sort of plating because of the fumes that may be given off when heated. If the pipe is rusty, then chances are it hasn�t got much of a plated surface. The pipe needs to be long enough to reach through the wall of the forge with enough of it extending to where you can conveniently locate your air source. A straight pipe should theoretically provide less resistance to the air flow, but in practice you should find that bends in the pipe will not matter unless your air source has a very limited output. Because heat rises, it is probably better to have the pipe rising slightly as it heads into the fire. If the pipe slopes downward into the fire then hot gas may flow back toward your blower/bellows when they are not pumping and possibly cause damage or annoyance.
CHARCOAL
Charcoal is a good fuel for blacksmithing. It is cleaner burning than coal and generally contains fewer impurities that might cause problems in the steel. I have never used briquette charcoal for forge work, and I would not use it unless I really had to because it might contain additives that could be a hindrance. Plain charcoal can often be purchased, but it can also be manufactured at
Ancient Skills © Stephen R. Coote. Electronic edition. 76
home. Any charcoal will give good heat, but when a simple pipe tuyere is used, and when a larger fire is needed, then larger lumps of charcoal should be used to ensure there are some big enough gaps to allow the air blast to penetrate far enough into the fire. So with that in mind, it is a good idea to ensure that at least some of your charcoal is in lumps about half the size of your fist or larger. If you make a fire that is only just big enough for the job at hand, and if you use your blower or bellows wisely, you might find you don�t use much charcoal at all for small jobs. Ten litres of charcoal should be plenty to make a simple knife blade under most circumstances. For health reasons it is sensible to use only untreated wood to make charcoal. Charcoal can be gathered from the remnants of old fires, or you can prematurely extinguish a fire with water and then gather any charcoal. The wood doesn�t have to be completely charred to use in the forge, but incompletely charred wood will generally create significant smoke and flame - but if this isn�t a problem you should still generally get a hot enough fire using this fuel. Charcoal is made by heating wood to drive out the volatile substances, and there are various ways to do this (charcloth, described earlier, is made in a similar manner). Here�s how I have made mine: I obtained a sixty-litre drum and cut out the top with a cold chisel (if doing this be sure that the drum does not contain a flammable or poisonous substance). I then cut six holes in the side, near the base, about forty millimetres in diameter. Pieces of wood were then loosely stacked into the drum and ignited (this creates smoke and a fire hazard so pick the location carefully). After the fire burned for a while I would place a flat piece of metal partly over the drum and carefully watch the smoke. When the smoke changed from a thick cloud to a thin bluish haze, I pushed the cover completely over the drum and piled earth against the base of the drum to block the six air holes. After a couple of hours the charcoal would generally be cool enough not to re-ignite when the cover was removed. Some of the wood would not be charred enough, and this would be kept to add to the next batch. My method is not particularly efficient and it creates a lot of smoke. This smoke will burn if it stays hot enough and if it has a supply of oxygen. If wood is heated in a container which is enclosed except for one strategically-located hole, the volatiles will escape from the hole and can be ignited to provide further heat to form the charcoal. (Some steel paint drums with �clip on� tops may be suitable). When the smoke flow from the hole slows down or stops, then the container would need to be removed from the fire and the hole would need to be blocked to stop air reaching the charcoal and allowing it to burn away. It might be tempting to open the drum while it is still hot. I think it is best to leave it to cool down because the remaining heat may help to drive out more volatiles from the wood. Opening the drum while it is hot could be dangerous if any hot gasses suddenly ignited. It is OK to douse the charcoal with water as soon as it is made. It will soon dry out.
HOW TO FORGE STEEL
This is a huge topic and this is only an introduction to it. If you can watch someone doing some forging it will be a big help, but I feel that it can be learned through research and trial and error. Hot steel behaves a bit like modelling clay or playdough (although it is much harder to squash), so by experimenting with modelling clay you can get an idea of what can be done. Keep safety in mind when you are setting up your forge, and dress for the occasion with safety
Ancient Skills © Stephen R. Coote. Electronic edition. 77
glasses, stout footwear, and clothing that won�t readily catch fire. Have a good supply of water at hand to put out fires, or to cool down things that shouldn�t be hot. Make sure that the heat and sparks from your forge will not start a fire. Most soft steel can be shaped while cold, to some extent, by hammering it on a hard surface. However it is much harder to work while it is cold, and cold working can cause the metal to crack. When the same steel is heated to a glowing orange colour, it will �flow� much more readily when hammered. Generally you should stop hammering the metal before the red glow completely disappears. Steel that is too thick can be �drawn out� (made thinner and longer and/or wider) by hammering. Steel that is not thick enough can sometimes be �upset� (thickened) by heating up the correct area and hammering the steel back into itself. Steel can also be thickened by welding� either new material can be welded on, or the original billet can be folded over on itself and then welded together. To see how upsetting works you could try heating the last few centimetres of a short length of round steel about a centimetre in diameter. Once it is at forging temperature, remove it from the heat, briefly quench the last centimetre to make it a bit firmer, then hold the rod vertically on your anvil with the hot end downwards. Apply a few blows of the hammer to the upper end and you should find that the heated portion grows in diameter, although it may bend as well if the glowing portion is longer than a centimetre or two. Forge welding is something that the beginner might like to leave until other skills have been mastered, but it involves getting the steel to just the right temperature and then hammering the two pieces together. Pure iron has a reputation of being relatively easy to weld; some steel alloys are regarded as difficult. Generally a flux is applied to the heated surfaces to help remove impurities before the weld takes place. My own experience with forge welding is limited. I have used borax as a flux, and I know that clean sand has been used. More recently I have read claims that wood ash will work quite well. As the forge welding takes place, the object being welded gets flattened by the hammering, so the workpiece may have to be made a little thicker to compensate for this. Holding the two pieces together so that the weld hammering can take place can be a challenge, especially as both pieces have to be at the right temperature for a bond to occur. Small pieces cool quickly. If you want to learn to forge weld you may have to experiment, and certainly further research won�t hurt. Although different alloys may weld at different temperatures I suggest that you initially try welding at a heat where one or two sparks are starting to jump from the steel. Don�t let too much oxygen get to the steel you are heating otherwise excessive scale may form on the surface. Other tools, as well as the hammer, can be used to shape hot steel. By striking steel with, or against or between, specially shaped punches or dies, special shapes and designs can be imparted to the hot steel. Hot steel is also relatively easy to bend or twist, and this can be done in a specially made jig, or sometimes by simply gripping it with a vice and a wrench. Steel at forging temperature can often be cut by laying it on a steel block and cutting it with a chisel (similar to a cold chisel). The chisel may damage the surface of the steel block, so only use a block that you don�t mind damaging. Pieces of hot steel can �fly� long distances when being cut... so take care. Chisels and punches used for hot work don�t need to be hardened, but they should be more durable if made out of tough steel like old cold chisels or axles.
Ancient Skills © Stephen R. Coote. Electronic edition. 78
FORGING TEMPERATURES Experience will be the best teacher as to what temperatures will suit certain operations. It is possible to melt steel in a forge... at this stage it will be virtually white-hot and will probably be giving off sparks. Generally this is something to be avoided because your steel is easily burned and damaged when it is this hot. However if you want to forge weld, then you will sometimes want to work very close to this temperature. I believe some iron alloys can stand higher temperatures than others. Below white heat, we have yellow, then orange, then red. Generally it is best to work yellow and orange steel, and then put the steel back in the forge while there is still a slight red glow. Sometimes it is hard to discern colours in bright daylight.
ANNEALING Annealing is the process whereby hard steel is made softer. Some alloys cannot be practically annealed by the amateur, but many common steel items can be annealed to a soft enough state where they can be readily drilled, sawn, or filed. The steel is heated to a bright cherry red, and then quickly buried in some heat-resistant, insulating material like wood ash where it is allowed to cool slowly. High-speed tool steel (as used for some large hacksaw blades) is one alloy that will not soften readily.
HARDENING Medium and high carbon steel is hardened by heating it to a temperature around the cherry red stage, and then cooling it quickly. Some steel alloys will harden by being cooled in air, but generally a quenching fluid is used. Plain carbon steel can often be quenched in cold water without cracking, but some steel alloys (like that used for some springs) must be quenched in a milder medium like oil. A chilled brine solution will cool steel relatively quickly, whereas a warm thick oil can be regarded as a slower quench. When red-hot steel is plunged into oil, the oil will give off smoke and may sometimes catch fire. Therefore you should take steps to protect yourself and your surroundings from these hazards. Generally the smoke and any flames will subside when the hot steel is removed from the oil, but the oil should be kept in a metal container, and a metal lid must be kept handy to smother any flames. It can be dangerous to try to put out an oil fire with water... this can cause a rapid expansion of the problem as the water turns to vapour and particles of oil are spread on the water droplets. Engine oil will work as a quench, but you may prefer to use vegetable oil. Enough water or oil has to be used to ensure that heat is carried away from the steel quickly enough. When steel is heated it expands, and as it is cooled it shrinks. If one part of your hot steel object cools quicker than another part, you may find that the object warps when quenched. Knife blades, for instance, should be lowered edge-first into the quenching fluid. If the blade goes in sideways it is more likely to warp. A warped item can often be straightened by returning it to the forge and then straightening when hot. If you hammer, or try to bend, a newly hardened object you may smash it. Hardened steel can be extremely brittle. If you are making tools like knives, chisels or axes you don�t really want the whole tool to have a hard temper as it is too likely to break. I suggest that you only harden the cutting edges. This advice applies especially to tomahawk blades - they are likely to break if they are too hard around the eye or the base of the blade.
Ancient Skills © Stephen R. Coote. Electronic edition. 79
TEMPERING
Tempering removes some of the hardness imparted to the steel (after hardening) to restore toughness. Steel that has been hardened only will resist wear very well, but it may crack or shatter if sufficient force is applied to it in any form. Items like surgical knives or paper shears may need only a slight degree of temper, whereas a crowbar would be dangerous unless it was tempered to a much softer state to ensure that it did not shatter when force was applied to it. Tempering takes place at temperatures much lower than red heat, and the full range of tempering is done over a relatively small range of temperature. Tempering temperatures can be gauged by the colours that appear on the surface of clean steel as it is heated. The first colour to appear is a pale yellow. As the temperature increases the colour changes. The various colour stages can be described as pale yellow, pale straw, medium straw, dark straw, purple, blue, then grey to black. By heating one end of a strip of clean steel in a forge or gas flame, you should see these colours appear. If the strip is cooled before it over-heats you will probably find that the colours stay on the surface until corrosion or wear removes them. Research and experimentation will help you decide what the best tempering temperatures (colours) are. As a guideline you could temper to pale yellow for a scalpel or a blade that is never going to �chop� or be levered or hammered. A rugged outdoor knife�s edge could be tempered to medium straw while the back and tang are tempered to blue. The edge of a tomahawk blade might be heated to dark straw (while the rest of the blade and the body are taken to at least blue or black). Springs (which require a nice even temper all over) could be heated to a blue. Some tools may be best just made from tough steel without being hardened and tempered.

Ancient Skills © Stephen R. Coote. Electronic edition. 80
Ancient Skills © Stephen R. Coote. Electronic edition. 81
MAKING A SIMPLE TANGED KNIFE BLADE In case you are wondering, a tang is a narrow, spike-like projection that is formed on the end of the blade. The tang is used to fix the blade to the knife handle. The handle can have a hole in it slightly narrower than the tang so that the tang is gripped when the wood or antler handle is hammered on to the tang. The tang can also be glued into the hole with epoxy glue, or even a mixture of melted pine resin and powdered charcoal. This sort of blade is good for a first project because it doesn�t really matter how big or small it turns out to be. Bear in mind that a knife that is to be used for heavy work should have a large tang that extends well into the handle. When picking a piece of steel for a forging project you may have to think more in terms of the volume rather than the length or width of the steel. You could get mathematical and calculate your requirements, but often all you need to do is ask yourself if the lump of steel looks like it has enough in it to make what you want. The ability to judge this should improve with practice and experimentation. So you don�t need to find a piece of steel that already looks like a blade for this project (although this might save you some work), all you need is a big enough piece of medium or high carbon steel that can be hammered into shape. However a beginner would probably find a rod or bar of steel easier to work with than a round ball. If you do have to use mild steel for a blade, you could try bringing some hardness to the edge by �cold working� it. This can be done by hammering (or �peening�) the blade against a hard surface. This peening should be done long and hard enough to deform and stress the steel. You also might like to try heating it to a cherry red and then quenching it as rapidly as possible in cold water into which salt has been dissolved. This �super quenching� may make the steel a little harder. I have heard of super-quenching solutions that are reputed to be capable of imparting a significant degree of hardness to low carbon steels, but I have not tried them. Super-quenched steel probably wouldn�t need to be tempered. Mild steel can be �case hardened�, and this is something that is worth researching if you are interested. Using mild (low carbon) steel to make a blade would be good practice, and the blade would hold an edge for a while, but I would always try to find a piece of medium or high carbon steel to make a blade wherever possible. Here are some steel objects you might like to experiment with: files, chisel blades, screwdriver blades, old spanners (see my earlier caution about plated steel), vehicle leaf springs, big coil springs, cold chisels, axles and saw blades. Other steel objects may well make a good blade also - if the steel appears to be tougher, harder or have more spring than an equivalent-sized bit of mild steel, then it would be worth trying. Let�s assume you have a piece of a flat file you want to turn into a tanged blade. Before you start to heat it, make sure you have a pair of tongs or a large pair of pliers that will hold it securely. If you can�t get a decent grip on your hot steel, your results may be poor and the steel may fly into the air while you are hammering it. This is dangerous and frustrating. Have everything you need on hand before you start. Fill your forge with enough charcoal to cover the tuyere by at least five centimetres. Make a hole in the charcoal in front of the tuyere, and drop in some paper and small chips or twigs of wood to get the fire going. Light the paper, and as the kindling ignites, place some charcoal over the flames and start to blow some air through the tuyere with your bellows or blower. You should soon get an idea of how to control the size and heat of the fire. Larger lumps of charcoal should
Ancient Skills © Stephen R. Coote. Electronic edition. 82
allow you to have a bigger fire area compared to what can be done using more finely crushed fuel. Start by using a small fire for your first blade to see what can be achieved with minimal fuel consumption. When air is blown into the fire, the fuel burns very hot - and rather quickly, so don�t blow more air than is necessary. Heat your steel by placing it directly into the glowing charcoal. It is best to keep some fuel between the tuyere and the blade because the burning fuel uses up oxygen before it comes in contact with the blade, and oxygen may damage hot steel. By heating the steel below a layer of charcoal, you protect it from the oxygen above the fire, and you also help protect it from the cooling effect of the surrounding air. Sometimes it seems to take ages for the steel to get to an orange heat. At other times it can be overheated and giving off sparks before you notice it. A knife blade that has �sparked� for more than a few seconds may well be permanently damaged. Keep watching your steel. You are less likely to damage your steel and waste your fuel if you use a hand-powered blower - it is too easy to leave an electric blower running while you do something else. Sometimes a whole piece of steel has to be heated, but often only part of it needs to get to forging temperature. If you are working with something like a piece of a flat file, I suggest that you form the tang first. If you are working with an odd-shaped lump of steel, it might be best to make a rectangular billet first, but other approaches will still work. (�Billet� is the name given to the lump of steel you are forging). The tang can extend from the middle of the base of the blade, or it can extend directly below the back of the blade. Because the tang is not the full width of the blade, you will find you will be able to form a long enough tang from a relatively short portion of your rectangular piece of steel. As you hammer it on the edges to make it narrower, it will grow longer. You may find it helpful to hold the edge of your billet against a round bar (or the rounded corner of your anvil) as you strike it. This will indent the bar and may speed up the process of �drawing out� the tang. Start by striking the billet over the bar at one end of the billet, and then work further into the billet as you want to extend the tang. Once you have made several blows to the edges of your billet, you will need to rotate the billet ninety degrees and hammer the sides of the tang that you are forming. This allows you to control the thickness of the tang and keep it straight. Hammer both sides as necessary. Keep on working at all four surfaces of the tang until you get the size and shape you desire. Where the tang meets the blade it is a good idea to have a nice, smooth, rounded corner as sharp angles and edges can help cracks to start. If this corner can�t be formed to your satisfaction with your hammer and anvil, you can file this top part of the tang later, or you can form it by striking a tool of the correct shape into the corner while the metal is at forging temperature (or by striking the tang against the tool). A beginner with limited experience and equipment may prefer to file this part. Now the blade. As the blade is hammered thin toward the cutting edge, it will �grow� along the cutting edge as the metal is displaced. This will cause the billet to widen and curve away from the edge. This effect has to be anticipated and counteracted in most cases. This can be achieved by having the billet narrower than the desired blade width, and by heating the billet and curving it in a reverse direction before the blade is thinned down to form the bevel. Of course, sometimes a curved blade is desired; and if a blade is to be symmetrical with a cutting edge on each side then the curving effects of working each side counteract each other. But a double-edged knife is too dangerous for me to recommend it as a working tool. The billet can be made narrower by drawing it out in a similar manner to which the tang was made. But because the fixed volume of metal has to go somewhere, the blade will grow in length as you beat it to make it narrower.
Ancient Skills © Stephen R. Coote. Electronic edition. 83
The billet can be curved by hammering it in stages over the edge of the anvil. Alternatively you could try supporting the edge of the billet on something like a pair of metal blocks with a gap between them and then striking the opposite edge of the billet directly above the gap between the blocks. You would probably have to move the billet along and strike it in several different places. This should be done with the blade part of the billet at forging temperature. You may find that if you are holding the knife billet by the tang for this part of the process, then the tang may tend to bend - especially if it is at forging temperature also. If you desire a tapered point on your knife you could hot cut excess metal away, or you could saw or grind away the unwanted metal after the knife has been forged to shape; but if you think ahead you could shape and taper the hot blank by careful forge work and save a lot of grinding. The main forging to form the point should be done before forging is done to form the cutting edge. Once all the forging is done, and the blade is nice and straight, the blade can be shaped and sharpened with a grinder or file. It is a waste of time to achieve razor sharpness at this stage. Before the handle is fitted, the blade should be hardened and tempered (assuming that medium or high carbon steel has been used). A really hard blade will keep a good edge for a long time, but it may be brittle enough to chip or break. A soft blade is unlikely to break, but it is not so good at holding an edge. Experience will teach you what is best. By having the cutting edge hard, and the tang and the back of the blade a little softer, the knife can have a reasonable edge and withstand a certain amount of hard use. I will try to describe how to do this. Heat the edge of the blade to a cherry red, or until a magnet will no longer stick to the edge. There is no need to heat the entire blade to this critical temperature unless you want to make it �springier� than it already is. It is OK to harden the whole blade if you want to do so. Plunge the blade, edge first, into the quenching fluid (as described earlier in this chapter). Move it up and down to assist cooling. Now remove the blade from the quench, and when it is cool enough to touch, try filing the edge. A sharp file will slide over a correctly hardened edge without cutting it. If the steel is not �glass� hard, you could try heating it a little hotter than before and quenching it again. If there is not enough carbon in the steel it will not get glass hard. Be careful with your newly hardened blade. It may break if you treat it roughly. You now have to temper the blade to remove excess hardness and to make the blade tougher (less brittle). With some emery paper or an old grindstone remove the scale from the blade so you can see shiny steel. This needs to be done so that the tempering colours can be judged correctly. The tang and the back of the blade need to be heated more than the cutting edge, so the colours reached in these two different regions will be different. I suggest that you try a blue for the tang and back, and a dark straw for the edge. It can be a bit tricky to achieve these different colours simultaneously. Once steel has reached the correct tempering temperature (indicated by the colour) it does not have to be quenched to be tempered properly. However, where there are different regions on a blade that differ in temperature, then it is wise to quench the blade to prevent heat from travelling from a hotter region to a region that you want to stay harder. This �zone� tempering requires care and it is easier to achieve by rubbing the blade against a red-hot block of steel, or with a fine gas flame, than to do it in the forge. To temper using a block of red-hot steel, rub the tang and the back portion of the blade against the
Ancient Skills © Stephen R. Coote. Electronic edition. 84
block. You will see the tempering colours travel from the hot part of the blade to the cooler parts. It doesn�t really matter how hot the back and the tang get (especially on your first knife), but the important thing is to make sure that no part of the cutting edge gets too hot. By moving the blade around and lifting it off the hot block momentarily you should find that you have a degree of control. When you see the straw colour reach the edge, quickly quench the blade. A knife tang that has not been hardened and tempered may bend and stay bent more easily than a tang that has been hardened and tempered to, say, a blue colour. This may only become a problem for knives that have to work as pry bars or axes. As you experiment you should find what sort of a temper suits you and your knives. As a guideline, a general-purpose knife edge might be tempered to the point where a new file will only just cut the steel. If the hardening and tempering doesn�t go to plan, you can simply start the process again. A handle can be made from a number of different materials. Antler and dense wood make good handles. A suitably sized hole can be made in one end of a wood or antler handle and then the handle can be simply �driven� on to the tang with a hammer while the blade is clamped in a vice. This may split the handle unless the hole is well matched to the tang. A wrapping of cord or wire, or a metal ferrule fitted to top of the handle may prevent a split. An oversized hole can be made and the tang can be glued into the handle with epoxy glue or a more primitive equivalent. The handle is generally unfinished at the stage it is fitted to the tang� the final shaping and polishing is done later. A large handle is less likely to split than a small one, and it may be more comfortable if the knife has to be used for long periods or for heavy work. I have just described the manufacture of a very simple knife. Research will show that there are other varieties that can be made. A stronger knife will result if the �tang� is kept the same width and length as the handle. These �full tang� knives generally have handles that consist of two slabs of material that are riveted to either side of the tang. By applying the principles outlined above, a variety of other useful implements could be made.
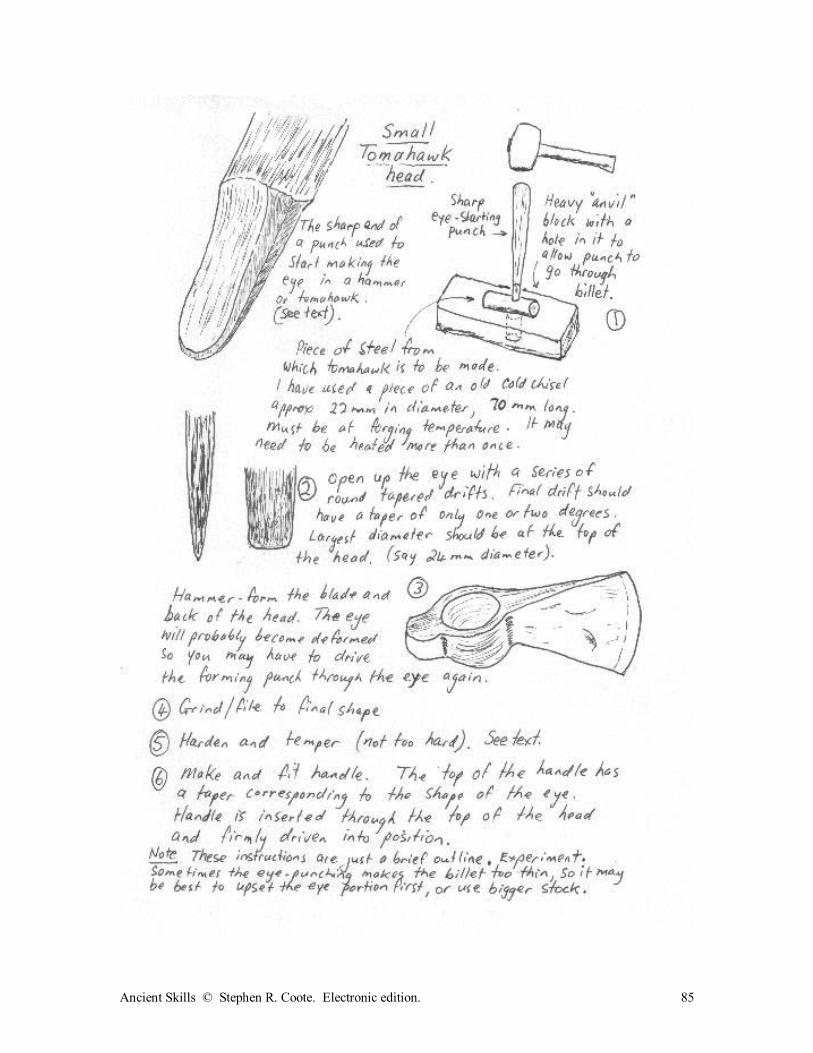
Ancient Skills © Stephen R. Coote. Electronic edition. 85
Ancient Skills © Stephen R. Coote. Electronic edition. 86
Chapter Seven PRIMITIVE POTTERY
The ability to make useful containers from baked clay must have made a huge difference to the standard of living for some of our ancestors. You may be surprised at how simple the process actually is. Here are the typical steps taken in producing primitively fired clay objects: 1. Gathering clay. 2. Removing impurities from the clay. 3. Adding temper (e.g. ground, baked clay; sand or burned shells) to the clay. 4. Achieving the right moisture content. 5. Forming the pot (or ornament). 6. Drying, burnishing and decorating the pot. 7. Firing in a simple wood fire. If you know absolutely nothing about clay and pottery you might like to visit someone who does know about it. Modern potters will have much knowledge that is of interest to a beginner in primitive pottery, but some of them may have never fired clay in a simple wood fire. So don�t be put off by any doubts that they may have, carry on anyway and learn by doing. My experience is very limited, but here are some guidelines. I�m told that good clay, when wet, can be rolled into a rod that can be bent to quite a degree without breaking apart. If you can�t find clay like this, don�t despair - just try using what you have. Once you know what good clay looks like you are better equipped to find it. Ask around� someone should know about the clay, or lack of it, in your area. If you can�t find a natural source of clay you could always buy some from a store or a potter to get you started. There are all sorts of commercial clays. I would choose one that fires at a low temperature. You may find a source of relatively pure clay, but if the clay contains impurities like gravel, sticks and leaves then you should try to remove them. Organic matter may leave faults in your pot as it burns away during firing. Some impurities may explode during firing thus ruining your pot. By drying the clay and crumbling it to form a powder you may be able to separate out the foreign material by hand or by shaking it through a sieve. If the clay is soaked in a container of water it should become very soft. This soft clay can be squeezed and squashed to expose the foreign bodies, which can then be picked out. You may like to push it through some sort of a sieve. If the soaked clay can be mixed with enough water and vigorously stirred to form a thin slurry then you may find that the impurities and the clay may naturally separate. Stones may sink to the bottom and some organic matter may float. Once the impurities have been removed, the slurry can be left to settle in the container and the excess water can be poured off. It may not be necessary to remove all foreign matter to get a useable pot. I have heard it can be a good practice to leave clay soaking in water for a long time. Experiment. Pots may crack while drying, while being fired, or when being used for cooking. Temper is added to clay to help prevent cracking, but it generally makes the clay more difficult to work. As a guideline, your clay/temper mix might contain about 30 to 40 percent temper for this sort of work. Temper can be �grog,� which is finely crushed fired pottery, or something like sand or crushed burned shell. I have even seen references to finely chopped dry organic matter being
Ancient Skills © Stephen R. Coote. Electronic edition. 87
included in the mix. Make sure that the temper gets mixed evenly throughout the clay. Mixing temper into dry powdered clay is probably the easiest method. If temper is added to wet clay, the clay will require quite a bit of kneading to distribute the temper evenly. You could try making and using pots from clay with no added temper at all because the natural composition of some clays may make them more resistant to cracking. If the clay mix is too dry to work, then add water. If it doesn�t accept water easily you could try soaking it; or you could try drying it out completely, crushing it, and then adding the water. If it is too wet you could try leaving it to stand in the open air for a few days. By placing the clay on a water-absorbing surface it should lose water more rapidly. You can form a pot by simply pushing and pinching a lump of clay. You can also make pots by joining suitably shaped slabs of clay. The coil method of making pots uses pieces of clay that have been rolled into �ropes�. The ropes are coiled around and moulded together to make the pot. Make sure the separate pieces are thoroughly moulded and welded together. Sometimes a suitably shaped object (like another pot) is used to mould the clay around. I think pots may be less likely to break during firing, or while being heated at a later stage, if they are of a fairly uniform thickness and if they are as close to spherical in shape as possible. Avoid sharp corners and sudden changes of direction. A beginner might find it best to start making smaller pots. Pots can be decorated by marking the wet clay, but if designs are to be painted on, then it may be better to let the pots dry out first. Pots will dry out if simply left in a dry area. When pots are dried out to be �leather hard� their surfaces can be smoothed by burnishing (rubbing) with a smooth stone or some other tool. Burnishing may help to slow the flow of water that can seep through an unglazed pot, and it should help you keep it cleaner. Burnishing may also provide a more suitable surface for decoration. Conventional modern glazing won�t work well with our primitive firing method, but if a fine slurry made from coloured clay is painted on to the pot some interesting results may occur. Other substances could also be experimented with. Pots should be very dry before you fire them. If you have painted your pots with anything, then further drying may be necessary. Pots should heat slowly during the firing process. This helps any remaining moisture to escape at a rate slow enough to avoid damage. I am not a ceramics expert, but it seems to me that primitive firing only causes partial fusing or welding together of the clay particles that you have moulded together to form a pot. The higher temperatures and longer heating times used in modern kilns will allow more extensive bonding to occur, but I think this may make a more rigid vessel than that made in a simple fire. With less fusion and more open space in the structure of the primitive pot we may find that our pots can �move� more to cope better with greater sudden changes in temperature. This is a good quality to have for pots that are used for cooking. There are different ways to fire pots. However it is done, care must be taken to have the pots as dry as possible before firing, and the pots should be allowed to heat and cool slowly. Of course the usual fire safety regulations and precautions should be adhered to. Having the fire in a pit or steel drum is a good thing because provides some shelter from the wind during firing and cooling. The wind could create sudden temperature changes and this may cause the pots to crack. If firing is to be done in a simple fire on the ground then it might be best to do the firing when there is no wind. A fire cannot burn hot unless there is enough oxygen reaching
Ancient Skills © Stephen R. Coote. Electronic edition. 88
the fuel, so if the fire is in a pit or a drum ensure that sufficient air can get to the fire. It is a good idea to support the pots, upside-down, on heat-resistant stones that have large gaps between them to allow the heat to get all around the pots. The pots can be moved closer to the fire as they gradually heat up, but I prefer to gradually move the fire closer to the pots. Don�t rush the pre-heating stage, and be aware that uneven heating can cause breakage. Have plenty of good firewood on hand before you start. Once you are satisfied that the pots have been heated properly, wood can be gently laid around and over the pots. The wood should ignite through contact with the nearby hot embers. This pile of wood may provide enough firing time to bake the pots, but be prepared to feed more wood on to the fire. Try to keep the pots entirely covered with glowing embers throughout the whole process. The pots shouldn�t need to be fired for more than two hours, but see what works for you. Half an hour of intense heat may be sufficient. I think pots should reach a red heat and stay red-hot for a while for the firing to be successful. Bigger pots will need bigger fires. Don�t be in a hurry to pull your pots from the ashes� give them plenty of time to cool down slowly. Some pots may break even when a lot of care has been taken. I have slowed down the cooling process by covering the dying fire with green plant material and a sheet of roofing iron. This certainly helps to keep the wind from the pots. The pots described above are likely to be slightly porous. To seal them for cooking you could try melting animal fat in them so that the fat penetrates into the clay. Cooking starchy food in the pot may seal the pores also.
Ancient Skills © Stephen R. Coote. Electronic edition. 89
Chapter Eight FOOD FOR THOUGHT
There is plenty of information around on the topics discussed below. I have just noted a few items of interest to think about.
GROWING YOUR OWN FOOD This can be a rewarding activity. Even a small garden area can produce a significant amount of healthy food, and a small, carefully tended area can out-produce a larger area that does not receive the same input. If you only have a small area available for gardening you might like to concentrate on growing fresh greens. Raised beds are a good idea. These can be made with planks, rocks and tyres etc. The best tyre beds, in my opinion, are made from tyres that are turned inside out once their side walls have been cut out. Lay the trimmed tyre on its side. Stand on the tyre with one foot in an effort to get part of it to bend inwards until it sits flat on the ground. You then pick up the portion of the tyre opposite where you are standing and lift it vertically. Your other foot (or someone else�s) then stands on the bent part of the tyre from the other side while you carefully remove your first foot. The tyre can then be pushed further toward the ground on the side where you were first standing. You should now see where you have to push and pull on the tyre with your hands to complete the process. Not all tyres are easy to deal with. An �inside out� tyre should have a more erect wall than one that has merely had the rims/side walls cut out. Watch for sharp bits of wire that may occasionally protrude from the rubber. The growing season can be extended by making �mini glasshouses� out of clear plastic film. The plastic can be draped over loops of wire that are stuck in the ground, and the plastic can be anchored with rocks. By feeding lengths of old garden hose over the wires you may prevent the wires chafing through the plastic. Consider growing varieties of fruit and vegetables that are disease resistant. This is particularly important if you are going to plant fruit trees. Do a lot of research before you get the trees. Several varieties of the same fruit can be grafted on to one tree. Placing layers of mulch around the roots of your plants and trees is something you should do. If you want to be more self-sufficient, learn about saving your own seeds. Be aware that seeds from some plants may not produce the plants that you want. Plants need light, nutrients and water. Compost, animal manure, seaweed and other organic material are natural sources of nutrients. And don�t forget to keep your plants watered. I think it is better to give a small garden lots of food, water and other attention than it is to plant a big area and then neglect it. One of the challenges in growing food is to have fresh produce on hand for the �lean� times in late winter and spring. This may be when store-bought produce is most expensive. If your
Ancient Skills © Stephen R. Coote. Electronic edition. 90
winters are hard, consider the use of glasshouses or cloches. Maybe some varieties of green vegetables available in your area will grow better than others in cold conditions. Perhaps seeds could be sprouted indoors to provide fresh greens.
EDIBLE WILD PLANTS
Some edible wild plants taste better than others, but they are all good, inexpensive food. They might even be essential to your survival if you are ever stuck in the outdoors. Be certain you are sure of a plant�s identity before you eat it. Sometimes it can be hard finding good information on this topic, but it is worth pursuing. If your local library isn�t much help, then perhaps you could contact people like the herb society or the botanical society if groups like this exist in your area. Dandelions grow in many parts of the world. I have been surprised at the claims of how nutritious these plants are. Other �weeds� might also provide you with an alternative salad. Beside greens, wild plants can provide food in the form of roots, fruit, seeds, flowers, pollen, nectar, sap and inner bark. As I have researched this topic I have found that many varieties of fungus are edible, but this is one area where you have to be absolutely sure that what you have found isn�t poisonous. Seaweed is another thing worth investigating. Even if you don�t make a habit of eating wild food, it can be fun just being able to identify the various species as you wander around in the outdoors.
HUNTING AND FISHING Because I come from a long line of hunter-gatherers, I consider hunting and fishing to be natural activities and a source of good food. Although it is exciting to catch a big fish or animal, I don�t like the �sporting� angle often given to hunting and fishing nowadays. To me it is not about killing, or getting record-sized fish and game. It is about being close to nature and harvesting food. It should be done with the utmost respect for the land, the animals and fish, and the landowner. A good hunter or fisher is always humane and conservation-minded. Wild meat and fish is generally very healthy food. It shouldn�t contain artificial growth hormones, antibiotics or other veterinary chemicals (although I think we may worry a little too much about such things). However if the area is polluted, then be wise about what you harvest. Shellfish are something to be particularly wary of in these circumstances. When hunting, be aware of any poison laid in the area. Some animals may have consumed poison and show no apparent effects. To be a consistently successful hunter or fisher you need to have a good knowledge of the animals or fish, and the area they live in. Get to know their habits and food preferences and the places they like to live in. �Book learning� is a good way to start, but I think learning from other folks, and your own practical experience, is better and more fun. Be sensitive toward others when you are hunting or fishing. If you offend or upset people then you may only add to the anti-hunting sentiments that some folk have. Exposing certain people to death and killing, blood and guts, or even insensitive talk about these subjects can lead to difficulties. Even though humans are in existence today because their ancestors were good
Ancient Skills © Stephen R. Coote. Electronic edition. 91
hunters, some choose to not kill or eat animals. Maybe we will all end up like that sometime, but right now I still enjoy meat and fish and I hope that future generations will be able to continue to harvest wild flesh. People who are perceived as indulging in �blood sports� are easy to dislike and argue against, but a humble hunter or fisher merely doing what our ancestors have done since the beginning of time is standing on much higher moral ground. Be aware that there are people around who would ban hunting and firearms ownership. Cats hunt, eagles hunt, I hunt. You don�t need expensive equipment to hunt and fish. A simple handline and a hook will catch fish. A string snare can catch a rabbit. Used properly, a gun of some sort is one of the most reliable and humane hunting tools. Unfortunately there is huge pressure in some places to limit or ban the use of guns. It is true that guns have been used for some terrible things, but it is the person using the gun, not the gun, that is the problem. Perhaps if some people went hunting or fishing they would have a better grasp of reality and would be less likely to run amok with a firearm. Certainly these activities are healthier than watching violence on television. This violence must influence people. Taking guns away from well-balanced law-abiding people will not stop criminals from obtaining and using firearms. When guns are outlawed, only outlaws will have guns. Guns are humane hunting tools, and a traditional recreational item, despite what we see on video. Why would down-to-earth, honest, well-intentioned, meat-eating politicians legislate to keep guns from good people? Some of them may just be taking shallow steps toward overcoming violence, but it could be that others might want to control us unjustly without any fear of retaliation. Good people don�t intentionally hurt other good people. The bow and arrow in the hands of a reasonably skilled archer, is an effective hunting weapon. It is harder to master, and more limited in range and power, than a gun but bows and arrows have some big advantages. You can make them yourself, they are much quieter than a gun, and you don�t have to involve yourself in as much legal drama as some gun owners. See the section in this book on bows and arrows. Traps and snares are an efficient way of catching animals, and they can be made with readily available materials. You can be �hunting� with them while you do something else. They are not always humane though. Even being enclosed in a harmless cage trap can be an unpleasant experience. If you set traps check them regularly. Be aware of any domestic or farm animals that may be in the area� you don�t want to catch someone�s pet. And trapping may be illegal in some places. Before you set a trap, you have to know how to deal with anything you may catch. With a trap that holds without killing you have the option of releasing the animal, but some angry animals may be difficult to release. If you are going to kill the animal you have to know how to do it humanely and without getting damaged yourself. Small animals, like hares and rabbits, can be killed by a swift, accurate blow to the head with a stout club. Something like a frustrated, thrashing wild pig is much harder to deal with if you don�t have a gun. A sturdy spear with a sharp blade, or a strong knife can be used for the job. If you can get to the front of the animal, then the blade should be thrust into one of the main arteries alongside the brisket� it doesn�t need to penetrate far to be fatal, but if you can push it all the way to the heart the result will be more certain. If you can only get to the side of the animal, then the blade should go in behind the front shoulder angling toward the front of the animal to get the vital organs. You need to have a basic knowledge of an animal�s anatomy if you are going to kill and butcher it. Be careful approaching any large animal. They can inflict significant damage with teeth, tusks,
Ancient Skills © Stephen R. Coote. Electronic edition. 92
horns or hooves. Even just a blow from their head can send you out of the game. If you think you have killed an animal ensure that it is really dead before you get too close to it. Poking its eye with a stick is one test you could use to get an indication of the state it is in. Although an experienced butcher can quickly cut up an animal and make a tidy job of it, there is nothing magical about cutting up a carcass. A ragged-edged, random hunk of meat hacked from the carcass with a sharp rock is still meat. However cleanliness is important, so gut contents, flies and pets, and any dirt or contamination should be kept from the meat if possible. It is also important to keep it cool because this slows the rate of spoilage. Just as there is no one right way to cut up an animal, there is no one right way to skin it. However if you have never done it, and you would like to keep the hide for something else, you might like to refer to the �rawhide� section of the book. Not many fish are poisonous; and edible fish that others may turn their nose up at can be good food. I have softened the bones of small fish so they can be spread on toast like canned fish. To do this they are gutted and scaled, and the heads are removed. I cut them in to a suitable size to fit them in a heat proof dish that has a heat proof cover. They are then covered with a mixture of water and vinegar, along with salt, brown sugar and spices. The next stage is to bake them for a long time until the bones soften. I can�t tell you what the ideal temperature is because I have only used an old wood-fired oven to do this. This oven didn�t have a thermometer, but it never got very hot, so if you want to try this you could perhaps aim at a temperature of around 100 degrees Celsius and expect the process to take several hours. A higher temperature would probably speed up the process, but it could cause the liquid to boil, make a mess, and perhaps evaporate completely. I can�t see any reason as to why this couldn�t be done in a pot above a fire or heating element. Experiment. Bigger bones may take longer to soften than small bones. I have squashed or ground away the barbs on metal fishhooks. They still caught fish very effectively and they were much easier to remove from fish that I wanted to return to the water alive. Barbless hooks are much easier to remove from a person�s flesh too, so they are a good thing for children to use. However I have found that the bait becomes detached from a barbless hook fairly easily, but if you use a lure, or if you can tie your bait to the hook somehow then this isn�t a problem. One of my favourite ways to eat small fish is to throw them whole onto the hot coals of a fire. The scales and skin blacken, but the fish generally cooks quickly. The fish should be turned over to cook on both sides. I remove the fish with a couple of sticks, allow it to cool a bit, rip off the charred skin and then suck the flesh from the bones. Some bones may end up in your mouth, so don�t swallow hastily without thoroughly chewing and feeling for the bones. After you have done this a few times you should recognise which bones are likely to pull away with the flesh. I don�t eat the intestines and their contents, however when they are cooked this way they generally aren�t unpleasant to deal with. If you want to give someone a memorable primitive experience, catch some fish in an unspoiled area, light a fire without matches, then cook your fish on the coals.
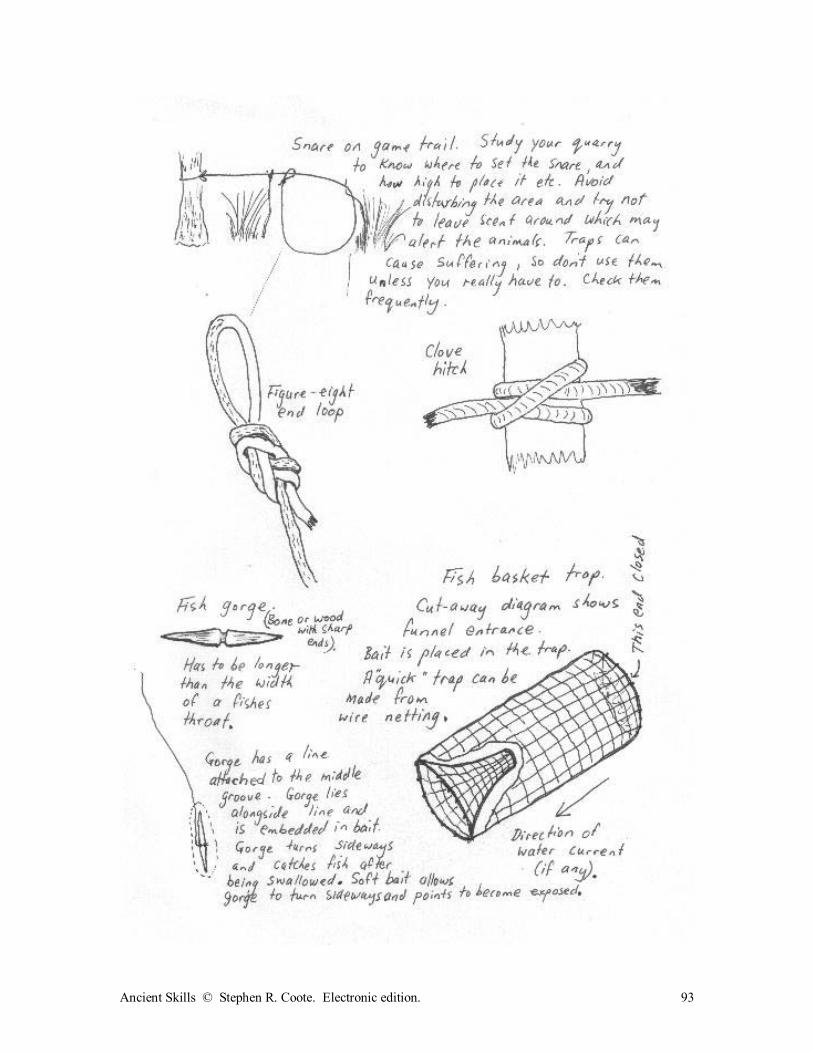
Ancient Skills © Stephen R. Coote. Electronic edition. 93
Ancient Skills © Stephen R. Coote. Electronic edition. 94
PRESERVING FOOD
Freezing is good method of preserving your fish, game and surplus produce. However food can be preserved effectively without using refrigeration. Foods with a high acid content can be preserved, relatively easily, in preserving jars with hermetically sealed lids. Fruit would fall into this category. Dehydration is an excellent way to preserve food. I won�t go into all the details here because there is plenty of information available. I have dried fruit, vegetables and meat. I do not bother to pre-treat fruit or vegetables with anything before drying� I just cut it to size and start to dry it as soon as possible. I have only dried meat after treating it with salt, sugar, vinegar and spices although I believe it should be possible to dry some meats in some conditions without the pre-treatment. Try to find out what folks do in your area. My first dryer was a large cabinet made from sheet metal. I had racks in it made from old stainless steel wire conveyor belt (used in the food industry). It was heated with light bulbs and an office fan circulated the air. Commercially made dehydrators can work very well, although one I used was a little too hot and it tended to overheat food in the tray closest to the heating element. I made a simple solar dryer by making a wooden box. The box was about one metre long, about 40 centimetres wide and 15 centimetres deep (although the dimensions don�t really matter). A narrow piece of timber was nailed about halfway up the walls on each side for the drying tray to sit on. These �rails� had notches cut along the top about 10 centimetres apart to allow skewers to sit in them for when fruit was being dried by being threaded on to skewers. I use thin stainless steel rod for skewers, but clean non-poisonous wood would work. The drying tray needs to be some sort of coarse stiff netting material that will not taint the food. I used stainless steel wire conveyor belt. Wooden slats would work. The inside of the box was made black to attract heat. I did this by charring the wood with a blowtorch. The dryer is elevated by a few inches at one end to better face the sun, and to encourage air circulation. Holes are drilled in both end walls (and should be covered with insect screening). These holes allow a certain amount of air to pass through the box. The holes on the elevated end of the box should be close to the top of the box to allow the hot air to readily escape. I cover my box with clean, clear polythene film. I would prefer to use a sheet of clear polycarbonate plastic, or a sheet of safety glass - but the plastic film works well enough and did not cost much. A solar dryer costs nothing to run, but if the weather conditions are poor the food may spoil because it stays too wet too long. There is no one right way to make a solar dryer - in fact just leaving food to dry on the ground is a form of solar drying. Food can be dried in an oven on low heat, or it can be simply be strung up indoors to dry. I have dried fruit and meat over my woodstove and I have found this to be a very reliable method. If food can be threaded on to a clean string or some sort of skewer (with a space between it for air circulation) it may take up much less area compared to spreading it out flat on a tray. I prefer to core my apples, cut them into slices about eight millimetres thick, then thread them on to stainless

Ancient Skills © Stephen R. Coote. Electronic edition. 95
steel rods and suspend them above my woodstove. I core my apples with a homemade coring tool fashioned from a sharpened piece of thin-walled stainless steel pipe that is forced through the apple. Commercially made apple corers do exist, but may not be common. Some varieties of meat, fruit and vegetables are more suitable for drying than others. Dried food needs to be stored in dry conditions and kept away from insect pests and other vermin.
Ancient Skills © Stephen R. Coote. Electronic edition. 96
Chapter Nine SURVIVAL
Some folks wonder about surviving if stuck in the wilderness, or if the structure of society collapses. I think it is a bit unhealthy to think constantly about such things, but it doesn�t hurt to have some relevant knowledge stored away. Survival is more about attitude, clear thinking and preparedness rather than having a special survival kit. Overcoming fear is a huge help. Having the right frame of mind may depend on your general philosophy, and your familiarity with life in the outdoors and hard circumstances. You can perhaps draw comfort from the fact that thousands of humans have lived in very primitive conditions. There is plenty of survival information around. However here are some factors to consider when preparing your survival �kit�: KNOWLEDGE. How much do you know about the place in which you have to survive? Do you know about the edible and poisonous natural foods in the area? What about natural hazards? What about the water supply and weather conditions? What about the lay of the land and the distance to the nearest settlement? Can you navigate? A survival kit may be different depending on where you will be. Rainforest areas, deserts, snowy high country, enemy territory, and a life raft on the Pacific Ocean are very different places. By informing reliable, helpful people of your plans and whereabouts, you may avoid being stranded in a survival situation. WARMTH. This topic relates to shelter, clothing and firelighting. If you can�t stay warm enough it is no use having other primitive survival knowledge. WATER. There are all sorts of ideas around on how much water you need, and how you can obtain it. But one thing is for sure, you need it to survive. You can last much longer without food than you can without water. Don�t drink seawater. Whether water is plentiful in your area or not, it is a good idea to have a container to store water in. Learn how to obtain water and purify it if necessary. FOOD. If you don�t carry it with you, it has to be purchased, begged, gathered or hunted. Knowledge of available food is of prime importance. Snares and traps may catch more food than you can with a rifle or other weapons. If an animal is lean, then you could eat the brains to get some essential fat.
Ancient Skills © Stephen R. Coote. Electronic edition. 97
THINGS FOR A SURVIVAL KIT When assembling a kit, think about where you are going and what you might experience. Here is a list of things to consider for land-based survival: Warm clothing, stout footwear, a warm hat, a good raincoat (or poncho) and gloves or mittens if necessary. Some fabrics are much better than others for keeping you warm, even when wet. Money, if you are going to be somewhere where you can swap it for useful goods or services. Some sort of waterproof tarpaulin, or even a sheet of plastic film. And maybe a sleeping bag or blankets. Lightweight �survival blankets� with a reflective surface are an option. Water bottle(s), and a metal container for cooking over a fire. Preserved food, candy etc. A small, sturdy, sharp knife. I am seldom without this most basic of all tools. Sometimes I have two them with me. Strong cordage. I often carry a good length of synthetic cord. This is good for snares and bowstrings, but it is most often used for less glamorous tasks. Stronger rope might be useful if you have to negotiate tricky territory. Matches, or some other firelighting tool. Keep them dry. A candle might be handy too. The ultimate firelighting tool for outdoor use is probably one of the synthetic flint sticks commonly known as a �metal match� or �fire steel.� Small flashlight. Modern �LED� flashlights are excellent. Fish hooks and line. A hatchet or machete with a protective cover over the blade. Compass and maps. Signalling equipment (e.g. whistle, mirror, radio, flares etc). First aid gear as appropriate. Eye protection if travelling through snow. Of course, it is still possible to survive if you have none of these things. Nature provides.

Ancient Skills © Stephen R. Coote. Electronic edition. 98
Chapter Ten ANCIENT WISDOM
There is more to life than the five senses tell us. Here are some things to consider and test for yourself. I am nothing like a guru, but I have spent time reading, listening, observing and making mistakes. These good ideas aren�t always easy to think of and work with in hard times, but it is then that they might be of most use. I am trying to make a habit of these good things, but I have quite a way to go yet. The way seems less onerous once you begin to see good results. I must say I do feel a bit hypocritical listing these ideas because I still struggle to work with them. But I feel I have proved them in small ways and I want to share them. Focus on good things. If you want to hit a target with an arrow you have to focus on the target. If you want to express and experience good things you should focus on them. I am not saying you should ignore, and never deal with, bad things; but to help overcome bad things it is better to have a strong focus on the good. It seems to me that our experience is influenced by our thinking. Do good things. My grandma used to say if you are feeling down then the best thing you can do is something nice for someone else. But why wait until you are down? Do good and align yourself with good. You can also expect good. It has been said that God is Love. Good comes from Love, so by aligning ourselves with good we are aligning ourselves with the ultimate Power in the universe. Giving is a source of blessings to both the recipient and the giver. Look for the good in others. Encourage them, help them, forgive them and be nice to them. This applies to everyone - even people that treat you badly. It can be wise to avoid difficult people and situations, but revenge and the desire to hurt are not good. And be gentle with yourself as well. Ask. It has been said if you don�t ask you don�t get. If you ask you may get �no� for an answer, but if you don�t ask you probably won�t get it anyway. Prayer is another form of asking. So �ask� in this higher sense as well, and if your request is good you may be surprised at what happens. Be patient and expect good. Be grateful for what you have. Always thank others for anything you receive, or any act of kindness. Listen. Listen to others, but more importantly listen to your spiritual intuition for guidance. I think everyone has it. I can�t explain exactly how you might hear yours, but I do know that the intuition/ideas that come to you from this source can only be good. Each of us is a valuable, unique part of creation. We each have our place to fill, and our part to contribute - no matter what may be said about us. Be your (good) self. While it may be appropriate to conform with the crowd on occasions, other times it may not be. Make a stand for what is right, and follow your dreams. Everyone should be allowed to figure out life for themselves, and forcing your own ideas on people is not helpful in this regard, although the occasional inspired response can be useful. Lead by example, and by listening. If you have a project that you really feel is right, sometimes it might be appropriate to just start it and see how things go. You might be surprised at how things work out. Then be persistent. To
Ancient Skills © Stephen R. Coote. Electronic edition. 99
me persistence is the key to achievement. But keep �listening�. I can�t help but think that Life must be eternal. There is just too much goodness, beauty, order and intelligence in the universe to conclude otherwise. There is evidence showing that by spiritual means alone the sick have been healed and the dead have been raised. Therefore I find it comforting to think that all stories probably have a happy ending� and if things don�t seem to be happy then maybe the story hasn�t ended yet. Think for yourself. Don�t automatically accept everything you see, hear or read (including the contents of this book). Just because hundreds of people have accepted that something is true for many years does not mean that it is true. Consider, too, that language is sometimes inadequate to convey the true meaning. Chew things over and listen to your intuition. Be aware that there can be more than one way to achieve something. Learn from mistakes. Dare to be different. Be humble. ------------------------------- END ------------------------------- ISBN No: 0-473-08720-0 -----------------