android timeviewer application - optronis
TRANSCRIPT

Android TimeViewer Application
Ver. 1.1
User Manual
Ref. 1921-SU-10-A

Android TimeViewer Ver. 1.1 Ref. 1921-SU-10-A Page 1
Contents
Table of Contents
Contents ....................................................................................................... 1
Table Of Figures ........................................................................................... 2
Concerning Android TimeViewer ............................................................... 3
System Requirements ................................................................................. 3
Install ............................................................................................................ 4
Uninstall ........................................................................................................ 4
Software Licenses and Liability .................................................................. 4
First Steps… ................................................................................................. 4
Android TimeViewer Application ................................................................ 5
Connect ........................................................................................................ 6 Troubleshooting connecting the camera ........................................... 6
Connection ........................................................................................ 7
Live Window ............................................................................................... 10
Menu ............................................................................................... 12 Settings 12
About 19 Exit 20 Live 20
Memory 20 SSD 20
Acquire Sequence ........................................................................... 21
Memory Window ........................................................................................ 24 Overview ......................................................................................... 24 Save Sequence to SSD ................................................................... 26
SSD Window ............................................................................................... 27 Overview ......................................................................................... 27
Appendix .................................................................................................... 30 Customer Service ............................................................................ 30
Android TimeViewer Ver. 1.1 Ref. 1921-SU-10-A Page 2
Table of Figures
FIGURE 1 : TIMEVIEWER LAUNCHER ................................................................................................................................ 5 FIGURE 2 : SCAN .......................................................................................................................................................... 7 FIGURE 3 : WI-FI LINK .................................................................................................................................................. 8 FIGURE 4 : MANUAL WI-FI PARAMETERS ......................................................................................................................... 9 FIGURE 5 : LIVE MODE ................................................................................................................................................ 10 FIGURE 6 : CHANGE PARAMETER IN LIVE MODE ............................................................................................................... 11 FIGURE 7 : MENU ...................................................................................................................................................... 12 FIGURE 8 : SETTINGS .................................................................................................................................................. 13 FIGURE 9 : FRAME FORMAT ......................................................................................................................................... 14 FIGURE 10 : ABOUT DIALOG ........................................................................................................................................ 19 FIGURE 11 : EXIT DIALOG ............................................................................................................................................ 20 FIGURE 12 : MEMORY FILLED ....................................................................................................................................... 21 FIGURE 13 : ACQUISTION IN PROGRESS .......................................................................................................................... 22 FIGURE 14 : RECORDING FINISHED ................................................................................................................................ 22 FIGURE 15 : MEMORY WINDOW .................................................................................................................................. 24 FIGURE 16 : CHANGE SET OUT ..................................................................................................................................... 25 FIGURE 17 : SAVE SEQUENCE ....................................................................................................................................... 26 FIGURE 18 : SSD VIEW ............................................................................................................................................... 27 FIGURE 19 : SSD SET SEQUENCE .................................................................................................................................. 28 FIGURE 20 : FORMAT SSD DIALOG ............................................................................................................................... 28 FIGURE 21 : SSD AND SEQUENCE INFORMATIONS ............................................................................................................ 29

Android TimeViewer Ver. 1.1 Ref. 1921-SU-10-A Page 3
Concerning Android TimeViewer
Use Android TimeViewer to capture and analyze video on your Android tablet from digital high-speed video cameras (CamRecord Sprinter Series) by Optronis. Android TimeViewer is optimized to work with single high-speed camera recordings.
System Requirements
TimeViewer Application works with Android tablets.
Please familiarize first with Android operating system before handling the camera. This user manual can not give operating instructions for the Android system.
The TimeViewer Application requires a tablet with Android 5.0 or higher
(API 21 +). TimeViewer Application has been tested with Android 7.1.1 (last official version) on a Google Nexus 9 tablet.
In order to communicate with the camera, the user has to connect the Wi-Fi dongle provided with the camera (Ralink RT5370, RT2870 or RT3070).
Tablets tested:
- Google Nexus 9 (Recommended)
- Samsung Galaxy Tab S

Android TimeViewer Ver. 1.1 Ref. 1921-SU-10-A Page 4
Install
Please install TimeViewer by Google Play:
www.play.google.com/Apps
Search the application name: TimeViewer Optronis and install the app on an android tablet.
Uninstall
Use Android functions to uninstall the TimeViewer App from your tablet.
Software Licenses and Liability
The application and this manual are the exclusive copyrights of Optronis.
Copying of the software or reproduction of this manual in whole or in part by any means is expressly forbidden without the written consent of the manufacturer.
Optronis makes no representations or warranties with regard to the use of the software and documentation and cannot be held responsible for the results of the use of this manual and the software.
Future upgrades of application and system software and any changes in specifications and functions will be announced separately.
The company names and product names in this manual are the trademarks or registered trademarks of their respective companies.
First Steps…
We recommend that you familiarize yourself with the application in advance of your first project. Connect a camera, setup Live Video and familiarize yourself with focus distance and diaphragm setting of the lens. Setup the high-speed camera, capture some content, create recordings.

Android TimeViewer Ver. 1.1 Ref. 1921-SU-10-A Page 5
Android TimeViewer Application
After installing the Android TimeViewer application, a TimeViewer shortcut appears on the window.
Figure 1 : TimeViewer Launcher

Android TimeViewer Ver. 1.1 Ref. 1921-SU-10-A Page 6
Connect
Connect a WiFi dongle to the high speed Optronis CamRecord Sprinter-series camera to its USB2 port.
Switch on the camera and wait some seconds. Then start the application, search for the camera and connect to the camera.
The camera system is intended to be handled by Android tablet via WiFi or by PC Windows software. The system does not operate using PC (Windows TimeViewer software) and tablet (Android TimeViewer App) at the same time.
Troubleshooting connecting the camera
Please contact [email protected] for any trouble connecting the camera.
Android TimeViewer Ver. 1.1 Ref. 1921-SU-10-A Page 7
Connection
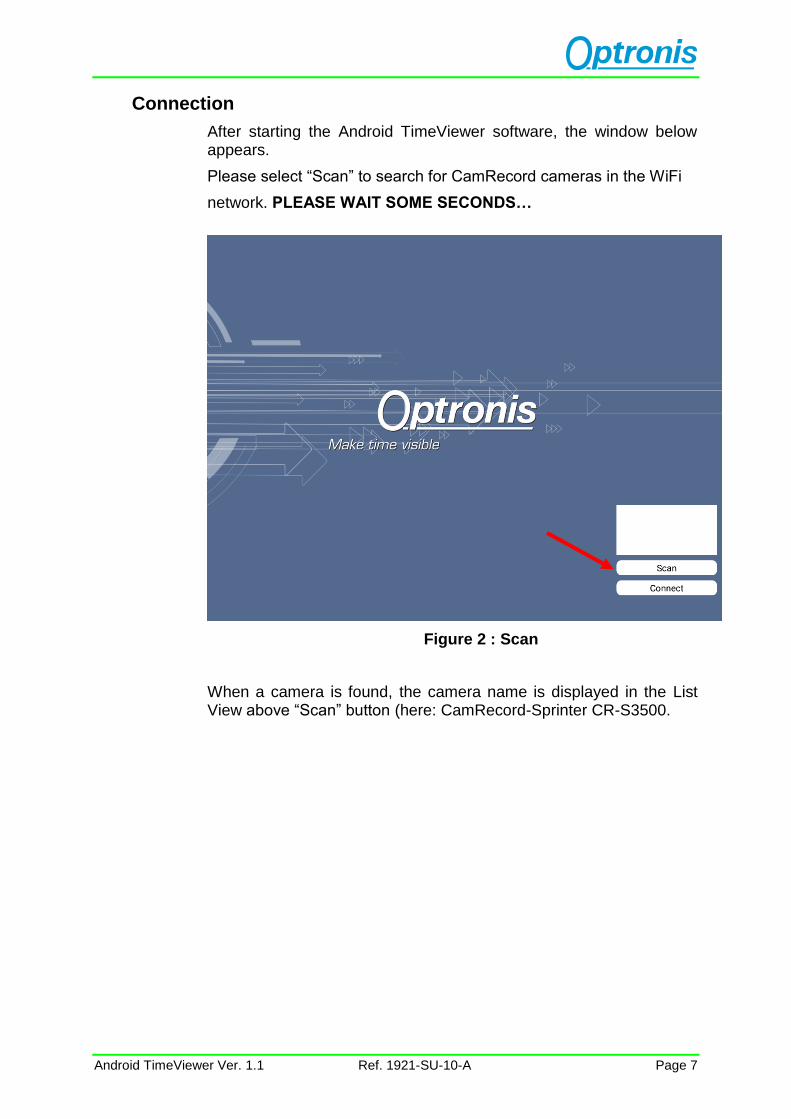
After starting the Android TimeViewer software, the window below appears.
Please select “Scan” to search for CamRecord cameras in the WiFi
network. PLEASE WAIT SOME SECONDS…
Figure 2 : Scan
When a camera is found, the camera name is displayed in the List View above “Scan” button (here: CamRecord-Sprinter CR-S3500.

Android TimeViewer Ver. 1.1 Ref. 1921-SU-10-A Page 8
Figure 3 : Wi-Fi Link
By clicking on “CamRecord-Sprinter CR-S3500”, the Wi-Fi connection between the camera and the tablet is established.
You can then connect to the camera by clicking on “Connect” button.
Android TimeViewer Ver. 1.1 Ref. 1921-SU-10-A Page 9
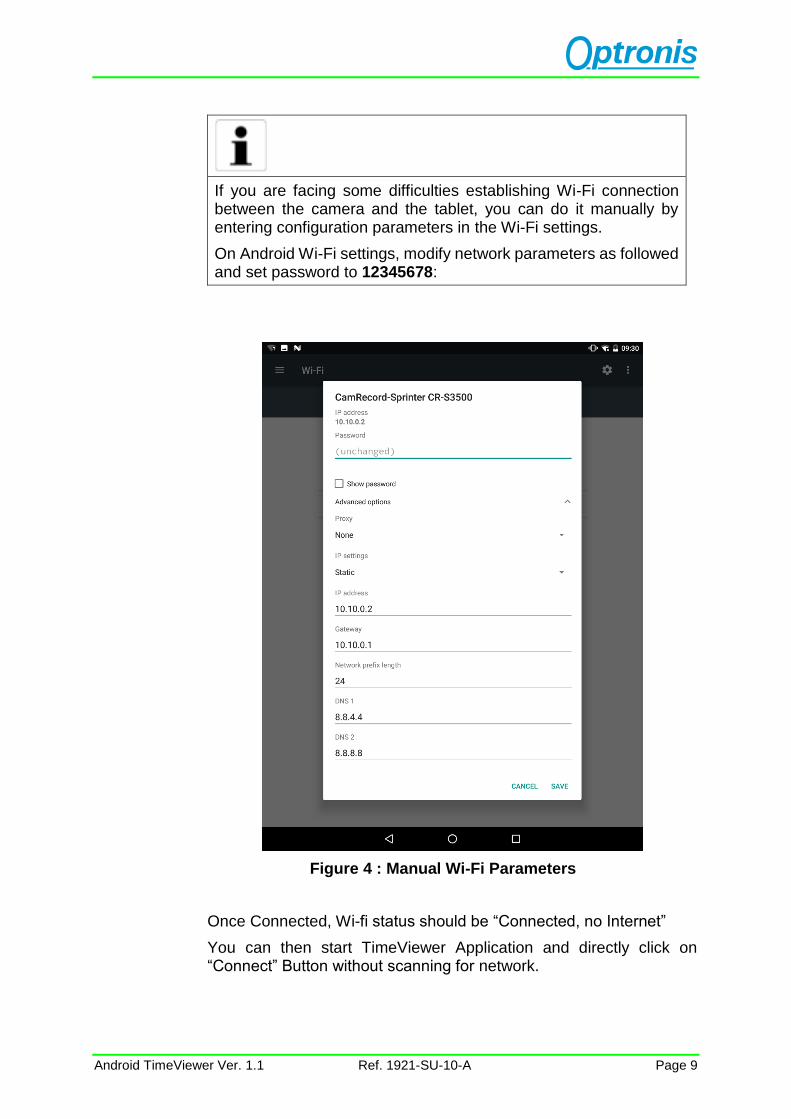
If you are facing some difficulties establishing Wi-Fi connection between the camera and the tablet, you can do it manually by entering configuration parameters in the Wi-Fi settings.
On Android Wi-Fi settings, modify network parameters as followed and set password to 12345678:
Figure 4 : Manual Wi-Fi Parameters
Once Connected, Wi-fi status should be “Connected, no Internet”
You can then start TimeViewer Application and directly click on “Connect” Button without scanning for network.
Android TimeViewer Ver. 1.1 Ref. 1921-SU-10-A Page 10
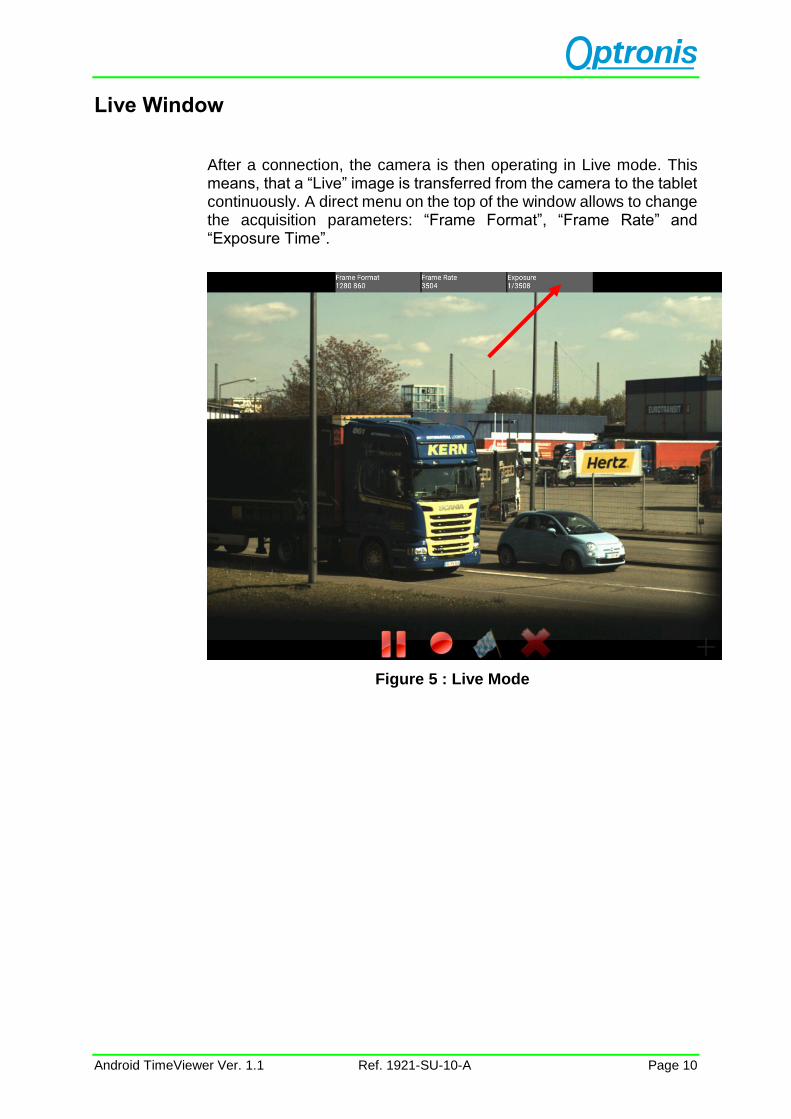
Live Window
After a connection, the camera is then operating in Live mode. This means, that a “Live” image is transferred from the camera to the tablet continuously. A direct menu on the top of the window allows to change the acquisition parameters: “Frame Format”, “Frame Rate” and “Exposure Time”.
Figure 5 : Live Mode

Android TimeViewer Ver. 1.1 Ref. 1921-SU-10-A Page 11
Figure 6 : Change Parameter in Live Mode

Android TimeViewer Ver. 1.1 Ref. 1921-SU-10-A Page 12
Menu
Settings
For additional settings please select the settings menu by wiping the menu from the left window side.
Figure 7 : Menu
Settings
Open Window: Wipe from left To right

Android TimeViewer Ver. 1.1 Ref. 1921-SU-10-A Page 13
Figure 8 : Settings
Back to Live View
Go back to the Live Window.

Android TimeViewer Ver. 1.1 Ref. 1921-SU-10-A Page 14
Frame Format
Changes the image size of the camera.
Figure 9 : Frame Format
Customize… allows to select specific values.
Frame Rate [FPS]
Changes the speed of the camera in frames per second.
Android TimeViewer Ver. 1.1 Ref. 1921-SU-10-A Page 15
Exposure Time [seconds]
Changes the exposure time of the camera.
Low values of exposure time (e.g. 1/10000) freeze fast moving objects but need a lot of light for illuminating the objects. High values are limited by the Frame Rate of the camera. Maximum exposure time is given by 1/FrameRate.
Gain
Changes the amplifier value inside the sensor to increase sensitivity.
The CamRecord Sprinter camera allows for a gain of x1.
Recording Memory
Reduces the recording time of the camera. The lower the Recording Memory, the lower the recording time of the camera but the higher the number of sequences that can be stored on the SSD of the camera.
Recording memory that has to be saved on camera SSD can be also reduced by “Set In” and “Set Out”.
Android TimeViewer Ver. 1.1 Ref. 1921-SU-10-A Page 16
Trigger Position
The camera uses a “Ring-Memory” This means that when starting a recording, the recording fills the camera memory until memory is full and then restarts automatically from the beginning. Setting the Trigger Position to e.g. 50% of the available memory, 50% of the image data is set in front of the Trigger and 50% of the image data is set behind the Trigger.
A trigger signal generally stops the acquisition. Depending on the trigger position it stops immediately (Trigger Position at the end of the memory) or with some delay (Trigger Position between beginning and end of the memory)
Synchronization
Choose an internal or an external synchronization.
Internal Synchronization uses the camera internal time base to generate the required frame rate. If the frame rate has to be synchronized to an external source please use external synchronization. For external synchronization, an external TTL signal has to be applied to the “External Sync.” pin of the camera. Please refer to the camera user manual for more information about external synchronization.

Android TimeViewer Ver. 1.1 Ref. 1921-SU-10-A Page 17
Trigger Source
The default trigger is via the application. When a separate trigger device is used, change the trigger source setting accordingly. Trigger can be active by application, by hardware switch, or by TTL signal.
Trigger on Application:
Please use the button Trigger Recording.
Trigger Extern on Falling Edge (Trigger on Switch):
Please connect a switch to the external trigger input of the camera or connect a TTL signal (low impedance < 100 Ohm). Trigger will be performed on falling edge of the TTL signal or on closing contact of a switch.
Trigger on Extern TTL Rising Edge:
Please connect a TTL signal (low impedance < 100 Ohm) to the external trigger input of the camera. Trigger will be performed on rising edge of the TTL signal.
Device Name
Name of the camera.
Model Name
Name of the camera model.
Serial Name
Camera Serial Number.
Memory Size
Camera internal memory.
Sensor Color
Monochrome (Black/White) or Color Sensor.
Android TimeViewer Ver. 1.1 Ref. 1921-SU-10-A Page 18
Sensor Bayer Type
Only for Color Sensor. Information about the configuration of the Color Bayer filter.
Real Frame Rate
For high frame rates, the internal synchronization clock of the camera don´t allow to reach exactly the selected frame rate. The “Real frame rate” information shows the real frame rate of the camera. If the frame rate has to be accurate, please use external synchronization clock of the camera.
Erase Data Base
Erase all custom values added by “Customizing…” in Frame Format, Frame Rate and Exposure Settings.
Language
Language of the application (English).
Grid
Adds a grid to the image. This is sometimes helpful to position the objects inside the image.

Android TimeViewer Ver. 1.1 Ref. 1921-SU-10-A Page 19
About
Android TimeViewer Application Version.
Figure 10 : About Dialog

Android TimeViewer Ver. 1.1 Ref. 1921-SU-10-A Page 20
Exit
Exit the Android TimeViewer application.
Figure 11 : Exit Dialog
Live
Live Window and Acquisition.
Memory
Playback of a recorded sequence and storage.
To view a Recording in the “memory window”, please switch to “memory”
SSD
Access to the SSD inside the camera.

Android TimeViewer Ver. 1.1 Ref. 1921-SU-10-A Page 21
Acquire Sequence
To acquire a sequence please use the buttons on the bottom of the window:
From left to right:
- Start / Stop Live View
- Start Recording
- Trigger Recording
- Abort Recording
Figure 12 : Memory Filled

Android TimeViewer Ver. 1.1 Ref. 1921-SU-10-A Page 22
Figure 13 : Acquistion In Progress
Figure 14 : Recording Finished
Android TimeViewer Ver. 1.1 Ref. 1921-SU-10-A Page 23
Here is an example : Start the record, wait for the memory to be filled, once the memory filled, press the trigger button and wait until the end of the counter.
Once the recording is finished, the view is still in live mode and doesn’t switch automatically in memory mode.

Android TimeViewer Ver. 1.1 Ref. 1921-SU-10-A Page 24
Memory Window
Overview
Memory allows to playback a recorded sequence.
Figure 15 : Memory Window
Cut the sequence
Playback Speed
Goto Image Number Save Sequence to SSD
Navigate inside sequence Playback Sequence
Android TimeViewer Ver. 1.1 Ref. 1921-SU-10-A Page 25
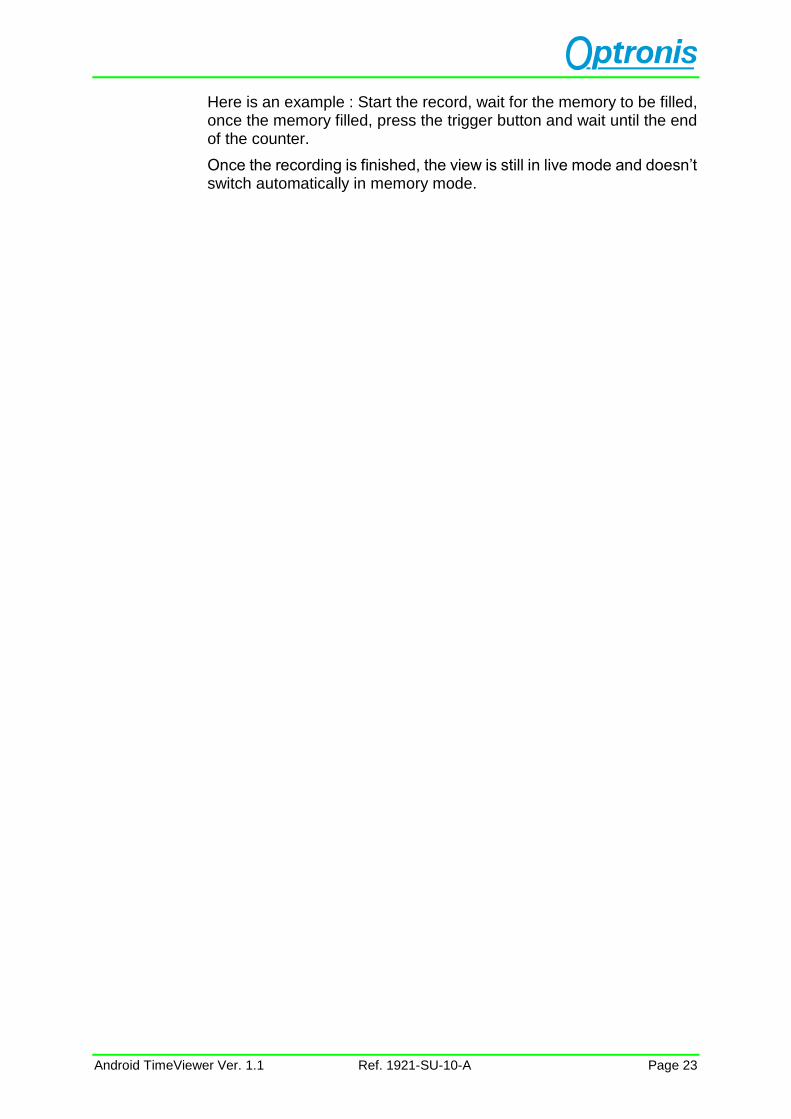
To cut the image sequence please select “Set In” and “Set out”. Selecting the values can be done by typing in the exact value as shown in the image below.
Figure 16 : Change Set Out
When a sequence is playing, a lot of parameters are not available, you need to pause the sequence to change those. For example, if you want to go to live mode, you have to pause the playback from memory before going to live mode.

Android TimeViewer Ver. 1.1 Ref. 1921-SU-10-A Page 26
Save Sequence to SSD
To save a sequence in the SSD, set the marker Set IN and set Out and click on the “Save Sequence to SSD button. A progress bar appears to give the current status of sequence saving.
Figure 17 : Save Sequence
During the saving process, all functions are unavailable. Wait until the end of the task to proceed to a new operation.
Android TimeViewer Ver. 1.1 Ref. 1921-SU-10-A Page 27
SSD Window
Overview
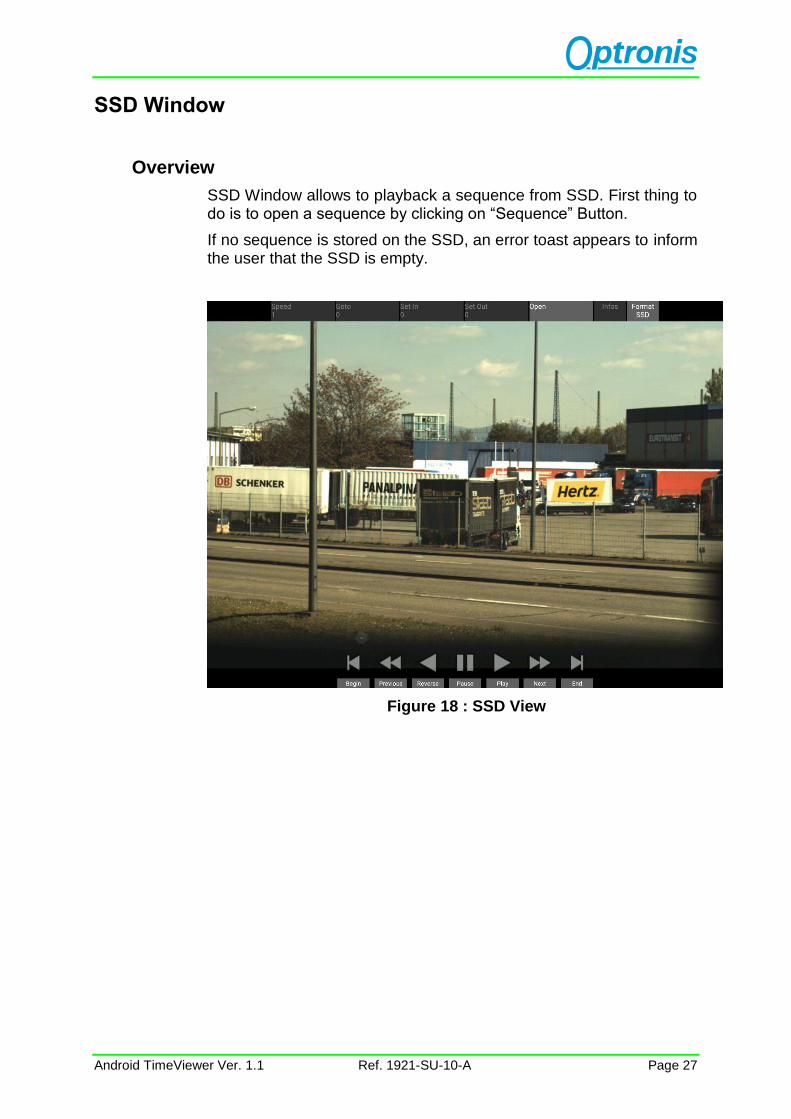
SSD Window allows to playback a sequence from SSD. First thing to do is to open a sequence by clicking on “Sequence” Button.
If no sequence is stored on the SSD, an error toast appears to inform the user that the SSD is empty.
Figure 18 : SSD View

Android TimeViewer Ver. 1.1 Ref. 1921-SU-10-A Page 28
Figure 19 : SSD Set Sequence
This view also allows to format the SSD by clicking on the “Format SSD” button.
Figure 20 : Format SSD Dialog

Android TimeViewer Ver. 1.1 Ref. 1921-SU-10-A Page 29
Once a sequence is selected, some information on the sequence and the SSD can be retrieved by clicking on the “Infos” button.
Figure 21 : SSD and Sequence Informations
During the reading process, all functions are unavailable. To set new parameters or go back to memory mode or live mode, pause the reading sequence process first.

Android TimeViewer Ver. 1.1 Ref. 1921-SU-10-A Page 30
Appendix
Customer Service
For any questions or problems, please do not hesitate to ask our customer service:
Optronis GmbH
Ludwigstrasse 2
77694 Kehl
Tel: +49 (0) 7851 9126 0
Fax: +49 (0) 7851 9126 10
e-mail: [email protected]
In case of problems please prepare the following information:
• Name of the device:
(e.g. CamRecord CR-Series or CamRecord Sprinter Series)
• Serial-Number of the camera:
• Operating System:
Android
• Software Version
See “About” in the Settings Menu.
• Short description of the problem