ankle wrist elbow supination - djo · pdf filesupination orthosis ... below knee amputee...
TRANSCRIPT

Advance Dynamic ROM®
Wrist Extension/Flexion Orthosis Elbow Orthosis Supination Orthosis Ankle Orthosis Knee Orthosis Below Knee Amputee Orthosis
Instruction Manual
Wrist
Elbow Supination
Ankle
Empi205 Hwy 22 EastClear Lake, SD 57226 USA 1.651.415.9000; 1.800.328.2536
360390 Rev. A © 2010 Empi 1/10
(MDSS) Medical Device Safety Service GmbHSchiffgraben 4130175 Hannover, GermanyTele: 49-511-62 62 86 30
Your Authorized Representative:
0473

Table of Contents Introduction ..................................................................................................................... 1Indications for use ................................................................................................................. 1Warning ................................................................................................................................... 1Contraindications .................................................................................................................. 1Precautions .............................................................................................................................. 1
Product Description ................................................................................................. 2-3
Instructions for Use ...................................................................................................... 4General fitting instructions for flexion and extension devices ................................... 4Unpack and review components ...................................................................................... 4Prepare device for fitting ..................................................................................................... 4Operating the lock lever and lock lever safety ............................................................. 4Fit the device .......................................................................................................................... 5Strut length adjustment ........................................................................................................ 5Cuff and strap adjustment ............................................................................................... 5-6Inspect the fit .......................................................................................................................... 6Initiating treatment ................................................................................................................ 6Post-wear criteria ................................................................................................................... 7Fitting tips ............................................................................................................................ 7-8Removal guidelines ............................................................................................................... 8
Advance Dynamic ROM® Wrist ......................................................................... 8Fitting instructions ................................................................................................................. 8Palmar support positioning options .................................................................................. 9Cuff adjustment and strap adjustment ............................................................................. 9
Advance Dynamic ROM Supination ..............................................................10Fitting instructions ...............................................................................................................10Custom adjustment .............................................................................................................10
Advance Dynamic ROM Ankle ..........................................................................11Fitting instructions ...............................................................................................................11Custom adjustment .............................................................................................................12Special considerations for inversion ...............................................................................12
Advance Dynamic ROM Below Knee Amputee (BKA) Extension ........................................................13Patient selection criteria ....................................................................................................13
Care Instructions ..........................................................................................................13Maintenance .........................................................................................................................13Cleaning .................................................................................................................................13
Declaration of Conformity ....................................................................................14
Limited Warranty and Disclaimer .............................................................15-16
Notes:

Introduction The goal of dynamic splinting is to apply a low-load prolonged stress to connective tissue.
Indications for useDynamic orthoses may be used to increase joint range of motion and alleviate stiffness from contractures that result from surgical procedures, prolonged immobilization and joint trauma.
ContraindicationsPatients should not use this device if they have:
•Severeosteoporosis •Thrombophlebitis •Severespasticity •Anyneurologicalorvascularchangeswhilewearingdeviceorwhen range of motion is otherwise contraindicated (e.g., due to severe abnormal joint alignment or pathological boney block that inhibits joint movement).
WarningCollagen fiber rupture can occur if stressed beyond 2% of resting length. TopreventskinbreakdownwhilewearingtheBKA,ensureaproperfit, provide adequate padding, and consider application of custom molded socket.
Precautions•Usewithcautiononpatientswith:
- Mild to moderate spasticity - Clonus - Healing skin wounds
•Deviceshouldonlybewornwhilerestingorsleeping.
•Itisnotdesignedtoprovidestabilityorsupport.
•Itisnotrecommendedtowearthisdevicewhenoperatingmachinery, motorized vehicles, during exercise or any other physical activity.
•Handledevicewithcare.Whendeviceisbeingfittedoradjusted,strutsmaymoveunexpectedly.Strutmovementmaycausepinching. Dropping or misuse may cause component damage.
4. Claim Procedure (cont.)sole reasonable discretion that the product contains defective workmanship or materials, Empi will refund to purchaser the purchase price for the defective product or return the repaired product or a replacement product to purchaser, freight and insurance pre-paid, as soon as reasonably possible following receipt oftheproductbyEmpi.Iftheproductdoesnotcontaindefectiveworkmanshipor materials, Empi will return the product to the purchaser, freight and insurance billed to the purchaser.
5. DisclaimersTHEWARRANTYSETFORTHABOVEISINLIEUOFALLWARRANTIESEXPRESS,IMPLIEDORSTATUTORY,INCLUDING,WITHOUTLIMITATION,WARRANTIESFORMERCHANTABILITY,FITNESSFORAPARTICULAR PURPOSEANDNONINFRINGEMENTANDWARRANTIESARISINGFROMTHECOURSEOFDEALINGORUSAGEOFTRADE.IFNOTWITHSTANDINGTHEABOVELANGUAGE,ANIMPLIEDWARRANTYISHELDTOEXIST,SUCHIMPLIEDWARRANTYSHALLONLYEXTENDFORTHELIFETIMEOFTHEINITIALPURCHASEROFTHEPRODUCT.
Noemployee,representativeoragentofEmpihasanyauthoritytobindEmpito any affirmation, representation or warranty regarding the product except as expressly stated in this warranty.
16 1
Glossary of Symbols
Keep away from sunlight
Keep dry

Limited Warranty and Disclaimer
1. Limited WarrantyEmpi warrants to the initial purchase (“The Purchaser”) and to no other person thattheAdvanceROMorthosis(“TheProduct”)shallbefreefromdefectsinmaterial and workmanship for one year from the date of purchase. Empi will, at Empi’s option, refund the purchase price for, repair or replacement of any defective product during the warranty period.
2. Exclusions from the WarrantyAccessoriesincluding,butnotlimitedto,detachablefoampads,areexcludedfromthewarrantyandaresold“ASIS”.Thiswarrantyisvoidedimmediatelyas to any product which has been repaired, altered or modified by any person other than authorized employees or agents of Empi or which have been subjected to misuse, abuse, neglect, damage in transit, accident or negligence.
3. Limitations on LiabilitiesEmpi’ssoleliabilityintheeventofabreachoftheWarrantyshallbelimited to refunding the purchase price, repair or replacement of the defective product.EMPISHALLNOTBELIABLEFORANYINDIRECT,INCIDENTAL,SPECIALORCONSEQUENTIALDAMAGESRESULTINGFROMANYDEFECT,FAILURE,MALFUNCTIONOFTHEPRODUCTORFROMANYOTHERMATTERRELATINGTOTHEPRODUCT,INCLUDING,BUTNOTLIMITEDTO,LOSSOFPROFITS,LOSSOFREVENUE,INABILITYTOUSETHEPRODUCTORMEDICALEXPENSES.INNOEVENTSHALLEMPI’S LIABILITYUNDERANYCAUSEOFACTIONWHATSOEVERRELATINGTOTHEPRODUCTEXCEEDTHEPURCHASEPRICEOFTHEPRODUCT.
4. Claim ProcedureInordertorecoverunderthiswarranty,purchasersmustsendEmpiorEmpi’sauthorized agent written detailed notice of the defect prior to the expiration ofthewarrantyperiodandwithin30daysofdiscoveryofthedefect.UponEmpi or the agents written request and authorization, purchaser shall return the product to Empi or authorized agent for inspection using the original shippingcartonoradurablesubstitute.Noticeandreturnshipmentshall be sent to your local-authorized Empi agent. Empi shall not be responsible fordamageduetoimpropershippingorpackaging.IfEmpideterminesinits
Product Description1. Tension spring: Patented eccentric spiral torsion spring mechanism
provides continuous levels of tension with little or no end-range drop-off.
2. Angle reference scale: Provides general reference for measuring angle ofdeflectionoforthosismovement.Useagoniometerforprecise measurements.
3. Tension control lever: Adjustsleveloftensionorforceofthetensionspring.
4. Tension control indicator: Displays tension control setting from 0-10, (low-high).
5. Lock lever: Locksdeviceintoplaceatoneofseveralangles.
6. Lock lever safety: Prevents disengagement of lock lever.
7. Adjustable struts: Allowslengtheningandshortening.
8. Cuff: Conforms to patient’s limb for custom fit and comfort.
9. Foam Pads: Provide even pressure distribution and comfort over treated area.
10. Adjustment straps: Securelyfastensdevicetopatient.
11. Palmar Support (Wrist device): Detachable and allows for free-floating lateral movement, or locks into slight ulnar, radial, or neutral positions.
12. Stabilizing Bars (Flexion devices, elbow and knee devices only): Curved, non-adjustable bars help maintain splint position and maximize flexion range.
2 15

We,EmpiInc.,locatedat 205 Hwy 22 East ClearLakeSD57226USA
declareunderitssoleresponsibility,thatthemarkingsonyourAdvanceDynamicROM®Orthosesareyourassuranceofitsconformitytothehighestapplicable standards of medical equipment safety. The following mark may appear on you device.
Council Directive 93/42/EEC Concerning Medical Devices (Medical Device Directive).
14 3
3 4
2
7
8
9
10
5 & 6
1
Elbow extension orthosis
Wrist flexion
0473
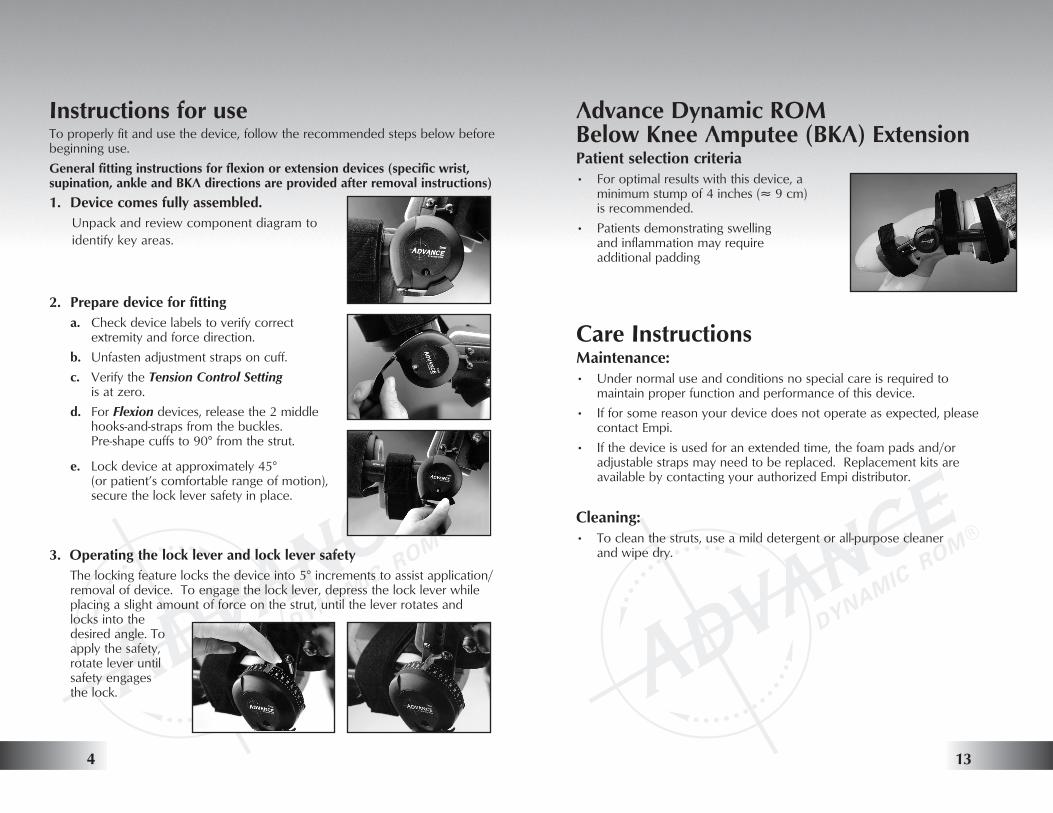
Advance Dynamic ROM Below Knee Amputee (BKA) ExtensionPatient selection criteria • Foroptimalresultswiththisdevice,a
minimum stump of 4 inches (» 9 cm) is recommended.
• Patientsdemonstratingswelling and inflammation may require additional padding
Care InstructionsMaintenance:• Undernormaluseandconditionsnospecialcareisrequiredto
maintain proper function and performance of this device.
• Ifforsomereasonyourdevicedoesnotoperateasexpected,please contact Empi.
• Ifthedeviceisusedforanextendedtime,thefoampadsand/or adjustablestrapsmayneedtobereplaced.Replacementkitsare available by contacting your authorized Empi distributor.
Cleaning:• Tocleanthestruts,useamilddetergentorall-purposecleaner
and wipe dry.
Instructions for useTo properly fit and use the device, follow the recommended steps below before beginning use.
General fitting instructions for flexion or extension devices (specific wrist, supination, ankle and BKA directions are provided after removal instructions)
1. Device comes fully assembled. Unpackandreviewcomponentdiagramto identify key areas.
2. Prepare device for fitting a. Check device labels to verify correct
extremity and force direction.
b. Unfastenadjustmentstrapsoncuff.
c. VerifytheTension Control Setting is at zero.
d. ForFlexion devices, release the 2 middle hooks-and-straps from the buckles.
Pre-shape cuffs to 90° from the strut.
e. Lockdeviceatapproximately45° (or patient’s comfortable range of motion), secure the lock lever safety in place.
3. Operating the lock lever and lock lever safety The locking feature locks the device into 5° increments to assist application/
removal of device. To engage the lock lever, depress the lock lever while placing a slight amount of force on the strut, until the lever rotates and locks into the desired angle. To apply the safety, rotate lever until safety engages the lock.
134

4. Fit the device a. Slidespecificbodypartthroughproximalcuffanddistalcuff.Position
strut and tension spring cover on lateral side of body part.
b. Alignandcenterthespringwiththejointaxis.Alignstrutsparallelto thelongbones.OnFlexion devices, stabilizing bars should not touch patient skin.
5. Strut length adjustment a. To achieve optimal fit, changing the
distal or proximal strut length may be required.
b. Do not restrict motion with distal strut.
c. Do not impinge on tissues with proximal strut.
Caution: Extending strut beyond last adjustment may cause leaf pin to fall out. If this occurs, reinsert leaf pin.
6. Cuff and strap adjustment a. Cuff adjustment: Bend cuffs so they maintain proper strut alignment
andconformcomfortablytothepatient’slimb.Foampadsmaybe repositioned on the cuffs or trimmed/sized to maximize patient comfort.
Advance Dynamic ROM Ankle (cont.)Custom adjustment1. Strut length: Position proximal
strut so cuff does not restrict knee motion. Check strut length and adjust as needed.
2. Calf cuff: Ifadditionalcuffconformity is required, remove the device, remove the foam pad and adjust.Replacethefoampadandre-apply.Securethestrap.
3. Foot cradle: Canbeadjustedtoaccommodatevariouslengths.Adjustthe strut so the ball of the foot rests on the midpoint of the foot cradle. Do not impede ankle dorsiflexion with foam pads or heel cradle.
4. Ankle foam pad: Position the ankle foam pad to minimize any neurovascular pressure on the dorsum of the foot.
Special considerations for inversionThe dual tension springs and adjustable foot strut length offer a variety of options to assist in foot positioning.Sinceinversionoftenaccompanies an ankle plantarflexion contracture, shorten the lateral strut on the foot plate cradle and/or increase the tension on the lateral tension spring to help encourage movement out of inversion.
12 5

Advance Dynamic ROM AnkleFitting instructions1. Initialproductpreparationisthesameas
otherROMdevices.
2. Loosenadjustmentstrapsonthecalf,ankle,heel, and foot plate.
3. Slidefootintodeviceandaligntensionsprings with medial and lateral malleoli.
4. Alignproximalstrutswiththelongbonesofthe calf medially and laterally.
5. Position ball of foot on midpoint of foot cradle and loosely secure heel cradle strap to proper position.
6. To achieve proper fit:
a. Removefoampadfromcalfcuff.
b. Loosenhookandlooponcalf.
c. Graduallyoverlapcalfcufffor a snug/comfortable fit.
7. Re-securestrapsbytighteningdoublepullankle adjustments strap and tightening calf strap so the strap pulls across open end of calf cuff.
6. Cuff and strap adjustment (cont.) b. Strap adjustment:Secureproximalanddistalstraps,thenmiddlestraps.
Strapsshouldbesnugenoughtoallowafingerbetweenstrapandskin. OntheFlexion devices the middle straps do not have to be as snug because their purpose is to ensure proper alignment and positioning of joint axis. Recommendation: Locate buckles on the medical sides of the cuff and position them so the straps are pulled across the open ends of the cuff.
7. Inspect the fit Check alignment and adjusts straps as needed. Check for any neurological
or vascular changes, such as numbness or tingling. Proper fitting of Advance Dynamic ROM Orthosis is essential for maximum therapeutic effectiveness and patient comfort.
8. Select splint function Fordynamicsplinting disengage both the lock lever and lock lever safety.
9. Initiating treatment a. Determine initial tolerance. Settensionlevelatzeroandinstruct
patient to wear the device for 2-4 hours. Patient should be alert but non-active, so tolerance to the device can be monitored. (SeeTable1and2).
b. Increase treatment time. Maximum treatment time should be establishedbyaphysicianortherapist.Graduallyincreasetreatment time based on the patient’s connective tissue remodeling stage and follow post-wear criteria. Treatment time and tension recommendations are listed in Table 1 and 2.
c. Increase treatment tension. Increasetensionlevelswhennogain in range of motion is made and post-wear soreness lasts less than 60minutes.
Caution: Overtightening or overloosening the tension spring can damage the mechanism and/or cause injury. A solid red block appearing in the tension indicator window indicates overtightening or overloosening.
6 11

Post-wear criteriaThe patient should not experience additional soreness/stiffness for more than one hour following removal of device. Check for neurological or vascular changes.
Table 1. Guidelines for use: Post tissue trauma/orthopedicRangeofmotionlimitationscausedbyinflammatoryprocessduetotrauma,fracture, surgery, etc.
1Currier,D.,Nelson,R.andCummings,G.,DynamicsofHumanBiologicalTissues. F.A. Davis Company. Ch 1-2, 1992.
*Warning: Collagen fiber rupture can occur if stressed beyond 2% of resting length.
Table 2. Guidelines for use: Immobilization/NeurologicRangeofmotionlimitationscausedbycontractureformationduetostroke,closed head injury, or other nervous system injury. Hypotonicity or mild to moderate hypertonicity (spasticity) usually present.
1Currier,D.,Nelson,R.andCummings,G.,DynamicsofHumanBiologicalTissues. F.A. Davis Company. Ch 1-2, 1992.
Fitting tips• Toensureproperstrutalignment,bendmalleablecufftoform90°angle
to strut, then apply and shape to the patient.
• Positionlimbatendrangeanduseminimumtensionleveltomaintain end range position (i.e., sit with leg outstretched versus using dynamic spring tension to position leg).
Advance Dynamic ROM SupinationFitting instructions1. Initialproductpreparationisthesameas
otherROMdevices.
2. Alignthedevicesothecenterofthetension spring lines up with the longitudinal axis of the forearm.
Custom adjustment1. Adjustthedistalstrutsothehandcradle
is positioned just behind the knuckles of the hand.
2. Position the proximal strut so the cuff does not impinge on the medial axial tissue.
3. Ifstrutadjustmentisrequired,changeproximal or distal strut length by depressing the leaf pin and lengthening or shortening as needed.
10 7
Connective Tissue Required Force Time-Usage per Day Remodeling Stage1 (hours)
AcuteInflammatory:0-5days Low* Minimum1-3
FibroplasticStage:1-3weeks Low* 1-3
Consolidation:3-9weeks LowModerate* 3+
Maturation:9weeks Moderate 6-8
Connective Tissue Required Force Time-Usage per Day Remodeling Stage1 (hours)
Disorganization:0-6weeks Low 1-3
ConsolidationStage:7+weeks Moderate 6-8

Palmar support positioning options1. Free floating: Removingtheallenheadscrewlocatedatthebaseofthe
Palmar support will provide unrestricted movement throughout the patient’s available ulnar radial range of motion.
2. Lock-out option: Insertandtightentheallenheadscrewinoneofthecorresponding holes at the base of the Palmar support. This positions the Palmar support in neutral or in slight (» 4°) radial or ulnar positions depending on hole selected.
Cuff adjustment and strap adjustment (Wrist device)Ifnecessary,repositionstraps.Positionthebuckleson the radial side of the wrist so the straps pull across the open ends of the cuffs.
An optional custom moldable finger platform is available. Contact your authorized Empi distributor to order.
Fitting tips (cont.)• Whenmuscleguardingispresent,uselockandlocksafetytohold
joint until muscle relaxes, then release lock and lock safety for dynamic treatment.
• Totalendrangetreatment(TERT)time2 can be divided into several sessions versus one longer session to accommodate patient needs without impacting results.
2Flowers,K.andLaStayo,P.,EffectsofTotalEndRangeTimeonImprovingPassiveRange of Motion. Journal of Hand Therapy7:150-157,1994.
10. Removal guidelines a. Alwayslockdeviceintoposition.
b. Unfastenadjustmentstraps.
c. Slowlyremovelimbfromdevice.
Advance Dynamic ROM WristFitting instructions1. Initialproductpreparationisthesameas
otherROMdevices.
2. Slidethehandandarmthroughproximalcuffs. Positioning of the hand:
a. Extension device: Palm should rest on top of hand platform.
b. Flexion device: Hand platform should rest on back (dorsum) of hand.
3. Position the struts and tension spring on the ulnar side of the forearm.
Align device so the center of the tension spring lines up with the wrist-joint axis. Align the struts parallel to the long bones of the forearm on the ulnar side.
8 9