antibody array user's guide - full moon biosystems, inc · antibody array user’s guide full...
TRANSCRIPT

Antibody Array User’s Guide Full Moon BioSystems, Inc.
Rev. 11.6 Page 1
Antibody Microarray
User’s Guide

Antibody Array User’s Guide Full Moon BioSystems, Inc.
Rev. 11.6 Page 2
TABLE OF CONTENTS
Introduction ............................................................................................................................................ 2
Antibody Arrays ....................................................................................................................................... 3
Antibody Array Assay Kit.......................................................................................................................... 3
How It Works .......................................................................................................................................... 4
Experimental Considerations ................................................................................................................... 5
Kit Components ....................................................................................................................................... 6
Additional Materials Required ................................................................................................................. 7
Reagent Preparation................................................................................................................................ 8
Assay Protocol ......................................................................................................................................... 9
Array Scanning ...................................................................................................................................... 17
Image Analysis ....................................................................................................................................... 18
INTRODUCTION
Antibody Microarray is a high-throughput ELISA based platform for efficient protein expression
profiling, screening, and comparison between normal, diseased, or treated samples. Full Moon
BioSystems’ antibody arrays allow researchers to detect and analyze hundreds of native proteins
simultaneously on a single slide, saving precious resources and reducing the number of variables that
affect experimental outcome. Our unique collection of antibody arrays includes phospho-specific
arrays for studying phosphorylation events, comprehensive exploratory arrays for examining hundreds
of proteins in a single experiment, and pathway arrays for studying highly relevant proteins in specific
research fields. Suitable samples include cell lysates, fresh/froze/FFPE tissue lysates, serum, culture
supernatant and bodily fluids.

Antibody Array User’s Guide Full Moon BioSystems, Inc.
Rev. 11.6 Page 3
ANTIBODY ARRAYS
The antibodies on the array are covalently immobilized on a high quality glass surface coated with our
proprietary 3-D polymer materials, which are designed to promote high binding efficiency and
specificity. All arrays are printed on standard-size microscope slides, and each slide contains one
complete array. The arrays utilize fluorescent detection and can be scanned on all microarray scanners
that are compatible with 76 x 25 x 1 mm (3 inch x 1 inch x 1 mm) slides.
Each set of antibody arrays contains two identical array slides – one slide can be used for a control
sample, and the other for a treated sample.
To maximize data reliability, each antibody on the array is printed with replicates. Pathway arrays
(<400 antibodies) contain six replicates. Larger arrays, including Explorer Antibody Array, Phospho
Explorer Array, and Signaling Explorer Array, contain two replicates for each antibody.
To see a list of the antibodies featured in a specific array and their reactivity information, visit our
website at www.fullmoonbio.com and select the array of your choice. Go to the Documentation
section to view Antibody List and Array Layout.
Multiple positive markers and negative controls are included in each array. Positive markers contain
Cy3 labeled antibodies to mark the boundaries of the array. Positive controls include beta-actin and
GAPDH. Negative controls contain BSA. Empty spots contain no material, and their signal intensity
may be used as background signal for data analysis.
ANTIBODY ARRAY ASSAY KIT
The Antibody Array Assay Kit is designed for easy and reliable processing of Full Moon BioSystems’
antibody arrays. It provides the major reagents required to perform protein extraction, biotinylation,
conjugation and detection. The reagents are convenient, easy to use, and optimized to work with our
antibody arrays.
Each 2-reaction kit provides sufficient reagents to process two array slides. Each 20-reaction kit
provides the reagents to process 20 slides.
Antibody Array User’s Guide Full Moon BioSystems, Inc.
Rev. 11.6 Page 4
HOW IT WORKS
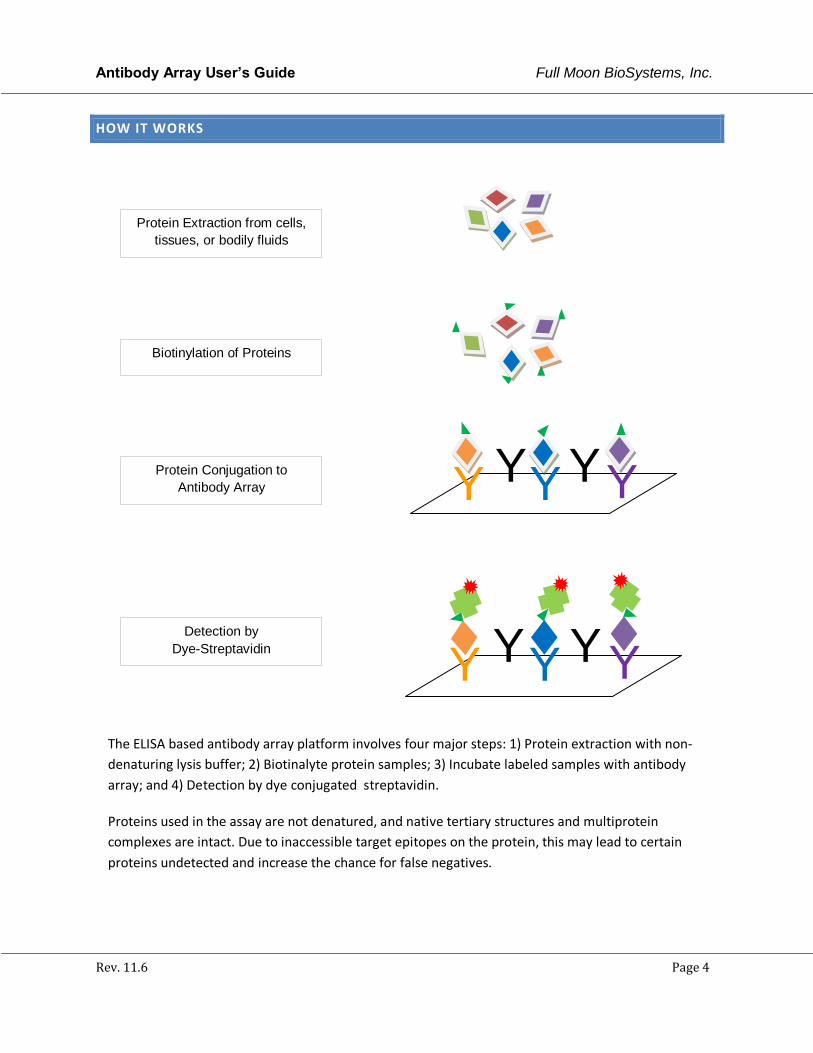
The ELISA based antibody array platform involves four major steps: 1) Protein extraction with non-
denaturing lysis buffer; 2) Biotinalyte protein samples; 3) Incubate labeled samples with antibody
array; and 4) Detection by dye conjugated streptavidin.
Proteins used in the assay are not denatured, and native tertiary structures and multiprotein
complexes are intact. Due to inaccessible target epitopes on the protein, this may lead to certain
proteins undetected and increase the chance for false negatives.
Protein Conjugation to
Antibody Array
Protein Extraction from cells,
tissues, or bodily fluids
Biotinylation of Proteins
Detection by
Dye-Streptavidin
Y Y Y Y Y
Y Y Y Y Y

Antibody Array User’s Guide Full Moon BioSystems, Inc.
Rev. 11.6 Page 5
EXPERIMENTAL CONSIDERATIONS
All reagents and materials are intended for research use only.
Handle the slides by holding the area with barcode labels. Do not touch the slide surface.
Use extra care; Any variation in buffers, operator, pipetting technique, washing technique, and incubation time or temperature can alter the performance of the kit.
Only use reagents and materials recommended by this user’s guide. Do not substitute buffers or solutions from other sources.
Do not allow arrays dry out between blocking, coupling, and washing. It can cause high background.
Wash the arrays extensively with Wash Solution and water to remove excess residual reagents from the slide surface.
The reagents provided in the Antibody Array Assay Kit do not contain protease inhibitors. To prevent protein degradation, you should work quickly and proceed diligently towards the array analysis step once you start the extraction. Alternatively, you may use inhibitors if you prefer or plan to store the proteins for a week or longer.
Always wear gloves before handling any reagents.

Antibody Array User’s Guide Full Moon BioSystems, Inc.
Rev. 11.6 Page 6
COMPONENTS
Antibody Arrays
Material/Reagent Quantity Purpose Storage Condition
Antibody Microarray 2 slides Microarray 4°C (6 months)
Antibody Array Assay Kit (sold separately from the arrays)
Catalog No. Description Quantity
KAS02 Antibody Array Assay Kit, 2 Reactions 2 Reactions
KAS20 Antibody Array Assay Kit, 20 Reactions 20 Reactions
Material/Reagent Quantity
Purpose Storage
Condition 2-Rxn Kit 20-Rxn Kit
Biotin Reagent 1 mg 5 x 1mg Labeling -20 °C
Blocking Reagent 60 mL 600 mL Blocking 4 °C
Coupling Chamber 1 5 Coupling RT
Coupling Reagent 12 mL 120 mL Coupling -20 °C
Detection Buffer 60 mL 600 mL Detection 4 °C
DMF 200 uL 1 mL Labeling 4 °C
Dry Milk 1.8g & 0.36g 18g & 3.6g Coupling 4 °C
Extraction Buffer 1.5 mL 15 mL Cell and tissue lysis 4 °C
Labeling Buffer 2 mL 20 mL Labeling 4 °C
Lysis Beads 2 tubes 20 tubes Cell and tissue lysis RT or 4 °C
Spin Columns 2 sets 20 sets Buffer Exchange RT
Stop Reagent 100 uL 1 mL Stop labeling
reaction 4 °C
10X Wash Buffer 100 mL 500 mL x 2 Washing 4 °C

Antibody Array User’s Guide Full Moon BioSystems, Inc.
Rev. 11.6 Page 7
ADDITIONAL MATERIALS REQUIRED
1X PBS, pH=7.4
Dye conjugated streptavidin
o Cy3-Streptavidin is commonly used. It can be purchased from any vendors including GE
Healthcare: PA43001; Invitrogen: S-32355 (Alexa Fluor 555 streptavidin); Sigma-Aldrich:
S6402, and others.
o Other dye labeled streptavidin can be used in place of Cy3-streptavidin as long as the dye is
compatible with your array scanner.
50 mL conical tube with cap
Centrifuge with 1.5 mL microtube rotor
Milli-Q Grade Water or dd H2O
Orbital shaker
Petri dishes, 100 x 15mm (9 cm in diameter)
Slide drying (only one option is required)
o By compressed air: compressed nitrogen/clean air supplied by a central line or from a
cylinder. Do not use canned air duster or heat gun/blower.
o By centrifugation: centrifuge with 50 mL swinging bucket rotor
UV Spectrophotometer
Vortexer
Microarray scanner compatible with 3 x 1 inch (76 x 25 mm) slides -- Optional
o If you don’t have access to a scanner, you can send the finished array slides to our lab for
scanning. Visit www.fullmoonbio.com/services/array-scanning-image-analysis/ for details.

Antibody Array User’s Guide Full Moon BioSystems, Inc.
Rev. 11.6 Page 8
REAGENT PREPARATION
REAGENTS TO WARM BEFORE USE
Blocking Reagent
Coupling Reagent
Wash Buffer
Warm to 25-30°C in a water bath.
Biotin
Detection Buffer
DMF
Dry Milk
Labeling Buffer
Stop Reagent
Warm to room temperature.
2-RXN Kit (KAS02)
1 1X Wash
Solution
Make 1:10 dilution. In a one-liter reagent bottle, add 100 ml of 10X Wash
Buffer to 900 ml of dd H2O. Shake to mix.
2 Blocking
Solution
Add 1.8 g of Dry Milk to 60 ml of Blocking Reagent. Shake to mix. Be sure
the milk powder is completely dissolved. Use within one week.
3 Coupling
Solution
Add 0.36 g of Dry Milk to 12 ml of Coupling Reagent. Shake to mix. Be
sure the milk powder is completely dissolved. Use within one week.
20-RXN Kit (KAS20)
1 1X Wash
Solution
Make 1:10 dilution. For example, add 100 ml of 10X Wash Buffer to 900
ml of ddH2O to make 1L of 1X Wash Solution. Shake to mix.
2 Blocking
Solution
If you plan to perform 20 assays within one week, add 18 g of Dry Milk to
600 ml of Blocking Reagent. Be sure the milk powder is completely
dissolved. For two assays, aliquot 60 ml of Blocking Reagent and add 1.8 g
of Dry Milk. Shake to mix. Use within one week.
3 Coupling
Solution
If you plan to perform 20 assays within one week, add 3.6 g of Dry Milk to
120 ml of Coupling Reagent. Be sure the milk powder is completely
dissolved. For two assays, aliquot 12 ml of Coupling Reagent and add 0.36
g of Dry Milk. Shake to mix. Use within one week.

Antibody Array User’s Guide Full Moon BioSystems, Inc.
Rev. 11.6 Page 9
ASSAY PROTOCOL – DETECTION BY CY3-STREPTAVIDIN
IMPORTANT – WARM REAGENTS BEFORE USE
(See Reagent Preparation for detailed instructions)
A. Protein Extraction
Note: It is recommended protein extraction be performed with the mild, non-denaturing
Extraction Buffer provided in the Antibody Array Assay Kit (KAS02). Other protein extraction
procedures or lysis buffers may be used. However, high concentrations of certain compounds
adversely affect biotinylation of protein samples. Be sure the lysis buffer contains no more than
50mM Tris, 0.1% SDS, 1% Triton X-100, or 1% NP-40. Please feel free to contact us if you are
unsure about your lysis buffer.
Note: The reagents provided in the Antibody Array Assay Kit do not contain protease or
phosphotase inhibitors. Commonly used protease and/or phosphatase inhibitors (such as
Roche’s inhibitor cocktail) may be added to Extraction Buffer to prevent protein degradation or
dephosphorylation.
I. Cells
1. Adherent Cells: Remove media and wash the culture with ice cold 1X PBS 3 – 5 times.
Remove remaining PBS and add 100 – 200 uL of Lysis Buffer to 1 to 5 million cells.
Detach cells using a scraper and transfer the cells and remaining supernatant to a clean
microcentrifuge tube. Add one tube of Lysis Beads.
Suspension Cells: Transfer media containing cells to a clean tube. Pellet the cells by
centrifugation at 500 x g for 2 minutes at 4°C. Remove media completely without
disrupting the cells. Wash the pellet with ice cold 1X PBS followed by centrifugation.
Repeat three times to ensure complete removal of media. Discard supernatant. Add
Extraction Buffer and one tube of Lysis Beads to the cells. The amount of Extraction
Buffer needed should be determined by the number of cells harvested. For 1 – 5 million
cells, use 100 - 200 uL of Extraction Buffer.
Important: Only use PBS to wash cells. To protect protein activity, avoid using trypsin or
other reagents.
Note: When working with primary cells or low protein yield cells, reduce extraction
buffer amount, or increase cell quantity accordingly.
2. Vortex rigorously for 30 seconds to 1 minute. Incubate on ice for 10 minutes. Repeat five

Antibody Array User’s Guide Full Moon BioSystems, Inc.
Rev. 11.6 Page 10
times.
3. Centrifuge the mixture at 10,000 x g for 5 minutes at 4°C.
4. Transfer all liquid to a clean tube. Discard the beads.
5. Centrifuge the new tube with liquid at 18,000 x g for 15 – 20 minutes at 4°C.
6. The supernatant on top should look colorless and transparent as water. Transfer the
clear supernatant to a clean tube.
Important: If the supernatant appears to be cloudy, centrifuge again at 18,000 x g for 15
to 20 minutes at 4°C. Check again. If the supernatant is still not clear, store the lysate at -
70°C for 10 to 20 minutes. Immediately centrifuge at 18,000 x g for 15 to 20 minutes at
4°C after removal from freezer. Save the top clear layer and discard the rest. The
supernatant should look colorless and transparent as water.
7. Proceed immediately to Step B (Buffer Exchange/Lysate Purification).
II. Tissues
1. Wash tissues with ice cold 1X PBS with vortexing. Remove and discard PBS. Repeat 3 – 5
times.
Important: If blood in the tissues gets in the lysate, it will lead to high background on the
arrays. Be sure to remove blood from the tissues completely. Increase the number of
PBS washes if necessary. When blood has been completely removed, the tissues should
appear white, and the PBS wash solution should appear clear and colorless.
2. Add one tube of Lysis Beads to 10 – 40 mg of tissues.
3. Add Extraction Buffer to the tissues. The amount of Extraction Buffer needed should be
determined by the amount of tissue harvested. For 10 – 20 mg of tissue, use 100 uL of
Extraction Buffer; for 20 – 40 mg of tissue, use 200 uL of Extraction Buffer.
4. Vortex rigorously for 30 seconds to 1 minute. Incubate on ice for 10 minutes. Repeat five
times.
5. Centrifuge the mixture at 10,000 x g for 5 minutes at 4°C.
6. Transfer all liquid to a clean tube. Discard the beads.
7. Centrifuge the new tube with liquid at 18,000 x g for 15-20 minutes at 4°C.
8. The supernatant on top should look colorless and transparent as water. Transfer the
clear supernatant to a clean tube.
Important: If the supernatant appears to be cloudy, centrifuge again at 18,000 x g for 15
to 20 minutes at 4°C. Check again. If the supernatant is still not clear, store the lysate at -
70°C for 10 to 20 minutes. Immediately centrifuge at 18,000 x g for 15 to 20 minutes at
4°C after removal from freezer. Save the top clear layer and discard the rest. The
supernatant should look colorless and transparent as water.
Antibody Array User’s Guide Full Moon BioSystems, Inc.
Rev. 11.6 Page 11
9. Proceed immediately to Step B (Buffer Exchange/Lysate Purification).
III. Serum/Plasma
1. Centrifuge the serum/plasma sample at 18,000 x g for 10 – 15 minutes at 4°C.
2. Transfer 2 – 3 uL of the clear, pale yellow liquid to a new tube and proceed directly to
Step D (Protein Labeling).
Important: After centrifugation, a thin milky film often collects at the top. When
removing the sample for labeling, it is important that the milky film is not transferred to
the new tube. Make sure that the pipette tip pierces through the milky film, then
release the pipette to aspirate the clear, yellowish serum/plasma. It’s helpful to wipe off
the pipette tip with a Kimwipe before releasing the sample in the new tube.
B. Buffer Exchange/Lysate Purification
Important: This step ensures the removal of unwanted buffer from your protein lysate and
replaces it with the Labeling Buffer provided in the Antibody Array Assay Kit.
1. The sample volume capacity of each spin column is 100 uL.
2. Gently tap the columns to ensure that the dry gel has settled to the bottom of the
column. Remove the top column cap and reconstitute the column by adding 650 uL of
Labeling Buffer.
3. Replace the column cap and vortex vigorously for about 5 seconds. Remove air bubbles
by sharply tapping the bottom of the column. Allow at least 30 to 60 minutes of room
temperature hydration time before using the column.
Note: If the column was stored at 4°C, allow the column to reach to room temperature
before use.
4. After hydration, remove the top column cap and then remove the column end stopper
from the bottom.
5. Spin the column in its wash tube at 750 x g for two minutes to remove excess fluid.
6. Blot excess drops from the bottom of the column. Discard the wash tubes and the
excess fluid. Do not allow the gel material to dry excessively. Process the samples
within the next few minutes.
7. Transfer up to 100uL of protein extract by carefully dispensing the sample directly onto
the center of the gel bed at the top of the column without disturbing the gel surface. Do
not touch the sides of the columns with the reaction mixture or the sample pipet tip
since this can reduce the purification efficiency.
8. Place the column into a collection tube and place both together into the rotor. Maintain

Antibody Array User’s Guide Full Moon BioSystems, Inc.
Rev. 11.6 Page 12
proper column orientation.
9. Spin the column and collection tube at the 750 x g for 2 minutes.
10. The purified protein will collect at the bottom of the collection tube. Discard the spin
column.
11. Proceed immediately to the next step.
C. Lysate quantification and QC
1. Lysate quantification: Measure lysate sample’s protein concentration by UV absorbance
spectroscopy (A280), BCA assay, Bradford assay, or other quantification methods.
UV Absorbance A280: Measure protein sample’s absorbance (OD). Use Labeling Buffer
or water as blank.
Note: The minimum absorbance is 3 OD. If the OD for your sample is too low, the
sample must be concentrated at 4°C in a vacuum centrifuge, such as SpeedVac, or using
YM-10 filters (Millipore Corporation).
Note: Only the absorbance reading (OD) is required. This reading will be used in Step D
to determine the amount of sample used for labeling and coupling. Conversion to
protein concentration (mg/ml) is not necessary. Most A280 assays assume 1 OD = 1
mg/ml. This conversion is not accurate for lysate samples because the non-protein
components (such as, nucleic acids and insoluble matters) may interfere with the assay.
BCA and Bradford assays: either assay can be used to determine lysate sample’s protein concentration. The minimum protein concentration required is 2 mg/ml.
2. Lysate Quality Control by A280 Assay – Optional, but highly recommended. This step can
be performed at the same as Step 1 above.
The quality of lysate sample directly affect assay results. The lysate sample should be as
clear and transparent as water. Cloudy or unclear lysate sample will result in low
labeling efficiency and high background. A280 spectrum from an UV spectrometer (e.g.,
Nanodrop) is a good way to determine whether the lysate sample has sufficient clarity.
A clear lysate produces two well separated peaks at 200-230nm and 240-280nm. If the
peaks are not well separated, it indicates the lysate is not clear enough. To improve the
lysate’s quality, store the lysate at -70°C for 10 to 20 minutes. Remove from the freezer
and immediately centrifuge at 18,000 x g for 15 to 20 minutes at 4°C. Save the top clear
layer and discard the rest.
Antibody Array User’s Guide Full Moon BioSystems, Inc.
Rev. 11.6 Page 13
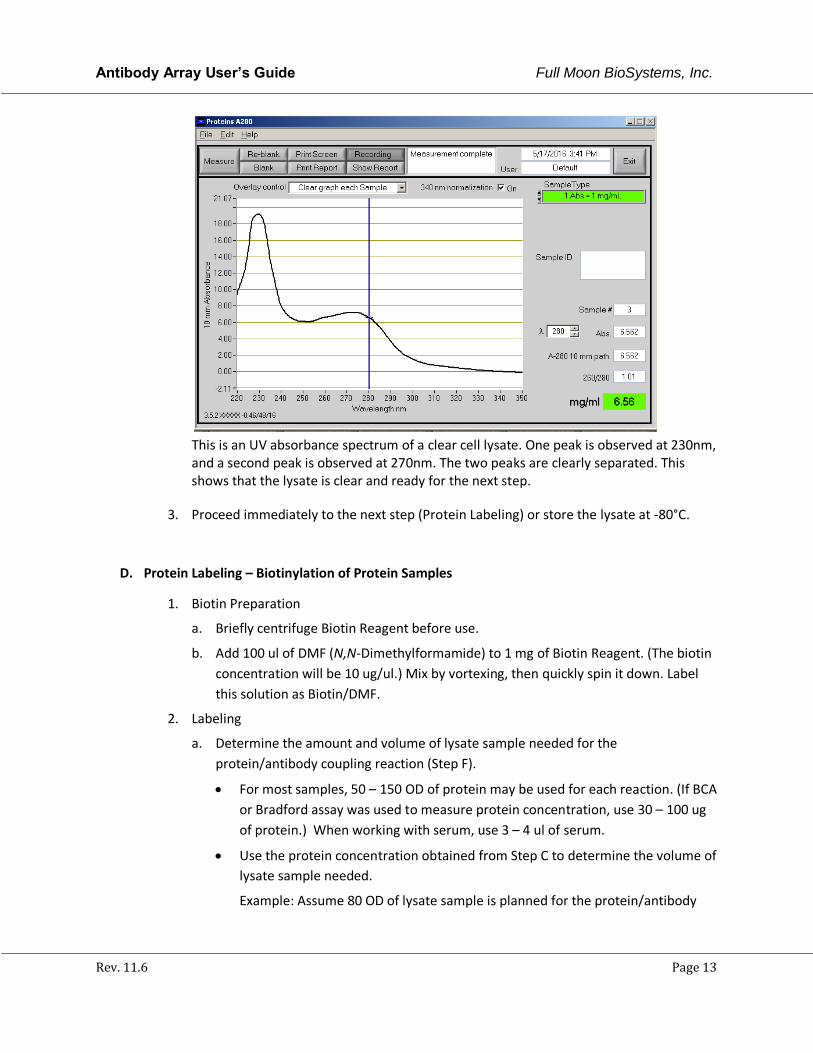
This is an UV absorbance spectrum of a clear cell lysate. One peak is observed at 230nm, and a second peak is observed at 270nm. The two peaks are clearly separated. This shows that the lysate is clear and ready for the next step.
3. Proceed immediately to the next step (Protein Labeling) or store the lysate at -80°C.
D. Protein Labeling – Biotinylation of Protein Samples
1. Biotin Preparation
a. Briefly centrifuge Biotin Reagent before use.
b. Add 100 ul of DMF (N,N-Dimethylformamide) to 1 mg of Biotin Reagent. (The biotin
concentration will be 10 ug/ul.) Mix by vortexing, then quickly spin it down. Label
this solution as Biotin/DMF.
2. Labeling
a. Determine the amount and volume of lysate sample needed for the
protein/antibody coupling reaction (Step F).
For most samples, 50 – 150 OD of protein may be used for each reaction. (If BCA
or Bradford assay was used to measure protein concentration, use 30 – 100 ug
of protein.) When working with serum, use 3 – 4 ul of serum.
Use the protein concentration obtained from Step C to determine the volume of
lysate sample needed.
Example: Assume 80 OD of lysate sample is planned for the protein/antibody
Antibody Array User’s Guide Full Moon BioSystems, Inc.
Rev. 11.6 Page 14
coupling reaction. If the lysate concentration is 4 OD, then the volume of lysate
needed will be 20 ul (80 OD/4 OD = 20 ul).
b. Aliquot and transfer the amount of lysate needed to a new tube. (This aliquot should
be no more than 50 ul.)
c. Add Labeling Buffer to the lysate to bring the total volume to 75 ul.
d. Add 3 ul of the Biotin/DMF solution to the sample. Incubate the mixture at room
temperature for 1 – 2 hours with vortexing every 10 minutes.
Note: Remaining Biotin/DMF solution may be stored at -20°C for future use.
e. Add 35 ul of Stop Reagent. Mix by vortexing, then quickly spin down. Incubate for 30 minutes at room temperature with mixing.
f. Proceed immediately to the next step, or store the biotinylated sample at -80°C for
future use.
E. Blocking
Pre-blocking preparation: Remove Antibody Arrays from refrigeration. Do not open the
pouch. Allow the arrays (with packaging) to warm up to room temperature for 60 minutes.
Then remove the packaging material and allow the slides to dry for 30 minutes or longer.
Depending on the ambient temperature and humidity, adjust warm-up and drying time
accordingly.
High humidity locations (relative humidity greater than 50%): Remove Antibody Arrays from
refrigeration. Do not open the pouch. Place the arrays (with packaging) in an oven at 30°C for
60 minutes. Remove the packaging material, continue to allow the slides to dry completely in
the oven for additional 10 minutes.
1. Add 30 ml of Blocking Solution (See “Reagent Preparation”) in a 100 x 15 mm Petri dish.
Important: Make sure the solution is at room temperature and that the dry milk is
completely dissolved before use.
2. Submerge one slide in the Blocking Solution. The side with a barcode label must face up.
3. Incubate on an orbital shaker rotating at 55 rpm for 30 to 45 minutes at room
temperature.
4. Rinse the slide extensively with Milli-Q grade water as follows:
a. Place the slide in a 50-ml conical tube. Fill the tube with 45 ml of water. Close the
cap. Shake for 10 seconds. Discard the water.
b. Repeat ten times.
Important: It is critical to rinse the slide extensively to completely remove Blocking
Solution from the slide surface. A clean slide will ensure a uniform and low background.
Antibody Array User’s Guide Full Moon BioSystems, Inc.
Rev. 11.6 Page 15
Because antibodies are covalently immobilized on the slide surface, rigorously washing
will not strip them off. After the last rinse cycle, the thin layer of water left on the slide
surface should appear uniformly smooth across the entire surface. If it looks spotty, it
means the surface is not clean. Repeat Step 4.
5. Shake off excessive water on the slide surface. Proceed immediately to the next step.
Note: Do not allow the slide to dry out. If you are not ready to start the coupling reaction,
place the slide in the conical tube filled with clean water.
F. Coupling
Note: Protein Coupling Mix (Step F.1) may be prepared in advance so that you can start
coupling immediately after blocking.
1. In a tube, add 6 ml of Coupling Solution (See “Reagent Preparation”) and one tube of
biotinylated sample (80 – 150 OD or 30 – 80 ug). Vortex briefly to mix. Label it as “Protein
Coupling Mix.”
Important: Make sure Coupling Solution is at room temperature and that the dry milk is
completely dissolved before use.
2. Place the slide in Well 1 (or any clean well) of the Coupling Chamber.
3. Slowly pour all 6 ml of Protein Coupling Mix over the slide. Make sure the slide is
completely submerged. Cover the Coupling Chamber.
4. Incubate on an orbital shaker rotating at 35 rpm for 1 – 2 hours at room temperature.
5. Transfer the slide to a 100x15 mm Petri dish containing 30 ml of 1X Wash Solution (See
“Reagent Preparation”). Increase shaker’s speed to 55 rpm, continue for 10 minutes at
room temperature.
6. Discard the wash solution. Repeat the wash step twice.
7. Rinse the slide extensively with Milli-Q grade water as follows:
a. Place the slide in a 50-ml conical tube. Fill the tube with 45 ml of water. Close the
cap. Shake for 10 seconds. Discard the water.
b. Repeat ten times.
Important: It is critical to rinse the slide extensively to completely remove Coupling
Solution from the slide surface. After the last rinse cycle, the layer of water left on the
slide surface should appear uniformly smooth across the entire surface. If it looks spotty,
it means the surface is not clean. Repeat Step 7.
8. Shake off excessive water on the slide surface and proceed to the next step immediately.
Note: Do not allow the slide to dry out. If you are not ready for the next step, place the
slide in the conical tube filled with clean water.

Antibody Array User’s Guide Full Moon BioSystems, Inc.
Rev. 11.6 Page 16
G. Detection
1. Add 60 ul of Cy3-streptavidin (0.5 mg/ml) to 60 ml of Detection Buffer.
Note: If the Cy3-streptavidin you purchased is in dry form, add biological grade ultrapure
water to make 0.5 mg/ml.
2. Pour 30 ml of Cy3-streptavidin Solution into a 100x15 mm Petri dish.
3. Submerge the slide in the Cy3-streptavidin solution. Incubate on an orbital shaker
rotating at 35 rpm for 20 minutes at room temperature in the dark or covered with
aluminum foil.
4. Transfer the slide to a new 100x15 mm Petri dish containing 30 ml of 1X Wash Solution.
Increase shaker’s speed to 55 rpm, continue for 10 minutes at room temperature.
5. Discard the wash solution. Repeat the wash step twice.
6. Rinse the slide extensively with Milli-Q grade water as follows: Place the slide in a 50-ml
conical tube. Fill the tube with 45 ml of water. Close the cap. Shake for 10 seconds.
Discard the water. Repeat ten times.
Important: It is critical to rinse the slide extensively to completely remove Detection
Solution from the slide surface. After the last rinse cycle, the layer of water left on the
slide surface should appear uniformly smooth across the entire surface. If it looks spotty,
it means the surface is not clean. Repeat Step 6.
7. Hold the slide with your fingers, shake off excess water from the slide.
8. Dry the slide with compressed nitrogen (or air) or by centrifugation.
Note: The goal is to remove water from the slide as quickly as possible.
By compressed air: Do not use compressed air in a can (for example, desktop air duster).
Compressed air or nitrogen from a cylinder tank or an outlet on the fume hood is
adequate. Make sure the pressure is less than 40 psi. Point the air nozzle at a 30° angle,
one inch away from the slide surface. Starting from one end of the slide, push the water
off of the surface. Repeat for the back side of the slide.
By centrifugation: place the slide in a 50-ml conical tube, and close the cap. Centrifuge
the tube at 1300 x g for 5 – 10 minutes.
9. The slide is now ready for scanning.
Note: If you do not have access to a microarray scanner, you can send the slides to our
lab for scanning (free of charge). Visit www.fullmoonbio.com/services/array-scanning-
image-analysis/ for details.
To prepare the slides for shipping, place the slides back in the slide holder. Cover the slide
holder with aluminum foil to protect the slides from light. Send the package at room
temperature. Please include the array information and your contact information (name,
organization, phone and email address) in the package.

Antibody Array User’s Guide Full Moon BioSystems, Inc.
Rev. 11.6 Page 17
Shipping address:
Attn: Array Scanning Service
Full Moon BioSystems, Inc.
754 North Pastoria Avenue
Sunnyvale, CA 94085
United States
Phone: 408-737-1702
Email: [email protected]
ARRAY SCANNING
Microarray scanners that are compatible with 75mm x 25mm (3in x 1in) microscope slides may be used
to scan Full Moon BioSystems’ antibody arrays.
Recommended Scanning Resolution: 10um or higher (10um, 5um, etc.)
Commonly Used Compatible Array Imaging Systems
Manufacturer Product Name Required Accessory
Agilent Technologies Microarray Scanner
Alpha Innotech AlphaScan™ Microarray Scanner NovaRay™ Detection Platform
Applied Precision arrayWoRx®e Biochip Reader
Aurora Photonics PortArray 5000™
Biomedical Photometrics The DNAscope™ HR
Bio-Rad VersArray ChipReader™
GE Healthcare, formerly Amersham Biosciences
Typhoon™ 8610 and newer Microarray Slide Holder Kit
Genewave AmpliReader™ 4600 Microarray Reader
InDevr Vidia™ Microarray Imaging System
INNOPSYS InnoScan® Microarray Scanner
Molecular Devices, formerly Axon Instruments
GenePix® Microarray Scanner All models
PerkinsElmer, formerly Packard Bioscience
ProScanArray® HT Microarray Scanner ProScanArray® Microarray Scanner ScanArray® GX Microarray Scanner ScanArray® GX PLUS Microarray Scanner
Tecan LS Reloaded™ Versatile Scanner PowerScanner™ Microarray scanner
Vidar Systems Revolution™ 4200 Microarray Scanner

Antibody Array User’s Guide Full Moon BioSystems, Inc.
Rev. 11.6 Page 18
Array Scanning Service
Our Antibody Array Scanning Service is free of charge for customers who purchase our antibody arrays but have no access to a microarray scanner. With this service, you will receive original raw image files in tiff format by email. The images may be analyzed using suitable image quantification software.
To use this service, the antibody array assay must be completed using Cy3 or Cy5-streptavidin or equivalent. Please refer to the wavelength table below when choosing alternative dyes.
Cy3 Cy5
Excitation wavelength ~550 nm ~570 nm
Emission wavelength ~650 nm ~670 nm
This service may be ordered independently or with Image Analysis Service.
IMAGE ANALYSIS
Antibody array images can be analyzed with image quantification software, including analysis software
provided by scanner manufacturers (e.g., GenePix Pro, Agilent Feature Extraction), third-party software,
or open source programs (e.g., ImageJ).
Consumer grade picture viewing software programs (e.g., Microsoft Picture Manager) are not suitable
for viewing or analyzing microarray images.
GenePix Array List (GAL) File
GAL file describes the size and position of blocks, the layout of feature-indicators in them, and the
names and identifiers of the printed substances associated with each feature-indicator. When a GAL file
is loaded, grids are generated automatically for spot quantification.
GAL file for each array is provided to aid image analysis. They can be found under the Support section on
www.fullmoonbio.com. Parameters in the GAL files are provided for images scanned at 10 m
resolution in portrait orientation. For images scanned at different resolutions, modify the parameters
accordingly. For arrays scanned in other orientations, images must be rotated in order to use the GAL
files. (A rotation guide for images acquired on Agilent microarray scanners can be found under the
Support section on our website.)
For image analysis software programs that are incompatible with GAL files, grid files must be generated
manually using array parameters and array map. Array parameters can be found in the User’s Guide
section on https://www.fullmoonbio.com/support/userguide/. Array Map for each array can be found

Antibody Array User’s Guide Full Moon BioSystems, Inc.
Rev. 11.6 Page 19
under the “Documentation” tab of each array’s webpage. Please refer to your analysis software’s user
guide for instructions on how to generate a grid file.
Image Analysis Service
Our Array Image Analysis Service is available to users who have acquired array images through our Array
Scanning Service but are unable to analyze antibody array images. Analysis results are delivered by email
in 2-7 business days. For more details, visit our website at https://www.fullmoonbio.com/services/array-
image-analysis/.
For questions related to antibody arrays, please contact our technical support team:
Phone: 408.737.2875 Email: [email protected]