anyplaceusb linux user manual - coolgear.com
TRANSCRIPT

Copyright © 2018 by TITAN Electronics Inc. All Rights Reserved.
AnyplaceUSB Linux User Manual
AnyplaceUSB Linux User Manual
2 / 36
Content Introduction .......................................................................................................................................... 3 Installation on Linux ............................................................................................................................ 4
To install a package along with dependencies, open a terminal and run: ........................................ 4
Uninstallation on Linux ....................................................................................................................... 5
To uninstall USB Network Gate: ....................................................................................................... 5
Quick starting guide ............................................................................................................................. 6
Sharing a USB device ....................................................................................................................... 6 Connecting to a shared USB device remotely .................................................................................. 7
Share Local USB Devices .............................................................................................................. 9
Unshare Local USB Devices ....................................................................................................... 12
Disable current connection ....................................................................................................... 13
Search for and add remote shared USB devices to the list ................................................. 14
How to connect from the client computer to a remote USB device ................................................ 14
Connect to Remote Shared USB Devices ................................................................................ 16
Disconnect from remote shared USB devices ........................................................................ 17
Remove remote shared USB devices from the list................................................................ 18
Callback Connection ........................................................................................................................... 20 Command Line Options for Linux .................................................................................................... 22
FAQ ............................................................................................................................................................... 24 Frequently Asked Questions: .......................................................................................................... 24
How to share and connect to devices using the command-line interface .............................. 25 How to share a local device ............................................................................................................ 25
How to connect to a remote device................................................................................................. 25
How to unshare and disconnect to devices using the command-line interface .................... 26
How to unshare a local device ........................................................................................................ 26
How to disconnect to a remote device ............................................................................................ 26
To connect a USB 3.0 hard disk drive to a Linux client ............................................................... 27 To connect a USB 3.0 hard disk drive to a Linux client the following steps are required: .............. 27
TCP and UDP ports used by AnyplaceUSB ..................................................................................... 28
AnyplaceUSB requires the following ports to be open: .................................................................. 28
Running GUI with root privileges ................................................................................................... 29 Installing issues .................................................................................................................................. 31
Installing DMKS on Red Hat/Centos ....................................................................................... 32
yum install kernel-devel different from the kernel version on Fedora or Oracle linux . 33
Can not register at end of installing ........................................................................................ 34
kernel module in UEFI secure boot .......................................................................................... 35

AnyplaceUSB Linux User Manual
3 / 36
Introduction
AnyplaceUSB lets you access any USB device (printer, scanner, flash drive, human interface device, etc) that is located on a remote PC over LAN/WAN/VLAN/VPN or Internet and use this device as if it were plugged to your local PC. All applications that work with the device won't see the difference and will treat it as a local one.
Additionally, there is no limit on the number of USB devices you may connect to, using AnyplaceUSB. Once USB device is connected you don't need to launch our application every time to be able to work with the device - it will be present at the system level at the boot time. Share USB port over LAN/WAN/VLAN/VPN/Internet To share a USB device between two or more PCs you have to move it around all the time or buy an expensive hardware USB switch (not the best solution if both computers are far from each other). Whenever you want to share any USB device over local area network or even across Internet and none of the traditional options work (extensive equipment, remote location, security issues and so on), AnyplaceUSB will help you out. Plug USB devices in virtual machines & blade servers Looking for a way to connect a USB device to virtual machine or share it among blade servers? Install AnyplaceUSB on a client operating system (virtual machine, blade server) and access your USB peripherals right away.
Access USB devices over Wi-Fi There's no need to change your existing network configuration to let your employees share a new USB device - it can be accessed wirelessly from desktops and laptops in your office. All you have to do is share a USB printer, scanner or other device on a single PC, and each of your network users will be able to work with a shared device as if it were connected to their computers.
Was tested on
• Centos 7 • Debian 8 - 9 • Oracle linux 7 • Fedora 24 - 28 • openSUSE 12.3 - 15 • LMDE 2 • Ubuntu 14.04 - 18.04 • Linux Mint 17 - 19
Please note: AnyplaceUSB for Linux requires kernel version from 2.6.18 up to 4.4

AnyplaceUSB Linux User Manual
4 / 36
Installation on Linux
To install a package along with dependencies, open a terminal and run:
• deb package:
dpkg -i [package]
If dependencies needed, to install the required dependencies
apt-get install -f
• rpm package:
rpm -i [package]
If dependencies needed, to install the required dependencies
yum install [package]
To upgrade an existing package:
• deb package:
dpkg -i [package]
• rpm package:
rpm -U --force [package]
See also:
Uninstallation on Linux
Installing issues

AnyplaceUSB Linux User Manual
5 / 36
Uninstallation on Linux
To uninstall USB Network Gate:
• installed from a deb package:
– keeping the configuration files (including the license info):
dpkg -r anyplaceusb
– removing it completely:
dpkg -P anyplaceusb
• installed from an rpm package:
rpm -e anyplaceusb
or
yum remove anyplaceusb

AnyplaceUSB Linux User Manual
6 / 36
Quick starting guide
To be able to use a USB device from any computer in your local network or over the Internet, you must download, install and configure AnyplaceUSB on both computers:
The server system that has a USB device attached to it physically;
The client system that is going to connect to the device remotely.
Sharing a USB device To share a USB device on the server side:
1. Open AnyplaceUSB with root permission.
2. Switch to the Share local USB devices tab.
3. Select the USB device you want to share and click Share:
4. Optionally, change the TCP port to be used in the connection, or enable encryption, authorization or traffic compression.
AnyplaceUSB Linux User Manual
7 / 36
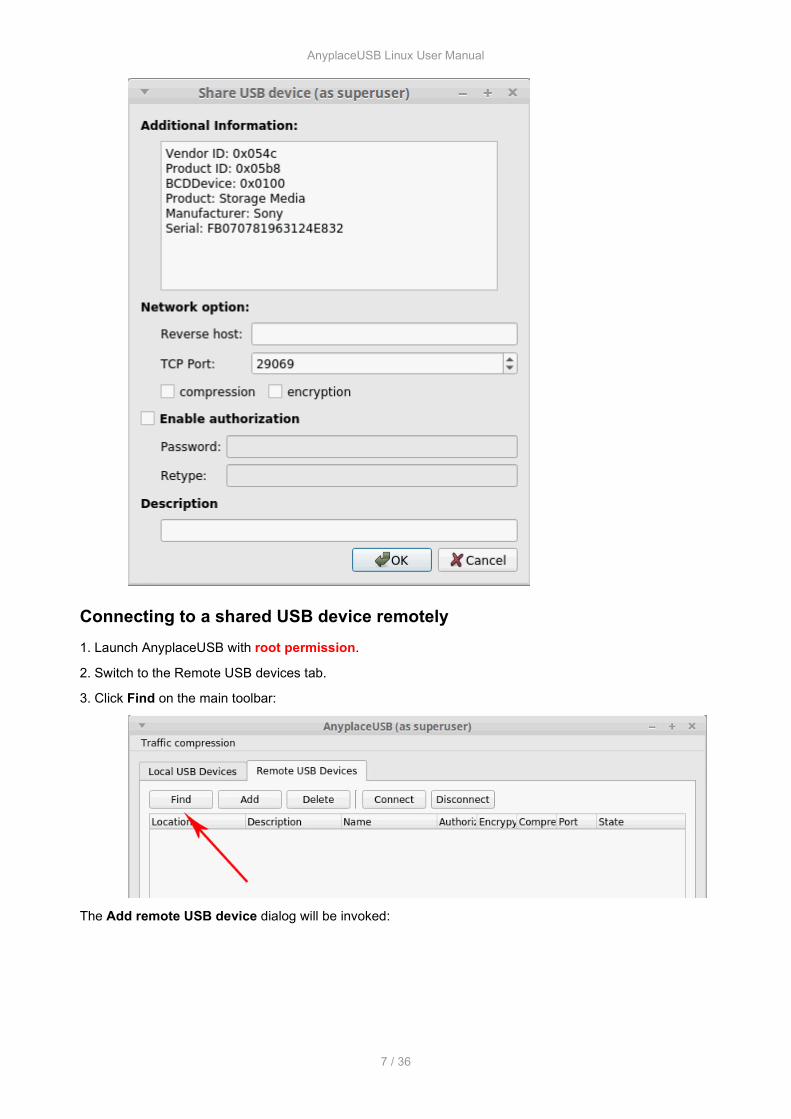
Connecting to a shared USB device remotely 1. Launch AnyplaceUSB with root permission.
2. Switch to the Remote USB devices tab.
3. Click Find on the main toolbar:
The Add remote USB device dialog will be invoked:

AnyplaceUSB Linux User Manual
8 / 36
4. If you want to search for USB devices shared on a specific remote host, type in its IP address or network name and click Find. To find all shared USB devices available on your local network, use Find all.
5. If the search in the previous step yielded no results, probably one of the required network ports on your server is blocked by a firewall. In this case you can press the Add button on the toolbar and manually specify the TCP port on which your device is shared:
6. After adding the device to the list, select it and press Connect to establish a connection (see the beginning of this section for the differences between these options).
If the device is protected by a password (see How to Secure Connection), it will be prompted.

AnyplaceUSB Linux User Manual
9 / 36
Share Local USB Devices
To be able to access USB device from the client side, your USB device should be first shared. This process resembles sharing your hard disk resources among other users on the network. However, unlike file sharing, a USB device becomes inaccessible for local usage once it is shared.
If you want to share your USB device over Internet, make sure that you have external IP address, which can be visible and accessible from other computers.
In fact, AnyplaceUSB shares a USB port, to which you can connect any USB device. Moreover, you can disconnect a device, and connect another one to the shared USB port. No system reboot or application restart is needed. Just unplug your USB flash drive, then plug in your USB webcam, and it will automatically appear on the client side.
To access any USB device remotely from the client side, the device must be plugged into the shared USB port under AnyplaceUSB HUB on the server side.
1. Switch to Local USB devices tab.
2. Select a USB device you want to share and click Share:
3. Share USB device window will be invoked. You can view additional info about your USB device (Vendor, Manufacturer, Serial Number, etc).
Customize some additional settings:

AnyplaceUSB Linux User Manual
10 / 36
3.1 You can create callback (reverse) connection – connection with a client initiated from the server side.
3.2 Set TCP port, which will be used in connection.
3.3 You can enable traffic compression.
Traffic compression helps speed up interaction with certain types of USB devices and reduce Internet traffic. You may find this useful for USB devices which transfer data in uncompressed format, like scanners.
It is recommended not to use this option for USB devices which transfer incompressible types of data, e.g. isochronous USB devices (audio cards, web cams, etc.). For example, web cam video compression is enabled by default, and further compression can result in degrading video quality.
Traffic compression applied to data, transferred to mobile devices, increases CPU load.
You can also set traffic compression algorithm – best or fast, the latter being the default one.
This parameter can be changed any time, but it won't be applied on the go. The new value will be applied to a new connection only.
Traffic compression algorithm can be changed under Traffic compression in the main menu:
3.4 You can enable traffic encryption. It is recommended for security reasons. All sent data will be encrypted, although it may slow down the communication speed.

AnyplaceUSB Linux User Manual
11 / 36
3.5 By enabling password authorization, you can use a password to secure connection. The client should paste the same password in order to establish connection.
3.6 In Description field you can label your USB device – set custom name for it. This name will be displayed on both server and client sides. It can help you identify devices if several devices of the same type (e.g. two printers) are shared.
You can also change custom names of already shared devices just on the go. To do so, double-click the device’s description in the corresponding field opposite the device and change its description in the invoked window:
4. In Share USB device window click OK.
5. Once the USB device is successfully shared, State will change to shared.
Tip: If you are unable to share the device, try unplugging the device, sharing the port where that device was present, and plugging it in again.
6. Now you can access shared USB device from the client side.

AnyplaceUSB Linux User Manual
12 / 36
Unshare Local USB Devices
To make a shared USB device inaccessible remotely (and available locally), you should unshare it.
To unshare a device, switch to the Share local USB devices tab, select the device in the list and press Unshare.
To unshare all currently shared devices:
click Unshare all on the toolbar:

AnyplaceUSB Linux User Manual
13 / 36
Disable current connection
This section concerns disabling current connection from the server side. To know how to disable current connection from the client side, refer to Disconnect from a remote shared USB device section.
If you want to make a shared USB device inaccessible for the client side, take the following steps:
1. Switch to Local USB devices tab.
2. Select a shared USB device you want to break connection with.
3. Click Disable current connection button:
5. To reestablish connection with this shared USB device in future, you will need to switch to Remote USB devices tab on the client side and find this device in the list. Now click Connect to reestablish connection with this shared USB device.
Note: when you disable current connection, the USB device still remains shared. This means you cannot access it on the server side. If you need to work with this device locally, you should unshare it.

AnyplaceUSB Linux User Manual
14 / 36
Search for and add remote shared USB devices to the list
How to connect from the client computer to a remote USB device To connect from the client computer to a remote USB device, which is shared on the server computer, you should first find available shared devices and add them to the list. Follow these instructions:
1. Switch to the Remote USB devices tab.
2. Click Find on the main toolbar:
The Add remote USB device dialog will be invoked:
3. If you want to search for USB devices shared on a specific remote host, type in its IP address or network name and click Find. To find all shared USB devices available on your local network, use Find all.
4. If the search in the previous step yielded no results, you can press the Add button on the toolbar and manually specify the TCP port on which your device is shared:

AnyplaceUSB Linux User Manual
15 / 36
5. After adding the device to the list, select it and press Connect to establish a connection.

AnyplaceUSB Linux User Manual
16 / 36
Connect to Remote Shared USB Devices
Once you have shared a USB device on the server side, you can connect to it from the client side. This section explains how to do this.
1. Switch to the Remote USB devices tab.
2. Click Find on the main toolbar:
The Add remote USB device dialog will be invoked:
3. If you want to search for USB devices shared on a specific remote host, type in its IP address or network name and click Find. To find all shared USB devices available on your local network, use Find all.
4. If the search in the previous step yielded no results, probably one of the required network ports on your server is blocked by a firewall. In this case you can press the Add button on the toolbar and manually specify the TCP port on which your device is shared:

AnyplaceUSB Linux User Manual
17 / 36
5. After adding the device to the list, select it and press Connect to establish a connection (see the beginning of this section for the differences between these options).
If the device is protected by a password (see How to Secure Connection), it will be prompted.
Created with the Personal Edition of HelpNDoc: Easily create EPub books
Disconnect from remote shared USB devices
To disconnect from a remote shared USB device from the client side, select it in the list and click Disconnect:
The device will become inaccessible for the usage on the client side. It will not be removed from the list, so you can reestablish connection with it at any moment.
Warning: a disconnected USB device still remains shared on the server side, therefore it is inaccessible for the local usage (on the server). Refer to this section to find out how to unshare USB device on the server side.
AnyplaceUSB Linux User Manual
18 / 36
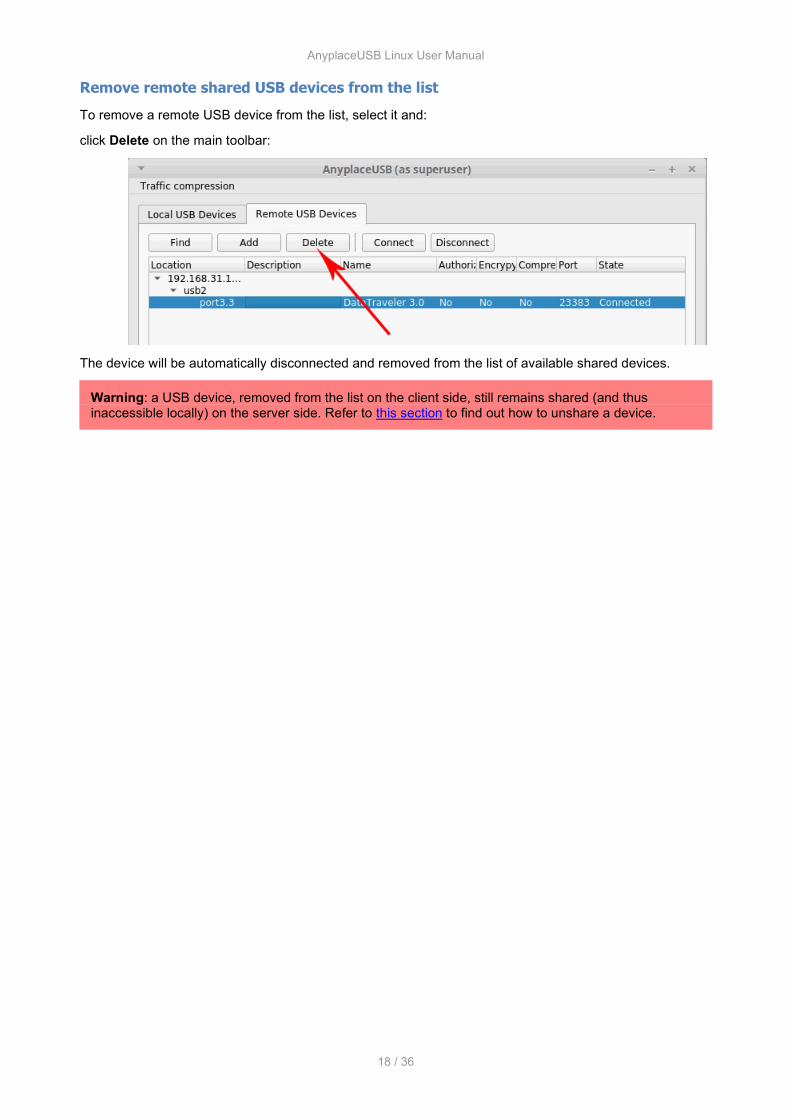
Remove remote shared USB devices from the list
To remove a remote USB device from the list, select it and:
click Delete on the main toolbar:
The device will be automatically disconnected and removed from the list of available shared devices.
Warning: a USB device, removed from the list on the client side, still remains shared (and thus inaccessible locally) on the server side. Refer to this section to find out how to unshare a device.
AnyplaceUSB Linux User Manual
19 / 36
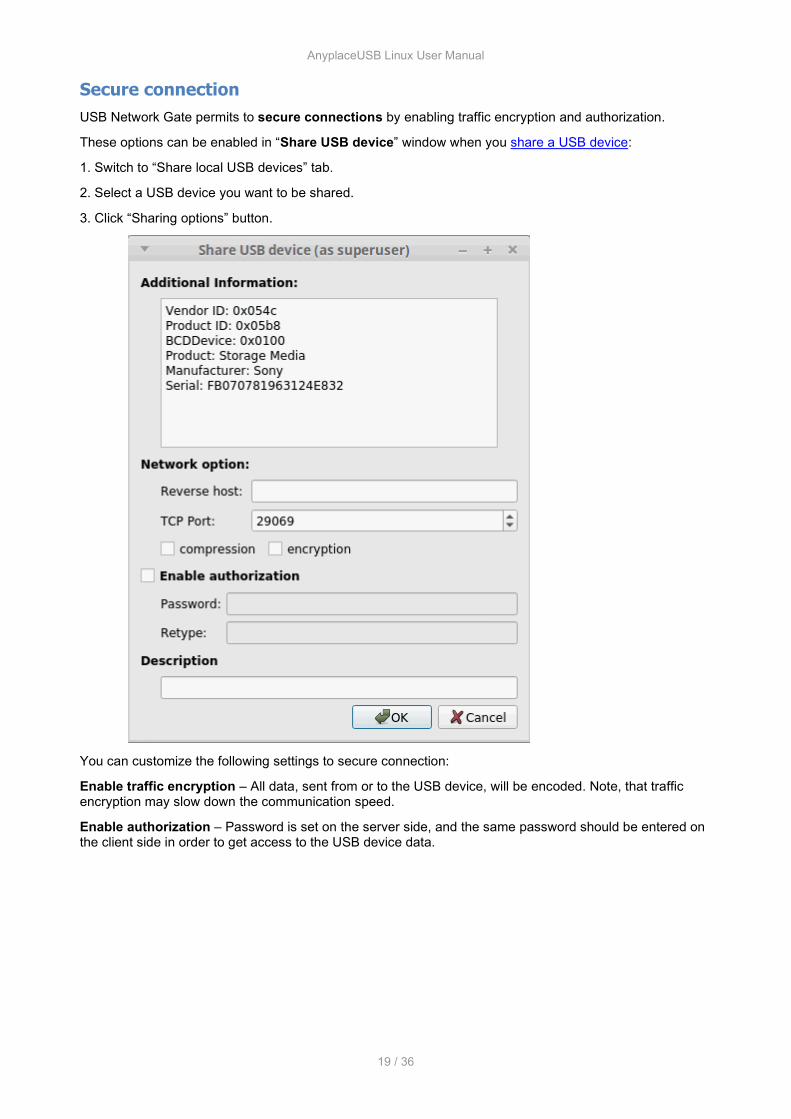
Secure connection
USB Network Gate permits to secure connections by enabling traffic encryption and authorization.
These options can be enabled in “Share USB device” window when you share a USB device:
1. Switch to “Share local USB devices” tab.
2. Select a USB device you want to be shared.
3. Click “Sharing options” button.
You can customize the following settings to secure connection:
Enable traffic encryption – All data, sent from or to the USB device, will be encoded. Note, that traffic encryption may slow down the communication speed.
Enable authorization – Password is set on the server side, and the same password should be entered on the client side in order to get access to the USB device data.

AnyplaceUSB Linux User Manual
20 / 36
Callback Connection
USB Network Gate lets you initiate a callback (reverse) connection – a connection with a client from the server side.
1. Switch to “Local USB devices” tab.
2. Select a USB device you want to share.
3. Click “Share“.
4. “Share USB device” window will be invoked.
To create a callback (reverse) connection, indicate the IP address of the remote (reverse) host.
Additionally, you can enable traffic compression.
You can enable traffic encryption. It is recommended for security reasons. All the data will be encrypted, although it may slow down the communication speed.
By enabling password authorization, you can use a password to secure the connection. The client should

AnyplaceUSB Linux User Manual
21 / 36
paste the same password to establish the connection.
In “Description” field you can label your USB device – set a custom name for it.
5. In “Share USB device” window click “OK” button.
AnyplaceUSB Linux User Manual
22 / 36
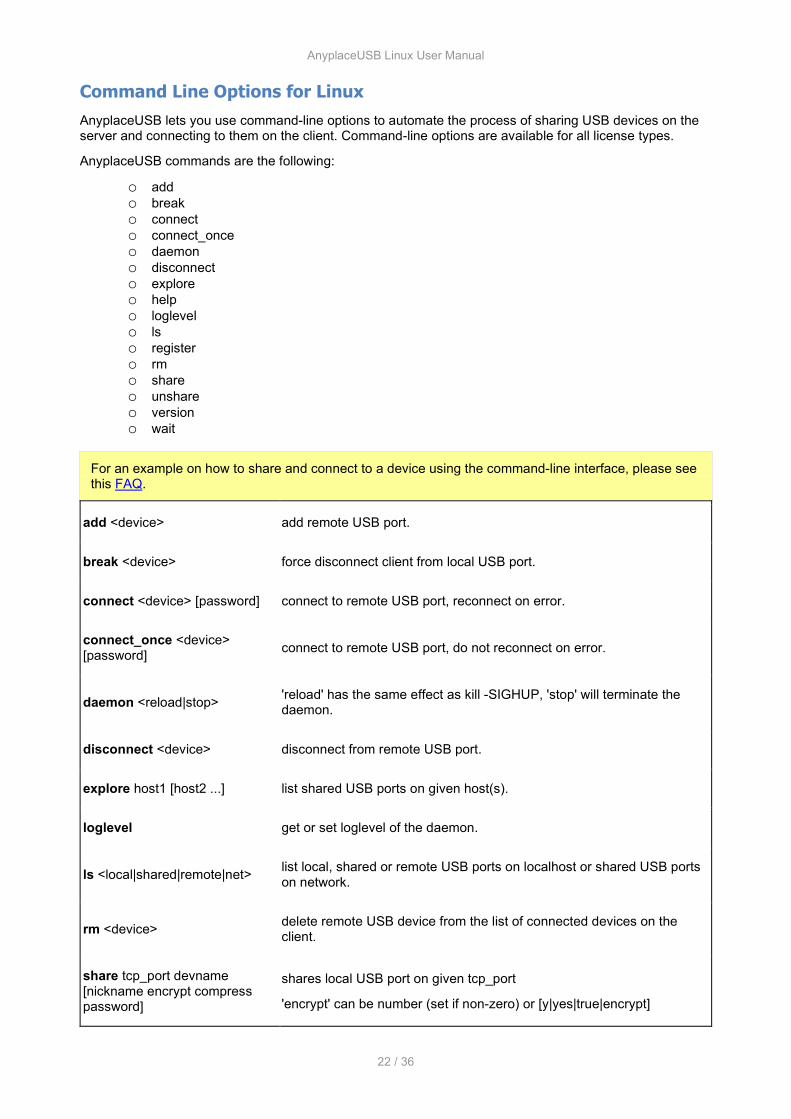
Command Line Options for Linux
AnyplaceUSB lets you use command-line options to automate the process of sharing USB devices on the server and connecting to them on the client. Command-line options are available for all license types.
AnyplaceUSB commands are the following:
o add o break o connect o connect_once o daemon o disconnect o explore o help o loglevel o ls o register o rm o share o unshare o version o wait
For an example on how to share and connect to a device using the command-line interface, please see this FAQ.
add <device> add remote USB port.
break <device> force disconnect client from local USB port.
connect <device> [password] connect to remote USB port, reconnect on error.
connect_once <device> [password] connect to remote USB port, do not reconnect on error.
daemon <reload|stop> 'reload' has the same effect as kill -SIGHUP, 'stop' will terminate the daemon.
disconnect <device> disconnect from remote USB port.
explore host1 [host2 ...] list shared USB ports on given host(s).
loglevel get or set loglevel of the daemon.
ls <local|shared|remote|net> list local, shared or remote USB ports on localhost or shared USB ports on network.
rm <device> delete remote USB device from the list of connected devices on the client.
share tcp_port devname [nickname encrypt compress password]
shares local USB port on given tcp_port
'encrypt' can be number (set if non-zero) or [y|yes|true|encrypt]

AnyplaceUSB Linux User Manual
23 / 36
'compress' can be number (set if non-zero) or [y|yes|true|compress]
unshare <device> | all unshare local USB port or all ports
version show anyplacec version.
wait wait for the daemon reply.
Note: anyplaceusbc should be placed into bin catalog: opt/Eltima/eveusb/bin/

AnyplaceUSB Linux User Manual
24 / 36
FAQ
Frequently Asked Questions:
• How to share and connect to devices using the command-line interface • How to unshare and disconnect to devices using the command-line interface • To connect a USB 3.0 hard disk drive to a Linux client • TCP and UDP ports used by AnyplaceUSB • Running GUI with root privileges Installing issues: • Installing DMKS on Red Hat/Centos • yum install kernel-devel different from the kernel version on Fedora or Oracle linux • Can not register at end of installing • kernel module in UEFI secure boot

AnyplaceUSB Linux User Manual
25 / 36
How to share and connect to devices using the command-line interface
AnyplaceUSB comes with a command-line utility, called anyplaceusbc, that allows you to share and connect to USB devices without having to open the graphical interface.
anyplaceusbc is located in the following directory: •/opt/Eltima/eveusb/bin on Linux;
How to share a local device 1. List all locally available USB ports using the “ls local” command:
As you can see in the output, here we have three USB devices attached. Let’s say we want to share the second one.
2. Run the “share” command to share the port:
where 12345 can be any unused TCP port.
How to connect to a remote device 1. Find all USB ports shared on a remote server with the “explore” command:
where instead of 127.0.0.1 you should specify the IP address or network name of your server.
2. Establish a connection by running the “connect” command:
For the full list of available commands and information on their usage, use anyplaceusbc help and anyplaceusbc help [command]

AnyplaceUSB Linux User Manual
26 / 36
How to unshare and disconnect to devices using the command-line interface
AnyplaceUSB comes with a command-line utility, called anyplaceusbc, that allows you to share and connect to USB devices without having to open the graphical interface.
anyplaceusbc is located in the following directory: •/opt/Eltima/eveusb/bin on Linux;
How to unshare a local device 1. List all shared USB ports using the “ls share” command:
As you can see in the output, here we have three USB devices attached. Let’s say we want to share the second one.
2. Run the “unshare” command to unshare the port:
where ",,12345,usb2,2-2.2,,Ultra USB 3.0,,,,127.0.0.1," is the shared USB device.
or you can run the "unshare all" command to unshare all the device.
How to disconnect to a remote device 1. Find connected USB ports using the “ls remote” command:
2. Disconnect by running the “disconnect” command:
where "localhost,,29095,usb2,port2.2,,Ultra USB 3.0,,,,," is the remote USB device.
For the full list of available commands and information on their usage, use anyplaceusbc help and anyplaceusbc help [command]

AnyplaceUSB Linux User Manual
27 / 36
To connect a USB 3.0 hard disk drive to a Linux client
To connect a USB 3.0 hard disk drive to a Linux client the following steps are required: 1. Add a device to the UAS (USB Attached SCSI) module exceptions.
echo options usb-storage quirks=idVendor:idProduct:u | sudo tee /etc/modprobe.d/blacklist_uas.conf
Tip: An example for Asmedia and Transcend USB hard drives:
echo options usb-storage quirks=0x174c:0×5106:u,0x0bc2:0×2322:u | sudo tee /etc/modprobe.d/blacklist_uas.conf
2. Regenerate initrd.
An example for Ubuntu:
sudo update-initramfs -u
3. Reboot a machine.

AnyplaceUSB Linux User Manual
28 / 36
TCP and UDP ports used by AnyplaceUSB
AnyplaceUSB requires the following ports to be open:
• TCP 5473 – for getting the list of shared USB devices and detailed information about them;
• UDP 5474 – for broadcasting, to automatically discover devices shared in the local network;
• UDP 5475 – for receiving response to a broadcast request;
• TCP 5475 – for remote service management;
• TCP port specified in the sharing options on the server.
AnyplaceUSB Linux User Manual
29 / 36
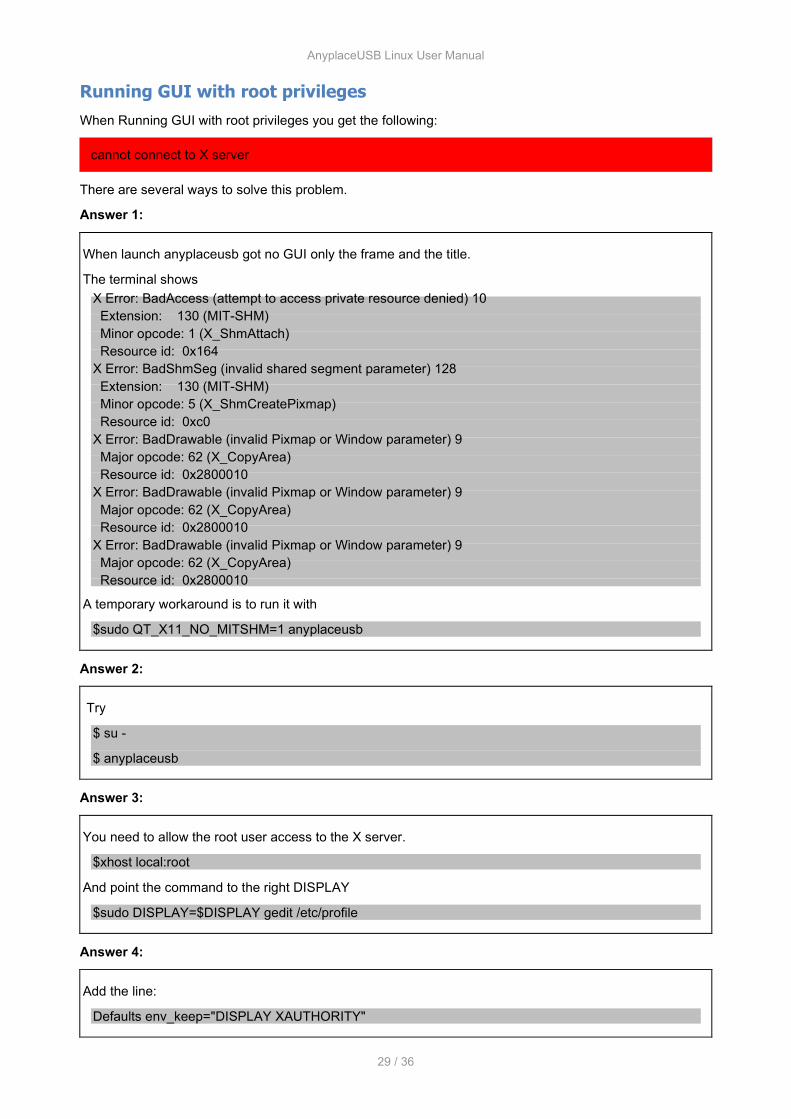
Running GUI with root privileges
When Running GUI with root privileges you get the following:
cannot connect to X server
There are several ways to solve this problem.
Answer 1:
When launch anyplaceusb got no GUI only the frame and the title.
The terminal shows X Error: BadAccess (attempt to access private resource denied) 10 Extension: 130 (MIT-SHM) Minor opcode: 1 (X_ShmAttach) Resource id: 0x164 X Error: BadShmSeg (invalid shared segment parameter) 128 Extension: 130 (MIT-SHM) Minor opcode: 5 (X_ShmCreatePixmap) Resource id: 0xc0 X Error: BadDrawable (invalid Pixmap or Window parameter) 9 Major opcode: 62 (X_CopyArea) Resource id: 0x2800010 X Error: BadDrawable (invalid Pixmap or Window parameter) 9 Major opcode: 62 (X_CopyArea) Resource id: 0x2800010 X Error: BadDrawable (invalid Pixmap or Window parameter) 9 Major opcode: 62 (X_CopyArea) Resource id: 0x2800010
A temporary workaround is to run it with
$sudo QT_X11_NO_MITSHM=1 anyplaceusb
Answer 2:
Try
$ su -
$ anyplaceusb
Answer 3:
You need to allow the root user access to the X server.
$xhost local:root
And point the command to the right DISPLAY
$sudo DISPLAY=$DISPLAY gedit /etc/profile
Answer 4:
Add the line:
Defaults env_keep="DISPLAY XAUTHORITY"

AnyplaceUSB Linux User Manual
30 / 36
at the end of visudo.
To do that you have to run
$sudo visudo
It will open the file then add the above line at the end.

AnyplaceUSB Linux User Manual
31 / 36
Installing issues
Installing issues: • Installing DMKS on Red Hat/Centos • yum install kernel-devel different from the kernel version on Fedora or Oracle linux • Can not register at end of installing • kernel module in UEFI secure boot
AnyplaceUSB Linux User Manual
32 / 36
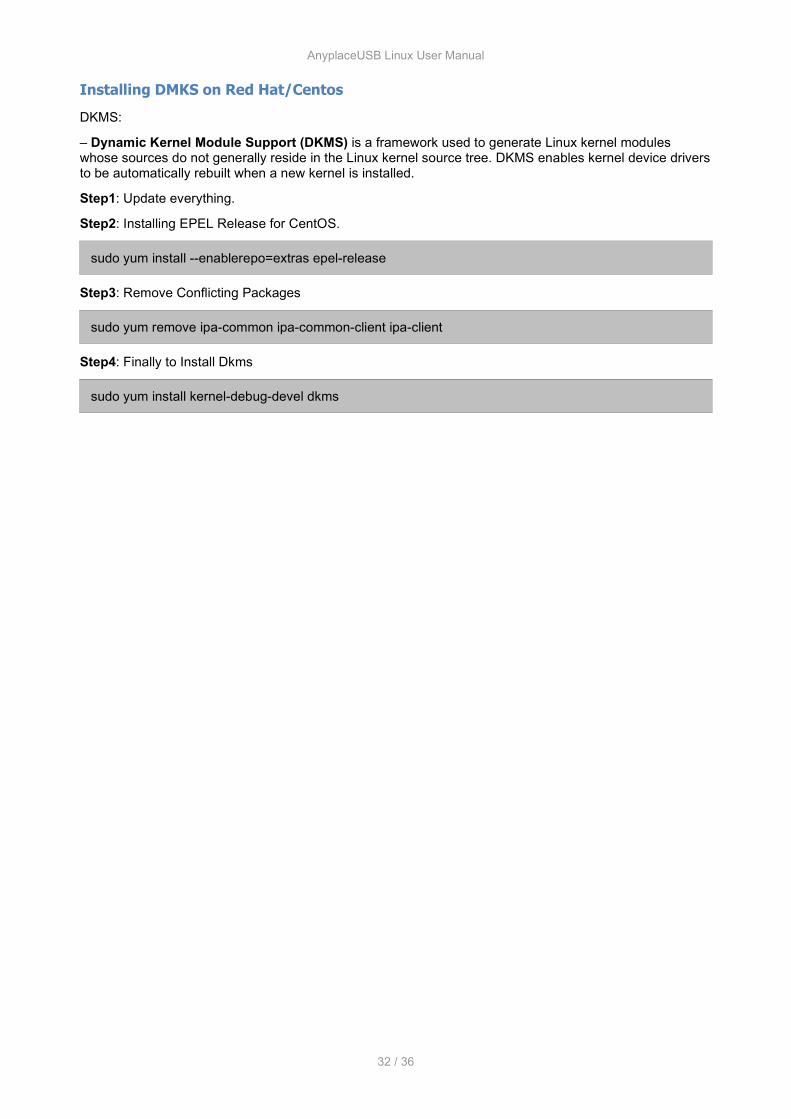
Installing DMKS on Red Hat/Centos
DKMS:
– Dynamic Kernel Module Support (DKMS) is a framework used to generate Linux kernel modules whose sources do not generally reside in the Linux kernel source tree. DKMS enables kernel device drivers to be automatically rebuilt when a new kernel is installed.
Step1: Update everything.
Step2: Installing EPEL Release for CentOS.
sudo yum install --enablerepo=extras epel-release
Step3: Remove Conflicting Packages
sudo yum remove ipa-common ipa-common-client ipa-client
Step4: Finally to Install Dkms
sudo yum install kernel-debug-devel dkms
AnyplaceUSB Linux User Manual
33 / 36
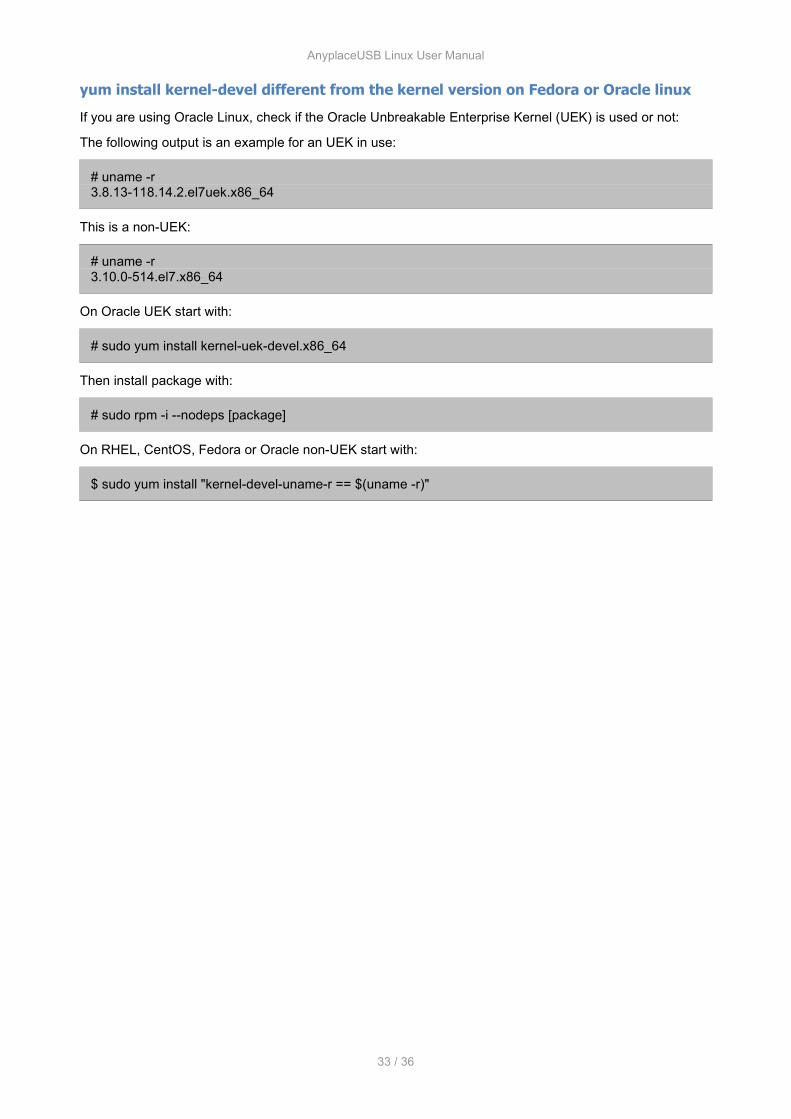
yum install kernel-devel different from the kernel version on Fedora or Oracle linux
If you are using Oracle Linux, check if the Oracle Unbreakable Enterprise Kernel (UEK) is used or not:
The following output is an example for an UEK in use:
# uname -r 3.8.13-118.14.2.el7uek.x86_64
This is a non-UEK:
# uname -r 3.10.0-514.el7.x86_64
On Oracle UEK start with:
# sudo yum install kernel-uek-devel.x86_64
Then install package with:
# sudo rpm -i --nodeps [package]
On RHEL, CentOS, Fedora or Oracle non-UEK start with:
$ sudo yum install "kernel-devel-uname-r == $(uname -r)"

AnyplaceUSB Linux User Manual
34 / 36
Can not register at end of installing
Step1: Reboot computer, then check service status
$ sudo reboot $ sudo service eveusb status
If status show "eveusbd is running", go to Step2.
Not running, go to Step 3.
Step2: Execute /opt/Eltima/eveusb/bin/reg.sh to register service.
$ /opt/Eltima/eveusb/bin/reg.sh
Step3: Check SELinux status.
$ getenforce
If get status "Enforcing", Disabling SELinux.
Configure SELINUX=disabled in the /etc/selinux/config file:
# This file controls the state of SELinux on the system. # SELINUX= can take one of these three values: # enforcing - SELinux security policy is enforced. # permissive - SELinux prints warnings instead of enforcing. # disabled - No SELinux policy is loaded. SELINUX=disabled # SELINUXTYPE= can take one of these two values: # targeted - Targeted processes are protected, # mls - Multi Level Security protection. SELINUXTYPE=targeted
Reboot your system. After reboot, confirm that the getenforce command returns Disabled:
$ getenforce Disabled
Then execute Step2.

AnyplaceUSB Linux User Manual
35 / 36
kernel module in UEFI secure boot
At the end of Installing, message shows:
Job for eveusb.service failed because the control process exited with error code. See "systemctl status eveusb.service" and "journalctl -xe" for details. cannot open socket connection with daemon waiting for daemon's readiness ... cannot open socket connection with daemon cannot open socket connection with daemon cannot register, try later
Check service status
$systemctl status eveusb.service
If there is a message shows:
ERROR: could not insert ‘eveusb’: Operation not permitted
your kernel boot is in “secure boot”, the module can’t be loaded.
Solution 1:
• Enter BIOS, then turn secure boot off.
Solution 2:
• Remove “secure boot” entirely • depends on UEFI BIOS • Might be done by
sudo apt install mokutil sudo mokutil --disable-validation reboot Press Down and Enter in shim menu to change secure boot state
Solution 3:
• Sign your modules • depends on UEFI BIOS • add you own signature to valid signatures
o create ciphering keys
openssl req -new -x509 -newkey rsa:2048 -keyout OCP.priv -outform DER -out OCP.der -nodes -days 36500 -subj "/CN=OpenCells/"
o keep the two files OCP.der, OCP.priv as you’ll need it to sign your kernel modules o import it in UEFI boot
sudo mokutil --import OCP.der
o It asks for a password: put any string, you’ll need it once, at next reboot, to secure the new ciphering enrolling
o You need to reboot the machine to enroll this new key • Now you can sign your modules
o each time you compile a module, you have to sign it
sudo /usr/src/linux-headers-$(uname -r)/scripts/sign-file sha256 ./OCP.priv ./OCP.der $(modinfo -n eveusb)
o reboot

AnyplaceUSB Linux User Manual
36 / 36
• You’ll need to compile and update the module after each kernel upgrades