anz bladepay™ - anz personal banking · 1.1 your merchant agreement 6 ... • bank/branch banking...
TRANSCRIPT

MERCHANT OPERATING GUIDE
05.2017
ANZ BLADEPAY™

2

3
You asked for payment technology that’s smaller, smarter and faster. So we’ve made it our business to deliver.
Now that you’ve got your ANZ BladePay™ device, here are just some of the features you will benefit from1:
• Accept credit, debit and EFTPOS payments via tap, insert or swipe
• ANZ FastPay® portal to view transactions and manage users
• Secure 4-digit PIN log in access
• The ability to use Apps integrated with ANZ FastPay® Next Generation to better run your business
• Same day settlement to ANZ transaction accounts2
1 ANZ BladePay™ and ANZ FastPay® Next Generation are only available to approved merchants who meet ANZ’s credit Approval criteria and have an ANZ business account. Terms and conditions and fees and charges apply to the use of ANZ BladePay™.
2 For transactions settled before 6.30pm AEST/AEDT.
ANZ BLADEPAY™ WITH ANZ FASTPAY® CONTACTLESS CARD READER
ANZ BladePay™ with ANZ FastPay® Contactless Card Reader and the ANZ FastPay® Next Generation App is the perfect combination for mobile payments with endless possibilities.

4
CONTENTS
1 Getting started 6 1.1 Your merchant agreement 6 1.2 Who to contact for help 6 1.3 How to get started 6 1.4 Change of business details 7 1.5 Cards accepted 8 1.6 Ordering more ANZ BladePay™ devices 8 1.7 Email receipts 8 1.8 User management 8 1.9 PIN, Passwords and One Time Passcode 9 1.10 Forgotten PIN 92 ANZ BladePay™ Set-up 103 Processing a transaction 14 3.1 Third Party App initiated 14 3.2 Authorisation 16 3.3 Email and SMS receipts 17 3.4 Refund transactions 17 3.5 Low Value Payments 194 Customer PIN entry instructions 20 4.1 How your customer enters their card PIN 20 4.2 Cardholder data security 215 Using the ANZ FastPay® Portal 22 5.1 ANZ FastPay® Portal General Layout 22 5.2 First time log in 23 5.3 Home tab 23 5.4 Transactions 24 5.4.1 Transaction history 24 5.4.2 Search transactions 25 5.4.3 View the details of a transaction 26 5.4.4 View the original receipt of a transaction 26 5.4.5 Re-issue a customer receipt 26 5.5 User profiles 27 5.6 Devices 28 5.6.1 Card Readers 28 5.6.2 ANZ BladePay™ details 29
5
5.7 App Catalogue 29
5.7.1 Search App Catalogue 29 5.7.2 App Catalogue 30 5.7.3 App Suites 31 5.8 Manage preferences tab 34
5.9 Online Help tab 35
5.10 Log Out 35
6 Settings and Updates 36
6.1 Settings 36 6.1.1 Wi-Fi 36 6.1.2 SIM Card 37 6.1.3 Bluetooth 39 6.1.4 Date & Time 40 6.1.5 Reset Device 41 6.2 Updates 41 6.2.1 App Updates 42 6.2.2 App Suites 437 Protecting your business from fraud 44
7.1 Basic precautions 44
7.2 Credit cards 45
7.3 Debit cards 46
7.4 Chip card 46
8 Chargebacks 47
9 Handling cardholder information securely 48
9.1 Found customer cards 48
10 Equipment maintenance 49
10.1 Upgrades 49
11 Troubleshooting 50
11.1 No mobile reception 50
11.2 Stronger PIN required 50
11.3 Receipt email not received 50
11.4 Forgotten your log in PIN 50
11.5 Unlocking users 50

6
1.1 YOUR MERCHANT AGREEMENT
Your ANZ Merchant Agreement contains important information about the operating procedures for ANZ BladePay™. It includes this guide and may be changed or replaced by us at any time.
Please keep in mind that at any time:
• We may conduct an investigation if a transaction is believed to be fraudulent
• The operators of the applicable card schemes may also conduct their own investigations
• Your merchant agreement outlines the circumstances in which you will be liable for such transactions
• If it is found that you have processed invalid or unacceptable transactions, you may be liable for the value of those transactions (see our ANZ BladePay™ General Conditions for more details).
1.2 WHO TO CONTACT FOR HELP
If you would like any help or are experiencing any issues with ANZ BladePay™, please call the ANZ Merchant Contact Centre on 1800 039 025 (24 hours a day, 7 days a week) or email [email protected]
1.3 HOW TO GET STARTED
Simply call us or send an enquiry into ANZ for ANZ BladePay™ and an Institutional or Commercial sales consultant will contact your organisation. Once your Application has been submitted, ANZ will process it within 4 business days. If approved, your ANZ BladePay™ device should be delivered to you within 1-2 business days. You will receive an email and SMS from Toll (ANZ’s delivery partner), advising you of the anticipated delivery date and address for your ANZ BladePay™ device. Should you wish to alter these details, please contact Toll directly by using their contact information provided in their email. A person over the age of 18 will be required to sign for the delivery of the
1. GETTING STARTED
This guide will tell you all you need to know about getting started and using ANZ BladePay™. Please follow the security checks and procedures to help identify and minimise fraudulent, invalid or unacceptable transactions.

7
ANZ BladePay™ device. In the event that this is not possible, the delivery will be left at an alternate drop off point close to your registered Trading Address. A calling card will be left and you will also receive an SMS with the location of the alternate drop off point.
Once you have received your ANZ BladePay™ device:
1. Turn on the ANZ BladePay™ device and follow the on-screen set-up
2. During the ANZ FastPay® Next Generation setup, an SMS will be sent to the mobile phone number registered during setup of the ANZ BladePay™ Merchant Facility, the SMS will contain your One Time Passcode
3. Enter the One Time Passcode and you will then be prompted to set up your 4 digit log in PIN
4. You will now be prompted to add the Apps you wish to use on your ANZ BladePay™ device. You may have been provided details of this by your App vendor, or you can follow the steps in this Merchant Operating Guide to add Apps to your device.
1.4 CHANGE OF BUSINESS DETAILS
Our ANZ BladePay™ and ANZ FastPay® Next Generation App General Conditions describe various situations in which you must notify us of a change to your circumstances. Please go to anz.com/merchantconnect to complete and submit the relevant form, or contact ANZ Merchant Services on 1800 039 025 if there are any changes to your:
• Business name and/or address
• Business type or activities including changes in the nature or mode of operation of your business
• Mailing address
• Ownership
• Bank/branch banking details
• Telephone or fax numbers
• Industry
• Email address.
The ANZ Merchant Services General Conditions sets out your obligations when your business is sold, ceases to trade or no longer requires an ANZ Merchant Facility. Please be aware that it’s your responsibility to make sure the merchant facility is closed, by contacting ANZ Merchant Services. Failure to do so may result in the continued charging of fees in accordance with the ANZ Merchant Services BladePay™ General Conditions.

8
1.5 CARDS ACCEPTED
• Credit cards - Cardholders can use either MasterCard® or Visa to perform transactions through ANZ FastPay® Next Generation.
• Debit cards - Cardholders with either a debit or EFTPOS card can use their PIN for transactions. EFTPOS cardholders will select their cheque or savings account.
• Charge Cards (American Express only) - Processing charge cards is essentially the same as processing credit card transactions. To accept charge cards, you must have an agreement with the charge card issuer. (e.g. American Express). For information on American Express card acceptance visit www.americanexpress.com.au/merchant or call 1300 969 614 (option 4).
1.6 ORDERING MORE ANZ BLADEPAY™ DEVICES
If you’d like additional ANZ BladePay™ devices you can order them by calling ANZ Merchant Services on 1800 039 025 (additional monthly rental charges will apply). All users you set-up on a merchant account can use any ANZ BladePay™ device associated with that merchant account.
1.7 EMAIL RECEIPTS
The merchant will receive PDF’s of every ANZ BladePay™ transaction processed via ANZ FastPay® Next Generation. Third Party Apps used on ANZ BladePay™ in conjunction with ANZ FastPay® Next Generation will manage the creation of the Customer Tax Receipts.
• Customer Eftpos receipts can be emailed in real-time from the ANZ FastPay® Next Generation gateway for approved, declined and failed transactions.
• Receipts are in PDF printable format for your convenience.
• The merchant email receipt may be sent to a centralised office location to assist with reconciliation.
1.8 USER MANAGEMENT
ANZ BladePay™ and the ANZ FastPay® Next Generation App are initially set-up with the Primary user provided by ANZ.
The Primary user can create additional users via the ANZ FastPay® Portal or by calling the ANZ Merchant Contact Centre on 1800 039 025.
To close user accounts, the primary user can deactivate the user on the ANZ FastPay® Portal or contact the ANZ Merchant Contact Centre on 1800 039 025.

9
1.9 PIN, PASSWORDS AND ONE TIME PASSCODE
The ANZ FastPay® Next Generation App will issue the activation One Time Passcode which is a combination of numbers. This will be sent via SMS after the first time you enter your Merchant ID and Username and attempt to log in. The SMS will be sent to the mobile phone number that is registered for your ANZ BladePay™ facility.
Once logged in you will be prompted to create a 4 digit secure Personal Identification Number (PIN).
If your 4 digit log in PIN is entered incorrectly 3 times, the App will lock you out.
Contact the ANZ Merchant Contact Centre on 1800 039 025 to have this reset^.
1.10 FORGOTTEN PIN
If you have forgotten your PIN or password, contact the Merchant Contact Centre, or log in to the ANZ FastPay® Portal. You will be provided with a One Time Passcode which will allow you to create a new 4 digit PIN once you log in.
^ Only the merchant may contact the Merchant Contact Centre to arrange 4 digit log in PIN resets for additional users.

10
Step 1 – Press the “Let’s get started” buttonPlease note – you should have your welcome email, Wi-Fi details and your mobile phone nearby to complete the set-up.
Step 2 – Alter time, date and time zone details if required and press Next* Please note: If a SIM card is inserted in the ANZ BladePay™ device, the date and time will be adjusted based on the cellular carrier settings
Step 3 – If the Wi-Fi toggle is set to “Off” and a Wi-Fi connection is required, tap the toggle to turn the Wi-Fi to “On”. If no Wi-Fi connection is required, press Next. You will be prompted to confirm that you do not require Wi-Fi turned on.
Select a visible Wi-Fi from the list of available Wi-Fi networks and enter any password associated with this network, or press the “hidden network” button to enter the details of a hidden Wi-Fi network.
You can update your Wi-Fi settings on the ANZ BladePay™ device at a later time.
Once the ANZ BladePay™ device has connected to the required network press Next.
Step 4 – The ANZ BladePay™ device will provide you the option to configure the SIM card and network being used.
Tap the On/Off toggle to switch Mobile Data on or off.
Please Note: The SIM card provided by ANZ in the ANZ BladePay™ device has already been configured for use with the Application APN details.
2. ANZ BLADEPAY™ SET-UP

11
Step 5 – The ANZ BladePay™ device will prompt you to set-up ANZ FastPay® Next Generation.
From your welcome email find your Merchant ID and Username and press the Log in button.
Step 6 – A One-Time-Passcode will be sent to the mobile phone number associated with the ANZ BladePay™ merchant facility.
Enter the 8 digit code into the One Time Passcode field and press Log In.
Step 7 – A screen outlining how to create the 4 digit PIN to comply with ANZ standards will be presented.
The 4 digit PIN created during this process will be used for all subsequent log ins by this user.
The username and PIN can be used to set-up other devices that are associated to the Merchant facility without having to set-up additional users or generate another One Time Passcode.
Step 8 – Enter the required PIN.

12
Step 9 – Confirm the PIN.
Step 10 – Re-enter the PIN to log in to the ANZ BladePay™ device.
Step 11 – If an App suite has previously been set-up, this will be presented in the App Suite list.
If no App Suites are available, follow the steps in 5.7.3 App Suites to set-up an App Suite on the ANZ FastPay® portal. App Suites created on the ANZ FastPay® Portal will appear in this list.
Alternatively, if you have been provided an App Suite Code by your 3rd Party App provider, press Link App Suite and follow Step 12.
You are also able to set-up multiple App Suites and associate different ANZ BladePay™ devices on the same ANZ BladePay™ Merchant Facility with different App Suites.
Step 12 – Enter in the App Suite code provided to you by your 3rd Party App provider. Create a name for the App Suite in the App Suite Name field.Please Note: The App Suite Name will appear in the App Suite list on any subsequent ANZ BladePay™ device associated with this MID. The App Suite Name will also appear in the ANZ FastPay® Portal.

13
Step 13 – Any Apps associated with an App Suite that have been linked to the ANZ BladePay™ device will now download to the ANZ BladePay™ device. Once the set-up is complete the tile App screen appears.

14
3.1 THIRD PARTY APP INITIATED
Step 1 – Please refer to your Point of Sale (POS) or 3rd Party App provider manual/guide on how to initiate a purchase transaction.
Step 2 – The Card Reader will display Present card.
Tap, insert or swipe the customer’s card using the Contactless Card Reader.
Step 3 – For card insert or swipe transactions, ask the customer to select their account.
The Card Reader will display Select Account Type or Select Application.
* Application names and order can vary depending on the card that is used.
Step 4 – Ask the customer to confirm the amount showing on the Contactless Card Reader of the ANZ BladePay™ device. If it is correct, ask them to select Yes. If it’s not correct, select No to cancel the transaction.
The Contactless Card Reader will display the Transaction amount, OK? And the value of the transaction.
3. PROCESSING A TRANSACTION

15
Step 5 – You can now hand the ANZ BladePay™ device with the Contactless Card Reader integrated to the customer for card verification.
(a) If the card requires a PIN, ask the customer to enter their card PIN. The Card Reader will display Enter PIN and a scrambled number pad.NOTE: If Low Value Payment is enabled on the terminal, it may not request signature or PIN authorisation.
As the customer enters their card PIN, an asterisk will appear after each PIN digit is entered.
Please see section 4.0 Customer PIN entry instructions.
(b) If the card requires a signature, ask the customer to sign on the ANZ BladePay™ device screen.
Step 6 – While the transaction is processing the Card Reader will display Sending Auth Request.

16
Step 7 – Once the transaction is complete the transaction summary will be displayed on your smartphone or tablet screen. The Card Reader will display APPROVED or the transaction outcome.
If the transaction has been declined due to Incorrect PIN, a Retry button will be displayed. This will return to the Present Card screen without the need to enter the Transaction Amount, Description or Cardholder name again.
Step 8 – When the transaction has been completed, the ANZ FastPay® Next Generation App will transition back to the Point of Sale (POS) or 3rd Party App.
3.2 AUTHORISATION
ANZ FastPay® Next Generation is designed to automatically seek authorisation from the cardholder’s card issuer while processing an electronic transaction.
Authorisation confirms the card number is valid and that there are enough funds in the account. Even though a transaction may be ‘authorised’, you as the merchant bear the risk that your customer is not the true cardholder. Authorisation does not amount to verification that the transaction is genuine nor does it authenticate the customer.
Keep in mind:
• Authorisation of the transaction does not mean that the true cardholder has authorised the transaction
• Authorisation does not protect you as a merchant from chargebacks
• We can’t guarantee a transaction has been conducted by the true cardholder.

17
Authorisation declined When an authorisation is declined, ask your customer for an alternative method of payment. If the customer can’t pay, the goods should be reclaimed. In cases where goods can’t be reclaimed (e.g. food items), ask for photographic identification such as a driver’s licence or take a description of the customer and arrange an alternative method of payment. If this fails, report the incident to the police.
3.3 EMAIL AND SMS RECEIPTS
Receipts are emailed in real-time from the ANZ FastPay® gateway for approved, declined and failed transactions to you, the merchant. These are created in PDF printable format for your convenience.
Depending on the 3rd Party App being used on your ANZ BladePay™ device, your customers may be able to choose to receive receipts via email, SMS or printed from a printer connected to your Point of Sale (POS) system.
3.4 REFUND TRANSACTIONS
The primary owner of the merchant facility can refund all transactions. However additional users can only refund their own transactions.
Card schemes require a refund to only be processed on the same card number that was used in the original sales transaction. Please check the card number from the original receipt before processing the refund transaction.
Step 1 – Please refer to your Point of Sale (POS) or 3rd Party App provider manual/guide on how to initiate a refund transaction
Step 2 – The Card Reader will display Present card.
Tap, insert or swipe the customer’s card using the Card Reader.
Step 3 – Ask the customer to select their account.The Card Reader will display Select Account Type or Select Application.
Application names and order can vary depending on the card that is used.

18
Step 4 – Ask the customer to confirm the amount showing on the Card Reader is correct, then ask them to select Yes if it’s correct, or No if they wish to cancel the transaction.
The Card Reader will display Refund amount, OK? And the refund amount.
Step 5 – You can now hand your ANZ BladePay™ device to the customer for card verification.
(a) As the customer enters the card PIN, an asterisk will appear after each PIN digit is entered.
Please see section 3.0 Customer PIN entry instructions.
(b) If the card requires a Signature, ask the customer to sign on the screen of the ANZ BladePay™ device.

19
Step 6 – While the transaction is processing the Card Reader will display Sending Auth Request.
Step 7 – Once the refund is complete, the refund summary will be displayed on the screen. The Card Reader will display APPROVED or the refund outcome.
For more help please see section 11 Troubleshooting.
3.5 LOW VALUE PAYMENTS
Low Value Payments (LVP) is a convenient and efficient way of paying for goods and services when a small ticket payment transaction is detected. LVP is limited to scheme determined Merchant Category Codes and when the selected account is credit. The processing flow will then be as per normal ANZ purchase transaction but PIN entry or Signature will not be required for the transaction if it is equal to or less than the respective card scheme’s LVP limit.
This feature is promoted by the card schemes under the following names or brandings:
• MasterCard® Quick Payment Service – QPS
• VISA Easy Payment Service – VEPS
• AMEX Small Ticket – AST.
For merchants in Applicable Merchant Category Codes, the requirements for commencing a transaction for ‘LVP’ processing are as follows:
• Transaction type = Insert or Swipe Card Transaction
• Account Type = Credit
• Amount of ‘Purchase’ is equal to or less than the ‘LVP’ transaction limit.

20
To process a new sale your customer will need to either enter their card PIN or sign for card verification. The following steps will enable you to guide your customer through the card PIN entry method for ANZ FastPay® Next Generation.
4.1 HOW YOUR CUSTOMER ENTERS THEIR CARD PIN
Your customer will enter their card PIN using the tiles on your ANZ BladePay™ device screen that corresponds to the scrambled number tiles on the Card Reader.
1. The Card Reader will display Enter PIN and a scrambled keypad.
Ask your customer to enter their card PIN one digit at a time by pressing the blank keypad tiles on the ANZ BladePay™ device that correspond to the scrambled number on the Card Reader number pad. Please let the customer know that the keypad on the Card Reader will re-shuffle after each digit is entered.
2. The Card Reader will display an asterisk after each digit is entered and denotes the number of card PIN characters that the cardholder has entered.
3. Once your customer has entered their card PIN, please ask them to press Enter.
The Enter button will only be enabled after 4 digits have been entered.
4. CUSTOMER PIN ENTRY INSTRUCTIONS

21
4. The transaction will now be processed.
4.2 CARDHOLDER DATA SECURITY
ANZ BladePay™ does not allow for any cardholder data to be stored on the ANZ BladePay™ device, in 3rd Party developed Apps, in the ANZ FastPay® Next Generation App or on the ANZ FastPay® Card Reader. Your customer’s card PIN number is safe and secure when using ANZ FastPay® Next Generation.
The Card Reader is an online transactional device and is incapable of storing any data including: PAN (Primary Account Number) which is the unique payment card number (typically for credit or debit cards) that identifies the issuer and the particular cardholder account, and the cardholder PIN (Personal Identification Number). These details are sent via the Card Reader to the server in an encrypted and secure format.
ANZ FastPay® Next Generation is compliant with the PCI Security Standards Council, which is the security standards body, ensuring cardholder data is never stored or easily accessible. For more information please visit www.pcisecuritystandards.org

22
5 USING THE ANZ FASTPAY® PORTAL
5.1 ANZ FASTPAY® PORTAL GENERAL LAYOUT
Top Navigation
The grey navigation bar identifies the main information areas you can view:
• Home - This tab is a summary of all your important ANZ FastPay® information, e.g. Company Details, Contact Details and ANZ FastPay® details.
• Transactions - This tab lists all transactions that have been conducted by all ANZ FastPay® users associated to your Merchant ID. To present more relevant history you can utilise the search feature to target specific transactions, allowing you to either view the detail of a specific transaction, view the original receipt of the transaction, or even re-issue the receipt to your customer.
• User Profiles - This tab lists all the ANZ FastPay® users associated to your Merchant ID, and will allow you to add or edit users and reset the App log in PIN for any of the ANZ FastPay® users listed.
• Devices - This tab lists all Card Readers and BladePay™ devices associated to your Merchant ID.
• App Catalogue – Search the App Catalogue, view Apps available in the App Catalogue and create or modify App Suites.
• Manage Preferences - This tab presents all the Portal elements you can manage.
• Online Help - This tab presents all online help for the ANZ FastPay® Portal functions.
Bottom navigation
The blue navigation bar at the bottom will link you to ANZ supplementary information:
• ANZ.com - This presents the Small Business section of the anz.com website.
• Security & Privacy Statement - This presents the standard anz.com privacy and security statement.
• Website terms of use - This presents the standard anz.com website terms of use policy.
• Site Map - This presents a view of all capabilities contained within the ANZ FastPay® Portal.

23
5.2 FIRST TIME LOG IN
The first time log in screen allows you to log into the ANZ FastPay® Portal and set up your own password; this is only done the first time you use the ANZ FastPay® Portal. You must also provide your valid Merchant ID and Username, (previously sent via email) and One Time Password (previously sent via SMS).
5.3 HOME TAB
The Home tab is a summary of all your important ANZ FastPay® information, e.g. Company Details, Contact Details and ANZ FastPay® details.

24
5.4 TRANSACTIONS
The Transactions tab lists all transaction details associated with your Merchant ID. This tab allows you to either:
• View your transaction history for the last 12 months
• Search for transactions
• View the detail of a transaction
• View the original receipt of a transaction
• Re-issue a customer receipt.
5.4.1 Transaction HistoryThe Transactions History screen lists all transaction details associated with your Merchant ID. On this screen you can:
• Change the number of records on each page
• Navigate through the pages of records
• Export search results or the entire transaction history.

25
For any screen that contains the Export button, you can export that information to either a CSV file or to Microsoft Excel. To export information, select the export format that you desire (either CSV or XLS) in the box to the left of the Export button. Once the format has been selected, press the Export button and the ANZ FastPay® Portal will commence downloading the information for you in the desired format. Once the download is complete, open the file and save it on your computer.
5.4.2 Search Transactions
You can search for a transaction by either:
• Selecting Transaction Search from the drop down menu on the Transactions tab
• Selecting the Search button on the Transaction History page
• From the Transaction Search page, enter the search criteria that you want to search upon.
For example you can search upon transaction details, card details, ANZ FastPay® user details or Card Reader details.
Please note that you need to enter at least one search criteria to search upon. By pressing the down arrow next to one of these, the search criteria from which you can choose is then displayed. Once the search criteria has been entered, press the Search button and the results will be displayed.
You can sort the lists on the Transaction History or search results by clicking on any of the column headings that contain the up and down arrows to the right of the column name (e.g. on the Transaction History page you can sort using the Date, Type, Amount or ANZ FastPay® Username columns). Please note that you can only sort based upon one column at any one time.
If you enter a search criteria that doesn’t match any of your transactions, or is not in the correct format, you will receive an error message.
To return to all transactions, select Transaction History from the Transactions drop down menu in the top navigation.

26
5.4.3 View the details of a transaction
To view the details of a transaction, select the exact transaction from the Transaction History from the Search Transactions results.
5.4.4 View the original receipt of a transactionIn order to view the original receipt that was sent to a customer, you first need to find the exact transaction that you want to view the receipt for. To do this, go to the Transactions tab on the navigation menu, select Transaction History from the drop down list, find the transaction that you are looking for, and select the transaction.
Once the Transaction Record Detail screen is displayed, select the View Receipt button, and the receipt will be shown in the format that was originally sent to your customer.
5.4.5 Re-issue a customer receiptIf your customer asks you to re-issue their receipt as they have lost it or they did not receive it, you first need to find the exact transaction that you want to view the receipt for. To do this, go to the Transaction tab on the navigation menu, select Transaction History from the drop down list, find the transaction that you are looking for, and select the transaction.
Once the Transaction Record Detail screen is displayed, select the Re-issue Receipt button. A pop-up box will appear allowing you to either enter the customer’s email address, or their mobile phone number if you have these. Once these details have been correctly entered, press the Send button and the receipt will be resent to your customer either via email or SMS, depending what details you entered.

27
5.5 USER PROFILES
The User Profiles tab lists all the details for every ANZ FastPay® user account associated with your Merchant ID, and will allow you to reset that ANZ FastPay® user’s log in PIN for their ANZ FastPay® account.
• Add User – You can add new users to your ANZ FastPay® facility by selecting the Add Users option from the User Profiles drop down menu. You will need to select a username and add a valid email address and mobile phone number for the user. The One Time Passcode required to log in to ANZ FastPay® for this user will be sent to the mobile phone number provided.
• Edit User – Find the user in the list and select the Edit button next to their name. You can edit the email address and mobile phone numbers of existing users on your ANZ FastPay® facility. Simply update the required information and press the Update button.
• Reset PIN – Find the user in the list and select the Reset PIN button next to their name. The next time they attempt to log into the ANZ FastPay Next Generation App, they will be sent a new One Time Passcode which they can use to gain access to the App.
• Deactivate – Find the user in the list and select the Deactivate button. This will disable access to the App for the selected user.

28
5.6 DEVICES
The Devices Tab will allow you to view the devices that are associated with your ANZ BladePay™ Merchant Facility.
5.6.1 Card Readers
A list of Card readers associated with the ANZ BladePay™ merchant facility will be displayed. Information relating to the use of the card reader will be displayed:
• Last Used By (Username) – the username of the user who last logged in to ANZ FastPay® Next Generation using that Card Reader
• Date/Time Last Used – the date/time that the last log in occurred
• Application Device OS – the operating system of the device that last used the card reader
• Application S/W version – the version number of the ANZ FastPay® Next Generation App that last used the card reader
• Card Reader Serial No – the serial number associated with the Card Reader – the serial number can be found on the bottom of each Card reader
• Card Reader Firmware – the software version number that is loaded on to the Card Reader
• Card Reader Status – the status (Active, Inactive) of the Card Reader.

29
5.6.2 ANZ BladePay™ Details
A list of the ANZ BladePay™ devices associated with the ANZ BladePay™ merchant facility will be displayed. Information relating to the use of the card reader will be displayed:
• Last Used By (Username) – the username of the user who last logged in to ANZ FastPay® Next Generation using the ANZ BladePay™ device
• Date/Time Last Used – the date/time that the last log in occurred
• ANZ BladePay™ Serial Number – the individual serial number used to identify each ANZ BladePay™ device. This is the IMEI number found on the inside cover of the ANZ BladePay™ device, under the battery
• Card Reader Serial No – the serial number associated with the Card Reader attached to the ANZ BladePay™ device
• Primary SIM Number – the number of the primary SIM card installed in the ANZ BladePay™ device
• ANZ BladePay™ Version – the device version details associated with the ANZ BladePay™ device Status - the status (Active, Inactive) of the ANZ BladePay™ device.
5.7 APP CATALOGUE
The App Catalogue Tab will allow you to manage the Apps that are associated and installed on your ANZ BladePay™ devices.
5.7.1 Search App Catalogue

30
You can search all of the Apps that have been approved for use on ANZ BladePay™ through the App Catalogue Search. You can search by:
• Name – the Name of the App
• Category – a list of the categories that is associated with each App
• Organisation – a list of the Organisations that have been approved to provide Apps for ANZ BladePay™.
A list of Apps that match the search criteria entered will be presented.
5.7.2 App Catalogue
A list of Apps that are approved for use on ANZ BladePay™ devices and that have been marked by their developer as public will be presented in the App Catalogue list.

31
To add an approved App to your ANZ BladePay™ device, you will need to add the App to an App Suite.
Click “Add to App Suite” next to the App
Select the App Suite from the App Suites listed in the drop down menu
A list of Apps that are currently attached to the App Suite will be shown.
5.7.3 App Suites
App Suites are simply a grouping of Apps that can then be linked to one or more ANZ BladePay™ devices on your ANZ BladePay™ Merchant Facility. You are able to create as many App Suites as you need.
To help you use and manage your ANZ BladePay™ device, a set of default Apps will be provided by ANZ and installed along with any Apps selected by you in your App Suite.

32
5.7.3.1 Add App SuiteFrom the App Suites screen, click the “Add App Suite” Button.
Enter the name for the App Suite.
Click Update to save the App Suite.
5.7.3.2 Edit App Suite
The Edit App Suite button will allow you to update the name of an existing App Suite that has been created.
5.7.3.3 Add a Private App to an App Suite
If an App is not in the App Catalogue, it may have been set as a private App by the Developer. If the Developer has set their App to Private they will be able to provide a 16 digit App Code to enable you to add the App to your App Suite.
Tap the Add Private App button.
Enter the 16 digit App Code provide by the App Developer and tap Add App.
33
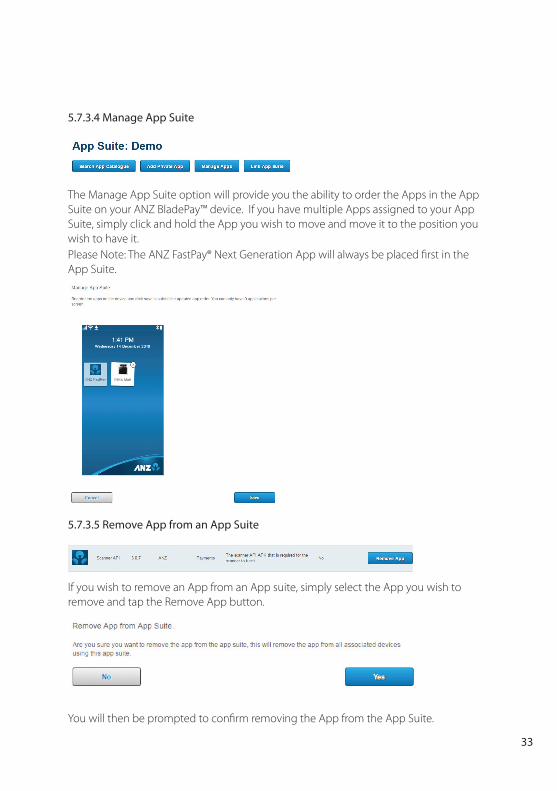
5.7.3.4 Manage App Suite
The Manage App Suite option will provide you the ability to order the Apps in the App Suite on your ANZ BladePay™ device. If you have multiple Apps assigned to your App Suite, simply click and hold the App you wish to move and move it to the position you wish to have it.Please Note: The ANZ FastPay® Next Generation App will always be placed first in the App Suite.
5.7.3.5 Remove App from an App Suite
If you wish to remove an App from an App suite, simply select the App you wish to remove and tap the Remove App button.
You will then be prompted to confirm removing the App from the App Suite.

34
5.7.3.6 Remove an App Suite
Click the Remove App Suite button to remove the App Suite from your list and relevant devices.
You will be prompted to confirm if you wish to remove the App Suite.
5.8 MANAGE PREFERENCES TAB
The Manage Preferences tab contains a drop down list, allowing you to change your current ANZ FastPay® Portal password.
To change your ANZ FastPay® Portal password, go to the Manage Preferences tab in the navigation menu, and select Change Password from the drop down list. Enter your current ANZ FastPay® Portal password, enter your new ANZ FastPay® Portal password and before entering the new ANZ FastPay® Portal password a second time, ensure that it is correct.

35
5.9 ONLINE HELP TAB
The Online Help tab presents FAQ and information to assist you in using the ANZ FastPay® Portal.
5.10 LOG OUT
When the Log out button on the top right of the screen is pressed, you will exit the ANZ FastPay® Portal, and be presented with the following confirmation message “You have successfully logged out.”

36
6.1 SETTINGS
The Settings App loaded on the ANZ BladePay™ device will allow access to a minimal number of settings that are required to use/manage the ANZ BladePay™ device.
• Wi-Fi
• SIM Cards
• Bluetooth
• Date & Time
• Reset Device
6.1.1 Wi-FiThe Wi-Fi setting will allow merchants to set up their ANZ BladePay™ device on to their Wi-Fi network.
If Wi-Fi is switched off, the toggle switch will be black and will not display any Wi-Fi networks.
Tap the toggle switch to turn Wi-Fi on.
If Wi-Fi is switched on, the toggle switch will be green and display a list of available Wi-Fi networks.
Tap the Applicable Wi-Fi network name to connect.
6.0 SETTINGS AND UPDATES

37
If the Wi-Fi network requires a password, you will be prompted to enter the password in the Password box.
If required you can tap the Show Password box to show the unmasked password being entered.
Tap the Join button to attempt to log in to the network.
When connected, a green tick will appear on the left of the Wi-Fi network that you have joined.
If the network that is being displayed is not visible, tap the Hidden Network button.
Enter the SSID and password for the network.
Tap the security button to select between WEP, WPA, WPA2 or None for the security level of the network.
6.1.2 SIM CardThe SIM setting will allow merchants to switch between the Primary SIM provided by ANZ or use a SIM that is provided and serviced by the merchant.
When switching SIM cards, turn the ANZ BladePay™ device off. Use the SIM key provided to eject the blue SIM tray on the left side of the ANZ BladePay™ device.
Insert the PIN end of the key in to the hole on the side of the SIM tray and push slightly until the SIM tray ejects.
Insert the SIM in to the SIM tray and slide the SIM tray back in to the ANZ BladePay™ device, with the hole on the SIM tray pointing towards the bottom of the ANZ BladePay™ device (it will only fit one way).
Turn the ANZ BladePay™ device on. Tap Settings, SIM Cards.
By default, the internal SIM provided by ANZ will be selected, along with the relevant APN (Access Point Name).

38
If use of mobile data is not required, tap the on/off toggle to switch mobile data off. This may be required if all communication with 3rd Party Apps requires use of Wi-Fi.
If a SIM has been inserted in to the SIM tray, then it will be visible under the primary SIM.
Tap the secondary SIM radio button to select the secondary SIM as your preference for mobile data use.
Use the drop down provided to confirm the correct APN (Access Point Name) required for use with the SIM card.
Tap the Edit APN button to change the Name displayed or the APN connection details.

39
Tap the Add APN button if the SIM card being used requires an APN that is not listed by default in the drop down list.
Restart your ANZ BladePay™ device after updating the APN details to ensure that any settings updates have taken affect correctly.
6.1.3 BluetoothThe Bluetooth setting will allow merchants to connect Bluetooth enabled peripheral devices to work in conjunction with the ANZ BladePay™ device.
If Bluetooth is switched off, the toggle switch will be black and will not display any available Bluetooth devices.
Tap the toggle switch to turn Bluetooth on.
If Bluetooth is switched on, the toggle switch will be green and display a list of available Bluetooth devices.
If the device isn’t in the list of available devices, tap the Scan button.
Tap the Applicable Bluetooth device to pair the devices.

40
If Applicable, tap the Pair button to confirm the pairing of the devices.
6.1.4 Date & TimeThe Date & Time of the device will automatically be updated by the SIM card that is provided by ANZ in the ANZ BladePay™ device. These can be changed if required.
The current Time, Date and Time Zone values will be displayed.
Tap the Time, Date or Time Zone value to change it if required.
Use the up and down arrows to change the Hour and Minute value.
Tap set to update the value.
Use the up and down arrows to change the Day, Month or Year value.Tap set to update the value.
Select the Time Zone required from the list.
Tap set to update the value.
Please Note: only Australian Time zones will be displayed.
.

41
6.1.5 Reset DeviceThe Reset device option allows merchants to follow the initial setup prompts should they need to. You will be prompted to confirm the Device Reset. Device Reset may require 3rd Party Apps to be reinstalled and set-up after the device reset is completed.
You will be prompted to confirm if you wish to continue with the Device Reset.
Tap No to return to the Settings menu.
Tap Yes to reset the device. You will be prompted to setup the ANZ BladePay™ device. See section 2. ANZ BladePay™ Set-up to follow the device set-up steps.
6.2 UPDATES
The Updates App will allow ANZ and 3rd Party App developers to provided updated Apps to your ANZ BladePay™ device. Like other smart devices, users will be notified of updates by an icon at the bottom of the Updates App with the number of updates available.

42
6.2.1 App UpdatesIf any App updates are available, the notification icon will display on the bottom right of the Updates icon with the number of App updates available. Users will also be notified to download any additional Apps that may have been linked to the App Suite that is currently being used on the ANZ BladePay™ device.
The list of Apps to update will be displayed.
Tap each individual App to view the App description that has been provided by the App Developer.
Tap the Install button to begin installing all of the Apps that are available.
The status of each App install will be displayed.
You will be prompted to tap the Ok button once all of the Apps have been installed.
Any new Apps that have been installed will now be displayed on the device.
Any existing Apps that have been updated will remain on the device.
The notification icon on the Updates icon will now be removed.

43
6.2.2 App SuitesIf you need to update/change the App Suite that is being used on the ANZ BladePay™ device, you can either follow the initial set-up steps by using the “Reset Device” option in the “Settings” App, or alternatively you can change the App Suite through “Change App Suite” in the Updates App.
The ANZ Default App Suite and any App Suites that have been created will be displayed in the list. See Section: 5.7.3 App Suites for more information on Adding new or Editing existing App Suites.
If an App Suite has been set-up, simply select the App Suite from the list and tap Continue. Any Apps associated with the App Suite will be installed.
If you have been provided an App Suite code by an App Developer, tap the Link App Suite button.
Enter an App Suite code provided to you by your 3rd Party App provider. Create a name for the App Suite in the App Suite Name field.
Any Apps associated with the App Suite will be installed.
Please Note: The App Suite Name will appear in the App Suite list on any subsequent ANZ BladePay™ device associated with this MID. The App Suite Name will also appear in the ANZ FastPay® Portal.

44
Before you start using ANZ BladePay™ and ANZ FastPay® Next Generation, please take the time to read through the Fraud Minimisation, Data Security & Chargeback Guide on anz.com. This guide is filled with detailed fraud information to help you protect your business.
7.1 BASIC PRECAUTIONS
Don’t Do
• Allow the ANZ FastPay® Next Generation App or Card Reader to be used by unauthorised persons
• Let anyone service or remove your Card Reader without viewing proper identification
• Share cardholder information (e.g. card names or numbers)
• Position your Card Reader under a security camera or any other CCTV device.
• Hold on to the customer’s card until you have completed the security checks and obtained authorisation for the transaction
• Be alert to customers who appear nervous, overly talkative or in a hurry, carry the card loosely or by itself, have no means of identification, make purchases without regard to size, quality or price of goods, or ask to split transactions into smaller amounts
• Watch customers who arrive on closing time, try to rush you or distract you.
Suspicious of a transaction?
• Ask for photographic identification (e.g. driver’s licence or passport) and make sure the details match the Cardholder’s name.
• For MasterCard® and Visa transactions, call the authorisation centre on 1800 999 205 (select option 1). You may be asked a series of ‘yes’ or ‘no’ questions to help the operator determine whether you should proceed with the transaction.
7. PROTECTING YOUR BUSINESS FROM FRAUD
REMEMBER IT’S BETTER TO BE SAFE THAN SORRYIf you remain suspicious, refund the credit transaction and ask your customer for a direct deposit or some other form of payment (particularly for large value sales). Never place yourself at risk as your safety comes first. And be sure to report all fraudulent activities to the police immediately.

45
7.2 CREDIT CARDS
The following checks are vital in helping you identify and minimise fraudulent credit card transactions via your ANZ FastPay® Next Generation facility.
Before you start any transaction
• Confirm you are authorised to accept that particular card, and
• Check whether the card appears damaged or altered.
Check the front of the card
• Ensure that the name on the card is appropriate to the customer. Identity theft may have occurred if you are presented with a card containing the name of a cartoon character, a female name on a card presented by a male or other questionable scenarios,
• The printing on the card should look professional,
• The card must have current validity dates (a card can only be used from the first day of the ‘valid from’ month to the last day of the ‘until end’ month), and
• Cards should look 3-dimensional and contain familiar security features such as a hologram, signature panel and CVC/CVV. It should not appear suspicious or be made of inferior material.
Embossed cards
• The cardholder name and number should be raised rather than flattened (unless it is a genuine unembossed card),
• The first four digits of the embossed number must match the pre-printed four digits on the card,
• The embossing should be clear and even unembossed cards,
• A cardholder name may or may not be included,
• Can be used for electronic transactions only, and
• The cardholder name and number are printed rather than raised.
Check the signature during the transaction
• A signature should appear within the signature panel on the card,
• The signature or signature panel should not appear to have been altered, and
• The customer’s signature on the transaction voucher should match the signature on the card if a PIN is not used.

46
7.3 DEBIT CARDS
A debit card is an EFTPOS issued card. You can process debit transactions by swiping the presented card and asking customers to enter their PIN or signature depending on the debit card type.
7.4 CHIP CARD
Chip cards are cards embedded with a security microchip that provide further protection in decreasing the risk of fraudulent transactions and chargebacks. Look at the card and if there is a chip, insert the card into the Card Reader. Then proceed with the same caution you would when handling non-chip cards.
Do not continue with the transaction if the Card Reader reads Insert chip and:
• The card doesn’t have a chip
• The inserted chip can’t be read by the terminal.

47
A chargeback is the term used to debit a merchant’s bank account with the amount of a transaction previously credited. In most cases this is done automatically. Chargebacks can occur for a number of reasons including (but not limited to):
• Processing errors,
• Unauthorised use of a card,
• Unauthorised transactions,
• Invalid card account number,
• Incorrect transaction amount,
• Transactions that a cardholder justifiably disputes,
• Transactions performed on a lost or stolen card,
• Failure to comply with obligations under the merchant agreement,
• Failure to respond to a retrieval request,
• Merchandise not received by the purchaser or wrong goods sent, and
• Unacceptable supporting documentation supplied to the issuing bank.
Chargebacks can have a financial impact on your business. It’s important that you’re fully aware of your obligations, the processes involved and possible outcomes. Take the time to carefully read through the Fraud Minimisation, Data Security & Chargeback Guide (found under Merchant Services on anz.com), as well as our General Conditions ANZ FastPay® Next Generation. If you need help understanding a particular chargeback, call ANZ Merchant Contact Centre on 1800 039 025 (24 hours a day, 7 days a week).
8. CHARGEBACKS

48
9. HANDLING CARDHOLDER INFORMATION SECURELYYou are responsible for the security of all cardholder and transaction information you receive, process or store.
Businesses store credit card details for various reasons. While this can be necessary to support legitimate business practices, storage of card data can lead to theft of customer information and significant impact to your business. ANZ recommends that card data is never stored on your systems.
9.1 FOUND CUSTOMER CARDS
From time to time customers may accidentally leave their cards behind at your premises. To ensure any potential fraud is minimised:
• Keep the card in a safe place for a period of up to two business days,
• Hand the card to the customer claiming the card only after having established the claimant’s identity by comparing signatures,
• If the requisite two business days have passed, destroy the card. Should the cardholder enquire about their missing card, instruct them to contact their issuing institution.

49
10. EQUIPMENT MAINTENANCE
You need to provide a clean operating environment for your ANZ BladePay™ device, as liquid or dust can damage the components and prevent it from operating.
• Clean your ANZ BladePay™ device regularly with a damp cloth but don’t use abrasive materials (you may be charged if it is damaged).
• Regularly charge your ANZ BladePay™ device, this can take up to 8 hours.
• Regularly inspect the ANZ BladePay™ charging cable to prevent fire, and call ANZ Merchant Contact Centre on 1800 039 025 if you see any damage.
• Don’t tamper with or remove the ANZ BladePay™ Card Reader casing.
• Don’t place stickers on the ANZ BladePay™ device.
• Don’t leave the ANZ BladePay™ device on the dashboard of your car.
• Don’t allow the ANZ BladePay™ device to get wet.
10.1 UPGRADES
As the merchant, it’s important that you regularly update your ANZ BladePay™ device, ANZ FastPay® Next Generation App and Card Reader software, whenever upgrades become available.
For any update available to Apps on the ANZ BladePay™ device, the device will display a red notification icon at the bottom right of the Updates App installed on the device. This will display a list of App updates that are available.
For any updates related to the software on the Card Reader, the user will be prompted to upgrade the software through the ANZ FastPay® Next Generation App.

50
11.1 NO MOBILE RECEPTION
If there is insufficient mobile reception to complete the transaction try the transaction again when mobile reception is available. Alternatively, ask the customer for another form of payment.
11.2 STRONGER PIN REQUIRED
• The PIN must be four numeric characters.
• The PIN can’t contain three or more consecutive repeats of the same character. For example, 2232 is valid but 2223 is invalid.
• The PIN can’t contain three or more consecutive numbers in an ascending or descending sequence. For example, 1234, 4321, 2341 and 3214 is invalid.
• The following ‘common’ PIN sequences are not allowed: 2580, 0852, 1397 or 1793.
• You must not use your birth date or an alphabetical code which is a recognisable part of your name as a PIN.
11.3 RECEIPT EMAIL NOT RECEIVED
Confirm the transaction was successfully processed by viewing the Transaction listing on the Transaction screen.
• If it’s not in the transaction list, an email will not have been generated. Call ANZ Merchant Contact Centre on 1800 039 025 to check your email address.
• If the cardholder hasn’t received the email receipt, locate the merchant copy and forward it to them. This can be done either by finding the receipt in the merchant email account or by re-issuing the receipt via the ANZ FastPay® Portal.
11.4 FORGOTTEN YOUR LOG IN PIN
If you’ve forgotten your log in PIN or one time passcode, call ANZ Merchant Contact Centre on 1800 039 025 or the merchant can log In to the ANZ FastPay® Portal. You will be provided with a One Time Passcode that will allow you to create a 4 digit log in PIN once you have successfully logged in. Reset PIN via the portal.
11.5 UNLOCKING USERS
If a user’s account has been locked, the merchant must call ANZ on 1800 039 025 to reset the user, or use the Reset PIN option provided in the ANZ FastPay® Portal. See section 5.5 User Profiles for more information. The user will be required to immediately set their PIN upon log in.
11. TROUBLESHOOTING

51

Australia and N
ew Zealand Banking G
roup Limited (A
NZ) A
BN 11 005 357 522. Item
No. 94557 05.2017 W
575172
anz.com