app orchestration 2 - docs. · pdf fileconfiguring netscaler 10.5 load balancing with...
TRANSCRIPT
© 2015 Citrix Systems, Inc. All rights reserved.
App Orchestration 2.6
Configuring NetScaler 10.5 Load Balancing with StoreFront 3.0 and NetScaler Gateway for App Orchestration 2.6
Last Updated: June 04, 2015

Configuring NetScaler 10.5 Load Balancing with StoreFront 3.0 and NetScaler Gateway for App Orchestration 2.6
Page 2 © 2015 Citrix Systems, Inc. All rights reserved.
Contents
Introduction ........................................................................................................................................................ 3
Configure the NetScaler load balancer certificates ............................................................................................ 3
To configure the SSL certificates ................................................................................................................... 4
To create a certificate file to import to NetScaler ............................................................................................ 7
To link the installed certificates to the root certificates .................................................................................. 15
Configure LDAP authentication ........................................................................................................................ 16
NetScaler load balancing ................................................................................................................................. 18
To configure load balancer certificates ......................................................................................................... 18
To configure internal domain DNS settings .................................................................................................. 20
To configure NetScaler DNS settings ........................................................................................................... 21
To configure the NetScaler load balancer .................................................................................................... 21
Configure and install StoreFront servers .......................................................................................................... 38
NetScaler Gateway .......................................................................................................................................... 40
To configure NetScaler Gateway ................................................................................................................. 40
App Orchestration 2.6 ...................................................................................................................................... 44
To configure App Orchestration for NetScaler Gateway ............................................................................... 45
To configure App Orchestration for load balancing with StoreFront .............................................................. 48
To verify your configuration .......................................................................................................................... 50
References ...................................................................................................................................................... 54
Configuring NetScaler 10.5 Load Balancing with StoreFront 3.0 and NetScaler Gateway for App Orchestration 2.6
Page 3 © 2015 Citrix Systems, Inc. All rights reserved.
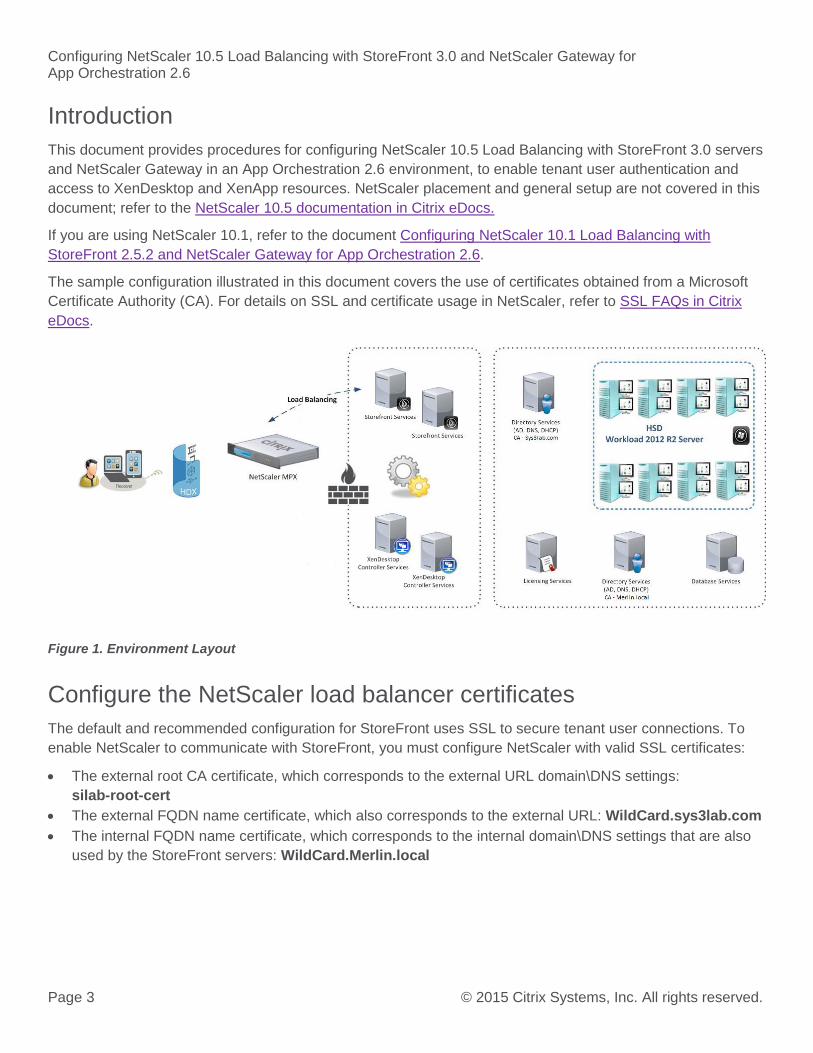
Introduction
This document provides procedures for configuring NetScaler 10.5 Load Balancing with StoreFront 3.0 servers
and NetScaler Gateway in an App Orchestration 2.6 environment, to enable tenant user authentication and
access to XenDesktop and XenApp resources. NetScaler placement and general setup are not covered in this
document; refer to the NetScaler 10.5 documentation in Citrix eDocs.
If you are using NetScaler 10.1, refer to the document Configuring NetScaler 10.1 Load Balancing with
StoreFront 2.5.2 and NetScaler Gateway for App Orchestration 2.6.
The sample configuration illustrated in this document covers the use of certificates obtained from a Microsoft
Certificate Authority (CA). For details on SSL and certificate usage in NetScaler, refer to SSL FAQs in Citrix
eDocs.
Figure 1. Environment Layout
Configure the NetScaler load balancer certificates
The default and recommended configuration for StoreFront uses SSL to secure tenant user connections. To
enable NetScaler to communicate with StoreFront, you must configure NetScaler with valid SSL certificates:
The external root CA certificate, which corresponds to the external URL domain\DNS settings:
silab-root-cert
The external FQDN name certificate, which also corresponds to the external URL: WildCard.sys3lab.com
The internal FQDN name certificate, which corresponds to the internal domain\DNS settings that are also
used by the StoreFront servers: WildCard.Merlin.local

Configuring NetScaler 10.5 Load Balancing with StoreFront 3.0 and NetScaler Gateway for App Orchestration 2.6
Page 4 © 2015 Citrix Systems, Inc. All rights reserved.
Complete the following process:
1. Configure the SSL certificates.
2. Create a certificate file to import into NetScaler. Although some steps describe using Microsoft Active
Directory Certificate Services, you can use your own certificate server to create the file.
3. Link the installed certificates to the root certificates. This enables the tenant users’ browsers, NetScaler,
and StoreFront to make secure connections.
To configure the SSL certificates
1. To create a private key with which to access your certificate request, log on to the NetScaler configuration
utility and perform the following actions:
a. In the navigation pane, click Traffic Management > SSL.
b. In the details pane, under SSL Keys, click Create RSA Key.
c. Specify a Key Filename to enable you to identify it.
d. Specify a Key Size of 2048 bits.
e. In PEM Encoding Algorithm, select DES3.
f. Enter and verify a passphrase, then click OK. This certificate .key file gets stored in the /nsconfig/ssl/
directory.
Configuring NetScaler 10.5 Load Balancing with StoreFront 3.0 and NetScaler Gateway for App Orchestration 2.6
Page 5 © 2015 Citrix Systems, Inc. All rights reserved.
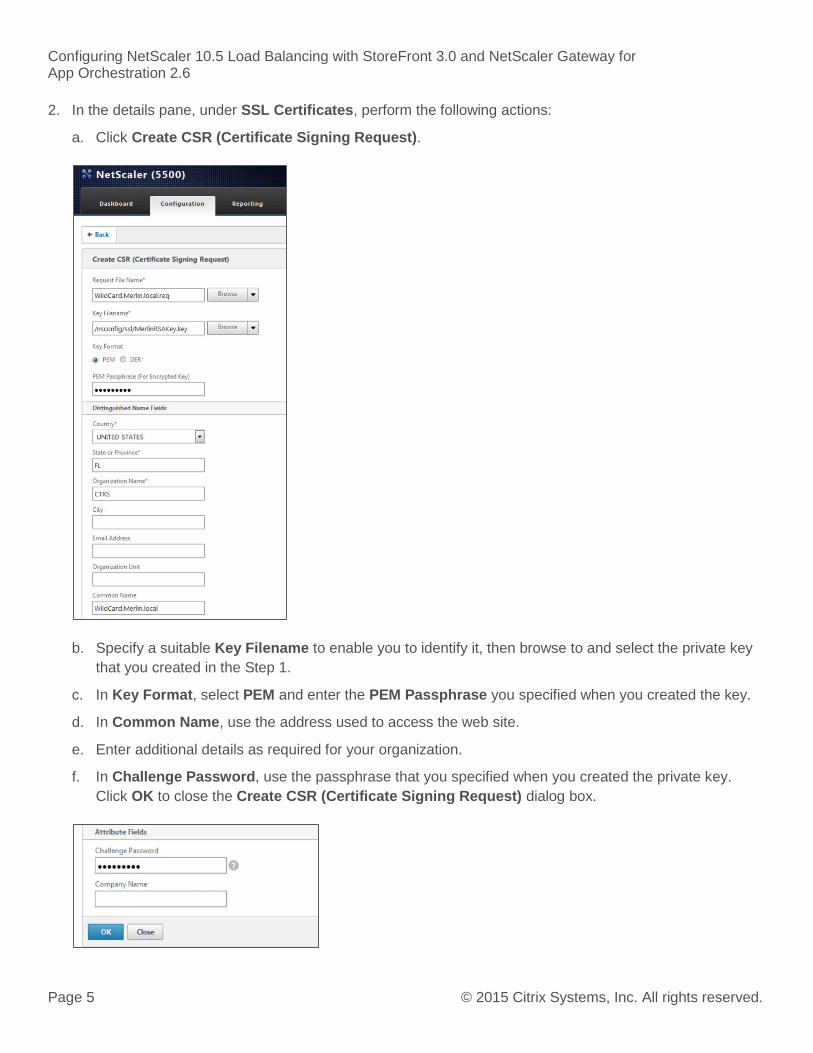
2. In the details pane, under SSL Certificates, perform the following actions:
a. Click Create CSR (Certificate Signing Request).
b. Specify a suitable Key Filename to enable you to identify it, then browse to and select the private key
that you created in the Step 1.
c. In Key Format, select PEM and enter the PEM Passphrase you specified when you created the key.
d. In Common Name, use the address used to access the web site.
e. Enter additional details as required for your organization.
f. In Challenge Password, use the passphrase that you specified when you created the private key.
Click OK to close the Create CSR (Certificate Signing Request) dialog box.
Configuring NetScaler 10.5 Load Balancing with StoreFront 3.0 and NetScaler Gateway for App Orchestration 2.6
Page 6 © 2015 Citrix Systems, Inc. All rights reserved.
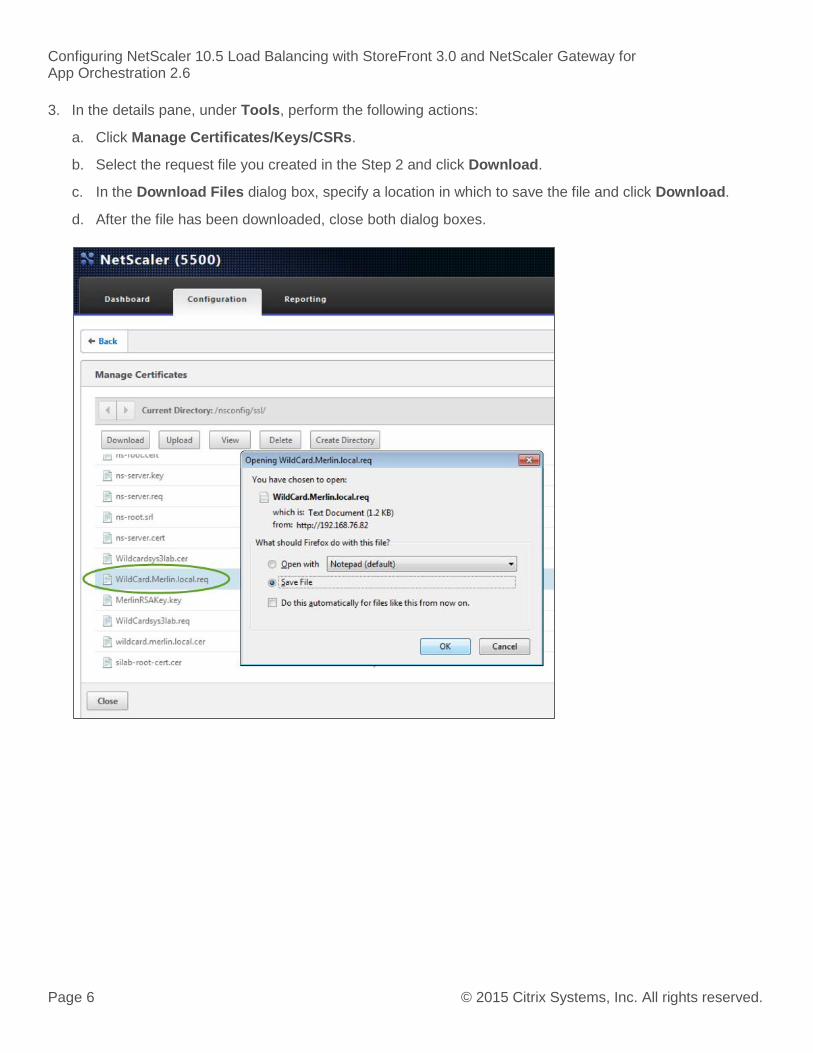
3. In the details pane, under Tools, perform the following actions:
a. Click Manage Certificates/Keys/CSRs.
b. Select the request file you created in the Step 2 and click Download.
c. In the Download Files dialog box, specify a location in which to save the file and click Download.
d. After the file has been downloaded, close both dialog boxes.
Configuring NetScaler 10.5 Load Balancing with StoreFront 3.0 and NetScaler Gateway for App Orchestration 2.6
Page 7 © 2015 Citrix Systems, Inc. All rights reserved.
To create a certificate file to import to NetScaler
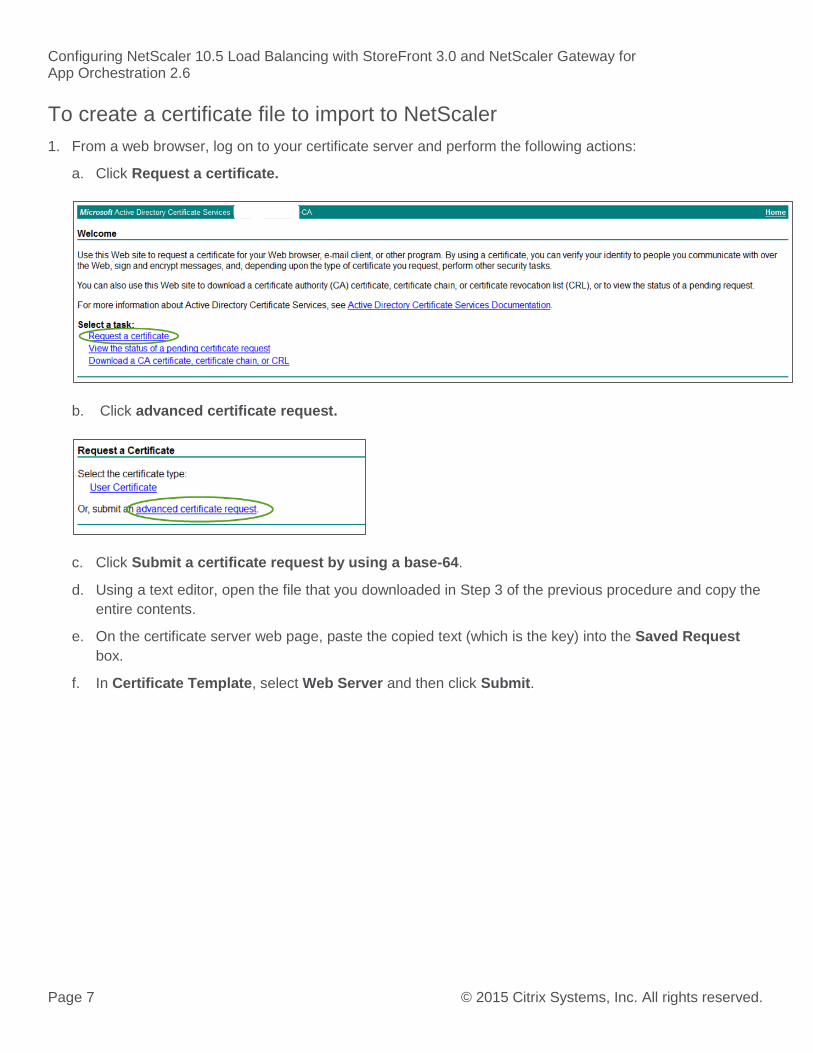
1. From a web browser, log on to your certificate server and perform the following actions:
a. Click Request a certificate.
b. Click advanced certificate request.
c. Click Submit a certificate request by using a base-64.
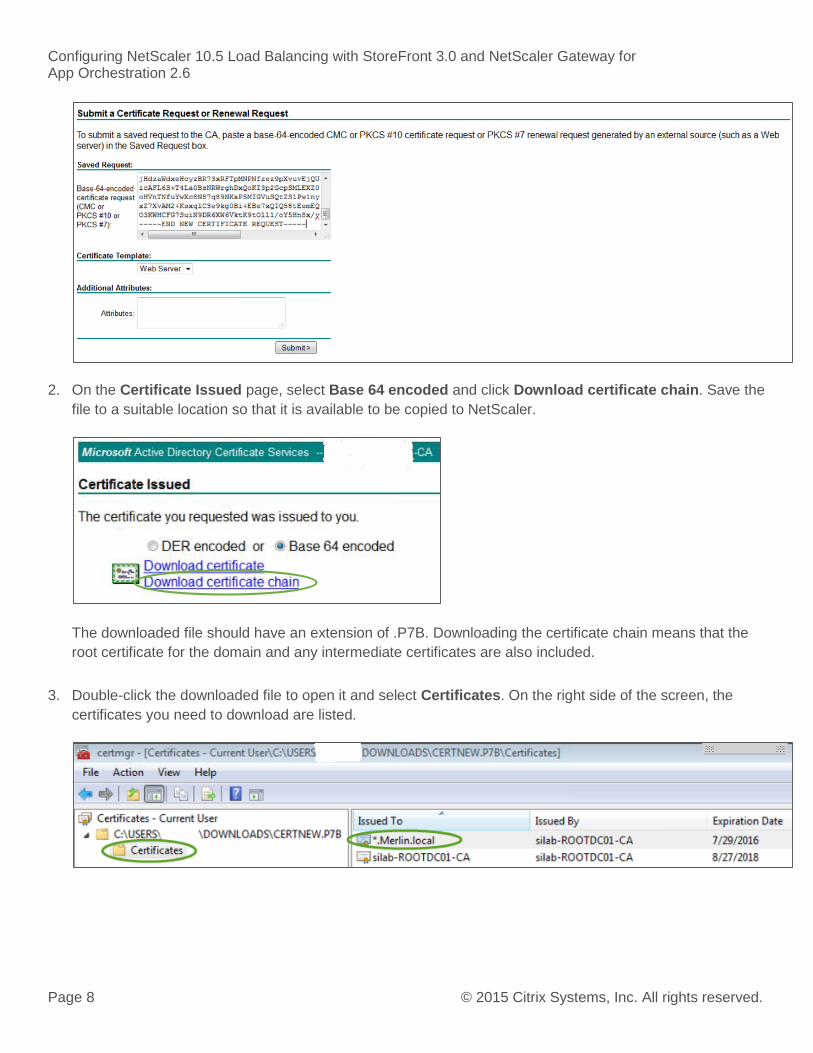
d. Using a text editor, open the file that you downloaded in Step 3 of the previous procedure and copy the
entire contents.
e. On the certificate server web page, paste the copied text (which is the key) into the Saved Request
box.
f. In Certificate Template, select Web Server and then click Submit.
Configuring NetScaler 10.5 Load Balancing with StoreFront 3.0 and NetScaler Gateway for App Orchestration 2.6
Page 8 © 2015 Citrix Systems, Inc. All rights reserved.
2. On the Certificate Issued page, select Base 64 encoded and click Download certificate chain. Save the
file to a suitable location so that it is available to be copied to NetScaler.
The downloaded file should have an extension of .P7B. Downloading the certificate chain means that the
root certificate for the domain and any intermediate certificates are also included.
3. Double-click the downloaded file to open it and select Certificates. On the right side of the screen, the
certificates you need to download are listed.
Configuring NetScaler 10.5 Load Balancing with StoreFront 3.0 and NetScaler Gateway for App Orchestration 2.6
Page 9 © 2015 Citrix Systems, Inc. All rights reserved.
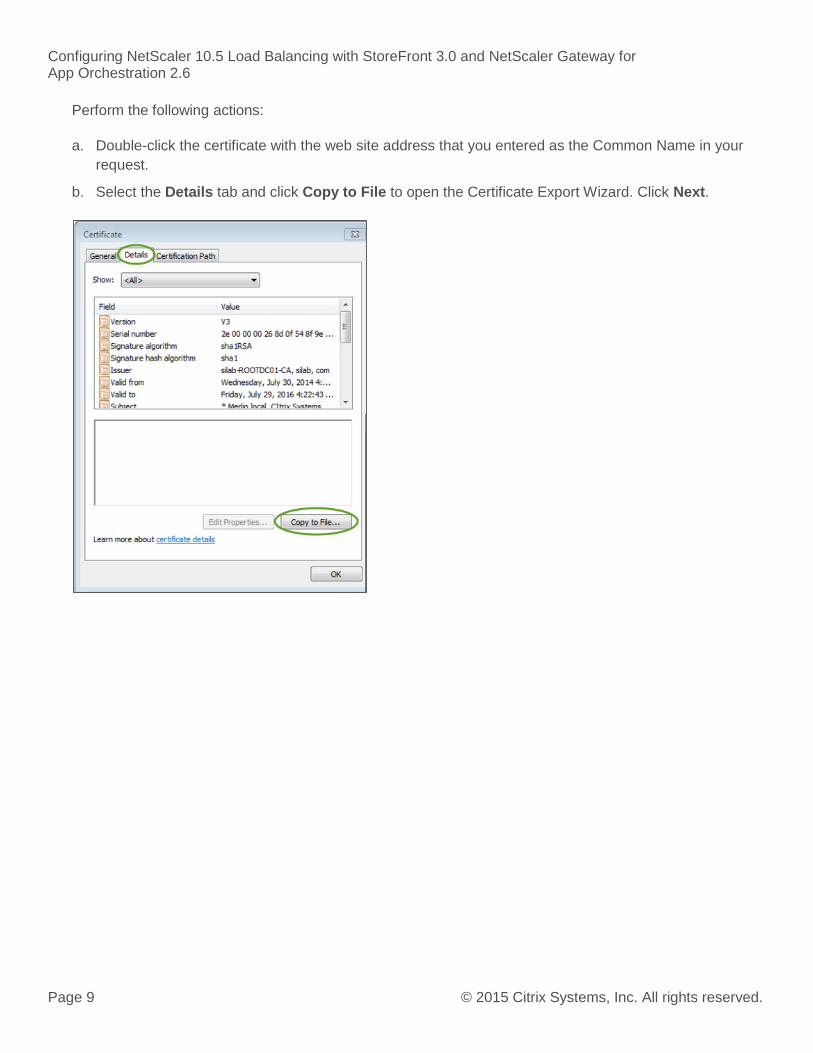
Perform the following actions:
a. Double-click the certificate with the web site address that you entered as the Common Name in your
request.
b. Select the Details tab and click Copy to File to open the Certificate Export Wizard. Click Next.
Configuring NetScaler 10.5 Load Balancing with StoreFront 3.0 and NetScaler Gateway for App Orchestration 2.6
Page 10 © 2015 Citrix Systems, Inc. All rights reserved.
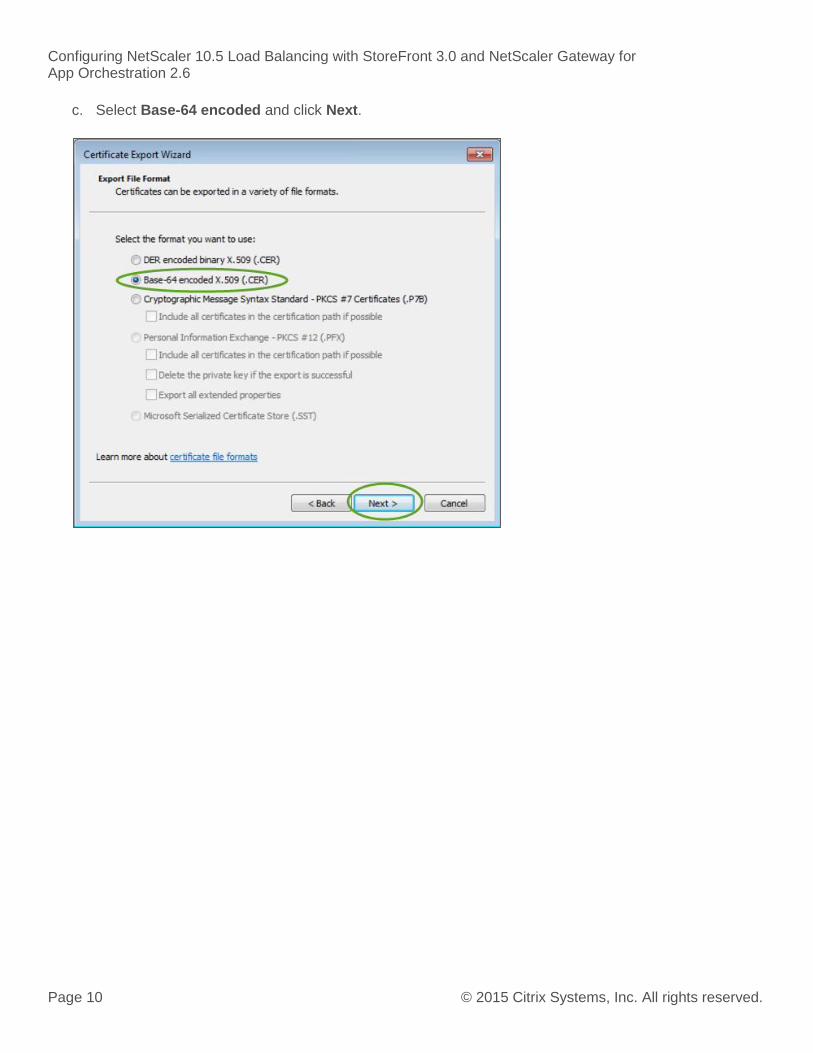
c. Select Base-64 encoded and click Next.
Configuring NetScaler 10.5 Load Balancing with StoreFront 3.0 and NetScaler Gateway for App Orchestration 2.6
Page 11 © 2015 Citrix Systems, Inc. All rights reserved.
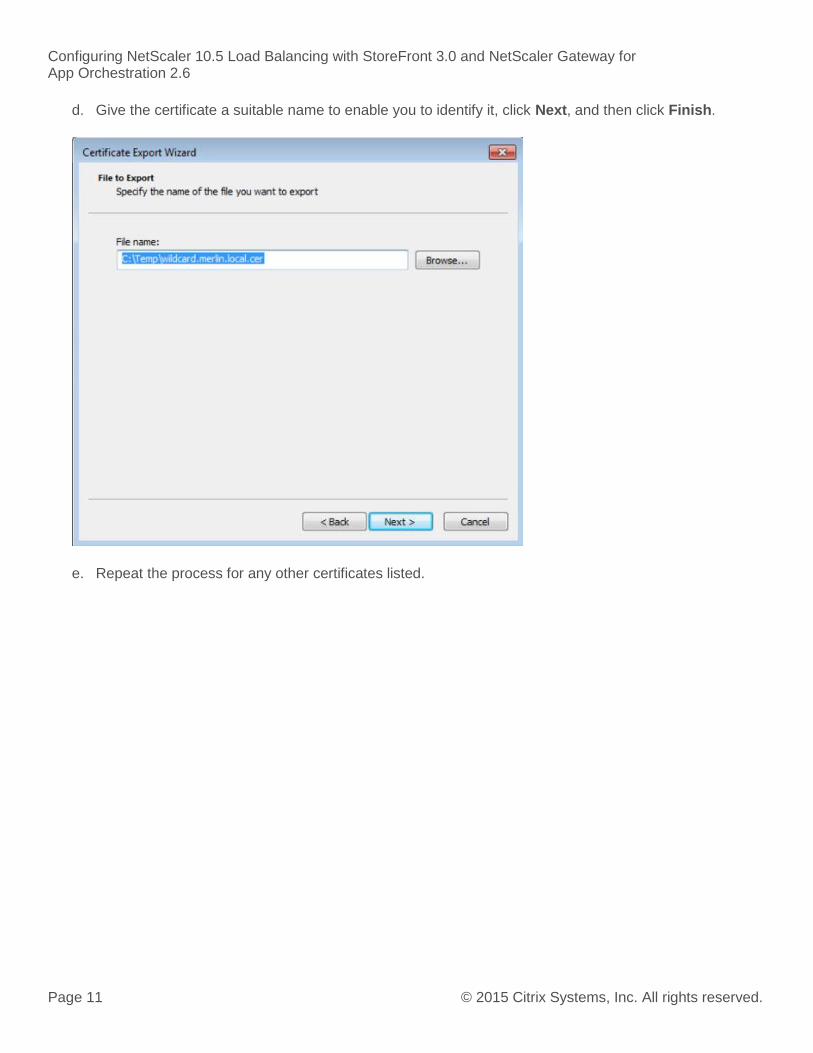
d. Give the certificate a suitable name to enable you to identify it, click Next, and then click Finish.
e. Repeat the process for any other certificates listed.
Configuring NetScaler 10.5 Load Balancing with StoreFront 3.0 and NetScaler Gateway for App Orchestration 2.6
Page 12 © 2015 Citrix Systems, Inc. All rights reserved.
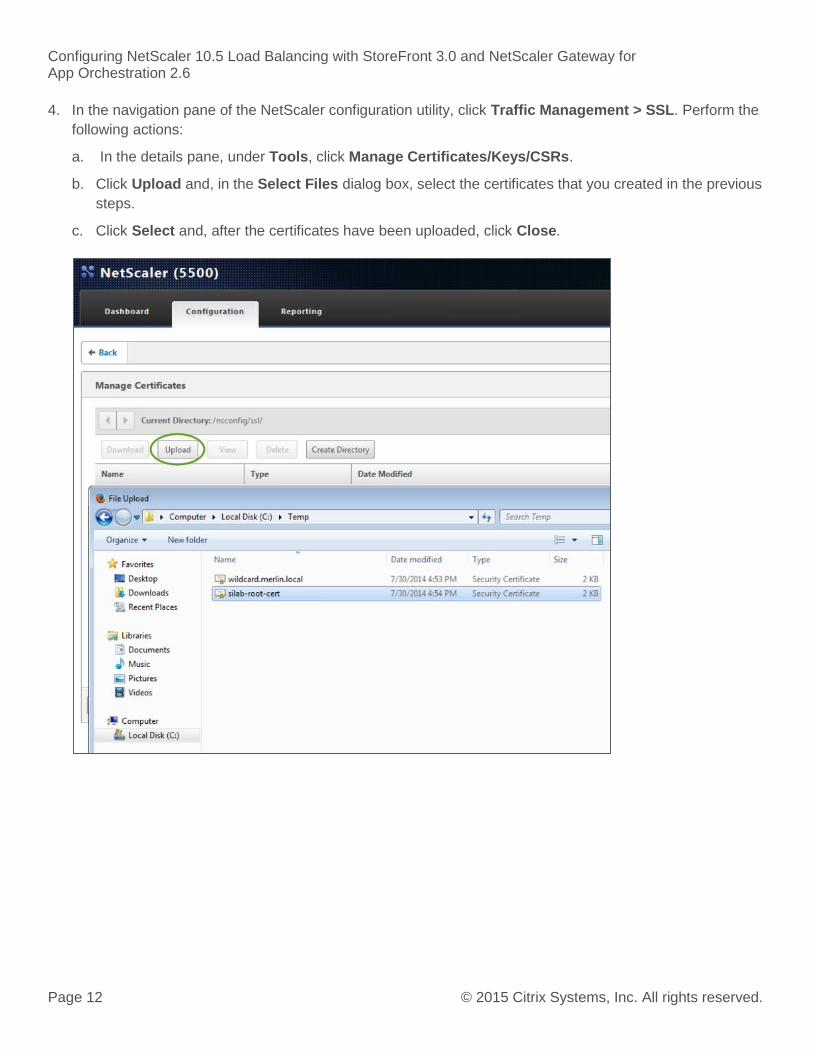
4. In the navigation pane of the NetScaler configuration utility, click Traffic Management > SSL. Perform the
following actions:
a. In the details pane, under Tools, click Manage Certificates/Keys/CSRs.
b. Click Upload and, in the Select Files dialog box, select the certificates that you created in the previous
steps.
c. Click Select and, after the certificates have been uploaded, click Close.
Configuring NetScaler 10.5 Load Balancing with StoreFront 3.0 and NetScaler Gateway for App Orchestration 2.6
Page 13 © 2015 Citrix Systems, Inc. All rights reserved.
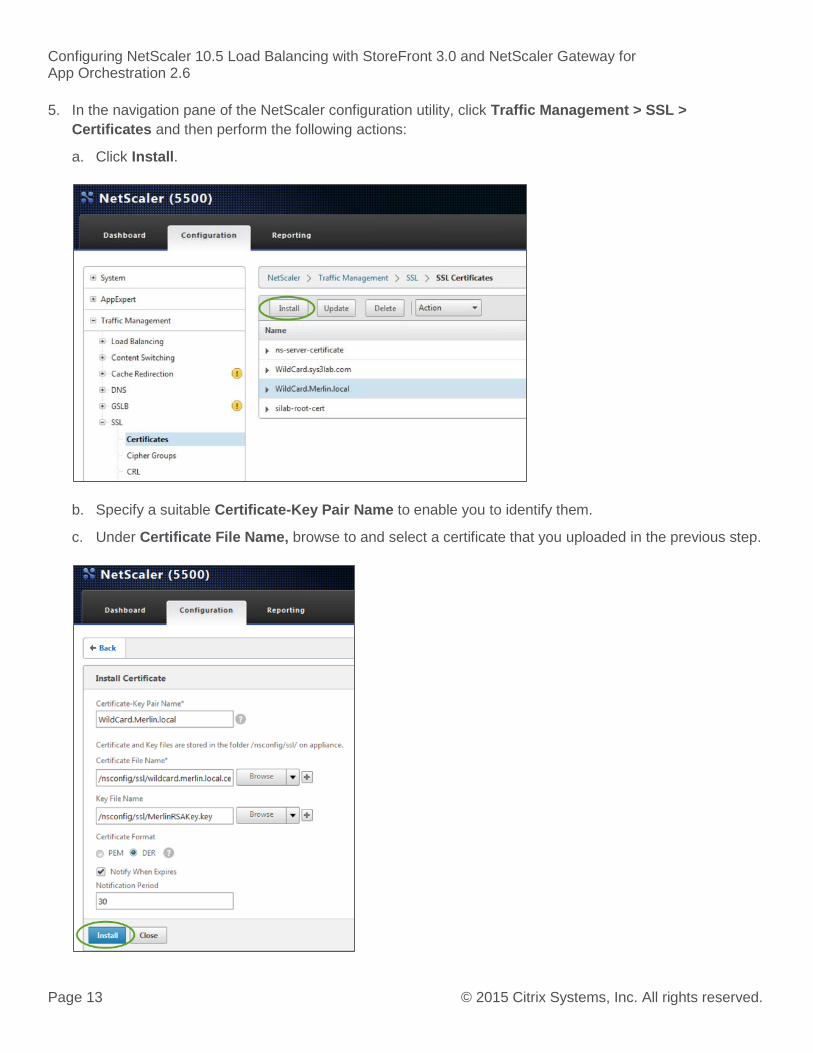
5. In the navigation pane of the NetScaler configuration utility, click Traffic Management > SSL >
Certificates and then perform the following actions:
a. Click Install.
b. Specify a suitable Certificate-Key Pair Name to enable you to identify them.
c. Under Certificate File Name, browse to and select a certificate that you uploaded in the previous step.
Configuring NetScaler 10.5 Load Balancing with StoreFront 3.0 and NetScaler Gateway for App Orchestration 2.6
Page 14 © 2015 Citrix Systems, Inc. All rights reserved.
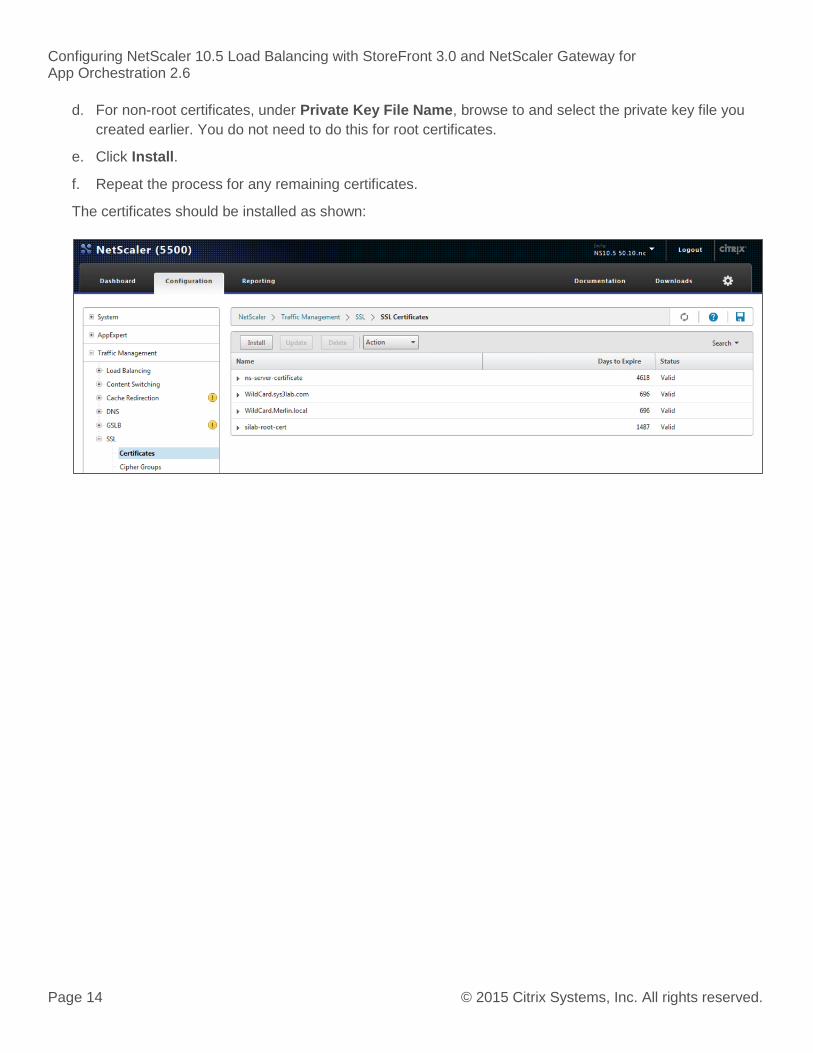
d. For non-root certificates, under Private Key File Name, browse to and select the private key file you
created earlier. You do not need to do this for root certificates.
e. Click Install.
f. Repeat the process for any remaining certificates.
The certificates should be installed as shown:
Configuring NetScaler 10.5 Load Balancing with StoreFront 3.0 and NetScaler Gateway for App Orchestration 2.6
Page 15 © 2015 Citrix Systems, Inc. All rights reserved.
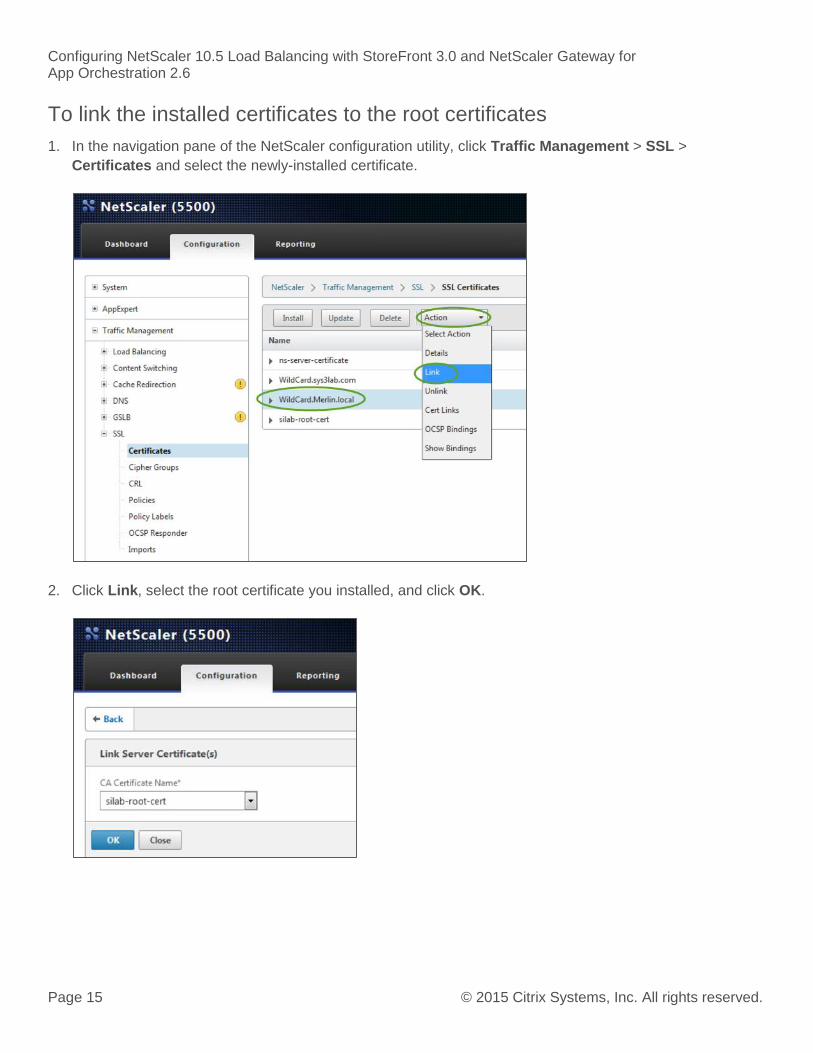
To link the installed certificates to the root certificates
1. In the navigation pane of the NetScaler configuration utility, click Traffic Management > SSL >
Certificates and select the newly-installed certificate.
2. Click Link, select the root certificate you installed, and click OK.
Configuring NetScaler 10.5 Load Balancing with StoreFront 3.0 and NetScaler Gateway for App Orchestration 2.6
Page 16 © 2015 Citrix Systems, Inc. All rights reserved.
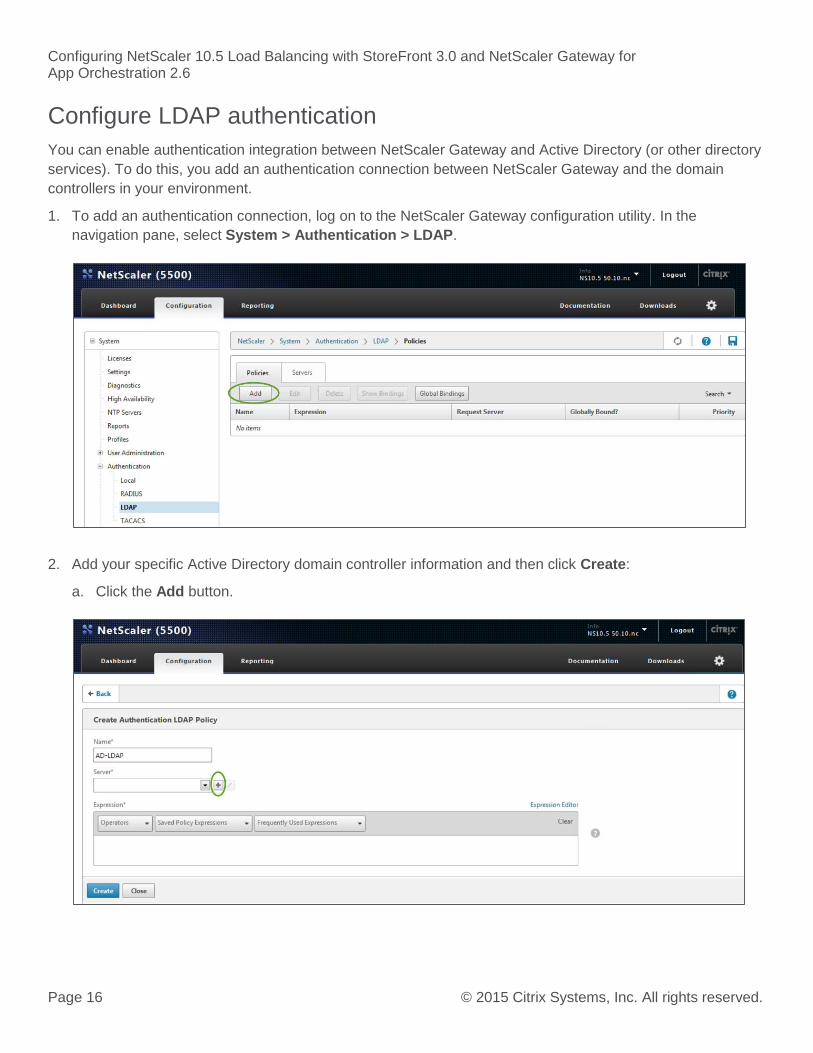
Configure LDAP authentication
You can enable authentication integration between NetScaler Gateway and Active Directory (or other directory
services). To do this, you add an authentication connection between NetScaler Gateway and the domain
controllers in your environment.
1. To add an authentication connection, log on to the NetScaler Gateway configuration utility. In the
navigation pane, select System > Authentication > LDAP.
2. Add your specific Active Directory domain controller information and then click Create:
a. Click the Add button.
Configuring NetScaler 10.5 Load Balancing with StoreFront 3.0 and NetScaler Gateway for App Orchestration 2.6
Page 17 © 2015 Citrix Systems, Inc. All rights reserved.
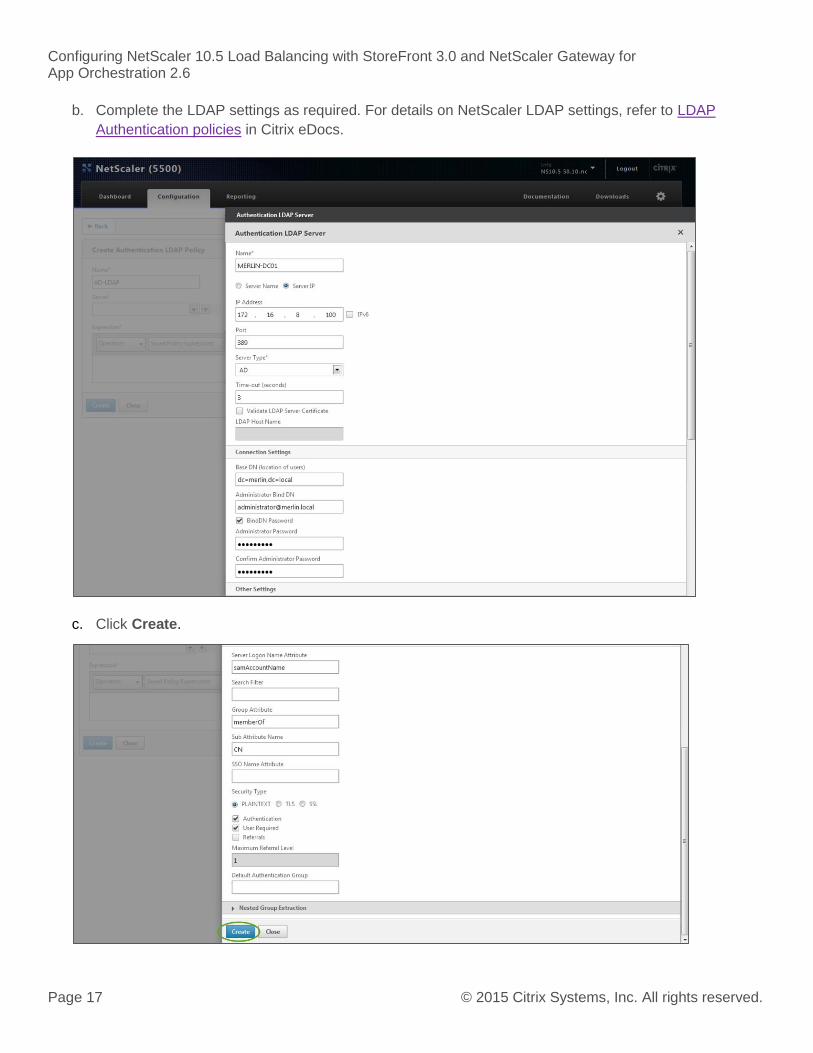
b. Complete the LDAP settings as required. For details on NetScaler LDAP settings, refer to LDAP
Authentication policies in Citrix eDocs.
c. Click Create.
Configuring NetScaler 10.5 Load Balancing with StoreFront 3.0 and NetScaler Gateway for App Orchestration 2.6
Page 18 © 2015 Citrix Systems, Inc. All rights reserved.
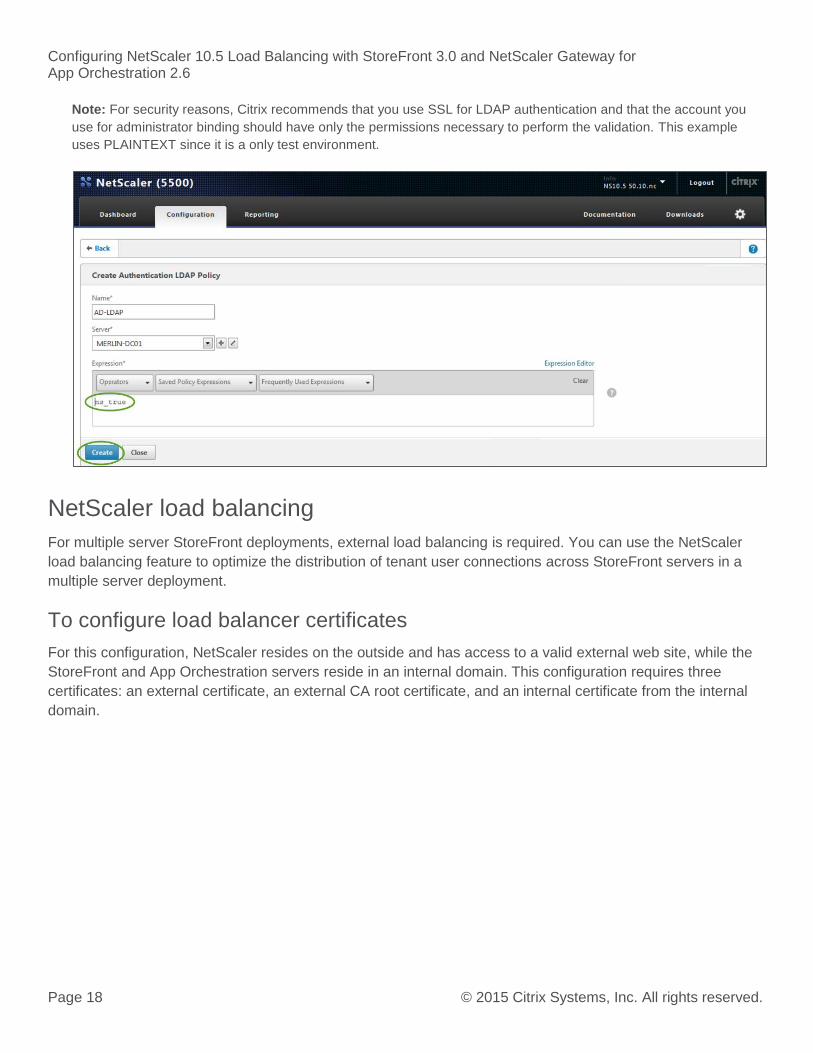
Note: For security reasons, Citrix recommends that you use SSL for LDAP authentication and that the account you
use for administrator binding should have only the permissions necessary to perform the validation. This example
uses PLAINTEXT since it is a only test environment.
NetScaler load balancing
For multiple server StoreFront deployments, external load balancing is required. You can use the NetScaler
load balancing feature to optimize the distribution of tenant user connections across StoreFront servers in a
multiple server deployment.
To configure load balancer certificates
For this configuration, NetScaler resides on the outside and has access to a valid external web site, while the
StoreFront and App Orchestration servers reside in an internal domain. This configuration requires three
certificates: an external certificate, an external CA root certificate, and an internal certificate from the internal
domain.
Configuring NetScaler 10.5 Load Balancing with StoreFront 3.0 and NetScaler Gateway for App Orchestration 2.6
Page 19 © 2015 Citrix Systems, Inc. All rights reserved.
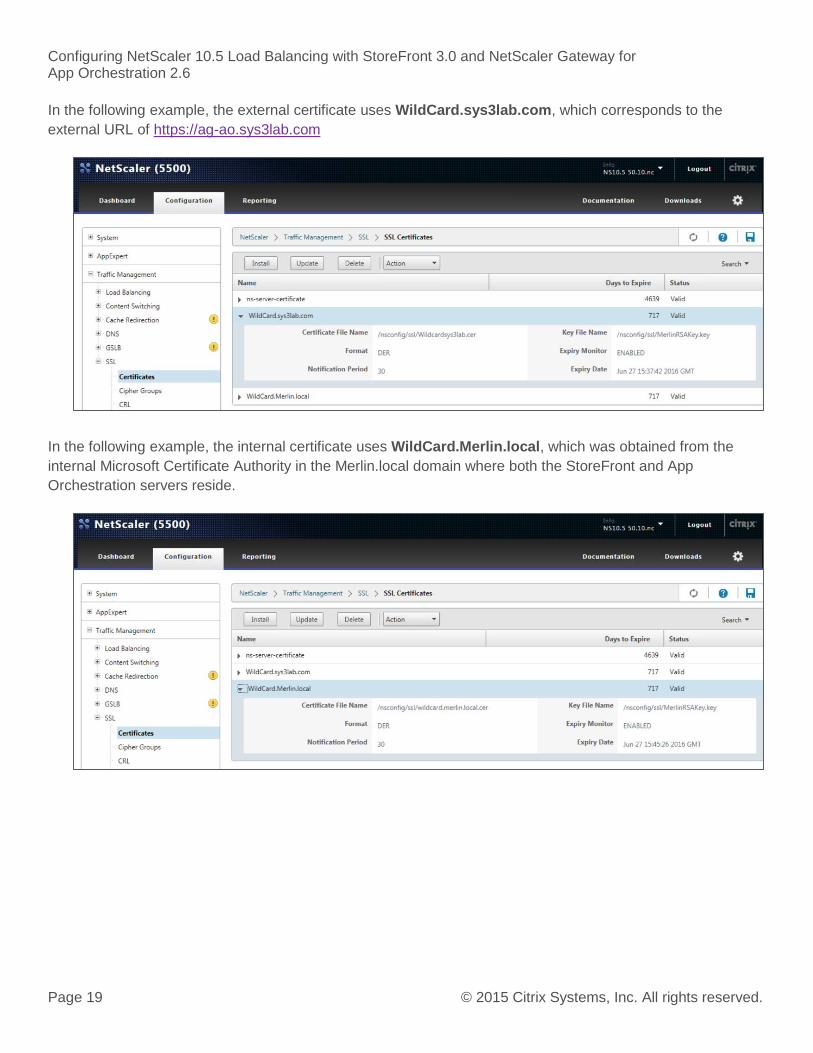
In the following example, the external certificate uses WildCard.sys3lab.com, which corresponds to the
external URL of https://ag-ao.sys3lab.com
In the following example, the internal certificate uses WildCard.Merlin.local, which was obtained from the
internal Microsoft Certificate Authority in the Merlin.local domain where both the StoreFront and App
Orchestration servers reside.
Configuring NetScaler 10.5 Load Balancing with StoreFront 3.0 and NetScaler Gateway for App Orchestration 2.6
Page 20 © 2015 Citrix Systems, Inc. All rights reserved.
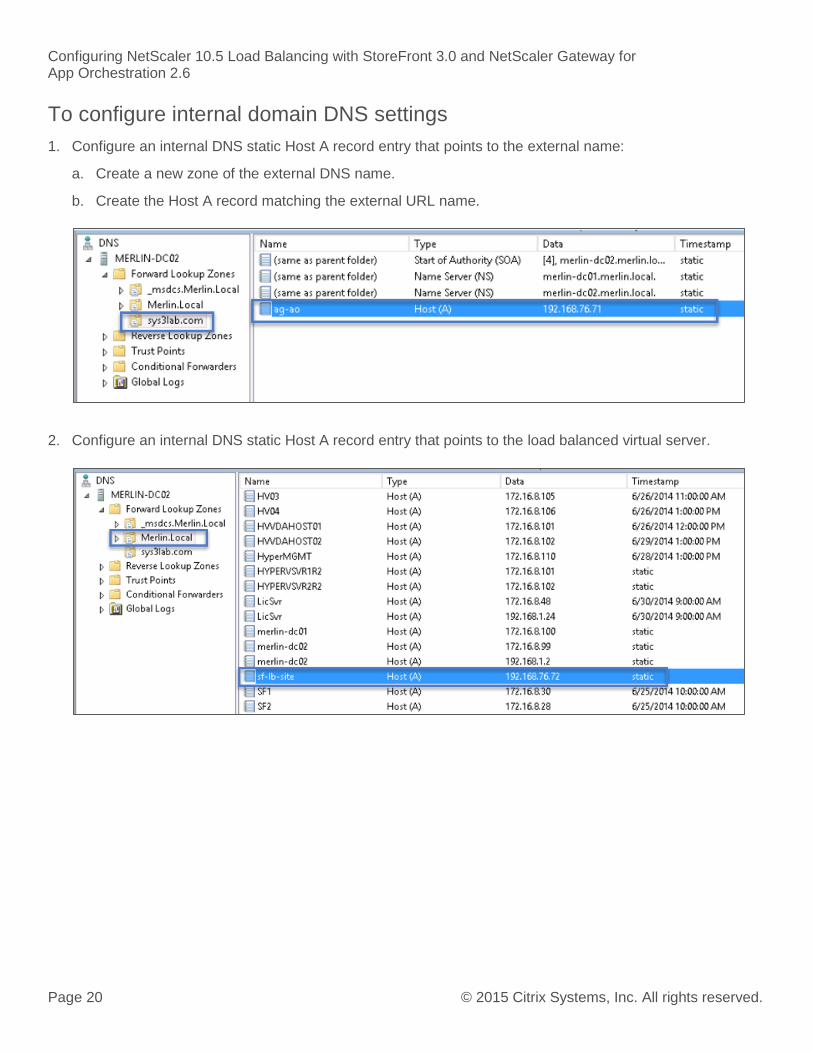
To configure internal domain DNS settings
1. Configure an internal DNS static Host A record entry that points to the external name:
a. Create a new zone of the external DNS name.
b. Create the Host A record matching the external URL name.
2. Configure an internal DNS static Host A record entry that points to the load balanced virtual server.
Configuring NetScaler 10.5 Load Balancing with StoreFront 3.0 and NetScaler Gateway for App Orchestration 2.6
Page 21 © 2015 Citrix Systems, Inc. All rights reserved.
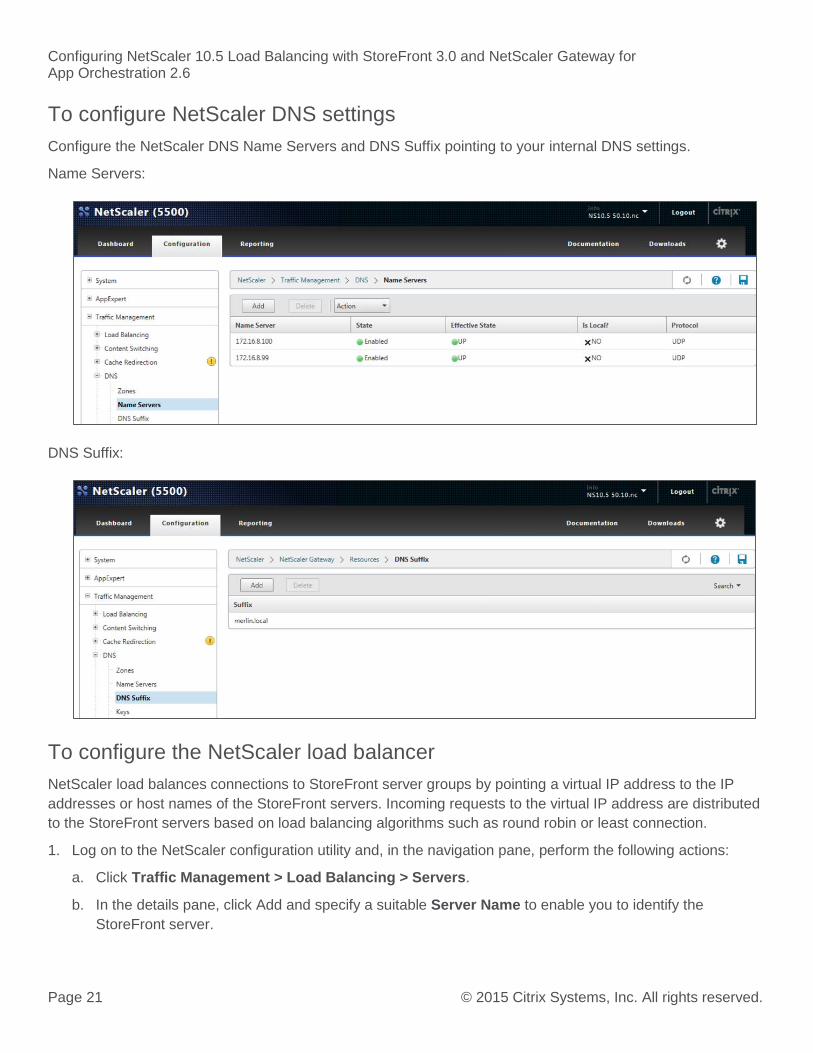
To configure NetScaler DNS settings
Configure the NetScaler DNS Name Servers and DNS Suffix pointing to your internal DNS settings.
Name Servers:
DNS Suffix:
To configure the NetScaler load balancer
NetScaler load balances connections to StoreFront server groups by pointing a virtual IP address to the IP
addresses or host names of the StoreFront servers. Incoming requests to the virtual IP address are distributed
to the StoreFront servers based on load balancing algorithms such as round robin or least connection.
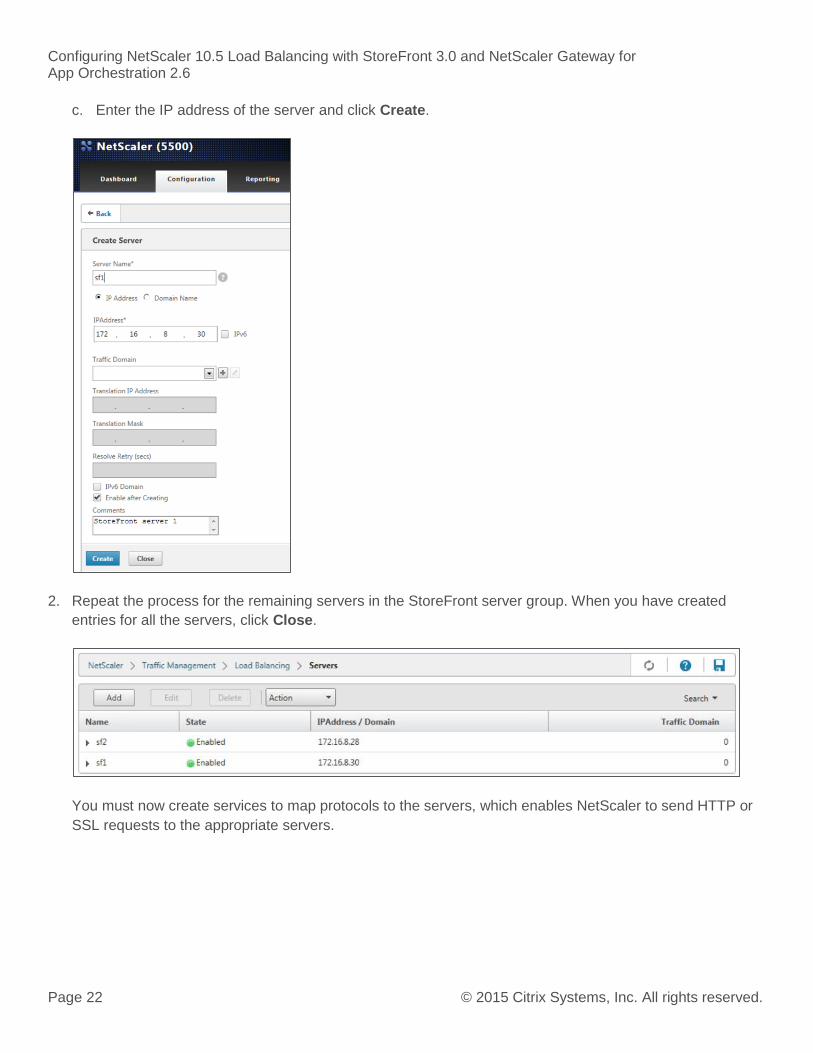
1. Log on to the NetScaler configuration utility and, in the navigation pane, perform the following actions:
a. Click Traffic Management > Load Balancing > Servers.
b. In the details pane, click Add and specify a suitable Server Name to enable you to identify the
StoreFront server.
Configuring NetScaler 10.5 Load Balancing with StoreFront 3.0 and NetScaler Gateway for App Orchestration 2.6
Page 22 © 2015 Citrix Systems, Inc. All rights reserved.
c. Enter the IP address of the server and click Create.
2. Repeat the process for the remaining servers in the StoreFront server group. When you have created
entries for all the servers, click Close.
You must now create services to map protocols to the servers, which enables NetScaler to send HTTP or
SSL requests to the appropriate servers.
Configuring NetScaler 10.5 Load Balancing with StoreFront 3.0 and NetScaler Gateway for App Orchestration 2.6
Page 23 © 2015 Citrix Systems, Inc. All rights reserved.
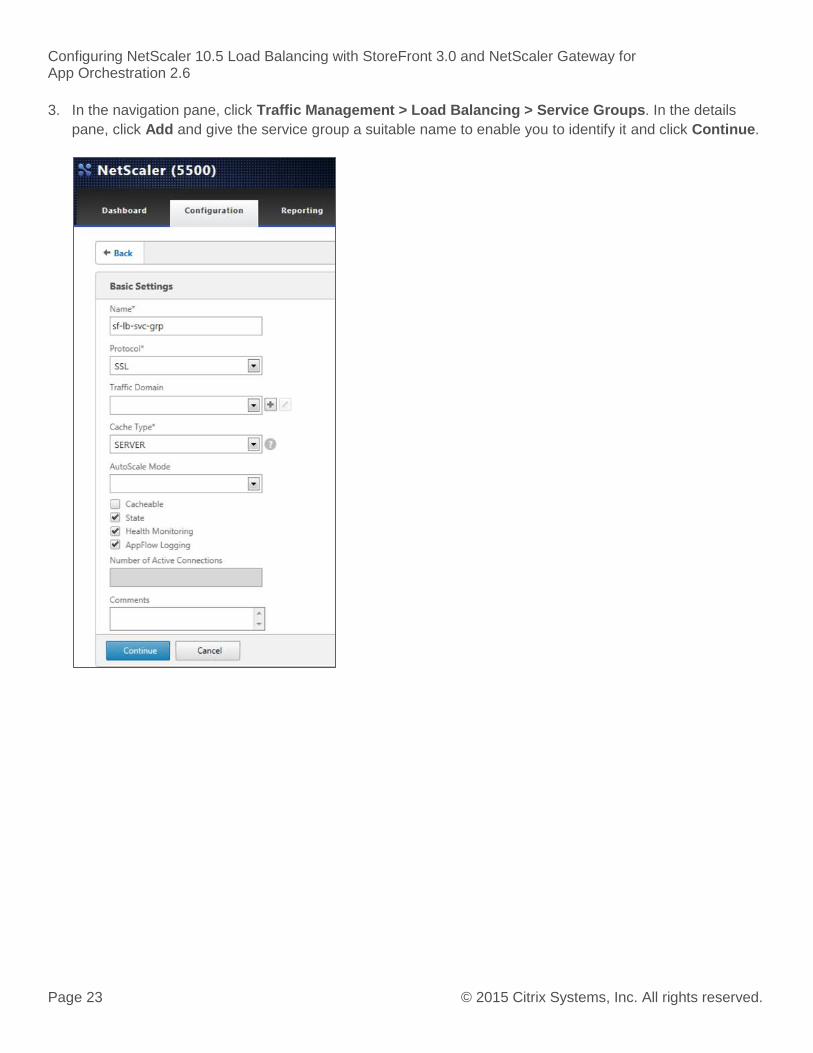
3. In the navigation pane, click Traffic Management > Load Balancing > Service Groups. In the details
pane, click Add and give the service group a suitable name to enable you to identify it and click Continue.
Configuring NetScaler 10.5 Load Balancing with StoreFront 3.0 and NetScaler Gateway for App Orchestration 2.6
Page 24 © 2015 Citrix Systems, Inc. All rights reserved.
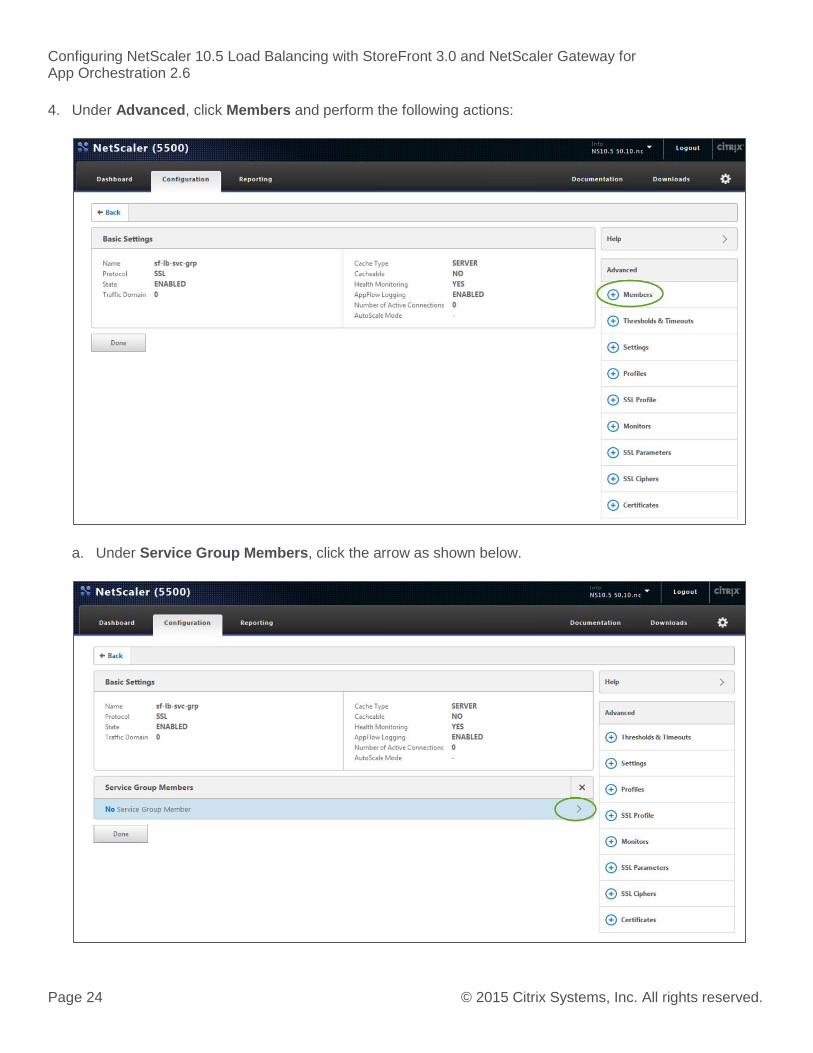
4. Under Advanced, click Members and perform the following actions:
a. Under Service Group Members, click the arrow as shown below.
Configuring NetScaler 10.5 Load Balancing with StoreFront 3.0 and NetScaler Gateway for App Orchestration 2.6
Page 25 © 2015 Citrix Systems, Inc. All rights reserved.
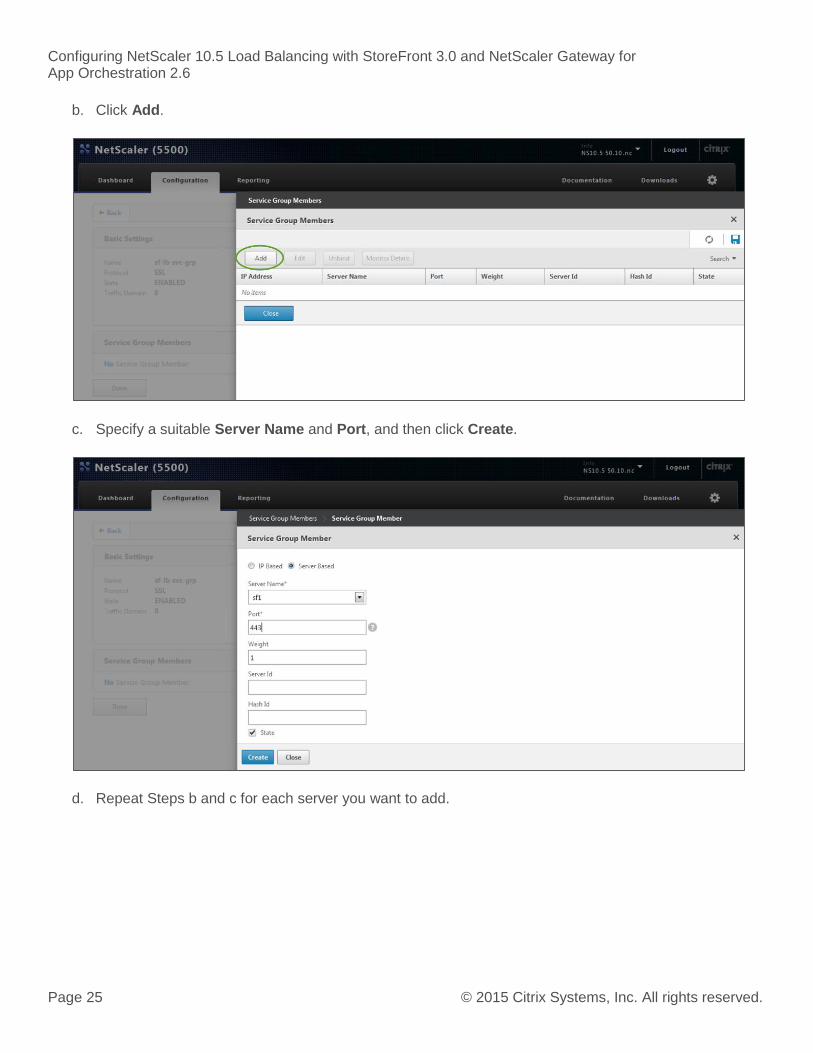
b. Click Add.
c. Specify a suitable Server Name and Port, and then click Create.
d. Repeat Steps b and c for each server you want to add.
Configuring NetScaler 10.5 Load Balancing with StoreFront 3.0 and NetScaler Gateway for App Orchestration 2.6
Page 26 © 2015 Citrix Systems, Inc. All rights reserved.
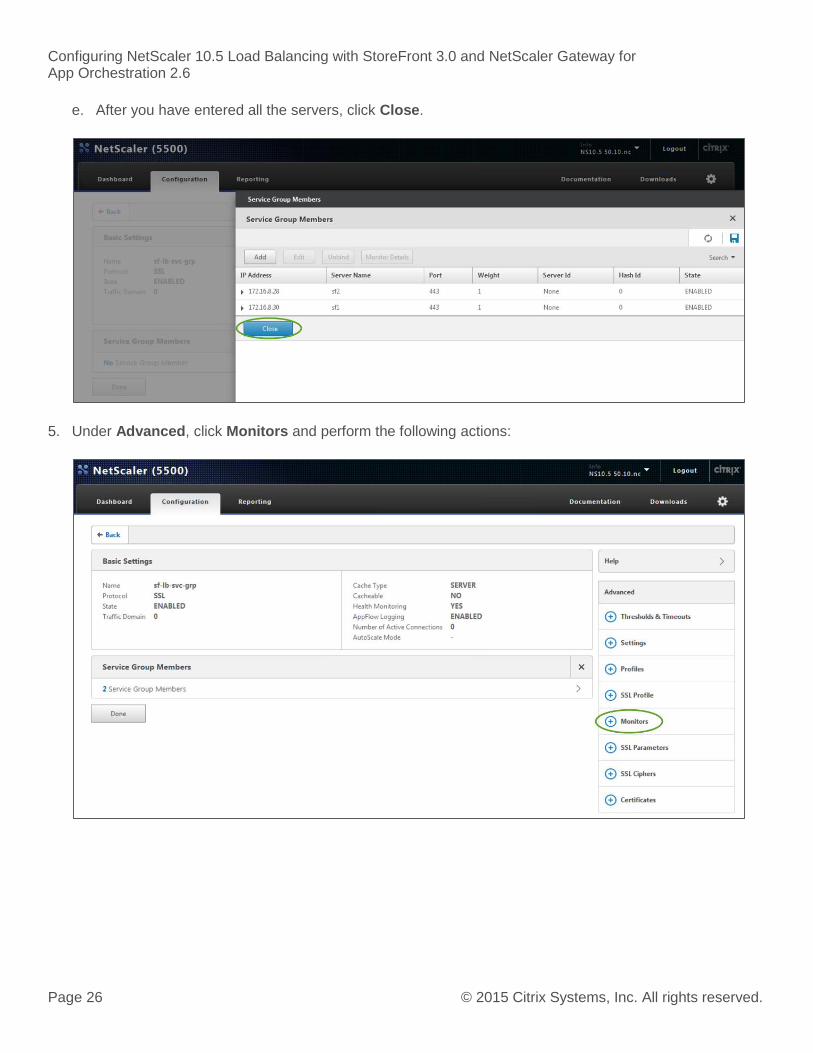
e. After you have entered all the servers, click Close.
5. Under Advanced, click Monitors and perform the following actions:
Configuring NetScaler 10.5 Load Balancing with StoreFront 3.0 and NetScaler Gateway for App Orchestration 2.6
Page 27 © 2015 Citrix Systems, Inc. All rights reserved.
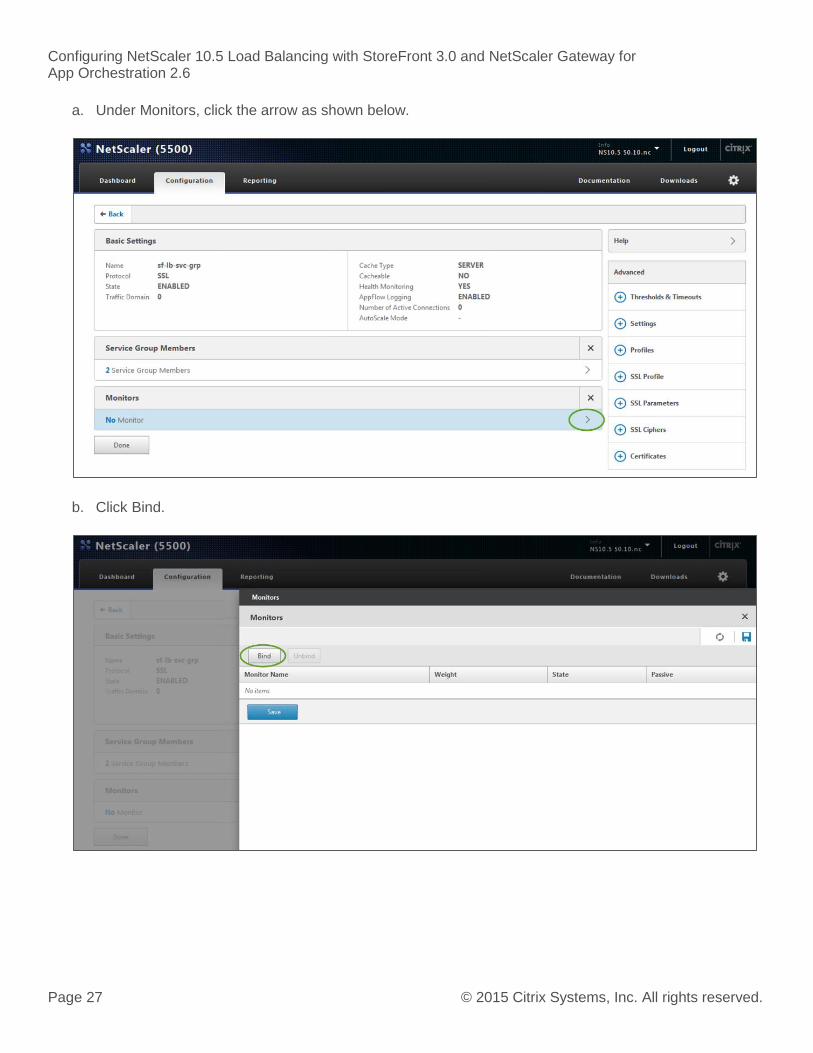
a. Under Monitors, click the arrow as shown below.
b. Click Bind.

Configuring NetScaler 10.5 Load Balancing with StoreFront 3.0 and NetScaler Gateway for App Orchestration 2.6
Page 28 © 2015 Citrix Systems, Inc. All rights reserved.
c. Select the appropriate monitor protocol and then click Insert. In this example, use https.
Configuring NetScaler 10.5 Load Balancing with StoreFront 3.0 and NetScaler Gateway for App Orchestration 2.6
Page 29 © 2015 Citrix Systems, Inc. All rights reserved.
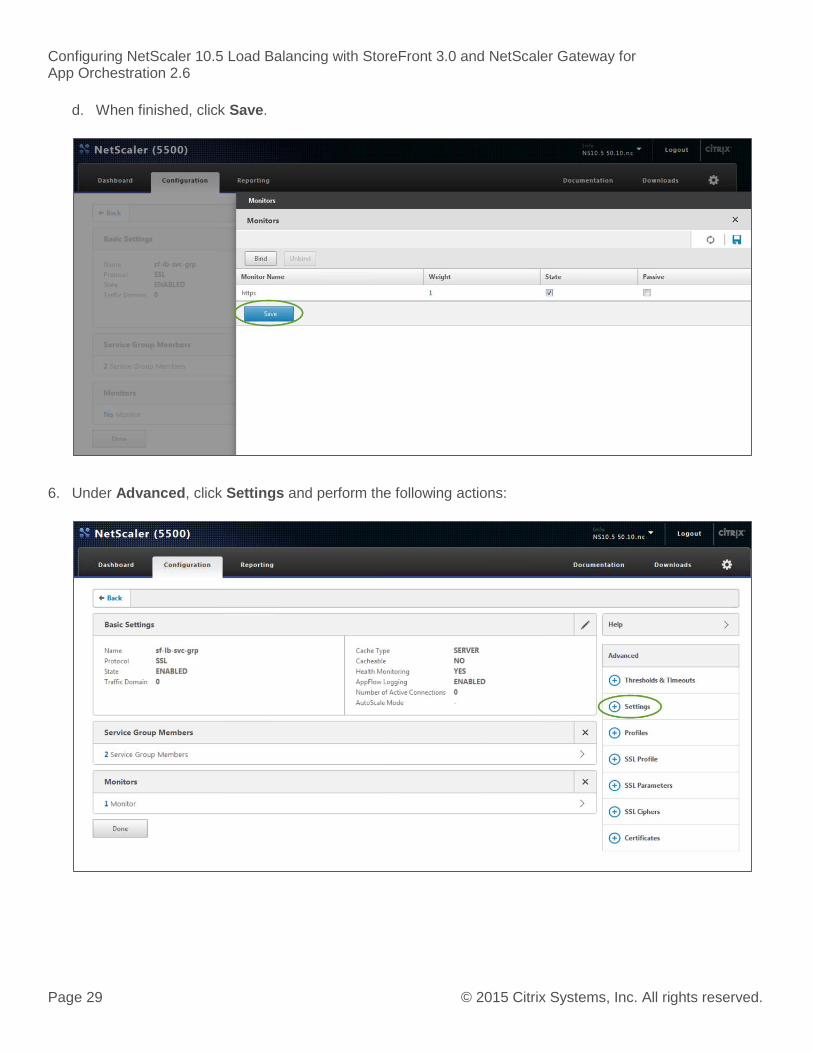
d. When finished, click Save.
6. Under Advanced, click Settings and perform the following actions:
Configuring NetScaler 10.5 Load Balancing with StoreFront 3.0 and NetScaler Gateway for App Orchestration 2.6
Page 30 © 2015 Citrix Systems, Inc. All rights reserved.
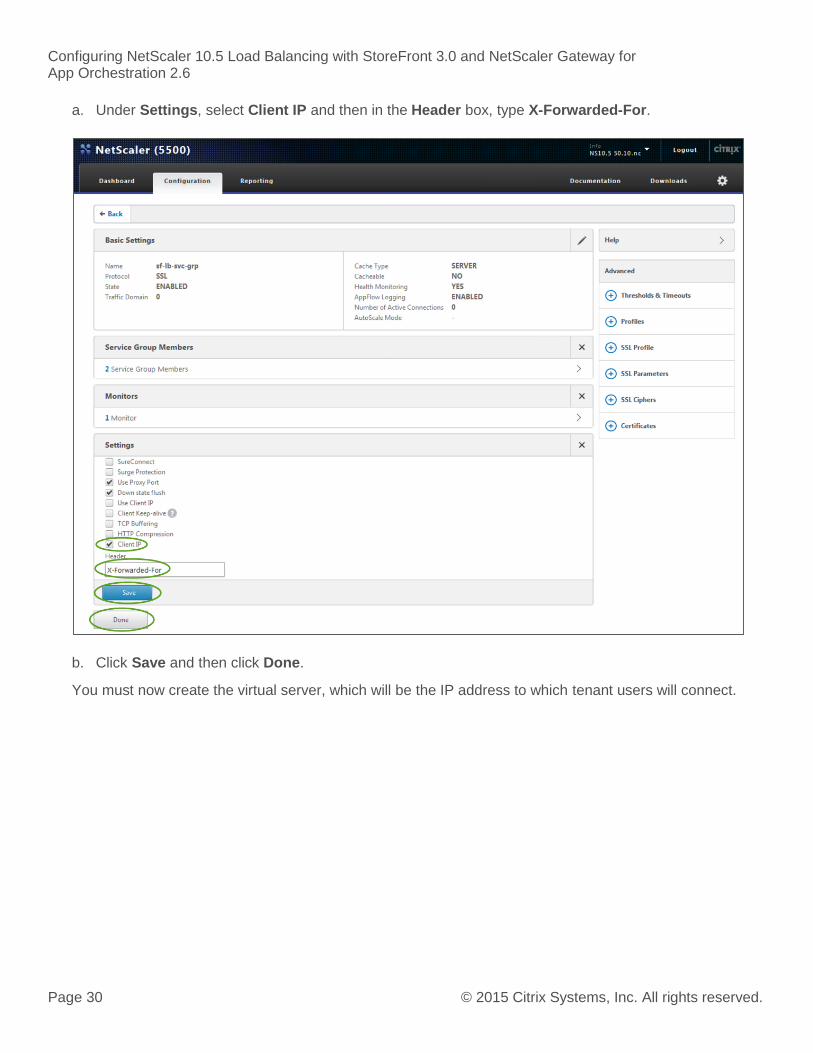
a. Under Settings, select Client IP and then in the Header box, type X-Forwarded-For.
b. Click Save and then click Done.
You must now create the virtual server, which will be the IP address to which tenant users will connect.

Configuring NetScaler 10.5 Load Balancing with StoreFront 3.0 and NetScaler Gateway for App Orchestration 2.6
Page 31 © 2015 Citrix Systems, Inc. All rights reserved.
7. In the navigation pane, click Traffic Management > Load Balancing > Virtual Servers and perform the
following actions:
a. In the details pane, click Add and give the virtual server a suitable Name to enable you to identify it.
b. Select the appropriate protocol, port, and IP address for the virtual server.
c. Click Continue to complete the configuration.
The virtual server Name and IP address should be set up for address resolution on your DNS server. This
address must be unique and must not be in any DHCP scopes to prevent address conflicts.
Configuring NetScaler 10.5 Load Balancing with StoreFront 3.0 and NetScaler Gateway for App Orchestration 2.6
Page 32 © 2015 Citrix Systems, Inc. All rights reserved.
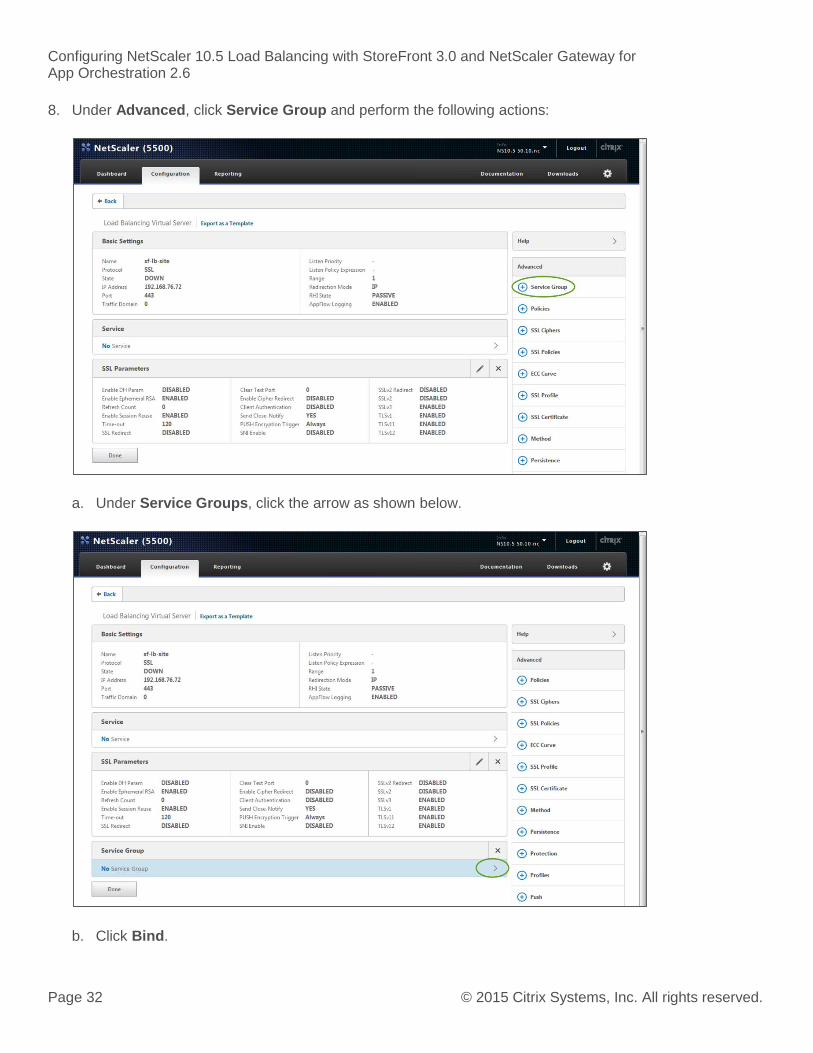
8. Under Advanced, click Service Group and perform the following actions:
a. Under Service Groups, click the arrow as shown below.
b. Click Bind.

Configuring NetScaler 10.5 Load Balancing with StoreFront 3.0 and NetScaler Gateway for App Orchestration 2.6
Page 33 © 2015 Citrix Systems, Inc. All rights reserved.
c. Select the service group that you created in the previous steps and click Insert.
d. When finished, click Save.
Configuring NetScaler 10.5 Load Balancing with StoreFront 3.0 and NetScaler Gateway for App Orchestration 2.6
Page 34 © 2015 Citrix Systems, Inc. All rights reserved.
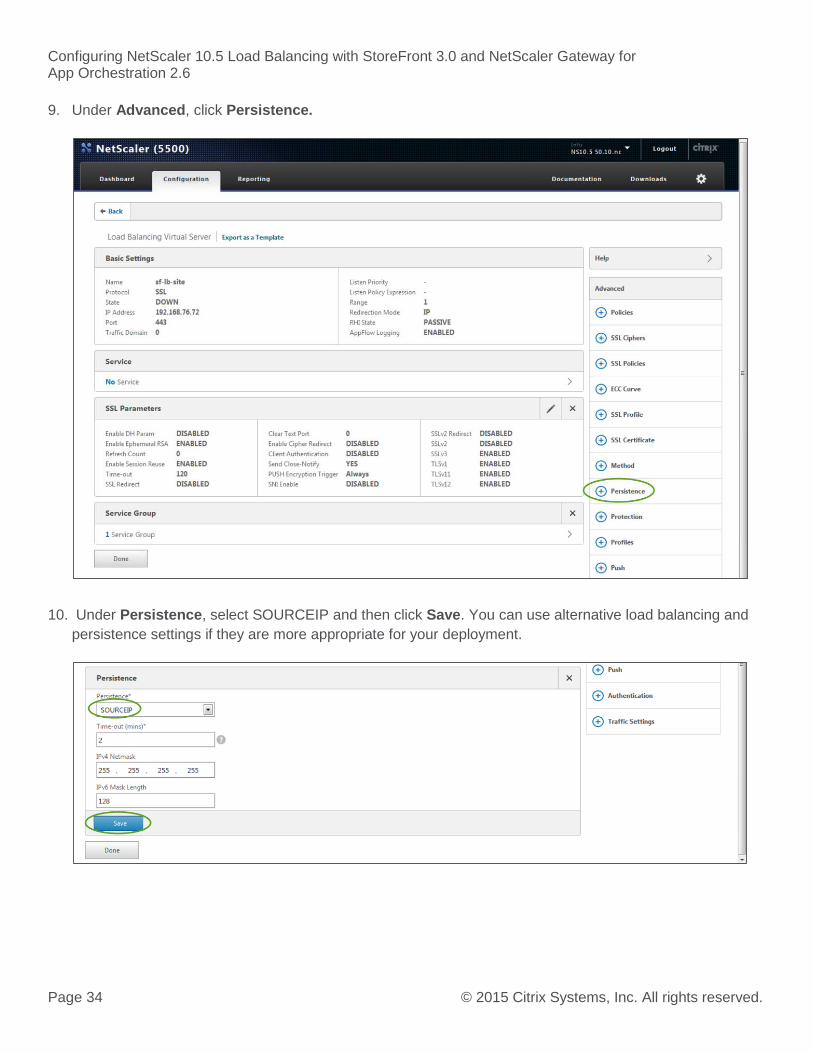
9. Under Advanced, click Persistence.
10. Under Persistence, select SOURCEIP and then click Save. You can use alternative load balancing and
persistence settings if they are more appropriate for your deployment.
Configuring NetScaler 10.5 Load Balancing with StoreFront 3.0 and NetScaler Gateway for App Orchestration 2.6
Page 35 © 2015 Citrix Systems, Inc. All rights reserved.
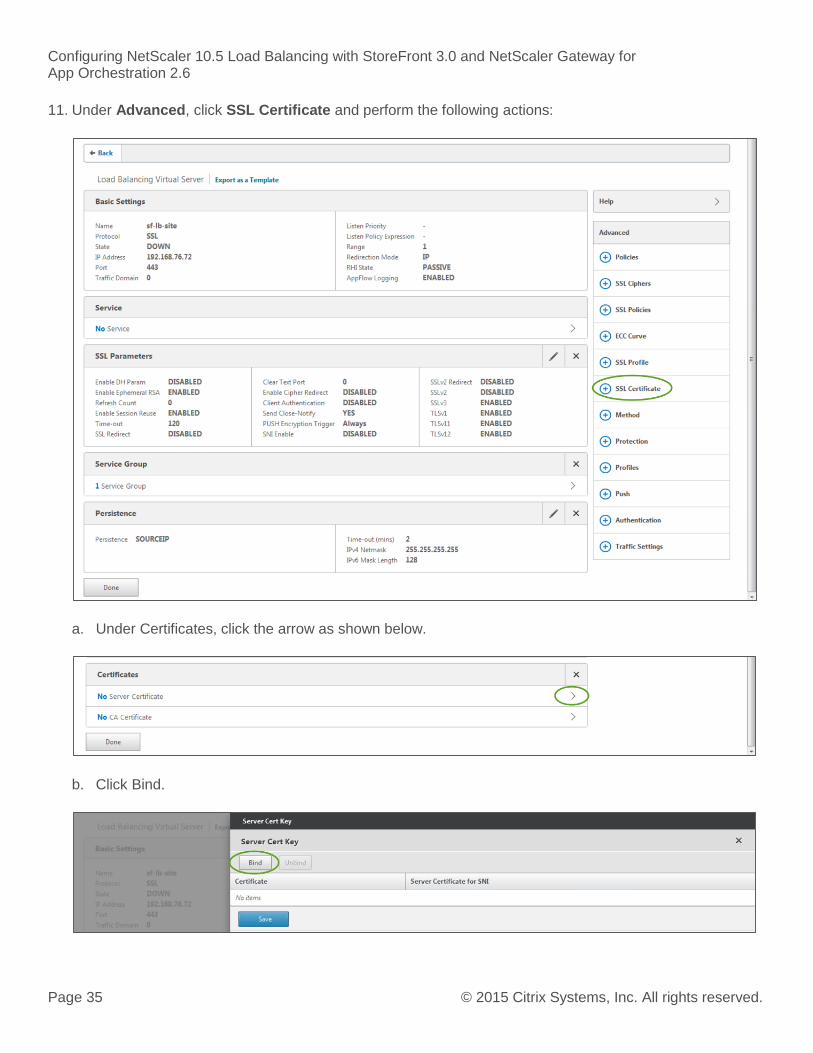
11. Under Advanced, click SSL Certificate and perform the following actions:
a. Under Certificates, click the arrow as shown below.
b. Click Bind.
Configuring NetScaler 10.5 Load Balancing with StoreFront 3.0 and NetScaler Gateway for App Orchestration 2.6
Page 36 © 2015 Citrix Systems, Inc. All rights reserved.
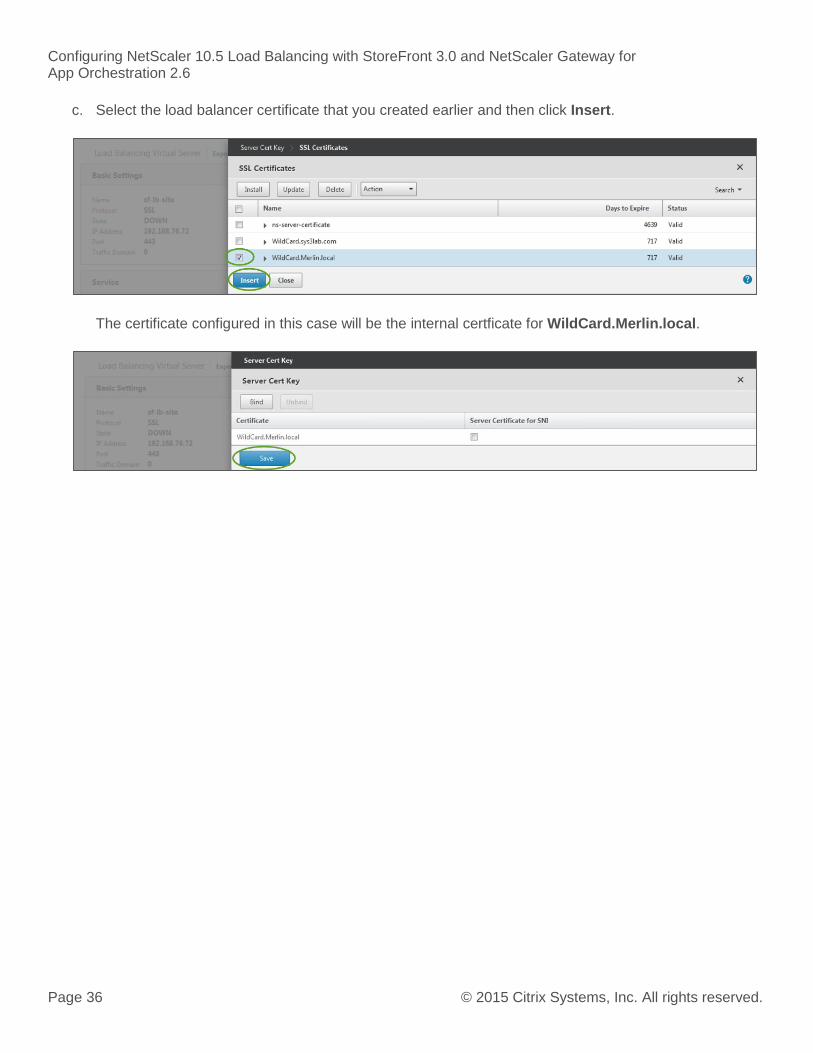
c. Select the load balancer certificate that you created earlier and then click Insert.
The certificate configured in this case will be the internal certficate for WildCard.Merlin.local.
Configuring NetScaler 10.5 Load Balancing with StoreFront 3.0 and NetScaler Gateway for App Orchestration 2.6
Page 37 © 2015 Citrix Systems, Inc. All rights reserved.
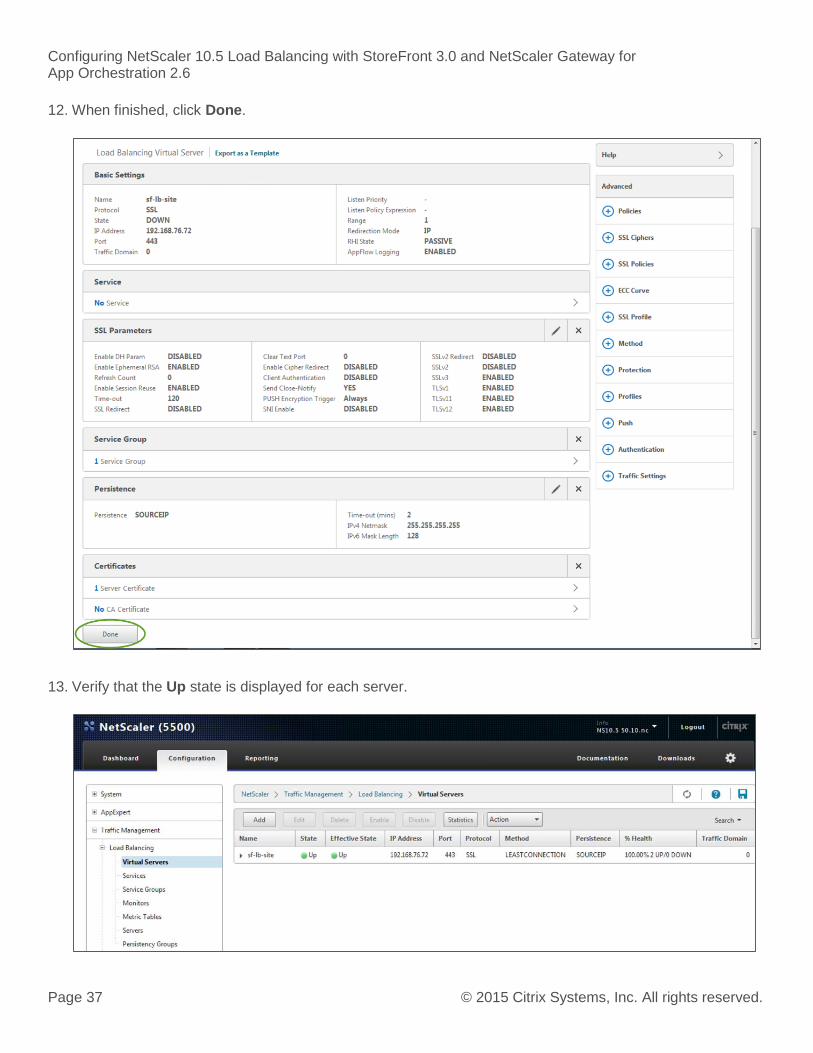
12. When finished, click Done.
13. Verify that the Up state is displayed for each server.
Configuring NetScaler 10.5 Load Balancing with StoreFront 3.0 and NetScaler Gateway for App Orchestration 2.6
Page 38 © 2015 Citrix Systems, Inc. All rights reserved.
Configure and install StoreFront servers
On each StoreFront server from Internet Information Services (IIS), create a Certificate Request for Web
Hosting. Ensure that you change the SSL port 443 binding to use the newly-added certificate.
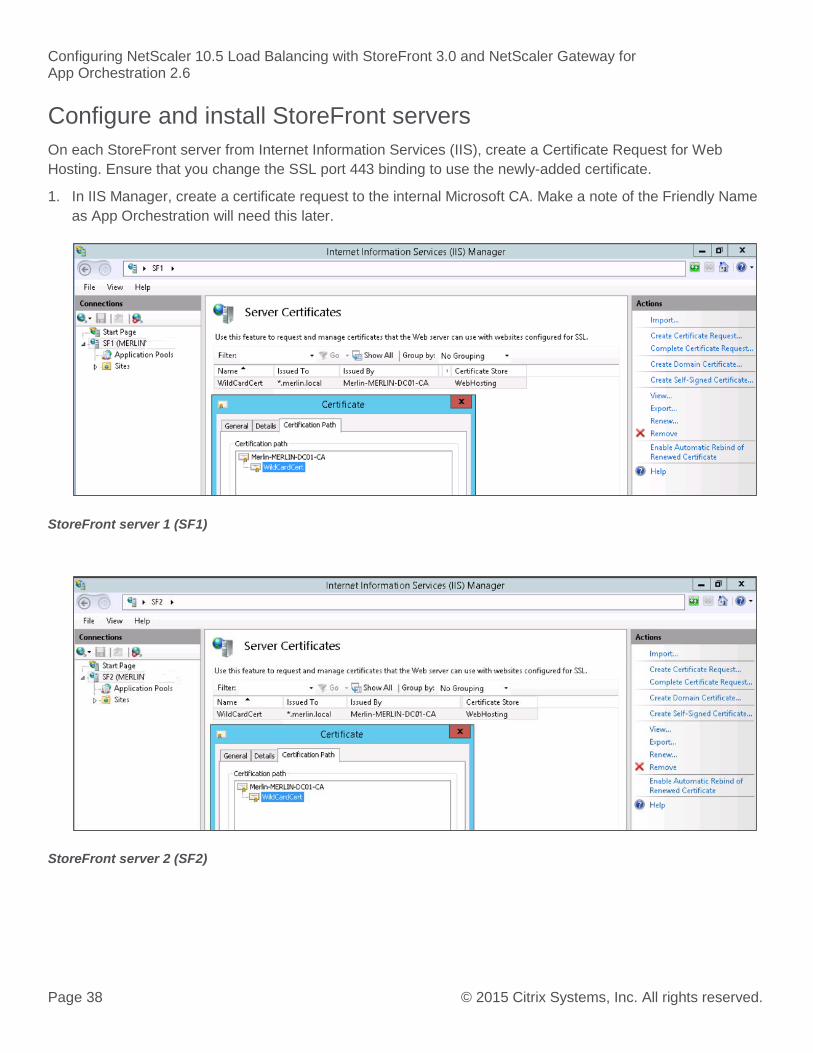
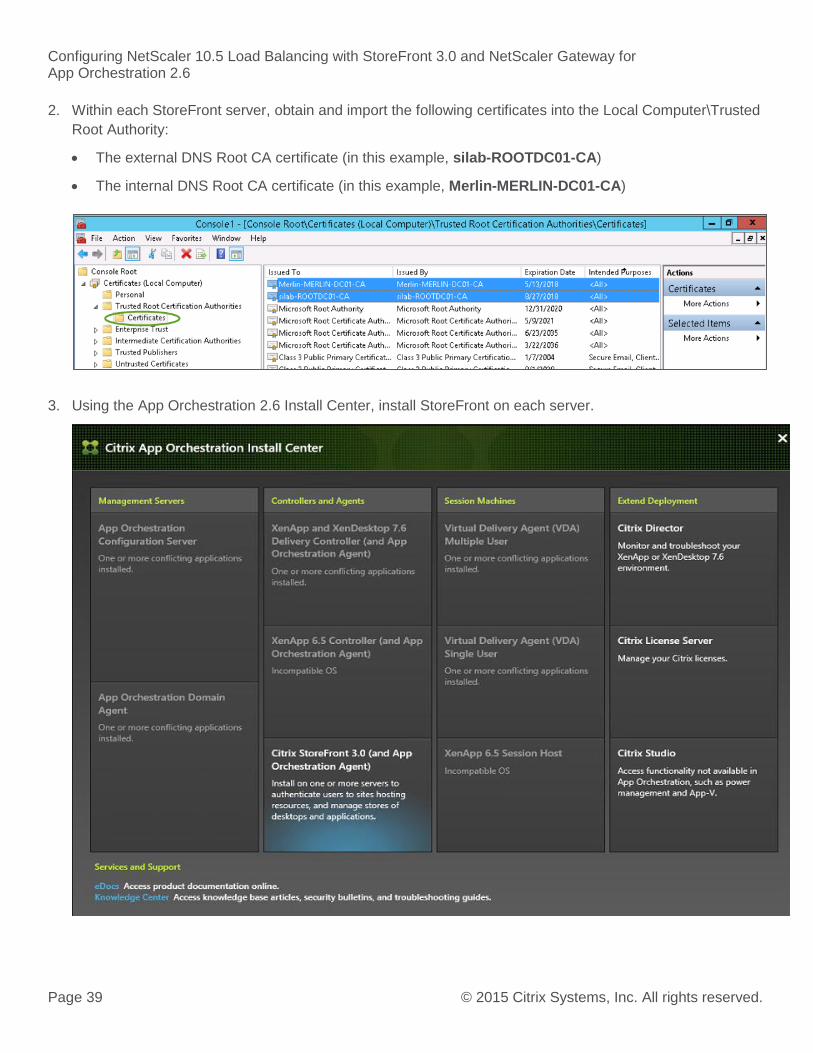
1. In IIS Manager, create a certificate request to the internal Microsoft CA. Make a note of the Friendly Name
as App Orchestration will need this later.
StoreFront server 1 (SF1)
StoreFront server 2 (SF2)
Configuring NetScaler 10.5 Load Balancing with StoreFront 3.0 and NetScaler Gateway for App Orchestration 2.6
Page 39 © 2015 Citrix Systems, Inc. All rights reserved.
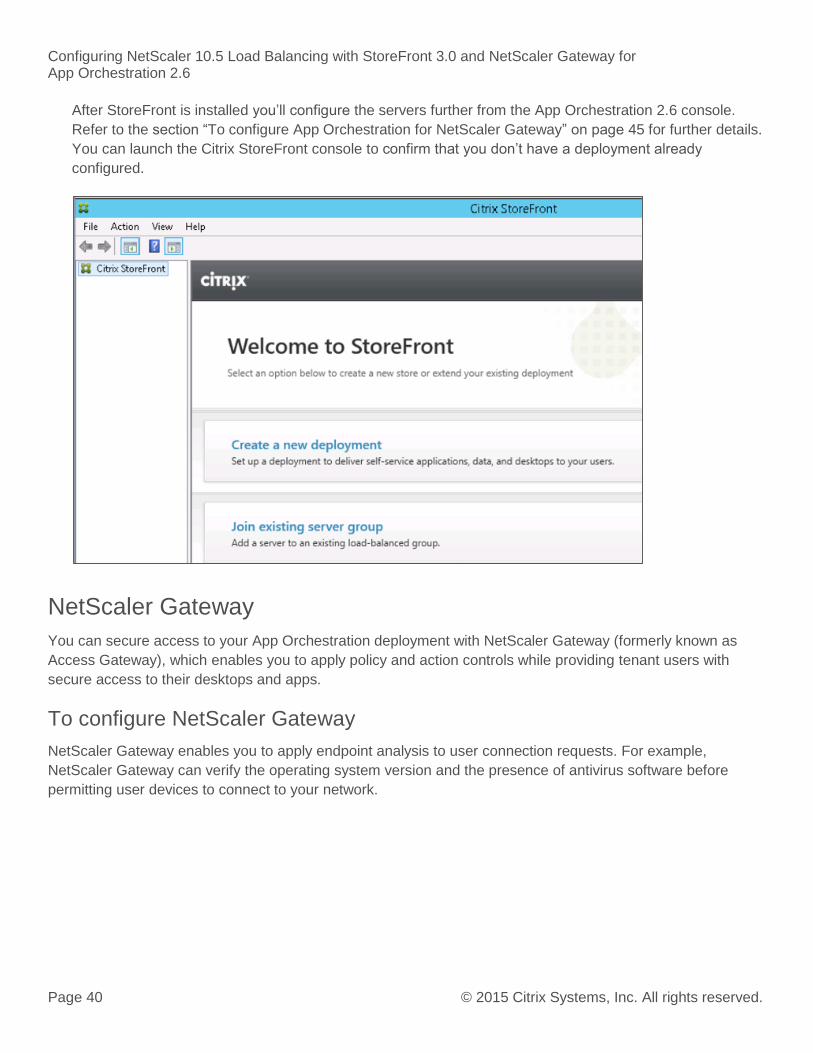
2. Within each StoreFront server, obtain and import the following certificates into the Local Computer\Trusted
Root Authority:
The external DNS Root CA certificate (in this example, silab-ROOTDC01-CA)
The internal DNS Root CA certificate (in this example, Merlin-MERLIN-DC01-CA)
3. Using the App Orchestration 2.6 Install Center, install StoreFront on each server.
Configuring NetScaler 10.5 Load Balancing with StoreFront 3.0 and NetScaler Gateway for App Orchestration 2.6
Page 40 © 2015 Citrix Systems, Inc. All rights reserved.
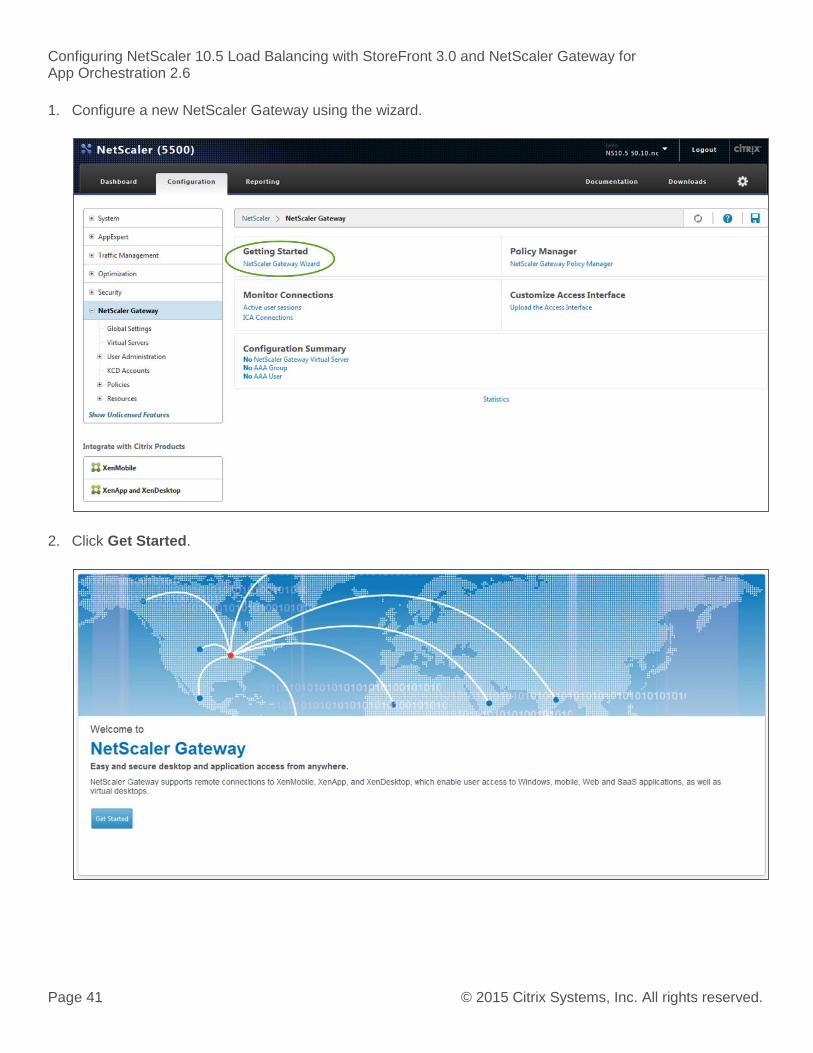
After StoreFront is installed you’ll configure the servers further from the App Orchestration 2.6 console.
Refer to the section “To configure App Orchestration for NetScaler Gateway” on page 45 for further details.
You can launch the Citrix StoreFront console to confirm that you don’t have a deployment already
configured.
NetScaler Gateway
You can secure access to your App Orchestration deployment with NetScaler Gateway (formerly known as
Access Gateway), which enables you to apply policy and action controls while providing tenant users with
secure access to their desktops and apps.
To configure NetScaler Gateway
NetScaler Gateway enables you to apply endpoint analysis to user connection requests. For example,
NetScaler Gateway can verify the operating system version and the presence of antivirus software before
permitting user devices to connect to your network.
Configuring NetScaler 10.5 Load Balancing with StoreFront 3.0 and NetScaler Gateway for App Orchestration 2.6
Page 41 © 2015 Citrix Systems, Inc. All rights reserved.
1. Configure a new NetScaler Gateway using the wizard.
2. Click Get Started.
Configuring NetScaler 10.5 Load Balancing with StoreFront 3.0 and NetScaler Gateway for App Orchestration 2.6
Page 42 © 2015 Citrix Systems, Inc. All rights reserved.
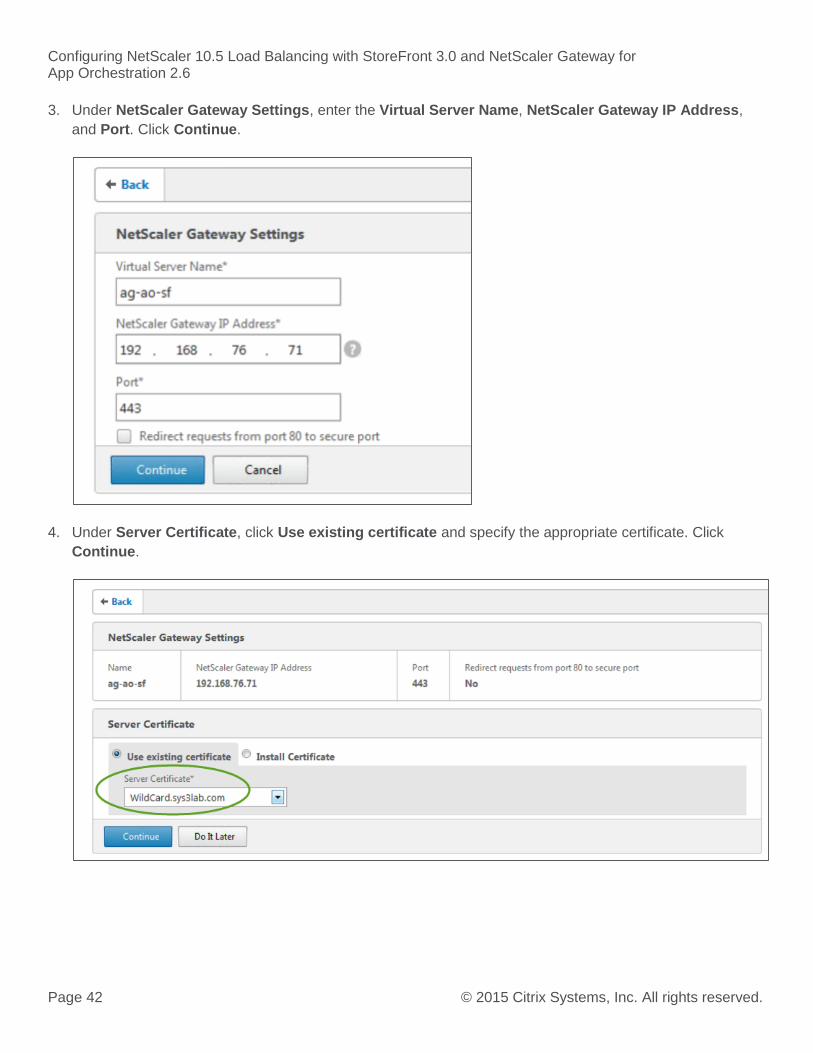
3. Under NetScaler Gateway Settings, enter the Virtual Server Name, NetScaler Gateway IP Address,
and Port. Click Continue.
4. Under Server Certificate, click Use existing certificate and specify the appropriate certificate. Click
Continue.
Configuring NetScaler 10.5 Load Balancing with StoreFront 3.0 and NetScaler Gateway for App Orchestration 2.6
Page 43 © 2015 Citrix Systems, Inc. All rights reserved.
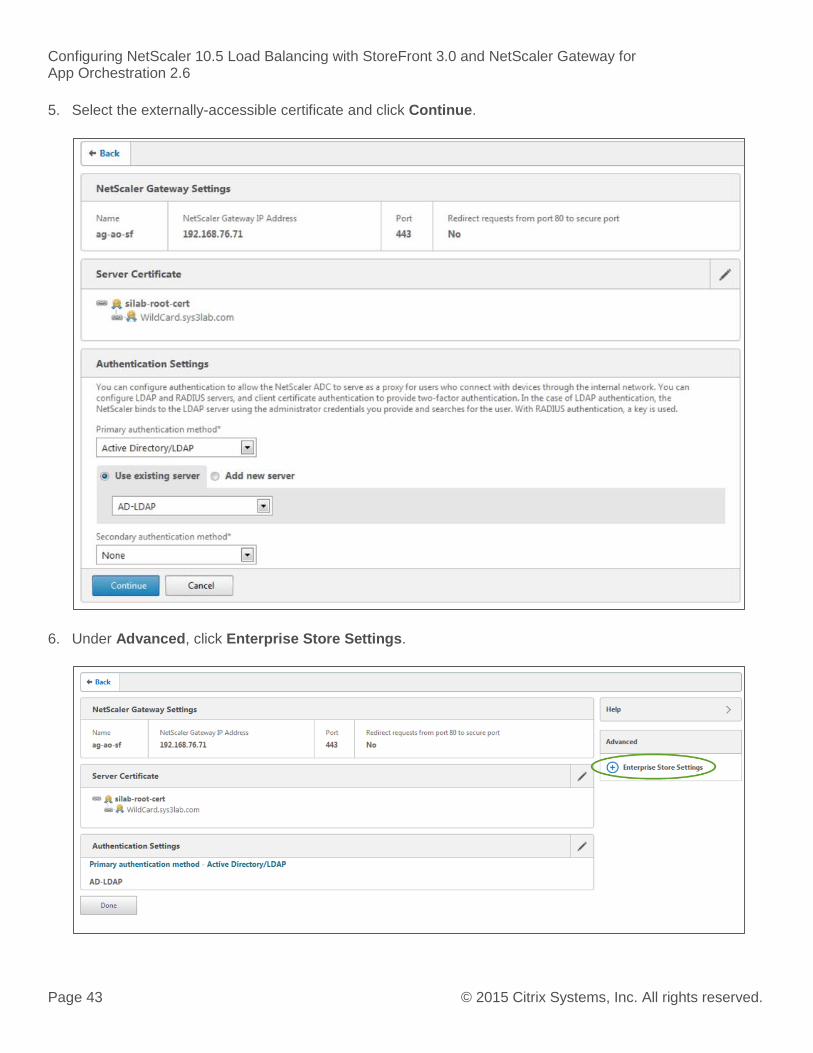
5. Select the externally-accessible certificate and click Continue.
6. Under Advanced, click Enterprise Store Settings.
Configuring NetScaler 10.5 Load Balancing with StoreFront 3.0 and NetScaler Gateway for App Orchestration 2.6
Page 44 © 2015 Citrix Systems, Inc. All rights reserved.
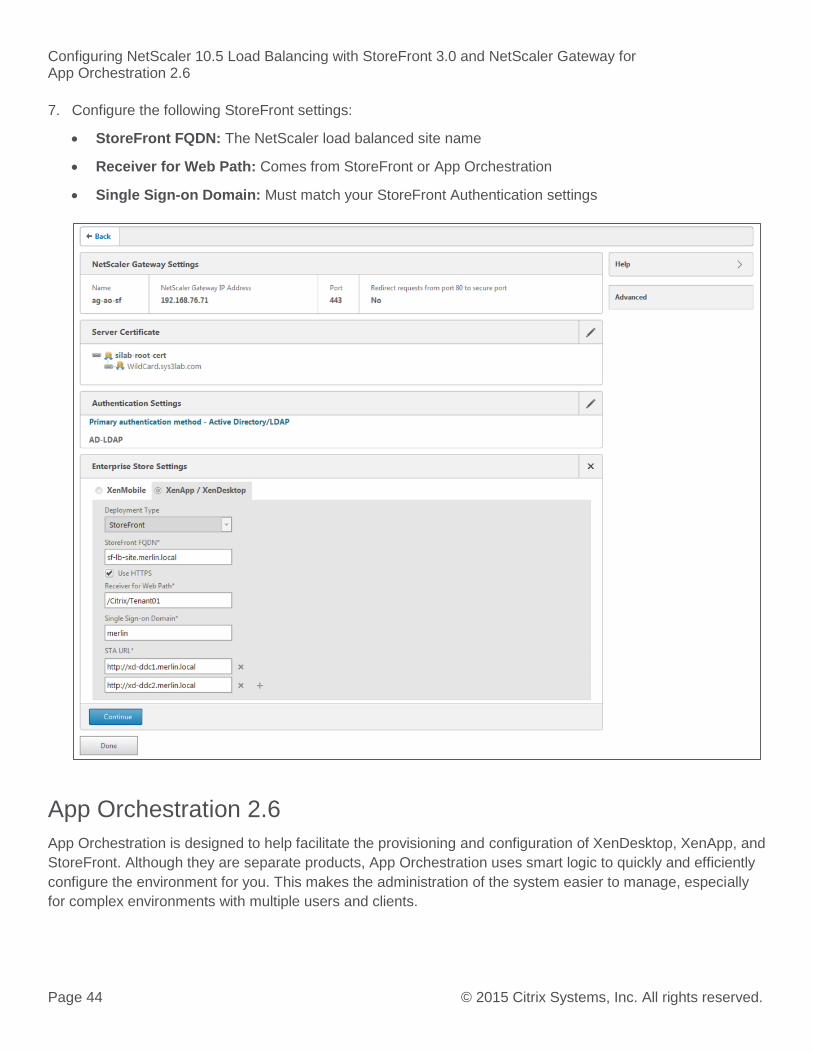
7. Configure the following StoreFront settings:
StoreFront FQDN: The NetScaler load balanced site name
Receiver for Web Path: Comes from StoreFront or App Orchestration
Single Sign-on Domain: Must match your StoreFront Authentication settings
App Orchestration 2.6
App Orchestration is designed to help facilitate the provisioning and configuration of XenDesktop, XenApp, and
StoreFront. Although they are separate products, App Orchestration uses smart logic to quickly and efficiently
configure the environment for you. This makes the administration of the system easier to manage, especially
for complex environments with multiple users and clients.
Configuring NetScaler 10.5 Load Balancing with StoreFront 3.0 and NetScaler Gateway for App Orchestration 2.6
Page 45 © 2015 Citrix Systems, Inc. All rights reserved.
This document addresses the specific settings for configuring App Orchestration 2.6 to work with NetScaler
10.5 and StoreFront 3.0. This example uses only a single tenant, so only the App Orchestration 2.6 Global
Settings for a datacenter are used.
Note: App Orchestration 2.6 also allows you to specify a NetScaler Gateway for a specific tenant.
To configure App Orchestration for NetScaler Gateway
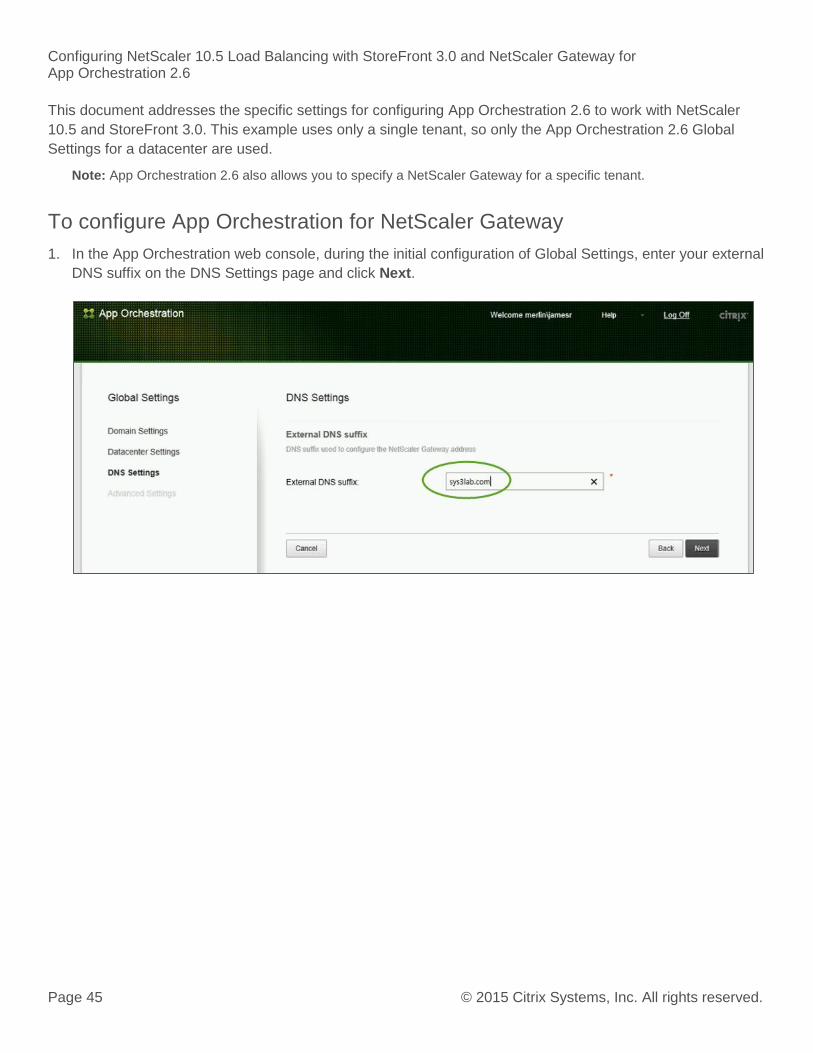
1. In the App Orchestration web console, during the initial configuration of Global Settings, enter your external
DNS suffix on the DNS Settings page and click Next.
Configuring NetScaler 10.5 Load Balancing with StoreFront 3.0 and NetScaler Gateway for App Orchestration 2.6
Page 46 © 2015 Citrix Systems, Inc. All rights reserved.
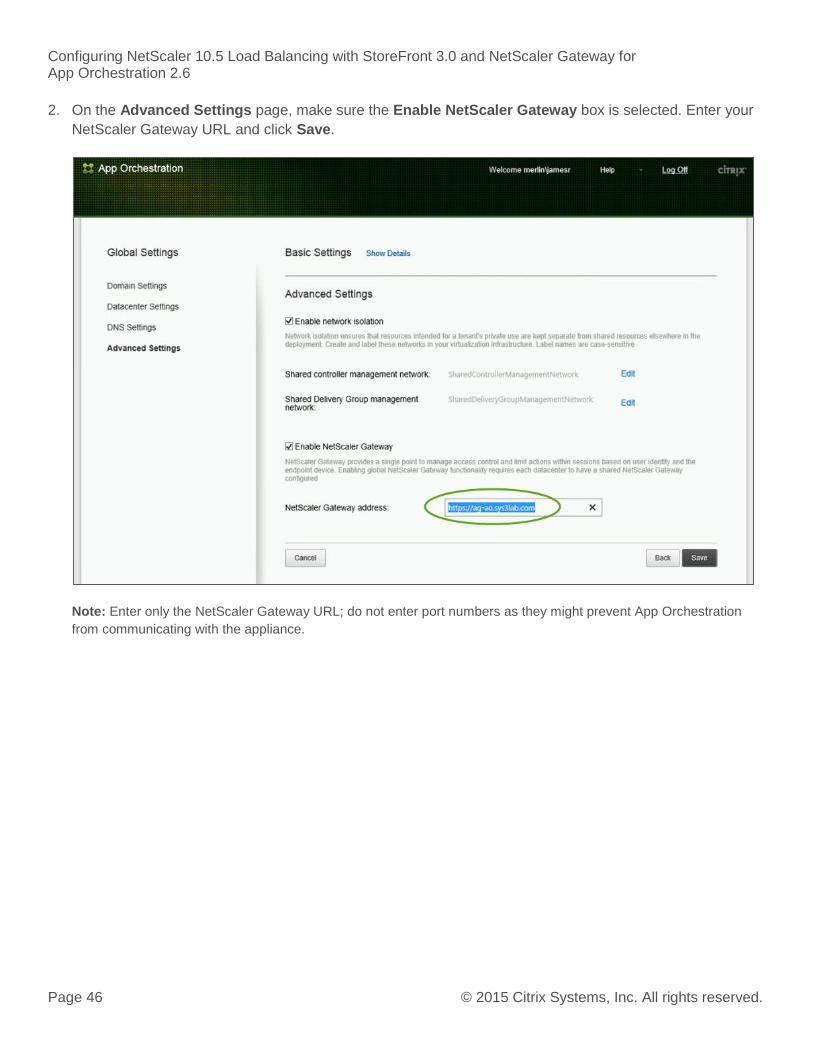
2. On the Advanced Settings page, make sure the Enable NetScaler Gateway box is selected. Enter your
NetScaler Gateway URL and click Save.
Note: Enter only the NetScaler Gateway URL; do not enter port numbers as they might prevent App Orchestration
from communicating with the appliance.
Configuring NetScaler 10.5 Load Balancing with StoreFront 3.0 and NetScaler Gateway for App Orchestration 2.6
Page 47 © 2015 Citrix Systems, Inc. All rights reserved.
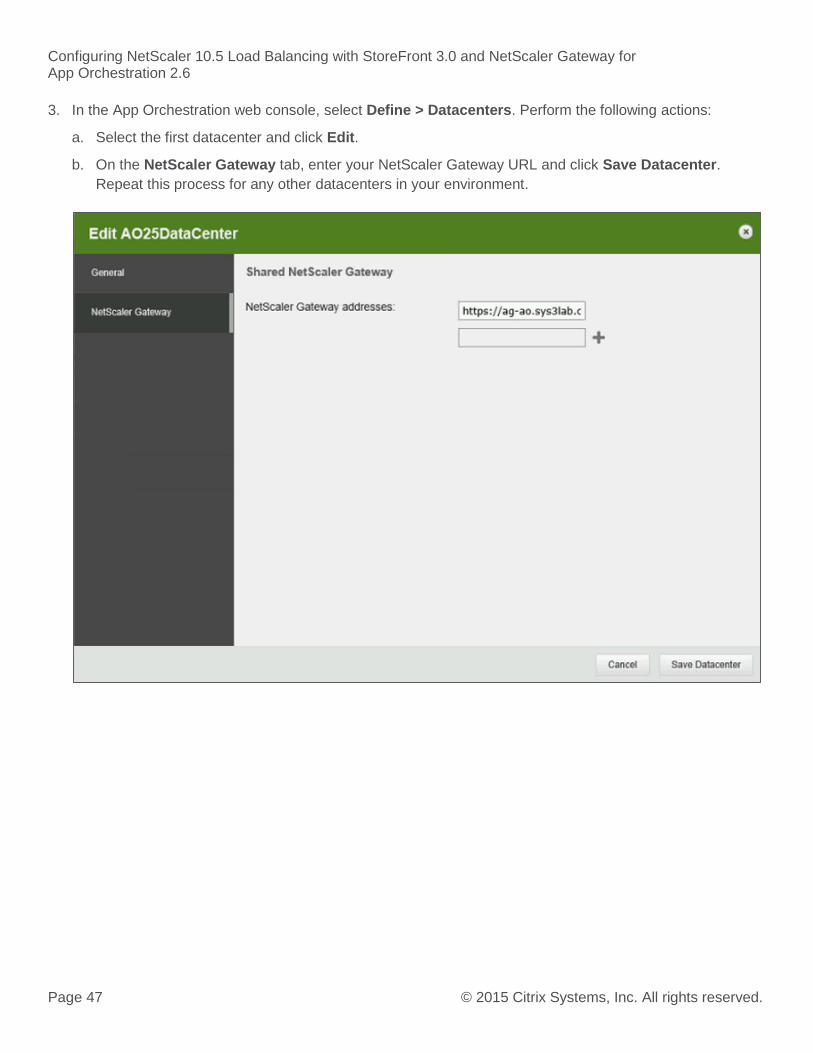
3. In the App Orchestration web console, select Define > Datacenters. Perform the following actions:
a. Select the first datacenter and click Edit.
b. On the NetScaler Gateway tab, enter your NetScaler Gateway URL and click Save Datacenter.
Repeat this process for any other datacenters in your environment.
Configuring NetScaler 10.5 Load Balancing with StoreFront 3.0 and NetScaler Gateway for App Orchestration 2.6
Page 48 © 2015 Citrix Systems, Inc. All rights reserved.
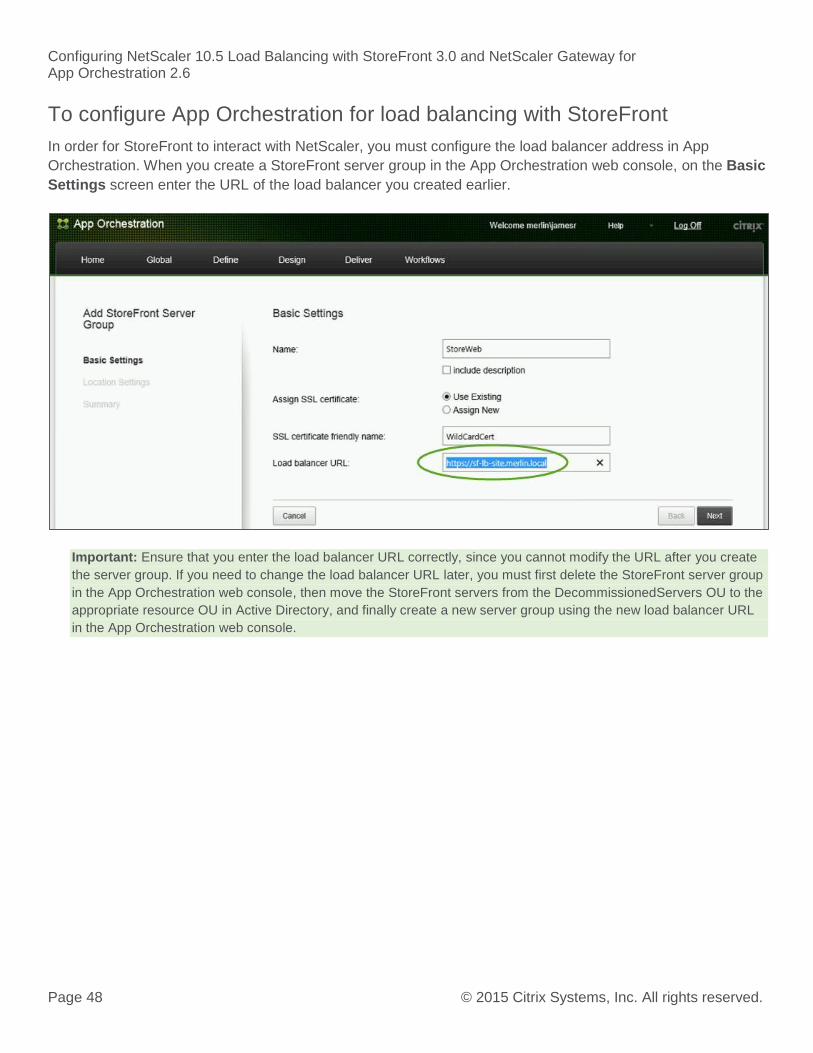
To configure App Orchestration for load balancing with StoreFront
In order for StoreFront to interact with NetScaler, you must configure the load balancer address in App
Orchestration. When you create a StoreFront server group in the App Orchestration web console, on the Basic
Settings screen enter the URL of the load balancer you created earlier.
Important: Ensure that you enter the load balancer URL correctly, since you cannot modify the URL after you create
the server group. If you need to change the load balancer URL later, you must first delete the StoreFront server group
in the App Orchestration web console, then move the StoreFront servers from the DecommissionedServers OU to the
appropriate resource OU in Active Directory, and finally create a new server group using the new load balancer URL
in the App Orchestration web console.
Configuring NetScaler 10.5 Load Balancing with StoreFront 3.0 and NetScaler Gateway for App Orchestration 2.6
Page 49 © 2015 Citrix Systems, Inc. All rights reserved.
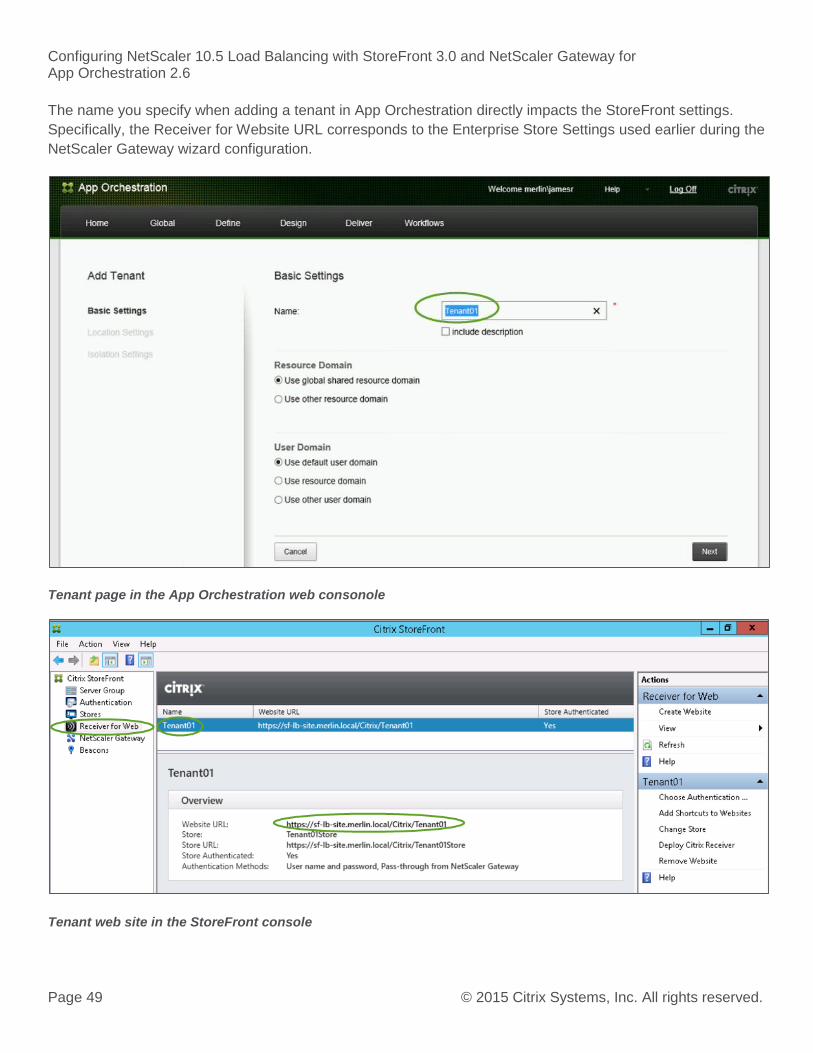
The name you specify when adding a tenant in App Orchestration directly impacts the StoreFront settings.
Specifically, the Receiver for Website URL corresponds to the Enterprise Store Settings used earlier during the
NetScaler Gateway wizard configuration.
Tenant page in the App Orchestration web consonole
Tenant web site in the StoreFront console
Configuring NetScaler 10.5 Load Balancing with StoreFront 3.0 and NetScaler Gateway for App Orchestration 2.6
Page 50 © 2015 Citrix Systems, Inc. All rights reserved.
To verify your configuration
After you have finished configuring your deployment, verify the settings on the StoreFront servers to ensure
that tenant users can access the deployment.
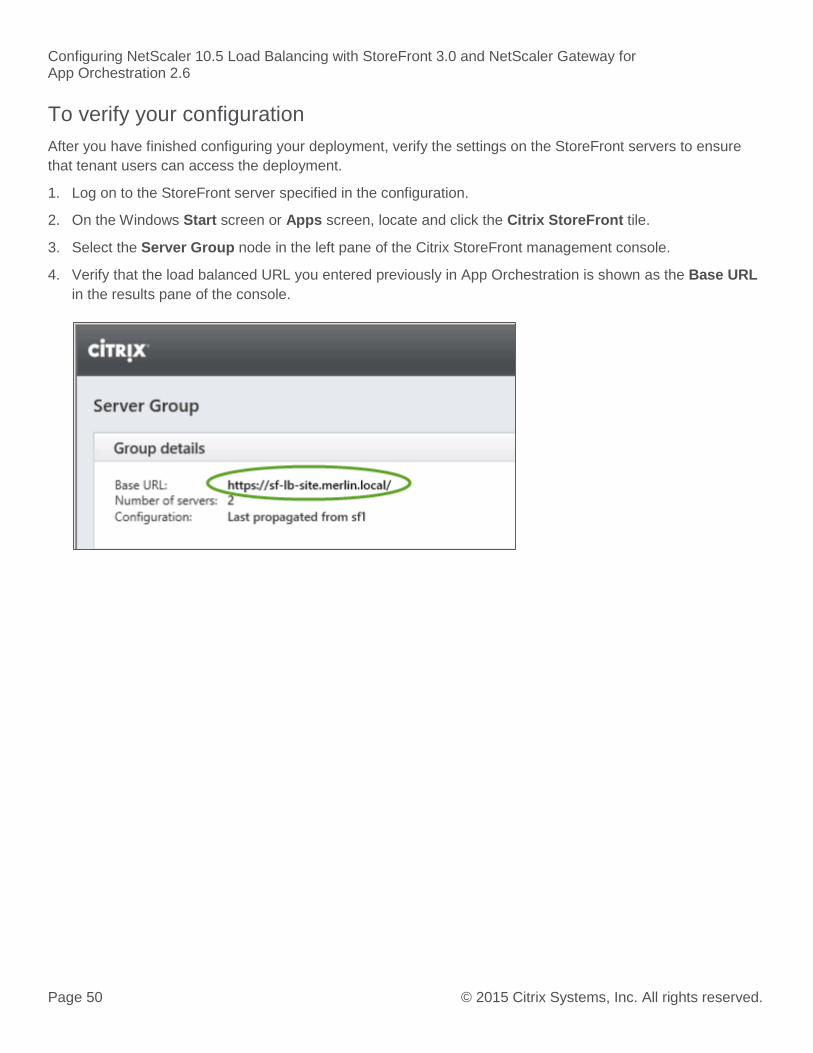
1. Log on to the StoreFront server specified in the configuration.
2. On the Windows Start screen or Apps screen, locate and click the Citrix StoreFront tile.
3. Select the Server Group node in the left pane of the Citrix StoreFront management console.
4. Verify that the load balanced URL you entered previously in App Orchestration is shown as the Base URL
in the results pane of the console.
Configuring NetScaler 10.5 Load Balancing with StoreFront 3.0 and NetScaler Gateway for App Orchestration 2.6
Page 51 © 2015 Citrix Systems, Inc. All rights reserved.
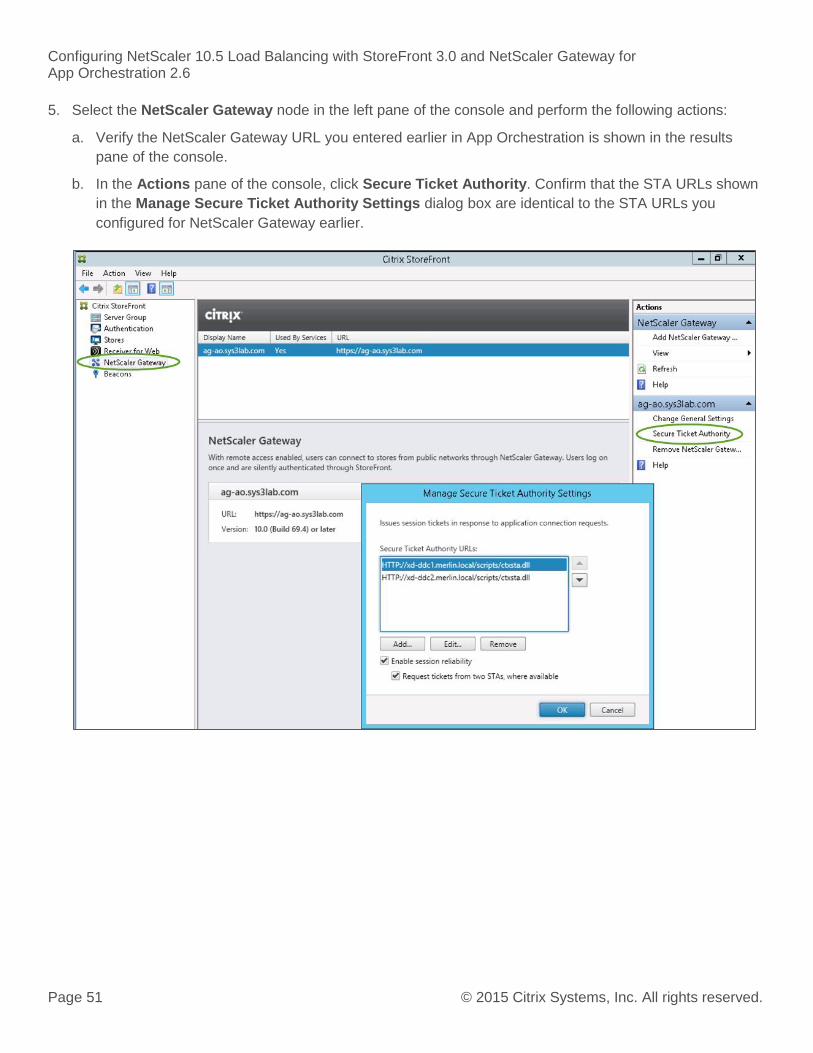
5. Select the NetScaler Gateway node in the left pane of the console and perform the following actions:
a. Verify the NetScaler Gateway URL you entered earlier in App Orchestration is shown in the results
pane of the console.
b. In the Actions pane of the console, click Secure Ticket Authority. Confirm that the STA URLs shown
in the Manage Secure Ticket Authority Settings dialog box are identical to the STA URLs you
configured for NetScaler Gateway earlier.
Configuring NetScaler 10.5 Load Balancing with StoreFront 3.0 and NetScaler Gateway for App Orchestration 2.6
Page 52 © 2015 Citrix Systems, Inc. All rights reserved.
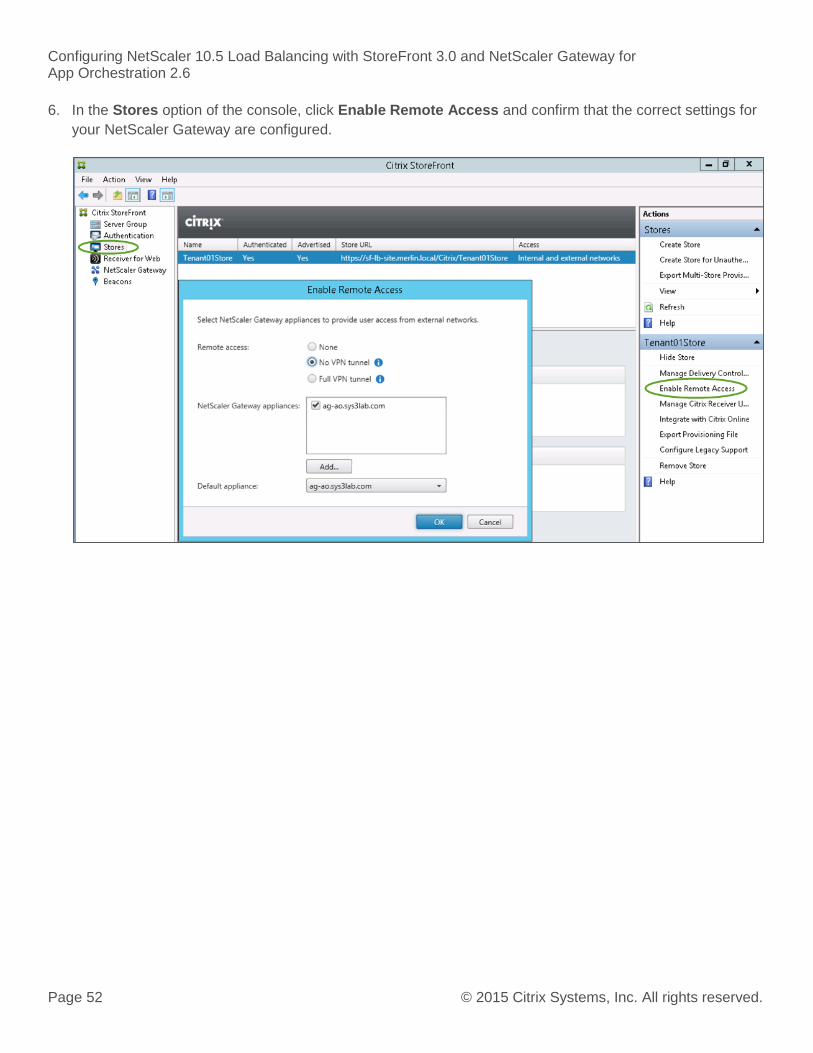
6. In the Stores option of the console, click Enable Remote Access and confirm that the correct settings for
your NetScaler Gateway are configured.
Configuring NetScaler 10.5 Load Balancing with StoreFront 3.0 and NetScaler Gateway for App Orchestration 2.6
Page 53 © 2015 Citrix Systems, Inc. All rights reserved.
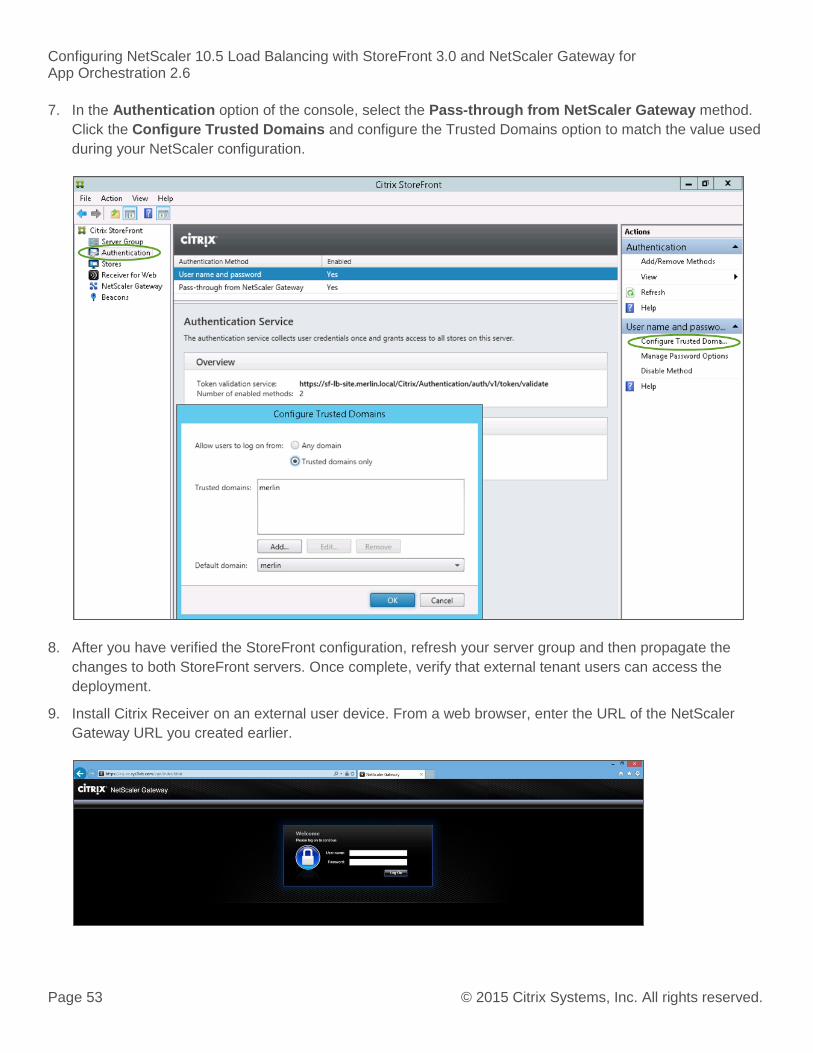
7. In the Authentication option of the console, select the Pass-through from NetScaler Gateway method.
Click the Configure Trusted Domains and configure the Trusted Domains option to match the value used
during your NetScaler configuration.
8. After you have verified the StoreFront configuration, refresh your server group and then propagate the
changes to both StoreFront servers. Once complete, verify that external tenant users can access the
deployment.
9. Install Citrix Receiver on an external user device. From a web browser, enter the URL of the NetScaler
Gateway URL you created earlier.
Configuring NetScaler 10.5 Load Balancing with StoreFront 3.0 and NetScaler Gateway for App Orchestration 2.6
Page 54 © 2015 Citrix Systems, Inc. All rights reserved.
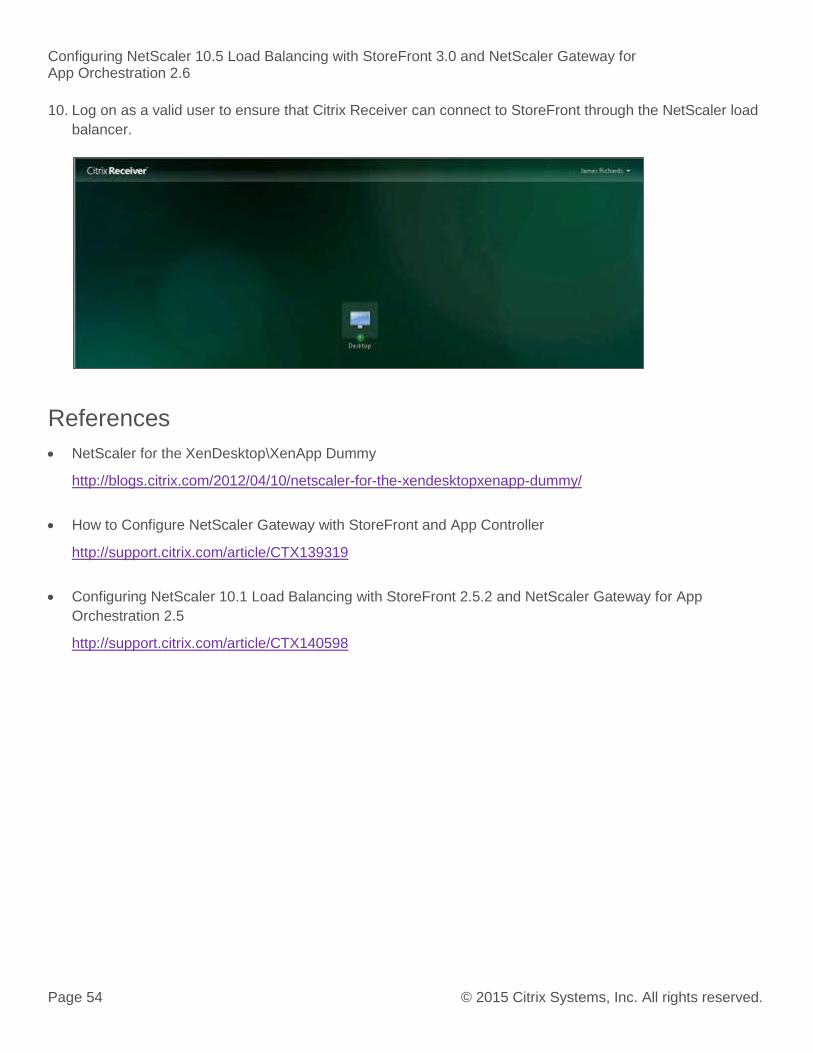
10. Log on as a valid user to ensure that Citrix Receiver can connect to StoreFront through the NetScaler load
balancer.
References
NetScaler for the XenDesktop\XenApp Dummy
http://blogs.citrix.com/2012/04/10/netscaler-for-the-xendesktopxenapp-dummy/
How to Configure NetScaler Gateway with StoreFront and App Controller
http://support.citrix.com/article/CTX139319
Configuring NetScaler 10.1 Load Balancing with StoreFront 2.5.2 and NetScaler Gateway for App
Orchestration 2.5
http://support.citrix.com/article/CTX140598