appendix a practices and solutions - ocm10gr2263b923f53ef06171a...oracle database 11g: sql...
TRANSCRIPT

Appendix APractices and Solutions

Oracle Database 11g: SQL Fundamentals II A - 2
Table of Contents Practices and Solutions for Lesson I................................................................................... 3
Practice I-1: Accessing SQL Developer Resources........................................................ 4 Practice I-2: Using SQL Developer ................................................................................ 5 Practice Solutions I-1: Accessing SQL Developer Resources........................................ 7 Practice Solutions I-2: Using SQL Developer ................................................................ 8
Practices and Solutions for Lesson 1 ................................................................................ 17 Practice 1-1: Controlling User Access.......................................................................... 17 Practice Solutions 1-1: Controlling User Access.......................................................... 20
Practices and Solutions for Lesson 2 ................................................................................ 25 Practice 2-1: Managing Schema Objects ...................................................................... 25 Practice Solutions 2-1: Managing Schema Objects ...................................................... 31
Practices and Solutions for Lesson 3 ................................................................................ 39 Practice 3-1: Managing Objects with Data Dictionary Views...................................... 39 Practice Solutions 3-1: Managing Objects with Data Dictionary Views...................... 43
Practices and Solutions for Lesson 4 ................................................................................ 47 Practice 4-1: Manipulating Large Data Sets ................................................................. 47 Practice Solutions 4-1: Manipulating Large Data Sets ................................................. 51
Practices and Solutions for Lesson 5 ................................................................................ 56 Practice 5-1: Managing Data in Different Time Zones ................................................ 56 Practice Solutions 5-1: Managing Data in Different Time Zones ................................ 59
Practices and Solutions for Lesson 6 ................................................................................ 62 Practice 6-1: Retrieving Data by Using Subqueries ..................................................... 62 Practice Solutions 6-1: Retrieving Data by Using Subqueries ..................................... 66
Practices and Solutions for Lesson 7 ................................................................................ 70 Practice 7-1: Regular Expression Support .................................................................... 70 Practice Solutions 7-1: Regular Expression Support .................................................... 72

Oracle Database 11g: SQL Fundamentals II A - 3
Practices and Solutions for Lesson I In this practice, you review the available SQL Developer resources. You also learn about your user account that you use in this course. You then start SQL Developer, create a new database connection, and browse your HR tables. You also set some SQL Developer preferences, execute SQL statements, and execute an anonymous PL/SQL block by using SQL Worksheet. Finally, you access and bookmark the Oracle Database 11g documentation and other useful Web sites that you can use in this course.

Oracle Database 11g: SQL Fundamentals II A - 4
Practice I-1: Accessing SQL Developer Resources In this practice, you do the following:
1) Access the SQL Developer home page.
a. Access the online SQL Developer home page available at: http://www.oracle.com/technology/products/database/sql_developer/index.html
b. Bookmark the page for easier future access.
2) Access the SQL Developer tutorial available online at: http://st-curriculum.oracle.com/tutorial/SQLDeveloper/index.htm. Then review the following sections and associated demos:
a) What to Do First b) Working with Database Objects c) Accessing Data

Oracle Database 11g: SQL Fundamentals II A - 5
Practice I-2: Using SQL Developer
1) Start SQL Developer by using the desktop icon.
2) Create a database connection using the following information:
a) Connection Name: myconnection b) Username: oraxx, where xx is the number of your PC (Ask your instructor to
assign you an ora account out of the ora21-ora40 range of accounts.) c) Password: oraxx d) Hostname: localhost e) Port: 1521 f) SID: orcl (or the value provided to you by the instructor)
3) Test the new connection. If the status is Success, connect to the database by using this new connection.
a) Click the Test button in the New/Select Database Connection window. b) If the status is Success, click the Connect button.
4) Browse the structure of the EMPLOYEES table and display its data.
a) Expand the myconnection connection by clicking the plus sign next to it.
b) Expand the Tables icon by clicking the plus sign next to it.
c) Display the structure of the EMPLOYEES table.
d) View the data of the DEPARTMENTS table.
5) Execute some basic SELECT statements to query the data in the EMPLOYEES table in the SQL Worksheet area. Use both the Execute Statement (or press F9) and the Run Script (or press F5) icons to execute the SELECT statements. Review the results of both methods of executing the SELECT statements on the appropriate tabbed pages.
a) Write a query to select the last name and salary for any employee whose salary is less than or equal to $3,000.
b) Write a query to display last name, job ID, and commission for all employees who are not entitled to receive a commission.
6) Set your script pathing preference to /home/oracle/labs/sql2.
a) Select Tools > Preferences > Database > Worksheet Parameters.
b) Enter the value in the Select default path to look for scripts field.
7) Enter the following in the Enter SQL Statement box. SELECT employee_id, first_name, last_name, FROM employees;
8) Save the SQL statement to a script file by using the File > Save As menu item.
a) Select File > Save As.
b) Name the file intro_test.sql.

Practice I-2: Using SQL Developer (continued)
Oracle Database 11g: SQL Fundamentals II A - 6
c) Place the file under your /home/oracle/labs/sql2/labs folder.
9) Open and run confidence.sql from your /home/oracle/labs/sql2/labs folder, and observe the output.

Oracle Database 11g: SQL Fundamentals II A - 7
Practice Solutions I-1: Accessing SQL Developer Resources 1) Access the SQL Developer home page.
a) Access the online SQL Developer home page available online at:
http://www.oracle.com/technology/products/database/sql_developer/index.html
The SQL Developer home page is displayed as follows:
b) Bookmark the page for easier future access.
2) Access the SQL Developer tutorial available online at: http://st-curriculum.oracle.com/tutorial/SQLDeveloper/index.htm Then, review the following sections and associated demos:
a) What to Do First
b) Working with Database Objects c) Accessing Data

Oracle Database 11g: SQL Fundamentals II A - 8
Practice Solutions I-2: Using SQL Developer
1) Start SQL Developer by using the desktop icon.
2) Create a database connection using the following information:
a. Connection Name: myconnection
b. Username: oraxx (Ask your instructor to assign you one ora account out of the ora21–ora40 range of accounts.)
c. Password: oraxx
d. Hostname: localhost
e. Port: 1521
f. SID: orcl (or the value provided to you by the instructor)

Practice Solutions I-2: Using SQL Developer (continued)
Oracle Database 11g: SQL Fundamentals II A - 9
3) Test the new connection. If the status is Success, connect to the database by using this
new connection. a) Click the Test button in the New/Select Database Connection window.
b) If the status is Success, click the Connect button.
Browsing the Tables
4) Browse the structure of the EMPLOYEES table and display its data.
a) Expand the myconnection connection by clicking the plus sign next to it.

Practice Solutions I-2: Using SQL Developer (continued)
Oracle Database 11g: SQL Fundamentals II A - 10
b) Expand the Tables icon by clicking the plus sign next to it.

Practice Solutions I-2: Using SQL Developer (continued)
Oracle Database 11g: SQL Fundamentals II A - 11
c) Display the structure of the EMPLOYEES table.
Click the EMPLOYEES table. The Columns tab displays the columns in the EMPLOYEES table as follows:
d) View the data of the DEPARTMENTS table.
In the Connections navigator, click the DEPARTMENTS table. Then click the Data tab.

Practice Solutions I-2: Using SQL Developer (continued)
Oracle Database 11g: SQL Fundamentals II A - 12
5) Execute some basic SELECT statements to query the data in the EMPLOYEES table in the SQL Worksheet area. Use both the Execute Statement (or press F9) and the Run Script icons (or press F5) to execute the SELECT statements. Review the results of both methods of executing the SELECT statements on the appropriate tabbed pages.
a) Write a query to select the last name and salary for any employee whose salary is less than or equal to $3,000.
SELECT last_name, salary FROM employees WHERE salary <= 3000;
b) Write a query to display last name, job ID, and commission for all employees who are not entitled to receive a commission.
SELECT last_name, job_id, commission_pct FROM employees WHERE commission_pct IS NULL;
6) Set your script pathing preference to /home/oracle/labs/sql2.
a) Select Tools > Preferences > Database > Worksheet Parameters.
b) Enter the value in the Select default path to look for scripts field. Then, click OK.

Practice Solutions I-2: Using SQL Developer (continued)
Oracle Database 11g: SQL Fundamentals II A - 13
7) Enter the following SQL statement:
SELECT employee_id, first_name, last_name FROM employees;
8) Save the SQL statement to a script file by using the File > Save As menu item.
a) Select File > Save As.
b) Name the file intro_test.sql.

Practice Solutions I-2: Using SQL Developer (continued)
Oracle Database 11g: SQL Fundamentals II A - 14
Enter intro_test.sql in the File_name text box.
c) Place the file under the /home/oracle/labs/SQL2/labs folder.
Then, click Save.
9) Open and run confidence.sql from your /home/oracle/labs/SQL2/labs folder and observe the output.

Practice Solutions I-2: Using SQL Developer (continued)
Oracle Database 11g: SQL Fundamentals II A - 15
Open the confidence.sql script file by using the File > Open menu item.
Then, press F5 to execute the script.
The following is the expected result:
COUNT(*) ---------------------- 8 1 rows selected COUNT(*) ---------------------- 107 1 rows selected COUNT(*) ---------------------- 25 1 rows selected

Practice Solutions I-2: Using SQL Developer (continued)
Oracle Database 11g: SQL Fundamentals II A - 16
COUNT(*) ---------------------- 4 1 rows selected COUNT(*) ---------------------- 23 1 rows selected COUNT(*) ---------------------- 27 1 rows selected COUNT(*) ---------------------- 19 1 rows selected COUNT(*) ---------------------- 10 1 rows selected

Oracle Database 11g: SQL Fundamentals II A - 17
Practices and Solutions for Lesson 1
Practice 1-1: Controlling User Access 1. What privilege should a user be given to log on to the Oracle server? Is this a system
privilege or an object privilege? _________________________________________________________________ 2. What privilege should a user be given to create tables? _________________________________________________________________ 3. If you create a table, who can pass along privileges to other users in your table? _________________________________________________________________ 4. You are the DBA. You create many users who require the same system privileges.
What should you use to make your job easier? _________________________________________________________________ 5. What command do you use to change your password? _________________________________________________________________ 6. User21 is the owner of the EMP table and grants the DELETE privilege to User22
by using the WITH GRANT OPTION clause. User22 then grants the DELETE privilege on EMP to User23. User21 now finds that User23 has the privilege and revokes it from User22. Which user can now delete from the EMP table?
_________________________________________________________________ 7. You want to grant SCOTT the privilege to update data in the DEPARTMENTS table.
You also want to enable SCOTT to grant this privilege to other users. What command do you use?
_________________________________________________________________ To complete question 8 and the subsequent ones, you need to connect to the database by using SQL Developer. If you are already not connected, do the following to connect:
1. Click the SQL Developer desktop icon.
2. In the Connections Navigator, use the oraxx account and the corresponding password provided by your instructor to log on to the database.
8. Grant another user query privilege on your table. Then, verify whether that user can
use the privilege. Note: For this exercise, team up with another group. For example, if you are user ora21, team up with another user ora22.
a. Grant another user privilege to view records in your REGIONS table. Include an option for this user to further grant this privilege to other users.
b. Have the user query your REGIONS table. c. Have the user pass on the query privilege to a third user (for example,
ora23).

Practice 1-1: Controlling User Access (continued)
Oracle Database 11g: SQL Fundamentals II A - 18
d. Take back the privilege from the user who performs step b. Note: Each team can run exercises 9 and 10 independently. 9. Grant another user query and data manipulation privileges on your COUNTRIES
table. Make sure that the user cannot pass on these privileges to other users. 10. Take back the privileges on the COUNTRIES table granted to another user. Note: For exercises 11 through 17, team up with another group. 11. Grant another user access to your DEPARTMENTS table. Have the user grant you
query access to his or her DEPARTMENTS table. 12. Query all the rows in your DEPARTMENTS table.
. . .
13. Add a new row to your DEPARTMENTS table. Team 1 should add Education as department number 500. Team 2 should add Human Resources as department number 510. Query the other team’s table.
14. Create a synonym for the other team’s DEPARTMENTS table.
15. Query all the rows in the other team’s DEPARTMENTS table by using your synonym.
Team 1 SELECT statement results:

Practice 1-1: Controlling User Access (continued)
Oracle Database 11g: SQL Fundamentals II A - 19
Team 2 SELECT statement results:
16. Revoke the SELECT privilege from the other team.
17. Remove the row that you inserted into the DEPARTMENTS table in step 13 and save the changes.

Oracle Database 11g: SQL Fundamentals II A - 20
Practice Solutions 1-1: Controlling User Access
To complete question 8 and the subsequent ones, you need to connect to the database by using SQL Developer.
1. What privilege should a user be given to log on to the Oracle server? Is this a system or an object privilege? The CREATE SESSION system privilege
2. What privilege should a user be given to create tables? The CREATE TABLE privilege
3. If you create a table, who can pass along privileges to other users in your table? You can, or anyone you have given those privileges to, by using WITH GRANT OPTION
4. You are the DBA. You create many users who require the same system privileges. What should you use to make your job easier? Create a role containing the system privileges and grant the role to the users.
5. What command do you use to change your password? The ALTER USER statement
6. User21 is the owner of the EMP table and grants DELETE privileges to User22 by using the WITH GRANT OPTION clause. User22 then grants DELETE privileges on EMP to User23. User21 now finds that User23 has the privilege and revokes it from User22. Which user can now delete data from the EMP table?
Only User21
7. You want to grant SCOTT the privilege to update data in the DEPARTMENTS table. You also want to enable SCOTT to grant this privilege to other users. What command do you use? GRANT UPDATE ON departments TO scott WITH GRANT OPTION;

Practice Solutions 1-1: Controlling User Access (continued)
Oracle Database 11g: SQL Fundamentals II A - 21
8. Grant another user query privilege on your table. Then, verify whether that user can use the privilege.
Note: For this exercise, team up with another group. For example, if you are user ora21, team up with another user ora22.
a) Grant another user privilege to view records in your REGIONS table. Include an option for this user to further grant this privilege to other users.
Team 1 executes this statement:
GRANT select ON regions TO <team2_oraxx> WITH GRANT OPTION;
b) Have the user query your REGIONS table.
Team 2 executes this statement:
SELECT * FROM <team1_oraxx>.regions;
c) Have the user pass on the query privilege to a third user (for example, ora23).
Team 2 executes this statement.
GRANT select ON <team1_oraxx>.regions TO <team3_oraxx>;
d) Take back the privilege from the user who performs step b.
Team 1 executes this statement.
REVOKE select ON regions FROM <team2_oraxx>;
9. Grant another user query and data manipulation privileges on your COUNTRIES table. Make sure the user cannot pass on these privileges to other users.
Team 1 executes this statement. GRANT select, update, insert ON COUNTRIES TO <team2_oraxx>;

Practice Solutions 1-1: Controlling User Access (continued)
Oracle Database 11g: SQL Fundamentals II A - 22
10. Take back the privileges on the COUNTRIES table granted to another user. Team 1 executes this statement. REVOKE select, update, insert ON COUNTRIES FROM <team2_oraxx>;
Note: For the exercises 11 through 17, team up with another group.
11. Grant another user access to your DEPARTMENTS table. Have the user grant you query access to his or her DEPARTMENTS table.
Team 2 executes the GRANT statement. GRANT select ON departments TO <team1_oraxx>;
Team 1 executes the GRANT statement. GRANT select ON departments TO <team2_oraxx>;
Here, <team1_oraxx> is the username of Team 1 and <team2_oraxx> is the username of Team 2.
12. Query all the rows in your DEPARTMENTS table.
SELECT * FROM departments;
13. Add a new row to your DEPARTMENTS table. Team 1 should add Education as department number 500. Team 2 should add Human Resources as department number 510. Query the other team’s table.
Team 1 executes this INSERT statement. INSERT INTO departments(department_id, department_name) VALUES (500, 'Education'); COMMIT;
Team 2 executes this INSERT statement. INSERT INTO departments(department_id, department_name) VALUES (510, 'Human Resources'); COMMIT;

Practice Solutions 1-1: Controlling User Access (continued)
Oracle Database 11g: SQL Fundamentals II A - 23
14. Create a synonym for the other team’s DEPARTMENTS table.
Team 1 creates a synonym named team2.
CREATE SYNONYM team2 FOR <team2_oraxx>.DEPARTMENTS;
Team 2 creates a synonym named team1. CREATE SYNONYM team1 FOR <team1_oraxx>. DEPARTMENTS;
15. Query all the rows in the other team’s DEPARTMENTS table by using your synonym.
Team 1 executes this SELECT statement. SELECT * FROM team2;
Team 2 executes this SELECT statement. SELECT * FROM team1;
16. Revoke the SELECT privilege from the other team.
Team 1 revokes the privilege. REVOKE select ON departments FROM <team2_oraxx>;
Team 2 revokes the privilege. REVOKE select ON departments FROM <team1_oraxx>;

Practice Solutions 1-1: Controlling User Access (continued)
Oracle Database 11g: SQL Fundamentals II A - 24
17. Remove the row that you inserted into the DEPARTMENTS table in step 8 and save the changes.
Team 1 executes this DELETE statement. DELETE FROM departments WHERE department_id = 500; COMMIT;
Team 2 executes this DELETE statement. DELETE FROM departments WHERE department_id = 510; COMMIT;

Oracle Database 11g: SQL Fundamentals II A - 25
Practices and Solutions for Lesson 2
Practice 2-1: Managing Schema Objects In this practice, you use the ALTER TABLE command to modify columns and add constraints. You use the CREATE INDEX command to create indexes when creating a table, along with the CREATE TABLE command. You create external tables. 1. Create the DEPT2 table based on the following table instance chart. Enter the syntax
in the SQL Worksheet. Then, execute the statement to create the table. Confirm that the table is created.
2. Populate the DEPT2 table with data from the DEPARTMENTS table. Include only the
columns that you need.
3. Create the EMP2 table based on the following table instance chart. Enter the syntax in the SQL Worksheet. Then execute the statement to create the table. Confirm that the table is created.
Column Name ID NAME
Key Type
Nulls/Unique
FK Table
FK Column
Data type NUMBER VARCHAR2
Length 7 25
Column Name ID LAST_NAME FIRST_NAME DEPT_ID
Key Type
Nulls/Unique
FK Table
FK Column
Data type NUMBER VARCHAR2 VARCHAR2 NUMBER
Length 7 25 25 7

Practice 2-1: Managing Schema Objects (continued)
Oracle Database 11g: SQL Fundamentals II A - 26
4. Modify the EMP2 table to allow for longer employee last names. Confirm your
modification.
5. Create the EMPLOYEES2 table based on the structure of the EMPLOYEES table.
Include only the EMPLOYEE_ID, FIRST_NAME, LAST_NAME, SALARY, and DEPARTMENT_ID columns. Name the columns in your new table ID, FIRST_NAME, LAST_NAME, SALARY, and DEPT_ID, respectively.
6. Drop the EMP2 table.
7. Query the recycle bin to see whether the table is present.
8. Restore the EMP2 table to a state before the DROP statement.
9. Drop the FIRST_NAME column from the EMPLOYEES2 table. Confirm your
modification by checking the description of the table.

Practice 2-1: Managing Schema Objects (continued)
Oracle Database 11g: SQL Fundamentals II A - 27
10. In the EMPLOYEES2 table, mark the DEPT_ID column as UNUSED. Confirm your
modification by checking the description of the table.
11. Drop all the UNUSED columns from the EMPLOYEES2 table. Confirm your
modification by checking the description of the table.
12. Add a table-level PRIMARY KEY constraint to the EMP2 table on the ID column. The constraint should be named at creation. Name the constraint my_emp_id_pk.
13. Create a PRIMARY KEY constraint to the DEPT2 table using the ID column. The constraint should be named at creation. Name the constraint my_dept_id_pk.
14. Add a foreign key reference on the EMP2 table that ensures that the employee is not assigned to a nonexistent department. Name the constraint my_emp_dept_id_fk.
15. Modify the EMP2 table. Add a COMMISSION column of the NUMBER data type, precision 2, scale 2. Add a constraint to the COMMISSION column that ensures that a commission value is greater than zero.
16. Drop the EMP2 and DEPT2 tables so that they cannot be restored. Verify the recycle bin.
17. Create the DEPT_NAMED_INDEX table based on the following table instance chart. Name the index for the PRIMARY KEY column as DEPT_PK_IDX.
18. Create an external table library_items_ext. Use the ORACLE_LOADER access driver.
Column Name Deptno Dname
Primary Key Yes
Data Type Number VARCHAR2
Length 4 30

Practice 2-1: Managing Schema Objects (continued)
Oracle Database 11g: SQL Fundamentals II A - 28
Note: The emp_dir directory and library_items.dat file are already created for this exercise. library_items.dat has records in the following format:
2354, 2264, 13.21, 150,
2355, 2289, 46.23, 200,
2355, 2264, 50.00, 100,
a. Open the lab_02_18.sql file. Observe the code snippet to create the library_items_ext external table. Then replace <TODO1>, <TODO2>, <TODO3>, and <TODO4> as appropriate and save the file as lab_02_18_soln.sql. Run the script to create the external table.
b. Query the library_items_ext table.
19. The HR department needs a report of the addresses of all departments. Create an external table as dept_add_ext using the ORACLE_DATAPUMP access driver. The report should show the location ID, street address, city, state or province, and country in the output. Use a NATURAL JOIN to produce the results.
Note: The emp_dir directory is already created for this exercise.
a. Open the lab_02_19.sql file. Observe the code snippet to create the dept_add_ext external table. Then, replace <TODO1>, <TODO2>, and <TODO3> with the appropriate code. Replace <oraxx_emp4.exp> and <oraxx_emp5.exp> with the appropriate file names. For example, if you are the ora21 user, your file names are ora21_emp4.exp and ora21_emp5.exp. Save the script as lab_02_19_soln.sql.
b. Run the lab_02_19_soln.sql script to create the external table.
c. Query the dept_add_ext table.

Practice 2-1: Managing Schema Objects (continued)
Oracle Database 11g: SQL Fundamentals II A - 29
Note: When you perform the preceding step, two files oraxx_emp4.exp and oraxx_emp5.exp are created under the default directory emp_dir.
20. Create the emp_books table and populate it with data. Set the primary key as deferred and observe what happens at the end of the transaction.
a. Run the lab_02_20_a.sql file to create the emp_books table. Observe that the emp_books_pk primary key is not created as deferrable.
b. Run the lab_02_20_b.sql file to populate data into the emp_books table.
What do you observe?
c. Set the emp_books_pk constraint as deferred. What do you observe?
d. Drop the emp_books_pk constraint.
e. Modify the emp_books table definition to add the emp_books_pk constraint
as deferrable this time.

Practice 2-1: Managing Schema Objects (continued)
Oracle Database 11g: SQL Fundamentals II A - 30
f. Set the emp_books_pk constraint as deferred.
g. Run the lab_02_20_g.sql file to populate data into the emp_books table.
What do you observe?
h. Commit the transaction. What do you observe?

Oracle Database 11g: SQL Fundamentals II A - 31
Practice Solutions 2-1: Managing Schema Objects
1. Create the DEPT2 table based on the following table instance chart. Enter the syntax in the SQL Worksheet. Then, execute the statement to create the table. Confirm that the table is created.
CREATE TABLE dept2 (id NUMBER(7), name VARCHAR2(25)); DESCRIBE dept2
2. Populate the DEPT2 table with data from the DEPARTMENTS table. Include only the columns that you need.
INSERT INTO dept2 SELECT department_id, department_name FROM departments;
3. Create the EMP2 table based on the following table instance chart. Enter the syntax in the SQL Worksheet. Then execute the statement to create the table. Confirm that the table is created.
Column Name ID NAME
Key Type
Nulls/Unique
FK Table
FK Column
Data type NUMBER VARCHAR2
Length 7 25
Column Name ID LAST_NAME FIRST_NAME DEPT_ID
Key Type
Nulls/Unique
FK Table
FK Column
Data type NUMBER VARCHAR2 VARCHAR2 NUMBER
Length 7 25 25 7

Practice Solutions 2-1: Managing Schema Objects (continued)
Oracle Database 11g: SQL Fundamentals II A - 32
CREATE TABLE emp2 (id NUMBER(7), last_name VARCHAR2(25), first_name VARCHAR2(25), dept_id NUMBER(7)); DESCRIBE emp2
4. Modify the EMP2 table to allow for longer employee last names. Confirm your modification.
ALTER TABLE emp2 MODIFY (last_name VARCHAR2(50)); DESCRIBE emp2
5. Create the EMPLOYEES2 table based on the structure of the EMPLOYEES table. Include only the EMPLOYEE_ID, FIRST_NAME, LAST_NAME, SALARY, and DEPARTMENT_ID columns. Name the columns in your new table ID, FIRST_NAME, LAST_NAME, SALARY, and DEPT_ID, respectively.
CREATE TABLE employees2 AS SELECT employee_id id, first_name, last_name, salary, department_id dept_id FROM employees;
6. Drop the EMP2 table.
DROP TABLE emp2;

Practice Solutions 2-1: Managing Schema Objects (continued)
Oracle Database 11g: SQL Fundamentals II A - 33
7. Query the recycle bin to see whether the table is present.
SELECT original_name, operation, droptime FROM recyclebin;
8. Restore the EMP2 table to a state before the DROP statement.
FLASHBACK TABLE emp2 TO BEFORE DROP; DESC emp2;
9. Drop the FIRST_NAME column from the EMPLOYEES2 table. Confirm your modification by checking the description of the table.
ALTER TABLE employees2 DROP COLUMN first_name; DESCRIBE employees2
10. In the EMPLOYEES2 table, mark the DEPT_ID column as UNUSED. Confirm your modification by checking the description of the table.
ALTER TABLE employees2 SET UNUSED (dept_id); DESCRIBE employees2
11. Drop all the UNUSED columns from the EMPLOYEES2 table. Confirm your modification by checking the description of the table. ALTER TABLE employees2 DROP UNUSED COLUMNS; DESCRIBE employees2

Practice Solutions 2-1: Managing Schema Objects (continued)
Oracle Database 11g: SQL Fundamentals II A - 34
12. Add a table-level PRIMARY KEY constraint to the EMP2 table on the ID column. The constraint should be named at creation. Name the constraint my_emp_id_pk.
ALTER TABLE emp2 ADD CONSTRAINT my_emp_id_pk PRIMARY KEY (id);
13. Create a PRIMARY KEY constraint to the DEPT2 table using the ID column. The constraint should be named at creation. Name the constraint my_dept_id_pk.
ALTER TABLE dept2 ADD CONSTRAINT my_dept_id_pk PRIMARY KEY(id);
14. Add a foreign key reference on the EMP2 table that ensures that the employee is not assigned to a nonexistent department. Name the constraint my_emp_dept_id_fk.
ALTER TABLE emp2 ADD CONSTRAINT my_emp_dept_id_fk FOREIGN KEY (dept_id) REFERENCES dept2(id);
15. Modify the EMP2 table. Add a COMMISSION column of the NUMBER data type, precision 2, scale 2. Add a constraint to the COMMISSION column that ensures that a commission value is greater than zero.
ALTER TABLE emp2 ADD commission NUMBER(2,2) CONSTRAINT my_emp_comm_ck CHECK (commission > 0);
16. Drop the EMP2 and DEPT2 tables so that they cannot be restored. Check in the recycle bin.
DROP TABLE emp2 PURGE; DROP TABLE dept2 PURGE; SELECT original_name, operation, droptime FROM recyclebin;
17. Create the DEPT_NAMED_INDEX table based on the following table instance chart. Name the index for the PRIMARY KEY column as DEPT_PK_IDX.
Column Name Deptno Dname
Primary Key Yes
Data Type Number VARCHAR2
Length 4 30

Practice Solutions 2-1: Managing Schema Objects (continued)
Oracle Database 11g: SQL Fundamentals II A - 35
CREATE TABLE DEPT_NAMED_INDEX (deptno NUMBER(4) PRIMARY KEY USING INDEX (CREATE INDEX dept_pk_idx ON DEPT_NAMED_INDEX(deptno)), dname VARCHAR2(30));
18. Create an external table library_items_ext. Use the ORACLE_LOADER access driver. Note: The emp_dir directory and library_items.dat are already created for this exercise. library_items.dat has records in the following format:
2354, 2264, 13.21, 150,
2355, 2289, 46.23, 200,
2355, 2264, 50.00, 100,
a) Open the lab_02_18.sql file. Observe the code snippet to create the library_items_ext external table. Then, replace <TODO1>, <TODO2>, <TODO3>, and <TODO4> as appropriate and save the file as lab_02_18_soln.sql. Run the script to create the external table.
CREATE TABLE library_items_ext ( category_id number(12) , book_id number(6) , book_price number(8,2) , quantity number(8) ) ORGANIZATION EXTERNAL (TYPE ORACLE_LOADER DEFAULT DIRECTORY emp_dir ACCESS PARAMETERS (RECORDS DELIMITED BY NEWLINE FIELDS TERMINATED BY ',') LOCATION ('library_items.dat') ) REJECT LIMIT UNLIMITED;

Practice Solutions 2-1: Managing Schema Objects (continued)
Oracle Database 11g: SQL Fundamentals II A - 36
b) Query the library_items_ext table. SELECT * FROM library_items_ext;
19. The HR department needs a report of addresses of all the departments. Create an external table as dept_add_ext using the ORACLE_DATAPUMP access driver. The report should show the location ID, street address, city, state or province, and country in the output. Use a NATURAL JOIN to produce the results. Note: The emp_dir directory is already created for this exercise.
a) Open the lab_02_19.sql file. Observe the code snippet to create the dept_add_ext external table. Then, replace <TODO1>, <TODO2>, and <TODO3> with appropriate code. Replace <oraxx_emp4.exp> and <oraxx_emp5.exp> with appropriate file names. For example, if you are user ora21, your file names are ora21_emp4.exp and ora21_emp5.exp. Save
the script as lab_02_19_soln.sql. CREATE TABLE dept_add_ext (location_id, street_address, city, state_province, country_name) ORGANIZATION EXTERNAL( TYPE ORACLE_DATAPUMP DEFAULT DIRECTORY emp_dir LOCATION ('oraxx_emp4.exp','oraxx_emp5.exp')) PARALLEL AS SELECT location_id, street_address, city, state_province, country_name FROM locations NATURAL JOIN countries;
Note: When you perform the preceding step, two files oraxx_emp4.exp and oraxx_emp5.exp are created under the default directory emp_dir.
Run the lab_02_19_soln.sql script to create the external table.

Practice Solutions 2-1: Managing Schema Objects (continued)
Oracle Database 11g: SQL Fundamentals II A - 37
b) Query the dept_add_ext table. SELECT * FROM dept_add_ext;
20. Create the emp_books table and populate it with data. Set the primary key as deferred and observe what happens at the end of the transaction.
a) Run the lab_02_20a.sql script to create the emp_books table. Observe that the emp_books_pk primary key is not created as deferrable.
CREATE TABLE emp_books (book_id number, title varchar2(20), CONSTRAINT emp_books_pk PRIMARY KEY (book_id));
b) Run the lab_02_20b.sql script to populate data into the emp_books table. What do you observe?
INSERT INTO emp_books VALUES(300,'Organizations'); INSERT INTO emp_books VALUES(300,'Change Management');
The first row is inserted. However, you see the ora-00001 error with the second row insertion. c) Set the emp_books_pk constraint as deferred. What do you observe?
SET CONSTRAINT emp_books_pk DEFERRED;
You see the following error: “ORA-02447: Cannot defer a constraint that is not deferrable.”
d) Drop the emp_books_pk constraint. ALTER TABLE emp_books DROP CONSTRAINT emp_books_pk;
e) Modify the emp_books table definition to add the emp_books_pk constraint as deferrable this time.
ALTER TABLE emp_books ADD (CONSTRAINT emp_books_pk PRIMARY KEY (book_id) DEFERRABLE);
f) Set the emp_books_pk constraint as deferred. SET CONSTRAINT emp_books_pk DEFERRED;

Practice Solutions 2-1: Managing Schema Objects (continued)
Oracle Database 11g: SQL Fundamentals II A - 38
g) Run the lab_02_20g.sql script to populate data into the emp_books table. What do you observe?
INSERT INTO emp_books VALUES (300,'Change Management'); INSERT INTO emp_books VALUES (300,'Personality'); INSERT INTO emp_books VALUES (350,'Creativity');
You see that all the rows are inserted.
h) Commit the transaction. What do you observe? COMMIT;
You see that the transaction is rolled back.

Oracle Database 11g: SQL Fundamentals II A - 39
Practices and Solutions for Lesson 3
Practice 3-1: Managing Objects with Data Dictionary Views In this practice, you query the dictionary views to find information about objects in your schema. 1. Query the USER_TABLES data dictionary view to see information about the tables
that you own.
… 2. Query the ALL_TABLES data dictionary view to see information about all the tables
that you can access. Exclude the tables that you own. Note: Your list may not exactly match the following list:
…
3. For a specified table, create a script that reports the column names, data types, and
data types’ lengths, as well as whether nulls are allowed. Prompt the user to enter the table name. Give appropriate aliases to the DATA_PRECISION and DATA_SCALE columns. Save this script in a file named lab_03_01.sql. For example, if the user enters DEPARTMENTS, the following output results:

Practice 3-1: Managing Objects with Data Dictionary Views (continued)
Oracle Database 11g: SQL Fundamentals II A - 40
4. Create a script that reports the column name, constraint name, constraint type, search condition, and status for a specified table. You must join the USER_CONSTRAINTS and USER_CONS_COLUMNS tables to obtain all this information. Prompt the user to enter the table name. Save the script in a file named lab_03_04.sql. For example, if the user enters DEPARTMENTS, the following output results:
5. Add a comment to the DEPARTMENTS table. Then query the USER_TAB_COMMENTS view to verify that the comment is present.
6. Create a synonym for your EMPLOYEES table. Call it EMP. Then find the names of all synonyms that are in your schema.
7. Run lab_03_07.sql to create the dept50 view for this exercise. You need to determine the names and definitions of all the views in your schema. Create a report that retrieves view information: the view name and text from the USER_VIEWS data dictionary view. Note: The EMP_DETAILS_VIEW was created as part of your schema. Note: You can see the complete definition of the view if you use Run Script (or press F5) in SQL Developer. If you use Execute Statement (or press F9) in SQL Developer, scroll horizontally in the result pane. If you use SQL*Plus, to see more contents of a LONG column, use the SET LONG n command, where n is the value of the number of characters of the LONG column that you want to see.

Practice 3-1: Managing Objects with Data Dictionary Views (continued)
Oracle Database 11g: SQL Fundamentals II A - 41
8. Find the names of your sequences. Write a query in a script to display the following information about your sequences: sequence name, maximum value, increment size, and last number. Name the script lab_03_08.sql. Run the statement in your script.
Run the lab_03_09_tab.sql script as a prerequisite for exercises 9 through 11. Alternatively, open the script file to copy the code and paste it into your SQL Worksheet. Then execute the script. This script:
• Drops if there are existing tables DEPT2 and EMP2
• Creates the DEPT2 and EMP2 tables
Note: In Practice 2, you should have already dropped the DEPT2 and EMP2 tables so that they cannot be restored.
9. Confirm that both the DEPT2 and EMP2 tables are stored in the data dictionary.
10. Confirm that the constraints were added by querying the USER_CONSTRAINTS view. Note the types and names of the constraints.
11. Display the object names and types from the USER_OBJECTS data dictionary view for the EMP2 and DEPT2 tables.
12. Create the SALES_DEPT table based on the following table instance chart. Name the index for the PRIMARY KEY column SALES_PK_IDX. Then query the data dictionary view to find the index name, table name, and whether the index is unique.

Practice 3-1: Managing Objects with Data Dictionary Views (continued)
Oracle Database 11g: SQL Fundamentals II A - 42
Column Name Team_Id Location
Primary Key Yes
Data Type Number VARCHAR2
Length 3 30

Oracle Database 11g: SQL Fundamentals II A - 43
Practice Solutions 3-1: Managing Objects with Data Dictionary Views
1. Query the data dictionary to see information about the tables you own. SELECT table_name FROM user_tables;
2. Query the dictionary view to see information about all the tables that you can access. Exclude tables that you own. SELECT table_name, owner FROM all_tables WHERE owner <>'ORAxx';
3. For a specified table, create a script that reports the column names, data types, and data types’ lengths, as well as whether nulls are allowed. Prompt the user to enter the table name. Give appropriate aliases to the DATA_PRECISION and DATA_SCALE columns. Save this script in a file named lab_03_01.sql. SELECT column_name, data_type, data_length, data_precision PRECISION, data_scale SCALE, nullable FROM user_tab_columns WHERE table_name = UPPER('&tab_name');
To test, run the script and enter DEPARTMENTS as the table name.
4. Create a script that reports the column name, constraint name, constraint type, search condition, and status for a specified table. You must join the USER_CONSTRAINTS and USER_CONS_COLUMNS tables to obtain all this information. Prompt the user to enter the table name. Save the script in a file named lab_03_04.sql.
SELECT ucc.column_name, uc.constraint_name, uc.constraint_type, uc.search_condition, uc.status FROM user_constraints uc JOIN user_cons_columns ucc ON uc.table_name = ucc.table_name AND uc.constraint_name = ucc.constraint_name AND uc.table_name = UPPER('&tab_name');
To test, run the script and enter DEPARTMENTS as the table name.

Practice Solutions 3-1: Managing Objects with Data Dictionary Views (continued)
Oracle Database 11g: SQL Fundamentals II A - 44
5. Add a comment to the DEPARTMENTS table. Then query the USER_TAB_COMMENTS view to verify that the comment is present.
COMMENT ON TABLE departments IS 'Company department information including name, code, and location.'; SELECT COMMENTS FROM user_tab_comments WHERE table_name = 'DEPARTMENTS';
6. Create a synonym for your EMPLOYEES table. Call it EMP. Then, find the names of all the synonyms that are in your schema.
CREATE SYNONYM emp FOR EMPLOYEES; SELECT * FROM user_synonyms;
7. Run lab_03_07.sql to create the dept50 view for this exercise. You need to determine the names and definitions of all the views in your schema. Create a report that retrieves view information: the view name and text from the USER_VIEWS data dictionary view.
Note: The EMP_DETAILS_VIEW was created as part of your schema.
Note: You can see the complete definition of the view if you use Run Script (or press F5) in SQL Developer. If you use Execute Statement (or press F9) in SQL Developer, scroll horizontally in the result pane. If you use SQL*Plus to see more contents of a LONG column, use the SET LONG n command, where n is the value of the number of characters of the LONG column that you want to see.
SELECT view_name, text FROM user_views;

Practice Solutions 3-1: Managing Objects with Data Dictionary Views (continued)
Oracle Database 11g: SQL Fundamentals II A - 45
8. Find the names of your sequences. Write a query in a script to display the following information about your sequences: sequence name, maximum value, increment size, and last number. Name the script lab_03_08.sql. Run the statement in your script.
SELECT sequence_name, max_value, increment_by, last_number FROM user_sequences;
Run the lab_03_09_tab.sql script as a prerequisite for exercises 9 through 11. Alternatively, open the script file to copy the code and paste it into your SQL Worksheet. Then execute the script. This script:
• Drops the DEPT2 and EMP2 tables
• Creates the DEPT2 and EMP2 tables
Note: In Practice 2, you should have already dropped the DEPT2 and EMP2 tables so that they cannot be restored.
9. Confirm that both the DEPT2 and EMP2 tables are stored in the data dictionary. SELECT table_name FROM user_tables WHERE table_name IN ('DEPT2', 'EMP2');
10. Query the data dictionary to find out the constraint names and types for both the tables. SELECT constraint_name, constraint_type FROM user_constraints WHERE table_name IN ('EMP2', 'DEPT2');
11. Query the data dictionary to display the object names and types for both the tables. SELECT object_name, object_type FROM user_objects WHERE object_name LIKE 'EMP%' OR object_name LIKE 'DEPT%';

Practice Solutions 3-1: Managing Objects with Data Dictionary Views (continued)
Oracle Database 11g: SQL Fundamentals II A - 46
12. Create the SALES_DEPT table based on the following table instance chart. Name the index for the PRIMARY KEY column as SALES_PK_IDX. Then query the data dictionary view to find the index name, table name, and whether the index is unique.
CREATE TABLE SALES_DEPT (team_id NUMBER(3) PRIMARY KEY USING INDEX (CREATE INDEX sales_pk_idx ON SALES_DEPT(team_id)), location VARCHAR2(30)); SELECT INDEX_NAME, TABLE_NAME, UNIQUENESS FROM USER_INDEXES WHERE TABLE_NAME = ‘SALES_DEPT’;
Column Name Team_Id Location
Primary Key Yes
Data Type Number VARCHAR2
Length 3 30

Oracle Database 11g: SQL Fundamentals II A - 47
Practices and Solutions for Lesson 4
Practice 4-1: Manipulating Large Data Sets In this practice, you perform multitable INSERT and MERGE operations, and track row versions.
1. Run the lab_04_01.sql script in the lab folder to create the SAL_HISTORY table.
2. Display the structure of the SAL_HISTORY table.
3. Run the lab_04_03.sql script in the lab folder to create the MGR_HISTORY table.
4. Display the structure of the MGR_HISTORY table.
5. Run the lab_04_05.sql script in the lab folder to create the SPECIAL_SAL
table.
6. Display the structure of the SPECIAL_SAL table.
7. a. Write a query to do the following:
- Retrieve details such as the employee ID, hire date, salary, and manager ID of those employees whose employee ID is less than 125 from the EMPLOYEES table.
- If the salary is more than $20,000, insert details such as the employee ID and salary into the SPECIAL_SAL table.

Practice 4-1: Manipulating Large Data Sets (continued)
Oracle Database 11g: SQL Fundamentals II A - 48
- Insert details such as the employee ID, hire date, and salary into the SAL_HISTORY table.
- Insert details such as the employee ID, manager ID, and salary into the MGR_HISTORY table.
b. Display the records from the SPECIAL_SAL table.
c. Display the records from the SAL_HISTORY table.
d. Display the records from the MGR_HISTORY table.
8.
a. Run the lab_04_08a.sql script in the lab folder to create the SALES_WEEK_DATA table.
b. Run the lab_04_08b.sql script in the lab folder to insert records into the SALES_WEEK_DATA table.

Practice 4-1: Manipulating Large Data Sets (continued)
Oracle Database 11g: SQL Fundamentals II A - 49
c. Display the structure of the SALES_WEEK_DATA table.
d. Display the records from the SALES_WEEK_DATA table.
e. Run the lab_04_08_e.sql script in the lab folder to create the
EMP_SALES_INFO table.
f. Display the structure of the EMP_SALES_INFO table.
g. Write a query to do the following:
- Retrieve details such as ID, week ID, sales quantity on Monday, sales quantity on Tuesday, sales quantity on Wednesday, sales quantity on Thursday, and sales quantity on Friday from the SALES_WEEK_DATA table.
- Build a transformation such that each record retrieved from the SALES_WEEK_DATA table is converted into multiple records for the EMP_SALES_INFO table. Hint: Use a pivoting INSERT statement.
h. Display the records from the EMP_SALES_INFO table.
9. You have the data of past employees stored in a flat file called emp.data. You want to store the names and email IDs of all employees, past and present, in a table. To do

Practice 4-1: Manipulating Large Data Sets (continued)
Oracle Database 11g: SQL Fundamentals II A - 50
this, first create an external table called EMP_DATA using the emp.dat source file in the emp_dir directory. Use the lab_04_09.sql script to do this.
10. Next, run the lab_04_10.sql script to create the EMP_HIST table.
a. Increase the size of the email column to 45.
b. Merge the data in the EMP_DATA table created in the last lab into the data in the EMP_HIST table. Assume that the data in the external EMP_DATA table is the most up-to-date. If a row in the EMP_DATA table matches the EMP_HIST table, update the email column of the EMP_HIST table to match the EMP_DATA table row. If a row in the EMP_DATA table does not match, insert it into the EMP_HIST table. Rows are considered matching when the employee’s first and last names are identical.
c. Retrieve the rows from EMP_HIST after the merge.
11. Create the EMP3 table by using the lab_04_11.sql script. In the EMP3 table, change the department for Kochhar to 60 and commit your change. Next, change the department for Kochhar to 50 and commit your change. Track the changes to Kochhar by using the Row Versions feature.

Oracle Database 11g: SQL Fundamentals II A - 51
Practice Solutions 4-1: Manipulating Large Data Sets
1. Run the lab_04_01.sql script in the lab folder to create the SAL_HISTORY table.
2. Display the structure of the SAL_HISTORY table. DESC sal_history
3. Run the lab_04_03.sql script in the lab folder to create the MGR_HISTORY table.
4. Display the structure of the MGR_HISTORY table. DESC mgr_history
5. Run the lab_04_05.sql script in the lab folder to create the SPECIAL_SAL table.
6. Display the structure of the SPECIAL_SAL table.
DESC special_sal
7. a) Write a query to do the following:
- Retrieve details such as the employee ID, hire date, salary, and manager ID of those employees whose employee ID is less than 125 from the EMPLOYEES table.
- If the salary is more than $20,000, insert details such as the employee ID and salary into the SPECIAL_SAL table.
- Insert details such as the employee ID, hire date, and salary into the SAL_HISTORY table.
- Insert details such as the employee ID, manager ID, and salary into the MGR_HISTORY table.
Practice Solutions 4-1: Manipulating Large Data Sets (continued)
Oracle Database 11g: SQL Fundamentals II A - 52
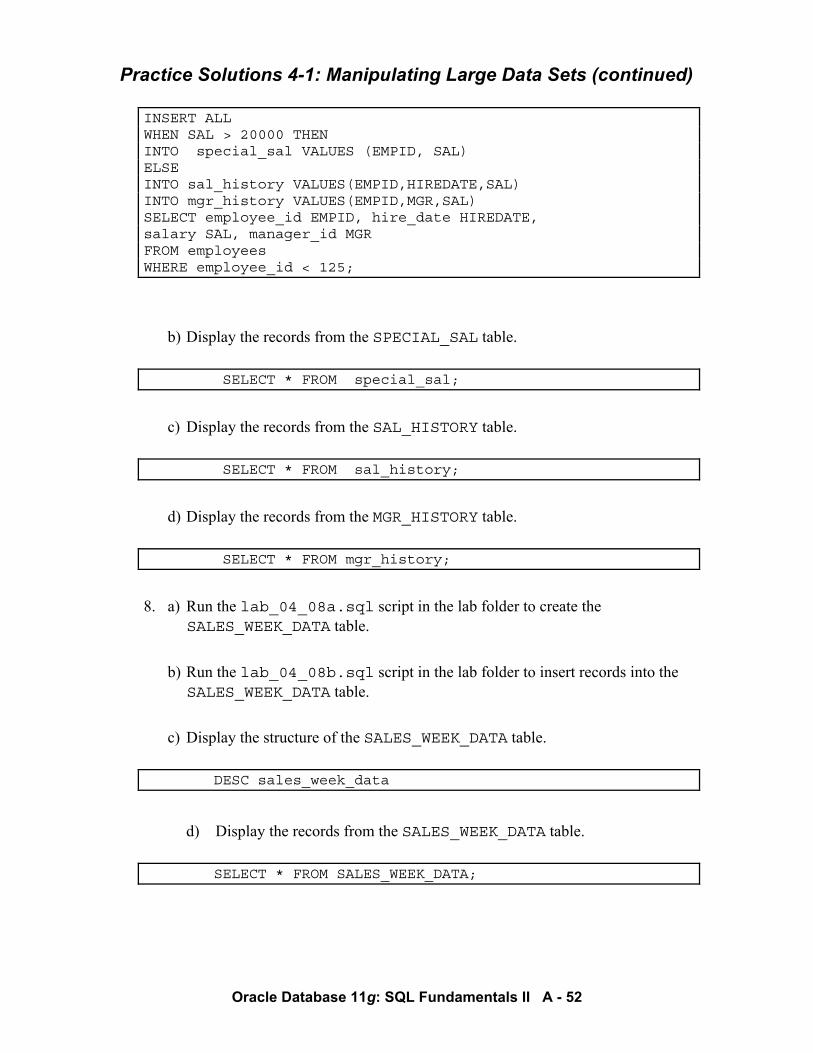
INSERT ALL WHEN SAL > 20000 THEN INTO special_sal VALUES (EMPID, SAL) ELSE INTO sal_history VALUES(EMPID,HIREDATE,SAL) INTO mgr_history VALUES(EMPID,MGR,SAL) SELECT employee_id EMPID, hire_date HIREDATE, salary SAL, manager_id MGR FROM employees WHERE employee_id < 125;
b) Display the records from the SPECIAL_SAL table. SELECT * FROM special_sal;
c) Display the records from the SAL_HISTORY table. SELECT * FROM sal_history;
d) Display the records from the MGR_HISTORY table. SELECT * FROM mgr_history;
8. a) Run the lab_04_08a.sql script in the lab folder to create the SALES_WEEK_DATA table.
b) Run the lab_04_08b.sql script in the lab folder to insert records into the SALES_WEEK_DATA table.
c) Display the structure of the SALES_WEEK_DATA table. DESC sales_week_data
d) Display the records from the SALES_WEEK_DATA table. SELECT * FROM SALES_WEEK_DATA;

Practice Solutions 4-1: Manipulating Large Data Sets (continued)
Oracle Database 11g: SQL Fundamentals II A - 53
e) Run the lab_04_08_e.sql script in the lab folder to create the EMP_SALES_INFO table.
f) Display the structure of the EMP_SALES_INFO table. DESC emp_sales_info
g) Write a query to do the following:
- Retrieve details such as the employee ID, week ID, sales quantity on Monday, sales quantity on Tuesday, sales quantity on Wednesday, sales quantity on Thursday, and sales quantity on Friday from the SALES_WEEK_DATA table.
- Build a transformation such that each record retrieved from the SALES_WEEK_DATA table is converted into multiple records for the EMP_SALES_INFO table. Hint: Use a pivoting INSERT statement.
INSERT ALL INTO emp_sales_info VALUES (id, week_id, QTY_MON) INTO emp_sales_info VALUES (id, week_id, QTY_TUE) INTO emp_sales_info VALUES (id, week_id, QTY_WED) INTO emp_sales_info VALUES (id, week_id, QTY_THUR) INTO emp_sales_info VALUES (id, week_id, QTY_FRI) SELECT ID, week_id, QTY_MON, QTY_TUE, QTY_WED, QTY_THUR,QTY_FRI FROM sales_week_data;
h) Display the records from the SALES_INFO table. SELECT * FROM emp_sales_info;

Practice Solutions 4-1: Manipulating Large Data Sets (continued)
Oracle Database 11g: SQL Fundamentals II A - 54
9. You have the data of past employees stored in a flat file called emp.data. You want to store the names and email IDs of all employees past and present in a table. To do this, first create an external table called EMP_DATA using the emp.dat source file in the emp_dir directory. You can use the script in lab_04_09.sql to do this.
CREATE TABLE emp_data (first_name VARCHAR2(20) ,last_name VARCHAR2(20) , email VARCHAR2(30) ) ORGANIZATION EXTERNAL ( TYPE oracle_loader DEFAULT DIRECTORY emp_dir ACCESS PARAMETERS ( RECORDS DELIMITED BY NEWLINE CHARACTERSET US7ASCII NOBADFILE NOLOGFILE FIELDS ( first_name POSITION ( 1:20) CHAR , last_name POSITION (22:41) CHAR , email POSITION (43:72) CHAR ) ) LOCATION ('emp.dat') ) ;
10. Next, run the lab_04_10.sql script to create the EMP_HIST table.
a) Increase the size of the email column to 45.
ALTER TABLE emp_hist MODIFY email varchar(45);
b) Merge the data in the EMP_DATA table created in the last lab into the data in
the EMP_HIST table. Assume that the data in the external EMP_DATA table is the most up-to-date. If a row in the EMP_DATA table matches the EMP_HIST table, update the email column of the EMP_HIST table to match the EMP_DATA table row. If a row in the EMP_DATA table does not match, insert it into the EMP_HIST table. Rows are considered matching when the employee’s first and last names are identical.
MERGE INTO EMP_HIST f USING EMP_DATA h ON (f.first_name = h.first_name AND f.last_name = h.last_name)

Practice Solutions 4-1: Manipulating Large Data Sets (continued)
Oracle Database 11g: SQL Fundamentals II A - 55
WHEN MATCHED THEN UPDATE SET f.email = h.email WHEN NOT MATCHED THEN INSERT (f.first_name , f.last_name , f.email) VALUES (h.first_name , h.last_name , h.email);
c) Retrieve the rows from EMP_HIST after the merge.
SELECT * FROM emp_hist; 11. Create the EMP3 table using the lab_04_11.sql script. In the EMP3 table,
change the department for Kochhar to 60 and commit your change. Next, change the department for Kochhar to 50 and commit your change. Track the changes to Kochhar using the Row Versions feature.
UPDATE emp3 SET department_id = 60 WHERE last_name = ‘Kochhar’; COMMIT; UPDATE emp3 SET department_id = 50 WHERE last_name = ‘Kochhar’; COMMIT;
SELECT VERSIONS_STARTTIME "START_DATE", VERSIONS_ENDTIME "END_DATE", DEPARTMENT_ID FROM EMP3 VERSIONS BETWEEN SCN MINVALUE AND MAXVALUE WHERE LAST_NAME ='Kochhar';

Oracle Database 11g: SQL Fundamentals II A - 56
Practices and Solutions for Lesson 5
Practice 5-1: Managing Data in Different Time Zones In this practice, you display time zone offsets, CURRENT_DATE, CURRENT_TIMESTAMP, and LOCALTIMESTAMP. You also set time zones and use the EXTRACT function.
1. Alter the session to set NLS_DATE_FORMAT to DD-MON-YYYY HH24:MI:SS.
2. a. Write queries to display the time zone offsets (TZ_OFFSET) for the following time zones.
- US/Pacific-New
- Singapore
- Egypt
b. Alter the session to set the TIME_ZONE parameter value to the time zone offset of US/Pacific-New.
c. Display CURRENT_DATE, CURRENT_TIMESTAMP, and LOCALTIMESTAMP for this session.
d. Alter the session to set the TIME_ZONE parameter value to the time zone offset of Singapore.
e. Display CURRENT_DATE, CURRENT_TIMESTAMP, and LOCALTIMESTAMP for this session.
Note: The output might be different based on the date when the command is executed.
Note: Observe in the preceding practice that CURRENT_DATE, CURRENT_TIMESTAMP, and LOCALTIMESTAMP are sensitive to the session time zone.
3. Write a query to display DBTIMEZONE and SESSIONTIMEZONE.
4. Write a query to extract the YEAR from the HIRE_DATE column of the EMPLOYEES
table for those employees who work in department 80.

Practice 5-1: Managing Data in Different Time Zones (continued)
Oracle Database 11g: SQL Fundamentals II A - 57
5. Alter the session to set NLS_DATE_FORMAT to DD-MON-YYYY.
6. Examine and run the lab_05_06.sql script to create the SAMPLE_DATES table and populate it.
a. Select from the table and view the data.
b. Modify the data type of the DATE_COL column and change it to TIMESTAMP. Select from the table to view the data.
c. Try to modify the data type of the DATE_COL column and change it to TIMESTAMP WITH TIME ZONE. What happens?
7. Create a query to retrieve last names from the EMPLOYEES table and calculate the review status. If the year hired was 1998, display Needs Review for the review status; otherwise, display not this year! Name the review status column Review. Sort the results by the HIRE_DATE column. Hint: Use a CASE expression with the EXTRACT function to calculate the review status.
…

Practice 5-1: Managing Data in Different Time Zones (continued)
Oracle Database 11g: SQL Fundamentals II A - 58
8. Create a query to print the last names and the number of years of service for each employee. If the employee has been employed for five or more years, print 5 years of service. If the employee has been employed for 10 or more years, print 10 years of service. If the employee has been employed for 15 or more years, print 15 years of service. If none of these conditions match, print maybe next year! Sort the results by the HIRE_DATE column. Use the EMPLOYEES table. Hint: Use CASE expressions and TO_YMINTERVAL.
...

Oracle Database 11g: SQL Fundamentals II A - 59
Practice Solutions 5-1: Managing Data in Different Time Zones
1. Alter the session to set NLS_DATE_FORMAT to DD-MON-YYYY HH24:MI:SS.
ALTER SESSION SET NLS_DATE_FORMAT = 'DD-MON-YYYY HH24:MI:SS';
2. a. Write queries to display the time zone offsets (TZ_OFFSET) for the following time zones: US/Pacific-New, Singapore, and Egypt.
US/Pacific-New SELECT TZ_OFFSET ('US/Pacific-New') from dual;
Singapore SELECT TZ_OFFSET ('Singapore') from dual;
Egypt SELECT TZ_OFFSET ('Egypt') from dual;
b. Alter the session to set the TIME_ZONE parameter value to the time zone offset of US/Pacific-New.
ALTER SESSION SET TIME_ZONE = '-7:00';
c. Display CURRENT_DATE, CURRENT_TIMESTAMP, and LOCALTIMESTAMP for this session. Note: The output may be different based on the date when the command is executed.
SELECT CURRENT_DATE, CURRENT_TIMESTAMP, LOCALTIMESTAMP FROM DUAL;
d. Alter the session to set the TIME_ZONE parameter value to the time zone offset of Singapore.
ALTER SESSION SET TIME_ZONE = '+8:00';
e. Display CURRENT_DATE, CURRENT_TIMESTAMP, and LOCALTIMESTAMP for this session. Note: The output might be different, based on the date when the command is executed.
SELECT CURRENT_DATE, CURRENT_TIMESTAMP, LOCALTIMESTAMP FROM DUAL;

Practice Solutions 5-1: Managing Data in Different Time Zones (continued)
Oracle Database 11g: SQL Fundamentals II A - 60
Note: Observe in the preceding practice that CURRENT_DATE, CURRENT_TIMESTAMP, and LOCALTIMESTAMP are all sensitive to the session time zone.
3. Write a query to display DBTIMEZONE and SESSIONTIMEZONE.
SELECT DBTIMEZONE,SESSIONTIMEZONE FROM DUAL;
4. Write a query to extract YEAR from the HIRE_DATE column of the EMPLOYEES table for those employees who work in department 80.
SELECT last_name, EXTRACT (YEAR FROM HIRE_DATE) FROM employees WHERE department_id = 80;
5. Alter the session to set NLS_DATE_FORMAT to DD-MON-YYYY.
ALTER SESSION SET NLS_DATE_FORMAT = 'DD-MON-YYYY';
6. Examine and run the lab_05_06.sql script to create the SAMPLE_DATES table and populate it.
a. Select from the table and view the data.
SELECT * FROM sample_dates;
b. Modify the data type of the DATE_COL column and change it to TIMESTAMP.
Select from the table to view the data.
ALTER TABLE sample_dates MODIFY date_col TIMESTAMP; SELECT * FROM sample_dates;
c. Try to modify the data type of the DATE_COL column and change it to
TIMESTAMP WITH TIME ZONE. What happens?
ALTER TABLE sample_dates MODIFY date_col TIMESTAMP WITH TIME ZONE;

Practice Solutions 5-1: Managing Data in Different Time Zones (continued)
Oracle Database 11g: SQL Fundamentals II A - 61
You are unable to change the data type of the DATE_COL column because the Oracle server does not permit you to convert from TIMESTAMP to TIMESTAMP WITH TIMEZONE by using the ALTER statement.
7. Create a query to retrieve last names from the EMPLOYEES table and calculate the review status. If the year hired was 1998, display Needs Review for the review status; otherwise, display not this year! Name the review status column Review. Sort the results by the HIRE_DATE column. Hint: Use a CASE expression with the EXTRACT function to calculate the review status.
SELECT e.last_name , (CASE extract(year from e.hire_date) WHEN 1998 THEN 'Needs Review' ELSE 'not this year!' END ) AS "Review " FROM employees e ORDER BY e.hire_date;
8. Create a query to print the last names and the number of years of service for each
employee. If the employee has been employed five or more years, print 5 years of service. If the employee has been employed 10 or more years, print 10 years of service. If the employee has been employed 15 or more years, print 15 years of service. If none of these conditions match, print maybe next year! Sort the results by the HIRE_DATE column. Use the EMPLOYEES table. Hint: Use CASE expressions and TO_YMINTERVAL. SELECT e.last_name, hire_date, sysdate, (CASE WHEN (sysdate -TO_YMINTERVAL('15-0'))>= hire_date THEN '15 years of service' WHEN (sysdate -TO_YMINTERVAL('10-0'))>= hire_date THEN '10 years of service' WHEN (sysdate - TO_YMINTERVAL('5-0'))>= hire_date THEN '5 years of service' ELSE 'maybe next year!' END) AS "Awards" FROM employees e;

Oracle Database 11g: SQL Fundamentals II A - 62
Practices and Solutions for Lesson 6
Practice 6-1: Retrieving Data by Using Subqueries In this practice, you write multiple-column subqueries, and correlated and scalar subqueries. You also solve problems by writing the WITH clause.
1. Write a query to display the last name, department number, and salary of any employee whose department number and salary both match the department number and salary of any employee who earns a commission.
2. Display the last name, department name, and salary of any employee whose salary and commission match the salary and commission of any employee located in location ID 1700.
3. Create a query to display the last name, hire date, and salary for all employees who have the same salary and commission as Kochhar.
Note: Do not display Kochhar in the result set.
4. Create a query to display the employees who earn a salary that is higher than the salary of all the sales managers (JOB_ID = 'SA_MAN'). Sort the results from the highest to the lowest.

Practice 6-1: Retrieving Data by Using Subqueries (continued)
Oracle Database 11g: SQL Fundamentals II A - 63
5. Display details such as the employee ID, last name, and department ID of those employees who live in cities the names of which begin with T.
6. Write a query to find all employees who earn more than the average salary in their
departments. Display last name, salary, department ID, and the average salary for the department. Sort by average salary and round to two decimals. Use aliases for the columns retrieved by the query as shown in the sample output.
7. Find all employees who are not supervisors.
a. First, do this using the NOT EXISTS operator.

Practice 6-1: Retrieving Data by Using Subqueries (continued)
Oracle Database 11g: SQL Fundamentals II A - 64
b. Can this be done by using the NOT IN operator? How, or why not?
8. Write a query to display the last names of the employees who earn less than the average salary in their departments.
9. Write a query to display the last names of the employees who have one or more coworkers in their departments with later hire dates but higher salaries.
10. Write a query to display the employee ID, last names, and department names of all the employees. Note: Use a scalar subquery to retrieve the department name in the SELECT statement.
…

Practice 6-1: Retrieving Data by Using Subqueries (continued)
Oracle Database 11g: SQL Fundamentals II A - 65
11. Write a query to display the department names of those departments whose total
salary cost is above one-eighth (1/8) of the total salary cost of the whole company. Use the WITH clause to write this query. Name the query SUMMARY.

Oracle Database 11g: SQL Fundamentals II A - 66
Practice Solutions 6-1: Retrieving Data by Using Subqueries
1. Write a query to display the last name, department number, and salary of any employee whose department number and salary match the department number and salary of any employee who earns a commission.
SELECT last_name, department_id, salary FROM employees WHERE (salary, department_id) IN (SELECT salary, department_id FROM employees WHERE commission_pct IS NOT NULL);
2. Display the last name, department name, and salary of any employee whose salary and commission match the salary and commission of any employee located in location ID1700.
SELECT e.last_name, d.department_name, e.salary FROM employees e, departments d WHERE e.department_id = d.department_id AND (salary, NVL(commission_pct,0)) IN (SELECT salary, NVL(commission_pct,0) FROM employees e, departments d WHERE e.department_id = d.department_id AND d.location_id = 1700);
3. Create a query to display the last name, hire date, and salary for all employees who have the same salary and commission as Kochhar.
Note: Do not display Kochhar in the result set.
SELECT last_name, hire_date, salary FROM employees WHERE (salary, NVL(commission_pct,0)) IN (SELECT salary, NVL(commission_pct,0) FROM employees WHERE last_name = 'Kochhar') AND last_name != 'Kochhar';
4. Create a query to display the employees who earn a salary that is higher than the salary of all the sales managers (JOB_ID = 'SA_MAN'). Sort the results on salary from the highest to the lowest.
SELECT last_name, job_id, salary FROM employees WHERE salary > ALL (SELECT salary FROM employees WHERE job_id = 'SA_MAN') ORDER BY salary DESC;

Practice Solutions 6-1: Retrieving Data by Using Subqueries (continued)
Oracle Database 11g: SQL Fundamentals II A - 67
5. Display details such as the employee ID, last name, and department ID of those employees who live in cities the names of which begin with T.
SELECT employee_id, last_name, department_id FROM employees WHERE department_id IN (SELECT department_id FROM departments WHERE location_id IN (SELECT location_id FROM locations WHERE city LIKE 'T%'));
6. Write a query to find all employees who earn more than the average salary in their departments. Display last name, salary, department ID, and the average salary for the department. Sort by average salary. Use aliases for the columns retrieved by the query as shown in the sample output.
SELECT e.last_name ename, e.salary salary, e.department_id deptno, AVG(a.salary) dept_avg FROM employees e, employees a WHERE e.department_id = a.department_id AND e.salary > (SELECT AVG(salary) FROM employees WHERE department_id = e.department_id ) GROUP BY e.last_name, e.salary, e.department_id ORDER BY AVG(a.salary);

Practice Solutions 6-1: Retrieving Data by Using Subqueries (continued)
Oracle Database 11g: SQL Fundamentals II A - 68
7. Find all employees who are not supervisors.
a. First, do this by using the NOT EXISTS operator.
SELECT outer.last_name FROM employees outer WHERE NOT EXISTS (SELECT 'X' FROM employees inner WHERE inner.manager_id = outer.employee_id);
b. Can this be done by using the NOT IN operator? How, or why not?
SELECT outer.last_name FROM employees outer WHERE outer.employee_id NOT IN (SELECT inner.manager_id FROM employees inner);
This alternative solution is not a good one. The subquery picks up a NULL value, so the entire query returns no rows. The reason is that all conditions that compare a NULL value result in NULL. Whenever NULL values are likely to be part of the value set, do not use NOT IN as a substitute for NOT EXISTS.
8. Write a query to display the last names of the employees who earn less than the average salary in their departments.
SELECT last_name FROM employees outer WHERE outer.salary < (SELECT AVG(inner.salary) FROM employees inner WHERE inner.department_id = outer.department_id);

Practice Solutions 6-1: Retrieving Data by Using Subqueries (continued)
Oracle Database 11g: SQL Fundamentals II A - 69
9. Write a query to display the last names of employees who have one or more coworkers in their departments with later hire dates but higher salaries.
SELECT last_name FROM employees outer WHERE EXISTS (SELECT 'X' FROM employees inner WHERE inner.department_id = outer.department_id AND inner.hire_date > outer.hire_date AND inner.salary > outer.salary);
10. Write a query to display the employee ID, last names, and department names of all employees.
Note: Use a scalar subquery to retrieve the department name in the SELECT statement.
SELECT employee_id, last_name, (SELECT department_name FROM departments d WHERE e.department_id = d.department_id ) department FROM employees e ORDER BY department;
11. Write a query to display the department names of those departments whose total salary cost is above one-eighth (1/8) of the total salary cost of the whole company. Use the WITH clause to write this query. Name the query SUMMARY.
WITH summary AS ( SELECT d.department_name, SUM(e.salary) AS dept_total FROM employees e, departments d WHERE e.department_id = d.department_id GROUP BY d.department_name) SELECT department_name, dept_total FROM summary WHERE dept_total > ( SELECT SUM(dept_total) * 1/8 FROM summary ) ORDER BY dept_total DESC;

Oracle Database 11g: SQL Fundamentals II A - 70
Practices and Solutions for Lesson 7
Practice 7-1: Regular Expression Support In this practice, you use regular expressions functions to search for, replace, and manipulate data. You also create a new CONTACTS table and add a CHECK constraint to the p_number column to ensure that phone numbers are entered into the database in a specific standard format. 1. Write a query to search the EMPLOYEES table for all the employees whose first
names start with “Ki” or “Ko.”
2. Create a query that removes the spaces in the STREET_ADDRESS column of the
LOCATIONS table in the display. Use “Street Address” as the column heading.
3. Create a query that displays “St” replaced by “Street” in the STREET_ADDRESS
column of the LOCATIONS table. Be careful that you do not affect any rows that already have “Street” in them. Display only those rows that are affected.
4. Create a contacts table and add a check constraint to the p_number column to
enforce the following format mask to ensure that phone numbers are entered into the database in the following standard format: (XXX) XXX-XXXX. The table should have the following columns:
- l_name varchar2(30) - p_number varchar2 (30)

Practice 7-1: Regular Expression Support (continued)
Oracle Database 11g: SQL Fundamentals II A - 71
5. Run the SQL script lab_07_05.sql to insert the following seven phone numbers into the contacts table. Which numbers are added?
6. Write a query to find the number of occurrences of the DNA pattern ctc in the string
gtctcgtctcgttctgtctgtcgttctg. Ignore case-sensitivity.
l_name Column Value p_number Column Value
NULL ‘(650) 555-5555’
NULL ‘(215) 555-3427’
NULL ‘650 555-5555’
NULL ‘650 555 5555’
NULL ‘650-555-5555’
NULL ‘(650)555-5555’
NULL ‘ (650) 555-5555’

Oracle Database 11g: SQL Fundamentals II A - 72
Practice Solutions 7-1: Regular Expression Support
1. Write a query to search the EMPLOYEES table for all employees whose first names start with “Ki” or “Ko.”
SELECT first_name, last_name FROM employees WHERE REGEXP_LIKE (last_name, '^K(i|o).');
2. Create a query that removes the spaces in the STREET_ADDRESS column of the LOCATIONS table in the display. Use “Street Address” as the column heading.
SELECT regexp_replace (street_address, ' ', '') AS "Street Address" FROM locations;
3. Create a query that displays “St” replaced by “Street” in the STREET_ADDRESS
column of the LOCATIONS table. Be careful that you do not affect any rows that already have “Street” in them. Display only those rows, which are affected.
SELECT regexp_replace (street_address, 'St$', 'Street') FROM locations WHERE regexp_like (street_address, 'St');
4. Create a contacts table and add a check constraint to the p_number column to
enforce the following format mask to ensure that phone numbers are entered into the database in the following standard format: (XXX) XXX-XXXX. The table should have the following columns: • l_name varchar2(30) • p_number varchar2 (30)
CREATE TABLE contacts ( l_name VARCHAR2(30), p_number VARCHAR2(30) CONSTRAINT p_number_format CHECK ( REGEXP_LIKE ( p_number, '^\(\d{3}\) \d{3}-\d{4}$' ) ) );

Practice Solutions 7-1: Regular Expression Support (continued)
Oracle Database 11g: SQL Fundamentals II A - 73
5. Run the lab_07_05.sql SQL script to insert the following seven phone numbers into the contacts table. Which numbers are added?
Only the first two INSERT statements use a format that conforms to the c_contacts_pnf constraint; the remaining statements generate CHECK constraint errors.
6. Write a query to find the number of occurrences of the DNA pattern ctc in the string gtctcgtctcgttctgtctgtcgttctg. Use the alias Count_DNA. Ignore case-sensitivity.
SELECT REGEXP_COUNT('gtctcgtctcgttctgtctgtcgttctg','ctc') AS Count_DNA FROM dual;

Practice Solutions 7-1: Regular Expression Support (continued)
Oracle Database 11g: SQL Fundamentals II A - 74