appendix b configuring and using internet information...
TRANSCRIPT

Burrows & Langford – Appendix B page 1 Learning Programming Using VISUAL BASIC .NET
APPENDIX B Configuring and Using Internet Information Services (IIS) Server
Visual Basic .NET has extensive support for developing web-based applications that range from simple HTML pages bound together by scripts to comprehensive e-commerce applications that use elaborate business rules. These applications are built around ASP.NET, which is a technology for developing and deploying applications on a web server, and it is an integral part of the .Net framework. These applications run on the Microsoft Internet Information Services (IIS) web server.
In this appendix we describe the use of the IIS server in web applications. We first start with an introduction to the IIS server, followed by a description of the various configurations that will enable you to use an IIS server to host web based applications. Visual Basic .NET performs most of the interaction with the IIS server; nevertheless it is useful to know the working of the server and the various options that are available when building web applications. We also present the differences between web servers on a local machine versus remote servers that are controlled by a central authority. IIS Web Server Installation
IIS Web Server is the web server provided by Microsoft for platforms running the various versions of the Windows Operating system. It is installed by default and running on server platforms like NT4 server and Windows 2000 server. IIS Server is not installed by default on workstation platforms like Windows 2000 Professional, Windows XP Professional, and Windows NT workstation. To install IIS Server on workstation platforms you need to install it through the additional Windows Components that are available through the control panel. In the Figure B.1 we show the installation of IIS Server on a workstation machine.
Figure B.1 shows the installation options for IIS Server on Workstations
To access the Windows Components Wizard, you need to first go to the “Control Panel”, then click on “Add or Remove Programs”, and then select “Add/Remove Windows Components”. To start the installation you need to check the box adjacent to
03/15/02 Draft

Burrows & Langford – Appendix B page 2 Learning Programming Using VISUAL BASIC .NET
Internet Information Services (IIS) and then click on “Next >” and follow the installation instructions.
After installation of the IIS Server it is necessary to check if the server is running on your machine. The easiest way to check for the presence of IIS Server is to use the Internet Explorer browser. To do this, open a web browser and type http://localhost or http://[machinename], where [machinename] is the name of your machine. The web site can also be accessed using the IP Address of the machine. Each machine has a unique IP address that is used to identify it on the network. To connect to your local machine using an IP address, type http://127.0.0.1 on your browser. This is a special address and it is always used to represent the local machine’s IP address. By doing this you are trying to access the web server running on your machine. Figure B.2 below shows a snapshot of the screen if IIS Server is running on your machine.
Figure B.2 Snapshot of Internet Explorer Windows with IIS running
One of the windows refers to the documentation available with the web server. The second window brings up a default page that describes the status of the web server. This page contains information about the default pages that are acceptable to the web server and the location of the files that belong to the web server. In most of the cases, web site related files are stored in the “/inetpub/wwwroot” folder on your local hard-drive. If you try to access this web server from another machine by typing http://[machine name] on the web browser, you will see an “Under Construction” page. This is displayed because you have not yet build a web page that will be displayed automatically to users connecting to our web server. Later in the appendix we will describe how to add web pages to the web server that can be seen by users trying to access your web server from other machines. Controlling and Configuring IIS Web Server
To configure the IIS web server open the Internet Services Manager from the “Control Panel” go to “Administrative Tools” and double click on “Internet Information Services”.
03/15/02 Draft

Burrows & Langford – Appendix B page 3 Learning Programming Using VISUAL BASIC .NET
The Internet Services Manager provides configuration options to start or stop the local web server, and to configure the various web sites that are available through the web server. The tool’s interface is divided into two adjacent frames. Figure B.3 shows the Default Web Site and other associated files that are initially created when IIS is installed.
Figure B.3 Default files on a web server
At this point it is possible to perform many simple actions like stopping/starting the server, creating default files for web pages, and renaming files. These actions can be performed by either clicking on the menu items in the window or by right-clicking on the Default Web Site. Figure B.4 shows how to stop the currently running web server.
03/15/02 Draft

Burrows & Langford – Appendix B page 4 Learning Programming Using VISUAL BASIC .NET
Figure B.4 Stopping the Web Server on local machine
When the web server is stopped, the web site is no longer available for anyone trying to connect to it and similarly the web applications that are developed are no longer accessible to users. Clicking on the Start button restarts the web server. Note that the options available through the popup menu and through the Action menu depend on the current selection in the left pane. For example if you right click on “local computer”, a different menu pops up. Virtual Directories
A virtual directory is an alias for a physical directory and it supports the creation of websites with different names and in different directories than the default Inetpub/wwwroot directory. This feature increases the security of the web server by hiding the actual names of the folders, and also allows more flexibility in storing the web site on the machine. The default location for the server website (home directory) is “Inetpub\wwwroot” on the system drive (the drive where Windows is installed – usually the “C:\” drive). Any folder that is created within that folder will automatically be added as a virtual directory to the web server’s default web site.
We can also specify the default homepage for the virtual directory, which will allow us to type the address of the virtual directory name without specifying the file name. The following example shows how to create a new folder under the “c:\inetpub\wwwroot”, setting up the default page for that virtual directory, and viewing a web page created in that folder using an http address.
03/15/02 Draft

Burrows & Langford – Appendix B page 5 Learning Programming Using VISUAL BASIC .NET
Example B.1 Creating new folder in “c:\inetpub\wwwroot” We begin by creating a new folder under c:\inetpub\wwwroot called “VDirDemo”
using the Windows Explorer. In this folder we place a new file called “welcome.html” that has the following HTML code:
<html> <body> <h3><center>Welcome to my virtual directory</center></h3> </body> </html>
Figure B.5 shows the Windows Explorer with the physical folder structure and the Internet Services Manager. You can see that the “VDirDemo” folder we created in “c:\inetpub\wwwroot” was added automatically to the virtual directories list in the Internet Services Manager.
Figure B.5 Creation of virtual directory
To set the file named “welcome.html” to be the default page in the VDirDemo virtual directory, use the Internet Services Manager, right-click on the VDirDemo icon and select “Properties”. Then select the “Documents” tab and click on the “Add” button. Figure B.6 shows VDirDemo Properties window. You can see in the figure that IIS already has file names that are used as default pages for the virtual directory. You can set the priority of the default page by using the arrows on the left of the file names list (top element has the highest priority).
03/15/02 Draft

Burrows & Langford – Appendix B page 6 Learning Programming Using VISUAL BASIC .NET
Figure B.6 Virtual directory properties window
In Figure B.7 we see the result of calling the virtual directory in the browser without specifying the file name. You can see that the default page has been displayed.
03/15/02 Draft

Burrows & Langford – Appendix B page 7 Learning Programming Using VISUAL BASIC .NET
Figure B.7 Default page in the virtual directory.
Example B.2 Creating a Virtual Directory Outside the Inetpub\wwwroot location
This example shows how to create a new virtual directory using the Virtual Directory Wizard and map it to a folder that exist outside of the root path “c:\inetpub\wwwroot”. We start by creating a folder named “ActualDir” on the “C:\” drive. We then place in that folder the “welcome.html” which we modify to say “Welcome to my page that is located in "C:\ActualDir". In the Internet Services Manager, we right-click on the default website folder and select “New” then “Virtual Directory…”. In the wizard that is opened for us we choose “VDir” as the alias and “C:\ActualDir" as the location (see Figure B.8.)
03/15/02 Draft

Burrows & Langford – Appendix B page 8 Learning Programming Using VISUAL BASIC .NET
Figure B.8 Virtual Directory Creation Wizard – Selecting physical folder
Continue to click through the wizard. When it’s done you can view the web page you saved (see Figure B.9) in "C:\ActualDir" using the following address:
http://localhost/VDir/welcome.html
Figure B.9 The default web page in the browser
03/15/02 Draft

Burrows & Langford – Appendix B page 9 Learning Programming Using VISUAL BASIC .NET
Remote Server Configuration The Internet Services Manager allows administration of web sites located on a
remote machine. It is quite common in a corporate network or even in a local network inside a University to have a web server on a machine different from the local machine. To configure IIS web server on a remote machine or to deploy web applications or web services you will need to have administrative privileges on that machine. To configure a remote machine, you will need to connect to that machine; once you are connected you can perform operations on the remote machine as you did on your local machine. Figure B.10 shows how to connect to remote machine using Internet Services Manager.
Figure B.10 Snapshot of Internet Services Manager to connect to a remote machine
If you have the necessary permissions, the Internet Services Manager provides the entire configuration options that are available on a local machine. Figure B.11 shows a snapshot of the Management Window that is connected two different machines. One of them is a local machine and the other one is a remote machine.
03/15/02 Draft

Burrows & Langford – Appendix B page 10 Learning Programming Using VISUAL BASIC .NET
Figure B.11 Internet Services Manager view of both a remote and a local machine
connection Moving A Web Application To Another Computer
If you want to move a web application from one computer to another to do development, there are several steps you must take so that the process works correctly. First, you should create your original project folder within the Inetpub/wwwroot directory. We have found that it is difficult to move a project to another computer if that project is not originally stored in Inetpub/wwwroot. Second, you need to be sure that the project solution file (.sln) is stored in the same folder as the other files that are part of the project. You should review the discussion in Section 11.2 for details.
Assuming that the original project satisfies the two requirements described above, you need to make a copy of the project folder and then place this copy in the Inetpub/wwwroot folder on the machine where you are moving the project to. Once you have done this, you need to make the project a new virtual site. To do this, right-click on the Default site icon in the Internet Services Manager and select New Virtual Directory…. Figure B.12 shows this action.
03/15/02 Draft

Burrows & Langford – Appendix B page 11 Learning Programming Using VISUAL BASIC .NET
Figure B.12 Adding a new project into IIS
After doing this, you will see the Virtual Directory Creation Wizard. Figure B.13 shows the second pane from this wizard. You should enter the name of the project that you used on the original machine. In this figure we see “Example1105” used as the alias.
Figure B.13 Defining the alias for the copy of the project
03/15/02 Draft
Burrows & Langford – Appendix B page 12 Learning Programming Using VISUAL BASIC .NET
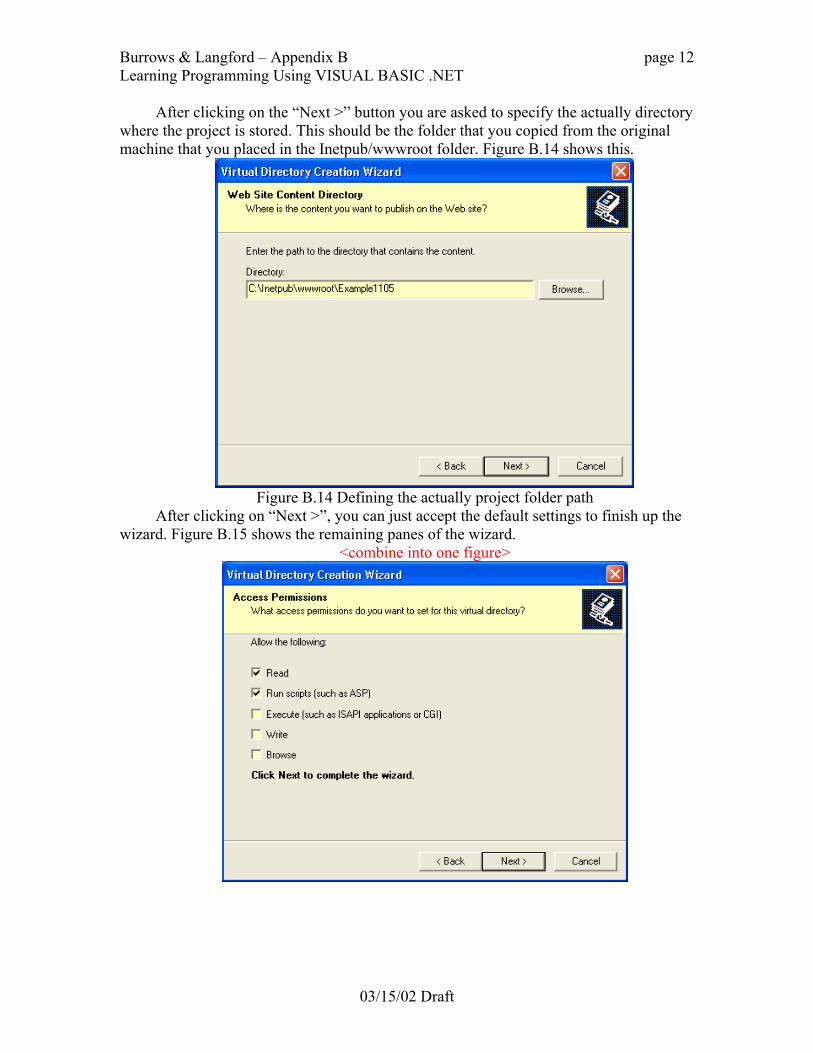
After clicking on the “Next >” button you are asked to specify the actually directory where the project is stored. This should be the folder that you copied from the original machine that you placed in the Inetpub/wwwroot folder. Figure B.14 shows this.
Figure B.14 Defining the actually project folder path
After clicking on “Next >”, you can just accept the default settings to finish up the wizard. Figure B.15 shows the remaining panes of the wizard.
<combine into one figure>
03/15/02 Draft

Burrows & Langford – Appendix B page 13 Learning Programming Using VISUAL BASIC .NET
03/15/02 Draft
Figure B.15 Final panes of the Virtual Directory Creation Wizard
After creating the new virtual directory, you need to stop and then restart the IIS server. You do this by first selecting the Default Web Site and click on the Stop and Start icons. Figure B.16 shows these icons.
Start Stop
Figure B.16 Stopping/Starting the IIS server
Two final points about moving a development project from one computer to another are in order. First, you may have to define the startup wed form the first time you try to run your project on the new machine. This is done by right-clicking on the web form and selecting “Select as Start Page” from the pop-up menu. Second, if your project uses a database served with MSDE on the original local computer, you will need to establish a new connection to the MSDE server on the new local computer. This connection will have to be linked to the OleDbDataAdapter.