application guide for the and practum series of models
TRANSCRIPT

Density
CountingConversion
Unstable Conditions
Weighing in Percent
Peak HoldCheckweighing
Statistics
Application Guide for the Secura®, Quintix® and Practum® Series of Models Getting Started Quickly
ComponentsWeighing Mixing

The Touch Screen on Your Balance
1 Toolbar showing currently available buttons: Zeroing, taring, GLP protocol, printing (data output)
2 Line for metrological specifications3 Alert icon indicating calculated values4 Current weight or value measured5 Key for toggling between the weight unit and display accuracy6 Key for running an application7 Application toolbar: Default settings for the selected application8 Menu key: For toggling to the selection mode for applications
and functions9 Secura® models: Minimum sample quantity SQmin10 Bar graph: Scaled display showing capacity usage (in percent)11 Plus (or minus) sign of the weight12 Key for toggling between various display modes of a weight13 Field for displaying the operating status and warnings
Start-up Wizard
When the device is turned on for the first time, a wizard is automatically called up. Follow the instructions on the interactive display in order to make the following settings: Language, date, time, date and time format.
If required, you can subsequently modify your selection in the “Settings” menu.
Access the adjustment function by touching “CAL”.
Quick Access to Calibration and Adjustment You will need to perform the combined calibration and adjustment procedure the first time you operate the balance, each time after changing it to a different location and at regular intervals during operation. If you are using a Practum® series balance, you will have to do this manually as described below. The Secura® and Quintix® series perform this procedure fully automatically.
For external adjustment, touch “CAL-Extern”.
Set the balance to zero by touching A and then w. Place the displayed calibration weight in the middle of the weighing pan. The balance adjusts itself automatically and then switches to the operation mode.
Leveling To ensure accurate measurement results, you need to level the balance each time after you have moved to a different location.
Secura® BalancesWhen “LEVEL” appears on the display, you must level the balance. Make sure that the weighing pan is unloaded. Press “LEVEL”Follow the instructions on the interactive display.
Quintix® and Practum® BalancesTurn the two leveling feet as shown in the illustration until the air bubble is centered within the circle of the level indicator.
1
2
3
4
5
6
13
12
11
109
8
7

Getting Started Quickly Initial Operation of Balances with a Draft Shield
Set out the following parts in the order listed:
− In-use dust cover − Turn the draft shield
lock to “unlocked” . − Place the draft shield
(1) on the balance. Note: Use both hands to hold the top struts of the draft shield.
− Slide the side doors all the way to the back.
− Turn the draft shield lock to “locked” .
− Position the shield plate (2), centering ring* (3), pan support (4) and weighing pan (5) and draft ring* (6) on the balance.
Note: For information about how to clean the draft shield, see Chapter “Care and Maintenance” in the installation instructions.
* only for Secura® models with 0.1 mg readability
Secura® Balances
Quintix® and Practum® Balances
Secura®, Quintix® and Practum®
Models 64 / 124 / 224 / 213 / 313 / 513 / 613 / 1103
Initial Operation of Balances Without a Draft Shield
Set out the following parts in the order listed:
1 In-use dust cover
2 Position the shield disk (1) and turn it clockwise until it is locked securely in place.
3 Position the pan support (2) and the weighing pan (3).
You will find detailed information about getting started in the installation instructions or detailed User Manual.
1. Insert the front panel − Open the cover. − Insert the top and bottom
panels.
2. Insert the side panels − Insert the panels into the
draft shield guide.
3. Insert the top panel − Position the panel on
the guide of the draft shield and push the panel towards the rear.
5. Place the following parts in sequence into the weighing chamber:
− Collection container − One of the two shield
disks (1 or 2) − Weighing pan (3)
4. Insert the collection container and the weighing pan
− First, put the collection container, and then the weighing pan in place.
Secura® and Quintix® Models 26 / 35 / 65 / 125 / 125D / 225D / 324
Model Secura® 26:

Quick Six-Step Guide to Applications
Counting
Mixing**
Components**
Familiarize yourself with the capabilities of your Sartorius balance and start off by counting identical parts. The balance will show you the quantity and the total weight.
Say you have a formula and need to weigh in various components quickly with 100% traceability, without losing track of the total weight. Use the “Mixing” application.
Do you need to compound components according to a formula, but don’t want to mix them immediately? With the application “Components” you can weigh the individual components in different containers and query the total weight at any time.
Touch the menu key to access the selection mode for applications and select “Counting”.
Touch the menu key to access the selection mode for applications and select “Mixing”.
Touch the menu key to access the selection mode for applications and select “Components”.
1
1
1
Place the empty collection container on the balance and tare it with D.
Place the empty container on the balance and tare the container weight with D.
Place the first empty container on the balance and tare it with D. Then weigh-in component 1 and save the value in the memory by touching v.
2
2
2
*
*
*
* To view videos of these applications, scan in our QR code or visit http://www.sartorius.com/manual-secura
** Available in Quintix® and Secura®

Put the reference number of pieces (the default is: 10 pcs) into the container and press w.
Fill the first component into the container and save the component by touching v.
3
3
3
The number of reference pieces put in is displayed. Fill the entire quantity into the container.
Fill the next component and save it by touching v.
4
4
4
The display of the balance shows the piece count of the sample. Touch “Qnt”, to view the total weight.
The total weight of the sample is displayed.
If required, you can fill in additional components. Touch “Net1” to view the total weight.
5 6
5
5 6
The total weight is displayed. If required, you can fill in additional components.
6
Remove the first sample from the balance and the weight value will jump to a negative value.
Now place a new container on the balance and tare it with D. You can then fill in component 2 and confirm with v.
Repeat this procedure to weigh-in any additional samples. To display the values which have been added up touch “Net”.
The sum of all components which have been saved will be displayed.

Statistics**
Density
Unstable Conditions
Would you like to save statistics on an entire group of different samples? Your Sartorius balance will transfer the readings to its statistics memory and generate a report on the key statistical parameters.
Do you want to determine the density of a solid, irregularly-shaped object precisely? Use the application “Density” and the Sartorius density determination kit to precisely calculate, for example, the quality of parts made of precious metals and plastics.
Do you have to weigh in an extremely unstable environment or measure the weight of an inquisitive little mouse that just won’t sit still? With this application you can determine the weight accurately and arrive at traceable results.
Touch the menu key to access the selection mode for applications and select “Statistics”.
First, install the Sartorius density kit on your balance with the help of the instructions. Touch the menu key and select “Density”.
Touch the menu key to access the selection mode for applications and select “Unstable Cond.”.
1
1
1
Tare your balance. Touch the gray interface to set the mean density and the accuracy of the density measurement result.
Specify the number of subweighing operations by touching the gray bar.
2
2
2
Select whether the results should be printed out after each weighing process and whether the balance should be automatically tared after saving the value and confirm your selection by touching the checkmark.
* To view videos of these applications, scan in our QR code or visit http://www.sartorius.com/manual-secura
** Available in Quintix® and Secura®
*
*
*
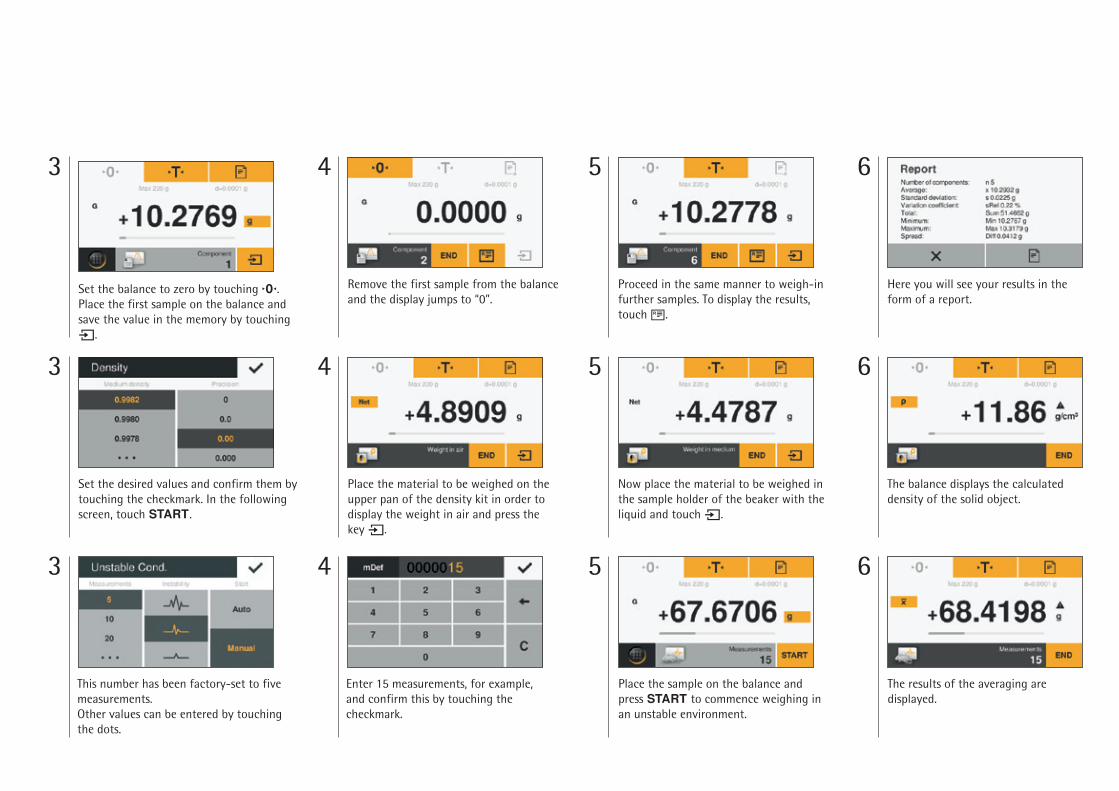
Set the balance to zero by touching A. Place the first sample on the balance and save the value in the memory by touching v.
Set the desired values and confirm them by touching the checkmark. In the following screen, touch w.
3
3
3
Remove the first sample from the balance and the display jumps to “0”.
Now place the material to be weighed in the sample holder of the beaker with the liquid and touch v.
4
4
4
Proceed in the same manner to weigh-in further samples. To display the results, touch n.
Here you will see your results in the form of a report.
The balance displays the calculated density of the solid object.
5 6
5 6
5 6
This number has been factory-set to five measurements. Other values can be entered by touching the dots.
Enter 15 measurements, for example, and confirm this by touching the checkmark.
Place the sample on the balance and press w to commence weighing in an unstable environment.
The results of the averaging are displayed.
Place the material to be weighed on the upper pan of the density kit in order to display the weight in air and press the key v.

Sartorius Lab Instruments GmbH & Co. KG Weender Landstrasse 94–108 37075 Goettingen, Germany
Phone +49(0)551.308.0 Fax +49(0)551.308.3289
www.sartorius.com
Accessories
Determination of the minimum sample quantity according to USP, Setting up of the SQmin function (only Secura®)
Sartorius can offer to set up the SQmin function for your balance.
Sartorius Service will determine the permitted minimum sample quantity on the basis of the specifications of your quality assurance system and will store this value in the balance. The configuration of the SQmin function will be documented in a certificate (“Balance Test According to USP”).
If you work with the SQmin function, the weight value will be compared with the default minimum sample quantity (SQmin = Sample Quantity Minimum). In this way it is ensured that the weighing results are above the default minimum sample quantity.
Weighing results which are below the SQmin will not be output via the printer or the computer, depending upon the safety stage settings, and will appear, clearly marked, in the display of the balance.
Using the SQmin function ensures that the weighing results comply with the USP directives (USP = United States Pharmacopeia).
Service
Prin
ted
in th
e EU
on
pape
r ble
ache
d w
itho
ut c
hlor
ine.
Spe
cifi
cati
ons
subj
ect t
o ch
ange
wit
hout
not
ice.
| W
Pu
blic
atio
n N
o.: W
SE60
14-e
1505
02 ·
Ord
er N
o.: 9
8648
-020
-20
General Information
Battery pack for standard laboratory balances
YRB11Z
Draft shield for models with readability of:
1 mg YDS02SQP
0.01 g | 0.1 g | 1 g YDS01SQP
In-use dust cover for models with a readability of:
< 0.01 mg Upon request
0.1 mg | 1 mg 6960SE01
0.01 g | 0.1 g | 1 g 6960SE02
Dust cover for models with a readability of:
< 0.01 mg Upon request
0.1 mg | 1 mg 6960SE03
Density Determination
Density determination kit for models with a readability of :
0.01 mg | 0.1 mg | 1 mg YDK03
10 mg YDK04
Calibration WeightsVarious versions, see also the brochure “Weights and Weight Sets”
Upon request
Laboratory Thermal Transfer Printer, GLP Compliant
YDP30
Printer paper for laboratory printers
69Y03285
Continuous labels for laboratory printers
69Y03286
Standard Laboratory Printer YDP40
Printer paper for standard laboratory printers
69Y03287
Data Cable for Mini USBData cable for Mini USB / USB A
YCC04-D09
Data cable for Mini USB / 9-pin RS-232
YCC03-D09
Data cable for Mini USB / 25-pin RS-232
YCC03-D25
Weighing TableWeighing table made from wood with synthetic stone for precise, reliable measurements
YWT09
Weighing table made from synthetic stone, with vibration dampening
YWT03
Wall console for micro-, analytical and precision balances
YWT04