application integration guide - tibco software 4 integrating with ibm websphere application server...
TRANSCRIPT
TIBCO Enterprise Message Service™
Application Integration GuideSoftware Release 6.0July 2010

Important Information
SOME TIBCO SOFTWARE EMBEDS OR BUNDLES OTHER TIBCO SOFTWARE. USE OF SUCH EMBEDDED OR BUNDLED TIBCO SOFTWARE IS SOLELY TO ENABLE THE FUNCTIONALITY (OR PROVIDE LIMITED ADD-ON FUNCTIONALITY) OF THE LICENSED TIBCO SOFTWARE. THE EMBEDDED OR BUNDLED SOFTWARE IS NOT LICENSED TO BE USED OR ACCESSED BY ANY OTHER TIBCO SOFTWARE OR FOR ANY OTHER PURPOSE.USE OF TIBCO SOFTWARE AND THIS DOCUMENT IS SUBJECT TO THE TERMS AND CONDITIONS OF A LICENSE AGREEMENT FOUND IN EITHER A SEPARATELY EXECUTED SOFTWARE LICENSE AGREEMENT, OR, IF THERE IS NO SUCH SEPARATE AGREEMENT, THE CLICKWRAP END USER LICENSE AGREEMENT WHICH IS DISPLAYED DURING DOWNLOAD OR INSTALLATION OF THE SOFTWARE (AND WHICH IS DUPLICATED IN LICENSE.PDF) OR IF THERE IS NO SUCH SOFTWARE LICENSE AGREEMENT OR CLICKWRAP END USER LICENSE AGREEMENT, THE LICENSE(S) LOCATED IN THE “LICENSE” FILE(S) OF THE SOFTWARE. USE OF THIS DOCUMENT IS SUBJECT TO THOSE TERMS AND CONDITIONS, AND YOUR USE HEREOF SHALL CONSTITUTE ACCEPTANCE OF AND AN AGREEMENT TO BE BOUND BY THE SAME.This document contains confidential information that is subject to U.S. and international copyright laws and treaties. No part of this document may be reproduced in any form without the written authorization of TIBCO Software Inc.TIB, TIBCO, TIBCO Adapter, Predictive Business, Information Bus, The Power of Now, TIBCO ActiveEnterprise, TIBCO Hawk, TIBCO Rendezvous, TIBCO Enterprise, TIBCO Enterprise Message Service, TIBCO SmartSockets and the TIBCO logo are either registered trademarks or trademarks of TIBCO Software Inc. in the United States and/or other countries.EJB, Java EE, J2EE, and all Java-based trademarks and logos are trademarks or registered trademarks of Sun Microsystems, Inc. in the U.S. and other countries.All other product and company names and marks mentioned in this document are the property of their respective owners and are mentioned for identification purposes only.THIS SOFTWARE MAY BE AVAILABLE ON MULTIPLE OPERATING SYSTEMS. HOWEVER, NOT ALL OPERATING SYSTEM PLATFORMS FOR A SPECIFIC SOFTWARE VERSION ARE RELEASED AT THE SAME TIME. SEE THE README.TXT FILE FOR THE AVAILABILITY OF THIS SOFTWARE VERSION ON A SPECIFIC OPERATING SYSTEM PLATFORM.THIS DOCUMENT IS PROVIDED “AS IS” WITHOUT WARRANTY OF ANY KIND, EITHER EXPRESS OR IMPLIED, INCLUDING, BUT NOT LIMITED TO, THE IMPLIED WARRANTIES OF MERCHANTABILITY, FITNESS FOR A PARTICULAR PURPOSE, OR NON-INFRINGEMENT.THIS DOCUMENT COULD INCLUDE TECHNICAL INACCURACIES OR TYPOGRAPHICAL ERRORS. CHANGES ARE PERIODICALLY ADDED TO THE INFORMATION HEREIN; THESE CHANGES WILL BE INCORPORATED IN NEW EDITIONS OF THIS DOCUMENT. TIBCO SOFTWARE INC. MAY MAKE IMPROVEMENTS AND/OR CHANGES IN THE PRODUCT(S) AND/OR THE PROGRAM(S) DESCRIBED IN THIS DOCUMENT AT ANY TIME.THE CONTENTS OF THIS DOCUMENT MAY BE MODIFIED AND/OR QUALIFIED, DIRECTLY OR INDIRECTLY, BY OTHER DOCUMENTATION WHICH ACCOMPANIES THIS SOFTWARE, INCLUDING BUT NOT LIMITED TO ANY RELEASE NOTES AND "READ ME" FILES.Copyright © 1997-2010 TIBCO Software Inc. ALL RIGHTS RESERVED.TIBCO Software Inc. Confidential Information

| iii
Contents
Figures . . . . . . . . . . . . . . . . . . . . . . . . . . . . . . . . . . . . . . . . . . . . . . . . . . . . . . . . . . . . . . . . . . . . . . . . .v
Tables . . . . . . . . . . . . . . . . . . . . . . . . . . . . . . . . . . . . . . . . . . . . . . . . . . . . . . . . . . . . . . . . . . . . . . . . .vii
Preface . . . . . . . . . . . . . . . . . . . . . . . . . . . . . . . . . . . . . . . . . . . . . . . . . . . . . . . . . . . . . . . . . . . . . . . . ix
Changes from the Previous Release of this Guide . . . . . . . . . . . . . . . . . . . . . . . . . . . . . . . . . . . . . . . . . . . . . . . . . x
Related Documentation . . . . . . . . . . . . . . . . . . . . . . . . . . . . . . . . . . . . . . . . . . . . . . . . . . . . . . . . . . . . . . . . . . . . . xiTIBCO Enterprise Message Service Documentation . . . . . . . . . . . . . . . . . . . . . . . . . . . . . . . . . . . . . . . . . . . xiOther TIBCO Product Documentation . . . . . . . . . . . . . . . . . . . . . . . . . . . . . . . . . . . . . . . . . . . . . . . . . . . . . . xiThird Party Documentation. . . . . . . . . . . . . . . . . . . . . . . . . . . . . . . . . . . . . . . . . . . . . . . . . . . . . . . . . . . . . . . xii
Typographical Conventions . . . . . . . . . . . . . . . . . . . . . . . . . . . . . . . . . . . . . . . . . . . . . . . . . . . . . . . . . . . . . . . . . .xiii
How to Contact TIBCO Customer Support . . . . . . . . . . . . . . . . . . . . . . . . . . . . . . . . . . . . . . . . . . . . . . . . . . . . . .xvi
Chapter 1 Using JNDI With Third-Party Naming/Directory Services. . . . . . . . . . . . . . . . . . . . . . .1
Overview of Using JNDI With Third-Party Naming/Directory Services . . . . . . . . . . . . . . . . . . . . . . . . . . . . . . . . . . 2
Storing Administered Objects in a Naming/Directory Service . . . . . . . . . . . . . . . . . . . . . . . . . . . . . . . . . . . . . . . . . 3
Retrieving Administered Objects from a Naming/Directory Service . . . . . . . . . . . . . . . . . . . . . . . . . . . . . . . . . . . . 7
Chapter 2 Overview of Third-Party Application Servers . . . . . . . . . . . . . . . . . . . . . . . . . . . . . . . .9
Third Party Application Servers . . . . . . . . . . . . . . . . . . . . . . . . . . . . . . . . . . . . . . . . . . . . . . . . . . . . . . . . . . . . . . 10
Chapter 3 Integrating With WebLogic Server 10.0 . . . . . . . . . . . . . . . . . . . . . . . . . . . . . . . . . . . .11
Running the Example MDB with WebLogic Server . . . . . . . . . . . . . . . . . . . . . . . . . . . . . . . . . . . . . . . . . . . . . . . . 12
Configuring the Example MDB . . . . . . . . . . . . . . . . . . . . . . . . . . . . . . . . . . . . . . . . . . . . . . . . . . . . . . . . . . . . . . . 13Adding TIBCO Enterprise Message Service to the WebLogic CLASSPATH . . . . . . . . . . . . . . . . . . . . . . . . . 13Creating the JMS Destination Object Inside TIBCO EMS . . . . . . . . . . . . . . . . . . . . . . . . . . . . . . . . . . . . . . . 13Modifying the MDB Class File to Use TIBCO Enterprise Message Service Objects . . . . . . . . . . . . . . . . . . . 14Modifying the Client Program to Use TIBCO Enterprise Message Service JNDI. . . . . . . . . . . . . . . . . . . . . . 15
Rebuilding and Redeploying the Example MDB . . . . . . . . . . . . . . . . . . . . . . . . . . . . . . . . . . . . . . . . . . . . . . . . . . 17
Running the Example MDB Client . . . . . . . . . . . . . . . . . . . . . . . . . . . . . . . . . . . . . . . . . . . . . . . . . . . . . . . . . . . . . 18
Modifying this Example to Use SSL Communication. . . . . . . . . . . . . . . . . . . . . . . . . . . . . . . . . . . . . . . . . . . . . . . 19Add the SSL JAR Files and New JNDI Properties File to the CLASSPATH . . . . . . . . . . . . . . . . . . . . . . . . . . 19Configure the TIBCO Enterprise Message Service Server for SSL . . . . . . . . . . . . . . . . . . . . . . . . . . . . . . . . 19Modify the Example MDB to Use the SSL Protocol . . . . . . . . . . . . . . . . . . . . . . . . . . . . . . . . . . . . . . . . . . . . 20
TIBCO Enterprise Message Service Application Integration Guide

iv | Contents
Modify the Example Client Program for SSL-Based Communication . . . . . . . . . . . . . . . . . . . . . . . . . . . . . . 20Rebuilding and Redeploying the Example MDB . . . . . . . . . . . . . . . . . . . . . . . . . . . . . . . . . . . . . . . . . . . . . . 20Running the Example MDB Client with SSL . . . . . . . . . . . . . . . . . . . . . . . . . . . . . . . . . . . . . . . . . . . . . . . . . 21
Modifying this Example to Use Container Managed Transactions and XA . . . . . . . . . . . . . . . . . . . . . . . . . . . . . . 22Create a JMS Connection Factory That Supports XA . . . . . . . . . . . . . . . . . . . . . . . . . . . . . . . . . . . . . . . . . . 22Modifying the MDB to Use Transactions . . . . . . . . . . . . . . . . . . . . . . . . . . . . . . . . . . . . . . . . . . . . . . . . . . . . 22Modify the Example Client Program to Use Transactions . . . . . . . . . . . . . . . . . . . . . . . . . . . . . . . . . . . . . . . 23Rebuilding and Redeploying the Example MDB . . . . . . . . . . . . . . . . . . . . . . . . . . . . . . . . . . . . . . . . . . . . . . 23Running the Example MDB Client with Transactions. . . . . . . . . . . . . . . . . . . . . . . . . . . . . . . . . . . . . . . . . . . 23
Chapter 4 Integrating With IBM WebSphere Application Server Version 6.1 . . . . . . . . . . . . . . 25
Overview of Integrating With IBM WebSphere . . . . . . . . . . . . . . . . . . . . . . . . . . . . . . . . . . . . . . . . . . . . . . . . . . . 26
Create TIBCO Enterprise Message Service Administered Objects . . . . . . . . . . . . . . . . . . . . . . . . . . . . . . . . . . . 27
Configure WebSphere to Use EMS as the JMS Provider . . . . . . . . . . . . . . . . . . . . . . . . . . . . . . . . . . . . . . . . . . . 28Add TIBCO Enterprise Message Service as a JMS Provider . . . . . . . . . . . . . . . . . . . . . . . . . . . . . . . . . . . . 28Configure JNDI Bindings for the Connection Factories . . . . . . . . . . . . . . . . . . . . . . . . . . . . . . . . . . . . . . . . . 29Configure JNDI Bindings for the Destinations . . . . . . . . . . . . . . . . . . . . . . . . . . . . . . . . . . . . . . . . . . . . . . . . 30Create new Listener Ports . . . . . . . . . . . . . . . . . . . . . . . . . . . . . . . . . . . . . . . . . . . . . . . . . . . . . . . . . . . . . . . 31Install the MDB to Use the Topic and Queue Listeners . . . . . . . . . . . . . . . . . . . . . . . . . . . . . . . . . . . . . . . . . 32Run the Sample Application Clients. . . . . . . . . . . . . . . . . . . . . . . . . . . . . . . . . . . . . . . . . . . . . . . . . . . . . . . . 33
Modify the Samples to Use SSL Communications . . . . . . . . . . . . . . . . . . . . . . . . . . . . . . . . . . . . . . . . . . . . . . . . 35Enable SSL in the TIBCO Enterprise Message Service Server . . . . . . . . . . . . . . . . . . . . . . . . . . . . . . . . . . 35Create JNDI Names for the SSL Queue and Topic Connection Factories. . . . . . . . . . . . . . . . . . . . . . . . . . . 35Add Additional SSL JNDI Properties to WebSphere . . . . . . . . . . . . . . . . . . . . . . . . . . . . . . . . . . . . . . . . . . . 36Configure SSL Communications Between the Application Server and the TIBCO Enterprise Message Service Server . . . . . . . . . . . . . . . . . . . . . . . . . . . . . . . . . . . . . . . . . . . . . . . . . . . . . . . . . . . . . . . . . . . . . . . . . . . . . . 36Run the Samples Application Clients. . . . . . . . . . . . . . . . . . . . . . . . . . . . . . . . . . . . . . . . . . . . . . . . . . . . . . . 37
Index . . . . . . . . . . . . . . . . . . . . . . . . . . . . . . . . . . . . . . . . . . . . . . . . . . . . . . . . . . . . . . . . . . . . . . . . . 39
TIBCO Enterprise Message Service Application Integration Guide

Figures | v
Figures
Figure 1 Object lookup in TIBCO Enterprise Message Service server. . . . . . . . . . . . . . . . . . . . . . . . . . . . . . . 3
Figure 2 Object created locally by the client. . . . . . . . . . . . . . . . . . . . . . . . . . . . . . . . . . . . . . . . . . . . . . . . . . . 5
TIBCO Enterprise Message Service Application Integration Guide

vi | Figures
TIBCO Enterprise Message Service Application Integration Guide

Tables | vii
Tables
Table 1 General Typographical Conventions . . . . . . . . . . . . . . . . . . . . . . . . . . . . . . . . . . . . . . . . . . . . . . . xiii
Table 2 Syntax Typographical Conventions . . . . . . . . . . . . . . . . . . . . . . . . . . . . . . . . . . . . . . . . . . . . . . . . xv
TIBCO Enterprise Message Service Application Integration Guide

viii | Tables
TIBCO Enterprise Message Service Application Integration Guide

| ix
Preface
TIBCO Enterprise Message Service™ software lets application programs send and receive messages according to the Java Message Service (JMS) protocol. It also integrates with TIBCO Rendezvous and TIBCO SmartSockets messaging products.
Topics
• Changes from the Previous Release of this Guide, page x
• Related Documentation, page xi
• Typographical Conventions, page xiii
• How to Contact TIBCO Customer Support, page xvi
TIBCO Enterprise Message Service Application Integration Guide

x | Changes from the Previous Release of this Guide
Changes from the Previous Release of this Guide
This section itemizes the major changes from the previous release of this guide.
Deprecated Document
The TIBCO Enterprise Message Service Application Integration Guide is deprecated. Future releases of TIBCO Enterprise Message Service will not include this guide.
Obsolete Features
The following application servers have been removed from this document:
• JBoss 4.0.2
• Borland Enterprise Server 5.1
• Sun Java System Application Server 7
• WebLogic Server 9.2
• IBM WebSphere Application Server Version 5
TIBCO Enterprise Message Service Application Integration Guide
Preface | xi
Related Documentation
This section lists documentation resources you may find useful.
TIBCO Enterprise Message Service DocumentationThe following documents form the TIBCO Enterprise Message Service documentation set:
• TIBCO Enterprise Message Service User’s Guide Read this manual to gain an overall understanding of the product, its features, and configuration.
• TIBCO Enterprise Message Service Installation Read the relevant sections of this manual before installing this product.
• TIBCO Enterprise Message Service Application Integration Guide This manual presents detailed instructions for integrating TIBCO Enterprise Message Service with third-party products.
• TIBCO Enterprise Message Service C & COBOL API Reference The C API reference is available in HTML and PDF formats.
• TIBCO Enterprise Message Service Java API Reference The Java API reference can be accessed only through the HTML documentation interface.
• TIBCO Enterprise Message Service .NET API Reference The .NET API reference can be accessed only through the HTML documentation interface.
• TIBCO Enterprise Message Service Release Notes Read the release notes for a list of new and changed features. This document also contains lists of known issues and closed issues for this release. This document is available only in PDF format.
Other TIBCO Product DocumentationYou may find it useful to read the documentation for the following TIBCO products:
• TIBCO Rendezvous®
• TIBCO SmartSockets®
• TIBCO Hawk®
• TIBCO EMS® Client for z/OS (CICS)
• TIBCO EMS® Client for z/OS (MVS)
• TIBCO EMS® Client for i5/OS
TIBCO Enterprise Message Service Application Integration Guide

xii | Related Documentation
Third Party Documentation• Java™ Message Service specification, available through
http://java.sun.com/products/jms/index.html.
• Java™ Message Service by Richard Monson-Haefel and David A. Chappell, O’Reilly and Associates, Sebastopol, California, 2001.
• Java™ Authentication and Authorization Service (JAAS) LoginModule Developer's Guide and Reference Guide, available through http://java.sun.com/products/jaas/.
TIBCO Enterprise Message Service Application Integration Guide

Preface | xiii
Typographical Conventions
The following typographical conventions are used in this manual.
Table 1 General Typographical Conventions
Convention Use
TIBCO_HOME
ENV_HOME
EMS_HOME
Many TIBCO products must be installed within the same home directory. This directory is referenced in documentation as TIBCO_HOME. The value of TIBCO_HOME depends on the operating system. For example, on Windows systems, the default value is C:\tibco .
Other TIBCO products are installed into an installation environment. Incompatible products and multiple instances of the same product are installed into different installation environments. The directory into which such products are installed is referenced in documentation as ENV_HOME. The value of ENV_HOME depends on the operating system. For example, on Windows systems the default value is C:\tibco.
TIBCO Enterprise Message Service installs into a directory within TIBCO_HOME. This directory is referenced in documentation as EMS_HOME. The value of EMS_HOME depends on the operating system. For example on Windows systems, the default value is C:\tibco\ems\6.0.
code font Code font identifies commands, code examples, filenames, pathnames, and output displayed in a command window. For example:
Use MyCommand to start the TIBCO foo process.
bold code
font Bold code font is used in the following ways:
• In procedures, to indicate what a user types. For example: Type the username admin .
• In large code samples, to indicate the parts of the sample that are of particular interest.
• In command syntax, to indicate the default value. For example, if no parameter is specified, MyCommand is enabled: MyCommand [enable | disable]
TIBCO Enterprise Message Service Application Integration Guide

xiv | Typographical Conventions
italic font Italic font is used in the following ways:
• To indicate a document title. For example: See TIBCO BusinessWorks Concepts for more details.
• To introduce new terms For example: A portal page may contain several portlets. Portlets are mini-applications that run in a portal.
• To indicate a variable in a command or code syntax that you must replace. For example: MyCommand pathname
Key combinations
Key name separated by a plus sign indicate keys pressed simultaneously. For example: Ctrl+C.
Key names separated by a comma and space indicate keys pressed one after the other. For example: Esc, Ctrl+Q.
Table 1 General Typographical Conventions
Convention Use
TIBCO Enterprise Message Service Application Integration Guide

Preface | xv
Table 2 Syntax Typographical Conventions
Convention Use
[ ] An optional item in a command or code syntax.
For example:
MyCommand [optional_parameter] required_parameter
| A logical ’OR’ that separates multiple items of which only one may be chosen.
For example, you can select only one of the following parameters:
MyCommand para1 | param2 | param3
{ } A logical group of items. Other syntax notations may appear within each logical group.
For example, the following command requires two parameters, which can be either param1 and param2 or param3 and param4 :
MyCommand {param1 param2} | {param3 param4}
In the next example, the command requires two parameters. The first parameter can be either param1 or param2 and the second can be either param3 or param4 :
MyCommand {param1 | param2} {param3 | param4}
In the next example, the command can accept either two or three parameters. The first parameter must be param1 . You can optionally include param2 as the second parameter. And the last parameter is either param3 or param4 .
MyCommand param1 [param2] {param3 | param4}
TIBCO Enterprise Message Service Application Integration Guide

xvi | How to Contact TIBCO Customer Support
How to Contact TIBCO Customer Support
For comments or problems with this manual or the software it addresses, please contact TIBCO Support Services as follows.
• For an overview of TIBCO Support Services, and information about getting started with TIBCO Product Support, visit this site:
http://www.tibco.com/services/support
• If you already have a valid maintenance or support contract, visit this site:
http://support.tibco.com
Entry to this site requires a username and password. If you do not have a username, you can request one.
TIBCO Enterprise Message Service Application Integration Guide
| 1
Chapter 1 Using JNDI With Third-Party Naming/Directory Services
TIBCO Enterprise Message Service™ allows you to work with third-party naming/directory service products. This chapter describes how to integrate these products with TIBCO Enterprise Message Service.
Topics
• Overview of Using JNDI With Third-Party Naming/Directory Services, page 2
• Storing Administered Objects in a Naming/Directory Service, page 3
• Retrieving Administered Objects from a Naming/Directory Service, page 7
TIBCO Enterprise Message Service Application Integration Guide

2 | Chapter 1 Using JNDI With Third-Party Naming/Directory Services
Overview of Using JNDI With Third-Party Naming/Directory Services
TIBCO Enterprise Message Service supports the storage (binding) and retrieval (look-up) of ConnectionFactories and Destinations in third-party naming or directory services. Examples of such services are an LDAP server, the RMI registry, or the file system.
To use a third-party directory service, you must have a JNDI provider for that specific type of service. A JNDI provider presents a common API to the service regardless of the service type or service vendor, much like a JDBC driver presents a common API on top of various vendors’ databases.
The Java 2 SDK, contains JNDI providers for LDAP and RMI registry, among others. A JNDI provider for the file system can be downloaded from the JNDI home page at java.sun.com.
From a client perspective, looking up administered objects is accomplished in virtually the same way regardless of whether the object is in a third-party naming/directory service or in the TIBCO Enterprise Message Service server. For third-party services, the only prerequisite is that the objects must have previously been stored there. That is, the object must be bound to a name in the context of that service. This is usually a task performed by a system administrator.
Third-party naming or directory servers are separate products that must be installed and set up independently of TIBCO Enterprise Message Service. This is usually done by a system administrator.
There is no automatic synchronization of administered objects between the TIBCO Enterprise Message Service server and any foreign naming/directory service. Keeping the two synchronized is the responsibility of the system administrator.
TIBCO Enterprise Message Service Application Integration Guide

Storing Administered Objects in a Naming/Directory Service | 3
Storing Administered Objects in a Naming/Directory Service
All TIBCO Enterprise Message Service administered objects implement the JNDI “Referenceable” interface. This means that when they are bound in a foreign naming/directory service, what is physically stored there is not the serialized object itself, but rather a “Reference” object that knows how to re-create the original object when the object is looked up.
There are two forms of Reference objects that are stored, and which form is used depends on the origin of the original object. If the original object was looked up in the TIBCO Enterprise Message Service server, then the Reference object that gets stored for the object contains a URL pointer to the originating server. When this object is looked up in the foreign naming/directory service, the JNDI provider follows the associated URL and retrieves the object from the TIBCO Enterprise Message Service server. Figure 1 illustrates this case.
Figure 1 Object lookup in TIBCO Enterprise Message Service server
TIBCO EMS Server
Client 1
TIBCO JNDIProvider
Third-PartyJNDI Provider
Client 2
TIBCO JNDIURL
ContextFactory
Third-PartyJNDI Provider
Third-Party Naming/Directory Service
1
lookup 2
object
3
bind (object)
4
lookup
6
lookup
5
ref7
object
TIBCO Enterprise Message Service Application Integration Guide

4 | Chapter 1 Using JNDI With Third-Party Naming/Directory Services
In Figure 1, the following occurs:
1. Client 1 requests a lookup of an object in TIBCO Enterprise Message Service server by way of the JNDI provider supplied in TIBCO Enterprise Message Service.
2. The TIBCO Enterprise Message Service server returns the object to Client 1.
3. Client 1 binds the object into a third-party service using a third-party JNDI provider. The object is stored as a URL reference to the actual object in the TIBCO Enterprise Message Service server.
4. Client 2 requests a lookup of an object in the third-party service using the third-party JNDI provider.
5. The URL reference is returned by the third-party JNDI provider.
6. JNDI realizes that this is a reference, and further that it is a URL reference to the TIBCO Enterprise Message Service server. Therefore, it invokes the URL context factory of the TIBCO Enterprise Message Service JNDI provider which requests a lookup of the object in the TIBCO Enterprise Message Service server.
7. The TIBCO Enterprise Message Service server returns the object to Client 2.
If however, the object was created locally by the client using the public constructor of the class, then the Reference object that is stored for the object contains whatever information is required to re-create the object locally. When this object is subsequently looked up in the foreign naming/directory service, the JNDI provider uses the information stored in the Reference object to instantiate the original object locally. All of this behavior happens automatically without any special interaction required of the client. Figure 2 illustrates this case.
TIBCO Enterprise Message Service Application Integration Guide

Storing Administered Objects in a Naming/Directory Service | 5
Figure 2 Object created locally by the client
In Figure 2, the following occurs:
1. Client 1 creates a new administered object using the constructor of the class.
2. Client 1 binds the object into the third-party service using the third-party JNDI provider. The object is stored as a local reference.
3. Client 2 requests a lookup of the object in the third-party service using the third-party JNDI provider
4. The local reference is returned to the third-party JNDI provider.
5. JNDI realizes that this is a local reference, and invokes the TIBCO Enterprise Message Service JNDI object factory associated with the reference, which creates a new instance of the object locally and returns it to Client 2.
This behavior occurs automatically without any special interaction from the client.
TIBCO EMS ServerThird-Party Naming/
Directory Service
4
ref
2
bind (object)
3
lookup
Third-Party JNDI Provider
1
"new Object"Client 1
TIBCO JNDIObjectFactories
Third-PartyJNDI Provider
objectClient2
5
TIBCO Enterprise Message Service Application Integration Guide

6 | Chapter 1 Using JNDI With Third-Party Naming/Directory Services
Storing objects as a URL reference requires that the TIBCO Enterprise Message Service server be up and running (at the same URL) when the object is looked up in the foreign naming/directory service. Storing objects created locally does not have this requirement, however, because there is no automatic synchronization between the foreign naming/directory service and the TIBCO Enterprise Message Service server. There is no guarantee that the object returned from a lookup is valid, that is, that it exists inside the TIBCO Enterprise Message Service server. Storing objects as a URL reference ensures that the returned object is always a valid object.
For an example of storing administered objects in both of these forms, refer to the tibjmsJNDIStore.java example included with TIBCO Enterprise Message Service.
All TIBCO Enterprise Message Service administered objects implement the javax.naming.Referenceable interface. Therefore, these objects cannot be directly bound, along with a javaCodebase attribute, into a directory service that follows the schema defined in RFC 2713, and subsequently looked up with a service provider that uses the javaCodebase attribute (such as Sun's LDAP service provider). To successfully look up a TIBCO Enterprise Message Service administered object bound with the javaCodebase attribute, the object must first be manually serialized, then the serialized object can be directly bound into the directory service.
TIBCO Enterprise Message Service Application Integration Guide
Retrieving Administered Objects from a Naming/Directory Service | 7
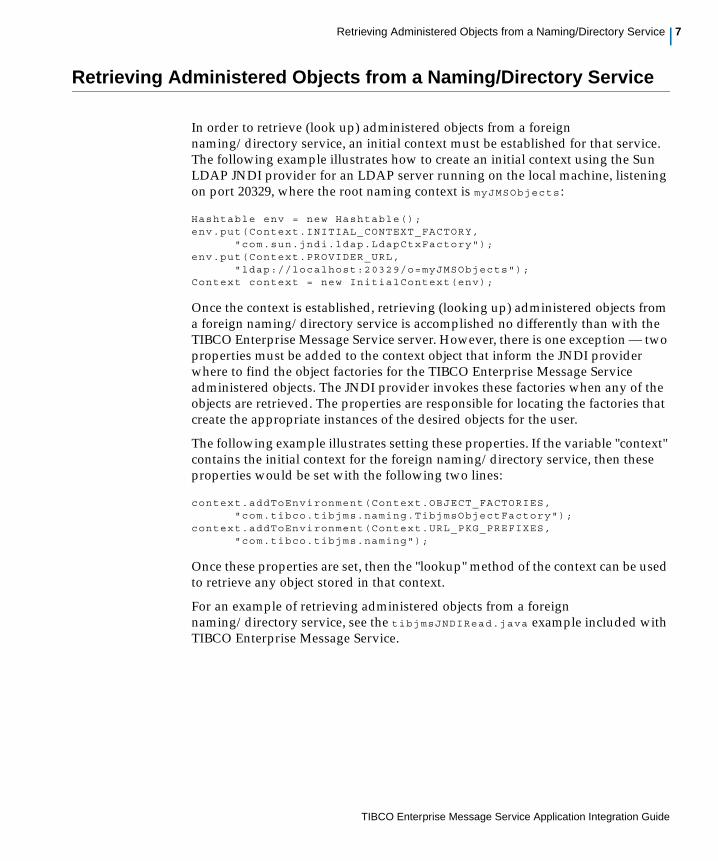
Retrieving Administered Objects from a Naming/Directory Service
In order to retrieve (look up) administered objects from a foreign naming/directory service, an initial context must be established for that service. The following example illustrates how to create an initial context using the Sun LDAP JNDI provider for an LDAP server running on the local machine, listening on port 20329, where the root naming context is myJMSObjects :
Hashtable env = new Hashtable();env.put(Context.INITIAL_CONTEXT_FACTORY,
"com.sun.jndi.ldap.LdapCtxFactory");env.put(Context.PROVIDER_URL,
"ldap://localhost:20329/o=myJMSObjects");Context context = new InitialContext(env);
Once the context is established, retrieving (looking up) administered objects from a foreign naming/directory service is accomplished no differently than with the TIBCO Enterprise Message Service server. However, there is one exception — two properties must be added to the context object that inform the JNDI provider where to find the object factories for the TIBCO Enterprise Message Service administered objects. The JNDI provider invokes these factories when any of the objects are retrieved. The properties are responsible for locating the factories that create the appropriate instances of the desired objects for the user.
The following example illustrates setting these properties. If the variable "context" contains the initial context for the foreign naming/directory service, then these properties would be set with the following two lines:
context.addToEnvironment(Context.OBJECT_FACTORIES, "com.tibco.tibjms.naming.TibjmsObjectFactory");
context.addToEnvironment(Context.URL_PKG_PREFIXES, "com.tibco.tibjms.naming");
Once these properties are set, then the "lookup" method of the context can be used to retrieve any object stored in that context.
For an example of retrieving administered objects from a foreign naming/directory service, see the tibjmsJNDIRead.java example included with TIBCO Enterprise Message Service.
TIBCO Enterprise Message Service Application Integration Guide

8 | Chapter 1 Using JNDI With Third-Party Naming/Directory Services
TIBCO Enterprise Message Service Application Integration Guide

| 9
Chapter 2 Overview of Third-Party Application Servers
TIBCO Enterprise Message Service successfully integrates with third-party J2EE EJB (application) servers so that TIBCO Enterprise Message Service can drive Message Driven Beans (MDBs) within the application servers. This chapter gives an overview of this integration.
Topics
• Third Party Application Servers, page 10
TIBCO Enterprise Message Service Application Integration Guide

10 | Chapter 2 Overview of Third-Party Application Servers
Third Party Application Servers
Third party servers which have been tested with TIBCO Enterprise Message Service are:
• WebLogic 10.0 with Service Pack 1 from BEA
• IBM WebSphere Application Server Version 6.1
Integration with other application servers is possible, although it has not been tested.
TIBCO Enterprise Message Service successfully integrates with third party J2EE EJB (application) servers so that TIBCO Enterprise Message Service can drive Message Driven Beans (MDBs) within the application servers.
TIBCO Enterprise Message Service implements the ConnectionConsumer interface of the JMS specification for application servers that follow the JMS specification for JMS integration.
TIBCO Enterprise Message Service also implements all interfaces necessary for Java Transaction API (JTA) compliance.
Special TIBCO Enterprise Message Service adapter classes are required for integration with some of the above listed application servers. These classes are contained in a separate JAR file included with this release, tibjmsapps.jar.
The following chapters contain more detailed instructions on how to integrate TIBCO Enterprise Message Service with each of the above listed application servers. Each chapter details how to run an example program provided by the application server using TIBCO Enterprise Message Service. When applicable, each chapter also describes how to modify the example to use SSL for communications between TIBCO Enterprise Message Service, the application server, and the example application.
TIBCO Enterprise Message Service Application Integration Guide

| 11
Chapter 3 Integrating With WebLogic Server 10.0
This chapter describes how to use TIBCO Enterprise Message Service to drive a Message Driven Bean (MDB) inside WebLogic Server 10.0. The examples in this chapter use the preconfigured Examples server and the example MDB that comes bundled as a sample with WebLogic Server 10.0.
The examples in this chapter assume you have installed WebLogic Server 10.0 on a Windows platform in the directory C:\bea .
Topics
• Running the Example MDB with WebLogic Server, page 12
• Configuring the Example MDB, page 13
• Rebuilding and Redeploying the Example MDB, page 17
• Running the Example MDB Client, page 18
• Modifying this Example to Use SSL Communication, page 19
• Modifying this Example to Use Container Managed Transactions and XA, page 22
Before running these examples, you must install these patches from BEA: CR326377 and CR333566.
TIBCO Enterprise Message Service Application Integration Guide
12 | Chapter 3 Integrating With WebLogic Server 10.0
Running the Example MDB with WebLogic Server
You should run the example MDB using WebLogic Server to ensure the MDB is configured and deployed properly. The source code for the example MDB is in:
WebLogicHome\samples\server\examples\src\examples\ejb\ejb20\message
where WebLogicHome is the WebLogic installation directory. For example, C:\bea\weblogic10 .
The file instructions.html in the directory above contains instructions for building and running the example MDB inside the Examples server. Follow the instructions detailed in that file for running the example MDB. There are two things that the instructions fail to explicitly state:
1. You must set up your environment by executing this command in the command window:
WebLogicHome\samples\domains\wl_server\setExamplesEnv.cmd
2. Next, you must navigate to the MDB source code directory, given above, before executing the command to run the MDB client (that is, the command ant run).
TIBCO Enterprise Message Service Application Integration Guide

Configuring the Example MDB | 13
Configuring the Example MDB
You must make the following configuration changes to the WebLogic Server 10.0 to drive the example MDB using TIBCO Enterprise Message Service instead of WebLogic Server.
• Add the TIBCO Enterprise Message Service JAR file to the CLASSPATH of WebLogic Server.
• Create the appropriate JMS Destination and connection factory objects inside the TIBCO Enterprise Message Service server using its administration tool.
• Modify the MDB class file by adding JavaDoc annotations, to use the appropriate JMSConnectionFactory, JMSDestination, and JNDI Connection Factory when rebuilding and redeploying.
• Modify the client program to look up its administered objects from the built-in JNDI provider in TIBCO Enterprise Message Service.
These steps are described in the following sections.
Adding TIBCO Enterprise Message Service to the WebLogic CLASSPATHIn the directory WebLogicHome\samples\domains\wl_server\examples , modify the CLASSPATH environment variable in setExamplesEnv.cmd (the examples setup script.).
In the directory WebLogicHome\samples\domains\wl_server\bin , modify the CLASSPATH variable in startExamplesServer.cmd (the start script).
Modify the CLASSPATH by adding this path to the end of its value list:
EMS_HOME\lib\tibjms.jar
Creating the JMS Destination Object Inside TIBCO EMSTo create the JMS destination object and connection factory objects:
1. Start the TIBCO Enterprise Message Service server by selecting Start > Programs > TIBCO EMS 6.0 > Start JMS Server from the Windows Start menu.
On Windows platforms the extension for both of these files is .cmd ; on UNIX platforms the extension is .sh .
TIBCO Enterprise Message Service Application Integration Guide

14 | Chapter 3 Integrating With WebLogic Server 10.0
2. Start the TIBCO Enterprise Message Service administration tool by selecting Start > Programs > TIBCO EMS 6.0 > Start EMS Administration Tool from the Windows Start menu.
3. Enter the following commands:
> connect> create topic quotes> create jndiname TIBCO.quotes topic quotes > create factory TIBCO.tcf topic> create factory SSLTopicConnectionFactory topic> setprop factory SSLTopicConnectionFactory
url=ssl://localhost:7243 ssl_verify_host=disable
Modifying the MDB Class File to Use TIBCO Enterprise Message Service Objects
You must modify the MessageTraderBean.java file in three ways. The MessageTraderBean.java file is located in:
WebLogicHome\samples\server\examples\src\examples\ejb\ejb20\message
where WebLogicHome is the WebLogic installation directory. For example, C:\bea\weblogic10 .
1. Add this import declaration to the top of the file:
import weblogic.ejbgen.ForeignJmsProvider;
2. Add these tags to the top of the file
@ForeignJmsProvider(providerUrl="tibjmsnaming://localhost:7222",initialContextFactory="com.tibco.tibjms.naming.TibjmsInitialContextFactory",connectionFactoryJndiName="TIBCO.tcf")
3. Modify the MessageDriven tag, so that the destinationJndiName property is TIBCO.quotes , and the transactionType property is BEAN driven. For example:
@MessageDriven(maxBeansInFreePool = "200",destinationType = "javax.jms.Topic",initialBeansInFreePool = "20",transTimeoutSeconds = "0",defaultTransaction = MessageDriven.DefaultTransaction.NOT_SUPPORTED,transactionType = MessageDriven.MessageDrivenTransactionType.BEAN,durable = Constants.Bool.FALSE,ejbName = "messageDriven",destinationJndiName = "TIBCO.quotes",acknowledgeMode = MessageDriven.AcknowledgeMode.DUPS_OK_ACKNOWLEDGE)
TIBCO Enterprise Message Service Application Integration Guide

Configuring the Example MDB | 15
Modifying the Client Program to Use TIBCO Enterprise Message Service JNDITo use the JNDI provided by TIBCO Enterprise Message Service, the example MDB client program must be modified in three areas:
• the source code
• the build script
• the runtime environment i.e. the CLASSPATH
To modify the client source code:
The source file for the MDB client program is Client.java in the directory:
WebLogicHome\samples\server\examples\src\examples\ejb\ejb20\message
where WebLogicHome is the WebLogic installation directory. For example, C:\bea\weblogic10 .
1. Find and replace the following strings in the source file:
There should be one occurrence of each of the above strings.
2. Change the line in constructor method to be (this line is right after getInitialContext() call):
TopicConnectionFactory cf = (TopicConnectionFactory) m_context.lookup("TIBCO.tcf");
When you are finished, save your changes.
To modify the build script to run the client:
The client program is run by executing the ant build script with a target of run . The build script passes the JNDI provider URL to the client program, and therefore it must be modified to pass the URL of TIBCO Enterprise Message Service JNDI. The file build.xml in the example MDB source directory contains the build script. Near the bottom of that file is the following line:
<arg value="t3://${wls.home}:${wls.port}"/>
Modify that line as follows:
<arg value="tibjmsnaming://localhost:7222" />
Find Replace With...
weblogic.jms.ConnectionFactory TopicConnectionFactory or TIBCO.tcf
weblogic.jndi.WLInitialContextFactory com.tibco.tibjms.naming.TibjmsInitialContextFactory
t3://localhost:7001 tibjmsnaming://localhost:7222
TIBCO Enterprise Message Service Application Integration Guide

16 | Chapter 3 Integrating With WebLogic Server 10.0
To set the environment:
You have already added the tibjms.jar file to the CLASSPATH in a previous section. To set the environment, perform the following:
1. Open a new command prompt window.
2. Change directory to:
WebLogicHome\samples\domains\wl_server>
where WebLogicHome is the WebLogic installation directory. For example, C:\bea\weblogic10 .
3. Enter the following command:
> setExamplesEnv
Verify that tibjms.jar is present when the script echoes the CLASSPATH .
TIBCO Enterprise Message Service Application Integration Guide
Rebuilding and Redeploying the Example MDB | 17
Rebuilding and Redeploying the Example MDB
If WebLogic Server 10.0 server is still running, restart it. This causes TIBCO Enterprise Message Service to be added to its environment. Using the window created in the section To set the environment: on page 16, change directory to the example MDB source directory:
WebLogicHome\samples\server\examples\src\examples\ejb\ejb20\message
where WebLogicHome is the WebLogic installation directory. For example, C:\bea\weblogic10 .
Enter the following commands to rebuild and redeploy the MDB:
> ant clean> ant build> ant deploy
As the build completes, you should see messages in the WebLogic Server Examples Server window indicating that it is activating the "message" application.
TIBCO Enterprise Message Service Application Integration Guide

18 | Chapter 3 Integrating With WebLogic Server 10.0
Running the Example MDB Client
In the window used to rebuild and redeploy the Example MDB, enter:
> ant run
To verify that the MDB is running, open the TIBCO EMS Administration Tool and issue the command:
> show topic quotes
The consumer count should be 1 .
To show that TIBCO Enterprise Message Service is driving the MDB, you can start another command prompt window and run the TIBCO Enterprise Message Service tibjmsTopicSubscriber sample as follows:
> java tibjmsTopicSubscriber -topic quotes
When you run the example MDB client, you should see that the tibjmsTopicSubscriber program receives the messages published by the example MDB client, along with the WebLogic Server.
TIBCO Enterprise Message Service Application Integration Guide

Modifying this Example to Use SSL Communication | 19
Modifying this Example to Use SSL Communication
This section describes how to modify the above example to use SSL communications between the TIBCO Enterprise Message Service server, the WebLogic Server 10.0, and the client program. This section assumes you have already set up and run the example detailed in the previous sections.
Add the SSL JAR Files and New JNDI Properties File to the CLASSPATHIn the directory where WebLogicHome\samples\domains\wl_server, modify the CLASSPATH environment variable in setExamplesEnv.cmd (the examples setup script) and startExamplesServer.cmd (the start script).
To add SSL JAR Files and New JNDI Properties File to the WLS 10.0 CLASSPATH:
1. Open the setExamplesEnv.cmd and startExamplesServer.cmd files.
2. In each file, add the following jar files to the end of the CLASSPATH and save the files.
EMS_HOME\lib\tibcrypt.jar;EMS_HOME\lib\slf4j-api-1.4.2.jar;EMS_HOME\lib\slf4j-simple-1.4.2.jar;EMS_HOME\lib
3. Run the setExamplesEnv.cmd command to set up the client environment.
4. Create a new file named jndi.properties , add the following lines and save it to the directory EMS_HOME\lib .
com.tibco.tibjms.naming.security_protocol=sslcom.tibco.tibjms.naming.ssl_enable_verify_host=false
These properties specify that the "SSL" protocol should be used for JNDI lookups and that host verification is turned off (the client will trust any host). JNDI reads this file automatically and adds the properties to the environment of the initial JNDI context.
Configure the TIBCO Enterprise Message Service Server for SSLIn C:\Tibco\EMS\bin\tibemsd.conf , add the following lines:
listen = ssl://localhost:7243ssl_server_identity = certs/server.cert.pemssl_server_key = certs/server.key.pemssl_password = passwordlisten = tcp://localhost:7222
TIBCO Enterprise Message Service Application Integration Guide

20 | Chapter 3 Integrating With WebLogic Server 10.0
These lines explicitly set the TCP and SSL listen ports and specify the three required server-side SSL parameters for identity, private key, and password.
Save the file, then stop and restart the TIBCO Enterprise Message Service server. When the server restarts, you should see messages like the following in the console window confirming SSL is enabled:
2008-06-14 10:00:05 Secure Socket Layer is enabled, using openSSL <version>2008-06-14 10:00:05 Accepting connections on ssl://<machineName>:7243.2008-06-14 10:00:05 Accepting connections on tcp://<machineName>:7222.
Modify the Example MDB to Use the SSL ProtocolFollow these steps to modify the example MDB:
1. Change the providerUrl property to tibjmsnaming://localhost:7243 .
2. Change the connectionFactoryJndiName property to SSLTopicConnectionFactory.
After competing the modifications, the foreignJmsProvider tag should look like this:
@ForeignJmsProvider(providerUrl="tibjmsnaming://localhost:7243",initialContextFactory="com.tibco.tibjms.naming.TibjmsInitialContextFactory",connectionFactoryJndiName="SSLTopicConnectionFactory")
Modify the Example Client Program for SSL-Based CommunicationThe modifications necessary for the example client program are similar to those that were necessary for MDB:
1. In Client.java , change the string TopicConnectionFactory or TIB CO.tcf to SSLTopicConnectionFactory.
2. In Client.java , change the port number from 7222 to 7243 in the URL.
3. In build.xml , change the port number from 7222 to 7243 for the URL.
Rebuilding and Redeploying the Example MDBRestart the WebLogic Server Examples Server so that it picks up the SSL related changes to the environment.
From the example MDB source directory, enter the commands:
> ant clean> ant build> ant deploy
TIBCO Enterprise Message Service Application Integration Guide

Modifying this Example to Use SSL Communication | 21
Running the Example MDB Client with SSLCreate a new command prompt window and run the examples setup script, setExamplesEnv.cmd , so that the SSL related changes to the environment are picked up.
From the example MDB source directory, enter the command:
> ant run
You should see the same messages sent by the client and received by the MDB in the WebLogic server window. You may notice that this example runs slightly slower than the non-SSL version. This is because of the SSL handshake that occurs before the messages are displayed.
To show that SSL communications are in fact occurring, you could remove the SSL settings you added to tibemsd.conf . Then restart the TIBCO Enterprise Message Service server and the WebLogic Server. If you check the WebLogic Server logs, you should see exceptions thrown indicating that it could not connect. If you now run the test program again, you should see that it throws an exception indicating that it could not connect to the server using the SSL protocol. Alternatively (or additionally), you could start the TIBCO Enterprise Message Service server from a command prompt window and turn SSL debug tracing on, as follows:
>tibemsd -ssl_debug_trace
Then, if you re-start WebLogic Server and re-run the test program, you will see SSL debugging output on the tibemsd console window.
TIBCO Enterprise Message Service Application Integration Guide

22 | Chapter 3 Integrating With WebLogic Server 10.0
Modifying this Example to Use Container Managed Transactions
and XA
This section describes how to modify the above example to support container-managed transactions. In this modified example, TIBCO Enterprise Message Service server participates in a distributed transaction started by WebLogic server.
Create a JMS Connection Factory That Supports XATo create the JMS Connection factory that supports XA, perform the following:
1. Start the TIBCO Enterprise Message Service administration tool by selecting Start > Programs > TIBCO EMS 6.0 > Start EMS Administration Tool from the Windows Start menu.
2. Enter the following commands:
> connect> create factory XATopicConnectionFactory xatopic
Modifying the MDB to Use TransactionsTo modify the example MDB to use transactions, you must update the ForeignJmsProvider and MessageDriven annotation tags in the MessageTraderBean.java file, which is located in:
WebLogicHome\samples\server\examples\src\examples\ejb\ejb20\message
where WebLogicHome is the WebLogic installation directory. For example, C:\bea\weblogic10 .
Follow these steps to modify the example MDB:
1. For the ForeignJmsProvider tag, make these changes:
a. Change the providerUrl property to tibjmsnaming://localhost:7222 .
b. Change the connectionFactoryJndiName property to XATopicConnectionFactory.
2. For the MessageDriven tag, make these changes:
a. Change the defaultTransaction property to MessageDriven.DefaultTransaction.NOT_SUPPORTED .
b. Change the transactionType property to MessageDriven.MessageDrivenTransactionType.BEAN .
TIBCO Enterprise Message Service Application Integration Guide
Modifying this Example to Use Container Managed Transactions and XA | 23
After competing the modifications, the foreignJmsProvider and MessageDriven tags should look like this:
@ForeignJmsProvider(providerUrl="tibjmsnaming://localhost:7222",initialContextFactory="com.tibco.tibjms.naming.TibjmsInitialContextFactory",connectionFactoryJndiName="XATopicConnectionFactory")
@MessageDriven(maxBeansInFreePool = "200",destinationType = "javax.jms.Topic",initialBeansInFreePool = "20",transTimeoutSeconds = "0",defaultTransaction = MessageDriven.DefaultTransaction.REQUIRED,transactionType=MessageDriven.MessageDrivenTransactionType.CONTAINER,durable = Constants.Bool.FALSE,ejbName = "messageDriven",destinationJndiName = "TIBCO.quotes")
Modify the Example Client Program to Use TransactionsThe modifications necessary for the example client program are similar to those that were necessary for MDB:
1. In Client.java , change the string SSLTopicConnectionFactory to XATopicConnectionFactory.
2. In Client.java , change the port number from 7243 to 7222 in the URL.
3. In build.xml , change the port number from 7243 to 7222 for the URL.
Rebuilding and Redeploying the Example MDBRestart the WebLogic Server Examples Server as described Rebuilding and Redeploying the Example MDB on page 20, so that it picks up the changes to the environment.
Running the Example MDB Client with TransactionsCreate a new command prompt window and run the examples setup script, setExamplesEnv.cmd , so that the changes to the environment are picked up.
From the example MDB source directory, enter the command:
> ant run
You should see the same messages sent by the client and received by the MDB in the WebLogic server window.
TIBCO Enterprise Message Service Application Integration Guide

24 | Chapter 3 Integrating With WebLogic Server 10.0
TIBCO Enterprise Message Service Application Integration Guide
| 25
Chapter 4 Integrating With IBM WebSphere Application Server Version 6.1
This chapter describes integrating TIBCO Enterprise Message Service with IBM WebSphere Application Server Version 6.1. Specifically, a J2EE client can use TIBCO Enterprise Message Service to trigger a Message Driven Bean (MDB) inside the WebSphere Application Server and also have the MDB send the received message back to the client.
Topics
• Overview of Integrating With IBM WebSphere, page 26
• Create TIBCO Enterprise Message Service Administered Objects, page 27
• Configure WebSphere to Use EMS as the JMS Provider, page 28
• Modify the Samples to Use SSL Communications, page 35
TIBCO Enterprise Message Service Application Integration Guide

26 | Chapter 4 Integrating With IBM WebSphere Application Server Version 6.1
Overview of Integrating With IBM WebSphere
This chapter is divided into the following sections:
• Create TIBCO Enterprise Message Service Administered Objects — describes the steps needed to create connection factory, topic, and queue objects in the EMS server, which are then used when configuring the WebSphere application server.
• Configure WebSphere to Use EMS as the JMS Provider — demonstrates how to reconfigure and run MDBs using TIBCO Enterprise Message Service as the JMS provider within WebSphere.
TIBCO Enterprise Message Service is simply added to WebSphere application server and client container as a JMS provider. Then, the MDB is reconfigured for the new JMS provider (TIBCO EMS) resources and re-deployed.
• Modify the Samples to Use SSL Communications — details how to modify the program to use SSL as the communication protocol with TIBCO Enterprise Message Service.
The instructions in this section assume you have already downloaded and installed WebSphere Application Server V6.1, trial (plus embedded messaging) on a Windows platform, and have an MDB configured with WebSphere Application Server. The instructions also assume that TIBCO Enterprise Message Service and WebSphere Application Server are both running on the same machine, and that you have complied the sample Java clients included with your EMS installation.
TIBCO Enterprise Message Service Application Integration Guide

Create TIBCO Enterprise Message Service Administered Objects | 27
Create TIBCO Enterprise Message Service Administered Objects
This section creates the following administered objects in the tibemsd :
• The topic connection factory, sample.TCF.
• The queue connection factory, sample.QCF.
• Two topics, sample.weather and sample.* .
• One queue, sample.Q1 .
In this section, you also associate the topic sample.* with the external JNDI name sample.listen .
To create the administered objects:
1. Start the TIBCO Enterprise Message Service server.
2. Start the admin tool and connect to the EMS server using the connect command:
> connect -server server_name
where server_name is the server you wish to connect to.
3. Enter the following commands to create the connection factories and destinations:
> create factory sample.TCF topic> create factory sample.QCF queue> create topic sample.*> create jndiname sample.listen topic sample.*> create topic sample.weather> create queue sample.Q1
The create jndiname command associates the destination with an external JNDI name. This command is needed if you want to use an external JNDI name that is different from the destination name. In the example above, the topic sample.* is assigned the external JNDI name sample.listen .
TIBCO Enterprise Message Service Application Integration Guide

28 | Chapter 4 Integrating With IBM WebSphere Application Server Version 6.1
Configure WebSphere to Use EMS as the JMS Provider
This section describes the steps required to configure WebSphere Application Server 6.1 to use TIBCO Enterprise Message Service as its JMS provider. The configuration process is described in the following steps:
• Add TIBCO Enterprise Message Service as a JMS Provider, page 28
• Configure JNDI Bindings for the Connection Factories, page 29
• Configure JNDI Bindings for the Destinations, page 30
• Create new Listener Ports, page 31
• Install the MDB to Use the Topic and Queue Listeners, page 32
After the application server is configured, the section Run the Sample Application Clients on page 33 gives steps for running the sample Java clients to test the configuration.
This section assumes that an MDB is already configured in the WebSphere Application Server, and that the required administered objects have been created in the EMS server, as described above in Create TIBCO Enterprise Message Service Administered Objects on page 27.
Add TIBCO Enterprise Message Service as a JMS ProviderThis section configures WebSphere to uses TIBCO Enterprise Message Service as a JMS provider.
1. Start the WebSphere application server.
2. Start the WebSphere Administrative Console.
3. In the WebSphere navigation pane, choose Resources > JMS > JMS providers.
4. In the content pane, click the New button.
5. Enter the following values for the required properties:
6. Click the OK button.
Name TIBCO
Description TIBCO Enterprise Message Service
Classpath EMS_HOME\lib\tibjms.jar
External Initial Context Factory
com.tibco.tibjms.naming.TibjmsInitialContextFactory
External Provider URLtibjmsnaming://localhost:7222
TIBCO Enterprise Message Service Application Integration Guide

Configure WebSphere to Use EMS as the JMS Provider | 29
7. Click the Apply button.
For more information about this task, review the WebSphere Application Server documentation for defining a generic JMS provider.
Configure JNDI Bindings for the Connection FactoriesThis section describes how to create topic and queue connection factories in the WebSphere server.
Create a TopicConnection
Factory
1. In the WebSphere navigation pane, choose Resources > JMS > Topic connection factories.
2. In the content pane, click the New button.
3. Choose TIBCO as the resource provider, and click OK.
4. Enter the following values for the required properties:
5. Click the OK button.
Create a QueueConnection
Factory
6. In the WebSphere navigation pane, choose Resources > JMS > Queue connection factories.
7. Click the New button.
8. Choose TIBCO as the resource provider, and click OK.
9. Enter the following values for the required properties:
10. Click the OK button.
11. Click the Save button.
Name TIBCOConnectionFactory1
Type TOPIC
JNDI Name jms/ConnectionFactory1
Description Sample Topic ConnectionFactory
External JNDI Name sample.TCF
Name TIBCOConnectionFactory2
Type QUEUE
JNDI Name jms/ConnectionFactory2
Description Sample Queue ConnectionFactory
External JNDI Name sample.QCF
TIBCO Enterprise Message Service Application Integration Guide
30 | Chapter 4 Integrating With IBM WebSphere Application Server Version 6.1
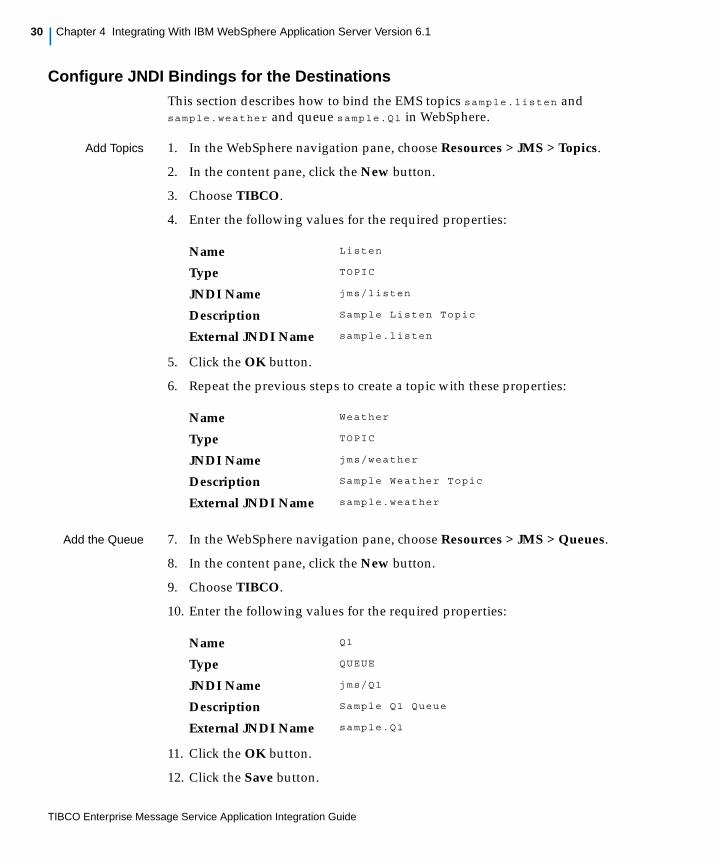
Configure JNDI Bindings for the DestinationsThis section describes how to bind the EMS topics sample.listen and sample.weather and queue sample.Q1 in WebSphere.
Add Topics 1. In the WebSphere navigation pane, choose Resources > JMS > Topics.
2. In the content pane, click the New button.
3. Choose TIBCO.
4. Enter the following values for the required properties:
5. Click the OK button.
6. Repeat the previous steps to create a topic with these properties:
Add the Queue 7. In the WebSphere navigation pane, choose Resources > JMS > Queues.
8. In the content pane, click the New button.
9. Choose TIBCO.
10. Enter the following values for the required properties:
11. Click the OK button.
12. Click the Save button.
Name Listen
Type TOPIC
JNDI Name jms/listen
Description Sample Listen Topic
External JNDI Name sample.listen
Name Weather
Type TOPIC
JNDI Name jms/weather
Description Sample Weather Topic
External JNDI Name sample.weather
Name Q1
Type QUEUE
JNDI Name jms/Q1
Description Sample Q1 Queue
External JNDI Name sample.Q1
TIBCO Enterprise Message Service Application Integration Guide

Configure WebSphere to Use EMS as the JMS Provider | 31
Create new Listener PortsThis section creates the WebSphere listener ports that connect to the tibemsd . You create two listener ports:
• TIBCOPubSubListenerPort for the configured topics.
• TIBCOPtoPListenerPort for the configured queue.
To create the listener ports:
1. In the WebSphere navigation pane, choose Servers > Application servers, and choose the name of the application server.
2. In the content pane, scroll down to the Communications section and click Message Listener Service.
3. In the content pane, select Listener Ports.
Create a ListenerPort for Topics
4. Click the New button.
5. Enter the following values for the required listener port properties:
6. Click the OK button.
Create a ListenerPort for a Queue
7. Repeat the previous steps to create another listener port with the following property values:
8. Click the OK button.
9. Click the Save button.
For more information about this task, review the WebSphere Application Server documentation for adding a new listener port.
Name TIBCOPubSubListenerPort
Initial State Started
Description Listener Port for TIBCO PubSub
ConnectionFactory JNDI Name jms/ConnectionFactory1
Destination JNDI Name jms/listen
Name TIBCOPtoPListenerPort
Initial State Started
Description Listener Port for TIBCO Point to Point
ConnectionFactory JNDI Name jms/ConnectionFactory2
Destination JNDI Name jms/Q1
TIBCO Enterprise Message Service Application Integration Guide
32 | Chapter 4 Integrating With IBM WebSphere Application Server Version 6.1
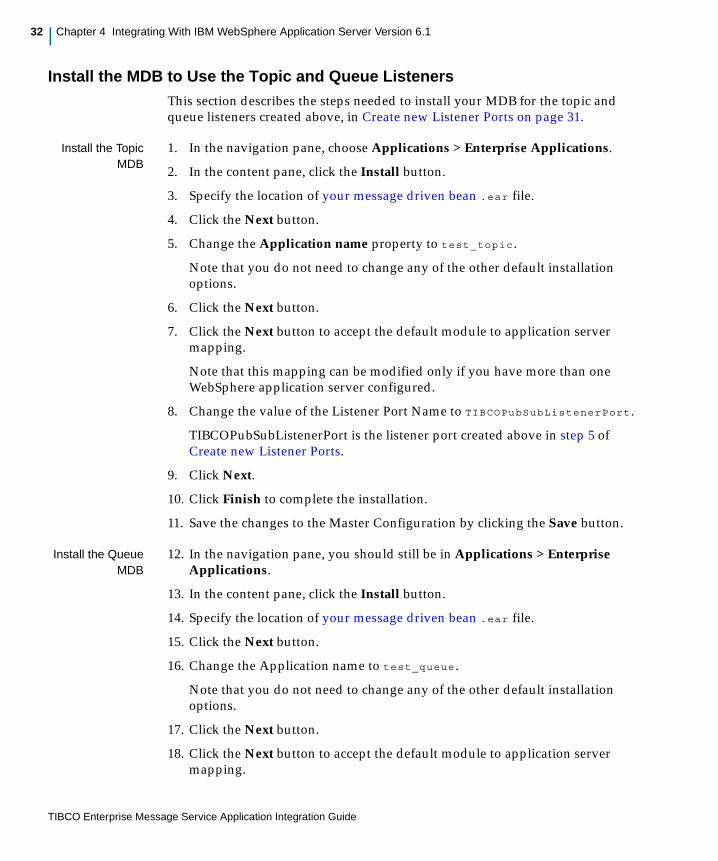
Install the MDB to Use the Topic and Queue ListenersThis section describes the steps needed to install your MDB for the topic and queue listeners created above, in Create new Listener Ports on page 31.
Install the TopicMDB
1. In the navigation pane, choose Applications > Enterprise Applications.
2. In the content pane, click the Install button.
3. Specify the location of your message driven bean .ear file.
4. Click the Next button.
5. Change the Application name property to test_topic .
Note that you do not need to change any of the other default installation options.
6. Click the Next button.
7. Click the Next button to accept the default module to application server mapping.
Note that this mapping can be modified only if you have more than one WebSphere application server configured.
8. Change the value of the Listener Port Name to TIBCOPubSubListenerPort .
TIBCOPubSubListenerPort is the listener port created above in step 5 of Create new Listener Ports.
9. Click Next.
10. Click Finish to complete the installation.
11. Save the changes to the Master Configuration by clicking the Save button.
Install the QueueMDB
12. In the navigation pane, you should still be in Applications > Enterprise Applications.
13. In the content pane, click the Install button.
14. Specify the location of your message driven bean .ear file.
15. Click the Next button.
16. Change the Application name to test_queue .
Note that you do not need to change any of the other default installation options.
17. Click the Next button.
18. Click the Next button to accept the default module to application server mapping.
TIBCO Enterprise Message Service Application Integration Guide

Configure WebSphere to Use EMS as the JMS Provider | 33
Note that this mapping can be modified only if you have more than one WebSphere application server configured.
19. Change the value of the Listener Port Name to TIBCOPtoPListenerPort .
TIBCOPtoPListenerPort is the listener port created above in step 7 of Create new Listener Ports.
20. Click Next.
21. Click Finish to complete the installation.
22. Save the changes to the Master Configuration by clicking the Save button.
Restart theApplication
Server
23. Stop and restart the application server to have your changes take effect.
24. After the application server has restarted, use the WebSphere Administrative Console to verify that the new listener ports are in their proper initial state.
To do this, expand Servers > Application Servers, then choose your server name in the content pane, then on Message Listener Service and then on Listener Ports. The new TIBCO listener ports should have a solid green arrow under the status column indicating that they are started.
For more information about this task, review the WebSphere Application Server documentation for configuring deployment attributes for a message-driven bean.
Run the Sample Application ClientsIn this section, you run the sample Java clients included with your TIBCO Enterprise Message Service installation. If this is the first time you have used these sample clients, you will need to compile them before following the steps described here.
1. From the EMS_HOME\samples\java directory, type the command: > java tibjmsTopicPublisher -topic sample.listen "hello world"
2. From the EMS_HOME\samples\java directory, type the command: > java tibjmsTopicPublisher -topic sample.weather "hello world 2"
3. From the EMS_HOME\samples\java directory, type the command: > java tibjmsQueueSender -queue sample.Q1 "hello world 3"
4. Open the WebSphere application server log, located in <installation_directory>\logs\<your server>\SystemOut.log , and verify that the
TIBCO Enterprise Message Service Application Integration Guide

34 | Chapter 4 Integrating With IBM WebSphere Application Server Version 6.1
WebSphere MDB consumed the sent messages. The log should contain messages sent to the following destinations:
Destination Message
sample.listen hello world
sample.weather hello world 2
sample.Q1 hello world 3
TIBCO Enterprise Message Service Application Integration Guide

Modify the Samples to Use SSL Communications | 35
Modify the Samples to Use SSL Communications
This section describes how to modify the above samples to use SSL communications between the TIBCO Enterprise Message Service server and WebSphere application server and client container. This section assumes you have already set up and run the samples over unencrypted connections, as detailed in the previous sections.
Enable SSL in the TIBCO Enterprise Message Service ServerThis section describes the steps that enable SSL in the tibemsd .
1. In EMS_HOME\bin\tibemsd.conf , add the following lines:
listen = ssl://localhost:7243
ssl_server_identity = certs/server.cert.pem ssl_server_key = certs/server.key.pem ssl_password = password
listen = tcp://localhost:7222
These lines explicitly set the tcp and ssl listen ports and specify the three required server-side SSL parameters: identity, private key, and password.
2. Save the file and stop the TIBCO Enterprise Message Service server.
3. Start the TIBCO EMS server with the -ssl_debug_trace option:
> tibemsd -ssl_debug_trace
See Starting the EMS Server on page 102 of the TIBCO Enterprise Message Service User’s Guide for more information.
When the server restarts you should see messages like the following in the console window confirming SSL is enabled:
2008-06-11 13:48:34 Secure Socket Layer is enabled. 2008-06-11 13:48:34 Accepting connections on ssl://localhost:7243. 2008-06-11 13:48:34 Accepting connections on tcp://localhost:7222.
Create JNDI Names for the SSL Queue and Topic Connection FactoriesTIBCO Enterprise Message Service is pre-configured with a sample SSL queue and topic connection factory. This step will create new JNDI names for the sample connection factories that are then be used throughout the rest of this section.
1. Verify that the SSL connection factories exist by starting the tibemsadmin tool and entering the command show factories . The names
TIBCO Enterprise Message Service Application Integration Guide

36 | Chapter 4 Integrating With IBM WebSphere Application Server Version 6.1
SSLTopicConnectionFactory and SSLQueueConnectionFactory should be among the names displayed.
2. Create new JNDI names for the existing SSL connection factories by entering the following commands:
> create jndiname sample.SSLTCF jndiname SSLTopicConnectionFactory> create jndiname sample.SSLQCF jndiname SSLQueueConnectionFactory
Add Additional SSL JNDI Properties to WebSphereLocate the jndi.properties file in the WebSphere installation directory:
<installation_directory>\properties\jndi.properties
If it does not already exist, create a text file called jndi.properties in the directory.
Edit the jndi.properties file to add the following lines:
com.tibco.tibjms.naming.security_protocol=sslcom.tibco.tibjms.naming.ssl_enable_verify_host=falsecom.tibco.tibjms.naming.ssl_vendor=j2se-default
These properties specify that the "SSL" protocol should be used for JNDI lookups, and that host verification is turned off (the JMS client will trust any host).
Configure SSL Communications Between the Application Server and the TIBCO Enterprise Message Service Server
This procedure adds the additional JAR files required for SSL to the CLASSPATH . It also modifies the external provider URL and the external JNDI name properties of the TIBCO JMS provider within the application server.
This causes the application server to connect to the SSL port on the TIBCO Enterprise Message Service server for JNDI lookups of administered objects. Additionally, the connection factory external JNDI names are modified to specify SSL connection factories (connection factories that create SSL-based connections).
1. From the WebSphere Administrative Console, expand Resources > JMS > JMS providers and choose TIBCO in the content pane.
2. Add the following lines to the Class path property value:
EMS_HOME\lib\tibjms.jarEMS_HOME\lib\TIBCrypt.jarEMS_HOME\lib\slf4j-api-1.4.2.jarEMS_HOME\lib\slf4j-simple-1.4.2.jar
3. Change the port number of the External Provider URL property from tibjmsnaming://localhost:7222 to:
TIBCO Enterprise Message Service Application Integration Guide

Modify the Samples to Use SSL Communications | 37
tibjmsnaming://localhost:7243
4. Click the OK button.
Configure theTopic Connection
Factory
5. In the WebSphere navigation pane, choose Resources > JMS > Topic connection factories.
6. Select TIBCOConnectionFactory1.
This is the connection factory created in Create a Topic Connection Factory on page 29.
7. For the External JNDI Name property value, change the name of the factory from sample.TCF to sample.SSLTCF.
8. Click the OK button.
Configure theQueue
ConnectionFactory
9. In the WebSphere navigation pane, choose Resources > JMS > Queue connection factories.
10. Select TIBCOConnectionFactory2.
This is the connection factory created in Create a Queue Connection Factory on page 29.
11. For the External JNDI Name property value, change the name of the factory from sample.QCF to sample.SSLQCF.
12. Click the OK button.
13. Click Save.
14. Stop and restart the WebSphere application server.
Run the Samples Application ClientsRun the samples application client again:
1. From the EMS_HOME\samples\java directory, type the command: > java tibjmsTopicPublisher -server ssl://localhost:7243 -topic sample.weather "hello world"
2. From the EMS_HOME\samples\java directory, type the command: > java tibjmsQueueSender -server ssl://localhost:7243 -queue sample.Q1 "hello world 2"
3. Open the WebSphere application server log, located in <installation_directory>\logs\<your server>\SystemOut.log , and verify that the WebSphere MDB consumed the sent messages.
TIBCO Enterprise Message Service Application Integration Guide

38 | Chapter 4 Integrating With IBM WebSphere Application Server Version 6.1
TIBCO Enterprise Message Service Application Integration Guide

TIBCO Enterprise Message Service Application Integration Guide
| 39
Index
A
application servers 10
C
changes from the previous release of TIBCO Enter-prise Message Service Application Integration Guide x
customer support xvi
I
integrating with third-party application servers 10
S
support, contacting xvi
T
technical support xvithird-party application servers 10TIBCO_HOME xiii