application note 307 - flex.com · application note 307 3 en/lzt 146 264 r3b ©flex, dec 2017...
TRANSCRIPT

BMR463 & BMR464 Parallel Operation With Load Sharing
Application Note 307Flex Power Modules

Introduction
A current sharing group is two or more modules operating in parallel at the same frequency - that is their outputs are connected together and interleaved to multiply the ripple frequency by the number of paralleled products. Paralleling products in this manner has the added benefits of reducing the input filter stress, distributing the converter thermal load, reducing volume and weight and many other advantages. Throughout this application note, the modules forming a current sharing group are sometimes referred to as phases. For example, a current sharing group of three paralleled modules has three phases. Similarly the current sharing group as a whole may also be referred to as a parallel rail.
Abstract
The 3E Digital products can be configured, controlled and monitored through a digital serial interface using the PMBus™ power management protocol.
This application note provides information on how to parallel two or more 3E POL regulators.
The most common reason for paralleling Board Mounted Power Supplies is either to increase the power output capability above the rating of a single product or to provide redundancy so that a single product failure will not affect the system operation. Other reasons for using products in parallel include distribution of thermal heat load over a larger board area and reducing the number of different product types used in a system design by implementing higher power requirements using products with lower output power in parallel.
Application Note 307 2 EN/LZT 146 264 R3B ©Flex, Dec 2017

Application Note 307 3 EN/LZT 146 264 R3B ©Flex, Dec 2017
Contents
Introduction 2
Paralleling Features & Philosophy 4Master and Slaves Over the GCB Bus 4
Introducing the GCB Bus 4Master and Slaves 4
Active Droop Current Sharing 4Understanding Droop 4Current Sharing Algorithm 5Current Balance Accuracy 6
Automatic Phase Distribution 6Common SYNC Clock 6Phase Distribution 6
Turn-On and Turn-Off 6Ramp Synchronization 7Minimum Duty Cycle 7Ramp Behavior 7Ramp Time Accuracy 8
Fault Handling 8Faults and Master/Slaves 8Faults and SYNC Clock 8
Phase Add/Drop 8Phase Drop 8Phase Add 9Dropped Phase and SYNC Clock 9Output Voltage at Phase Add/Drop 9
Voltage Tracking 10Adaptive Deadtime 10NLR Threshold Scaling 10Control Loop Design 10
Paralleling with Flex Power Designer 11
Introduction 11Creating a Parallel Rail 11Paralleling Made Simple 12
Layout Considerations 13
Appendix 1: Parallel Settings Automatically Configured by Flex Power Designer 14
Appendix 2: Parallel Command Reference 15GCB_CONFIG 15ISHARE_CONFIG 16USER_CONFIG 16MFR_CONFIG 17MISC_CONFIG 18DEADTIME_CONFIG 19DEADTIME 19VOUT_COMMAND 19VOUT_TRIM 19VOUT_CAL_OFFSET 19VOUT_DROOP 20TON_DELAY 21TOFF_DELAY 21TON_RISE, TON_FALL 21FREQUENCY_SWITCH 21ON_OFF_CONFIG 21OVUV_CONFIG 22POWER_GOOD_DELAY 22AUTO_COMP_CONFIG 22

Paralleling Features & Philosophy
Operation of modules in parallel normally requires reconfiguration using the PMBus. During operation of the modules however, the PMBus is not used for current sharing related communication. Thus unless needed for control or monitoring, a PMBus connection is not required for current sharing operation if the modules have already been properly reconfigured.
Master And Slaves Over The GCB Bus
Introducing the GCB (Global Communication Bus)The Flex BMR 462-464 modules have a dedicated single wire serial bus (the GCB bus) to synchronize and communicate real-time events. This is an internal bus, such that it is only connected across modules and not the PMBus system host. GCB addresses are assigned on a rail level, i.e. modules within the same current sharing group share the same GCB address. Addressing rails across the GCB is done with a 5 bit GCB ID, yielding a theoretical total of 32 rails that can be shared with a single GCB bus. Ensure that the GCB signal integrity is maintained when using a large product count.
During GCB events, all products will receive messages; however, only those products configured to respond will do so. GCB products can also transmit events if their programmed algorithm requires inter product communication. Some examples include current sharing, fault spreading, sequencing, broadcast margin and broadcast enable. Multiple current sharing groups and power rails can communicate over the same GCB bus.
Master and SlavesAt a high level, current sharing is a group of modules with their outputs tied together to form a single rail. The modules, acting as shared phases, require one phase to act as a master to continuously broadcast its inductor current to the other slave phases using the GCB bus. The master phase is the module with assigned position 1, whereas the slave phases are assigned positions 2, 3, 4,... etc. When a slave phase receives the inductor current from the master, it trims its output voltage up or down until all products in the group supply the same current to the load. If the master device faults during operation, the next device with the lowest member position will become the new current-sharing master.
A maximum of 7 products or phases is allowed in a current sharing group, and must be of the same model.
Active Droop Current Sharing
Current sharing with digital power has its share of advantages, but to understand this it is worth revisiting the fundamentals of current sharing and droop.
PRODUCT 1
MASTER
POSITION 1
(PHASE 1)GCB
SYNC
3.3 V
VIN
VIN
VIN
Rout Cout
SDA
SYNC OUT
PRODUCT 2
SLAVE
POSITION 2
(PHASE 2)
SYNC IN
PRODUCT 3
SLAVE
POSITION 3
(PHASE 3)
SYNC IN
RAIL 1SCL
Figure 1. A three-phase current sharing group. The GCB line is common across all phases, and the common Sync clock is generated by the master phase.
Understanding DroopIn most load-sharing applications, there needs to be a way for the individual phases to share load in proportion to their capacity. Ideally, the voltages across phases would operate at exactly the same voltage at all times. In practice though, manufacturing variations and the board design can lead to small differences in the actual output voltage. These small differences, when applied to regulators operating in parallel, creates current loss where a regulator with a higher voltage is supplying current to the other regulator(s). Figure 2 shows a simple example where one voltage source has a slightly different voltage by 5 mV, which causes a current imbalance of over 4 Amps.
Application Note 307 4 EN/LZT 146 264 R3B ©Flex, Dec 2017

Iout 1 = 12.38 A
PRODUCT 1 PRODUCT 2
Output = 1.0 V Output = 0.995 V
~20A Load( 0.05 Ω )
1 mΩ 1 mΩ
ILoad = 19.75 A
Iout 2 = 7.37 A
Figure 2. One scenario of current imbalance due to voltage differences.
Even if the regulators themselves are outputting the same voltage, there could be components between the regulator and the load that create variations of the ‘loadline resistance’, which also create a current imbalance. This can be due to the board layout, current-sense resistor differences, etc. Figure 3 shows another simple example where a small difference in the loadline creates a current imbalance of nearly 4 Amps.
Iout 1 = 11.86 A
PRODUCT 1 PRODUCT 2
Output = 1.0 V Output = 1.0 V
~20A Load( 0.05 Ω )
1.5 mΩ 1 mΩ
ILoad = 19.76 A
Iout 2 = 7.9 A
Figure 3. Another scenario where loadline imbalances can also cause current imbalance.
Across a range of loads, these imbalances change and can be visualized by plotting the individual loadlines (or droop) of each phase.
Because the BMR462-464 modules can sense their output voltage and output current while communicating with each other over the GCB bus, they can dynamically trim the output to reduce current imbalances, leading us to “Active Droop Current Sharing”.
Current Sharing AlgorithmA specific droop is set based on the application. The droop is set to the same value for each product in the group - that is you assume that the loadline is the same across all phases. Figure 4 shows an example where each product’s droop, or loadline, was set to 1 mV/A. Note that the graphs and the x axis represent the individual loadline of each product, not the loadline of the group. Due to differences in layout and component variances the actual loadlines contain slope differences and lead to a current imbalance; they are exaggerated in this example.
Iout15105 35302520 55504540 6560 70
0.60
0.55
0.80
0.75
0.70
0.65
0.95
0.90
0.85
Vout
75 95908580 115110105100
1.10
1.05
1.00
1.20
1.15
52 A35 A27.5 A
Slave_2
Slave_1
Master
Total Load Current = 27.5 A + 35 A + 52 A = 114.5 A
Configured Loadline = 1 mV/A per phase
Actual Loadlines
Master = 1.0 mV/A
Slave_1 = 1.5 mV/A
Slave_2 = 2.0 mV/A
Figure 4. Unbalanced phase currents due to slope error.
The minor imbalance results in each phase contributing an unequal portion of the load current. With Active Droop Current Sharing, the imbalance is detected as the Master’s load current is broadcast and each Slave’s reference voltage is trimmed up or down until all products in the group carry an equal portion of the load current:
This effect is shown in Figure 5. Notice in this case the Master initially sourced the majority of the load current. Each Slave’s reference voltage was trimmed in the positive direction until all phases source equal current to the load.
Iout15105 35302520 55504540 6560 70
0.60
0.55
0.80
0.75
0.70
0.65
0.95
0.90
0.85
Vout
75 95908580 115110105100
1.10
1.05
1.00
1.20
1.15
38.16 A / Phase
Slave_2
Slave_1
Master
Total Load Current = 114.5 A / 3 = 38.16 A
Each phase carries 38.16 A
Loadline is equal to configured
loadline = 1 mV/A per phase
Figure 5. Balanced phase currents. Slave reference voltage(s) is trimmed until all products’ currents equalize.
Current sharing equilibrium is shown in Figure 6 with a singular loadline being plotted that represents the actual static response for the sharing group. This loadline is maintained even when phases are added or dropped.
Application Note 307 5 EN/LZT 146 264 R3B ©Flex, Dec 2017

Each phase carries 38.16 A
Loadline is equal to configured
Actual Current Share Loadline per Phase = 1 mV/A
Iout15105 35302520 55504540 6560 70
0.60
0.55
0.80
0.75
0.70
0.65
0.95
0.90
0.85
Vout
75 95908580 115110105100
1.10
1.05
1.00
1.20
1.15
38.16 A / Phase
Actual Loadline
Total Load Current = 114.5 A / 3 = 38.16 A
loadline = 1 mV/A per phase
Figure 6. Current sharing phase balance is achieved.
Current Balance AccuracyThe actual current supplied by each product in a sharing group in steady state will not always be equal due to the current monitoring accuracy of each product. The current monitoring accuracy (see Technical Specification for each product) in turn will depend on the trimming of each product in production as well as varying with operating conditions such as input voltage, output voltage and temperature.
The products have been designed to operate beyond rated output current in order to support 100% of rated output current from each product in a sharing group (e.g. three 40 A products in parallel support 120 A output current). However the current monitoring accuracy should be taken into account when considering the thermal operating conditions of a current sharing group.
Automatic Phase Distribution
Common SYNC ClockAs mentioned earlier, a current sharing group requires a common SYNC clock across all phases, as shown in Figure 1. This SYNC clock can be provided internally by one of the products in the group (typically the master phase but can also be one of the slave phases) or by an external source. The SYNC output can be configured as push-pull or open-drain. All other products connected to the SYNC source must be configured as SYNC inputs. If using an external source, the switching frequency of each product must be configured to the same value as the external source.
Phase DistributionA current sharing group’s phases are always evenly distributed over a maximum phase offset of 360°. By default the phase offset of the Master is 0°. For example, if we evenly distribute the phase offsets of a 3-phase current sharing group (shown in Figure 1), the offset of the phases will ideally be 0°, 120° and 240°.
The actual phase offset is represented by a 4 bit binary number, which provides 16 possible offset values in 22.5° steps. The real phase displacement will be rounded to the closest 22.5° increment. The actual offsets for the 3-phase rail are in Table 1, and all possible phase displacements are shown in Figure 7.
In cases where a parallel rail shares the SYNC clock with other rails (single or parallel), one may want to customize the default phase offsets by using the INTERLEAVE command. The Flex Power Designer makes phase spreading simple to customize and visualize. See application note AN309 for more details.
Ideal Offset Actual Offset
Position_1 0º 0º
Position_2 120º 112.5º
Position_3 240º 247.5º
Table 1. Ideal vs actual phase offset.
0o
22.5 o
45.0 o
67.5 o90.0
o
112.5o
135.0o
157.5o180.0
o
202.5o
225.
0o
247.
5o27
0.0o
292.
5o
315.
0o
337.5o
N =
0
N =
1
N = 2
N = 3
N = 4
N = 5
N = 6
N = 7
N =
8
N = 9
N = 10
N = 11
N = 12
N = 13N =
14
N =
15
Figure 7. Phase offset resolution wheel.
Turn-On and Turn-Off
Turn-on and turn-off of a current sharing group may be controlled in two ways.
1. CTRL pin. The CTRL pin of all products in the current sharing group should be connected and be controlled from the same source.
Application Note 307 6 EN/LZT 146 264 R3B ©Flex, Dec 2017

2. PMBus enable. Sending a PMBus Enable or Margining command (OPERATION) to any of the products in the group will enable the whole group, as the module will ‘broadcast’ enable to phases over the GCB bus as shown in Figure 8.
Broadcast group x
Enable, Margining(OPERATION command)
Enable, Margining
PRODUCT 1 PRODUCT 2 PRODUCT 3
PMBus
GCB bus
Figure 8. Enable or margining signal will broadcast on the GCB bus.
For PMBus enable and margining, the products must be setup for Broadcast Enable and Margining (found in the MISC_CONFIG command), which is automatically set when using the Flex Power Designer software.
Ramp SynchronizationDuring turn-on and turn-off the voltage ramps of each phase are synchronized to start at the same time. This ensures that inter-phase circulating currents are minimized. Each product contains a separate digital controller that executes firmware. The individual controller firmware requires synchronization prior to ramp events. This is accomplished by forcing the Master phase to wait at least one additional firmware cycle during ramping events by configuring it to have additional TON_DELAY time and TOFF_DELAY relative to the other group Slaves. This additional delay is automatically set when using Flex Power Designer.
When the sharing group receives a CTRL pin or PMBus enable, the Slaves initialize their registers but wait for the Master to send a message before enabling. Once the Master phase completes its extra timing delay it transmits a GCB Ramp Flag and all products of the group produce a sequenced PWM and begin their soft-start routine. Timing diagram shown in Figure 9.
120o0o 240o 360o 480o 600o 720o 840o 960o
SYNCCLK
PH_1
PH_2
PH_3
Figure 9. Start-up synchronization.
Minimum Duty CycleCurrent sharing groups can be comprised of 2 to 7 products. Each product contains its own digital PID controller. To ensure that each controller produces an identical pulse width at turn-on the products must be configured for minimum duty cycle in the USER_CONFIG register. This starts each product in the group with the same initial pulse width. The actual configured rise time is conserved as shown in Figure 10.
Actual Ramp Start
Configured Rise Time
DV
DT
Figure 10. Turn-on rise time profile
The magnitude DV in the beginning of the ramp caused by the minimum duty cycle will increase with input voltage and switch frequency. The inrush current through the inductors may in some applications cause a small distortion in the beginning of the ramp as shown in Figure 11.
Figure 11. Effect of minimum duty cycle at ramp-up.
Ramp BehaviorThe products use a unique ramping algorithm in current sharing configuration that results in near perfect current sharing while ramping. This is accomplished by deriving different compensator coefficients for ramping than those used for steady-state operation. The PID taps for ramps are not user configurable. The ramp compensation is derived from the configured rise/fall time, input voltage, output voltage and switching frequency. During ramp the loop bandwidth is intentionally set to a very low value so response to transients will be limited. The user should limit dynamic loading while ramping.
Application Note 307 7 EN/LZT 146 264 R3B ©Flex, Dec 2017

If DLC (Dynamic Loop Compensation) is supported and enabled, the DLC algorithm will begin once the ramp is completed. The resulting compensation solution will be transmitted over the GCB bus so that each product in the group has the same compensator settings.
If DLC is not supported or disabled, the controllers of the products will switch to the configured compensator settings as defined in the used configuration. The switchover takes place at the moment when the PG (power good) signal is asserted. The user has control over the switchover by configuring the PG delay. While ramping down, the switch over takes place just before the TOFF delay timer starts.
Ramp Time AccuracyThe unique ramping algorithm used in current sharing restricts the rise and fall times to a maximum value. The low bandwidth ramp technique also limits the resolution of the rise and fall times. The ramp time accuracy and the maximum limit will depend on the configured switch frequency, input voltage and output voltage. When using the Flex Power Designer, the maximum limit is automatically calculated and handled.
Fault Handling
Faults and Master/SlavesIf one or more products in a current sharing group fault, the remaining phases will continue to operate, and the product with the next lowest position becomes the new master. Automatically adding back faulted phases into the group, i.e. restarting of individual products in the group due to a fault, is not supported. If the products in the group have one or more fault responses configured for restart (which is the default setting for BMR463-464), a synchronized restart of the whole group will occur only after all phases have shut down due to faults.
If the master phase faults and shuts down, a time of approximately 30 ms must pass after PG deassertion of the failed master phase, before the remaining phases can be disabled. If the remaining phases are disabled too quickly, they would stay active despite enable signal set to disable (if they can support the current). This is due to a slave phase being in a wait state when transitioning from being a slave phase to becoming the new master phase.
Faults and SYNC ClockA product (either current sharing master or slave) that is configured to source the SYNC clock will continue to supply the clock if it faults, even though it’s output has become inactive.
Phase Add/Drop
When products are configured in a current sharing group, individual products are capable of (dynamically) dropping out and adding back to the group. Phases are typically dropped or added to improve efficiency or to process a fault. Phases can be added or dropped on the fly using a separate power management host controller by invoking the PHASE_CONTROL command (and setting Phase Control Select in the MISC_CONFIG command to use the PHASE_CONTROL command).
Even though a dropped product stops switching the operation status of the product will be Enabled and the duty cycle read (command READ_DUTY_CYCLE) will be unchanged.
Phase DropIf the dropped phase was the group Master a new master will be reassigned based on the lowest sharing group position number of the existing operational products. If the dropped phase was supplying the SYNC clock it will continue to do so. The angular offset relative to the SYNC clock is defined by the group position and will autonomously redistribute based on the standing phases.
PRODUCT 1
MASTER
POSITION 1
(PHASE 1)
GCB
SDASCL
3.3 V
VIN
VIN
PRODUCT 2
SLAVE
POSITION 2
(PHASE 2)
VIN
PRODUCT 3
SLAVE
POSITION 3
(PHASE 3)
Rout Cout
Figure 12. 3-phase converter showing master, slave and position number.
Figure 12 shows an example of a functional 3-phase current sharing group prior to the dropping of the Master (Product 1). Figure 13 illustrates the new 2-phase configuration after the Master phase is dropped. Product 2 becomes the new Master for current
Application Note 307 8 EN/LZT 146 264 R3B ©Flex, Dec 2017

sharing. Product 1 supplying the SYNC clock continues to do so. The timing diagram is shown in Figure 14. After the Master phase is dropped the remaining two phases are redistributed and the phase displacement changes from 120° to 180°.
PRODUCT 1
DROPPED
POSITION 1
(PHASE 1)
GCB
SDASCL
3.3 V
VIN
VIN
PRODUCT 2
MASTER
POSITION 2
(PHASE 2)
VIN
PRODUCT 3
SLAVE
POSITION 3
(PHASE 3)
Rout Cout
Figure 13. 3-phase converter after master phase is dropped.
SYNCCLK
PH_1
PH_2
PH_3
PH_2
PH_3
0o 120o 240o 360o 480o 600o 720o 840o 960o
0o 180o 360o 540o 720o 900o
PO
S_1
PO
S_1
PO
S_1
PO
S_2
PO
S_2
PO
S_2
PO
S_2
PO
S_2
PO
S_2
PO
S_3
PO
S_3
PO
S_3
PO
S_3
PO
S_3
PO
S_3
BEFORE
AFTER
Figure 14. 3-phase converter after master phase is dropped.
Phase AddThe phase that was previously dropped may be added back into the group as determined by the power management host. When the adding is performed, the event is coordinated with the active group products over the GCB bus and the previously inactive product is added back into the group. In this example, Product 1 (from figure 12) was made active and resumed the role of being Master. The phase offset of each group product was automatically redistributed from 180° to 120° - essentially the reverse action of Figure 13.
Dropped Phase and SYNC ClockIf the dropped group product was supplying the SYNC clock it will continue to do so even though it has become inactive. If the product supplying the SYNC clock dropped from the group and is no longer capable of supplying the clock, the remaining members will detect the absence of SYNC and respond according to their fault spreading configuration. If a host or power system manager is monitoring SALERT, the PMBus can be read and the products will respond with the appropriate fault management alarm as described in the PMBus Power System Mgt Protocol Specification – Part II.
Output Voltage at Phase Add/DropWhen adding or dropping a phase there will be a small deviation to the output voltage due to the droop change. Since the effective droop value for the whole group is maintained the individual droop of each phase must change. For example in a sharing group of four phases and an effective droop of 0.25 mΩ, each phase has an individual droop of 1 mΩ. When dropping one of the phases the individual droop of the still active products is maintained at 1 mΩ for a short period of time, resulting in an actual effective droop of 0.33 mΩ. Figure 15 shows the example when the output current is 100 A, giving a deviation of 8 mV. When adding a phase back to the group there will be a deviation due to the same reason but in that case the output voltage will increase instead of decrease. In any case, the deviation will always be within the voltage drop range defined by the configured total droop. Note that the output voltage is also affected by the load step that occurs for active products during a phase add or drop.
Figure 15. Example of output voltage deviation during drop (10 mV/div, 10 ms/div)
Application Note 307 9 EN/LZT 146 264 R3B ©Flex, Dec 2017
Voltage Tracking
For current sharing groups voltage tracking is emulated by configuring the output ramp to match the ramp of the VTRK voltage. Doing this affects how the Rise/Fall times should be set along with the power-up delay times. See application note AN310 for more details.
NOTE: Voltage tracking with a pre-bias voltage at the output is not recommended since there is risk of phase currents to drift apart.
Adaptive Deadtime
The controllers of the products utilize a closed loop algorithm to optimize the dead-time applied between the drive signals for the power stage. In parallel operation several other algorithms are also running, i.e. local droop, rail droop, voltage regulation, and current balance algorithms. In order to avoid the possibility of these algorithms interferring with each other, the adaptive deadtime algorithm must be disabled while current sharing, i.e. fixed deadtimes must be used.
NLR Threshold Scaling
When multiple products are configured in a current sharing group, the effective output ripple is (ideally) divided by the number of active group products. This means when all products in the group are operating, the NLR (Non Linear Response) thresholds can be set to a smaller value just above the ripple amplitude. When a phase is dropped the ripple amplitude will increase.In order to avoid spurious NLR activity the products automatically adjust the NLR thresholds according to the ratio of active group products to total products of the group:
where ThresholdDrop is the NLR inner threshold setting used when some group products are dropped. ThresholdConfig is the NLR inner threshold setting configured for the group products. NAll is the total number of products in the sharing group.NActive is the number of products active in the group (products not faulted or intentionally deactivated).
NAll and NActive are determined automatically from the group configuration parameters. No additional programming or configuration is required. Since the available thresholds are quantized to multiples of 0.5% of the configured output voltage, the next higher available threshold is used if the result of the above formula is fractional.
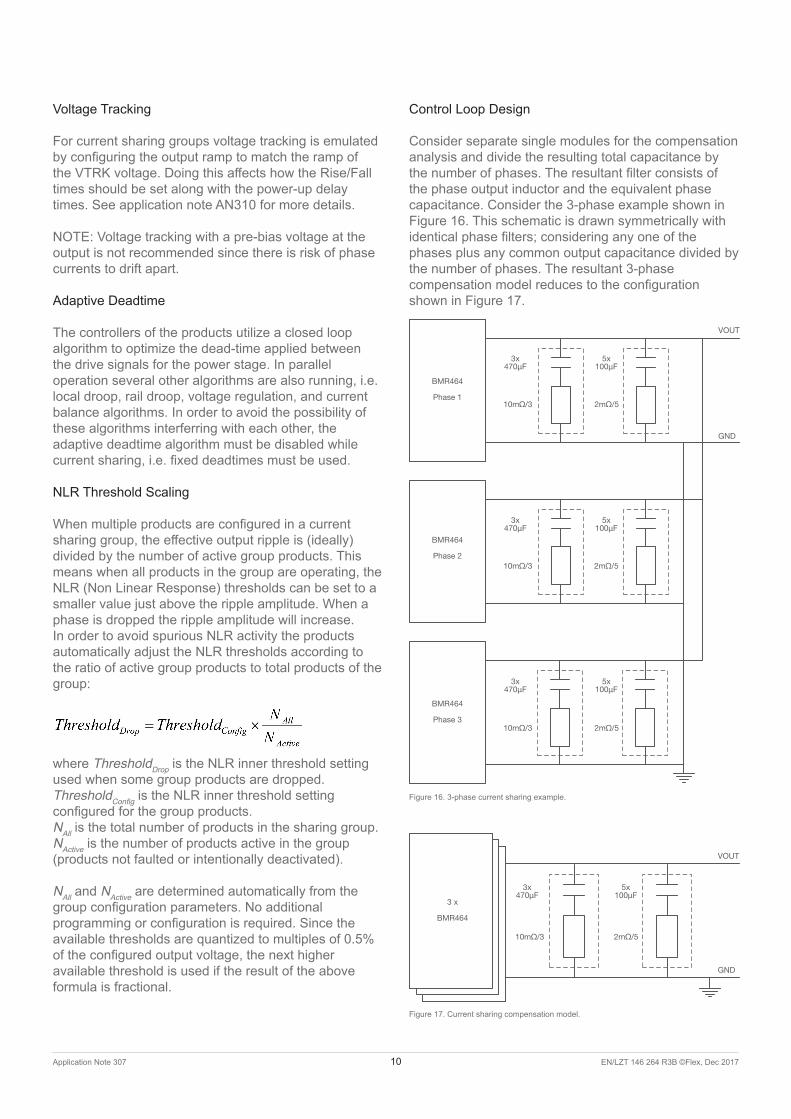
Control Loop Design
Consider separate single modules for the compensation analysis and divide the resulting total capacitance by the number of phases. The resultant filter consists of the phase output inductor and the equivalent phase capacitance. Consider the 3-phase example shown in Figure 16. This schematic is drawn symmetrically with identical phase filters; considering any one of the phases plus any common output capacitance divided by the number of phases. The resultant 3-phase compensation model reduces to the configuration shown in Figure 17.
BMR464
Phase 3
BMR464
Phase 2
BMR464
Phase 1
3x470µF
10mΩ/3
5x100µF
2mΩ/5
3x470µF
10mΩ/3
5x100µF
2mΩ/5
3x470µF
10mΩ/3
5x100µF
2mΩ/5
VOUT
GND
Figure 16. 3-phase current sharing example.
3 x
BMR464
3x470µF
10mΩ/3
5x100µF
2mΩ/5
VOUT
GND
Figure 17. Current sharing compensation model.
Application Note 307 10 EN/LZT 146 264 R3B ©Flex, Dec 2017

Paralleling with Flex Power Designer
Introduction
Paralleling BMR 463-464 modules requires setting up a number of parameters. While this can be done manually by setting individual commands, it is significantly easier to use the Flex Power Designer software to quickly create parallel rails. The software is available for download at digitalpowerdesigner.com.
Creating a Parallel Rail
This section walks through creating a parallel rail using the Flex Power Designer. No hardware is required, but this walkthrough project can be loaded onto two BMR 463’s using the POL paralleling test board (ROA 128 5077).
Step 1. Open the Flex Power Designer and create a new project.
Figure 18. Starting a new project.
Step 2. Add a parallel rail and member phases. Right-click on the “Rails” item in the Configuration Browser.
Figure 19. Starting a new project.
After adding the rail, add the phases. In the “Select Product:” field, select a BMR 463 device. Then click the “Add Parallel device” button to add another phase. For this example, we set the addresses of the phases to 0x58 and 0x59, which are the first two addresses on the POL parallel test board.
Figure 20. Adding parallel phases with the “Add parallel device” button.
After adding the parallel devices, your rail’s configuration should look as shown below.
Figure 21. Configuring parallel phase addresses.
Step 3. Now that the parallel rail is defined, we just need to configure its settings. First, while droop is usually configured automatically, you may optionally change the droop, which is automatically calculated evenly across phases and adjusted during phase add/drop events.
Figure 22. Current sharing droop settings.
Step 4. Outside of the optional droop setting, all we need to set in this example is the Rail’s VSET resistor, which is 3.3V (the POL parallel board default across all phases). The setting is found on the ‘Basic’ configuration tab as shown in Figure 23. You may also configure custom voltages, timing, and fault settings here as well.
Application Note 307 11 EN/LZT 146 264 R3B ©Flex, Dec 2017

Figure 23. Setting the default voltage expected from the VSET pin. PMBus set voltages/faults/timings can also be set on this tab.
Step 4. If you are going through this walkthrough with a POL parallel test board, you can load the project onto the devices. Setup the board as shown in Figure 24 below, then power it and connect the USB-PMBus Adapter to the board.
Figure 24. POL parallel test board setup for this example - two BMR463 modules at addresses 0x58 and 0x59.
After the board is powered and connected, ensure that the CTRL switch is off. To load the project configuration to devices, use the ‘Write Project to RAM & Store to NVM’ button in the toolbar.
Paralleling Made Simple
The previous example only took a few steps with an entirely new project. This is because the software automatically sets the commands required for parallel operation. You can see which commands have been automatically set by either going to the registers tab, or by going to the Export menu and previewing the commands sent to the parallel rail.
A full explanation of the automatically set commands is provided in Appendix I.
Application Note 307 12 EN/LZT 146 264 R3B ©Flex, Dec 2017

Layout Considerations
The PWB layout and placement of input and output capacitances should be made as symmetrical as possible between the products in a current sharing group, as illustrated in Figure 25. This is to minimize loadline differences, improve ripple cancelation and even-up the control loop response of each phase. For the same reason VIN, VOUT and GND connections should be as low impedance as possible.
Each product in a current sharing group must use the same point for voltage sense. It is recommended that the traces for the voltage sense lines are routed as a differential pair in order to minimize the sensitivity to disturbances.
Figure 25. Layout principles, two products.
Application Note 307 13 EN/LZT 146 264 R3B ©Flex, Dec 2017

Appendix 1: Parallel Settings Automatically Configured by Flex Power Designer
The Flex Power Designer software automatically does the following steps when setting up a parallel rail. These steps are done across all phases in the parallel rail unless otherwise noted.
If one is configuring modules without Flex Power Designer, these steps should serve as a checklist with more command information provided in Appendix 2.
1. Enable ramp-down during disable (i.e. Set bit 0 in ON_OFF_CONFIG to 0).
2. Disable crowbarring from occurring during an OV FAULT (i.e. Set bit 7 in OVUV_CONFIG to 0).
3. Enable Alternate Ramp Control (i.e. Set bit 2 in MFR_CONFIG to 1).
4. Enable a Minimum Duty Cycle of FSW/256 (i.e. In USER_CONFIG, set bit 13 to 1, and set bits 15:14 to 00).
5. Designate and configure SYNC source for the group. By default, the software configures the master phase to output SYNC, and slave phases to be SYNC inputs. Products not sourcing SYNC must be configured as SYNC inputs (all products in the group must use the same SYNC signal) (affects MFR_CONFIG bit 0, USER_CONFIG bits 6 & 5).
6. Disable Precise Ramp Up Delay (if applicable to the product model used, i.e. set bit 7 MISC_CONFIG to 1).
7. In ISHARE_CONFIG, - Assign the same “group number” setting. - Enumerate the member position across phases, the master phase will be set to Member Position 1. - Assign the same “number of devices” setting.
8. Ensure that the TON_DELAY and TOFF_DELAY times for the Master are at least 10 ms greater than the corresponding delay parameters of each Slave, with a minimum required delay of 15ms. Delay parameters must be greater than 5 ms. Delay parameters should be the same value across all slave phases. If using tracking, please see AN310 for more information on how TON_DELAY and TOFF_DELAY should be set.
9. Set Broadcast Enable and Broadcast Margin to
both be enabled (i.e. Set bits 15 & 14 in MISC_CONFIG to 1).
10. Ensure that the GCB_ID (set in GCB_CONFIG) and IShare GCB ID (set in ISHARE_CONFIG) is set to the same value across all devices.
11. Set INTERLEAVE to all 0’s. In cases where custom phase-spreading is needed, this value should be changed as described in AN309.
12. Disable adaptive deadtime algorithm and set a fixed deadtime (DEADTIME, DEADTIME_CONFIG).
13. Ensure that the following values are the same across all phases. The software ensures these values are the same by restricting the user from changing values on individual phases. - Ramp Timing (TON_RAMP & TOFF_FALL). - Fault Thresholds and Responses. - Droop/Loadline resistance settings (VOUT_DROOP). - Compensation-related parameters (PID_TAPS, NLR_CONFIG, AUTO_COMP_CONFIG). - Broadcast Group (GCB_CONFIG). - INTERLEAVE. - Switching Frequency (FREQUENCY_SWITCH).
Application Note 307 14 EN/LZT 146 264 R3B ©Flex, Dec 2017

Appendix 2: Parallel Command Reference
The tables below give a detailed description of the configurations required by or related to current sharing modules. Refer to AN302 for a detailed specification of each command.
GCB_CONFIG
Bits Purpose Configuration
15:13 Reserved These bits are not used and should be set to 0.
12:8 Broadcast Group Typically set to 0 for all devices. For a current sharing group that shall be enabled by the PMBus, the Broadcast Group value must be set the same of each product in the group. If there are other products connected to the same GCB bus, they must also have the same Broadcast Group if any sequencing of fault-spreading functions are used. For more information, see section Broadcast Enable and Margining.
7:6 Reserved These bits are not used and should be set to 0.
5 GCB TX Inhibit Set this bit to 0 (default value) for each product in the group to enable GCB communication.
4:0 GCB ID Sets the rail’s GCB ID for sequencing and fault spreading. Assign the same rail GCB ID to each product in the current sharing group. If there are other non-current sharing products connected to the same GCB bus, make sure that those rails have a unique rail GCB ID. This ID value must be the same as the IShare GCB ID set in ISHARE_CONFIG.
Examples:GCB_CONFIG = 0x0000 GCB_ID = 0, Broadcast Group = 0GCB_CONFIG = 0x0407 GCB_ID = 7, Broadcast Group = 4
Application Note 307 15 EN/LZT 146 264 R3B ©Flex, Dec 2017

ISHARE_CONFIG
Bits Purpose Configuration
15:8 IShare GCB ID Set to the same GCB ID as in GCB_CONFIG for each product in the current sharing group.
7:5 Number of Member For each product in the current sharing group, set to the number of products in the group - 1. Example: 3 products in the group use 3 – 1 = 2.
4:2 Member position Defines position of product in the group. The master with position 1 is assigned value 0 and the slaves are assigned values 1, 2, 3, …
1 Reserved This bit is not used and should be set to 0.
0 IShare control Set this bit to 1 for each product in the current sharing group. This enables current sharing.
Examples: ISHARE_CONFIG = 0x0721 GCB_ID = 7, Position 1 in a group of 2 products ISHARE_CONFIG = 0x0725 GCB_ID = 7, Position 2 in a group of 2 products
USER_CONFIG
Bits Purpose Configuration
15:13 Minimum Duty Cycle The minimum allowable duty cycle must be enabled to ensure that each phase starts the turn-on ramp with the same pulse width. For each product in the group, enable a minimum duty cycle of FSW / 256, i.e. bits 15:13 = 001.
12 Alternate Ramp Down Set according to system design requirements. Normally set to 0 for each product in the current group (default value).
11 SYNC Time-out Enable
10 Reserved
9 PID Feed-forward Control
8 Fault spreading mode If fault spreading shall be used for the current sharing rail, set this bit to 1 for each product in the current sharing group.
7 Reserved This bit is not used and should be set to 0.
6 Sync Input Mode For each product in the current sharing group, except the one that possibly will be used to generate sync clock, this bit shall be set to 1 (force the SYNC pin to be input). For a product that shall be used to output sync clock this bit shall be set to 0.
Application Note 307 16 EN/LZT 146 264 R3B ©Flex, Dec 2017

Application Note 307 17 EN/LZT 146 264 R3B ©Flex, Dec 2017
5 Sync Output Control Set to 1 for products in the current sharing group that shall be used to output sync clock from the SYNC pin. Make sure the SYNC Output Mode bit in MFR_CONFIG is set according to the system design requirements for these products. For each product in the group that uses the SYNC pin as an input the Sync Output Control bit shall be set to 0 (default).
4:3 Reserved Set to 0 for each products in the current group (default value).
2 OFF low-side control
1:0 Standby Mode Monitoring must be enabled for all products in the current sharing group (bits 1:0 = 01 = default value). This ensures that the firmware is initialized prior to enabling the output voltage.
Examples: USER_CONFIG = 0x2031 SYNC pin as clock output, fault spreading disabled USER_CONFIG = 0x2051 SYNC pin as clock input, fault spreading disabled USER_CONFIG = 0x2151 SYNC pin as clock input, fault spreading enabled
MFR_CONFIG
Bits Purpose Configuration
15:11 Current Sense Blanking Delay
This delay parameter controls the blanking time (ns) after switching the top or bottom FET, preventing switch noise from disturbing the current measurement circuit. Normally the default value used for each product will be enough but in some applications an increased value might be needed.
10:8 Current Sense Fault Count Set according to system design requirements. Normally the default values shall be used for each product in the current sharing group.
7:6 Reserved
5:4 Current Sense Control
3 NLR During Ramp Shall be set to 0 (default) for each product in the current group.
2 Alternate Ramp Control Shall be set to 1 (alternate ramp enabled) for each product in the current sharing group.
1 PG Pin Output Control Set according to system design requirements.
0 SYNC Pin Output Control Set according to system requirements (open drain or push-pull output) for products in the group that is configured to output sync clock. For products using the SYNC pin as input this bit can be set to either 0 or 1.
Examples: MFR_CONFIG = 0x8F14 SYNC pin output as open-drain MFR_CONFIG = 0x8F15 SYNC pin output as push-pull

If the Current Sense Blanking Delay, BlankDelay, is increased the read READ_IOUT value will be affected by a small offset. To compensate for this the existing IOUT_CAL_OFFSET value can be changed according to the approximate formula below (it is assumed that bits 5:4 Current Sense Control is unchanged = down slope sense).
Where L = Output inductor value of the product (model dependent).
MISC_CONFIG
Bits Purpose Configuration
15 Broadcast Margin If broadcast margining or enable shall be used (see GCB_CONFIG) for the current sharing group these bits must be set accordingly. The same setting must be used for each product in the group. Note that Broadcast Enable can be used only when PMBus on/off control is used. If using on/off control by the CTRL pin, the CTRL pin of each product in the group must be connected to the enable signal.
14 Broadcast Enable
13 Phase Enable Select Shall be set to 1 (= phase add/drop by PHASE_CONTROL command) for each product in the current sharing group.
12:9 ReservedSet according to system design requirements. Normally set to 0 for each product in the current group (default value).8 * IOUT_OMEGA_OFFSET
calibration
7 * Precise Ramp-Up Delay If Precise Ramp-Up Delay is supported by the product used, this bit shall be set to 1 (=Precise Ramp-up Delay disabled) for each product in the current sharing group.
6 Diode Emulation
Set according to system design requirements. Normally the default values shall be used for each product in the current sharing group. Diode Emulation and Adaptive Frequency is not supported with current sharing and shall be disabled.
5:3 Reserved
2 Minimum GL Pulse
1 Snapshot
0 * Adaptive Frequency
* These bits are not supported by some models, see AN302 or Flex Power Designer.
Examples: MISC_CONFIG = 0x2082 No broadcast functions MISC_CONFIG = 0x6082 Broadcast Enable activated MISC_CONFIG = 0xA082 Broadcast Margining activated
Application Note 307 18 EN/LZT 146 264 R3B ©Flex, Dec 2017

DEADTIME_CONFIG
Bits Purpose Configuration
15 H-L Deadtime Mode Set to 1 in order to disable the adaptive deadtime algorithm.
14:8 Min Deadtime H-L Not applicable when the adaptive deadtime algorithm is disabled.
7 L-H Deadtime Mode Set to 1 in order to disable the adaptive deadtime algorithm.
6:0 Min Deadtime L-H Not applicable when the adaptive deadtime algorithm is disabled.
Example: DEADTIME_CONFIG = 0x8080 Adaptive deadtime algorithm disabled for both H-L and L-H deadtimes
DEADTIME
Product H-L Deadtime(Bits 15:8)
L-H Deadtime(Bits 7:0)
DEADTIME
BMR 463 xx02 / xxx BMR 463 xx06 / xxx
30 ns 12 ns 0x1E0C
BMR 463 xx08 / xxx BMR 463 xx09 / xxx
24 ns 12 ns 0x180C
BMR 464 xx02 / xxx 30 ns 20 ns 0x1E14
BMR 464 xx08 / xxx 24 ns 20 ns 0x1814
Example: DEADTIME = 0x1E0C H-L deadtime = 30 ns, L-H deadtime = 12 ns
VOUT_COMMAND
Each current sharing phase must be set to the same output voltage. Since the droop/current sharing algorithm will need headroom to adjust the output voltage, it is recommended to keep VOUT_COMMAND below 0.96 x VOUT_MAX.
The user might want to increase the nominal output voltage by an offset in order to compensate for the load-line droop. Typically an offset magnitude of 0.5 x IMAX x RDROOP would be used.
VOUT_TRIM
Writing this command will have no effect for products in a current sharing group since the command is used by the current sharing algorithm. The Master phase will always retain a zero VOUT_TRIM value, while each
Slave phase will adjust its VOUT_TRIM value until all phases carry equal load current.
Application Note 307 19 EN/LZT 146 264 R3B ©Flex, Dec 2017

VOUT_CAL_OFFSET
The VOUT_CAL_OFFSET parameter contains a calibration value from production and should not be changed. If an offset voltage is desired to overcome the
effects of droop, the value of VOUT_COMMAND should be adjusted.
VOUT_DROOP
Droop resistance is used as part of the current sharing algorithm. Each product in the group shall be assigned the same VOUT_DROOP value, which will be the effective droop (or loadline) of the whole group. Since the total current is shared between the products in the group, the droop of each individual phase will be set higher than the configured VOUT_DROOP value.
Example for a current sharing group with four products:
VOUT_DROOP value assigned to all
four products 0.25 mV/A
Effective Vout Droop (loadline of the
group output) 0.25 mV/A
Individual Vout Droop Per Phase (when
all phases active) 0.25 x 4 = 1.0 mV/A
The assigned effective droop is maintained even when phases are added or dropped which means the individual droop of each phase is automatically adjusted.
It is recommended to assign a VOUT_DROOP value that gives an individual droop between 0.5 and 1.5 mV/A per phase. In general current sharing balance is improved with higher droop. A too high droop may cause instability at high loads. The highest possible droop for stable operation decreases as temperature and output load increases. The graphs in Figure 26 and Figure 27 show the recommended maximum individual droop per phase vs output voltage and maximum output current, assuming operation at a maximum temperature of +95ºC.
In order not to affect the configured over current protection (OCP) threshold; the maximum output current used when defining maximum droop should be equal to the configured OCP threshold.
Dro
op
/ p
hase
(mV
/A)
0.4
0.6
0.8
1.0
1.2
1.4
1.6
1.8
2.0
2.2
2.4
2.6
2.8
3.0
3.2
3.4
26 30 34 38 42 46 50
VOUT 0.600 - 0.988 V VOUT 0.988 - 1.383 V VOUT 1.383 - 1.975 V
VOUT 1.975 - 2.398 V VOUT 2.398 - 2.963 V VOUT 2.963 - 3.753 V
Max output current / phase (OCP threshold) (A)
Figure 26. Recommended maximum individual droop per phase vs VOUT and max IOUT for BMR464.
0.8
1.2
1.6
2.0
2.4
2.8
3.2
3.6
4.0
4.4
4.8
5.2
5.6
15 17 19 21 23 25 27 29
VOUT 0.600 - 0.988 V VOUT 0.988 - 1.383 V VOUT 1.383 - 1.975 V
VOUT 1.975 - 2.398 V VOUT 2.398 - 2.963 V VOUT 2.963 - 3.753 V
Max output current / phase (OCP threshold) (A)
Dro
op
/ p
hase
(mV
/A)
Figure 27. Recommended maximum individual droop per phase vs VOUT and max IOUT for BMR463.
Application Note 307 20 EN/LZT 146 264 R3B ©Flex, Dec 2017

TON_DELAY
For each Slave phase the TON_DELAY parameter shall be set equal to 5 ms or higher. For the Master phase TON_DELAY shall be set at least 10 ms higher than the TON_DELAY value used for each
Slave phase. The resulting delay times used for the common output will be the one set for the Master phase.
TOFF_DELAY
Same configurations rules as for TON_DELAY.
TON_RISE, TON_FALL
The TON_RISE and TON_FALL values must be equal for each phase in the group. For a current sharing group there is an upper limit to the ramp time that can be used. The limit will depend on the used switch frequency, input voltage and output voltage. Figure 28 shows the approximate maximum ramp time when considering the whole input voltage range 4.5-14 V. It is recommended to use ramp times in the range 5 to 10 ms.
Max ramp time(ms)
Output voltage (V)
5.00
15.00
25.00
35.00
45.00
0.5 1.0 1.5 2.0 2.5 3.0 3.5
200 kHz 320 kHz 480 kHz 640 kHz
Figure 28. Max ramp time vs output voltage and switch frequency.
FREQUENCY_SWITCH
If the current sharing group uses an external clock, the FREQUENCY_SWITCH value shall be set to the frequency value of the external clock.
The FREQUENCY_SWITCH value shall be equal for each product in a current sharing group.
ON_OFF_CONFIG
The configuration of ON_OFF_CONFIG must be equal for each product in a current sharing group. Ramping down the output at turn-off is mandatory which means bit 0 in ON_OFF_CONFIG must be set to 0. Note that if enabling by the PMBus is used, Broadcast Enable must be activated in MISC_CONFIG and GCB_CONFIG Examples:ON_OFF_CONFIG = 0x16 Enable by CTRL pin, active high polarity, ramp down at turn-offON_OFF_CONFIG = 0x14 Enable by CTRL pin, active low polarity, ramp down at turn-offON_OFF_CONFIG = 0x1A Enable by PMBus command OPERATION, ramp down at turn-off
Application Note 307 21 EN/LZT 146 264 R3B ©Flex, Dec 2017

OVUV_CONFIG
For products in a current sharing group the crowbar function must be turned off, i.e. bit 7 in OVUV_CONFIG must be cleared.
Example:OVUV_CONFIG = 0x0F
POWER_GOOD_DELAY
In order for the transition of compensator coefficients (see section Ramp Behavior) to not occur before ramp-up has finished, the POWER_GOOD_DELAY value should fulfill the equation below.
The POWER_GOOD_DELAY value shall be equal for each product in the group.
AUTO_COMP_CONFIG
The AUTO_COMP_CONFIG value shall be equal for each product in the current sharing group.
Bits Purpose Configuration
7:4 DLC Result Scaling Set according to system design requirements.
3 Power Good Assertion Set according to system design requirements. It is recommended to set this bit to 1 (default), i.e. assert PG after DLC algorithm has finished, due to the variation of the time the DLC algorithm takes.
2 DLC Result Store Set according to system design requirements.
1:0 DLC Mode Set to 00 (DLC disabled) or 01 (DLC algorithm once after ramp). Repetition of DLC algorithm every second or minute shall not be used for current sharing groups.
Examples: AUTO_COMP_CONFIG = 0x49 50% DLC scaling, Assert PG after DLC, Do not store DLC to RAM, Perform DLC algorithm after ramp
Application Note 307 22 EN/LZT 146 264 R3B ©Flex, Dec 2017

Flex Power Modulesflex.com/expertise/power/modules
APPLICATION NOTEEN/LZT 146 264 R3B
© Flex Dec 2017
Formed in the late seventies, Flex Power Modules is a division of Flex that primarily designs and manufactures isolated DC/DC converters and non-isolated voltage products such as point-of-load units ranging in output power from 1 W to 700 W. The products are aimed at (but not limited to) the new generation of ICT (information and communication technology) equipment where systems’ architects are designing boards for optimized control and reduced power consumption.
Flex Power Modules Torshamnsgatan 28 A164 94 Kista, SwedenEmail: [email protected]
Flex Power Modules - Americas600 Shiloh RoadPlano, Texas 75074, USATelephone: +1-469-229-1000
Flex Power Modules - Asia/PacificFlex Electronics Shanghai Co., Ltd 33 Fuhua Road, Jiading DistrictShanghai 201818, ChinaTelephone: +86 21 5990 3258-26093
The content of this document is subject to revision without notice due to continued progress in methodology, design and manufacturing. Flex shall have no liability for any error or damage of any kind resulting from the use of this document