application notes for configuring ascom i62 wireless ... avaya aura® session manager r6.2 – issue...
TRANSCRIPT

PG; Reviewed:
SPOC 1/4/2013
Solution & Interoperability Test Lab Application Notes
©2013 Avaya Inc. All Rights Reserved.
1 of 27
Ascomi62_CM62
Avaya Solution & Interoperability Test Lab
Application Notes for Configuring Ascom i62 Wireless
Handsets with Avaya Aura® Communication Manager R6.2
and Avaya Aura® Session Manager R6.2 – Issue 1.0
Abstract
These Application Notes describe the configuration steps for provisioning Ascom’s i62
Wireless Handsets to interoperate with Avaya Aura® Communication Manager and Avaya
Aura® Session Manager.
Information in these Application Notes has been obtained through DevConnect compliance
testing and additional technical discussions. Testing was conducted via the DevConnect
Program at the Avaya Solution and Interoperability Test Lab.

PG; Reviewed:
SPOC 1/4/2013
Solution & Interoperability Test Lab Application Notes
©2013 Avaya Inc. All Rights Reserved.
2 of 27
Ascomi62_CM62
1. Introduction
These Application Notes describe the configuration steps for provisioning Ascom’s i62 Wireless
handsets to interoperate with Avaya Aura® Communication Manager R6.2 and Avaya Aura®
Session Manager R6.2. Ascom’s i62 handsets are configured to register with Avaya Aura®
Session Manager and are also configured on Avaya Aura® Communication Manager as 9600
SIP endpoints. The Ascom i62 handsets then behave as third-party SIP extensions on Avaya
Aura® Communication Manager able to make/receive internal and PSTN/external calls and have
full voicemail and other telephony facilities available on Avaya Aura® Communication
Manager.
2. General Test Approach and Test Results
The interoperability compliance testing evaluates the ability of Ascom i62 Wireless sets to make
and receive calls to and from Avaya H.323, SIP deskphones, and PSTN endpoints. Avaya Aura®
Messaging was used to allow users leave voicemail messages and to demonstrate Message
Waiting Indication and DTMF on the Ascom handsets.
DevConnect Compliance Testing is conducted jointly by Avaya and DevConnect members. The
jointly-defined test plan focuses on exercising APIs and/or standards-based interfaces pertinent
to the interoperability of the tested products and their functionalities. DevConnect Compliance
Testing is not intended to substitute full product performance or feature testing performed by
DevConnect members, nor is it to be construed as an endorsement by Avaya of the suitability or
completeness of a DevConnect member’s solution.

PG; Reviewed:
SPOC 1/4/2013
Solution & Interoperability Test Lab Application Notes
©2013 Avaya Inc. All Rights Reserved.
3 of 27
Ascomi62_CM62
2.1. Interoperability Compliance Testing
The compliance testing included the test scenarios shown below. Note that when applicable, all tests
were performed with Avaya SIP deskphones, Avaya H.323 deskphones, Ascom i62 endpoints and
PSTN endpoints.
Basic Calls
Hold and Retrieve
Attended and Blind Transfer
Call Forwarding Unconditional, No Reply and Busy
Call Waiting
Call Park/Pickup
EC500
Conference
Do Not Disturb
Calling Line Name/Identification
Codec Support
DTMF Support
Message Waiting Indication
2.2. Test Results
The following observations were noted during testing.
1. TLS negotiation between the i62 handsets and Session Manager fails. All compliance
testing was done using UDP and TCP as the transport protocol.
2.3. Support
Support from Avaya is available by visiting the website http://support.avaya.com and a list of
product documentation can be found in Section 11 of these Application Notes. Technical support
for the Ascom i62 wireless handsets can be obtained through a local Ascom supplier. Ascom
global technical support:
Email: [email protected]
Help desk: +46 31 559450

PG; Reviewed:
SPOC 1/4/2013
Solution & Interoperability Test Lab Application Notes
©2013 Avaya Inc. All Rights Reserved.
4 of 27
Ascomi62_CM62
3. Reference Configuration
Figure 1 shows the network topology during compliance testing. The Ascom i62 Wireless
Handsets connect to the Wireless router which is placed on the LAN. The i62 handsets register
with Session Manager in order to be able to make/receive calls to and from the Avaya H.323 and
SIP deskphones on Communication Manager.
Figure 1: Network Solution of Ascom i62 Wireless Handsets with Avaya Aura®
Communication Manager R6.2 and Avaya Aura® Session Manager R6.2

PG; Reviewed:
SPOC 1/4/2013
Solution & Interoperability Test Lab Application Notes
©2013 Avaya Inc. All Rights Reserved.
5 of 27
Ascomi62_CM62
4. Equipment and Software Validated
The following equipment and software was used for the compliance test.
Equipment/Software Release/Version
Avaya Aura® System Manager running on
Avaya S8800 Server R6.2 SP2
Avaya Aura® Communication Manager running
on Avaya S8800 Server R6.2 SP2
Avaya Aura® Session Manager running on
Avaya S8800 Server R6.2 SP2
Avaya Aura® Messaging running on S8800
Server R6.1
Avaya 96xx Series Deskphone 96xx H.323 Release 3.1 SP2
Avaya 96xx Series Deskphone 96xx SIP Release 2.6 SP3
Ascom Device Manager 3.8.1
Ascom i62 Telephone v. 3.4.16

PG; Reviewed:
SPOC 1/4/2013
Solution & Interoperability Test Lab Application Notes
©2013 Avaya Inc. All Rights Reserved.
6 of 27
Ascomi62_CM62
5. Configure Avaya Aura® Communication Manager
It is assumed that a fully functioning Communication Manager is in place with the necessary
licensing with a SIP Trunk in place to Session Manager. For further information on the
configuration of Communication Manager please see Section 11 of these Application Notes. The
following sections go through the following.
Dial Plan Analysis
Feature Access Codes
IP Interfaces
Network Region
IP Codec
5.1. Configure Dial Plan Analysis
Use the change dialplan analysis command to configure the dial plan using the parameters
shown below. Extension numbers (ext) are those beginning with 2, 3, 4 and 5. Feature Access
Codes (fac) use digits 8 and 9 or #.
change dialplan analysis Page 1 of 12
DIAL PLAN ANALYSIS TABLE
Location: all Percent Full: 1
Dialed Total Call Dialed Total Call Dialed Total Call
String Length Type String Length Type String Length Type
2 4 ext
3 4 ext
4 4 ext
5 4 ext
8 1 fac
9 1 fac
* 3 dac
# 3 fac

PG; Reviewed:
SPOC 1/4/2013
Solution & Interoperability Test Lab Application Notes
©2013 Avaya Inc. All Rights Reserved.
7 of 27
Ascomi62_CM62
5.2. Configure Feature Access Codes
Use the change feature-access-codes command to configure feature access codes which can be
entered from Ascom handsets to initiate Communication Manager call features. These access
codes must be compatible with the dial plan described in Section 5.1. The following access
codes need to be setup.
Answer Back Access Code : #22
Auto Alternate Routing (AAR) Access Code : 8
Auto Route Selection (ARS) - Access Code 1 : 9
Call Park Access Code : #11 change feature-access-codes Page 1 of 10
FEATURE ACCESS CODE (FAC)
Abbreviated Dialing List1 Access Code:
Abbreviated Dialing List2 Access Code:
Abbreviated Dialing List3 Access Code:
Abbreviated Dial - Prgm Group List Access Code:
Announcement Access Code:
Answer Back Access Code: #22
Attendant Access Code:
Auto Alternate Routing (AAR) Access Code: 8
Auto Route Selection (ARS) - Access Code 1: 9 Access Code 2:
Automatic Callback Activation: Deactivation:
Call Forwarding Activation Busy/DA: All: Deactivation:
Call Forwarding Enhanced Status: Act: Deactivation:
Call Park Access Code: #11
Call Pickup Access Code:
CAS Remote Hold/Answer Hold-Unhold Access Code:
CDR Account Code Access Code:
Change COR Access Code:
Change Coverage Access Code:
Conditional Call Extend Activation: Deactivation:
Contact Closure Open Code: Close Code:
CDR Account Code Access Code:
Change COR Access Code:
Change Coverage Access Code:
Conditional Call Extend Activation: Deactivation:
Contact Closure Open Code: Close Code:
5.3. Configure IP Interfaces
Shown below is an example of the nodes names used in the compliance testing. Note that Ascom
does not feature in this setup and only the name and IP address of Session Manager is added. Use
the change node-names ip command to configure the IP address of Session Manager. SM100 is
the Name used for Session Manager and 192.168.50.16 is the IP Address.
change node-names ip Page 1 of 2
IP NODE NAMES
Name IP Address
SM100 192.168.50.16
default 0.0.0.0
g250-dcp 192.168.50.18
procr 192.168.50.13
procr6 ::

PG; Reviewed:
SPOC 1/4/2013
Solution & Interoperability Test Lab Application Notes
©2013 Avaya Inc. All Rights Reserved.
8 of 27
Ascomi62_CM62
5.4. Configure Network Region
Use the change ip-network-region x (where x is the network region to be configured) command
to assign an appropriate domain name to be used by Communication Manager, in the example
below devcon.avaya is used. Note this domain is also configured in Section 6.1 of these
Application Notes.
change ip-network-region 1 Page 1 of 20
IP NETWORK REGION
Region: 1
Location: 1 Authoritative Domain: devcon.avaya
Name: default NR
MEDIA PARAMETERS Intra-region IP-IP Direct Audio: yes
Codec Set: 1 Inter-region IP-IP Direct Audio: yes
UDP Port Min: 2048 IP Audio Hairpinning? y
UDP Port Max: 3329
DIFFSERV/TOS PARAMETERS
Call Control PHB Value: 46
Audio PHB Value: 46
Video PHB Value: 26
802.1P/Q PARAMETERS
Call Control 802.1p Priority: 6
Audio 802.1p Priority: 6
Video 802.1p Priority: 5 AUDIO RESOURCE RESERVATION PARAMETERS
H.323 IP ENDPOINTS RSVP Enabled? n
H.323 Link Bounce Recovery? y
Idle Traffic Interval (sec): 20
Keep-Alive Interval (sec): 5
Keep-Alive Count: 5
5.5. Configure IP-Codec-Set
Use the change ip-codec-set x (where x is the ip-codec set used) command to designate a codec
set compatible with the Ascom Handsets, which support both G.711A and G.729A.
change change ip-codec-set 1 Page 1 of 2
IP Codec Set
Codec Set: 1
Audio Silence Frames Packet
Codec Suppression Per Pkt Size(ms)
1: G.711A n 2 20
2: G.729A n 2 20

PG; Reviewed:
SPOC 1/4/2013
Solution & Interoperability Test Lab Application Notes
©2013 Avaya Inc. All Rights Reserved.
9 of 27
Ascomi62_CM62
5.6. Configuration of Coverage Path and Hunt Group for Voicemail
The coverage path setup used for compliance testing is illustrated below. Note the following:
Don’t’ Answer is set to y The coverage path will be used in the event the phone set
is not answered
Number of Rings is set to 4 The coverage path will be used after 4 rings
Point 1: is set to h59 Hunt Group 59 is utilised by this coverage path
display coverage path 59
COVERAGE PATH
Coverage Path Number: 59
Cvg Enabled for VDN Route-To Party? n Hunt after Coverage? n
Next Path Number: Linkage
COVERAGE CRITERIA
Station/Group Status Inside Call Outside Call
Active? n n
Busy? y y
Don't Answer? y y Number of Rings: 4
All? n n
DND/SAC/Goto Cover? y y
Holiday Coverage? n n
COVERAGE POINTS
Terminate to Coverage Pts. with Bridged Appearances? n
Point1: h59 Rng: Point2:
Point3: Point4:
Point5: Point6:
The hunt group used for compliance testing is shown below. Note on Page 1 the Group
Extension is 5999 which is the voicemail pilot number for Messaging and on Page 2 Message
Center is set to sip-adjunct.
display hunt-group 59 Page 1 of 60
HUNT GROUP
Group Number: 59 ACD? n
Group Name: Voicemail Queue? n
Group Extension: 5999 Vector? n
Group Type: ucd-mia Coverage Path:
TN: 1 Night Service Destination:
COR: 1 MM Early Answer? n
Security Code: Local Agent Preference? n
ISDN/SIP Caller Display: mbr-name
display hunt-group 59 Page 2 of 60
HUNT GROUP
Message Center: sip-adjunct
Voice Mail Number Voice Mail Handle Routing Digits
(e.g., AAR/ARS Access Code)
59000 59000 *99

PG; Reviewed:
SPOC 1/4/2013
Solution & Interoperability Test Lab Application Notes
©2013 Avaya Inc. All Rights Reserved.
10 of 27
Ascomi62_CM62
6. Configure Avaya Aura® Session Manager
The Ascom i62 Wireless Handsets are added to Session Manager as SIP Users. In order to make
changes in Session Manager a web session to System Manager is opened.
6.1. Configuration of a Domain
Navigate to http://<System Manager IP Address>/SMGR, enter the appropriate credentials and
click on Log On as shown below.
Once logged in click on Routing highlighted below.

PG; Reviewed:
SPOC 1/4/2013
Solution & Interoperability Test Lab Application Notes
©2013 Avaya Inc. All Rights Reserved.
11 of 27
Ascomi62_CM62
Click on Domains in the left window. If there is not a domain already configured click on New
highlighted below and enter a suitable domain name. Note the domain Name used in the
compliance testing was devcon.avaya. Note this domain is also referenced in Section 5.4 of
these Application Notes.

PG; Reviewed:
SPOC 1/4/2013
Solution & Interoperability Test Lab Application Notes
©2013 Avaya Inc. All Rights Reserved.
12 of 27
Ascomi62_CM62
6.2. Configuration of SIP Entities
Log into System Manager as described in Section 6.1 above, click on SIP Entities highlighted
below.
Clicking on SIP Entities shows what SIP Entities have been added to the system and allows the
addition of any new SIP Entity that may be required. Please note the SIP Entities present for the
Compliance Testing of Ascom i62 Wireless Handsets.
Communication Manager SIP Entity
Session Manager SIP Entity
Messaging SIP Entity
Note: There is no SIP Entity present or required for Ascom.

PG; Reviewed:
SPOC 1/4/2013
Solution & Interoperability Test Lab Application Notes
©2013 Avaya Inc. All Rights Reserved.
13 of 27
Ascomi62_CM62
6.3. Adding Ascom SIP Users
From the home page click on User Management highlighted below.
Click on Manage Users.

PG; Reviewed:
SPOC 1/4/2013
Solution & Interoperability Test Lab Application Notes
©2013 Avaya Inc. All Rights Reserved.
14 of 27
Ascomi62_CM62
Click on New highlighted to add a new SIP user.
Under the Identity tab fill in the user’s Last Name and First Name as shown below. Enter the
Login Name and ensure Authentication Type is set to Basic.

PG; Reviewed:
SPOC 1/4/2013
Solution & Interoperability Test Lab Application Notes
©2013 Avaya Inc. All Rights Reserved.
15 of 27
Ascomi62_CM62
Under the Communication Profile tab enter a suitable Communication Profile Password and
click on Done when added, note that this password is required when configuring the Ascom
handset in Section 8. Click on New to add a new Communication Address.
Enter the extension number and the domain for the Fully Qualified Address and click on Add
once finished.
Ensure Session Manager Profile is checked and enter the Primary Session Manager details,
enter the Origination Application Sequence and the Termination Application Sequence and
the Home Location as highlighted below. Note that CMAPPSEQ is an application sequence that
corresponds to the Communication Manager in the test configuration and has been configured in
the system previously.

PG; Reviewed:
SPOC 1/4/2013
Solution & Interoperability Test Lab Application Notes
©2013 Avaya Inc. All Rights Reserved.
16 of 27
Ascomi62_CM62
Ensure that CM Endpoint Profile is selected and choose the DEFAULT_9620SIP_CM_6_2 as
the Template and ensure Port is set to IP. Click Endpoint Editor to configure the buttons and
features for that handset on Communication Manager.
Under the General Options tab ensure that Coverage Path 1 is set to that configured in Section
5.6. Also ensure that Message Lamp Ext. is showing the correct extension number.

PG; Reviewed:
SPOC 1/4/2013
Solution & Interoperability Test Lab Application Notes
©2013 Avaya Inc. All Rights Reserved.
17 of 27
Ascomi62_CM62
Under the tab Feature Options ensure that EC500 State is enabled.

PG; Reviewed:
SPOC 1/4/2013
Solution & Interoperability Test Lab Application Notes
©2013 Avaya Inc. All Rights Reserved.
18 of 27
Ascomi62_CM62
7. Configure Avaya Aura® Messaging
It is assumed that a fully working messaging system is in place and the necessary configuration
for Communication Manager and Session Manager has already been done. For further
information on the installation and configuration of Messaging please refer to Section 11 of
these Application Notes.
Navigate to http://<Messaging IP Address>. Enter the appropriate credentials and click on
Logon highlighted below.
Once logged on select Messaging under Administration as shown below.

PG; Reviewed:
SPOC 1/4/2013
Solution & Interoperability Test Lab Application Notes
©2013 Avaya Inc. All Rights Reserved.
19 of 27
Ascomi62_CM62
Click on User Management in the left hand column and click on Add under Add User/Info
Mailbox as highlighted below.
Enter a suitable First Name and Last Name. Select the appropriate Site from the drop down
box. Enter the correct Mailbox number and Extension. Select the appropriate Class of Service.

PG; Reviewed:
SPOC 1/4/2013
Solution & Interoperability Test Lab Application Notes
©2013 Avaya Inc. All Rights Reserved.
20 of 27
Ascomi62_CM62
Ensure that MWI Enabled is set to Yes. Enter a suitable password and click on Save once
finished.

PG; Reviewed:
SPOC 1/4/2013
Solution & Interoperability Test Lab Application Notes
©2013 Avaya Inc. All Rights Reserved.
21 of 27
Ascomi62_CM62
8. Configure Ascom i62 Wireless Handsets
The configuration of the i62 Wireless handsets is done using Ascom’s WinPDM software
installed on a PC. Attach the Ascom DP1 USB Cradle to a PC on which the Ascom Device
Manager (WinPDM) has been installed. Insert the handset to be configured in the DP1 USB
Cradle, start the Ascom Device Manager, select the Numbers tab and click New icon
highlighted below.
8.1. Configure SIP settings
Select VoIP General from the left window. In the main window ensure the following are set.
Replace Call Rejected with User Busy Yes
VoIP Protocol SIP
Codec configuration G.711A-law (as set in Section 5.5)
Codec packetization time 20
Internal call number length 4
Endpoint number Ext number of set as set in Section 6.3
Endpoint ID Ext number of set as set in Section 6.3

PG; Reviewed:
SPOC 1/4/2013
Solution & Interoperability Test Lab Application Notes
©2013 Avaya Inc. All Rights Reserved.
22 of 27
Ascomi62_CM62
Select the VoIPSIP menu point, and enter the values shown below.
SIP proxy IP address IP address of Session Manager
SIP proxy password Password assigned to the endpoint in Section 6.3
Registration identity Enter Endpoint ID
Authentication identity Enter Endpoint ID
Call forwarding locally Enable
SIP Register Expiration 120 (recommended value)
For further information about the Ascom i62 WiFi configurations please refer to Ascom’s
documentation in Section 11 of these Application Notes. This section covers specific settings
concerning SIP.

PG; Reviewed:
SPOC 1/4/2013
Solution & Interoperability Test Lab Application Notes
©2013 Avaya Inc. All Rights Reserved.
23 of 27
Ascomi62_CM62
8.2. Configure Message Centre
Click on Device Message centre in the left window. In the right window enter the Voice mail
number as configured in Section 5.6 and the Message Centre number which is the extension
number of the handset.

PG; Reviewed:
SPOC 1/4/2013
Solution & Interoperability Test Lab Application Notes
©2013 Avaya Inc. All Rights Reserved.
24 of 27
Ascomi62_CM62
9. Verification Steps
The following steps can be taken to ensure that connections between Ascom i62 handsets and
Session Manager and Communication Manager are up.
Log into System Manager as done previously in Section 6.1, select Session Manager as
highlighted below.
Select System Status and User Registrations in the left column. This displays the users that are
currently registered with Session Manager. The i62 users should show as being registered as they
are below for extensions 3007and 3008 highlighted.
PG; Reviewed:
SPOC 1/4/2013
Solution & Interoperability Test Lab Application Notes
©2013 Avaya Inc. All Rights Reserved.
25 of 27
Ascomi62_CM62
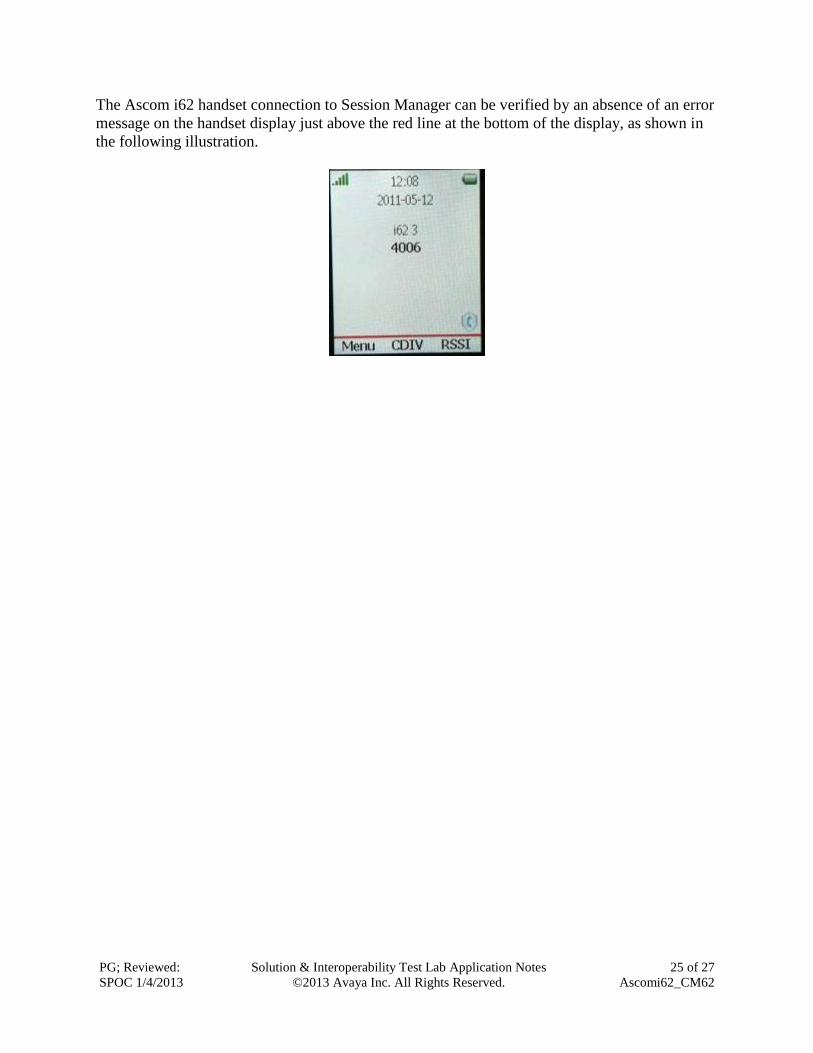
The Ascom i62 handset connection to Session Manager can be verified by an absence of an error
message on the handset display just above the red line at the bottom of the display, as shown in
the following illustration.

PG; Reviewed:
SPOC 1/4/2013
Solution & Interoperability Test Lab Application Notes
©2013 Avaya Inc. All Rights Reserved.
26 of 27
Ascomi62_CM62
10. Conclusion
These Application Notes describe the configuration steps required for Ascom’s i62 Wireless
Handsets to successfully interoperate with Avaya Aura® Communication Manager R6.2 and
Avaya Aura® Session Manager R6.2 by registering the Ascom Handsets with Avaya Aura®
Session Manager as third-party SIP phones. Please refer to Section 2.2 for test results and
observations.
11. Additional References
This section references documentation relevant to these Application Notes. The Avaya product
documentation is available at http://support.avaya.com where the following documents can be
obtained.
[1] Administering Avaya Aura® Communication Manager, Document ID 03-300509
[2] Avaya Aura® Communication Manager Feature Description and Implementation,
Document ID 555-245-205
[3] Implementing Avaya Aura® Session Manager Document ID 03-603473
[4] Administering Avaya Aura® Session Manager, Doc ID 03-603324
Please see below for a list of documentation used during the compliance testing information on
Ascom i62 Wireless Handsets. A full list of Ascom’s technical documentation is available
through a local supplier. Please refer to Section 2.3 of these Application Notes for information
on Ascom support. [5] User Manual Ascom i62 VoWiFi Handset (TD 92599EN)
[6] Configuration Manual Ascom i62 VoWiFi Handset (TD 92675EN)
[7] System Description Ascom VoWiFi System (TD 92313EN)
[8] System Planning Ascom VoWiFi System (TD 92408EN)

PG; Reviewed:
SPOC 1/4/2013
Solution & Interoperability Test Lab Application Notes
©2013 Avaya Inc. All Rights Reserved.
27 of 27
Ascomi62_CM62
©2013 Avaya Inc. All Rights Reserved.
Avaya and the Avaya Logo are trademarks of Avaya Inc. All trademarks identified by ® and
™ are registered trademarks or trademarks, respectively, of Avaya Inc. All other trademarks
are the property of their respective owners. The information provided in these Application
Notes is subject to change without notice. The configurations, technical data, and
recommendations provided in these Application Notes are believed to be accurate and
dependable, but are presented without express or implied warranty. Users are responsible for
their application of any products specified in these Application Notes.
Please e-mail any questions or comments pertaining to these Application Notes along with the
full title name and filename, located in the lower right corner, directly to the Avaya
DevConnect Program at [email protected].